ENGLISH ALFA ROMEO Artwork Mark Version AW Printed Version CMYK CMYK AC AC QUICK GUIDE
|
|
|
- Brittany Leonard
- 5 years ago
- Views:
Transcription


1 QUICK GUIDE

2
3 CONTENTS THE KEYS...2 DOORS...4 SEATS...6 ELECTRIC SEATS AND REAR VIEW MIRRORS...8 STARTING...10 LIGHTS...12 CONTROLS ON TUNNEL...14 CLIMATE CONTROL SYSTEM...16 STEERING WHEEL...18 MANUAL GEARBOX...24 AUTOMATIC TRANSMISSION...25 ALFA DNA PRO SELECTOR...26 CONNECT SYSTEM CONTROLS...28 STEERING WHEEL CONNECT CONTROLS...32 CONNECT SYSTEM

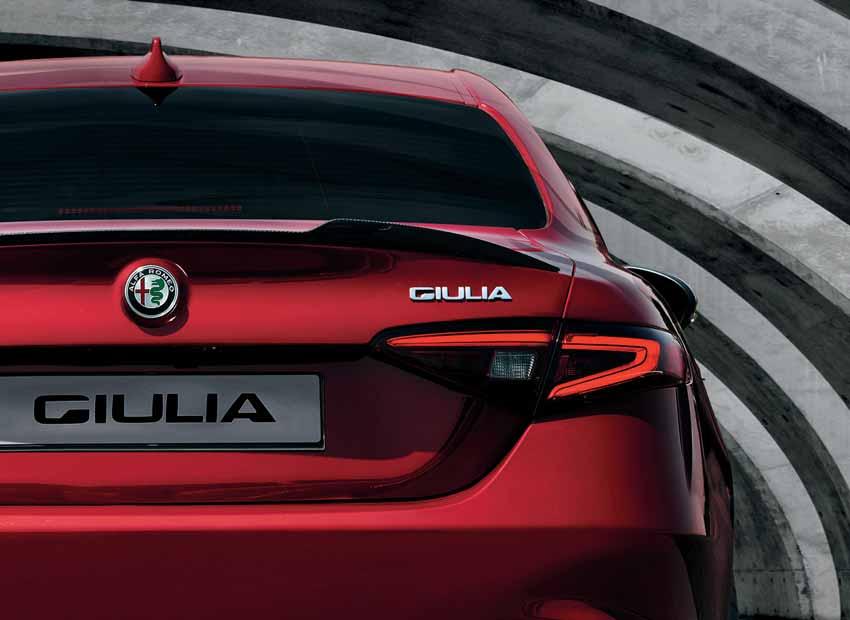
4 THE KEYS 2
5 THE KEYS 6. CLOSING: Locks the vehicle doors 5. OPENING: Unlocks the vehicle doors 4. BOOT: Boot opening 1. REMOTE STARTING: Starts the engine from the remote control (where provided) 2. CAR FINDER : Controls the turning on of the dipped beam headlights from a distance (where provided) 3. PANIC: Activates the PANIC function (where provided) 3
6 DOORS 4
7 DOORS Keyless Start system The Keyless Start system allows to enter the passenger compartment and start the engine without using a key. The vehicle recognizes the electronic key in the immediate proximity or inside the vehicle. 1. OPENING: Grab the handle and pull it in the indicated direction 2. CLOSING: Press the button on the handle Boot Unlocking and opening the boot, just like the doors, can be done without using the electronic key. For further information, see the vehicle Use and Maintenance Instruction Manual. 5
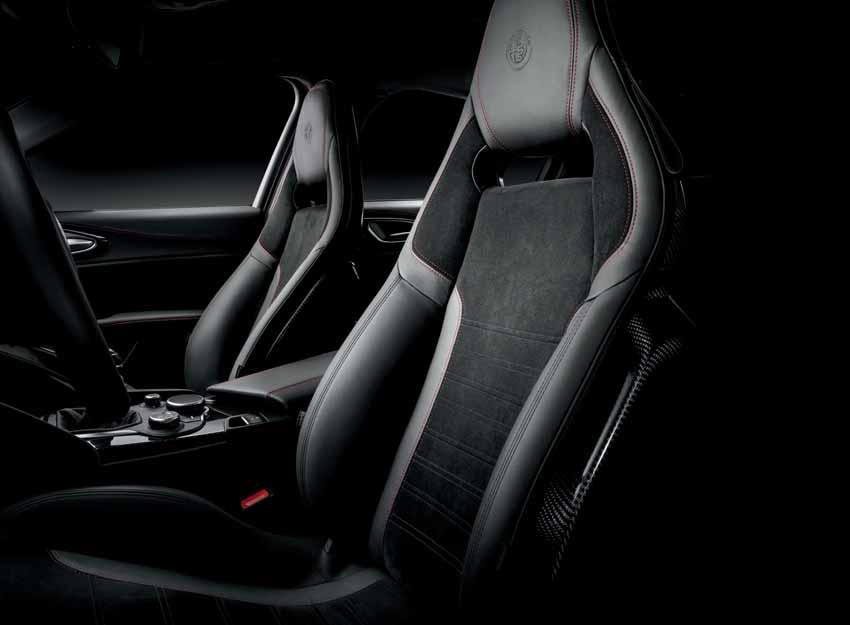
8 SEATS 6
9 MANUAL ADJUSTMENT SEATS 3. Seat longitudinal adjustment 1. Backrest angle adjustment 2. Seat height adjustment ELECTRIC ADJUSTMENT 1. Backrest width adjustment 4. Backrest angle adjustment 2. Lumbar adjustment 3. Longitudinal, height and inclination adjustment of the seat 7

10 ELECTRIC SEATS AND REAR VIEW MIRRORS 8
11 ELECTRIC SEATS AND REAR VIEW MIRRORS MIRROR ADJUSTMENT Select the mirror (right/left) by rotating control 1, then regulate the position of the mirror using the same control. 1. Electric adjustment of rear view mirrors MIRROR FOLDING With the device in position "0" move it backwards. 2. Electric folding of rear view mirrors 3. Seat position store buttons SEAT STORING It is possible to store and then recall three different positions for the driver side seat. To store the position, keep one of the indicated buttons pressed for a few seconds. 9

12 STARTING 10
13 STARTING PROCEDURE FOR PETROL VERSIONS Manual gearbox versions Proceed as follows: engage the parking brake and place the gear lever in neutral; fully depress the clutch pedal, without touching the accelerator; briefly press the ignition button; if the engine doesn't start within a few seconds, you need to repeat the procedure. If the problem persists, contact an Alfa Romeo Dealership. Versions with automatic transmission Proceed as follows: engage the electric parking brake and set the gear lever to P (Park) or N (Neutral); fully depress the brake pedal without touching the accelerator; briefly press the ignition button; if the engine doesn't start within a few seconds, you need to repeat the procedure. If the problem persists, contact an Alfa Romeo Dealership. PROCEDURE FOR DIESEL VERSIONS Versions with manual gearbox Proceed as follows: engage the parking brake and place the gear lever in neutral; take the ignition device to the ON position: warning light will come on in the instrument panel; wait for the warning light to go off; fully depress the clutch pedal, without touching the accelerator; briefly press the ignition button; if the engine doesn't start within a few seconds, you need to repeat the procedure. If the problem persists, contact an Alfa Romeo Dealership. Versions with automatic transmission Proceed as follows: engage the electric parking brake and set the gear lever to P (Park) or N (Neutral); fully depress the brake pedal without touching the accelerator; briefly press the ignition button; if the engine doesn't start within a few seconds, you need to repeat the procedure. If the problem persists, contact an Alfa Romeo Dealership. Stopping the engine To stop the engine, proceed as follows: park the vehicle in a position that is not dangerous for oncoming traffic; engage a gear (versions with manual gearbox) or position the gear lever to P (Park) (versions with automatic transmission); with engine idling, press the start button. 11
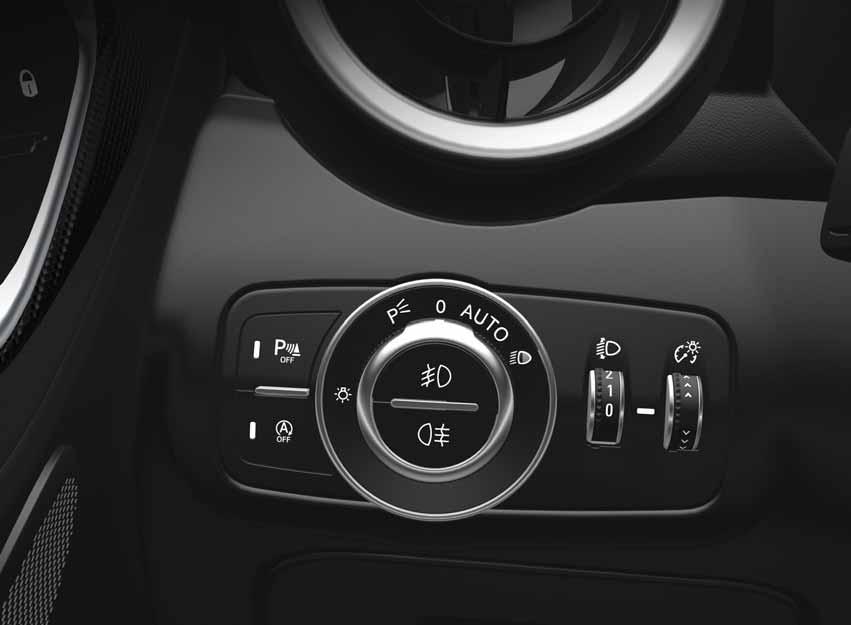
14 LIGHTS 12
15 LIGHTS 5. Light switch; Switch positions: side lights and dipped headlamps on automatic light operation 0 lights off parking lights on 4. Fog lights button (where provided); 1. Ring nut for adjusting the headlight alignment (where provided) 2. Ring nut for adjusting the brightness of the instrument panel and control warning lights; 3. Rear fog lights button; P 0 AUTO P OFF A OFF 2 1 O 13
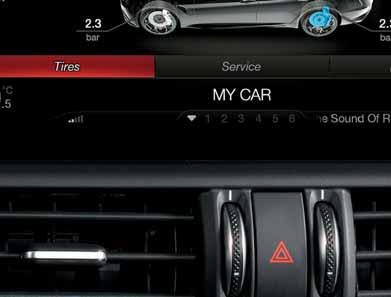
16 CONTROLS ON TUNNEL 14
17 CONTROLS ON TUNNEL 8. Connect system display 7. Hazard warning lights button 6. Automatic climate control system dashboard 5. Gear lever 4. Alfa DNA Pro selector 1. ON/OFF control and Volume 3. EPB: electric park brake 2. Rotary Pad Parking brake EPB Disengaging the electric parking brake manually In order to manually release the parking brake, the ignition device should be at ON position. Moreover, you need to press the brake pedal, then briefly lift the control on the central tunnel. 15

18 CLIMATE CONTROL SYSTEM 16
19 CLIMATE CONTROL SYSTEM 1. Rear window heating 15. MAXDEF function 2. Air distribution at passenger side 14. Air distribution at driver side 13. Temperature adjustment knob 3. Temperature adjustment knob 4. AUTO function 12. AUTO function 11. Internal air recirculation 5. SYNC function 6. Passenger seat heating 10. Driver seat heating 9. Steering wheel heating 7. Fan speed regulator 8. Climate control system compressor activation/deactivation 17

20 STEERING WHEEL 18
21 STEERING WHEEL Adjusting the steering wheel: Lower the adjustment lever Adjust the steering wheel to the indicated directions Put the lever back in the lock position. Steering lock (where provided): The steering lock engages automatically upon opening the driver door if the ignition device is in the STOP position. It automatically disengages by turning the ignition device to ON and START. 19

22 STEERING WHEEL 20
23 STEERING WHEEL 1. ACC (setting distance button) 2. Cruise Control /Active Cruse Control (ACC) RES SET 3. Reset Cruise Control 4. Cruis Control speed adjustment: use the ring nut to change the speed 21

24 STEERING WHEEL 1. Direction indicators: Press the lever up or down to activate the direction indicators "Change Lane" function: press the lever up or down until the first click (about half stroke). 2. Fixed main beams: press the lever in the direction of the arrow 3. "Lane Departure Warning" System: to activate the system, press the indicated button 4. Main beam flashing: pull the lever in the direction of the arrow RES SET 22

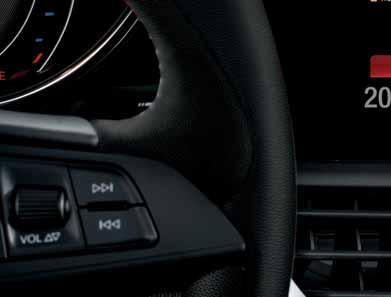
25 STEERING WHEEL 5. MIST function Wiper engagement: press the lever upwards to activate the temporary wiper action. 6. Display screens navigation on control panel: press the indicated button to view scrolling the display screens of the control panel. VOL 7. Wiper activation ring nut: Position : windscreen wiper stopped Position and : adjusts the sensitivity of the rain sensor Position and : adjusts the speed of the windscreen wipers when in manual mode 8. Windscreen and headlamp washers (where provided): pull the lever in the direction of the arrow 9. Horn 23
. To engage reverse gear R from the idle position, press towards the left (until end of stroke) to avoid mistakenly inserting the first gear.")
26 MANUAL GEARBOX To engage the gears, fully press the clutch pedal and put the gear lever into the desired position (the gear engagement diagram is shown on the knob). To engage reverse gear R from the idle position, press towards the left (until end of stroke) to avoid mistakenly inserting the first gear. 24
27 AUTOMATIC TRANSMISSION The gear functioning is controlled by the gear lever control, which can assume the following positions: P = Parking mode (activated by pushing the P (Parking) 2 button); R = Reverse (to engage, press the brake pedal and press the lever movement button 1); N = Neutral D = Drive (automatic forward speed) AutoStick: + shifting to higher gear in manual (sequential) driving mode; shifting to lower gear in sequential driving mode. These operations can be performed using the levers behind the steering wheel. The positions diagram is illustrated on the top of the lever. To select an operating mode, move the lever forwards or backwards and press the brake pedal at the same time. To engage R (Reverse) mode, press the pedal and the lever movement button 1 in combination. 2. P (Park) button P 1. Lever moving button 25

28 ALFA DNA PRO SELECTOR Controls 26
29 ALFA DNA PRO SELECTOR This device allows, using the selector (on the central tunnel), different car response modes to be selected according to driving style and road conditions: d: Dynamic (sports driving mode); n: Normal (driving mode for normal conditions); a: Advanced Efficiency (ECO driving mode for maximum fuel savings); RACE:track race driving mode (where provided); : adjusts the calibration of the suspensions (where provided). Unlike the other ones, the RACE position is unstable, therefore, by rotating the selector to RACE, it will return to its initial position "d". The symbol of the active mode lights up in red on the selector. 27


30 CONNECT SYSTEM CONTROLS 28
31 CONNECT SYSTEM CONTROLS ON/OFF control and Volume. LONG PRESS: switches the Connect system on and off; ROTATION: clockwise to increase the volume, counter-clockwise to decrease the volume. In Radio mode: SHORT PRESS: activates/deactivates the Mute function; MOVING THE KNOB: to the right, selects the next radio station, to the left, selects the previous radio station. In Media mode: SHORT PRESS: activates play/pause; MOVING THE KNOB: to the right, selects the next track, to the left, selects the previous track. 29

32 CONNECT SYSTEM CONTROLS Controls 30
33 CONNECT SYSTEM CONTROLS Rotary Pad Within the Menus: ROTATION: scrolls the menu items; PRESSING: confirms the selection. BRIEF MOVEMENT TO THE RIGHT: accesses to the sub-menu of the selected function. BRIEF MOVEMENT TO THE LEFT: returns to the previous menu, Esc function. BRIEF UPWARD MOVEMENT: enters the Multitasking menu and closes the preselection bar. BRIEF DOWNWARD MOVEMENT: enters the preselection bar and closes the Multitasking menu. In Radio mode: BRIEF DOWNWARD MOVEMENT: activates the radio preselection. In navigation mode (where fitted): ROTATION: zoom function on the maps; BRIEF MOVEMENT TO THE RIGHT: in the Point On Map function, to move to the right on the map; BRIEF MOVEMENT TO THE LEFT: in the Point On Map function, to move to the left on the map; SHORT UPWARD MOVEMENT: in the Point On Map function, to move upwards on the map; SHORT DOWNWARD MOVEMENT: in the Point On Map function, to move downwards on the map. MENU button Opens the main menu. Option button Access to the mode setting menu (RADIO; MEDIA; PHONE; NAVIGATION). AUX input Inside the glove compartment in the central tunnel. USB inputs The vehicle may be equipped with up to three USB ports, one located under the air conditioner control panel, one in the glove compartment in the central tunnel and one (recharge only) under the air vents behind the central tunnel. 31


34 STEERING WHEEL CONNECT CONTROLS 32
35 STEERING WHEEL CONNECT CONTROLS There is a series of controls on the steering wheel which may be used to activate some of the system's main functions. 1. button: In Radio mode: SHORT PRESS: selects the next radio station; LONG PRESS: scans higher frequencies until released. In Media mode: SHORT PRESS: selects the next track; LONG PRESS: fast forward. 2. button: In Radio mode: SHORT PRESS: selects the previous radio station; LONG PRESS: scans lower frequencies until released. In Media mode: SHORT PRESS: selects the previous track; LONG PRESS: fast backward. 3. Volume control: ROTATION: upwards: increases volume; downwards: decreases volume; In Radio mode: PRESS: activates/deactivates the Mute function; In Media mode: PRESS: activates play/pause. 4. Phone button: Answers / closes call or shows the recent calls list. 5. Voice command button: SHORT PRESS: activates voice commands, LONG PRESS: immediately closes the voice session. 33


36 CONNECT SYSTEM To activate Radio mode, proceed as follows: press the MENU button to activate the main menu, turn and press the Rotary Pad to select Radio mode and activate it. Frequency band selection In the Radio menu, select the "Frequency Band" function by turning and pressing the Rotary Pad. The frequency bands can be selected cyclically by pressing the Rotary Pad. Quick Radio station search You can scroll through the stations using the / buttons, placed on the ON/OFF and Volume control knobs or on the steering wheel. Each time a control is moved/pressed, the system will tune in to the previous or to next station from the initial one. Store a Radio station To store the current radio station on one of the six pre-set frequencies, move the Rotary Pad downwards to activate the function, select and store the required pre-setting position and hold pressed to store it. MEDIA (USB and AUX inputs) After having inserted a USB/iPod device while the system is on, activate Media mode and press Play to start playback. NOTE The device connected to the AUX input cannot be controlled using the Connect System controls, but only through the controls on the device itself. 34

37 AUDIO This function allows to set the sound output parameters. To access the function, from the main menu select the following functions in sequence by turning and pressing the Rotary Pad: Settings - Infotainment - Audio or Option button - Audio. The following menu items can be found here: Bass; Treble; Medium; Balance/Fader; Volume/Speed; Surround sound; AUX volume comp.; Restore settings. Enter the single functions and adjust them by rotating and pressing the Rotary Pad. 35

38 NAVIGATOR (where provided) To activate Navigation mode, press the MENU button to activate the main menu, select and activate the Navigation mode by turning and pressing the Rotary Pad. The following menu options can be found here: Set destination; Recent destinations; Favourite destinations; Places of interest; Zoom; Explore map. WARNING In the interest of safety and to reduce distractions while you are driving, you should always plan a route before you start driving. Programming a route In the Navigation menu, select the "Route planning" function by rotating and pressing the Rotary Pad. The following three options are available: Set destination; Recent destinations; Favourite destinations. Set Destination Selecting and confirming this mode, by turning and pressing the Rotary Pad, activates the screen where you can manually enter the address information, the fields to fill in are: Country; State (where provided); City/post code; Address; House number. To enter the address, turn and press the Rotary Pad to select the item you wish to add (Country, City, etc...) on the round keyboard, by turning and pressing the Rotary knob, select the characters to compile the desired name; as you enter the letters, the system will automatically complete the word and suggest, on the right of the display, a list of options consistent with the characters you have entered. You can now either complete the word or go to the list of suggests by moving the Rotary Pad rightwards or by pointing to OK and pressing the Rotary Pad. When you have set the desired destination, select "Start navigation". 36

39 When the navigation has started, next to the map displaying the route, the system offers a series of options to help during navigation: Stop navigation; stops the navigation, the system requires a second confirmation after the function has been selected. Navigation volume; allows to set the volume of the navigation messages. Edit route; allows to set a series of options to improve the navigation ("Add new destination"; "Add recent destination", "Add favourite destination", "Add POI", "Reorder Trip"). Route preview; allows to display the streets in sequence. Zoom; allows to enlarge the map, by rotating the Rotary Pad to the right, and to reduce it, by rotating the Rotary Pad to the left. Explore map; allows to move within the map by moving the Rotary Pad in the four directions (right, left, up and down). The following information is also shown on the navigation page: on the bottom: name of the current road and current position; on the right, the kilometres remaining to the destination, the expected time of arrival and any POIs along the route; on the top: current navigation instruction and next navigation instruction. 37

40 TELEPHONE The system does not have an internal phone, therefore it can only interact with a connected phone. WARNING Activate the Bluetooth function on the phone you want to connect. To register a cell phone, press the MENU button to enter the main menu and select, by turning and pressing the Rotary Pad, the following functions in sequence: Settings - Infotainment - Bluetooth - Add device. During registration, the display shows the progress status of the connection. You may need to enter or confirm the PIN code, if the device requests it. A dedicated screen will inform you that the registration is complete. 38

41 SETTINGS To access the user-programmable functions open the main menu by pressing the MENU button, then select Settings by turning and pressing the Rotary Pad. The following menu items can be found here: Lights; Units & Language; Clock & Date; Safety; Driver assistance; Doors & Locks; Cluster; Infotainment; System. Units & Language The following settings can be modified when this mode is selected: Units, allows to select the following options: US Metric Custom: by selecting this item, you can choose the unit of measurement of "distance", choosing between km or mi, of "Temperature", between Celsius or Fahrenheit, of "Pressure" between Bar, psi or kpa, and of "Consumption", choosing between km/l, L/100km or mpg. Language: this is used to select the language to be set on the system. Restore Settings: this is used to manually delete the current settings and restores the factory settings. Enter the single functions and adjust them by rotating and pressing the Rotary Pad. Time and Date The following settings can be modified when this mode is selected: Sync with GPS time: activates/deactivates the clock synchronization through the GPS; if it's off, the options "Set Time" and "Set Date" are enabled. Set time: allows to manually set the time. Time format: you can choose between a 24h clock and a 12h clock. Set date: allows to manually set the date. Restore Settings: deletes the current settings and restores the factory settings. Enter the single functions and adjust them by rotating and pressing the Rotary Pad. 39
42 Doors & Locks The following settings can be modified when this mode is selected: Lock doors while moving: activates/deactivates the function Unlock all on exit: activates/deactivates the function Passive entry: activates/deactivates the function Unlock doors on entry (where available): allows you to select either "all doors" or "driver door" Horn with Remote Start (for versions/markets where provided): this allows to activate/ deactivate the horn when the engine is started with the electronic key. Sound Horn with Lock: allows you to choose between the following options: OFF, "Once" or "Twice" Automatic lock: activates/deactivates the function Restore Settings: deletes the current settings and restores the factory settings. Enter the single functions and adjust them by rotating and pressing the Rotary Pad. Cluster The following settings can be modified when this mode is selected: Warning Buzzer Volume: you can choose between 7 different intensity levels; Trip B: activates/deactivates the function; Repeat phone: activates/deactivates the function; Repeat audio: activates/deactivates the function; Repeat Navi: activates/deactivates the function; Restore Settings: this is used to manually delete the current settings and restores the factory settings. Enter the single functions and adjust them by rotating and pressing the Rotary Pad. 40
, select the following functions in sequence by rotating and pressing the Rotary Pad: Apps - My car - Oil")
43 ENGINE OIL LEVEL CHECK The oil level is displayed before each time the engine is started and it can be checked via the Connect system, in order to do that, proceed as follows: from the main menu (MENU button), select the following functions in sequence by rotating and pressing the Rotary Pad: Apps - My car - Oil Level. 41

44 TYRE PRESSURE MONITORING SYSTEM (TPMS) The TPMS signals the driver a possible insufficient pressure if this falls below the warning limit for any reason, including the effects of low temperature and normal loss of pressure from the tyre. Therefore, if insufficient tyre pressure is indicated by the warning light on the instrument panel, you will need to increase the inflation pressure up to the prescribed cold inflation value. The TPMS will stop indicating insufficient tyre pressure ( warning light is off on the instrument panel) when it is equal to or greater than the prescribed cold inflation pressure. In order to see which tyre has insufficient pressure on the Connect system display, proceed as follows: from the main menu (MENU button), select the following functions in sequence by rotating and pressing the Rotary Pad: Apps - My car - Tyre pressure. Inflation pressure The tyre pressure values can be found in the Use and Maintenance Instruction Manual or on the IDENTIFICATION DATA SUMMARY PLATE placed on the left side door pillar. 42
 98 for the best performance.")
45 REFUELLING To refuel proceed as follows: open the fuel cap by pressing on its rear edge; remove the closing cap of the dispenser; introduce the dispenser in the filler and refuel. proceed in reverse order to close the tank. Petrol engines It is advisable to use unleaded petrol, with an octane number (R.O.N.) 98 for the best performance. Only use unleaded petrol with a number of octanes (R.O.N.) not lower than 95 (EN228 specification). Diesel engines Only use Diesel for motor vehicles (EN590 and EN16734 specification). 43
46 FCA Italy S.p.A. - MOPAR - Technical Services - Service Engineering Largo Senatore G. Agnelli, Volvera - Turin (Italy) Print no /2017-5th edition
47 ENGLISH
v40 Quick GUIDE Web Edition
 v40 Quick GUIDE Web Edition WELCOME TO YOUR NEW VOLVO! This folder contains a selection of the most common functions in your car. The owner's manual and other manuals contain important information with
Quick GUIDE Web Edition
 XC70 Quick GUIDE Web Edition WELCOME TO THE GLOBAL FAMILY OF VOLVO OWNERS! Getting to know your new vehicle is an exciting experience. This Quick Guide provides a brief overview of the most common features
S60. Quick GUIDE Web Edition
 S60 Quick GUIDE Web Edition WELCOME TO YOUR NEW VOLVO! This folder contains a selection of the most common functions in your particular car. The owner's manual and other manuals contain important information
web edition quick guide
 web edition quick guide WELCOME TO YOUR NEW VOLVO! This folder contains a selection of the most common functions in your particular car. The owner's manual and other manuals contain important information
QUICK GUIDE WEB EDITION WELCOME TO YOUR NEW VOLVO! VOLVO S60
 VOLVO S60 QUICK GUIDE WEB EDITION WELCOME TO YOUR NEW VOLVO! Getting to know your new car is an exciting experience. Take a look at this Quick Guide to learn some of the most common functions quickly and
Quick GUIDE Web Edition
 XC90 Quick GUIDE Web Edition WELCOME TO THE GLOBAL FAMILY OF VOLVO OWNERS! Getting to know your new vehicle is an exciting experience. This Quick Guide provides a brief overview of the most common features
Quick Guide WELCOME TO YOUR NEW VOLVO! VOLVO S80 WEB EDITION
 VOLVO S80 Quick Guide WEB EDITION WELCOME TO YOUR NEW VOLVO! Getting to know your car is an exciting experience. After looking through this Quick Guide you'll like your new Volvo even more. You can find
web edition quick guide
 web edition quick guide WELCOME TO YOUR NEW VOLVO! This folder contains a selection of the most common functions in your car. The owner's manual and other manuals contain important information with all
XC60. Quick GUIDE Web Edition
 XC60 Quick GUIDE Web Edition WELCOME TO YOUR NEW VOLVO! This folder contains a selection of the most common functions in your particular car. The owner's manual and other manuals contain important information
WEB EDITION QUICK GUIDE
 WEB EDITION QUICK GUIDE WELCOME TO THE GLOBAL FAMILY OF VOLVO OWNERS! This Quick Guide provides a brief overview of the most common features and functions in your Volvo. The owner s manual and the other
WELCOME TO THE GLOBAL FAMILY OF VOLVO OWNERS!
 QUICK GUIDE WELCOME TO THE GLOBAL FAMILY OF VOLVO OWNERS! This Quick Guide provides a brief overview of the most common features and functions in your Volvo. The owner s manual and the other driver s information
2014 MIRAGE. Owner s Handbook
 2014 MIRAGE Owner s Handbook Please place copies of the following items in the pocket below: 1. Pre-Delivery Inspection Form (Customer Copy) 2. Triple Diamond Delivery Checklist (Customer Copy) 3. Salesperson
web edition quick guide
 web edition quick guide WELCOME TO YOUR NEW VOLVO! This folder contains a selection of the most common functions in your particular car. The owner's manual and other manuals contain important information
WEB EDITION QUICK GUIDE
 WEB EDITION QUICK GUIDE WELCOME TO YOUR NEW VOLVO! This folder contains a selection of the most common functions in your particular car. The owner's manual and other manuals contain safety instructions
QUICK GUIDE WEB EDITION WELCOME TO YOUR NEW VOLVO! VOLVO V70 & XC70
 VOLVO V70 & XC70 QUICK GUIDE WEB EDITION WELCOME TO YOUR NEW VOLVO! Getting to know your new car is an exciting experience. Take a look at this Quick Guide to learn some of the most common functions quickly
E UID E G c EREN EF k R c UI Q T PAc OMG V 200 O AR N c c _13_NV_200_Cargo_Van_QRG_ indd 3 11/28/12 11:28 AM
 23 NV 200 COMPACT CARGO Quick Reference Guide 03 11 04 05 06 07 12 08 09 13 14 10 To the right of driver s seat 16 15 TRIP COMPUTER LOW TIRE PRESSURE WARNING LIGHT 03 INSTRUMENT BRIGHTNESS CONTROL/ TRIP
volvo s40 Quick Guide
 volvo s40 Quick Guide WELCOME TO THE GLOBAL FAMILY OF VOLVO OWNERS! Getting to know your new vehicle is an exciting experience. Please browse through this Quick Guide to get the full benefits from your
E UID E G c EREN EF k R c UI Q RA R XTE _13_Xterra_NAM_QRG_ indd 2 10/26/12 11:18 AM
 23 XTERRA Quick Reference Guide 03 04 05 12 06 07 13 14 08 09 10 11 16 15 17 18 19 LOW TIRE PRESSURE WARNING LIGHT HEADLIGHT AND TURN SIGNAL CONTROL 03 TRIP COMPUTER 04 INSTRUMENT BRIGHTNESS CONTROL* /
note remote key & key blade
 remote key & key blade Locks the doors and trunk and arms the alarm. If the car is locked with the remote key while the power retractable hard top is down, the double locking feature activates after approximately
volvo C70 quick guide
 volvo C70 quick guide WELCOME TO THE GLOBAL FAMILY OF VOLVO OWNERS! Getting to know your new vehicle is an exciting experience. Please browse through this Quick Guide to get the full benefits from your
Quick Guide. volvo C30
 volvo C30 Quick Guide WELCOME TO THE GLOBAL FAMILY OF VOLVO OWNERS! Getting to know your new vehicle is an exciting experience. This Quick Guide provides a brief overview of the most common features and
web edition quick guide
 web edition quick guide WELCOME TO THE GLOBAL FAMILY OF VOLVO OWNERS! This Quick Guide provides a brief overview of the most common features and functions in your Volvo. The Owner s Manual and the other
Audi TT Coupé Quick reference guide
 Audi TT Coupé Quick reference guide Fuel tank flap To open: Press the switch on the driver s door. To close: Press the tank flap until you hear it click into place. Fuel (see sticker) Tyre pressures (see
Quick Guide VOLVO S80
 VOLVO S80 Quick Guide WELCOME TO THE GLOBAL FAMILY OF VOLVO OWNERS! Getting to know your new vehicle is an exciting experience. This Quick Guide provides a brief overview of the most common features and
WEB EDITION QUICK GUIDE
 WEB EDITION QUICK GUIDE WELCOME TO THE GLOBAL FAMILY OF VOLVO OWNERS! This Quick Guide provides a brief overview of the most common features and functions in your Volvo. The owner s manual and the other
WELCOME TO THE GLOBAL FAMILY OF VOLVO OWNERS!
 QUICK GUIDE WELCOME TO THE GLOBAL FAMILY OF VOLVO OWNERS! This Quick Guide provides a brief overview of the most common features and functions in your Volvo. The owner s manual and the other driver s information
web edition quick guide
 web edition quick guide WELCOME TO THE GLOBAL FAMILY OF VOLVO OWNERS! This Quick Guide provides a brief overview of the most common features and functions in your Volvo. The Owner s Manual and the other
QUICK GUIDE VOLVO XC60 WEB EDITION WELCOME TO YOUR NEW VOLVO!
 VOLVO XC60 QUICK GUIDE WEB EDITION WELCOME TO YOUR NEW VOLVO! Getting to know your car is an exciting experience. After looking through this Quick Guide you'll like your new Volvo even more. You can find
Quick GUIDE Web edition
 s60 Quick GUIDE Web edition WELCOME TO YOUR NEW VOLVO! Getting to know your new car is an exciting experience. Take a look at this Quick Guide to learn some of the most common functions quickly and easily.
WELCOME TO YOUR NEW VOLVO!
 QUICK GUIDE WELCOME TO YOUR NEW VOLVO! This folder contains a selection of the most common functions in your car. The owner's manual and other manuals contain safety instructions and all warning, important
WELCOME TO YOUR NEW VOLVO!
 QUICK GUIDE WELCOME TO YOUR NEW VOLVO! This folder contains a selection of the most common functions in your car. The owner's manual and other manuals contain safety instructions and all warning, important
Quick Guide WEB EDITION WELCOME TO YOUR NEW VOLVO! VOLVO S80
 VOLVO S80 Quick Guide WEB EDITION WELCOME TO YOUR NEW VOLVO! Getting to know your new car is an exciting experience. Take a look at this Quick Guide to learn some of the most common functions quickly and
*See your Owner s Manual for information.
 24 cube Quick Reference Guide 13 03 04 05 14 06 07 15 16 08 09 17 10 11 12 03 04 05 LOW TIRE PRESSURE WARNING LIGHT HEADLIGHT AND TURN SIGNAL CONTROL INSTRUMENT BRIGHTNESS CONTROL* TWIN TRIP ODOMETER /
1 Green light: Vehicle is locked. 2 Yellow light: Vehicle is unlocked. 3 Flashing red light: Someone may be in the
 REMOTE KEY WITH PCC* personal car communicator Locks the doors and trunk and arms the alarm. Unlocks the doors and trunk, and disarms the alarm A. Trunk (press once to unlock, press twice to open trunk
XC70. Quick GUIDE Web Edition
 XC70 Quick GUIDE Web Edition WELCOME TO THE GLOBAL FAMILY OF VOLVO OWNERS! This Quick Guide provides a brief overview of the most common features and functions in your Volvo. The Owner s Manual and the
E UID E G c EREN EF k R c UI Q TIER FRON _13a_Frontier_QRG_ indd 3 10/26/12 3:55 PM
 23 FRONTIER Quick Reference Guide 02 03 04 05 12 06 07 13 14 behind 08 09 steering 10 wheel 16 17 18 15 19 11 20 LOW TIRE PRESSURE WARNING LIGHT 02 HEADLIGHT AND TURN SIGNAL CONTROL 03 TRIP COMPUTER 04
note remote key & key blade
 remote key & key blade Locks the doors and tailgate, and arms the alarm. Unlocks the doors and tailgate A and disarms the alarm. Unlocks (but does not open) the tailgate. key blade Used to lock/unlock
Feel the difference. FordKa Owner s handbook
 COP LUM KA GB:Layout 1 18-10-2010 11:21 Pagina 1 GB The information contained in this publication was correct at the time of going to print. In the interest of development the right is reserved to change
APPENDIX TO INSTRUCTIONS MANUAL LEON
 APPENDIX TO INSTRUCTIONS MANUAL LEON Instruments and control lamps Instruments and control lamps Digital instrument panel (SEAT Digital Cockpit) Details of the instruments : 1 2 3 4 5 Rev counter (revolutions
personal safety; car safety; environmental protection.
 F I A T 5 0 0 O W N E R H A N D B O O K Dear customer, Thank you for choosing Fiat and congratulations on your choice of a Fiat. We have written this handbook to help you get to know all the features of
note remote key & key blade
 remote key & key blade Locks the doors and trunk and arms the alarm. If the car is locked with the remote key while the power retractable hard top is down, the double locking feature activates after approximately
Quick GUIDE Web edition
 v40 Quick GUIDE Web edition WELCOME TO YOUR NEW VOLVO! Getting to know your new car is an exciting experience. Take a look at this Quick Guide to learn some of the most common functions quickly and easily.
2007 VERSA QUICK REFERENCE GUIDE. Shift_space
 2007 VERSA QUICK REFERENCE GUIDE Shift_space 04 05 06 12 13 14 11 07 08 15 09 10 HEADLIGHT AND TURN SIGNAL CONTROL 04 TWIN TRIP ODOMETER 07 INSTRUMENT BRIGHTNESS CONTROL* 10 HOOD RELEASE* 13 AUDIO SYSTEM
2007 XTERRA QUICK REFERENCE GUIDE. Shift_your limits
 2007 XTERRA QUICK REFERENCE GUIDE Shift_your limits 08 09 10 04 11 12 13 09 CLIMATE CONTROLS 06 14 10 FRONT-PASSENGER AIRBAG STATUS LIGHT 11 E-LOCK SWITCH 07 12 HILL DESCENT CONTROL SWITCH HEADLIGHT AND
2012 cube Quick Reference Guide
 22 cube Quick Reference Guide 13 03 04 05 14 06 07 15 16 08 09 17 10 11 12 03 04 05 LOW TIRE PRESSURE WARNING LIGHT HEADLIGHT AND TURN SIGNAL CONTROL INSTRUMENT BRIGHTNESS CONTROL* TWIN TRIP ODOMETER /
E d UI E G C EREN EF k R C UI Q RA R XTE _14b_Xterra_NAM_QRG_ indd 2 12/4/13 11:30 AM
 2014 XTERRA QUICk Reference Guide 01 02 03 04 05 12 06 07 13 14 08 09 10 11 UNDERNEATH INSTRUMENT PANEL 16 15 17 18 19 01 LOW TIRE PRESSURE WARNING LIGHT 02 HEADLIGHT AND TURN SIGNAL CONTROL 03 TRIP COMPUTER
WelCOMe TO YOUR new VOlVO! VOLVO V50 QUICK GUIDE
 VOLVO V50 QUICK GUIDE WelCOMe TO YOUR new VOlVO! Getting to know your car is an exciting experience. After looking through this Quick Guide you'll like your new Volvo even more. You can find detailed information
2012 juke. Quick Reference Guide
 22 juke Quick Reference Guide 15 04 05 06 16 07 08 09 17 10 11 12 18 19 20 13 14 04 05 VEHICLE INFORMATION DISPLAY* HEADLIGHT AND TURN SIGNAL CONTROL LOW TIRE PRESSURE WARNING LIGHT INSTRUMENT BRIGHTNESS
TECHNOLOGY REFERENCE GUIDE
 TECHNOLOGY REFERENCE GUIDE owners.honda.com 2015 Honda Accord Sedan LX, Sport, and EX 31T2AA20 Technology Reference Guide 00X31-T2A-A200 2014 American Honda Motor Co., Inc. All Rights Reserved Printed
COP LUM KA GB :43 Pagina 1. FordKa Owner s handbook. Feel the difference
 COP LUM KA GB 16-07-2008 16:43 Pagina 1 FordKa Owner s handbook Feel the difference K10468_Service_Portfolio_090508.1 1 09.05.2008 15:52:47 Uhr 001-025 Ford KA GB 15-07-2008 8:51 Pagina 1 About this handbook
READY TO GO PEUGEOT 208
 READY TO GO PEUGEOT 208 EXTERIOR Remote control key Refilling A. Unfolding/Folding. B. Unlocking. 1. Opening the fuel filler flap. 2. Removing the filler cap. 3. Hanging up the filler cap. Disarming the
2007 MAXIMA QUICK REFERENCE GUIDE. Shift_exhilaration
 2007 MAXIMA QUICK REFERENCE GUIDE Shift_exhilaration 12 05 13 06 07 08 09 10 14 11 15 HEADLIGHT AND TURN SIGNAL CONTROL STEERING WHEEL SWITCHES FOR AUDIO CONTROL 07 OUTSIDE MIRROR CONTROL SWITCH 10 STEERING
Side view. Fig. 1 Vehicle side overview.
 Side view Fig. 1 Vehicle side overview. Key to fig. 1: (1) Fuel filler flap (2) Roof antenna (3) Outside door handles (4) Outside mirror Additional turn signal light (5) Lift points for the jack Front
2007 ARMADA QUICK REFERENCE GUIDE. Shift_scale
 2007 ARMADA QUICK REFERENCE GUIDE Shift_scale 07 HOOD RELEASE* 09 08 STEERING WHEEL TILT ADJUSTMENT* 10 09 CONTROL PANEL DISPLAY 05 06 11 12 10 AUDIO SYSTEM 13 07 08 11 FRONT-PASSENGER AIR BAG STATUS LIGHT
Volkswagen Information System. Introduction
 Volkswagen Information System Introduction In this section you ll find information about: Using the instrument cluster menus: Basic version Using the instrument cluster menus: Premium version with multi-function
CONTENTS 01 AUDIO SYSTEM DAB 15 PARKING DISTANCE CONTROL 16 ENGINE COMPARTMENT - RHD 17 SERVICE INFORMATION 18 FORECOURT INFORMATION 19
 MG3 Quick Guide CONTENTS CONTENTS 01 KEY FEATURES 02 DRIVING CONTROLS 03 KEYS 04 SEATS 05 DRIVER CONTROLS STEERING WHEEL 06 DRIVER CONTROLS STOP START 07 INSTRUMENT PANEL 08 MESSAGE CENTRE 09 ELECTRIC
tc 2011 QUICK REFERENCE GUIDE GET INFORMED. ROLL.
 tc 2011 QUICK REFERENCE GUIDE GET INFORMED. ROLL. 2011 Scion tc This Quick Reference Guide is a summary of basic vehicle operations. It contains brief descriptions of fundamental operations so you can
2015 Scion iq Quick Reference Guide
 2015 Scion iq Quick Reference Guide 2015 Scion iq This Quick Reference Guide is a summary of basic vehicle operations. It contains brief descriptions of fundamental operations so you can locate and use
Customer Experience Center Pocket Reference Guide
 Customer Experience Center 1-800-331-4331 2007 Pocket Reference Guide MN 00452-PRG07-COR Printed in USA 6/06 17 2007 Corolla This Pocket Reference Guide is a summary of basic vehicle operations. It contains
GS350_200t_QG_OM30F25U_(U)
") The Quick Guide is not intended as a substitute for your Owner s Manual. We strongly encourage you to review the Owner s Manual and supplementary manuals so you will have a better understanding of your
The Quick Guide is not intended as a substitute for your Owner s Manual. We strongly encourage you to review the Owner s Manual and supplementary manuals so you will have a better understanding of your
T E C H N O L O G Y R E F E R E N C E G U I D E
 T E C H N O L O G Y R E F E R E N C E G U I D E o w n e r s. h o n d a. c o m 3 1 T R 3 A 1 0 2013 Honda Civic Sedan Technology Reference Guide 00X31- TR3- A100 2012 American Honda Motor Co., Inc. All
personal safety; the car s wellbeing; environmental protection.
 Dear Customer, Congratulations on your purchase and thank you for choosing Alfa Romeo. We have written this handbook to help you get the most out of your new car. Please read it all the way through before
Quick Overview WARNING LIGHTS
 Quick Overview WARNING LIGHTS 1. Left-hand direction indicator. 2. Low outside temperature. 3. Glow plug (diesel only). 4. Engine malfunction. 5. Low oil pressure. 6. Battery charge indicator. 7. Front
2006 QUEST QUICK REFERENCE GUIDE. Shift_convention
 20 QUEST QUICK REFERENCE GUIDE Shift_convention STEERING WHEEL TILT ADJUSTMENT (BEHIND STEERING WHEEL) AUDIO SYSTEM REAR SONAR SWITCH TRIP BUTTON STEERING WHEEL SWITCHES FOR AUDIO CONTROL LIGHTS ON DEMAND
E UID E G c EREN EF k R c UI Q Z
 24 370Z Quick Reference Guide 02 03 04 05 06 06 07 14 08 09 10 11 15 12 13 16 17 18 ENTER / NEXT SWITCHES* 02 INSTRUMENT BRIGHTNESS CONTROL* 03 VEHICLE INFORMATION DISPLAY* 04 LOW TIRE PRESSURE WARNING
VISUAL INDEX. Steering Wheel and Nearby Controls. Quickly locate items in the vehicle s interior. button*
 VISUAL INDEX VISUAL INDEX Quickly locate items in the vehicle s interior. Steering Wheel and Nearby Controls 10 7 1 8 2 3 4 6 11 5 9 1 Lights/turn signals/lanewatch button* 2 TRIP knob Brightness control
For your ease and convenience, this guide is intended to find the most essential functions you will need to start experiencing your Infiniti Q30.
 Q30 Quick User Guide For your ease and convenience, this guide is intended to find the most essential functions you will need to start experiencing your Infiniti Q30. Cockpit overview 2 Instrument panel
COMMANDER 2009 QUICK REFERENCE GUIDE
 COMMANDER 2009 QUICK REFERENCE GUIDE vehicle feature fuel cap: Loose Gas Cap Message If a CHECK GASCAP message appears in the Electronic Vehicle Information Center (EVIC), tighten the gas cap until a clicking
Quick Guide. volvo XC90
 volvo XC90 Quick Guide WELCOME TO THE GLOBAL FAMILY OF VOLVO OWNERS! Getting to know your new vehicle is an exciting experience. This Quick Guide provides a brief overview of the most common features and
Audi RS 6 Avant Quick reference guide
 Dear Audi Driver, This quick reference guide gives you a brief introduction to the main features and controls of your vehicle. However, it cannot replace the Owner s Manual and the other manuals supplied
Contents ES350_QG_OM33A11U_(U)
") Contents The Quick Guide is not intended as a substitute for your Owner s Manual. We strongly encourage you to review the Owner s Manual and supplementary manuals so you will have a better understanding
Contents The Quick Guide is not intended as a substitute for your Owner s Manual. We strongly encourage you to review the Owner s Manual and supplementary manuals so you will have a better understanding
Z ROADSTER QUICK REFERENCE GUIDE. SHIFT_obsession
 2009 350Z ROADSTER QUICK REFERENCE GUIDE SHIFT_obsession INSTRUMENT BRIGHTNESS CONTROL* TRIP COMPUTER/MODE SETTING BUTTONS HEADLIGHT AND TURN SIGNAL CONTROL WINDSHIELD WIPER/WASHER SWITCH STEERING WHEEL
SIMPLY CLEVER BEFORE YOU SET OFF. ŠKODA Superb
 SIMPLY CLEVER BEFORE YOU SET OFF ŠKODA Superb This brochure is intended to quickly acquaint you with some vehicle functions. This does not replace the vehicle Owner's Manual, because it does not provide
KEY FOB. Locking And Unlocking The Doors
 KEY FOB Key Fob Locking And Unlocking The Doors Cargo Vehicle (Canada) Push and release the lock button once to lock all the doors. Push and release the unlock button once to unlock the front two doors.
2013 Scion tc Quick Reference Guide
 2013 Scion tc Quick Reference Guide 2013 Scion tc This Quick Reference Guide is a summary of basic vehicle operations. It contains brief descriptions of fundamental operations so you can locate and use
Quick Guide WELCOME TO YOUR NEW VOLVO! VOLVO V70 & XC70 WEB EDITION
 VOLVO V70 & XC70 Quick Guide WEB EDITION WELCOME TO YOUR NEW VOLVO! Getting to know your car is an exciting experience. fter looking through this Quick Guide you'll like your new Volvo even more. You can
2013 Infiniti EX Quick Reference Guide
 2013 Infiniti EX Quick Reference Guide 01 Behind steering wheel 03 04 05 02 Behind steering wheel 16 06 07 08 17 09 10 12 13 14 15 Behind steering wheel On steering column 11 19 18 01 INSTRUMENT BRIGHTNESS
FORD ECOSPORT Quick Reference Guide
 FORD ECOSPORT Quick Reference Guide About This Quick Reference Guide We have created this guide to help you get to know certain features of your vehicle. It only contains basic instructions to get you
Onboard power supply management
 Onboard power supply management The onboard power supply J519 Functions of onboard power supply control unit Until now s and relays functioned at different locations in the vehicle. In the onboard power
Exterior. Stop & Start. Cornering lighting. Electronic stability programme. Familiarisation
 Handbook Familiarisation Exterior Stop & Start This system puts the engine temporarily into standby during stops in the traffic (red lights, traffic jams, etc...). The engine restarts automatically as
2010 XTERRA. Quick Reference Guide
 2010 XTERRA Quick Reference Guide 01 02 03 12 04 05 06 07 08 09 13 14 10 15 19 11 16 17 18 01 02 03 04 05 LOW TIRE PRESSURE WARNING LIGHT TRIP COMPUTER INSTRUMENT BRIGHTNESS CONTROL/TRIP CHANGE BUTTON
QUICK REFERENCE GUIDE
 QUICK REFERENCE GUIDE 2005 350Z SHIFT_obsession NISSAN 350Z INSTRUMENT PANEL FEATURES STEERING WHEEL TILT ADJUSTMENT 05 AUDIO SYSTEM SOFT TOP OPERATING SWITCH (ROADSTER MODELS) 04 STORAGE POCKET OR NAVIGATION
Manual Climate Controls
 2009 QUICK REFERENCE GUIDE CharGER Blower Push A/C Button Temp. Push Rear Window Defroster Button Mode Recirc. Manual Climate s Air Recirculation Use recirculation for maximum A/C operation. For window
GS350_QG_OM30E50U_(U)
") The Quick Guide is not intended as a substitute for your Owner s Manual. We strongly encourage you to review the Owner s Manual and supplementary manuals so you will have a better understanding of your
The Quick Guide is not intended as a substitute for your Owner s Manual. We strongly encourage you to review the Owner s Manual and supplementary manuals so you will have a better understanding of your
TECHNOLOGY REFERENCE GUIDE
 TECHNOLOGY REFERENCE GUIDE owners.honda.com 2014 Honda CR-V LX, EX, EX-L, and EX-L with RES 31T0AA20 Technology Reference Guide 00X31-T0A-A201 2013 American Honda Motor Co., Inc. All Rights Reserved Printed
2007 FRONTIER QUICK REFERENCE GUIDE Shift_capability
 2007 FRONTIER QUICK REFERENCE GUIDE Shift_capability 10 03 04 05 06 11 08 07 15 09 12 13 14 headlight and turn 04 signal control WINDSHIELD WIPER/ WASHER SWITCH steering wheel TILT 07 10 AUDIO SYSTEM 13
2015 Yaris Liftback Quick Reference Guide
 2015 Yaris Liftback Quick Reference Guide 2015 INDEX Yaris Liftback OVERVIEW Engine maintenance 7 This Quick Reference Guide is a summary of basic vehicle operations. It contains brief descriptions of
TECHNICAL SERVICE BULLETIN
 GROUP General NUMBER MODEL 2016MY Sorento (UMa) DATE 073 March 2015 TECHNICAL SERVICE BULLETIN SUBJECT: SORENTO (UMa) TECHNOLOGY HIGHLIGHTS In an effort to better educate and familiarize customers in regards
2013 Scion xd Quick Reference Guide
 2013 Scion xd Quick Reference Guide 2013 INDEX Scion xd OVERVIEW Engine maintenance 7 This Quick Reference Guide is a summary of basic vehicle operations. It contains brief descriptions of fundamental
FORD MONDEO Quick Reference Guide
 FORD MONDEO Quick Reference Guide About This Quick Reference Guide We have created this guide to help you get to know certain features of your vehicle. It only contains basic instructions to get you started
31SJCQ Honda Ridgeline Technology Reference Guide X31- SJC- Q American Honda Motor Co., Inc. All Rights Reserved
 T E C H N O L O G Y R E F E R E N C E G U I D E w w w. o w n e r s. h o n d a. c o m 1 2 3 4 5 31SJCQ50 2011 Honda Ridgeline Technology Reference Guide 1234. 5678. 91. 0 00X31- SJC- Q500 2010 American
Display. LEXUS App Suite. Radio Media Phone Setup. Setup Highlight using the Remote. Touch, then push knob to select.
 Lexus Personalized Settings Your vehicle includes a variety of electronic features that can be programmed to your preferences. Programming of these features is performed once at no charge by your Lexus
Z QUICK REFERENCE GUIDE. Shift_obsession
 2006 350Z QUICK REFERENCE GUIDE Shift_obsession SOFT TOP OPERATING SWITCH (ROADSTER MODELS) 03 STEERING WHEEL SWITCHES FOR AUDIO CONTROL 09 CLIMATE CONTROLS 02 FUEL-FILLER DOOR OPENER SWITCH TRACTION CONTROL
HYUNDAI GENESIS Quick Reference Guide
 MAINTENANCE Scheduled Maintenance Normal Usage Severe Usage* Engine Oil And Filter Replace 7,500 or 12 mos. Replace 3,750 or 6 mos. Tire Rotation Perform 7,500 Perform 7,500 Air Cleaner Filter Fuel Tank
Air Recirc. Button. Defrost Button. Mode Buttons
 2009 QUICK REFERENCE GUIDE GRAND CARAVAN Driver Temp. A/C Button Defrost Button Mode Buttons Blower Air Recirc. Button Rear Window Defroster Button Passenger Temp. Rear ContRol Rear Blower Rear Temp. Manual
Contents. *: These features may be operated by Voice Command (See P.83) ES350_QG_OM33B49U_(U)
 ES350_QG_OM33B49U_(U)") Contents The Quick Guide is not intended as a substitute for your Owner s Manual. We strongly encourage you to review the Owner s Manual and supplementary manuals so you will have a better understanding
Contents The Quick Guide is not intended as a substitute for your Owner s Manual. We strongly encourage you to review the Owner s Manual and supplementary manuals so you will have a better understanding
2008 Quick Reference Guide
 2008 Quick Reference Guide Interactive Owner s Guide Have a question about the main features of your new Toyota? Find the answers quickly and easily in this Quick Reference Guide, which includes highlights
2015 ALTIMA QUICK REFERENCE GUIDE
 05 ALTIMA QUICK REFERENCE GUIDE Behind steering wheel 3 4 4 Behind steering wheel 5 9 0 9 3 4 5 0 6 7 8 Behind steering wheel 6 7 8 3 Vehicle Information Display Low Tire Pressure Warning Light 3 Headlight
Owner s Handbook OUTLANDER SPORT
 Owner s Handbook OUTLANDER SPORT Please place copies of the following items in the pocket below: 1. Pre-Delivery Inspection Form (Customer Copy) 2. Triple Diamond Delivery Checklist (Customer Copy) 3.
2014 Infiniti QX50 Quick Reference Guide
 24 Infiniti QX50 Quick Reference Guide Behind steering wheel 03 04 05 02 Behind steering wheel 16 06 07 08 17 09 10 12 13 14 15 Behind steering wheel On steering column 11 19 18 INSTRUMENT BRIGHTNESS control