UNIVERSAL SEAT HEATING AND COOLING INSTALLATION PROCEDURE
|
|
|
- Wilfred Andrews
- 5 years ago
- Views:
Transcription


1 UNIVERSAL SEAT HEATING AND COOLING INSTALLATION PROCEDURE

 The current causes one junction to heat up as the other cools.")
 Waste (+) (+) (-) Cooling")
2 TED - OPERATING PRINCIPLE The MTM works by blowing air across the TED which uses the Peltier effect, a creation of a heat differential from an electric voltage. When a current is passed through two semiconductors (n-type and p-type) that are connected to each other at two junctions (top and bottom) The current causes one junction to heat up as the other cools. When the current is reversed, the opposite thermal effect occurs at the junctions. Main To Seat TED Air Flow Main To Seat TED Air Flow Waste Waste Heating Configuration Waste (-) Waste (+) (+) (-) Cooling Configuration For best performance the Air flow into the TED should be exposed to vehicle cabin air and the waste air allowed to exit the seat into the cabin air.


3 STEP 1 - EVALUATE SEAT TRIM Remove Leather trim and foam from seat assembly. Upgraded Leather trim will need to contain perforated leather inserts as well as a reticulated foam. (Reticulated foam is a substitution for traditional plus pad). Traditional plus pad Reticulated foam


4 STEP 2 - PRELIMINARY BACK LAYOUT Position Back TED, blower and duct in similar fashion depending on application. Use tie wraps to secure CCS system. Use tie wraps to secure legs on the TED to suspension stringer wires. Cut plastic stringer wire spacer tube to allow TED snout to pass through suspension Use tie wraps to secure legs on blower to suspension wires.


5 STEP 3 - PRELIMINARY CUSHION LAYOUT Position Cushion TED, blower and duct in similar fashion depending on application. Cut 57x20mm slot in steel pan to allow TED snout to pass through pan if necessary. Use tie wraps to secure blower legs to suspension.

6 STEP 4 SEAT MOTION ENVELOPE Move seat in all degrees of motion to verify the placement of CCS system does not impede motion of seat. Also verify with suspension deflection while occupied. 1. Lumbar rotate and function 3. Chair tilt up/down 2. Back rotate 4. Base slide 5. Chair horizontal slide


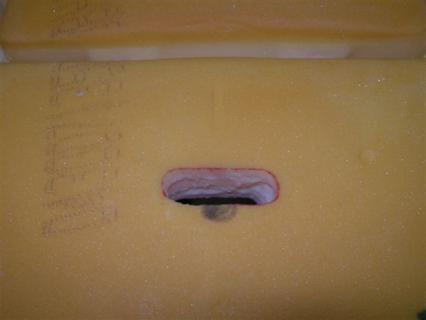
7 STEP 5 CUT HOLE IN CUSHION AND BACK SEAT FOAM A. Cushion Using slot cut in seat pan, place and mark location of hole on foam. Skive/cut out slot in foam. B. Back Using location of TED on back suspension, place and mark location of hole on foam. Skive/cut out slot in foam.


8 STEP 6 CUT AND PLACEMENT OF DISTRIBUTION PADS A. Cutting Place distribution pad in desired location (do not stick to foam yet). Using a marker go through the back side of newly cut hole in foam and mark newly cut hole on back side of distribution pad. Cut on the line only through top layer. Now remove the top layer in pad to create opening. B. Placement Now peel off PSA strips and put pad against foam, lining up hole in foam with hole in pad and press firmly to seat adhesive. Reinstall foam onto frame.


9 STEP 7 BACK INSTALL TED AND WAIST DUCT A. B. Snap waste duct assembly to the waste exit of the TED in the back assembly. Secure with tie wraps. C. Route waste duct to desired area (Bottom or side of Lean back) to establish placement of grill bezel. Extend duct if necessary using adaptor and extra duct. D. Secure TED to seat back with tie wraps. Mark cover and cut opening for waist duct.


10 STEP 8 BACK INSTALL BLOWER AND EXHAUST VENT A. B. Snap duct to the other side of the TED in the back assembly. Secure with tie wraps. C. D. Snap blower assembly to duct. Secure blower to duct with tie wraps then secure bower to seat back with tie wraps. Snap duct onto barb feature of grill bezel, and secure with tie wrap. Using bezel as guide, mark and cut out hole inside facing. Snap bezel grill to bezel base plate, making sure side facing material is trapped by bezel.


. B.")

11 STEP 9 - CUSHION INSTALL TED AND BLOWER A. Install TED into opening cut in cushion. Secure TED to cushion frame with tie wraps. (No waste duct is needed under the seat). B. Attach blower to duct using tie straps and attach blower to frame using tie straps.


12 STEP 10 MOUNT ECU Place ECU against seat structure. Using mounting features mark hole location on structure. Secure module to structure with tie straps or self tapping screws.

13 STEP 11 CONNECT HARNESS TO MTM A. Place and route wire harness to seat. B. Connect back and cushion TED and blower connectors to appropriate connectors on harness. C. Connect seat switch to harness. D. Connect ECU to harness. E. Secure any loose wires to seat structure with tie wraps. F. Function seat through its full travel one more time to confirm motion does not pinch or stretch harness. Switch Back Blower Back TED ECU To Vehicle Power Negative (-) Black Positive (+) Red (2 wires) TO 12V POWER RELAY OR KEY OFF POWER Cushion TED Cushion Blower
14 STEP 12 CONFIRM SEAT FUNCTION A. Connect seat CCS harness to 12V power source with amp meter or use a hand held voltmeter to measure current. B. Confirm cooling function by actuating switch to place into cool mode (blue LEDs). Amp meter should read approx 5 amps. C. Confirm heating function by actuating switch to place into heating mode (red LEDs). Amp meter should read approx 10 amps D. Seat ready for installation back into vehicle.
Seat Comfort Systems Ventilation/Heater Installation Instructions
 Seat Comfort Systems Ventilation/Heater Installation Instructions KIT P/N: SCS00000C3 IMPORTANT: THE VENTILATION SYSTEM DRAWS AIR FROM THE CABIN AND MUST HAVE OPEN ACCESS THROUGH THE BOTTOM OF THE SEAT
RoadComfort TM. Installation Manual Vibration Massage & Heat
 RoadComfort TM Vibration Massage & Heat Installation Manual 1-562-447-1780 WWW.RELAXOR.COM Table of Contents I Required tools II System Configuration III Motor Placement Bottom IV Motor Placement Back
GENUINE PARTS INSTALLATION INSTRUCTIONS
 GENUINE PARTS INSTALLATION INSTRUCTIONS 1. 2. 3. 4. DESCRIPTION: Accent light Kit APPLICATION: Versa (2012) PART NUMBER: 999F3 AW008 - Universal Accent Lighting Kit. KIT CONTENTS: Item QTY Description
INSTALLATION INSTRUCTIONS FUEL SURGE TANK KIT
 INSTALLATION INSTRUCTIONS FUEL SURGE TANK KIT BMW E46 3-Series, Excl Convertible Document: 19-0056 Support: info@radiumauto.com Relieve fuel pressure in vehicle before beginingthe installation. Disconnect
TOYOTA CAMRY LE / SE / XLE DUAL SEAT HEATER KIT Section I Pre-Installation Check
 Section I Pre-Installation Check Kit Part Number: 250-1897 3 General Applicability Camry LE / SE / XLE 5 4 1 Recommended Sequence of Application Item # Accessory 1 Wiring 2 Elements 3 2 Kit Contents Item
Part Number: TAV-713 TOYOTA AVALON LED DRL
 Part Number: TAV-713 Kit Contents Item # Quantity Reqd. Description 1 2 DRL s bezels w/led DRL 2 1 Driver Box 3 1 Harness bag 4 1 User s card 5 1 Cushion pad 6 1 Switch 7 2 Drill Jigs Hardware Bag Contents
SCION xd INTERIOR LIGHTING UPGRADE Preparation
 Preparation Part Number: PTS21-52085 Light Guide Kit Contents Item # Quantity Reqd. Description 1 1 Controller Board, 4 color programmed w/ Bracket 2 1 RGB, LED Engine wire harness 3 2 14mm Light Rod,
DESCRIPTION & OPERATION
 SEATS - POWER 1998 ACCESSORIES & EQUIPMENT General Motors Corp. - Power Seats DESCRIPTION & OPERATION Power seats operate using toggle switches located on seat side. Seat adjusters are powered by a 12-volt,
GENUINE PARTS INSTALLATION INSTRUCTIONS
 GENUINE PARTS INSTALLATION INSTRUCTIONS 1. 2. 3. 4. DESCRIPTION: APPLICATION: PART NUMBER: KIT CONTENTS: Security light Kit Maxima 999F4 AX009 - Universal Security Lighting Kit. Item QTY Description Service
GENUINE PARTS INSTALLATION INSTRUCTIONS
 GENUINE PARTS INSTALLATION INSTRUCTIONS 1. 2. 3. 4. DESCRIPTION: Security Light Kit APPLICATION: Altima Coupe and Sedan (2011+) PART NUMBER: 999F4 AX008 - Universal Security Lighting Kit. KIT CONTENTS:
3.4L V6 SUPERCHARGER 7 TH INJECTOR KIT
 Part Number: 00602-17620-260 00602-17620-261 00602-17620-263 00602-17620-264 00602-17620-274 00602-17620-275 00602-17620-276 Section I Installation Preparation Kit Contents Item # Quantity Reqd. Description
DIAGNOSIS AND TESTING
 501-10-1 Seating 501-10-1 DIAGNOSIS AND TESTING Seats Refer to Wiring Diagrams Cell 119 for schematic and connector information. Refer to Wiring Diagrams Cell 120, Power Seats for schematic and connector
TOYOTA RAV4/HV INTERIOR LIGHT KIT Preparation
 Preparation Part Number: PT413-42130 Kit Contents Item # Quantity Reqd. Description 1 1 Wire Harness 2 3 Hardware Bag Contents Item # Quantity Reqd. Description 1 20 Cable Tie 2 2 Scotchlok 3 2 Foam Pad
PART NUMBER: H630SSJ000. Kit Contents: A. Amplifier with Bracket (1) D. Badge (2) with push nuts (4)
 D. Badge (2) with push nuts (4)") Kit Contents: A. Amplifier with Bracket (1) D. Badge (2) with push nuts (4) E. Clip B. Harness (1) C. Cable tie (8) F. Mounting Hardware (2) G. Replacement Speaker (2) H. HVAC Duct extension (2) IMPORTANT:
Kit Contents: A. Amplifier with Bracket (1) D. Badge (2) with push nuts (4) E. Clip B. Harness (1) C. Cable tie (8) F. Mounting Hardware (2) G. Replacement Speaker (2) H. HVAC Duct extension (2) IMPORTANT:
Slide on the heat shrink tubing and connect the wire to the color matched cable on the Junction Box, making sure to line up the cable properly
 Manual Routing Di2 Frame Wires Down Tube E-wire Remove the Battery Cover and Hidden Battery compartment from the frame and put aside (Figure 1). Using electrical tape, attach the end of the Down Tube E-wire
ATTENTION. Custom Dynamics UTV Turn Signal Kit Installation Instructions
 Custom Dynamics UTV Kit Installation Instructions We thank you for purchasing the Custom Dynamics UTV LED Kit. Our products utilize the latest technology and high quality components to ensure you the most
ACCESSORY HOOD DODGE RAM. Call Out Description Parts Quantity 1 Hood Supplied in kit 1 2 Bezel Supplied in kit 2 3 Foam tape supplied in kit 1
 ACCESSORY HOOD 1 DODGE RAM Call Out Description Parts Quantity 1 Hood Supplied in kit 1 2 Bezel Supplied in kit 2 3 Foam tape supplied in kit 1 2 PROCEDURE STEPS: 1. Disconnect the washer fluid hose (1)
TOYOTA RAV TRAILER WIRE HARNESS Section I Installation Preparation
 Section I Installation Preparation Part Number: 08921-42900 Kit Contents Item # Quantity Reqd. Description 1 1 Converter 2 1 Wire harness 3 1 Sub wire harness No.1 4 2 Plastic Tie (300mm) 5 21 Plastic
Conflicts. TOYOTA Prius Foglights. Part Number: Accessory Code: LF1. Factory Fog Lights
 TOYOTA Prius 2011- Foglights Part Number: 00016-47401 Accessory Code: LF1 Conflicts Factory Fog Lights Item # Quantity Reqd. Description 1 2 Fog Lamps 2 2 Fog Lamp s bezels 3 1 Switch Assembly 4 1 Fog
Part Number: TAV-713. Kit Contents Item # Quantity Reqd. Description 1 2 DRL s bezels w/led DRL. Hardware Bag Contents.
 Date: 09.04.2013 TOYOTA AVALON 2013 - LED DRL Part Number: TAV-713 Kit Contents Item # Quantity Reqd. Description 1 2 DRL s bezels w/led DRL 2 1 Driver Box 3 1 Harness bag 4 1 User s card 5 1 Cushion pad
TOYOTA PRIUS FOG LIGHT (Halogen or LED)
") Part Number: TPR-413 / TPR-813 Kit Contents Item # Quantity Reqd. Description 1 2 Fog Lamps 2 1 Lower Grill 3 1 Switch Assembly 4 1 Fog Light Operation guide 5 1 Harness Bag Hardware Bag Contents Item
Part Number: TPR-413 / TPR-813 Kit Contents Item # Quantity Reqd. Description 1 2 Fog Lamps 2 1 Lower Grill 3 1 Switch Assembly 4 1 Fog Light Operation guide 5 1 Harness Bag Hardware Bag Contents Item
Side panel, replacing
 "VCC147307 EN 20110211" 1(23) Side panel, replacing As the illustrations in this service information are used for different model years and / or models, some variation may occur. However, the essential
SCION TC HANDS FREE BLU LOGIC Preparation
 SCION TC 2008- HANDS FREE BLU LOGIC Preparation Part #: PT923-00099 Conflicts: JBL Audio NOTE: Part number of this accessory may not be the same as the part number shown. Kit Contents: For kits manufactured
Conflicts. Camry L (ECO Grade) Security System with Keyless Entry. Part Number: Accessory Code: QK1
 Security System with Keyless Entry. Part Number: Accessory Code: QK1") 2013- Part Number: 00016-32905 Accessory Code: QK1 Conflicts Note: NOT FOR INSTALLATION ON VEHICLES WITH FACTORY THEFT DETERRENT SYSTEMS. Kit Contents Item # Quantity Reqd Description 1 1 Keyless Security
2013- Part Number: 00016-32905 Accessory Code: QK1 Conflicts Note: NOT FOR INSTALLATION ON VEHICLES WITH FACTORY THEFT DETERRENT SYSTEMS. Kit Contents Item # Quantity Reqd Description 1 1 Keyless Security
GENUINE PARTS INSTALLATION INSTRUCTIONS
 GENUINE PARTS INSTALLATION INSTRUCTIONS DESCRIPTION: APPLICATION: PART NUMBER: Electronic Tailgate Lock Kit Nissan Titan 999M2-W3005 KIT CONTENTS: Item Qty. Part Description Service Part Number A 1 Electronic
Designed for 2015 Ford F150 Super-Cab and Super-Crew vehicles (Compatible in vehicles with or without Sony System. M6 Bolt X 2
 SF150SC15 Designed for 2015 Ford F150 Super-Cab and Super-Crew vehicles (Compatible in vehicles with or without Sony System Subwoofer Assembly Amplifier Relocation Bracket (not used on non Sony trucks)
2005+ Roll Bar (Mm5RB-20.1 to -20.6) Recommended Center punch 1/8" pilot drill 1-3/4" Hole saw 2" Hole saw
 Recommended Center punch 1/8 pilot drill 1-3/4 Hole saw 2 Hole saw") 3430 Sacramento Dr., Unit D San Luis Obispo, CA 93401 Telephone: 805/544-8748 Fax: 805/544-8645 www.maximummotorsports.com 2005+ Roll Bar (Mm5RB-20.1 to -20.6) Recommended Center punch 1/8" pilot drill
3430 Sacramento Dr., Unit D San Luis Obispo, CA 93401 Telephone: 805/544-8748 Fax: 805/544-8645 www.maximummotorsports.com 2005+ Roll Bar (Mm5RB-20.1 to -20.6) Recommended Center punch 1/8" pilot drill
Part Number: TCA-712SE
 Date: 09.04.2013 TOYOTA CAMRY SE 2012-14 LED DRL Part Number: TCA-712SE Kit Contents Item # Quantity Reqd. Description 1 2 DRL s bezels w/led DRL 2 1 Driver Box 3 1 Harness bag 4 1 User s card 5 1 Cushion
Side Door Sill Trim Plate Package Installation
 Page 1 of 5 2014 Chevrolet Equinox Equinox, Terrain VIN L Accessory Installation Manual Accessories Interior Accessories Accessories Document ID: 3619390 Side Door Sill Trim Plate Package Installation
PART NUMBER: H630SXC001. Kit Contents: A. Amplifier with Bracket (1) D. Badge (2) with push nuts (4)
 D. Badge (2) with push nuts (4)") Kit Contents: A. Amplifier with Bracket (1) D. Badge (2) with push nuts (4) E. Clip B. Interface / Power Harness (1) C. Cable tie (8) F. Mounting Nuts (2) G. Replacement Front Speaker (2) H. Badge mounting
Kit Contents: A. Amplifier with Bracket (1) D. Badge (2) with push nuts (4) E. Clip B. Interface / Power Harness (1) C. Cable tie (8) F. Mounting Nuts (2) G. Replacement Front Speaker (2) H. Badge mounting
Scion xa SATELLITE RADIO TUNER Preparation
 Preparation Part Number: PTS31-00051 Kit Contents Item # Quantity Reqd. Description 1 1 Antenna, Interior 2 1 Antenna Tape Pad 3 1 Wire Harness 4 1 Bracket, Floor 5 3 Hardware Bags 6 3 Templates 7 1 SIRIUS
UNPACK AND IDENTIFY THE FOLLOWING PARTS.
 SUT-500-S ASSEMBLY REQUIREMENTS *Torque all T-bolt nuts to 35-40 foot pounds. *Check all lights before towing. *Tire pressure not to exceed recommendation on serial tag. *Re-torque wheel nuts after first
Ford Mustang with Factory Air Control Panel Conversion Kit (475170)
") an ISO 900:205 Registered Company 969-70 Ford Mustang with Factory Air Control Panel Conversion Kit (47570) 8865 Goll St. San Antonio, TX 78266 Phone: 800-862-6658 Sales: sales@vintageair.com Tech Support:
an ISO 900:205 Registered Company 969-70 Ford Mustang with Factory Air Control Panel Conversion Kit (47570) 8865 Goll St. San Antonio, TX 78266 Phone: 800-862-6658 Sales: sales@vintageair.com Tech Support:
Instrument Panel Assembly Replacement. Fig. 14 Battery Negative Cable Removal/Installation
 Page 1 of 11 Home Account Contact ALLDATA Log Out Help BILL SEIDLES MITSUBISHI Select Vehicle New TSBs Technician's Reference Component Search: OK 2003 Chrysler Truck PT Cruiser L4-2.4L VIN B Conversion
SUT-250-S (These instructions are used for SUT-250-SCLC also)
") SUT-250-S (These instructions are used for SUT-250-SCLC also) Torque wrench, carpenters square, wire cutters, Phillips screwdriver, 7/16, 9/16, and 3/4 combination wrenches, ratchet, 9/16, 3/4, 13/16,
SUT-250-S (These instructions are used for SUT-250-SCLC also) Torque wrench, carpenters square, wire cutters, Phillips screwdriver, 7/16, 9/16, and 3/4 combination wrenches, ratchet, 9/16, 3/4, 13/16,
UNPACK AND IDENTIFY THE FOLLOWING PARTS.
 SUT-350-AIT ASSEMBLY REQUIREMENTS *Torque all T-bolt nuts to 35-40 foot pounds. *Check all lights before towing. *Tire pressure not to exceed recommendation on serial tag. *Re-torque wheel nuts after first
GENUINE PARTS INSTALLATION INSTRUCTIONS
 GENUINE PARTS INSTALLATION INSTRUCTIONS 1. 2. 3. 4. DESCRIPTION: Security Light Kit APPLICATION: Altima Sedan (2013+) PART NUMBER: 999F4 AX010 - Universal Security Lighting Kit. KIT CONTENTS: Item QTY
P5 SUPPLEMENTARY MANUAL
 P5 SUPPLEMENTARY MANUAL ROUTING DI2 FRAME WIRES Down Tube E-Tube Wire Remove the Battery Cover and Hidden Battery compartment from the frame and set aside. Using electrical tape, attach the end of the
Installation Instructions Supertop for Truck
 Installation Instructions Supertop for Truck US Patent 6827391 Vehicle Application: Toyota Tacoma Double Cab 2005-2011 (5 ft.) Part Number: 76308 INSTALLATION TIME SKILL LEVEL 1-1/2 Hours 2 - Moderately
1956 Ford Passenger Car Control Panel Conversion Kit (473150)
") an ISO 900:2008 Registered Company 956 Ford Passenger Car Control Panel Conversion Kit (47350) 8865 Goll St. San Antonio, TX 78266 Phone: 20-654-77 Fax: 20-654-33 www.vintageair.com 900505 REV B 04/4/5,
an ISO 900:2008 Registered Company 956 Ford Passenger Car Control Panel Conversion Kit (47350) 8865 Goll St. San Antonio, TX 78266 Phone: 20-654-77 Fax: 20-654-33 www.vintageair.com 900505 REV B 04/4/5,
2000 Dodge Durango ACCESSORIES & EQUIPMENT' 'Power Windows - Dakota & Durango 2000 ACCESSORIES & EQUIPMENT. Power Windows - Dakota & Durango
 DESCRIPTION & OPERATION 2000 ACCESSORIES & EQUIPMENT Power Windows - Dakota & Durango A permanent magnet motor moves each of the power windows. A master switch on driver's door controls all windows and
GENUINE PARTS INSTALLATION INSTRUCTIONS
 GENUINE PARTS INSTALLATION INSTRUCTIONS 1. 2. 3. 4. DESCRIPTION: Illuminated Kick Plate Kit APPLICATION: Murano PART NUMBER: 999G6 C2000, 999G6 C2100, 999G6 C2200 999Q9 AY001 - Accessory Service Connector
APS F-Body Twin Pump Fuel Supply System - APSGMF-FSS/01
 APS F-Body Twin Pump Fuel Supply System - APSGMF-FSS/01 1 Remove the fuel tank from the vehicle in accordance with the factory service manual. 2 Remove the stock fuel pump assembly from the fuel tank in
Mustang CLASSIC LIGHT BAR INSTALLATION INSTRUCTIONS CDC #
 1990-1993 Mustang CLASSIC LIGHT BAR INSTALLATION INSTRUCTIONS CDC # 101000 Kit Components: 1 Light Bar 4 Bolts ( 5 / 16-18 x 2.5 ) #182010 4 Washer #182005 4 Shims #182009 2 Dark Blue Connectors #182004
GENUINE PARTS INSTALLATION INSTRUCTIONS
 GENUINE PARTS INSTALLATION INSTRUCTIONS 1. 2. 3. 4. DESCRIPTION: APPLICATION: PART NUMBER: KIT CONTENTS: Accent light Kit Pathfinder 999F3 XZ000 - Accent Lighting Kit. Item QTY Description Service Part
TOYOTA PRIUS 2004 TVIP V2 (GBS ADD ON) Section I Installation Preparation
 Section I Installation Preparation") Section I Installation Preparation Part Number: 08586 47840 Section I Installation Preparation Kit Contents Item # Quantity Reqd. Description 1 1 Wire Harness 2 1 3 1 ECU Mounting Bracket Hardware Bag
Section I Installation Preparation Part Number: 08586 47840 Section I Installation Preparation Kit Contents Item # Quantity Reqd. Description 1 1 Wire Harness 2 1 3 1 ECU Mounting Bracket Hardware Bag
2005 Freestyle/Five Hundred/Montego Workshop Manual
 Page 1 of 8 SECTION 501-10: Seating 2005 Freestyle/Five Hundred/Montego Workshop Manual DISASSEMBLY AND ASSEMBLY Procedure revision date: 07/14/2006 Seat Backrest Front Printable View (466 KB) Special
Chevrolet Camaro without Factory Air Control Panel Conversion Kit
 an ISO 900:205 Registered Company 967-68 Chevrolet Camaro without Factory Air Control Panel Conversion Kit 47568 8865 Goll St. San Antonio, TX 78266 Phone: 800-862-6658 Sales: sales@vintageair.com Tech
A CAB KIT (Shown with GLASS DOORS KIT A-11859)
") Cab Installation Instructions for John Deere One Series, 1023E, 1025R and 1026R Model Series A-11976 CAB KIT (Shown with GLASS DOORS KIT A-11859) FOR USE WITH OPTIONAL KITS; A-11859 GLASS DOORS WITH NON-OPENABLE
Cab Installation Instructions for John Deere One Series, 1023E, 1025R and 1026R Model Series A-11976 CAB KIT (Shown with GLASS DOORS KIT A-11859) FOR USE WITH OPTIONAL KITS; A-11859 GLASS DOORS WITH NON-OPENABLE
TOYOTA VENZA HANDS FREE BLU LOGIC Preparation
 TOYOTA VENZA 2009- HANDS FREE BLU LOGIC Preparation Part #: PT923-00111 Conflicts: JBL Audio NOTE: Part number of this accessory may not be the same as the part number shown. Kit Contents: For kits manufactured
Page 1. File: Motolight caliper one-piece Date: 8/14/2006
 Page 1 Caliper Mount Installation One-piece mounting brackets You should allow about two to three hours for installation. We suggest you use a well-lighted space for installation. PLEASE READ ALL THE INSTRUCTIONS.
TOYOTA TUNDRA TVIP V3 (RS3000) Section I - Installation Preparation
 Section I - Installation Preparation") Section I - Installation Preparation Part Number: 0886-34861 Section I - Installation Preparation Kit Contents Item # Quantity Reqd. Description 1 1 Wire Harness 2 1 Status Monitor 3 1 Piezo Buzzer 4 1
Section I - Installation Preparation Part Number: 0886-34861 Section I - Installation Preparation Kit Contents Item # Quantity Reqd. Description 1 1 Wire Harness 2 1 Status Monitor 3 1 Piezo Buzzer 4 1
General Applicability Note: Recommended Tools. Personal & Vehicle Protection Safety Goggles Seat Covers Floor Covers Special Tools. Installation Tools
 TOYOTA HIGHLANDER/HIGHLANDER HV 2008- Preparation Part #: PT923-00111 Conflicts: JBL Audio, Factory Navigation NOTE: Part number of this accessory may not be the same as the part number shown. Kit Contents:
WOC Mid Size Door Installation
 WOC-10112 Mid Size Door Installation NOTE: If the Mid Size Ranger that you are installing this door system on is a 2010 or newer you will need to remove the sill plates and side nets. If the doors are
Revised 10/22/2014 Page 2 of?
 1.Remove side panels, hood, seat, fuel tank, and 2.Remove stock air box, remove fuel line muffler. Save exhaust springs and rubber muffler mounts for turbo bracket. Sand back surface flat for mounting.
GENUINE PARTS INSTALLATION INSTRUCTIONS
 GENUINE PARTS INSTALLATION INSTRUCTIONS 1. 2. 3. DESCRIPTION: APPLICATION: PART NUMBER: Accent light Kit Cube (MY2013+) 999F3 AW000 - Universal Accent Lighting Kit. 4. KIT CONTENTS: Item QTY Description
GENUINE PARTS INSTALLATION INSTRUCTIONS
 GENUINE PARTS INSTALLATION INSTRUCTIONS 1. 2. 3. 4. DESCRIPTION: APPLICATION: PART NUMBER: KIT CONTENTS: Accent light Kit Versa Note 999F3 4Z000 - Accent Lighting Kit. 999Q9 AY000 - Accessory Service Connector
GENUINE PARTS INSTALLATION INSTRUCTIONS
 GENUINE PARTS DESCRIPTION: APPLICATION: PART NUMBER: REQUIRED FOR INSTALLATION: INSTALLATION INSTRUCTIONS Interior Accent Lighting Kit. Murano 999F3 C5000 999Q9 AY001 (Accessory Service Connector) -Not
2005+ Drag Race Roll Bar (Mm5RB-20)
") 3430 Sacramento Dr., Unit D San Luis Obispo, CA 93401 Telephone: 805/544-8748 Fax: 805/544-8645 www.maximummotorsports.com 2005+ Drag Race Roll Bar (Mm5RB-20) Note that the NHRA DOES allow the door bars
3430 Sacramento Dr., Unit D San Luis Obispo, CA 93401 Telephone: 805/544-8748 Fax: 805/544-8645 www.maximummotorsports.com 2005+ Drag Race Roll Bar (Mm5RB-20) Note that the NHRA DOES allow the door bars
TOYOTA HIGHLANDER TRAILER WIRE HARNESS Preparation
 Preparation Part Number: PT219-48111 Kit Contents Item # Quantity Reqd. Description 1 1 Converter 2 1 Flat 4-pin wire harness 3 5 Plastic tie 4 1 Special plastic tie for stud mount 5 1 Packing 6 2 Bolt
LED REVEALS - INSTALLATION INSTRUCTIONS
 SEPTEMBER 2017 PAGE 1 Fry Reglet s Reveals are designed to be installed in conventional drywall construction and will accommodate board thickness. Standard installation is quick and easy similar to the
Document: LIT-MAN-UNV-2 Rev A 10/21/15
 Document: LIT-MAN-UNV-2 Rev A 10/21/15 Limited Warranty This Product is warranted to be free from defects in manufacturing and workmanship and is guaranteed to work for three years or 36,000 miles, or
Part Number: TTA-2N1. Hardware Bag Contents. General Applicability SR5, TRD Sport, TRD Off-Road, Limited
 Date: 2.10.2016 TOYOTA TACOMA 2016-2 in 1 LED UPGRADE KIT Part Number: TTA-2N1 Kit Contents Item # Quantity Reqd. Description 1 2 DRL + Fog Light Housing 2 1 Driver Box 3 1 Harness bag 4 1 User s card
INSTALLATION INSTRUCTIONS FORD SUPER DUTY NOTE: (Vehicle Retains Tow Hook) PART # P3064
 PART # P3064") INSTALLATION INSTRUCTIONS 2011-14 FORD SUPER DUTY 250-550 NOTE: (Vehicle Retains Tow Hook) PART # P3064 PARTS LIST: Qty Description Qty Description 1 Grill Guard 2 10mm x mm Hex Bolts 1 Driver/Left Lower
INSTALLATION INSTRUCTIONS 2011-14 FORD SUPER DUTY 250-550 NOTE: (Vehicle Retains Tow Hook) PART # P3064 PARTS LIST: Qty Description Qty Description 1 Grill Guard 2 10mm x mm Hex Bolts 1 Driver/Left Lower
Blowfish Racing, LLC 200 Old Love Point Road Stevensville, MD
 Blowfish Racing, LLC 200 Old Love Point Road Stevensville, MD 21666 steve@blowfishracing.com 410-643-1127 Next Gen Front Tow Hook Kit, 2005-2014 Mustang - ALL Congratulations on the purchase of your Blowfish
1. Disconnect the battery. This is important! This will prevent air bag deployment.
 PARTS PACKING LIST Evaporator assembly Drain tube Plastic air plug Hardware package 11040 3601 W. Clarendon Phoenix, Arizona 85019 (602) 233-0090 800-648-4475 www.ackits.com 2003-4 Jeep Wrangler EVAPORATOR
TOYOTA RAV FOG LIGHT KIT Preparation
 Preparation Part Number: PT413-42163 Kit Contents Item # Quantity Reqd. Description 1 7 7 Wire Tie 2 4 #10-16 Cross Pan-Washer Head Screws 3 1 Switch 4 1 Relay 5 1 LH Fog Light Bezel 6 1 RH Fog Light Bezel
PRODUCT: Install Instructions, MV-1 C/O Std, With Aux Fan RELEASE DATE: 2/28/14 REVISION DATE: 9/30/2014 PART NUMBER: Rev C
 Parts List (1) 01 000 027 Switch, 4 Position Blower (1) 04 000 007 Hose, 1/2 ID Drain, 6 (1) 01 000 087 Harn, Resistor (1) 04 000 078 Tube, Convo 1/2 x 24 (2) 01 000 136 Relay, 40 Amp (1) 04 000 015 Hose,
Part Number: T4R-2N1. Hardware Bag Contents. General Applicability Models with factory fog light
 11/10/16 TOYOTA CAMRY 2012-2014 2 in 1 LED UPGRADE KIT Part Number: T4R-2N1 Kit Contents Item # Quantity Reqd. Description 1 2 DRL + Fog Light Housing 2 1 Driver Box 3 1 Harness bag 4 1 User s card 5 1
INTERCOOLER UPGRADE INSTALLATION INSTRUCTIONS PART NUMBER D
 INTERCOOLER UPGRADE INSTALLATION INSTRUCTIONS PART NUMBER D330-0021 APPLICATION: 2014-16 F22 228i & xdrive coupe (see restrictions below) 2015-16 F23 228i & xdrive convertible 2012-16 F30 328i & xdrive
M944T. Soundshield Assembly Instructions
 M944T Soundshield Assembly Instructions Corporate Headquarters 4420 14th Avenue N.W. Seattle, WA 98107 Tel: (206) 789-3880 Toll Free: (800) 762-0165 Fax: (206) 782-5455 Alaska Branch Offi ce 1200 West
SFSDC08. Designed for 2008-present Ford F250/F350 Super Crew vehicles. Adaptor Harness. Subwoofer Power Harness
 SFSDC08 Designed for 2008-present Ford F250/F350 Super Crew vehicles Subwoofer Enclosure Subwoofer Harness Adaptor Harness Wire Ties Wire Taps Fuse Factory Amplifier Relocation Bracket, Nut and Bolt Subwoofer
TOYOTA tc HANDS FREE BLU LOGIC Preparation
 TOYOTA tc 2011- HANDS FREE BLU LOGIC Preparation Part #: PT923-00111 Conflicts: JBL Audio, Factory Navigation NOTE: Part number of this accessory may not be the same as the part number shown. Kit Contents:
Part Number: T4R-2N1. Hardware Bag Contents. General Applicability XLE, Limited
 Date: 2.10.2016 TOYOTA RAV4 2016 2 in 1 LED UPGRADE KIT Part Number: T4R-2N1 Kit Contents Item # Quantity Reqd. Description 1 2 DRL + Fog Light Housing 2 1 Driver Box 3 1 Harness bag 4 1 User s card 5
Installation Instructions for John Deere cotton picker models: 9986 & 2-row and All-row systems included.
 Ag Leader Technology Cotton Picker Installation Installation Instructions for John Deere cotton picker models: 9986 & 9996 2-row and All-row systems included. IMPORTANT: Ensure the model numbers shown
1969 Firebird without A/C Control Panel Conversion Kit
 an ISO 900:2008 Registered Company 969 Firebird without A/C Control Panel Conversion Kit 47464 Firebird NORMAL WARM DE-ICE HI 8865 Goll St. San Antonio, TX 78266 ph: 20-654-77 fax: 20-654- 90407 REV C
Parts and Accessories Installation Instructions
 Parts and Accessories Installation Instructions Installation kit, sound module MINI (R5) Cooper S (R53) Left-hand drive (LHD) Not suitable for vehicles with option SA 69 (navigation system with on-board
TOYOTA YARIS KEYLESS ENTRY SYSTEM
 TOYOTA YARIS 2011 - KEYLESS ENTRY SYSTEM Part Number: 00016-32901 Accessory Code: KE1 Conflicts Not for installation in vehicles equipped with factory installed keyless entry. Kit Contents Item # Quantity
INTERCOOLER UPGRADE INSTALLATION INSTRUCTIONS PART NUMBER D
 INTERCOOLER UPGRADE INSTALLATION INSTRUCTIONS PART NUMBER D330-0021 APPLICATION: 2014-16 F22 228i & xdrive coupe (see restrictions below) 2012-16 F30 328i & xdrive sedan 2014-16 F31 328i xdrive wagon 2014-16
PROPER ELECTRICAL CONNECTIONS
 INSTALLATION 230 Volt 13 ampere 50 Hz The SUITMATE Swimsuit Water Extractor has been designed and manufactured with safety as our primary consideration. Therefore, it is important that the unit be installed
BD Transmission Cooler Dodge (68RFE, 518, 47RH, 47RE & 48RE) Ford (All) & Chevy (Allison) Transmissions
 Ford (All) & Chevy (Allison) Transmissions") 20 September 2012 1030606 Transmission Cooler Instruction Manual 1 BD Transmission Cooler Dodge (68RFE, 518, 47RH, 47RE & 48RE) Ford (All) & Chevy (Allison) Transmissions P/N# 1030606-5/16 P/N# 1030606-3/8
20 September 2012 1030606 Transmission Cooler Instruction Manual 1 BD Transmission Cooler Dodge (68RFE, 518, 47RH, 47RE & 48RE) Ford (All) & Chevy (Allison) Transmissions P/N# 1030606-5/16 P/N# 1030606-3/8
This harness kit includes: Installing the Hybrid ReVolt Universal grid charger in an Insight
 Installing the Hybrid ReVolt Universal grid charger in an Insight This harness kit includes: Insight harness (2000 to 2006) (a) 4 #6 mounting screws for bulkhead (c) 2 sheet metal screws for fan board
axcs Magellan CMU Installation, Operation and Care Manual
 axcs Magellan CMU 123456789012 123456789012 123456789012 123456789012 Installation, Operation and Care Manual Table of Contents Section I Introduction Introduction... 2 Specifications... 3 Basic Components...
1969 Firebird with A/C Control Panel Conversion Kit
 an ISO 900:008 Registered Company 969 Firebird with A/C Control Panel Conversion Kit 47465 NORM OFF VENT INSIDE A/C HEAT COOL WARM OFF DE-ICE HI 8865 Goll St. San Antonio, TX 7866 ph: 0-654-77 fax: 0-654-
SSICRE14. Subwoofer Assembly. Subwoofer Body Harness. Subwoofer Power Harness. Fuse Wire Ties x 6 Wire Taps x 2 Adaptor Harness
 SSICRE14 Designed for: 2014 and newer Chevrolet Silverado & GMC Sierra Crew-Cab 1500 series with base or premium radio 2015 and newer Chevrolet Silverado & GMC Sierra Crew-Cab 2500/3500 with base or premium
TOYOTA im INTERIOR LIGHT KIT Preparation
 Preparation Part Number: PT922-12170 Kit Contents Item # Quantity Reqd. Description 1 1 Main Wire Harness 2 1 Switch 3 1 Switch Header 4 1 ECU 5 1 ECU Bracket 6 1 Hardware Kit 7 1 Instruction Card 8 1
TOYOTA AVALON EC REARVIEW MIRROR
 Section I - Installation Preparation Part Number: PT732-07000 Section I - Installation Preparation Kit Contents Item # Quantity Reqd. Description 1 1 Full Mirror Assembly, Compass 2 1 Hardware Bag 3 1
TOOLS REQUIRED: Panel Removal Tool Phillips Screwdriver 10mm Nut Driver Ratchet 10mm Socket 7mm Wrench 7mm Nut Driver Straight Screwdriver
 CONTENTS: 1EA. FIVE CHANNEL AMPLIFIER/BRACKET ASSEMBLY P/N MPDSP039AA 1EA. OVERLAY HARNESS P/N RH41LX10 3EA. 7MM SCREWS P/N RF7MM 6EA. WIRE TIE P/N RFZIP6 1EA. 30 AMP FUSE P/N RFUSE30 1EA. INSTRUCTIONS
INTERIOR > CONSOLE, FLOOR > REMOVAL > REMOVAL > BASE FLOOR CONSOLE
 Page 1 of 18 2016 Dodge Grand Caravan 3.6L Eng VIN G SE Service Manual: BODY - INTERIOR & EXTERIOR Print Date: INTERIOR > CONSOLE, FLOOR > REMOVAL > REMOVAL > BASE FLOOR CONSOLE Fig 1: Base Floor Console
D5W Z Auxiliary Heater Upgrade D5W Z Auxiliary Heater to Auxiliary Preheating System C
 Water Heater DW Z Auxiliary Heater Upgrade DW Z Auxiliary Heater to Auxiliary Preheating System C 6 FORD Mondeo.0 l TDCI Diesel. l TDCI Diesel Legend for Figure Blade-type fuse holder and blower relay
INSTALLATION INSTRUCTIONS
 INSTALLATION INSTRUCTIONS Honda Dealer: Please give a copy of these instructions to your customer. PARTS LIST (15) (8) (12) (14) (13) (10) (11) (18) (17) (1) Accessory Application Publications No. TRX500FA/FGA
INSTALLATION INSTRUCTIONS Mitsubishi Lancer Evolution VIII / IX Fuel Surge Tank Kit Document#
 d INSTALLATION INSTRUCTIONS Mitsubishi Lancer Evolution VIII / IX Fuel Surge Tank Kit Document# 19-0077 Brie Tech Support: info@radiumauto.com CAUTION: Exercise extreme caution when working with the fuel
BD Dual Transmission Cooler Dodge (68RFE, 518, 47RH, 47RE & 48RE) Ford (5R110) & Chevy (Allison 1000) Transmissions
 Ford (5R110) & Chevy (Allison 1000) Transmissions") 8 January 2013 1030606-DS Dual Transmission Cooler Instruction Manual 1 BD Dual Transmission Cooler Dodge (68RFE, 518, 47RH, 47RE & 48RE) Ford (5R110) & Chevy (Allison 1000) Transmissions P/N# P/N# 1030606-DS-1/2
8 January 2013 1030606-DS Dual Transmission Cooler Instruction Manual 1 BD Dual Transmission Cooler Dodge (68RFE, 518, 47RH, 47RE & 48RE) Ford (5R110) & Chevy (Allison 1000) Transmissions P/N# P/N# 1030606-DS-1/2
5. Refer to GTR Workshop Manual, section: and disconnect battery ground cable.
 HYDRAULIC HOSE REPAIR REMOVAL PROCEDURE 1. Open door. 2. Turn ignition 'ON'. 3. Power the convertible top to the fully lowered position. 4. Turn ignition 'OFF'. 5. Refer to GTR Workshop Manual, section:
TOYOTA TUNDRA TVIP V4 Preparation
 Preparation Part Number: PT398-00100 PT398-00100-AA Conflicts Do not install into vehicles without RKE system. Recommended Sequence of Application Item # Accessory 1 TVIP/RES Any TVIP or RES system 2 XM
SHELBY GT500
 2007-2009 SHELBY GT500 Removal of Factory Unit WARNING: 1. Radiator fluid must be handled properly. Please observe local ordinances with regards to handling and disposal. 2. Allow vehicle and components
TOYOTA CAMRY TVIP V2 (GBS WITH ADD ON)
") Preparation Part Number: 08586-3T930 Kit Contents Item # Quantity Reqd. Description 1 2 Wire Harness (One wire harness is only for RS3200+) 2 1 GBS ECU 3 1 GBS Mounting Bracket 4 1 Microphone Hardware
Preparation Part Number: 08586-3T930 Kit Contents Item # Quantity Reqd. Description 1 2 Wire Harness (One wire harness is only for RS3200+) 2 1 GBS ECU 3 1 GBS Mounting Bracket 4 1 Microphone Hardware
P3066 INSTALLATION MANUAL
 P3066 INSTALLATION MANUAL Parts List 1 Grille guard 1 Driver / left frame bracket Level of Difficulty Moderate Scan for helpful install tips 1 Passenger / right frame bracket 1 Driver / left top bracket
Part Number: T4R-2N1. Hardware Bag Contents. General Applicability Models with factory fog light. Conflicts -
 Date: 07.30.2015 TOYOTA TUNDRA 2014-2016 LED Fog Light & DRL 2 in 1 Part Number: T4R-2N1 Kit Contents Item # Quantity Reqd. Description 1 2 DRL + Fog Light Housing 2 1 Driver Box 3 1 Harness bag 4 1 User
FACTORY AIR CONVERSION HEAT/ COOL/ DEFROST CHEVROLET CHEVELLE
 specializing in AIR CONDITIONING, PARTS AND SYSTEMS for your classic vehicle FACTORY AIR CONVERSION HEAT/ COOL/ DEFROST 1970-72 CHEVROLET CHEVELLE CONTROL & OPERATING INSTRUCTIONS The controls on your