2005 Mercury Mountaineer
|
|
|
- Rosamond Thornton
- 5 years ago
- Views:
Transcription
 (TDD for the hearing impaired: 1-800-232-5952) This Quick Reference Guide is not intended to replace your Owner s Guide which contains more detailed")

1 2005 Mercury Mountaineer QUICK REFERENCE GUIDE Ford Motor Company Customer Relationship Center P.O. Box 6248 Dearborn, MI (FORD) (TDD for the hearing impaired: ) This Quick Reference Guide is not intended to replace your Owner s Guide which contains more detailed information concerning the features of your vehicle, as well as important safety warnings designed to help reduce the risk of injury to you and your occupants. Please read your entire Owner s Guide carefully as you begin learning about your new vehicle and refer to the appropriate sections when questions arise. All information contained in this Quick Reference Guide was accurate at the time of duplication. We reserve the right to change features, operation and/or functionality of any vehicle specification at any time. Your Mercury dealer is the best source for the most current information. For detailed operating and safety information, please see your Owner s Guide. *F5L9J19G217AA* 5L9J-19G217-AA May 2004 First Printing Quick Reference Guide Mercury Mountaineer Litho in U.S.A.
2 Specifications LOCATION OF THE SPARE TIRE AND TOOLS The spare tire is located under the vehicle, just forward of the rear bumper. The spare tire winch drive nut is located at the rear center of the cargo area, under a lid. The jack, lug nut wrench and jack handle are located behind the rear seat under the carpeted floor lid in the cargo floor. FUSES If electrical components in your vehicle are not working, a fuse may have blown. The fuse panel is below the instrument panel on the driver s side; remove the cover to view the fuses. To learn about changing fuses, please see your Owner s Guide. UNLEADED FUEL RECOMMENDATIONS Use Regular unleaded gasoline with an (R+M)/2 octane rating of 87. Mercury does not recommend using Regular gasoline with an octane rating of 86 or lower in high altitude areas. TIRE PRESSURE Your tire pressure is properly set at the dealership according to the recommended specifications found on the Tire Pressure Label on the driver s door jamb. Please check your tire pressure during routine maintenance and seasonal changes. If the Tire Pressure Monitoring System light (if equipped) stays illuminated after starting, immediately check your tire pressure. CHANGING THE TIRES Your spare tire is not equipped with a Tire Pressure Monitoring System (TPMS) sensor. The TPMS warning light (if equipped) will illuminate when the spare is in use. Replace the spare with the road tire as soon as possible. If your vehicle is equipped with AWD, remember that a spare tire of a different size should not be used. It can make your vehicle difficult to control and can result in damage to driveline components. If you get a flat tire while driving, do not apply the brake heavily. Instead, gradually decrease your speed. Hold the steering wheel firmly and slowly move to a safe place on the side of the road. ROADSIDE ASSISTANCE During your vehicle s 3-year/36,000-mile limited warranty period, every new Mercury vehicle includes the assurance and support of a 24-hour emergency Roadside Assistance program. Roadside Assistance includes such services as fuel delivery, tire changes, jump starts, and help when you are locked out of your vehicle. Please complete your Roadside Assistance identification card and keep it in your wallet for quick reference. This card can be found in your glove compartment, in your Mercury Owner s Guide portfolio. To receive roadside assistance in the United States for Ford or Mercury vehicles, call Warning: Improperly inflated tires can affect vehicle handling and can fail suddenly, possibly resulting in loss of vehicle control.

3 Additional Features REMOTE ENTRY SYSTEM The remote entry system allows you to lock or unlock all vehicle doors and liftgate, and open the liftgate window without a key. UNLOCKING THE DOORS/LIFTGATE Press this control to unlock the driver s door. The interior lamps will illuminate with the ignition in OFF. Press the control a second time within three seconds to unlock all doors and the liftgate. LOCKING THE DOORS/LIFTGATE Press this control once to lock all doors and liftgate. The doors and liftgate will lock and the parking lamps will flash once as long as all doors, liftgate, and the liftgate glass are closed. To confirm that all doors are closed and locked, press the control a second time within three seconds. The doors will lock again, the horn will chirp, and the lamps will flash. If any door, the liftgate or the liftgate glass are not closed properly, the lamps will not flash, and the horn will chirp twice if the control is pressed a second time within three seconds. OPENING THE LIFTGATE WINDOW Press the control to open the liftgate window. SOUNDING A PANIC ALARM The Panic feature will only operate when the ignition is in the OFF or ACCESSORY position. Press this control to activate the alarm. The personal panic alarm will cycle the horn and the parklamps will flash for a maximum of 3 minutes. MEMORY SEAT FEATURE (IF EQUIPPED) The remote entry system can also control the memory seat and pedal features. Press the control once to unlock the driver s door and move the memory seat and power adjustable pedal to the corresponding memory position (just as if you had pressed the memory control in the vehicle). Please consult your Owner s Guide for complete details on this feature. TIRE PRESSURE MONITORING SYSTEM (IF EQUIPPED) Using radio-frequency pressure sensors, this system monitors tire pressure on all road tires and provides the driver with a yellow warning light when air needs to be added. (Message Center equipped vehicles provide additional warning messages.) The TPMS warning light will reset itself (turn off) after the tires are set to specification and the vehicle is either parked up to 1 hour or the vehicle is driven above 20 mph for 10 seconds. Please note: Outside temperature affects tire pressure. Please see your Owner s Guide for additional information.

4 HEATED SEATS (IF EQUIPPED) Mountaineer is so accommodating that its available heated seats allow both driver and front passenger to add warmth to their travels. To operate the heated seats: Activate by pushing the control on the side of the seat, on the outboard portion of the plastic side shield. The heated seat icon in the Dual Automatic Temperature Control (DATC) (if equipped) will illuminate when activated. To deactivate, push the control again. DUAL AUTOMATIC TEMPERATURE CONTROL (DATC) (IF EQUIPPED) If your Mountaineer came equipped with another climate control system, please see your Owner s Guide ON/OFF With the ignition in the ON position, press AUTO, any of the override controls, the fan speed control, or either of the temperature selection controls to turn the system on. Press OFF to turn the system off. If the outside temperature function has been selected, it will continue to operate until the ignition is turned off. 2. AUTO To initiate automatic operation, press AUTO and select the desired temperature. When AUTO is selected, the air conditioning system automatically makes climate control adjustments based on existing conditions. 3. DUAL As the driver, you can press DUAL to enable or disable the dual zone temperature feature. Your passenger may also initiate the dual temperature zone feature by pressing the passenger side temperature control. When DUAL is selected, the indicator will illuminate. The display window will indicate the current driver-selected temperature setting and the last passenger-selected temperature setting. 4. TEMPERATURE CONTROL To control the temperature on the driver s side, select any temperature between 60 F and 90 F by pressing the temperature control. The display window indicates the selected temperature and allows for manual control of fan speed if automatic fan speed is not desired. Have your passenger press the passenger side temperature control to select any temperature between 60 F and 90 F.
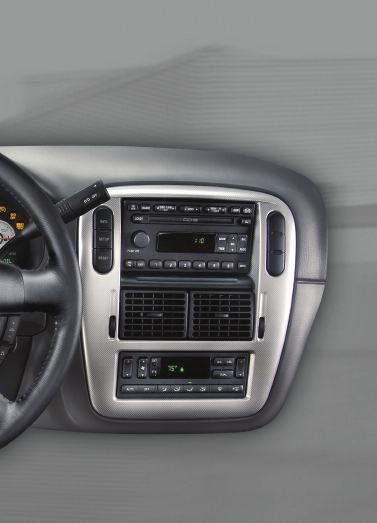
5 Audio Features AUDIOPHILE SATELLITE-READY IN-DASH SIX-CD RADIO (IF EQUIPPED) If your Mountaineer came equipped with another audio system, please see your Owner s Guide. CAUTION: DO NOT USE CDs WITH ADHESIVE LABEL* 1. SCAN FUNCTION In radio mode, press to hear a sampling of all listenable stations. In CD mode, press to hear a brief sampling of all selections on the current CD. 2. CD/AUX Press to select CD/AUX modes. No CD will display if there is not a CD in the audio system. If a disc is loaded, there will be a number (1-6) inside the circle on the display. When in radio mode, press CD/AUX to play a loaded CD. 3. LOADING CD Press LOAD and then a preset number to select a slot. Press and hold LOAD to activate autoload. 4. VOLUME/POWER CONTROL Press the control to turn the audio system on or off. Turn the control to raise or lower volume. The speed sensitive volume feature automatically adjusts radio volume in accordance with vehicle speed to compensate for road and wind noise. To engage, press and hold the volume control for five seconds (with the radio on), then simultaneously press SEL to choose the compensation level. 5. AM/FM SELECT In radio mode, press AM/FM to select AM, FM1, or FM2 frequency bands. In CD mode, press AM/FM to stop play and begin radio play. Press and hold AM/FM to activate autoset. 6. SATELLITE Your Audiophile radio comes equipped with satellite-ready capability. The kit to enable satellite reception is available through your Mercury dealer. Detailed satellite instructions are included with the dealer-installed kit. 7. DISC/TUNE CAT In radio mode, press to move to the next frequency up or down the band. In CD mode, press to select a disc in the CD player. CAT is only available when equipped with satellite radio. 8. DIGITAL SIGNAL PROCESSING Press DSP to access the ambiance menu. Ambiance gives the feeling of being there to your music. Press SEL to engage/disengage. 9. SEEK FUNCTION In radio mode, press to move to the next listenable station up or down the band. In CD mode, press to select the next/previous track on the current disc. 10.SETTING THE CLOCK Press MENU until SELECT HOUR or SELECT MINS is displayed. Press SEL to set the time. Press MENU again to disengage the clock mode. 11. SETTING MEMORY PRESET STATIONS Select AM, FM1, or FM2 band, then select a station. Next, press and hold a numbered control until the sound returns. * CDs with adhesive labels and irregularly shaped CDs may get stuck in the CD player. Homemade CDs should be identified with permanent felt tip marker rather than adhesive labels.

6 2005 Mercury Mountaineer QUICK REFERENCE GUIDE

7 1 The luxurious Mountaineer was designed to enhance the way you live and help you handle your driving environment. It comes with many sophisticated features you ll find some are intuitive, others may be new to you. Take a few minutes to use this Quick Reference Guide with the accompanying CD-ROM. Insert the CD into any audio CD player; find the numbered callouts on the instrument panel portion of this guide, then select the corresponding number on the CD audio track for a fast, convenient introduction to Mountaineer. For details, place the CD into your computer (the CD jacket will tell you if your computer meets the minimum configuration requirements) or consult your Owner s Guide. This vehicle handles differently from an ordinary passenger car in driving conditions which may occur on streets and highways and off-road. DRIVE WITH CARE AND WEAR A SAFETY BELT AT ALL TIMES. Ford urges you to read the Owner s Guide and Driving Your SUV or Truck Supplement for further information on safe driving precautions and instructions.

8
9

10 Interior Features 2 HEADLAMP CONTROLS This control is on the lower left of your instrument panel. The first position to your right controls your parking lamps and the second position controls your headlamps. If your vehicle is equipped with fog lights, pull the control switch out one position to aid your visibility in fog, snow, or rain. Autolamp (if equipped) automatically activates/deactivates your headlamps as necessary. To use autolamp, rotate the control counterclockwise;to deactivate, rotate the control clockwise to the OFF position. 3 PARKING BRAKE RELEASE Pull the release lever to release the parking brake. Driving with the parking brake engaged will cause the brakes to wear out quickly and reduce fuel economy. The parking brake is not recommended to stop a moving vehicle. However, if the normal brakes fail, the parking brake can be used to stop your vehicle in an emergency. Because the parking brake applies only the rear brakes, the vehicle s stopping distance will increase greatly and the handling of your vehicle will be adversely affected. 4 ANTI-LOCK BRAKES Your anti-lock braking system (ABS) detects the onset of wheel lockup during brake applications and helps prevent wheels from locking during extreme braking situations. The ABS warning light will illuminate when you start your engine; however, if it stays on, continues to flash, or fails to illuminate, see your dealership's service department immediately. 5 TURN SIGNALS AND WINDSHIELD WIPER WASHERS Push the lever down to activate your left turn signal; up to activate the right turn signal. To use your windshield wiper washers: For a single swipe, push the end of the stalk briefly. Push and hold for three swipes with wash. Push and hold for a longer wash (up to ten seconds). The bars of varying length are for intermittent wipers. Rotate the windshield wiper control upward for fast intervals and downward for slow intervals. The control ring on the right side of the stalk operates the rear window wiper. Rotate the control to the normal speed (INT-2) or intermittent (INT-1).

11 6 AUDIO SYSTEM (Please see reverse side for more details.) 7 SPEED CONTROL To engage speed controls, make sure you re traveling at or above 30 mph and press ON. To set a higher speed, press and hold SET + ; release when you ve reached the desired speed. To set a lower speed, press and hold COAST or CST ; release when you ve slowed to the desired speed. To return to a previously set speed, press RES (you must be traveling above 30 mph). To disengage, press the brake pedal or press the OFF button. 8 SERVICE ENGINE SOON WARNING LIGHT This light is located on the upper right of your instrument cluster. It illuminates when you start your engine. However if it stays on, it may indicate your fuel cap isn t securely tightened, your vehicle is out of fuel or fuel quality is poor, or another condition requiring attention exists DUAL AUTOMATIC TEMPERATURE CONTROL (DATC) (IF EQUIPPED) (Please see reverse side for more details.) CLOCK (6-CD RADIO ONLY) SETTING THE CLOCK: Press MENU until SELECT HOUR or SELECT MINS is displayed. Use the SEL control to manually increase or decrease the hours or minutes. Press MENU again to disengage the clock mode. 11 WINDSHIELD DEFROSTING/DEFOGGING To defrost/defog your windshield, select defrost. To defrost your rear window, press the rear defroster control on your instrument panel; press again to turn it off. (Defrost turns off automatically after 10 minutes; if you need more defrost time, press again.) If the outside temperature is about 43 F or higher, the air conditioner will dehumidify your interior automatically.

12 Message Center Features MESSAGE CENTER With the ignition in the ON position, the message center on your instrument cluster displays important vehicle information by constantly monitoring of vehicle systems. TRIP ODOMETER This system registers the miles of individual journeys. On the standard instrument cluster, press and release the SELECT/RESET button to toggle between the odometer and trip odometer display. Press and hold the button to reset. On the optional instrument cluster, press and release the TRIP/RESET button to toggle between the odometer and trip odometer display. Press and hold the button to reset. COMPASS Driving past broadcast antennas, large buildings, bridges, power lines, and the like can throw off compass readings. In most cases, the compass will automatically return to normal function within a few days. If it doesn t, see your Owner s Guide for instructions on adjusting the system manually. DISTANCE TO EMPTY This feature gives you an estimate of how far you can drive with your remaining fuel, under normal driving conditions. AVERAGE FUEL ECONOMY Keep track of your fuel economy. Remember to press the RESET control after setting the speed control for accurate highway fuel economy readings. LANGUAGE This can be changed by pressing and holding the RESET control to cycle through the choices. Press the RESET control again to set your language choice. SYSTEMS CHECK This will review the condition of fuel level, washer fluid level, oil life, engine temperature, oil pressure, tire pressure (if equipped), AdvanceTrac (if equipped), brake fluid levels, and your charging system. For each of the monitored systems, the message center will indicate either an OK message or a warning message for three seconds. System warnings alert you to possible problems or malfunctions.
2005 Mercury Montego
 2005 Mercury Montego Get ready to redefine your driving expectations. Your new Mercury Montego is going to take your automotive experience to a whole new level. And, you get to go along for the ride in
2007 VERSA QUICK REFERENCE GUIDE. Shift_space
 2007 VERSA QUICK REFERENCE GUIDE Shift_space 04 05 06 12 13 14 11 07 08 15 09 10 HEADLIGHT AND TURN SIGNAL CONTROL 04 TWIN TRIP ODOMETER 07 INSTRUMENT BRIGHTNESS CONTROL* 10 HOOD RELEASE* 13 AUDIO SYSTEM
2007 ARMADA QUICK REFERENCE GUIDE. Shift_scale
 2007 ARMADA QUICK REFERENCE GUIDE Shift_scale 07 HOOD RELEASE* 09 08 STEERING WHEEL TILT ADJUSTMENT* 10 09 CONTROL PANEL DISPLAY 05 06 11 12 10 AUDIO SYSTEM 13 07 08 11 FRONT-PASSENGER AIR BAG STATUS LIGHT
FORD MONDEO Quick Reference Guide
 FORD MONDEO Quick Reference Guide About This Quick Reference Guide We have created this guide to help you get to know certain features of your vehicle. It only contains basic instructions to get you started
2007 XTERRA QUICK REFERENCE GUIDE. Shift_your limits
 2007 XTERRA QUICK REFERENCE GUIDE Shift_your limits 08 09 10 04 11 12 13 09 CLIMATE CONTROLS 06 14 10 FRONT-PASSENGER AIRBAG STATUS LIGHT 11 E-LOCK SWITCH 07 12 HILL DESCENT CONTROL SWITCH HEADLIGHT AND
Quick GUIDE Web Edition
 XC90 Quick GUIDE Web Edition WELCOME TO THE GLOBAL FAMILY OF VOLVO OWNERS! Getting to know your new vehicle is an exciting experience. This Quick Guide provides a brief overview of the most common features
Getting to Know Your 2004 Century
 Congratulations on your purchase of a Buick Century. Please read this information and your Owner Manual to ensure an outstanding ownership experience. Note that your vehicle may not include all the features
2006 QUEST QUICK REFERENCE GUIDE. Shift_convention
 20 QUEST QUICK REFERENCE GUIDE Shift_convention STEERING WHEEL TILT ADJUSTMENT (BEHIND STEERING WHEEL) AUDIO SYSTEM REAR SONAR SWITCH TRIP BUTTON STEERING WHEEL SWITCHES FOR AUDIO CONTROL LIGHTS ON DEMAND
PATRIOT 2009 QUICK REFERENCE GUIDE
 PATRIOT 2009 QUICK REFERENCE GUIDE vehicle feature Fuel Cap: Loose Gas Cap Message If a gas cap message (shown as gascap) appears, tighten the gas cap until a clicking sound is heard. Press the odometer
2007 MAXIMA QUICK REFERENCE GUIDE. Shift_exhilaration
 2007 MAXIMA QUICK REFERENCE GUIDE Shift_exhilaration 12 05 13 06 07 08 09 10 14 11 15 HEADLIGHT AND TURN SIGNAL CONTROL STEERING WHEEL SWITCHES FOR AUDIO CONTROL 07 OUTSIDE MIRROR CONTROL SWITCH 10 STEERING
Before driving Introduction 2 Instrumentation 6 Controls and features 24 Seating and safety restraints 98
 Contents Before driving Introduction 2 Instrumentation 6 Controls and features 24 Seating and safety restraints 98 Starting and driving Starting 138 Driving 145 Roadside emergencies 169 Servicing Maintenance
volvo s40 Quick Guide
 volvo s40 Quick Guide WELCOME TO THE GLOBAL FAMILY OF VOLVO OWNERS! Getting to know your new vehicle is an exciting experience. Please browse through this Quick Guide to get the full benefits from your
Customer Experience Center Pocket Reference Guide
 Customer Experience Center 1-800-331-4331 2007 Pocket Reference Guide MN 00452-PRG07-COR Printed in USA 6/06 17 2007 Corolla This Pocket Reference Guide is a summary of basic vehicle operations. It contains
volvo C70 quick guide
 volvo C70 quick guide WELCOME TO THE GLOBAL FAMILY OF VOLVO OWNERS! Getting to know your new vehicle is an exciting experience. Please browse through this Quick Guide to get the full benefits from your
note remote key & key blade
 remote key & key blade Locks the doors and tailgate, and arms the alarm. Unlocks the doors and tailgate A and disarms the alarm. Unlocks (but does not open) the tailgate. key blade Used to lock/unlock
2013 Scion xd Quick Reference Guide
 2013 Scion xd Quick Reference Guide 2013 INDEX Scion xd OVERVIEW Engine maintenance 7 This Quick Reference Guide is a summary of basic vehicle operations. It contains brief descriptions of fundamental
Before driving Introduction 2 Instrumentation 4 Controls and features 20 Seating and safety restraints 89
 Contents Before driving Introduction 2 Instrumentation 4 Controls and features 20 Seating and safety restraints 89 Starting and driving Starting 120 Driving 127 Roadside emergencies 150 Servicing Maintenance
Quick Guide WEB EDITION WELCOME TO YOUR NEW VOLVO! VOLVO S80
 VOLVO S80 Quick Guide WEB EDITION WELCOME TO YOUR NEW VOLVO! Getting to know your new car is an exciting experience. Take a look at this Quick Guide to learn some of the most common functions quickly and
note remote key & key blade
 remote key & key blade Locks the doors and trunk and arms the alarm. If the car is locked with the remote key while the power retractable hard top is down, the double locking feature activates after approximately
Getting to Know Your Bonneville
 Congratulations on your purchase of a Pontiac Bonneville. Please read this information and your Owner Manual to ensure an outstanding ownership experience. Note that your vehicle may not include all the
Introduction 4. Instrument Cluster 8. Warning and control lights 8 Gauges 14. Entertainment Systems 16. AM/FM stereo with CD 16. Climate Controls 30
 Table of Contents Introduction 4 Instrument Cluster 8 Warning and control lights 8 Gauges 14 Entertainment Systems 16 AM/FM stereo with CD 16 Climate Controls 30 Electronic automatic temperature control
Getting to Know Your ION
 Instrument Panel.........................2 Instrument Panel Cluster..................3 Audio Systems...........................4 Driver s Seat Adjustments..................8 Remote Trunk Opening....................8
Quick Guide. volvo C30
 volvo C30 Quick Guide WELCOME TO THE GLOBAL FAMILY OF VOLVO OWNERS! Getting to know your new vehicle is an exciting experience. This Quick Guide provides a brief overview of the most common features and
Getting to Know Your Sunfire
 Instrument Panel..........................2 Instrument Panel Cluster...................3 Audio Systems...........................4 Antilock Brake System (ABS)...............6 Accessory Power Outlet....................6
FORD ECOSPORT Quick Reference Guide
 FORD ECOSPORT Quick Reference Guide About This Quick Reference Guide We have created this guide to help you get to know certain features of your vehicle quickly. It only contains basic instructions to
note remote key & key blade
 remote key & key blade Locks the doors and trunk and arms the alarm. If the car is locked with the remote key while the power retractable hard top is down, the double locking feature activates after approximately
Getting to Know Your Sunfire
 Congratulations on your purchase of a Pontiac Sunfire. Please read this information and your Owner Manual to ensure an outstanding ownership experience. Note that your vehicle may not include all the features
FORD ECOSPORT Quick Reference Guide
 FORD ECOSPORT Quick Reference Guide About This Quick Reference Guide We have created this guide to help you get to know certain features of your vehicle quickly. It only contains basic instructions to
2015 Scion iq Quick Reference Guide
 2015 Scion iq Quick Reference Guide 2015 Scion iq This Quick Reference Guide is a summary of basic vehicle operations. It contains brief descriptions of fundamental operations so you can locate and use
Introduction 2. Instrumentation 4. Controls and features 25. Seating and safety restraints 105. Starting 147. Driving 151. Roadside emergencies 167
 Contents Before driving Introduction 2 Instrumentation 4 Controls and features 25 Seating and safety restraints 105 Starting and driving Starting 147 Driving 151 Roadside emergencies 167 Servicing Maintenance
2007 FRONTIER QUICK REFERENCE GUIDE Shift_capability
 2007 FRONTIER QUICK REFERENCE GUIDE Shift_capability 10 03 04 05 06 11 08 07 15 09 12 13 14 headlight and turn 04 signal control WINDSHIELD WIPER/ WASHER SWITCH steering wheel TILT 07 10 AUDIO SYSTEM 13
Getting to Know Your ION
 Instrument Panel.........................2 Instrument Panel Cluster..................3 Radio and CD Operation...................4 XM Satellite Radio........................6 Multiple-Disc CD Player....................7
Table of Contents. Introduction 4. Instrument Cluster 10. Warning and control lights 10 Gauges 15. Entertainment Systems 18
 Table of Contents Introduction 4 Instrument Cluster 10 Warning and control lights 10 Gauges 15 Entertainment Systems 18 AM/FM stereo cassette with CD 18 AM/FM stereo with in-dash six CD 33 Rear seat controls
Steering Wheel and Nearby Controls
 VISUAL INDEX Quickly locate items in the vehicle s interior. Visual Index Steering Wheel and Nearby Controls 13 7 1 8 9 2 3 4 14 11 10 6 5 12 1 Lights/turn signals/lanewatch button* 2 SEL/RESET knob* Brightness
Introduction 2. Instrumentation 6. Controls and features 27. Seating and safety restraints 112. Starting 144. Driving 149. Roadside emergencies 173
 Contents Before driving Introduction 2 Instrumentation 6 Controls and features 27 Seating and safety restraints 112 Starting and driving Starting 144 Driving 149 Roadside emergencies 173 Servicing Maintenance
COMMANDER 2009 QUICK REFERENCE GUIDE
 COMMANDER 2009 QUICK REFERENCE GUIDE vehicle feature fuel cap: Loose Gas Cap Message If a CHECK GASCAP message appears in the Electronic Vehicle Information Center (EVIC), tighten the gas cap until a clicking
2013 Scion tc Quick Reference Guide
 2013 Scion tc Quick Reference Guide 2013 Scion tc This Quick Reference Guide is a summary of basic vehicle operations. It contains brief descriptions of fundamental operations so you can locate and use
Quick Reference Guide
 21 XTERRA Quick Reference Guide 04 03 12 05 06 07 10 13 14 08 09 15 19 11 16 17 18 03 04 05 LOW TIRE PRESSURE WARNING LIGHT TRIP COMPUTER* INSTRUMENT BRIGHTNESS CONTROL / TRIP CHANGE BUTTON* HEADLIGHT
2009 m{zd{ 3 SMART START GUIDE. Optional equipment shown.
 2009 m{zd{ 3 SMART START GUIDE Optional equipment shown. 162132_09a_Mazda3_SSG_072908.indd 1 7/29/08 11:13:03 AM Key Seats KEYLESS ENTRY This system remotely locks and unlocks the doors and the liftgate
Volkswagen Information System. Introduction
 Volkswagen Information System Introduction In this section you ll find information about: Using the instrument cluster menus: Basic version Using the instrument cluster menus: Premium version with multi-function
Instrument Panel 2. E. Driver Information Center (DIC) buttons F. Audio Steering Wheel Controls G. Storage Tray H. Audio System
 buttons F. Audio Steering Wheel Controls G. Storage Tray H. Audio System") Instrument Panel..........................2 Instrument Panel Cluster...................3 Important Information about Car Washes.....4 SSR Keys................................4 Fuel Recommendation.....................4
Instrument Panel..........................2 Instrument Panel Cluster...................3 Important Information about Car Washes.....4 SSR Keys................................4 Fuel Recommendation.....................4
1 Green light: Vehicle is locked. 2 Yellow light: Vehicle is unlocked. 3 Flashing red light: Someone may be in the
 REMOTE KEY WITH PCC* personal car communicator Locks the doors and trunk and arms the alarm. Unlocks the doors and trunk, and disarms the alarm A. Trunk (press once to unlock, press twice to open trunk
2015 LANCER EVOLUTION. Owner s Handbook
 2015 LANCER EVOLUTION Owner s Handbook Please place copies of the following items in the pocket below: 1. Pre-Delivery Inspection Form (Customer Copy) 2. Triple Diamond Delivery Checklist (Customer Copy)
Fit. Technology Reference Guide
 Fit 2 0 1 0 Technology Reference Guide Indicators/Info Display/TPMS Instrument Panel Indicators Indicators briefly appear with each engine start. Red and amber indicators are most critical. Blue and green
Getting to Know Your. J. Transmission Shift Lever. I. Climate Control System. K. Cupholder. L. Glove Box. E. Driver Information Center.
 Congratulations on your purchase of a Chevrolet SSR (Super Sport Roadster). Please read this information and your Owner Manual to ensure an outstanding ownership experience. Note that your vehicle may
2016 LANCER. Owner s Handbook
 2016 LANCER Owner s Handbook PLEASE PLACE COPIES OF THE FOLLOWING ITEMS IN THE POCKET BELOW: 1. Pre-Delivery Inspection Form (Customer Copy) 2. Triple Diamond Delivery Checklist (Customer Copy) 3. Salesperson
2015 LANCER SERIES. Owner s Handbook
 2015 LANCER SERIES Owner s Handbook PLEASE PLACE COPIES OF THE FOLLOWING ITEMS IN THE POCKET BELOW: 1. Pre-Delivery Inspection Form (Customer Copy) 2. Triple Diamond Delivery Checklist (Customer Copy)
Quick Guide. volvo XC90
 volvo XC90 Quick Guide WELCOME TO THE GLOBAL FAMILY OF VOLVO OWNERS! Getting to know your new vehicle is an exciting experience. This Quick Guide provides a brief overview of the most common features and
Quick Guide VOLVO S80
 VOLVO S80 Quick Guide WELCOME TO THE GLOBAL FAMILY OF VOLVO OWNERS! Getting to know your new vehicle is an exciting experience. This Quick Guide provides a brief overview of the most common features and
(LATCH)...16 ENTERTAINMENT
...16 ENTERTAINMENT") DRIVER INFORMATION Instrument Panel.........................2 Instrument Panel Cluster...................3 Driver Information Center (DIC)..............4 REMOTE KEYLESS ENTRY Remote Keyless Entry (RKE)................6
DRIVER INFORMATION Instrument Panel.........................2 Instrument Panel Cluster...................3 Driver Information Center (DIC)..............4 REMOTE KEYLESS ENTRY Remote Keyless Entry (RKE)................6
Table of Contents. Introduction 2. Instrument Cluster 10. Entertainment Systems 22. Climate Controls 62. Lights 74. Driver Controls 91
 Table of Contents Introduction 2 Instrument Cluster 10 Entertainment Systems 22 Climate Controls 62 Lights 74 Driver Controls 91 Table of Contents Locks and Security 111 Seating and Safety Restraints 129
Quick Guide WELCOME TO YOUR NEW VOLVO! VOLVO S80 WEB EDITION
 VOLVO S80 Quick Guide WEB EDITION WELCOME TO YOUR NEW VOLVO! Getting to know your car is an exciting experience. After looking through this Quick Guide you'll like your new Volvo even more. You can find
Contents. Entering and Exiting
 Contents The Quick Guide is not intended as a substitute for your Owner s Manual. We strongly encourage you to review the Owner s Manual and supplementary manuals so you will have a better understanding
2014 MIRAGE. Owner s Handbook
 2014 MIRAGE Owner s Handbook Please place copies of the following items in the pocket below: 1. Pre-Delivery Inspection Form (Customer Copy) 2. Triple Diamond Delivery Checklist (Customer Copy) 3. Salesperson
tc 2011 QUICK REFERENCE GUIDE GET INFORMED. ROLL.
 tc 2011 QUICK REFERENCE GUIDE GET INFORMED. ROLL. 2011 Scion tc This Quick Reference Guide is a summary of basic vehicle operations. It contains brief descriptions of fundamental operations so you can
& MAINTENANCE REMOTE KEYLESS ENTRY
 DRIVER INFORMATION Instrument Panel.............2 Instrument Panel Cluster.......3 Driver Information Center.......4 REMOTE KEYLESS ENTRY Remote Keyless Entry.........6 Remote Start.................6 ENTERTAINMENT
Z QUICK REFERENCE GUIDE. Shift_obsession
 2006 350Z QUICK REFERENCE GUIDE Shift_obsession SOFT TOP OPERATING SWITCH (ROADSTER MODELS) 03 STEERING WHEEL SWITCHES FOR AUDIO CONTROL 09 CLIMATE CONTROLS 02 FUEL-FILLER DOOR OPENER SWITCH TRACTION CONTROL
WelCOMe TO YOUR new VOlVO! VOLVO V50 QUICK GUIDE
 VOLVO V50 QUICK GUIDE WelCOMe TO YOUR new VOlVO! Getting to know your car is an exciting experience. After looking through this Quick Guide you'll like your new Volvo even more. You can find detailed information
Side view. Fig. 1 Vehicle side overview.
 Side view Fig. 1 Vehicle side overview. Key to fig. 1: (1) Fuel filler flap (2) Roof antenna (3) Outside door handles (4) Outside mirror Additional turn signal light (5) Lift points for the jack Front
Air Recirc. Button. Defrost Button. Mode Buttons
 2009 QUICK REFERENCE GUIDE GRAND CARAVAN Driver Temp. A/C Button Defrost Button Mode Buttons Blower Air Recirc. Button Rear Window Defroster Button Passenger Temp. Rear ContRol Rear Blower Rear Temp. Manual
2015 Yaris Liftback Quick Reference Guide
 2015 Yaris Liftback Quick Reference Guide 2015 INDEX Yaris Liftback OVERVIEW Engine maintenance 7 This Quick Reference Guide is a summary of basic vehicle operations. It contains brief descriptions of
Table of Contents. Introduction 3. Instrument Cluster 10. Warning and control lights 10 Gauges 15. Entertainment Systems 19
 Table of Contents Introduction 3 Instrument Cluster 10 Warning and control lights 10 Gauges 15 Entertainment Systems 19 AM/FM stereo cassette with CD 19 AM/FM stereo with CD 28 AM/FM stereo cassette (CD
(DIC)...4 REMOTE KEYLESS ENTRY FEATURES
...4 REMOTE KEYLESS ENTRY FEATURES") DRIVER INFORMATION Instrument Panel.........................2 Instrument Panel Cluster...................3 Driver Information Center (DIC)..............4 REMOTE KEYLESS ENTRY FEATURES Remote Keyless Entry
DRIVER INFORMATION Instrument Panel.........................2 Instrument Panel Cluster...................3 Driver Information Center (DIC)..............4 REMOTE KEYLESS ENTRY FEATURES Remote Keyless Entry
2013 Scion FR-S Quick Reference Guide
 2013 Scion FR-S Quick Reference Guide 2013 Scion FR-S This Quick Reference Guide is a summary of basic vehicle operations. It contains brief descriptions of fundamental operations so you can locate and
Introduction 2. Instrumentation 4. Controls and features 15. Seating and safety restraints 79. Maintenance and care 165
 Contents Before driving Introduction 2 Instrumentation 4 Controls and features 15 Seating and safety restraints 79 Starting and driving Starting 106 Driving 111 Roadside emergencies 145 Servicing Maintenance
DRIVER INFORMATION CONVENIENCE
 DRIVER INFORMATION Instrument Panel.......................2 Instrument Panel Cluster.................3 Driver Information Center................4 SAFETY & SECURITY Lockout Protection......................5
Quick GUIDE Web edition
 s60 Quick GUIDE Web edition WELCOME TO YOUR NEW VOLVO! Getting to know your new car is an exciting experience. Take a look at this Quick Guide to learn some of the most common functions quickly and easily.
2016 Scion tc Quick Reference Guide
 2016 Scion tc Quick Reference Guide 2016 Scion tc This Quick Reference Guide is a summary of basic vehicle operations. It contains brief descriptions of fundamental operations so you can locate and use
QUICK REFERENCE GUIDE
 QUICK REFERENCE GUIDE 2005 350Z SHIFT_obsession NISSAN 350Z INSTRUMENT PANEL FEATURES STEERING WHEEL TILT ADJUSTMENT 05 AUDIO SYSTEM SOFT TOP OPERATING SWITCH (ROADSTER MODELS) 04 STORAGE POCKET OR NAVIGATION
*See your Owner s Manual for information.
 24 cube Quick Reference Guide 13 03 04 05 14 06 07 15 16 08 09 17 10 11 12 03 04 05 LOW TIRE PRESSURE WARNING LIGHT HEADLIGHT AND TURN SIGNAL CONTROL INSTRUMENT BRIGHTNESS CONTROL* TWIN TRIP ODOMETER /
Table of Contents. Introduction 4. Instrument Cluster 10. Warning and control lights 10 Gauges 15. Entertainment Systems 17
 Table of Contents Table of Contents Introduction 4 Instrument Cluster 10 Warning and control lights 10 Gauges 15 Entertainment Systems 17 AM/FM stereo with CD 17 AM/FM stereo cassette with CD 20 Climate
FORD TOURNEO CUSTOM / TRANSIT CUSTOM Quick Reference Guide
 FORD TOURNEO CUSTOM / TRANSIT CUSTOM Quick Reference Guide About This Quick Reference Guide We have created this guide to help you get to know certain features of your vehicle. It only contains basic instructions
2009 QuiCK reference guide ramtruck2500/3500 gas _09_RAM2500_3500_QRG.indd 6 11/5/08 4:40:38 PM
 2009 QUICK REFERENCE GUIDE ram2500/3500 TRUCK GAS Rotate Blower Control Rotate Temperature Control Single Zone Climate Control Air Recirculation Rotate Air Recirc. Use recirculation for maximum A/C operation.
Table of Contents. Introduction 4. Instrument Cluster 10. Entertainment Systems 19. Climate Controls 58. Lights 67. Driver Controls 78
 Table of Contents Introduction 4 Congratulations 4 Safety and environment protection 5 Symbol glossary 8 Instrument Cluster 10 Warning and control lights 10 Gauges 16 Entertainment Systems 19 AM/FM stereo
Message Centre ! WARNING: MESSAGE CENTRE LOCATION. Messages
 Message Centre MESSAGE CENTRE LOCATION Messages Driver information, messages and data are displayed on the message centre display panel situated within the instrument cluster. For the message centre to
Adaptive cruise control (ACC)
") Adaptive cruise control (ACC) PRINCIPLE OF OPERATION The Adaptive Cruise Control (ACC) system is designed to aid the driver to maintain a gap from the vehicle ahead or a set road speed if there is no slower
Adaptive cruise control (ACC) PRINCIPLE OF OPERATION The Adaptive Cruise Control (ACC) system is designed to aid the driver to maintain a gap from the vehicle ahead or a set road speed if there is no slower
Table of Contents. Introduction 4. Instrument Cluster 10. Warning and control lights 10 Gauges 13. Entertainment Systems 16
 Table of Contents Introduction 4 Instrument Cluster 10 Warning and control lights 10 Gauges 13 Entertainment Systems 16 AM/FM stereo with CD 16 AM/FM stereo cassette with CD 19 AM/FM stereo with in-dash
Quick Overview WARNING LIGHTS
 Quick Overview WARNING LIGHTS 1. Left-hand direction indicator. 2. Low outside temperature. 3. Glow plug (diesel only). 4. Engine malfunction. 5. Low oil pressure. 6. Battery charge indicator. 7. Front
SECTION 2 5 OPERATION OF INSTRUMENTS AND CONTROLS. Gauges, Meters and Service reminder indicators
 SECTION 2 5 OPERATION OF INSTRUMENTS AND CONTROLS Gauges, Meters and Service reminder indicators Fuel gauge................................................ 122 Odometer and two trip meters................................
PERFORMANCE & MAINTENANCE
 DRIVER INFORMATION Instrument Panel.............................2 Instrument Panel Cluster......................3 Driver Information Center.....................4 SAFETY & SECURITY Programmable Automatic
(1,1) Index 14 北米Model "A1330BE-B" EDITED: 2017/ 11/ 30
 Index 14 北米Model A1330BE-B EDITED: 2017/ 11/ 30") Index 14 14-2 Index A Abbreviation... 3 ABS (Anti-lock Brake System)... 7-33 Warning light... 3-20 Access key fob... 2-3 Warning light... 3-25 Accessories... 11-37 Accessory power outlet... 6-7 Air cleaner
Index 14 14-2 Index A Abbreviation... 3 ABS (Anti-lock Brake System)... 7-33 Warning light... 3-20 Access key fob... 2-3 Warning light... 3-25 Accessories... 11-37 Accessory power outlet... 6-7 Air cleaner
If your vehicle is not equipped with the DIC steering wheel buttons not all of the features listed will be available on your vehicle.
 2003 Yukon 4WD The DIC comes on when the ignition is on. After a short delay the DIC will display the current driver and the information that was last displayed before the engine was turned off. Report
Introduction 4. Instrument Cluster 12. Warning lights and chimes 12 Gauges 16. Entertainment Systems 18
 Table of Contents Introduction 4 Instrument Cluster 12 Warning lights and chimes 12 Gauges 16 Entertainment Systems 18 How to get going 18 AM/FM stereo with CD 22 AM/FM stereo with in-dash six CD 29 Auxiliary
Remote Keyless Entry (RKE)
") Getting to Know Your 2005 G6 REMOTE KEYLESS ENTRY SYSTEM Remote Keyless Entry (RKE)........2 Remote Vehicle Start System.......3 RKE Transmitter Battery Replacement.....................4 COMFORT FEATURES
Getting to Know Your 2005 G6 REMOTE KEYLESS ENTRY SYSTEM Remote Keyless Entry (RKE)........2 Remote Vehicle Start System.......3 RKE Transmitter Battery Replacement.....................4 COMFORT FEATURES
Table of Contents Ranger (ran) Owners Guide (post-2002-fmt) USA (fus) Introduction 4. Instrument Cluster 12. Entertainment Systems 19
 Owners Guide (post-2002-fmt) USA (fus) Introduction 4. Instrument Cluster 12. Entertainment Systems 19") Table of Contents Introduction 4 Instrument Cluster 12 Warning lights and chimes 12 Gauges 16 Entertainment Systems 19 AM/FM stereo 19 AM/FM Stereo single CD system 21 Premium and Audiophile CD6/MP3 Pioneer
Table of Contents Introduction 4 Instrument Cluster 12 Warning lights and chimes 12 Gauges 16 Entertainment Systems 19 AM/FM stereo 19 AM/FM Stereo single CD system 21 Premium and Audiophile CD6/MP3 Pioneer
Table of contents. Introduction 4. Congratulations 4 Safety and environment protection 5 Symbol glossary 8. Instrument cluster 10
 Table of contents Introduction 4 Congratulations 4 Safety and environment protection 5 Symbol glossary 8 Instrument cluster 10 Warning and control lights 10 Gauges 15 Entertainment systems 21 AM/FM stereo
Black plate (27,1) Index 14 北米Model "A3180BE-B" EDITED: 2014/ 2/ 7
 Index 14 北米Model A3180BE-B EDITED: 2014/ 2/ 7") Index 14 14-2 Index A Abbreviation... 3 ABS (Anti-lock Brake System)... 7-20 Warning light... 3-15, 7-21 Accessories... 5-2, 11-36 Accessory power outlet... 6-10 Active head restraint... 1-6 Air cleaner
Index 14 14-2 Index A Abbreviation... 3 ABS (Anti-lock Brake System)... 7-20 Warning light... 3-15, 7-21 Accessories... 5-2, 11-36 Accessory power outlet... 6-10 Active head restraint... 1-6 Air cleaner
Contents. Before driving. Introduction 2. Instrumentation 4. Controls and features 19. Seating and safety restraints 113. Starting and driving
 Contents Before driving Introduction 2 Instrumentation 4 Controls and features 19 Seating and safety restraints 113 Starting and driving Starting 139 Driving 144 Roadside emergencies 175 Servicing Maintenance
SECTION 1-6 OPERATION OF INSTRUMENTS AND CONTROLS 05 HIGHLANDER_U (L/O 0409) Gauges, Meters and Service reminder indicators
 Gauges, Meters and Service reminder indicators") SECTION 1-6 OPERATION OF INSTRUMENTS AND CONTROLS Gauges, Meters and Service reminder indicators Fuel gauge................................................ 132 Engine coolant temperature gauge...........................
SECTION 1-6 OPERATION OF INSTRUMENTS AND CONTROLS Gauges, Meters and Service reminder indicators Fuel gauge................................................ 132 Engine coolant temperature gauge...........................
2001 Chevrolet Corvette ACCESSORIES & EQUIPMENT Remote Keyless Entry Systems - Corvette
 DESCRIPTION 2001 ACCESSORIES & EQUIPMENT Remote Keyless Entry Systems - Corvette Remote Keyless Entry (RKE) system is controlled by Remote Function Actuation (RFA) system. Transmitter allows remote control
2010 Flex Workshop Manual. REMOVAL AND INSTALLATION Procedure revision date: 12/10/2010
 SECTION 501-12: Instrument Panel and Console REMOVAL AND INSTALLATION Procedure revision date: 12/10/2010 Refrigerator Rear console Item Part Number Description 1 04567 Front finish panel 2 045A90B Bottom
2012 juke. Quick Reference Guide
 22 juke Quick Reference Guide 15 04 05 06 16 07 08 09 17 10 11 12 18 19 20 13 14 04 05 VEHICLE INFORMATION DISPLAY* HEADLIGHT AND TURN SIGNAL CONTROL LOW TIRE PRESSURE WARNING LIGHT INSTRUMENT BRIGHTNESS
Adaptive cruise control (ACC)
") Adaptive cruise control (ACC) PRINCIPLE OF OPERATION E94163 It is the drivers responsibility to stay alert, drive safely and be in control of the vehicle at all times. Keep the front of the vehicle free
Adaptive cruise control (ACC) PRINCIPLE OF OPERATION E94163 It is the drivers responsibility to stay alert, drive safely and be in control of the vehicle at all times. Keep the front of the vehicle free
Table of Contents. Introduction 4. Instrument Cluster 10. Warning and control lights 10 Gauges 15. Entertainment Systems 18
 Table of Contents Table of Contents Introduction 4 Instrument Cluster 10 Warning and control lights 10 Gauges 15 Entertainment Systems 18 AM/FM stereo 18 AM/FM stereo with CD 20 AM/FM stereo cassette with
Table of Contents Fusion (fsn) Owners Guide (post-2002-fmt) USA (fus) Introduction 4. Instrument Cluster 10. Entertainment Systems 17
 Owners Guide (post-2002-fmt) USA (fus) Introduction 4. Instrument Cluster 10. Entertainment Systems 17") Table of Contents Introduction 4 Instrument Cluster 10 Warning lights and chimes 10 Gauges 14 Entertainment Systems 17 How to get going 17 AM/FM stereo with CD 21 AM/FM stereo with in-dash six CD 29 Auxiliary
Table of Contents Introduction 4 Instrument Cluster 10 Warning lights and chimes 10 Gauges 14 Entertainment Systems 17 How to get going 17 AM/FM stereo with CD 21 AM/FM stereo with in-dash six CD 29 Auxiliary
VISUAL INDEX. Steering Wheel and Nearby Controls. Quickly locate items in the vehicle s interior. button*
 VISUAL INDEX VISUAL INDEX Quickly locate items in the vehicle s interior. Steering Wheel and Nearby Controls 10 7 1 8 2 3 4 6 11 5 9 1 Lights/turn signals/lanewatch button* 2 TRIP knob Brightness control
Contents. Before driving. Introduction 2. Instrumentation 3. Controls and features 14. Seating and safety restraints 61. Starting and driving
 Contents Before driving Introduction 2 Instrumentation 3 Controls and features 14 Seating and safety restraints 61 Starting and driving Starting 83 Driving 89 Roadside emergencies 105 Servicing Maintenance
Would you like some Free Manuals?
 www.carburetor-manual.com Would you like some Free Manuals? http://carburetor-manual.com/free-shop-manual-club-t-13.html Also visit http://freeshopmanual.com for more Free Manuals Also Visit my website
Contents. Entering and Exiting Keys P.7 Wireless Remote Control P.8 Theft Deterrent System P.9. Before Driving
 Contents The Quick Guide is not intended as a substitute for your Owner s Manual. We strongly encourage you to review the Owner s Manual and supplementary manuals so you will have a better understanding
Getting to Know Your Envoy
 Instrument Panel..........................2 Instrument Panel Cluster...................3 Malfunction Indicator Lamp.................4 Heated Front Seats........................4 Interior Lamps............................4