Electronic Refrigerator Diagnostics
|
|
|
- Abigayle Rice
- 5 years ago
- Views:
Transcription
1 Electronic Refrigerator Diagnostics
2 IMPORTANT SAFETY NOTICE The information in this presentation is intended for use by individuals possessing adequate backgrounds of electrical, electronic, & mechanical experience. Any attempt to repair a major appliance may result in personal injury & property damage. The manufacturer or seller cannot be responsible for the interpretation of this information, nor can it assume any liability in connection with its use. WARNING To avoid personal injury, disconnect power before servicing this product. If electrical power is required for diagnosis or test purposes, disconnect the power immediately after performing the necessary checks. RECONNECT ALL GROUNDING DEVICES If grounding wires, screws, straps, clips, nuts, or washers used to complete a path to ground are removed for service, they must be returned to their original position & properly fastened.

3 Main Electronic Board Caution: When servicing or testing in the main board area, many components and connections are electrically hot to ground. Be sure to use proper service procedures and protective devices.

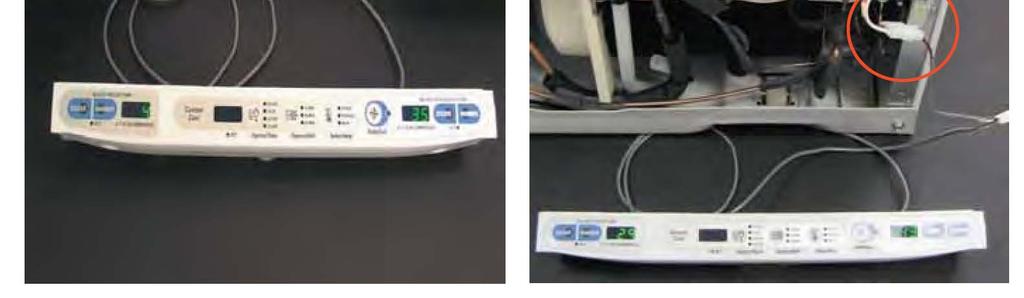
4 Electronic Diagnostic Test Mode All the GE electronic refrigerators have a Diagnostic Mode that is incorporated in the software in each main electronic board. This Diagnostic Mode will test certain components and operate others. To activate this diagnostic test feature on an electronic refrigerator, you will need a touch pad control with at least 5 key pads; otherwise you will have to install the additional diagnostic tool.

5
6 Electronic Diagnostic Test Mode Enter the appropriate display numbers as shown on the chart in the next slide by pressing the freezer Colder or Warmer pad and the fresh food Colder or Warmer pad. Then press any pad to activate that specific test. Not all tests are available on all models. If no pads are pressed for 30 minutes, the diagnostic mode will time out.

7 Electronic Diagnostic Test Mode This test will not indicate failure for thermistors out of spec This test will also cycle the FF damper on single evap models This test will attempt to turn ON the compressor if it is OFF

8 Main Electronic Board AC DC The main board outputs both AC and DC voltages to the refrigerator components. The one half of the board is AC inputs and outputs; while the other half of the board is DC inputs and outputs. Note: Wiring connectors are not shown for a better view of the board.

9 Main Electronic Board J4 J8 J9 J11 J15 J3 J2 J7 J1 J5 All J connectors are labeled on the main board, check the schematic for each model; since there may be some differences depending on the model.
10 Main Electronic Board AC J11 J7-9 The main board is supplied with 120vac power between the J11 (L1) and J7 pin 9 (N) circuit. All the other 120vac components can be measured from the J7 connector.


11 Main Electronic Board Testing Line Voltage Input J11 Brown Wire AC Meter Lead Meter Lead J7-9 Orange Wire For a dead refrigerator with interior light operation only, check the input voltage to the main board. To test for 120vac for line voltage to the main board, place your meter leads as shown in the above example.
12 Main Electronic Board Testing DC Output J4-3 (Common) J2-3 (Common) DC For DC voltage measurement, you will need to read between a DC common connection and the connection for the specific DC component you are checking. DC commons can be found at either J2 pin 3 or J4 pin 3. Checking J4-2 to J4-3 verifies the main board 12-13vdc output voltage.

13 Main Electronic Board J 15 - Inverter J3 3-Way Valve J2 - Fans DC J 1 - Thermistors Each DC component is connected at various plugs on the DC side of the board and operate on different DC voltages. J1 for Thermistors, J2 for fans, J3 for the 3-Way Valve, and J15 for the inverter models. Remember to measure a DC voltage, you must measure from one of the DC common points: J2 pin 3 or J4 pin 3.
14 Component problems? The main board provides power to the components. If the component is not running, it could be: The main board is not supplying power. To verify this, measure the output voltage with your volt meter. If there s no individual output voltage, the problem is at the board. But if you have voltage, verify the connections. A bad connection will prevent the component from receiving power. Verify the component itself. If it s receiving power and doesn t run, the component is the problem. When using the Diagnostics Mode to verify the component s operation: Measure output voltage. This is the ultimate confirmation to locate the problem. Unless otherwise stated; voltage tests should be done with the load connected. The diagnostics in this module cover individual AC components and their testing. If none of the components are operating check the AC input to the board and the DC outputs. A shorted DC component can take down the main board.
 by opening or closing relays on the board. The main board does NOT receive AC feedback to determine whether the commands were followed.")
15 Main Electronic Board The main board receives Inputs from various operations and makes decisions based on those inputs. The main board initiates Outputs (commands) by opening or closing relays on the board. The main board does NOT receive AC feedback to determine whether the commands were followed. As an example, the board will close the compressor relay for cooling, but the board does not know whether the compressor started running. The main board will retain the input data if there is a power failure.

16 Main Electronic Board AC AC Relays DC The main board outputs both AC and DC voltages to the refrigerator components. One half of the board is for DC inputs and outputs; while the other half of the board is for AC inputs and outputs. The black boxes in the above picture are relays that the board uses to control the AC components (compressor, defrost heater, dispenser, water valve, etc.)
17 Main Electronic Board J8 AC Compressor J9 Defrost Heater J11 Line Power J7 AC Inputs and Outputs J12 Used for various heater outputs All J connectors are labeled on the main board, check the schematic for each model; since there may be some differences depending on the model. Note: J8 is not used for inverter model compressors.
18 Main Electronic Board Fuse The main board is supplied with 120vac in order for the main board to function. If the unit is dead you can measure the incoming AC power between the J11 brown (L1) and J7 pin 9 orange (N) circuit. If the fuse on the main board is open; it most likely failed from a utility power surge or power supply short circuit on the main board; replace the main board. Wire colors can vary, check the schematic with the unit.
19 Testing the AC Compressor Circuit Main Board
20 Testing the AC Compressor Circuit If the compressor does not run (condenser fan on) - check for 120vac measured between J8 black (Comp) and J7 pin 9 orange (N). Diagnostic mode code 1-2. If the voltage checks ok at this point the main board is not the fault; check the compressor and the cabinet wiring. If you hear the relay click and the run voltage is not present replace the main board. Wire colors can vary, check the schematic with the unit.

21 Testing the AC Compressor Circuit If the compressor does not run, unplug the refrigerator and check for resistance between J8 black and J7 pin 9 orange (N). Refer to the specific diagram for resistance value. If the circuit reads open at this point; check the compressor and the cabinet wiring. Check the J8 black wire to cabinet ground to check for a grounded compressor; which may have damaged the compressor relay on the main board.

22 Testing the AC Compressor Circuit If the compressor resistance between J8 black and J7 pin 9 orange (N) checks good and is not shorted to ground attempt to direct test the compressor. If your volt/ohm meter has an Ammeter function, set the meter for amps and check across the J8 black to the J11 brown to attempt to start the compressor by bypassing the main board. If the compressor runs, replace the main board. Note: Be sure to set your meter back to AC volts if your going to perform further voltage tests. Test not valid for Inverter compressor models.
23 Testing the AC Defrost Circuit Main Board
24 Testing the AC Defrost Heater Circuit The defrost heater receives 120vac measured between J9 blue and J7 orange pin 9 (N). If you read 120vac in this test, check the defrost heater and safety thermostat circuit. Diagnostic mode 1-4. You can also clamp an amp probe around the J9 blue wire to verify the heater is on and holding current.

25 Testing the AC Defrost Heater Circuit J11 An alternate test without diagnostic mode would be to set your meter for amperage and test from J9 blue to the J11 brown line in. If the defrost heater comes on and holds current, replace the main board. Note: Be sure to set your meter back to AC volts if your going to perform further voltage tests. Another test would be to check resistance of the defrost circuit across J9 blue to the J7 pin 9 orange with the refrigerator disconnected from power. Refer to specific diagram for resistance value.


26 Testing the AC Dispenser Functions The J7 connector on the main board uses inputs and outputs for the dispenser operation. Door switch inputs to the main board are essential for correct dispenser operation. There are two inputs for dispenser operation, J7-4 is for auger operation and J7-7 is used for water dispensing. J7-1,2,3 are outputs to the individual components. Inputs Outputs
27 Testing the AC Ice Dispenser In order for the auger motor and cube solenoid to operate; we have to have 120vac (input) coming back from the freezer door switch. J7-4 receives power from the door switch when the door is closed and supplies that power to the auger and cube relays, auger interlock. If both the auger and cube solenoid fail to operate, check for 120vac from J7-4 to J7-9 to verify that the door switch has not failed or has a poor wiring connection. 120vac Auger Interlock The water dispenser will still operate since the water relay does not use this interlock input. Wire colors can vary, check the schematic with the unit.
28 Testing the AC Auger Relay Operate the ice dispenser and check for 120vac on the J7-1 to the J7-9 terminals. As with other AC components you can use your meter ammeter function and check from J11 line to the J7-1 to check the auger motor operation. If you have output voltage from the board check the auger motor and associated wiring. If you don t hear the relay click or have the output voltage replace the main board. 120vac Wire colors can vary, check the schematic with the unit.
29 Testing the AC Cube Relay Select Cubed Ice to activate the Cubed Ice Relay. Check for 120vac on the J7-2 to the J7-9 terminals. As with other AC components you can use your meter ammeter function and check from J11 line to the J7-2 to check the solenoid operation. If you have output voltage from the board check the solenoid and associated wiring. If you don t hear the relay click or have the output voltage replace the main board 120vac Wire colors can vary, check the schematic with the unit.
30 Testing the AC Water Dispenser The dispenser water valve does not rely on the auger interlock to operate. The lack of voltage input to the J7-7 lets the board know that the door is closed. This is why the water dispenser can operate when the auger motor and cube solenoid do not. When the door is open 120vac is sent to J7-7 disabling the water feature. 0vac Water dispenser active with 0vac at pin 7 Wire colors can vary, check the schematic with the unit.
31 Testing the AC Water Dispenser Select Water to activate the Water Relay. Check for 120vac on the J7-3 to the J7-9 terminals. As with other AC components you can use your meter ammeter function and check from J11 line to the J7-3 to check the valve operation. If you have output voltage from the board check the valve and associated wiring. If you don t hear the relay click or have the output voltage replace the main board. 120vac Wire colors can vary, check the schematic with the unit.

32 Testing the AC Custom Cool Drawer Heater Some models have a climate controlled drawer in the bottom of the fresh food section. In order for this drawer to operate at higher temperatures than the fresh food temperature; a foil heater in the drawer is activated. You can turn this heater on by selecting Quick Thaw on the customer controls. You should hear the drawer fan turn on and the heater should be active. When the heater is activated you should read 120vac from the J7-5 to J7-9. You can also read the resistance of the heater on these same terminals with power disconnected and the connector off the board. 120vac Wire colors can vary, check the schematic with the unit.
33 Testing the AC Heaters - K7 Relay J12 Terminal Some main boards have an additional relay K7 which can be programmed depending on model to operate various heaters. Refer to the specific model schematic diagram for its use. The K7 relay outputs AC voltage to the J12 terminal. The J12 terminal is located in different locations depending on the main board. It can be a Tab terminal next to the AC connector or an individual Tab on the main board.
34 Testing the AC Heaters Monogram Drain Pan Heater For Monogram defrost drain pan testing, use the diagnostic function to enter Defrost. Diagnostic code 1-4. You should read 120vac from the J12 terminal to J7-9 orange neutral. 120vac


35 Testing the AC Heaters SxS Beverage Center Duct Some side by side models have a Beverage Center feature, this is a cooled compartment on the fresh food door. The air duct that cools this compartment is located in the center mullion wall. There is a heater located in this duct to clear any frost build up in the air channel during freezer defrost. Diagnostic code vac
36 Testing the AC Heaters French Door Mullion Sweat Heater Many French door bottom freezer models use a 120vac mullion heater between the freezer and fresh food section. If the mullion is sweating first check the energy save feature to make sure the consumer has not turned the heater off by activating energy save. To test the mullion heater, check resistance or use your meter on the ammeter function. 120vac
SECOND GENERATION Use this guide with unit serial number prefix beginning with BWF using Terra Power separator.
 Technical Information and Diagnostic Guide for SECOND GENERATION Use this guide with unit serial number prefix beginning with BWF using Terra Power separator. This guide will assist you in becoming more
Third Generation NITE Phoenix
 Technical Information and Diagnostic Guide for Third Generation NITE Phoenix Use this guide with unit serial number prefix beginning with BYC, CAI built after 2-10-2012 and CCA, CDJ, CIA units after 6/25/2012
Wiring diagrams on page 29 are for reference only. For detailed vehicle wiring refer to Navistar documents.
 1 10/2014 REV 7 !!Attention!! Before performing diagnostics: Wiring diagrams on page 29 are for reference only. For detailed vehicle wiring refer to Navistar documents. Check for Fault Codes using the
A/C-HEATER SYSTEM - AUTOMATIC
 A/C-HEATER SYSTEM - AUTOMATIC 1988 Toyota Celica 1988 Automatic A/C-Heater Systems Celica * PLEASE READ THIS FIRST * CAUTION: When discharging air conditioning system, use only approved refrigerant recovery/recycling
Technical Information and Diagnostic Guide RestStar Use this guide with 5700XE RestStar Unit. Western Star 5700XE.
 Western Star 5700XE RestStar 4 10-2017 1 Technical Information and Diagnostic Guide RestStar Use this guide with 5700XE RestStar Unit 2390 Blackhawk Road P.O. Box 6007 Rockford, IL 61125 nitesystem.com
THE ALT AL ERNA RN T A OR
 THE ALTERNATOR Initial Voltage of the Battery (Engine Not Running) Charging Voltage for the Battery (Engine Running) Testing for Maximum Output of the Alternator Inspecting the Regulator Positive Side
Technical Information and Diagnostic Guide
 Technical Information and Diagnostic Guide This guide will assist you in becoming more familiar with the working components of the NITE System and the proper steps and procedures to completely diagnose
eapu Reference Guide System Component Information (For serial numbers starting with 37)
") eapu Reference Guide System Component Information (For serial numbers starting with 37) #68004 REV B December 2018 Table of Contents Topic Battery Separator 3 DC Voltage 6 Thermostat 7 Power Converter
eapu Reference Guide System Component Information (For serial numbers starting with 37) #68004 REV B December 2018 Table of Contents Topic Battery Separator 3 DC Voltage 6 Thermostat 7 Power Converter
Fan Coil Unit (FCU) Fan Motor Control
 Fan Motor Control") Fan Coil Unit (FCU) Fan Motor Control Fan Relay Board 2 (FRBii) Installation, Operation, and Maintenance The Fan Relay Board assembly (FRBii) provides electronic control for the fan motor and various connections
Fan Coil Unit (FCU) Fan Motor Control Fan Relay Board 2 (FRBii) Installation, Operation, and Maintenance The Fan Relay Board assembly (FRBii) provides electronic control for the fan motor and various connections
PSS25NGNABB FREEZER DOOR
 PSS25NGNABB FREEZER DOOR PSS25NGNABB FREEZER DOOR 7 WR12X10406 HANDLE SXS ASM WH (S/P) 7 WR12X10430 HANDLE SXS ASM BK (S/P) 7 WR12X10432 HANDLE SXS ASM BQ (S/P) 11 WR38X10219 RECESS TRIM BOWED BK (S/P)
Idle Free Systems, Inc. Reference Guide System Component Information
 Idle Free Systems, Inc. Reference Guide System Component Information #68004 REV 3 #68004 REV 3 Idle Free Reference Sheets System Components & Trouble shooting Table of Contents RF # 101.0 102.0 103.0 104.0
PSS26PSTASS FREEZER DOOR
 PSS26PSTASS FREEZER DOOR PSS26PSTASS FREEZER DOOR 6 WR1X10450 SET SCREW (S/P) 7 WR12X10698 HANDLE ASM HYDROFORM (S/P) 9 WR2X12028 FASTENER HANDLE SS (S/P) 12 WR2X10782 STOP DOOR BK (S/P) 14 WR24X10158
Prodigy Eclipse ECC, EH330 and EH430 C or D Service Parts
 This part list contains the service parts for the Eclipse 00, 00, and 800 systems. D series models began early 0 The models that are covered include: EH0 C & D EH0 C & D ECC00 ECC00 ECC800 Contents Head
CHARGING SYSTEM 8C - 1 CHARGING SYSTEM CONTENTS
 ZG CHARGING SYSTEM 8C - 1 CHARGING SYSTEM CONTENTS page GENERAL INFORMATION OVERVIEW... 1 DESCRIPTION AND OPERATION BATTERY TEMPERATURE SENSOR... 2 CHARGING SYSTEM OPERATION... 1 ELECTRONIC VOLTAGE REGULATOR...
VCFF136DSS7 : CABINET [1/10]
![VCFF136DSS7 : CABINET [1/10]](/thumbs/92/110582149.jpg "VCFF136DSS7 : CABINET [1/10]") VCFF136DSS7 : 001 - CABINET [1/10] Page 1 of 20 VCFF136DSS7 : 001 - CABINET [1/10] Ref # Part Number Qty. Description 1 N/P 1 CABINET 2 021734-000 1 SCREW 3 021936-000 1 COVER, RIGHT HINGE, APOLLO GREY
VCFF136DSS7 : 001 - CABINET [1/10] Page 1 of 20 VCFF136DSS7 : 001 - CABINET [1/10] Ref # Part Number Qty. Description 1 N/P 1 CABINET 2 021734-000 1 SCREW 3 021936-000 1 COVER, RIGHT HINGE, APOLLO GREY
EI28BS56IB0 EI28BS56IS0 EI28BS56IW0
 Product No. B0 S0 W0 Series Mainline Mainline Mainline Color black stainless white Volts 1 1 1 Wiring Diagram 241955901 241955901 241955901 Market North America North America North America Energy Guide
BRIVIS DUCTED INVERTER SERVICE MANUAL DRCi
 BRIVIS DUCTED INVERTER SERVICE MANUAL DRCi 1 TABLE OF CONTENTS TABLE OF CONTENTS... 2 IMPORTANT NOTE... 3 FAULT FINDING AND DIAGNOSTICS... 3 ABBREVIATIONS... 3 PCB S... 4 OUTDOOR MAIN PCB... 4 INDOOR PCB...
Advanced EasyStart Troubleshooting
 Advanced EasyStart Troubleshooting EasyStart is designed for excellent reliability and durability. Every EasyStart is tested on a compressor before it leaves Micro-Air to ensure it will work when delivered.
TABLE OF CONTENTS INTRODUCTION 3. INSTALLATION PROCEDURES Air Conditioner Location 4. A/C Ducting Installation 5
 585474 1 TABLE OF CONTENTS SECTION PAGE INTRODUCTION 3 INSTALLATION PROCEDURES Air Conditioner Location 4 Air Conditioner Mounting 4 A/C Ducting Installation 5 Power Kit Installation (Batteries). 5 Separator...
Prodigy Eclipse 600, 800, 1000 Service Parts
 Prodigy Eclipse 600, 800, 000 Service Parts This part list contains the service parts for the Eclipse 600, 800 and 000 systems. The B series references changes to panels. The models that are covered include:
DC TO AC POWER INVERTER PWRIC150012W INSTRUCTION MANUAL
 DC TO AC POWER INVERTER PWRIC150012W INSTRUCTION MANUAL SAVE THIS MANUAL You will need the manual for the safety warnings and precautions, assembly instructions, operating and maintenance procedures, parts
DOORS Parts for Model# PFSS0MFZBSS DESCRIPTION DRAWING PART NO. ARM WHEEL SPROCKET 902 WR02X12905 ARM WHEEL SPROCKET 903 WR02X12906
 DOORS Parts for Model# PFSS0MFZBSS DESCRIPTION DRAWING PART NO. ARM WHEEL SPROCKET 902 WR02X12905 ARM WHEEL SPROCKET 903 WR02X12906 AXLE WHEEL SPROCKET 904 WR02X12941 BASKET LOWER 30 WR21X10182 BRACKET
MICRO P-711 Exerciser Instruction Book
 DINOSAUR ELECTRICS MICRO P-711 Exerciser Instruction Book First Edition Table of Contents Introduction 1- MICRO P-711 tests AC DC Gas 5 Dometic eyebrow ID drawings 6 Dometic AES and AMES tests AC 7 DC
BI Series Parts Manual
 subzero.com 00..70 BI Series Parts Manual BI-SID Part Lists & Exploded Views Built-In (BI) Series (SWS #00000) 7007 Door, Ref -S S Svce 7000 Door, Ref -F/O S Svce NOTE: Door Assemblies do NOT incl. hinges
POWERLINE 2000 Energy Management System TM
 Display Panel TM The PowerLine 00 EMS is a specialized power distribution and energy management system intended to be used in recreational vehicles. The Control Module is housed in the standard main distribution
FRS26H5DSB3 FRS26H5DSB4
 Product No. SB3 SB4 Series R134a R134a Color stain/blk stain/blk Volts 115 115 Wiring Diagram 241526901 241526901 Owner's Guide 241572801 241572801 Market North America North America Energy Guide 241538755
ECO3-601/602 EcoStar III * Chevy Express/GMC Savana Contact Intermotive for additional vehicle applications
 An ISO 9001:2015 Registered Company ECO3-601/602 EcoStar III 2009-2019* Chevy Express/GMC Savana Contact Intermotive for additional vehicle applications * In 2017-2018, the ignition switches on Chevy Express
Fault Codes. J control
 J control Timer Temp Fault Codes 12 11 10 9 8 7 6 5 4 3 2 1 30 29 28 27 26 25 24 23 22 21 20 Enter unit inspection mode by pushing the UP and DOWN buttons simultaneously for two seconds. Ensure that the
Eclipse 2000 Service Parts
 This part list contains the service parts for the Eclipse 000 systems. The models that are covered include: CME08 CP08 ERC08 Eclipse 000 Service Parts Table of Contents CME08 Cabinet Page CME08 Interior
GRD502-B Flow Chart 02/05/09
 PINPOINT TEST A: NO PROVE OUT OF ANY LEDs prove out (all LED's light up) of the LED's when module power is applied or module "wakes up", indicates that: - the Guardian module does not have power. - the
ENGINE COOLING FAN Toyota Celica ELECTRIC COOLING FAN RADIATOR COOLING FAN SYSTEM TEST ENGINE COOLING Toyota Engine Cooling Fans
 ENGINE COOLING FAN 1994 Toyota Celica 1994 ENGINE COOLING Toyota Engine Cooling Fans Celica 1.8L 4-Cyl ELECTRIC COOLING FAN NOTE: Electric cooling fan may be used for radiator or condenser. To verify electric
2002 Buick Rendezvous - AWD
 2002 Buick Rendezvous - AWD DTC P0410 Description The control module activates the secondary air injection (AIR) system by grounding both the pump relay and the vacuum control solenoid control circuits.
REFRIGERATION COOLERS
 REFRIGERATION COOLERS CF Series and CFX Series Technical Specifications and Trouble Shooting USA & Canada Service Office Dometic Corporation 1120 North Main Street Elkhart, IN 46514 Service Center & Dealer
INSTRUCTIONS FOR THE RELIANCE Fast/Tran TM ARL0909 & ARL0909R
 INSTRUCTIONS FOR THE RELIANCE Fast/Tran TM ARL0909 & ARL0909R THE RELIANCE Fast/Tran IS NOT FOR "DO-IT-YOURSELF" INSTALLATION. It must be installed by a qualified electrician thoroughly familiar with all
STARTING SYSTEM TEST STARTING SYSTEM
 2013 Dodge or Ram Truck RAM 1500 Truck 2WD V8-5.7L Vehicle > Starting and Charging > Starting System > Testing and Inspection > Component Tests and General Diagnostics STARTING SYSTEM TEST STARTING SYSTEM
CABINET LINER AND DOOR PARTS For Models: KUIS18NNTW0, KUIS18NNTT0, KUIS18NNTB0, KUIS18NNTS0 (White) (Biscuit) (Black) (Stainless Steel)
 (Biscuit) (Black) (Stainless Steel)") CABINET LINER AND DOOR PARTS ICE CUBE MAKER 5 09 Litho In U.S.A. (rrm) (psw) 1 Part No. Rev.A CABINET LINER AND DOOR PARTS 1 Literature Parts 2313820 Use & Care Guide 2324311 Service & Wiring Sheet 2 3400886
CABINET LINER AND DOOR PARTS ICE CUBE MAKER 5 09 Litho In U.S.A. (rrm) (psw) 1 Part No. Rev.A CABINET LINER AND DOOR PARTS 1 Literature Parts 2313820 Use & Care Guide 2324311 Service & Wiring Sheet 2 3400886
PROBLEM SOLVING GUIDE ELMECO SLUSH MACHINE MODEL FCM
 A01 INSTRUCTIONS ON HOW TO READ REFERENCES...2 A10 FEATURES AND TECHNICAL SPECIFICATIONS...3 A15 RECOMMENDED PREVENTIVE MAINTENANCE SPARE PARTS KIT...3 A20 IMPORTANT INFORMATION ON FUNCTIONALITY OF THE
HVAC System: Engine Cooling, Controls and Communication
 Course #S-AC07-04.01VCT HVAC System: Engine Cooling, Controls and Communication Participant Guide Revised: 01/24/11 Copyright 2011, General Motors Company, All Rights Reserved Caution Danger: In order
HVAC Compressor Clutch Does Not Engage
 Page 1 of 6 2004 Pontiac GTO GTO (VIN V) Service Manual HVAC HVAC Systems - Manual Diagnostic Information and Procedures Document ID: 1378425 HVAC Compressor Clutch Does Not Engage Test Description The
REFRIGERADOR GE TFHW24RRAWH IMAGEN 1
 REFRIGERADOR GE TFHW24RRAWH IMAGEN 1 1 REFRIGERADOR GE TFHW24RRAWH LISTADO DE PARTES 1 31-5024 ATTENTION INSTALLER 1 49-6692 GUIDE OWNERS 3 WR02X3757 FASTENER TUBULAR 6 WR12X0848 INSERT HANDLE CHANNEL
V 2.0 DC TO AC POWER INVERTER PWRINV500012W PWRINV500024W PWRINV500036W PWRINV500048W. Instruction Manual
 DC TO AC POWER INVERTER PWRINV500012W PWRINV500024W PWRINV500036W PWRINV500048W Instruction Manual Introduction The AIMS Power 5000 Watt series inverters are the most advanced line of mobile DC to AC power
ITS-50R TRANSFER SWITCH OWNER S MANUAL
 ITS-50R OWNER S MANUAL IOTA Engineering Transfer Switches provide automatic power switching between two or three separate 120/240 volt AC input sources, including powercords, onboard generators, onboard
Series 1000 and Figure NOTE: The top terminals are showing normally closed at rest and the middle terminals are normally
 38.18.The red wire on the OCR plug carries battery voltage. Behavior: D.C. battery voltage should show-up on a volt meter when the red probe is touched to this terminal and the black probe is grounded,
Subject Underhood G System Error Codes and Symptoms System or Parts affected
 System or Parts affected Index Underhood70G (V90Gxxx) System or Parts affected... 1 Overview... 1 Identifying your System... 1 Retrieving Logged Error Messages... 1 Error Messages... 3 Error Message Table...
Go Power! Manual. GP-1750HD Inverter GP-2500 Inverter
 Go Power! Manual GP-1750HD Inverter GP-2500 Inverter Go Power! Electric Inc. PO Box 6033 Victoria, BC V8P 5L4 Tel: 866-247-6527 Fax: 866-607-6527 Email: info@gpelectric.com Table of Contents 1. INTRODUCTION...
High Profile Evaporator
 High Profile orator PRODUCT DATA & INSTALLATION Bulletin K30-KHPHG-PDI-3 Part # 1081591 PRODUCT SUPPORT web: k-rp.com/khp email: evaps@k-rp.com call: 1-844-893-3222 x520 scan: Low & Medium Hot Gas Defrost
MDT5N25 & MTD5N40 SERVICE PARTS
 This parts list contains the service parts and wiring diagrams for this model. Check the model number of the machine requiring the parts to be sure that this is the correct parts list. MDTNs & MDTN0s have
OnCommand Troubleshooting Guide Hayward Industries
 OnCommand Troubleshooting Guide 2010 Hayward Industries Table of Contents Safety Precautions Page 1 Overview Pages 2-5 Software Troubleshooting Page 6 Local Display Pages 7-8 Relays Pages 9-10 Heaters
SERVICE NOTEBOOK VCWB300 PROFESSONAL MODEL BUILT-IN FULL HEIGHT WINE COOLER UPDATED
 SERVICE NOTEBOOK VCWB300 PROFESSONAL MODEL BUILT-IN FULL HEIGHT WINE COOLER UPDATED 11-2008 Table of Contents Technical Information---------------------------------------------------------------------
LG Air conditioning CAC and Multi Split unit Fault code sheet Universal and Multi Split Units
 Universal and Multi Split Units If there is fault on any LG universal or multi unit a two digit number will appear on the remote controllers led display. If the unit does not have a remote controller the
TOP-MOUNT REFRIGERATOR WITH ICE-MAKER. Model No. PHT219HK / PHT219HS
 Product No. PHT219HKM3 PHT219HSM3 Series R134a R134 Color stainless (LH) stainless (RH) Volts 115 115 Wiring Diagram 241582401 241582401 Owner's Guide 241813800 241813800 Market North America North America
Transfer Switch GPTS 30
 Transfer Switch GPTS 30 Owner s Manual Table of Contents Introduction 2 Installation 3 Operational Testing 7 Troubleshooting 8 Hi-Pot Testing 9 Generator Note 10 Medical Appliances 10 Caution 10 Warranty
High Profile Evaporator
 PRODUCT DATA & INSTALLATION Bulletin K30-KHPE-PDI-3 Part # 1081588 PRODUCT SUPPORT web: k-rp.com/khp email: evaps@k-rp.com call: 1-844-893-3222 x520 scan: High Profile orator Low & Medium Temperature Electric
MDT5N25 & MTD5N40 SERVICE PARTS
 MDTN & MTDN0 SERVICE PARTS This parts list contains the service parts and wiring diagrams for this model. Check the model number of the machine requiring the parts to be sure that this is the correct parts
An ISO 9001:2008 Registered Company
 An ISO 9001:2008 Registered Company CVC501-A HVAC & Fast Idle CAN Vehicle Controller CVC502-A HVAC Control without Fast Idle 2011-2016 Ford F250-F550 (CVC501/502-A) 2017 Ford F-250-F550 (B-CVC501/502-A)
HWP Protection Board
 February 2009 HWP Protection Board Features and Operation This board provides the system protection features necessary to keep our HWP (Water Sourced Heat Pump) units safe in the instances when they are
Prodigy Eclipse 600, 800, 1000 Service Parts
 Prodigy Eclipse 600, 00, 000 Service Parts This part list contains the service parts for the Eclipse 600, 00 and 000 systems. The B series references changes to panels. The models that are covered include:
Model : WSN11. Refrigerant SPARE PARTS LIST FOR EXPORT Specifications : 2 Doors No Frost Refrigerator. Specific parts for specific countries
 SPARE PARTS LIST FOR EXPORT 2005 Model : WSN11 Refrigerator Page: 1 / 12 Specifications Classification : 2 Doors No Frost Refrigerator Defrosting Type : Automatic Temperature Control : Thermostat Refrigerant
Reach ins, Freeezers & Refrigerators Installation & Operation Manual
 Reach ins, Freeezers & Refrigerators Installation & Operation Manual BSR23 BSF23 BSR49 BSF49 BSR72 BSF72 IMPORTANT SAFETY INSTRUCTIONS (SAVE THESE INSTRUCTIONS) Visit us on the web at www.blueairinc.com
2012 Volkswagen Eos Komfort
 Test-ID Specified value min. max. 1 Rich to lean sensor barrier - 0.6241 V voltage 2 Lean to rich sensor barrier - 0.6241 V voltage 7 Minimum voltage at sensor - 0.450 V for test cycle 8 Maximum voltage
STARTING SYSTEMS 8B - 1 STARTING SYSTEMS CONTENTS
 TJ STARTING SYSTEMS 8B - 1 STARTING SYSTEMS CONTENTS page DESCRIPTION AND OPERATION STARTER MOTOR... 2 STARTER RELAY... 3 STARTING SYSTEM... 1 DIAGNOSIS AND TESTING STARTER MOTOR... 8 STARTER MOTOR NOISE
FRT15B3JQ0 FRT15B3JW0 FRT15B3JZ0
 Product No. Q0 W0 Z0 Series R134a R134a R134a Color bisque (right) white (right) white (left) Volts 115 115 115 Wiring Diagram 241582401 241582401 241582401 Owner's Guide 241857201 241857201 241857201
Fuel Pump Electrical Circuit Diagnosis
 Page 1 of 6 Document ID# 599891 2000 Chevrolet Camaro Feedback Print Fuel Pump Electrical Circuit Diagnosis Circuit Description When the ignition switch is ON, the powertrain control
TOP-MOUNT REFRIGERATOR. Model No. GLRT217TD
 Product No. KP SP Series R134a R134a Color stain/blk (LH) stain/blk (RH) Volts 115 115 Wiring Diagram 241582401 241582401 Owner's Guide 240400112 240400112 Market North America North America Energy Guide
A/C SYSTEM SPECIFICATIONS
 A/C SYSTEM SPECIFICATIONS SPECIFICATIONS Application Specification Compressor Type Matsushita Matsushita Rotary Sanden Sanden Scroll Compressor Belt Deflection (1) Used 5/16-7/16" (8-9.5 mm) New 9/32-5/16"
CHARGING SYSTEM 8C - 1 CHARGING SYSTEM CONTENTS
 TJ CHARGING SYSTEM 8C - 1 CHARGING SYSTEM CONTENTS page DESCRIPTION AND OPERATION BATTERY TEMPERATURE SENSOR... 2 CHARGING SYSTEM OPERATION... 1 ELECTRONIC VOLTAGE REGULATOR... 2 GENERATOR... 1 DIAGNOSIS
Transfer Switch TS-50. Owner s Manual
 Transfer Switch TS-50 Owner s Manual Table of Contents Introduction 2 Installation 2 Operational Testing 7 Troubleshooting 7 Hi-Pot Testing 8 Generator Note 9 Medical Appliances 10 Caution 10 Disclaimer
Installation instructions for KIT15017, KIT15018, KIT15019, and KIT15020
 18-CH41D1-1 Installation instructions for KIT15017, KIT15018, KIT15019, and KIT15020 WARNING: HAZARDOUS VOLTAGE - DISCONNECT POWER BEFORE SERVICING ALL phases of this installation must comply with NATIONAL,
UNIT 3: GENErAL ELECTriCAL SySTEM DiAGNOSiS
 Electrical/Electronic Systems UNIT 3: GENErAL ELECTriCAL SySTEM DiAGNOSiS LESSON 3: TEST electrical circuits I. Types of electrical circuit tests and electrical faults A. Different types of electrical
NDE550 & NDE650 SERVICE PARTS
 NDE0 & NDE0 SERVICE PARTS This parts list contains the service parts and wiring diagrams for this model. Check the model number of the machine requiring the parts to be sure that this is the correct parts
MODEL 2001 HERMETI-CHECK OPERATING INSTRUCTIONS
 MODEL 2001 HERMETI-CHECK OPERATING INSTRUCTIONS Model 2001 HERMETI-CHECK tests all single phase compressors up to 5 HP, 110, 220, or 277 volts. The HERMETI-CHECK comes equipped with a built in 200 micro
VCSF136DSS01 : CABINET [1/13]
![VCSF136DSS01 : CABINET [1/13]](/thumbs/77/75717131.jpg "VCSF136DSS01 : CABINET [1/13]") VCSFDSS0 : 00 - CABINET [/] Page of VCSFDSS0 : 00 - CABINET [/] Page of Ref # Part Number Qty. Description 5 7 8 9 0 5 7 8 9 0 5 7 8 9 0 NI NON-SERVICEABLE 059-000 057-000 07-000 0575-000 08-000 08-000
VCSFDSS0 : 00 - CABINET [/] Page of VCSFDSS0 : 00 - CABINET [/] Page of Ref # Part Number Qty. Description 5 7 8 9 0 5 7 8 9 0 5 7 8 9 0 NI NON-SERVICEABLE 059-000 057-000 07-000 0575-000 08-000 08-000
ME AGS Auto Gen Start System for Coach Generators. Operator s Manual.
 ME AGS Auto Gen Start System for Coach Generators Operator s Manual ME AGS Operator s Manual Auto Gen Start System for Coach Generators Section 2003 - Magnum Energy, Inc. Table of Contents Page 1. Overview
LG Air Conditioning Universal & Multi Split Fault Codes Sheet. Universal and Multi Split Units
 Universal and Multi Split Units If there is a fault on any LG Universal or Multi unit, a two digit number will appear on the remote controllers led display. If the unit does not have a remote controller
ATLAS Wheel Balancer Electrical Flow Chart
 ATLAS Wheel Balancer Electrical Flow Chart WARNING: Leave all work to trained and licensed electricians. Attempting repairs yourself is extremely dangerous, with the potential for serious injury and even
BLOWER VACUUM SWITCH FAILED OPEN
 F1 F1 AC BLOWER VACUUM SWITCH FAILED CLOSED AC BLOWER VACUUM SWITCH FAILED CLOSED UHS If the blower vacuum switch is closed before blower start-up, the control module will not start the blower. Pre-check
INSTALLATION INSTRUCTIONS
 INSTALLATION INSTRUCTIONS Electric Vacuum Pump Kit 28146 Thank you for choosing STAINLESS STEEL BRAKES CORPORATION for your braking needs. Pleases take the time to read and carefully follow these instructions
348002K/348012K Manifold Block Style Service Manual 12/2000
 348002K/348012K Manifold Block Style Service Manual 12/2000 Service Manual 348002K/348012K Manifold Block Style Recovery/Recycling/Recharging Unit For R-12 or R-134a Only TABLE OF CONTENTS: Theory of Operation
Technical Information and Diagnostic Guide for Freightliner ParkSmart Rev5/Split No Idle System for optimized idle - beginning March 2013
 Technical Information and Diagnostic Guide for Freightliner ParkSmart Rev5/Split No Idle System for optimized idle - beginning March 2013 Beginning 3/7/2016 all (NEW) trucks are built with the Optimized
DC TO AC POWER INVERTER PWRINV150W INSTRUCTION MANUAL
 DC TO AC POWER INVERTER PWRINV150W INSTRUCTION MANUAL SAVE THIS MANUAL You will need the manual for the safety warnings and precautions, assembly instructions, operating and maintenance procedures, parts
Related Electrical Systems 1
 Related Electrical Systems Student/intern information: Name Class Vehicle used for this activity: Year Make Model Odometer VIN Learning Objective/Task (Related Electrical Systems) 2007 NATEF Reference
CABINET LINER AND DOOR PARTS For Models: KUIS15NRTW1, KUIS15NRTT1, KUIS15NRTB1, KUIS15NRTS1 (White) (Biscuit) (Black) (Stainless Steel)
 (Biscuit) (Black) (Stainless Steel)") CABINET LINER AND DOOR PARTS ICE CUBE MAKER 5 09 Litho In U.S.A. (rrm) (eeb) 1 Part No. Rev.A CABINET LINER AND DOOR PARTS 1 Literature Parts 2313814 Use & Care Guide 2324311 Service & Wiring Sheet 2 3400886
CABINET LINER AND DOOR PARTS ICE CUBE MAKER 5 09 Litho In U.S.A. (rrm) (eeb) 1 Part No. Rev.A CABINET LINER AND DOOR PARTS 1 Literature Parts 2313814 Use & Care Guide 2324311 Service & Wiring Sheet 2 3400886
SUNROOF - SERVICE INFORMATION ADJUSTMENTS
 SUNROOF - SERVICE INFORMATION DESCRIPTION OPERATION DIAGNOSIS AND TESTING POWER TOP - SUNROOF SUNROOF ASSEMBLY-MODULE REMOVAL INSTALLATION CHANNEL-DRAIN REMOVAL INSTALLATION COVER-GUIDE MECHANISM REMOVAL
Low Profile Unit Cooler
 Low Profile Unit Cooler Publication No. 100.13 January, 2004 MEA Air Defrost - 3,900 to 39,000 BTUH Electric Defrost - 3,600 to 28,000 BTUH Hot Gas Defrost - 3,600 to 28,000 BTUH Small to Medium Walk -
Q35 Series Automatic Vent Damper System
 Installation Sheets Manual 121 Energy Conservation and Miscellaneous Kits Section Q Technical Bulletin Q35 Issue Date 0999 Q35 Series Automatic Vent Damper System Figure 1: Q35 Automatic Vent Damper System
DIN Rail UPS Model: DIN-UPS Installation/Operation Manual
 DIN Rail UPS Model: DIN-UPS 24-10 Installation/Operation Manual Table of Contents Section Page Section Page Quick Start 2 1) General Information 4 Materials Provided 4 Optional Equipment 4 2) Safety Information
DFFB536 : INTERIOR ASSEMBLY [1/9]
![DFFB536 : INTERIOR ASSEMBLY [1/9]](/thumbs/93/112556315.jpg "DFFB536 : INTERIOR ASSEMBLY [1/9]") DFFB536 : 001 - INTERIOR ASSEMBLY [1/9] Page 1 of 18 DFFB536 : 001 - INTERIOR ASSEMBLY [1/9] Ref # Part Number Qty. Description 1 L20910705 1 BRACKET LIGHT AR 36 2 PE950125 6 LIGHT SOCKET 3 A3079001 6
DFFB536 : 001 - INTERIOR ASSEMBLY [1/9] Page 1 of 18 DFFB536 : 001 - INTERIOR ASSEMBLY [1/9] Ref # Part Number Qty. Description 1 L20910705 1 BRACKET LIGHT AR 36 2 PE950125 6 LIGHT SOCKET 3 A3079001 6
Unit 5 Troubleshooting
 Unit 5 Troubleshooting Unit Objectives Given a realistic scenario depicting a broken machine, the learner will be able to effectively troubleshoot, diagnosis, and repair the problem returning the machine
INSTALLATION INSTRUCTIONS
 INSTALLATION INSTRUCTIONS Universal Air Series!! NOTE!! Covers the following model: 6000 Series 85-0100B-AZ Rev 0 5/07 To ensure that the system is installed properly, provide your electrician with these
TOP-MOUNT REFRIGERATOR. Frigidaire P.O. BOX 8020 CHARLOTTE, NC Model No. FFHT2021T
 Product No. B0 W0 Series R134a R134a Color black white Volts 115 115 Wiring Diagram A02646801 A02646801 Owner's Guide Eng/Spn 807876506 807876506 Owner's Guide Frn 807877206 807877206 Market North America
Battery Control Center - Diesel
 Service Manual CAUTION: All servicing of the Battery Control Center should be done only by a qualified Service Technician. Inadvertent shorts inside the Battery Control Center could result in severe damage
2/2/2018 Feed Circuit Test (Starting System) - ALLDATA
 - ALLDATA") 2005 Jeep Truck Grand Cherokee 2WD V8-5.7L VIN 2 Vehicle > Starting and Charging > Starting System > Testing and Inspection > Component Tests and General Diagnostics FEED CIRCUIT TEST The starter feed
2005 Jeep Truck Grand Cherokee 2WD V8-5.7L VIN 2 Vehicle > Starting and Charging > Starting System > Testing and Inspection > Component Tests and General Diagnostics FEED CIRCUIT TEST The starter feed
TOP-MOUNT REFRIGERATOR. Frigidaire P.O. BOX 8020 CHARLOTTE, NC Model No. FFTR18G2Q
 Product No. S1 W1 Series R134a R134a Color stainless white Volts 115V 115V Wiring Diagram A01475501 A01475501 Owner's Guide 807332458 807876505 Market North America North America Energy Guide 807332458
Program IV: ProStar TM. Performance A/C International. Series. Study Guide Performance A/C Program IV: International ProStar Series TMT
 Performance A/C International A N AV I S TA R C O M PA N Y Program IV: ProStar TM Study Guide TMT-160701 Series Study Guide Performance A/C Program IV: International ProStar Series TMT-160701 2007 International
P0716-INPUT SPEED SENSOR 1 CIRCUIT PERFORMANCE
 Page 1 of 10 P0716-INPUT SPEED SENSOR 1 CIRCUIT PERFORMANCE Circuit Schematic 2007 Dodge Nitro 3.7L Eng SXT Page 2 of 10 Fig 1: Speed Sensor Circuit Schematic Additional Wiring For complete wiring diagrams
VEHICLE SPEED CONTROL SYSTEM
 J VEHICLE SPEED CONTROL SYSTEM 8H - 1 VEHICLE SPEED CONTROL SYSTEM CONTENTS page DIAGNOSIS... 2 GENERAL INFORMATION... 1 page SERVICE PROCEDURES... 9 GENERAL INFORMATION The vehicle speed control system
CONTROLLER DIAGNOSTIC GUIDE
 Proprietary tice: This document contains proprietary information which not to be reproduced, transferred, to other documents, disclosed to others, used for manufacturing or any other purpose without the
GSL Electronics Modified Sine Wave Power Inverters
 GSL Electronics Modified Sine Wave Power Inverters Congratulations on choosing one of our Modified Sine Wave Inverters for your application. There are 6 models in the range, which will meet most of your
REPLACEMENT PARTS MANUAL
 REPLACEMENT PARTS MANUAL WHA-A WHA-B WHA-C WALL-MUNTED PACKAGED HEAT PUMP WHADA WHADB WHADC WHA-A WHA-B WHA-C Models: WHADA WHADB WHADC W0HA-A W0HA-B W0HA-C W0HADA W0HADB W0HADC Contents Description Page
ILISP610-A Shift Interlock Chevy/GMC Full Size Van Chevy/GMC Full Size Van L Contact InterMotive for specific applications
 An ISO 9001:2008 Registered Company ILISP610-A Shift Interlock Chevy/GMC Full Size Van 2008-2018 Chevy/GMC Full Size Van 2008-2015 4.6L Contact InterMotive for specific applications Introduction The ILISP610-A