2010 Toyota Prius Fog Light Retrofit
|
|
|
- Archibald Jackson
- 5 years ago
- Views:
Transcription
1 2010 Toyota Prius Fog Light Retrofit A DIY prospective Last updated: Friday, December 25, 2009 *** Disclaimer Use this document and its contents at your own risk! *** Forward: This document was compiled from a thread titled Fog Lights: Install [Retrofit] fog lights on 2010 Prius? on A special thanks to all those that made this document possible (priuschat user Ids): hawkmoon77 CASUMIK rachaelseven tjp74 jayvee Jim Calvert ALL_600D and many more. Please forgive me if anyone was left out. This document will likely grow, as there are many alternatives and options presented in the original thread. As a basis however this document will cover how to upgrade a Prius without existing fog lights. The lights will be activated / deactivated with the parking and or headlight switch. An additional switch will allow the driver to turn off the fog lights when necessary.
2 Preliminaries: Parts The entire parts list for the full OEM approach appears to be: cover fog lamp L/H cover fog lamp R/H A screw, qty 2 reqd stalk switch w/fog lamps, w/o auto lights terminal, 2C pin 8 (Lexus part number currently) D041 - fog lamp, R/H (see note 1 below) D041 - fog lamp, L/H (see note 1 below) terminal, CA1 pin terminal packing engine compartment harness You will also need a suitable piece of wire to run the lead from the interior junction box (connector 2C) to connector CA1 in the engine compartment, as well as miscellaneous butt connectors, wire ties, etc. For those wanting less than a 100% OEM install, two levels of reduction are available: 1. To use the factory stalk but save some money with aftermarket lights, remove the final five items from the list and purchase an aftermarket fog lamp kit designed for the Camry or Yaris. Use the harness in the kit and attach to connector 2C at the junction box. As an alternative, one can tap into wire #18 (brown) on the 36 pin the ECU. This wire (+12v) is the trigger for the parking lights. It is capable of activating the relay that comes with the Yaris or Camry light kits. 2. To skip the factory stalk as well, some of the aftermarket fog lamp kits will have a switch, which fits in the 4-switch cluster (choose brand of kit carefully). Using that switch and the relay included in the kit would negate the need for all but the first three factory parts listed. And the screws could of course be purchased locally, so you really only need the covers and the kit. For the basis of this document, the OEM fog light covers where purchased as well as a Yaris (06-08, 4 door version) OEM Style fog light kit off of e-bay. The fog light kit came with all the wiring needed and a switch. The covers can be purchased from a Toyota dealer or on-line from sites like Procedure:

3 I test fitted the parts first thing. I didn t want to start tearing into the car before knowing the parts worked together. The following describes putting the lights into the fog light covers: The Lights fit into the cover, and only one screw holds them in. None of the parts came with this screw (see OEM part list above for actual part number), but any course-threaded (as opposed to fine machine threaded) screw should work. I just had to be careful not to use a screw too big in diameter, as it would crack the plastic. Also, a flat head (as opposed to a fluted head) screw is used. There is no need to over-tighten this, it is just plastic. Also, I had to make sure that the plastic of light fixture was seated properly in the cover where the screw hole is. Note that when everything is put together, you will see a small gap between the front glass and the plastic housing. Note: The plastic housing does not actually touch the glass. There is a slight gap between the light and the cover this is normal. Fog light covers on the left, light kit on the right.

4 Assembled lights from the rear. Notice screw lower left that was used to secure light to cover. Existing cover removal: 1. I placed a jack behind the wheel at the location indicated in the manual. I raised it a bit, not enough to raise the wheel off the ground, but it gave me about another 6 to 8 inches of clearance under the bumper. The picture shows the black flashing. I removed the 4 screws. When the three black screws are removed, a little piece of plastic can be removed. I then removed the 4th, silver screw. There are two clips. A small flathead screwdriver can remove them well. I inserted it under the round center part, but over the rim (where the rim cut-outs are) and gave the screwdriver a little turn. The round center disc will NOT pop up unless the rim is pressed tightly against the car. Trying to pop up the centerpiece while allowing the rim to come with it will cause a lot of trouble. I popped the center disc up a little bit, and the whole snap comes out very gracefully. These snaps do not in any way require muscle or prying so long as the center disc gets popped up while the rim stays flush against the car. Once all is removed, I popped the flashing out from the front of the car. It does not come off entirely as there are two rivets in the back. Freeing the front of it from the bumper and lowering it a bit toward the floor gave plenty of access.
 I could not see C from under the car, but it can be done by touch alone. Once the clips were released, the assembly can be pulled toward the wheel.")
5 2. I removed the nut (this picture shows the nut already removed). I then unclipped each of the 4 clips, (while pulling the gray cover toward the wheels very slightly). I unclipped them in the order listed (from A to D) I could not see C from under the car, but it can be done by touch alone. Once the clips were released, the assembly can be pulled toward the wheel. Then, from the front of the car, I was able to unclip the wire harness. The clips are on the reverse side of what is pictured. I just reached through the hole where the cover was, and was able to depress the two clips by hand and pop it out. Note that the driver s side as two more clips holding the wire harness in. I was able to remove those from under the car.
 screw is used.")
6 3. The Lights fit into the cover, and only one screw holds them in. None of the parts came with this screw, but any course-threaded (as opposed to fine machine threaded) screw should work. I just had to be careful not to use a screw to big in diameter, as it would crack the plastic. Also, a flat head (as opposed to a fluted head) screw is used. There is no need to over-tighten this, it is just plastic. Also, I had to make sure that the plastic of light fixture was seated properly in the cover where the screw hole is. Note that when everything is put together, you will see a small gap between the front glass and the plastic housing. The plastic housing does not actually touch the glass.

7 Fog light assembly installation: First, the light assembly was positioned over the screw (where I removed the nut) shown in picture 2. The whole assembly was then brought straight forward. While looking at it from the front, I was able to reach a hand underneath and push it forward while visually seeing that the four clips were lined up. When everything was lined up, it snapped in place. I was careful to make sure that ALL clips engage. They do not all make a satisfying clipping sound, so I was careful to make sure each engaged properly. I then replaced the nut on the screw (being careful not to over tighten it). Then I clipped the wire harness back in.

8 Dash/panel removal: 1. Using my fingers only, I slightly lifted the flashing at the marked points, upward slightly, and then toward the passenger side. It pops off.
.")
9 2. I unscrewed the nut in the picture. It is finger tight only. (Note that for reassembly, this nut just gets pushed on, not turned). I then lifted the flashing up at that point to clear the screw,, and continued to pull at an angle (in the direction of the passenger side rear seat). It should pop off, but added pressure might have been needed at the spot marked clips (apply pressure toward the passenger side). If the blue clips stay in the car, they need to be removed with pliers, and then reinserted into the flashing before reassembly.

10 3. I removed the screw. Pulled out and up at points A do disengage the clips, then out and slightly down at the clips marked B. To remove the hood release, I lifted up on it (which popped the hood open) and underneath; there is a clip

11 that is part of the white plastic. Release this clip and slide the assembly toward the floor to remove. Then, I removed all of the wire connectors, and removed this piece, exposing the ECU.

12 4. I removed the two screws, and then disengaged the clip. The flashing slides out. The plastic stud slides through the square hole, it is NOT clipped in. I had to remember to put this back in the square hole when reassembling. The underside has two wire harnesses, and a clip that holds the wires on. I unclipped all of them to remove the piece. That's it for the disassembly. Now, for the wiring. Wiring: The following is the wiring harness that came with the Yaris Fog Light kit.

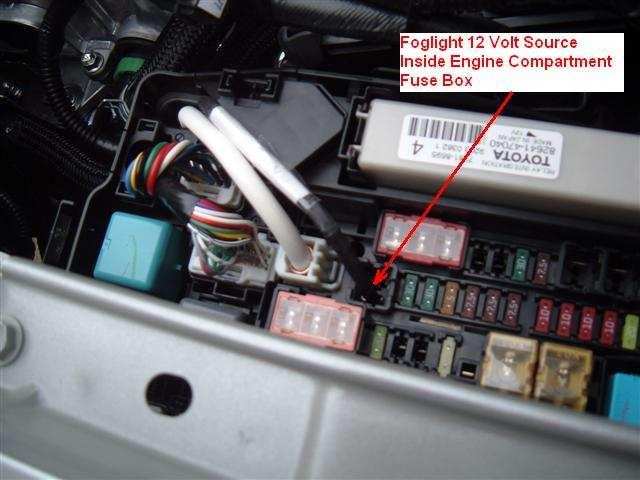
13 5. Using the wire harness shown above, I first clipped off the connectors on the white wire (labeled 12 Volt Power for Foglights ) and the red wire labeled (Connector to Other Harness) leaving about 6 inches of wire or so at the connector end. The other ends I ran through the firewall as described in step 8 below. Once through, I reattached to connectors and the white wire I connected to a slot in the main fuse box as shown below and the red wire connects to the fog light wire harness (also part of the light kit). The relay I attached using a bolt that was holding the upper part of the ECU to the dash frame (partly visible in step 6 photo below at top). I attached the ground wire to a screw hold the dash to the dash frame (visible in step 6 photo below in lower right). The red wire labeled (12 Volt Power for On/Off Switch Indicator Light) I attached to the brown wire as noted in step 5 photo below. That wire is energized when the parking lights and or headlights are on. I replaced one of the switch blanks with the switch in the dash. Also connect the wiring harness to the switch (green connector).
14

15 6. The wire followed this path. I tucked it through the gap on the side of the ECU where the other wires were run, and then ran it downward.

16 7. This is the path I followed. I used wire ties looped around the wire in the picture. Note that I slid some of that black plastic over the wire from this point forward considering it carries positive voltage. If it were a ground wire, I would not have.

17 8. This shows the rest of the path to the rubber plug that goes to the engine room. There was a hole just to the passenger side of the plug. The hole doesn't go all the way through. I used a screwdriver to pop the rest of the way. It's only a few millimeters thick. I was careful to avoid hitting any of the existing wires, which was why I stayed to the passenger side of the plug. I imagine that this hole could be in different places on other people's cars if it was rotated slightly when installed. Not a big deal, a small screwdriver can puncture this gasket enough to get a wire though. My hole was so small, that the rubber stayed very tight against the wire, sealing it up well.

18 9. AFTER I used this screwdriver to put a hole in the rubber gasket, I then taped the wire to it and pushed it through, grabbing the other side from the engine room. I pulled the wire through to get rid of the slack. 10. This is a great picture. It shows virtually the whole run of the wire. Not that the red wire is inside of the black plastic shroud. On the left of the picture you can see where it goes up into the back of the ECU shown in picture 6. It then runs across the foot well and into and through the rubber firewall plug.

19 11. This is where it emerges. Well, sort of, this did not photograph well.

20 Here is a diagram from a Yaris to give you an idea of what to look/feel for:
21 12. This is it zoomed in a bit more. Note that only the red wire was pushed through the rubber hole, not the black plastic shroud. I did however add more of the black plastic shroud after I pulled the wire through the engine compartment. It followed this path.

22 13. This is the rest of the path. Note that I have not yet put the wire in place in that picture. But the path I followed should be clear. I used wire ties to hold everything in place. The arrow points to the headlight, from there, the wire goes straight down to the fog light. I used wire ties looped around the other wire harnesses that are already there.

23 14. From under the car, I removed the flashing just behind the front bumper. There is one clip in the center. the rest use silver (zinc) screws. Course threads in the front, and machine threads in the back. I was careful not to over tighten them on reassembly. Once removed, the wire connecting the driver's side fog to the passenger side was wire tied up there, and the flashing was replaced. I then put the corner flashing pieces back to cover the fogs. I lowered the jacks, and put the interior trim pieces back together. 15. That's it! Fog lights complete. (**Edit** After seeing them on for the first time at night, I realized that I forgot a crucial step. They need to be adjusted! The screw on the back of the light, with the toothed washer, is the adjusting screw. It's An easy step, but a very critical one). Alignment: FYI, according to Toyota, the proper adjustment is that the top of the beam should be the following distance below the height of the center of the lamp (measured from the ground to the center of lamp):
24 Vehicle 3m (10 ft) from wall: Top of beam 40mm below center of lamp. Vehicle 7.62m (25 ft) from wall: Top of beam 102mm below center of lamp. There is Philips type slot in the interior of the knobby adjustment dial (see upper left-hand corner of second picture in this document) on the lamp. You can insert a long Philips type screwdriver through a hole in the panel from the underside of the car into dial. Clockwise lowers the beam, counter-clockwise raises the beam. It is tough to get the screwdriver into the slot but it will go.
Ford Mustang V6 OEM-Style Fog Light Kit Parts List: Quantity: Tool List:
 2015-2017 Ford Mustang V6 OEM-Style Fog Light Kit Parts List: Quantity: Tool List: LED Foglights/ Bezels 2 Flat head & Phillips screwdriver (if you ordered part#3600) Ratchet & Socket set OR Wiring harness
Depress each tab as you pull the bezel off. The bezels are tight. L.H. shown.
 2013-2014 Ford Mustang V6 & Boss 302 Lower Valance Fog Light Kit Parts List: Quantity: Tool List: Fog light & bulb with bracket 2 Flat head & Phillips screwdriver Black bezels 2 Ratchet & Socket set OR
White / Amber LED Angel Eye DIY Guide Turn Signal Method
 White / Amber LED Angel Eye DIY Guide Turn Signal Method Remove rubber trim surrounding the headlight. Remove corner light. Usually 2000-2001 e46s will have a slide in style where you press in the tab
Installing the Wireless Charging upgrade kit in a 2018 XT5 (Platinum version)
") Installing the Wireless Charging upgrade kit in a 2018 XT5 (Platinum version) September 2, 2018 Tools needed: Wireless charger upgrade kit Plastic trim tools 7 mm nut driver Background: I purchased the
Installing the Wireless Charging upgrade kit in a 2018 XT5 (Platinum version) September 2, 2018 Tools needed: Wireless charger upgrade kit Plastic trim tools 7 mm nut driver Background: I purchased the
Conflicts. TOYOTA Prius Foglights. Part Number: Accessory Code: LF1. Factory Fog Lights
 TOYOTA Prius 2011- Foglights Part Number: 00016-47401 Accessory Code: LF1 Conflicts Factory Fog Lights Item # Quantity Reqd. Description 1 2 Fog Lamps 2 2 Fog Lamp s bezels 3 1 Switch Assembly 4 1 Fog
Connecting the rear fog light on the A4 Jetta, while keeping the 5 Light Mod
 Connecting the rear fog light on the A4 Jetta, while keeping the 5 Light Mod DISCLAIMER: I'm human and make mistakes. If you spot one in this how to, tell me and I'll fix it This was done on my 99.5 Jetta.
ACD-PRO Install in 2008 EvoX
 Turning in a counter clockwise direction, unscrew ift knob ACD-PRO Install in 2008 EvoX Slide back and remove the floor console panel assembly Pull up to remove the center console tray Disconnect the plug
Headlight Removal & Installation: VW Jetta Mk.4 / Bora
 Headlight Removal & Installation: 99-04 VW Jetta Mk.4 / Bora Disclaimer: Buyer assumes any and all risk and liability from the installation and use of this product. Seller, author, or any of their affiliates
2010 Toyota Prius model II Head Unit Upgrade
 2010 Toyota Prius model II Head Unit Upgrade Monday, December 21, 2009 Disclaimer: Use this document and its contents at your own risk. Forward: Huge thanks to those members on Priuschat.com that forged
TOYOTA PRIUS C FOG LIGHT
 TOYOTA PRIUS C 2012 - FOG LIGHT Part Number: 00016-47160 Accessory Code: LF10 Conflicts NONE Kit Contents Item # Quantity Reqd. Description 1 2 Fog Lamps 2 2 Fog Lamp s bezels 3 1 Switch Assembly 4 1 Fog
Conflicts - Fog Lights
 TOYOTA CAMRY 2013 - BLACKOUT LED DRL Part Number: 00016-32270 Accessory Code: LDBO10 Conflicts - Fog Lights Kit Contents Item # Quantity Reqd. Description 1 2 DRL Housing 2 2 DRL s bezels 3 1 Driver Box
TOYOTA PRIUS FOG LIGHT (Halogen or LED)
") Part Number: TPR-413 / TPR-813 Kit Contents Item # Quantity Reqd. Description 1 2 Fog Lamps 2 1 Lower Grill 3 1 Switch Assembly 4 1 Fog Light Operation guide 5 1 Harness Bag Hardware Bag Contents Item
Part Number: TPR-413 / TPR-813 Kit Contents Item # Quantity Reqd. Description 1 2 Fog Lamps 2 1 Lower Grill 3 1 Switch Assembly 4 1 Fog Light Operation guide 5 1 Harness Bag Hardware Bag Contents Item
LEXUS GS 350/450h ILLUMINATED DOOR SILLS Preparation
 Preparation Part Number: PT922-30120 (GS350) PT922-30130 (GS450h) NOTE: Part number of this accessory may not be the same as the part number shown. Kit Contents Item # Quantity Req'd. Description 1 1 Illuminated
LED Fog Light. Conflicts Note: 1832, 1852, 1856, 1872, General Applicability Fits Models
 LED Fog Light Year & Model Part Number 2017 Corolla TCO-817 Conflicts Note: 1832, 1852, 1856, 1872, 1874 General Applicability Fits Models 1863 1866 1864 1865 Additional Items Required For Installation
2015 Copyright Maxspeed-Motorsports.com
 1 Porsche PCM 3.1 Backup Camera Installation Instructions. Thank you for purchasing your product at www.maxspeedmotorsports.com Before you start please understand that these installation instructions are
TOYOTA PRIUS C FOG LIGHT (Halogen & LED)
") TOYOTA PRIUS C 2012-14 FOG LIGHT (Halogen & LED) Part Number: TPC-312 / TPC-812 Kit Contents Item # Quantity Reqd. Description 1 2 Fog Lamps 2 2 Bezels 3 1 Switch Assembly 4 1 Fog Light Operation guide
TOYOTA PRIUS C 2012-14 FOG LIGHT (Halogen & LED) Part Number: TPC-312 / TPC-812 Kit Contents Item # Quantity Reqd. Description 1 2 Fog Lamps 2 2 Bezels 3 1 Switch Assembly 4 1 Fog Light Operation guide
LED Fog Light. Conflicts Note: 1226, General Applicability Fits Models Additional Items Required For Installation
 LED Fog Light Year & Model Part Number Conflicts Note: 1226, 1228 2017 Prius TPR-817 General Applicability Fits Models 1221 1225 1223 1227 1224 Additional Items Required For Installation Items 1 N/A 2
TOYOTA im INTERIOR LIGHT KIT Preparation
 Preparation Part Number: PT922-12170 Kit Contents Item # Quantity Reqd. Description 1 1 Main Wire Harness 2 1 Switch 3 1 Switch Header 4 1 ECU 5 1 ECU Bracket 6 1 Hardware Kit 7 1 Instruction Card 8 1
TOYOTA RAV FOG LIGHT KIT Preparation
 Preparation Part Number: PT413-42163 Kit Contents Item # Quantity Reqd. Description 1 7 7 Wire Tie 2 4 #10-16 Cross Pan-Washer Head Screws 3 1 Switch 4 1 Relay 5 1 LH Fog Light Bezel 6 1 RH Fog Light Bezel
CAMRY STRIP LED DRL TOYOTA Part Number: Accessory Code: LDRS10. PIO / DIO Rev. A 02/26/13. Doc
 Doc. 02.126.00 TOYOTA CAMRY PIO / DIO Rev. A 2013-02/26/13 STRIP LED DRL Part Number: 00016-32280 Accessory Code: LDRS10 Conflicts - Only works on Camry SE Kit Contents Item # Quantity Reqd. Description
Part Number: T4R-2N1. Hardware Bag Contents. General Applicability Models with factory fog light
 11/10/16 TOYOTA CAMRY 2012-2014 2 in 1 LED UPGRADE KIT Part Number: T4R-2N1 Kit Contents Item # Quantity Reqd. Description 1 2 DRL + Fog Light Housing 2 1 Driver Box 3 1 Harness bag 4 1 User s card 5 1
TOYOTA TACOMA XSP-X LED DRL. Part Number: Accessory Code: LDRL10
 TOYOTA TACOMA 2013 - XSP-X LED DRL Part Number: 00016-35230 Accessory Code: LDRL10 Conflicts -None Kit Contents Item # Quantity Reqd. Description 1 2 LED DRL 2 1 Driver Box 3 1 Harness bag 4 Hardware Bag
M-9603-FST FOCUS ST COLD AIR INTAKE KIT INSTALLATION INSTRUCTIONS
 M-9603-FST Please visit www.fordracingparts.com for the most current instruction information.!!! PLEASE READ ALL OF THE FOLLOWING INSTRUCTIONS CAREFULLY PRIOR TO INSTALLATION. AT ANY TIME YOU DO NOT UNDERSTAND
Remove black panel shown. Save 6 retaining pins for re-install later. Pry up on center part of pin first. Then pry out entire retaining pin.
 2005-2009 Ford Mustang V6 Fog Light Wiring Kit Parts List: Quantity: Tools Required: Wiring harness 1 Flat head screwdriver Supplemental wire leads 2 Ratchet & Socket set OR Wire tap red 2 Adjustable Wrench
Part Number: T4R-2N1. Hardware Bag Contents. General Applicability Models with factory fog light. Conflicts -
 Date: 07.30.2015 TOYOTA TUNDRA 2014-2016 LED Fog Light & DRL 2 in 1 Part Number: T4R-2N1 Kit Contents Item # Quantity Reqd. Description 1 2 DRL + Fog Light Housing 2 1 Driver Box 3 1 Harness bag 4 1 User
INSTALLATION GUIDE PREMIUM FRONT BUMPER FOR RAM AEV30304AA Last Updated: 09/18/17
 AEV30304AA Last Updated: 09/18/17 PREMIUM FRONT BUMPER FOR RAM 1500 INSTALLATION GUIDE PLEASE READ BEFORE YOU START To guarantee a quality installation, we recommend reading these instructions thoroughly
Projector39/Umnitza BMW Headlight & Re-Installation for E39s Predator Angel Eyes, and Lamin-X Installation
 Projector39/Umnitza BMW Headlight & Re-Installation for E39s Predator Angel Eyes, and Lamin-X Installation Now it is time to remove the headlights! Obviously you have to open the hood to do this. 100_3630.jpg
LEXUS CT 200h ILLUMINATED DOOR SILLS Preparation
 Preparation Part Number: PT922-89100 Kit Contents Item # Quantity Req'd. Description 1 1 Door Sill, Front Right Hand 2 1 Door Sill, Front Left Hand 3 1 Door Sill, Rear Right Hand 4 1 Door Sill, Rear Left
Fabricating and Installing Headlight Relays. Mike Graham
 Fabricating and Installing Headlight Relays Mike Graham For some time I had been reading about the benefits of installing headlight relays. As I understand it, there are two principal benefits: the load
Fitting Instructions For The TDV6 EGR Blanking Kit To A 2006 Model Discovery 3 TDV6 GHSE
 Part Number DA1112 Fitting Instructions For The TDV6 EGR Blanking Kit To A 2006 Model Discovery 3 TDV6 GHSE You do this modification at your own risk. Britpart won t be held responsible for what is written
Door Panel Removal & Window Stop Adjustment
 Door Panel Removal & Window Stop Adjustment By: Jeff Wolford Disclaimer: This is simply an article of how I fixed my car. I m not responsible if you break, scratch, or mess up anything following my example.
TOYOTA PRIUS V LED DRL Black-Out
 TOYOTA PRIUS V 2012 - LED DRL Black-Out Part Number: 00016-47021 Accessory Code:LDBO10 Conflicts Fog Lights Kit Contents Item # Quantity Reqd. Description 1 2 DRL Housing 2 2 DRL s bezels 3 1 Driver Box
TOYOTA SIENNA FOG LIGHT (Halogen & LED)
") (Halogen & LED) Part Number: TSI-312 / TSI-812 Kit Contents Item # Quantity Reqd. Description 1 2 Fog Lamps 2 2 Fog Light bezels 3 1 Switch Assembly 4 1 Fog Light Operation guide 5 1 Harness Bag Hardware
(Halogen & LED) Part Number: TSI-312 / TSI-812 Kit Contents Item # Quantity Reqd. Description 1 2 Fog Lamps 2 2 Fog Light bezels 3 1 Switch Assembly 4 1 Fog Light Operation guide 5 1 Harness Bag Hardware
Installation Manual TWM Performance Short Shift Kit Stage 1 and Stage 2 MazdaSpeed 6
 Page 1 Installation Manual TWM Performance Short Shift Kit Stage 1 and Stage 2 MazdaSpeed 6 Please Note: It is preferable to park on a flat surface, as you will have to engage and disengage the hand brake
WARNING TAKE NOTE OF THE FOLLOWING: THIS PRODUCT MUST BE INSTALLED EXACTLY AS PER THESE INSTRUCTIONS USING ONLY THE HARDWARE SUPPLIED.
 ARB WINCH/NONWINCH BUMPER TO SUIT TOYOTA HJ100 IFS PRODUCT No. 3913140 5100050 Top Tube Kit 5100160 Buffer Kit With hole (required when fitting Top Tube) 5100170 Buffer Kit With no hole Fitting Kit No.
INSTALLATION INSTRUCTIONS
 COLD AIR INTAKE INSTALLATION INSTRUCTIONS PART NUMBER D760-0390C APPLICATION: 1999-2003 E39 M5 PARTS LIST 1 Left Aluminum Intake Tube 1 Air Pump Bracket (A) 1 Right Aluminum Intake Tube 1 Air Pump Bracket
Installation Instructions for Chevrolet Colorado, GMC Canyon, LT, Z71, With Factory Fog Lights
 Installation Instructions for 2015-2018 Chevrolet Colorado, GMC Canyon, LT, Z71, With Factory Fog Lights This kit is designed to allow use of your factory fog light operation along with an addition auxiliary
Tools Required. Metric Wrench Set Screwdriver Set Metric Socket Set Pliers Heavy duty hydraulic Jack and Car Stands Box knife or similar Hacksaw WD40
 Subaru 2004+ Legacy GT & Outback XT For JDM 2.0 twinscroll turbo and USDM 2.5 turbo models Front Mount Intercooler Fitting Instructions PN# LEG-1348-000 You are now the proud owner of a highly tested and
LED Fog Light & DRL 2in1. TOYOTA RAV4 Part Number: Accessory Code: L D4000
 TOYOTA RAV4 Part Number: 00016-00081 Accessory Code: L D4000 2017 LED Fog Light & DRL 2in1 Conflicts - Vehicles w/o factory fog lights, Model 4476 Kit Contents Item # Quantity Reqd. Description 1 2 Fog
TOYOTA COROLLA FOG LIGHT
 Doc. 03.69.00 PIO / DIO Rev. C 10/11/12 TOYOTA COROLLA 2012 - FOG LIGHT Part Number: 00016-32118 Accessory Code: LF10 Conflicts - Factory code PM on model 1838 Kit Contents Item # Quantity Reqd. Description
TOYOTA RAV TRAILER WIRE HARNESS Preparation
 Preparation Part Number: PU322-42013-UW Kit Contents Item # Qty Description 1 1 Trailer Module Harness 2 1 Trailer 4-Flat Harness 3 1 Trailer Power Wire Harness 4 1 Mounting Bracket, 4-Flat 5 2 Screw #10-24
Part Number: T4R-2N1. Hardware Bag Contents. General Applicability XLE, Limited
 Date: 2.10.2016 TOYOTA RAV4 2016 2 in 1 LED UPGRADE KIT Part Number: T4R-2N1 Kit Contents Item # Quantity Reqd. Description 1 2 DRL + Fog Light Housing 2 1 Driver Box 3 1 Harness bag 4 1 User s card 5
Slave Cylinder Weep Hole Drilling Procedure
 Slave Cylinder Weep Hole Drilling Procedure Tools Required: T20 Torx Driver T25 Torx Driver T25 Torx Bit with ¼ Ratchet Wrench 4mm Hex Key (Allen wrench) 5mm Hex Key 6mm Hex Key 8mm Hex Key 12mm Hex Key
TOYOTA RAV FOG LIGHT
 TOYOTA RAV4 2011 - FOG LIGHT Part Number: 00016-12013 Accessory Code: LF10 Conflicts - Kit Contents Item # Quantity Reqd. Description 1 2 Fog Lamps 2 2 Fog Lamp s bezels 3 1 Switch Assembly 4 1 Fog light
SCION FRS FOG LIGHTS. Part Number: SFR-313
 Part Number: SFR-313 Kit Contents Item # Quantity Reqd. Description 1 2 Light Housings 2 2 Fog Light bezels 3 1 Harness bag 4 1 User s card 5 1 Switch 6 1 Fuse jumper Hardware Bag Contents Item # Quantity
 www.odometergears.com Mercedes-Benz Mechanical Odometer Repair This how to can be used for all mechanical repairs as the only difference will be the removal of the instrument cluster. http://www.dieselgiant.com/repairyourodometer.htm
GENUINE PARTS INSTALLATION INSTRUCTIONS
 GENUINE PARTS INSTALLATION INSTRUCTIONS 1. 2. 3. 4. DESCRIPTION: Accent light Kit APPLICATION: R42H (2011) PART NUMBER: 999F3 AW000 - Universal Accent Lighting Kit. KIT CONTENTS: Item QTY Description Service
Part Number: TTA-2N1. Hardware Bag Contents. General Applicability SR5, TRD Sport, TRD Off-Road, Limited
 Date: 2.10.2016 TOYOTA TACOMA 2016-2 in 1 LED UPGRADE KIT Part Number: TTA-2N1 Kit Contents Item # Quantity Reqd. Description 1 2 DRL + Fog Light Housing 2 1 Driver Box 3 1 Harness bag 4 1 User s card
Toyota Tundra Lightbar
 2014-2017 Toyota Tundra Lightbar Recommended Tools & Safety 1 Safety Glasses 1 Blanket/Fender Cover 1 10mm wrench 1 10mm socket 1 ¼ Drive 1 Razorblade 1 Plastic Trim Tool 1 Wire Router 1 Phillips Head
BMW 528i E39 Sunroof Repair
 These instructions will help guide you through the repair process for broken sunroof control rails on an E39 chassis. Before I get started, I want to give a shout-out to a couple people who also posted
Mustang CDC Lightbar (94-04) - Installation Instructions
 - Installation Instructions") Mustang CDC Lightbar (94-04) - Installation Instructions The below installation instructions work for the following products: Classic Design Concepts Mustang Convertible Lightbar (94-04 Carbon Fiber) Classic
Mustang CDC Lightbar (94-04) - Installation Instructions The below installation instructions work for the following products: Classic Design Concepts Mustang Convertible Lightbar (94-04 Carbon Fiber) Classic
Max Motorsports Clutch Quadrant and Steeda Clutch Adjuster Installation Guide
 Max Motorsports Clutch Quadrant and Steeda Clutch Adjuster Installation Guide The below installation instructions work for the following products: Maximum Motorsports Aluminum Mustang Clutch Quadrant (79-04)
Part Number: TTU-BGB14-DRL TTU-BGP14-DRL
 11/15/16 TOYOTA TUNDRA 2014-17 Billet Grille w/led DRL Part Number: TTU-BGB14-DRL TTU-BGP14-DRL Kit Contents Item # Quantity Reqd. Description 1 2 LED DRL 2 1 Driver Box 3 1 Switch 4 1 User Card 5 2 Hardware
Part Number: TRA-316/TRA-816
 Date: 07.29.2016 TOYOTA RAV4 2016- FOG LIGHT (Halogen/LED) Part Number: TRA-316/TRA-816 Kit Contents Item # Quantity Reqd. Description 1 2 Light Housings 2 2 Light Bezels 3 1 Wire Harness Bag* 4 1 Connector
TOYOTA CAMRY FOG LIGHT
 Date: 05.01.2014 TOYOTA CAMRY 2012-14 FOG LIGHT (Halogen and LED) Part Number: TCA-312 Kit Contents Item # Quantity Reqd. Description 1 2 Light Housings 2 2 Fog Light Bezels 3 1 Switch Assembly 4 1 Fog
Part Number: TAV-713 TOYOTA AVALON LED DRL
 Part Number: TAV-713 Kit Contents Item # Quantity Reqd. Description 1 2 DRL s bezels w/led DRL 2 1 Driver Box 3 1 Harness bag 4 1 User s card 5 1 Cushion pad 6 1 Switch 7 2 Drill Jigs Hardware Bag Contents
Gentex Homelink Installation Instructions
 Gentex Homelink Installation Instructions Kit Contents: Item Qty Part Description 1 Number GENK-41 NVS Homelink Mirror GENK-42 NVS Homelink w/mood lights 1 of the GENK-45 NVS Homelink w/compass following
Retro it Steering Column
 Retro it Steering Column INSTALLATION INSTRUCTIONS for 1976-86 CJ5 & CJ7 FOR PART NUMBER S: 1520800010, 1520800020, 1520800051, 1526800010, 1526800020, 1526800051 S I NCE 1986 Instruction # 8000000010
Installation MKIV Headlight Housings with Fog Lamps (Procedures apply to both MKIV Jetta and Golf)
") Page 1 This tutorial is provided as a courtesy by ECS Tuning. Service Procedure Installation Proper service and repair procedures are vital to the safe, reliable operation of all motor vehicles as well
Page 1 This tutorial is provided as a courtesy by ECS Tuning. Service Procedure Installation Proper service and repair procedures are vital to the safe, reliable operation of all motor vehicles as well
Small knife. Remove black panel shown. Save 6 retaining pins for re-install later.
 2005-2009 Ford Mustang V6 Fog Light Wiring Kit Parts List: Quantity: Tools Required: Wiring harness 1 Flat head screwdriver PB-3425 Parts Bag 1 Ratchet & Socket set OR Ford OEM Switch (if you 1 Adjustable
JHP 04 GTO SPORTS BINNACLE KIT INSTALL GUIDE
 JHP 04 GTO SPORTS BINNACLE KIT INSTALL GUIDE NOTE: If you don't feel comfortable with any of the following steps, you should find a professional to do the installation. 1) Use a piece of tape as shown
TOYOTA TACOMA FOG LIGHT
 TOYOTA TACOMA 2012 - FOG LIGHT Part Number: 00016-35220 Accessory Code: LF10 Conflicts - Factory Fog Lights Kit Contents Item # Quantity Reqd. Description 1 2 Fog Lamps 2 1 Hardware bag 3 1 Switch Assembly
Remove the 3-11mm nuts holding mirror on. Don t drop the nuts!
 2005-2012 Ford Mustang Puddle Lamp Kit Parts List: Quantity: Tool List: LED Lamps 2 Flat head screwdriver Seals 2 Ratchet & Socket set OR Nuts 2 Adjustable Wrench Wiring harness 1 Drill & 11/16 th bit
Triumph Street Triple VSM Grip Heater Install
 Triumph Street Triple VSM Grip Heater Install Introduction: With winter fast approaching and with painful memories of last winter riding with the club it was time to do something about getting some grip
BMS F1X M5/M6 S63TU Stage1 Install Guide
 BMS F1X M5/M6 S63TU Stage1 Install Guide Last updated 10/22/2018 Use subject to terms and conditions posted at http://www.burgertuning.com/terms.htm THIS PART IS LEGAL FOR USE ONLY IN COMPETITION RACING
Conflicts. TOYOTA TUNDRA 201 LED Fog Light & DRL 2in1. Part Number: Accessory Code: LD4000
 TOYOTA TUNDRA 201 LED Fog Light & DRL 2in1 Part Number: 00016-00081 Accessory Code: LD4000 Conflicts 1.) Vehicles w/o factory foglight / Blind spot Monitor 2.) Vehicles with remote control mirror w/seat
Ford Mustang GT-Style Fog Light Kit Parts List: Quantity: Tool List:
 2013-2014 Ford Mustang GT-Style Fog Light Kit Parts List: Quantity: Tool List: Fog light (Left& Right) 2 Flat head & Phillips screwdriver Upper grille with surround 1 Ratchet & Socket set OR Lower grille
MKVI Jetta Fog Light Kit
 MKVI Jetta Fog Light Kit Part Number VW Jetta Fog Light Installation This tutorial is provided as a courtesy by ECS Tuning. Proper service and repair procedures are vital to the safe, reliable operation
2001 V70 T5 ETM Removal and Cleaning Directions
 2001 V70 T5 ETM Removal and Cleaning Directions Howard Cheng howardc64@gmail.com 10/24/05 Version 1.4 Read this before you start I performed this ETM cleaning because I had gotten 2 reduced performance
INSTALLATION INSTRUCTIONS FUEL SURGE TANK KIT
 INSTALLATION INSTRUCTIONS FUEL SURGE TANK KIT BMW E46 3-Series, Excl Convertible Document: 19-0056 Support: info@radiumauto.com Relieve fuel pressure in vehicle before beginingthe installation. Disconnect
GIVE ME A BRAKE Light Kit 2005 / 2006 MINI Cooper/Cooper S Brake Light Modification
 Page 1 of 6 GIVE ME A BRAKE Light Kit 2005 / 2006 MINI Cooper/Cooper S Brake Light Modification ****Pages 1 and 2 apply only to non-convertible MINI s**** ****for convertibles please go to page 5**** This
Toyota Tacoma Winch Mount Bumper Installation Instructions Tools Required: Transmission cooler relocation brackets Torque Wrench
 2016-2017 Toyota Tacoma Winch Mount Bumper Installation Instructions Tools Required: Items Included: Small flat head screw driver Winch Mount Ratchet, 10mm, 12mm, 14mm, 17mm & Skid Plate 19mm sockets Transmission
Installation Manual TWM Performance Short Shifter Nissan 350Z, 370Z Infiniti G35, G37
 Installation Manual TWM Performance Short Shifter Nissan 350Z, 370Z Infiniti G35, G37 It is preferable to park on a flat surface, as you will have to engage and disengage the hand brake and shift from
TOYOTA TACOMA LED DRL Black-Out
 TOYOTA TACOMA 2013 - LED DRL Black-Out Part Number: 00016-35021 Accessory Code: LDBO10 Conflicts - Fog Lights Kit Contents Item # Quantity Reqd. Description 1 2 DRL Housing 2 1 Driver Box 3 1 Harness bag
HID INSTALLATION ON RST1000 Futura
 HID INSTALLATION ON RST1000 Futura Disclaimer: This is a full description of what I have done to my motorcycle. I am in no way suggesting you do as I have done by following these instructions. I have not
Installation Instructions
 Installation Instructions Jeep JK 2-Door (2011 Present) Mounting Bracket and Air Line System Kit for ARB On-Board Twin Air Compressor (CKMTA12) Made in the USA Kit Contents: 1 Flat Bracket 1 Formed Bracket
Stand Alone Fog Lights Installation Instructions
 Tools Required: 1. Trim Removal tool or protected flat screwdriver 2. #2 Phillips Screwdriver 3. 10mm socket 4. 10mm wrench 5. 8mm or 5/16 socket 6. Adjustable Pliers 7. Electrical Tape WARNING!!! Disconnect
Installation Manual TWM Performance Toyota GT86 / Scion FRS / Subaru BRZ Direct Replacement Short Shifter
 Installation Manual TWM Performance Toyota GT86 / Scion FRS / Subaru BRZ Direct Replacement Short Shifter Begin the installation by parking on a flat surface, place wooden blocks in front or behind the
IT IS IMPORTANT THAT YOU OBTAIN THE CORRECT INFORMATION FOR YOUR VEHICLE, OR DAMAGE TO THE WIRING SYSTEM COULD OCCUR.
 Instructions for Universal Harness PRINT THESE INSTUCTIONS Gentex Mirror Installation Instructions Provided by www.rearviewautomirrors.com These instructions have been prepared to provide you with details
Installation Manual TWM Performance Short Shifter Cobalt SS/SC, SS/TC, HHR SS, Ion Redline and Saab 9-3
 Page 1 Installation Manual TWM Performance Short Shifter Cobalt SS/SC, SS/TC, HHR SS, Ion Redline and Saab 9-3 Please Note: It is preferable to park on a flat surface, as you will have to engage and disengage
Installation Instructions
 Installation Instructions Jeep JK Unlimited (2007 Present) Mounting Bracket and Air Line System Kit for ARB On-Board Twin Air Compressor (CKMTA12) Made in the USA Kit Contents: 1 Bracket for ARB Compressor
Remove 4 circled pins. Route wiring along dashed line. Remove the 2 9mm nuts and black retaining plate that secure extractor.
 2015 Ford Mustang Turn Signal Hood Kit Parts List: Quantity: Tool List: Bracket & pre-installed lamp 2 Flat head screwdriver Wiring harness 1 Phillips screwdriver PB-3660 Parts Bag 1 Ratchet & Socket set
Part Number: TCA-712SE
 Date: 09.04.2013 TOYOTA CAMRY SE 2012-14 LED DRL Part Number: TCA-712SE Kit Contents Item # Quantity Reqd. Description 1 2 DRL s bezels w/led DRL 2 1 Driver Box 3 1 Harness bag 4 1 User s card 5 1 Cushion
Part Number: T4R-2IN1
 Date: 12.11.2014 TOYOTA HIGHLANDER 2015 LED Fog Light & DRL 2in1 Part Number: T4R-2IN1 Kit Contents Item # Quantity Reqd. Description 1 2 DRL + Fog Light Housing 2 1 Driver Box 3 1 Harness bag 4 1 User
TOYOTA TACOMA FOG LIGHT
 TOYOTA TACOMA 2013 - FOG LIGHT Part Number: 00016-35220 Accessory Code: LF10 Conflicts - Factory Fog Lights Kit Contents Item # Quantity Reqd. Description 1 2 Fog Lamps 2 1 Hardware bag 3 1 Switch Assembly
STEPS FOR REMOVING REAR ASHTRAY & CUP HOLDER, CENTER ARMREST, E- BRAKE CONSOLE, FRONT ASHTRAY, LOWER CENTER CONSOLE AND GLOVE BOX
 Please give credit where credit is due! This DIY was completed ENTIRELY by the hardest working VW Vortex moderator on the site!! Gary Thompson, Ph.D. - vortex ID VGRT6, email address vgrt6@yahoo.com. Please
Part Number: T4R-2N1. Hardware Bag Contents. General Applicability. Conflicts - Limited Models
 Date: 12.11.2014 TOYOTA HIGHLANDER 2014-2016 LED Fog Light & DRL 2 in 1 Part Number: T4R-2N1 Kit Contents Item # Quantity Reqd. Description 1 2 DRL + Fog Light Housing 2 1 Driver Box 3 1 Harness bag 4
TOYOTA SIENNA LED DRL Black-Out
 TOYOTA SIENNA 2013 - LED DRL Black-Out Part Number: 00016-08021 Accessory Code: LDBO10 Conflicts - Fog Lights Kit Contents Item # Quantity Reqd. Description 1 2 DRL Housing 2 2 DRL s bezels 3 1 Driver
Lexus ES Fine Mesh and Adaptive Cruise Control Fine Mesh Grilles Upper and Lower Replacements
 IMPORTANT: PLEASE KEEP THIS INSTRUCTION MANUAL FOR FUTURE REFERENCE! 2013-15 Lexus ES Fine Mesh and Adaptive Cruise Control Fine Mesh Grilles Upper and Lower Replacements Part #1372-0102-13 / Black Ice
PDC RETROFIT INSTALLATION By Kevin
 1 PDC RETROFIT INSTALLATION By Kevin Kshek369@hotmail.com 1 These instructions are intended to help those who chose to do this retrofit by showing you what you are in store for and to give you some instructions
Installation Directions for FINGER STICK and Blocker Plate
 Installation Directions for FINGER STICK and Blocker Plate What is a Finger Stick? A Finger Stick is a simple circuit that modifies the MAF signal on LLY and LBZ engines (not LB7 engines) to expected levels
Special Note About The JDM High Performance Water Pump:
 Page 1 of 30 JDM Engineering, Inc. home Call Us! 732-780- 0770 back to Installation Instructions Electric Fan Upgrade Kit Electric Fan Wiring Diagram Thank you for your purchase of the JDM Engineering
TOYOTA TACOMA LED DRL. Part Number: TTA-712
 Part Number: TTA-712 Kit Contents Item # Quantity Reqd. Description 1 2 DRL s bezels w/led DRL 2 1 Driver Box 3 1 Harness bag 4 1 User s card 5 1 Switch Hardware Bag Contents Item # Quantity Reqd. Description
Part Number: TAV-713. Kit Contents Item # Quantity Reqd. Description 1 2 DRL s bezels w/led DRL. Hardware Bag Contents.
 Date: 09.04.2013 TOYOTA AVALON 2013 - LED DRL Part Number: TAV-713 Kit Contents Item # Quantity Reqd. Description 1 2 DRL s bezels w/led DRL 2 1 Driver Box 3 1 Harness bag 4 1 User s card 5 1 Cushion pad
Conflicts: Vehicles without a sunroof Vehicles with a single sunroof
 Toyota Sienna (Dual Sunroof) 2011-10.2 Overhead Video Part Number: 00016-00110 00016-00110-17 Fit Kit 00016-00120 00016-00120-17 Fit Kit Accessory Code: ED5 Conflicts: Vehicles without a sunroof Vehicles
Mustang Radiator Conversion DIY. By GearHeadPeter. January 27, 2011
 1964-1966 Mustang Radiator Conversion DIY By GearHeadPeter January 27, 2011 We all know that the radiators in our cars are not the best, especially if you have done any customization to the engine, which
Fitting the Bell Auto Services (B-A-S) TDV6 EGR Blanking Kit to a 2006 model Discovery 3 TDV6 HSE
 TDV6 EGR Blanking Kit to a 2006 model Discovery 3 TDV6 HSE") Fitting the Bell Auto Services (B-A-S) TDV6 EGR Blanking Kit to a 2006 model Discovery 3 TDV6 HSE Before I describe how I did this, I must first thank other members of the Disco3.co.uk forum (namely J,moore
Fitting the Bell Auto Services (B-A-S) TDV6 EGR Blanking Kit to a 2006 model Discovery 3 TDV6 HSE Before I describe how I did this, I must first thank other members of the Disco3.co.uk forum (namely J,moore
Nissan GTR Alpha Fuel System
 Nissan GTR Alpha Fuel System Instructions V5 The goal of AMS is to provide the highest quality, best performing products available. By utilizing research and development, and rigorous testing programs
Procharger Stage II Intercooled Supercharger System (11-14 GT)
") Procharger Stage II Intercooled Supercharger System (11-14 GT) Installation Time: Approximately one day. Installed on 2012 Mustang GT 5.0/Manual Required Tools 3/8 Socket Set (Standard and Metric) 1/2
Procharger Stage II Intercooled Supercharger System (11-14 GT) Installation Time: Approximately one day. Installed on 2012 Mustang GT 5.0/Manual Required Tools 3/8 Socket Set (Standard and Metric) 1/2
Chevy Colorado / GMC Canyon INSTALL GUIDE
 Chevy Colorado / GMC Canyon INSTALL GUIDE S-TECH Switch Systems DEVELOPED, DESIGNED, MANUFACTURED and Assembled in the Rocky Mountains of Colorado, known to many as JEEP COUNTRY. Trail riding at 10,000