INSTALLATION INSTRUCTIONS
|
|
|
- Poppy Floyd
- 5 years ago
- Views:
Transcription
 Congratulations!")
1 INSTALLATION INSTRUCTIONS North Ave. Sanger, CA local: fax: toll free: Lowering Spindle Assembly Installation Instructions ½ TON SILVERADO / SIERRA (GMT 800 / 880) Congratulations! You were selective enough to choose a BELLTECH PRODUCT. We have spent many hours developing our line of products so that you will receive maximum performance with minimum difficulty during installation. Note: Warning: Warning: Reminder: Note: Confirm that all of the hardware listed in the parts list is in the kit. Do not begin installation if any part is missing. Read the instructions thoroughly before beginning this installation. DO NOT work under a vehicle supported by only a jack. Place support stands securely under the vehicle in the manufacturer s specified locations unless otherwise instructed. DO NOT drive vehicle until all work has been completed and checked. Torque all hardware to values specified. Proper use of safety equipment and eye/face/hand protection is absolutely necessary when using these tools to perform procedures! It is very helpful to have an assistant available during installation. RECOMMENDED TOOLS: o Properly rated Floor Jack, Support Stands o ½ square drive 12mm Hex Bit Socket and Wheel Chocks o Internal Spring Compressor o Air Hammer with Chisel and Punch Attachments o Metric Socket Set, including: 10, 13, 15, 16, 18mm o Metric Wrench Set, including: 8, 10, 15, 18, 24mm o Metric Hex Key Set, including: 6mm o Flat Blade Screwdriver (small) o Felt Tipped Pen o Standard Socket Set, including: ½, ¾ o Standard Wrench Set, including: ½, ¾ o ½ drive Torque Wrench o Die Grinder with abrasive cut-off wheel o Medium weight ball-pen hammer o Metal File o Punch or Drift o Spray Lubrication o 15 inches of Heavy Gage Wire KIT INSTALLATION As this is a relatively complex installation, we recommend that qualified mechanic at a properly equipped repair facility perform it. We also recommend that the installation be performed on a firm, flat, and level surface, such as seasoned asphalt or concrete. The use of safe and properly maintained equipment is very important! In order to document any possible irregularities in the factory ride height of your vehicle, please take a few moments to fill out the initial portion of the Belltech Vehicle Inspection Record included with these instructions. 1. Jacking, Supporting, and Preparing the Vehicle a. Block the rear wheels of the vehicle with appropriate wooden blocks or wheel chocks. Make sure the vehicle s transmission is in Park (Automatic) or 1 st gear (Manual). Activate the parking brake. Loosen, but DO NOT REMOVE, the front wheel lug nuts. b. Properly lift and support the front of the vehicle as described in the vehicle Owner s or Shop Manual. 1
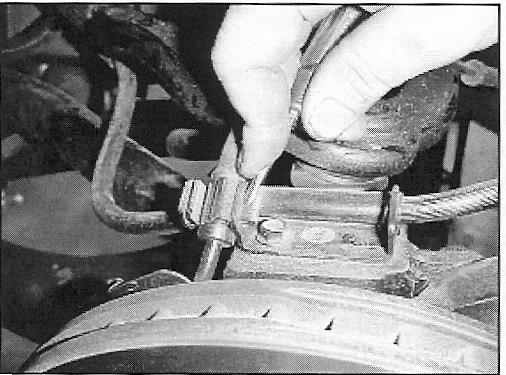
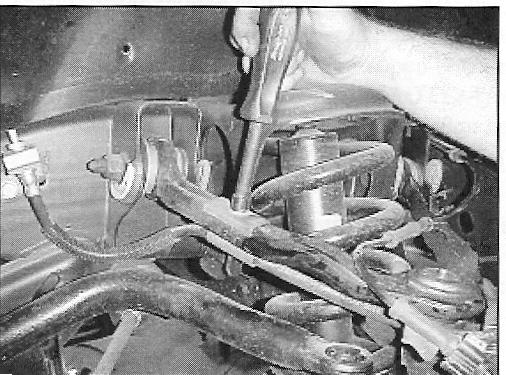
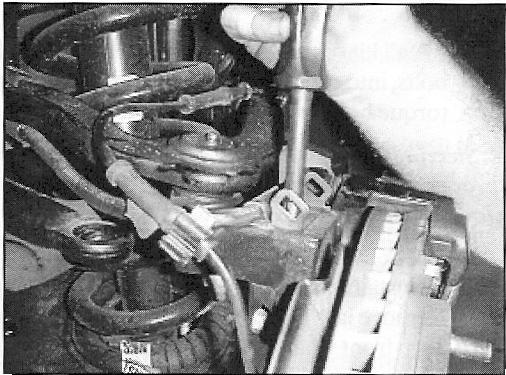
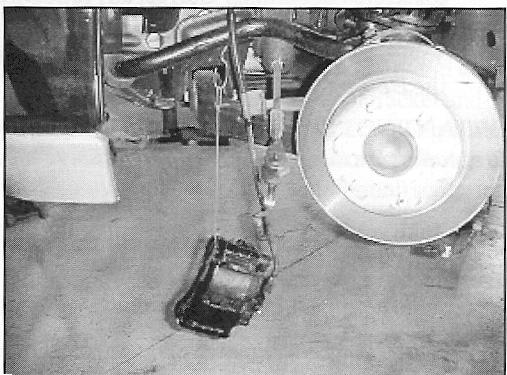
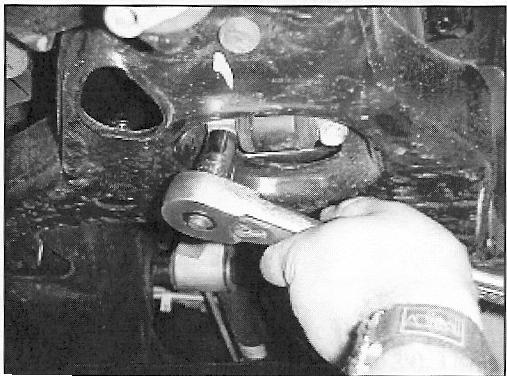
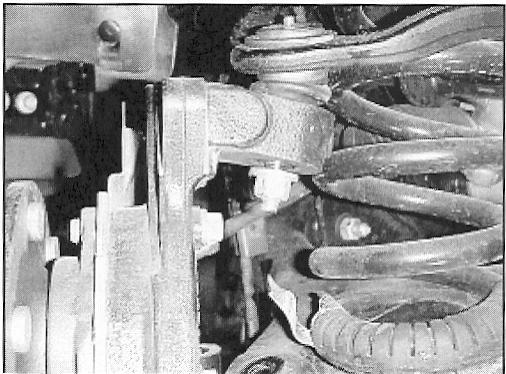
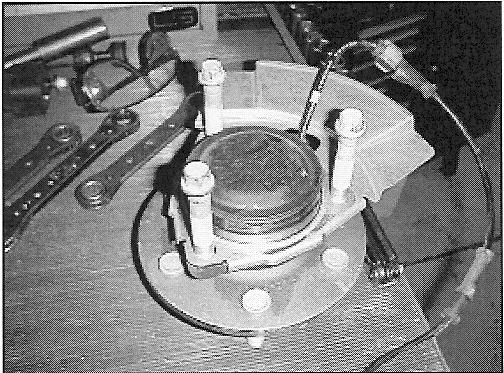
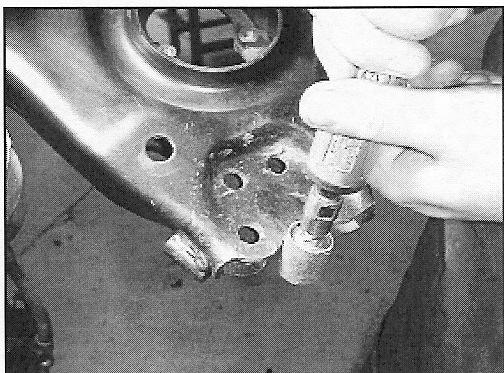
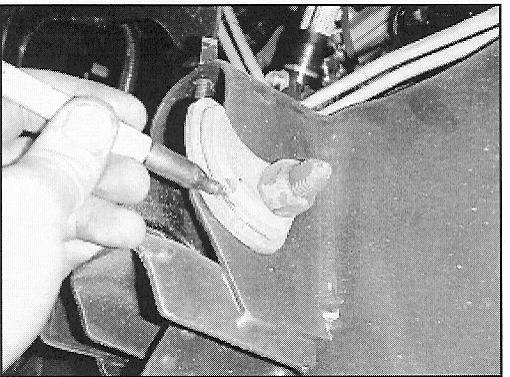
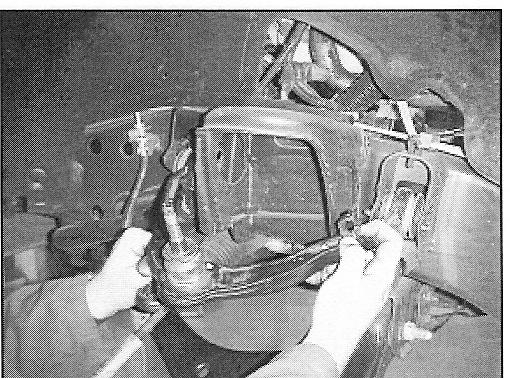
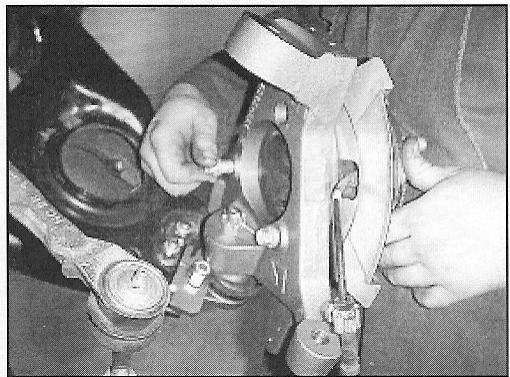
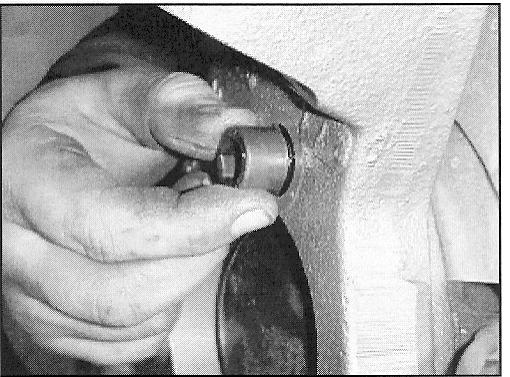
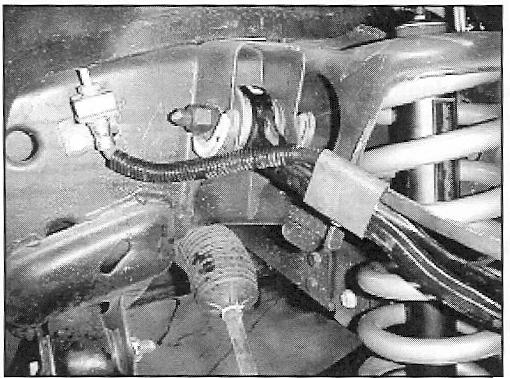
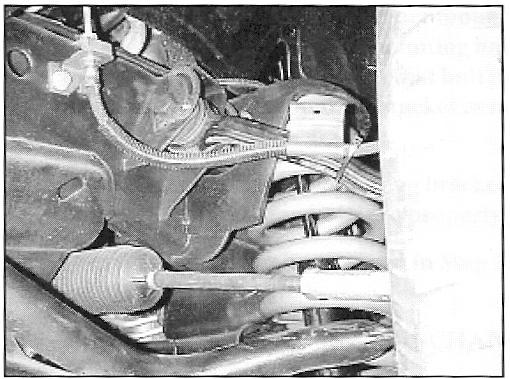
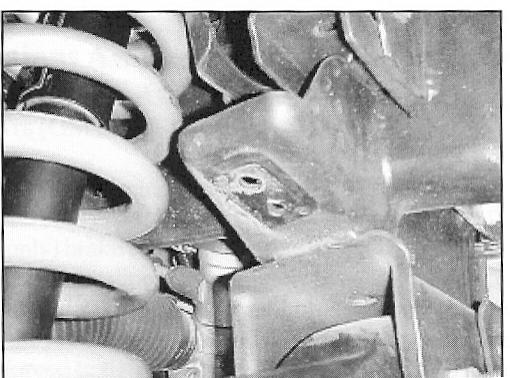
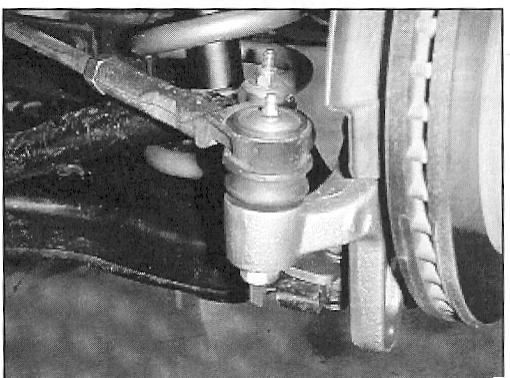
2 c. Position a set of jack stands, rated for the vehicle s weight, so that they contact the forward frame rails of the vehicle, just behind the front wheels. Slowly lower the vehicle onto the stands and, before placing the vehicle s entire weight on them, check that they properly and securely contact the frame rails. NOTE: Check for safe vehicle stability before proceeding under the vehicle to begin the following procedures. NEVER work under a vehicle supported only by a jack. Always use properly rated jack stands to support the vehicle. 2. Front Anti-Roll Bar Removal a) Remove front wheels. b) Using a 16mm socket and 15mm open-end wrench, remove front anti-roll bar end-links from both left and right lower control arms. c) Using floor jacks, support center portion of front anti-roll bar. d) Using a 10mm socket, remove the four bolts attaching two (2) anti-roll bar pivot-bushing brackets to frame. Remove anti-roll bar from vehicle and store for later reinstallation. Important: Note the factory orientation of the front anti-roll bar, as this will be important during subsequent steps. 3. Front Suspension and Brake Disassembly a) Remove front wheels b) Working from the Driver s side of the vehicle, remove factory bump stop (Photo1). c) Using a 18mm open-end wrench, remove nut attaching tie-rod end to steering arm of factory spindle. Using medium weight hammer, gently tap unthreaded portion of tie-rod end, protruding from underside of steering rack output shaft up and away from spindle, towards the front of vehicle. Inspect tie-rod end for wear or damage, and replace if necessary. d) Using small, flat-bladed screwdriver (or small tool), unplug ABS sensor wire from wiring harness. The plug is located above the upper spring frame pocket. Remove sensor wire from plastic clips on frame bracket and upper control arm (Photo 2). Remove integral sensor wire clip from metal brake hose bracket located on top surface of spindle (Photo 3). e) Using 10mm socket, remove small screw attaching brake hose-to-upper control arm mounting bracket to forward section of upper control arm (Photo 4). Remove metal brake hose bracket from control arm. f) Using 10mm socket, remove small screw attaching brake hose bracket to top surface of spindle (Photo5). g) Using heavy gauge wire, fabricate a J hook, approximately 10 inches in length, to hang front brake caliper from frame rail in following steps. h) Using an 18mm socket, remove two brake caliper bolts attaching caliper to spindle. Remove caliper from spindle by sliding it away from brake rotor, being careful not to stretch rubber brake hose. If brake rotor spring clips were not present, remove brake rotor now. i) Move the brake caliper and hose assembly towards the front of wheel opening, just forward of the front suspension. Using J hook fabricated in Step #4, safely support the caliper from an accessible hole or slot in frame rail (Photo 6). Note: BE CAREFUL not to stretch or damage rubber brake hose. j) If equipped, remove brake rotor retaining spring clips and then brake-rotor from spindle-hub assembly. 2
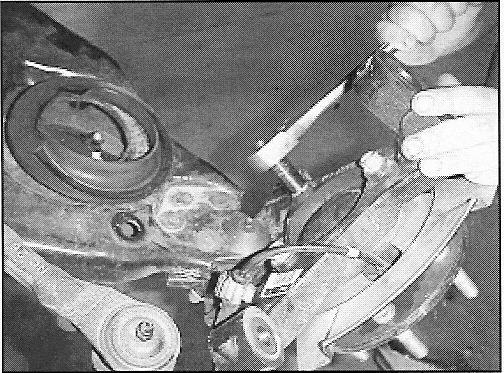
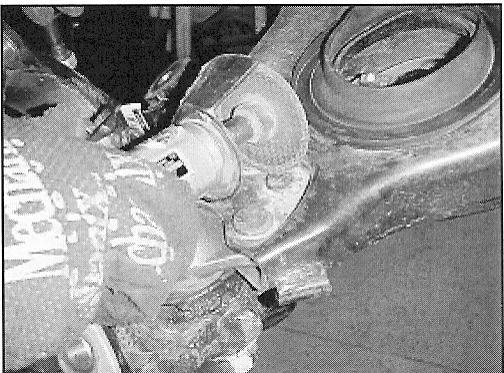
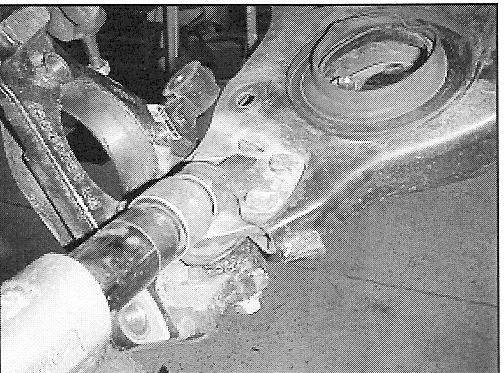
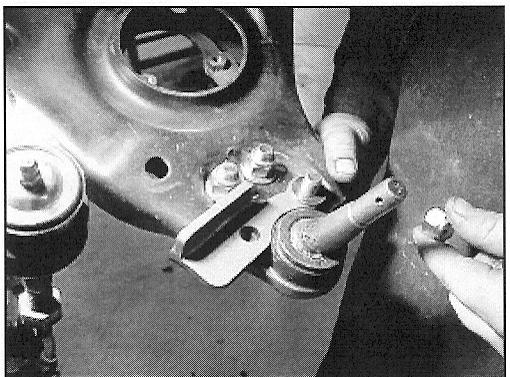
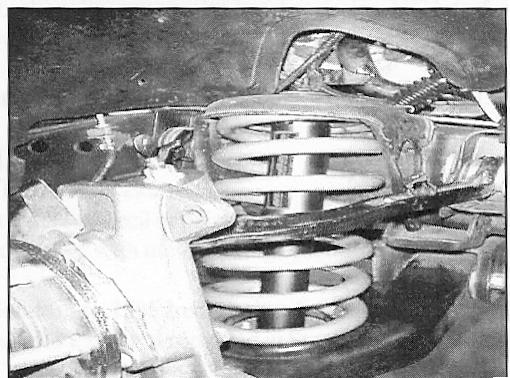
3 k) Using 13mm socket, remove two (2) lower shock absorber attachment-bolt from underside of lower control arm (Photo 7). Remove top shock absorber attachment nut and bushing from upper spring pocket. Remove shock absorber, from inside of coil spring, by sliding it through the opening in the underside of lower control arm. NOTE: Check wheel studs to verify that the vehicle is equipped with brake rotor retaining spring clips. If clips are not present, use caution when removing brake caliper in following steps, so that brake rotor is not dropped and damaged during disassembly. 5. OEM Spring and Spindle-Hub Assembly Removal a) Using the floor jack, support underside of lower control arm. b) Using an 18mm open-end wrench, loosen two turns, but DO NOT completely remove, the lock nut attaching upper control arm ball-joint to spindle (Photo 8). Use a 6mm hex key, fitted into end of stud, to prevent rotation if necessary. c) Using a medium weight hammer, gently tap the spindle upper ball-joint tab until the ball-joint disengages from its tapered bore (Photo 9). d) Using a strong chain, secure the spring to the lower control arm to prevent damage and injury in the event of a spring compressor failure. WARNING! Use extreme caution when working with coil springs as they store a large amount of energy and can do great harm to both people and property IMPORTANT NOTE: Coil spring tension will force the ball-joint from its tapered bore when the upper ball-joint tab is struck with the hammer. The loosened locknut will prevent the spindle from completely separating from the upper control arm. DO NOT attempt this procedure without the upper ball-joint locknut loosened and in place! e) Install the spring compressor inside the coil spring and, following the tool manufacturer s instructions, compress the spring. f) Lower the floor jack slightly and remove the coil spring, noting its orientation. Remove the spring compressor from the coil spring immediately. NOTE: When using the Belltech lowering coils, remove the factory spring (rubber) isolator from the top end of OEM coil spring for later use. g) With the floor jack still supporting the lower control arm and the coil spring removed, remove the upper ball-joint locknut loosened in Step 4 (b). Raise the upper control arm and separate the OEM spindle from the upper control arm ball-joint (Photo 10). h) Using a 15mm wrench, remove the three (3) bolts attaching the central hub assembly to the spindle body (Photo11). Retain two (2) of these three (3) bolts for use in later steps. i) Carefully remove the hub assembly and the small backing plate from the spindle body (Photo 12). Note the orientation of the ABS sensor and sensor wire. Be careful to avoid damaging the ABS sensor wire. Store these parts in a safe place for later reinstallation. 3
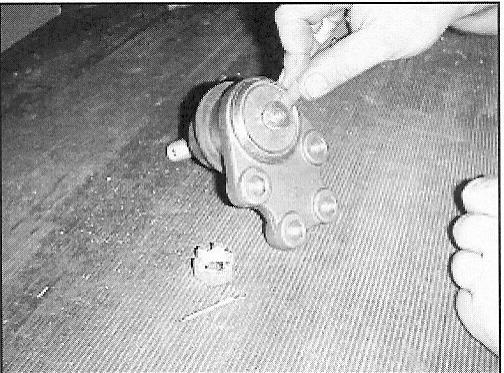
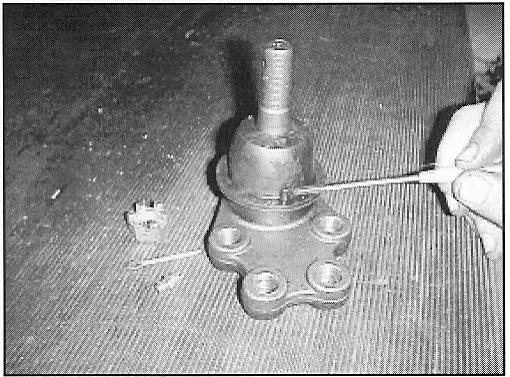
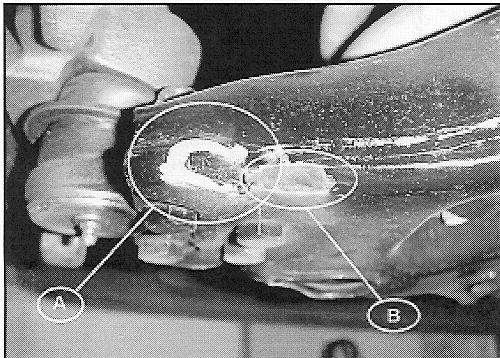
4 5. Lower Ball-joint Removal IMPORTANT NOTE: The following steps require an above average amount of patience, and mechanical skill. Also, the skillful use of the proper tools and safety equipment is absolutely necessary. We recommend that you DO NOT ATTEMPT these steps unless you have the time, patience, knowledge, tools, and mechanical ability to perform them in a reasonable amount of time. A very sound option is to remove the OEM lower control arms and spindle from the vehicle and have a qualified professional installation facility perform the lower ball-joint removal for you. With the lower control arm still supported with the floor jack, separate the OEM lower ball-joint from the lower control arm as follows: a) Using a die grinder (or similar tool) equipped with a cut-off wheel, carefully grind 1/8 slots in the top heads of the four (4) rivets attaching the ball-joint to the control arm (Photo 13). Note: Proper use of safety equipment and eye / face / hand protection is absolutely necessary when performing these procedures! b) Using an air hammer equipped with a chisel tool bit (Photo14), shear the rivet heads from their shanks. Note: Be very careful to avoid damaging lower control arm with the chisel tool bit. c) Using an air hammer equipped with a punching tool bit, remove the rivet shanks attaching the ball joint to the lower control arm. Note: Be very careful to avoid damaging lower control arm with the punching tool bit. d) Remove any burrs, from around holes in the lower control arm using a file or similar tool. e) Using a hammer as required, remove the factory lower ball-joint assembly from the lower control arm pocket. Note: Be very careful to avoid damaging the lower control arm. Remove the factory spindle and the lower ball-joint from the lower control arm NOTE: Another option is to remove the OEM lower control arm and spindle assembly from the vehicle and use an hydraulic press to separate rivet shanks from the control arm (after heads are removed). 6. Belltech Lower Ball-joint Installation a) Working with the kit supplied Belltech lower ball-joint, install grease fitting into threaded hole (Photo 15). Hand-tighten with 8mm open-end wrench. b) Using a grease gun lube the ball joint at the grease fitting. c) Install the Belltech lower ball-joint assembly into the control arm. Important Note: The ball-joint stud must be installed pointing up, opposite from factory orientation. Align holes in lower control arm with holes in ball-joint housing using punch or similar tool. IMPORTANT NOTE: It may be necessary to grind a small amount of material from the curved edge of the lower control arm (Photo 16) in order for the holes in the ball-joint to properly align with holes in lower control arm. d) Insert four (4) ½ - 20 x 2 hex head bolts, from the underside of the lower control arm, through holes aligned in Step 6 (b), making sure that the heads seat flush with the flat underside area of the lower control arm. Note: DO NOT use washers between the bolt heads and control arm, as there is not enough clearance. e) Fasten the inner two bolts (farthest from ball-joint) first; prior to installing steering stop Step 6 (e) below, using washers and locknuts (Photo 17). Using a ¾ socket and open-end wrench, tighten and torque the bolts to 110ft-lbs using torque wrench. 4
5 f) Install the steering stop as shown in (Photo 18), with the long end pointed toward front of vehicle, over the outer most bolts (closest to ball-joint). Fasten the two bolts and steering stop to control arm using washers and locknuts. Using a ¾ socket and open-end wrench, tighten and torque bolts to 110ft-lbs using torque wrench. IMPORTANT NOTE: Fasten the inner two bolts prior to installing the steering stop, so that the nuts can be easily accessed with a ¾ open-end wrench g) Install grease boot over upward-facing ball-joint stud as indicated on boot. Note: The grease boot has a small raised bump, located on the outside portion of the largest diameter (Photo 19). The grease boot should be installed so that this raised bump is oriented towards the inside of the vehicle. 7. Reversing the Orientation of Upper Control Arm a) Using 21mm socket and open-end wrench, remove the two (2) nuts attaching the upper control arm pivot bolts to the frame mounts. Remove the pivot bolts. Using a felt-tipped pen, mark the factory alignment position on upper control arm wheel alignment guide plates (Photo 20). b) Note orientation of the factory wheel alignment adjustment guide-plates. Remove the guide plates from the frame mounts. Remove the upper control arm from the frame mounts. c) Remove the plastic ABS sensor wire clip from its location in the upper control arm. Re-install the clip in opposite hole, but from the opposite side (Photo 21). d) Check condition of the OEM upper ball-joint. If excessive wear is detected, replace as necessary, following instructions in the vehicle Shop Manual. e) Turn (flip) the upper control arm over. Re-install the upper control arm, into frame mounts, with the ball-joint stud now facing up. IMPORTANT NOTE: The upper control arm must be flipped and installed with the ball-joint stud pointing up. f) Re-install the wheel alignment guide plates, pivot bolts and nuts as removed in Step 7 (b). Be sure to align the slots in the guide-plates with the pins located on the frame mounts. g) Tighten and torque nuts to 140 ft-lbs. Note: When tightening nuts, be sure to align marks made in Step 7 (a). This temporary wheel alignment should allow vehicle to be driven to a competent wheel alignment facility after completing installation. PART LIST FOR 2505-DROP SPINDLE KIT PART# DESCRIPTION QTY Spindle casting L.H Spindle casting R.H Ball Joint Lower A-Arm Sckt Cap Screw 14mm-1.5x50mm Flange Nut w/nylon Insert Cap Screw ½ -20 x Nylon Insert Lock Nut ½ Flat Washer ½ Cap Screw 3/8-16 x Nylon Insert Lock Nut 3/ Washer Cup Large 2 5


6

7


8

9

10
11 11


12 INSTALLATION INSTRUCTIONS ADDENDUM Belltech #2505 Lowering Spindle Assembly ½ Ton Silverado/Sierra (GMT 800/880) 12
13 13

14 14
15 15
INSTALLATION INSTRUCTIONS
 INSTALLATION INSTRUCTIONS 2102 LOWERING SPINDLE ASSEMBLY 1998-UP CHEVROLET / GMC BLAZER / X-TREME / JIMMY / ENVOY 2 Wheel Drive Congratulations! You were selective enough to choose a BELLTECH PRODUCT.
INSTALLATION INSTRUCTIONS
 INSTALLATION INSTRUCTIONS 1075 North Ave. Sanger, CA 93657-3539 local: 559-875-0222 fax: 559-876-2259 toll free: 800-445-3767 3100-3200 3 DROPPED FRONT SPINDLE 73-87 1/2 TON C-10 PICK-UP / 1/2 TON BLAZER
INSTALLATION INSTRUCTIONS
 INSTALLATION INSTRUCTIONS --1075 North Ave. Sanger, CA 93657-3539 local: 559-875-0222 fax: 559-876-2259 toll free: 800-445-3767-- 2509 2 DROP SPINDLE 2WD 4WD AWD >>> Must Use 17 Wheels or larger
INSTALLATION INSTRUCTIONS
 INSTALLATION INSTRUCTIONS --1075 North Ave. Sanger, CA 93657-3539 local: 559-875-0222 fax: 559-876-2259 toll free: 800-445-3767-- 2000 1984 1991 Toyota 2 Wheel Drive Pick-Ups 2 Front Dropped Spindles Congratulations!
INSTALLATION INSTRUCTIONS
 INSTALLATION INSTRUCTIONS --1075 North Ave. Sanger, CA 93657-3539 local: 559-875-0222 fax: 559-876-2259 toll free: 800-445-3767-- 2511 2 DROP SPINDLE 2WD (Must Use 17 or larger wheels AND be used for 3+
INSTALLATION INSTRUCTIONS
 INSTALLATION INSTRUCTIONS ----1075 North Ave. Sanger, CA 93657-3539 toll free: 800-445-3767 web: www.belltechcorp.com---- 6636 HANGER and SHACKLE KIT 95 99 CHEVY TAHOE / GMC YUKON Congratulations! You
INSTALLATION INSTRUCTIONS
 INSTALLATION INSTRUCTIONS ----1075 North Ave. Sanger, CA 93657-3539 toll free: 800-445-3767 web: www.belltechcorp.com---- 6419 HANGER & SHACKLE KIT FORD F-150 Congratulations! You were selective enough
INSTALLATION INSTRUCTIONS
 INSTALLATION INSTRUCTIONS 1075 North Ave. Sanger, CA 93657-3539 local: 559-875-0222 fax: 559-876-2259 toll free: 800-445-3767 av1075 North Ave Sanger, CA 93657-3539 local: 559-875-8883 fax: 559-875-9883
INSTALLATION INSTRUCTIONS
 INSTALLATION INSTRUCTIONS 2100 DROPPED FRONT SPINDLE CHEVROLET 2WD S-10 / S-15 PICKUP / BLAZER / JIMMY, including models with ABS General Motors G-Body Rear Wheel Drive Cars CONGRATULATIONS! You were selective
INSTALLATION INSTRUCTIONS
 INSTALLATION INSTRUCTIONS --1075 North Ave. Sanger, CA 93657-3539 local: 559-875-0222 fax: 559-876-2259 toll free: 800-445-3767-- 6522 REAR AXLE FLIP & SHACKLE KIT 07-UP CHEVROLET 1500 REGULAR CAB ONLY
INSTALLATION INSTRUCTIONS
 INSTALLATION INSTRUCTIONS ----1075 North Ave. Sanger, CA 93657-3539 toll free: 800-445-3767 web: www.belltechcorp.com---- 6592 REAR HANGER & SHACKLE KIT DODGE RAM 2500 / 3500 Congratulations! You were
INSTALLATION INSTRUCTIONS
 INSTALLATION INSTRUCTIONS 1075 North Ave. Sanger, CA 93657-3539 local: 559-875-0222 fax: 559-876-2259 toll free: 800-445-3767 2350 2 DROP SPINDLE 2WD (Must Use 18 Wheels or larger see instructions on Pg.
INSTALLATION INSTRUCTIONS
 INSTALLATION INSTRUCTIONS --300 W PONTIAC WAY CLOVIS, CA 93612 local: 559-875-0222 fax: 559-876-2249 toll free: 800-445-3767-- 25007 LIFT / LOWERING STRUT 2015+ FORD F-150 2WD (+1 to -3 ) 2015+ FORD F-150
INSTALLATION INSTRUCTIONS
 INSTALLATION INSTRUCTIONS 2351 2 DROP SPINDLE 2WD ONLY >>> CANNOT USE STOCK WHEELS you MUST use 20 wheels or larger see instructions on pg. 3
INSTALLATION INSTRUCTIONS
 INSTALLATION INSTRUCTIONS ----1075 North Ave. Sanger, CA 93657-3539 toll free: 800-445-3767 web: www.belltechcorp.com---- 5052 AIR JACK 94-99 DODGE ½ TON RAM C-1500 Congratulations! You were selective
INSTALLATION INSTRUCTIONS
 INSTALLATION INSTRUCTIONS --1075 North Ave. Sanger, CA 93657-3539 local: 559-875-0222 fax: 559-876-2259 toll free: 800-445-3767-- 5317 & 5318 4 INCH REAR LOWERING KIT 09&UP DODGE RAM 1500 2WD Thank you
INSTALLATION INSTRUCTIONS
 INSTALLATION INSTRUCTIONS 6525 REAR AXLE FLIP & HANGER KIT 5 OR 6 INCH LOWERING 14&UP CHEVROLET SILVERADO / GMC SIERRA 1500 Thank you for being selective enough to choose our high quality BELLTECH PRODUCT.
INSTALLATION INSTRUCTIONS
 INSTALLATION INSTRUCTIONS ----1075 North Ave. Sanger, CA 93657-3539 toll free: 800-445-3767 web: www.belltechcorp.com---- 6570 SPRING HANGER KIT DODGE DAKOTA Congratulations! You were selective enough
INSTALLATION INSTRUCTIONS
 INSTALLATION INSTRUCTIONS 2005 2010 DROPPED SPINDLE DATSUN 720 2 WHEEL DRIVE PICK-UPS NISSAN HARDBODY 2WD PICK-UPS Congratulations! You were selective enough to choose a BELLTECH PRODUCT. We have spent
INSTALLATION INSTRUCTIONS
 INSTALLATION INSTRUCTIONS 2500 DROPPED FRONT SPINDLE CHEVROLET C / K and G.M.C. SIERRA 1500 / 2500 / 3500 Pick-Ups Congratulations! You were selective enough to choose a BELLTECH PRODUCT. We have spent
INSTALLATION INSTRUCTIONS
 INSTALLATION INSTRUCTIONS 6612/6616 & 6614/6618 REAR AXLE FLIP-KIT 1999-UP CHEVROLET SILVERADO/GMC SIERRA 1500 Congratulations! You were selective enough to choose a BELLTECH PRODUCT. We have spent many
INSTALLATION INSTRUCTIONS
 INSTALLATION INSTRUCTIONS --1075 North Ave. Sanger, CA 93657-3539 local: 559-875-0222 fax: 559-876-2259 toll free: 800-445-3767-- 2103 FRONT DROP BALL JOINT INSTALLATION INSTRUCTIONS CHEVY COLORADO Congratulations!
INSTALLATION INSTRUCTIONS
 INSTALLATION INSTRUCTIONS 6523 & 6524 C-NOTCH KIT 07&UP CHEVROLET SILVERADO / GMC SIERRA 1500 REQUIRES MODIFIED EXHAUST Thank you for being selective enough to choose our high quality BELLTECH PRODUCT.
25011 ADJUSTABLE STRUT GMC ENVOY & TRAILBLAZER RAISING AND LOWERING STRUT
 INSTALLATION INSTRUCTIONS 1075 North Ave. Sanger, CA 93657-3539 local: 559-875-0222 fax: 559-876-2259 toll free: 800-445-3767 25011 ADJUSTABLE STRUT 02-07 GMC ENVOY & TRAILBLAZER RAISING AND LOWERING STRUT
INSTALLATION INSTRUCTIONS
 INSTALLATION INSTRUCTIONS ----1075 North Ave. Sanger, CA 93657-3539 toll free: 800-445-3767 web: www.belltechcorp.com---- 6420 SHACKLE & HANGER KIT FORD F-350 Congratulations! You were selective enough
INSTALLATION INSTRUCTIONS
 INSTALLATION INSTRUCTIONS ----3300 W. Pontiac Way Clovis, CA 93612 toll free: 1-800-445-3767 web: www.belltech.com---- 4809 2 DROP SPRING KIT Nissan Titan 05+ Thank you for being selective enough to choose
PRO COIL INSTALLATION
 INSTALLATION INSTRUCTIONS 1075 North Ave. Sanger, CA 93657-3539 local: 559-875-0222 fax: 559-876-2259 toll free: 800-445-3767 12463-12464 PRO COIL INSTALLATION 2007 IMPORTANT NOTE THIS KIT GIVES YOU THE
INSTALLATION INSTRUCTIONS
 INSTALLATION INSTRUCTIONS ----1075 North Ave. Sanger, CA 93657-3539 toll free: 800-445-3767 web: www.belltechcorp.com---- 6907 REAR LOWERING KIT 97-00 CHEVY 1-TON C-3500 Congratulations! You were selective
INSTALLATION INSTRUCTIONS
 INSTALLATION INSTRUCTIONS --300 W PONTIAC WAY CLOVIS, CA 93612 local: 559-875-0222 fax: 559-876-2249 toll free: 800-445-3767-- 6446 5.5 REAR AXLE FLIP-KIT 2015+ FORD F-150 2WD SHORT BED Thank you for being
INSTALLATION INSTRUCTIONS
 INSTALLATION INSTRUCTIONS ----1075 North Ave. Sanger, CA 93657-3539 toll free: 800-445-3767 web: www.belltechcorp.com---- 5001 AIRJACK AIR SPRING SUSPENSION SYSTEM C 1500 AND C-2500 Congratulations! You
INSTALLATION INSTRUCTIONS
 INSTALLATION INSTRUCTIONS --1075 North Ave. Sanger, CA 93657-3539 local: 559-875-0222 fax: 559-876-2259 toll free: 800-445-3767-- 5547 REAR ANTI-SWAY BAR 1997-03 FORD F-150 Crew Cab, Harley Edition, &
INSTALLATION INSTRUCTIONS
 INSTALLATION INSTRUCTIONS ----3300 W. Pontiac Way Clovis, CA 93612 toll free: 1-800-445-3767 web: www.belltech.com---- 6605-6607 FLIP KIT CHEVROLET C/K 1500 / 2500 PICK UP Thank you for being selective
5481 FRONT ANTI-SWAY BAR 10+ CHEVROLET CAMARO
 INSTALLATION INSTRUCTIONS 5481 FRONT ANTI-SWAY BAR 10+ CHEVROLET CAMARO CONGRATULATIONS! You were selective enough to choose a BELLTECH PRODUCT. We have spent many hours developing our line of products
INSTALLATION INSTRUCTIONS
 INSTALLATION INSTRUCTIONS --1075 North Ave. Sanger, CA 93657-3539 local: 559-875-0222 fax: 559-876-2259 toll free: 800-445 3767 5557 REAR ANTI-SWAY BAR 05-UP NISSAN TITAN CONGRATULATIONS! You were selective
INSTALLATION INSTRUCTION 88581
 INSTALLATION INSTRUCTION 88581 FOR RANCHO SUSPENSION SYSTEM RS6581B: DODGE RAM READ ALL INSTRUCTIONS THOROUGHLY FROM START TO FINISH BEFORE BEGINNING INSTALLATION Rev C IMPORTANT NOTES! WARNING: This suspension
INSTALLATION INSTRUCTIONS 88518
 INSTALLATION INSTRUCTIONS 88518 For Rancho Suspension Systems RS6518: 2009 FORD F-150 4WD READ ALL INSTRUCTIONS THOROUGHLY FROM START TO FINISH BEFORE BEGINNING INSTALLATION Rev A IMPORTANT NOTES! WARNING:
FRONT & 4 REAR GM WD LOWERING KIT
 92725200 88-98 2 FRONT & 4 REAR GM 1500 2WD LOWERING KIT Thank you for choosing Rough Country for all your suspension needs. Rough Country recommends a certified technician install this system. In addition
INSTALLATION INSTRUCTIONS
 INSTALLATION INSTRUCTIONS ----3300 W. Pontiac Way Clovis, CA 93612 toll free: 1-800-445-3767 web: www.belltech.com---- 6686 REAR AXLE FLIP-KIT 2004 DODGE RAM REGULAR CAB, QUAD CAB Thank you for being selective
INSTALLATION INSTRUCTION Rev A
 INSTALLATION INSTRUCTION 88587 Rev A FOR RANCHO SUSPENSION SYSTEM RS6587B: 2009 DODGE RAM 1500 READ ALL INSTRUCTIONS THOROUGHLY FROM START TO FINISH BEFORE BEGINNING INSTALLATION IMPORTANT NOTES! WARNING:
Installation Notes: #86000-R Race Series +3.5 L/T Kit
 159 North Maple St. Unit J, CORONA CA 92880 P. 951-737-9682 F. 951-737-9006 WWW.CHAOSFAB.COM Installation Notes: #86000-R Race Series +3.5 L/T Kit Factory manual is recommended for removal and re-installation
INSTALLATION INSTRUCTION 89400
 INSTALLATION INSTRUCTION 89400 FOR RANCHO SUSPENSION SYSTEM RS66400B: 2012 RAM 1500 4WD. READ ALL INSTRUCTIONS THOROUGHLY FROM START TO FINISH BEFORE BEGINNING INSTALLATION Rev B IMPORTANT NOTES! WARNING:
Thank you for choosing Rough Country for all your suspension needs.
 06-UP JEEP COMMANDER 2 LIFT KIT Thank you for choosing Rough Country for all your suspension needs. Rough Country recommends a certified technician install this system. In addition to these instructions,
Detroit Speed, Inc. Detroit Speed Control Arm and Spindle Kit A-Body P/N: &
 Detroit Speed, Inc. Detroit Speed Control Arm and Spindle Kit 1964-72 A-Body P/N: 030104 & 030105 The Detroit Speed A-Body front suspension kit is a bolt-on package that addresses the shortcomings of the
TOYOTA FJ CRUISER 6 SUSPENSION KIT
 92177000 TOYOTA FJ CRUISER 6 SUSPENSION KIT Thank you for choosing Rough Country for your suspension needs. Rough Country recommends a certified technician installs this system. In addition to these instructions,
INSTALLATION INSTRUCTION 88088
 INSTALLATION INSTRUCTION 88088 For Rancho Suspension Systems RS6588 & RS6589: FORD F-150 READ ALL INSTRUCTIONS THOROUGHLY FROM START TO FINISH BEFORE BEGINNING INSTALLATION Rev B IMPORTANT NOTES! WARNING:
'99-03 CHEVROLET/GMC IFS 4WD 6" SUSPENSION SYSTEM P/N INSTALLATION INSTRUCTIONS
 1/16/04 '99-03 CHEVROLET/GMC IFS 4WD 6" SUSPENSION SYSTEM P/N. 10-41099 INSTALLATION INSTRUCTIONS NOTE: Each Lift Kit and options to Lift Kits are packaged separately. Therefore, installation procedures
Suspension System RS6582B
 Suspension System RS6582B Tahoe/Yukon READ ALL INSTRUCTIONS THOROUGHLY FROM START TO FINISH BEFORE BEGINNING INSTALLATION IMPORTANT NOTES! WARNING: This suspension system will enhance the off-road performance
07-UP AVALANCHE 7.5 KIT
 92120900R1 07-UP AVALANCHE 7.5 KIT Thank you for choosing Rough Country for your suspension needs. We appreciate your business!! This kit will not fit vehicles equipped with electric steering or trucks
"Engineered to Ride, Built to Last "
 Congratulations on your purchase of an Arnott air suspension product. We at Arnott Incorporated are proud to offer a high quality product at the industry s most competitive pricing. Thank you for your
INSTALLATION INSTRUCTION 88146
 INSTALLATION INSTRUCTION 88146 Rev H FOR RANCHO SUSPENSION SYSTEM RS6547: 4WD SUBURBAN/YUKON XL, 4WD TAHOE/YUKON, & 4WD AVALANCHE READ ALL INSTRUCTIONS THOROUGHLY FROM START TO FINISH BEFORE BEGINNING
INSTALLATION INSTRUCTION 88148
 INSTALLATION INSTRUCTION 88148 Rev C For Rancho Suspension Systems RS6548, RS6549 & RS6550: GM 2500HD, 2500, and 1500HD Trucks READ ALL INSTRUCTIONS THOROUGHLY FROM START TO FINISH BEFORE BEGINNING INSTALLATION
INSTALLATION INSTRUCTION 88051
 INSTALLATION INSTRUCTION 88051 For Rancho Suspension System RS6551: Chevrolet 2500 Suburban & 2500 Avalanche READ ALL INSTRUCTIONS THOROUGHLY FROM START TO FINISH BEFORE BEGINNING INSTALLATION Rev C IMPORTANT
Team Z Motorsports. K-Member installation instructions
 Team Z Motorsports K-Member installation instructions Parts Included: 1-Tubular K-Member Needed Items-Solid Steering Shaft Offset Steering Rack Bushings Optional-Heavy Duty Bolt Kit Tubular Front Lower
WD Dodge Suspension Kit
 92137600 02-05 2WD Dodge 1500 6 Suspension Kit Thank you for choosing Rough Country for your suspension needs. Rough Country recommends a certified technician installs this system. In addition to these
99-06 CHEVY/GM LIFT KIT
 92127200 99-06 CHEVY/GM 1500 6 LIFT KIT Thank you for choosing Rough Country for all of your suspension needs. Rough Country recommends a certified technician installs this system. In addition to these
XJ CHEROKEE LIFT KIT
 921633XN200 Thank you for choosing Rough Country for your suspension needs. 84-01 4.5 XJ CHEROKEE LIFT KIT Rough Country recommends a certified technician installs this system. In addition to these instructions,
04-08 FORD F150 4 KIT
 9257700 04-08 FORD F50 4 KIT THANK YOU FOR CHOOSING ROUGH COUNTRY FOR YOUR SUSPENSION NEEDS. Rough Country recommends a certified technician install this system. In addition to these instructions, professional
INSTALLATION INSTRUCTION 88094
 INSTALLATION INSTRUCTION 88094 FOR RANCHO SUSPENSION SYSTEM RS6594B 4WD & 2WD NISSAN TITAN READ ALL INSTRUCTIONS THOROUGHLY FROM START TO FINISH BEFORE BEGINNING INSTALLATION Rev D IMPORTANT NOTES! WARNING:
*1234BAG1 1234BAG WD CHEVY/GM LIFT N200
 *1234BAG1 1234BAG1 921234N200 99-06 2WD CHEVY/GM 1500 6 LIFT Thank you for choosing Rough Country for all of your suspension needs. Rough Country recommends a certified technician installs this system.
02-10 GM 2500HD / HD & HD CLASSIC 6 2WD SUSPENSION KIT
 92122000 92127400 02-10 GM 2500HD / 01-06 1500HD & 07 1500HD CLASSIC 6 2WD SUSPENSION KIT Thank you for choosing Rough Country for your suspension needs. Rough Country recommends a certified technician
A/F/X Body GM Installation Instructions
 A/F/X Body GM Installation Instructions Power Disc Conversion 64-72 A Body / 67-69 F Body / 68-74 X Body 9 slimline booster pictured Your new disc brake conversion kit can be bolted up with standard hand
1969 Camaro. Concourse Style Disc Brake Conversion Kit Instllation Instructions
 Concourse Style Disc Brake Conversion Kit Instllation Instructions 1969 Camaro (1970 Chevelle Kit Shown) This document contains our regular disc brake conversion instructions with the addition of GM assembly
Installation Instructions. 6 Basic System FTS21060BK / FTS21061BK / FTS21042BK GM 2WD C1500 P/U ONLY
 Installation Instructions 6 Basic System FTS21060BK / FTS21061BK / FTS21042BK 2007-13 GM 2WD C1500 P/U ONLY 2007-13 GM 1500 Truck Basic System FTS21060BK / FTS21061BK / FTS21042BK 2007-13 GM 2WD C1500
Jeep Grand Cherokee ZJ 4 Suspension Kit
 92168800 Jeep Grand Cherokee 93-98 ZJ 4 Suspension Kit Thank you for choosing Rough Country for all your suspension needs. Rough Country recommends a certified technician install this system. In addition
INSTALLATION INSTRUCTION 88073
 INSTALLATION INSTRUCTION 88073 Rev C FOR RANCHO SUSPENSION SYSTEMS RS6572 & RS6573: DODGE RAM READ ALL INSTRUCTIONS THOROUGHLY FROM START TO FINISH BEFORE BEGINNING INSTALLATION IMPORTANT NOTES! WARNING:
JEEP JK 4 LONGARM. Tools Needed: Thank you for choosing Rough Country for your suspension needs.
 921786000 Thank you for choosing Rough Country for your suspension needs. JEEP JK 4 LONGARM Rough Country recommends a certified technician install this system. In addition to these instructions, professional
'88-'00 CHEVROLET/GMC IFS 4WD(8LUG) OLD BODY STYLE 6" SUSPENSION SYSTEM P/N
 OLD BODY STYLE 6 SUSPENSION SYSTEM P/N") 4/10/13 '88-'00 CHEVROLET/GMC IFS 4WD(8LUG) OLD BODY STYLE 6" SUSPENSION SYSTEM P/N. 10-41888 INSTALLATION INSTRUCTIONS APPLICATION WARNING: Applicable for hub mounted ABS sensor models only. Not for 1992-94
4/10/13 '88-'00 CHEVROLET/GMC IFS 4WD(8LUG) OLD BODY STYLE 6" SUSPENSION SYSTEM P/N. 10-41888 INSTALLATION INSTRUCTIONS APPLICATION WARNING: Applicable for hub mounted ABS sensor models only. Not for 1992-94
80-96 Ford F150 / Bronco 4WD Class II 4"- 6" Suspension Lift Installation Instructions
 www.skyjacker.com Required Tool List: 80-96 Ford F150 / Bronco 4WD Class II 4"- 6" Suspension Lift Installation Instructions Safety Glasses Metric / Standard Wrenches & Sockets Floor Jack Jack Stands Measuring
*1274BAG9* 1274BAG GM 4-6 SUSPENSION KIT N2.0. Thank you for choosing Rough Country for your suspension needs A
 92127400A 88-98 GM 4-6 SUSPENSION KIT N2.0 Thank you for choosing Rough Country for your suspension needs. *1274BAG9* 1274BAG9 Rough Country recommends a certified technician installs this system. In addition
Tools Needed: Class 8.8 Class MM 55ft/lbs 75ft/lbs 14MM 85ft/lbs 120ft/lbs 16MM 130ft/lbs 165ft/lbs 18MM 170ft/lbs 240ft/lbs
 921788000 JEEP JK 6 LONGARM Rough Country recommends a certified technician install this system. In addition to these instructions, professional knowledge of disassemble/reassembly procedures as well as
*1557BAG12* 1557BAG F /5 /6 LIFT KIT G THANK YOU FOR CHOOSING ROUGH COUNTRY FOR YOUR SUSPENSION NEEDS.
 2015-18 F-150 4 /5 /6 LIFT KIT THANK YOU FOR CHOOSING ROUGH COUNTRY FOR YOUR SUSPENSION NEEDS. 92155700G *1557BAG12* 1557BAG12 Rough Country recommends a certified technician install this system. In addition
Thank you for choosing Rough Country for all your suspension needs.
 Nissan 2016 Titan XD 6 Suspension Kit Thank you for choosing Rough Country for all your suspension needs. 921877200F *1877BAG11* 1877BAG11 Rough Country recommends a certified technician install this system.
Installation Instructions
 Installation Instructions 6 Suspension System FTS25005BK / FTS25006BK 2006-2012 Nissan Frontier 2wd/4wd SHORT BED ONLY Tool List: (not included) Floor Jack & Jack Stands Assorted Metric & S.A.E Sockets
Nissan Titan 6 Front & 4 Rear Suspension Kit
 92187500 Thank you for choosing Rough Country for all your suspension needs. Nissan Titan 6 Front & 4 Rear Suspension Kit Rough Country recommends a certified technician install this system. In addition
& 6 XJ CHEROKEE LONG ARM KIT
 92PERF1689 84-01 4.5 & 6 XJ CHEROKEE LONG ARM KIT Thank you for choosing Rough Country for your suspension needs. Rough Country recommends a certified technician installs this system. In addition to these
WD CHEVY/GM LIFT
 92750100 99-06 2WD CHEVY/GM 1500 3 LIFT Thank you for choosing Rough Country for all of your suspension needs. Rough Country recommends a certified technician installs this system. In addition to these
115 W. La Cadena Dr. Ste 100 Riverside, CA (909) phone (909) fax 2004 NISSAN TITAN 2WD (CSS-N3-1) 8 SUSPENSION LIFT KIT
 phone (909) fax 2004 NISSAN TITAN 2WD (CSS-N3-1) 8 SUSPENSION LIFT KIT") 115 W. La Cadena Dr. Ste 100 Riverside, CA 92501 (909) 328-9902 phone (909) 328-9908 fax 2004 NISSAN TITAN 2WD (CSS-N3-1) 8 SUSPENSION LIFT KIT PLEASE READ ALL INSTRUCTIONS THOROUGHLY FROM START TO FINISH
115 W. La Cadena Dr. Ste 100 Riverside, CA 92501 (909) 328-9902 phone (909) 328-9908 fax 2004 NISSAN TITAN 2WD (CSS-N3-1) 8 SUSPENSION LIFT KIT PLEASE READ ALL INSTRUCTIONS THOROUGHLY FROM START TO FINISH
SUSPENSION 2-1 SUSPENSION TABLE OF CONTENTS
 DN SUSPENSION 2-1 SUSPENSION TABLE OF CONTENTS page ALIGNMENT... 1 FRONT SUSPENSION - 4x2... 6 page FRONT SUSPENSION - 4x4... 14 REAR SUSPENSION... 23 ALIGNMENT TABLE OF CONTENTS page AND OPERATION WHEEL
XJ CHEROKEE LIFT KIT
 92169600 84-01 6.5 XJ CHEROKEE LIFT KIT Thank you for choosing Rough Country for your suspension needs. Rough Country recommends a certified technician installs this system. In addition to these instructions,
INSTALLATION GUIDE. TCP TIER-14 Bump Steer Conversion Kit - Early Mustang to Late Spindle
 READ ALL INSTRUCTIONS COMPLETELY AND THOROUGHLY UNDERSTAND THEM BEFORE DOING ANYTHING. CALL TOTAL CONTROL PRODUCTS TECH SUPPORT (916) 388-0288 IF YOU NEED ASSISTANCE. INSTALLATION GUIDE TCP TIER-14 Bump
»Product» Safety Warning
 D1401 Installation Instructions 2013 Ram 3500, 2014 Ram 2500 4.5" Radius Arm Suspension Lift Read and understand all instructions and warnings prior to installation of product and operation of vehicle.
HP10251 KIT. Chevrolet Silverado WD / 4WD * GMC Sierra WD / 4WD * 1.5" / 2.25" Leveling Kit L6401_REV3_ECN1-1963
 HP10251 KIT Chevrolet Silverado 1500 2WD / 4WD * GMC Sierra 1500 2WD / 4WD * 1.5" / 2.25" Leveling Kit *See PacPro Application Guide for proper fitment _REV3_ECN1-1963 KIT CONTENT A B C KIT CONTENTS A
*THIS KIT IS NOT INTENDED FOR VEHICLES WITH ABS*
 *THIS KIT IS NOT INTENDED FOR VEHICLES WITH ABS* Notes: New full-cast rotors from 1990 or newer Wrangler must be used with this kit, this rotor (ITT #65225 or equivalent) has a.25 thick mounting flange.
04-08 FORD F150 6 KIT
 957600 THANK YOU FOR CHOOSING ROUGH COUNTRY FOR YOUR SUSPENSION NEEDS. 0-08 FORD F50 6 KIT Rough Country recommends a certified technician install this system. In addition to these instructions, professional
1988 Chevrolet Pickup V SUSPENSION - FRONT (4WD)' 'Front Suspension - "V" Series 1988 SUSPENSION - FRONT (4WD) Front Suspension - "V" Series
' 'Front Suspension - V Series 1988 SUSPENSION - FRONT (4WD) Front Suspension - V Series") 1988 SUSPENSION - FRONT (4WD) Front Suspension - "V" Series DESCRIPTION NOTE: Vehicle serial numbers used in this article has been abbreviated for common reference to Chevrolet and GMC models. Chevrolet
1988 SUSPENSION - FRONT (4WD) Front Suspension - "V" Series DESCRIPTION NOTE: Vehicle serial numbers used in this article has been abbreviated for common reference to Chevrolet and GMC models. Chevrolet
STaSIS Engineering B6 B7 Streetsport Suspension
 STaSIS Engineering B6 B7 Streetsport Suspension SS Suspension Kit Parts List Qty Description Part Number 1 STaSIS adjusted Koni cadmium plated dampers (2 front, 2 rear) 1150-5061 Special Tools Required
Nissan Titan 4 Front & 2 Rear Suspension Kit
 92187400 Nissan Titan 4 Front & 2 Rear Suspension Kit Thank you for choosing Rough Country for all your suspension needs. Rough Country recommends a certified technician install this system. In addition
»Product» Safety Warning
 RBP-LK410-40, RBP-LK410-60 RBP-LK411-60, RBP-LK411-40 Installation Instructions 2005-2015 / 2016+ Toyota Tacoma 4" and 6" Lift Systems Read and understand all instructions and warnings prior to installation
Dodge 5 Lift Kit Thank you for choosing Rough Country Suspension for your Off Road needs.
 *1368BAG4* 1368BAG4 921368200 2014-16 2500 Dodge 5 Lift Kit Thank you for choosing Rough Country Suspension for your Off Road needs. Rough Country recommends a certified technician installs this system.
Installation Instructions
 Preparing your vehicle to install your brake system upgrade 1. Rack the vehicle. 2. If you don t have a rack, then you must take extra safety precautions. 3. Choose a firmly packed and level ground to
2011-UP CHEVY/GM 2500HD 2WD/4WD 5 NTD LIFT KIT
 921260X00F *1260BAG6* 1260BAG6 2011-UP CHEVY/GM 2500HD 2WD/4WD 5 NTD LIFT KIT Thank you for choosing Rough Country for all of your suspension needs. Rough Country recommends a certified technician installs
*1576BAG9* 1576BAG FORD F KIT C THANK YOU FOR CHOOSING ROUGH COUNTRY FOR YOUR SUSPENSION NEEDS.
 957600C THANK YOU FOR CHOOSING ROUGH COUNTRY FOR YOUR SUSPENSION NEEDS. 0-08 FORD F50-6 KIT Rough Country recommends a certified technician install this system. In addition to these instructions, professional
INSTALLATION INSTRUCTIONS
 INSTALLATION INSTRUCTIONS ----3300 W. Pontiac Way Clovis, CA 93612 toll free: 1-800-445-3767 web: www.belltech.com---- 4985 DRIVE LINE SPACER INSTALLATION INSTRUCTIONS Thank you for being selective enough
INSTALLATION INSTRUCTIONS
 INSTALLATION INSTRUCTIONS --1075 North Ave. Sanger, CA 93657-3539 local: 559-875-8883 fax: 559-875-9883 toll free: 800-595-7016-- 90310 ST COILOVER GT Ford Focus Sedan Congratulations! You were selective
07-13 TOYOTA TUNDRA 2WD 6" LIFT SPINDLES
 MAXTRAC SUSPENSION 4030 E LEAVERTON CT ANAHEIM, CA 92807 714-630-0363 WWW.MAXTRACSUSPENSION.COM SALES@MAXTRACSUSPENSION.COM PRODUCT: K886764 07-13 TOYOTA TUNDRA 2WD 6" LIFT SPINDLES PARTS LIST QTY LIFT
BRAKE SYSTEM Toyota Celica DESCRIPTION DRUM BRAKES ADJUSTMENTS BRAKE PEDAL HEIGHT ADJUSTMENTS BRAKE PEDAL FREE PLAY ADJUSTMENTS
 BRAKE SYSTEM 1988 Toyota Celica 1988-89 BRAKES Toyota Celica, Corolla, MR2, Tercel DESCRIPTION The hydraulic brake system uses a tandem master cylinder with a vacuum power assist servo. MR2 and some Celica
*1333BAG1* 1333BAG DODGE LIFT KIT
 921333300 *1333BAG1* 1333BAG1 2012-18 DODGE 1500 4 LIFT KIT Thank you for choosing Rough Country for all your suspension needs. Rough Country recommends a certified technician install this system. In addition
Class 8.8 Class MM 18ft/lbs 23 ft/lbs 10MM 32ft/lbs 45ft/lbs 12MM 55ft/lbs 75ft/lbs 14MM 85ft/lbs 120ft/lbs
 92190500 Jeep Grand Cherokee 93-98 ZJ 4 Longarm Thank you for choosing Rough Country for all your suspension needs. Rough Country recommends a certified technician install this system. In addition to these
Complete Front End Suspension Rebuild, Ñ Part 1, Tear Down
 Complete Front End Suspension Rebuild, 1955-57Ñ Part 1, Tear Down by Randy Irwin There is much more to performance than pure horsepower. Great performance comes from control and Classic Chevy InternationalÕs
*127130BAG1* BAG1 GM WD LIFT
 921271300 *127130BAG1* 127130BAG1 GM 88-98 2WD 1500 6 LIFT Thank you for choosing Rough Country for all of your suspension needs. Rough Country recommends a certified technician installs this system. In