AGCO Massey Ferguson Combine Models 8780, 9690, Lincoln Automatic Lubrication System Installation Instructions
|
|
|
- Ophelia Fletcher
- 6 years ago
- Views:
Transcription


1 AGCO Massey Ferguson Combine Models 8780, 9690, 9790 Lincoln Automatic Lubrication System Installation Instructions
2 System Overview Thank you for purchasing the Quicklub On Board Grease System for your AGCO Combine. The system has been designed to increase the component life and overall productivity of your equipment, while reducing labor costs related to the traditional method of point-by-point manual lubrication. The system consists of the Quicklub progressive metering valves that positively displace and meter precise amounts up to N.L.G.I. #2 shop grease down to -13 F temperature. Grease is distributed to each connected point through high-pressure tube and hose. This Quicklub kit is designed to work with your AGCO Combine model There are subtle differences between models and years and this kit will accommodate all changes. This is a fully automated lubrication system utilizing a 12 volt DC heavy duty electric pump with integrated timer that dispenses lubricant to the progressive metering valves at timed intervals. The lubricant is pumped to the primary metering valve, which distributes it to secondary metering valves in specific zones of service. The secondary metering valves deliver measured amounts of lubricant proportional to each lube point in its zone. The components are connected with lengths of high-pressure hose and tubing that are included in the kit. Contents of the kit are specifically marked to coincide with this instruction manual to achieve a consistent and quality installation. This manual has been included with the system as an easy-to-follow guide for installation and operation. Keep it with the equipment, as it is also a trouble-shooting manual to keep your automated lubrication system working properly. This kit also contains Installation and Operation Instructions for the QLS 301 system supply pump. Please refer to this manual for detailed information on operations, maintenance, trouble shooting and technical data. If missing, please contact Lincoln and request service pace Q3-9, form # Durable and reliable, the Quicklub On Board Grease System has been carefully designed using industry proven products to provide long and trouble-free life under the most severe farming conditions. For further information on this system please contact Lincoln Technical Services at ext. 4782# or fax THIS DOCUMENT (INSTALLATION INSTRUCTIONS) IS THE EXCLUSIVE PROPERTY OF LINCOLN INDUSTRIAL CORPORATION ( LINCOLN ). IT CONTAINS PROPRIETARY DATA AND INFORMATION DEVELOPED AT LINCOLN S EXPENSE AND IS FURNISHED UPON THE EXPRESS CONDITION, ACKNOWLEDGED BY THE RECIPIENT, THAT IT S CONTENTS SHALL NOT BE DISCLOSED, COPIED OR DUPLICATED, DISSEMINATED, OR USED, EXCEPT FOR THE PURPOSES ESTABLISHED BY WRITTEN CONTRACT OR OTHERWISE AUTHORIZED BY LINCOLN IN WRITING. LINCOLN RESERVES ALL RIGHTS UNDER PATENT, COPYRIGHT, TRADE SECRET AND OTHER APLICABLE LAWS. Quicklub is a registered trademark of Lincoln.
 out to the connected number of lubrication points irrespective of distance and back pressure.")
3 THE HEART OF THE QUICKLUB SYSTEM: At the heart of every Quicklub System is the metering valve or progressive distributor block, designed to positively meter the input of lubricant (oil up to NLGI #2 greases) out to the connected number of lubrication points irrespective of distance and back pressure. The inlet passageway is connected to all piston chambers at all times with only one piston free to move at any one time. With all pistons at the far right, lubricant from the inlet flows against the right end of piston A (fig. 1). Lubricant flow shifts piston A from right to left, dispensing piston A output through Connecting passages to outlet 2. Piston A shift directs flow against right side of piston B (fig. 2). Lubricant flow shifts piston B from right to left, dispensing piston B output through valve ports of piston A and through outlet 7 (fig. 3). Lubricant flow shifts piston C from right to left dispensing piston C output through valve ports of piston B and through outlet 5. Piston C shift directs lubricant flow against right side of piston D (not illus.)
.")
4 Lubricant flow shifts piston D from right to left, dispensing piston D output through valve ports of piston C and through outlet 3. Piston D shift directs lubricant through connecting passage to the left side of piston A (fig. 4). Lubricant flow against left side of piston A begins the second half cycle which shifts pistons from left to right, dispensing lubricant through outlets 1, 8, 6 and 4 of the divider valve. Cross-porting (Divider Valve) Installing a closure plug in one or more outlets may combine outputs from adjacent outlets. Lubricant from a plugged outlet is redirected to the next adjacent outlet in descending numerical order. Outlets 1 and 2 must not be plugged since they have no cross-port passage to the next adjacent outlet. In figure 5 outlets 5 and 3 are cross-ported and directed through outlet 1. In this example, outlet 1 will dispense three times as much lubricant as outlet 7. The tube ferrules in outlets 1 and 7 block the cross-port passage so that lubricant flow is directed through the outlets.
5 QUICKLUB COMPONENT GLOSSARY PART NUMBER and DESCRIPTION Divider valve SSV12k with indicator and 12 port outlets Divider valve SSV6k with indicator and 6 port outlets Grade 8-1/4" valve mounting bolt Male run tee Clamping ring (ferrule)... - Valve outlet adapter /8 NPTF 90 Street Elbows Feed Line Bundling Spiral Wrap (10ft.)... P QLS301 With Back Mounted SSV12...
6 QUICKLUB COMPONENT GLOSSARY PART NUMBER and DESCRIPTION /4" tube Quicklinc valve outlet fitting Valve closure plug for Black divider valves Swivel quicklinc fitting /4" Nylon locknut for valve mounting /16" locknut Plastic Grease fitting cap /8" NPT field installable hose coupling Valve mounting bracket /8" PTF Special Short 90 Fitting Straight leak-proof grease fitting...
7 QUICKLUB COMPONENT GLOSSARY PART NUMBER and DESCRIPTION /8" Grease filled high pressure hose (26 ft. coil) /8" Grease filled high pressure hose (40 ft. coil) /4" grease filled black nylon tubing (25 ft coil) /4" grease filled black nylon tubing (50 ft coil) /4" -28 Male 90 Fitting /4" -28 Male Straight Fitting /4" Tubing x 1/8" NPT Male Straight P-style clamp for 12mm bolt P-style clamp for 12mm bolt P-style clamp for 12mm bolt P-style clamp for 10mm bolt P-style clamp for 10mm bolt P-style clamp for 10mm bolt Nylon Ties (100 count poly bag) 7" Length...
 Front Axle, Inner Driveshaft Coupling Rear Wheels - Non-Powered (Standard) Axle Wheel")
8 Grease Points Left Side Points not Serviced by the Automatic Lubrication System Front Axle Outer Drive Driveshaft Coupling and Disc Hub (2 fittings) Front Axle, Inner Driveshaft Coupling Rear Wheels - Non-Powered (Standard) Axle Wheel Bearing
 Front Axle, Inner Driveshaft Coupling Grain Tank Filling Auger U-Joint (2 fittings) Rear Wheels - Non-Powered")
9 Grease Points Right Side Points not Serviced by the Automatic Lubrication System Cleaning Fan Driven Pulley Inner Sliding Sheave Hub Return Elevator Drive Slip Clutch (2 fittings) Return Elevator Conveyor Drive Sheave Front Axle, Outer Driveshaft Couplings and Disc Hub (2 fittings) Front Axle, Inner Driveshaft Coupling Grain Tank Filling Auger U-Joint (2 fittings) Rear Wheels - Non-Powered (Standard) Axle Wheel Bearing
10 Installation Steps: The following steps will assist the installer with a systematic approach for installing the Quicklub Automated lube system on Lexion Combines. By following the steps outlined, a successful installation will be realized and will increase the service life of all pins and bearings connected to the lube system. Remove all grease fittings from lube points that will be connected to the lube system. Install appropriate adapters and tube fittings in lube points. Position valve mounting brackets to machine. Attach metering valves to previously mounted brackets. Use tubing cutters, cut to length individual tubing feed lines from secondary valves to lube points and make connections. When installing feed line tubing into the Quicklinc fittings, push until firmly seated. Neatly bundle, loom with spiral wrap provided and tie strap feed lines wherever possible to protect from abrasion. Size, cut and attach appropriate hose ends to all supply lines. The high pressure hose is used as supply lines from the pump to the primary, the primary to the secondary. It is recommended that the supply lines be routed and cut only after all valves and the electric pump have been attached to the machine. This assures the supply line is cut to the proper length. Also, allow for unrestricted movement while the machine is in motion. Route supply lines from the pump to primary valve and from the primary valve to the secondary valve and make connections. Secure supply/feed lines with tie straps, so not in harms way. Mount pump and make electrical connections (electrical diagram included with the pump).
11 THIS DOCUMENT IS THE EXCLUSIVE PROPERTY OF LINCOLN INDUSTRIAL CORPORATION ("LINCOLN"). IT CONTAINS PROPRIETARY DATA AND INFORMATION DEVELOPED AT LINCOLN'S EXPENSE AND IS FURNISHED UPON THE EXPRESS CONDITION, ACKNOWLEDGED BY THE RECIPIENT, THAT IT'S CONTENTS SHALL NOT BE DISCLOSED, COPIED OR DUPLICATED, DISSEMINATED, OR USED,EXCEPT FOR THE PURPOSES ESTABLISHED BY WRITTEN CONTRACT OR OTHERWISE AUTHORIZED BY LINCILN IN WRITING. LINCOLN RESERVES ALL RIGHTS UNDER PATENT, COPYRIGHT,TRADE SECRET AND OTHER APPLICABLE LAWS.
12


13 Left Front Valve Mount the Left Front Valve and bracket behind the left front Axle Unloader removable panel. Install one fitting to replace grease zerk at the right Lateral Tilt Roller. Route/install line from outlet 5 of the Left Front Valve Install one fitting to replace grease zerk at the left Lateral Tilt Roller. Route/install line from outlet 3 of the Left Front Valve


14 Install one fitting replacing the grease zerk at the Center Pivot. Route/install line from outlet 1 on the Left Front Valve. Install one fitting replacing grease zerk at the Concave Adjusting Lever. Route/install line from outlet 6 of the Left Front Valve. Install one fitting replacing grease zerk at the Shaker Shoe Shaft Left Bearing. Route/install line from outlet 4 of the Left Front Valve. Install one fitting replacing grease zerk at the Shaker Shoe Shaft Right Bearing. Route/install line from outlet 2 of the Left Hand Valve.
15

16 Left Rear Valve Mount the Left Rear Valve and bracket above the Cleaning Fan between the remote Lube lines.


17 Install one fitting replacing grease zerk at the Feeder House Pivot. Route/install line from outlet 11 on the Left Rear Valve. Install one fitting replacing grease zerk at the Pitman Drive Idler. Route/install line from outlet 10 of Left Right Valve. Install one fitting replacing the grease zerk at the Grain Idler Pivot. Route/install line from outlet 12 of the Left Rear Valve. Install one fitting replacing the grease zerk at the Tailshaft Bearing. Route/install line from outlet 9 of the Left Rear Valve.


18 Install two (2) fittings replacing the grease zerks at the Unloader Drive Idler and the Front Beater Drive Idler. Route/install line from outlets 5 and 1 of the Left Rear Valve. Install two (2) fittings replacing the grease zerks at the Countershaft Drive Idler and the Rotor/Propulsion Pump Drive Idler. Route/install lines from outlets 6 and 2 of the Left Rear Valve.
19


20 Right Hand Valve Mount the Right Hand Valve and bracket behind the Hydraulic valve and above the white sticker on the right hand side behind the front axle. Install one fitting replacing the grease zerk at the Feeder Drive Idler Pivot. Route/install line from outlet 5 on the Right Hand Valve


21 Install one fitting replacing the. grease zerk at the Feeder House Pivot. Route/install lines from outlet 10 on the Right Hand Valve. Install one fitting replacing the grease zerk at the Cleaning Fan Drive Idler Pivot. Route/install line from outlet 2 on the Right Hand Valve. Install one fitting replacing the grease zerk at the Return Elevator Drive Idler Pivot. Route/install line from outlet 6 on the Right Hand Valve. Install one fitting replacing the grease zerk at the Front Rotor Bearing. Route/install line from outlet 12 of the Right Hand Valve.


22 Install one fitting replacing the grease zerk at the Chopper/Spreader Primary Drive Idler Pivot. Route/install line from outlet 1 on the Right Hand Valve. Install one fitting replacing the grease zerk at the Chopper/Spreader Secondary Drive Idler Pivot. Route/install line from outlet 7 on the Right Hand Valve. Install one and fitting replacing the grease zerk at the Rotary Screen Adjustment Lever. Route/install line from outlet 9 of Right Hand Valve. Install one fitting replacing the grease zerk at the Rotary Screen Drive Idler Pivot. Route/install line from outlet 11 on the Right Hand Valve.
23

24 Rear Steering Valve Mount the rear steering valve in front of the left rear axle below the hydraulic hoses.


25 Remove the grease zerk and install one fitting at the the Left Hand Lower King Pin. Route/Install line from outlet 1 of the Rear Steering Valve. Remove the grease zerk and install one fitting at the the Left Hand Upper King Pin. Route/Install line from outlet 5 of the Rear Steering Valve. Remove the grease zerk and install one fitting at the Left Hand Tie Rod End. Route/Install line from outlet 11 of the Rear Steering Valve. Remove the grease zerk and install one fitting at the the Right Hand Upper King Pin. Route/Install line from outlet 6 of the Rear Steering Valve.


26 Remove the grease zerk and install one fitting at the the Right Hand Lower King Pin. Route/Install line from outlet 2 of the Rear Steering Valve. Remove the grease zerk and install one fitting at the Right Hand Tie Rod End. Route/Install line from outlet 9 of the Rear Steering Valve. Remove the grease zerk and install one fitting at the Center Pivot. Route/Install line from outlet 10 of the Rear Steering Valve.


27 Pump Mounting and Power Source Mount the pump on the left side of the engine compartment between the walkway rails. Route the Power cord through engine compartment to the right side of the cab and pick up 12 volt power from the seat compressor circuit. Use an inline fuse in the power cable.


28 Install hose from outlet 1 of the Primary Valve to the inlet of the Left Front Valve. Install hose from outlet 8 of the Primary Valve to the inlet of the Left Rear Valve. Install hose from outlet 7 of the Primary valve to the inlet of the Right Hand Valve. Install hose from outlet 1 of the Primary Valve to the inlet of the Male Run Tee for the Return Header Line.


29 Programming the Pump Adjust the pump to run one cycle every 15 min. as follows.!with power to the pump You will adjust P-1 to read 00 and P-2 to read 15. At this setting the pump Will Run four cycles per hour. Complete the programming as follows. Programming options - Pause time: P hours P minutes Min. pause time 20 minutes Max. pause time 99 hours 59 minutes * To access to the programming mode, press both but-tons at the same time ³ 4 seconds. ³ 4 sec ³ 4 sec Setting hours P1 * Settings are made in one direction: 0, 1, 2, 3, h Button pressed once...increases by 1 hour Button pressed continuously...quick sequence The fields hour and minutes are indicated by a decimal point on the right - hand for the hours and on the left - hand for the minutes. Setting minutes P2 * Settings are made in one direction: 0, 1, 2, minutes Button pressed once...increases by 1 minute Button pressed continuously...quick sequence Note: The minimum pause time begins with 20 minutes. When pause times < 20 minutes are programmed, the display automatically shows.20. Completing the programming * Press the button. P- is displayed. * There are two ways to complete the programming: - by pressing the button, or - if the button is not pressed within 30 seconds, programming mode is closed automatically.
30 System Checkout The following checklist has been developed as an aid in verifying proper installation and operation of the Quicklub Onboard Grease System. By completing the steps outlined below, the operational readiness of the system and resulting extension of the component life of all points connected to the system will be insured. Apply grease gun (manual or pneumatic) to the grease fitting located on the Primary valve and each secondary valve inlet. While pumping grease through the system, cycle the indicator pin on the primary metering valve a minimum of 15 times. NOTE: Grease gun nozzle and grease fitting should be thoroughly cleaned before lubricating to prevent flow of contaminants into the lube system. Inspect primary valve supply and outlets for grease discharge. If leakage is detected, tighten the fittings. Continue to cycle the system until fresh grease appears at each lube point. Inspect each lube point fitting for leaks. Correct any leaks by firmly pushing tube into the fitting until seating occurs, or tighten the threaded fittings for components connected with hose. Operate the equipment through its complete range of motion, inspecting for unrestricted movement of tube and hose. Correct any problems of rubbing, chaffing or kinking. Inspect all hose and tube that is not covered with some type of protective wrap. Wrap any tube or hose that would be susceptible to damage from rubbing or chaffing. Inspect all hose and tube connected to moving components. Insure that adequate hose or tube is provided to allow unrestricted movement to these moving lube points. Verify proper pump operation and verify time setting by activating pump with the green activation button located on the face of the pump control panel. Activate the pump at least three times to insure proper operation. After the Combine is in operation for a period of time (approx. 80 hours), you may find you need to adjust timing to a shorter or longer period based on the operating conditions. Fill the reservoir with selected grease by filling at the grease fitting located on the face of the pump reservoir.
31 Daily Walk-Around Inspection The Lincoln Industrial Quicklub automated lube system components are designed, engineered, manufactured and assembled to the highest quality standards. This lube system requires little maintenance, however, to ensure maximum reliability and to realize maximum service life of all components, it is highly recommended that a daily walkaround inspection be performed. The daily walk-around inspection should include the following: NOTE: Operator to confirm operation of electric pump while machine is in service. Observe lubricant level in reservoir. Fill reservoir if it is low. Inspect the display for error or low level messages. If panel indicates error, refer to the trouble shooting guide on next page. Inspect all valves and lube point connections to verify that no leaks are occurring. Inspect supply/feed lines to insure that no breaks or leaks have occurred. Inspect lube points so that all lube points have a fresh grease appearance.
32
33
Automated Lubrication System
 Automated Lubrication System Installation/Operation Manual Case IH Combine Models 2344, 2366, 2377 and 2388 Revised 08-09-06 1 System Overview Thank you for purchasing the Quicklub On Board Grease System
Automated Lubrication System
 Automated Lubrication System Installation/Operator Instructions John Deere STS Combine Models 9660, 9760, 9860 Dtd.020405 1 System Overview Thank you for purchasing the Quicklub Combine. On Board Grease
Automated Lubrication System
 Automated Lubrication System Installation/Operator Instructions John Deere STS Combine Models 9660, 9760, 9860 Dtd.081506 1 System Overview Thank you for purchasing the Quicklub Combine. On Board Grease
Automated Lubrication System
 Automated Lubrication System Installation/Operator Instructions Case IH RBX2 Series Baler Contents Pages Introduction 3 Preparation 4 Bill of Material 5 Component Appendix 6-9 System Operation 10 Valve
Automated Lubrication System
 Automated Lubrication System Operator s Guide Lexion 700 Series Combine Rev. 1, 7/11, CWA Contents Pages Introduction 3 Component Appendix 4-6 Glossary f Terms 7-8 System Operation 9 Valve Operation 10-11
John Deere R Series Sprayer Lubrication System Installation Guide
 John Deere R Series Sprayer Lubrication System Installation Guide 1 Contents Pages Preparation/Installation Overview 3 Introduction 4 Purging Instruction 5 Divider Valve Operation 6 Components Glossary
John Deere R4045 Sprayer Wet/Dry Lubrication System Installation Guide
 John Deere R4045 Sprayer Wet/Dry Lubrication System Installation Guide 1 Contents Pages Preparation/Installation Overview 3 Introduction 4 Purging Instruction 5 Divider Valve Operation 6 Components Glossary
Quicklub Lubrication Systems Fittings, Adapters and Accessories
 Divider Valve Mounting Accessories 24646 Valve mounting bracket 5304 4" nylon locknut for valve mounting 247023 Grade 8, 4" valve mounting bolt 239499 Template for divider valve mounting (6, 8, 0 and 2
Quicklub Lubrication Systems Fittings, Adapters and Accessories
 Divider Valve Mounting Accessories 246416 Valve mounting bracket 51304 ¼" nylon locknut for valve mounting 247023 Grade 8, ¼" valve mounting bolt 239499 Template for divider valve mounting (6, 8, 10 and
Quicklub Lubrication Systems
 Fittings, Adapters and Accessories Divider Valve Mounting Accessories 246416 Valve mounting bracket 51304 ¼" nylon locknut for valve mounting 247023 Grade 8, ¼" valve mounting bolt 239499 Template for
Lincoln Quicklub centralized and automatic lubrication systems
 Lincoln Quicklub centralized and automatic lubrication systems People, capabilities and systems to save money and increase productivity We re the largest and most successful company in our field because
Centralized & Automated Lubrication Systems. I design Quicklub and other systems to satisfy each customer s unique requirements.
 Quicklub Centralized & Automated Lubrication Systems I design Quicklub and other systems to satisfy each customer s unique requirements. Patrick Sändker, Application Engineer, Lincoln Industrial Systems
9895 Combine Parts Catalog EFF. S/N HSC8101
 9895 Combine Parts Catalog EFF. S/N HSC8101 1 FORWARD ALPHABETICAL INDEX The complete alphabetical index appears at the beginning of this publication. It is used to locate major groups, assemblies and
QUICKLUB CENTRALIZED & AUTOMATED LUBRICATION SYSTEMS
 QUICKLUB CENTRALIZED & AUTOMATED LUBRICATION SYSTEMS Quicklub Simple, cost-effective lubrication solutions for all of your machinery. People, Capabilities and Systems to Save Money and Increase Productivity
Owner s and Maintenance Manual for: Lincoln QuickLub Systems
 Owner s and Maintenance Manual for: Lincoln QuickLub Systems Contents: I. Introduction 1. System Operation 2. Components II. Pump Mounting and Wiring 1. Power 2. Testing III. Purging and Testing IV. Programming
Complete Systems & Parts Automatic Oiler & Grease Bank MADE IN THE USA
 Complete Systems & Parts Automatic Oiler & Grease Bank MADE IN THE USA Lubrication Systems contents Lube Minder Automatic Oiler Why Lube Minder?..4 Lube Minder Parts and Pictures....6-7 Understanding the
SOLUTIONS. Airless Spray System. In This Issue: Airless Spray System pg. 2. Improved FlowMaster pg. 5
 THE LATEST PRODUCTS AND NEWS FOR LINCOLN CUSTOMERS SOLUTIONS DECEMBER 2002 VOL. 4, NO. 1 Airless Spray System In This Issue: Airless Spray System pg. 2 Improved FlowMaster pg. 5 MC 2 Progressive High Pressure
PARTS SERVICE PARTS GUIDE. All rights reserved.
 All rights reserved. No part of this publication may be used, reproduced, distributed, transmitted, translated, stored in a retrieval system or reduced to any electronic medium or machine or computer readable
John Deere. MODEL: 4400 Combine JD-O-OMH86804
 John Deere MODEL: 4400 Combine THIS IS A MANUAL PRODUCED BY JENSALES INC. WITHOUT THE AUTHORIZATION OF JOHN DEERE OR IT'S SUCCESSORS. JOHN DEERE AND IT'S SUCCESSORS ARE NOT RESPONSIBLE FOR THE QUALITY
Grease Jockey On-Road Lubrication Solutions. Time-tested lubrication equipment with you for the long haul.
 Grease Jockey On-Road Lubrication Solutions Time-tested lubrication equipment with you for the long haul. About Graco Since 1926, Graco remains proud to offer best-in-class industrial fluid handling equipment.
Lincoln Quicklub System Installation Manual for: CAT M Loaders
 Lincoln Quicklub System Installation Manual for: CAT 966-972M Loaders Contents: I. Introduction 1. System Operation 2. Components II. III. IV. Special Tools System Layout and Design 1. System Drawing 2.
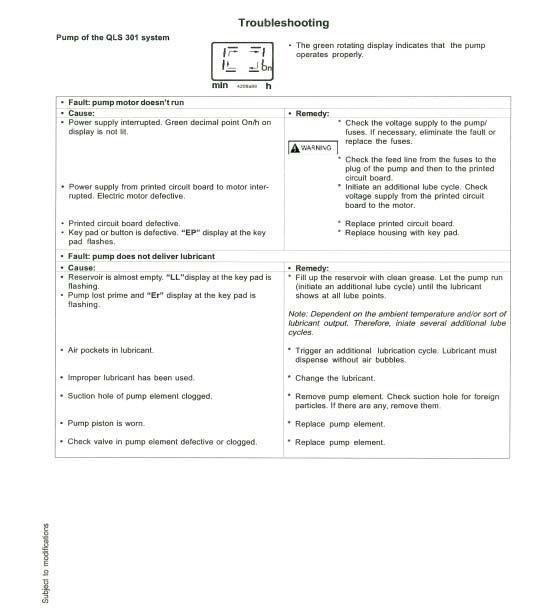
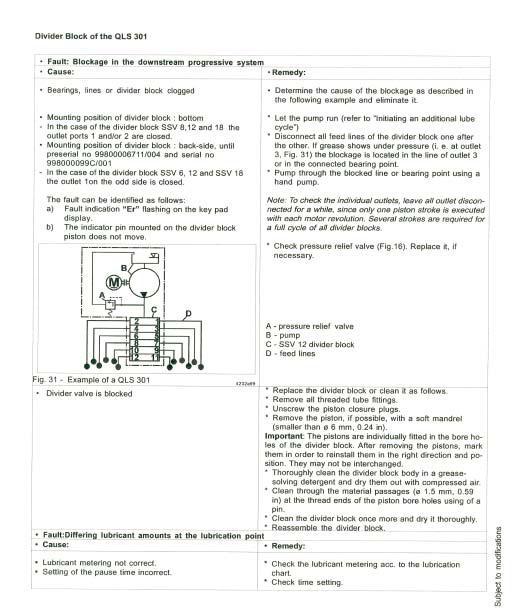
Trouble Shooting Manual Progressive Systems
 1 INTRODUCTION The information contained in this manual provides insight in how a progressive grease distribution system works and how to trouble shoot a progressive system. 2 OPERATING PRINCIPLE Any pump
Centralized Lubrication for Commercial Vehicles Drive Productivity Experience Performance
 Centralized Lubrication for Commercial Vehicles Drive Productivity Experience Performance Increase the efficiency of your commercial vehicles. Proper lubrication saves valuable time and makes maintenance
Capabilities. Solutions. for Commercial Vehicle Applications. Inside: Vol. 2, No. 1 June Lincoln Advantage pg. 2. It s Your Choice pg.
 Vol. 2, No. 1 June 2003 INFORMATION FROM THE LEADER IN THE LUBRICATION INDUSTRY Solutions for Commercial Vehicle Applications Inside: Lincoln Advantage pg. 2 It s Your Choice pg. 3 On-Road Applications
QLS 321 SOLUTIONS. Compact and Rugged Easy to Install and Use Multiple Standard Features. Quicklub Lubrication Systems.
 THE LATEST PRODUCTS AND NEWS FOR LINCOLN CUSTOMERS SOLUTIONS APRIL 2001 VOL. 3, NO. 2 A New Addition To Our Line of Powerful Quicklub Lubrication Systems In This Issue: QLS 321 Compact and Rugged Easy
IVTM Installation Manual
 Integrated Vehicle Tire Pressure Monitoring IVTM Installation Manual 2nd edition Copyright WABCO 2006 Vehicle Control Systems An American Standard Company The right of amendment is reserved Version 002/06.06(us)
People, Capabilities and Systems to Save Money and Increase Productivity
 People, Capabilities and Systems to Save Money and Increase Productivity We re the largest and most successful company in our field because we continually satisfy our customers with the world s best lubrication
Lubrication Installation Components, Accessories & Fittings Table of Contents
 Lubrication Installation Components, Accessories & Fittings Table of Contents Lubrication Fittings & Accessories: Introduction............................................. 2 Threaded Fittings........................................
Models CHASSIS LUBE ELECTRIC GREASE PUMP Series "C" - 13C MAY FORM Page. Section - Q3
 Models 94422 CHASSIS LUBE ELECTRIC GREASE PUMP Series "C" MAY - 2004 FORM 403467 Section - Q3 Page - 13C 9.00" (229 mm) 13.75" (350 mm) 0.35" (9mm) Mounting Holes 4.76" (121 mm) 9.84" (250 mm) Do not use
Model CHASSIS LUBE ELECTRIC GREASE PUMP Series "C"
 Model 94222 CHASSIS LUBE ELECTRIC GREASE PUMP Series "C" Indicates change MAY - 2004 FORM 403466 Section - Q3 Page - 12B 7.75" (197 mm) 12.6" (321 mm) 0.35" (9 mm) Mounting Holes 4.85" (123 mm) 8.85" (225
Models CHASSIS LUBE ELECTRIC GREASE PUMP Series "C" - Q3. MAY FORM Section
 Models 94822 CHASSIS LUBE ELECTRIC GREASE PUMP Series "C" - Q3 MAY - 2004 FORM 403468 Section Page - 14B 13.00" (330 mm) 17.72" (450 mm).35" (9 mm) Mounting Holes 4.72" (120 mm) 9.84" (250 mm) Figure 1
Lubrication Systems. Section 26
 Lubrication Systems Section 26 26-1 INFORMATION - SYSTEMS The Lincoln QuickLub is an automated and centralised lubrication system that can improve productivity and extend the service life of your plant.
MF SERVICE PARTS GUIDES
 MF SERVICE PARTS GUIDES All rights reserved. No part of this publication may be used, reproduced, distributed, transmitted, translated, stored in a retrieval system or reduced to any electronic medium
COMBINES 6620, 7720, 8820
 COMBINES 6620, 7720, 6620 Engine Drive 1 1 H79236 Alternator and water pump (6466DH-01 and 6466TH-01) 2 1 ( -600000) R71603 Compressor, air conditioner 1 (600001- ) H113565 Compressor, air conditioner
\ \ ~, en ~ \ \\ en I- ( \\\ b3~(i 5/27/93. æ Lr PECULIAR HYDRAULICS W LL BELT DRIVE, SLC,
 DODGE V8-38\360 W-W/O AC W/SERPENTINE 99-9 PECULIAR HYDRAULICS BELT DRIVE, SLC, UNDERHOOD VALVE 7505 ~., ( \\\ \ \\ ~,/./ LL a: :: z en ~ en I- W LL æ Lr ~,. \ \ \ "',: e /' ~ '\ '- -- - /' "-.. -- - -..
Page 1 of 17. Part# M0200 Rev.11 7/29/2016
 Part# M0200 Rev.11 7/29/2016 This manual contains important information concerning the installation and operation of the product listed above. Read manual thoroughly and keep for future reference INSTRUCTIONS
A system of lubricant dispensing devices (oil or grease) connected by piping to a central pumping unit that is operated automatically or manually.
 connected by piping to a central pumping unit that is operated automatically or manually.") Air/Oil Systems: A lubrication system in which small measured quantities of oil are introduced into an air/oil mixing device which is connected to a lube line that terminates at a bearing, or other lubrication
Air/Oil Systems: A lubrication system in which small measured quantities of oil are introduced into an air/oil mixing device which is connected to a lube line that terminates at a bearing, or other lubrication
FAX
 INSTALLATION INSTRUCTIONS 6090 Air Suspension Kit (pat. pending) 1999-2006 Tahoe, Suburban, Avalanche, Yukon Thank you for purchasing a quality Hellwig Product. PLEASE READ THIS INSTRUCTION SHEET COMPLETELY
OWNERS MANUAL GM C4500/C5500 DANA MODEL S135 REAR AXLE 2003-NEWER MODELS LINK MFG. PART NO. 8M PROUDLY INSTALLED BY : COMPANY :
 OWNERS MANUAL GM C4500/C5500 DANA MODEL S135 REAR AXLE 2003-NEWER MODELS LINK MFG. PART NO. 8M000030 Link Mfg. Ltd. 223 15th St. N.E. Sioux Center, IA USA 51250-2120 (712) 722-4874 Fax (712) 722-4876 QUESTIONS?
CH.4 Basic Components of Hydraulic and Pneumatic System/16 M HAP/17522/AE5G
 Content : 4.1 Hydraulic and Pneumatic actuators. 10 Marks Hydraulic Actuators - Hydraulic cylinders (single, double acting and telescopic) construction and working, Hydraulic motors (gear and piston type)
9500 Series Combines. Massey Ferguson Combines: The Next Generation
 9500 Series Combines Massey Ferguson Combines: The Next Generation Welcome to our new 9500 Series. The combine that lives up to its legacy. Ever since Massey Ferguson introduced the first self-propelled
Service Manual. MF2135 Industrial
 Massey Harris Massey Ferguson Service Manual MF2135 Industrial Service Manual THIS IS A MANUAL PRODUCED BY JENSALES INC. WITHOUT THE AUTHORIZATION OF MASSEY HARRIS MASSEY FERGUSON OR IT S SUCCESSORS. MASSEY
Portable Equipment High-Pressure Heavy-Duty Grease Pumps
 High-Pressure Heavy-Duty Grease Pumps 917 346P 987 Series 20 50:1 Air-Operated Double Acting The following models contain Lincoln s high pressure Series 20 grease pumps. Model 917 120 lb. Drum Will dispense
OPERATORS MANUAL/INSTRUCTIONS/PARTS & SERVICE FOR MANUAL & ELECTRIC
 OPERATORS MANUAL/INSTRUCTIONS/PARTS & SERVICE FOR MANUAL & ELECTRIC TABLE OF CONTENTS SAFETY DELIVERY INSPECTION OPERATION 4 MAINTENANCE 5 TROUBLE SHOOTING 5 PARTS 6-15 Frame Scissor Assembly 6-7 Thrust
Troubleshooting of the LubeTech Grease System
 Troubleshooting of the LubeTech Grease System February 2009 The LubeTech grease system is designed to be a preventative maintenance system that will extend the life of your bearings that are connected
OWNERS MANUAL GM C4500/C5500 4X4 DANA MODEL S135 REAR AXLE 2005-NEWER MODELS LINK MFG. PART NO. 8M PROUDLY INSTALLED BY : COMPANY :
 OWNERS MANUAL GM C4500/C5500 4X4 DANA MODEL S135 REAR AXLE 2005-NEWER MODELS LINK MFG. PART NO. 8M000060 Link Mfg. Ltd. 223 15th St. N.E. Sioux Center, IA USA 51250-2120 (712) 722-4874 Fax (712) 722-4876
Related Parts Selling Manual
 HYSTER COMPANY Related Parts Selling Manual Aftermarket Training At Hyster Company, we re raising the standards. Your guide to selling related parts for Electric Trucks Internal Combustion Trucks PREFACE
550 & 555 Tractor, Loader & Backhoe Volume 1 of 2
 Ford Service Manual 550 & 555 Tractor, Loader & Backhoe Volume 1 of 2 Service Manual THIS IS A MANUAL PRODUCED BY JENSALES INC. WITHOUT THE AUTHORIZATION OF FORD OR IT S SUCCESSORS. FORD AND IT S SUCCESSORS
If there is additional labor or other costs above the 4 hrs labor you must call VMAC for approved coverage
 Installation Manual for the A500027 RAPTAIR MF Dual Air Filter Retrofit Kit Author: Brian Collings Date: 15/07/2014 1900997 - Manual, Installation (A500027) Systems or Parts Affected: D600005BETA01-D600005BETA59
IS INDEPENDENT SUSPENSION SYSTEM OWNERS MANUAL
 IS INDEPENDENT SUSPENSION SYSTEM OWNERS MANUAL * Made in U.S.A. Patent number 5899470 IS153-002 REV. 1 Description Congratulations on your purchase of the MOR/ryde IS suspension system*. The MOR/ryde IS
PARTS CATALOG FOR. Mud Hog System II & System III 2-Speed Rear Wheel Drive FOR JOHN DEERE 9960, 9965 & 9970 COTTON PICKERS
 PARTS CATALOG FOR Mud Hog System II & System III 2-Speed Rear Wheel Drive FOR JOHN DEERE 9960, 9965 & 9970 COTTON PICKERS Mud Hog Model Numbers Tread Center MH System 9960 9965 & 9970 JD47601 JD47651 82-90
VALVE AND PLUMBING KIT 2408TL LOADER AGCO & MASSEY FERGUSON TRACTORS
 ASSEMBLY MANUAL Keep With Operator s Manual VALVE AND PLUMBING KIT 2408TL LOADER AGCO & MASSEY FERGUSON TRACTORS AGCO MASSEY FERGUSON CAB ROPS ST34A 1533 X ST41A 1540 N/A X TRACTOR AND VALVE KIT GENERAL
REPAIR MANUAL AFX8010
 REPAIR MANUAL AFX 1 27/05/2004 Contents INTRODUCTION DISTRIBUTION SYSTEMS POWER PRODUCTION POWER TRAIN TRAVELLING BODY AND STRUCTURE TOOL POSITIONING CROP PROCESSING A B C D E G K AFX 1 27/05/2004 INTRODUCTION
Operating Instructions & Parts Manual
 Hydraulic Air/Manual Bottle Jacks Operating Instructions & Parts Manual Model Number ATD-74 ATD-74 Capacity Ton 0 Ton! U.S. Patent No.'s. 5,34,73-5,946,9 This is the safety alert symbol. It is used to
Automated Steering Hydraulic Installation Kit
 Automated Steering Hydraulic Installation Kit P/N: ED-MF0 Fits Massey Ferguson Swather Models: 0 Read and Follow Safety Messages In these instructions, you will see the heading, WARNING, and the safety
PFadvantage JD 3300/4400/6600/7700; 4420
 Ag Leader Technology Combine Installation JD 33//66/77; 2 Note: Indented items indicate parts included Quantity by Model in an assembly listed above Early Late Part Name/Description Part Number 3 3 6 6
MultiPort II Lubricator
 MultiPort II Lubricator Mobile, Progressive, Grease General The MultiPort II Lubricator is an electrically driven multiple outlet lubrication unit designed primarily for use with progressive divider valve
Parts Manual PZ Please read the operator manual carefully and make sure you understand the instructions before using the machine.
 Parts Manual PZ 60 967 045601-00 Please read the operator manual carefully and make sure you understand the instructions before using the machine. When you need spare parts or support in service questions,
C FORD F250 / F L POWERSTROKE DIESEL WITH AUTOMATIC TRANSMISSIONS ONLY
 EXHAUST BRAKES C40019 1999-2003 FORD F250 / F350 7.3L POWERSTROKE DIESEL WITH AUTOMATIC TRANSMISSIONS ONLY Getting Started Thank you and congratulations on your purchase of a Pacbrake exhaust retarder.
Accessories. Accessories Catalogue
 Accessories Accessories Catalogue 1 Multi Line Accessories INDUSTRIAL Multi Line Accessories Pump Elements For XGS, AX and AC Pumps Blanking Plugs Fast Prime Kit AC Pump 78033 0.010cc Element Red 78034
Kysor On/Off Rear Air Fan Drive
 . Proper precautions must be taken to prevent personal injury from contact with moving parts, unintended engine start or other hazards present when working with powered equipment. Refer to the vehicle
SETUP & INSTALLATION MANUAL FOR DOOSAN DL 200 TC TOOL CARRIER BY
 SETUP & INSTALLATION MANUAL FOR DOOSAN DL 200 TC TOOL CARRIER BY IM 005 ISSUE 1 05/04/2012 Page 1 of 27 2012 Interlube Systems Ltd. UK Table of Contents Ports / Bearings Fitting and Lubrication Charts...
C40008 & C40009 EXHAUST BRAKES
 EXHAUST BRAKES C40008 & C40009 1995 2003 Ford F250 / F350 7.3 L Powerstroke Diesel with manual transmissions 1995 1998 Ford F250 / F350 7.3 L Powerstroke Diesel with automatic transmission* *Requires the
Centro-Matic. Automated Lubrication Systems
 Centro-Matic Automated Lubrication Systems I install Lincoln Centro-Matic systems with confidence because I know they re going to prolong the life of my customer s critical machinery. Les Maness, Installation
FAX
 INSTALLATION INSTRUCTIONS 6299 Air Suspension Kit (pat. pending) 2009+ Dodge 1500 Pickup with Rear Coil Springs Thank you for purchasing a quality Hellwig Product. PLEASE READ THIS INSTRUCTION SHEET COMPLETELY
OWNERS MANUAL. GMC C K AND 19K GVW CHASSIS CAB 2004-NEWER MODELS (Link Part No. 8M000050) PROUDLY INSTALLED BY : COMPANY : INSTALLER SIGNATURE :
 PROUDLY INSTALLED BY : COMPANY : INSTALLER SIGNATURE :") OWNERS MANUAL GMC C5500 15K AND 19K GVW CHASSIS CAB 2004-NEWER MODELS (Link Part No. 8M000050) Link Mfg. Ltd. 223 15th St. N.E. Sioux Center, IA USA 51250-2120 (712) 722-4868 Fax (712) 722-4779 QUESTIONS?
OWNERS MANUAL GMC C5500 15K AND 19K GVW CHASSIS CAB 2004-NEWER MODELS (Link Part No. 8M000050) Link Mfg. Ltd. 223 15th St. N.E. Sioux Center, IA USA 51250-2120 (712) 722-4868 Fax (712) 722-4779 QUESTIONS?
Massey Ferguson Combines: The Next Generation Series Combines
 Massey Ferguson Combines: The Next Generation 9500 Series Combines Welcome to our new 9500 Series. The combine that lives up to its legacy. ENGINE BULGE UNLOAD BOOST GRAIN TANK MODEL HP (KW) HP (KW) BU
JARVIS. Model 50G Hydraulic Dehorner
 Hydraulic Dehorner EQUIPMENT SELECTION... Ordering No. TABLE OF CONTENTS... Page 50G Dehorner Electric Triggers Offset Blades... 4025011 Cup Blades... 4025047 Air Triggers Offset Blades... 4025025 Cup
215E. Operator and Parts Manual MM158
 5E Operator and Parts Manual MM58 This manual is furnished with each new TENNANT Model 5E This manual consists of Specifications; Operation; Maintenance; Appendix; the How To Use This Manual; Low Dump
Lincoln Quicklub centralized and automatic lubrication systems
 Lincoln Quicklub centralized and automatic lubrication systems People, capabilities and systems to save money and increase productivity We re the largest and most successful company in our ield because
Kysor On/Off Rear Air Fan Drive
 . Proper precautions must be taken to prevent personal injury from contact with moving parts, unintended engine start, or other hazards present when working with powered equipment. Refer to the vehicle
PARTS BOOK CATALOG IMPLEMENT ASSEMBLIES STANDARD BOOM 3PT HITCH MOUNT
 PARTS BOOK CATALOG IMPLEMENT ASSEMBLIES STANDARD BOOM 3PT HITCH MOUNT DIAMOND MOWERS, Inc. 350 E 60 th St. North Sioux Falls, SD 57104 FOR WARRANTY CALL DIAMOND MOWERS DIRECT: 888-960-0364 OUR TECHNICIANS
PFadvantage MF 6850/6855; Ideal 9080/9090
 MF 6850/6855; Ideal 9080/9090 Note: Indented items indicate parts included in an Quantity by Model assembly listed above MF Ideal Part Name/Description Part Number 6850 6855 9080 9090 Instruction Kit MF
GRAIN CART RETROFIT J-M 5.5 SPINDLE SCALE SYSTEM
 GRAIN CART RETROFIT J-M 5.5 SPINDLE SCALE SYSTEM Instructions This manual is copyrighted by Scale-Tec. Redistribution or copy of this manual or portions of this manual must be approved through Scale-Tec
Paint/Solvent/Dump Valve and Flow-Through Valve
 Instruction Sheet P/N 08573D Paint/Solvent/Dump Valve and Flow-Through Valve. Description See Figure. The paint/solvent/dump valve is a normally-closed valve that opens to trigger and/or dump coating material.
Centralized Lubrication Systems for Renewable Energy Production
 Centralized Lubrication Systems for Renewable Energy Production Biofuel Geothermal Wood/Wood Pellets Hydro Power Wind Energy Lincoln Centralized Lubrication Systems The Quicklub Progressive System - Ideal
AIR CONTROL ACCESSORY KIT
 RAPID RESPONSE SYSTEM 2283 AIR CONTROL ACCESSORY KIT INSTALLATION INSTRUCTIONS Congratulations on your purchase of a new Air Control Accessory Kit. This kit was designed to provide inflation control of
PARTS BOOK CATALOG IMPLEMENT ASSEMBLIES STANDARD BOOM 3PT HITCH MOUNT
 PARTS BOOK CATALOG IMPLEMENT ASSEMBLIES STANDARD BOOM 3PT HITCH MOUNT DIAMOND MOWERS, Inc. 350 E 60 th St. North Sioux Falls, SD 57104 FOR WARRANTY CALL DIAMOND MOWERS DIRECT: 888-960-0364 OUR TECHNICIANS
TrynEx International, LLC, 531 Ajax Drive, Madison Heights, MI , POWER PLOW Snowplow
 TrynEx International, LLC, 531 Ajax Drive, Madison Heights, MI 48071 49 www.snowexproducts.com January 15, 018 Lit. No. 531, Rev. 04 8100, 8611 POWER PLOW Snowplow Blade Assembly 77750, 77755 Big Box Assembly
HP10134 & HP10135 KITS BASIC SIMULTANEOUS AIR SPRING ACTIVATION KIT
 HP10134 & HP10135 KITS BASIC SIMULTANEOUS AIR SPRING ACTIVATION KIT Thank you and congratulations on the purchase of a Pacbrake simultaneous air spring activation kit. This kit was designed to add in-cab
Hydraulic Long Jacks
 Operating Instructions & Parts Manual Hydraulic Long Jacks Model 44915 44930 44940 44980 44981C (Air option) Capacity 1-1/2 Ton 3 Ton 4 Ton 8 Ton 8 Ton Models 44915, 44930, 44940 & 44980 Model 44981C U.S.
Fluidizing Pickup Tube Kits
 Instruction Sheet P/N 303787-02 Introduction The fluidizing pickup tube kit retrofits your existing mobile powder system with fluidizing air. It injects fluidizing air at the pickup tube inlet with minimal
JARVIS. Model 30CL-1 AND 30CL-3 Hock Cutter and Dehorner. 30CL-1 Hock Cutter
 Model 30CL-1 AND 30CL-3 Hock Cutter and Dehorner 30CL-1 Hock Cutter with Leg Grabber 30CL-1 Hock Cutter 30CL-3 Dehorner Equipment Selection 30CL-1 Sheep Head Dropper Order Number 30CL-1 Hock Cutter 30CL-1
Part# JL AIR IT UP 4 Tire On Board Air Delivery System. (Requires External Air Source)
") Part# 18-1819 JL AIR IT UP 4 Tire On Board Air Delivery System (Requires External Air Source) The most up-to-date instructions always visit www.updownair.com www.updownair.com 833-226-4863 I M P O R T
Part# 18-1819 JL AIR IT UP 4 Tire On Board Air Delivery System (Requires External Air Source) The most up-to-date instructions always visit www.updownair.com www.updownair.com 833-226-4863 I M P O R T
INSTRUCTIONS PARTS LIST This manual contains important warnings and information. READ AND RETAIN FOR REFERENCE
 INSTRUCTIONS PARTS LIST 308 493 This manual contains important warnings and information. READ AND RETAIN FOR REFERENCE Rev. A Second Gun Hose Kit 100 psi (6.9 bar) Maximum Working Pressure These kits include
Betico SB1 Compressor. Unloader Kit Installation Manual
 Betico SB1 Compressor Unloader Kit Installation Manual Contents 1. Sample of BOM for Unloader Kit Page 3 2. Regulation kit plumbing diagram Page 4 3. Disassemble standard inlet valves from machine Page
Fits AGCO, Challenger, & Massey Ferguson Tractor Models:
 Automated Steering Hydraulic Installation Kit P/N: ED-MF8400 Fits AGCO, Challenger, & Massey Ferguson Tractor Models: DT180A MT635B 8450 DT200A MT645B 8460 DT220A MT655B 8470 DT240A MT665B 8480 Overview
GRAIN CART RETROFIT BOLT-ON TYPE HITCH SCALE SYSTEM
 GRAIN CART RETROFIT BOLT-ON TYPE HITCH SCALE SYSTEM Instructions This manual is copyrighted by Scale-Tec. Redistribution or copy of this manual or portions of this manual must be approved through Scale-Tec
Quicklub Lubrication Systems
 Electric Grease Pumps 203 Series * Can be set for either minutes or seconds. P203 Series Pump These pumps are electrically operated and are used in progressive-type automated lubrication systems. The proven
P385B COMMERCIAL PAVER ENGINEERED INNOVATION
 P8B COMMERCIAL PAVER ENGINEERED INNOVATION Engineered for the demands of the commercial paving market. Engineered and built to produce in a wide range of applications, the Weiler P8B incorporates proven
Lincoln installation components, accessories and lubrication fittings
 Lincoln installation components, accessories and lubrication fittings People, capabilities and systems to save money and increase productivity Industry leader Continually satisfying our customers with
PARTS BOOK CATALOG 3PT HITCH MOUNT HEADS SWING FLAIL-HEAVY DUTY MOWERS
 PARTS BOOK CATALOG 3PT HITCH MOUNT HEADS SWING FLAIL-HEAVY DUTY MOWERS DIAMOND MOWERS, Inc. 350 E 60 th St. North Sioux Falls, SD 57104 FOR WARRANTY CALL DIAMOND MOWERS DIRECT: 888-960-0364 OUR TECHNICIANS
SHOP PRO FXP 95 UPGRADE KIT (REGULATED)
") 1. Make sure the Shop Pro FXP is disconnected from the 120VAC power source. 4. Loosen the five ¼" headed bolts slightly until the motor cover slides to the left and remove the cover. 2. Remove the vent
1. Make sure the Shop Pro FXP is disconnected from the 120VAC power source. 4. Loosen the five ¼" headed bolts slightly until the motor cover slides to the left and remove the cover. 2. Remove the vent
Owner s Manual TC-515 with Reversed Hoist, Sub-Frame, Deck, & Hitch Mount
 Proudly built in the USA Owner s Manual TC-55 with Reversed Hoist, Sub-Frame, Deck, & Hitch Mount TruckCraft Corporation Chambersburg, PA -800-755-87 Copyright c 0 www.truckcraft.com TruckCraft Corporation
Part Name/Description Part Number Quantity Instruction Kit Metalfor Flow Sensor
 NOTE: Indented items indicate parts included in an assembly listed above Part Name/Description Part Number Quantity Instruction Kit Metalfor 4101091 1 Flow Sensor 4001356 1 Deflector plate 2000612-1 1
BALE KING GT40 Grain Feeder Operator's & Parts Manual Last Update: November 20, 2014 Bridgeview Manufacturing Inc - 1 -
 BALE KING GT40 Grain Feeder Operator's & Parts Manual Last Update: November 20, 2014 Bridgeview Manufacturing Inc - 1 - Your Authorized Dealer: Your Serial Number: The Serial Number is located on the tank.
MODEL P Parts List UNIT SERIAL NUMBER MANUAL NUMBER: AB-F EFFECTIVE 06/2016
 Parts List UNIT SERIAL NUMBER MANUAL NUMBER: EFFECTIVE 06/2016 1330 76TH AVE SW CEDAR RAPIDS, IA 52404-7052 PHONE (319) 363-8281 FAX (319) 286-3350 www.highwayequipment.com Copyright 2007 Highway Equipment
1090, 1170 & 1175 Volume 1 of 2
 J.I. Case Service Manual 1090, 1170 & 1175 Volume 1 of 2 Service Manual THIS IS A MANUAL PRODUCED BY JENSALES INC. WITHOUT THE AUTHORIZATION OF J.I. CASE OR IT S SUCCESSORS. J.I. CASE AND IT S SUCCESSORS
INSTALLATION AND OPERATING INSTRUCTIONS
 ASTRO ENVELOPE FEEDER AMC-2000-5 FOR RYOBI 3302 / ITEK 3985 (2 COLOR) INSTALLATION AND OPERATING INSTRUCTIONS INTRODUCTION Thank you for purchasing the Astro Envelope Feeder. It is fast, efficient, reliable,
AllCropHarvester.com. New/New Old Stock List as of 03/04/2016
 AllCropHarvester.com New/New Old Stock List as of 03/04/2016 If your part is not listed, please contact us. We may be able to get it, and/or have it as a used part. Contact us for prices not listed/used.