Model AFH2 Air Flow Hood. Specifications - Installation and Operating Instructions
|
|
|
- Egbert Little
- 6 years ago
- Views:
Transcription

1 Model AFH2 Air Flow Hood Specifications - Installation and Operating Instructions Bulletin AV-4-AFH2 DWYER INSTRUMENTS, INC. Phone: 219/ P.O. BOX 373 MICHIGAN CITY, INDIANA 46360, U.S.A. Fax: 219/ info@dwyer-inst.com
![Model AFH2 Air Flow Hood Specifications - Installation and Operating Instructions Bulletin AV-4-AFH2 24 SQ. [609.60] 38 [965.20] 8 [203.20] 18-1/2 [469.](/docs-images/77/74704461/images/2-0.jpg "90] HOOD FRAME ASSEMBLY MOUNTING PLATE The Model AFH2 Air Flow Hood is designed to measure differential air pressure in and around commercial and industrial air handling systems.")

2 Model AFH2 Air Flow Hood Specifications - Installation and Operating Instructions Bulletin AV-4-AFH2 24 SQ. [609.60] 38 [965.20] 8 [203.20] 18-1/2 [469.90] HOOD FRAME ASSEMBLY MOUNTING PLATE The Model AFH2 Air Flow Hood is designed to measure differential air pressure in and around commercial and industrial air handling systems. The AFH2 Air Flow Hood maintains a running average of measurements in the desired system. Using this product, you will have the ability to manually record measurements with the manometer on a given time interval. This unit also has an auto-zero feature and will auto-zero at user-defined intervals (this statement does not apply to l/sec, m 3 /hr or cfm mode, these modes are factory set to auto-zero every 10 seconds and this cannot be changed by the user). In addition to these features, the unit will alert you when its battery is running low in order to avoid recording inaccurate measurements. This lightweight flow hood is durable and easily stores in included travel case. New low flow adapter kit allows easy conversion of any AFH2 into a low flow hood. All kits fit easily into the AFH2 s travel case. SECTION 1: INTRODUCTION 1.1 WARNING Do not use the digital manometer/capture hood unit for liquid or gas mixtures other than air. No responsibility will be taken by Dwyer Instruments, Inc. for any resulting damage to the unit or to operators if it is used with corrosive or other dangerous or explosive gas mixtures. When using the digital manometer/capture hood to check air flow at ceiling diffusers, make certain that you can raise and hold the unit safely during use. This instrument is not classified as flameproof or intrinsically safe; therefore they must not be used where an explosion hazard may exist. The unit is not authorized for use on life support applications. Note: Observe standard safety procedures when working on ladders and scaffolding. Also ensure the unit does not become caught in moving machinery or on sharp objects. ITEMS INClUDED WITH THE AFH2 HOOD 1. Base unit with 2 x 2 (600 mm x 600 mm) hood. 2. Micromanometer 3. Carrying case 4. 1 pair of suction cup handles 5. 1 accessory pack (4 tubing adapters 2 mm x 6 mm, 1 neck sling, 2 bore flexible tubing 3 m x 2 mm) 1.2 CAUTION If stored under conditions outside normal operating range, allow the unit to stabilize at room conditions before use. Owing to its size and shape, take care when carrying the assembled unit from place to place. Avoid people and near-by equipment. Avoid sharp objects that may tear the capture hood. Turn the instrument off before storage or transportation and remove the batteries if storing for long periods or transporting by air. Make sure that the bellmouth/capture hood cable is not pinched by the mounting system. When not in use, the connector can be tucked behind the mount. Avoid subjecting the bellmouth sensing grid to excessive loading during use or assembly. Any air flow other than through the calibrated sensing holes, such as any hair-line cracks, will seriously affect the sensitivity. A damaged bellmouth sensing grid must be replaced, it cannot be repaired. Take care when fitting different sized canvas hoods of the protruding pins at the bellmouth. Do not disassemble the bellmouth sensing grid from the bellmouth molding. The retaining structure is specifically designed to accommodate loading due to normal operation. Under low humidity conditions, static electric charges may be encountered. These can be avoided by applying a suitable anti-static solution.

3 SECTION 2: DESCRIPTION 2.1 Power Supply The manometer is powered by one 9V battery or equivalent. The battery is contained in the battery compartment, which is accessible by removing the clip-on cover on the back of the digital manometer. To conserve battery power, the instrument has an AUTO-OFF feature that may be turned on or off. If you wish to learn how to use this feature of the digital manometer, please see page 6 (Setting the Switch Off Period) Battery Selection: 9 volt or equivalent battery Installing the Battery 1. Remove the manometer from its rubber casing. 2. Remove the battery compartment cover by pressing and sliding in the direction of the arrow. 3. Insert the proper 9V connection to the top of the battery in the correct orientation. 4. Replace the battery compartment cover and ensure it is clipped in place. 5. Place the manometer back into its rubber holder. 2.2 Assembly The nylon capture hood is extended and tensioned using 4 glass-fiber stiffening poles placed between the molding and the hood frame. Note: The degree of flexing required to fit the poles will vary with the hood. Erecting the Hood Note: Refer to the appropriate pole-arrangement diagram. 1. Remove the hood assembly from the carrying case and place on the ground with the hood attachment upwards. 2. Remove the 4 stiffening poles from their packaging. Place them somewhere accessible from a standing position. 3. Leaving the bellmouth on the ground, unfurl the hood and open. Remove out of its hinged frame. 4. Holding the frame against your body with one hand on the opposite side, insert the lower end of a pole into one of the poles already attached to the corner of the bellmouth molding. Locate the upper end of the pole into the hole at the opposite corner of the capture hood. 5. Repeat this process next for the diagonally opposite pole flexing of the poles may be necessary, depending on the hood. When these two poles have been inserted the assembly will be more-or-less self supporting on one side. 6. Repeat this process for the opposite side and the two remaining poles. BASE UNIT WITH HOOD AND FRAME STRUCTURE Assembly of 2 x 2 (600 x 600 mm) Frame Page 3 SPECIFICATIONS Service: Air. Volume Flow Rate Units: CFM, l/s, m 3 /hr. Volume Flow Ranges: Supply: CFM: 41 to 1176; l/s: 19 to 555; m 3 /hr: 69 to 2000; Exhaust: CFM: 45 to 1176; l/s: 21 to 555; m 3 /hr: 76 to Volume Flow Ranges with low Flow Kit: Supply: CFM: 25 to 1176; l/s: 12 to 555; m 3 /hr: 43 to 2000; Exhaust: CFM: 29 to 1176; l/s: 14 to 555; m 3 /hr: 49 to C (68 F): Supply: ±3% of reading ±9 CFM (±4 l/s, 14 m 3 /hr); Exhaust: ±3% of reading ±9 CFM (±4 l/s, 14 m 3 /hr). Span Stability v. Temperature: Better than 0.1% of range in use per 2 F (1 C). Zero System Accuracy: ±1 count (±0.05 Pascal typical; ± in w.c.). Temperature limits: Operating: 32 to 122 F (0 to 50 C); Storage: 23 to 122 F (-5 to 50 C). Thermal Effect: ±0.1% of range in use per 2 F (1 C). Zero Drift: Negligible due to auto zero system. When auto zero set at 30 second intervals (2 minute warm up). Orientation Effect: Any 45 degree change in w.c. (0.1 pascal) typical. System Air leak: in 3 /hr ( in w.c. (5 kpa) typical. Maximum Differential Pressure: 60 in w.c. (15 kpa). Auto Ranging Display: high digits. Resolution: 1 CFM, 1 l/s, 1 m 3 /hr. Output: RS-232 serial interface (baud rate 9600). Memory Capability: 2500 readings in any engineering unit. Power Requirements: 8.4 V NiMH battery, installed functional, user replaceable (optional 9 V alkaline battery may be used in place of rechargeable). Dimensions: 30 x 24 x 24 (965 x 610 x 610 mm). Hood only: 2 x 2 (600 mm x 600 mm). Weight: 8.8 lb (4 kg). Agency Approval: CE. Hood Handles Installation: Ensure that the base unit is clean and dry. Flip up the latches on each handle. Apply the handles to the base unit. Flip down the latches to secure the handles. Test each handle by pulling gently on it, if there is any movement remove the handle and repeat the installation process. Removal: Flip up the latches on each handle. If necessary, slide a finger under the suction pad to release the suction. DO NOT attempt to remove the handles without releasing the latches as this could cause damage. CAUTION Check the handles before use and contact Dwyer Instruments, Inc. immediately if any components are missing or damaged. Check before use that all components are securely fastened. DO NOT apply more than 45 kg of force to the handles. Dwyer Instruments, Inc. does not accept liability for any damage or injury caused by improper use. Positioning of Handles: Both handles can be fitted to the inside of the base. Both handles can be fitted to the outside of the base. One handle can be fitted to the inside and the other to the outside of the base.


 Canvas Model A-177 Use Parts 1 + 2 + 3 + 4 + A + A + C + C from A-175 Hood Adapter Kit.")
 hood to the base and slot the larger end into the channels in the frame ensuring that the canvas is not caught.")
, 2 x 4 (600 x 1200 mm), 1 x 5 (300 x 1500 mm), 3 x 3 (900 x 900 mm) 4 3 x 3 (900 x 900 mm) Canvas Model A-179 Use Parts 1 + 2 + 3 + 4 + B + B from")
4 Connecting the Digital Manometer 1. Attach the instrument to the steel plate. 2. Connect the blue hose to the Reference port on the instrument. Connect the clear hose to the Signal In port on the instrument. 2.3 Disassembly Disassembly is essentially the reverse of the assembly procedure. Page 4 Disconnecting the Instrument 1. Disconnect the hoses from the digital manometer. 2. Detach the manometer from the metal plate. 3. Collapse the capture hood. 4. Store the instrument and components in the travel case. ASSEMBlING OPTIONAl FRAMES The frames are fitted together using nuts. Each frame consists of the corner pieces 1, 2, 3, and 4 and additional pieces can be inserted between these to create different sized frames. 2 x 4 (600 x 1200 mm) Canvas Model A-177 Use Parts A + A + C + C from A-175 Hood Adapter Kit. Fit one A piece between pieces 1 and 2 and the other between pieces 3 and 4, then fit one C piece between pieces 2 and 3 and the other between pieces 1 and 4. Attach the smaller end of the 2 x 4 (600 x 1200 mm) hood to the base and slot the larger end into the channels in the frame ensuring that the canvas is not caught. Fit the poles so that they run parallel to the side seams as shown in picture. B 3 A 2 1 Optional hoods: C 1 x 4 (300 x 1200 mm), 2 x 4 (600 x 1200 mm), 1 x 5 (300 x 1500 mm), 3 x 3 (900 x 900 mm) 4 3 x 3 (900 x 900 mm) Canvas Model A-179 Use Parts B + B from A-175 Adapter Kit. Fit one B piece between pieces 2 and 3 and the other between pieces 1 and 4, then fit piece 1 to piece 2 and piece 3 to piece 4. Attach the smaller end of the 3 x 3 (900 x 900 mm) hood to the base and slot the larger end into the channels in the frame ensuring that the canvas is not caught. Fit the poles so that they run parallel to the side seams as shown in picture. 1 x 5 (300 x 1500 mm) Canvas Model A x 4 (300 x 1200 mm) Canvas Model A-176 Use Parts A + A from A-175 Hood Adapter Kit. Fit one A piece between pieces 1 and 2 and the other between pieces 3 and 4, then join piece 1 to piece 4 and piece 2 to piece 3. Attach the smaller end of the 1 x 4 (300 x 1200 mm) hood to the base and slot the larger end into the channels in the frame ensuring that the canvas is not caught. Fit the poles so that they run parallel to the side seams as shown in picture. Use Parts B + B from A-175 Hood Adapter Kit. Fit one B piece between pieces 1 and 2 and the other between pieces 3 and 4, then join piece 1 to piece 4 and piece 2 to piece 3. Attach the smaller end of the 1 x 5 (300 x 1500 mm) hood to the base and slot the larger end into the channels in the frame ensuring that the canvas is not caught. Fit the poles so that they run parallel to the side seams as shown in picture. Assembling A-174 low Flow Hood Adapter plate A, 15.7 x 15.7 canvas and four (4) extension poles are used to assemble the low flow hood. The adapter plate is placed on top of the sensor grid beneath the brass fittings. To remove: Gently pull until the adapter plate slides out of place. To replace: Slot the adapter plate underneath the brass fittings on one side of the grid and push gently until it slots beneath the second pair of brass fittings.

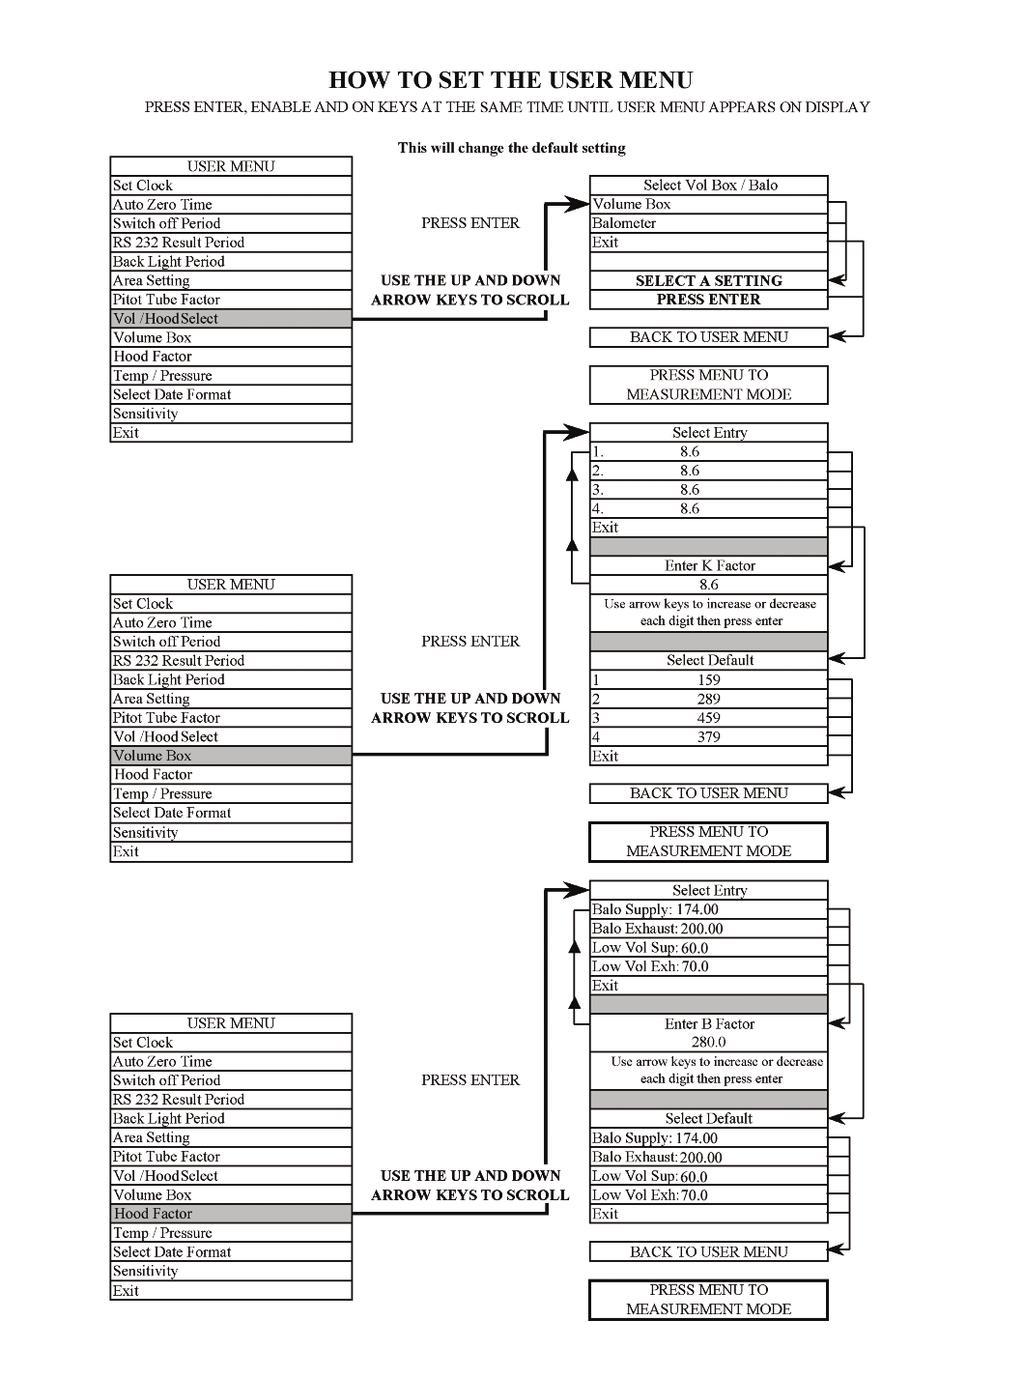
5 Page 5 MICROMANOMETER DISPlAY 2 3 KEY PAD CONTROlS: ENABlE: Protects against accidental switching of the instruments power source ON: Is used in conjunction with the enable key to switch on the instrument. OFF: Is used in conjunction with the enable key to switch off the instrument. FAST / SlOW: Smoothes out the response to applied pressure changes. Time constant: Fast = 0 seconds. Slow 1 = 5 seconds. Slow 2 = 10 seconds. Slow 3 = 15 seconds. Slow 4 = 20 seconds. 8 7 UNITS: Changes units of measurement. 1. Whenever the auto zero sequence is initiated manually or at powerup, auto zero will be displayed until the cycle is complete. Being an auto ranging instrument, the resolution and decimal points will change according to the pressure being applied. 2. Shows the Pitot tube or Hood Factor. Use the Units key to toggle to the Hood Mode, this will show the Hood Factor. 3. Shows the area setting. 4. Displays which mode the instrument is in. Press the fast/slow key to change the mode. 5. Engineering Units; use the Units key to toggle between units of measurement. 6. Number of readings stored. (Up to 2500 readings can be stored). 7. Displays the average velocity of the readings stored. 8. Shows the average volume of the readings stored (l/s, cfm or m 3 /hr). 2.4 Digital Manometer Features Auto Zero System Cycle will start to operate as soon as the instrument is switched on. This is factory set, initially set at a 30 second interval upon switching the unit ON and thereafter set at 60 second intervals. See user menu set up to change this timing. The instrument contains a miniature solenoid valve, which isolates the pressure sensors during the auto zero process, and the valve emits to clearly audible clicks, which signal the start and end of the auto zero process. The auto zero system can be overridden at any time by pressing ZERO. Timing intervals may be changed in the user menu from 30 seconds to 600 seconds, or the auto zero system may be turned off completely. Battery low Monitoring The battery condition is monitored every time the instrument auto zeros. When the battery low warning appears, the battery must be replaced immediately, otherwise the readings obtained will be unreliable. If at anytime the readings seem suspect auto zero the instrument manually and this will check the battery condition, if in doubt then replace the battery. STORE: To be used when storing readings manually. MENU: Options are activated to select the appropriate functions before carrying out any measurement. UP / DOWN: To operate the backlight; to select an appropriate function during the menu operation; and to toggle between supply and exhaust in Hood mode. BACKSPACE: Backspace. ENTER: Accepts commands from the menu operation, and gives access to user menu when used in conjunction with ENABLE and ON keys. ZERO: Zeroes the instrument manually, overriding the auto-zero system. Audible Feedback Audible noise should be heard every time a key is pressed while the instrument is on. Units Each time this key is pressed, the units of the measurement selected is shown on the right hand side of the display. Being an auto ranging unit, the correct resolution and the decimal point will be displayed according to the pressure being applied. MENU OVERVIEW Menu: There are two variants of the MENU. a. User Menu - This sets the instruments default values, which are factory set, but can be customized to individual requirements. This will change the values permanently. Note: Permanently changing certain default settings may give rise to incorrect readings. b. Option Menu - This sets or changes the default settings temporarily.
6 Page 6
7 Page 7
8 Page 8
9 Page 9
10 Page 10
11 Page 11
12 Page 12
13 Page 13
14 Page 14 Only use genuine cable and diskette. If any other accessories are used or the incorrect downloading software is used then the guarantee on the instrument and the accessories becomes null and void. ACCESSORIES A-190, Software and Cable
15 Making Measurements The capture hood can be used on either supply or exhaust flows. Which of these factors you will use depends on where in the duct you wish to measure the air flow rate. Press the UNITS key until L/s, m 3 /hr or cfm appears on the right-hand-side of the display. Use the Up and Down arrow keys to toggle between the Hood Supply and Hood Exhaust factors, which are shown in the top line of the display. ATD Factors (Air Terminal Device Factors) The Air Terminal Device Factors consist of the following factors: Hood Supply Factor, Hood Exhaust Factor, Pitot Tube Factor, Low Volume Supply Factor, and the Low Volume Exhaust Factor. It is not recommended that one change these factors permanently. If for any reason you do and need to set them back to the default, the default factors are as follows: Hood Supply Factor Hood Exhaust Factor Pitot Tube Factor Low Volume Hood Supply Low Volume Exhaust Factor The instrument can store up to 2 Pitot Tube factors. These can be input via the User Menu. In order to select a Pitot Tube factor, press the MENU key while in measurement mode, scroll to Select Pitot Factor using the Up and Down arrow keys and press the ENTER key. Use the Up and Down arrow keys to select the desired Pitot Tube factor and press the ENTER key. Press the MENU key to return to measurement mode. Press the UNITS key until m/s or ft/min is displayed on the right-handside of the screen. The selected Pitot Tube factor will be displayed in the top line of the display on the left-hand-side. Measuring Volume Flow Select the duct shape and input the dimensions in millimeters or inches. When storing the data manually in m/sec or ft/min, the display shows the average value. The resulting value is then multiplied with the area to give the volume (providing that the stored value is of the same units). The resulting figure will either be in liters/sec or CFM depending on the model. Downloading PC Connection: Connect the RS232 Plug to the instrument located between pressure parts and fit 9-way D type connector to the serial port of the PC. Ensure that the software is loaded on the PC using the provided diskette. Switch on the instrument and select PC Connection mode via the Menu (See the Option Menu section). Double click the icon (under the heading Manometer Up Load ). Message will appear on the screen to give it a file name and save that file in appropriate location. Ensure that the file is saved under the TXT format. Click on the file and open with the Note Pad program and the data will be displayed in the format: Time Date Measured Unit of Stamp Stamp Value Measurement Note: Only use genuine cable and software. If any other accessories are used or the incorrect downloading software is used then the instrument s warranty becomes null and void. Page 15 SECTION 3: BACK PRESSURE When using the capture hood, it can slightly restrict the flow coming out of the diffuser causing some back pressure on the system. This added resistance may alter the true air flow, however in most cases this error is likely to be less than the accuracy of the instrument. SECTION 4: TROUBlE SHOOTING Problem No Display on Switch On Instrument Stops Working (no display on LCD) Inconsistent Measurements Data Not Downloaded to Computer Possible Causes No batteries fitted Batteries fitted but have incorrect orientation (wrong polarity) Batteries exhausted The Unit may not be switched on. Make sure it did not automatically turn itself off if it is set on automatic turn-off mode. Low Battery Computer is connected incorrectly Computer is configured incorrectly Incorrect printer cable is being used If none of these issues are causing your problem, please contact Dwyer. SECTION 5: MAINTENANCE Some simple routine maintenance after each use will ensure that your instrument/capture hood will function correctly for many years. Remove any moisture droplets using a clean, absorbent cloth/paper before disassembling and storing the unit. Remove battery if the unit is to be stored, unused for an extended period of time. Always store and transport the unit carefully. Store in dry conditions. DO NOT immerse the instrument in water. DO NOT use abrasive cleaning products. Bellmouth molding manifold and hood can be wiped clean with a damp cloth and dried. DO NOT immerse the bellmouth in water. DO NOT use abrasive cleaning products, which may block or damage the manifold grid. Grid may be CAREFULLY wiped clean with a cloth. Ensure Pitot tube holes are not contaminated with moisture. DO NOT use abrasive cleaning products that may damage the grid, or may leave a residue in or around the holes. DO NOT attempt to remove the grid from the bellmouth molding. CHECK periodically for damage or any visible cracks. Take care NOT to damage or obscure the calibrated holes in the tubes. This can seriously affect the measurements obtained. Capture hood fabric can be wiped clean with a damp cloth, if necessary, and moisture droplets dried with an absorbent cloth/paper. Periodically, wash in cool water using a mild detergent. Drip dry, ensuring it cannot become caught on any sharp objects. The fabric used is impermeable, tough, and very resistant under normal use. In the event that the fabric becomes worn or torn, replace the fabric hood immediately. A damaged hood will seriously affect the measurements taken. Anti-static solution can be applied to the instrument by using a clean, lintfree cloth and carefully rubbing it over the instrument case and window. Note: This is normally only necessary when working in low-humidity conditions. Upon final installation of the Model AFH2 Air Flow Hood, no routine maintenance is required. A periodic check of system calibration is recommended. The Model AFH2 is not field serviceable and should be returned if repair is needed (field repair should not be attempted and may void warranty). Be sure to include a brief description of the problem plus any relevant application notes. Contact customer service to receive a return goods authorization number before shipping.
16 Page 16 Copyright 2013 Dwyer Instruments, Inc. Printed in U.S.A. 9/13 FR# R Rev. 3 DWYER INSTRUMENTS, INC. Phone: 219/ P.O. BOX 373 MICHIGAN CITY, INDIANA 46360, U.S.A. Fax: 219/ info@dwyer-inst.com
Specifications - Installation and Operating Instructions Ø5 [127.00] 17/64 [6.91] 1-59/64 [48.89]
![Specifications - Installation and Operating Instructions Ø5 [127.00] 17/64 [6.91] 1-59/64 [48.89]](/thumbs/84/88997249.jpg "Specifications - Installation and Operating Instructions Ø5 [127.00] 17/64 [6.91] 1-59/64 [48.89]") Bulletin P-DM-1200 Series DM-1200 DigiMag Digital Differential Pressure and Air Flow Gage Specifications - Installation and Operating Instructions PRESSURE CONNECTIONS 21/64 [8.59] LONG Ø5 [127.00] 4-31/64
Bulletin P-DM-1200 Series DM-1200 DigiMag Digital Differential Pressure and Air Flow Gage Specifications - Installation and Operating Instructions PRESSURE CONNECTIONS 21/64 [8.59] LONG Ø5 [127.00] 4-31/64
Read these instructions carefully before using the DIFF. It is also important to read the instructions of the used battery charger.
 Title : Observator DIFF Automatic Air Volume Flowmeter Version : Version 10.02-EN Date : 11 juni 2010 Author : C.W. Nasveld Read these instructions carefully before using the DIFF. It is also important
PROHOOD AIR CAPTURE HOOD MODEL PH731
 PROHOOD AIR CAPTURE HOOD MODEL PH731 The PH731 ProHood Capture Hood is a multipurpose electronic air balancing instrument primarily used for efficiently taking direct air volume readings at diffusers and
AXD 530 MicroManometer
 OWNER S MANUAL AXD 530 MicroManometer A TSI Company Table of Contents Features 2 Using the AXD530 Safely 3 Getting Started 4 Installing Batteries 4 Preparing the Instrument 4 Attaching the Optional Pitot-Static
Instruction Manual AVTM for. Strip Chart Recorder Catalog Nos and
 AVTM220003 Rev. B January 2003 Instruction Manual AVTM220003 for DC µa Strip Chart Recorder Catalog Nos. 220003 and 220003-47 PO Box 9007 Valley Forge, PA 19485-1007 U.S.A. 610-676-8500 Shipping Address:
Care and use guide. Contents. page
 Care and use guide Contents page Features Bluelab ph Meter Introduction Preparing for use Calibration 3 Measuring the ph value 5 Battery replacement 5 Cleaning and maintenance 6 Storing the Bluelab ph
DWYER INSTRUMENTS, INC. Phone: 219/ P.O. BOX 373 MICHIGAN CITY, IN 46361, U.S.A. Fax: 219/
 Series 43000 Capsu-Photohelic Pressure Switch/Gage Specifications - Installation and Operating Instructions Bulletin B-34 Ø4-3/4 [120.65] 3-7/8 SQ [98.43] 3/4 CONDUIT 4-3/8 [111.13] HOUSING REMOVAL 3-1/16
Users Manual. Airflow Meter
 922 Airflow Meter Users Manual PN 2683880 November 2006 Rev.1, 12/07 2006-2007 Fluke Corporation, All rights reserved. Printed in Taiwan. Product specifications are subject to change without notice. All
Model DS7060 Handrail Scale. User Manual
 Model DS7060 Handrail Scale User Manual Doran Scales, Inc. 1315 Paramount Pkwy Batavia, IL 60510 USA 1-800-264-4107 www.doranmedical.com MAN0302 Revision 0.0 TNW 2/20/2013 Section 1. Unpacking and Installation...
TERMINATOR User Manual
 TERMINATOR User Manual TERMINATOR User Manual Table of Contents Section Page 1 2 3 4 5 6 7 8 9 10 11 12 13 14 15 16 17 18 19 20 21 Introduction Safety Precautions Features and Benefits Overview of the
HD 2114P.0 HD 2114P.2 HD 2134P.0 HD 2134P.2
 HD 2114P.0 HD 2114P.2 HD 2134P.0 HD 2134P.2 Batteries 4 1.5V type AA batteries Autonomy 200 hours with 1800mAh alkaline batteries Power absorbed with instrument off 20μA Mains models HD2114P.2 and HD2134P.2
AXD 510 MicroManometer
 OWNER S MANUAL AXD 510 MicroManometer A TSI Company ALNOR INSTRUMENT COMPANY 7555 North Linder Avenue Skokie, Illinois, 60077 USA March 1997 Toll-Free (800) 424-7427 Printed in USA Telephone (847) 677-3500
BATTERY CHARGER RS-1000 Instruction Manual
 BATTERY CHARGER RS-1000 Instruction Manual BEFORE USING OUR BATTERY CHARGER RS1000, READ IN DETAILS ALL INSTRUCTIONS CONTAINED IN THIS MANUAL. KEEP THIS MANUAL IN A SAFE PLACE AS YOU MAY NEED TO USE IT
Automated socks packaging machine PS-1
 English Manual Automated socks packaging machine PS-1 Contents 1. Introduction 2. Important safety instructions 3. PS-1 4. Installation of air supply 5. SwifTach Power Unit (SPU) module 6. Operations 7.
FOR YOUR PERMANENT FILE
 FOR YOUR PERMANENT FILE WRENCH MODEL NUMBER: operation manual computorq 3 electronic WRENCH WRENCH SERIAL NUMBER: For Warranty Claims, Contact CDI Torque Products at (626) 965-0668. LIMITED WARRANTY The
ANALOG BALANCING TOOL MODELS ABT701, ABT703, ABT711, ABT713
 ANALOG BALANCING TOOL MODELS ABT701, ABT703, ABT711, ABT713 OWNER S MANUAL P/N 6002462, REV E FEBRUARY 2016 LIMITATION OF WARRANTY AND LIABILITY Copyright TSI Incorporated / 2009-2016 / All rights reserved.
MICROMANOMETER ALNOR MODEL AXD610 AIRFLOW INSTRUMENTS MODEL PVM610
 MICROMANOMETER ALNOR MODEL AXD610 AIRFLOW INSTRUMENTS MODEL PVM610 OPERATION AND SERVICE MANUAL P/N 1980587, REV F SEPTEMBER 2014 Copyright TSI Incorporated / 2007-2014 / All rights reserved. Address
Installation and User Manual. with RAIN SENSOR.
 with RAIN SENSOR www.solarsmartopener.com Revision..0 TABLE OF CONTENTS Features In The Box Further Items Required Basic Operation Solar Panel and Operator Installation Operator Installation Solar Panel
DP-CALC TM Micromanometer
 ENERGY AND COMFORT Ventilation Testing DP-CALC TM Micromanometer Model 5815 Operation and Service Manual Copyright TSI Incorporated / May 2007 / All rights reserved. Address TSI Incorporated / 500 Cardigan
OWNER S MANUAL. Alnor Electronic Balancing Tool Models EBT720/EBT721 and AIRFLOW Instruments ProHood Capture Hood Models PH720/PH721
 OWNER S MANUAL Alnor Electronic Balancing Tool Models EBT720/EBT721 and AIRFLOW Instruments ProHood Capture Hood Models PH720/PH721 EBT720/PH720 Shown with all accessory options EBT721/PH721 Shown with
MODEL MA4210 Installation and Operation Manual Important:
 MODEL MA4210 Installation and Operation Manual Important: This manual contains specific cautionary statements relative to worker safety. Read this manual thoroughly and follow as directed. It is impossible
INTRODUCTION. Specifications. Operating voltage range:
 INTRODUCTION INTRODUCTION Thank you for purchasing the EcoPower Electron 65 AC Charger. This product is a fast charger with a high performance microprocessor and specialized operating software. Please
User's Manual. Model Hot Wire Thermo-Anemometer. Introduction
 User's Manual Model 407123 Hot Wire Thermo-Anemometer Introduction Congratulations on your purchase of Extech s Hot Wire Anemometer. This meter is equipped with a telescoping antenna, indicates air-flow
Service Manual Model L1000 Smart Lift
 Service Manual Model L1000 Smart Lift Form #1-147 Rev. 10/1/13 Table of Contents Parts Breakdown 3 Monthly Maintenance Checklist 5 Smart Lift Operating Instructions 7 Scale Calibration 8 Advanced Smart
Ventilation Testing. Micromanometer. Alnor Model AXD610 AIRFLOW TM Model PVM610. Operation and Service Manual
 Ventilation Testing Micromanometer Alnor Model AXD610 AIRFLOW TM Model PVM610 Operation and Service Manual Copyright TSI Incorporated / 2007-2008 / All rights reserved. Address TSI Incorporated / 500 Cardigan
MoistureMatch A next generation grain tester
 MoistureMatch A next generation grain tester A next generation moisture tester incorporating new and unique technology. Finally, a portable tester that will more accurately match and track with the commercial
Ulyser Component Maintenance Manual
 No. MA_Ulyser_CMM_E_Rev_1.2 Ulyser Component Maintenance Manual Novega Produktionssysteme GmbH Gewerbepark 2 87477 Sulzberg (See) Germany Fon: +49/8376/92990-0 Fax: +49/8376/92990-20 info@novega.de www.novega.de
IM012E (ELECTRONIC) POSITIVE DISPLACEMENT FLOWMETER INSTRUCTION MANUAL
 POSITIVE DISPLACEMENT FLOWMETER INSTRUCTION MANUAL") IM012E (ELECTRONIC) POSITIVE DISPLACEMENT FLOWMETER INSTRUCTION MANUAL To the Owner PLEASE READ THIS INFORMATION CAREFULLY BEFORE USE. Read and retain this instruction manual to assist you in the operation
IM012E (ELECTRONIC) POSITIVE DISPLACEMENT FLOWMETER INSTRUCTION MANUAL To the Owner PLEASE READ THIS INFORMATION CAREFULLY BEFORE USE. Read and retain this instruction manual to assist you in the operation
Model 8710 DP-CALC TM Micromanometer and Model 8375 ACCUBALANCE Modular Air Balancing Tool
 ENERGY AND COMFORT Ventilation Testing/Balancing Model 8710 DP-CALC TM Micromanometer and Model 8375 ACCUBALANCE Modular Air Balancing Tool Operation and Service Manual Model 8375 ACCUBALANCE Modular Air
Service Manual. Model L500 and L600 Smart Lift. WARNING: Cancer and Reproductive Harm - Form #1-144 Rev.
 Service Manual Model L500 and L600 Smart Lift WARNING: Cancer and Reproductive Harm - www.p65warnings.ca.gov. Form #1-144 Rev. 2/5/19 Table of Contents Parts Breakdown 3 Monthly Maintenance Checklist 5
IAQ-CALC TM Indoor Air Quality Meter
 ENERGY AND COMFORT Indoor Air Quality IAQ-CALC TM Indoor Air Quality Meter Model 7515 Operation and Service Manual Copyright TSI Incorporated / May 2007 / All rights reserved. LIMITATION OF WARRANTY AND
VHM-P (Non-Locking) and VHM-PL (Locking) Variable Height Arm with Slide-In Mounting Plate
 and VHM-PL (Locking) Variable Height Arm with Slide-In Mounting Plate") 3875 Cypress Drive Petaluma, CA 94954 800.228.2555 +1.707.773.1100 Fax 707.773.1180 www.gcx.com VHM-P (Non-Locking) and VHM-PL (Locking) Variable Height Arm with Slide-In Mounting Plate (Refer to qualified
3875 Cypress Drive Petaluma, CA 94954 800.228.2555 +1.707.773.1100 Fax 707.773.1180 www.gcx.com VHM-P (Non-Locking) and VHM-PL (Locking) Variable Height Arm with Slide-In Mounting Plate (Refer to qualified
707Ex. Users Manual. ma Calibrator
 707Ex ma Calibrator Users Manual March 2003 Rev 2 3/03(English) 2003 Fluke Corporation, All rights reserved. Printed in USA All product names are trademarks of their respective companies. Table of Contents
Battery compartment door. Belt clip (back of pump) Front view Top view. Figure 1. AirLite Sample Pump
 Front view Top view. Figure 1. AirLite Sample Pump") AirLite Sample Pump Cat. No. 110-100 Operating Instructions 863 Valley View Road, Eighty Four, PA 15330 USA Tel: 724-941-9701 e-mail: skctech@skcinc.com www.skcinc.com Pump inlet (inlet fi lter underneath)
AirLite Sample Pump Cat. No. 110-100 Operating Instructions 863 Valley View Road, Eighty Four, PA 15330 USA Tel: 724-941-9701 e-mail: skctech@skcinc.com www.skcinc.com Pump inlet (inlet fi lter underneath)
WPS600. Hydraulic Pressure Transducer. User s Guide. 600 bar 60 MPa 8700 psi
 WPS600 Hydraulic Pressure Transducer User s Guide This accessory complies with the following standards: Electromagnetic Compatibility (EMC) Directive 2004/108/EC FCC Part 15 Pressure Equipment Directive
Operating Instructions AirLite Sample Pump Cat. No SKC Inc. 863 Valley View Road Eighty Four, PA 15330
 Operating Instructions AirLite Sample Pump Cat. No. 110-100 SKC Inc. 863 Valley View Road Eighty Four, PA 15330 Form 37814 Rev 1306 Table of Contents AirLite Quick Start Guide... 1 Description... 3 Performance
IAQ-CALC INDOOR AIR QUALITY METER MODEL 7515
 IAQ-CALC INDOOR AIR QUALITY METER MODEL 7515 OPERATION AND SERVICE MANUAL P/N 1980571, REVISION D FEBRUARY 2016 Copyright TSI Incorporated / May 2007-2016 / All rights reserved. Address TSI Incorporated
OPERATING INSTRUCTION
 99 Washington Street Melrose, MA 02176 Phone 781-665-1400 Toll Free 1-800-517-8431 Visit us at www.testequipmentdepot.com 8/05 Form #270 OPERATING INSTRUCTION MODEL 3005 DIGITAL INSULATION-CONTINUITY TESTER
Digital Formaldehyde Meter
 USER GUIDE Digital Formaldehyde Meter Model FM100 Introduction EXTECH INSTRUMENTS Thank you for selecting the Extech Instruments Model FM100. The FM100 measures Formaldehyde CH 2 O (HCHO) concentration,
TABLE OF CONTENTS 10.0 LIMITED WARRANTY
 10.0 LIMITED WARRANTY ELECTROMATIC Equipment Co., Inc. (ELECTROMATIC) warrants to the original purchaser that this product is of merchantable quality and confirms in kind and quality with the descriptions
1.Safe testing IMPORTANT:
 Electricity is dangerous and can cause injury and death. Always treat it with the greatest of respect and care. If you are not quite sure how to proceed, then stop, take advice from a qualified person.
POCKET-TACH 100 MONARCH INSTRUMENT Rev 1.4. Instruction Manual. Printed in the U.S.A. Monarch Instrument 2001 all rights reserved
 MONARCH INSTRUMENT Instruction Manual POCKET-TACH 100 Printed in the U.S.A. Monarch Instrument 2001 all rights reserved 1071-4834-001 Rev 1.4 15 Columbia Drive Amherst, NH 03031 USA Phone: (603) 883-3390
DIGITAL RCD(ELCB) TESTER
 TESTER") INSTRUCTION MANUAL DIGITAL RCD(ELCB) TESTER KEW 5410 R KYORITSU ELECTRICAL INSTRUMENTS WORKS, LTD. Contents 1. Safety Warnings.... 1 2. Procedure of removing Cover. 3 2-1 Method of removing the Cover.
INSTRUCTION MANUAL DIGITAL RCD(ELCB) TESTER KEW 5410 R KYORITSU ELECTRICAL INSTRUMENTS WORKS, LTD. Contents 1. Safety Warnings.... 1 2. Procedure of removing Cover. 3 2-1 Method of removing the Cover.
Model 8340 Intrinsically Safe VELOCICHECK Air Velocity Meter
 Ventilation Testing/Balancing Model 8340 Intrinsically Safe VELOCICHECK Air Velocity Meter Operation and Service Manual 1980076, Revision E October 2002 Model 8340 Intrinsically Safe VELOCICHECK Air Velocity
WPS500X. 500 psi / 34.5 bar Automotive Pressure Transducer. User s Guide
 WPS500X 500 psi / 34.5 bar Automotive Pressure Transducer User s Guide This accessory complies with the following standards: Electromagnetic Compatibility (EMC) Directive 2004/108/EC FCC Part 15 Pressure
User s Guide. EZ-Bar Livestock Scale WEIGH BARS AND DIGITAL INDICATOR. WB-40 Weigh Bars TS-700 WB Digital Indicator. Guide version 1.
 accurate around the world s i n c e 1 8 9 7 User s Guide EZ-Bar Livestock Scale WEIGH BARS AND DIGITAL INDICATOR WB-40 Weigh Bars TS-700 WB Digital Indicator Guide version 1.3 USER S GUIDE Table of Contents
MANUAL DE INSTRUÇÕES DO ANEMÔMETRO DIGITAL MODELO AN-3040
 MANUAL DE INSTRUÇÕES DO ANEMÔMETRO DIGITAL MODELO AN-3040 Leia atentamente as instruções contidas neste manual antes de iniciar o uso do anemômetro Introduction Congratulations on your purchase of the
GPS AutoSteer System Installation Manual
 GPS AutoSteer System Installation Manual John Deere Track Supported Models 8295RT 8320RT 8345RT PN: 602-0255-01-A LEGAL DISCLAIMER Note: Read and follow ALL instructions in this manual carefully before
ACCUBALANCE Air Capture Hood Model 8371
 ENERGY AND COMFORT Ventilation Testing/Balancing ACCUBALANCE Air Capture Hood Model 8371 Operation and Service Manual 1980335, Revision D June 2009 Copyright TSI Incorporated / October 2002-2009 / All
MDX-300 Series. For 12-volt automotive starting batteries and starting/charging systems INSTRUCTION MANUAL
 For 12-volt automotive starting batteries and starting/charging systems INSTRUCTION MANUAL Blank page Contents Caution... 4 Capabilities... 4 Display and Keypad... 4 Preparations Before the Test... 6 Connecting
Users Manual. Accessories Motor and Phase Rotation Indicator ships with the following items: 3 test leads 3 test probes 3 alligator clips 9 V battery
 MS5900 Users Manual Table of Contents Introduction Motor and Phase Rotation Indicator is a handheld, battery-operated instrument designed to detect the rotary field of three-phase systems and determine
SAC SERIES CONTENTS TRIPLE-INTERVAL HIGH PRECISION COUNTING SCALE OPERATION MANUAL 1. INSTALLATION 2. SPECIFICATIONS
 CONTENTS SAC SERIES TRIPLE-INTERVAL HIGH PRECISION COUNTING SCALE 1. INSTALLATION 2. SPECIFICATIONS 2.1 GENERAL SPECIFICATIONS 2.2 MINIMUM PIECES, WEIGHT APPLIED & SAMPLE SIZE WEIGHT SPECIFICATIONS OPERATION
OWNER S MANUAL. Model 9880 Intrinsically Safe Air Velocity Meter
 OWNER S MANUAL Model 9880 Intrinsically Safe Air Velocity Meter LIMITATION OF WARRANTY AND LIABILITY Seller warrants the goods sold hereunder, under normal use and service as described in the operator's
DCell Suction. Model DM Operating Instructions & Maintenance Manual. Clearing The Airway Is Our #1 Priority
 DCell Suction Model DM10-001 Clearing The Airway Is Our #1 Priority Operating Instructions & Maintenance Manual, INC. 11064 Randall Street Sun Valley, CA 91352 USA www.sscor.com Email: marketing@sscor.com
Service Manual Model S800 Smart Stand
 Service Manual Model S800 Smart Stand Form #1-146 Rev. 10/3/13 Table of Contents Parts Breakdown 3 Monthly Maintenance Checklist 7 Smart Stand Operating Instructions 9 Scale Calibration 10 Advanced Smart
CGD8800X CGD8800X220 Combustible Gas Detector
 CGD8800X CGD8800X220 Combustible Gas Detector Background and Purpose The CGD8800X Combustible Gas Detector offers significantly improved hydrocarbon detection while featuring visual concentration indicators
INSTALLATION: HOW IT WORKS: SensiStat Energy Saver Refrigeration Controller. both the holding plate temperature and refrigeration box temperature.
 both the holding plate temperature and refrigeration box temperature. SensiStat Energy Saver Refrigeration Controller HOW IT WORKS:...1 INSTALLATION:...1 OPERATION:...2 CUSTOMIZATION:...4 TROUBLE SHOOTING:...6
OPERATING AND MAINTENANCE MANUAL. Primary Current Injection Test Set. 750ADM-H mk2
 OPERATING AND MAINTENANCE MANUAL Product: Type: Primary Current Injection Test Set 750ADM mk2 750ADM-H mk2 DESIGNED AND MANUFACTURED BY: T & R Test Equipment Limited 15-16 Woodbridge Meadows, Guildford,
MODEL 901 OPERATING INSTRUCTIONS
 MODEL 901 OPERATING INSTRUCTIONS GENERAL DESCRIPTION The Quantek Model 901 is a battery-operated, portable oxygen analyzer used for the measurement of residual oxygen in gas-flushed (CAP/MAP) food packages.
DMG100 Digital Micron Gauge Limited Warranty DMG100 DMG100 Digital Micron Gauge USA CANADA COPYRIGHT 2011 UEi
 99 Washington Street Melrose, MA 02176 Phone 781-665-1400 Toll Free 1-800-517-8431 Visit us at www.testequipmentdepot.com DMG100 Digital Micron Gauge Parts Diagram 2 LCD Display Item A B C Main Numeric
User's Guide. EzFlex Thermo-Anemometer. Model EZ30 UNITS MAX MIN AVG VEL
 MAX MIN AVG User's Guide EzFlex Thermo-Anemometer Model EZ30 VEL UNITS VEL MAX MIN AVG Introduction Congratulations on your purchase of the Extech EZ30 Thermo-Anemometer. The EZ30 measures air velocity
Service Manual Model S400 and S500 Smart Stand
 Service Manual Model S400 and S500 Smart Stand Form #1-145 Rev. 10/3/13 Table of Contents Parts Breakdown 3 Monthly Maintenance Checklist 7 Smart Stand Operating Instructions 9 Scale Calibration 10 Advanced
TRAIL-Control - Manufacturer -
 Installation and Operating Instructions TRAIL-Control - Manufacturer - Release 03-2001 Müller Elektronik GmbH & Co. KG Franz-Kleine-Str. 18 33154 Salzkotten Datei: 302901-02_E(ME015488)_PDF.DOC Contents
Intelligent Battery Charger
 Intelligent Battery Charger PA-NT2000 USER S MANUAL www.power-charger.net CONTENTS 1. Intended Use... 2 2. Delivery content... 3 3. Safety Instructions... 3 3.1Product Safety... 3 3.2 Battery safety...
Vantage 6000 Portable Ultrasonic Flow Meter
 Vantage 6000 Portable Ultrasonic Flow Meter Instruction Manual Eastech Badger Flow Technology Group 4250 S. 76 th East Ave. Tulsa OK 74145 800-226-3569 Description The Vantage 6000 portable transit time
Battery Chargers Sealed or Valve Regulated Lead Acid Batteries Models: PSC A AND PSC A
 Battery Chargers Sealed or Valve Regulated Lead Acid Batteries Models: PSC-122000A AND PSC-241000A Operating Instructions WARNING CONCERNING THE REMOVAL OF COVER: CAUTION: TO PREVENT THE RISK OF ELECTRIC
OPERATING INSTRUCTIONS
 CM OPERATING INSTRUCTIONS 9 Function, Auto Range Digital Multi-Meter DM6450 INTERTEK Read this owner s manual thoroughly before use and save. C LISTED US I. DISPLAY FUNCTIONS & SYMBOLS 9 6 10 11 14 8 7
(Refer to qualified personnel)
") 3875 Cypress Drive Petaluma, CA 94954 800.228.2555 +1.707.773.1100 Fax 707.773.1180 www.gcx.com Installation Guide VHM-P (Non-Locking) and VHM-PL (Locking) Variable Height Arm (Slide-Above-Arm Configuration)
3875 Cypress Drive Petaluma, CA 94954 800.228.2555 +1.707.773.1100 Fax 707.773.1180 www.gcx.com Installation Guide VHM-P (Non-Locking) and VHM-PL (Locking) Variable Height Arm (Slide-Above-Arm Configuration)
VELOCICALC Air Velocity Meter
 ENERGY AND COMFORT Ventilation Testing VELOCICALC Air Velocity Meter Model 9515 Operation and Service Manual Copyright TSI Incorporated / May 2007 / All rights reserved. Address TSI Incorporated / 500
FOR YOUR PERMANENT FILE
 FOR YOUR PERMANENT FILE WRENCH MODEL NUMBER: operation manual torque and angle electronic WRENCH WRENCH SERIAL NUMBER: For Warranty Claims, Contact CDI Torque Products at (626) 965-0668. LIMITED WARRANTY
DMG200. Digital Micron Gauge. 99 Washington Street Melrose, MA Phone Toll Free
 DMG200 Digital Micron Gauge 99 Washington Street Melrose, MA 02176 Phone 781-665-1400 Toll Free 1-800-517-8431 Visit us at www.testequipmentdepot.com Parts Diagram 2 LCD Display Item A B C Main Numeric
30A BLDC ESC. Figure 1: 30A BLDC ESC
 30A BLDC ESC Figure 1: 30A BLDC ESC Introduction This is fully programmable 30A BLDC ESC with 5V, 3A BEC. Can drive motors with continuous 30Amp load current. It has sturdy construction with 2 separate
Sonic Meter. Soni. Operating Manual. Rev. A
 Sonic Meter Soni Operating Manual Rev. A Important: Do not attempt to operate this instrument without completely reading this manual and understanding the correct operating procedures. For online technical
Product manual Oil Streak Sensor INTRODUCTION CONSTRUCTION. Master Sensor
 Product manual Oil Streak Sensor INTRODUCTION Oil streak sensors are designed to detect traces of oil travelling through air tubes, down to flows as low as 5mm 3 /min. The product utilizes a master and
User Guide. Model Insulation Tester / Megohmmeter. Introduction
 User Guide Model 380363 Insulation Tester / Megohmmeter Introduction Congratulations on your purchase of Extech s Insulation Tester/Megohmmeter. The Model 380363 provides three test ranges plus continuity
Battery Chargers Sealed or Valve Regulated Lead Acid Batteries Model: PSC AP
 Battery Chargers Sealed or Valve Regulated Lead Acid Batteries Model: PSC-124000AP OPERATING PROCEDURES AND SAFETY INSTRUCTIONS CAUTION: TO PREVENT THE RISK OF ELECTRIC SHOCK, DO NOT REMOVE COVER NO USER
User Manual Solar Charge Controller 3KW
 User Manual Solar Charge Controller 3KW Version: 1.3 CONTENTS 1 ABOUT THIS MANUAL... 1 1.1 Purpose... 1 1.2 Scope... 1 1.3 SAFETY INSTRUCTIONS... 1 2 INTRODUCTION... 2 2.1 Features... 2 2.2 Product Overview...
Accessory Fitting Instructions
 Accessory Fitting Instructions Expedition Aluminium Pannier Kit - Silver Kit Number A9500600 A9500800 Models Affected Tiger XR, Tiger XRT, Tiger XRX, Tiger XC, Tiger XCA, Tiger XCX, Tiger Explorer XR,
OPERATIONS MANUAL. Mini Centrifuge Model MCF Certified
 OPERATIONS MANUAL Mini Centrifuge Model MCF-2360 Certified Contents 1. Safety 2 2. Introduction 7 3. Package Contents 7 4. Specifications 8 5. Features 8 6. Parts of the Mini Centrifuge 9 7. Installation
SAVANNAH EI & DELUXE SYSTEM TROUBLE SHOOTING GUIDE
 SAVANNAH EI & DELUXE SYSTEM TROUBLE SHOOTING GUIDE ***PLEASE MAKE SURE TO LEARN THE REMOTE TO THE SYSTEM (REFER TO PG 6) AND CHECK THE BATTERIES FIRST!!! (American Flame AF-4000 Series) Intermittent Pilot
BBT-205. For 12-volt automotive starting batteries and starting/charging systems INSTRUCTION MANUAL
 For 12-volt automotive starting batteries and starting/charging systems INSTRUCTION MANUAL Blank page Contents Registering Your tester... 5 Caution... 6 Capabilities... 6 Display and Keypad... 6 Preparations
WPS bar, 60 MPa, 8700 psi Hydraulic Pressure Transducer. User s Guide
 WPS600 600 bar, 60 MPa, 8700 psi Hydraulic Pressure Transducer User s Guide WPX600 2 DO187-5 1. Safety terms and symbols User s Guide Please review the following safety precautions to avoid injury and
AIR VELOCITY METER ALNOR MODEL AVM410 AIRFLOW INSTRUMENTS MODEL TA410
 AIR VELOCITY METER ALNOR MODEL AVM410 AIRFLOW INSTRUMENTS MODEL TA410 OPERATION AND SERVICE MANUAL P/N 1980575, REV F FEBRUARY 2016 Copyright TSI Incorporated / 2007-2016 / All rights reserved. Address
Calibrator Capabilities Function Range Resolution Measure V dc 28 V 1 mv Measure ma dc Source ma dc
 707 Loop Calibrator Instruction Sheet Introduction The Fluke 707 Loop Calibrator (hereafter, the Calibrator) is a compact sourcing and measuring tool. The Calibrator tests current loops of 0-20 ma or 4-20
IAQ-CALC TM Indoor Air Quality Meter
 ENERGY AND COMFORT Indoor Air Quality IAQ-CALC TM Indoor Air Quality Meter Model 7515 Operation and Service Manual Copyright TSI Incorporated / May 2007 / All rights reserved. Address TSI Incorporated
Stay-IN-Play with Panic Stop Braking
 INSTALLATION INSTRUCTIONS TOWED VEHICLE BRAKING SYSTEM Stay-IN-Play with Panic Stop Braking SMI Manufacturing, Inc. P.O. Box 14040 Evansville, IN 47728 1-800-893-3763 www.smibrake.com SIP0906 Model SIP0603
Rotating Vane Anemometer
 Ventilation Testing Rotating Vane Anemometer Alnor Model RVA801 AIRFLOW Model LCA301 Operation and Service Manual Copyright TSI Incorporated / 2007-2012 / All rights reserved. Address TSI Incorporated
Battery Management Innovation. For 12-volt automotive starting batteries and starting/charging systems INSTRUCTION MANUAL
 Battery Management Innovation For 12-volt automotive starting batteries and starting/charging systems INSTRUCTION MANUAL ! CAUTION Because of the possibility of personal injury, always use extreme caution
3875 Cypress Drive Petaluma, CA Fax
 3875 Cypress Drive Petaluma, CA 94954 800.228.2555 +1.707.773.1100 Fax 707.773.1180 www.gcx.com VHM-P (Non-Locking) Variable Height Arm with Fixed Angle Front End for Flat Panel / Keyboard Bracket (L Brackets
Battery Chargers Sealed or Valve Regulated Lead Acid Batteries Model: PSC A
 Battery Chargers Sealed or Valve Regulated Lead Acid Batteries Model: PSC-124000A OPERATING PROCEDURES AND SAFETY INSTRUCTIONS CAUTION: TO PREVENT THE RISK OF ELECTRIC SHOCK, DO NOT REMOVE COVER NO USER
GENERAL INFORMATION. H-1649, H-1650, H-1651 H-1653, H-1654 Easy-Count. uline.com. that may hurt accuracy:
 π H-1649, H-1650, H-1651 H-1653, H-1654 Easy-Count counting scale 1-800-295-5510 uline.com 1-800-295-5510 GENERAL INFORMATION Avoid placing the scale in locations that may hurt accuracy: 1. Temperature
Elite Power Solutions Automatic Battery Control (ABC) Operation Manual
 Operation Manual") Elite Power Solutions Automatic Battery Control (ABC) Operation Manual Elite Power Solutions 335 E Warner Rd. STE 3 Chandler, AZ 85225 www.elitepowersolutions.com ABC Operation Manual Page 1 Table of Contents
Elite Power Solutions Automatic Battery Control (ABC) Operation Manual Elite Power Solutions 335 E Warner Rd. STE 3 Chandler, AZ 85225 www.elitepowersolutions.com ABC Operation Manual Page 1 Table of Contents
RD712 & RD712XL Remote Displays. Model 615 / 615XL Indicator User s Manual
 RD712 & RD712XL Remote Displays Model 615 / 615XL Indicator User s Manual EUROPEAN COUNTRIES WARNING This is a Class A product. In a domestic environment this product may cause radio interference in which
CAPSU-PHOTOHELIC PRESSURE SWITCH/GAGE*
 CAPSU-PHOTOHELIC PRESSURE SWITCH/GAGE* Specifications - Installation and Operating Instructions Bulletin B-34 Series 43000 CAPSU-Photohelic Switch/Gage The CAPSU-Photohelic Switch/Gage is a most versatile,
POSITIVE DISPLACEMENT FLOWMETER
 Includes models IM019E-01 IM019E-02 IM019E (ELECTRONIC) POSITIVE DISPLACEMENT FLOWMETER INSTRUCTION MANUAL To the Owner PLEASE READ THIS INFORMATION CAREFULLY BEFORE USE. Read and retain this instruction
NTB-550 Manual. Contents
 1 NTB-550 Manual Please read this Manual before using the Machine. You will need to know the safety instructions, System Settings, Wheel Parameters Input and Calibration process before you can properly
DT304. Digital Temperature Logger INSTRUCTION MANUAL
 Test Equipment Depot - 800.517.8431-99 Washington Street Melrose, MA 02176 - TestEquipmentDepot.com DT304 INSTRUCTION MANUAL Digital Temperature Logger TABLE OF CONTENTS Introduction..........................................1
SensiStat Energy Saver Refrigeration Controller Revision 1.14
 SensiStat Energy Saver Refrigeration Controller Revision 1.14 HOW IT WORKS:... 1 INSTALLATION:... 2 OPERATION:... 3 CUSTOMIZATION:... 5 TROUBLE SHOOTING:... 9 FACEPLATE TEMPLATE... 11 The SCAD SensiStat
VHM-P (Non-Locking) Variable Height Arm with VESA Mounting Plate for 75 x 75mm or 100 x 100mm applications
 Variable Height Arm with VESA Mounting Plate for 75 x 75mm or 100 x 100mm applications") 3875 Cypress Drive Petaluma, CA 94954 800.228.2555 +1.707.773.1100 Fax 707.773.1180 www.gcx.com VHM-P (Non-Locking) Variable Height Arm with VESA Mounting Plate for 75 x 75mm or 100 x 100mm applications
3875 Cypress Drive Petaluma, CA 94954 800.228.2555 +1.707.773.1100 Fax 707.773.1180 www.gcx.com VHM-P (Non-Locking) Variable Height Arm with VESA Mounting Plate for 75 x 75mm or 100 x 100mm applications
18V CORDLESS STAPLER/NAILER
 18V CORDLESS STAPLER/NAILER MODEL NO: CONSN18LI PART NO: 6487055 OPERATION & MAINTENANCE INSTRUCTIONS LS1213 INTRODUCTION Thank you for purchasing this CLARKE product. Before attempting to use this product,