TyrolSport UGSMIC Install Instructions for Audi A4.
|
|
|
- Jason Fleming
- 6 years ago
- Views:
Transcription
. Magnet/pick-up tool (optional). Please be advised the vehicle in this example is a 2001 A4. 1997-1999.5 have a different headlight arrangement and no MAP sensor.")
1 TyrolSport UGSMIC Install Instructions for Audi A4. Tools Necessary: Torx T25, T45. 10mm socket and ratchet. 6mm hex wrench. Flat blade screwdriver. Hacksaw blade or die grinder or dremel tool. Drill (not required on all cars). Magnet/pick-up tool (optional). Please be advised the vehicle in this example is a 2001 A have a different headlight arrangement and no MAP sensor. Removing the two-piece headlights on cars is a simple process and should be self explanatory. 1. Turn the wheels all the way to one side, remove the fender liner screws. Turn the steering wheel all the way to the opposite sides and repeat. 1


2 2. Unhook the tab for the lower grill and remove. Repeat for the other side. 2

3 3. Remove the two hex bolts from the bottom of the bumper with a 6mm hex wrench. 3


4 4. Unhook the tabs for the front bumper. First, push down on the bumper, then pull outwards. This process can be frightening for a first timer, as it takes a lot of force to pull the bumper skin away from the vehicle after pushing downwards. Repeat for the other side. 4

5 5. Pull the bumper assembly forward. Unhook the connectors of the fog lights on both sides by inserting a flat blade screwdriver in the tab and lightly turning. Pull the connectors off. 5


6 6. Disconnect the headlight washers hose by removing the plastic horsheshoe on the hose junction. If you like, you can clamp the hose before disconnecting so that your reservoir doesn t empty. 6

7 7. Remove the rubber hood insulation on the leading edge of the radiator support. 7


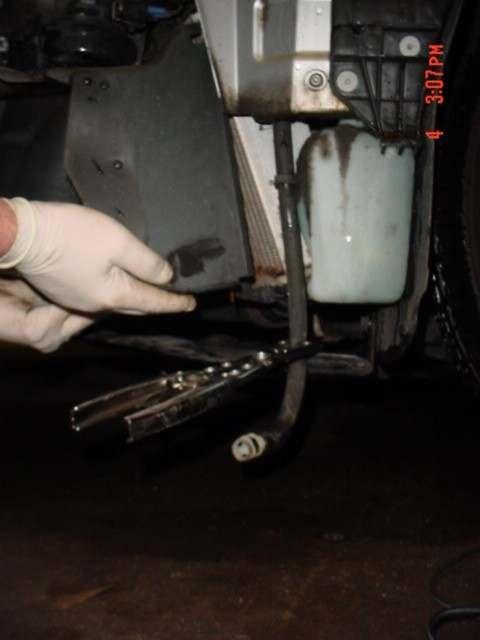
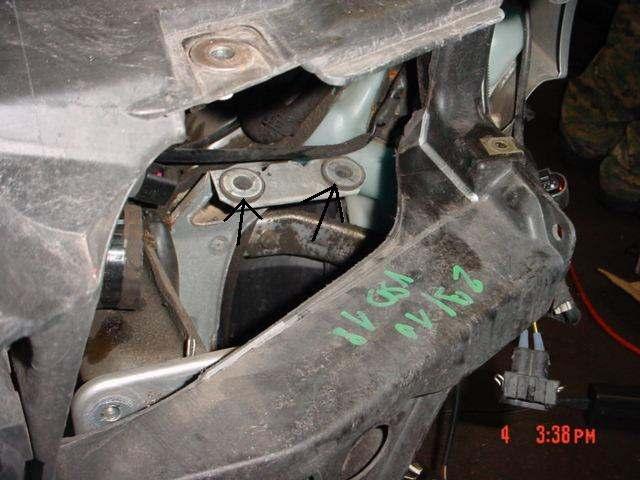
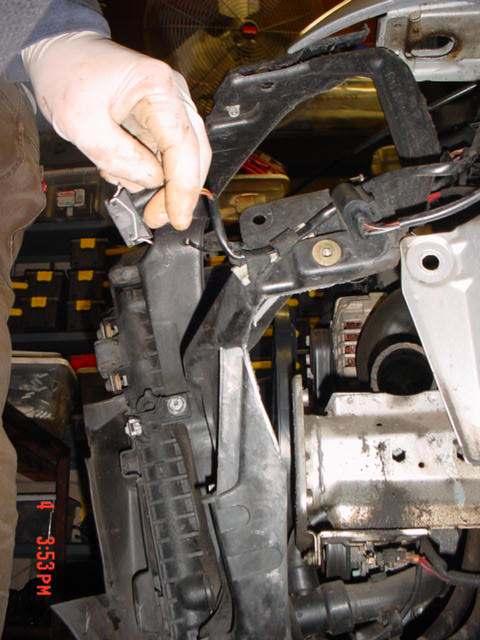
8 8. Remove the driver side headlight. There are three torx screws. Two of them are shown in the following image. One of them is located deep inside the opening in the fender. After loosening, the screw can be removed using a magnet or pickup tool. 8

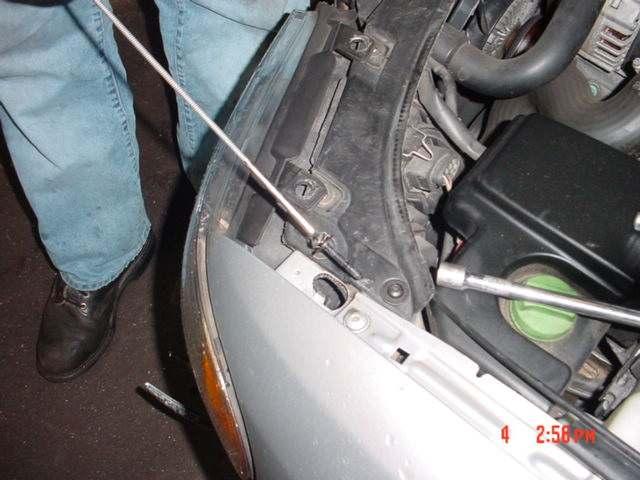
9 9

10 Here we see the two parts the recessed bolt was holding together 10

11 9. Remove the headlight by disconnecting the connectors for the main and side bulbs. As before, insert the flat blade screwdriver in the tab, and lightly turn. Pull off connector. 11


12 10. Remove the 3 T45 bolts and single 10mm nut on driver side. 4 T45 bolts and single 10mm nut on the passenger side. Pull out the bumper shocks. 12
13 13

14 14
15 15


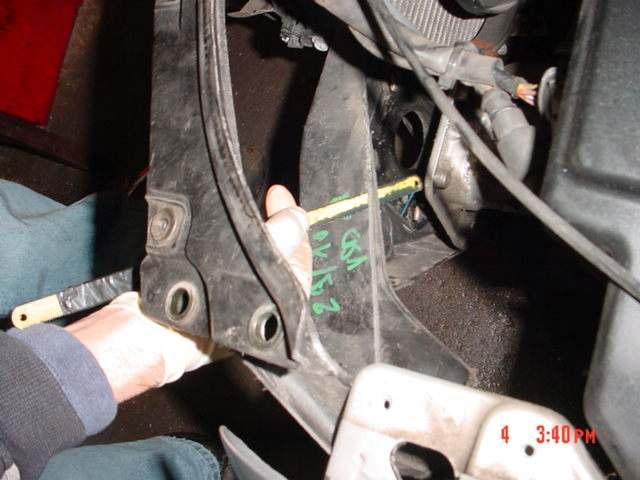
16 11. Remove three T30 screws on both driver and passenger side for the radiator support. 16

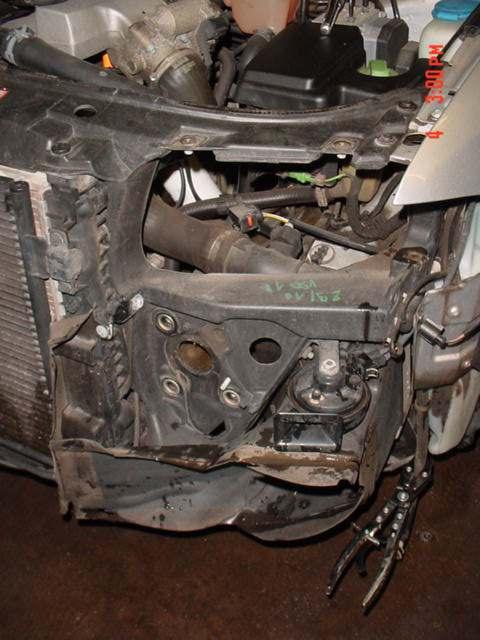
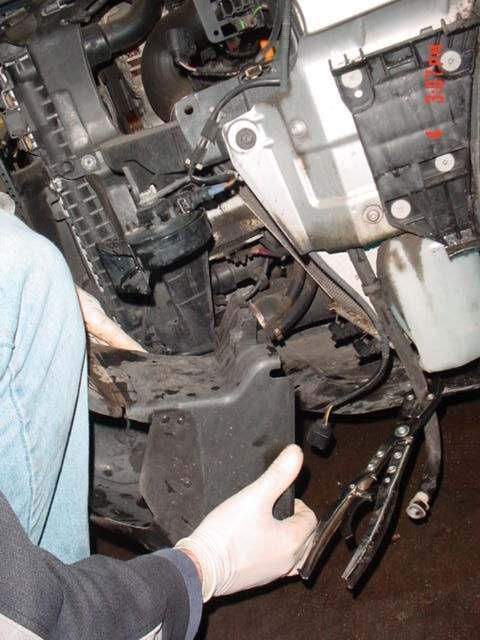
17 12. Remove three quick-release screws from the leading edge of the plastic belly pan. 17
18 18

19 13. Remove the intercooler shroud. First, push up on the shroud, then pull out toward the front of the car. 19
20 20
21 21

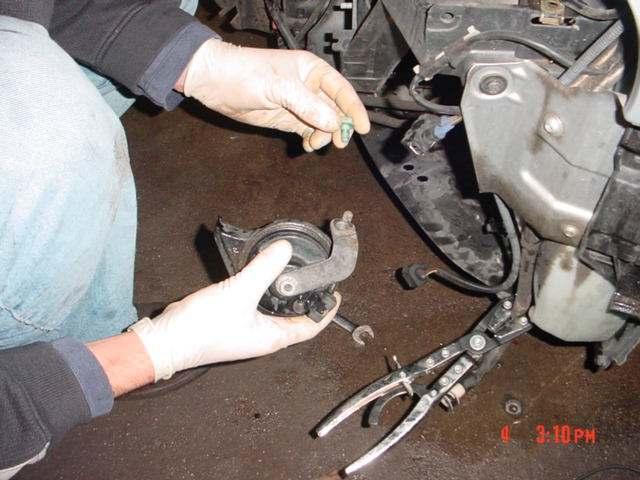
22 14. (Optional step for cars equipped with horns in front of the stock intercooler) Disconnect the horn connector by grasping the metal ends and squeezing. Remove the horn by loosening the 13mm bolts 22
23 23


24 15. Remove the airbox cover, and the plastic inlet hose that connects to the airbox. 24

25 16. Slide the radiator support off. 25

26 17. Loosen the clamps on the both intercooler inlet/outlet hoses. 26

27 27
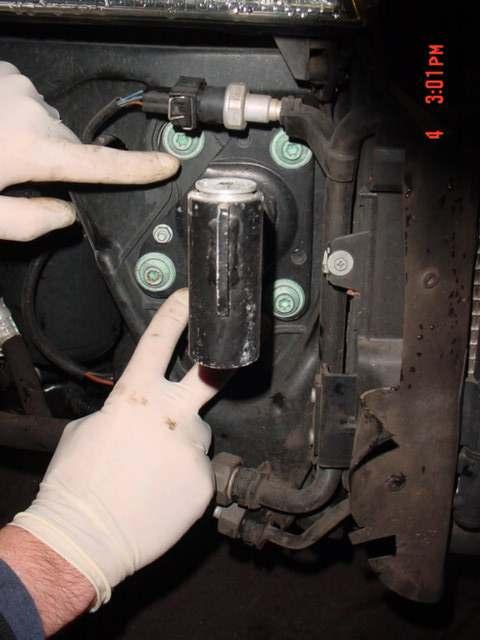
 Disconnect the MAP sensor connector by inserting flat")
28 18. (Optional step for Ts) Disconnect the MAP sensor connector by inserting flat blade screwdriver and twisting. 28

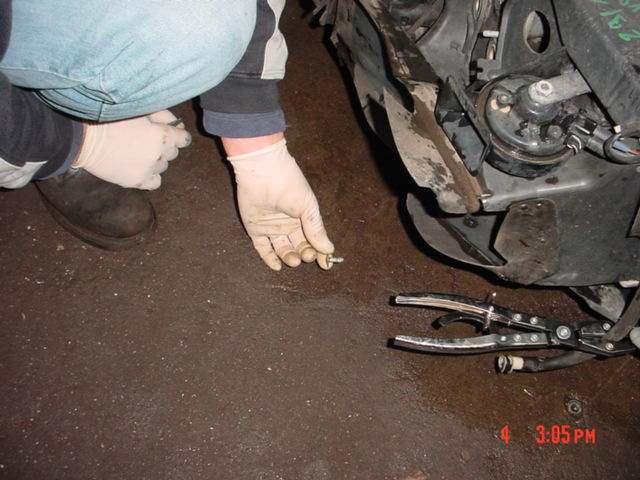
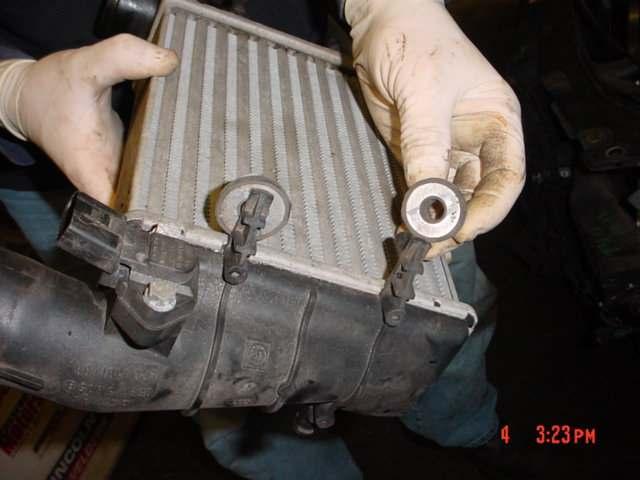
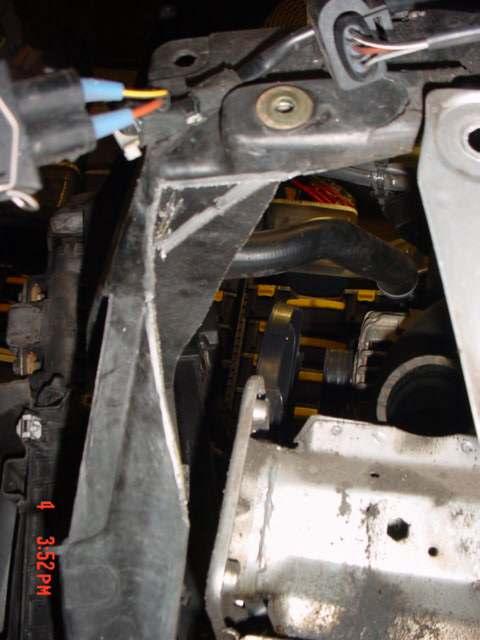
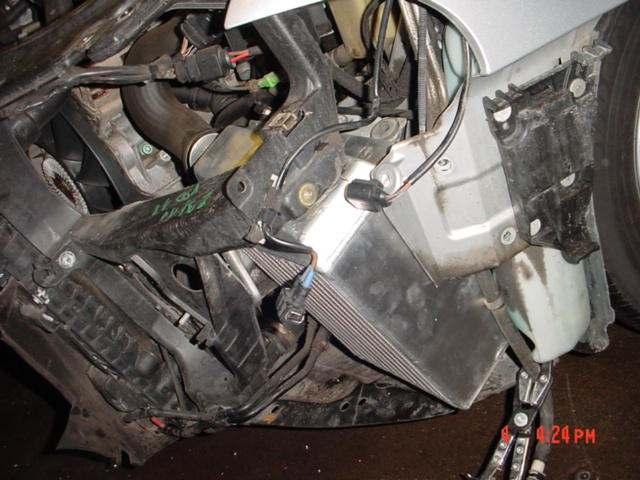
29 19. Remove the intercooler by pulling on the bottom of the intercooler first, then lifting up the intercooler to unhook from the intercooler mount. Reinstall the rubber grommets back into the support bracket. 29
30 30
31 31
.")
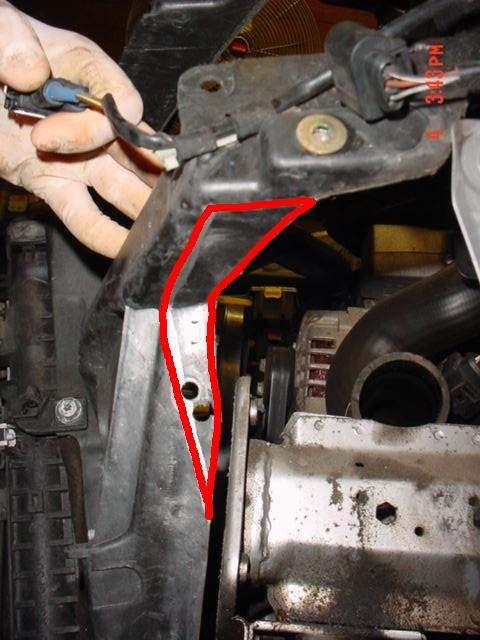
32 20. Some trimming is involved in order to fit the new UG SMIC. Notice the red mark. (View from front driver side). Use a hacksaw blade, die grinder, or dremel to cut appropriately. 32
33 33
34 34
35 35
36 36
 Remove map sensor from old intercooler and reinstall in UG")
37 21. (Optional step for ts) Remove map sensor from old intercooler and reinstall in UG SMIC using supplied hardware. 37


38 22. Remove the following two fender support screws. 38

39 23. Time to install the UG SMIC. First, slide the SMIC in as far as you can. Pull on the fender support panel and slide the rest of the SMIC in. Be sure the top mounting tabs of the SMIC fit into the support bracket before you push the SMIC into the bottom support hole. After the top mounting tab is in place, put the SMIC down and slide the bottom mounting tab in place. It is a VERY tight squeeze, as we used every possible square inch of space to maximize performance. 39

40 40


41 24. Connect the inlet/outlet hose back to the UGSMIC. Tighten the clamps. 41
42 25. Reattach fender screws and radiator support screw 42

43 26. (optional step for cars with horns that were removed earlier) Relocate the horn. Some radiator supports conveniently have a hole where the horns can be remounted without interfering with the UG SMIC. Other cars will require drilling a small hole in order to remount the horns. 43

44 27. Here s the installed UGSMIC 28. Reinstallation is the reverse of removal. 44
Locate the 4 screws on each side of the vehicle, on the inner fender well liner. Remove them with a Torx T25 bit:
 Installation Instructions for TyrolSport UG SM IC. The first step in installing the UG SMIC is removing the front bumper. Locate the 4 screws on each side of the vehicle, on the inner fender well liner.
INSTRUCTIONS. INTERCOOLER UPGRADE BMW E82 135i 2008-
 INSTRUCTIONS INTERCOOLER UPGRADE BMW E82 135i 2008- Parts Included: - Intercooler - Left and right side pipes with hoses - 3 Silicone Hoses ( 2.5 x 3 ) - 1 Silicone Hose 90degree 2.5 elbow - 8 Hoseclamps
INSTALLATION INSTRUCTIONS ELEVATION FRONT BUMPER DODGE RAM
 INSTALLATION INSTRUCTIONS PARTS LIST: 1 Elevation Bumper Assembly 24 12mm x 37mm OD x 3mm Flat Washers 2 Frame Mounting Brackets 12 12mm Nylon Lock Nuts 8 12-1.75mm x 50mm Hex Bolts 2 License Plate Mounting
INSTRUCTION. INTERCOOLER UPGRADE BMW E92 335i
 INSTRUCTION INTERCOOLER UPGRADE BMW E92 335i 2007-2011 Parts Included: - Intercooler - Shroud with seals - Left and right side pipes with hoses - 1 Silicone Hoses ( 2.5 x 3 ) - 2 Silicone Hose 45 degree
Audi S4 SMIC Installation. B5 Audi S4 Side Mount Intercooler installation
 Audi S4 SMIC Installation B5 Audi S4 Side Mount Intercooler installation Disclaimer: These installation instructions are to be used as a guide only. It is at the reader and/or installer s discretion to
B5 A4 1.8t Front Mount Intercooler Install Instructions
 B5 A4 1.8t Front Mount Intercooler Install Instructions Only work underneath your vehicle after properly supporting it with adequate jack stands on a flat surface. NEVER work under a vehicle only supported
Subaru Front Mount Intercooler Kit STI Subaru Front Mount Intercooler Kit STI
 Subaru Front Mount Intercooler Kit STI 2008-2014 715500 Subaru Front Mount Intercooler Kit STI 2008-2014 Congratulations on your purchase of the Subaru Front Mount Intercooler Kit STI 2008-2014. The following
INSTALLATION INSTRUCTIONS Unitronic Intercooler Upgrade Kit for 2.0 TFSI (EA113) UH007-ICA
 UH007-ICA") Unitronic recommends that you read through the entire installation instructions prior to beginning the installation to familiarize yourself with the included components, tools required, and procedures
Unitronic recommends that you read through the entire installation instructions prior to beginning the installation to familiarize yourself with the included components, tools required, and procedures
VW SCIROCCO R TWINTERCOOLER INSTALLATION INSTRUCTIONS
 VW SCIROCCO R TWINTERCOOLER INSTALLATION INSTRUCTIONS Tools needed: T25 torx driver Small flat head screwdriver 12mm & 13mm socket, with ratchet Dremel or similar with cut off disc Large Phillips screwdriver
54531/ FORD FUSION
 54531/51531 54531/51531 13-15 FORD FUSION 13-15 FORD FUSION FORD FUSION Upper Class Grille w/ Bars TOOLS REQUIRED: Socket Set Flat/Phillips Screw Drivers Torx Bits Plastic Pry Bar 3/16 Drill Bit and Drill
IE Audi B9 S4, S5, A4, A5, Allroad FDS Intercooler Install Guide IETPCK1
 IE Audi B9 S4, S5, A4, A5, Allroad FDS Intercooler Install Guide IETPCK1 Thank you for purchasing the best performing intercooler on the market! This instruction guide is used for installation of IE s
MAZDASPEED3 Intercooler Instructions
 MAZDASPEED3 Intercooler Instructions Congratulations on your purchase of the COBB Tuning Front Mount Intercooler System for your 2007-2009 Mazdaspeed3. The following instructions should assist you through
RS5mesh style Grille. Audi A5/S5. Installation Instructions. pre-facelift ES best viewed in Acrobat Reader
 Audi A5/S5 pre-facelift RS5mesh style Grille Installation Instructions ES2627648 This tutorial is provided as a courtesy by ECS Tuning. best viewed in Acrobat Reader Proper service and repair procedures
Integrated Engineering MK7/MQB TSI GEN 3 FDS Intercooler Install. Part Number IETPCI1
 Integrated Engineering MK7/MQB TSI GEN 3 FDS Intercooler Install Part Number IETPCI1 Thank you for purchasing another high quality Integrated Engineering product! This instruction guide is used for installation
VW SCIROCCO TWINTERCOOLER INSTALLATION INSTRUCTIONS
 VW SCIROCCO TWINTERCOOLER INSTALLATION INSTRUCTIONS Tools needed: T25 torx driver Small flat head screwdriver 12mm & 13mm socket, with ratchet Dremel or similar with cut off disc Large Phillips screwdriver
Installation instruction do88 Intercooler for SAAB 9-3 1,9 TTiD
 Installation instruction do88 Intercooler for SAAB 9-3 1,9 TTiD This instruction shows how to replace the OEM intercooler with this performance intercooler. At this type of installation we always recommend
FMCZTINT Mitsubishi Colt CZT front mounting intercooler installation
 FMCZTINT Mitsubishi Colt CZT front mounting intercooler installation Tools needed: Drill with 8mm HSS drill bit, hacksaw, dremel/stanley knife 3/8 drive ratchet with extension and 10mm,13mm sockets Torx
Fig A ADDICTIVE DESERT DESIGNS. Preparation: Removal:
 Preparation: Disconnect the negative battery terminal. Park the vehicle on level ground and set the emergency brake. We recommend reading through the installation instructions in whole before performing
PARTS LIST INSTALLATION INSTRUCTIONS PARTS LIST AND INSTALLATION GUIDE INSTALL TIME: 2 HOURS INSTALL DIFFICULTY: 3/5
 PARTS LIST AND PARTS LIST 1PC MISHIMOTO INTERCOOLER 1PC M6 X 1.0 X 20MM FLANGE BOLT 1PC M4 X 0.7 X 12MM BUTTON-HEAD BOLT 1PC M4 LOCK WASHER 1PC MAP SENSOR O-RING 2. Remove the eight pop clips that hold
Installation instruction do88 Intercooler for SAAB 9-3SS/SC 4-cyl Turbo
 Installation instruction do88 Intercooler for SAAB 9-3SS/SC 4-cyl Turbo This instruction shows how to replace the OEM intercooler with this performance intercooler. 1. 4. 5. At this type of installation
SAFETY THIS PRODUCT IS FOR OFFROAD USE ONLY. ALL LIABILITY FOR INSTALLATION AND USE RESTS WITH THE OWNER.
 SAFETY Your safety and the safety of others is very important. In order to help you make informed decisions about safety, we have provided installation instructions and other information. These instructions
09-12 Dodge 4WD /4 Body Lift
 92RC80000 09-12 Dodge 4WD 1500 1 1/4 Body Lift Thank you for choosing Rough Country for all your suspension needs. Rough Country recommends a certified technician install this kit. Attempts to install
Fitting Instructions. Revo MQB Golf/GTi/Octavia/Leon Intercooler. Recommended Tools. Contents RV581M Dealer installation advised.
 RV581M100100 Recommended Tools Contents No. Description Tools Size Intercooler Torx Bit T25, T30 Bracket Kit llen Key 4, 5 mm Silicone Hoses Socket 7, 10, 16, 19 mm Hose Clamps Flat Head Screwdriver Small,
Installation instruction do88 Intercooler for SAAB 9-3SS/SC 2,8 V6 Turbo
 Installation instruction do88 Intercooler for SAAB 9-3SS/SC 2,8 V6 Turbo This instruction shows how to replace the OEM intercooler with this performance intercooler. At this type of installation we always
54531/ FORD FUSION
 2014-2015 FORD Upper Class Grille w/ Bars TOOLS REQUIRED: Socket Set Flat/Phillips Screw Drivers Torx Bits Plastic Pry Bar 3/16 Drill Bit and Drill Motor PARTS LIST: (4) #8 u-nuts (2) seal brackets (driver
Front aero bumper Lower grille Right air spoiler. Left air spoiler Bolts (15) Self-tapping screws (8)
 Self-tapping screws (8)") INSTALLATION INSTRUCTIONS Parts List AERO ACCORD FEB. 2008 Front aero bumper Lower grille Right air spoiler Left air spoiler Bolts (15) Self-tapping screws (8) Nuts (10) Tools and Supplies Required Phillips
INSTALLATION INSTRUCTIONS Parts List AERO ACCORD FEB. 2008 Front aero bumper Lower grille Right air spoiler Left air spoiler Bolts (15) Self-tapping screws (8) Nuts (10) Tools and Supplies Required Phillips
HIGH FLOW COLD AIR INTAKE SYSTEM INSTALLATION INSTRUCTIONS D , D A
 HIGH FLOW COLD AIR INTAKE SYSTEM INSTALLATION INSTRUCTIONS D760-0320, D760-0320A 1992-95 325i, is 1995 M3 (3.0L) Parts List: 1 Intake Tube 1 Silicone Hose 1 Air Flow Meter Bracket 1 Hose Clamp (#36z) 1
COLD AIR INTAKE INSTALLATION INSTRUCTIONS
 COLD AIR INTAKE INSTALLATION INSTRUCTIONS # D760-0030 Fits: 2007-10 135i (E82, E88; with N54 engine) 2007-08 335i/xi (E90) 2007-10 335i (E92, E93; with N54 engine) Congratulations for being selective enough
INSTALLATION INSTRUCTIONS
 Hardware: 12M x 40M hex head bolts Qty: 4 12M flat washers Qty: 8 12M lock washers Qty: 4 12M Ny-lock hex nuts Qty: 4 Extension bracket with bolt Qty: 2 8M Ny-lock hex nuts Qty: 2 8M Lock washer Qty: 2
2010+ Audi B8 S4/S5 3.0T S-FLO Intake Kit INSTALLATION GUIDE FOR RACING USE ONLY
 INSTALLATION GUIDE 2010+ Audi B8 S4/S5 3.0T S-FLO Intake Kit FOR RACING USE ONLY Congratulations on your purchase of the AWE Tuning S-FLO Intake for the 2010+ Audi B8 S4 and B8 S5 3.0T. Exquisite build
Performance Inlet Manifold
 Performance Inlet Manifold Tools needed (some tools not required on some models): 13mm Combination Wrench Flat Blade Screwdriver T30 Torx Driver T25 Torx Driver 10mm Combination Wrench and/or Socket with
2015+ EcoBoost F150 & Raptor Intercooler Install
 2015+ EcoBoost F150 & 2017+ Raptor Intercooler Install Note: This entire job can be performed with the truck on the ground - No need to raise the vehicle. The most difficult part is removing the grille
ZZPerformance.com ZZP 3 Redline Cold Air Intake GEN 2
 Tools you will need: Flat Blade Screwdriver Phillips Screwdriver 10mm End Wrench Ratchet Extension 5.5mm Socket 7mm Socket 10mm Socket 13mm Deep Socket ZZPerformance.com ZZP 3 Redline Cold Air Intake GEN
REVi RX-8 Intake. RX-8 REVi Intake System I PN Installation Instructions. Tools Required:
 RX-8 REVi Intake System PN 18299 Installation Instructions I-18299 Tools Required: Small/Stubby Phillips head screwdriver Small flat head screwdriver Medium Phillips head screwdriver 10mm socket and ratchet
(2) License Plate Plugs
 License Plate Plugs") PARTS LIST: 1 HD Bull Nose Bumper Assembly 12 12-1.75mm x 50mm 1 Driver/left Frame Mounting Bracket 40 12mm x 37mm OD x 3mm Flat Washers 1 Passenger/right Frame Mounting Bracket 20 12mm Lock Washers 1
PARTS LIST: 1 HD Bull Nose Bumper Assembly 12 12-1.75mm x 50mm 1 Driver/left Frame Mounting Bracket 40 12mm x 37mm OD x 3mm Flat Washers 1 Passenger/right Frame Mounting Bracket 20 12mm Lock Washers 1
OIL COOLER KIT INSTALLATION INSTRUCTIONS PART NUMBER D
 OIL COOLER KIT INSTALLATION INSTRUCTIONS PART NUMBER D570-0907 APPLICATION: 2011-12 E90 335i/xi (N55 engine) with BMW M-Technic bumper and without stock oil cooler Congratulations for being selective enough
T Intercooler System INSTALLATION GUIDE. Contact us with any installation questions AWE-Tuning.com
 INSTALLATION GUIDE 2000-04 2.7T Intercooler System FOR RACING USE ONLY Congratulations on your purchase of the AWE Tuning Intercooler System for the 2002-04 Audi 2.7T engine. Exquisite build quality with
3/8 Universal Joint Phillips Head Screwdriver
 Magnetic retrieval tool Pliers 1/4 Ratchet Drive T-35 Torx Socket 3/8 Ratchet Drive 5mm Allen Head Socket Torque Wrench 7-3/8 Drive Extension Flat Head Screwdriver 10mm Socket 8mm Socket 3/8 Universal
IE MK5/MK6 2.0T FSI & TSI FDS INTERCOOLER INSTALL GUIDE PART NUMBER: IETPCB1
 IE MK5/MK6 2.0T FSI & TSI FDS INTERCOOLER INSTALL GUIDE PART NUMBER: IETPCB1 Thank you for purchasing another high quality Integrated Engineering product! This instruction sheet is used for installation
TESLA MODEL S REAR UNDER SPOILER & DIFFUSER SYSTEM
 TESLA MODEL S Thank you for purchasing your Unplugged Performance Rear Under Spoiler & Diffuser System for the Tesla Model S! Please read this manual carefully prior to installation. REAR UNDER SPOILER
FRONT MOUNT INTERCOOLER GOLF / JETTA IV 1.8T PART # & P INSTALATION INSTRUCTIONS
 FRONT MOUNT INTERCOOLER GOLF / JETTA IV 1.8T PART # 48.10.90 & 48.10.90P INSTALATION INSTRUCTIONS PART LIST: 1 INTERCOOLER CORE 1 U-BENT TUBE 1 L-SHAPED TUBE 1 INTERCOOLER INLET TUBE 4 M6 NYLOC NUT 3 M6
HAVING INSTALLATION QUESTIONS? CALL TECHNICAL SUPPORT AT
 9/23/2009 1 of 6 ITEM 1 QTY 8 Parts List PART NUMBER DESCRIPTION 3/8" CONICAL TOOTHED WASHER TOOLS REQUIRED #2 PHILLIPS SCREWDRIVER #2 STUBBY SCREWDRIVER 8mm SOCKET 13mm SOCKET RATCHET 12" EXTENSION TORQUE
OIL COOLER KIT INSTALLATION INSTRUCTIONS PART NUMBER D E92 335i/xi (N55 engine) with BMW Standard bumper and with stock oil cooler
 with BMW Standard bumper and with stock oil cooler") OIL COOLER KIT INSTALLATION INSTRUCTIONS PART NUMBER D570-0924 APPLICATION: 2011-12 E92 335i/xi (N55 engine) with BMW Standard bumper and with stock oil cooler Congratulations for being selective enough
OIL COOLER KIT INSTALLATION INSTRUCTIONS PART NUMBER D570-0924 APPLICATION: 2011-12 E92 335i/xi (N55 engine) with BMW Standard bumper and with stock oil cooler Congratulations for being selective enough
GMC Yukon
 Torch Series LED Grille TOOLS REQUIRED: Flat Head Screwdriver Long Flat Head Screwdriver Phillips Screwdriver 7mm Socket 10mm Socket Ratchet & Extensions 3/16 Drill Bit Power Drill Cutting Wheel or Saw
OIL COOLER KIT INSTALLATION INSTRUCTIONS PART NUMBER D
 OIL COOLER KIT INSTALLATION INSTRUCTIONS PART NUMBER D570-0904 APPLICATION: 2011-2012 E90 335i/xi (N55 engine) with BMW standard bumper and with stock oil cooler Congratulations for being selective enough
Procharger Stage II Intercooled Supercharger System (11-14 GT)
") Procharger Stage II Intercooled Supercharger System (11-14 GT) Installation Time: Approximately one day. Installed on 2012 Mustang GT 5.0/Manual Required Tools 3/8 Socket Set (Standard and Metric) 1/2
Procharger Stage II Intercooled Supercharger System (11-14 GT) Installation Time: Approximately one day. Installed on 2012 Mustang GT 5.0/Manual Required Tools 3/8 Socket Set (Standard and Metric) 1/2
2015+ SUBARU STI FRONT-MOUNT INTERCOOLER PARTS LIST AND INSTALLATION GUIDE INSTALL DIFFICULTY DISCLAIMER CAUTION INSTALL PROCEDURE TOOLS NEEDED
 PARTS LIST AND PARTS INCLUDED 1PC ALUMINUM INTAKE PIPE 1PC BAR-AND-PLATE INTERCOOLER 1PC STEEL CRASH BAR W/ MOUNTING HARDWARE 2PC HOT-SIDE INTERCOOLER PIPES 2PC COLD-SIDE INTERCOOLER PIPES 1PC BPV FLANGE
AWE/McNeil Competition Air/Air Intercooler Kit for Audi 2.7T
 AWE/McNeil Competition Air/Air Intercooler Kit for 2000-04 Audi 2.7T Congratulations on your purchase of the AWE/McNeil Competition Intercoolers for your 2.7T Audi. Hundreds of hours of design and operational
COLD AIR INTAKE INSTALLATION INSTRUCTIONS. # D Fits: E92 328i & xdrive PARTS LIST
 COLD AIR INTAKE INSTALLATION INSTRUCTIONS # D760-9001 Fits: 2007-13 E92 328i & xdrive PARTS LIST (1) Intake Snorkel (1) Flex Tube (1) Brake Scoop Assy (1) Front Grill (1) Filter (1) Hardware Kit (2) Edge
OIL COOLER KIT INSTALLATION INSTRUCTIONS PART NUMBER D E92 335is (N54 engine) with BMW M-Technic bumper and with stock oil cooler
 with BMW M-Technic bumper and with stock oil cooler") OIL COOLER KIT INSTALLATION INSTRUCTIONS PART NUMBER D570-0923 APPLICATION: 2011 E92 335is (N54 engine) with BMW M-Technic bumper and with stock oil cooler Congratulations for being selective enough to
OIL COOLER KIT INSTALLATION INSTRUCTIONS PART NUMBER D570-0923 APPLICATION: 2011 E92 335is (N54 engine) with BMW M-Technic bumper and with stock oil cooler Congratulations for being selective enough to
2017 Current Ford Raptor HoneyBadger Front Bumper Installation Instructions
 2017 Current Ford Raptor HoneyBadger Front Bumper Installation Instructions PREPARATION 1. Disconnect the negative terminal on the battery. Park the vehicle on level ground and set the emergency brake.
SAFETY SENSORS FIELD OF VIEW WILL BE ALTERED WITH USE OF THE REPLACEMENT BUMPER. Injury hazard
 SAFETY Your safety and the safety of others is very important. In order to help you make informed decisions about safety, we have provided installation instructions and other information. These instructions
Banks High-Flow Boost Tubes. Step-by-step installation video: Bankspower.com/v/install-lml-boost-tubes
 with Installation Instructions Owner smanual Banks High-Flow Boost Tubes Stock Fitment 2011-2016 Chevy/GMC Turbo-Diesel Pickup Trucks THIS MANUAL IS FOR USE WITH PART NUMBER 25993 Gale Banks Engineering
INSTALLATION GUIDE Front Bumper. KL Cherokee (Trailhawk)
") INSTALLATION GUIDE Front Bumper KL Cherokee (Trailhawk) Included Hardware: Sample Sample Sample Skill Level: 5/5 stars (Professional install recommended) Disclaimer Expedition One is not responsible for
INSTALLATION GUIDE Front Bumper KL Cherokee (Trailhawk) Included Hardware: Sample Sample Sample Skill Level: 5/5 stars (Professional install recommended) Disclaimer Expedition One is not responsible for
Performance Oil Cooler Kit for (C6) Chevrolet Corvette
 Chevrolet Corvette") Performance Oil Cooler Kit for 2005-2013 (C6) Chevrolet Corvette Part No. EC6-600 Made in USA Important: Read these instructions in their entirety prior to installation. Copyright 2008-2018 Improved Racing
Performance Oil Cooler Kit for 2005-2013 (C6) Chevrolet Corvette Part No. EC6-600 Made in USA Important: Read these instructions in their entirety prior to installation. Copyright 2008-2018 Improved Racing
Left and Right Bar Light L Brackets. Driver/Left Frame Bracket
 PARTS LIST: 1 Bumper 14 12mm Nylon Lock Nuts 1 Bull Nose Hoop 2 10mm Double Bolt Plates 1 Winch Tray 4 10-1.5mm x 25mm Hex Bolts 1 Driver/left Frame Mounting Bracket 8 10mm x 30mm x 2.5mm Flat Washers
FIAT 500 ABARTH FRONT MOUNTED INTERCOOLER INSTALLATION
 FIAT 500 ABARTH FRONT MOUNTED INTERCOOLER INSTALLATION Tools needed: T30 screwdriver/bit 10mm socket, suitable extension and ratchet 17mm socket, suitable extension and ratchet 10mm ratchet spanner Pozidriv/Phillips
EXPANSION TANK PARTS LIST AND INSTALLATION GUIDE
 PARTS LIST AND INSTALLATION GUIDE PARTS LIST 1 PC MISHIMOTO RADIATOR 2 PC CAST THERMOSTAT HOUSINGS 1 PC MAGNETIC DRAIN PLUG W/ DOWTY OIL SEAL 4 PC RUBBER BUSHINGS AND METAL COLLARS 3 PC HARDWARE PACKETS
Parts List See cover Page
 Thank you for purchasing the CorkSport Front Mount Intercooler Kit for the 2010-2013 Mazdaspeed 3. Keep your BAT s under check with the CorkSport FMIC Kit with the small or large intercooler. Please let
IE Audi 3.0T Crank Pulley Upgrade Install Guide IEBAVJ3
 IE Audi 3.0T Crank Pulley Upgrade Install Guide IEBAVJ3 Thank you for purchasing your IE 3.0T crankshaft pulley upgrade! This instruction guide is used for installation of IE s lower overdrive pulley for
APIKOL Ur-S4/S6 Gen. II Front Mount Intercooler INSTALLATION INSTRUCTIONS
 APIKOL Ur-S4/S6 Gen. II Front Mount Intercooler INSTALLATION INSTRUCTIONS Only work underneath your vehicle after properly supporting it with adequate jack stands on a flat surface. NEVER work under a
SAFETY THIS PRODUCT IS FOR OFFROAD USE ONLY. ALL LIABILITY FOR INSTALLATION AND USE RESTS WITH THE OWNER.
 SAFETY Your safety and the safety of others is very important. In order to help you make informed decisions about safety, we have provided installation instructions and other information. These instructions
SAFETY SENSORS FIELD OF VIEW WILL BE ALTERED WITH USE OF THE REPLACEMENT BUMPER. Injury hazard
 SAFETY Your safety and the safety of others is very important. In order to help you make informed decisions about safety, we have provided installation instructions and other information. These instructions
Ford F-150 Billet Grilles Upper Replacement
 2015-16 Ford F-150 Billet Grilles Upper Replacement Upper Black Billet Part #1045-019U-15B Upper Polished Billet Part #1045-019U-15 TOOLS REQUIRED Automotive grade masking tape, plastic clip removal tool,
Passenger/Right Top Support Bracket. (2) 10mm Nut Plates
 10mm Nut Plates") PARTS LIST: 1 Extreme Grille Guard 16 12mm x 32mm OD x 3mm Flat Washers 1 Driver/Left Frame Mounting Bracket 10 12mm Lock Washers 1 Passenger/Right Frame Mounting Bracket 10 12mm Hex Nuts 1 Driver/Left
PARTS LIST: 1 Extreme Grille Guard 16 12mm x 32mm OD x 3mm Flat Washers 1 Driver/Left Frame Mounting Bracket 10 12mm Lock Washers 1 Passenger/Right Frame Mounting Bracket 10 12mm Hex Nuts 1 Driver/Left
COLD AIR INTAKE INSTALLATION INSTRUCTIONS
 COLD AIR INTAKE INSTALLATION INSTRUCTIONS # D760-0029 Fits: 2009-10 335i/xi (E90; with N54 engine) Congratulations for being selective enough to use a Dinan Engineering Cold Air Intake. We have spent many
advanced FLOW engineering Instruction Manual P/N: Make: Nissan Model: Titan XD Year: Engine: V8-5.
 advanced FLOW engineering Instruction Manual P/N: 46-20281 Make: Nissan Model: Titan XD Year: 2016-2017 Engine: V8-5.0L (td) Cummins Please read the entire instruction manual before proceeding. Ensure
INSTALLATION INSTRUCTIONS
 INSTALLATION INSTRUCTIONS 2011 Dodge Charger Road Defender 5000 Series Push Bumper Part Number 5076 Do not attempt to install this product on any vehicle other than the one it is designed for and listed
2017 Current Ford Raptor Stealth Fighter Rear Bumper Installation Instructions
 2017 Current Ford Raptor Stealth Fighter Rear Bumper Installation Instructions PREPARATION 1. Disconnect the negative terminal on the battery. Park the vehicle on level ground and set the emergency brake.
SL63 Weistec M156 Supercharger System Installation Guide Stage 1 / Stage 2
 SL63 Weistec M156 Supercharger System Installation Guide Stage 1 / Stage 2 WARNING! DO NOT HAVE YOUR ECU REPROGRAMMED ANYWHERE BUT AT WEISTEC FOR THIS SUPERCHARGER. THE AMG 63 USES AN ELECTRONIC THROTTLE
Shelby GT500 Front Fascia Conversion Kit (05-09 All) Item # Installation Time: 1 Day. Required tools:
 Item # Installation Time: 1 Day. Required tools:") Shelby GT500 Front Fascia Conversion Kit (05-09 All) Item #53611 Installation Time: 1 Day Required tools: Phillips Screw driver 10mm Socket + Ratchet/Wrench 8mm Socket + Ratchet/Wrench 5mm Socket + Ratchet/Wrench
Shelby GT500 Front Fascia Conversion Kit (05-09 All) Item #53611 Installation Time: 1 Day Required tools: Phillips Screw driver 10mm Socket + Ratchet/Wrench 8mm Socket + Ratchet/Wrench 5mm Socket + Ratchet/Wrench
Audi A3 8P RS4-Style Grille
 Audi A3 8P RS4-Style Grille Installation Tutorial ES2717887 ES2717886 1 However you choose to lift the car into the air, always ensure the car is secured properly and that the parking brake is engaged.
Lingenfelter Pontiac GTO High Flow Air Intake Installation Instructions
 Lingenfelter 2005-2006 Pontiac GTO High Flow Air Intake Installation Instructions L650060505 1557 Winchester Road Decatur, IN 46733 260-724-2552 260-724-8761 FAX www.lingenfelter.com Parts List # Part
IE B9 A4/A5 Cold Air Intake Install Guide
 IE B9 A4/A5 Cold Air Intake Install Guide Thank you for purchasing another high quality Integrated Engineering product! This instruction guide is used for installation of IE s Cold Air Intake Kit for Audi
Audi C6 A6 RS-style Grille Installation Tutorial
 Audi C6 A6 RS-style Grille Installation Tutorial Proper service and repair procedures are vital to the safe, reliable operation of all motor vehicles as well as the personal safety of those performing
SAFETY. Your safety and the safety of others is very important.
 SAFETY Your safety and the safety of others is very important. In order to help you make informed decisions about safety, we have provided installation instructions and other information. These instructions
M-9603-FST FOCUS ST COLD AIR INTAKE KIT INSTALLATION INSTRUCTIONS
 M-9603-FST Please visit www.fordracingparts.com for the most current instruction information.!!! PLEASE READ ALL OF THE FOLLOWING INSTRUCTIONS CAREFULLY PRIOR TO INSTALLATION. AT ANY TIME YOU DO NOT UNDERSTAND
OIL COOLER KIT CHEVY CAMARO 2.0T PARTS LIST AND INSTALLATION GUIDE INSTALL DIFFICULTY DISCLAIMER CAUTION TOOLS NEEDED NOTE INSTALL PROCEDURE
 PARTS LIST AND PARTS INCLUDED 3PC APPLICATION-SPECIFIC MOUNTING BRACKETS 1PC HORN RELOCATION MOUNTING BRACKET 1PC 25-ROW OIL COOLER (SLEEK SILVER OR STEALTH BLACK) 1PC 4'4" STAINLESS STEEL BRAIDED HOSE
MAZDA 3 MPS FRONT MOUNTING INTERCOOLER INSTALLATION
 MAZDA 3 MPS FRONT MOUNTING INTERCOOLER INSTALLATION Tools needed: 7mm Hose clamp driver 10mm,12mm sockets and suitable ratchet with extensions Flat bladed screwdriver Pliers Phillips screwdriver KIT CONTENTS
Removal of bumper & intercooler:
 R56 Front Mount Intercooler 090107 Thank you for purchasing the ALTA Performance R56 Front Mount Intercooler kit. Persons experienced in the proper operation of MINI engines should only perform this installation.
INSTALLATION INSTRUCTIONS ARMOUR FRONT BUMPER W/O LED LIGHTS FOR CHEVY COLORADO PART # AFB-CO15
 INSTALLATION INSTRUCTIONS ARMOUR FRONT BUMPER W/O LED LIGHTS FOR CHEVY COLORADO 15-17 PART # AFB-CO15 ARMOUR FRONT BUMPER PARTS LIST: 1 ARMOUR Bumper Assembly 2 8mm x 25mm Hex Bolts 1 Driver/left Frame
09-12 Dodge 4WD Leveling Kit
 9235900 09-12 Dodge 4WD 1500 2.5 Leveling Kit Thank you for choosing Rough Country for all your suspension needs. DOES NOT FIT TRX PACKAGE VEHICLES!! Rough Country recommends a certified technician install
Fig A. Addictive Desert Designs. Preparation: Removal:
 Preparation: Disconnect the negative battery terminal. Park the vehicle on level ground and set the emergency brake. We recommend reading through the installation instructions in whole before performing
SAFETY SENSORS FIELD OF VIEW WILL BE ALTERED WITH USE OF THE REPLACEMENT BUMPER. Injury hazard
 SAFETY Your safety and the safety of others is very important. In order to help you make informed decisions about safety, we have provided installation instructions and other information. These instructions
2016+ FORD FOCUS RS PERFORMANCE AIR INTAKE PARTS LIST AND INSTALLATION GUIDE PARTS INCLUDED INSTALL PROCEDURE TOOLS NEEDED
 PARTS LIST AND PARTS INCLUDED 1PC ALUMINUM INTAKE PIPE W/ CNC-MACHINED MAP SECTION 1PC AIRBOX W/ PROTECTIVE EDGING 1PC HIGH-FLOW OILED FILTER 1PC SILICONE TURBO INLET HOSE 2PC WORM-GEAR CLAMPS MOUNTING
RT1 SLIP-ON EXHAUST HONDA CBR600RR REV. A
 08-50-43733 REV. A PARTS INCLUDED Ref. Part Number Description Qty 1) 00-200-00064 Slip-on S-bend Assembly 1 2) 00-200-00088 RT1 Aluminum Muffler Assembly 1 3) 03-46-43058 Muffler Mounting Strap 1 4) 07-27-42566
CHALLENGER TWIN TURBO SYSTEM INSTALLATION INSTRUCTIONS
 CHALLENGER TWIN TURBO SYSTEM INSTALLATION INSTRUCTIONS 1 Verify contents of kits with supplied packing list 1) Unhook the battery. 2) Remove wheel wells & front fascia of vehicle. 3) Remove the catalytic
VOLKSWAGEN GOLF MK5 GTI 2.0 TFSI FMIC INSTALLATION INSTRUCTIONS
 VOLKSWAGEN GOLF MK5 GTI 2.0 TFSI FMIC INSTALLATION INSTRUCTIONS Please thoroughly read through and familiarize yourself with these instructions in their entirety prior to beginning any part of the installation
2017 Current Ford Raptor HoneyBadger Rear Bumper Installation Instructions
 2017 Current Ford Raptor HoneyBadger Rear Bumper Installation Instructions PREPARATION 1. Disconnect the negative terminal on the battery. Park the vehicle on level ground and set the emergency brake.
RS4 Style Grille. Installation. Audi B8 A4/S4 ES ES This tutorial is provided as a courtesy by ECS Tuning.
 RS4 Style Grille Audi 2013+ B8 A4/S4 Installation ES2627562 ES2627563 This tutorial is provided as a courtesy by ECS Tuning. Proper service and repair procedures are vital to the safe, reliable operation
Exhaust Heat Shield Instructions ND
 Exhaust Heat Shield Instructions ND 2016 + Thank you for purchasing the Track Dog Racing Exhaust Heat Shield for the 2016 to Present Mazda MX-5. Our TDR Heat Shield is designed to help maintain lower temperatures
ASSEMBLY & INSTALLATION INSTRUCTIONS
 ASSEMBLY & INSTALLATION INSTRUCTIONS VEHICLE MOUNT KIT 99101087 AND VEHICLE CENTER MEMBER For 26 Series: 99100890 TO FIT 2009 & Later FORD F150 4x4 (without EcoBoost V6) 2011 & Later FORD F150 4x4 (with
OIL COOLER KIT INSTALLATION INSTRUCTIONS D Application: , E89 Z4 sdrive 35i without stock oil cooler* PARTS LIST
 OIL COOLER KIT INSTALLATION INSTRUCTIONS D570-0891 Application: 2009-11, E89 Z4 sdrive 35i without stock oil cooler* PARTS LIST Qty Part No. Description 1 D573-0050 Oil Cooler + Frame Assy 1 D573-0044
Nissan Titan / / Front Bumper Installation Instructions. Removal. Hardware. 12mm/1.
 2004-2014 Nissan Titan 20-915-04 / 22-915-04 / 24-915-04 Front Bumper Installation Instructions Hardware 6 ½ Hex Bolts 10 ½ Lock Washers 16 ½ Flat washers 6 ½ Hex Nuts 4 12mm/1.25 x 35mm Removal 1. First,
PWI Mazda BT50 & Ford Ranger 2012-onwards 2.2L / 3.2L 68mm Intercooler fitment instructions.
 PWI53860 - Mazda BT50 & Ford Ranger 2012-onwards 2.2L / 3.2L 68mm Intercooler fitment instructions. Tools required: 3/8 drive or similar ratchet with 8mm &10mm long sockets. Flat blade screwdriver. T27
FRONT FENDERS WITH FACTORY INNER FENDERS JEEP WRANGLER TJ/LJ/YJ/CJ7 INSTALLATION INSTRUCTIONS
 FRONT FENDERS WITH FACTORY INNER FENDERS JEEP WRANGLER TJ/LJ/YJ/CJ7 INSTALLATION INSTRUCTIONS TOOLS NEEDED 13mm socket 5/32 Allen head 5/16 wrench or socket 7/16 wrench or socket 7/32 Allen head 5/8 wrench
COLD AIR INTAKE INSTALLATION INSTRUCTIONS. # D Fits: F10 M5 # D Fits: F06/F12/F13 M6 PARTS LIST
 COLD AIR INTAKE INSTALLATION INSTRUCTIONS # D760-0035 Fits: 2013-15 F10 M5 # D760-0037 Fits: 2012-15 F06/F12/F13 M6 PARTS LIST (1) Left Carbon Airbox Lid (1) Right Carbon Airbox Lid (1) Left Carbon Snorkel
7B1210 COBB BMW N54 Charge Pipe
 7B1210 COBB BMW N54 Charge Pipe Installation Instructions Congratulations on your purchase of the COBB BMW N54 Charge Pipe for your BMW. The following instructions will assist you through your installation
Fig A ADDICTIVE DESERT DESIGNS. Preparation: Removal:
 Preparation: Disconnect the negative battery terminal. Park the vehicle on level ground and set the emergency brake. We recommend reading through the installation instructions in whole before performing
Volvo P1 Air Intake. ELEVATE Turbo Intake Pipe. MAF Sensor. Inlet Manifold. Air Filter Housing. ECU Cover
 Volvo P1 Air Intake Tools needed: 13mm Combination Wrench Flat Blade Screwdriver T30 Torx Driver T25 Torx Driver 8mm Combination Wrench and/or Socket with Ratchet 10mm Combination Wrench and/or Socket