Installation Instructions
|
|
|
- Shauna Page
- 6 years ago
- Views:
Transcription


1 Installation Instructions 2.0T TSI Intake Manifold: Featuring better flow, higher boost capacity, 40% larger plenum volume, and integrated flapper delete; this product will take your 2.0L VW TSI to the next level. A direct replacement for your OEM plastic intake manifold. Once installed, running OEM PCV and not aftermarket catch can, you can trim your engine cover to fit. The finished result should resemble this; PLEASE NOTE: Disconnect battery negative terminal before installation. Cool down the engine before installation.

 Removing engine cover panel Pull engine cover off upwards at securing")
2 Note placement of parts and bolts during removal. We highly recommend purchasing 4 x injector O-ring kit from your local dealer prior to installation. Part number: 06J B. INSTRUCTIONS: 1) Removing engine cover panel Pull engine cover off upwards at securing points -arrows-. 2) Removing air filter Pull cover off air duct (release clips on sides) -arrows-.

 Remove bolt -arrow A- and pull air filter housing upwards out of mounting.")
3 Unclip air duct at the bottom by releasing clips -arrows-. Detach air duct at bottom together with air hose. Engine code CBFA: Pull hose to secondary air pump motor -V101- from air filter housing. 3) Remove bolt -arrow A- and pull air filter housing upwards out of mounting. Remove air filter housing together with air mass meter and connecting pipe.
 Remove Connectors On Valve Cover:")
4 4) Remove Catch Can Hoses, OEM PCV Hose, and/or Boost Tap: 5) Remove Connectors On Valve Cover:


5 6) Remove Throttle Body Coupler:

6 7) Remove Throttle Body Connectors:

7 8) Remove EVAP Connector:

8 9) Remove Vacuum Line Bracket: 10) Remove Lower Bolt from Manifold Brace & Remove Brace (not to be re-used, silver bolt left of throttle body):


9 11) Remove Fuel Hard Line Bracket:


10 12) Remove Fuel Hard Line Connection at HPFP (slowly as this is under pressure and some fuel will drip, place absorbent rag underneath to soak up spilled fuel):


11 13) Remove Fuel Hard Line Connection Under Manifold at Fuel Rail (place absorbent rag underneath to soak up spilled fuel): 14) Remove Large Rubber Hose From Straight Bracket:


12 15) Unbolt Bracket (two bolts right of throttle body): 16) Remove Nut Holding Fuel Rail Behind Bracket:


13 17) Remove Nut Holding Fuel Rail Under Manifold: 18) Remove Silver Bolts Holding Manifold to Cylinder Head:

14 19) Remove Bracket Bolt Near Oil Filter: 20) Remove Oil Filter (allows for easier access for the remainder of the installation):


15 21) Carefully Remove Manifold, Disconnect Fuel Injectors, Remove Fuel Rail & Injectors From Cylinder Head:


16 22) Manifold & Fueling Fully Removed: NOTE: Carbon Buildup (5,000 miles on new engine):


17 23) Clean Fuel Injectors with Combustion Cleaner:


18 NOTE: Build-up Right / Cleaned Left (dirty fuel injector had 12,000 miles): 24) Replace Fuel Injector O-Rings with OEM Fuel Injector Service Kit: NOTE: While in the removal process, you may damage the O-rings on the injectors. We highly recommend purchasing 4 x injector O-ring kit from your local dealer. Part number: 06J B.


19 25) Perform Carbon Cleaning With Combustion Cleaner & Clean Cylinder Head Surface With Brake Clean: NOTE: While the manifold is off, it is a great time to do a carbon clean up if you haven t done so.


20 26) Clean Air Diverter Plates & File Down Guide Pins Until Flush: 27) Reinstall Air Diverter Plates & Fuel Injectors:
 Complete Throttle Body Connection, Reassemble Fuel Rail & Vacuum Lines: NOTE: Once you have the")

21 28) Apply 2-3MM Bead Of Included Ultra Black RTV Sealant To Throttle Body and Install On Manifold With Included Bolts & Washers: 29) Complete Throttle Body Connection, Reassemble Fuel Rail & Vacuum Lines: NOTE: Once you have the OEM factory plastic intake manifold off, you will need to transfer everything over. Install the supplied PCV fittings; if the fittings do not start right away and seem tight please ensure they are threaded in straight before tightening.


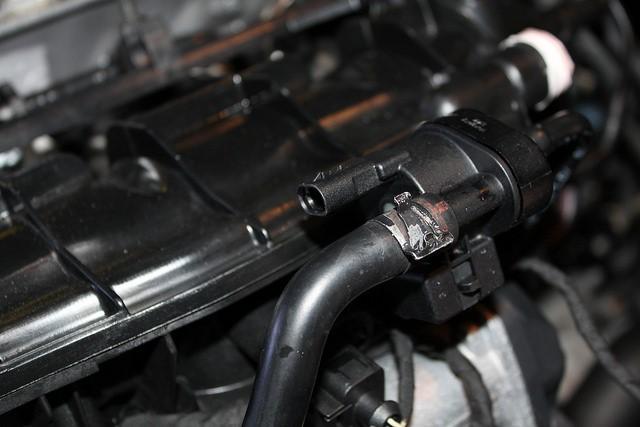
22 30) Reconnect Previously Removed Fuel Lines, PCV Lines, Vacuum Lines, Breather Lines: NOTE: If you have a boost tap, it is no longer needed as the HPA intake manifold provides an extra 1/8 NPT fitting and plug for boost tap purposes.

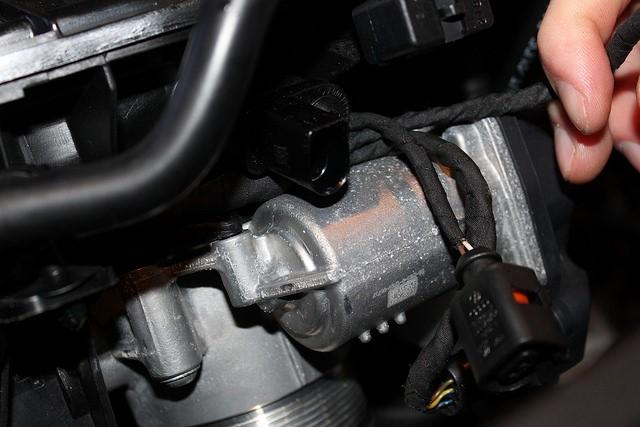
23 31) Plug Vacuum Line for OEM Intake Manifold Flapper Motor: NOTE: The OEM flapper delete motor will no longer be used; the electrical connectors can be taped up and zipped tide away. You will also see the vacuum canister with a vacuum line attached; follow this line to the rear of the engine to a TEE. You can disconnect this line and plug it with a vacuum cap.

24 Finished Installation Should Look Like This:

25 NOTE: It would be a good idea to double check the PCV valve on top of the valve cover. These are known to fail, especially on higher boost applications. Copy the part number on the top and ask your local dealer for the latest iteration of it.
26 NOTES:
Installation Instructions
 Installation Instructions 2.0T FSI Intake Manifold: Featuring better flow, higher boost capacity, 40% larger plenum volume, and integrated flapper delete; this product will take your 2.0L VW TSI and FSI
M-9424-M50B 2012 Boss 302 Intake Manifold INSTALLATION INSTRUCTIONS
 !!! PLEASE READ ALL OF THE FOLLOWING INSTRUCTIONS CAREFULLY PRIOR TO INSTALLATION. WARNING: CUSTOM CALIBRATION REQUIRED! CALIBRATION NOT INCLUDED! KIT CONTENTS: 1) Intake Manifold Assembly 2) Assembly
M-9424-M50CJ INTAKE MANIFOLD INSTALLATION INSTRUCTIONS
 Please visit www.fordracingparts.com for the most current instruction information!!! PLEASE READ ALL OF THE FOLLOWING INSTRUCTIONS CAREFULLY PRIOR TO INSTALLATION. AT ANY TIME YOU DO NOT UNDERSTAND THE
INSTALLATION INSTRUCTIONS CATCH CAN KIT
 INSTALLATION INSTRUCTIONS CATCH CAN KIT FORD FOCUS Document: 19-0150 Support: info@radiumauto.com STEPS 1-19 COVER THE PCV SIDE CATCH CAN KIT (P/N: 20-0315) STEPS 20-32 COVER THE CRANKCASE CATCH CAN KIT
INSTALLATION INSTRUCTIONS CATCH CAN KIT
 INSTALLATION INSTRUCTIONS CATCH CAN KIT FORD FOCUS Document: 19-0150 Support: info@radiumauto.com STEPS 1 TO 19 COVER THE PCV SIDE CATCH CAN KIT (P/N: 20-0315) STEPS 20-32 COVER THE CRANKCASE CATCH CAN
APR, LLC
 + 1. 3 3 4. 5 0 2. 5 1 8 1 4 8 0 0 U S H W Y 2 8 0 W e s t, O p e l i k a, A l a b a m a 3 6 8 0 1 4 8 0 0 U S H W Y 2 8 0 W e s t, O p e l i k a, A l a b a m a 3 6 8 0 1 + 1. 3 3 4. 5 0 2. 5 1 8 1 NOTES:
4. Remove (4) 10mm and (1) 7mm bolt that holds fascia at front corners, on each side
 10mm and (1) 7mm bolt that holds fascia at front corners, on each side") 2010 Camaro LS3 1. Disconnect battery ground 2. Remove front wheels 3. Remove (5) push pins and (5) #20 torx screws on inner front wheel well liners and remove liners on each side 4. Remove (4) 10mm and
2010 Camaro LS3 1. Disconnect battery ground 2. Remove front wheels 3. Remove (5) push pins and (5) #20 torx screws on inner front wheel well liners and remove liners on each side 4. Remove (4) 10mm and
REMOVAL & INSTALLATION
 REMOVAL & INSTALLATION NOTE: For reassembly reference, label all electrical connectors, vacuum hoses and fuel lines before removal. Also place mating marks on engine hood and other major assemblies before
Crawford Performance Top Mount Air/Oil Separator Install Instructions Version 1.12
 Crawford Performance Top Mount Air/Oil Separator Install Instructions Version 1.12 Parts List Part Number Quantity Description Sent Received S0774 1 TMIC Air/Oil Separator F0365 1 Crank Case Breather Connector
IAG Competition Series Air / Oil Separator (AOS) For WRX
 For WRX") P IAG Competition Series Air / Oil Separator (AOS) For 2015-16 WRX Part# IAG-ENG-7252 Tools Required: Ratchet, torque wrench, extensions, needle nose pliers, hose cutter, snips/scissors, flat head screw
P IAG Competition Series Air / Oil Separator (AOS) For 2015-16 WRX Part# IAG-ENG-7252 Tools Required: Ratchet, torque wrench, extensions, needle nose pliers, hose cutter, snips/scissors, flat head screw
IAG Competition Series Air / Oil Separator (AOS) For 2017 STI
 For 2017 STI") P IAG Competition Series Air / Oil Separator (AOS) For 2017 STI Part# IAG-ENG-7251 Tools Required: Ratchet, torque wrench, extensions, needle nose pliers, hose cutter, snips/scissors, flat head screw driver,
P IAG Competition Series Air / Oil Separator (AOS) For 2017 STI Part# IAG-ENG-7251 Tools Required: Ratchet, torque wrench, extensions, needle nose pliers, hose cutter, snips/scissors, flat head screw driver,
AEROMOTIVE Part # Ford 5.4L GT500 Shelby Mustang Fuel Rail Kit INSTALLATION INSTRUCTIONS
 AEROMOTIVE Part # 14145 07 Ford 5.4L GT500 Shelby Mustang Fuel Rail Kit INSTALLATION INSTRUCTIONS CAUTION: Installation of this product requires detailed knowledge of automotive systems and repair procedures.
IAG Street Series Air / Oil Separator (AOS) For WRX
 For WRX") P IAG Street Series Air / Oil Separator (AOS) For 2015-16 WRX Part# IAG-ENG-7152 Tools Required: Ratchet, torque wrench, extensions, needle nose pliers, hose cutter, snips/scissors, flat head screw driver,
P IAG Street Series Air / Oil Separator (AOS) For 2015-16 WRX Part# IAG-ENG-7152 Tools Required: Ratchet, torque wrench, extensions, needle nose pliers, hose cutter, snips/scissors, flat head screw driver,
SLP Camaro ZL1 STAGE 3 (650 HP)
") SLP - 2012 Camaro ZL1 STAGE 3 (650 HP) PART #26002 PACKING LIST Before installation, use this check list to make sure all necessary parts have been included. ITEM QTY CHECK PART NUMBER DESCRIPTION 1. 1
SLP - 2012 Camaro ZL1 STAGE 3 (650 HP) PART #26002 PACKING LIST Before installation, use this check list to make sure all necessary parts have been included. ITEM QTY CHECK PART NUMBER DESCRIPTION 1. 1
IAG Street Series Air / Oil Separator (AOS) For 2017 WRX
 For 2017 WRX") P IAG Street Series Air / Oil Separator (AOS) For 2017 WRX Part# IAG-ENG-7152 Tools Required: Ratchet, torque wrench, extensions, needle nose pliers, hose cutter, snips/scissors, flathead screwdriver,
P IAG Street Series Air / Oil Separator (AOS) For 2017 WRX Part# IAG-ENG-7152 Tools Required: Ratchet, torque wrench, extensions, needle nose pliers, hose cutter, snips/scissors, flathead screwdriver,
AEROMOTIVE Part # L 4V Fuel Rails INSTALLATION INSTRUCTIONS
 AEROMOTIVE Part # 14130 5.0L 4V Fuel Rails INSTALLATION INSTRUCTIONS CAUTION: Installation of this product requires detailed knowledge of automotive systems and repair procedures. We recommend that this
Integrated Engineering MK7 & MQB Catch Can Kit Install
 Integrated Engineering MK7 & MQB Catch Can Kit Install Thank you for purchasing another high quality Integrated Engineering product! This instruction guide is used for installation of Integrated Engineerings
IAG Street Series Air / Oil Separator (AOS) For WRX & WRX STI
 For WRX & WRX STI") IAG Street Series Air / Oil Separator (AOS) For 2006-07 WRX & 2004-07 WRX STI Part# IAG-ENG-7150 Tools Required: Ratchet, torque wrench, extensions, needle nose pliers, hose cutter, snips/scissors, flat
IAG Street Series Air / Oil Separator (AOS) For 2006-07 WRX & 2004-07 WRX STI Part# IAG-ENG-7150 Tools Required: Ratchet, torque wrench, extensions, needle nose pliers, hose cutter, snips/scissors, flat
Stratified Aux fuel system ecoboost 2.0
 Stratified Aux fuel system ecoboost 2.0 Additional Fuel Injection System Installation and User Guide Stratified Aux Fuel System Installation and User Guide -1-0204-0021.1 Thank you and congratulations
XRT300 AND XRT350 BA XR6 TURBO UPGRADE KIT FITTING INSTRUCTIONS
 XRT300 AND XRT350 BA XR6 TURBO UPGRADE KIT FITTING INSTRUCTIONS The use of NFU (No Further use) and REUSE (Re Use) relates to the individual parts storage when performing the upgrade. Also note that all
INSTALLATION INSTRUCTIONS CATCH CAN KIT
 INSTALLATION INSTRUCTIONS CATCH CAN KIT FORD FOCUS Document: 19-0150 Support: info@radiumauto.com STEPS 1 TO 19 COVER THE PCV CATCH CAN KIT (P/N: 20-0315) STEPS 20-32 COVER THE CRANKCASE CATCH CAN KIT
2006 Honda Civic SI Supercharger Kit Installation Instruction Kit #
 2006 Honda Civic SI Supercharger Kit Installation Instruction Kit #350-091 3239 MONIER CIRCLE, STE.5 RANCHO CORDOVA, CA 95742 916.635.4550 FAX 916.635.4632 www.ct-engineering.com INS-157 VERSION: 3.25.2009
IAG Street Series Air / Oil Separator (AOS) For WRX & WRX STI
 For WRX & WRX STI") IAG Street Series Air / Oil Separator (AOS) For 2006-07 WRX & 2004-07 WRX STI Part# IAG-ENG-7150 Tools Required: Ratchet, torque wrench, extensions, needle nose pliers, hose cutter, snips/scissors, flat
IAG Street Series Air / Oil Separator (AOS) For 2006-07 WRX & 2004-07 WRX STI Part# IAG-ENG-7150 Tools Required: Ratchet, torque wrench, extensions, needle nose pliers, hose cutter, snips/scissors, flat
Weistec M113K Supercharger System Installation Guide
 Weistec M113K Supercharger System Installation Guide WARNING! DO NOT HAVE YOUR ECU REPROGRAMMED ANYWHERE BUT AT WEISTEC FOR THIS SUPERCHARGER. THE AMG 55 USES AN ELECTRONIC THROTTLE CONTROL (ETC), WHICH
Installation Instructions for: TOYOTA 3.4L SUPERCHARGER SYSTEM
 Installation Instructions for: TOYOTA 3.4L SUPERCHARGER SYSTEM 1996-2002 4Runner 1997-1998 T100 1997-2004 Tacoma 2000-2003 Tundra * PREMIUM FUEL REQUIRED * Magnuson Products LLC 1990 Knoll Drive, Bldg
INSTALLATION INSTRUCTIONS Dual Catch Can Kit Subaru Turbo and STi Document# Support:
 INSTALLATION INSTRUCTIONS Dual Catch Can Kit 02-14 Subaru Turbo and 2015+ STi Document# 19-0099 Support: info@radiumauto.com This document covers the installation of a Radium dual catch can kit for the
Crawford Performance Top Mount Air/Oil Separator Version 2 (S0714-1)
") Crawford Performance Top Mount Air/Oil Separator 02-07 Version 2 (S0714-1) Parts List Part Number Quantity Description Sent Received S0707-1 1 TMIC Air/Oil Separator V2 F0365 1 Crank Case Breather Connector
Crawford Performance Top Mount Air/Oil Separator 02-07 Version 2 (S0714-1) Parts List Part Number Quantity Description Sent Received S0707-1 1 TMIC Air/Oil Separator V2 F0365 1 Crank Case Breather Connector
FREE $15 Gift Card for every $100 spent on Ship To Home orders. Find Out How
 1 of 29 10/12/2011 5:05 PM FREE $15 Gift Card for every $100 spent on Ship To Home orders. Find Out How Ford Ranger/Explorer/Mountaineer 1991-1999 Intake Manifold REMOVAL & INSTALLATION Print The engines
2010+ Audi B8 S4/S5 3.0T S-FLO Intake Kit INSTALLATION GUIDE FOR RACING USE ONLY
 INSTALLATION GUIDE 2010+ Audi B8 S4/S5 3.0T S-FLO Intake Kit FOR RACING USE ONLY Congratulations on your purchase of the AWE Tuning S-FLO Intake for the 2010+ Audi B8 S4 and B8 S5 3.0T. Exquisite build
Intake Manifold Spacers. For the Porsche 928
 The following photos and instructions are to install the 928 Motorsports, LLC. Intake Manifold Spacers For the 1987-1995 Porsche 928 Questions? Call our toll free number 877-FOR-928M or send an e-mail
Stratified Aux fuel system ecoboost 2.0/2.3
 Stratified Aux fuel system ecoboost 2.0/2.3 4-Port Fuel Injection System Installation and User Guide Stratified 4-Port Aux Fuel System Installation and User Guide -1-0204-0024.1 Thank you and congratulations
Audi > B4 > Liter V6 2V Engine Mechanical, Engine Code(s): AAH, AFC 10 Engine Assembly
: AAH, AFC 10 Engine Assembly") Audi > B4 > 1993 1995 2.8 Liter V6 2V Engine Mechanical, Engine Code(s): AAH, AFC 10 Engine Assembly Removing The engine is removed from above, after being separated from the transmission. Note: All tie
Audi > B4 > 1993 1995 2.8 Liter V6 2V Engine Mechanical, Engine Code(s): AAH, AFC 10 Engine Assembly Removing The engine is removed from above, after being separated from the transmission. Note: All tie
BBK Intake Manifold Kit ( L) - Installation Instructions
 - Installation Instructions") BBK Intake Manifold Kit (86-93 5.0L) - Installation Instructions The below installation instructions work for the following products: BBK Intake Manifold Kit (86-93 5.0L) Please read through the instructions
BBK Intake Manifold Kit (86-93 5.0L) - Installation Instructions The below installation instructions work for the following products: BBK Intake Manifold Kit (86-93 5.0L) Please read through the instructions
IAG Street Series Air / Oil Separator (AOS) For WRX & WRX STI
 For WRX & WRX STI") IAG Street Series Air / Oil Separator (AOS) For 2006-07 WRX & 2004-07 WRX STI Part# IAG-ENG-7100 Tools Required: Ratchet, torque wrench, extensions, needle nose pliers, hose cutter, snips/scissors, flat
IAG Street Series Air / Oil Separator (AOS) For 2006-07 WRX & 2004-07 WRX STI Part# IAG-ENG-7100 Tools Required: Ratchet, torque wrench, extensions, needle nose pliers, hose cutter, snips/scissors, flat
05-08 GT. Hellion Power Systems Mustang Kit Instructions
 Hellion Power Systems 05-08 Mustang Kit Instructions 1. Disconnect Battery 2. Drain Radiator, keep fluid for re-installation. 3. Remove air box and inlethoses. 6. Next, underneath, punch oil pan for turbo
4-Port Aux Fuel Injection System Installation and User Guide
 Stratified Aux Fiesta ST 4-Port Aux Fuel Injection System Installation and User Guide Stratified 4-Port Aux Fuel System Installation and User Guide -1-0204-0025 Thank you and congratulations on the purchase
Air Oil Separator for WRX/STI Top Mounted Intercooler Setups
 Air Oil Separator for 02-07 WRX/STI Top Mounted Intercooler Setups Thank you for purchasing this PERRIN product for your car! Installation of this product should only be performed by persons experienced
INTAKE MANIFOLD COLLECTOR. 1. Electric throttle control actuator 2. Gasket 3. Vacuum hose
 INTAKE MANIFOLD COLLECTOR Removal and Installation PFP:14003 ABS0095V 1. Electric throttle control actuator 2. Gasket 3. Vacuum hose 4. EVAP canister purge volume control solenoid valve 5. Bracket 6. Intake
Part number SP1305. Maintaining your Cold air intake system: Tools required:
 Part number SP1305 2000-03 Honda S2000 4 cyl. 2.0L 2004-06 Honda S2000 4 cyl. 2.2L 1-2 piece cold air intake 1-3 Injen filter (#1014) 1-2 3/4 x 3 silicone step hose (#3040) 1-3 straight hose (#3044) 1-
VR6 Supercharger System Golf III and Jetta III VR6 Installation Manual Model Year
 VR6 Supercharger System Golf III and Jetta III VR6 Installation Manual Model Year 1994-1999.5 Date 10/28/00 Page 1 Index 1.0 Parts List 1.1 Required Tools 1.2 Required Standard Parts 1.3 Required Misc.
Crawford Performance Top Mount Air/Oil Separator For 08 STi + Version 2 (S0713-1)
") Crawford Performance Top Mount Air/Oil Separator For 08 STi + Version 2 (S0713-1) Parts List Part Number Quantity Description Sent Received S0709-1 1 TMIC Air/Oil Separator 08STI V2 F0365 1 Crank Case
Crawford Performance Top Mount Air/Oil Separator For 08 STi + Version 2 (S0713-1) Parts List Part Number Quantity Description Sent Received S0709-1 1 TMIC Air/Oil Separator 08STI V2 F0365 1 Crank Case
IAG Street Series Air / Oil Separator (AOS) For WRX
 For WRX") IAG Street Series Air / Oil Separator (AOS) For 2008-14 WRX Part# IAG-ENG-7100 Tools Required: Ratchet, extensions, needle nose pliers, hose cutter, snips/scissors, flat head screw driver, hose clamping
IAG Street Series Air / Oil Separator (AOS) For 2008-14 WRX Part# IAG-ENG-7100 Tools Required: Ratchet, extensions, needle nose pliers, hose cutter, snips/scissors, flat head screw driver, hose clamping
AEROMOTIVE Part # / L SOHC Ford Fuel Rail Kit INSTALLATION INSTRUCTIONS
 AEROMOTIVE Part # 14119 98 1/2-04 4.6L SOHC Ford Fuel Rail Kit INSTALLATION INSTRUCTIONS CAUTION: Installation of this product requires detailed knowledge of automotive systems and repair procedures. We
MAZDASPEED3 Intercooler Instructions
 MAZDASPEED3 Intercooler Instructions Congratulations on your purchase of the COBB Tuning Front Mount Intercooler System for your 2007-2009 Mazdaspeed3. The following instructions should assist you through
#TL T EA888 GEN 3 FUELING SYSTEM/ INSTALLATION INSTRUCTIONS
 #TL100069 2.0T EA888 GEN 3 FUELING SYSTEM/ INSTALLATION INSTRUCTIONS Notes: These instructions were written for a North American specification MkVII GTI. Other models, like the Golf R, are similar. When
Instant Chat off the main page of Or simply call our tech team at
 02-07 WRX/STI Air Oil Separator for Top Mounted Intercooler Setups 2013-02- 27 Thank you for purchasing this PERRIN product for your car! Installation of this product should only be performed by persons
Edelbrock Victor II Intake Manifold. For Chrysler 5.7L (Eagle), 6.1L and 6.4L Gen III HEMI Engines Part #7179
, 6.1L and 6.4L Gen III HEMI Engines Part #7179") For Chrysler 5.7L (Eagle), 6.1L and 6.4L Gen III HEMI Engines PLEASE study these instructions carefully before beginning this installation. You should be familiar with and comfortable working on your
For Chrysler 5.7L (Eagle), 6.1L and 6.4L Gen III HEMI Engines PLEASE study these instructions carefully before beginning this installation. You should be familiar with and comfortable working on your
Chevy Sonic 1.4L Intake Manifold
 Chevy Sonic 1.4L Intake Manifold Install Time: 3 hours In the Box: (1) Racer X Intake manifold (6) M8x1.25 bolts (4) M6x1 bolts (2) 1/8 NPT plugs (1) 3/8 NPT plug (1) 1/4 NPT 90 degree barb (4) Small O-rings
8 Zip Tie Zip Tie 1 Union Fitting 1 ½ ½ Union Reducer Fitting Union 1 5/8 ½ (For Plastic Intake Manifold Vehicles)
") P IAG Street Series Air / Oil Separator (AOS) For 2017 STI Part# IAG-ENG-7151 Tools Required: Ratchet, torque wrench, extensions, needle nose pliers, hose cutter, snips/scissors, flat head screw driver,
P IAG Street Series Air / Oil Separator (AOS) For 2017 STI Part# IAG-ENG-7151 Tools Required: Ratchet, torque wrench, extensions, needle nose pliers, hose cutter, snips/scissors, flat head screw driver,
Edelbrock Victor II Intake Manifold. For Chrysler 5.7L (Eagle) and 6.1L Gen III HEMI Engines Part #7179
 and 6.1L Gen III HEMI Engines Part #7179") For Chrysler 5.7L (Eagle) and 6.1L Gen III HEMI Engines PLEASE study these instructions carefully before beginning this installation. You should be familiar with and comfortable working on your vehicle.
For Chrysler 5.7L (Eagle) and 6.1L Gen III HEMI Engines PLEASE study these instructions carefully before beginning this installation. You should be familiar with and comfortable working on your vehicle.
Steeda Billet Charge Motion Control Plates (05-08 GT) - Installation Instructions
 - Installation Instructions") Steeda Billet Charge Motion Control Plates (05-08 GT) - Installation Instructions The below installation instructions work for the following products: Steeda Billet Charge Motion Control Plates (05-08
Steeda Billet Charge Motion Control Plates (05-08 GT) - Installation Instructions The below installation instructions work for the following products: Steeda Billet Charge Motion Control Plates (05-08
Intake Manifold Replacement
 Page 1 of 14 2004 Chevrolet TrailBlazer - 4WD Bravada, Envoy, Rainier, TrailBlazer (VIN S/T) Service Manual Engine Engine Mechanical - 4.8L, 5.3L, and 6.0L Repair Instructions - On Vehicle Document ID:
AEROMOTIVE Part # /2 4.6L SOHC Ford Fuel Rail Kit INSTALLATION INSTRUCTIONS
 AEROMOTIVE Part # 14125 96-98 1/2 4.6L SOHC Ford Fuel Rail Kit INSTALLATION INSTRUCTIONS CAUTION: Installation of this product requires detailed knowledge of automotive systems and repair procedures. We
Air Oil Separator for WRX
 Air Oil Separator for 2015+ WRX 2018-06-05 Thank you for purchasing this PERRIN product for your car! Installation of this product should only be performed by persons experienced with installation of aftermarket
2001 Ford Windstar ENGINES 3.8L V6 - VIN 4 - Windstar
 COWL TOP VENT PANEL 1. Remove windshield wiper pivot arms. Remove cowl top vent panel retaining screws. Release cowl top vent panel retaining clips. Remove windshield wiper fluid hose. Remove cowl top
1988 Ford F-350 PICKUP
 1988 Ford F-350 PICKUP Submodel: Engine Type: V8 Liters: 7.5 Fuel Delivery: FI Fuel: GAS 1987 93 4.9L Engine The intake and exhaust manifolds on these engines are known as combination manifolds and are
Instant Chat off the main page of Or simply call our tech team at
 Subaru WRX/STI Air Oil Separator for Front Mounted Intercooler Setups 2013-02- 22 Thank you for purchasing this PERRIN product for your car! Installation of this product should only be performed by persons
DrVanos.com Stage II Installation Instructions. Tool rental is available with the purchase of a vanos kit *See website for more info*
 DrVanos.com Stage II Installation Instructions Special Tools Needed: Camshaft locking tool TDC Crank pin Sprocket turning tool Tool rental is available with the purchase of a vanos kit *See website for
Wrenches: ⅞, 8mm, 10mm, 13mm, 19mm P. allen, Other: Electrical Tape
 IAG Street Series Air / Oil Separator (AOS) For 2008-14 STI Part# IAG-ENG-7100 Tools Required: Ratchet, torque wrench, extensions, needle nose pliers, hose cutter, snips/scissors, flat head screw driver,
Service Bulletin CL Warranty Extension: EGR Port Clogging. December 17, (Supersedes , dated October 26, 2001)
") Service Bulletin 99-045 Applies To: 1997 99 3.0CL ALL December 17, 2001 3.0CL Warranty Extension: Port Clogging (Supersedes 99-045, dated October 26, 2001) BACKGROUND In some areas of the U.S., certain
Service Bulletin 99-045 Applies To: 1997 99 3.0CL ALL December 17, 2001 3.0CL Warranty Extension: Port Clogging (Supersedes 99-045, dated October 26, 2001) BACKGROUND In some areas of the U.S., certain
AIR INDUCTION SYSTEM
 Page 1 PART NUMBER: APPLICATION: 203.51.2500 HONKER C5 1997 2000 CORVETTE AIR INDUCTION SYSTEM (without supercharger) INSTRUCTION SHEET NUMBER: 903.51.9850G PACKAGE CONTENTS: Air Box Cover Air Box Base
Procharger Stage II Intercooled Supercharger System (11-14 GT)
") Procharger Stage II Intercooled Supercharger System (11-14 GT) Installation Time: Approximately one day. Installed on 2012 Mustang GT 5.0/Manual Required Tools 3/8 Socket Set (Standard and Metric) 1/2
Procharger Stage II Intercooled Supercharger System (11-14 GT) Installation Time: Approximately one day. Installed on 2012 Mustang GT 5.0/Manual Required Tools 3/8 Socket Set (Standard and Metric) 1/2
Cylinder head, removing and
 Page 1 of 35 15-2 Cylinder head, removing and installing Note: Replace cylinder head bolts. Always replace self-locking nuts, bolts as well as gaskets and O-rings. After installing a replacement cylinder
 Special Tools Needed: DrVanos.com Stage I Installation Instructions Camshaft locking tool TDC Crank pin Sprocket turning tool Tool rental is available with the purchase of a vanos kit *See website for
-Magnet (not completely necessary but can come in handy)
") McLeod High Performance Hydraulic Clutch Line Upgrade (05-14 V8) Included in kit: -New clutch line -2 fittings Required Tools: -Floor jack and jack stands (or a lift) -Flashlight -Angled pick tool -13mm
McLeod High Performance Hydraulic Clutch Line Upgrade (05-14 V8) Included in kit: -New clutch line -2 fittings Required Tools: -Floor jack and jack stands (or a lift) -Flashlight -Angled pick tool -13mm
L Intake Manifold Part #
 86-93 5.0L Intake Manifold Part #5001-5002 I N S T A L L A T I O N I N S T R U C T I O N S Supplied Materials Bottom cover, Upper manifold, Lower manifold, Plenum cover plate, 1501 Throttle body (comes
AEROMOTIVE Part # L Ford F L Ford Expedition L Ford F-250 Super Duty INSTALLATION INSTRUCTIONS
 AEROMOTIVE Part # 14118 97-03 5.4L Ford F-150 97-02 5.4L Ford Expedition 98-03 5.4L Ford F-250 Super Duty INSTALLATION INSTRUCTIONS CAUTION: Installation of this product requires detailed knowledge of
Intake Manifold Removal
 PLEASE READ ALL OF THE FOLLOWING INSTRUCTIONS CAREFULLY PRIOR TO INSTALLATION. AT ANY TIME YOU DO NOT UNDERSTAND THE INSTRUCTIONS Parts included: -GT350 Intake manifold M-944-M5 -GT350 Air bucket w/filter.
AEROMOTIVE Part # GM LS1 Fuel Rails INSTALLATION INSTRUCTIONS
 AEROMOTIVE Part # 14106 GM LS1 Fuel Rails INSTALLATION INSTRUCTIONS CAUTION: Installation of this product requires detailed knowledge of automotive systems and repair procedures. We recommend that this
ENGINE DEVELOPMENT INC.
 2003 Ford Expedition 4.6L& 5.4L We encourage you to read this manual thoroughly before you begin work, and perform the following: 1. A quick parts check to make certain your kit is complete. If you discover
Tork Tech Inc. Customer Service , Sales
 Tork Tech Inc. Customer Service 971.226.9006, Sales 513.697.0060 Email: Info@TorkTech.com www.torktech.com * PREMIUM FUEL MANDATORY * Make sure vehicle has 91+ octane gas in it prior to beginning installation.
INSTALLATION INSTRUCTIONS DUAL OIL CATCH CAN KIT
 INSTALLATION INSTRUCTIONS DUAL OIL CATCH CAN KIT SUBARU WRX FA20F ENGINE Document: 19-0135 Support: info@radiumauto.com This dual catch can kit installs in the right-hand side of the engine bay and intercepts
AEROMOTIVE Part # C5 Corvette Fuel Rail Kit INSTALLATION INSTRUCTIONS
 AEROMOTIVE Part # 14128 99-04 C5 Corvette Fuel Rail Kit INSTALLATION INSTRUCTIONS CAUTION: Installation of this product requires detailed knowledge of automotive systems and repair procedures. We recommend
Owner smanual. Banks Monster-Ram Intake and Grid Heater Delete Kit. For Racing Only Ram 6.7L Pickup Trucks. with Installation Instructions
 with Installation Instructions Owner smanual Banks Monster-Ram Intake and Grid Heater Delete Kit For Racing Only 2007-2017 Ram 6.7L Pickup Trucks THIS MANUAL IS FOR USE WITH SYSTEM 42788, 42788-PC, 42790,
List of parts needed below. Tools needed
 1 BMW 645 Coolant leak repair (Cap with Seal Repair and Expanding Coolant Pipe Installation w Pics) By Michael R. Brown (Estimated time to complete the job is 6-8 hrs) List of parts needed below. BMW PART
SL63 Weistec M156 Supercharger System Installation Guide Stage 1 / Stage 2
 SL63 Weistec M156 Supercharger System Installation Guide Stage 1 / Stage 2 WARNING! DO NOT HAVE YOUR ECU REPROGRAMMED ANYWHERE BUT AT WEISTEC FOR THIS SUPERCHARGER. THE AMG 63 USES AN ELECTRONIC THROTTLE
IAG Air / Oil Separator (AOS) For STi
 For STi") IAG Air / Oil Separator (AOS) For 2008-14 STi Part# IAG-ENG-7000 Tools Required: Ratchet, torque wrench, extensions, needle nose pliers, hose cutter, snips/scissors Sockets: 10mm, 12mm 13mm Wrenches: 10mm,
IAG Air / Oil Separator (AOS) For 2008-14 STi Part# IAG-ENG-7000 Tools Required: Ratchet, torque wrench, extensions, needle nose pliers, hose cutter, snips/scissors Sockets: 10mm, 12mm 13mm Wrenches: 10mm,
INSTALLATION INSTRUCTIONS BILLET FUEL RAIL KIT
 INSTALLATION INSTRUCTIONS BILLET FUEL RAIL KIT MITSUBISHI LANCER EVOLUTION X Document# 19-0067 Support: info@radiumauto.com WARNING: DON'T SMOKE OR WORK WITH OPEN SPARKS WHILE WORKING ON THE FUEL SYSTEM
Equipped with AEM Dryflow Filter No Oil Required! INSTALLATION INSTRUCTIONS PART NUMBER C (Gun Metal Grey Finish) 2015 Ford Mustang 2.
 2015 Ford Mustang 2.") Equipped with AEM Dryflow Filter No Oil Required! INSTALLATION INSTRUCTIONS PART NUMBER 26-3001C (Gun Metal Grey Finish) 2015 Ford Mustang 2.3 Turbo ITEM NO. PART NUMBER DESCRIPTION QTY. 1 2-1523C TUBE;
Equipped with AEM Dryflow Filter No Oil Required! INSTALLATION INSTRUCTIONS PART NUMBER 26-3001C (Gun Metal Grey Finish) 2015 Ford Mustang 2.3 Turbo ITEM NO. PART NUMBER DESCRIPTION QTY. 1 2-1523C TUBE;
AMS F1-I INTAKE MANIFOLD
 AMS F1-I INTAKE MANIFOLD The goal of AMS is to provide the highest quality, best performing products available. By utilizing research and development, and rigorous testing programs AMS will never compromise
Disconnect the breather tube from the air cleaner outlet duct.
 Disconnect the breather tube from the air cleaner outlet duct. Disconnect the IAT sensor harness connector. Remove the air cleaner outlet duct retaining wingnut. Separate the air cleaner outlet duct from
The M7 Direct Flow Intercooler (DFIC) Installation Guide
 Installation Guide") The M7 Direct Flow Intercooler (DFIC) Installation Guide This information is meant only as a guide. The author of this information,, or any M7 Tuning employees assumes no liabilities for any outcomes resulting
The M7 Direct Flow Intercooler (DFIC) Installation Guide This information is meant only as a guide. The author of this information,, or any M7 Tuning employees assumes no liabilities for any outcomes resulting
Lower Intake Manifold Replacement
 Lower Intake Manifold Replacement Removal Procedure 1. Turn OFF all the lamps and the accessories. 2. Ensure the ignition switch is in the OFF position. 3. Disconnect the negative battery cable from the
Air Oil Separator for Subaru WRX/STI Front Mounted Intercooler Setups
 Air Oil Separator for Subaru WRX/STI Front Mounted Intercooler Setups 2015-01-05 Thank you for purchasing this PERRIN product for your car! Installation of this product should only be performed by persons
AEROMOTIVE Volkswagen 1.8T Fuel Rail Part # INSTALLATION INSTRUCTIONS
 AEROMOTIVE Volkswagen 1.8T Fuel Rail Part # 14163 INSTALLATION INSTRUCTIONS CAUTION: Installation of this product requires detailed knowledge of automotive systems and repair procedures. We recommend that
ENGINE ASSEMBLY STOCK TO 250 HP
 GM SPORT COMPACT Performance Build Book 25 ENGINE ASSEMBLY STOCK TO 250 HP Fig. 3 The stock ECOTEC engine has proven reliable to 250 hp.(fig. 3) Performance upgrades are available from GM Performance Parts
Installation Instructions General Motors 8.1 Sequential Vapor Injection (S.V.I.) System 7500/6500 Series Trucks model year.
 System 7500/6500 Series Trucks model year.") Installation Instructions General Motors 8.1 Sequential Vapor Injection (S.V.I.) System 7500/6500 Series Trucks 2003-2005 model year. Technocarb Equipment (2004) Ltd. 4-30435 Progressive Way Abbotsford,
Installation Instructions General Motors 8.1 Sequential Vapor Injection (S.V.I.) System 7500/6500 Series Trucks 2003-2005 model year. Technocarb Equipment (2004) Ltd. 4-30435 Progressive Way Abbotsford,
Installation Instructions Camaro ZL1 ( Z) ( ZB)
 ( ZB)") Installation Instructions Camaro ZL1 (501-1099-10-Z) (501-1099-10-ZB) Parts List 1 Insulated Air Box \ Lid 1 Thermal Coated Intake Tube / MAF Housing with (2) M4 x.7 thread 8mm long Stainless Screws; 1
Installation Instructions Camaro ZL1 (501-1099-10-Z) (501-1099-10-ZB) Parts List 1 Insulated Air Box \ Lid 1 Thermal Coated Intake Tube / MAF Housing with (2) M4 x.7 thread 8mm long Stainless Screws; 1
SYSTEM # CHEVROLET COLORADO & GMC CANYON with 3.6L Engine
 Installation Instructions for: SYSTEM # 2017-2018 CHEVROLET COLORADO & GMC CANYON with 3.6L Engine NOT LEGAL FOR SALE OR USE ON ANY POLLUTION-CONTROLLED MOTOR VEHICLE IN CALIFORNIA OR IN STATES THAT HAVE
INSTALLATION INSTRUCTIONS CATCH CAN KIT
 INSTALLATION INSTRUCTIONS CATCH CAN KIT 2017+ Honda Civic Type-R Document: 19-0193 Support: info@radiumauto.com 20-0424 PCV Catch Can Installation: Follow Steps 1-24 20-0425 CCV Catch Can Installation:
Installation Procedure Nissan Maxima SE 3L DOHC VE30DE
 Phenolic Performance Intake Spacers Installation Procedure 1992-1994 Nissan Maxima SE 3L DOHC VE30DE Disclaimer: These spacers should only be installed by a qualified mechanic. If you decide to do the
Part number RD1306. Maintaining your Cold air intake system: Tools required:
 Part number RD1306 06-07 Honda S2000 4 cyl. 2.2L 1-2 piece cold air intake 1-3 Injen filter (#1014) 1-2 3/4 x 3 silicone step hose (#3040) 1-3 straight hose (#3044) 4- Power-bands.362.048 (#4004) 1-1525
INSTALLATION INSTRUCTIONS PART NUMBER AEM C (GUN METAL GRAY FINISH)
") Equipped with AEM Dryflow Filter No Oil Required! INSTALLATION INSTRUCTIONS PART NUMBER AEM-21-805C (GUN METAL GRAY FINISH) 2016.5-17 CHEVROLET CRUZE 1.4T ITEM NO. PART NUMBER DESCRIPTION QTY. 1 21-2038DK
Equipped with AEM Dryflow Filter No Oil Required! INSTALLATION INSTRUCTIONS PART NUMBER AEM-21-805C (GUN METAL GRAY FINISH) 2016.5-17 CHEVROLET CRUZE 1.4T ITEM NO. PART NUMBER DESCRIPTION QTY. 1 21-2038DK
2015 Corvette Supercharger System Instructions
 2015 Corvette Supercharger System Instructions These instructions are meant to serve as a guide to the installation of the ECS 2015 Corvette Supercharging system. Please be sure to use all safety equipment
3 WRX/STI TURBO INLET HOSE
 3 WRX/STI TURBO INLET HOSE Thank you for purchasing this PERRIN product for your car! Installation of this product should only be performed by persons experienced with installation of aftermarket performance
Ford Racing Performance Improvement Intake Manifold (96-04 GT) Time Necessary: Approximately 4 hours
 Time Necessary: Approximately 4 hours") Ford Racing Performance Improvement Intake Manifold (96-04 GT) Time Necessary: Approximately 4 hours Tools Required: Ratchet and socket set Torque wrench Large adjustable wrench Needle nose pliers A dozen
Ford Racing Performance Improvement Intake Manifold (96-04 GT) Time Necessary: Approximately 4 hours Tools Required: Ratchet and socket set Torque wrench Large adjustable wrench Needle nose pliers A dozen
Ford Racing Laser Etched Valve Covers (05-10 GT, GT500)
") Applicable Part Numbers: M-6582-FR3VBL (Blue) M-6582-FR3VBLK (Black) M-6582-C543V (Chrome) List of Tools: 1/4 ratchet 3/8 ratchet 8mm socket 10mm socket 7mm socket 1/4 & 3/8 extensions Plastic gasket scraper
Applicable Part Numbers: M-6582-FR3VBL (Blue) M-6582-FR3VBLK (Black) M-6582-C543V (Chrome) List of Tools: 1/4 ratchet 3/8 ratchet 8mm socket 10mm socket 7mm socket 1/4 & 3/8 extensions Plastic gasket scraper
AEROMOTIVE Part # Subaru Fuel Rails for Top Feed Injectors WRX & STI INSTALLATION INSTRUCTIONS
 AEROMOTIVE Part # 14135 Subaru Fuel Rails for Top Feed Injectors 02-14 WRX & 07-14 STI INSTALLATION INSTRUCTIONS CAUTION: Installation of this product requires detailed knowledge of automotive systems
APR, LLC 1027-B Opelika Road Auburn Alabama 36830
 B6 A4 INJECTOR INSTALLATION L A T I N Tool Needed: - Flathead Screwdriver (large) - Flathead Screwdriver (small) - Ratchet - 5mm Allen Socket If you are using the APR Injectors, you will also need the
Fuel Pressure Regulator Kit PART# - RY12040-RRFPR-6S5
 APPLICATION(S): Yamaha FX-SHO, FZR & FZS Fuel Pressure Regulator Kit PART# - RY12040-RRFPR-6S5 We strongly recommend the use of a service manual to familiarize yourself with the various components and