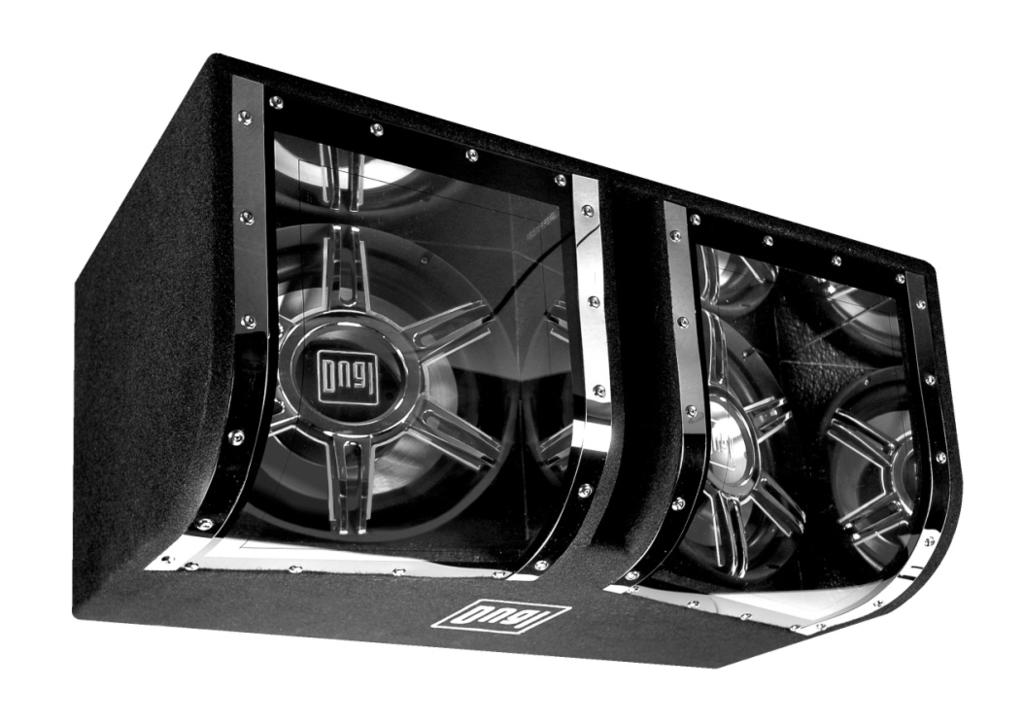
BP1204 INSTALLATION/OWNER'S MANUAL
|
|
|
- Audra McCarthy
- 6 years ago
- Views:
Transcription

1 BP1204 INSTALLATION/OWNER'S MANUAL
2 BP1204 PREPARATION Getting Started Thank you for purchasing the Dual Electronics BP1204 Bandpass Subwoofer System. Although Dual has attempted to ensure the information in this manual is accurate, please be aware that any part of it is subject to change without notice. Safety! CAUTION THE FOLLOWING INSTRUCTIONS ARE DESIGNED TO ENSURE SAFETY DURING INSTALLATION AND USE OF THE BP1204. FAILURE TO HEED THESE INSTRUCTIONS CAN RESULT IN INJURY OR DAMAGE TO THE UNIT. To prevent injury and damage to the unit, please read and follow the instructions in this manual. If you feel unsure about installing this system yourself, have it installed by a qualified audio technician. Before installation, disconnect the battery negative (-) terminal to prevent damage to the unit, fire and/or possible injury. Do not connect amplifier or any audio source to illumination inputs. These inputs are designed for 12 volt power only. Illuminite inputs are designed for 12 volt DC power source only. Do NOT connect your illuminite product directly to your battery permanently, as it will cause your battery to discharge. Please use a switched 12 volt source.
3 BP1204 INSTALLATION Installation The following installation instructions are very basic. If you feel unsure about installing this speaker system yourself, Dual recommends aquiring the services of a professional car audio installation center. Before installation, please review the following guidelines: 1. Be sure to carefully read and understand the instructions before attempting to install this product. 2. For safety, disconnect the battery negative terminal prior to beginning the installation. 3. If additional wiring is required, we recommend running all wires prior to mounting your speaker in place. 4. To ensure reliable performance and minimize signal or power loss, use the highest quality connectors available. 5. Use caution before you drill or cut! Be careful not to cut or drill into gas tanks, fuel lines, brake or hydraulic lines, vacuum lines or electrical wiring when working on any vehicle. 6. Never run speaker wires underneath your vehicle. Running speaker wires inside the vehicle provides the best protection from exhaust, heat and environmental elements. 7. Avoid running wires over, near or through sharp-edged surfaces. We suggest you also use rubber grommets to protect any wires routed through metal, especially the firewall. 8. When running the speaker cable from the amplifier, avoid running it near sources of high current (i.e. wiring harnesses, battery cables). 9. When connecting the amp, the positive (+) speaker output from the bass amp connects to the positive (+) terminal and the negative output (-) connects to the negative (-) input terminal on the input cup located on the rear of the subwoofer enclosure. DO NOT CONNECT AMP OR ANY AUDIO SOURCE TO ILLUMINATION INPUTS, AS DAMAGE TO LIGHTS WILL OCCUR. 10. For the illumination connection, the positive (+) output from your 12V system connects to the positive (+) input and the negative (ground) connects to the negative (-) input on the input cup located on the rear of the subwoofer enclosure. Improper 12V polarity will not cause damage to the lights, but they will not illuminate.
4 BP1204 INSTALLATION Enclosure Guidelines To achieve the best possible sound from this subwoofer enclosure, Dual recommends aquiring the services of a professional car audio installation center. If you feel confident in your ability to install this product without the assistance of a professional, please read this section thoroughly. We have provided a number of placement recommendations and installation tips to assist you. Keep in mind that these are provided as a guideline and you may find that other placements may provide better results for your specific vehicle. Make sure all moving parts and factory electrical wires are out of the way and will not interfere after installation. Ensure the wire is of sufficient length to avoid pulling or stretching. This is even more important if the wires will be run under or through the factory interior. Use electrical tape and wire ties to ensure all wires are properly secured. Avoid installing speakers or electronics where they can be subject to moisture. Ensure the speaker wires are connected using correct polarity. The positive polarity is marked by a (+) sign. Incorrectly connected subwoofers will result in limited bass output. Ensure the Illuminite wires (12V) are connected using correct polarity. Do not connect an amplifier or any audio output source to the Illuminite inputs, as doing so will cause permanent damage to the lighting elements. Speaker wire should be isolated from the vehicle s electrical system to avoid noise being picked up by the amplifiers. We recommend using 14 gauge or larger sized speaker wire to ensure your subwoofer receives the full power output of your amplifier. Remember to listen responsibly and respect your ears. Being exposed to sounds over 125dB for even short periods of time can create permanent hearing loss! 4
5 BP1204 INSTALLATION Illuminite Lighting Hook-Up Dual s patent-pending Illuminite bulb system and control circuitry provide for extraordinary blue illumination, allowing for creative, color-coordinated installations. The interior of your vehicle will never sound or look ordinary again! Let your imagination take you there. The lighting features of all Illuminite products require a 12V power source to operate. The speaker has two distinct sets of input terminals. The first is labeled "audio input" and the second is labeled "Illuminite lighting inputs". The inputs are clearly marked with a label positioned directly above the terminal housing. The polarity (+ and -) indicators for each set of inputs also appear on these labels. 1. Do not connect your amplifier or any audio source to the Illuminite inputs. These inputs are designed for switched 12V DC power only. Do not connect directly to your battery permanently, as it will cause your battery to discharge. Please use a switched 12V source. 2. See Fig. 1a, (illustrated wiring diagram) to be sure to maintain polarity. Be sure to connect to a switched 12 volt source. Proper connection would be the positive (+) 12V wire to the positive (+) Illuminite input terminal and the negative (-) Illuminite input terminal to a solid chassis ground. DO NOT CONNECT AMP OR ANY AUDIO SOURCE TO ILLUMINATION INPUTS. DAMAGE TO LIGHTS WILL OCCUR, AND WARRANTY WILL BE VOID! Fig 1a Lighting Hook-Up From Rear Ground 12 volt DC source From Amplifier Illuminite Lighting Input Terminals Audio Input Terminals Note: The BP1204 Illuminite lights are not removable. There are no serviceable parts inside or attached to the speaker assembly. The BP1204 is a sensitive electronic device. Removal of or tampering with any part of the speaker and/or its assemblies will damage the product and void the warranty. 5
6 BP1204 GENERAL FEATURES General Features Input Terminal Cup The input terminal cups provide a quick and easy connection from your amplifier to the enclosure, and 12 volt inputs to power the Illuminite feature. Computer-Tuned Acoustic Chamber Dual s enclosures utilize a specialized tuned-port, computer-aided design to increase output efficiency. Low Q Optimized Subwoofers The subwoofers are designed to create loud yet very accurate bass. Curved Plexiglas Viewing Window Extremely Durable Carpeted Enclosure Nailed and Glued Construction with Added Bracing This construction eliminates enclosure movement caused by high sound pressure levels. In-Line LED Protection Circuitry On-Off Illuminite Toggle Switch Removable Illuminite Logo This static poly logo can be placed on any window or glass surface. 6
7 BP1204 WARRANTY Limited One-Year Warranty This warranty gives you specific legal rights. You may also have other rights which vary from state to state. Dual Electronics Corp. warrants this product to the original purchaser to be free from defects in material and workmanship for a period of one year from the date of the original purchase. Dual Electronics Corp. agrees, at our option, during the warranty period, to repair any defect in material or workmanship or to furnish an equal new, renewed or comparable product (whichever is deemed necessary) in exchange without charges, subject to verification of the defect or malfunction and proof of the date of purchase. Subsequent replacement products are warranted for the balance of the original warranty period. Who is covered? This warranty is extended to the original retail purchaser for products purchased and used in the U.S.A. What is covered? This warranty covers all defects in material and workmanship in this product. The following are not covered: installation/removal costs, damage resulting from accident, misuse, abuse, neglect, product modification, improper installation, incorrect line voltage, unauthorized repair or failure to follow instructions supplied with the product, or damage occurring during return shipment of the product. What to do? 1. Before you call for service, check the troubleshooting guide in your owner s manual. A slight adjustment of any custom controls may save you a service call. 2. If you require service during the warranty period, you must carefully pack the product (preferably in the original package) and ship it by prepaid transportation with a copy of the original receipt from the retailer to an authorized service center. 3. Please describe your problem in writing and include your name, a return UPS shipping address (P.O. Box not acceptable), and a daytime phone number with your shipment. 4. For more information and for the location of the nearest authorized service center please contact us by one of the following methods: Call us toll-free at us at cs@dualav.com Exclusion of Certain Damages: This warranty is exclusive and in lieu of any and all other warranties, expressed or implied, including without limitation the implied warranties of merchantability and fitness for a particular purpose and any obligation, liability, right, claim or remedy in contract or tort, whether or not arising from the company s negligence, actual or imputed. No person or representative is authorized to assume for the company any other liability in connection with the sale of this product. In no event shall the company be liable for indirect, incidental or consequential damages. 7
8 Dual Electronics Corp. Toll Free: Dual Electronics Corp. All rights reserved. NSA0307-V01
INSTALLATION/OWNERS MANUAL
 INSTALLATION/OWNERS MANUAL XOBP12D PREPARATION Getting Started Thank you for purchasing the Dual Electronics XOBP12D Bandpass Subwoofer System. Although Dual has attempted to make sure all of the information
INSTALLATION/OWNERS MANUAL XNBP BANDPASS SERIES. Bandpass Enclosures
 INSTALLATION/OWNERS MANUAL XNBP BANDPASS SERIES Bandpass Enclosures XNBP SERIES PREPARATION Getting Started Thanks for choosing Dual. This manual is designed to provide information for the purchaser of
TS69 TS65 TS55 TS45 TS5768 TS SERIES INSTALLATION/OWNER'S MANUAL
 TS69 TS65 TS55 TS45 TS5768 TS SERIES INSTALLATION/OWNER'S MANUAL Car Audio Speakers TS SERIES PREPARATION Getting Started Thank you for purchasing the TS Series car speakers. Although Dual has attempted
DM1016S INSTALLATION/OWNER'S MANUAL 10" Marine DVC Subwoofer
 DM1016S INSTALLATION/OWNER'S MANUAL 10" Marine DVC Subwoofer DM1016S INSTALLATION Preparation/Installation Please read entire manual before installation. Before You Start Disconnect negative battery terminal.
INSTALLATION/OWNER'S MANUAL DP " Woofer in Enclosure
 INSTALLATION/OWNER'S MANUAL DP1000 10" Woofer in Enclosure Installation Thank you for purchasing the DP1000 10" Woofer with enclosure. Although Dual has attempted to make sure all of the information contained
DWS404 DWS524 DWS654 DWS684 DWS694. DWS SERIES INSTALLATION/OWNER'S MANUAL Car Audio Speakers
 DWS404 DWS524 DWS654 DWS684 DWS694 DWS SERIES INSTALLATION/OWNER'S MANUAL Car Audio Speakers PREPARATION Safety Guidelines Thank you for purchasing the DWS Series car speakers. Although Dual has attempted
BAK1500 INSTALLATION/OWNER'S MANUAL Compact Amplified Subwoofer
 BAK1500 INSTALLATION/OWNER'S MANUAL Compact Amplified Subwoofer PREPARATION Getting Started Thank you for purchasing the Dual BAK1500 compact amplified subwoofer. Although Dual has attempted to ensure
TBX10A INSTALLATION/OWNER'S MANUAL 10" Sealed Enclosure with Built-in Amplifier
 TBX10A INSTALLATION/OWNER'S MANUAL 10" Sealed Enclosure with Built-in Amplifier Getting Started Thank you for purchasing the Dual TBX10A 10" ported enclosure with built-in amplifier. Although Dual has
AXS609 AXS612 AXS514 AXS SERIES. INSTALLATION/OWNER'S MANUAL Car Audio
 AXS609 AXS612 AXS514 AXS SERIES INSTALLATION/OWNER'S MANUAL Car Audio PREPARATION Safety Guidelines Thank you for purchasing the AXS Series car speakers. Although Axxera has attempted to make sure all
Power Series Amplifiers Installation Manual / Quick Start Guide
 REL T REB BAL FADE VOL CD -R/R W AU i E JPTH IN X LOC/DX 1 2 INT 5 6 BAND SCAN i MUTE 3 RPT 4 SHF DN CHANGER UP i BA X- SS SU B-W MONO AS /PS DIS P MODE Installation Assistance For installation assistance,
LU47PW-LU47PB. INSTALLATION/OWNER S MANUAL Indoor/Outdoor 3-Way Dynamic Loudspeakers
 LU47PW-LU47PB INSTALLATION/OWNER S MANUAL Indoor/Outdoor 3-Way Dynamic Loudspeakers Introduction LU47PW-LU47PB INTRODUCTION Introduction The LU47 series speakers are designed as multi-purpose speaker and
LU43PB/W - LU53PB/W INSTALLATION/OWNER S MANUAL
 LU43PB/W - LU53PB/W INSTALLATION/OWNER S MANUAL Indoor/Outdoor 3-Way Dynamic Loudspeakers Introduction LU43P-LU53P INTRODUCTION Introduction The DUAL outdoor speaker series is designed as a multipurpose
PVI 1800/PVI Residential/Commercial Grid-Tied Photovoltaic Inverter WARRANTY MANUAL. Subject to Change REV , Solectria Renewables
 PVI 1800/PVI 2500 WARRANTY MANUAL Residential/Commercial Grid-Tied Photovoltaic Inverter 2009, Solectria Renewables Subject to Change REV 10.09 1 Product Warranty & RMA Policy 1.1 Warranty Policy The Solectria
Woolich Racing. Bike Harness Installation Instructions Suzuki Harness Type 4a GSX1300R (Hayabusa)
") Woolich Racing Bike Harness Installation Instructions Suzuki Harness Type 4a 2013+ GSX1300R (Hayabusa) 1) Introduction To connect your Woolich Racing product to the ECU ( Engine Control Unit or computer)
Woolich Racing Bike Harness Installation Instructions Suzuki Harness Type 4a 2013+ GSX1300R (Hayabusa) 1) Introduction To connect your Woolich Racing product to the ECU ( Engine Control Unit or computer)
SS Series Midbass Drivers Owners Manual
 Introduction SS Series Midbass Drivers Owners Manual Models: SSMB6 / SSMB8 Attention: Please take a moment and record the information asked for below in the provided area. It is also a good idea to attach
Woolich Racing. Bike Harness Installation Instructions Hayabusa Gen 2 (08+)
") Woolich Racing Bike Harness Installation Instructions Hayabusa Gen 2 (08+) 1) Introduction To connect your Woolich Racing product to the ECU ( Engine Control Unit or computer) in your bike you need to
Woolich Racing Bike Harness Installation Instructions Hayabusa Gen 2 (08+) 1) Introduction To connect your Woolich Racing product to the ECU ( Engine Control Unit or computer) in your bike you need to
PVI 60KW, PVI 82KW, PVI 95KW
 PVI 60KW PVI 82KW PVI 95KW WARRANTY MANUAL Commercial, Grid-Tied Photovoltaic Inverters 2008, Solectria Renewables LLC Subject to Change DOC-020099 rev 024 1 1 Product Warranty & RMA Policy Warranty Policy
REDI-LINE. Rugged, Reliable, DC to AC Power Conversion ELECTRIC GENERATORS USER'S GUIDE. KARAM A.L.
 REDI-LINE ELECTRIC GENERATORS USER'S GUIDE Rugged, Reliable, DC to AC Power Conversion KARAM A.L. www.alternatorstarter.com 1-888-515-2726 REDI-LINE ELECTRIC GENERATOR MODEL INPUT ACTUAL OUTPUT ACTUAL
Safety Sentry Electronic Breakaway Switch
 Safety Sentry Electronic Breakaway Switch P-616-WE 819-0454 Installation Instructions An Altra Industrial Motion Company Parts List Mounting hardware included with the Safety Sentry Breakaway Switch kit:
3-Channel Power Amplifier. User s Manual. Version 1 MODERN SOUND FOR YOUR CLASSIC.
 3-Channel Power Amplifier User s Manual MODERN SOUND FOR YOUR CLASSIC Version 1 www.retromanufacturing.com TABLE OF CONTENTS WELCOME 2 WHAT S IN THE BOX 3 PRECAUTIONS 4 POWER AND GROUND CONNECTIONS 6 MOUNTING
Power InverterTM Watt. Continuous. User's Manual. WAGAN Corp. Limited Warranty Registration Form. Item no
 WAGAN Corp. Limited Warranty Registration Form All WAGAN Corporation products are warranted to the original purchaser of this product. Warranty Duration: This product is warranted to the original purchaser
5-Channel Power Amplifier. User s Manual. Version 1 MODERN SOUND FOR YOUR CLASSIC.
 5-Channel Power Amplifier User s Manual MODERN SOUND FOR YOUR CLASSIC Version 1 www.retromanufacturing.com TABLE OF CONTENTS WELCOME 2 WHAT S IN THE BOX 3 PRECAUTIONS 4 POWER AND GROUND CONNECTIONS 6 MOUNTING
Please read all of the installation instructions carefully before installing the product. Improper installation will void manufacturer s warranty.
 TM 1 What s in the Box? Note: Configuration will vary depending what item options you select. ire 1 Color Sony CCD night vision weather proof backup camera 1 16 Camera Cable 1 Power Connection Wire Table
SPEAKER ENCLOSURES RZR FRONT RFRZ-FSE. Serial Number: Date of Purchase: Installation & Operation
 Installation assistance available at: www.rockfordfosgate.com/rftech 600 South Rockford Drive Tempe, Arizona 85281 United States Direct: (480) 967-3565 Toll Free: (800) 669-9899 ROCKFORDFOSGATE.COM RZR
AUTO-BLiP. User Manual Lotus INTELLIGENT DOWNSHIFTS. Version 1.0
 AUTO-BLiP INTELLIGENT DOWNSHIFTS www.auto-blip.com User Manual Lotus Version 1.0 Copyright 2012 Tractive Technology, LLC. All rights reserved. Page 1 WARNING Use of the AUTO-BLiP while driving could lead
Model RP310 Owner's Manual & Installation Instructions
 INSTALLATION AND INSTRUCTION MANUAL REMOTE STROBE PACK Model RP310 Owner's Manual & Installation Instructions PLITSTR223 REV. B 3/3/11 Table of Contents SAFETY WARNINGS 1 MOUNTING 2 WIRING INSTRUCTIONS
User Manual. FRESH AERO EasyBrow Plug-In Battery Operated LED Eyebrow Light For Most Aircraft. Where Imagination Meets Innovation
 FRESH AERO EasyBrow Plug-In Battery Operated LED Eyebrow User Manual The Steelebrook Group Where Imagination Meets Innovation Thank you for purchasing the Fresh Aero EasyBrow Plug-in Battery Operated Eyebrow
AUTO-BLiP. User Manual Chevrolet Corvette. Version 1.7
 AUTO-BLiP INTELLIGENT DOWNSHIFTS www.auto-blip.com User Manual 2008-2013 Chevrolet Corvette Version 1.7 Copyright 2012 Tractive Technology, LLC. All rights reserved. Page 1 WARNING Use of the AUTO-BLiP
AUTO-BLiP. User Manual Chevrolet Corvette. Version 1.2
 AUTO-BLiP INTELLIGENT DOWNSHIFTS www.auto-blip.com User Manual 1997-2004 Chevrolet Corvette Version 1.2 Copyright 2012 Tractive Technology, LLC. All rights reserved. Page 1 WARNING Use of the AUTO-BLiP
Installation and Operation Manual
 Installation and Operation Manual * Read all installation instruction and warranty information prior to beginning installation * XeVision HID landing and taxi lights are for experimental aircraft only
AUTO-BLiP. User Manual Ford Mustang INTELLIGENT DOWNSHIFTS. Version 1.2
 AUTO-BLiP INTELLIGENT DOWNSHIFTS www.auto-blip.com User Manual 2015-2016 Ford Mustang Version 1.2 Copyright 2012 Tractive Technology, LLC. All rights reserved. Page 1 WARNING Use of the AUTO-BLiP while
6.5 x 5.25 Classic Vamp Spin Speakers
 w w w.ro swellmarine. co m 6.5 x 5.25 Classic Vamp Spin Speakers Installation & Usage Instructions Part # C920-1824 Information: info@roswellmarine.com If you have any questions please call : 1-321-638-1331
Model A Turn Signal Kit Installation Guide
 Model A Turn Signal Kit Installation Guide Creative Connections, Inc. Consumer Hot Line: 888-471-LOGO 770-476-7322 In Atlanta, GA http://www.logolites.com P/N: 100-005/K 2008 Creative Connections, Inc.
COAXIAL SPEAKERS FI4-F3, FI5-F3, FI57-F3, FI6-F3, FI69-F3
 COAXIAL SPEAKERS FI4-F3, FI5-F3, FI57-F3, FI6-F3, FI69-F3 2 OWNERS MANUAL Congratulations on purchasing your FLI speakers. Please read this manual in order to fully understand how to get the best results
User s Manual. Item no. 2561
 User s Manual Item no. 2561 Solar e Charger Exec Duo by Wagan Tech User s Manual Read before using this equipment Mini USB Port Power switch Charging jack Basic Operation 1. Insert and attach the iphone
600 Amp Battery Jumper with Air Compressor
 Item #2509 600 Amp Battery Jumper with Air Compressor User s manual- Read these instructions before using the unit Features Front LED Worklight Worklight Switch USB Power Ports and on/off Switch 12V DC
60 PSI Boost Gauge. For Product Numbers: MT-DV01_60, MT-WDV01_60
 60 PSI Boost Gauge For Product Numbers: MT-DV01_60, MT-WDV01_60 Red: 12v Constant (un-switched) Source (+) Orange: 12v Dimmer (switched) Source (+) (optional) White: 12v Ignition (switched) Source (+)
20A Solar Charge Controller
 Item no. 2511 20A Solar Charge Controller User s Manual 20A Solar Charge Controller by Wagan Tech Thank you for purchasing the 20A Solar Charge Controller by Wagan Tech. With normal care and proper treatment
GT-BassPro12. powered automotive subwoofer. Owner s Manual
 GT-BassPro12 powered automotive subwoofer Owner s Manual Introduction Thank you for choosing the JBL GT-BassPro12 powered automotive subwoofer. The GT-BassPro12 has been designed to deliver great bass
AUTO-BLiP. User Manual Porsche INTELLIGENT DOWNSHIFTS. Version 1.2
 AUTO-BLiP INTELLIGENT DOWNSHIFTS www.auto-blip.com User Manual 2005+ Porsche Version 1.2 Copyright 2012 Tractive Technology, LLC. All rights reserved. Page 1 WARNING Use of the AUTO-BLiP while driving
Owner s Installation Guide
 Owner s Installation Guide Introduction The nophoto is a highly advanced smart detterent device designed to protect your license plate from flash photography. Using patented technology, the nophoto reacts
Digital echo-charge. Owner s Manual. Xantrex Digital echo-charge Battery Charger
 Digital echo-charge Owner s Manual Xantrex Digital echo-charge Battery Charger INTRODUCTION The Xantrex Digital echo-charge is specially developed for charging an auxiliary battery with Freedom TM or Fleet
INSTALLATION AND MAINTENANCE MANUAL FORM #PM-126 REV A 12/09
 HAND CRANK & MOTORIZED POWER CORD REELS: SERIES 1125PC SERIES: 1125PC HAND CRANK SERIES: 1125PC MOTORIZED COXREELS The technical data and images which appear in this manual are for informational purposes
A S S E M B L Y I N S T R U C T I O N S
 A S S E M B L Y I N S T R U C T I O N S Please Do Not Return This Product to the Store! Contact Escalade Sports customer service department at: Phone: 1-888-USA-GOAL Toll-Free! Fax: 1-866-873-3536 Toll-Free!
Standard Series STEREO SPEAKERS
 Standard Series STEREO SPEAKERS USER S MANUAL MODERN SOUND FOR YOUR CLASSIC www.retromanufacturing.com TABLE OF CONTENTS WELCOME 2 PRECAUTIONS 3 INSTALLATION INSTRUCTIONS 4 SPECIFICATIONS 6 LIMITED WARRANTY
Item no Smart AC 200 USB. User s Manual
 R Item no. 2402 Smart AC 200 USB User s Manual Smart AC 200 Watt with USB by Wagan Tech User s Manual Read before using this equipment Thank you for purchasing Smart AC 200 Watt with USB by Wagan Tech.
12 Volt Utility Controller for 4, 6 or 8 Brakes No P
 12 Volt Utility Controller for 4, 6 or 8 Brakes No. 1300-77 P-1379 819-0094 Installation Instructions Introduction The Warner Electric manually operated Utility Controller operates 4, 6, or 8 twelve-volt
Installation Instructions
 85-4592 rev. 08 02-18 Installation Instructions Thank you for purchasing our sway bar kit. Please read through these instructions before installation. Auxiliary Rear Anti-Sway Bar Kit for Ford F53 part
Application & Enclosure Guide
 PS-WB101 PS-WB121 SINGLE SUBWOOFER BASS REFLEX SYSTEM Application & Enclosure Guide Please read through this manual to familiarize yourself with your new subwoofer. Should your PowerBass Autosound Subwoofer
Model:M5B/M5W/M5N. Installation Guide. Specifications Desktop Weight Capacity Keyboard Tray Weight Capacity Height Adjustable Range
 Model:M5B/M5W/M5N Installation Guide Website: www.flexispot.com Tel: 1-855-421-2808 Specifications Desktop Weight Capacity Keyboard Tray Weight Capacity Height Adjustable Range 33 Ibs (15 KG) 4.4 Ibs (2
USB Charge Port Installation Instructions
 USB Charge Port Installation Instructions Lifetime Technical Support support@logolites.com 770-476-7322 www.logolites.com Manual 100-0014C Thank you for purchasing a Logo Lites USB Charge Port! USB Charge
7.3L POWERSTROKE BANJO BOLT KIT Fits L Powerstroke Diesel. Installation Guide
 7.3L POWERSTROKE BANJO BOLT KIT Fits 94-03 7.3L Powerstroke Diesel Installation Guide INSPECT CONTENTS OF THIS KIT THOROUGHLY BEFORE STARTING THE INSTALLATION PROCESS! IF YOU FIND A PROBLEM WITH YOUR PACKAGE:
PIAA Multi-Fit 005/1100X Light Bracket Kits
 ENGLISH PIAA Multi-Fit 005/1100X Light Bracket Kits Thank you for your purchase. Please read all the instructions before beginning.! WARNING Lighting laws vary state to state, check your local laws before
LOUDSPEAKER OWNER'S MANUAL
 CDT ARCHITECTURAL LOUDSPEAKER OWNER'S MANUAL ARCHITECTURAL SPEAKERS IMPORTANT SAFETY INSTRUCTIONS 1. READ these instructions. 2. KEEP these instructions. 3. HEED all warnings. 4. FOLLOW all instructions.
WARRANTY POLICY. Grid-Tied Photovoltaic Inverters. Revision D. 2014, Solectria Renewables, LLC DOCIN
 WARRANTY POLICY Revision D 2014, Solectria Renewables, LLC DOCIN-070360 1 Product Warranty & RMA Policy 1. Warranty Policy Warranty Registration: It is important to have updated information about the inverter
Application Guide PS-DF110T SINGLE SUBWOOFER DOWNFIRING BASS SYSTEM
 PS-DF110T SINGLE SUBWOOFER DOWNFIRING BASS SYSTEM Application Guide Please read through this manual to familiarize yourself with your new speakers. Should your PowerBass Autosound speakers ever require
INSTALLATION AND MAINTENANCE MANUAL FORM #PM-122 REV A 12/09
 HAND CRANK WELDING CABLE REEL: SERIES 100WC COXREELS The technical data and images which appear in this manual are for informational purposes only. NO WARRANTIES, EXPRESS OR IMPLIED, INCLUDING WARRANTIES
Kit INSTALLATION GUIDE. For maximum effectiveness and safety, please read these instructions completely before proceeding with installation.
 Kit 25690 MN-369 (111512) ECR 8349 INSTALLATION GUIDE For maximum effectiveness and safety, please read these instructions completely before proceeding with installation. Failure to read these instructions
DC to AC Power Inverters
 Manufacturer of Dimensions TM Inverters 4467 White Bear Parkway St. Paul, MN 55110 Phone: 651-653-7000 Fax: 651-653-7600 E-mail: inverterinfo@sensata.com Web: www.dimensions.sensata.com ISO 9001:2000 Certified
PMX-2 RZR WIRE KIT RFRZ-PMXWH1. Serial Number: Date of Purchase: Installation & Operation
 Installation assistance available at: www.rockfordfosgate.com/rftech 600 South Rockford Drive Tempe, Arizona 85281 United States Direct: (480) 967-3565 Toll Free: (800) 669-9899 ROCKFORDFOSGATE.COM PMX-2
DC to AC Power Inverters
 Manufacturer of Dimensions TM Inverters 4467 White Bear Parkway St. Paul, MN 55110 Phone: 651-653-7000 Fax: 651-653-7600 E-mail: inverterinfo@sensata.com Web: www.dimensions.sensata.com 121114C OWNERS
ValveSentry USER S MANUAL PLEASE READ CAREFULLY AND SAVE
 ValveSentry USER S MANUAL IMPORTANT! PLEASE READ CAREFULLY AND SAVE This user s manual contains important information about your ValveSentry device s operation. If you are installing this ValveSentry device
Model AS-RC3260 TV Cart. Rolling Cart for Audio Mount System & Flat Panel TVs
 Model AS-RC3260 TV Cart Rolling Cart for Audio Mount System & Flat Panel TVs GETTING STARTED Introduction Congratulations on the purchase of your new Helios AS-RC3260 Rolling Cart. For maximum benefit,
ADI-125/750 ADI-125/1500 ADI-125/2500
 Manufacturer of Dimensions TM Inverters 4467 White Bear Parkway St. Paul, MN 55110 Phone: 651-653-7000 Fax: 651-653-7600 E-mail: inverterinfo@sensata.com Web: www.dimensions.sensata.com 121094B OWNERS
Installation Power Management Unit Battery Cables and Battery Harness
 Installation Power Management Unit Battery Cables and Battery Harness Important Safety Messages SAVE THESE INSTRUCTIONS - This manual contains important instructions that should be followed during installation
Instruction Manual. Backup Sensor Reversing System RVS-RS103
 Instruction Manual Backup Sensor Reversing System RVS-RS103 RVS Systems, Inc. 2017 TABLE OF CONTENTS System Description............................ 03 Safety Information........................... 04 Before
DUAL WIDEBAND AIR/FUEL RATIO GAUGE Product Numbers: GS-W702W_Dual, GS-C702W_Dual, GS-T702W_Dual
 Installation Instructions Tech Support: 856.768.8300 TechSupport@GlowShiftGauges.com DUAL WIDEBAND AIR/FUEL RATIO GAUGE Product Numbers: GS-W702W_Dual, GS-C702W_Dual, GS-T702W_Dual (1) Gauge (2) Controllers
ActuLink ABS Module - ABS-MOD-400
 Installation Instructions ActuLink ABS Module - ABS-MOD-400 For more information on the installation and operation of Tuson s towable ABS system, consult the installation and operations manuals for the
6 OFF ROAD LIGHT BAR
 6 OFF ROAD LIGHT BAR LOUD speaker Model 95953 Set up And Operating Instructions Diagrams within this manual may not be drawn proportionally. Due to continuing improvements, actual product may differ slightly
Jeep Wrangler (TJ)
") INSTALLATION GUIDE APPLICATION MODEL YR PART # Bestop PART # Jeep Wrangler (TJ) 2003 2006 10-03315-10 751-01 INSTALLATION TIME 3:00 hrs SKILL LEVEL 1 2 3 4 4= Experienced TOOLS REQUIRED Safety goggles
INSTALLATION GUIDE APPLICATION MODEL YR PART # Bestop PART # Jeep Wrangler (TJ) 2003 2006 10-03315-10 751-01 INSTALLATION TIME 3:00 hrs SKILL LEVEL 1 2 3 4 4= Experienced TOOLS REQUIRED Safety goggles
Power. On Your Terms.
 Power. On Your Terms. 10 YEAR LIMITED WARRANTY PHI 1310 TM 1 SIMPLIPHI POWER, INC. REV102016 10 YEAR LIMITED WARRANTY: PHI 1310 TM LIMITED PRO-RATED WARRANTY COVERAGE The SimpliPhi Power PHI 1310 as supplied
WARNING. Instructions for Guidelights and Chargers. How SnapPower Products Work
 Instructions for Guidelights and Chargers WARNING Failure to turn OFF electrical power prior to installing or removing the Guidelight or Charger can result in electrical shock, fires, and/or death. www.snappower.com
INSTALLATION. Figure 1. Figure 2.
 THANK YOU for choosing the JBL BassPro II. BassPro II has been designed to deliver great bass performance from a compact, easily installed powered subwoofer enclosure. To get the best performance from
STEREO REPLACEMENT SPEAKERS
 STEREO REPLACEMENT SPEAKERS USER S MANUAL MODERN SOUND FOR YOUR CLASSIC TABLE OF CONTENTS WELCOME 2 PRECAUTIONS 3 INSTALLATION INSTRUCTIONS 4 SPECIFICATIONS 6 LIMITED WARRANTY 7 INSTALLATION NOTES 8 The
TALCO FIRE SYSTEMS. LSF Start-Up Instructions. 1) IMPORTANT: Inspect the unit for damage. Report any damage to the freight carrier immediately.
 IMPORTANT: Inspect the unit for damage. Report any damage to the freight carrier immediately.") LSF Start-Up Instructions 1) IMPORTANT: Inspect the unit for damage. Report any damage to the freight carrier immediately. 2) PRE-START-UP: Be sure there is water in the pump. Bleed air at all high points
LSF Start-Up Instructions 1) IMPORTANT: Inspect the unit for damage. Report any damage to the freight carrier immediately. 2) PRE-START-UP: Be sure there is water in the pump. Bleed air at all high points
DIGIGAUGE P R E S S U R E D I S P L A Y S Y S T E M I N S T R U C T I O N M A N U A L
 DIGIGAUGE P R E S S U R E D I S P L A Y S Y S T E M I N S T R U C T I O N M A N U A L Thank you for purchasing DigiGauge by ZAETECH Disclaimer DigiGauge is for show and off road use only. By using this
Transmission Guardian
 Transmission Guardian Thank you for purchasing the Transmission Guardian from Bowler Performance Transmissions. We hope you are 100 percent satisfied with your purchase and if for any reason you are not,
owner s manual 4.00-inch (100 mm) Coaxial Loudspeakers
 Coaxial Loudspeakers") owner s manual 4.00-inch (100 mm) Coaxial Loudspeakers Thank you for choosing a JL Audio Evolution C2 Coaxial Speaker System for your automotive sound system. These Evolution Speakers have been designed
owner s manual 4.00-inch (100 mm) Coaxial Loudspeakers Thank you for choosing a JL Audio Evolution C2 Coaxial Speaker System for your automotive sound system. These Evolution Speakers have been designed
OWNER S MANUAL inch (130 mm) Coaxial Loudspeakers. Thank you for choosing JL Audio loudspeakers for your automotive sound system.
 Coaxial Loudspeakers. Thank you for choosing JL Audio loudspeakers for your automotive sound system.") OWNER S MANUAL 5.25-inch (130 mm) Coaxial Loudspeakers Thank you for choosing JL Audio loudspeakers for your automotive sound system. We strongly recommend that you have your new loudspeakers installed
OWNER S MANUAL 5.25-inch (130 mm) Coaxial Loudspeakers Thank you for choosing JL Audio loudspeakers for your automotive sound system. We strongly recommend that you have your new loudspeakers installed
OWNERS MANUAL JANUARY 2007 ISO
 Manufacturer of Dimensions TM Inverters 4467 White Bear Parkway St. Paul, MN 55110 Phone: 651-653-7000 Fax: 651-653-7600 E-mail: inverterinfo@sensata.com Web: www.dimensions.sensata.com 121231B OWNERS
/99 LIONEL. Lionel Route 66 Cafe Owner s Manual
 72-2993-250 01/99 LIONEL Lionel Route 66 Cafe Owner s Manual Congratulations! Congratulations on your purchase of the Lionel Route 66 Cafe. This Lionel illuminated accessory is made of sturdy plastics,
Kit INSTALLATION GUIDE. 5 psi Low Pressure Sensor (Single Gauge)
") Kit 25592 5 psi Low Pressure Sensor (Single Gauge) MN-333 (141404) ECR 7953 INSTALLATION GUIDE For maximum effectiveness and safety, please read these instructions completely before proceeding with installation.
Kit 25592 5 psi Low Pressure Sensor (Single Gauge) MN-333 (141404) ECR 7953 INSTALLATION GUIDE For maximum effectiveness and safety, please read these instructions completely before proceeding with installation.
Compressor Isolator Kit 50714
 Air Lift PERFORMANCE Compressor Isolator Kit 50714 MN-902 (011307) ERN 7261 Compressor not supplied with isolator kit. INSTALLATION GUIDE View AutoPilotV2 videos at: www.airliftperformance.com/video/ For
Thermaltake Warranty / Support Information
 Thermaltake Warranty / Support Information Technical Support Thermaltake is committed to providing the highest quality, most reliable products for our valued customer. There are several ways you may contact
Kit PSI Air Shock Controller
 Kit 25804 160 PSI Air Shock Controller MN-203 (141606) ECR 8612 INSTALLATION GUIDE For maximum effectiveness and safety, please read these instructions completely before proceeding with installation. Failure
4-SIDED HOCKEY SCOREBOARD LED BAR DIGIT INSTRUCTION MANUAL REVISION DATE: PART#:
 4-SIDED HOCKEY SCOREBOARD LED BAR DIGIT INSTRUCTION MANUAL REVISION DATE: 05-15-07 PART#: 98-0006-06 SERVICE & CUSTOMER INFORMATION CUSTOMER MUST HAVE PART NUMBER WHEN ORDERING ITEMS THROUGH THE SERVICE
OUTDOOR SPEAKERS OWNER S MANUAL
 OUTDOOR SPEAKERS OWNER S MANUAL UNPACKING 1. Carefully unpack the speakers. If you suspect damage from transit, report it immediately to your dealer and/or delivery service. Keep the shipping carton and
Instruction Manual. Backup Camera System With Replacement Mirror Display RVS N
 Instruction Manual Backup Camera System With Replacement Mirror Display RVS-778718N Rear View Safety, Inc. 2016 1 NOTE! Please read all of the installation instructions carefully before installing the
Model NTX7 Series Automatic Battery Charger User s Manual Rev. 1.0 October 17, 2006
 B R A N D Model NTX7 Series Automatic Battery Charger User s Manual Rev. 1.0 October 17, 2006 For Sales, Support and Service phone: 407-331-4793 fax: 407-331-4708 website: www.xenotronix.com email: information@xenotronix.com
Use/Installation Guide
 Use/Installation Guide 5 Series Outdoor Gas Grill Carts IMPORTANT: PLEASE READ AND FOLLOW 1. Before beginning, please read these instructions completely and carefully. 2. Do not remove permanently affixed
Blue Air. Commercial Refrigeration Inc. Installation & Operation Manual Glass Door Countertop Refrigerator
 Blue Air Commercial Refrigeration Inc. Installation & Operation Manual Glass Door Countertop Refrigerator Please read this manual completely before installing or operating this unit! BAGR7 Blue Air reserves
QUICK START GUIDE OWNER S MANUAL AL50 SERIES SAND FILTRATION TECHNOLOGY PLEASE CALL DO NOT RETURN TO STORE
 QUICK START GUIDE OWNER S MANUAL SAFETY, INSTALLATION, OPERATION & PARTS AL50 SERIES SAND FILTRATION TECHNOLOGY PLEASE CALL 877-278-2797 DO NOT RETURN TO STORE! WARNING This equipment must be installed
CSA CERTIFIED Conforms to UL 507
 Installation tion Instructions Please read and save these instructions! TURBO/MAXX12 Volt All Weather RV Ventilator Fans P/N 00-965001 Deluxe Model 1200T WITH THERMOSTAT P/N 00-965007 Standard Model 3550
This Manual Provides Installation and Operation Instructions for the following models:
 OWNER'S MANUAL Capstan Powered Lift Assist This Manual Provides Installation and Operation Instructions for the following models: CAPSTAN 1000 CAPSTAN 300 QUICK CATCH POT PULLER pwcs101 12 Volt Powered
E24-E28 M88 & S38 Mass Air Flow Conversion System Instruction Manual
 E24-E28 M88 & S38 Mass Air Flow Conversion System Instruction Manual Miller Performance Ltd. Tel 855.BMW.TUNER 2009 Abbotsford Way, Abbotsford BC, V2S 6Y5 Millerperformancecars.com Table of Contents: 1.
Utility Controller Hand Air Operated
 Utility Controller Hand Air Operated P-1395 819-0288 Installation Instructions Introduction The Warner Electric air/manual Utility Controller combines manual and automatic (air) actuation for the operation
INSTRUCTIONS AND 5 - YEAR LIMITED WARRANTY
 INSTRUCTIONS AND 5 - YEAR LIMITED WARRANTY CARE & INSTRUCTIONS To ensure the long-lasting beauty of your Badgley Mischka Timepiece, please treat it as you would a piece of fine jewelry. To protect the
How to Install and Operate the LXA300 Amplifier. Contents. Technical Assistance
 How to Install and Operate the LXA300 Amplifier POWER L R HI INPUT LOW INPUT BASS -BOOST ON OFF LEVEL MIN MAX LPF HPF LPF L R PASS 50 250 HPF 50 250 PROTECT Welcome! What you're holding in your hands is
10 Year Limited Warranty
 Power. On Your Terms. 10 Year Limited Warranty PHI 2.7 TM PHI 3.5 TM 60A SIMPLIPHI POWER, INC. REV020618 10 Year Limited Warranty: PHI 2.7 TM PHI 3.5 TM 60A 24V 48V Limited Pro-Rated Warranty Coverage
Ultra-Thin DASH SPEAKERS
 Ultra-Thin DASH SPEAKERS USER S MANUAL MODERN SOUND FOR YOUR CLASSIC www.retromanufacturing.com TABLE OF CONTENTS WELCOME 2 PRECAUTIONS 3 INSTALLATION INSTRUCTIONS 4 SPECIFICATIONS 9 LIMITED WARRANTY 10