Arrow Shark TS 760A E Starter for Gas Cars. Owner s Manual
|
|
|
- Louise Dayna Heath
- 6 years ago
- Views:
Transcription

1 Arrow Shark TS 760A E Starter for Gas Cars Starting a Gas Engine Has Never Been So Easy! Owner s Manual The TS 760A is heavy duty equipment with most main components being CNC billet finished and anodized in three main colors Popular Titanium, Jet Black and Brilliant Red to suit various colors used in gas engines and RC cars. The TS 760A is powered by an OEM 760 series high torque and high rpm electric motor with an 11.1 volt LIPO battery; this delivers excellent torque for enough power to start gas engines up to 60cc. A clever design of gearbox seal retains grease inside the casing to protect the gears from overheating and wear, and to deliver higher reliability and longer life. A unique two level drive system efficiently avoids gear damage even with long term usage. The first level belt drive system soft transfers all the rpm and torque from the electric motor to the second level gear drive to start your gas engine within a second. The TS 760A has five built in bearings for stable and durable performance of the shafts and gears. A high quality one way bearing is filled with grease and has been tested up to 100 times without failing. It is installed inside a hardened alloy adaptor which allows for easy maintenance or replacement. The Press On switch that comes with the TS 760A kit is of polished alloy and is complete with pre welded wires. A single press is all you need to start your engine. This one press switch approach has the big advantage of not requiring a three channel RC system. Our long established E Starter for boats necessarily uses third channel operation to re start boats that have stopped out on the water. Cars can usually be retrieved and re started no matter where they might stop. However, we do offer an optional remote starting upgrade kit if you wish to start your RC car from your transmitter that will be available soon!

2 Parts List Part List Description Part List Description TS0001 CNC Main Body TS0014 Main Gear Center Shaft TS0002 CNC Main Body Cover TS T Shaft Gear TS0003 CNC Belt Wheel Cover TS0016 Main Shaft Clip TS Series High Torque Motor TS0017 Flywheel Adaptor Bolts x 2 TS0005 Hardened Flywheel Adaptor TS0018 Shaft clip x 3 TS0006 Hardened Drive Shaft TS0019 Center Main Bearing TS T Main Gear TS0020 M4x12 Hex Nut x 2 TS0008 CNC Switch Adaptor TS0021 M4x5 Hex Nut TS0009 Alloy Polish Power Switch TS0022 Belt Wheels Cover Spacer TS0010 Main Belt Wheel TS0023 M3x10 Bolts x 5 TS0011 Motor Side Belt Wheel TS0024 Belt Wheel Cover Holding Bolt x 2 TS0012 Harden One Way Bearing Adaptor TS0025 M3x6 Slot Bolt x 2 TS0013 Heavy Duty One Way Bearing TS0026 Drive Belt


3 Performance Tips Power Switch Starting The stock version of the TS 760A Starter Kit comes with a polished alloy power switch for manual starting. You will need to correctly connect all the wires and an 11.1V LIPO battery to the starter kit according to the following photo: You can arrange and organize the power wires to any position in your RC vehicle that best suits your application; make sure though that the location where you store the battery will not hit the ground should your RC car flip.

4 Starting a Cold Engine After all the wire connections have been correctly set up, you are ready to start your engine. Before doing so, ensure the low and high speed mixture needles are adjusted to the factory recommendation from your engine manufacturer. Then you will need to close the choke on your carburetor and press the primer bulb to pump the gas up from the tank. Once you see the gas flowing into the carburetor, press on the power switch for no more than 3 seconds. If you then hear the engine starting to fire, open the choke and press the power switch one more time your engine should start. When starting a warm engine, you don t need to close the choke; just simply press on the power switch for less than 3 seconds and the engine will start. Why operate the starter for no more than 3 seconds each time? This is because the peak electric current from the battery to the motor is achieved in those first few seconds; after that the peak power of the motor reduces. If the engine has not started in this time (it usually does if properly tuned), pause for a few seconds before trying again for up to another three seconds. That pause allows the battery to again deliver its maximum current for the motor to achieve its highest performance. If the engine is warm, you will need only one second to start it. Trouble Shooting If gas has been flowing into the engine yet it does not start, it might have flooded with too much gas inside. If this happens, remove the spark plug and hold a rag over the spark plug hole. Turn on the starter for 5 to10 seconds to pump out the extra gas from inside of the cylinder. Then re install the spark plug and try again.


5 Greasing the Gears The TS 760A is designed with a built in gear box that retains grease inside for durable gear performance. Please re grease the main gears and the one way bearing every hours of TS 760A operation. Fitting the TS 760A to Baja 5B The TS 760A E Starter can be directly bolted on to HPI, Rovan, KM 5B, 5CS and 5T without any modification. It is easier to fit it on a 5B without a body cover, although it can still be installed with a small modification cut on the cover please see the pictures below for comparisons of installation with and without a body cover.


6 Note: We suggest covering the holes on the cooling fan area of the electric motor if you fit the TS 760A on a 5B type Baja. This is because, on the 5B, the electric motor is exposed outside the vehicle without any body cover on it, and so it might get stone chips into the electric motor via the fan area holes which could damage the motor. Covering the holes would better protect the motor. The motor is operated for only a few seconds at a time so even with the fan holes covered the motor will not overheat.

7 Fitting TS 760A to Losi 5IVE T Fitting with stock muffler If you install a TS 760A E Starter to a Losi 5IVE T off road truck fitted with a stock muffler, you will need to bend one of the wire connections on the electric motor at a 90 degree angle to avoid contact with the muffler as shown in the picture above.
")
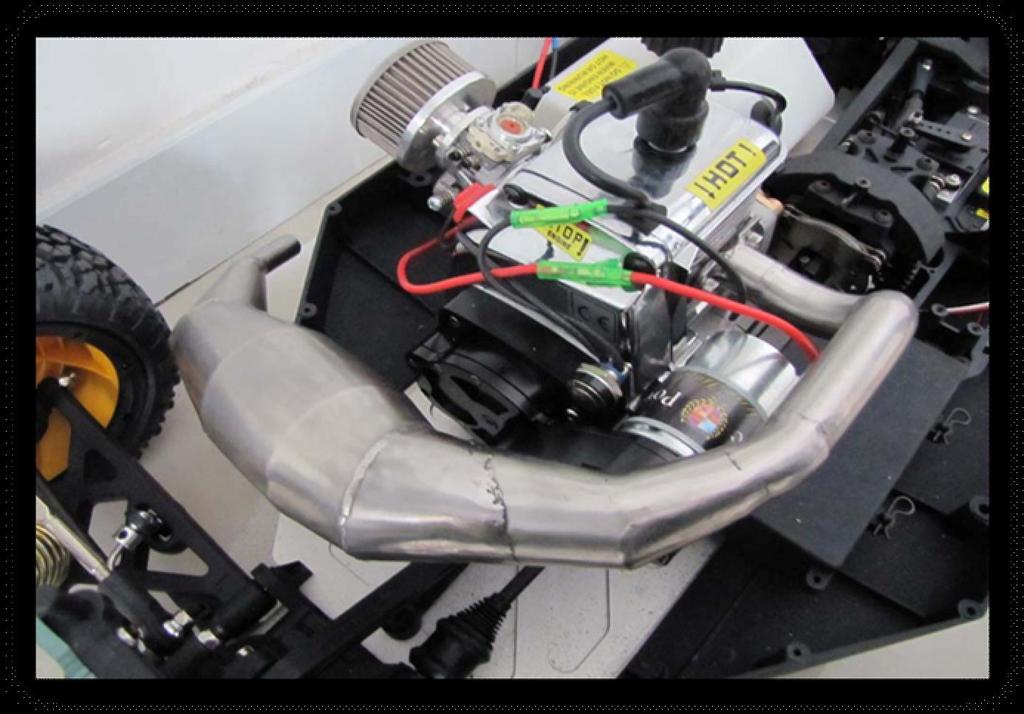
8 Fitting with modified power tuned pipe If you plan to fit the TS 760A to a Losi 5IVE T modified with a power tuned pipe, please check the dimensions below. Make sure that you have sufficient clearance space between the tuned pipe and he TS 760. (The measurements in the picture below are in mm; 1mm=0.039 inch.)
9

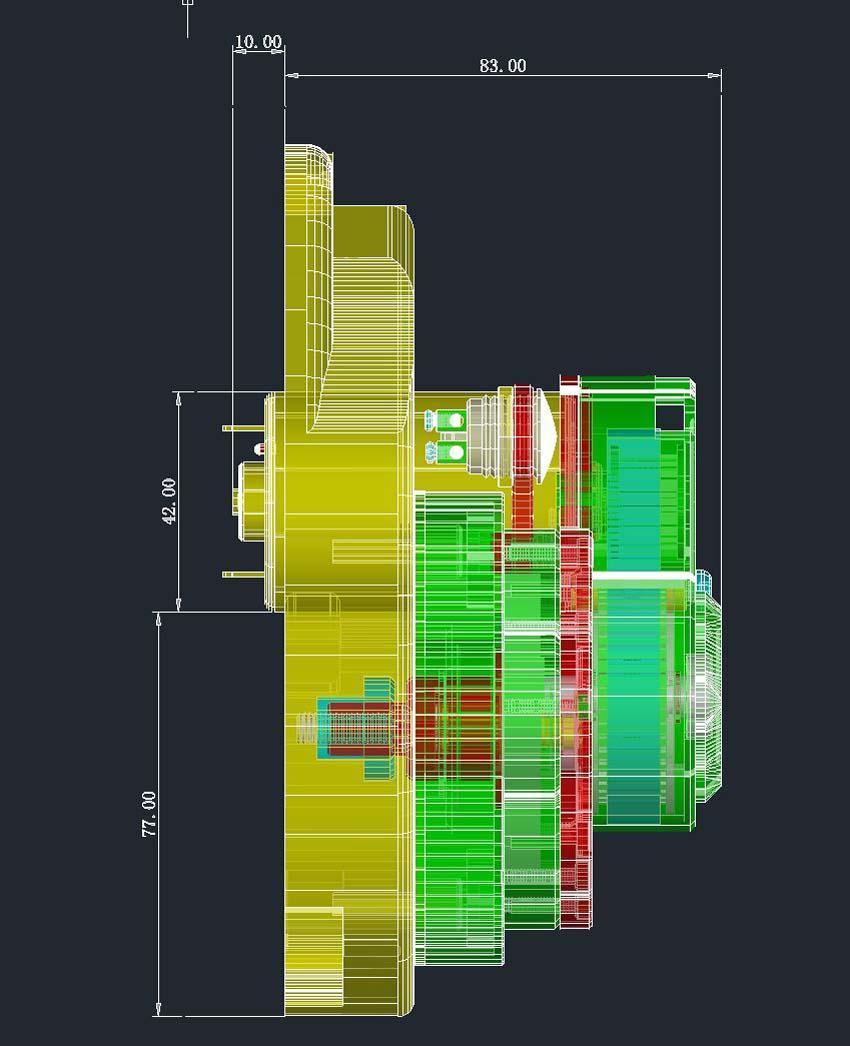
10 Installation Guide Motor Down Version The TS 760A is designed to be installed in either an electric motor up or down version. In most cases, you will use the motor up version which we have set up as the stock version. This will fit most of the gas cars that are currently available in the market. However, you can also install it in the motor down version if required by your application. The following dimensions guide will assist you to determine which is best for your car.


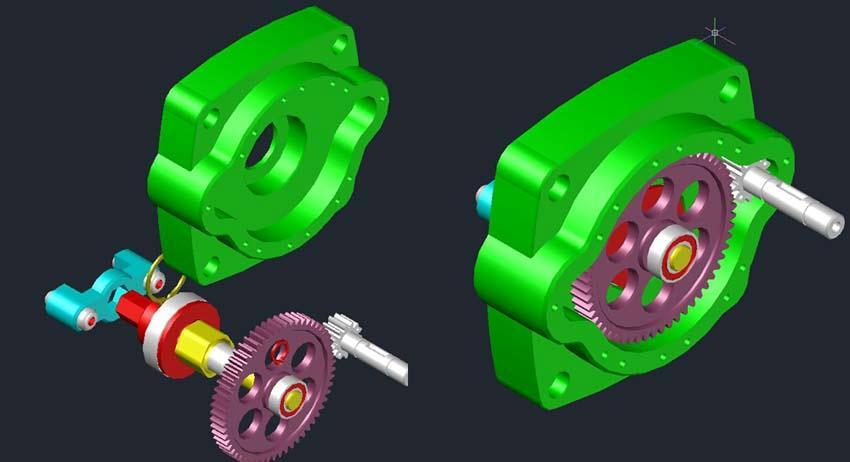
11 TS 760A E Starter Assembly Guide Gear Box Assembly


12 #1: Flywheel Adaptor & Bolts: This must be bolted to the flywheel on your gas engine as shown in the picture above; apply a small amount of Loctite on the bolts. #2: Center Main Shaft: This is the hardened drive shaft; the front hexagon shaft part should insert into the flywheel adaptor when in operation. #3: Main Center Bearing: This helps the center main shaft performance and reduces torque on one way bearing. #4: M20 Clip: This stops the center main shaft from moving up and down. #5: Hardened One Way Bearing Adaptor: This holds the one way bearing in place, and inserts it into the center drive shaft for operation. #6: Heavy Duty One Way Bearing: This is a high quality one way bearing which has been tested up to 100 times without failure; the one way bearing requires re greasing every 15 hours of usage. #7: Center Gear Shaft: This is the hardened drive shaft that holds the main gear, and goes into the one way bearing for operation, #8: Harden 57T Main Gear: This requires re greasing every 15 hours of usage. #9: M8 Clip: This holds the main gear in place. #10: 13T gear shaft: This hardened shaft gear works with the 57T main gear. #11: Bearing: That installs on the end of the gear shaft and into the main body cover to aid smooth overall performance.

13

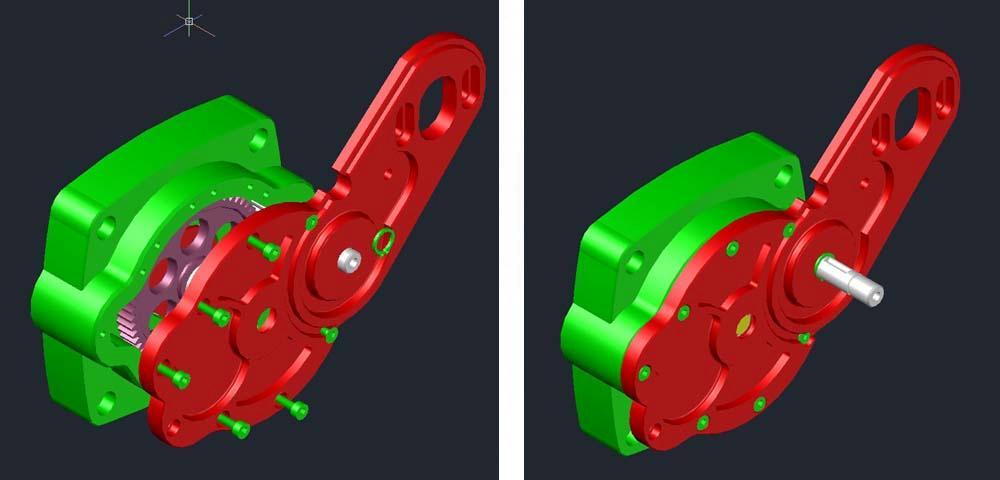
14 Electric Motor Installation Steps #1: Install the electric motor to the plate and screw in the bolts, but do not tighten them yet and leave the motor at its lowest position on the motor plate. #2: Insert the main belt wheel into the gear shaft and match the slot on the shaft with the hex nut holes on the belt wheel; then screw both the M4x12mm hex nuts into the belt wheel against the gear shaft. Apply a little Loctite on the hex nuts before screwing them in (do not use too much Loctite as it might cause problems when you want to loosen the screws at a later time). #3: Install the small belt wheel on to the motor shaft, and secure it with the M4x5mm hex nut. #4: Attach the belt onto the main belt and motor belt wheels, and then pull the motor to the highest position on the plate in order to tighten the belt; secure the bolts for the electric motor. #5: Install the spacer to the plate and hold it in place with the screw from behind the plate. #6: The bearing on the top of the gear shaft should install into the CNC belt cover later see under Belt Cover Installation following.


15 Switch Installation Install the switch as shown in the following diagram.


16 Belt Cover Installation Install the small bearing that was mentioned previously in the last step of the Electric Motor Installation Steps into the belt cover from inside; match the cover onto the slot on the motor plate and secure it with the bolt into the spacer inside. Use a little Loctite on the screw. Congratulations! You have now completed the assembly of the TS 760A which you can directly bolt onto your gas car engine. We hope the ease and convenience of our Arrow Shark TS 760A kit will bring a higher level of enjoyment to your experience on RC gas cars!
Arrow Shark 2015 E-Starter V4 Owner Manual
 Arrow Shark 2015 E-Starter V4 Owner Manual The Arrow Shark E-Starter V3 has successfully been available in the market for over three years now. During that time, we have never stopped seeking ways to improve
Arrow Shark TS760-Marine Onboard E-Starter. Owner Manual
 Arrow Shark TS760-Marine Onboard E-Starter Owner Manual The TS760-Marine Onboard E-Starter has concluded years of experience Arrow Shark has on RC boat onboard E-Starter, it will work for about all brands
Arrow Shark 2016 M8 II Sterndrive - Collector Edition Owner Manual. M8 II weight: 925 grams Dimensions
 Arrow Shark 2016 M8 II Sterndrive - Collector Edition Owner Manual M8 II weight: 925 grams Dimensions Parts List M8V2#0001 Billet Lower Unit M8V2#0013 Steering Cable Assembly M8V2#0002 Steering Arm Housing
Arrow Shark 2013 Outboard Dragon Drive Owner Manual. Introduction
 Arrow Shark 2013 Outboard Dragon Drive Owner Manual Introduction Our purpose in designing the Dragon Drive is to offer a high quality, sleek looking and durable outboard drive for the growing RC F1 (Formula
Backwater Performance Systems Large Vanguard Mikuni Twin Carburetor Kit
 Backwater Performance Systems Large Vanguard Mikuni Twin Carburetor Kit 1. Throttle Cable Twin (CKC-41) 2. Carburetor VM30mm (CKC-40) 3. Loctite 242.5mL (A-210) 4. Air Cleaner Filter 6000 (EC-86) 5. Rev
WORKSHOP MANUAL. 63,4 cm³ chainsaws
 WORKSHOP MANUAL General failures analysis Suggested tools I. Emak tool kit II. Compression tester: to check thermal group III. Electronic tachometer: for 2 and 4 stroke engines, measurement range from
WORKSHOP MANUAL. Chainsaw GS35 GS350 MT350 MT3500
 WORKSHOP MANUAL Chainsaw GS35 GS350 MT350 MT3500 General failures analysis Suggested tools I. Emak tool kit II. Compression tester: to check thermal group III. Electronic tachometer: for 2 and 4 stroke
Mikuni RS Carburetor Conversion
 Mikuni RS Carburetor Conversion After putting your carbies on the bench or the kitchen table if the wife is out, you will see that the linkages may be in different positions depending on which brand of
Husqvarna Hedgetrimmers 325HS/ 325HE/ 325HDA. Workshop manual
 Husqvarna Hedgetrimmers 325HS/ 325HE/ 325HDA Workshop manual 101 90 73-26 2 Workshop Manual Hedge trimmers Supplement for models 325HS, 325HE,325HDA Contents 1. Starter 5 2. Ignition system 7 3. Fuel system
Dual Port Cylinder Covers Can be used on all 1600 based dual port engines.
 VW Heater Channel Plays an important role in keeping your engine alive. They create a smooth flow of air around the lower part of the cylinders, for added cooling. Can be used on all fresh air 40hp, 13,
OIL COOLER KIT INSTALLATION INSTRUCTIONS PART NUMBER D
 OIL COOLER KIT INSTALLATION INSTRUCTIONS PART NUMBER D570-0904 APPLICATION: 2011-2012 E90 335i/xi (N55 engine) with BMW standard bumper and with stock oil cooler Congratulations for being selective enough
AVERAGE PRICE ITEM & PICTURE DESCRIPTION ITEM & PICTURE DESCRIPTION
 NOT ALL SOLENOIDS ARE CREATED EQUAL - AS CLEARLY DEMONSTARTED IN THE COMPARISON LIST BELOW Expecting to pay more (not less) for the superiority of a Pulsoid, then be ready for a surpise [Please see below]
TECHNICAL DATA. COMPRESSION RATUI 9,5/1 WEIGHT ready to fly CONSUMPTION at 5400RPM 5,6litres/h POWER at 6200RPM
 VICTOR 1 SUPER This handbook aims to bring to the attention of key technical, functional and maintenance of your motor VICTOR 1. Read carefully the following pages, will be synonymous with safety, reliability
OIL COOLER KIT INSTALLATION INSTRUCTIONS PART NUMBER D E92 335i/xi (N55 engine) with M-Technic bumper and without stock oil cooler
 with M-Technic bumper and without stock oil cooler") OIL COOLER KIT INSTALLATION INSTRUCTIONS PART NUMBER D570-0925 APPLICATION 2011-12 E92 335i/xi (N55 engine) with M-Technic bumper and without stock oil cooler Congratulations for being selective enough
OIL COOLER KIT INSTALLATION INSTRUCTIONS PART NUMBER D570-0925 APPLICATION 2011-12 E92 335i/xi (N55 engine) with M-Technic bumper and without stock oil cooler Congratulations for being selective enough
Holley High Performance Intake System* For Port 13B Engines (Includes B 6-Port engines converted to 4-Port)
") Holley High Performance Intake System* For 1974-1978 4-Port 13B Engines (Includes 1984-85 13B 6-Port engines converted to 4-Port) Installation Instructions I-18038 Note: These instructions assume: The
Holley High Performance Intake System* For 1974-1978 4-Port 13B Engines (Includes 1984-85 13B 6-Port engines converted to 4-Port) Installation Instructions I-18038 Note: These instructions assume: The
93 SERIES RTR BRUSHLESS EP RACING BOAT
 INSTRUCTION MANUAL THIS MODEL IS NOT A TOY! 93 SERIES RTR BRUSHLESS EP RACING BOAT THESE INSTRUCTIONS SHOULD BE READ BY A SUPERVISING ADULT, IN CONJUNCTION WITH THE SEPARATELY INCLUDED RADIO CONTROL INSTRUCTIONS
OIL COOLER KIT INSTALLATION INSTRUCTIONS PART NUMBER D E92 335is (N54 engine) with BMW M-Technic bumper and with stock oil cooler
 with BMW M-Technic bumper and with stock oil cooler") OIL COOLER KIT INSTALLATION INSTRUCTIONS PART NUMBER D570-0923 APPLICATION: 2011 E92 335is (N54 engine) with BMW M-Technic bumper and with stock oil cooler Congratulations for being selective enough to
OIL COOLER KIT INSTALLATION INSTRUCTIONS PART NUMBER D570-0923 APPLICATION: 2011 E92 335is (N54 engine) with BMW M-Technic bumper and with stock oil cooler Congratulations for being selective enough to
SL100DCx series Sliding gate system Installation guide
 SL100DCx series Sliding gate system Installation guide Application note MAG SL100ACx series is a complete sliding gate automation system. Components in MAG SL100DCx series Gate Automatic System 1 PVC box
OIL COOLER KIT INSTALLATION INSTRUCTIONS PART NUMBER D E92/E93 335i/xi with stock oil cooler
 OIL COOLER KIT INSTALLATION INSTRUCTIONS PART NUMBER D570-0920 APPLICATION 2007-10 E92/E93 335i/xi with stock oil cooler Congratulations for being selective enough to use a Dinan Engineering Oil Cooler
Replace C1U-H47 Carburator on Homelite
 Replace C1U-H47 Carburator on Homelite Weed Whacker It's cheaper, quicker, and more reliable to replace your carburetor with a new one, rather than rebuilding it. Written By: Gil ifixit CC BY-NC-SA www.ifixit.com
COMER SW80 TECHNICAL SPECIFICATIONS
 VERSION 3 / 2013 UPDATED AUGUST 20 th, 2013 DOCUMENT UPDATE SCHEDULE It is certified that the updates listed below have been approved by the Australian Karting Association and have been incorporated into
TR V1 HD Clutch System TUR0012
 TR V1 HD Clutch System TUR0012 Kit Includes: 1pc. Enclosed Clutch Carrier w/bearings 1pc. HD One Piece Gear Plate w/bearing Optional TR Pinion. Note, stock pinion will not fit, be sure to purchase TR Pinion.
CRRCpro GP26R Gasoline Engine
 CRRCpro GP26R Gasoline Engine Thank you very much for buying this engine. Hope it will bring you a good happy time. In order to get a good operation, please read the instruction in detail as below. I Parameter
What is a GLOW engine?
 Micro engines What is a GLOW engine? R/C models get power from various modes. Gliders, for example, do not need a power source other than what nature provides. But they are the exception. Normally all
installation manual 123\TUNE+-2CV
 installation manual 123\TUNE+-2CV Installation Instructions The 123\TUNE+-2CV is designed for the stock (BLACK) 2CV-coil STEP 1 Turn the ignition off. Remove the engine fan use a long 14 mm socket or
HW Prowler Carburetor Installation Instructions
 HW Prowler Carburetor Installation Instructions Page 1 of 6 Carb Kit Contains: HW modified Mikuni 36mm pumper style carb Custom choke cable Fuel Line Clamp Instructions (2) Leaner and (2) richer main jets
Chevy Nova Pro-Touring Front Suspension Installation Instructions
 1962-1967 Chevy Nova Pro-Touring Front Suspension Installation Instructions 1-800-984-6259 www.totalcostinvolved.com 1 Pro-Touring Clip A-Arm Assembly Sway Bar Assembly Fender Panel Kit 8 7/16-20 * 1 ¼
Detroit Speed, Inc. QUADRA Link Rear Suspension Camaro/Firebird P/N:
 Detroit Speed, Inc. QUADRA Link Rear Suspension 1967-1969 Camaro/Firebird P/N: 041703 Figure 1 Item Component Quantity 1 Upper Link Front Pocket-Left 1 2 Upper Link Front Pocket-Right 1 3 Upper Shock Crossmember
OIL COOLER KIT INSTALLATION INSTRUCTIONS PART NUMBER D E92 335i/xi (N55 engine) with BMW Standard bumper and with stock oil cooler
 with BMW Standard bumper and with stock oil cooler") OIL COOLER KIT INSTALLATION INSTRUCTIONS PART NUMBER D570-0924 APPLICATION: 2011-12 E92 335i/xi (N55 engine) with BMW Standard bumper and with stock oil cooler Congratulations for being selective enough
OIL COOLER KIT INSTALLATION INSTRUCTIONS PART NUMBER D570-0924 APPLICATION: 2011-12 E92 335i/xi (N55 engine) with BMW Standard bumper and with stock oil cooler Congratulations for being selective enough
Porsche 928 with 16v LH-Jetronic Fuel System
 Porsche 928 with 16v LH-Jetronic Fuel System Toll-Free Tech Hot Line: 877-FOR-928M 877-367-9286 Please do not copy this manual and give copies to your friends. Our ability to bring you this supercharger
The Savage X 4.6 Reverse SS power and upgrades with REVERSE!
 The Savage X 4.6 Reverse SS power and upgrades with REVERSE! Introducing the Savage X 4.6 REVERSE! This latest addition to the Savage line-up combines huge power and reversing capability for the ultimate
installation manual 123\2CV, 123\UNI & 123\EVO
 installation manual 123\2CV, 123\UNI & 123\EVO old situation with points new situation with 123\2CV Installation Instructions All 123ignition\2CV modules are designed for the stock (black) 2CV-coil. Previous
Canems Engine Management Solutions. +44 (0) Scotter Road Scunthorpe DN15 7EH UK
 Scotter Road Scunthorpe DN15 7EH UK") DRH Performance ECU Porsche 911 3.2 DIS ignition conversion kit Kit Contents A) 4 x M6x50 bolts and spring washers B) 1 x Magnecor 8mm silicone HT lead set C) 1 x ECU update CD-ROM (upgrades only) D) 1
DRH Performance ECU Porsche 911 3.2 DIS ignition conversion kit Kit Contents A) 4 x M6x50 bolts and spring washers B) 1 x Magnecor 8mm silicone HT lead set C) 1 x ECU update CD-ROM (upgrades only) D) 1
OIL COOLER KIT INSTALLATION INSTRUCTIONS PART NUMBER D E92 335i/xi without stock oil cooler
 OIL COOLER KIT INSTALLATION INSTRUCTIONS PART NUMBER D570-0921 APPLICATION 2007-08 E92 335i/xi without stock oil cooler Congratulations for being selective enough to use a Dinan Engineering Oil Cooler
Detroit Speed, Inc. QUADRA Link Rear Suspension Camaro/Firebird P/N:
 Detroit Speed, Inc. QUADRA Link Rear Suspension 1967-1969 Camaro/Firebird P/N: 041703 The Detroit Speed Inc., QUADRA Link rear suspension system is a great way to upgrade from an original leaf spring rear
installation manual 123\2CV, 123\UNI & 123\EVO
 installation manual 123\2CV, 123\UNI & 123\EVO old situation with points Installation Instructions All 123ignition\2CV modules are designed for the stock (black) 2CV-coil but are also compatible with high
420cc Builder Modified Predator OHV engine Technical Specifications 5/27/13
 BM (Builder Modified) Predator 420cc OHV engine With Electric Start Approved Engine: OHV Predator 420cc engine modified only according to these BM OHV Engine Spec. ENGINE SPEC SHEET FOR BM 420cc OHV CLASS
A Simple Guide to Installing the C2Motorsports 2.5L SRI
 A Simple Guide to Installing the C2Motorsports 2.5L SRI Special Thanks to Josh and the Crew at Nothing-Leaves-Stock **Disclaimer: This is an aid for installing the SRI on a 2.5L motor. C2Motorsports is
Multi-tool 2CV / Visa
 Multi-tool 2CV / Visa For the professional 2CV specialist / perfectionist: The heart of the engine, the crankshaft and camshaft often needs a (partial) revision. There are many new 2CV parts, but for these
COLD AIR INTAKE INSTALLATION INSTRUCTIONS
 COLD AIR INTAKE INSTALLATION INSTRUCTIONS # D760-0030 Fits: 2007-10 135i (E82, E88; with N54 engine) 2007-08 335i/xi (E90) 2007-10 335i (E92, E93; with N54 engine) Congratulations for being selective enough
EDELBROCK THUNDER SERIES AVS CARBURETORS Part #1801, 1802, 1803, 1804, 1805, 1806, 1812, 1813, 1825, 1826 INSTALLATION INSTRUCTIONS
 EDELBROCK THUNDER SERIES AVS CARBURETORS Part #1801, 1802, 1803, 1804, 1805, 1806, 1812, 1813, 1825, 1826 INSTALLATION INSTRUCTIONS IMPORTANT NOTE: Proper installation is the responsibility of the installer.
Hasse Mods for the Ampeg J20 Guitar Amp
 Hasse Mods for the Ampeg J20 Guitar Amp The following is adapted from a post I put up on The Gear Page, in the Amp Techincal forum. It shows the mods I did to my Ampeg J20. Okay, here s my mods for this
Typical Install Instructions
 Typical Install Instructions Read & understand all steps of these instructions before beginning this installation. WEBER Conversion Kit, VW T-1/2, up to 1835cc 32 / 36 DFEV Weber Carburetor These instructions
NHP Exhaust Boxster Muffler V2 Installation Instructions and Tech Tips.
 NHP Exhaust Boxster Muffler V2 Installation Instructions and Tech Tips. Thank you for purchasing your new Porsche 986 NHP Exhaust System, below you will find installation instructions to help you complete
Improving the gearshift feel in an SW20.
 Improving the gearshift feel in an SW20. Part one In 3 parts. The SW20 gearshift can be often be greatly improved by eliminating play in the shift linkages, and this article covers three areas that need
What You Need at the Flying Field
 What You Need at the Flying Field The following items are considered necessary for the R/C pilot to have available in the field. Several of the items are needed right away and others might be needed at
DrVanos.com Stage II Installation Instructions. Tool rental is available with the purchase of a vanos kit *See website for more info*
 DrVanos.com Stage II Installation Instructions Special Tools Needed: Camshaft locking tool TDC Crank pin Sprocket turning tool Tool rental is available with the purchase of a vanos kit *See website for
BA /02/03/04/06/07/08/13/13B/15 BIG AIR KIT (BAK) - Yamaha Road Star (99-07)
 - Yamaha Road Star (99-07)") BA-2020-00/02/03/04/06/07/08/13/13B/15 BIG AIR KIT (BAK) - Yamaha Road Star (99-07) Page: 1 Revision: 6.2-02/23/2011 Install Time: 1.5 Hours We recommend a qualified Yamaha technician install this kit
BA-2020-00/02/03/04/06/07/08/13/13B/15 BIG AIR KIT (BAK) - Yamaha Road Star (99-07) Page: 1 Revision: 6.2-02/23/2011 Install Time: 1.5 Hours We recommend a qualified Yamaha technician install this kit
Tooling List 10mm Socket 3 Extension Ratchet Large Jaw Pliers Needle Nose Pliers
 Thank you for purchasing! The CorkSport Binary VTA BPV provides features and performance to suit stock cars and on up to big turbo high power setups. The CorkSport Binary VTA BPV holds 50psi, responds
235/245400, , 28N
 Models 235/245400, 287000, 28N thru W, 310/312/313700 These carburetors have a fixed high speed main jet with adjustable idle, Fig 183. The different carburetors are identified as LMT 1 and up. The letters
ILLUSTRATED PARTS BOOK Walk Behind Mower MODEL: SM2010
 ILLUSTRATED PARTS BOOK Walk Behind Mower MODEL: SM2010 Table of Contents Top Level Assembly...3 Engine Top Level Assembly..4 Handle Assembly 5 Frame Assembly.6 Blade Assembly...7 Wheel Assembly.8 Warning
Kodak 750H Carousel Projector Repair
 Kodak 750H Carousel Projector Repair An AT YOUR OWN RISK PROJECT by Klaus Wolter, Rev B, 3-26-2016 Here I documen the repair of my 750H carousel. A common problem with this projector, and all of the projectors
Repairing the CIS Jetronic Alloy adjustable Bosch Fuel distributor
 CIS-Jetronic.com 07.3-0997-06-01 Repairing the CIS Jetronic Alloy adjustable Bosch Fuel distributor When do you have to repair your CIS Bosch fuel distributor? If your car has rough idle, low power, high
Figure 1 Factory G50 update and old Shift Fork Shaft
 911 Clutch Job So you have one of the best 911s there is, a 87-89 G50 Porsche. However, after many years of service, it is time for a clutch. Maybe, the rubber clutch disc has failed, or the clutch is
Mercedes E63/CLS AMG Carbon Turbo Intake System Instructions
 Mercedes E63/CLS AMG Carbon Turbo Intake System Instructions The goal of Alpha Performance is to provide the highest quality, best performing products available. By utilizing research and development,
Building Tips by PMD For Wedico Trucks
 Building Tips by PMD For Wedico Trucks These are in no particular order but will help you with building! Below are some methods we have found to ease the assembly of these models. If you have any ideas
A. IMPROVEMENTS ON A PUNCHED CARD SELECTOR FRAME
 XIX. SHOP NOTES A. IMPROVEMENTS ON A PUNCHED CARD SELECTOR FRAME Hand-sorted punched card systems are commonly used for filing and cross-indexing literature reference material. However, the use of such
v Porsche 928
 1985-86 32v Porsche 928 Toll-Free Tech Hot Line: 877-FOR-928M 877-367-9286 Please do not copy this manual and give copies to your friends. Our ability to bring you this supercharger kit at this price relies
2-SPEED TRANSMISSION CON- VERSION FOR THE MAXIMUM BX, MT, ST
 2-SPEED TRANSMISSION CON- VERSION FOR THE MAXIMUM BX, MT, ST 2) Remove the engine by unscrewing the four 4 x 12mm engine mounting screws. Disconnect the throttle rod from the carburetor by rotating the
COLD AIR INTAKE INSTALLATION INSTRUCTIONS PART NUMBER D A. APPLICATION: E36/7 M-Roadster or M-Coupe 3.
 COLD AIR INTAKE INSTALLATION INSTRUCTIONS PART NUMBER D760-0323A APPLICATION: 1998-00 E36/7 M-Roadster or M-Coupe 3.2 Liter PARTS LIST Air Filter Assembly 3 1/2" Tube Intake Shield Silicone Hose Airflow
Installation Manual TWM Performance Short Shifter Nissan 350Z, 370Z Infiniti G35, G37
 Installation Manual TWM Performance Short Shifter Nissan 350Z, 370Z Infiniti G35, G37 It is preferable to park on a flat surface, as you will have to engage and disengage the hand brake and shift from
Installation Instructions Jeep CJ-7
 Retrofit Steering Column Installation Instructions 1976-86 Jeep CJ-7 For Part # s 1520800010, 152800020, 1520800051 www.ididitinc.com 610 S. Maumee St., Tecumseh, MI 49286 (517) 424-0577 (517) 424-7293
Rekluse Motor Sports. The e-axle KTM. Installation Guide Copyright 2006 Rekluse Motor Sports e-axle Revision 1.
 Rekluse Motor Sports The e-axle 2003 2007 KTM Installation Guide Copyright 2006 Rekluse Motor Sports e-axle Revision 1.000 RMS 2733 195-2733C Manual Revision: 032207 Rekluse Motor Sports, Inc. 110 E. 43
YAMAHA WATER PUMP YP10G(7TY1) OTHERS 287TY 400E2
 OTHERS 287TY 400E2") YAMAHA WATER PUMP YP10G() OTHERS 287TY 400E2 A2 A3 FOREWORD This Parts Catalogue is related to the parts for the model(s) in the below frame. When you are ordering replacement parts, please refer to this
YAMAHA WATER PUMP YP10G() OTHERS 287TY 400E2 A2 A3 FOREWORD This Parts Catalogue is related to the parts for the model(s) in the below frame. When you are ordering replacement parts, please refer to this
Tuning A Walbro Carb. Walbro Carb TUNE UP & Illustrated Guide
 Tuning A Walbro Carb Walbro Carb TUNE UP & Illustrated Guide by M. B. Fuess Walbro carbs aren t too difficult to tune up if you know what you re doing. First of all, you need to know how the carb works
The kit includes everything seen here, and there are only a few upgrades or mods available.
 The kit includes everything seen here, and there are only a few upgrades or mods available. Complete Kit $1,445.00 1 pair trailing arms LH/RH, with poly lined Monster balls. Pinion angle corrected 1 pair
Procharger Stage II Intercooled Supercharger System (11-14 GT)
") Procharger Stage II Intercooled Supercharger System (11-14 GT) Installation Time: Approximately one day. Installed on 2012 Mustang GT 5.0/Manual Required Tools 3/8 Socket Set (Standard and Metric) 1/2
Procharger Stage II Intercooled Supercharger System (11-14 GT) Installation Time: Approximately one day. Installed on 2012 Mustang GT 5.0/Manual Required Tools 3/8 Socket Set (Standard and Metric) 1/2
Installation Instructions
 86-95 Low Range Off Road Universal Front Shock Tower Kit for Suzuki Samurai (SKU# SSP-UST) Installation Instructions Revised 10/29/13 Suggested Tools: CAUTION: Safety glasses should be worn at all times
INTELLIGENT BATTERY CHARGER/MAINTAINER
 INTELLIGENT BATTERY CHARGER/MAINTAINER OWNER S MANUAL Read carefully and understand all ASSEMBLY AND OPERATION INSTRUCTIONS before operating. Failure to follow the safety rules and other basic safety precautions
Installation Instructions
 Instructions Created by an: 1986-1995 Toyota Pickup 4Runner Hilux Front Ball Joint Spacer Kit - 2.5" 64mm Lift by Low Range Off-Road (SKU# TSP-BJS-1.5 & TSP-BJS-1.5-W/Shocks) Installation Instructions
Intake Kit Supplement for CRV and Pathfinder
 Intake Kit Supplement for CRV and Pathfinder This guide will briefly outline how to install the intake kits for the Honda CRV and Nissan Pathfinder. This is a pretty basic job, but for the average person
Installation instruction do88 Performance Radiator for Volvo S60 V70 XC70 S
 Installation instruction do88 Performance Radiator for Volvo S60 V70 XC70 S80 00-09 1. This instruction shows how to replace the OEM radiator with do88 performance radiator. At this type of installation
Illustrated Parts List
 01/08/2010 FILE IN SECT. 2 OF SERVICE MANUAL PRO DRIVE 613777-0113 -E1 Illustrated Parts List Model Series AIR COOLED 613777 TYPE NUMBERS 0113. TABLE OF CONTENTS Air Cleaner... Alternator... Blower Housing/Shrouds...
K&T Saw Shop or
 11-600036D PRO MAC 60 07/72 to 12/76 IPL 89321 Page 1 of 19 Accessories www.ktoutdoor.com 11-600036D PRO MAC 60 07/72 to 12/76 IPL 89321 Page 2 of 19 Accessories 84453 Kit - Piston tool 69191 Kit - Pressure
DLA56 USER MANUAL TOPLEVEL GASOLINE ENGINE. Manufactured by FeiaoModel
 DLA56 TOPLEVEL GASOLINE ENGINE USER MANUAL Manufactured by FeiaoModel User Manual Thanks for purchasing DLA series engines,pls read all of the instructions below before starting your engine, especially
The M7 Direct Flow Intercooler (DFIC) Installation Guide
 Installation Guide") The M7 Direct Flow Intercooler (DFIC) Installation Guide This information is meant only as a guide. The author of this information,, or any M7 Tuning employees assumes no liabilities for any outcomes resulting
The M7 Direct Flow Intercooler (DFIC) Installation Guide This information is meant only as a guide. The author of this information,, or any M7 Tuning employees assumes no liabilities for any outcomes resulting
Hydraulic Slide Starts and Stops
 Hydraulic Slide Starts and Stops This guide is intended to assist Heartland Owners in understanding why the Hydraulic Pump may start and stop while operating the slideouts. Who created this document? Important
2005 Manufactured exclusively for Horizon Hobby, Inc
 2005 Manufactured exclusively for Horizon Hobby, Inc. www.horizonhobby.com 800-535-5551 7795 Evolution Engines 26GT/35GT USER GUIDE Before using this engine, please read these instructions carefully. Introduction
Though Indian s 111-cubic-inch engine delivers a
 TECH by Chris Maida Andrews Indian 111 Camshafts Part I: Removing the cams from the camshaft compartment Tools Needed Red Loctite Clean rags 6mm Allen 5/64" Allen 3/32" punch External circlip pliers Needlenose
Introduction Warning Suggested Field Equipment and Supplies Contents of Kit Section 1: Building the Boat Stand...
 TM INSTRUCTION MANUAL Overall Length...................... 61 1 /2" Hull Length......................... 55" Beam............................ 14 3 /4" Weight.......................... 14.5 lb Speed..........................
COMER SW80 TECHNICAL SPECIFICATIONS
 COMER SW80 TECHNICAL SPECIFICATIONS Comer SW80 Toowoomba % LV Tech Spec 2017 Preamble: The following are the Technical Specifications for the COMER SW80 engine, as approved by the Australian Karting Association.
SilverPro Series. Lawnmower. Parts Catalog. Form Number Model No and up.
 Form Number 3350-622 SilverPro Series Lawnmower Model No. 10323-240000001 and up. Parts Catalog Ordering Replacement Parts To order replacement parts, please supply the part number, the quantity, and the
World Formula TECH MANUAL
 World Formula TECH MANUAL Section 1 General Rules 1. Only stock Briggs & Stratton World Formula Model # 124435-8101 will be used in this class except as provided in this Tech manual. All parts will be
PH3100Ri Powerhouse Inverter Generator
 PH3100Ri Powerhouse Inverter Generator Powerhouse Inverter Generator PH3100Ri 1. 7504 69449 Engine Assembly 1 2. 09080104 69500 Cable holder 1 3. 03050221 69350 M6 x 12 flange bolt 1 4. 03050241 69349
Combine Cover Manual
 Combine Cover Manual Installation Instructions Page 26 Operating Instructions Page 7 Warranty Page 7 Trouble Shooting Page 8 10 For Big Top Extension Model s: Case I.H. 8010, 8120 Please forward onto Customer
BBK Long Tube Header and Shorty Mid-pipe (05-10 GT):
:") Time Required: Approximately 6-8 Hours BBK Long Tube Header and Shorty Mid-pipe (05-10 GT): Tools Required: Floor Jack or Ramps Jack Stands (unless you used a ramp) 5mm, 8mm, 10mm, 12mm, 22mm sockets/open
Time Required: Approximately 6-8 Hours BBK Long Tube Header and Shorty Mid-pipe (05-10 GT): Tools Required: Floor Jack or Ramps Jack Stands (unless you used a ramp) 5mm, 8mm, 10mm, 12mm, 22mm sockets/open
COLD AIR INTAKE INSTALLATION INSTRUCTIONS
 COLD AIR INTAKE INSTALLATION INSTRUCTIONS # D760-0029 Fits: 2009-10 335i/xi (E90; with N54 engine) Congratulations for being selective enough to use a Dinan Engineering Cold Air Intake. We have spent many
OGO-MAP/MAF User Manual
 OGO-MAP/MAF User Manual 1 OGO Dual Mode MAP/MAF Sensor Enhancer Ready to Install This Map Sensor Enhancer was built directly from the OGO specifications manual. It has separate Hwy & City adjustments along
z3300 Chain Saw UT Page 1 of 14 Accessories
 z3300 Chain Saw UT-10782 Page 1 of 14 Accessories z3300 Chain Saw UT-10782 Page 2 of 14 Accessories Ref # Part Number Qty S/P/F Description PT12371MD 1 Guide Bar 12" (Power Tip) (3/8") H1N7245AH 1 Chain
WARNING: the engine does not come with oil in it. Please fill the oil before starting. The 200cc hardknock requires 9/10 of a quart of oil.
 WARNING: the engine does not come with oil in it. Please fill the oil before starting. The 200cc hardknock requires 9/10 of a quart of oil. Things needed for assembly. -2 tubes of blue loc-tite. I don
Installation instructions for the FC6 Forward Controls for Suzuki Marauder 800
 Installation instructions for the FC6 Forward Controls for Suzuki Marauder 800 It is highly recommended that you use a thread lock compound such as Loctite on all threads to keep them from vibrating loose.
GM A-Body Instructions 3 & 2½ Header Applications w/ Balance Tube Crossover
 GM A-Body Instructions 3 & 2½ Header Applications w/ Balance Tube Crossover Included with this kit are the following: 2 Collector Reducers 1 Balance Tube Kit A 2 Headpipes 2 Tailpipes 2 Tailpipe Extensions
SECTION 4 - FUEL SYSTEMS AND CARBURETION
 SECTION - FUEL SYSTEMS AND CARBURETION FUEL SYSTEMS - - - - - - - - - - - - - - - - - - - - - - - - - - - - - - - - - - - - - - - - - - - - - - - - - - - - - - - - - - - - - -62 FUEL PUMP - - - - - - -
ILLUSTRATED PARTS BOOK 43cc Cultivator P-CV-43 PCV43 PCV43.1
 ILLUSTRATED PARTS BOOK 43cc Cultivator P-CV-43 PCV43 PCV43.1 Table of Contents Unit Assembly... 2 Engine Sub Assemblies: Air Filter & Carburetor Assembly... 6 Muffler Assembly...8 Fuel Tank Assembly...
Performer Series Carburetor Rebuild Kit Catalog #1477 Models
 Please read these instructions carefully before attempting to rebuild your carburetor. Make sure to refer to your carburetor Owner s Manual for further information if need be. If you have any questions
Technical Support (707)
") Installation Instructions UNIMATIC SHIFTER Fits: GM, Powerglide, Ford and Chrysler Transmissions See Application Guide for Specific Vehicles Catalog # 80775 WORK SAFELY! For maximum safety, perform this
Installation Instructions UNIMATIC SHIFTER Fits: GM, Powerglide, Ford and Chrysler Transmissions See Application Guide for Specific Vehicles Catalog # 80775 WORK SAFELY! For maximum safety, perform this
9/3/2008. Item No. Qty. MSRP Dealer Cost. Part No. UPC Number Description Baja Description
 HG6000 Toll Free: 888-863-2252 (BAJA) PARTS AND PRICES ARE SUBJECT TO CHANGE 1 of 34 CRANKCASE ASSY 9 H60-108 883099072581 IGNITION COIL 1 1 10 H60-109 883099072598 M6 x 25 bolt 2 2 12 H60-111 883099072604
Volvo 850 Radiator Replacement Jason Reed 29 March 2013
 This write up covers removing and replacing the radiator on a 97 855 GLT wagon with light pressure turbo and automatic transmission. This car has 162K miles. The radiator, which was original, developed
Local Option 206 Rules Manual Section 1 General Rules 1. Only stock Briggs & Stratton LO206 # engine will be allowed in this class.
 Local Option 206 Rules Manual Section 1 General Rules 1. Only stock Briggs & Stratton LO206 # 124332-8201engine will be allowed in this class. o All parts will be stock unaltered Briggs & Stratton Animal
GTR 485 FUEL PUMP BASKET UPGRADE INSTALL GUIDE
 INTRODUCTION GTR 485 FUEL PUMP BASKET UPGRADE INSTALL GUIDE UPDATED 05-14-17 Welcome to the Install Guide for the Visconti Tuning s GTR 485 FUEL PUMP BASKET UPGRADE. 485 pumps in our preassembled baskets