Smooth Roll Advantage Side Dump
|
|
|
- Mervyn Marshall
- 6 years ago
- Views:
Transcription
1 Smooth Roll Advantage Side Dump Installation, Maintenance and Safety Instructions Sioux City Tarp 5201 Harbor Drive Sioux City, IA Ph:

2 Getting Started Important: Please read manual thoroughly and completely. This manual explains how to install, operate & maintain the Smooth Roll Advantage Systems safely. Warnings, cautions, notes, & hints: This manual is available for your safety & assistance while installing your new Smooth Roll Advantage system. There are two levels of steps found in this installation manual. The primary steps are found in BOLD AND ALL CAPITAL LETTERS. Followed by secondary steps in regular font. Type of systems ordered: There are two types of tarping styles. One is having the tarp inside the tub; you can have either mesh, vinyl, or ballistic tarp material with this style of tarping. The second is having the tarp stay on the bulkhead of the trailer. Some have a large bulkhead so that you will not need to have an extension for it. Others will need an extension from the factory to allow the tarp ride on the bulkhead properly. The tarp can be mesh, vinyl, or ballistic as well. Step 1 INSTALLATION OF FIXED SIDE TARP MOUNTING BRACKETS Parts Needed: Fixed Side Tarp Mounting Bracket 2071 (7) Hinge Weldment 2088 (2) Part #2088 Part #2071 *Note: Some trailers may already have these on the trailer. If so, check that all stops are in good condition. If any studs are broken off on fixed side tarp mounting bracket, please replace. This is what maintains your tarp security and in place when moving the tarp from open to close positions. (per the hinge weldment). If all are ok, please proceed to STEP To achieve proper spacing of the fixed side tarp mounting brackets, place all the brackets on passenger side of the trailer. To mark for the front and rear brackets, mark them 4 in from the tub and 4 down from the bottom of the side rail using part number Then, looking at tub left to right place a second weldment 3 in and 4 down for extra support for tension on front and rear of the tub. SEE FIGURE 1.1 Figure 1.1
3 Step 1, cont. 2 - Measure and spread out the remainder of the mounting brackets evenly. Part numbers 2071 and *Note: Refer to FIGURE 1.1 for proper order of all brackets. Part number 2088 is to be measured 5 down from the bottom of the side rail to keep all clamps even. 3 - Remove all paint and dirt that will cause bad welds to be made on the tub of the trailer and have a good ground for all (9) of the tarp mounting plates. 4 - Weld all plates in place. 5 - Prime and paint all brackets when cooled with tub color. Step 2 INSTALLING THE TARP MOUNTING BRACKETS (UNIVERSAL): Parts needed: Tarp Mounting Bracket (Universal) 2094 (2) Tarp Mounting Bracket Weldment (4) ½ x 1-1/8 cap screws (8) ½ Nylon lock nuts (8) ½ Flat washer (8) *Note: The placement of the Tarp Mounting Bracket (Universal) are very important for safety and optimal performance of the Smooth Roll Advantage System. 1 - Assemble the swing arm clamp and the tarp mounting bracket with a vice or a pair of vice grips. Then drill the four ½ holes in the tarp mounting brackets. Use the bolts, washers and nuts provided. 2 - Put the assembly on the end of the tub and place it 5 ½ below the tube side rail. Center with the cylinder and side-to-side. Make sure that the bracket is level with the trailer. Once it is level, mark, grind and remove all dirt for welding of the mounts on good ground. SEE FIGURE Weld assembly on to the trailer Weldment 4 - Prime and paint the brackets to match tub. 5 - Repeat on opposite end of the tub Weldment Figure 2.1
 ½ Flat Washer (4) 1- The back of the mounting plates are labeled front and rear.")
4 Step 3 INSTALLATION OF SPRING MOUNTING BRACKET PARTS NEEDED: Front Mounting Plate 2054 Rear Mounting Plate 2055 Front Pivot Plate 2069 Rear Pivot Plate /16 Nylon Lock Nut (8) 1/2 Nylon Lock Nut (4) ½ Flat Washer (4) 1- The back of the mounting plates are labeled front and rear. When installing onto the tarp mounting bracket, favor the studs on the back of the mounting plates towards the bottom of the tarp mounting bracket when looking at the face of the plate. The bar should be to the passenger side of the trailer. See figure Place the studs in the perforated holes and lock down with ½ flat washers and lock nuts. Figure Repeat on other side of trailer. *Note: Front mounting, rear mounting and pivot plates are already put together with 5/16 nylon lock nuts when full kit is ordered. Step 4 INSTALLATION OF FRONT AND REAR ARM ASSEMBLIES PARTS NEEDED: Front Spring 2052 Rear Spring 2053 Front arm assembly, Straight or Offset 2048/2050 Rear arm assembly, Straight or Offset 2049/ flat washer (2) 5/16 cotter pin 1 - Place front spring on the front pivot plate and place the 90 degree bent tab on the bar toward the passenger side of the tub. 2 - Pick up the front arm assembly, then slide the base of the arm assembly onto the shaft. *WARNING: Make sure you have firm and sturdy ground when placing assembly into place. Failure to do so may cause injury to yourself or to the Smooth Roll Advantage System.
5 Step 4, cont. 3 - Once arm assembly is slid into place, place the flat washer on and follow it with the cotter pin. Spread the pin at the front this time. Then place it in the relax position on the trailer. 4 - Repeat on the other side, however; do not spread the cotter pin on the rear. Step 5 MEASURE FOR THE ROLL TUBE AND STATIONARY TUBE 1 - Once you have the front and rear arm assemblies installed, place the front and rear gear boxes on a sturdy surface and measure from front to rear of the roll tube. SEE FIGURE Place the roll tube on the ground and slide the pre-welded insert on one end of the roll into the other roll tube and weld the tube together. *Note: Before welding, make sure the tube is lying straight. Avoiding this will cause strain on the Smooth Roll Advantage System. 3 - Once welded on each side of the weld that connects the two pieces together, make three marks 3 apart on each side of the weld (for a total of 6). Then drill 1/4 holes in the tubes and install 3/4 long rivets. Then rotate the welded tubes 180 degrees and mark and drill 6 more 1/4 holes, (3 apart) and install 6 more 3/4 long rivets in the holes. SEE FIGURE Next, cut the roll tube to length and slide, then set aside until stationary tube is cut. 5 - To measure for the stationary tube, determine if your tarp is on the body or on the header of the trailer. If on header, measure full length of tub. In the tub, measure full tub to determine length. 6 - Make the stationary tube assembly by placing the two 1 ¼ galvanized tubes together and weld. 7 - Cut tube to length and set aside. 8 - Spread out the tarp on a flat service. 9 - Insert the stationary tube and keep it flush on the front and put in a ¾ self-tapping screw with a flat washer in the hem of the tarp. Walk to the back of the tarp and put a stretch on the tarp so all of the wrinkles are out and place the other ¾ screw and washer in the hem. 10. Insert roll tube into the tarp and balance the tube so that it is sticking out equally on each side of the tarp. Do not place U-Clamps on the tarp at this time. 3 1/4 Holes /4 Holes 3 Figure 5.1 Figure 5.2
6 Step 6 INSTALLING TARP ASSEMBLY PARTS NEEDED: Tarp assembly (1) Tarp cradle 2068 (2) Tarp Clatch 2072 (7) 5/16 flange nut (14) 3 3/8 (2) 3/8 nylon lock nut (2) Lift the tarp assembly onto the headers of the trailer then place the roll tube in the center of the header. Secure with clamps or people holding. *WARNING: Failure to secure the roll TUBE on each end of the trailer may cause serious injury or death. 2 - Center the tarp on the header where you want the tarp to ride in the tub or on header. 3 - Unroll the tarp so that the stationary tube comes into position for securing the tarp on the stationary side of the trailer. 4 - Secure the stationary tube to the tarp clatches with 5/16 flange nuts and tarp cradles with 3 x3/8 bolts and nyloc nuts. see figures 6.1 Figure Once all the tarp clatches and tarp cradles are secure, roll the roll tube over to the other side of the trailer. Step 7 MOUNTING THE TARP SYSTEM *WARNING: Make sure to have good footing. some of the steps may require two people. there are awkward and sensitive steps and some help may be required. Failure to do so can cause injury to yourself and/or the Smooth Roll Advantage System. PARTS NEEDED: U-Clamps 2085 (18) ½ x 2 Bolts (4) ¾ Self Tapping Screws (18) ½ Flat Washer 2098 (8) Rubber Wheels 2074 (2) ½ Locknuts (4) Traction Sleeve 2073 (2) Tub Top Cradle 2082 (2) ¾ x ¼ Steel rivets (12) Hinge Weldment 2088 (2) - on roll side 1¼ 8mm Self Tapping Screws (6) Tork Screws (4) Tarp Cradle 2068 (2) - on roll side Large Washers (4) Hockey Stick 2096 (2) Hockey Stick Back Plate 2097 (2) - on roll side


7 Step 7, cont. 1. Slide the rubber wheels on front end of the tube so that it touches the tarp. *Note: Do not put screws in yet. You may have to make adjustments. 2 - Lift the front arm assembly and insert roll tube onto the shaft of the arm assembly. Bring it flush with inside of the shaft and keep arm parallel with the trailer. 3 - Go to the rear of the trailer and slide on the rubber wheel on end of roll tube as done on the front of the trailer. 4 - After installing the rear arm assembly onto the mounting pivot plates, put on the flat washer and insert cotter pin and spread the pin. 5 - Double check that the front and rear arms are parallel with the tub. Once parallel, measure from the end of the aluminum tube and place three marks at 2 1/2, 5 and 7 1/2. Then drill a 1/4 hole at the 2 1/2 mark into the tube and through the insert. Install a 1/4 rivet in the drilled hole. Then proceed to drill 1/4 holes at the 5 and 7 1/2 marks and install the 1/4 rivets. Then rotate the tube 180 degrees and measure and mark at 2 1/2, 5 and 7 1/2. Then drill all 3 holes with 1/4 bit and install three 1/4 rivets. SEE FIGURE 7.1 Figure Now that the arms are secure on the roll tube, make sure that the tarp is even on the trailer having the same amount of space on the front and back of the trailer. 7 - Starting on the front of the trailer, drill the first U-Clamp and Self-tapping screw on the hem of the tarp. Place two U-Clamps and screw on the hem, one on each piece of strapping. Go to the rear of the trailer and pull all the wrinkles you can out of the tarp. Place two more U-Clamps and screws just like you have done on the front of the trailer. Put the remaining U-Clamps and screws on each seam and where there is twin belting down the rest of the tarp. *Note: Keep all the U-Clamps in a straight line. This will keep equal tension on the tarp. If tension is not right on the tarp, then the tarp may wear out faster. 8 - Setting the rubber wheels: The rubber wheels should be placed next to the tarp so that they don t interfere with the lock down of the Smooth Roll Advantage System. SEE FIGURE 7.2 then drill one hole in the center of the wheel and put in the tork screw. Do the same on the opposite side of the wheel Figure Repeat on the rear of the trailer Installing the roll tube protectors: It can be done by marking where the header of the trailer will rub the tube or once the wiring is done, roll over your Smooth Roll Advantage System and see exactly where the header does rub on the tube to see where it needs to be protected.
8 Step 7, cont Put in the three 1 ¼ self tapping screws into the roll tube protector Repeat on the other side of the trailer Install the tarp cradles on the roll side of the trailer. *Note: There are two separate instruction depending on the style you wish for the tarp to stay when in the closed position If the tarp is to fasten down on the top of the tube, your trailer should have studs already. If not, you will have to weld them onto the trailer. Then fasten the tub top cradles (Part #2082) to the studs on the top of the tub, roll the tarp to where you want the tarp to stop and place your hook against the roll tube. Mark where it will set and roll the tarp out of the way. Grind off all the dirt and paint out of the weld area and proceed to weld the cradle into place. Repeat on opposite end of the trailer For the tarp cradles on tarp lock down under the side rail of the tub: Roll the tarp to the closed position and place the cradles into place on the front of the tub with the bolt washers and hockey stick back plate provided. *NOTE: THE BACK MAY BE HIGHER ON THE BACK OF THE TUB. THIS IS DUE TO THE WEIGHT DIFFERENCE ON THE FRONT AND REAR ARM OF THE MOTOR GEAR BOXES AND ACCESSORIES ON THE FRONT OF THE TRAILER. TO TAKE CARE OF THIS ANGLE, THE CRADLE ON THE BACK TILTED DOWN MORE THAN THE BACK. THIS WILL CORRECT THE PROBLEM FOR FURTHER DETAILS IN THE TROUBLE SHOOTING, SEE THE BACK TO THIS BOOK If your tub is not made with the proper holes, than you will need to weld these onto your trailer. Only tack the cradles on the tub and run it open and closed. Do this to make sure that they are in the proper place and the roll tube clears these when it is moving to the open position and into the closed position. Now you have installed your Smooth Roll Advantage System. We hope you enjoy it and come back for all your tarping needs. Thank you for your purchase of our Smooth Roll Advantage System. If you have any questions, please see the trouble shooting section on the back of this book. Also, feel free to call us any time during business hours and we will be glad to help with your questions. Sioux City Tarp 5201 Harbor Drive Sioux City, IA Ph:


9 Parts Listing Complete Rear Offset Arm Assembly Complete Front Straight Arm Assembly Complete Front Offset Arm Assembly Complete Rear Straight Arm Assembly 2052 & Front & Rear Springs Front Mounting Plate Rear Mounting Plate Switch Kit Tarp Cradle 2069 & Front & Rear Pivot Plate Fixed Side Tarp Mounting Bracket Traction Sleeve Hinge Weldment Rubber Wheel Tub Top Cradle


 2086.")
 2091 15.00 Female Socket (horizontal) 2092 15.")

10 Parts Listing Front Motor Gear Box Rear Motor Gear Box Tarp Mounting Bracket (Universal) Female Socket Mounting Bracket Pigtail Vertical/Horizontal Electrical Cord Hockey Stick Hockey Stick Back Plate Solenoid for Switch Smooth Roll Parts Part # $ Complete Front Offset Arm Assembly Complete Rear Offset Arm Assembly Complete Front Straight Arm Assembly Complete Rear Straight Arm Assembly Front Spring Rear Spring Front Mounting Plate Rear Mounting Plate Fixed Tube 1-1/8 x 24 with connector Complete Rolltube Roll Tube 3 1/2 x 20 with connector Roll Tube 3 1/2 x 20 no connector Roll Tube Splice Switch Kit Straight Arm Plate & Alum. Arm Front & Rear Offset Arm Plate & Alum. Arm Front & Rear Tarp Cradle Front Pivot Plate Rear Pivot Plate Fixed Side Tarp Mounting Bracket Tarp Clatch (holds 1 1/8 tube) Traction Sleeve Rubber Wheel Arm Power Cord Tub Top Cradle U-Clamp Screw (U-Clamp) Bolt Hinge Weldment (on side of trailer) Front Motor Gear Box Rear Motor Gear Box Female Socket (vertical) Female Socket (horizontal) Female Mounting Bracket (front only) Tarp Mounting Bracket (Universal) Pigtail vertical/horizontal electrical cord Hockey Stick Hockey Stick back plate Hockey Stick washer Female Socket boot cover Rocker Switch with mounting bracket Solenoid for Switch amp. breaker Power Cord Switch for Kit 2103 $5/ lin. ft.
11 Troubleshooting Q. When I lock down my tarp the back wants to get stuck on the hockey stick. A. This is caused by the front being heavier than the back arm assembly due to the motor being on it. To correct this problem, adjust the hockey stick up, then try to get it in the right stop. You can do this by tapping the hockey stick with a hammer for smaller adjustments, then once in place re-tighten the bolts to keep them from moving anymore. Q. The front of the tarp will go under the side rail and the back will clear the hockey stick. A. This is caused because of the weight of the motor on the front. Gravity will naturally pull the front down more than the back. The first thing is to do is to check to see if your tube is long enough that the roll tube will hit the hockey stick. If it wants to hit the shaft the tube is too short. If the tube is long enough then over on the front face of the rear tension box there is a 3/8 nut lower the tarp down so that all the tension is off the boxes. Then take out that 3/8 bolt and nut with a cresent wrench, turn that black arm so it will go down to the bottom setting. This will take of tension on the tarp and allow it to go under the side rail. Q. When I open the tarp to the open position, the front won t go over as far as the back. A. The first thing to do is make sure that the tarp is rolling up as even as it can. If it is, then roll it back over to the closed position and adjust the U - clamps. Take out only the two front U - clamps and turn the tarp so that the old holes where the screw went through are going to be at the top of the U - clamp. You will be turning the tarp up. This will ease the tension and will give more tarp to roll up and will bring the front over the rest of the way. Sioux City Tarp 5201 Harbor Drive Sioux City, IA Ph:

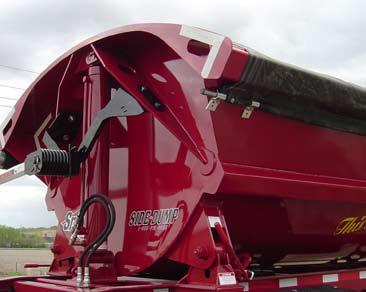
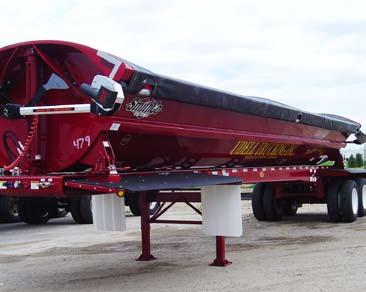
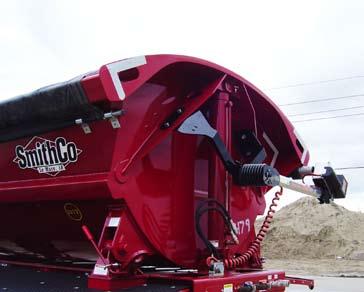
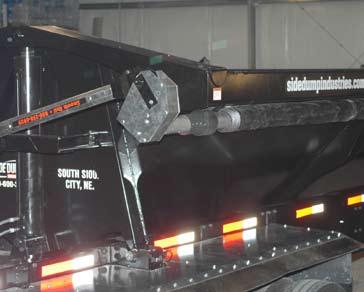

12 Reference Photographs
Combine Cover Manual
 Combine Cover Manual Installation Instructions Page 27 Operating Instructions Page 8 Warranty Page 8 Trouble Shooting Page 9 11 For Model s: Case I.H. 2388, 2188, 1688 and 1680 With a MAURER Hopper Extension
Side Kick 2 06/01/2013 Jan/06/14 Rev: Dec 8/2015 Rev: May 27/2016 Side Dump Trailer Tarp Cover
 Side Dump Trailer Tarp Cover Installation, Maintenance, Safety Instructions Attention Dealers: Please give this manual to the customer when the product is delivered. 1 Important: This manual explains how
Combine Cover Manual
 Combine Cover Manual Installation Instructions Page 26 Operating Instructions Page 7 Warranty Page 7 Trouble Shooting Page 8 10 For Big Top Extension Model s: Case I.H. 8010, 8120 Please forward onto Customer
Side Kick 2. Installation Instructions & Parts Lists. Attention Dealers: Please give this owners manual to the customer when the product is delivered.
 Serving the Truck & Trailer Industry Since 1944 Side Kick 2 Installation Instructions & Parts Lists Attention Dealers: Please give this owners manual to the customer when the product is delivered. Call
DC Series Installation Manual (# )
") DC Series Installation Manual (# 101630) Page 1 of 33 In this booklet you will find: TOWER INSTALLATION... 3 U-Bolt Style mount... 4 Side Frame Style mount... 4 PIVOT INSTALLATION... 5 External Pivot Installation:
DC Series Installation Manual (# 101630) Page 1 of 33 In this booklet you will find: TOWER INSTALLATION... 3 U-Bolt Style mount... 4 Side Frame Style mount... 4 PIVOT INSTALLATION... 5 External Pivot Installation:
SIOUX CITY TARP, INC. ONE OF NATION S LARGEST SUPPLIERS OF NEW AND REPLACEMENT TARPS AND PARTS! LOCK DOWN ELECTRIC USER MANUAL
 SIOUX CITY TARP, INC. ONE OF NATION S LARGEST SUPPLIERS OF NEW AND REPLACEMENT TARPS AND PARTS! LOCK DOWN ELECTRIC USER MANUAL GETTING STARTED IMPORTANT: PLEASE READ MANUAL THOROUGHLY AND COMPLETELY. This
N. 15th Street, Middlesboro, KY TARP-N-GO SYSTEMS INSTALLATION INSTRUCTIONS
 1-800-248-7717 1002 N. 15th Street, Middlesboro, KY 40965 TARP-N-GO SYSTEMS INSTALLATION INSTRUCTIONS Congratulations on your purchase of a Mountain Tarp Tarp-N-Go tarping system. With tarping systems
FARM MODEL INSTALLATION INSTRUCTIONS
 REAR ATTACHMENT ELECTRIC CONVERSION FARM MODEL INSTALLATION INSTRUCTIONS This page intentionally left blank MICHEL S INDUSTRIES, LTD. p.o. Box 119 St. GREGOR,SK PH: 306.366.2184 em: SALES@MICHELS.CA 1
Patriot. Aluminum and Steel 5spring. Step #1 Tarp Spool with Gear Motor (Includes Instructions for Optional Wind Deflector)
") Aluminum and Steel 5spring Qty. Component Parts Description: LONG BOX: (1) 103 Aluminum Tarp Axle (2) 98 Upper Arms with 90 Degree Elbow (2) Lower Aluminum ( 84 ) (1) Aluminum Cross Tube SMALL HARDWARE
Aluminum and Steel 5spring Qty. Component Parts Description: LONG BOX: (1) 103 Aluminum Tarp Axle (2) 98 Upper Arms with 90 Degree Elbow (2) Lower Aluminum ( 84 ) (1) Aluminum Cross Tube SMALL HARDWARE
Additional Instructions for 6" Drop
 Serving the Truck & Trailer Industry Since 1944 Additional Instructions for 6" Drop Attention Dealers: Please give this manual to the customer when product is delivered. Call 800-535-9545 www.aeroindustries.com
table of Contents Warranty:
 table of Contents placement of the Mounting Bolts spudnik swingout... 2 spudnik solid... 2 logan swingout... 3 logan solid... 3 double l swingout... 4 double l solid... 4 Mounting Framework... 5-6 Mounting
Side Dump Tarp System Driver or Passenger Stowing Non-Sealed applications
 Roll Rite, LLC and its entire staff would like to not only Thank You but congratulate you on your purchase of one of what we feel to be the finest line of tarping systems in the industry. Side Dump Tarp
INSTALLATION, MAINTENANCE, & SAFETY INSTRUCTIONS
 Tarpaulin Systems Flip -N- Go / Quick Mount Flip -N- Go System INSTALLATION, MAINTENANCE, & SAFETY INSTRUCTIONS (800) CRAMARO (800) 272-6276 Plants In: Delaware, Florida, Massachusetts, Nevada, Ohio Install
ATTENTION: PLEASE READ AND UNDERSTAND ALL INSTRUCTIONS AND WARNINGS BEFORE ASSEMBLING, INSTALLING OR USING THIS PRODUCT. PRODUCT REGISTRATION WARNING
 VAN STORAGE SOLUTIONS FOR THE WAY YOU WORK TM INSTALLATION MANUAL SLIDING LADDER RACK Model 250 ATTENTION: PLEASE READ AND UNDERSTAND ALL INSTRUCTIONS AND S BEFORE ASSEMBLING, INSTALLING OR USING THIS
Installation Instructions
 by Installation Instructions For: CJ5 (1955-1975) and M38, A1 (1951-1971) Part Number 51405 WARNING This product is designed primarily to enhance the appearance of the vehicle and to shield the occupants
Easy Cover. Installation Instructions. Attention Dealers: Please give this owners manual to the customer when the product is delivered.
 Serving the Truck & Trailer Industry Since 1944 Model 9 10 Spring Flange Mount Easy Cover Attention Dealers: Please give this owners manual to the customer when the product is delivered. Call 800-3-94
Installation Instructions. Attention Dealers: Please give this owners manual to the customer when the product is delivered.
 Serving the Truck & Trailer Industry Since 1944 Attention Dealers: Please give this owners manual to the customer when the product is delivered. Call 800-535-9545 www.aeroindustries.com Indianapolis, IN
Installation Instructions Models 2858, 2858A-1, 2858GL February 2009
 Installation Instructions Models 2858, 2858A-1, 2858GL February 2009 www.donovan-ent.com Donovan Enterprises 3353 SE Gran Park Way Stuart, FL 34997 800-327-8287 Step 1 Head Assembly Installation Instructions
Easy Cover. Installation Instructions. Attention Dealers: Please give this owners manual to the customer when the product is delivered.
 Serving the Truck & Trailer Industry Since 944 Easy Cover Attention Dealers: Please give this owners manual to the customer when the product is delivered. Call 00-3-94 www.aeroindustries.com Indianapolis,
INSTALLATION & OWNER S MANUAL
 Rev. B, p. 1 of 25 INSTALLATION & OWNER S MANUAL POLARIS RANGER RCS (for models XP or HD) (for model years 2009-) cab without doors kit (p/n 1POLRCWD) cab with doors kit (p/n 1POLRC) doors only kit (p/n
Steel Protector, 7 Aluminum Windguard, 9 Open & Steel Protector Plus w/electric Drive Conversion Kit Installation Instructions
 WLH 0/0/ 0-0, 0-09, 0-0, 0-0 (0-0 Configuration) 0-0 TABLE OF CONTENTS ***Assembly*** ***Wiring, Parts & Tools Required*** Securing Roller and Removing Tarp... Electric Motor Wiring and Plug Assembly...
Midwest Industries, Inc. Ida Grove, IA Page 1
 SSV40108HAC - Hydraulic Hoist with 120 Volt Pump SSV40108HDAC - Hydraulic Hoist, Deep Water, with 120 Volt Pump SSV40108HDC - Hydraulic Hoist with 12 Volt Pump SSV40108HDDC - Hydraulic Hoist, Deep Water,
INSTALLATION INSTRUCTIONS
 INSTALLATION INSTRUCTIONS Thank you for purchasing an AUTOLOCK Electric Tarp. ACI proudly manufactured this product using superior quality materials and workmanship. With proper care, your tarp will provide
Side Dump System. P/N Rev. B
 Side Dump System P/N 6984 Rev. B Shur-Co, LLC Terms & Conditions P/N 6984 Rev. B SHIPPING. Orders are shipped F.O.B. from the Shur-Co, LLC sites listed below. No full freight isallowed or prepaid shipment
Convertible Top Installation Instructions
 Convertible Top Installation Instructions For: Dodge Ramcharger, Part Number: 51318 Plymouth Trailduster 74-80 Congratulations on your purchasing decision. Bestop designed the Convertible Top to give you
MIC210 Electric Farm Conversion Instructions
 MIC210 Electric Farm Conversion Instructions Note: Apply the supplied Dielectric Lubricant to all wire connections when each wire is hooked up. The Dielectric Lubricant will help to prevent corrosion.
Installation Instructions
 Installation Instructions ELECTRIC CONVERSION KIT 3 ALUMINUM ROLL TUBE IMPORTANT: This Electric Conversion Kit has been designed for systems with a 3 aluminum roll tube. It is assumed that the tarping
Installation Instructions and Suggestions For Jeep YJ Fiberglass Replacement Bodies
 Installation Instructions and Suggestions For Jeep YJ Fiberglass Replacement Bodies Getting started with the removal of your existing Jeep body. Trust nothing to memory; take photos of everything at different
Siderolling Tarp Systems Under 9 6 Wide
 Load Loc Select Maximizer Grain Carts Grain Bagger Siderolling Tarp Systems Under 9 6 Wide CRANK STYLE INSTALLATION INSTRUCTIONS MICHEL S INDUSTRIES, LTD. P.O. BOX 119 ST. GREGOR, SK. S0K 3X0 PH:306.366.2184
Universal Super Shield & Ultimate Aluminum w/electric Drive Conversion Kits , , Installation Instructions
 WLH 09/19/16 111-0215 & 112-0215 607-0026 For technical support call us at (800) 368-3075 or visit our website at PullTarps.com. TABLE OF CONTENTS ***Assembly*** Conversion Kit-Universal Super Shield ***Wiring,
ATLAS TRANSFER CASES CABLE SHIFTER units built before 4/30/12
 Paso Robles, CA 93447 PAGE 1 OF 5 Telephone: (800) 350-2223 Fax: (805) 238-4201 Page Rev. Date: 05-12-15 KIT CONSISTS OF: No. Qty Part No. Description 1. 1 302051 TWIN STICK BASE MOUNT 2. 1 302060 TWIN
EZ-LOC HAND AND ELECTRIC INSTALLATION INSTRUCTIONS AND OWNER S MANUAL
 EZ-LOC HAND AND ELECTRIC INSTALLATION INSTRUCTIONS AND OWNER S MANUAL TYPICAL OF FARM TRUCK, GRAIN CART, AND SEMI-TRAILER BOXES INSTALLER: These instructions must be given to the consumer. CONSUMER: Retain
BELLY DUMP MANUAL AND ELECTRIC INSTALLATION INSTRUCTIONS AND OWNER S MANUAL
 BELLY DUMP MANUAL AND ELECTRIC INSTALLATION INSTRUCTIONS AND OWNER S MANUAL BY: INSTALLER: These instructions must be given to the consumer. CONSUMER: Retain these instructions for further use. Save this
ATLAS TRANSFER CASES CABLE SHIFTER units built after 5/1/12
 KIT CONSISTS OF: No. Qty Part No. Description P.O. Box 247, 4320 Aerotech Center Way PAGE 1 OF 6 Page Rev. Date: 08-01-17 1 1 302051 BASE- TWIN STICK MOUNT 2 1 302060 BOOT- TWIN STICK 3 1 302063 BOOT RING-
Section 13. Tail Rotor Drive. RotorWay International A600 TALON Construction Manual. Section 13. Page A
 RotorWay International Page A Tail Rotor Drive Procedures covered in this section: Install driveshafts and gearboxes; install drive belt and tensioner; fabricate and install tail rotor pitch actuator arms;
MENTOR INSTALLATION, MAINTENANCE, & SAFETY INSTRUCTIONS (800)
") MENTOR INSTALLATION, MAINTENANCE, & SAFETY INSTRUCTIONS (800) 272-6276 001-321-757-7611 www.cramarotarps.com Plants In: Delaware, Florida, Massachusetts, Nevada, Ohio, and Canada Important: Read before
MENTOR INSTALLATION, MAINTENANCE, & SAFETY INSTRUCTIONS (800) 272-6276 001-321-757-7611 www.cramarotarps.com Plants In: Delaware, Florida, Massachusetts, Nevada, Ohio, and Canada Important: Read before
R4TECH PRODUCT SAFETY NOTICE
 R4TECH PRODUCT SAFETY NOTICE Congratulations. This vehicle has been equipped with an R4Tech suspension system that provides the ride quality of a full-air suspension with the ease of installation of a
Fabric Replacement Top Installation Instructions
 Fabric Replacement Top Installation Instructions For: GEO Tracker, Suzuki Sidekick & Vitara 1986-1994 Parts List Top, Soft (1) Rear Window (1) WARNING This product is designed to enhance the appearance
LIFT N LOAD INSTALLATION, MAINTENANCE, & SAFETY INSTRUCTIONS (800)
") LIFT N LOAD INSTALLATION, MAINTENANCE, & SAFETY INSTRUCTIONS (800) 272-6276 001-321-757-7611 www.cramarotarps.com Plants In: Delaware, Florida, Massachusetts, Nevada, Ohio, and Canada General Information
LIFT N LOAD INSTALLATION, MAINTENANCE, & SAFETY INSTRUCTIONS (800) 272-6276 001-321-757-7611 www.cramarotarps.com Plants In: Delaware, Florida, Massachusetts, Nevada, Ohio, and Canada General Information
OWNER'S MANUAL MOBILE LIFT:
 : 18"MODELS-(19675 & 24565) OR 24" MODELS-(20565, 24570, & 24770) INSTALLATION AND OPERATION INSTRUCTIONS -SERVICE AND PARTS INFORMATION IMPORTANT A class III frame receiver hitch must be installed by
Installation Guide. Installation Guide. Exploded Views Installation Instructions Mounting System Parts List. USTarp.
 Installation Guide Installation Guide Exploded Views Installation Instructions Mounting System Parts List USTarp.com 800-249-0297 Fits dump trailers up to 40 long, or up to 45 long with Bulletproof HD
Part # Chevy Level 3 Street Challenge Package One Piece Frame
 350 S. St. Charles St. Jasper, In. 47546 Ph. 812.482.2932 Fax 812.634.6632 www.ridetech.com Part # 11020399 55-57 Chevy Level 3 Street Challenge Package One Piece Frame Front Components: 1 11013011 TQ
2-row and All-row systems included.
 Ag Leader Technology Cotton Picker Installation Installation Instructions for John Deere cotton picker models: 2-row and All-row systems included. IMPORTANT: Ensure the model numbers shown above correspond
Part # Chevy Level 2 Air Suspension Package One Piece Frame
 350 S. St. Charles St. Jasper, In. 47546 Ph. 812.482.2932 Fax 812.634.6632 www.ridetech.com Part # 11020299 55-57 Chevy Level 2 Air Suspension Package One Piece Frame Front Components: 1 11013001 Master
FIFTH WHEELS TROUBLESHOOTING AND REBUILD PROCEDURES. XA-71 Series Fifth Wheel Top Plates. XA-71-DA 2 SAE Kingpin (Rebuild Kit RK-65014)
") GO THE DISTANCE. FIFTH WHEELS TROUBLESHOOTING AND REBUILD PROCEDURES XA-71 Series Fifth Wheel Top Plates XA-71-DA 2 SAE Kingpin (Rebuild Kit RK-65014) XA-71-DA-03705 2 SAE Kingpin for FW2570-7103 SERIES
GO THE DISTANCE. FIFTH WHEELS TROUBLESHOOTING AND REBUILD PROCEDURES XA-71 Series Fifth Wheel Top Plates XA-71-DA 2 SAE Kingpin (Rebuild Kit RK-65014) XA-71-DA-03705 2 SAE Kingpin for FW2570-7103 SERIES
SRT-2 MANUAL AND ELECTRIC
 Installation Manual SRT-2 MANUAL AND ELECTRIC BY: INSTALLER: These instructions must be given to the consumer. CONSUMER: Retain these instructions for further use. Save this manual for future reference.
Premium Dry Freight (Plywood) Door Installation REFERENCE FIGURE 1
 Door Installation REFERENCE FIGURE 1") Premium Dry Freight (Plywood) Door Installation A Premium door can be identified as usually having a two-spring balancer, 2 diameter (nominal) rollers, and end hinges with removable covers. If your Whiting
Premium Dry Freight (Plywood) Door Installation A Premium door can be identified as usually having a two-spring balancer, 2 diameter (nominal) rollers, and end hinges with removable covers. If your Whiting
CALIFORNIA TRIMMER MOWER MAINTENANCE MANUAL
 CALIFORNIA TRIMMER MOWER MAINTENANCE MANUAL 2 Table of Contents Section 1: General Information Page Handle Assembly Instructions 4 Maintenance All Models 6 Oil Change Procedures All Models 9 Height Adjustment
Low Range HD 2 Inch Body Lift Kit (Sidekick, GV, Vitara, Tracker, X90) SKU# KSP-BL2
 SKU# KSP-BL2") Low Range HD 2 Inch Body Lift Kit (Sidekick, GV, Vitara, Tracker, X90) SKU# KSP-BL2 Installation Instructions Background: These instructions are designed for installing the 2 body lift. They can also be
Low Range HD 2 Inch Body Lift Kit (Sidekick, GV, Vitara, Tracker, X90) SKU# KSP-BL2 Installation Instructions Background: These instructions are designed for installing the 2 body lift. They can also be
GRAIN CART TARP SYSTEM INSTALLATION AND OPERATION MANUAL
 GRAIN CART TARP SYSTEM INSTALLATION AND OPERATION MANUAL Grain Carts KITS Thunderstone Manufacturing, LLC. 3400 West O Street Lincoln, NE 68528 402-435-4249 (Fax) 402-438-3918 www.thunderstonemfg.com Aluminum
Automatic Roof Hatch Opener
 Automatic Roof Hatch Opener Installation Guide REQUIRED TOOLS (These tools are required to complete the installation) Cordless Drill 1/8 1/4 Drill Bits 1/8 Pin Punch #2 Philips Bit Rachet Sharpie Hammer
Installation Instructions
 Installation Instructions Jeep JK 2-Door (2011 Present) Mounting Bracket and Air Line System Kit for ARB On-Board Twin Air Compressor (CKMTA12) Made in the USA Kit Contents: 1 Flat Bracket 1 Formed Bracket
Model 3770 WARNING. Failure to comply with the safety information in these instructions could result in serious injury or death.
 B&W Trailer Hitches 1216 Hawaii Road / PO Box 186 Humboldt, KS 66748 P:620.473.3664 See Limited Lifetime Warranty at F:620.869.9031 bwtrailerhitches.com/warranty NOTE: We recommend reading instructions
Handy Lift HD Owners Manual WARNING. BURR 500 lb. Capacity Handy Lift HD PN (40 ) PN (45 ) PN (50 )
 PN (45 ) PN (50 )") Installation and Operating Instructions - Service and Parts Information BURR 500 lb. Capacity Handy Lift HD PN 32689 (40 ) PN 33145 (45 ) PN 33056 (50 ) Avoid serious injury, or death, to yourself and
Installation and Operating Instructions - Service and Parts Information BURR 500 lb. Capacity Handy Lift HD PN 32689 (40 ) PN 33145 (45 ) PN 33056 (50 ) Avoid serious injury, or death, to yourself and
Signature Overhead System INSTALLATION MANUAL
 Signature Overhead System TM INSTALLATION MANUAL PACLINE Installation Manual Read All Instructions Carefully Proper installation is not difficult, and by adhering to the following procedures the conveyor
INSTALLATION MANUAL. Thunderstone Manufacturing LLC 3400 West O Street Lincoln, NE (Fax)
") INSTALLATION MANUAL August 7 th 2018 43 /48 /50 2011 and Older Timpte STD/Split 36 Style Hopper Trailers with Roller Bearing Doors Kit #101533 for 96w & Kit #101534 for 102w Thunderstone Manufacturing
INSTALLATION MANUAL August 7 th 2018 43 /48 /50 2011 and Older Timpte STD/Split 36 Style Hopper Trailers with Roller Bearing Doors Kit #101533 for 96w & Kit #101534 for 102w Thunderstone Manufacturing
<THESE INSTRUCTIONS MUST BE GIVEN TO THE END USER> B&W Trailer Hitches 1216 Hawaii Road / PO Box 186 Humboldt, KS P: F:
 B&W Trailer Hitches 26 Hawaii Road / PO Box 86 Humboldt, KS 66748 P:620.473.3664 F:620.869.903 Ford OEM Mount System Installation Instructions 20,000
Installation Instructions COMPETITION/PLUS SHIFTER Ford Mustang MT82 6-Speed Manual Transmission Catalog#
 Installation Instructions COMPETITION/PLUS SHIFTER 2015-2017 Ford Mustang MT82 6-Speed Manual Transmission Catalog# 3916037 Rev. 00 WORK SAFELY! For maximum safety, perform this installation on a clean,
Half Door Installation Instructions
 Half Door Installation Instructions For: CJ5 (1976-1983) Part Number: 53027 Congratulations on your purchasing decision. Bestop designed these Doors to give you years of dependability and performance with
Installation Instructions Supertop for Truck
 Installation Instructions Supertop for Truck Vehicle Application: Ford F-150 5.5 Ft. Styleside 2004 and newer Part Number: 76309 www.bestop.com - We re here to help! Visit our web site and click on Ask
Assembly Instructions
 Assembly Instructions CONTENTS Product Overview... 2 List of Assembly Components... 4 General Specifications... 5 Product Inspection Report (PIR)... 6 Cutting Instructions... 10 Slats... 10 Motor Tube
Rollstar Shade Installation Instructions
 Rollstar Shade Installation Instructions All Lifting Systems Inside or Outside Mount Thank you for purchasing your new Rollstar shade. It has been custom-made from the highest quality materials to the
Installation Instructions
 Instructions Created by an: 2005+ Toyota Tacoma BTB Front Coilovers by Low Range Off Road SKU# TAC-SP-05CO-BTB-650 Diff Drop Kit (SKU# LR-2GDDK) Instructions included Installation Instructions Revised
INSTALLATION & OWNER S MANUAL
 Rev. A, p. of 0 INSTALLATION & OWNER S MANUAL MASSEY FERGUSON GC2400 cab kit p/n MFGC2400 Installation Instructions The contents of this envelope are the property of the owner. Be sure to leave with the
PRODUCT SAFETY NOTICE
 PRODUCT SAFETY NOTICE Congratulations. This vehicle has been equipped with a Firestone air suspension system. This suspension will enhance the vehicle s handling when loaded, however, the vehicle s performance
Part # Chevy Level 2 CoilOver Suspension Package Two Piece Frame
 350 S. St. Charles St. Jasper, In. 47546 Ph. 812.482.2932 Fax 812.634.6632 www.ridetech.com Part # 11030210 55-57 Chevy Level 2 CoilOver Suspension Package Two Piece Frame Front Components: 1 11013510
Side Kit: Commodities Hauler. OWNER'S MANUAL Installation, Safety, and Maintenance Instructions READ THIS ENTIRE MANUAL PRIOR TO INSTALLATION
 R Side Kit: Commodities Hauler OWNER'S MANUAL Installation, Safety, and Maintenance Instructions READ THIS ENTIRE MANUAL PRIOR TO INSTALLATION I n d u s t r i e s, I n c. Indianapolis, IN -800-535-955
R O A D S M I T H TRIKE CONVERSIONS BY THE TRIKE SHOP
 R O A D S M I T H TRIKE CONVERSIONS BY THE TRIKE SHOP Please thoroughly review the instructions before and during installation. Keep in mind that this product was designed to be installed by trained dealer
R O A D S M I T H TRIKE CONVERSIONS BY THE TRIKE SHOP
 R O A D S M I T H TRIKE CONVERSIONS BY THE TRIKE SHOP Please thoroughly review the instructions before and during installation. Keep in mind that this product was designed to be installed by trained dealer
Guide to Installing Y o u r H a r m a r S t a i r L i f t
 Guide to Installing Y o u r H a r m a r S t a i r L i f t 2 W E L C O M E T O T H E H A R M A R F A M I L Y Congratulations on your purchase of a Harmar Access Stairway Lift. These instructions will assist
ISOBUS Down Force Hydraulics Kinze
 Important Notices Please carefully follow these step-by-step instructions. If you have questions, contact at 515-232-5363 x 1. Direction words (LEFT and RIGHT) are commonly used when describing an installation
Commander SUSPENSION SYSTEM INSTALLATION INSTRUCTIONS
 PARTS INCLUDED: 2 - FRONT UPPER A-ARMS 2 - FRONT LOWER A-ARMS 4 - COTTER PINS 2-12MM JAM NUTS 2 - TIE ROD EXTENDERS 8- FLANGED DELRON BUSHINGS 4- DELRON CASTER SPACERS 6 - GREASE FITTINGS 3 - BEARING REMOVAL
Top Down Rollstar Shade Installation Instructions
 Top Down Rollstar Shade Installation Instructions Thank you for purchasing your new Rollstar shade. It has been custom-made from the highest quality materials to the dimensions you specified. With proper
Installation Instructions February 2009
 Installation Instructions February 2009 www.donovan-ent.com Donovan Enterprises 3353 SE Gran Park Way Stuart, FL 34997 800-327-8287 The Hammer Head Assembly Installation Instructions (Rollerbar & Direct
Installation Instructions
 Instructions Created by an: Inchworm Tacoma Dual Case Adapter Installation Instructions Suggested Tools: CAUTION: Safety glasses should be worn at all times when working with vehicles and related tools
INSTALLATION & OWNER S MANUAL
 INSTALLATION & OWNER S MANUAL CAB INSTALLATION INSTRUCTIONS JOHN DEERE 4000 SERIES (4500/4600/4700) (4510/4610/4710) (4120/4320/4520/4720) HARD SIDED CAB ENCLOSURE (p/n 1JD4120AS) SOFT SIDED CAB ENCLOSURE
This is an aluminum-case PowerGlide Transmission out of a 1966 Chevelle.
 Removal Procedures ***Take a picture of the transmission and note the lever positions (Transmission Arm Lever points up and Kickdown Lever point down)*** This is an aluminum-case PowerGlide Transmission
INSTALLATION INSTRUCTIONS 89551
 INSTALLATION INSTRUCTIONS 89551 For Rancho Suspension System RS66551B: Ford F250, F350 Super Duty 4x4 DIESEL ONLY (Single Rear Wheels Only With or Without Auxiliary Spring). (WILL NOT WORK ON GAS ENGINES
INSTALLATION INSTRUCTIONS
 INSTALLATION INSTRUCTIONS INSTALLATION INSTRUCTIONS THESE INSTRUCTIONS COVER THE INSTALLATION OF THE FOLLOWING REAR DOORS WITH OUTSIDE CABLES AND MAXIMUM SECURITY LOCK: 3/4" and 1" DryFreight TODCOLD Insulated
HiBoy Maverick/Commander Doors Part # HiBoy4 Maverick/Commander Doors Black
 Racing 3191 N Washington St. Suite 2 Chandler, AZ 85225 1 (800) 708-9803 http://www.racing.com HiBoy Maverick/Commander Doors Part # 07-2001 HiBoy4 Maverick/Commander Doors Black Congratulations on your
The world's first Bolt in Only stress bar for VW Mk 4 Chassis. Installation Manual V1.0.
 The world's first Bolt in Only stress bar for VW Mk 4 Chassis Installation Manual V1.0 www.yarrowsport.com Tools Needed: 1. 17mm, 10mm sockets and ratchet with 3inch extension 2. 10mm box end wrench 3.
OTS O BRIAN TARPER. US Patents and Patent Pending. Owner s Manual FOR ASSISTANCE CALL
 $4.00 OTS O BRIAN TARPER US Patents and Patent Pending Owner s Manual FOR ASSISTANCE CALL 252-291-2141 ATTENTION DISTRIBUTOR: DO NOT DISCARD, Please forward to customer Along with warranty registration
Installation Instructions Tigertop
 Installation Instructions Tigertop Vehicle Application Jeep CJ5 1955 1975 Part Number: 51405 Jeep M38, A1 1951 1971 Part Number: 51405 www.bestop.com - We re here to help! Visit our web site and click
Convertible Top Installation Instructions
 Convertible Top Installation Instructions For: 1995-1998 Geo Tracker & Suzuki Sidekick Parts List Top, Soft (1) Rear Window (1) Quater Window, Rt. (1) Quarter Window, Lt. (1) WARNING This product is designed
Installation Instructions
 Instructions Created by an: Samurai Rear Diamond Plate Corners (Pre-bent) (SKU# SEB-RDP) Installation Instructions CAUTION: Safety glasses should be worn at all times when working with vehicles and related
Detroit Speed, Inc. Mini Tubs Camaro/Firebird P/N:
 Detroit Speed, Inc. Mini Tubs 1967-1969 Camaro/Firebird P/N: 040401 The Detroit Speed Mini-Tubs are inner wheel housings designed to accommodate a wider wheel and tire package. They are engineered for
INSTALLATION INSTRUCTIONS For 65800, 65801, 66355, 69250, Rear Bumper And Tire Carrier For Jeep XJ Cherokee
 INSTALLATION INSTRUCTIONS For 65800, 65801, 66355, 69250, 69251 Rear Bumper And Tire Carrier For Jeep XJ Cherokee Your safety, and the safety of others, is very important. To help you make informed decisions
A B C D E F. Tools Required (supplied by others)
") Page 1 of 17 Parts List Below Deck Automatic Retractable Security Cover Kit (1) Tube End Bearing Plate (A) (1) Rope Reel and Cover Drum Motor Assembly (B) (1) Cover Drum (1) Pulley Support Channel (2)
Page 1 of 17 Parts List Below Deck Automatic Retractable Security Cover Kit (1) Tube End Bearing Plate (A) (1) Rope Reel and Cover Drum Motor Assembly (B) (1) Cover Drum (1) Pulley Support Channel (2)
PRODUCT SAFETY NOTICE DEALER/INSTALLER NOTICE
 PRODUCT SAFETY NOTICE Congratulations. This vehicle has been equipped with a Firestone air suspension system. This suspension will enhance the vehicle s handling when loaded, however, the vehicle s performance
The POWER. In PRESENTATION PRODUCTS. Instruction Book for BOARDROOM ELECTROL DA-LITE SCREEN COMPANY, INC.
 The POWER In PRESENTATION PRODUCTS Instruction Book for BOARDROOM ELECTROL DA-LITE SCREEN COMPANY, INC. 3100 North Detroit Street Post Office Box 137 Warsaw, Indiana 46581-0137 Phone: 574-267-8101 800-622-3737
Part Name/Description Part Number Quantity Instruction Kit Metalfor Flow Sensor
 NOTE: Indented items indicate parts included in an assembly listed above Part Name/Description Part Number Quantity Instruction Kit Metalfor 4101091 1 Flow Sensor 4001356 1 Deflector plate 2000612-1 1
Supertop Replacement Top with Tinted Side and Rear Windows Installation Instructions
 Supertop Replacement Top with Tinted Side and Rear Windows Installation Instructions TM Inc. For: Wrangler TJ 1997 2002 Part Number: 55629 Does Not Include Hardware This product is only designed for the
Page: REV 3: Add drill and tap information to Figure 4 DRILL #3, TAP 1/4-28 BOTH ENDS.
 REVISION DESCRIPTION: 1) Page: 32-03 MEMO: Step 4 should not be bold. Fix WD-1213 callout in Figure 3. Page: 32-04 REV 3: Add drill and tap information to Figure 4 DRILL #3, TAP 1/4-28 BOTH ENDS. Add make
RAMPAGE POWER LIFT RAMP
 RAMPAGE POWER LIFT RAMP INSTALLATION AND OPERATING INSTRUCTIONS (3/10/07) The Rampage Power Lift Ramp is the fast, easy, and safe way to load a motorcycle into a truck. One person can load or unload a
Times-2 Speed Files INSTALLATION INSTRUCTIONS
 Times-2 Speed Files INSTALLATION INSTRUCTIONS AURORA from RICHARDS-WILCOX, INC. 600 South Lake Street Aurora, Illinois 60506 Phone: 630-897-6951 Fax: 630-897-6994 Toll Free: 800-277-1699 TIMES-2 SPEED
Suzuki Samurai to Toyota Front Spring Swap Kit, with Missing Link Shackles (SKU#SSP-TSFM) Installation Instructions
 Installation Instructions") Suzuki Samurai to Toyota Front Spring Swap Kit, with Missing Link Shackles (SKU#SSP-TSFM) Installation Instructions CAUTION: Safety glasses should be worn at all times when working with vehicles and related
Suzuki Samurai to Toyota Front Spring Swap Kit, with Missing Link Shackles (SKU#SSP-TSFM) Installation Instructions CAUTION: Safety glasses should be worn at all times when working with vehicles and related
Installation Instructions Supertop NX Twill
 Installation Instructions Supertop NX Twill Vehicle Application: Jeep Wrangler Unlimited 2007-current Part Number 54823 Installation Tips Before you begin installing your new Supertop NX Twill, please
5000 Series Covering Systems Installation Instructions
 ENTERPRISES Donovan R a I s e T h e S t a n d a r d 5000 Series Covering Systems Installation Instructions The following hardware is universal to all kits: Bent arm extension (L) 1 905 Hose clamp 1 ½ 4
FORD FAIRLANE Booster Conversion Kit ( TORINO, RANCHERO )
") 1966-1971 FORD FAIRLANE Booster Conversion Kit ( TORINO, RANCHERO ) F R Unboxing your kit: 1. Remove new booster, bracket assembly and master cylinder from their boxes and inspect the parts. 2. New boosters
1966-1971 FORD FAIRLANE Booster Conversion Kit ( TORINO, RANCHERO ) F R Unboxing your kit: 1. Remove new booster, bracket assembly and master cylinder from their boxes and inspect the parts. 2. New boosters
Ford Super Duty Recoil Traction Bar System. Part#: ,123409
 Part#: 123418,123409 Ford Super Duty Recoil Traction Bar System Rev. 011017 491 W. Garfield Ave., Coldwater, MI 49036. Phone: 517-279-2135 Web/live chat: www.bds-suspension.com. E-mail: tech-bds@sporttruckusainc.com