INSTRUCTIONS FOR USE Ortofon Century
|
|
|
- Susan Welch
- 5 years ago
- Views:
Transcription

1 INSTRUCTIONS FOR USE Ortofon Century
2 2
 SPEED CONTROL (5) MOTOR WITH MOTOR PULLEY (6) DRIVE BELT (7) SUB-PLATTER (8) TRANSPORT SCREWS (9) TONEARM COUNTERWEIGHT (10) TONEARM LIFT (11)")
 ANTI-SKATING WEIGHT SUPPORT (17) LID (18) LID HINGES (19) HINGE FASTENERS (20) PHONO OUTPUT SOCKET (21)")
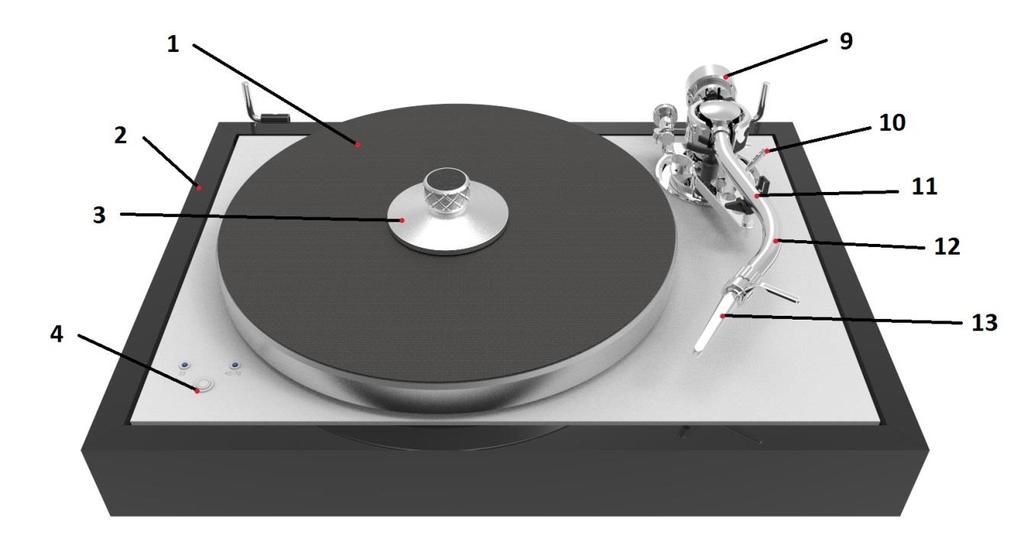
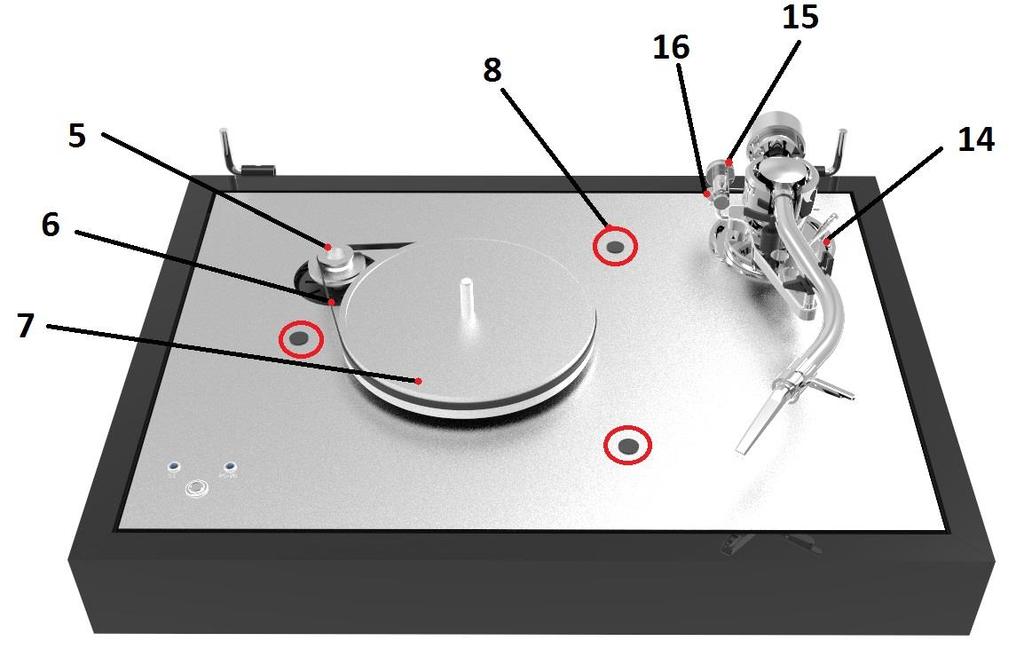
3 Ortofon Century 100 year jubilee edition turntable Controls, features and connections (1) MAIN PLATTER WITH PRO-JECT LEATHER IT (2) CHASSIS (3) RECORD CLAMP (4) SPEED CONTROL (5) MOTOR WITH MOTOR PULLEY (6) DRIVE BELT (7) SUB-PLATTER (8) TRANSPORT SCREWS (9) TONEARM COUNTERWEIGHT (10) TONEARM LIFT (11) TONEARM REST AND REMOVABLE TRANSPORT LOCK (12) CARBON / ALUMINIUM TONEARM TUBE (13) ORTOFON CONCORDE CENTURY CARTRIDGE (14) TONEARM FLANGE (15) ANTI-SKATING SLIDING MECHANISM WITH WIRE (16) ANTI-SKATING WEIGHT SUPPORT (17) LID (18) LID HINGES (19) HINGE FASTENERS (20) PHONO OUTPUT SOCKET (21) POWER SUPPLY SOCKET 3
4 Turntable accessories (1) Instruction for use (2) Cartridge alignment protractor (3) White cotton gloves (4) Anti-skating weight support (5) Anti-skating sliding mechanism (6) Allen key 1.5mm (7) Allen key 2mm (8) Allen key 3mm (9) Counterweight no. 180 for cartridges with weight between 3-9g (without headshell) (10) Single adaptor (11) Hook tool (12) Stylus Pressure Gauge (13) Connect IT RCA CC 1,23m (14) Cloth (15) Power supply (16) 3x Feet (17) Round drive belt for 78 r.p.m. (18) Pro-Ject Leather IT 4
5 CONTENTS TURNTABLE OVERVIEW 2-3 ACCESSORIES OVERVIEW 4 SETUP AND INSTALLATION 1. FEET ASSEMBLY 7 2. TRANSPORT SCREWS 7 3. MOUNTING AND CONNECTING THE CARTRIDGE 8 4. CARTRIDGE DOWNFORCE ADJUSTMENT ANTI-SKATING FORCE ADJUSTMENT 9 6. ANTI-SKATING ADJUSTMENT CONNECTION TO THE AMPLIFIER MAINS POWER CONNECTION FITTING THE LID SWITCHING ON AND OFF CHANGING REPLAY SPEED ADJUSTING THE VERTICAL TRACKING ANGLE (VTA) ADJUSTING THE AZIMUTH USEFUL TIPS MAINTENANCE AND CLEANING 13 TECHNICAL SPECIFICATIONS 14 WARRANTY, SERVICE 15 PACKAGING 16 5
6 Dear music lover, Thank you for purchasing a Pro-Ject Audio Systems record player. In order to achieve maximum performance and reliability, please study these instructions carefully. Warning of a hazard for the user, the unit or possible misuse Important notice The following instructions for adjusting the cartridge are provided in case the cartridge is replaced by a different model at a later date. During assembling and adjustment small parts could be lost if they are not carefully placed in a suitable receptacle. Before starting assembly make yourself acquainted with the parts listed above which are correspondingly numbered in the technical drawings above. Separately packed items are marked with an asterisk *. Safety instructions The power supply is used to connect and disconnect the unit from the mains. Make sure that the plug is easily accessible at all times. Hold the plug when unplugging the power cord. Never handle the power cord while your hands are wet or damp. Avoid letting liquids enter the device. Never place any item containing liquid, like a flower vase, on or near the device. Never spill any liquid on the device. Never place any naked flame sources, like lighted candles, on or near the device. The product shall not be used in damp or wet locations, next to a bathtub, sink, swimming pool or any other similar conditions. Keep plastic bags away from children to prevent any risk of suffocation. The turntable was shipped partially disassembled in order to avoid damage to sensitive parts. Please check immediately to make sure that neither the packaging nor the device was damaged in transit. 6

 from the upper part of the chassis before installing the")
7 SETUP AND INSTALLATION 1. FEET ASSEMBLY Remove the three feet (15 accessories list) from the grey foam insert. Carefully turn the turntable and screw the feet into the thread insert from the bottom of the turntable. Balance the turntable by using a spirit level before next steps. 2. TRANSPORT SCREWS Remove the three transport screws (8) from the upper part of the chassis before installing the sub-platter (7), the drive belt (6), the platter (1) and record clamp (3). 7

8 3. MOUNTING AND CONNECTING THE CARTRIDGE Informations below are valid only with using SME type headshell. Turntable has mounted intergated cartridge and headshell without the need for screws or the plugging in of wires. All cartridges with half inch mounting holes can be mounted. Leave the needle's protection cover on, fit the cartridge to the headshell by using the supplied screws by passing one screw through each slot in the headshell (13). Do not tighten the nuts yet. Connect the tonearm wires with the cartridge pins as follows: white red green blue left channel positive (L+) right channel positive (R+) right channel return (R-) left channel return (L-) The full sound quality of the record player can only be achieved if the cartridge is adjusted correctly. Particular tools like the Pro-Ject Audio Systems alignment tool are required to accomplish this job properly. If you are not well acquainted with the adjustment of cartridges, please call for the willing help of your Pro-Ject Audio Systems dealer. Please note: adjusting a cartridge and tonearm calls for the greatest care in order to avoid damaging the cartridge or tonearm bearings. Ask your local dealer for help if you are unsure in any of the necessary steps and precautions which must be taken CARTRIDGE DOWNFORCE ADJUSTMENT The counterweight (9) supplied is suitable for cartridges weighing between 3-9g and for between 15 22g for compelte systems like The Concorde cartridge (counterweight no. 180). Adjust the downforce prior to setting the anti-skating force. Place counterweight (9) halfway along the counterweight support rod at rear of arm, being sure to have the securing screw uppermost. With the power off, and the platter static, place the stylus pressure gauge onto the platter. To set the recommended 18mN downforce (1mN = 0,1g / 0,1 Pond), place the tip of the stylus exactly in-between the two points marked 15mN and 20mN.
9 If the stylus gauge becomes level, then the correct pressure has been achieved. However if the there is insufficient or excessive pressure the gauge will either not move or tilt down. To adjust the amount of pressure, carefully move the counterweight (9) along the support rod, until the stylus pressure is sufficient to raise the pressure gauge to the level position. Moving the counterweight (9) away from the cartridge will reduce pressure and towards will increase pressure. Please note: It is advised to remove stylus tip from gauge whilst making adjustments to avoid damage to stylus. 5. ANTI-SKATING FORCE ADJUSTMENT Adjust the anti-skating force by positioning the weight on the appropriate groove of the anti-skating sliding mechanism. Anti-skating downforce should be adjusted in correspondence with the tonearm downforce as follows: Tonearm downforce: Anti-skating groove: Lower than 13 mn or 1.3 grams 1 st groove from bearing mn or grams 2 nd groove from bearing mn or grams 3 rd groove from bearing 9

10 6. ANTI-SKATING ADJUSTMENT The anti-skating mechanism is shipped partially disassembled to avoid damage during transport. For correct installation, please follow the steps below. Step 1: Prepare anti-skating sliding mechanism and anti-skating mechanism support from the accessories bag. The anti-skating sliding mechanism is supplied with a pre-mounted anti-skating weight and thread for mounting on the tonearm. Step 2: Mount the anti-skating mechanism support as shown on the picture below and tighten the securing screw. Put the anti-skating mechanism on the end of the anti-skating support rod. Be careful when handing the anti-skating thread in order to avoid damaging it. Step 3: Put the eye of the anti-skating thread around the hole for the HOOK SCREW and screw the HOOK SCREW into the tonearm through the eye of the anti-skating thread as shown in the illustration below. The anti-skating thread should fit into the groove in the tonearm. 10
 on your amplifier.")

11 7. CONNECTION TO THE AMPLIFIER The record player has gold plated female RCA phono sockets (20) so you can substitute the interconnect cables supplied with higher quality cables such as the Pro-Ject Connect IT Si interconnect cables for connection to the amplifier if you wish. Use the Phono input (sometimes labelled gram, disc or RIAA) on your amplifier. Make sure that the phono input offers correct matching and amplification for the type of cartridge used. Line inputs (like CD, Tuner, Tape or Video) are not suitable. Take care about connecting the left and right channel correctly. The RIGHT CHANNEL is usually marked RED, the LEFT CHANNEL BLACK or WHITE. Check the manual of your amplifier for relevant information. An earthing wire may be connected to the screw terminal between the sockets if you encounter humming problems. If your amplifier does not have an input suitable for phono cartridges, a separate phono amplifier stage for MM or MC cartridges is required. It has to be connected between record player and a free line level input of the amplifier. For detailed product information regarding Pro-Ject Audio Systems interconnect cables and phono amplifiers please visit our website: 8. MAINS POWER CONNECTION The turntable is supplied with a power supply suitable for your country's mains supply. Check the label before connecting to ensure compliance with the mains rating in your house. Connect the low voltage plug from the power supply to the socket (21) on the rear of the record player before connecting the power supply to the mains. 11
 to start the turntable. 11. CHANGING REPLAY SPEED To play records at 33 r.p.m. press the speed control button (4) to starts the motor.")
12 9. FITTING THE LID Fit the lid (dust cover 17) carefully over the hinge prongs and adjust the screws (19) until the lid stays open where you want it to without being too stiff to open or close. 10. SWITCHING ON AND OFF Press the speed control button (4) to start the turntable. 11. CHANGING REPLAY SPEED To play records at 33 r.p.m. press the speed control button (4) to starts the motor. Pressing the speed control button two times selects 45 r.p.m.. The selected speed is shown respectively by the flashing LED. When the platter has attained full speed, the LEDs stop flashing. To be able to play 78 r.p.m. the flat drive belt has to be removed and the round drive belt has to be fitted around the sub-platter (7) and the larger diameter part of the motor pulley (5). To do so the platter (1) has to be removed. After the round drive belt has been fitted, pressing the speed control button two times selects 78 r.p.m.. When full speed is attained the LED 45 stops flashing. A long (more than three seconds) press on the speed control button stops the motor. 12. ADJUSTING THE VERTICAL TRACKING ANGLE (VTA) Put a record on the platter. When the needle is lowered into the record groove and the tonearm is not resting on the lift arm, the tube of the tonearm should be parallel to the surface of the record. If it is not, loosen both hexagon screws in the tonearm base just enough to allow vertical movement of the arm pillar without force and slide the arm up or down until it is parallel. Retighten the hexagon screws without applying excessive force (which would deform the arm pillar) finger tight is quite sufficient. 12
13 13. ADJUSTING THE AZIMUTH The cartridge needle must be vertical in the record groove in order to trace the groove wall modulations correctly. A small screw at the bearing end of the arm allows incorrect azimuth to be corrected. Slacken off the screw just enough to be able to revolve the arm tube without applying force. Note! Do not remove this screw completely! 14. USEFUL TIPS The lid is not only a dust cover but also a resonant structure likely to be excited by and to pass into the plinth the acoustic energy emanating from your loudspeakers during replay. Therefore it is recommended to remove the lid for achieving a better sound quality. The record player should be positioned on a low-resonance surface, like wood or multiple layer ply board to avoid structural vibrations disturbing replay. 15. MAINTENANCE AND CLEANING Your record player requires little or no regular maintenance. Remove dust with a slightly moistened antistatic cloth. Never use a dry cloth because this will create static electricity which attracts even more dust! Antistatic cleaning fluids are available at specialized stores but must be applied sparingly to avoid damage to rubber parts. It is recommended to fit the needle cover before cleaning or maintenance to avoid damage. If the player is not used over a long period of time, the drive belt should be removed to prevent unequal stretching. Always disconnect the record player from the mains power supply as a precaution before maintenance! 13
14 TECHNICAL SPECIFICATIONS Ortofon Century Pro-Ject 9 S-Shape Nominal speeds 33/45 r.p.m. (electronic) 78 r.p.m. (manual) Speed variance 33: ±0.13 % 45: ±0.10 % Wow and flutter 33: ±0.10 % 45: ±0.09 % Signal to noise 70dB Effective tonearm mass 13.5g Effective tonearm length 9 " (230mm) Overhang 18mm Power consumption 5W/ >0.5W standby mode Outboard power supply 15V/ 1.6 A DC, universal power supply Dimensions (W x H x D) 462 x 131 x 351mm, dust cover open 462 x 423 x 390mm Weight 10.5 kg Technical specifications The Concorde Century Frequency range Hz Channel separation 26dB/1kHz Output voltage 5.5mV/1000 Hz Recommended load impedance 47 kohm/amplifier connection MM-input Compliance/stylus type 16µm/mN elliptical Recommended tracking force 18mN Weight 18.5g 14
15 Potential incorrect use and fault conditions Pro-Ject turntables are manufactured to the highest standards and undergo strict quality controls before leaving the factory. Faults that may possibly occur are not necessarily due to material or production faults but can sometimes be caused by incorrect use or unfortunate circumstances. Therefore the following list of common fault symptoms is included. The platter doesn't turn although the unit is switched on: The unit is not connected to the mains power supply. No mains at the socket. Drive belt is not fitted or has slipped off. No signal through one or other channel or both channels: No signal contact from the cartridge to the internal tonearm wiring or from that to the arm lead or from that to the phono box or between that and the amplifier. This could be due to a faulty plug, broken wire or solder joint or simply loose plug/socket connection. Phono input not selected at amplifier. Amplifier is not switched on. Amplifier or speakers are defective or muted. No connection to the loudspeakers. Strong hum on phono input: No earth connection from cartridge or arm or arm cable to amplifier, or earth loop. Distorted or inconsistent sound from one or both channels: Record player is connected to wrong input of amplifier, or MM/MC switch incorrectly set. Needle or cantilever damaged. Wrong r.p.m., drive belt overstretched or dirty, platter bearing without oil, dirty or damaged. Service Should you encounter a problem which you are not able to alleviate or identify despite the above information, please contact your dealer for further advice. Only when the problem cannot be resolved there should the unit be sent to the responsible distributor in your country. Guarantee repairs will only be affected if the unit is returned correctly packaged. For this reason we recommend keeping the original packaging. Never return a record player without making sure that is it safely disassembled and correctly packaged in the original packaging according to the diagrams on the last page of this user guide. Please remove these parts and pack them separately: lid, counterweight, anti-skating weight, platter and belt. Fit the cartridge protection cap. Insert the transport screws for the sub-chassis, the transport lock for the tonearm prior to carefully packaging the record player. Warranty The manufacturer accepts no responsibility for damage caused by not adhering to these instructions for use and/or by transportation without the original packaging. Modification or change to any part of the product by unauthorized persons, release the manufacturer from any liability over and above the lawful rights of the customer. Pro-Ject Audio Systems is a Registered Trademark of H. Lichtenegger. This guide was produced by: Pro-Ject Audio Systems Copyright All rights reserved. The information was correct at the time of going to press. The manufacturer reserves the right to make changes to the technical specification without prior notice as deemed necessary to uphold the ongoing process of technical development. 15

16 16
INSTRUCTIONS FOR USE Pro-Ject SIGNATURE 10
 INSTRUCTIONS FOR USE Pro-Ject SIGNATURE 10 Dear Music Lover, thank you for purchasing a Pro-Ject Audio System s record player. In order to achieve maximum performance and reliability with this record player
European Audio Team INSTRUCTIONS FOR USE. E.A.T. E-Flat
 European Audio Team INSTRUCTIONS FOR USE E.A.T. E-Flat Dear Music Lover, Welcome! Congratulations on your purchase of our E.A.T. E-Flat turntable. Your E.A.T. E-Flat was handcrafted by our skilled technicians
European Audio Team INSTRUCTIONS FOR USE. E.A.T. C-Major
 European Audio Team INSTRUCTIONS FOR USE E.A.T. C-Major Dear Music Lover, Welcome! Congratulations on your purchase of our E.A.T. C-Major turntable. Your E.A.T. C-Major was handcrafted by our skilled technicians
INSTRUCTIONS FOR USE Pro-Ject Signature 12
 INSTRUCTIONS FOR USE Pro-Ject Signature 12 pic Controls, features and connections 1 Platter 2 Platter shaft 3 Drive pulley 4 Drive belt 5 Idler pulley shaft 6 Idler pulley 7 Platter belt 8 Transport screws
European Audio Team INSTRUCTIONS FOR USE. E.A.T. C-Sharp
 European Audio Team INSTRUCTIONS FOR USE E.A.T. C-Sharp Dear Music Lover, Welcome! Congratulations on your purchase of our E.A.T. C-Sharp turntable. Your E.A.T. C-Sharp was handcrafted by our skilled technicians
EuroAudioteam, s.r.o. INSTRUCTIONS FOR USE. EAT Forte S
 EuroAudioteam, s.r.o. INSTRUCTIONS FOR USE EAT Forte S Dear Music Lover, Welcome! Congratulations on your purchase of our EAT Forte S turntable. Your EAT Forte S was hand-crafted by our team of skilled
C 558 Turntable. Owner s Manual ENGLISH PORTUGUÊS ESPAÑOL FRANÇAIS ITALIANO DEUTSCH NEDERLANDS SVENSKA РУССКИЙ
 C 558 Turntable РУССКИЙ ENGLISH DEUTSCH NEDERLANDS SVENSKA ITALIANO PORTUGUÊS ESPAÑOL FRANÇAIS Owner s Manual IMPORTANT SAFETY INSTRUCTIONS ENGLISH PORTUGUÊS FRANÇAIS ESPAÑOL ITALIANO DEUTSCH NEDERLANDS
music hall mmf-5.1 INSTRUCTION MANUAL
 music hall mmf-5.1 INSTRUCTION MANUAL music hall http://www.musichallaudio.com august 2007 CONGRATULATIONS ON YOUR PURCHASE You have selected an exceptional turntable. Each component used in the construction
Debut III Debut III E Debut III/Phono USB Debut III/Phono SB Debut SE II
 Product overview Record player - Debut-Line Debut III Debut III E Debut III/Phono USB Debut III/Phono SB Debut SE II Record player - Classic-Line 1 Xpression III 1 Xpression III Comfort 2 Xperience 2 Xperience
music hall mmf-9.1 INSTRUCTION MANUAL
 music hall mmf-9.1 INSTRUCTION MANUAL music hall http://www.musichallaudio.com august 2007 CONGRATULATIONS ON YOUR PURCHASE You have selected an exceptional turntable. Each component used in the construction
INSTRUCTIONS FOR USE
 INSTRUCTIONS FOR USE Thank you for purchasing the Musical Fidelity M1 turntable system. The M1 is made from very well finished top quality materials, and used properly and carefully will give you many,
Opera Audio products are based on a simple philosophy: The component shall reproduce the original musical sound, purely and naturally.
 air-1 Turntable User Guide Congratulations on your new CONSONANCE! Opera Audio products are based on a simple philosophy: The component shall reproduce the original musical sound, purely and naturally.
Dynavector DV507MKII Tonearm. Instruction Manual
 Dynavector DV507MKII Tonearm Instruction Manual 1. Introduction DV507MKII Instruction Manual Thank you for your purchase of the DV-507MKII tonearm. DV507MKII is a high-performance tonearm with many advanced
IN THE BOX. 6. Power Cord. 1. StudioDeck Turntable. 2. Dustcover. 7. Counterweight. 8. Additional Parts Hex Wrench (2) Anti-skate Weight Stylus Brush
 Anti-skate Weight Stylus Brush") 2 1 3 4 IN THE BOX 1. StudioDeck Turntable 6. Power Cord 5 6 7 2. Dustcover 7. Counterweight 3. Delrin Platter 4. Platter Belt 5. RCA Interconnects 8. Additional Parts Hex Wrench (2) Anti-skate Weight
2 1 3 4 IN THE BOX 1. StudioDeck Turntable 6. Power Cord 5 6 7 2. Dustcover 7. Counterweight 3. Delrin Platter 4. Platter Belt 5. RCA Interconnects 8. Additional Parts Hex Wrench (2) Anti-skate Weight
JMW 10 AND 12 Tonearms
 JMW 10 AND 12 Tonearms Setup and Instruction Manual VPI INDUSTRIES INC., 77 CLIFFWOOD AVE #3B, CLIFFWOOD NJ 07721 PHONE: 732-583-6895, FAX: 732-946-8578 www.vpiindustries.com BEFORE YOU BEGIN NOT FOLLOWING
PRODUCT INFORMATION. Real High-End Features - True Audiophile Sound - Affordable Price. Walnut finish: High-Gloss Black and White:
 X1 Our next generation of the legendary X-Line. Real High-End Features - True Audiophile Sound - Affordable Price n/c MSRP 699 (incl. VAT) Pick it S2MM MSRP 799 (incl. VAT) Speed control with electronic
Dear Client, Seite 1 / 8
 Dear Client, Congratulations to your new turntable TTT-Compact (TTT-C). This unit allows analogue playback on the highest level because of compact design and careful engineering in every detail. Please
Tradition verpflichtet. User manual. High-end Belt Drive
 Tradition verpflichtet User manual Turntable PE 4040 High-end Belt Drive PE 2525 BELT DRIVE - MADE IN GERMANY CONTENTS: 1. SAFETY INFORMATION... 3 2. UNPACKING...4 3. SET-UP and ASSEMBLY... 5 4. CONNECTIONS...7
VPI Classic Turntable Manual
 VPI Classic Turntable Manual Setup and Instruction Manual VPI Industries, Inc., 77 Cliffwood Ave. #5D, Cliffwood, NJ 07721 http://www.vpiindustries.com Classic Turntable Packing List Serial #: Classic
KUZMA STABI S12 TURNTABLE
 KUZMA STABI S12 TURNTABLE Instruction manual 2009-7 1 KUZMA LTD INSTRUCTION MANUAL FOR STABI S12 turntable The Stabi S12 turntable is a very precisely engineered piece of equipment. The construction, however,
VPI Classic 3 Turntable Setup and Instruction Manual
 VPI Classic 3 Turntable Setup and Instruction Manual VPI Industries, Inc., 77 Cliffwood Ave. #3B, Cliffwood, NJ 07721 Phone: 732-583-6895, Email: Sales@vpiindustries.com http://www.vpiindustries.com Important:
INSTRUCTION MANUAL. Amadeus. Amadeus GT. Rev. IX
 INSTRUCTION MANUAL Amadeus Amadeus GT Rev. IX 1 Preliminary Before embarking on the relatively simple process of assembling the Amadeus, please take the time to fully read these instructions and follow
VPI Classic Signature Turntable Manual
 VPI Classic Signature Turntable Manual Setup and Instruction Manual VPI Industries, Inc., 77 Cliffwood Ave. #5D, Cliffwood, NJ 07721 http://www.vpiindustries.com Classic Signature Turntable Packing List
GOLDMUND ST4 TURNTABLE
 GOLDMUND ST4 TURNTABLE USER MANUAL WARNING! This high quality turntable possess new technical features which are necessary for an accurate tracking of the today's records. Only a careful use can provide
The best pick-up arm in the world INSTRUCTIONS SERIES M2 MODELS M
 The best pick-up arm in the world INSTRUCTIONS SERIES M2 MODELS M2-9-10-12 Introduction The Series M2 embraces three models the M2-9, M2-10 and M2-12 offering pivot to stylus dimensions covering virtually
THE TNT HR-X REFERENCE TURNTABLE & TONEARM
 THE TNT HR-X REFERENCE TURNTABLE & TONEARM SETUP AND INSTRUCTION MANUAL VPI INDUSTRIES INC., 77 CLIFFWOOD AVE #3B, CLIFFWOOD N.J. 07721 PHONE: 732-583-6895, FAX: 732-946-8578 www.vpiindustries.com 1 HOW
music hall cruise control 2.0 INSTRUCTION MANUAL music hall
 music hall cruise control 2.0 INSTRUCTION MANUAL music hall http://www.musichallaudio.com CONGRATULATIONS ON YOUR PURCHASE You have selected an exceptional electronic speed control. Each component used
KUZMA STABI S PS AC TURNTABLE (on photo with Stogi S tonearm and clamp).. Instruction manual
.. Instruction manual") KUZMA STABI S PS AC TURNTABLE (on photo with Stogi S tonearm and clamp).. Instruction manual 2016-10 1 KUZMA LTD INSTRUCTION MANUAL FOR STABI S PS AC turntable The Stabi S PS AC turntable is a very precisely
KUZMA STABI S PS AC TURNTABLE (on photo with Stogi S tonearm and clamp).. Instruction manual 2016-10 1 KUZMA LTD INSTRUCTION MANUAL FOR STABI S PS AC turntable The Stabi S PS AC turntable is a very precisely
CANARY AUDIO CA-400. Vacuum Tube MM/MC Phono Preamplifier OWNER S MANUAL. Handcrafted in California MADE IN USA
 CANARY AUDIO Vacuum Tube MM/MC Phono Preamplifier Handcrafted in California CA-400 OWNER S MANUAL MADE IN USA Dear Customer: Please allow us to take this opportunity to thank you for purchasing this CANARY
KUZMA STOGI S TONEARM ( with Stabi S turntable and cartridge) Instruction manual
 Instruction manual") KUZMA STOGI S TONEARM ( with Stabi S turntable and cartridge) Instruction manual 1 KUZMA LTD INSTRUCTION MANUAL FOR STOGI S tonearm The Stogi S tonearm is a very precisely engineered piece of equipment.
KUZMA STOGI S TONEARM ( with Stabi S turntable and cartridge) Instruction manual 1 KUZMA LTD INSTRUCTION MANUAL FOR STOGI S tonearm The Stogi S tonearm is a very precisely engineered piece of equipment.
THE HR-X RIM DRIVE REFERENCE TURNTABLE & JMW-12.7 TONEARM
 THE HR-X RIM DRIVE REFERENCE TURNTABLE & JMW-12.7 TONEARM SETUP AND INSTRUCTION MANUAL IMPORTANT NEW INFORMATION: THE ACCURACY AND SOUND OF THE RIM DRIVE IS VERY DEPENDENT ON THE PERFECT ROUNDNESS OF THE
REFERENCE MOVING COIL CARTRIDGE
 REFERENCE MOVING COIL CARTRIDGE OVERVIEW One of the most important aspects of cartridge design is the diamond tip of the stylus. It is this jewel which has to retrieve information often represented by
The Fine Art of Playing Music
 The Fine Art of Playing Music Delphi Mk VI Owner s Manual FOREWORD This is your Delphi Mk VI Owner s Manual. The following pages will describe as succinctly as possible the assembly of your new turntable.
Magne> Nordic Mythology
 Model Magne Manual Magne> Nordic Mythology Magne means strength. In Nordic mythology Magne is the super baby, son of Thor, the God of Thunder, and when he is three days old he is so strong that he can
INSTRUCTION MANUAL LTD
 INSTRUCTION MANUAL LTD Rev. March 2014 1 Description The Well Tempered Lab LTD Tonearm is a stand alone refined version of our Amadeus and Simplex tonearms that are only available on Well Tempered Lab
CANARY AUDIO. Vacuum Tube Preamplifier CA-800 OWNER S MANUAL. Handcrafted in California MADE IN USA
 CANARY AUDIO Vacuum Tube Preamplifier Handcrafted in California CA-800 OWNER S MANUAL MADE IN USA Dear Customer: Please allow us to take this opportunity to thank you for purchasing this CANARY AUDIO product.
analogue turntables Sophisticated Craftsmanship with attention to detail that makes a Dual turntable so special.
 Katalog Catalogue 2015 2016 analogue turntables Sophisticated...... Craftsmanship with attention to detail that makes a Dual turntable so special. 1 Production made in Germany Production The company history
A century of accuracy in sound
 A century of accuracy in sound MC CENTURY Ortofon has always been a leading company in the field of sound reproduction. Founded in Copenhagen in 1918, Ortofon started by creating technology which served
Assembly and User Manual
 Champion LEVEL 1 Assembly and User Manual Page 1 clearaudio electronic GmbH 2006 DEAR AUDIO ENTHUSIAST Thank you for your decision to purchase a clearaudio Champion Level 1 turntable. This turntable is
KUZMA STABI R TURNTABLE (supplied without arm ) S/N Instruction manual
 S/N Instruction manual") KUZMA STABI R TURNTABLE (supplied without arm ) S/N.. 2018-09 Instruction manual 1 KUZMA LTD INSTRUCTION MANUAL FOR STABI R turntable The Stabi R turntable is a very precisely engineered piece of equipment.
KUZMA STABI R TURNTABLE (supplied without arm ) S/N.. 2018-09 Instruction manual 1 KUZMA LTD INSTRUCTION MANUAL FOR STABI R turntable The Stabi R turntable is a very precisely engineered piece of equipment.
Series Five arms. Audiomods tonearm setup. Unpacking the arm. Mounting the arm. Contents. Mounting the cartridge
 Series Five arms Audiomods tonearm setup Unpacking the arm The arm is packed fixed onto the centre partition of the box. To release it, loosen the brass locking nut and slide the arm upwards. Counterweights
 Register your product and get support at www.philips.com/welcome User manual 2 Contents 1 Important 4 Safety 4 Notice 4 English 2 Your car power amplifier 5 Introduction 5 What s in the box 5 Overview
PRELIMINARY INSTRUCTION MANUAL. Simplex. Rev. April 10
 PRELIMINARY INSTRUCTION MANUAL Simplex Rev. April 10 1 Preliminary Simplex: Nothing could be simpler, yet we strongly recommend thoroughly reviewing this manual before embarking on assembling and playing
Musical Surroundings Presents:
 Musical Surroundings Presents: The SuperNova 2 preamplifier Musical Surroundings Presents: The SuperNova 2 preamplifier table of contents Introduction the SuperNova 2 1 Standard configuration 1 Power Amp-Direct
INSTRUCTION MANUAL NAIM SLIDE Warranty
 V 1.2E INSTRUCTION MANUAL NAIM SLIDE Warranty Register your product at: www.avidhifi.com/register.htm Table of Contents Section Page Preface 3 Introduction 3 Packaging 3 Parts Checklist 3 Servicing 3 Cleaning
KUZMA STABI XL TURNTABLE (with Air line tonearm) Instruction manual
 Instruction manual") KUZMA STABI XL TURNTABLE (with Air line tonearm) Instruction manual 1 KUZMA LTD INSTRUCTION MANUAL FOR STABI XL turntable The Stabi XL turntable is a very precisely engineered piece of equipment. However
KUZMA STABI XL TURNTABLE (with Air line tonearm) Instruction manual 1 KUZMA LTD INSTRUCTION MANUAL FOR STABI XL turntable The Stabi XL turntable is a very precisely engineered piece of equipment. However
Model DPS Instruction Manual
 tonarme - tonearms - bras de lecture Model DPS Instruction Manual Dear Customer Congratulations! You have purchased a unique tonearm that will transcribe the most accurate detail and provide the most musically
DP-500M DIRECT DRIVE MANUAL TURNTABLE SYSTEM OPERATING INSTRUCTIONS
 DIRECT DRIVE MANUAL TURNTABLE SYSTEM DP00M OPERATING INSTRUCTIONS SERIAL NO. PLEASE RECORD UNIT SERIAL NUMBER ATTACHED TO THE REAR OF THE CABINET FOR FUTURE REFERENCE IMPORTANT TO SAFETY WARNING: TO PREVENT
KUZMA STABI XL DC Turntable Instruction manual
 KUZMA STABI XL DC Turntable Instruction manual 2015-03 1 KUZMA LTD INSTRUCTION MANUAL FOR STABI XL DC turntable The Stabi XL DC turntable is a very precisely engineered piece of equipment. However the
essentia audiotoo s User Manual Rev 2.0 September 2015 Mains Multiplier 5 Mains Multiplier 7 Mains Multiplier 8
 essentia User Manual Rev 2.0 September 2015 Mains Multiplier 5 Mains Multiplier 7 Mains Multiplier 8 Contents essentia Introduction... page 4 Description... page 5 Safety precautions... page 6 Connections...
PASS INT W High Bias AB Integrated Amp
 PASS INT-60 60W High Bias AB Integrated Amp WARNING For your protection please read the following: Water and moisture: Electrical devices should not be used near water ( as per example, near a bathtub,
Installation Instructions LamboStyleDoors
 Installation Instructions LamboStyleDoors (The instruction refers only to one side of the car, but is valid for both sides) Preparations: (Dismantling according to the regulation of the car manufacturer)
MIRACORD 90. Rediscovering Our Roots
 An icon returns. MIRACORD 90 Rediscovering Our Roots Miracord 90 Anniversary - ELAC resurrects a golden era with a turntable to mark its 90th birthday. Ninety is the new thirty, as we say at ELAC, and
KAT d. o. o. Kuzma Audio Trade Hotemaže 17 a 4205 PREDDVOR SLOVENIA tel fax
 S T A B I T U R N T A B L E instruction manual KAT d. o. o. Kuzma Audio Trade Hotemaže 17 a 4205 PREDDVOR SLOVENIA tel. 386 4 2535450 fax 386 4 2535454 CONTENTS I. GENERAL DESCRIPTION 3 SPECIFICATIONS
Swissonor Internet-Shop v2 2019
 Swissonor Internet-Shop v2 2019 Please read the conditions on last page EXW Pric Prices in CHF Swissonor Mini-Series Amplifiers PPP with Hashimoto HM-3 Transformers, gain 26/32 db (specify at order) PPP
DIRECTOR COLLECTION D39. D39 Installation Manual
 DIRECTOR COLLECTION D39 D39 Installation Manual Table of Contents Introduction 1 Specifications 2 What s Included 3 Tools & Items 3 Wire Recommendation 3 Wiring Options 4 About Speaker Wire 6 Installing
Dynavector DV-505 Tone arm Instruction Manual
 Dynavector DV-505 Tone arm Instruction Manual INDEX Dynavector DV-505 tone arm has an entirely new concept in tone arm design. The DV-505 is a high performance tone arm with various new functions that
BOX DESIGN. Pair DSD dB. Phono Line Digital USB BT
 BOX DESIGN DSD 64 128 Pair 256 +6dB 1 2 3 4 5 6 7 8 9 Phono Line Digital USB BT DS2 Aluminum enclosure in silver or black Under the hood: Latest state-of-the-art high-end electronic components Every component
Models: EP EP EP EP EP EP USER MANUAL ENGLISH
 P R O F E S S I O N A L P O W E R A M P L I F I E R Models: EP - 300 EP - 500 EP - 800 EP - 1000 EP - 1300 EP - 1800 USER MANUAL ENGLISH WARNING FOR YOUR OWN SAFETY, PLEASE READ THIS USER MANUAL CAREFULLY
Manual for the Dragonfly tattoo machine rev.2
 Manual for the Dragonfly tattoo machine rev.2 1 Introduction We are proud to present the Dragonfly tattoo machine. Designed with the tattoo artist in focus and manufactured with the highest quality materials
owner s manual 3.50-inch (90 mm) Coaxial Loudspeakers
 Coaxial Loudspeakers") owner s manual 3.50-inch (90 mm) Coaxial Loudspeakers Thank you for choosing a JL Audio Evolution C2 Coaxial Speaker System for your automotive sound system. These Evolution Speakers have been designed
owner s manual 3.50-inch (90 mm) Coaxial Loudspeakers Thank you for choosing a JL Audio Evolution C2 Coaxial Speaker System for your automotive sound system. These Evolution Speakers have been designed
Installation instructions
 Installation instructions Akrapovič System: Evolution and Optional Front Link Pipe Set for the Porsche Cayenne Turbo (type 958) Porsche Cayenne Turbo S (type 958) www.akrapovic.com Installation instructions
GTr 96 A ACTIVE SUBWOOFER
 GTr 96 A ACTIVE SUBWOOFER Enjoy it. Operating and Installation Instructions INTRODUCTION Proper system planning is vital in order to maximize the device s performance and road safety. Plan your installation
Installation Instructions LamboStyleDoors
 Installation Instructions LamboStyleDoors (The instruction refers only to one side of the car, but is valid for both sides) Preparations: (Dismantling according to the regulation of the car manufacturer)
Installation instructions
 Installation instructions Akrapovič Exhaust System: Slip-On for the Porsche 911 Carrera (type 991) Porsche 911 Carrera S (type 991) Porsche 911 Carrera 4 (type 991) Porsche 911 Carrera 4S (type 991) Please
WARNING. Electric Recovery Winch. General Safety Precautions
 1 Electric Recovery Winch Thanks for purchasing a WINCH. This manual covers operation and maintenance of the winch. All information in this publication is based on the latest production information available
owner s manual 4.00-inch (100 mm) Coaxial Loudspeakers
 Coaxial Loudspeakers") owner s manual 4.00-inch (100 mm) Coaxial Loudspeakers Thank you for choosing a JL Audio Evolution C2 Coaxial Speaker System for your automotive sound system. These Evolution Speakers have been designed
owner s manual 4.00-inch (100 mm) Coaxial Loudspeakers Thank you for choosing a JL Audio Evolution C2 Coaxial Speaker System for your automotive sound system. These Evolution Speakers have been designed
Installation Instructions LamboStyleDoors
 Installation Instructions LamboStyleDoors (The instruction refers only to one side of the car, but is valid for both sides) Preparations: (Dismantling according to the regulation of the car manufacturer)
INSTRUCTION MANUAL ANGLE GRINDER PT W
 INSTRUCTION MANUAL ANGLE GRINDER PT50360 4½ INCHES 120V 60Hz 600W 5A 12,000 rpm C US Note : Before operating this tool, read this manual and follow all safety rules and operating instructions. This electric
Features. Marathon SL TECHNICAL CHARACTERISTICS. Sliding bushes: made of friction free and wear free material.
 Features TECHNICAL CHARACTERISTICS Fork with Ø30 mm legs with "Double Air" damping system. Adjustment of the air preload (positive air) on both legs. Adjustment of the rebound damping (negative air) on
Installation instructions
 Installation instructions Akrapovič Exhaust System Slip-On for the Kawasaki Z900 *505636* EN Revision 1.0 12/2016 www.akrapovic.com www.akrapovic.com Congratulations on purchasing the Akrapovič exhaust
D50 Series. Director Collection. Installation Manual D59, D57
 D50 Series Director Collection Installation Manual D59, D57 Table of Contents Introduction 1 Specifications 2 What s Included 3 Tools & Items 3 Wire Recommendation 3 Speaker Placement 4 About Speaker Wire
MAGICO S5 User s Guide
 1 A MESSAGE FROM ALON WOLF THANK YOU FOR PURCHASING THE MAGICO S5 LOUDSPEAKERS. THE S5 INCORPORATES ALL WE HAVE LEARNED IN THE PAST 22 YEARS ABOUT LOUDSPEAKER DESIGN AND MANUFACTURING. LIKE ALL MAGICO
WARRANTY. Illustration
 WARRANTY This product is guaranteed against defects for a period of 12 months from date of purchase. This warranty is provided by Super Cheap Auto Pty Ltd ACN 085 395 124 (Supercheap Auto) of 751 Gympie
AQUATEC R / AQUATEC F / AQUATEC XL. Bathlift Operating instructions
 AQUATEC R / AQUATEC F / AQUATEC XL Bathlift Operating instructions 1 2 3 4 5 6 7 8 9 10 11 Contents 1 General instructions................. 3 1.1 Introduction......................... 3 1.2 Proper use.........................
Fitting Instruction for EZI-GRIP Bike Rack
 Fitting Instruction for EZI-GRIP Bike Rack Congratulations on purchasing Ezi-Grip to carry your valued bicycles. We are sure you will get many years of enjoyable use from your Ezi-Grip Bike Rack. These
User Guide. Model No.: GDI-GFD7200
 User Guide Model No.: GDI-GFD7200 2 Important Safety Instructions and Warnings Please read before installation WARNING: CAUTION: To reduce the risk of fire or electrical shock, do not expose the product
The Da-Lite Difference.
 The Da-Lite Difference. Instruction Book for Boardroom Electrol DA-LITE SCREEN COMPANY, INC. 3100 North Detroit Street Post Office Box 137 Warsaw, Indiana 46581-0137 Phone: 574-267-8101 800-622-3737 Fax:
Installation instructions
 Installation instructions Akrapovič Exhaust System: Slip-On for the Laborghini Gallardo 550-2 Coupe Laborghini Gallardo 560-4 Coupe / Spyder Laborghini Gallardo 570-4 Coupe / Spyder Congratulations on
Installation instructions
 Installation instructions Akrapovič Exhaust System: Slip-On for the ABARTH 500 ABARTH 500C www.akrapovic.com Installation instructions Akrapovič Exhaust System: Slip-On for the ABARTH 500 ABARTH 500C
PHEV Conversion Kit User Manual
 PHEV Conversion Kit User Manual for 2010 Prius Warning: You are strongly recommended to have a specialist to undertake this installation! High Voltage (HV) Direct Current (DC) Warning: Traction battery
Installation instructions
 Installation instructions Akrapovič Exhaust System: Slip-On for the Yamaha XJR 1300 *503789* www.akrapovic.com www.akrapovic.com Congratulations on purchasing an Akrapovič exhaust system. Please read the
PHEV Conversion Kit User Manual
 PHEV Conversion Kit User Manual for 2003-2009 Prius Warning: You are strongly recommended to have a specialist to undertake this installation! High Voltage (HV) Direct Current (DC) Warning: Traction battery
Installation instructions
 Installation instructions Akrapovič Exhaust System: Slip-On for the Kawasaki Z800 *503616* www.akrapovic.com www.akrapovic.com Congratulations on purchasing an Akrapovič exhaust system. Please read the
KAC-8452 KAC-8402 INSTRUCTION MANUAL
 4/3/2 CHANNEL POWER AMPLIFIER KAC-8452 KAC-8402 INSTRUCTION MANUAL B64-3017-00/01 (MV) Safety precautions 2WARNING To prevent injury or fire, take the following precautions: When extending the ignition,
OWNER S MANUAL inch (130 mm) Coaxial Loudspeakers. Thank you for choosing JL Audio loudspeakers for your automotive sound system.
 Coaxial Loudspeakers. Thank you for choosing JL Audio loudspeakers for your automotive sound system.") OWNER S MANUAL 5.25-inch (130 mm) Coaxial Loudspeakers Thank you for choosing JL Audio loudspeakers for your automotive sound system. We strongly recommend that you have your new loudspeakers installed
OWNER S MANUAL 5.25-inch (130 mm) Coaxial Loudspeakers Thank you for choosing JL Audio loudspeakers for your automotive sound system. We strongly recommend that you have your new loudspeakers installed
MAGICO S5 User s Guide
 1 A MESSAGE FROM ALON WOLF THANK YOU FOR PURCHASING THE MAGICO S5 LOUDSPEAKERS. THE S5 INCORPORATES ALL WE HAVE LEARNED IN THE PAST 22 YEARS ABOUT LOUDSPEAKER DESIGN AND MANUFACTURING. LIKE ALL MAGICO
Grant Fidelity RITA-880S Tube Amplifier
 www.grantfidelity.com Ph: 1-888-477-5379 Grant Fidelity RITA-880S Tube Amplifier Thank you for your purchase of the Grant Fidelity Reference Integrated Tube Amplifier (RITA-880). The product was originally
Installation instructions
 Installation instructions Akrapovič Exhaust System Slip-On and Slip-On High Mounted for the Honda VFR 1200F *502653* EN Revision 1.0 03/2016 www.akrapovic.com www.akrapovic.com Congratulations on purchasing
Installation instructions
 Installation instructions Akrapovič Exhaust System: Slip-On Classic Line for the Harley-Davidson Sportster *503783* www.akrapovic.com www.akrapovic.com Congratulations on purchasing an Akrapovič exhaust
Installation instructions
 Installation instructions Akrapovič Exhaust System Racing for the Yamaha MT-03 Yamaha R3 *505481* EN Revision 1.0 07/2016 www.akrapovic.com www.akrapovic.com Congratulations on purchasing the Akrapovič
PE51 HURLEY 3 STATION METAL SWING SET OWNER'S MANUAL
 PE51 HURLEY 3 STATION METAL SWING SET OWNER'S MANUAL WARNING! The disassembled product may contain small parts which pose a choking hazard to children under 3. IMPORTANT: This product may contain sharp
The Da-Lite Difference.
 The Da-Lite Difference. Instruction Book for Large Advantage Electrol DA-LITE SCREEN COMPANY, INC. 3100 North Detroit Street Post Office Box 137 Warsaw, Indiana 46581-0137 Phone: 574-267-8101 800-622-3737
Operating instructions ErgoPack 600 E
 Operating instructions ErgoPack 600 E Operation of the device is only permitted if the operating instructions have been carefully read and understood before use! Declaration of conformity EU declaration
Installation instructions
 Installation instructions Akrapovič Exhaust System: Evolution Header for the Ducati Monster 1200 Ducati Monster 1200S Ducati Monster 821 Ducati Monster 821 Dark *504286* Congratulations on purchasing an
Installation instructions
 Installation instructions Akrapovič Exhaust System Slip-On for the Kawasaki Versys 1000 *503272* EN Revision 1.0 02/2016 www.akrapovic.com www.akrapovic.com Congratulations on purchasing the Akrapovič
Installation instructions
 Installation instructions Akrapovič Exhaust System Slip-On for the Kawasaki Z800 *503616* EN Revision 1.0 02/2016 www.akrapovic.com www.akrapovic.com Congratulations on purchasing the Akrapovič exhaust
Installation instructions
 Installation instructions Akrapovič Exhaust Systems: Racing and Evolution for the HONDA CRF250R *503981* www.akrapovic.com www.akrapovic.com Congratulations on purchasing an Akrapovič exhaust system. Please
Installation instructions
 Installation instructions Akrapovič Exhaust System Slip-On for the Honda CBR 500R Honda CB 500F Honda CB 500X *503767* EN Revision 1.0 02/2016 www.akrapovic.com www.akrapovic.com Congratulations on purchasing
Marzocchi Suspension MZ I MZ I. Technical instructions
 Technical instructions Exploded view - MZ I - 100 Rif. Code Quantity Spare part list - MZ I - 100 Rif. Code Description Q.ty in the model Technical characteristics: Technical characteristics Single-crown