INSTALLATION INSTRUCTIONS
|
|
|
- Veronica Eaton
- 5 years ago
- Views:
Transcription

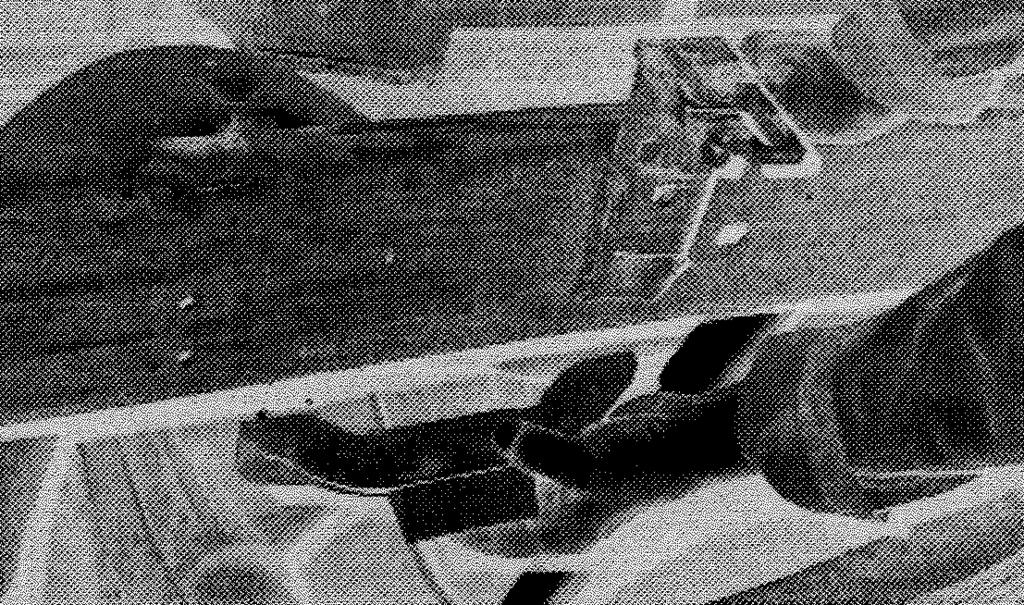
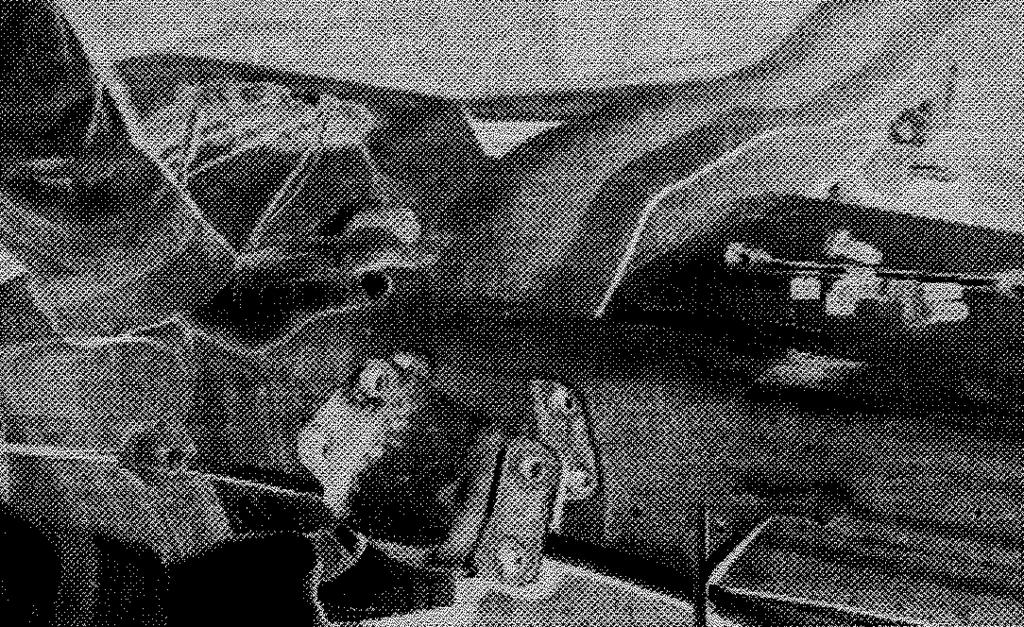
1 INSTALLATION INSTRUCTIONS North Ave. Sanger, CA toll free: web: REAR LOWERING KIT CHEVY 1-TON C-3500 Congratulations! You were selective enough to choose a BELLTECH PRODUCT. We have spent many hours developing our line of products so that you will receive maximum performance with minimum difficulty during installation. Note: Warning: Warning: Reminder: Note: Confirm that all of the hardware listed in the parts list is in the kit. Do not begin installation if any part is missing. Read the instructions thoroughly before beginning this installation. DO NOT work under a vehicle supported by only a jack. Place support stands securely under the vehicle in the manufacturer s specified locations unless otherwise instructed. DO NOT drive vehicle until all work has been completed and checked. Torque all hardware to values specified. Proper use of safety equipment and eye/face/hand protection is absolutely necessary when using these tools to perform procedures! It is very helpful to have an assistant available during installation. RECOMMENDED TOOLS: Properly rated floor jack, support stands, and wheel chocks Combination wrench set Torque wrench: 0-75 lb ft. range Ratcheting socket wrench and socket sets Air Chisel / Die grinder W/ cut off wheel Heavy Duty Drill Safety Glasses This is a relatively complex installation and as such we recommend that a qualified mechanic perform it. We also recommend that to retain the stability of the leaf spring pack and axle assembly, only one side of the vehicle should be modified at a time. NOTE: As it may be necessary to temporarily loosen fuel tank mounting straps to install driver side hanger, we recommend that the fuel level be as close to empty as possible to reduce fuel tank weight. KIT INSTALLATION 1. For access to the rear suspension and to simplify the installation procedure, remove the bed from the truck. There are eight large bolts that hold the bed to the frame, which must be removed. Unbolt the gas filler neck, unplug tail light harness and disconnect the two ground straps in the front and back of the truck. Be sure to check all of these prior to removal. 2. Block the front wheels and raise the rear of the truck using a hydraulic floor jack under the center axle. Place the frame on jack stands just ahead of the front spring hangers and remove the wheels from the truck. (PHOTO 1) 1
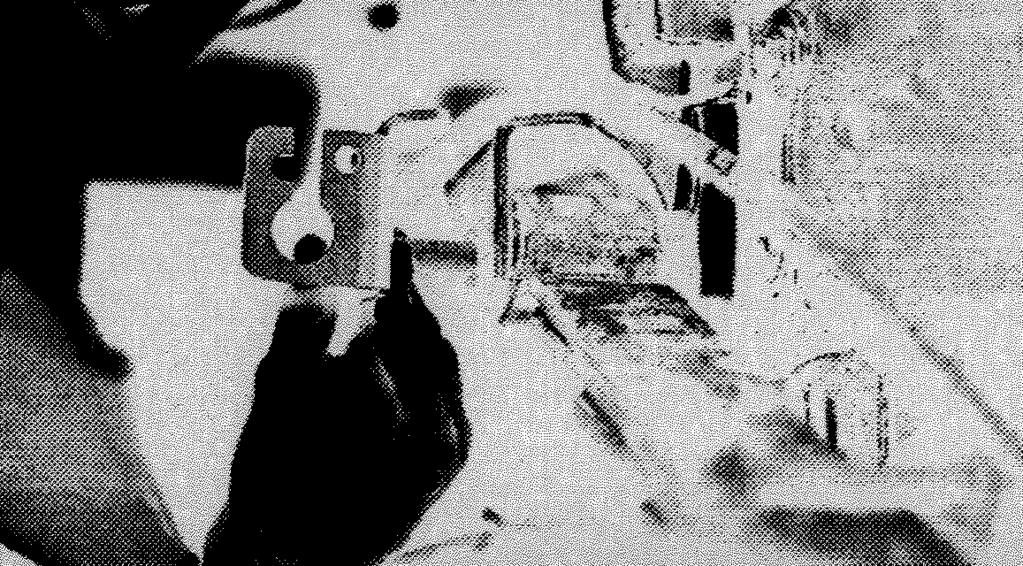
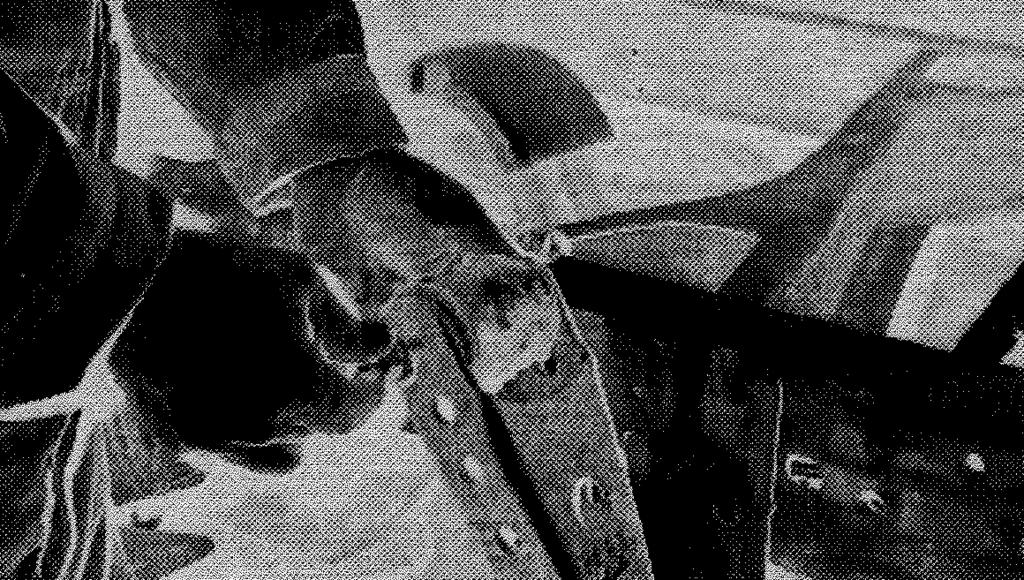
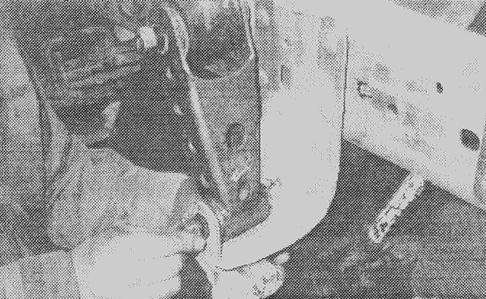
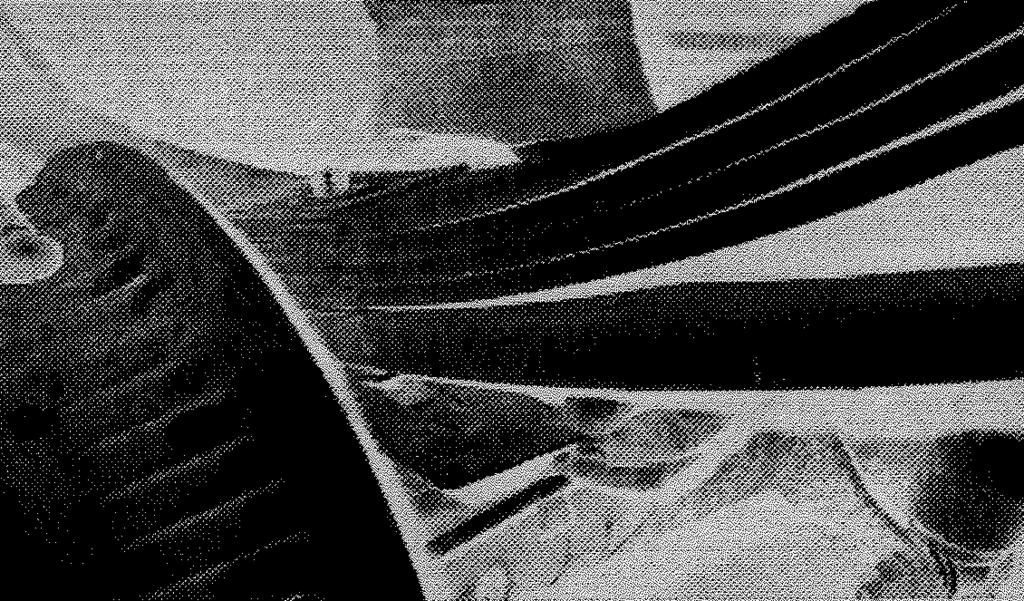
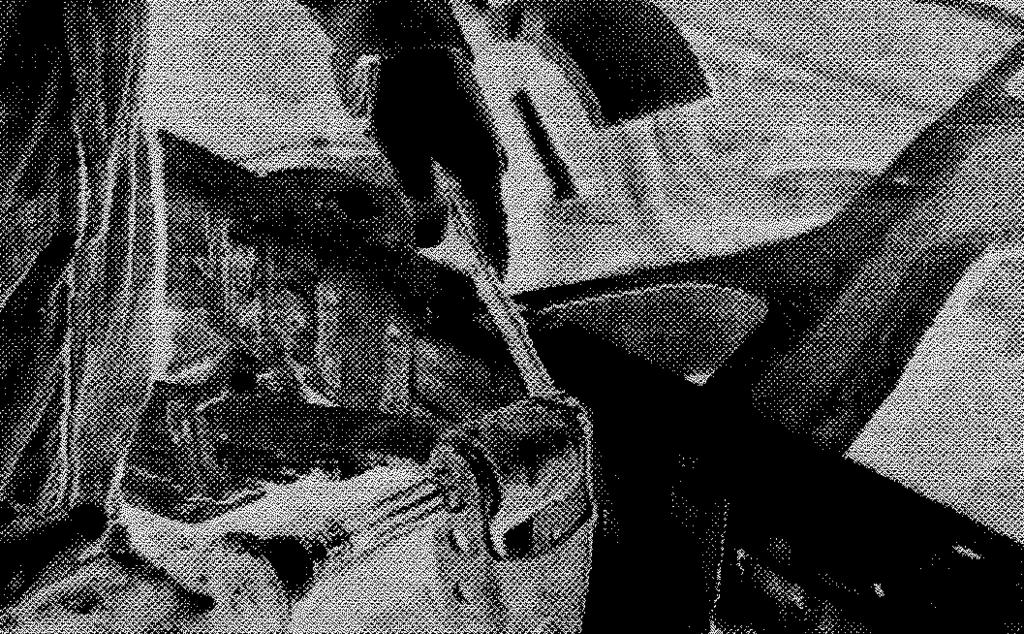
2 3. Remove the lower shock mounting hardware so the shocks are free from the rear end. Lower the floor jack so that all the pressure is off the leaf spring assemblies. CAUTION: Leaf springs are under tension use caution when disconnecting. (PHOTO 2) 4. Remove the bolts and nuts from the spring hangers and lower the jack so the front spring eyes free themselves from the hangers. CAUTION: Do not let the rear axle drop to the point where the brake lines and/or drive shaft are strained. You may want to use a jack stand to support the rear end housing at this point. (PHOTOS 3 & 4) 5. Unbolt the stock emergency brake bracket from the spring hanger. The other cable feed through a hole in the hanger. A section of the material must be cut away in order to free the cable from the hanger. CAUTION: Always wear eye protection when using power tools. (PHOTOS 5 & 6) 6. The rivets must be removed from the stock hangers. This can be done several ways. Shown here is the use of an air chisel. Cutting a slot in the head of the rivet aids in the removal of the rivet head. Grinding the heads of the rivets is an alternative method. CAUTION: Always wear eye protection when using power tools. (PHOTOS 7 & 8) 7. Remove the stock hangers from the frame. Drive the remainder of the rivet from the frame using an air chisel or similar tool. (PHOTO 9) 8. There is a bed bracket welded to the chassis that must be notched for clearance, where the new spring hanger will make contact. On the passenger side there is a bolt extending out of the chassis. This also will have to be ground off. CAUTION: Always wear eye protection when using power tools. (PHOTO 10) 9. NOTE: There is an additional hole in each hanger in this kit. This hole should be on the front side of the spring eye bolt (toward the front of the vehicle). 10. Install the new hangers on the frame using the ½ hardware supplied and torque to ft. lbs. (PHOTO 11) 11. Once the hanger is secured, drill and install the fifth (extra) bolt and nut into the hanger. Torque bolt to ft. lbs. IMPORTANT: This is a mandatory step in the installation procedure. (PHOTO 12) 12. Position the rear axle so there is no pressure on the leaf springs at the rear shackles. Remove the shackle bolts and stock shackles from the spring. CAUTION: Leaf springs are under tension use caution when disconnecting. (PHOTO 13) 13. The one-ton springs are equipped with an upper overload. This must be removed before completion of the installation. Support the axle with jack stands. Remove the U-bolts from the axle. Lift the spring from its position on the axle. Place the spring in a stable position in which it can be worked on. Be sure to mark the front of the springs to be sure you replace them correctly. 14. The spring center bolt must be removed in order to remove the upper overload spring and spacer. NOTE: You may want to clamp the spring pack together (all except the upper overload) to maintain leaf alignment. (PHOTO 14) 15. Once the spring center bolt is removed, the upper overload and steel spacer can be discarded. Push the new center bolt down through the spring pack from the top to bottom (the threads and the long nut will be on the bottom of the spring). 16. Thread the long nut on the center bolt and torque to ft. lbs. Cut off the remaining excess length of the bolt. 2
3 17. Remove the rivets securing the stock bump stop assembly by the frame rail. This can be accomplished by the same method used to remove the front hanger rivets. (PHOTOS 15 & 16) 18. Drill a 3/8 hole in the frame rail directly above the axle tube and install the kit supplied bump stop. 19. Re-install the front spring eye into the new front spring hanger. Put the new emergency brake adapter bracket into position and slide the spring eyebolt completely through the bracket, spring and hanger. Attach the washer and nut, but do not tighten at this time. (PHOTO 17) 20. Lift the rear of the spring up and place the new shackle on the spring. Re-install the spring eyebolt so that the head of the bolt is on the frame side of the shackle. (PHOTO 18) 21. Lower the shackle into the stock hanger on the frame and re-install the stock bolt. Attach the washers and nuts, but do not tighten yet. (PHOTO 19) 22. Remove the four overload pads from the chassis by removing the four bolts and nuts from each pad. (PHOTO 20) 23. Jack up the rear end so that the long nuts start to enter their position on the spring perches on the axle. Slide the 4-degree shims into place between the axle and the spring. The thick portion of the shim should be toward the front of the truck. Make sure that the shoulder of the shim is completely against the long nut. (PHOTO 21) 24. Place the stock U-bolts, axle plates and mounting hardware back into its stock location. Torque the U- bolts to 110 Ft. lbs. 25. Once the U-bolts are tight, raise the rear end with the jack until the frame begins to lift off the jack stands. Now tighten all six-spring eyebolts to factory specifications. (PHOTO 22) 26. Release pressure from the floor jack so the truck is again securely on the jack stands. 27. Slide drivers side emergency cable through the kit supplied bracket. The stock emergency brake bracket can now be attached to the new adapter bracket. Use the stock bolt and nut to mate the two pieces. There is a slot in the new bracket where the tab on the stock bracket fits. Make sure these are aligned and tightened completely. Re-install the factory grommet into the new adapter bracket. (PHOTOS 23, 24 & 25) IMPORTANT: The emergency cable must be re-adjusted to factory specifications after the installation of this kit. Failure to do so may damage the emergency brake system and/or the kit supplied bracket. 28. Install the kit supplied transmission tail shaft spacers by removing the stock transmission mounting bolts and raising the rear of the transmission with a jack or suitable lifting device. (PHOTO 26) To ease installation of the kit supplied transmission bolts; remove the bottom transmission mount nut and the transmission mount. Install the kit supplied transmission mount bolts through the transmission mount flanges and locate the kit-supplied spacers over the bolts with the kit supplied washers on the ends of the spacer tubes against the transmission housing and transmission mount. (PHOTO 27 & 28) Reinstall the transmission mount with the bolts and spacers intact and start all the hardware related to this mount before applying final torque. Torque the bottom transmission mount nut to Ft-lbs. and the kit supplied spacer bolts to Ft-lb. (PHOTO 29) 29. On an extended cab vehicle, it will be necessary to remove a portion of the under-cab cross member to allow drive shaft clearance after installation of the center carrier bearing spacer. To ease this process, remove the bolts that retain the center carrier bearing to the vehicle cross member. Slide the propeller shaft assembly as far to one side as possible. Locate the kit supplied template on the center of the 3
4 cross-member as directed by the instructions on the template. (PHOTO 30) After marking the front and rear of the cross member as directed (PHOTO 31), remove the section indicated with a Sawzall, plasma cutter or suitable tool. (PHOTO 32) CAUTION: Always wear eye protection when using power tools. 30. Lift the drive shaft assembly and install the kit supplied center carrier bearing and the vehicle cross member with the feet of the spacer down toward the vehicle cross member. (PHOTO 33) Install and torque the kit supplied hardware to Ft-lbs. 31. Install the kit supplied lower shock extensions making sure they slip into the cutout on the stock mounts. (PHOTO 34) Install the kit supplied 9/16 bolts, washers and spacers through the stock shock mounts and shock extensions. (PHOTO 35) Torque the 9/16 hardware to ft-lbs. Drill a 5/16 hole through the back of the stock shock mounts using the hole in the shock extensions as a guide. (PHOTO 36) Install and torque the kit supplied 5/16 hardware to ft-lbs. 32. Upgraded shocks can be installed at this time. Otherwise install the stock shock using the original mounting hardware. 33. Replace the truck bed. Be sure all eight bolts, ground straps, and filler neck hardware is replaced. 34. Install the wheels and tires, raise the truck, remove the stands and lower the truck to the ground. The installation is completed. IMPORTANT: Re-torque U-bolts after 100 and 500 miles. PART LIST FOR 6907 CHEVY REAR LOWERING KIT PART No. DESCRIPTION QTY Front Hanger, LH Front Hanger, RH Shackle Parking Brake Cable Bracket S 2 hock Ext ½ -20 x 1-1/4 NF Grade 8 CS ZP ½ -20 NF GRC LN ZP ½ A325 FW ZP Spring Center Bolt 3/8-24 x Coupling Nut 3/8-24 x 1-1/ Pinion Shim /16-12 x 3-1/2 Grade 5 CS ZP /16-12 Nylon LN ZP /16 A325 FW ZP Sleeve Urethane Bump Stop /16-18 x 1 Grade 5 CS /16-18 Nylon LN ZP /16 A325 FW ZP /16 x 20 Nylon LN ZP /16-20 x 3 NC Grade 8 CS ZP /16 A325 FW Carrier Bearing Spacer Transmission Spacer mm x 55mm Grade 8 ZP CS 2 4
5 /8 A325 FW ZP
6

7
8
9
INSTALLATION INSTRUCTIONS
 INSTALLATION INSTRUCTIONS ----1075 North Ave. Sanger, CA 93657-3539 toll free: 800-445-3767 web: www.belltechcorp.com---- 6419 HANGER & SHACKLE KIT FORD F-150 Congratulations! You were selective enough
INSTALLATION INSTRUCTIONS
 INSTALLATION INSTRUCTIONS ----1075 North Ave. Sanger, CA 93657-3539 toll free: 800-445-3767 web: www.belltechcorp.com---- 6592 REAR HANGER & SHACKLE KIT DODGE RAM 2500 / 3500 Congratulations! You were
INSTALLATION INSTRUCTIONS
 INSTALLATION INSTRUCTIONS ----1075 North Ave. Sanger, CA 93657-3539 toll free: 800-445-3767 web: www.belltechcorp.com---- 6420 SHACKLE & HANGER KIT FORD F-350 Congratulations! You were selective enough
INSTALLATION INSTRUCTIONS
 INSTALLATION INSTRUCTIONS ----1075 North Ave. Sanger, CA 93657-3539 toll free: 800-445-3767 web: www.belltechcorp.com---- 6570 SPRING HANGER KIT DODGE DAKOTA Congratulations! You were selective enough
INSTALLATION INSTRUCTIONS
 INSTALLATION INSTRUCTIONS ----3300 W. Pontiac Way Clovis, CA 93612 toll free: 1-800-445-3767 web: www.belltech.com---- 6605-6607 FLIP KIT CHEVROLET C/K 1500 / 2500 PICK UP Thank you for being selective
INSTALLATION INSTRUCTIONS
 INSTALLATION INSTRUCTIONS ----1075 North Ave. Sanger, CA 93657-3539 toll free: 800-445-3767 web: www.belltechcorp.com---- 6636 HANGER and SHACKLE KIT 95 99 CHEVY TAHOE / GMC YUKON Congratulations! You
INSTALLATION INSTRUCTIONS
 INSTALLATION INSTRUCTIONS ----1075 North Ave. Sanger, CA 93657-3539 toll free: 800-445-3767 web: www.belltechcorp.com---- 5052 AIR JACK 94-99 DODGE ½ TON RAM C-1500 Congratulations! You were selective
INSTALLATION INSTRUCTIONS
 INSTALLATION INSTRUCTIONS --300 W PONTIAC WAY CLOVIS, CA 93612 local: 559-875-0222 fax: 559-876-2249 toll free: 800-445-3767-- 6446 5.5 REAR AXLE FLIP-KIT 2015+ FORD F-150 2WD SHORT BED Thank you for being
INSTALLATION INSTRUCTIONS
 INSTALLATION INSTRUCTIONS ----3300 W. Pontiac Way Clovis, CA 93612 toll free: 1-800-445-3767 web: www.belltech.com---- 4985 DRIVE LINE SPACER INSTALLATION INSTRUCTIONS Thank you for being selective enough
INSTALLATION INSTRUCTIONS
 INSTALLATION INSTRUCTIONS --1075 North Ave. Sanger, CA 93657-3539 local: 559-875-0222 fax: 559-876-2259 toll free: 800-445-3767-- 6522 REAR AXLE FLIP & SHACKLE KIT 07-UP CHEVROLET 1500 REGULAR CAB ONLY
INSTALLATION INSTRUCTIONS
 INSTALLATION INSTRUCTIONS ----1075 North Ave. Sanger, CA 93657-3539 toll free: 800-445-3767 web: www.belltechcorp.com---- 5001 AIRJACK AIR SPRING SUSPENSION SYSTEM C 1500 AND C-2500 Congratulations! You
INSTALLATION INSTRUCTIONS
 INSTALLATION INSTRUCTIONS --1075 North Ave. Sanger, CA 93657-3539 local: 559-875-0222 fax: 559-876-2259 toll free: 800-445-3767-- 2000 1984 1991 Toyota 2 Wheel Drive Pick-Ups 2 Front Dropped Spindles Congratulations!
INSTALLATION INSTRUCTIONS
 INSTALLATION INSTRUCTIONS 6525 REAR AXLE FLIP & HANGER KIT 5 OR 6 INCH LOWERING 14&UP CHEVROLET SILVERADO / GMC SIERRA 1500 Thank you for being selective enough to choose our high quality BELLTECH PRODUCT.
INSTALLATION INSTRUCTIONS
 INSTALLATION INSTRUCTIONS 1075 North Ave. Sanger, CA 93657-3539 local: 559-875-0222 fax: 559-876-2259 toll free: 800-445-3767 3100-3200 3 DROPPED FRONT SPINDLE 73-87 1/2 TON C-10 PICK-UP / 1/2 TON BLAZER
INSTALLATION INSTRUCTIONS
 INSTALLATION INSTRUCTIONS --1075 North Ave. Sanger, CA 93657-3539 local: 559-875-0222 fax: 559-876-2259 toll free: 800-445-3767-- 5317 & 5318 4 INCH REAR LOWERING KIT 09&UP DODGE RAM 1500 2WD Thank you
INSTALLATION INSTRUCTIONS
 INSTALLATION INSTRUCTIONS ----3300 W. Pontiac Way Clovis, CA 93612 toll free: 1-800-445-3767 web: www.belltech.com---- 6686 REAR AXLE FLIP-KIT 2004 DODGE RAM REGULAR CAB, QUAD CAB Thank you for being selective
INSTALLATION INSTRUCTIONS
 INSTALLATION INSTRUCTIONS 2005 2010 DROPPED SPINDLE DATSUN 720 2 WHEEL DRIVE PICK-UPS NISSAN HARDBODY 2WD PICK-UPS Congratulations! You were selective enough to choose a BELLTECH PRODUCT. We have spent
INSTALLATION INSTRUCTIONS
 INSTALLATION INSTRUCTIONS 6523 & 6524 C-NOTCH KIT 07&UP CHEVROLET SILVERADO / GMC SIERRA 1500 REQUIRES MODIFIED EXHAUST Thank you for being selective enough to choose our high quality BELLTECH PRODUCT.
INSTALLATION INSTRUCTIONS
 INSTALLATION INSTRUCTIONS --1075 North Ave. Sanger, CA 93657-3539 local: 559-875-0222 fax: 559-876-2259 toll free: 800-445-3767-- 2103 FRONT DROP BALL JOINT INSTALLATION INSTRUCTIONS CHEVY COLORADO Congratulations!
PRO COIL INSTALLATION
 INSTALLATION INSTRUCTIONS 1075 North Ave. Sanger, CA 93657-3539 local: 559-875-0222 fax: 559-876-2259 toll free: 800-445-3767 12463-12464 PRO COIL INSTALLATION 2007 IMPORTANT NOTE THIS KIT GIVES YOU THE
INSTALLATION INSTRUCTIONS
 INSTALLATION INSTRUCTIONS 6612/6616 & 6614/6618 REAR AXLE FLIP-KIT 1999-UP CHEVROLET SILVERADO/GMC SIERRA 1500 Congratulations! You were selective enough to choose a BELLTECH PRODUCT. We have spent many
INSTALLATION INSTRUCTIONS
 INSTALLATION INSTRUCTIONS --1075 North Ave. Sanger, CA 93657-3539 local: 559-875-0222 fax: 559-876-2259 toll free: 800-445-3767-- 2509 2 DROP SPINDLE 2WD 4WD AWD >>> Must Use 17 Wheels or larger
INSTALLATION INSTRUCTIONS
 INSTALLATION INSTRUCTIONS --1075 North Ave. Sanger, CA 93657-3539 local: 559-875-0222 fax: 559-876-2259 toll free: 800-445-3767-- 2505 Lowering Spindle Assembly Installation Instructions ½ TON SILVERADO
Super Duty Front Air Bag Installation Instructions
 2005-2010 Super Duty Front Air Bag Installation Instructions Congratulations! You have just purchased the best engineered, highest quality front air suspension kit available on the market for your 2005-2010
INSTALLATION INSTRUCTIONS
 INSTALLATION INSTRUCTIONS --1075 North Ave. Sanger, CA 93657-3539 local: 559-875-0222 fax: 559-876-2259 toll free: 800-445-3767-- 2511 2 DROP SPINDLE 2WD (Must Use 17 or larger wheels AND be used for 3+
Toyota Tundra Tow Kit Installation Instructions
 2007-2013 Toyota Tundra Tow Kit Installation Instructions Congratulations! You have just purchased the best engineered, highest quality air suspension kit available on the market for your 07-14 Toyota
Dodge Ram 2500/3500 Tow Kit Installation Instructions
 2003-2010 Dodge Ram 2500/3500 Tow Kit Installation Instructions Congratulations! You have just purchased the best engineered, highest quality air suspension kit available on the market for your 2003-2010
INSTALLATION INSTRUCTIONS
 INSTALLATION INSTRUCTIONS ----3300 W. Pontiac Way Clovis, CA 93612 toll free: 1-800-445-3767 web: www.belltech.com---- 4809 2 DROP SPRING KIT Nissan Titan 05+ Thank you for being selective enough to choose
INSTALLATION INSTRUCTIONS
 INSTALLATION INSTRUCTIONS 1075 North Ave. Sanger, CA 93657-3539 local: 559-875-0222 fax: 559-876-2259 toll free: 800-445-3767 2350 2 DROP SPINDLE 2WD (Must Use 18 Wheels or larger see instructions on Pg.
25011 ADJUSTABLE STRUT GMC ENVOY & TRAILBLAZER RAISING AND LOWERING STRUT
 INSTALLATION INSTRUCTIONS 1075 North Ave. Sanger, CA 93657-3539 local: 559-875-0222 fax: 559-876-2259 toll free: 800-445-3767 25011 ADJUSTABLE STRUT 02-07 GMC ENVOY & TRAILBLAZER RAISING AND LOWERING STRUT
INSTALLATION INSTRUCTIONS
 INSTALLATION INSTRUCTIONS 1075 North Ave. Sanger, CA 93657-3539 local: 559-875-0222 fax: 559-876-2259 toll free: 800-445-3767 av1075 North Ave Sanger, CA 93657-3539 local: 559-875-8883 fax: 559-875-9883
INSTALLATION INSTRUCTIONS
 INSTALLATION INSTRUCTIONS --1075 North Ave. Sanger, CA 93657-3539 local: 559-875-0222 fax: 559-876-2259 toll free: 800-445-3767-- 5547 REAR ANTI-SWAY BAR 1997-03 FORD F-150 Crew Cab, Harley Edition, &
INSTALLATION INSTRUCTIONS
 INSTALLATION INSTRUCTIONS 2100 DROPPED FRONT SPINDLE CHEVROLET 2WD S-10 / S-15 PICKUP / BLAZER / JIMMY, including models with ABS General Motors G-Body Rear Wheel Drive Cars CONGRATULATIONS! You were selective
INSTALLATION INSTRUCTIONS
 INSTALLATION INSTRUCTIONS --1075 North Ave. Sanger, CA 93657-3539 local: 559-875-0222 fax: 559-876-2259 toll free: 800-445 3767 5557 REAR ANTI-SWAY BAR 05-UP NISSAN TITAN CONGRATULATIONS! You were selective
INSTALLATION INSTRUCTIONS
 INSTALLATION INSTRUCTIONS --300 W PONTIAC WAY CLOVIS, CA 93612 local: 559-875-0222 fax: 559-876-2249 toll free: 800-445-3767-- 25007 LIFT / LOWERING STRUT 2015+ FORD F-150 2WD (+1 to -3 ) 2015+ FORD F-150
37-39 TCI Chevy Rear 4-Link Kit Installation Instructions
 37-39 TCI Chevy Rear 4-Link Kit Installation Instructions 1-800-984-6259 www.totalcostinvolved.com Read and understand these instructions before starting any work! SUPPORT VEHICLE WITH JACK STANDS BEFORE
CHECK ALL PARTS INCLUDED IN THIS KIT TO THE PARTS LIST BEFORE INSTALLATION. IF ANY PIECES ARE MISSING, PLEASE CONTACT: TOTAL COST INVOLVED
 1949-1954 TCI Engineering Chevy Rear 4-Link Coil-Over & Air Bag Kit Installation Instructions 1-866-925-1101 www.totalcostinvolved.com Read and understand these instructions before starting any work! CHECK
INSTALLATION INSTRUCTIONS
 INSTALLATION INSTRUCTIONS 2500 DROPPED FRONT SPINDLE CHEVROLET C / K and G.M.C. SIERRA 1500 / 2500 / 3500 Pick-Ups Congratulations! You were selective enough to choose a BELLTECH PRODUCT. We have spent
GM HD Heavy Duty 4 Link Tow Kit Installation Instructions
 2001-2010 GM HD Heavy Duty 4 Link Tow Kit Installation Instructions Congratulations! You have just purchased the best engineered, highest quality air suspension kit available on the market for your 2001-2010
INSTALLATION INSTRUCTIONS QA1 P/N R , R , R R , R , R F100 Rear Coil-over Conversion System
 INSTALLATION INSTRUCTIONS QA1 P/N R120-170, R120-200, R120-250 R220-170, R220-200, R220-250 65-72 F100 Rear Coil-over Conversion System TOOLS AND SUPPLIES REQUIRED Floor Jack Two (2) Jack Stands Drill
05+ Toyota Tacoma Rear Shock Hoop Install Notes Part# 86460
 159 North Maple St. Unit J, CORONA CA 92880 P. 951-737-9682 F. 951-737-9006 WWW.CHAOSFAB.COM 05+ Toyota Tacoma Rear Shock Hoop Install Notes Part# 86460 Note: This kit is designed to work with the Total
LIFT-503. BMF Lift Kit. Club Car Precedent. Installation Instructions
 LIFT-503 BMF Lift Kit Club Car Precedent Installation Instructions Contents of LIFT-503 Club Car Precedent BMF Lift Kit: a (1 ea.) BMF Front Suspension b (1 ea.) Driver Side Upper A-Arm (Shipped Loose)
INSTALLATION INSTRUCTIONS
 INSTALLATION INSTRUCTIONS 2351 2 DROP SPINDLE 2WD ONLY >>> CANNOT USE STOCK WHEELS you MUST use 20 wheels or larger see instructions on pg. 3
A. Tools Needed:
 92723200A 2014 GM 2 FRONT & 4 REAR LOWERING KIT Thank you for choosing Rough Country for all your suspension needs. Rough Country recommends a certified technician install this system. In addition to these
720BAG GM 2 FRONT & 4 REAR LOWERING KIT
 *720BAG2* 720BAG2 92720200 07-13 GM 2 FRONT & 4 REAR LOWERING KIT Thank you for choosing Rough Country for all your suspension needs. Rough Country recommends a certified technician install this system.
DO NOT GRIND ANY WELDS
 1 READ FIRST! PLEASE READ THROUGH ALL OF THE INSTRUCTIONS AND ENSURE THAT YOU UNDERSTAND THEM. BE SURE THAT YOU HAVE ALL THE REQUIRED GSI COMPONENTS, BASIC TOOLS, AND SKILLS. CUTTING THIS KIT REQUIRES
INSTALLATION INSTRUCTIONS
 INSTALLATION INSTRUCTIONS 2102 LOWERING SPINDLE ASSEMBLY 1998-UP CHEVROLET / GMC BLAZER / X-TREME / JIMMY / ENVOY 2 Wheel Drive Congratulations! You were selective enough to choose a BELLTECH PRODUCT.
LIFT-506 BMF Lift Kit Club Car DS Gas & Electric Installation Instructions
 LIFT-506 BMF Lift Kit Club Car DS Gas & Electric 2003.5-09 Installation Instructions Contents of LIFT-506 Club Car DS BMF Lift Kit: a (1 ea.) BMF Front Suspension b (1 ea.) Driver Side Upper A-Arm c (1
GM Street Scraper Instructions
 GM 92-00 3500 Street Scraper Instructions 1. Remove bed from truck. 2. Using floor jack, jack up rear of truck at axle till the tires are off the ground. 3. Support truck at the frame in front of axle
88-98 GM 2-3 SUSPENSION KIT
 92754500 Thank you for choosing Rough Country for your suspension needs. 88-98 GM 2-3 SUSPENSION KIT Rough Country recommends a certified technician installs this system. In addition to these instructions,
JEEP JK 4 LONGARM. Tools Needed: Thank you for choosing Rough Country for your suspension needs.
 921786000 Thank you for choosing Rough Country for your suspension needs. JEEP JK 4 LONGARM Rough Country recommends a certified technician install this system. In addition to these instructions, professional
USE THE PARTS LIST BELOW TO MAKE SURE YOUR KIT IS COMPLETE BEFORE INSTALLATION. IF ANY PIECES ARE MISSING, PLEASE CONTACT:
 1955-1959 Chevy Truck Rear Leaf Spring Kit Install Instructions Tech Line: 1-855-693-1259 www.totalcostinvolved.com Read and understand these instructions before starting any work! USE THE PARTS LIST BELOW
05-07 F250 6 SUSPENSION KIT
 92159300 Stabilizer Drop Brackets Track Bar Bracket Control Arm Bracket Brake Line Drop Bracket Sway Bar Link Ext. Hardware Bags Pitman Arm 6111 Add-a-leaf 6578 3 Block and U-Bolt Kit 05-07 F250 6 SUSPENSION
Chevrolet 3100 IFS Kit
 1947-54 Chevrolet 3100 IFS Kit Congratulations on your purchase on what we believe is the finest IFS kit available for 1947-54 Chevrolet pickups with stock frames. We have invested many hours into designing
INSTALLATION INSTRUCTIONS
 INSTALLATION INSTRUCTIONS --1075 North Ave. Sanger, CA 93657-3539 local: 559-875-8883 fax: 559-875-9883 toll free: 800-595-7016-- 90211 ST COILOVER GT BMW 3 Series E36 Sedan, Coupe, Convertible, Wagon
WARNING!!! READ AND UNDERSTAND ALL INSTRUCTIONS BEFORE PROCEEDING. MAKE SURE THAT YOU HAVE ALL TOOLS AND PARTS BEFORE BEGINNING THE INSTALLATION.
 INSTALLATION INSTRUCTIONS FOR 2007-2015 JEEP JK 3 SUSPENSION LIFT SYSTEM PART NUMBER 587 WARNING!!! READ AND UNDERSTAND ALL INSTRUCTIONS BEFORE PROCEEDING. MAKE SURE THAT YOU HAVE ALL TOOLS AND PARTS BEFORE
FTS21031BK Rear Leaf Spring Hanger GM 2500 HD 4WD
 4331 EUCALYPTUS AVE. ~~ CHINO, CA 91710 909-597-7800 Fax 909-597-7185 FTS21031BK Rear Leaf Spring Hanger 2001-2006 GM 2500 HD 4WD PARTS LIST: Qu a Part # Description 1 FT20250BK Front Hanger Bracket Driver
WARNING DO NOT EXCEED THE MANUFACTURER S RECOMMENDED GROSS VEHICLE WEIGHT RATING (GVWR).
.") WARNING DO NOT EXCEED THE MANUFACTURER S RECOMMENDED GROSS VEHICLE WEIGHT RATING (GVWR). As in any suspension installation, it is the installer s responsibility to assure a correct installation. The installer
WARNING DO NOT EXCEED THE MANUFACTURER S RECOMMENDED GROSS VEHICLE WEIGHT RATING (GVWR). As in any suspension installation, it is the installer s responsibility to assure a correct installation. The installer
2017 Current Ford Raptor Bump Stop Kit Installation Instructions
 2017 Current Ford Raptor Bump Stop Kit Installation Instructions PREPARATION 1. Disconnect the negative terminal on the battery. Park the vehicle on level ground and set the emergency brake. 2. We recommend
Detroit Speed, Inc. Mini-Tub Kit Chevy Nova, Oldsmobile Omega, Pontiac Ventura P/N: &
 Detroit Speed, Inc. Mini-Tub Kit 1968-74 Chevy Nova, Oldsmobile Omega, Pontiac Ventura P/N: 041207 & 041208 Item Component Quantity 1 DSE Mini Tubs 1968-74 X-Body 2 2 Rear Upper Shock Crossmember 1 3 Upper
LIFT Drop Spindle Lift Kit E-Z-Go RXV Gas or Electric Installation Instructions
 LIFT-107 6 Drop Spindle Lift Kit E-Z-Go RXV Gas or Electric Installation Instructions Contents of LIFT-107 E-Z-Go RXV Drop Spindle Lift Kit: a (1 ea.) Driver Side Spindle b (1 ea.) Passenger Side Spindle
INSTALLATION INSTRUCTIONS
 INSTALLATION INSTRUCTIONS --1075 North Ave. Sanger, CA 93657-3539 local: 559-875-8883 fax: 559-875-9883 toll free: 800-595-7016-- 90281 ST COILOVER GT Chrysler 300C 8cyl Type LX Congratulations! You were
USE THE PARTS LIST BELOW TO MAKE SURE YOUR KIT IS COMPLETE BEFORE INSTALLATION. IF ANY PIECES ARE MISSING, PLEASE CONTACT:
 60-65 Ford Falcon Triangulated 4-Link Suspension Installation Instructions Tech Line: 1-855-693-1259 www.totalcostinvolved.com Read and understand these instructions before starting any work! USE THE PARTS
Installation Instructions
 Installation Instructions 6 Suspension System FTS25005BK / FTS25006BK 2006-2012 Nissan Frontier 2wd/4wd SHORT BED ONLY Tool List: (not included) Floor Jack & Jack Stands Assorted Metric & S.A.E Sockets
QUALITY INTEGRITY INNOVATION SERVICE
 30630 Lift Kit Warrior recommends this system be installed by a certified technician. In addition to these instructions, professional knowledge of disassembly and reassembly procedures as well as post
INSTALLATION INSTRUCTIONS
 INSTALLATION INSTRUCTIONS --1075 North Ave. Sanger, CA 93657-3539 local: 559-875-8883 fax: 559-875-9883 toll free: 800-595-7016-- 90310 ST COILOVER GT Ford Focus Sedan Congratulations! You were selective
LIFT Standard A-Arm Lift Kit Club Car Precedent Installation Instructions
 LIFT-563 6 Standard A-Arm Lift Kit Club Car Precedent Installation Instructions Contents of LIFT-563 Club Car Precedent Lift Kit: a (1 ea.) Front Suspension b (1 ea.) Driver Side Upper A-Arm c (1 ea.)
Tools Needed: Class 8.8 Class MM 55ft/lbs 75ft/lbs 14MM 85ft/lbs 120ft/lbs 16MM 130ft/lbs 165ft/lbs 18MM 170ft/lbs 240ft/lbs
 921788000 JEEP JK 6 LONGARM Rough Country recommends a certified technician install this system. In addition to these instructions, professional knowledge of disassemble/reassembly procedures as well as
IMPORTANT WARRANTY & INSTALLATION INSTRUCTIONS ATTACHED
 IMPORTANT WARRANTY & INSTALLATION INSTRUCTIONS ATTACHED Please Forward All Attached Information to Consumer Warranty Not Valid Unless Returned to CORSA Exhaust STOP Please take time to read and understand
kelderman air ride 2003 & Newer Dodge Rear 5-6 Lift Kit Warranty Disclaimer Notice Read Before Beginning Installation
 Air Ride Conversion System Installation Instructions kelderman air ride The difference in the ride is like night and day Inside this manual: 2003 & Newer Dodge Rear 5-6 Lift Kit Tools required for installation
Nissan Titan 6 Front & 4 Rear Suspension Kit
 92187500 Thank you for choosing Rough Country for all your suspension needs. Nissan Titan 6 Front & 4 Rear Suspension Kit Rough Country recommends a certified technician install this system. In addition
05-07 F250 6 SUSPENSION KIT
 92158000 05-07 F250 6 SUSPENSION KIT Thank you for choosing Rough Country for your suspension needs. Rough Country recommends a certified technician installs this system. In addition to these instructions,
AIR SUSPENSION KIT HP UNIVERSAL AIR SUSPENSION KIT
 AIR SUSPENSION KIT HP10019 - UNIVERSAL AIR SUSPENSION KIT KIT CONTENTS A A D B Make sure all the items shown in the photo are provided in your kit before starting the installation. J V III D D D VII I
08-10 F OR 6 SUSPENSION KIT
 92159400 Thank you for choosing Rough Country for your suspension needs. 08-10 F250 4.5 OR 6 SUSPENSION KIT Rough Country recommends a certified technician installs this system. In addition to these instructions,
INSTALLATION INSTRUCTIONS FOR: RE DOOR JK WRANGLER RE DOOR JK WRANGLER 3.5 STANDARD SUSPENSION SYSTEM
 RUBICON MANUFACTURING INC. 3290 MONIER CIR., RANCHO CORDOVA, CA. 95742 916-473-4600 INSTALLATION INSTRUCTIONS FOR: RE7122 2 DOOR JK WRANGLER RE7142 4 DOOR JK WRANGLER 3.5 STANDARD SUSPENSION SYSTEM Safety
159 North Maple St. Unit J, CORONA CA P F
 159 North Maple St. Unit J, CORONA CA 92880 P. 951-737-9682 F. 951-737-9006 WWW.CHAOSFAB.COM 2005+ Tacoma 4WD/Pre-Runner Rear Mid-Travel Spring-Under Installation Instructions Part#86450 Leaf Spring Note:
JEEP JK 4 SUSPENSION KIT
 92168100 Thank you for choosing Rough Country for your suspension needs. JEEP JK 4 SUSPENSION KIT Rough Country recommends a certified technician install this system. In addition to these instructions,
Please read these instructions completely before proceeding with the installation.
 Fits Multi-Leaf Steel Spring Models Only. P/N 59111 This kit is for a 2" drop Please read these instructions completely before proceeding with the installation. by MN-346 (03006) ECN3100 Nylon Nut Upper
COMPETITION ENGINEERING. 80 Carter Drive P.O. Box 1470 Guilford, CT Phone: (203) Fax: (203)
 Fax: (203)") INSTALLATION INSTRUCTIONS P/N: C2094 SLIDE-A-LINK The Slide-A-Link by Competition Engineering is designed for use in Stock Eliminator and Bracket Racing vehicles. The rigid front mount assembly clamps
INSTALLATION INSTRUCTIONS P/N: C2094 SLIDE-A-LINK The Slide-A-Link by Competition Engineering is designed for use in Stock Eliminator and Bracket Racing vehicles. The rigid front mount assembly clamps
*1234BAG1 1234BAG WD CHEVY/GM LIFT N200
 *1234BAG1 1234BAG1 921234N200 99-06 2WD CHEVY/GM 1500 6 LIFT Thank you for choosing Rough Country for all of your suspension needs. Rough Country recommends a certified technician installs this system.
/3500 Dodge 5 Long Arm Kit
 92137900A 11-12 2500/3500 Dodge 5 Long Arm Kit Thank you for choosing Rough Country Suspension for your Off Road needs. Rough Country recommends a certified technician installs this system. In addition
Installation Instructions
 Installation Instructions 5 COILOVER CONVERSION FTS24087 2007-15 JEEP JK PARTS LIST: FTS24087BK 5" JK CO Hoop BX FT50377 Hardware Sub- Assembly QTY Part # Description QTY Part # Description 1 FT50349BK
IMPORTANT WARRANTY & INSTALLATION INSTRUCTIONS ATTACHED
 IMPORTANT WARRANTY & INSTALLATION INSTRUCTIONS ATTACHED Please Forward All Attached Information to Consumer Warranty Not Valid Unless Returned to CORSA Exhaust STOP Please take time to read and understand
INSTALLATION INSTRUCTIONS
 INSTALLATION INSTRUCTIONS --1075 North Ave. Sanger, CA 93657-3539 local: 559-875-8883 fax: 559-875-9883 toll free: 800-595-7016-- 90504 ST COILOVER GT Acura Integra DC2 Congratulations! You were selective
Installation Instructions. 6 Basic System FTS21060BK / FTS21061BK / FTS21042BK GM 2WD C1500 P/U ONLY
 Installation Instructions 6 Basic System FTS21060BK / FTS21061BK / FTS21042BK 2007-13 GM 2WD C1500 P/U ONLY 2007-13 GM 1500 Truck Basic System FTS21060BK / FTS21061BK / FTS21042BK 2007-13 GM 2WD C1500
02-10 GM 2500HD / HD & HD CLASSIC 6 2WD SUSPENSION KIT
 92122000 92127400 02-10 GM 2500HD / 01-06 1500HD & 07 1500HD CLASSIC 6 2WD SUSPENSION KIT Thank you for choosing Rough Country for your suspension needs. Rough Country recommends a certified technician
INSTALLATION INSTRUCTION 88578
 INSTALLATION INSTRUCTION 88578 For Rancho Suspension System RS6579B: 4WD Dodge 1500 & 2500 READ ALL INSTRUCTIONS THOROUGHLY FROM START TO FINISH BEFORE BEGINNING INSTALLATION Rev E IMPORTANT NOTES! WARNING:
Suzuki Samurai to Toyota Front Spring Swap Kit, with Missing Link Shackles (SKU#SSP-TSFM) Installation Instructions
 Installation Instructions") Suzuki Samurai to Toyota Front Spring Swap Kit, with Missing Link Shackles (SKU#SSP-TSFM) Installation Instructions CAUTION: Safety glasses should be worn at all times when working with vehicles and related
Suzuki Samurai to Toyota Front Spring Swap Kit, with Missing Link Shackles (SKU#SSP-TSFM) Installation Instructions CAUTION: Safety glasses should be worn at all times when working with vehicles and related
CAUTION: Never work on a hot exhaust system. Allow time for the vehicle to cool. Always wear eye protection when working under a vehicle.
 Please take time to read and understand these installation instructions. CORSA Exhaust System Installation We recommend that the installation of this system be performed by a qualified service center or
2011-UP CHEVY/GM 2500/3500 HD 7.5 NTD DROP LIFT KIT
 921253X00B 2011-UP CHEVY/GM 2500/3500 HD 7.5 NTD DROP LIFT KIT Thank you for choosing Rough Country for all of your suspension needs. Rough Country recommends a certified technician installs this system.
08-10 F SUSPENSION KIT
 92147800 Thank you for choosing Rough Country for your suspension needs. 08-10 F250 4.5 SUSPENSION KIT Rough Country recommends a certified technician installs this system. In addition to these instructions,
INSTALLATION INSTRUCTION 88092
 INSTALLATION INSTRUCTION 88092 FOR RANCHO SUSPENSION SYSTEM RS6592: NISSAN XTERRA & 2WD FRONTIER READ ALL INSTRUCTIONS THOROUGHLY FROM START TO FINISH BEFORE BEGINNING INSTALLATION Rev C IMPORTANT NOTES!
Rusty s XJ Cherokee 4.5 Spring Pack Kit RK-405SP-XJ INSTALLATION INSTRUCTIONS
 Rusty s XJ Cherokee 4.5 Spring Pack Kit RK-405SP-XJ INSTALLATION INSTRUCTIONS Last Revised: 1.10.18 Rusty s Off-Road Products Introduction: Rusty s recommends that this installation be performed by a certified
HP10019 KIT. Universal AMP Air Suspension Kit
 HP10019 KIT Universal AMP Air Suspension Kit Use the most advanced air springs on the market to eliminate your vehicle s sag, sway and bottoming out. Pacbrake air suspension levels your truck s stance
XJ CHEROKEE LIFT KIT
 92162300 84-01 4.5 XJ CHEROKEE LIFT KIT Thank you for choosing Rough Country for your suspension needs. Rough Country recommends a certified technician installs this system. In addition to these instructions,
Nissan Titan 4 Front & 2 Rear Suspension Kit
 92187400 Nissan Titan 4 Front & 2 Rear Suspension Kit Thank you for choosing Rough Country for all your suspension needs. Rough Country recommends a certified technician install this system. In addition
8" 4-LINK SUSPENSION SYSTEM. Ford Super Duty 4WD Part#:
 Part#: 013813 8" 4-LINK SUSPENSION SYSTEM Ford Super Duty 4WD 2011-2016 Rev. 051817 491 W. Garfield Ave., Coldwater, MI 49036. Phone: 517-279-2135 E-mail: tech-bds@sporttruckusainc.com Read And Understand
DO NOT GRIND ANY WELDS! DO NOT QUENCH WELDS WITH WATER OR OIL. ALLOW TO AIR COOL.
 1 READ FIRST! PLEASE READ THROUGH ALL OF THE INSTRUCTIONS AND ENSURE THAT YOU UNDERSTAND THEM. BE SURE THAT YOU HAVE ALL THE REQUIRED GSI COMPONENTS, BASIC TOOLS, AND SKILLS. CUTTING THIS KIT REQUIRES
INSTALLATION INSTRUCTIONS P/N: C2094 SLIDE-A-LINK
 INSTALLATION INSTRUCTIONS P/N: C2094 SLIDE-A-LINK The Slide-A-Link by Competition Engineering is designed for use in Stock Eliminator and Bracket Racing vehicles. The rigid front mount assembly clamps
Ford F-150 4WD 6" Suspension Lift Installation Instructions
 2004-2008 Ford F-150 4WD 6" Suspension Lift Installation Instructions www.skyjacker.com Required Tool List: Safety Glasses Metric / Standard Sockets & Wrenches Spring Compressor Floor Jack Jack Stands