W209 Convertible Top Issue Hydraulic Leak
|
|
|
- Adrian Dorsey
- 5 years ago
- Views:
Transcription
.")
1 W209 Convertible Top Issue Hydraulic Leak I wanted to share my experience of tackling the repair of my 2004 CLK500 W209 top not working. Hope this will help other DIY ers. Like many others, my top did not open completely stopped in the middle of opening. Had to push and shove the pieces and get the car home. I knew NOTHING about convertible tops (my first convertible). I jumped on internet and started researching. Needless to say, I found a lot of posts by others having the same issue and one common resource amongst other DIY ers was the forums. The WIS on bulletings boards helped but it assumed you had all the tools and above average knowledge of autorepair. I also found certain steps missing. There are a lot of blogs on W208 vs W209. Since I am paranoid about making things worse, I wanted to find the exact step by step before I start. So I spent about 2 3 days on assembling the pieces and approach. Since I relied on a lot of kind DIY ers who posted their experiences, I wanted to give back and share my approach. Please use this as a guide as I am sure there are better ways of doing it. This is meant only to document what I did on my 2004 W209. Documents needed: Manually open/close top (THIS IS A MUST KNOW): WIS Manuals (Good reference). In particular the rear sear and rear side panel removal that can be found here: class w209/ clk350 soft top problem.html Absolute Tool Needed: Cylinder Bolt Retaining Pin removal tool. I used a cotter pin removal tool that I bought for $12 at an auto store. Go get one (see below). Other special tools needed are some Torx of varies sizes and plastic prying tools.


2 FINDING THE LEAK Seems there are 2 reasons your top wont work hydraulic issues or some sensor switches not working. I would recommend you check your fluid level in the hydraulic pump first. It is easy to do versus having to check all the sensors. Remove driver side panels in the trunk to get to the pump. If the fluid level is low, you have a hydraulic leak. My tank showed loss of fluid.
. 2. Refill hydraulic fluid to MAX. 3.")


3 To check if you also have a limit sensor switch issue and also pinpoint location of leak, here is what I did: 1. Place paper towels under/around all cylinders (see pictures of paper towels). 2. Refill hydraulic fluid to MAX. 3. Put top down normally using the button. I was able to go through a complete cycle of open which tells me the limit switches are good. 4. Manually open the top and check your paper towels and fluid level in pump. I found fluid I just filled is gone and the paper towels under my main cylinders were leaking. If you do not find any leaks under cylinders, then your leak is at the pump (refer to the end of this document for pump removal to check for leak)

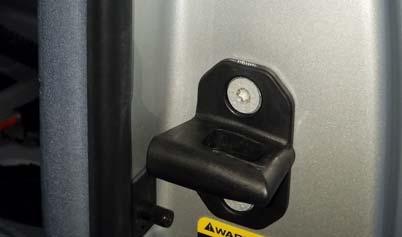
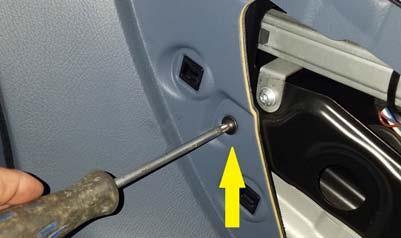
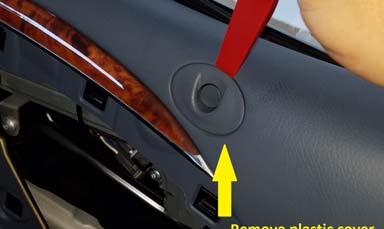
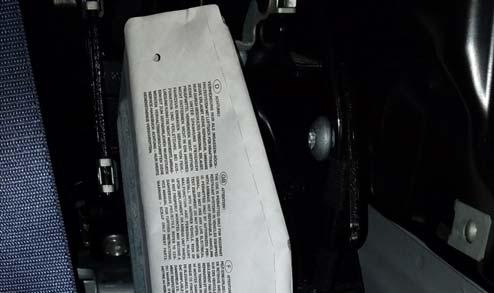
4 Rear Seat Removal You will have to remove the rear seat to get to the main cylinders. I used the directions on how to remove the rear seat (use WIS document). Pretty straight forward except you need to remove the plastic bolts that are anchoring the back of the seat cushions. Once those are removed, the back cushions come out easily. Your car will look like this:


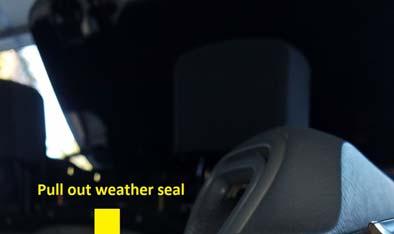
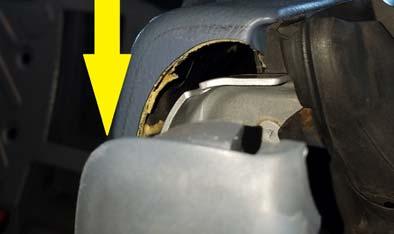
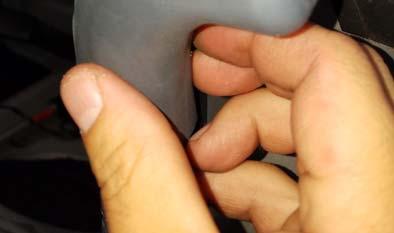
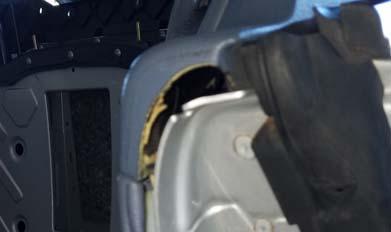

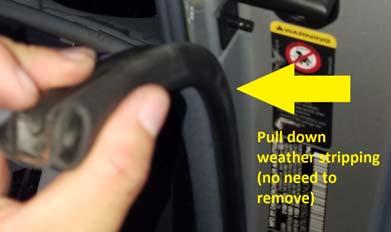

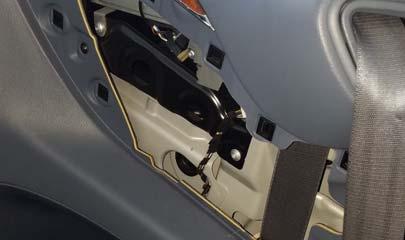
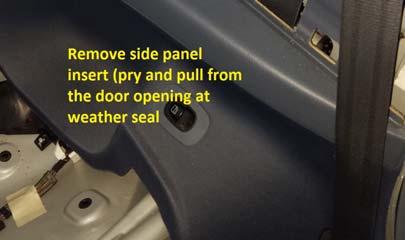
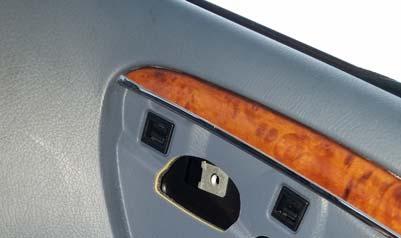
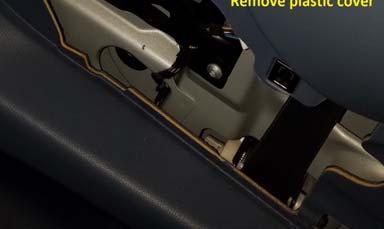
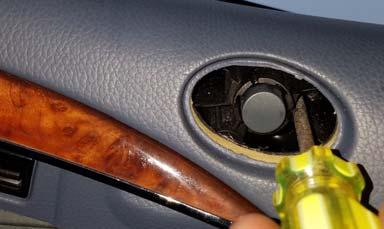
5 Removing the side panels, I did the following:

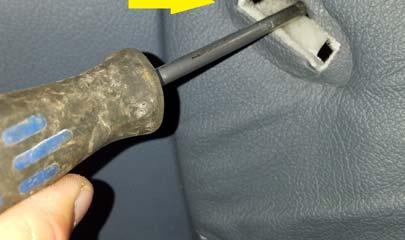


6


7


8


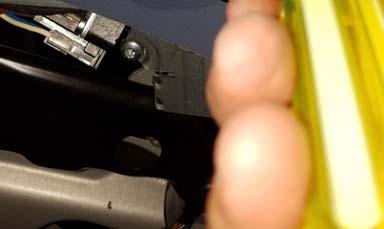
9 Now you can see the bottom of main cylinders and the bow cylinders. I debated on replacing just the main, but suspecting that the others will leak soon as well and I didnt want to go through all this again, I opted to replace them all. Note I had to use my car while waiting for parts so I put the seat belts anchors back.


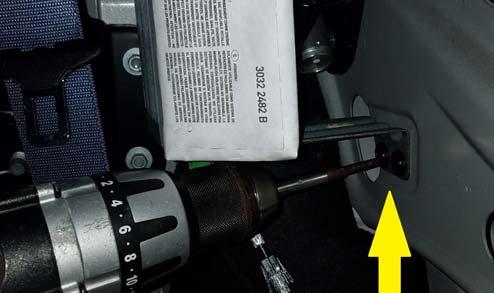
10 EXTRACTING THE CYLINDERS FOR SHIPMENT The Front Cylinder first. Open the top manually with the top stowed in the rear compartment, follow the WIS PDF and manually opening the top to place the cover in the compartment. You want the top to look like this: Open the cover to get to the front cylinders. Remove the bolts per below picture. Flip the assembly over.


11


12 Zip tie a bag over the lines to catch any hydraulic fluid. I put the cover back because I need to drive the car. Close the top so you can access the top of the main and bow cylinders from the rear opening. Removing the main cylinders and bow cylinders next: From your back seat, remove the bottom bolts of main and bow cylinders


13 Remove the bolts to both main and bow cylinders. This will free up the bottom of these cylinders. Go to the rear compartment with the rear window folder up to expose the cylinders, remove the top of the main and bow cylinders. Bow cylinder is with retaining clip latch; main cylinder is via retaining pin. Disconnect lines. Zip lock the lines to prevent fluid draining. You now have a total of 5 cylinders in hand.

. DO NOT REMOVE bolt.")


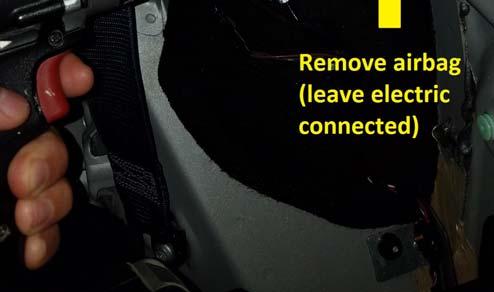
14 Last Rear Compartment Cylinders With the compartment cover open, unlatch the retaining bolt clip (easier from here). DO NOT REMOVE bolt. Close the compartment cover to get to the trunk. Remove the retaining pin and bolt on the bottom of the cylinders. Follow the cylinder to the top and now remove the retaining bolt clip previously unclipped. Remove the compartment cover cylinders. The driver side has the sensor switch which you can unclip and remove. Zip ties a bag over the lines to catch any hydraulic fluid.


15 With the driver side cylinder removed, you can also pull out the pump to see if there is a leak. There is a bolt securing the pump assembly to the side panel you need to remove. Then just wiggle it out of its foam well. Hopefully yours is not leaking. You will need to refer to other doc on removing the pump. I was fortunate enough not to have to deal with that. You can manually close and lock the top now since it will take time to get the rebuild parts back. A word on where you should get it repaired. I actually look into rebuilding the seals myself and decided not to hard to find parts and I didn t want to screw up the cylinders. I shopped around on rebuild services also. Top Hydraulic had the best prices and reviews, plus they are and have been a great resource for us DIY ers. Good luck in your repairs.
BMW E61 Hydraulic Pump replacement instructions
 BMW E61 Hydraulic Pump replacement instructions This DIY will guide you through the tasks needed to successfully replace your defective tailgate hydraulic pump Difficulty 3 of 10. The most difficult part
BMW E46 Convertible Hydraulic Line #23 Replacement Guide Created by taylor192 of E46Fanatics.com
 BMW E46 Convertible Hydraulic Line #23 Replacement Guide Created by taylor192 of E46Fanatics.com BMW E46 Line #23 Replacment Guide, page 1 of 23 Background: Line #23 runs from the valve block on the driver's
Door panel removal F07 5 GT
 Things needed Decent plastic trim removal tools Torx 30 Spare door clips 07147145753 I got away with a set of 5 but if I did it again I d be cautious and get 10. From prior experience if they are damaged
Door Panel Removal & Window Stop Adjustment
 Door Panel Removal & Window Stop Adjustment By: Jeff Wolford Disclaimer: This is simply an article of how I fixed my car. I m not responsible if you break, scratch, or mess up anything following my example.
Peugeot 406 Coupe: Delocking your boot V.1 April 2005
 This is a first stab at a DIY guide to de-locking your 406 Coupe. It isn t a hard modification to do yourself, but you do need to be confident working on your cars electrics and removing and refitting
Sunroof Repair. Sunroof Repair TSB. The sunroof repair kit available for the J30 is part number Y20. See images at bottom of document.
 Sunroof Repair This document is the text/images from the TSB (technical service bulletin) issued by Infiniti concerning the repair procedure for sunroof issues. Be advised that this is a LARGE, TIME-CONSUMING
Mercedes-Benz W209. Soft Top Operation Diagnostic Aid. Page 1. W209 Soft Top Operation Diagnostic Aid V 1.2
 Mercedes-Benz W209 Soft Top Operation Diagnostic Aid Page 1 Page 2 Hydraulic Parts Cylinder Designation Name of Cylinder 1 Hydraulic Pump - A2098000648 2 Front Lock Cylinder - A2098001172 3 Left Soft Top
BEW engine timing belt replacement procedure from MOGolf (as demonstrated on a 2004 Jetta).
.") BEW engine timing belt replacement procedure from MOGolf (as demonstrated on a 2004 Jetta). Based on the procedure published by Volkswagen, but modified for the "average" shadetree mechanic. Some special
BEW engine timing belt replacement procedure from MOGolf (as demonstrated on a 2004 Jetta). Based on the procedure published by Volkswagen, but modified for the "average" shadetree mechanic. Some special
Smart Opener Retrofit by Richard Bevan (bimmerfest riku2)
") Smart Opener Retrofit by Richard Bevan (bimmerfest riku2) Document history V 1.0 02.04.2015 Document created. Introduction This document tells how to retrofit the smart opener to a 2011 BMW 5 series (F10).
Smart Opener Retrofit by Richard Bevan (bimmerfest riku2) Document history V 1.0 02.04.2015 Document created. Introduction This document tells how to retrofit the smart opener to a 2011 BMW 5 series (F10).
Bimmerboard How-Tos. E32 E34 E38 5HP30 Valve body restoration by Jeff Chia April 2008
 Bimmerboard How-Tos E32 E34 E38 5HP30 Valve body restoration by Jeff Chia April 2008 Updated Aug 2009 If this article has helped you, please donate to http://bimmerboard.com This doc is possible because
At Mark's suggestion I thought I'd write this up so future Coupe lovers can have as much fun* as I did with this job.
 At Mark's suggestion I thought I'd write this up so future Coupe lovers can have as much fun* as I did with this job. My enormous thanks to forum members, particularly glorfindel, for their advice when
CADILLAC CTS & CTS-V: (HAYNES REPAIR MANUAL) BY EDITORS OF HAYNES MANUALS
 BY EDITORS OF HAYNES MANUALS") CADILLAC CTS & CTS-V: 2003-2012 (HAYNES REPAIR MANUAL) BY EDITORS OF HAYNES MANUALS DOWNLOAD EBOOK : CADILLAC CTS & CTS-V: 2003-2012 (HAYNES REPAIR Click link bellow and free register to download ebook:
CADILLAC CTS & CTS-V: 2003-2012 (HAYNES REPAIR MANUAL) BY EDITORS OF HAYNES MANUALS DOWNLOAD EBOOK : CADILLAC CTS & CTS-V: 2003-2012 (HAYNES REPAIR Click link bellow and free register to download ebook:
CENTER BELT SYSTEM INSTALLATION INSTRUCTIONS CARCG121220
 CENTER BELT SYSTEM INSTALLATION INSTRUCTIONS 2013+ DODGE CHARGER Distributed by CARCG121220 Important Notice: Read all instructions before starting the installation of the seat. Before drilling or installing
Fitting the Bell Auto Services (B-A-S) TDV6 EGR Blanking Kit to a 2006 model Discovery 3 TDV6 HSE
 TDV6 EGR Blanking Kit to a 2006 model Discovery 3 TDV6 HSE") Fitting the Bell Auto Services (B-A-S) TDV6 EGR Blanking Kit to a 2006 model Discovery 3 TDV6 HSE Before I describe how I did this, I must first thank other members of the Disco3.co.uk forum (namely J,moore
Fitting the Bell Auto Services (B-A-S) TDV6 EGR Blanking Kit to a 2006 model Discovery 3 TDV6 HSE Before I describe how I did this, I must first thank other members of the Disco3.co.uk forum (namely J,moore
We all put our heads together to try and determine what the facts were. They were as follows:
 VWvortex Forums > Eos > How to solve (or prevent) Eos Roof leaks As many of you know, I don t own an Eos. This makes it difficult to provide practical advice based on my own experience with the car, as
Installing the Wireless Charging upgrade kit in a 2018 XT5 (Platinum version)
") Installing the Wireless Charging upgrade kit in a 2018 XT5 (Platinum version) September 2, 2018 Tools needed: Wireless charger upgrade kit Plastic trim tools 7 mm nut driver Background: I purchased the
Installing the Wireless Charging upgrade kit in a 2018 XT5 (Platinum version) September 2, 2018 Tools needed: Wireless charger upgrade kit Plastic trim tools 7 mm nut driver Background: I purchased the
Rear Wheel Removal (by BassCliff)
") Rear Wheel Removal (by BassCliff) Hello to my GS riding friends! After picking up a nail in my rear tire (while on the freeway at 75mph!) I thought I would take a few pictures to help illustrate the rear
Rear Wheel Removal (by BassCliff) Hello to my GS riding friends! After picking up a nail in my rear tire (while on the freeway at 75mph!) I thought I would take a few pictures to help illustrate the rear
W123 Transmission Vacuum Modulator Adjustment DIY - measure it the 'right' way
 W123 Transmission Vacuum Modulator Adjustment DIY - measure it the 'right' way Why do you need to do this?: You need to do this to properly check the internal hydraulic pressure of the transmission, either
~~~~~~~~~~~~~~~~~~~~~~~~~~~~~~~~~~~~~~~~~~~~~~~~ ~~~~~~~~~~~~~~~~~~~~~~~~~~~~~~~~~~~~~~~~~~~~~~~~
 ~~~~~~~~~~~~~~~~~~~~~~~~~~~~~~~~~~~~~~~~~~~~~~~~ GSB Design Concepts Runnin' At Redline 7/9/17 ~~~~~~~~~~~~~~~~~~~~~~~~~~~~~~~~~~~~~~~~~~~~~~~~ Guest Shot: Gene Mills I've known Gene for a number of years,
Traditional method Oil Change Instructions For VW 1.9 TDI
 Traditional method Oil Change Instructions For VW 1.9 TDI Created by DeafBug This document provides instructions on changing the oil and filter on a VW 1.9 TDI engines. All the pictures here are taken
Figure 1: Valve housing smooth vs. o-ring groove
 If you are driving an older Corvette, and by that I mean a C2 or C3, it will eventually get to a point where the Power Steering Control Valve (PSCV) will leak and require attention. In 2002, I had to repair
YOU MAY WANT TO FIRST TRY TO LOOSEN THE FILTER HOUSING
 2005 XC90 Tune-up (5-cyl) Including: Oil Change - Spark Plugs - Fuel Filter - Cabin Filter First off - let me say that I am an amateur (at best) mechanic, and I claim no responsibility for whatever you
Ford Racing BOSS 302 Engine Oil Cooler (11-14 GT)
") Tools needed: 14mm hex socket 7mm socket/wrench 8mm socket/wrench Ford Racing BOSS 302 Engine Oil Cooler (11-14 GT) 10mm socket (for airbox removal) ¾ inch or 19mm wrench Torque wrench Appropriate ratchets
Tools needed: 14mm hex socket 7mm socket/wrench 8mm socket/wrench Ford Racing BOSS 302 Engine Oil Cooler (11-14 GT) 10mm socket (for airbox removal) ¾ inch or 19mm wrench Torque wrench Appropriate ratchets
Installing Rear Brake Pads on a WK Jeep
 Installing Rear Brake Pads on a WK Jeep Step by Step By Chirpz Disclaimer: I do not claim that this procedure is the right way or even the best way to change your rear brake pads. This is what I did after
Restoring the Strategic Air & Space Museum s E-4B Model
 Restoring the Strategic Air & Space Museum s E-4B Model By Don Joy IPMS Fort Crook I received a request from the SASM (Strategic Air and Space Museum) to do a restoration of the model. They had a member
There is hence three things you can do - add oil, adjust the temp that the clutch begins to engage, or do both.
 As most of you may be aware, I have been doing a lot of research lately on our cooling system in the 80's including the fact that we have a dead spot on the OEM temp gauge which prompted me to not rely
List of parts needed below. Tools needed
 1 BMW 645 Coolant leak repair (Cap with Seal Repair and Expanding Coolant Pipe Installation w Pics) By Michael R. Brown (Estimated time to complete the job is 6-8 hrs) List of parts needed below. BMW PART
How to change Swirl Flaps, on Diesel BMW
 How to change Swirl Flaps, on Diesel BMW I am now going to show you how i did it on my car. May'sedition of Total BMW (still in WHSmiths) did a cover on how to change and modify Swirl flaps on a 330d engine,
Replacing a Brake Line by UCLA-Vstar, April 2007
 Replacing a Brake Line by UCLA-Vstar, April 2007 Replacing a brake line may seem intimidating if you ve never bled brakes before, and especially if you cannot find a stepby-step how-to. Here s a crude
YOUR CAR's COOLANT MUST BE COLD TO DO THIS. DON'T BE STUPID AND SCALD YOURSELF.
 I just read through the service manual, checked out Billman's recommendations, and tackled the coolant change on my 2003 s2000. I'm not a mechanic by trade but have done valve adjustments, head gaskets,
PLEASE READ THROUGH THE WHOLE WRITE UP BEFORE ACTUALLY USING IT!!!!
 JDM power folding mirror switch install into stock USDM harness. By: Greg L., Zeke21 on twinturbo.net PLEASE READ THROUGH THE WHOLE WRITE UP BEFORE ACTUALLY USING IT!!!! This is how I was able to get the
I cannot believe it has been so long since my last update. A lot has happened and I will try to bring everyone up to speed. First of all, I had my
 I cannot believe it has been so long since my last update. A lot has happened and I will try to bring everyone up to speed. First of all, I had my left knee replaced about 5 weeks ago. Needless to say
Air Compressor/Water Pump IV - Pilot Valve Stem, Test & Installation
 Page 1 of 8 Air Compressor/Water Pump Part IV Pilot Valve Stem, Test & Installation Nelson Riedel Nelson@NelsonsLocomotive.com Initial: 1/13/04 Last Revised: 0 Valve Test: I decided to test the steam valves
How To: Fix That Ugly Hanging E-Brake Cable A CFans Members Mod Project by dirtydawg
 How To: Fix That Ugly Hanging E-Brake Cable A CFans Members Mod Project by dirtydawg Skill Level: Easy Disclaimer: Please use caution and seek professional assistance when necessary. ColoradoFans.com,
Heater Core Replacement
 Heater Core Replacement Ok, I just finished replacing the heater core in my dad's '94 840Ci. While this is fresh in my mid I thought I would outline the procedure, I'm going from memory here, so I will
As stated, these are solely based off of how I like to do the Pre-Trip. I give my personal opinions as well as some helpful tips.
 Here are our sections: Engine Compartment Drivers Door Fuel Area Coupling System Trailer (Please note in the type of suspension your trailer has) Light Check In-Cab Inspection and Brake Tests You will
Changing the Struts on a WK Jeep CRD
 Changing the Struts on a WK Jeep CRD Step by Step By Chirpz Disclaimer: I do not claim that this procedure is the right way or even the best way to change your struts. This is what I did after reading
Manual Shift Transmission Fluid Change How Often Honda Civic
 Manual Shift Transmission Fluid Change How Often Honda Civic 1997 Honda Civic Manual transmission drain and refill. Tools: 3/8 How To Change Honda. If your engine will rev up, but the car won't shift into
2000 Mr2 Spyder Seat Cover Replacement Project
 2000 Mr2 Spyder Seat Cover Replacement Project Tool List: Plastic Trim Tool, Hog Ring Pliers, Medium or Heavy Duty Wire Cutters, 12mm socket, 14mm Socket, Ratchet, Extension, Flat Head Screwdriver & Gloves
Brake System Rebuilding the brake calipers
 Page 1 of 39 Brake System Rebuilding the brake calipers Written by the backyard hack mechanic Sean750 Document history: # 14 Jan 2004 added pictures of rear caliper rebuild kit # 13 Nov 2004 added more
FD Transmission Rebuild: Parts Inspection
 FD Transmission Rebuild: Parts Inspection Now that everything is disassembled, cleaned, and bagged in labeled Zip-Locs, it s time to decide what to replace. Warning: I m not a transmission specialist I
Hasse Mods for the Ampeg J20 Guitar Amp
 Hasse Mods for the Ampeg J20 Guitar Amp The following is adapted from a post I put up on The Gear Page, in the Amp Techincal forum. It shows the mods I did to my Ampeg J20. Okay, here s my mods for this
WARNING These following pages are instruction for C5 CE stripes; however, it is the same method applying vinyl. Please spend time to read thru these
 WARNING These following pages are instruction for C5 CE stripes; however, it is the same method applying vinyl. Please spend time to read thru these pages. At the end, it is your C5/C6 ME stripes' instruction.
The Invision kit comes with everything you need to install the DVD players into your X5; two leather headrests with integrated DVD players, two
 Our BMW X5 plays a lot of roles in our life daily driver, tow vehicle, household hauler, etc. but the most important is Mommy Mobile and road trip car. The X5 makes a great long distance cruiser; it comfortably
Tools & Parts I Used. Here's everything that comes with the kit.
 Ford Super Duty Power Tailgate Lock Install 2004 F250 4x4 XLT Sport Crew Cab Back to 2004 F250 Main Page This page describes the steps to install the Pop & Lock PL8250 power tailgate lock kit. This kit
2001 BMW X5 4.4i. Fuel Filter Replacement
 P P 2001 BMW X5 4.4i Fuel Filter Replacement Symptoms for Replacement: OBDII code P0171, Lean Bank1, which could be a bad or dirty MAF sensor Sluggish engine performance including hesitation with Wide
Ford F-150 Speaker Replacement Instructions
 Ford F-150 Speaker Replacement Instructions This article was downloaded from http://www.fordf150.net Be sure to go there to view and download the other how-to articles. Thanks to John Meyer for contributing
How To Build A DIY Portable Solar Power Generator (For Under $200)
") How To Build A DIY Portable Solar Power Generator (For Under $200) This project was born from a camping with my better half and a group of friends. These friends are not of our prepper mindset and as such
How To Build A DIY Portable Solar Power Generator (For Under $200) This project was born from a camping with my better half and a group of friends. These friends are not of our prepper mindset and as such
Procharger Stage II Intercooled Supercharger System (11-14 GT)
") Procharger Stage II Intercooled Supercharger System (11-14 GT) Installation Time: Approximately one day. Installed on 2012 Mustang GT 5.0/Manual Required Tools 3/8 Socket Set (Standard and Metric) 1/2
Procharger Stage II Intercooled Supercharger System (11-14 GT) Installation Time: Approximately one day. Installed on 2012 Mustang GT 5.0/Manual Required Tools 3/8 Socket Set (Standard and Metric) 1/2
We will be upgrading from the factory, paper-cone disgrace to an Infinity Kappa 62.9i:
 In order to fully round out your stereo upgrade, the factory rear speakers must go. This is another easy job to tackle, but the fitment of the package tray and being hunched over in the rear glass area
Automatic trunk lid retrofit BMW F10 Bj.2011 by laser21 bimmerfest.com
 Automatic trunk lid retrofit BMW F10 Bj.2011 by laser21 bimmerfest.com lukasko@gmail.com This is a short guide to help you retrofit the option SA316 - automatic trunk lid mechanism into your F10. That
Orientation and Conferencing Plan Stage 1
 Orientation and Conferencing Plan Stage 1 Orientation Ensure that you have read about using the plan in the Program Guide. Book summary Read the following summary to the student. Everyone plays with the
Some tips and tricks I learned from getting clutch out of vehicle Skoda Octavia year 2000
 Some tips and tricks I learned from getting clutch out of vehicle Skoda Octavia year 2000 Last change 2013-Oct-11 I bought Haynes manual for a starter. That s something well worth it s cost I believe.
Apologies for the absence of pictures during the removal. I was just getting on with it and completely forgot about taking pictures.
 Please note that this is exclusive to a non-sunroof vehicle. Those with sunroofs will have additional fittings/fixings to deal with, of which I have no knowledge of. Apologies for the absence of pictures
No Drill Modern Gas Shock Installation on a 1931 Ford Model A Coupe
 No Drill Modern Gas Shock Installation on a 1931 Ford Model A Coupe Today we are not going to cover something new but just a little insider info in to what we do during our time off at Apex Tool Company.
Rear Shock Replacement 2007 Honda Accord
 P a g e 1 Rear Shock Replacement 2007 Honda Accord This is step-by-step documentation for replacing the rear shock absorbers in a 2007 Honda Accord. Hopefully it will be of use to you if you are about
BMW 3 SeriesE90 - E93 Factory Alarm Install
 Instructions on a BMW 3 Series Factory Alarm Install. Written By: Danielle 2017 guides.drivediy.com Page 1 of 9 INTRODUCTION Tips on how to install a BMW 3 Series Factory alarm. Credit: CC 330i[E90Post.com
Troubleshooting Guide for Limoss Systems
 Troubleshooting Guide for Limoss Systems NOTE: Limoss is a manufacturer and importer of linear actuators (motors) hand controls, power supplies, and cables for motion furniture. They are quickly becoming
Please use this How to in conjunction with the workshop manual pdf on the same subject.
 Please use this How to in conjunction with the workshop manual pdf on the same subject. The workshop manual is a decent guide but fails to mention a few things which would hinder progress and probably
BMW 2002 M42 Swap Notes-THIS IS NOT FINISHED
 BMW 2002 M42 Swap Notes-THIS IS NOT FINISHED This document is to help those that want to install an m42 into a BMW 2002. It is based around an e30 engine, trans, and wiring. You can use the e36 block/head/wiring
Troubleshooting Guide for Okin Systems
 Troubleshooting Guide for Okin Systems More lift chair manufacturers use the Okin electronics system than any other system today, mainly because they re quiet running and usually very dependable. There
ALTERNATOR REPAIR FOR BMW 645 CI. E64 ENGINE N62 BY KEVIN BOWEN 6/9/2013
 ALTERNATOR REPAIR FOR BMW 645 CI. E64 ENGINE N62 BY KEVIN BOWEN 6/9/2013 Level of difficulty: If you follow these directions, moderate, hardest part is aligning the alternator back for repositioning. Length
Installing the Dan-Marc and Pingel setup.
 Installing the Dan-Marc and Pingel setup. This is an alternative to the OEM vacuum petcock. It's the setup I use and feel more comfortable with it. Many still like the OEM vacuum petcock and they can continue
Single Barrel Shotgun HPFP Install Guide
 Single Barrel Shotgun HPFP Install Guide Thank you for purchasing the VTT Single Barrel Shotgun HPFP upgrade kit! PLEASE READ THE ENTIRE GUIDE BEFORE BEGINNING INSTALLATION! The first thing you should
By Coranzo on VW Vortex:
 By Coranzo on VW Vortex: First off, let me just say, these bulbs are BRIGHT! They are a nice rich red LED that you see on newer high end cars nowadays. They have had these available for quite a while now
Repairing a Loose Headlight Reflector Volvo V70XC ? Mark Pilant
 Repairing a Loose Headlight Reflector Volvo V70XC 2001 200? Mark Pilant If you find yourself in a position where the headlight adjusters do not change the aiming of your headlight, it is possible one of
How to Replace the B2 Piston Bore Seal
 Page 1 Home Cars for sale Trucks for sale Where we are Links to other diesel sites About us Why diesel? Diesel Videos How they work How they sound FAQ Dodge Diesel Maintenance tips, parts and DIY DVD's
My experience with SeaBis electrolysis control system
 My experience with SeaBis electrolysis control system Since when I bought my sailing yacht in Spain in 2009 I noted some faster than usual corrosion at some specific places like inside anchor compartment
Changing the Power Steering Belt
 Changing the Power Steering Belt Brett Dukes (Maverick) from the BigJimny Forum has contributed this article to the Website. Many thanks. Whilst off-roading on Sunday, my alternator Fan Belt snapped -
There was some debate whether or not there was a write up, with Pictures, for replacing the ignition switch.
 Replacing the Ignition Switch - Step by Step with Pictures. http://forums.audiworld.com/showthread.php?p=18927576 (Corey 02ALMSTT) (With updates/corrections by Dave F.) February 1, 2013 (I = Corey, mostly)
SKID MARK GARAGE. Axillary Fuel Supply
 1 SKID MARK GARAGE Axillary Fuel Supply *Disclaimer: Our Axillary Fuel kits are designed to fit most late model GM vehicles with minimum modifications. While not quite a universal kit for all, it has been
ACURA NSX ABS/ALB Modulator Rebuild Procedure
 Version 03 ACURA NSX ABS/ALB Modulator Rebuild Procedure I rebuilt my 1991 ABS/ALB modulator using this procedure. Please note that this will not guarantee that your ABS/ALB system issues will be resolved
OEM Cruise Control Installation in GMC/Chevy NBS trucks
 OEM Cruise Control Installation in 99-02 GMC/Chevy NBS trucks May 2008 ~ Rampage_Rick Having just installed factory cruise control in my 00 Sierra, I thought I d share the fun. I followed the steps outlined
Rebuilding the Alternator for a 2007 Honda Accord 4CYL. Honda CYL Alternator (Denso)
") Rebuilding the Alternator for a 2007 Honda Accord 4CYL Honda 2007 4CYL Alternator (Denso) The OEM brushes and bearings for this alternator are available for purchase online. On my vehicle with ~240k miles,
Rebuilding the Alternator for a 2007 Honda Accord 4CYL Honda 2007 4CYL Alternator (Denso) The OEM brushes and bearings for this alternator are available for purchase online. On my vehicle with ~240k miles,
Here's the difference (externally) in the and 04+ bumper and headlights: (00-03 on top, 04 on bottom)
 in the and 04+ bumper and headlights: (00-03 on top, 04 on bottom)") OK guys, I've been meaning to post this for awhile.. well here it goes. I did the '04 front end conversion on my '01 about 4-5 months ago, but then the dealer had to buy the car back for legal reasons.
OK guys, I've been meaning to post this for awhile.. well here it goes. I did the '04 front end conversion on my '01 about 4-5 months ago, but then the dealer had to buy the car back for legal reasons.
K6JRF's Page formerly W6FZC
 K6JRF's Page formerly W6FZC My Mercedes Benz S500 Coupe (Updated: Nov 9, 2004) Analyze and Troubleshoot "Check Engine" MIL and Electronic Control Units (ECU)! Seat Belt Extender About one month ago, the
Fly Rocket Fly: Design Lab Report. The J Crispy and The Airbus A
 Fly Rocket Fly: Design Lab Report The J Crispy and The Airbus A380 800 Rockets: Test 1 Overall Question: How can you design a water, bottle rocket to make it fly a maximum distance. It needs to be made
INSTALLATION INSTRUCTIONS
 INSTALLATION INSTRUCTIONS FUEL SURGE TANK INSTALLATION KIT 1999-2006 BMW E46 COUPE Document# 19-0056 Support: info@radiumauto.com Note: This kit was designed for a standard single pump Radium Engineering
Hood stripes Tools needed from AutoZone or any auto parts store: bottle spray, squeegee, a towel that you re using to clean you car up after washing,
 WARNING These following pages are instruction for C5 CE stripes; however, it is the same method applying vinyl. Please spend time to read thru these pages. At the end, it is your C5 GS1 stripes instruction.
FILE # SCION FRS REPAIR MANUAL
 04 November, 2017 FILE # SCION FRS REPAIR MANUAL Document Filetype: PDF 498.5 KB 0 FILE # SCION FRS REPAIR MANUAL Follow up what we will offer in this article about scion frs repair manual. The way to
BMW 3 Series Oxygen Sensor
 1984-1991 BMW 3 Series Oxygen Sensor Replacement Replace an old oxygen sensor on your E30 for better gas mileage. Written By: Andrew Bookholt ifixit CC BY-NC-SA www.ifixit.com Page 1 of 10 INTRODUCTION
10 Critical Paint Meter Mistakes That Cost Unsuspecting Car Dealers A Fortune
 10 Critical Paint Meter Mistakes That Cost Unsuspecting Car Dealers A Fortune What You Learn In This Report Can Add $1,000's Of Additional Profit To Your Bottom Line...Every Month And Help You Avoid Disastrous
Now we re ready to install our new mounts. The picture on the right shows our old and new for comparison.
 Well I didn t have a chance to write last week so we have a little catching up to do. Last Sunday I started out with setting up a jig to weld in the mounts. The jig is made out of a old fork tube that
How to install the Barnett clutch and the stronger Oil Pump Drive Gear
 How to install the Barnett clutch and the stronger Oil Pump Drive Gear Written by WildFred I m from Germany so please excuse my English and the spelling. The following procedure is a combination of the
BMW E46 318i M43, from r.
 BMW E46 318i M43, from 08.2001r. Originally mounted steering wheel (with a airbag for two plugs): Pic. 1 Steering wheel to be mounted (along with the radio control and cruise control): Pic. 2 For start
2003 BMW 325xi 2.5L Straight 6 About 120K Miles; Looks Well Kept Multi Strike COP Ignition. History. Customer bought used about 3 months ago
 2003 BMW 325xi 2.5L Straight 6 About 120K Miles; Looks Well Kept Multi Strike COP Ignition History Customer bought used about 3 months ago Claims since day one runs rough on cold start Sometimes MIL would
Ford 6.7 EGR Delete Kit
 Fits: 2011 12 Powerstroke 6.7L Read instructions thoroughly before proceeding! ***This kit may void factory warranty please check with manufacturer.*** ***This kit is intended for off road use only.***
 Page 1 of 14 This install requires work on your supplemental restraint system and could cause injury or damage to your car. If you are not comfortable performing the steps detailed here then do not attempt
Yikes98 My $0.02 DIY Steering Angle Sensor (SAS) Repair on BMW i e92
 Repair on BMW i e92") Yikes98 My $0.02 DIY Steering Angle Sensor (SAS) Repair on BMW 07 328i e92 First, thanks to all who posted on their SAS problems and pics. Using all that info I was able to piece together how to attack
Yikes98 My $0.02 DIY Steering Angle Sensor (SAS) Repair on BMW 07 328i e92 First, thanks to all who posted on their SAS problems and pics. Using all that info I was able to piece together how to attack
Anglefire s Guide to Radiator Replacement
 Land Rover Discovery 3 Anglefire s Guide to Radiator Replacement Mark Colston WWW.DISCO3CLUB.CO.UK August 2011 Version 1.0 Copyright Mark Colston Change Record. DATE Revision Update Notes Made By August
Bendix Hydroboost Repair
 Bendix Hydroboost Repair Report this image Pic 1 the leaky power piston seal... (probably master cyl too.) Pic 2 PS fluid after spider removal and MC actuator rod Pic 3 Removing the accumulator (note 1/8
2007 Crown Victoria Police Interceptor (P71) Blend Door Actuator Replacement (If I did it, you can too.)
 Blend Door Actuator Replacement (If I did it, you can too.)") 2007 Crown Victoria Police Interceptor (P71) Blend Door Actuator Replacement (If I did it, you can too.) I'm not saying this is the only way, or even the right way, but it worked for me. First time I've
2007 Crown Victoria Police Interceptor (P71) Blend Door Actuator Replacement (If I did it, you can too.) I'm not saying this is the only way, or even the right way, but it worked for me. First time I've
Rescuing a Saab 9-3 HOT Aero by Matt Barwell* *Raw and Unabridged
 Rescuing a Saab 9-3 HOT Aero by Matt Barwell* *Raw and Unabridged Had I not seen the 9-3 on Saab vs. Scepticism or dropped the mobile on my head that night, there is no way I d have purchased this car,
How Much Does It Cost To Switch From Manual To Automatic Transmission
 How Much Does It Cost To Switch From Manual To Automatic Transmission Can you change an Eagle Talon automatic transmission to a manual and about how much does it usually cost? You dont need a new engine
Speakers and Motors. Three feet of magnet wire to make a coil (you can reuse any of the coils you made in the last lesson if you wish)
") Speakers and Motors We ve come a long way with this magnetism thing and hopefully you re feeling pretty good about how magnetism works and what it does. This lesson, we re going to use what we ve learned
Speakers and Motors We ve come a long way with this magnetism thing and hopefully you re feeling pretty good about how magnetism works and what it does. This lesson, we re going to use what we ve learned
Removing your Two-blade Hartzell HC-12 (?) 20 prop off a Franklin Engine (Or How do I change the prop cylinder O-rings! )
 20 prop off a Franklin Engine (Or How do I change the prop cylinder O-rings! )") Removing your Two-blade Hartzell HC-12 (?) 20 prop off a Franklin Engine (Or How do I change the prop cylinder O-rings! ) If you are having oil leaking around the propeller piston/cylinder assembly and
Removing your Two-blade Hartzell HC-12 (?) 20 prop off a Franklin Engine (Or How do I change the prop cylinder O-rings! ) If you are having oil leaking around the propeller piston/cylinder assembly and
RATHBONE ENERGY BROADCAST BATTERIES
 RATHBONE ENERGY BROADCAST BATTERIES Since 1989 DO NOT DO A BATTERY REFILL BATTERY RECELL, EVER! THESE THINGS BELOW I HAVE KNOWN FROM PERSONAL INSPECTION SINCE 1989 TO PRESENT. THESE AMATEUR AND AMATEUR
Here I Will Explain How To Install Recon Cab Lights In A 3rd Gen Dodge Ram.
 1 P age Here I Will Explain How To Install Recon Cab Lights In A 3rd Gen Dodge Ram. *Now, There Are Many Ways of Installing Them, Including Wiring Methods, Wiring Connectors, And Other Variables - In This
4TH GEN SEATS IN A 3RD GEN TRUCK
 4TH GEN SEATS IN A 3RD GEN TRUCK by Flopster843 02 Oct 2016 If you drive a 3rd generation Dodge Ram truck, I am sure you have discovered that the OEM seats are not the greatest (Figure 1.) They are extremely
JEEP CHEROKEE, WAGONEER (XJ) FRONT BUMPER INSTALLATION INSTRUCTIONS KIT# W/ WINCH KIT# 83203
 FRONT BUMPER INSTALLATION INSTRUCTIONS KIT# W/ WINCH KIT# 83203") 3651 N Highway 89 Chino Valley, AZ 86323 (928) 636-7080 www.p-a-g.net JEEP CHEROKEE, WAGONEER (XJ) FRONT BUMPER INSTALLATION INSTRUCTIONS 1984-2001 KIT# 83202 1984-2001 W/ WINCH KIT# 83203 WARNING Before
3651 N Highway 89 Chino Valley, AZ 86323 (928) 636-7080 www.p-a-g.net JEEP CHEROKEE, WAGONEER (XJ) FRONT BUMPER INSTALLATION INSTRUCTIONS 1984-2001 KIT# 83202 1984-2001 W/ WINCH KIT# 83203 WARNING Before