Ohlins Shock Install and Rear Suspension Linkage Mod for the Aprilia RST 1000 Futura
|
|
|
- Maximilian Reeves
- 5 years ago
- Views:
Transcription
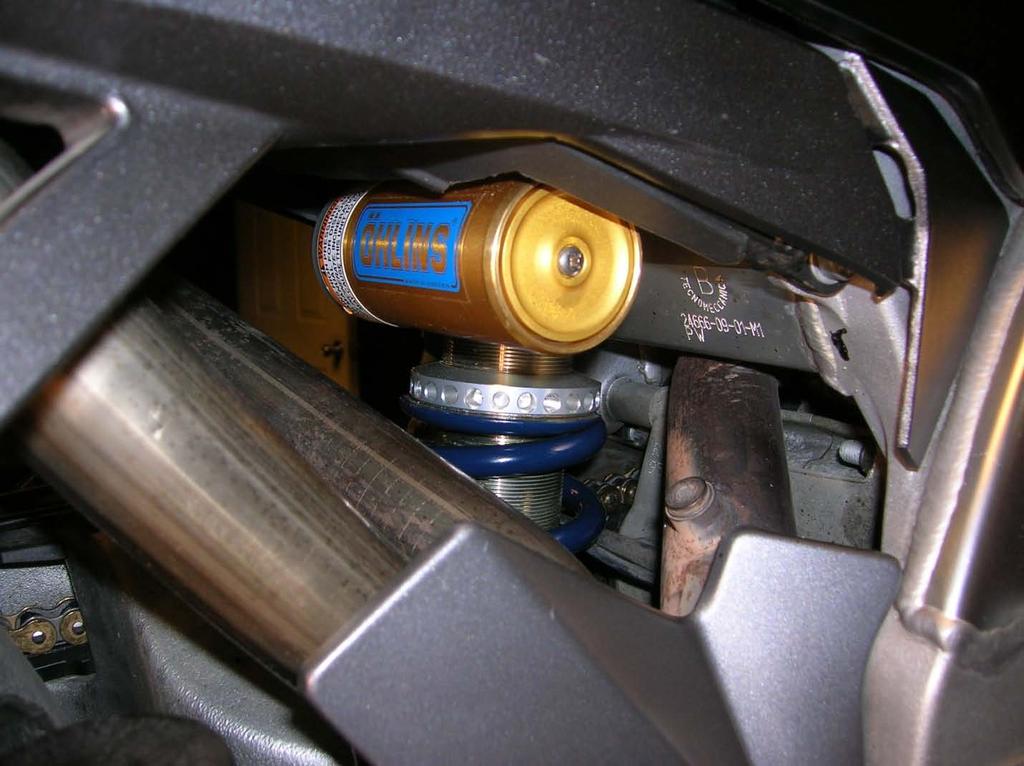
1 Ohlins Shock Install and Rear Suspension Linkage Mod for the Aprilia RST 1000 Futura I probably started researching this two years ago so I hope this info helps saves someone a lot of time and trouble. There are aftermarket shocks available from Penske and Wilburs, but if the thought of Ohlins on your bike makes you giddy, read on. You can find specific shock removal instructions elsewhere, but what follows is info that is specific to the Ohlins rear shock. I accessed the shock by tilting up the rear subframe and going in from the back. I have heard tell that it s possible to set the bike s centerstand on a board allowing the rear wheel to drop much lower than normal and removing the shock from the bottom. I chose to tear it down instead. (Besides, I didn t know about the other method ) The advantage to taking the whole bike down to bits is that you can clean places that have been neglected for miles for example, most of my wiring connections around the battery got cleaned and renewed in the process. The Ohlins Mille shocks that I am certain will fit are (drumroll, please ) AP8240 & AP8410. (Same as AP824 & AP841) There may be others too, but these are installed on forum member s bikes and working. The Ohlins shock type is 46PRCL. Add an S to the end for remote preload adjustment. Some Aprilia Mille s use a 56mm stroke (AP840) and the others are 65mm. You want 65mm. NOT 56mm. Shock length is 321mm. AF1 sells one for the Mille for about $1000 and last time I contacted Ed you could choose the spring rate. I would try and determine what AP**** number the AF1 shock is first before ordering just to be sure. The shock I used is an AP841 which I bought from a low mileage wreck on ebay for about $500 in the dead of winter. It does not have the remote preload adjuster so I had a preload collar and new Hyperco spring installed by Traxxion Dynamics which raised the cost another $ The preload adjuster adjusts by just sticking a bar into one of the many holes and turning...that s it. Easy. If you ve ever used the stock Ohlins spanner type with the two notched collars you know how bloody your knuckles can get. Sure the Hyperco spring is Royal Blue not Ohlins yellow, but then again I d prefer blue on my black bike before yellow anyway.

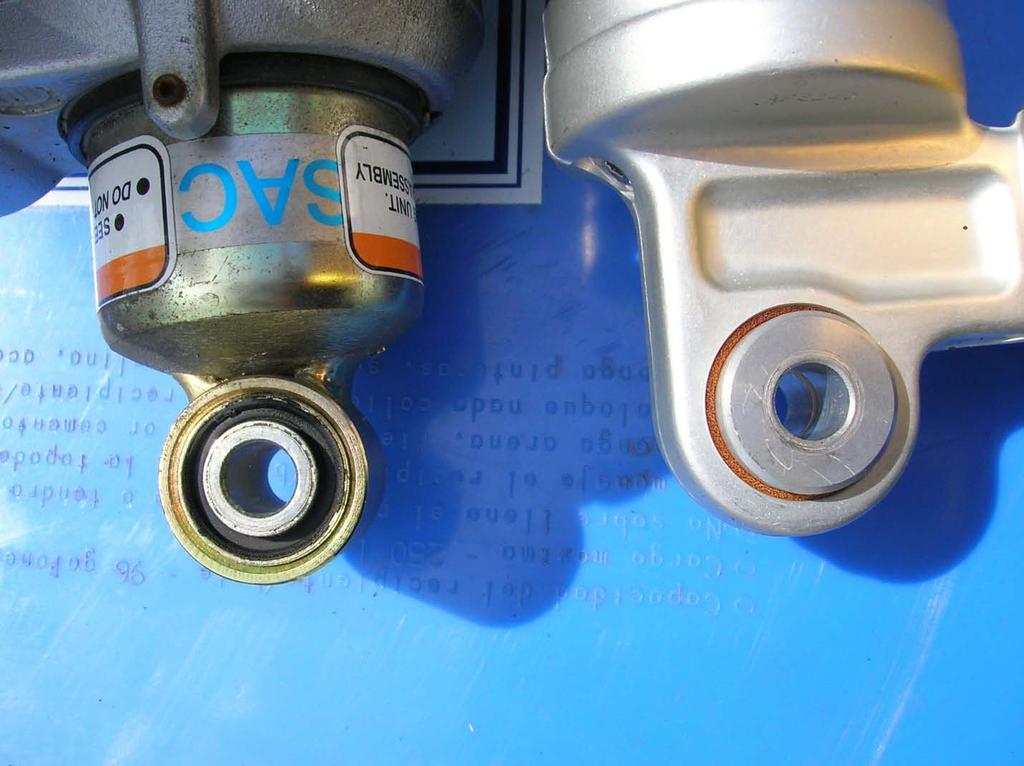
2 From their experience on Futuras with Penske shocks, Traxxion Dynamics recommended a 115N/mm spring, at least for my weight. (185lbs. w/o gear). I believe that is the stock Sachs spring rate as well. Hyperco is the spring used on Penske shocks. Stock the AP841 Ohlins spring had a 95N/mm. Forum member Deefred tried a 120 N/mm that was too hard and settled on a 110 N/mm that he s comfortable with. Dugkim is using a 95 N/mm that he rides two up with and it works for him go figure. I ve logged almost 1k miles now with this shock and the 115 N/mm feels great. The really good news is that mounting the shock is not a problem whatsoever. It was earlier thought that the width of the top mount might be an issue but it is indeed a direct bolt up. The stock Sachs shock top mount is 0.9 mm wider than the Ohlins, but the floating upper attaching bolt makes up for it.
3

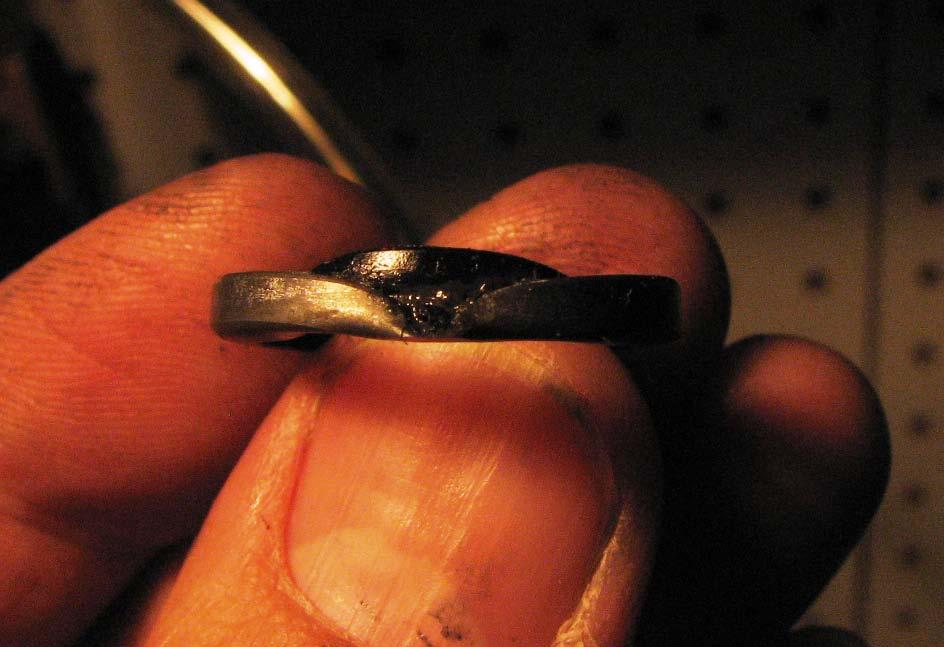
4 The head of the bolt passes right though the frame and contacts the shock which in turn seats on the collar (that I m holding in the photo) and is held by a lock nut. No worries. If you reuse the stock locknuts, a little dab of blue Locktite will do ya. I would say that the biggest challenge is the modification of the tray just in front of the battery slot. The top of the shock and the huge reservoir hit this tray so it either needs to be cut away or melted and reformed. This is before cutting

5 I thought about using an Ohlins with a remote reservoir, but Ohlin s info is so hard to find I d be researching for another year. The tray in question extends directly under the fuel tank banjo fittings and has drainage nipples underneath so that little drainage system for fuel leaks is jettisoned. A safety issue? Hardly. I ll take my chances. So after a go with the heat gun and losing most of the hair on my knuckles I decided to just cut the tray. This is after cutting

6 You may have better luck with the melting method, but I didn t have the patience. I used a combination of Dremel tool and a coping saw to do mine but I m sure there are better methods not involving molten plastic being flung. I left the two lengths on the sides, drilled small holes and zip tied them to the sub frame for extra strength to hold the weight of the battery. (see photo) So now you have a big hole and can see the top of the shock. If you happen to have a hugger you re in luck since that hole is a great way for mud and muck to enter the engine area from the rear wheel. Instead of installing a hugger my solution was to cut a thin piece of 1 mil sheet aluminium to fit the open area, drill holes and fasten it to the frame with the original mounting bolts.
 has had luck with melting the tray though, so it is a possibility.")
7 The rear of the plate sits perfectly in the recess of the remaining plastic tray up against the plastic ridge and is free to move ever so slightly with the shock if it needs to. At least one person (Defreed) has had luck with melting the tray though, so it is a possibility. This shock has an adjustable ride height so it s possible to jack the back end up a bit to tweak handling and quicken turn in. Lower the front, raise the rear yeah. Instant additional ground clearance. Just watch for the clearance between the bottom of the shock and the dogbone as it will eventually touch if adjusted out too far. Check the clearance with the suspension fully extended on the centerstand.

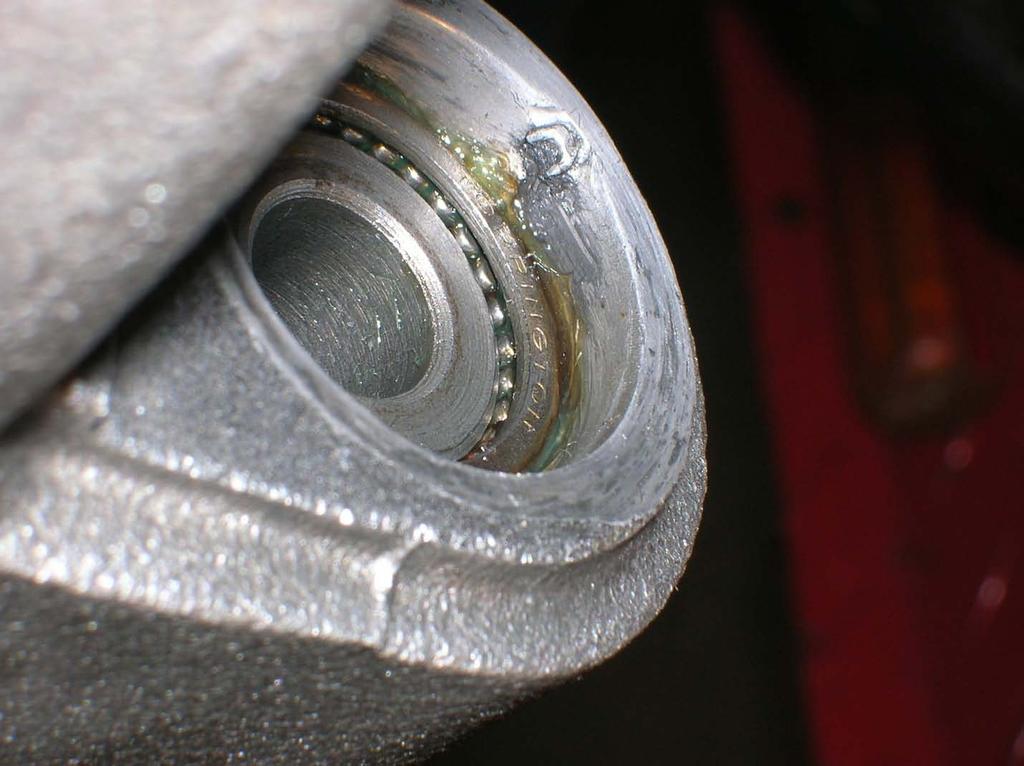
8 That brings us to the linkage. While the shock is out you ll want to inspect/lube the shock linkage bearings. With 20k plus on mine the bearings were in good shape but definitely needed grease. I believe the factory interval is 15000km so I was long overdue. If you use a pressure washer on your bike you can bet yours are bone dry and screaming for grease. Or worse yet, rusted beyond repair. The linkage uses loose needle bearings in flanged races so once you pull out the spacer the needle bearings are free to fall out. Watch for that because you can t buy just one needle. Put a clean white paper towel underneath what you re doing to see where they eventually will fall. If the spacer won t come out with your finger, you ve got rust. I wouldn t remove the seals unless you re changing them. Replacing all the seals as a precaution is fine, but they are $18 each from Aprilia (x6). Clean everything well and use quality waterproof grease like Bel-ray to pack them and hold them in place. I used a pick to get them back in place, and then slid the spacer back into the seal. The spacers should slide into the seal with a slight resistance which denotes a good seal. In my case one of the seals was botched at the factory because of a blob of metal on the seal surface of my swingarm which I had to Dremel smooth. They just banged it in and sent it out.
9
 shims in the 6 shims in the photo.")
10 Since it was apart I took the opportunity to shim the linkage since in stock form it s a real sloppy set up. Maybe Aprilia wanted it that way, but it seems to me that shims are a good idea. Kzmille was kind enough to set me up with a set of custom shims based on my measurements that fit perfectly. You can see 4 of the 6 (black) shims in the 6 shims in the photo. Yes, there is that much of a gap in stock form. I wish I would have taken a shot of the shims before installation, but the center hole fits perfectly over the spacer which is wide enough to cover the seal. It looks like the shims will also help protect the seals and keep the grease in somewhat better than having that area wide open to the elements with that huge gap. After I reassembled everything and torqued everything to specs, the dogbone swung back and forth like a clock pendulum yet had no side play sweet. I m still experimenting with damping settings, but I m very happy with this set up already. No more shimmy and shake! Well worth the effort. Big thanks to forum members Dugkim and Deefred for sharing their numbers with me.
11
Improving the gearshift feel in an SW20.
 Improving the gearshift feel in an SW20. Part one In 3 parts. The SW20 gearshift can be often be greatly improved by eliminating play in the shift linkages, and this article covers three areas that need
Installing LED lights in a Hypercharger By Keith Edwards Joker s Wild! (Wildjokr)
") Installing LED lights in a Hypercharger By Keith Edwards Joker s Wild! (Wildjokr) THINGS YOU WILL NEED: A Hypercharger (duh!) LEDs (The ones I got were from Benny Bryant at Fantasies on Wheels in Sylacauga,
Installing LED lights in a Hypercharger By Keith Edwards Joker s Wild! (Wildjokr) THINGS YOU WILL NEED: A Hypercharger (duh!) LEDs (The ones I got were from Benny Bryant at Fantasies on Wheels in Sylacauga,
There is hence three things you can do - add oil, adjust the temp that the clutch begins to engage, or do both.
 As most of you may be aware, I have been doing a lot of research lately on our cooling system in the 80's including the fact that we have a dead spot on the OEM temp gauge which prompted me to not rely
PLEASE READ THROUGH THE WHOLE WRITE UP BEFORE ACTUALLY USING IT!!!!
 JDM power folding mirror switch install into stock USDM harness. By: Greg L., Zeke21 on twinturbo.net PLEASE READ THROUGH THE WHOLE WRITE UP BEFORE ACTUALLY USING IT!!!! This is how I was able to get the
Now we re ready to install our new mounts. The picture on the right shows our old and new for comparison.
 Well I didn t have a chance to write last week so we have a little catching up to do. Last Sunday I started out with setting up a jig to weld in the mounts. The jig is made out of a old fork tube that
RZR 900 spring/shock installation
 RZR 900 spring/shock installation Thank you for purchasing the Shock Therapy Dual Rate Spring Kit for your RZR 900. Your item list: 2 Front upper coil springs, 2 Front lower coil springs, 2 Rear upper
Brake Upgrades for FWD/4WD with 5x100 stud pattern
 Brake Upgrades for FWD/4WD with 5x100 stud pattern These started out as my original front brakes, & because I m more of a twisty road person, than straight line speed, I didn t think they d be adequate.
Door Panel Removal & Window Stop Adjustment
 Door Panel Removal & Window Stop Adjustment By: Jeff Wolford Disclaimer: This is simply an article of how I fixed my car. I m not responsible if you break, scratch, or mess up anything following my example.
Some tips and tricks I learned from getting clutch out of vehicle Skoda Octavia year 2000
 Some tips and tricks I learned from getting clutch out of vehicle Skoda Octavia year 2000 Last change 2013-Oct-11 I bought Haynes manual for a starter. That s something well worth it s cost I believe.
Mikuni RS Carburetor Conversion
 Mikuni RS Carburetor Conversion After putting your carbies on the bench or the kitchen table if the wife is out, you will see that the linkages may be in different positions depending on which brand of
Slave Cylinder Weep Hole Drilling Procedure
 Slave Cylinder Weep Hole Drilling Procedure Tools Required: T20 Torx Driver T25 Torx Driver T25 Torx Bit with ¼ Ratchet Wrench 4mm Hex Key (Allen wrench) 5mm Hex Key 6mm Hex Key 8mm Hex Key 12mm Hex Key
 Installing Seat Belts in my Tudor August 2009 My '29 Tudor was restored about 25 years ago by my brother-in-law. He restored it to close to original, but made a few changes that many will claim are for
Improving the casting performance on old Ambassadeurs for free!
 Improving the casting performance on old Ambassadeurs for free! Whenever I acquire a fishing reel I will always strip it down and give it a service-it doesn t matter if the reel is new or old. Sometimes
My Hawk build Part 8 by Stuart Clarke
 My Hawk build Part 8 by Stuart Clarke Front hubs, brakes and brake lines. There was still no news on my rear springs so I thought I d find something else to get on with. I had the front hubs, brake calipers
Rear Wheel Removal (by BassCliff)
") Rear Wheel Removal (by BassCliff) Hello to my GS riding friends! After picking up a nail in my rear tire (while on the freeway at 75mph!) I thought I would take a few pictures to help illustrate the rear
Rear Wheel Removal (by BassCliff) Hello to my GS riding friends! After picking up a nail in my rear tire (while on the freeway at 75mph!) I thought I would take a few pictures to help illustrate the rear
Mark McDermott, Tom Di Nucci, and Doug Bailey Next we put Tom Di Nucci s 61 convertible up in the air.
 CADILLAC CLINIC On Saturday, March 12th we met at Cadillac of Lake Lanier in Gainesville for another of our famous Cadillac Clinics. Marty Pecora not only hosted and supplied his technical expert Lawrence,
Bag 1. Bag 1. Center Pivot. Center Pivot
 8 00734 01901 5 Center Pivot Bag 1 3374 - Center Pivot Socket 4019 - Alum Pivot ball 3254-2-56 Button Head *Note - Sometimes it is helpful to slightly over-tighten the top clamp screws, then work the ball
How I installed new brake pads on my i with Sport Package (should be fine for other E39 s) By Robert B.
 By Robert B.") How I installed new brake pads on my 1999 528i with Sport Package (should be fine for other E39 s) How I installed new brake pads on my 1999 528i with Sport Package (should be fine for other E39 s) By
How I installed new brake pads on my 1999 528i with Sport Package (should be fine for other E39 s) How I installed new brake pads on my 1999 528i with Sport Package (should be fine for other E39 s) By
Installing the Dan-Marc and Pingel setup.
 Installing the Dan-Marc and Pingel setup. This is an alternative to the OEM vacuum petcock. It's the setup I use and feel more comfortable with it. Many still like the OEM vacuum petcock and they can continue
HotGrips Installation
 Page 1 of 8 HotGrips Installation There are two general solutions when it comes to upgrading any motorcycle with heated grips. Heated membranes that fit under the stock grips or complete replacement grips
Fitting the Bell Auto Services (B-A-S) TDV6 EGR Blanking Kit to a 2006 model Discovery 3 TDV6 HSE
 TDV6 EGR Blanking Kit to a 2006 model Discovery 3 TDV6 HSE") Fitting the Bell Auto Services (B-A-S) TDV6 EGR Blanking Kit to a 2006 model Discovery 3 TDV6 HSE Before I describe how I did this, I must first thank other members of the Disco3.co.uk forum (namely J,moore
Fitting the Bell Auto Services (B-A-S) TDV6 EGR Blanking Kit to a 2006 model Discovery 3 TDV6 HSE Before I describe how I did this, I must first thank other members of the Disco3.co.uk forum (namely J,moore
4TH GEN SEATS IN A 3RD GEN TRUCK
 4TH GEN SEATS IN A 3RD GEN TRUCK by Flopster843 02 Oct 2016 If you drive a 3rd generation Dodge Ram truck, I am sure you have discovered that the OEM seats are not the greatest (Figure 1.) They are extremely
Ford Racing BOSS 302 Engine Oil Cooler (11-14 GT)
") Tools needed: 14mm hex socket 7mm socket/wrench 8mm socket/wrench Ford Racing BOSS 302 Engine Oil Cooler (11-14 GT) 10mm socket (for airbox removal) ¾ inch or 19mm wrench Torque wrench Appropriate ratchets
Tools needed: 14mm hex socket 7mm socket/wrench 8mm socket/wrench Ford Racing BOSS 302 Engine Oil Cooler (11-14 GT) 10mm socket (for airbox removal) ¾ inch or 19mm wrench Torque wrench Appropriate ratchets
Replacing the hub oil seal.
 Replacing the hub oil seal. The most common reason for hub oil seal failure is a blocked axle breather, so check this first before you start. Remove the brass bell-shaped fitting on the top of the axle,
Disco 3 Clock Spring / Rotary Coupler replacement
 Disco 3 Clock Spring / Rotary Coupler replacement I recently had to change my Clock spring and thought some folks may find it helpful to see what it entailed. I did lots of reading around but couldn t
ESS INSTALL. The donor car /6 Cosmos Black/Sand UUC Short Shifter Brembo cross drilled rotors Phillips Nav System 16:9
 ESS INSTALL The donor car.. 1997 540/6 Cosmos Black/Sand UUC Short Shifter Brembo cross drilled rotors Phillips Nav System 16:9 The install went in several stages. Disconnect the battery Stage 1 Remove
Fitting a.45 ACP Conversion Cylinder Copyright 2014 Roy Seifert
 Copyright 2014 Roy Seifert Disclaimer: This article is for entertainment only and is not to be used in lieu of a qualified gunsmith. Please defer all firearms work to a qualified gunsmith. The author assumes
How many miles do you have on that KLR? Last update: September 3, 2018
 How many miles do you have on that KLR? Last update: September 3, 2018 A red-letter day for my KLR back in 2013. The addition of the "1" and the comma seemed like a requirement. As the miles pile on my
Installation Guide for Rough Country 2.5 inch Lift Kit w/o Shocks (07-15 Wrangler JK) Item # J10212
 Item # J10212") Installation Guide for Rough Country 2.5 inch Lift Kit w/o Shocks (07-15 Wrangler JK) Item # J10212 Installation Time: 3 Hours Tools Required: Jack (2 helps, but not needed) Jack stands(2 3-ton, 2 2-ton)
Installation Guide for Rough Country 2.5 inch Lift Kit w/o Shocks (07-15 Wrangler JK) Item # J10212 Installation Time: 3 Hours Tools Required: Jack (2 helps, but not needed) Jack stands(2 3-ton, 2 2-ton)
Installing AMP-wiring in a New Beetle
 Installing AMP-wiring in a New Beetle Vehicle used: New Beetle 2.0i Type 9C (1999) Used set of cables: Dietz 35mm² power cable, double shielded Dietz chinch cable ( 35mm² Professional Line ) First of all:
U-Score U-Score AAC Rank AAC Rank Vocabulary Vocabulary
 go 1 927 you 2 7600 i 3 4443 more 4 2160 help 5 659 it 6 9386 want 7 586 in 8 19004 that 9 10184 like 10 1810 what 11 2560 make 12 1264 is 13 10257 on 14 6674 out 15 2350 do 16 2102 here 17 655 eat 18
How to Change Front Brake Pads on a Toyota Corolla
 How to Change Front Brake Pads on a Toyota Corolla Link to this article on (All other links in this document are disabled) Follow this picture guide to change the front brake pads on a 2003-2008 Toyota
MGB V8 Roadster restoration project - 145
 11th June 2017. The MGB V8 rebuild is getting near to being finished. The exhaust manifold this side was a lot easier to fit than the left hand side. I could get my 3/8 drive Allen key socket onto the
2010 Toyota Prius model II Head Unit Upgrade
 2010 Toyota Prius model II Head Unit Upgrade Monday, December 21, 2009 Disclaimer: Use this document and its contents at your own risk. Forward: Huge thanks to those members on Priuschat.com that forged
Figure 1: Valve housing smooth vs. o-ring groove
 If you are driving an older Corvette, and by that I mean a C2 or C3, it will eventually get to a point where the Power Steering Control Valve (PSCV) will leak and require attention. In 2002, I had to repair
~~~~~~~~~~~~~~~~~~~~~~~~~~~~~~~~~~~~~~~~~~~~~~~~ ~~~~~~~~~~~~~~~~~~~~~~~~~~~~~~~~~~~~~~~~~~~~~~~~
 ~~~~~~~~~~~~~~~~~~~~~~~~~~~~~~~~~~~~~~~~~~~~~~~~ GSB Design Concepts Runnin' At Redline 7/9/17 ~~~~~~~~~~~~~~~~~~~~~~~~~~~~~~~~~~~~~~~~~~~~~~~~ Guest Shot: Gene Mills I've known Gene for a number of years,
Triumph Street Triple VSM Grip Heater Install
 Triumph Street Triple VSM Grip Heater Install Introduction: With winter fast approaching and with painful memories of last winter riding with the club it was time to do something about getting some grip
Triumph Oil Filter Mount A Design By Glenn Phrog Davidson
 Triumph Oil Filter Mount A Design By Glenn Phrog Davidson After a long and expensive rebuild, I wanted to offer my 1966 Triumph the maximum engine protection possible so I started investigating ways to
The Holly Buddy. 2.5cc Model Diesel - Compression Ignition engine.
 The Holly Buddy 2.5cc Model Diesel - Compression Ignition engine. Firstly I want to dedicate this engine to David Owen. I didn t know David for very long, but his influence on me and my affection for these
DIY: Shiver Valve Check, Illustrated
 DIY: Shiver Valve Check, Illustrated By Petemoss, AF1 Forum Tools needed: 4mm allen wrench to remove all the fairing pieces 2.5mm allen wrench to remove battery holder 5mm allen wrench for valve cover
Volvo 1800 Dash Pad Replacement
 Volvo 1800 Dash Pad Replacement (courtesy of John Garden State Chapter Volvo Club America) Reupholstering the dash Well it has been some time since I have been online in the forum. Winter is a quite time
OEM Cruise Control Installation in GMC/Chevy NBS trucks
 OEM Cruise Control Installation in 99-02 GMC/Chevy NBS trucks May 2008 ~ Rampage_Rick Having just installed factory cruise control in my 00 Sierra, I thought I d share the fun. I followed the steps outlined
Moddit. How to Install Stance Coilovers on a Subaru
 Moddit How to Install Stance Coilovers on a Subaru BRZ Let's get LOW (and maybe lighter and stiffer suspension)! In this article, we will install Stance ST- ZN6-XS Coilovers on the FRSport Subaru BRZ.
I hope this guide helps you as much as Boomer Bob helped me. We re just sharing what we know to help out other folks. Best of luck! Phil C.
 A brief tutorial on swapping cams for the Victory Cross Roads and Cross Country on the Victory Freedom 106 inch V-Twin Engine with 6 speed over drive transmission Disclaimer: Swapping cams on a Victory
Mustang Radiator Conversion DIY. By GearHeadPeter. January 27, 2011
 1964-1966 Mustang Radiator Conversion DIY By GearHeadPeter January 27, 2011 We all know that the radiators in our cars are not the best, especially if you have done any customization to the engine, which
INSTALLATION INSTRUCTIONS. FD3S RX7 Manual Rack Conversion
 INSTALLATION INSTRUCTIONS FD3S RX7 Manual Rack Conversion 1 Removal of Stock Rack 1.1 With your steering wheel centered, remove the pinch bolt from the factory intermediate shaft lower knuckle. If you
MGB V8 Roadster restoration project Report 105
 30th December 2016. Just in case somebody does the same as me and bolts the catch for the boot lock round the wrong way, I have included a photo that I found on the internet of the correct way to fit it.
Steeda Sport Mustang Lowering Springs (2005+) - Installation Instructions
 - Installation Instructions") Steeda Sport Mustang Lowering Springs (2005+) - Installation Instructions The below installation instructions work for the following products: Steeda Sport Mustang Lowering Springs (2005+) Please read
Steeda Sport Mustang Lowering Springs (2005+) - Installation Instructions The below installation instructions work for the following products: Steeda Sport Mustang Lowering Springs (2005+) Please read
H31 BOOSTER REBUILD & MASTER CYLINDER
 2010 1991 BMW 750iL George Fontes gajfontes@yahoo.com H31 BOOSTER REBUILD & MASTER CYLINDER Rebuild hydraulic booster and replace Master Cylinder. Page 1 of 16 Master Cylinder Removal & Brake Booster Rebuild
Brake master cylinder replacement
 Brake master cylinder replacement 8-25-2010 I had replaced the front brake master cylinder a few years ago when it developed a bad leak, at that time, I ordered a new master cylinder from Spartan, very
Replacing MK4 Golf/Jetta radiator mounts in-car
 Replacing MK4 Golf/Jetta radiator mounts in-car This is a guide to replacing the radiator mounts in a MK4 Golf/Jetta. This involves moving the core support to the service position which allows you to do
Thanks for Ordering The Kawasaki KLX Adjustable Lowering Kit From
 www.scootworks.com Thanks for Ordering The Kawasaki KLX Adjustable Lowering Kit From READ THIS BEFORE UNPACKING YOUR KIT! This instruction booklet contains detailed steps for installing the rear suspension
AMT Motorsport C7 Corvette Camber Kit User s Guide. 8 Upper Control Arm Studs and hardware for rear upper control arm adjustments
 AMT Motorsport C7 Corvette Camber Kit User s Guide Thank you for purchasing the AMT Motorsport Camber Kit for the C7 Corvette. We believe this is the most versatile camber kit available on the market,
Part 3: CHECKING TOE ANGLE -
 CHECKING TOE ANGLE - Part 3: With the caster and camber out of the way and the vehicle on a properly leveled surface, it's time to lay out the string network that will allow you to take accurate measurements
Fitting HID Xenon Headlamp system to R75/MG-ZT
 Fitting HID Xenon Headlamp system to R75/MG-ZT By Ross R75 Time Required: 30-45 minutes Let me first of all start by saying that this subject in itself is an area of heated debate. The basic fact of the
1986 Rear Disk Brake Upgrade. All hard lines mounted to the rear axle with mounting screws. 1/4" fittings
 1986 Rear Disk Brake Upgrade Being well prepared for a project of this size is the key to success. I thought I was well prepared by doing a lot of research and getting all of the required parts before
Troubleshooting Guide for Limoss Systems
 Troubleshooting Guide for Limoss Systems NOTE: Limoss is a manufacturer and importer of linear actuators (motors) hand controls, power supplies, and cables for motion furniture. They are quickly becoming
Owners manual. Öhlins Superbike front fork FG 170
 Owners manual Öhlins Superbike front fork FG 0 Including: Setting up your fork Changing springs and seals Service the fork Trouble shooting Technical info Spare parts & tools Öhlins super bike front fork
Converting a Chevy Non-positraction rear-end to a positraction rear using an Eaton posi unit.
 Converting a 56-62 Chevy Non-positraction rear-end to a positraction rear using an Eaton posi unit. Tom Parsons Non-posi unit Posi unit 1 Converting a 56-62 Chevy Non-positraction rear-end to a positraction
Removing your Two-blade Hartzell HC-12 (?) 20 prop off a Franklin Engine (Or How do I change the prop cylinder O-rings! )
 20 prop off a Franklin Engine (Or How do I change the prop cylinder O-rings! )") Removing your Two-blade Hartzell HC-12 (?) 20 prop off a Franklin Engine (Or How do I change the prop cylinder O-rings! ) If you are having oil leaking around the propeller piston/cylinder assembly and
Removing your Two-blade Hartzell HC-12 (?) 20 prop off a Franklin Engine (Or How do I change the prop cylinder O-rings! ) If you are having oil leaking around the propeller piston/cylinder assembly and
The Ryan Overdrive by Tom Endy
 The Ryan Overdrive by Tom Endy The Ryan overdrive is a factory built overdrive designed for the Model a Ford. They were manufactured in Denver, Colorado and marketed between 1990 and 2000. They were discontinued
E46 FUEL FILTER CHANGE Pics from CI
 1 of 10 5/3/2010 1:48 PM E46 FUEL FILTER CHANGE Pics from 2001 330CI Bellows Expansion Joints Metal Bellows Expansion Joints in Every Style from Flexicraft www.flexicraft.com/metal_bellows Ask a BMW Mechanic
Troubleshooting Guide for Okin Systems
 Troubleshooting Guide for Okin Systems More lift chair manufacturers use the Okin electronics system than any other system today, mainly because they re quiet running and usually very dependable. There
Setup Guide and Chassis Tuning Tips (simple version) By Jim Daniels
 By Jim Daniels") This document is released into the public domain and may be reproduced and distributed in its entirety so long as all credit to Jim Daniels remains. If you find this guide helpful please consider donating
This document is released into the public domain and may be reproduced and distributed in its entirety so long as all credit to Jim Daniels remains. If you find this guide helpful please consider donating
The Car Tutorial Part 2 Creating a Racing Game for Unity
 The Car Tutorial Part 2 Creating a Racing Game for Unity Part 2: Tweaking the Car 3 Center of Mass 3 Suspension 5 Suspension range 6 Suspension damper 6 Drag Multiplier 6 Speed, turning and gears 8 Exporting
Hasse Mods for the Ampeg J20 Guitar Amp
 Hasse Mods for the Ampeg J20 Guitar Amp The following is adapted from a post I put up on The Gear Page, in the Amp Techincal forum. It shows the mods I did to my Ampeg J20. Okay, here s my mods for this
Indexing a spark plug in a SPARK PLUG INDEXING TOOLSHED ENGINEER
 TOOLSHED ENGINEER STORY AND PHOTOS BY ROB KRIDER SPARK PLUG INDEXING Indexing a spark plug in a cylinder head is the simple process of aligning the ground electrode on the spark plug to a specified direction
Winterizing the Truma-Equipped Winnebago Travato
 Winterizing the Truma-Equipped Winnebago Travato DANIEL SENIE MONDAY, OCTOBER 16, 2017 REVISION 2 Introduction When we bought our 2016 Travato 59G, the manual s instructions for winterizing seemed to not
Servicing a Katadyn PUR40E
 Servicing a Katadyn PUR40E ABOUT THE ASSOCIATION OF OCEAN ROWERS The Association of Ocean Rowers is open to anyone interested in the sport of Ocean Rowing. It is strictly independent of all other bodies
VW & Audi TDI CR140 ECO KIT Installation Guide
 VW & Audi TDI CR140 ECO KIT Installation Guide This guide is to help you install your new Rawtek DPF, EGR & Adblue Delete Exhaust ECO Kit on your (2009-2014) VW / Audi with 2.0l CR140 Diesel Engine. Note:
Plumbing Part VI - Blowdown Valve Nelson Riedel Initial: 9/28/03 Last Revised: 04/24/2006
 Page 1 of 8 Plumbing Part VI - Blowdown Valve Nelson Riedel Nelson@NelsonsLocomotive.com Initial: 9/28/03 Last Revised: 0 When I started to think about the blowdown I realized that I'd never seen the actual
BMW 2002 M42 Swap Notes-THIS IS NOT FINISHED
 BMW 2002 M42 Swap Notes-THIS IS NOT FINISHED This document is to help those that want to install an m42 into a BMW 2002. It is based around an e30 engine, trans, and wiring. You can use the e36 block/head/wiring
10 Critical Paint Meter Mistakes That Cost Unsuspecting Car Dealers A Fortune
 10 Critical Paint Meter Mistakes That Cost Unsuspecting Car Dealers A Fortune What You Learn In This Report Can Add $1,000's Of Additional Profit To Your Bottom Line...Every Month And Help You Avoid Disastrous
This is a guide to assist you adjust the valve clearance on a 2l V6 MIVEC engine found in a Mitsubishi FTO GPX
 Adjusting the valve clearance on a 2L V6 FTO engine This is a guide to assist you adjust the valve clearance on a 2l V6 MIVEC engine found in a Mitsubishi FTO GPX Disclaimer: This guide is to assist you
TAYO EPISODE #22. SPEEDING IS DANGEROUS. TAYO (VO) Speeding is Dangerous! Hm-hm-hm hm-hm-hm... NA Tayo is driving along the river on his day off.
 Speeding is Dangerous! Hm-hm-hm hm-hm-hm... NA Tayo is driving along the river on his day off.") EPISODE #22. SPEEDING IS DANGEROUS [01;12;00;00)] #1. EXT. RIVERSIDE ROAD DAY (VO) Speeding is Dangerous! Hm-hm-hm hm-hm-hm... NA Tayo is driving along the river on his day off. Hi, Tayo. Huh? Hey, Shine.
EPISODE #22. SPEEDING IS DANGEROUS [01;12;00;00)] #1. EXT. RIVERSIDE ROAD DAY (VO) Speeding is Dangerous! Hm-hm-hm hm-hm-hm... NA Tayo is driving along the river on his day off. Hi, Tayo. Huh? Hey, Shine.
How To: Fix That Ugly Hanging E-Brake Cable A CFans Members Mod Project by dirtydawg
 How To: Fix That Ugly Hanging E-Brake Cable A CFans Members Mod Project by dirtydawg Skill Level: Easy Disclaimer: Please use caution and seek professional assistance when necessary. ColoradoFans.com,
CALDERA 10E Spur Gear Change
 CALDERA 10E Spur Gear Change www.thirdcoastrc.com ebay handle - little*oak Click Below to Visit our Ebay Store EBAY STORE (Please take a moment and bookmark my website, ebay store, and save me as an ebay
Cane Creek Double Barrel Instructions
 Cane Creek Double Barrel Instructions Congratulations on your purchase of the Cane Creek Double Barrel rear shock. Developed in partnership with Öhlins Racing, the Double Barrel brings revolutionary suspension
Our goal is to make the install a breeze. Please read the entire guide before beginning.
 www.airkewld.com Page 1 of 6 IRS Axle Kit Install IRS Axle Kit Install Our goal is to make the install a breeze. Please read the entire guide before beginning. KITS SHOULD INCLUDE 2 - Control-arm mounting
Changing the Power Steering Belt
 Changing the Power Steering Belt Brett Dukes (Maverick) from the BigJimny Forum has contributed this article to the Website. Many thanks. Whilst off-roading on Sunday, my alternator Fan Belt snapped -
Rebuilding of the Dana 25 (front axle) Chris Stout
 Chris Stout") The inside gears and bearings were all in excellent condition. A fluid change and some good cleaning was all the was necessary. However, the pinion shaft seal was shot as were the front wheel bearings
The inside gears and bearings were all in excellent condition. A fluid change and some good cleaning was all the was necessary. However, the pinion shaft seal was shot as were the front wheel bearings
Днепр) Russian Motorcycle Carburetors Part 2B: PZ-24 and PZ-28 Carburetor Assembly and Jet Drilling
 Russian Motorcycle Carburetors Part 2B: PZ-24 and PZ-28 Carburetor Assembly and Jet Drilling") Ural (Урал( Урал) - Dnepr (Днепр( Днепр) Russian Motorcycle Carburetors Part 2B: PZ-24 and PZ-28 Carburetor Assembly and Jet Drilling (applies also to K-37 K and K-38 K carbs) Ernie Franke eafranke@tampabay.rr.com
Ural (Урал( Урал) - Dnepr (Днепр( Днепр) Russian Motorcycle Carburetors Part 2B: PZ-24 and PZ-28 Carburetor Assembly and Jet Drilling (applies also to K-37 K and K-38 K carbs) Ernie Franke eafranke@tampabay.rr.com
Door panel removal F07 5 GT
 Things needed Decent plastic trim removal tools Torx 30 Spare door clips 07147145753 I got away with a set of 5 but if I did it again I d be cautious and get 10. From prior experience if they are damaged
SHARK UPPER WINDSHIELD FRAME & WINDSHIELD REPLACEMENT. Text and Photos by TOM BENFORD
 Text and Photos by TOM BENFORD I purchased a fathom green 69 big-block tri-power T-top coupe with only 42,000 original miles on it recently. I'm the third owner of the car, and I got it for a very good
X-Type w/ non-premium sound amplifier installation instructions
 X-Type w/ non-premium sound amplifier installation instructions 1. Pull radio from dash (see Radio Removal Instructions ) 2. Disconnect wiring harness from back of radio by pushing in tab on plug and pulling
DrVanos.com Stage II Installation Instructions. Tool rental is available with the purchase of a vanos kit *See website for more info*
 DrVanos.com Stage II Installation Instructions Special Tools Needed: Camshaft locking tool TDC Crank pin Sprocket turning tool Tool rental is available with the purchase of a vanos kit *See website for
RZR Full Spring Kit
 RZR 800 50 Full Spring Kit Polaris RZR 800 50 2008-2013 Part #: 5301204, 5301214 Rev. 082417 491 W. Garfield Ave., Coldwater, MI 49036. Phone: 517-278-7768 E-mail: sales-rtpro@sporttruckusainc.com SAFETY
Changing the Struts on a WK Jeep CRD
 Changing the Struts on a WK Jeep CRD Step by Step By Chirpz Disclaimer: I do not claim that this procedure is the right way or even the best way to change your struts. This is what I did after reading
DYNATRAC PRODUCTS V5.3
 DYNATRAC PRODUCTS V5.3 2000-2008 Dodge Hub Kit Stage 1 4x4, Front Axle Free Spin Conversion Kit Note: This Kit is not Approved for 2007 & up 3500 Cab and Chassis Trucks Due to a Larger U-Joint (If U-Joint
Shay - Painting The Trucks & Frames
 Shay - Painting The Trucks & Frames Nelson Riedel Nelson@NelsonsLocomotive.com Initial:2/23/04 Last Revised: 06/06/2004 Painting of the locomotive trucks and frame are described in this page. The tender
PT 709 firing pin and extractor removal. Disclaimer: My Taurus manual says not to take this apart (just flush it with cleaner).
.") PT 709 firing pin and extractor removal. Disclaimer: My Taurus manual says not to take this apart (just flush it with cleaner). But several list members have done this without ill effect. So here goes:
PT 709 firing pin and extractor removal. Disclaimer: My Taurus manual says not to take this apart (just flush it with cleaner). But several list members have done this without ill effect. So here goes:
W C-230 Kompressor Sports Sedan 1.8l Thermostat Replacement & Antifreeze flush
 W203 2003 C-230 Kompressor Sports Sedan 1.8l Thermostat Replacement & Antifreeze flush First, I have to thank everyone who has contributed to the MBworld.org forums without you; I would not have gotten
Hitachi Alternator Upgrade for Series I E-Types Ray Livingston (831) Home (831) Cell
 Home (831) Cell") Hitachi Alternator Upgrade for Series I E-Types Ray Livingston (831) 457-1373 Home (831) 234-0858 Cell rayl@atc.creative.com The Hitachi alternator for a 1986 Nissan pickup is a perfect replacement for
Hitachi Alternator Upgrade for Series I E-Types Ray Livingston (831) 457-1373 Home (831) 234-0858 Cell rayl@atc.creative.com The Hitachi alternator for a 1986 Nissan pickup is a perfect replacement for
PYRTE. Building The Front Axle, Fork and Steering
 PYRTE Building The Front Axle, Fork and Steering The front axle on this traction engine is a very simple affair, in that it is a rectangular steel rod, sat on edge, with a pivot in the centre, which is
Mercedes Diesel Valve Adjustment Procedure
 1 of 30 5/30/2008 12:58 PM Home Cars for sale Trucks for sale Where we are Links to other diesel sites About us Why diesel? Diesel Videos How they work How they sound FAQ Dodge Diesel Maintenance tips,
2001 V70 T5 ETM Removal and Cleaning Directions
 2001 V70 T5 ETM Removal and Cleaning Directions Howard Cheng howardc64@gmail.com 10/24/05 Version 1.4 Read this before you start I performed this ETM cleaning because I had gotten 2 reduced performance
 www.odometergears.com Mercedes-Benz Mechanical Odometer Repair This how to can be used for all mechanical repairs as the only difference will be the removal of the instrument cluster. http://www.dieselgiant.com/repairyourodometer.htm
Motorcycle Suspension, How They Work, Install and Set Up
 Motorcycle Suspension, How They Work, Install and Set Up Presenters: Klaus Huenecke and Duane Kerzic of Wilbers USA Time: Place: Audience: Beginner to Advanced Street Riders who want to know more about
SW20 Coolant System Maintenance.
 SW20 Coolant System Maintenance. This article contains information on how to change and bleed the coolant, as well as flushing the system. It is based on information in the service manual, tips gathered
Lockpicking Tools: User Guide
 Lockpicking Tools: User Guide Tips & Tricks for using Lockpicking Tools Contents Introduction..3 Padlock Shims..5 Comb Picks....7 Jiggler Keys...9 The Lock Gun..11 Bypass Sheets....13 Bump Keys...14 Other