Rugged Ridge Spartacus HD Tire Carrier Kit Install
|
|
|
- Tracy Griffith
- 5 years ago
- Views:
Transcription
 Shims Torque wrench Electrical tape Heat")

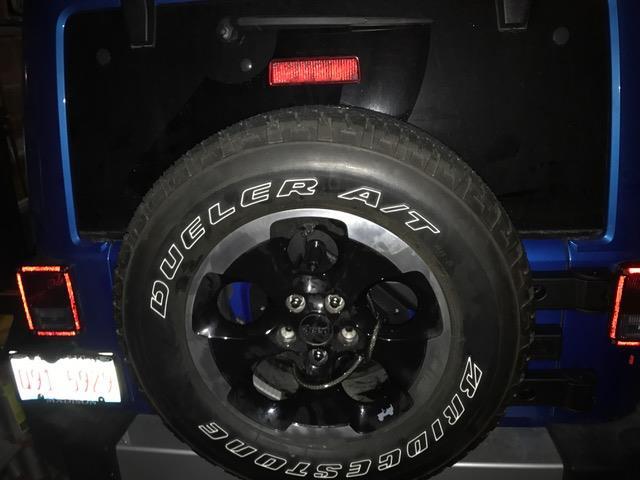
1 Rugged Ridge Spartacus HD Tire Carrier Kit Install Installation Time: 2Hrs Tools Required: T-20 Torx T-50 Torx Phillips Screw driver #2 Wire cutters/strippers/crimpers Socket Wrench & Extension 6mm hex key 10mm, 13mm, & 19mm Sockets 10mm & 19mm open end wrench or adjustable wrench ¾ Deep Socket or Tire Iron from inside jeep Locktite (red or blue) Shims Torque wrench Electrical tape Heat shrinking butt connectors & Lighter (optional) Read through the instructions completely prior to beginning this install. A second set of hands is helpful at times during this install. Installation Instructions: 1. Remove your spare tire using the ¾ deep well socket or the factory tire iron. Remove the rubber bumper closest to the hinges. 2. Open your tailgate and remove the 4 T-20 Torx screws from the back of the Third brake light. Remove the cover. Push down on the tab and disconnect the plug from the back of the taillight. Carefully remove the wire from the carrier and hang it over the tailgate. I chose to remove the wires completely as I have a backup camera hanging in the way. To do this you will need to remove the black plastic cover (circled in yellow below) inside the tailgate and disconnect the grey plug it exposes, then remove the black thru-body grommet.


2 3. With your tailgate closed, remove the stock tire carrier by removing the 8 13mm bolts. (Circled above) Put to side. Remove the plastic hinge covers; up and towards the driverside for the tailgate covers & pry the top and bottom away from the hinge and push toward the passenger side for the hinge covers. Now place shims under the gate until they are tight. KEEP TAILGATE CLOSED FOR REMAINDER OF INSTALL. 4. Next you will remove your factory hinges by removing the 4 13mm bolts on the tail gate. Flip the hinges to the open position and remove the T-50 torx bolts holding the hinges to the body/tub.


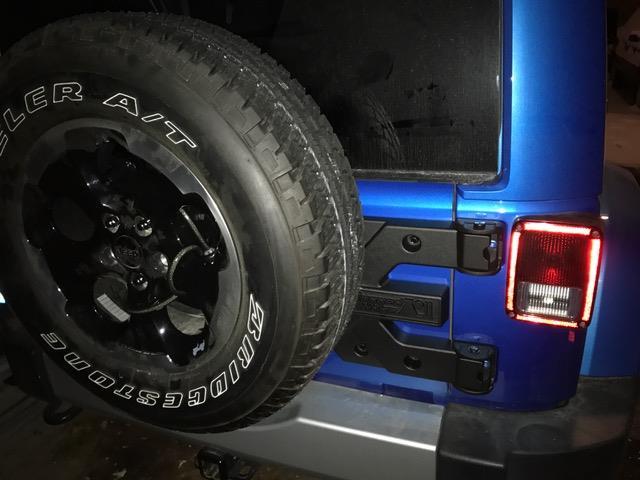
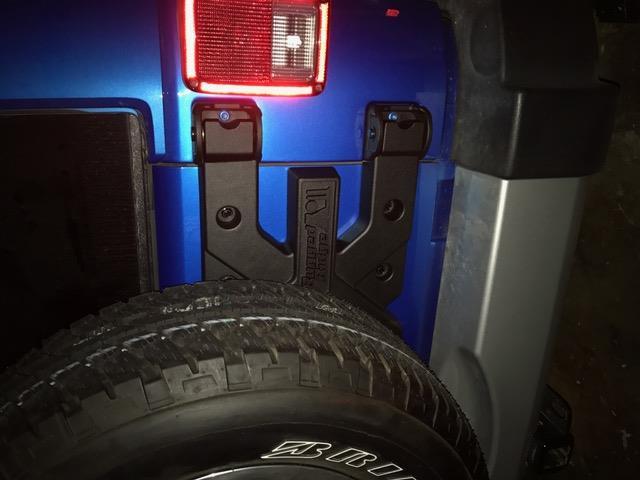
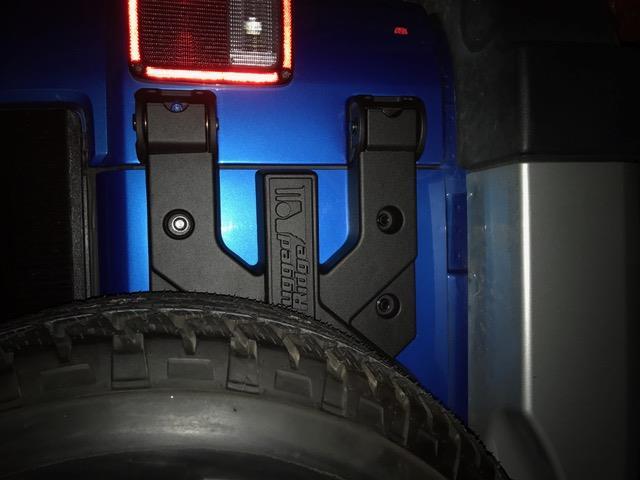
3 5. Clean your tailgate. This would be a great time to wax your tailgate. You can also take this opportunity to paint under the hinges as I did if you would like. I caught the early signs of rust formation so I used wire brushes and 80 grit sanding block to remove the rust prior to painting over. 6. Time to mount your Rugged Ridge hinge. A second set of hands would make this easier. Hold the carrier in place and replace the factory T-50 torx hinge bolts; 2 outside, then open the hinge and replace the 4 inside. Apply Loctite to these bolts. Snug only, do not tighten down yet. 7. Now replace 4 13mm factory carrier bolts to help line up the carrier. Snug these in place but do not overtighten. With those snug, Tighten the outside T-50 torx hinge bolts.


 that came with it, starting with the 4 on the driver")
 that came with the")


4 8. With the outside Hinge T-50 torx bolts tight, remove the 4 13mm bolts you replaced in step 7 and open the hinge & tighten the inside 4 T-50 Torx hinge bolts. 9. Now take your HD carrier out of the box and position it in place & thread in the 8 13mm Short carrier bolts (with washers) that came with it, starting with the 4 on the driver side. (1st pic). Use the 4 13mm hex bolts (with washers) that came with the hinge to secure the hinge to the tailgate. (2cnd pic). Locktite & Fully tighten all of these bolts! Tip: Get all of the bolts started by hand and tighten them evenly, small amounts at a time With the carrier and hinge completely tightened, you will now attach the lug plate to the carrier. Using a 19mm socket and 19mm wrench (or adjustable wrench) tighten the 4 M12 bolts & Lock nuts almost entirely, allowing you to adjust the lug plate with some force.


5 11. Using the 6mm Hex Key, thread in the two set screws into the driver side of the lug plate. Mount your spare onto the lugs, and thread on the lugnuts. A second set of hands will help with this but it Is doable alone. Once you have your spare lugs snug, you will need to work the spare and the bracket until your tire makes contact with the driverside rubber bumper. Once that is achieved, tighten the set screws. I was able to reach the bottom set screw through my stock rims. If you have rims that prevent you from reaching through, you will have to guess and check until you have a desired positioning. 12. With your set screws tight, temporarily place the third brake light bracket in place on the carrier. Adjust the height according to the size of your spare. I was able to put some of the small 10mm bolts (without the locking nuts) in to keep it in place. 13. Now remove your spare and tighten the 4 19mm bolts on the Lug plate & the 4 10mm brake light bracket bolts (shown above) using your socket and wrench. Then take your third brake light harness and the black and white wires this kit comes with. You will need to tape back the mesh wire cover, and cut the black and white wires 6-8 from the connector. Then you will butt splice in the extra wire. I chose not to use the butt connectors the kit came with, instead I used heat-shrinking butt connectors I had on hand (available at most autoparts stores).


6 14. Now place the third brake light into the bracket and use the 4 Phillips Head screws that the kit came with to tighten it into place. Then run the wire through the carrier and back through the tailgate. Reinsert the rubber grommet into the tailgate and reconnect the plug inside the tailgate. Replace the black plastic cover. 15. Reinstall your spare, torque lug nuts to 80lb/ft. 16. Enjoy!!
7 Installation Instructions Written by ExtremeTerrain Customer BobbyD 12/10/2016
Rugged Ridge Spartacus HD Tire Carrier Kit Install
 Rugged Ridge Spartacus HD Tire Carrier Kit Install Installation Time: 2 hours Tools Required: Ratchet ¾ socket 19 mm socket 13 mm socket 10 mm socket 19 mm Wrench 10 mm wrench 6mm Allen Wrench T50 torx
Raxiom Factory GPS Rear Back-up Camera Kit (07-17 Wrangler)
") Raxiom Factory GPS Rear Back-up Camera Kit (07-17 Wrangler) Installation Time: 2.5-3Hrs Tools Required: 7mm Socket & Driver 10mm Socket 10mm Open end wrench Knife / Razor blade Zip-ties Wire Cutters Needle
Raxiom Factory GPS Rear Back-up Camera Kit (07-17 Wrangler) Installation Time: 2.5-3Hrs Tools Required: 7mm Socket & Driver 10mm Socket 10mm Open end wrench Knife / Razor blade Zip-ties Wire Cutters Needle
80703 & Backside License Plate Mount for Jeep JK Wrangler (80707) & 10+ (80703)
 & 10+ (80703)") 80703 Backside Mount 80707 Backside Mount REQUIRED TOOLS 10mm SOCKET 13mm SOCKET 4mm HEX KEY WIRE CRIMPS WIRE STRIPPERS ELECTICAL TAPE SCREW DRIVER KIT CONTAINS BACKSIDE MOUNT LICENSE PLATE BRACKET WITH
80703 Backside Mount 80707 Backside Mount REQUIRED TOOLS 10mm SOCKET 13mm SOCKET 4mm HEX KEY WIRE CRIMPS WIRE STRIPPERS ELECTICAL TAPE SCREW DRIVER KIT CONTAINS BACKSIDE MOUNT LICENSE PLATE BRACKET WITH
Backside License Plate Mount for Jeep JK Wrangler
 REQUIRED TOOLS 10mm SOCKET 13mm SOCKET 4mm HEX KEY WIRE CRIMPS WIRE STRIPPERS ELECTICAL TAPE SCREW DRIVER KIT CONTAINS BACKSIDE MOUNT LICENSE PLATE BRACKET WITH LEDS PLASTIC PASS-THROUGH GROMMET STAINLESS
Jeep JK Wrangler XHD Rear Tire Carrier
 Contents: 1. Frame (1) 2. Pivot Mount (1) 3. Latch Mount (1) 4. Lug Nuts (3) 5. Catch Pin (1) 6. M12 Washer (18) 7. M12 x 30 Hex Bolt (14) 8. Brake Light Mount (1) 9. Snap Ring (1) 10. Rub Strip (1) 11.
HD Hinge Casting HARDWARE: CONTENTS:
 Page 1/9 Part #11546.51 CONTENTS: HD Hinge Casting Spacer Plates (2 PCS) HD Hinge Casting HARDWARE: Hex Bolt X 4 Washer X 4 TOOLS REQUIRED: Socket Wrench 10 extension 13mm socket 3/4 deep socket T-20,
INSTALLATION INSTRUCTIONS
 Jeep Wrangler Rear Vision Camera, 2007 Current (Kit # 9002-8838) Items Included in the Kit Camera Chassis Harness Zip lock bag with 15 Wire Ties & 3 Push Nuts These Instructions Required Tools & Supplies
(1) License Plate Light (2) License Plate Plugs
 License Plate Light (2) License Plate Plugs") PARTS LIST: 1 HD Replacement Bumper 4 12mm x 40mm Hex Bolts 1 Driver/Left Bracket 4 12mm Nylon Lock Nuts 1 Passenger/Right Bracket 8 12mm x 37mm x 3mm Oversize Flat Washers 2 Thin Side Spacers 4 Rubber
PARTS LIST: 1 HD Replacement Bumper 4 12mm x 40mm Hex Bolts 1 Driver/Left Bracket 4 12mm Nylon Lock Nuts 1 Passenger/Right Bracket 8 12mm x 37mm x 3mm Oversize Flat Washers 2 Thin Side Spacers 4 Rubber
Remove the rear tire and the (8) 13mm bolts holding the tire carrier to the tailgate. Remove the 3rd brake light wiring harness.
 13mm bolts holding the tire carrier to the tailgate. Remove the 3rd brake light wiring harness.") J108781 2 4 Rear Bumper & Tire Carrier & Optional Flood Lights Jeep Wrangler JK (2007-2017) Tools Required: Basic Hand Tools 35mm Socket Tape Measure Grease Gun Straight Edge Remove the rear tire and the
J108781 2 4 Rear Bumper & Tire Carrier & Optional Flood Lights Jeep Wrangler JK (2007-2017) Tools Required: Basic Hand Tools 35mm Socket Tape Measure Grease Gun Straight Edge Remove the rear tire and the
DV8 Tire Carrier Manufacturer Part Number TCSTTB-01 Model Number J104640
 DV8 Tire Carrier Manufacturer Part Number TCSTTB-01 Model Number J104640 Installation Time: 30 Minutes Tools Required: 19mm Socket 13mm Socket Ratchet T15 Torx Driver T50 Torx Driver Painters Tape Dremel
INSTALLATION INSTRUCTIONS ELEVATION REAR BUMPER FORD F150
 INSTALLATION INSTRUCTIONS PARTS LIST: 1 Elevation Bumper Assembly 2 Plastic Plugs (license plate mount) 6 12-1.75mm x 50mm Hex Bolts 8 4mm x 10mm Socket Head Screws 12 12mm x 37mm OD x 3mm Flat Washers
INSTALLATION INSTRUCTIONS ELEVATION REAR BUMPER FORD SUPERDUTY F #PW016687
 INSTALLATION INSTRUCTIONS #PW016687 PARTS LIST: 1 Elevation Bumper Assembly 2 Plastic Plugs for license plate mount 2 2-hole Spacer Plates (for tow hitch only) 8 4mm x 10mm Socket Head Screws 4 Sensor
RS-2 SINGLE ACTION REAR BUMPER WITH TIRE CARRIER INSTALL MANUAL FOR JEEP WRANGLER ALL MODELS.
 RS-2 SINGLE ACTION REAR BUMPER WITH TIRE CARRIER INSTALL MANUAL FOR 2007-2016 JEEP WRANGLER ALL MODELS. Rear Bumper Installation Instructions 1) Remove factory rear bumper, (this includes all tow hitch
INSTALLATION MANUAL
 INSTALLATION MANUAL 2563000 Parts List 1 Carrier weldment 2 Support arm assembly 1 Third brake light assembly 1 Light extension bracket 1 Spare tire adjustment plate 1 Spare tire mount plate 1 Female spade
INSTALLATION INSTRUCTIONS
 2007-Current Jeep Wrangler 360º System for Aftermarket display (Kit # AVMS-3700v2) Please read thoroughly before starting installation and check that kit contents are complete. Items Included in the Kit:
Jeep Wrangler Adjustable Infrared Light Rear Vision Camera System for Factory Display Radios 2007 Current (Kit # )
") Jeep Wrangler Adjustable Infrared Light Rear Vision Camera System for Factory Display Radios 2007 Current (Kit # 9002-8857) Items Included in the Kit Required Tools & Supplies Camera Chassis Harness Power
Jeep Wrangler Adjustable Infrared Light Rear Vision Camera System for Factory Display Radios 2007 Current (Kit # 9002-8857) Items Included in the Kit Required Tools & Supplies Camera Chassis Harness Power
INSTALLATION INSTRUCTIONS
 2007-Current Jeep Wrangler 360º System for Factory Display Radios (Kit # AVMS-3701) Please read thoroughly before starting installation and check that kit contents are complete. Items Included in the Kit:
INSTALLATION INSTRUCTIONS
 2007-Current Jeep Wrangler 360º System for Factory Display Radios (Kit # AVMS-3701v2) Please read thoroughly before starting installation and check that kit contents are complete. Items Included in the
INSTALLATION INSTRUCTIONS
 2007-Current Jeep Wrangler 360º System for Factory MyGig Display (Kit # AVMS-3701) Please read thoroughly before starting installation and check that kit contents are complete. Items Included in the Kit:
Curt Mfg. Trailer Hitch and Hoppy Wiring Kit Installation Instructions
 Curt Mfg. Trailer Hitch and Hoppy Wiring Kit Installation Instructions The Curt trailer hitch replaces the stock rear cross member in the Touareg. It attaches with 8 bolts just like the factory VW hitch.
(2) License Plate Plugs
 License Plate Plugs") PARTS LIST: 1 HD Bull Nose Bumper Assembly 12 12-1.75mm x 50mm 1 Driver/left Frame Mounting Bracket 40 12mm x 37mm OD x 3mm Flat Washers 1 Passenger/right Frame Mounting Bracket 20 12mm Lock Washers 1
PARTS LIST: 1 HD Bull Nose Bumper Assembly 12 12-1.75mm x 50mm 1 Driver/left Frame Mounting Bracket 40 12mm x 37mm OD x 3mm Flat Washers 1 Passenger/right Frame Mounting Bracket 20 12mm Lock Washers 1
PRODUCT: JK SportGate Tire Carrier READ INSTRUCTIONS IN FULL BEFORE INSTALLATION. QUESTIONS? CALL M-F 7:00 AM 5:00 PM PST
 PRODUCT: JK SportGate Tire Carrier READ INSTRUCTIONS IN FULL BEFORE INSTALLATION. QUESTIONS? CALL 916-631-8071 M-F 7:00 AM 5:00 PM PST The MetalCloak experience includes the ease of installation of our
TrailGator REAR BUMPER INSTALLATION INSTRUCTIONS Runner
 TrailGator REAR BUMPER INSTALLATION INSTRUCTIONS 2010+ 4Runner Version 3.1.0 - December 2018 Thank you for purchasing the Southern Style OffRoad Toyota 4Runner 5 th Gen Modular Rear Plate Steel Bumper.
EVO-1162 EVO Tailgate Tire Carrier
 EVO-1162 EVO Tailgate Tire Carrier Bill of Materials EVO-1162 Tailgate Tire Carrier Part number Description Quantity EVO-12161 EVO Tailgate Tire Carrier 1 EVO-12162 Bolt Plate 1 EVO-12163 Wheel Mount 1
INSTALLATION INSTRUCTIONS LD-1 REAR BUMPER RAM 1500 PART#R R #PW017838
 INSTALLATION INSTRUCTIONS LD-1 REAR BUMPER PART#R102617 R102620 #PW017838 PARTS LIST: 1 LD1 Bumper Assembly 4 12-1.75mm x 40mm Hex Bolts 1 Push in License Plate Light 4 12mm x 37mm x 3mm Flat Washers 2
TACTIK Heavy Duty Wheel Mount
 TACTIK Heavy Duty Wheel Mount Installation Manual for 2007 - Current Wrangler (JK) # 12052.0012 TO REDUCE RISK OF SERIOUS INJURY OR PROPERTY DAMAGE: READ ALL SAFETY MESSAGES AND UNDERSTAND ALL INSTRUCTIONS
INSTALLATION INSTRUCTIONS ELEVATION FRONT BUMPER DODGE RAM
 INSTALLATION INSTRUCTIONS PARTS LIST: 1 Elevation Bumper Assembly 24 12mm x 37mm OD x 3mm Flat Washers 2 Frame Mounting Brackets 12 12mm Nylon Lock Nuts 8 12-1.75mm x 50mm Hex Bolts 2 License Plate Mounting
REAR STEEL BUMPER INSTALLATION INSTRUCTIONS Runner
 REAR STEEL BUMPER INSTALLATION INSTRUCTIONS 2010+ 4Runner Version 2.1.0 - September 2016 Thank you for purchasing the Southern Style OffRoad Toyota 4Runner 5 th Gen Modular Rear Plate Steel Bumper. It
Jeep Wrangler Adjustable Rear Vision Camera, 2007 Current (Kit # )
") Items Included in the Kit Jeep Wrangler Adjustable Rear Vision Camera, 2007 Current (Kit # 9002-8848) Camera Chassis Harness Power Harness 22--pin white connector w/ video RCA (for factory display radio)
Items Included in the Kit Jeep Wrangler Adjustable Rear Vision Camera, 2007 Current (Kit # 9002-8848) Camera Chassis Harness Power Harness 22--pin white connector w/ video RCA (for factory display radio)
ADDICTIVE DESERT DESIGNS
 Preparation: Disconnect the negative battery terminal. Park the vehicle on level ground and set the emergency brake. We recommend reading through the installation instructions in whole before performing
The world's first Bolt in Only stress bar for VW Mk 4 Chassis. Installation Manual V1.0.
 The world's first Bolt in Only stress bar for VW Mk 4 Chassis Installation Manual V1.0 www.yarrowsport.com Tools Needed: 1. 17mm, 10mm sockets and ratchet with 3inch extension 2. 10mm box end wrench 3.
INSTALLATION INSTRUCTIONS
 INSTALLATION INSTRUCTIONS Accessory Application Publications No. ATTACHMENT (EX-L WITH NAVI) 2008 RIDGELINE AII 36587 Issue Date MAY 2007 PARTS LIST Attachment Kit P/N: 08B21-SJC-102 Template Rear camera
Jeep Wrangler Rear Vision Camera, 2007 Current (Kit # )
") Items Included in the Kit Camera Chassis Harness Zip lock bag with 15 Wire Ties & 3 Push Nuts These Instructions 22--pin white connector w/ video RCA (for factory display radio) Jeep Wrangler Rear Vision
Items Included in the Kit Camera Chassis Harness Zip lock bag with 15 Wire Ties & 3 Push Nuts These Instructions 22--pin white connector w/ video RCA (for factory display radio) Jeep Wrangler Rear Vision
2007 Current Jeep Wrangler JK Stealth Fighter Rear Bumper With Tire Gate Installation Instructions
 2007 Current Jeep Wrangler JK Stealth Fighter Rear Bumper With Tire Gate Installation Instructions PREPARATION 1. Disconnect the negative terminal on the battery. Park the vehicle on level ground and set
Smittybilt XRC Rear Bumper Installation Guide Part # 76856
 Installation Difficulty: Easy Installation Duration: 2 Hours Tools Needed: Smittybilt XRC Rear Bumper Installation Guide Part # 76856-13, 16, 17, 18, 19mm wrenches and/or sockets - Socket extension - Torque
Installation Instructions BR20 Rear Bumper Replacement Part # 28178T Toyo ta Tundra 2/4WD
 Installation Instructions BR20 Rear Bumper Replacement Part # 28178T 2014-2016 Toyo ta Tundra 2/4WD Excludes Models with B lind Spot Monitoring & Cross Traffic Alert Parts List Item Qty. Part # Description
2015 Ford F150 Rear Bumper w/ LED
 2015 Ford F150 Bumper w/ LED T527990 T527991 PARTS LIST: 1 Bumper Assembly 4 12mm Lock Washers 2 Mounting Brackets 6 12 mm Nylon Lock Nuts 4 Sensor Hole Plugs 8 4mm x 10mm Button Head Bolts 2 Plastic Plugs
ECO-SERIES REAR BUMPER FORD F150 PART # FD-2962
 15-16 FORD F150 PART # FD-2962 Body Armor 4x4 272 Corporate Terrace St. Corona, CA 92879 951-808-0750 Customer Service hours: M-TH: 7:30am to 4:30 PM Pacific Time Friday: 8 AM Noon Pacific Time PARTS LIST:
ECO-SERIES REAR BUMPER FORD F150 (accommodated factory hitch receiver) PART # FD-2962
 PART # FD-2962") (accommodated factory hitch receiver) PART # FD-2962 Body Armor 4x4 272 Corporate Terrace St. Corona, CA 92879 951-808-0750 Customer Service hours: M-TH: 7:30am to 4:30 PM Pacific Time Friday: 8 AM Noon
(accommodated factory hitch receiver) PART # FD-2962 Body Armor 4x4 272 Corporate Terrace St. Corona, CA 92879 951-808-0750 Customer Service hours: M-TH: 7:30am to 4:30 PM Pacific Time Friday: 8 AM Noon
Rear Bumper Installation Instructions
 KEY TO COMPONETS A. 1 ea. Rear bumper B. 2 ea. Mounting L bracket C. 11 ea. M12x1.75 hex head bolt D. 4 ea. M12x1.75 hex head bolt E. 6 ea. M12 Hex head lock nut F. 9 ea. Pressure washer G. 19 ea. M12
Approximate installation time: 2 hrs. REV. DATE: 3/17/2016 Page 1 of 7
 Installation Instructions BR20 Rear Bumper Replacement Part Number 28169T 2011-2014 Chevrolet Silverado 2500HD & 3500HD 2/4WD Do not attempt to install this product on any vehicle other than the one listed
VRSC-DX Truck-Lite LED Headlight Installation Instructions
 VRSC-DX Truck-Lite LED Headlight Installation Instructions The following Instructions are for installing a 7 Truck-Lite LED headlight into a Harley Davidson VRSC-DX Night Rod Special fairing. Other 7 headlights
(2) Support Brackets (fit left or right) (2) 12mm x 40mm Bolt Plates
 Support Brackets (fit left or right) (2) 12mm x 40mm Bolt Plates") PARTS LIST: 1 bumper 6 12-1.75mm x 160mm Hex Bolts 2 Frame Mounting Brackets (fit left or right) 2 12-1.75mm x 50mm Hex Bolts 2 Support Brackets (fit left or right) 18 12mm x 37mm OD x 3mm Flat Washers
PARTS LIST: 1 bumper 6 12-1.75mm x 160mm Hex Bolts 2 Frame Mounting Brackets (fit left or right) 2 12-1.75mm x 50mm Hex Bolts 2 Support Brackets (fit left or right) 18 12mm x 37mm OD x 3mm Flat Washers
INSTALLATION INSTRUCTIONS HEAVY DUTY FRONT BUMPER CHEVY SILVERADO 1500
 INSTALLATION INSTRUCTIONS PARTS LIST: 1 Heavy Duty Bumper Assembly 16 12mm Nylon Lock Nuts 1 Driver Mounting Bracket 8 4mm x 10mm Socket Head Screws 1 Passenger Mounting Bracket 4 Sensor Plugs 4 Support
Spare Tire Access Guide (2) Plastic Plugs for License Plate on Trailer Plug Bracket Trailer Plug Bracket
 Plastic Plugs for License Plate on Trailer Plug Bracket Trailer Plug Bracket") LDB-CSIL55-RB PARTS LIST: 1 LD1 Bumper Assembly 12 14mm x 28mm OD x 2.5mm Flat Washers 1 Driver/left Frame Bracket 6 14mm Nylon Lock Nuts 1 Passenger/right Frame Bracket 4 12-1.75mm x 35mm Hex Bolts 1
LDB-CSIL55-RB PARTS LIST: 1 LD1 Bumper Assembly 12 14mm x 28mm OD x 2.5mm Flat Washers 1 Driver/left Frame Bracket 6 14mm Nylon Lock Nuts 1 Passenger/right Frame Bracket 4 12-1.75mm x 35mm Hex Bolts 1
Installation of Auto Meter Cobalt Boost/Vacuum Gauge:
 Installation of Auto Meter Cobalt Boost/Vacuum Gauge: Fitment: All 79-14 models. This installation was completed on a 2004 Mustang GT, and should be identical for all 1999-2004 model Mustangs. Time needed:
Installation of Barricade Flat Style Fender Flare Kit (97-06 Wrangler TJ)
") Installation of Barricade Flat Style Fender Flare Kit (97-06 Wrangler TJ) Installation Time: 3-4 Hours Tools Required: 8mm wrench 8mm socket drive #1 Phillips screw driver Pliers Pry bar Electric drill
Installation of Barricade Flat Style Fender Flare Kit (97-06 Wrangler TJ) Installation Time: 3-4 Hours Tools Required: 8mm wrench 8mm socket drive #1 Phillips screw driver Pliers Pry bar Electric drill
Lowering Spring Installation on a Mustang GT
 Lowering Spring Installation on a 99-04 Mustang GT This installation is very the same installation that many of the 79-04 Mustangs excluding Cobra require. Time to install: 2-3 hours to do alone with a
JEEP JL 2018 License Plate Relocation Bracket
 921105340 JEEP JL 2018 License Plate Relocation Bracket Thank you for choosing Rough Country for all your vehicle needs. Please read instructions before beginning installation. Check the kit hardware against
INSTALLATION INSTRUCTIONS
 OEM Tailgate Camera/Bezel Assembly with Chassis Harness 2014-current Chevrolet Silverado and GMC Sierra (Kit part number 9002-1005) Kit Contents: Chassis Harness 1 bubble bag containing: Tailgate Handle
2. With the rear door open remove pull-style clip from the passenger side just below the door latch.
 LoD Offroad FJ Cruiser Rear Bumper with Tire Carrier Installation Instructions 1. Begin with removing factory spare from the rear door. 2. With the rear door open remove pull-style clip from the passenger
Fox 2.0 Adjustable Coilovers (Par# ) Installation on a 2013 F-150 (2WD)
 Installation on a 2013 F-150 (2WD)") Fox 2.0 Adjustable Coilovers (Par# 983-02-052-2) Installation on a 2013 F-150 (2WD) This guide is for the install of the Fox 2.0 adjustable leveling struts on a 2013 F-150 2WD, these are being installed
Fox 2.0 Adjustable Coilovers (Par# 983-02-052-2) Installation on a 2013 F-150 (2WD) This guide is for the install of the Fox 2.0 adjustable leveling struts on a 2013 F-150 2WD, these are being installed
701-Tire Swing for 153-A/T Slider rear bumper
 701-Tire Swing for 153-A/T Slider rear bumper Holds up to a 37 Spare, Swings clear of rear tailgate for easy access. One-piece construction creates a clean professional appearance. 2 1/2 O.D. heavy-duty
JK SHIELD TIRE CARRIER INSTALLATION INSTRUCTIONS
 JK SHIELD TIRE CARRIER INSTALLATION INSTRUCTIONS TOOLS NEEDED 3/4 Wrench 3/4 Socket 9/16 Wrench or Socket 1 1/2 Socket 1 1/8 Wrench 13mm Socket Torque Wrench for 1 1/2 Socket 5mm Allen T20 Torx Hammer
UNPACK AND IDENTIFY THE FOLLOWING PARTS.
 SUT-350-AIT ASSEMBLY REQUIREMENTS *Torque all T-bolt nuts to 35-40 foot pounds. *Check all lights before towing. *Tire pressure not to exceed recommendation on serial tag. *Re-torque wheel nuts after first
*Patent Pending Design*
 *Shown with optional Angled Tire Mount Part # 94202 *Patent Pending Design* Components 1) Rear Bumper 1) Swingarm 1) Swingarm Stop Bracket 1) Assembly 1) Rear Door Plate 1) Lower 3rd Brakelight Bracket
(4) 1/4" Plastic Plugs 12-1/16" 1/4" Ø (4X) 2-5/8" (2X) 4-1/16" 7-1/8" 7-1/8"
 1/4 Plastic Plugs 12-1/16 1/4 Ø (4X) 2-5/8 (2X) 4-1/16 7-1/8 7-1/8") T-67 G2 Light Kit Mounting Instructions Step 1. Lower the liftgate to the ground. To avoid a risk of an electrical short, disconnect the power cable from the positive side of the battery or manually trip
T-67 G2 Light Kit Mounting Instructions Step 1. Lower the liftgate to the ground. To avoid a risk of an electrical short, disconnect the power cable from the positive side of the battery or manually trip
(Ford Transit Rear Bumper) INSTALLATION INSTRUCTIONS
 INSTALLATION INSTRUCTIONS") Aluminess Products Inc 9402 Wheatlands Ct. #A Santee, CA 92071 619-449-9930 (Ford Transit Rear Bumper) INSTALLATION INSTRUCTIONS Please read before beginning Stainless steel hardware may bind together
Aluminess Products Inc 9402 Wheatlands Ct. #A Santee, CA 92071 619-449-9930 (Ford Transit Rear Bumper) INSTALLATION INSTRUCTIONS Please read before beginning Stainless steel hardware may bind together
Mustang V6 Shaker 99-04* Components Check List:
 Mustang V6 Shaker 99-04* Components Check List: *03 Model requires new hood CDC Inspected Installer Check Quantity Descriptions 1- Hood Appliqué 1- Aluminum Shaker Scoop 1- Lower Air Box w/drain tube fittings
2017 Current Ford Raptor Bump Stop Kit Installation Instructions
 2017 Current Ford Raptor Bump Stop Kit Installation Instructions PREPARATION 1. Disconnect the negative terminal on the battery. Park the vehicle on level ground and set the emergency brake. 2. We recommend
Passenger/Right Support Bracket Driver/Left Support Bracket
 PARTS LIST: 1 bumper 24 12mm x 37mm OD x 3mm Flat Washers 1 Driver/left Mounting Bracket 14 12mm Lock Washers 1 Passenger/right Mounting Bracket 14 12mm Hex Nuts 1 Driver/left Lower Support Bracket 2 Plastic
EVO Manufacturing. EVO-3032/3032B JL JLU HD Hinge Tire Carrier
 EVO Manufacturing EVO-3032/3032B JL JLU HD Hinge Tire Carrier READ BEFORE INSTALLATION: Some backspacing wheels/tire width combinations (small backspacing/wide tires) may require a single wheel spacer
LiteDOT Installation Document
 LiteDOT Installation Document This document designed to aid in installation of LiteDOT s on Jeep TJ models, other models are similar. NOTE: Installing LiteDOT s on a Jeep where the 2 necessary mounting
BMW 3 SeriesE90 - E93 Factory Alarm Install
 Instructions on a BMW 3 Series Factory Alarm Install. Written By: Danielle 2017 guides.drivediy.com Page 1 of 9 INTRODUCTION Tips on how to install a BMW 3 Series Factory alarm. Credit: CC 330i[E90Post.com
Fig A ADDICTIVE DESERT DESIGNS. Preparation: Removal: Release these clips
 Preparation: Disconnect the negative battery terminal. Park the vehicle on level ground and set the emergency brake. We recommend reading through the installation instructions in whole before performing
2014 Current Chevy/GMC 1500 HoneyBadger Rear Bumper Installation Instructions
 2014 Current Chevy/GMC 1500 HoneyBadger Rear Bumper Installation Instructions PREPARATION 1. Disconnect the negative terminal on the battery. Park the vehicle on level ground and set the emergency brake.
HAVING INSTALLATION QUESTIONS? CALL TECHNICAL SUPPORT AT
 9/23/2009 1 of 6 ITEM 1 QTY 8 Parts List PART NUMBER DESCRIPTION 3/8" CONICAL TOOTHED WASHER TOOLS REQUIRED #2 PHILLIPS SCREWDRIVER #2 STUBBY SCREWDRIVER 8mm SOCKET 13mm SOCKET RATCHET 12" EXTENSION TORQUE
TOYOTA VENZA 2009 TRAILER WIRE HARNESS Procedure
 Part Number: PT791-0T099 Kit Contents Item # Quantity Reqd. Description 1 1 Trailer Wire Harness Module 2 1 4-Flat Harness 3 1 Battery Power Wire Harness 4 1 Mounting Bracket, 4-Flat 5 2 Screw #10-24 6
TACTIK Heavy Duty Tailgate Hinge
 TACTIK Heavy Duty Tailgate Hinge Installation Manual for 2007 - Current Wrangler (JK) # 12052.0011 TO REDUCE RISK OF SERIOUS INJURY OR PROPERTY DAMAGE: READ ALL SAFETY MESSAGES AND UNDERSTAND ALL INSTRUCTIONS
Jeep Wrangler Rear Vision Camera, 2007 Current (Kit # )
") Jeep Wrangler Rear Vision Camera, 2007 Current (Kit # 9002-8837) Items Included in the Kit Required Tools & Supplies Camera Chassis Harness Zip lock bag with 15 Wire Ties & 3 Push Nuts Program Module 22--pin
Jeep Wrangler Rear Vision Camera, 2007 Current (Kit # 9002-8837) Items Included in the Kit Required Tools & Supplies Camera Chassis Harness Zip lock bag with 15 Wire Ties & 3 Push Nuts Program Module 22--pin
INSTALLATION INSTRUCTIONS. Jeep Wrangler Adjustable Rear Vision System for Factory Display Radios, 2007 Current (Kit # )
") Jeep Wrangler Adjustable Rear Vision System for Factory Display Radios, 2007 Current (Kit # 9002-8847) Items Included in the Kit Camera Chassis Harness Power Harness 22--pin white connector w/ video RCA
Jeep Wrangler Adjustable Rear Vision System for Factory Display Radios, 2007 Current (Kit # 9002-8847) Items Included in the Kit Camera Chassis Harness Power Harness 22--pin white connector w/ video RCA
In This DIY We Will Show You How To Install Recon Backup Lamps (part # To Run On A Separate Switch & In Reverse.
 In This DIY We Will Show You How To Install Recon Backup Lamps (part # 264150 To Run On A Separate Switch & In Reverse. Please Note, There Are Many Ways of Installing These Lights, Including Wiring Methods,
TOYOTA VENZA 2009 TRAILER WIRE HARNESS Procedure
 Part Number: PT791-0T099 Kit Contents Item # Quantity Reqd. Description 1 1 Trailer Wire Harness Module 2 1 4-Flat Harness 3 1 Battery Power Wire Harness 4 1 Mounting Bracket, 4-Flat 5 2 Screw #10-24 6
R O A D S M I T H TRIKE CONVERSIONS BY THE TRIKE SHOP
 R O A D S M I T H TRIKE CONVERSIONS BY THE TRIKE SHOP Please thoroughly review the instructions before and during installation. Keep in mind that this product was designed to be installed by trained dealer
wiring instructions NEW FORD WIRE MOD 60 INCH BLADE INCH BLADE
 wiring instructions 2018-2019 + NEW FORD WIRE MOD New technologically advanced logic box solves and eliminates all codes from trailering, backup assist, BLIS (Blind Spot Information System) and all currently
Included in Hardware Kit. Rear Corners 2-Door. Jeep JK Trail Armor. Set Part #14009 Rev STEP 1 - PRIOR TO INSTALLATION
 Jeep JK Trail Armor Set Part #14009 Rev-2 02-23-11 A) B) C) STEP 1 - PRIOR TO INSTALLATION Bushwacker only approves installing the trail armor according to these written instructions with the hardware
Please read thoroughly before starting installation and check that kit contents are complete.
 Rear Vision System Mirror Display 2013-Current Ram (Kit part number 1009-9518) Please read thoroughly before starting installation and check that kit contents are complete. Items Included in the Kit: Rear
INSTALLATION GUIDE. JK Rear bumper & tire carrier. AEV30105AC Last Updated: 10/11/16 US PATENT: D642,502 ; D
 AEV30105AC Last Updated: 10/11/16 JK Rear bumper & tire carrier US PATENT: D642,502 ; D633.024 INSTALLATION GUIDE PLEASE READ BEFORE YOU START TO GUARANTEE A QUALITY INSTALLATION, WE RECOMMEND READING
Amp & Speaker Upgrade Install Instructions for Batwing Fairing
 Amp & Speaker Upgrade Install Instructions for Batwing Fairing Tools Needed: 1/2 inch Socket Wire Cutters 7/16 inch Socket Wire Strippers 10 mm Socket Phillips Screwdriver 1/2 inch Ratchet Wrench T25 Torx
INSTALLATION INSTRUCTIONS
 Rear Vision System Mirror Display Dodge Ram Kit Contents: Instruction Sheets Template Chassis Harness Endgate Handle with Camera Wire Ties (Qty: 17) Bottle of ZTech Plug for Non-Locking Endgates (Optional)
Parts List ILLUSTRATION #1
 Installation Instructions BR20 Rear Bumper Replacement Part Number 28171T 2014-2016 Chevrolet Silverado 1500 2/4WD Do not attempt to install this product on any vehicle other than the one listed above!
INSTALLATION INSTRUCTIONS
 Rear Vision System Aftermarket and Factory 5.0, 8.4 and 6.1 MyGig Touch Screen Display (Factory Display requires Chrysler/Dodge dealer to activate) 2009 Current* Dodge Ram (Kit part number 1009-6503) *NOTE:
Master Your Terrain (307) Rear Swing-out Tire Carrier Jeep CJ. Installation Instructions
 Rear Swing-out Tire Carrier Jeep CJ. Installation Instructions") Master Your Terrain (307) 775 9565 www.tntcustoms.com Rear Swing-out Tire Carrier Jeep CJ Installation Instructions Congratulations for purchasing a TNT, Inc. Rear Swing-out Tire Carrier for your Jeep
Master Your Terrain (307) 775 9565 www.tntcustoms.com Rear Swing-out Tire Carrier Jeep CJ Installation Instructions Congratulations for purchasing a TNT, Inc. Rear Swing-out Tire Carrier for your Jeep
INSTALLATION INSTRUCTIONS
 INSTALLATION INSTRUCTIONS Accessory Application Publications No. BII 37518 2008 RDX Issue Date JUL 2007 PARTS LIST 10 Plain washers, 12 mm Trailer Hitch Kit P/N 08L92-STK-200 Trailer hitch 6 Lock washers,
8759 Lion Street Rancho Cucamonga, CA (909) TECH SUPPORT (909) FAX RECOMMENDED SERVICE PART NUMBERS
 TECH SUPPORT (909) FAX RECOMMENDED SERVICE PART NUMBERS") 8759 Lion Street Rancho Cucamonga, CA 91730 (909) 476-7225 TECH SUPPORT (909) 476-1491 FAX www.volantperformance.com INSTALLATION INTRUCTIONS PART NO. 37640 TOOLS NEEDED FOR INSTALL: 1. FLATHEAD SCREWDRIVER
8759 Lion Street Rancho Cucamonga, CA 91730 (909) 476-7225 TECH SUPPORT (909) 476-1491 FAX www.volantperformance.com INSTALLATION INTRUCTIONS PART NO. 37640 TOOLS NEEDED FOR INSTALL: 1. FLATHEAD SCREWDRIVER
Right Bar Light L Bracket Left Bar Light L Bracket. License Plate Bracket
 LD1 FRONT BUMPER PART#R102616 R102619 PARTS LIST: 1 LD1 Bumper Assembly 16 10mm x 27mm OD x 3mm Flat Washers 1 Driver/left Frame Mounting Bracket 8 10mm Lock Washers 1 Passenger/right Frame Mounting Bracket
Installation Instructions Z-Gate Shifter
 Installation Instructions Z-Gate Shifter Part Number 80681 1998, 2001 by B&M Racing and Performance Products The B&M Z-Gate shifter can be used in vehicles equipped with most popular three speed automatic
Procharger Stage II Intercooled Supercharger System (11-14 GT)
") Procharger Stage II Intercooled Supercharger System (11-14 GT) Installation Time: Approximately one day. Installed on 2012 Mustang GT 5.0/Manual Required Tools 3/8 Socket Set (Standard and Metric) 1/2
Procharger Stage II Intercooled Supercharger System (11-14 GT) Installation Time: Approximately one day. Installed on 2012 Mustang GT 5.0/Manual Required Tools 3/8 Socket Set (Standard and Metric) 1/2
INSTALLATION INSTRUCTIONS
 9002-6513 Rear Vision System W/ Zoom Aftermarket and Factory 8.4 Touch Screen Display (Factory Display requires Chrysler/Dodge dealer to activate) 2009 2012 RAM (Part B) 2013 Current RAM (Part A) NOTE:
ADDICTIVE DESERT DESIGNS
 ADDICTIVE DESERT DESIGNS Preparation: Disconnect the negative battery terminal. Park the vehicle on level ground and set the emergency brake. We recommend reading through the installation instructions
IMPORTANT: PLEASE RETAIN THIS INSTRUCTION MANUAL FOR FUTURE REFERENCE
 IMPORTANT: PLEASE RETAIN THIS INSTRUCTION MANUAL FOR FUTURE REFERENCE 2009 Toyota RAV-4 Stainless Steel Mesh Grilles L 30 G8P Fine Mesh Part #30-002-09 Quantity Description Part No. Upper Mesh Grille (includes):
JK SHIELD TIRE CARRIER INSTALLATION INSTRUCTIONS
 JK SHIELD TIRE CARRIER INSTALLATION INSTRUCTIONS TOOLS NEEDED 3/4 Wrench 3/4 Socket 9/16 Wrench or Socket 1 1/2 Socket 1 1/8 Wrench 13mm Socket Torque Wrench for 1 1/2 Socket 5mm Allen T20 Torx Hammer
OIL COOLER KIT INSTALLATION INSTRUCTIONS PART NUMBER D
 OIL COOLER KIT INSTALLATION INSTRUCTIONS PART NUMBER D570-0904 APPLICATION: 2011-2012 E90 335i/xi (N55 engine) with BMW standard bumper and with stock oil cooler Congratulations for being selective enough
Stand Alone Kit Installation Instructions
 Before installation: Stand Alone Kit Installation Instructions Read all information in this manual carefully Check the product for all components before starting the installation Remove the negative battery
Installation Instructions
 Installation Instructions DODGE RAM (1/2 TON AND 3/4 TON) 2002 2008 1500 PICK UP TRUCK 2003 2012 2500 PICK UP TRUCK (Except Megacab) Part Numbers: 50040 Parts List Qty A 1 B 1 C 2 D 2 E 2 F 2 Description
License Plate Bracket (4) Rubber Plugs. (2) Retaining Rings (2) Foam Spacers
 Rubber Plugs. (2) Retaining Rings (2) Foam Spacers") LDB-NTIT62-FB PARTS LIST: 1 LD1 Bumper Assembly 2 8mm Hex Nuts 1 Driver/left L Bracket (center LED light) 2 6mm x 20mm Button Head Bolts 1 Passenger/right L Bracket (center LED light) 4 6mm x 18mm x 1.6mm
LDB-NTIT62-FB PARTS LIST: 1 LD1 Bumper Assembly 2 8mm Hex Nuts 1 Driver/left L Bracket (center LED light) 2 6mm x 20mm Button Head Bolts 1 Passenger/right L Bracket (center LED light) 4 6mm x 18mm x 1.6mm
NORTHSTAR TRAILERS. Assembly Guide for MULTISTAR Trailer
 NORTHSTAR TRAILERS Assembly Guide for MULTISTAR Trailer Congratulations! You are the proud owner of a NORTHSTAR trailer. Please follow the instructions and steps in this manual for proper assembly. TRAILER
V6 Mustang BBK Long Tube Headers and Shorty X-Pipe:
 2011-2012 V6 Mustang BBK Long Tube Headers and Shorty X-Pipe: Time Required: Approximately 9 hours w/ 3 installers (highly recommended having help during install); process will be much faster with a lift
Installation Instructions
 Installation Instructions HighRock 4x4 TM Rear and Tire Carrier Vehicle Application: 1986-2006 Jeep Wrangler and Wrangler Unlimited HighRock 4x4 TM Rear and Tire Carrier Part Number: 42931 / 44931 www.bestop.com
Ford F-150 Series Rock Slider Side Steps Installation Instructions
 2004-2014 Ford F-150 Series Rock Slider Side Steps Installation Instructions PREPARATION 1. Disconnect the negative terminal on the battery. Park the vehicle on level ground and set the emergency brake.