Weistec M113K Supercharger System Installation Guide
|
|
|
- Alfred Hunter
- 5 years ago
- Views:
Transcription

1 Weistec M113K Supercharger System Installation Guide
2 WARNING! DO NOT HAVE YOUR ECU REPROGRAMMED ANYWHERE BUT AT WEISTEC FOR THIS SUPERCHARGER. THE AMG 55 USES AN ELECTRONIC THROTTLE CONTROL (ETC), WHICH IS CONTROLLED BY THE ENGINE CONTROL UNIT (ECU) AND THE CALIBRATION INSIDE. A REFLASH DOES NOT PROPERLY RECALIBRATE THE ENGINE MANAGEMENT SYSTEM; THIS CREATES A DANGEROUS SITUATION THAT COULD RESULT IN A STUCK THROTTLE AND CAN LEAD TO INJURY OR DEATH. WEISTEC FULLY REPROGRAMS THE ECU TO MERCEDES STANDARDS, AND ENSURES THAT ALL ENGINE SAFETY CONTROLS ARE FULLY FUNCTIONAL. 1
3 WARNING! THE WEISTEC M113K SUPERCHARGER AND ACCOMPANYING PROGRAMMING ARE DESIGNED AROUND THE USE OF 91 OCTANE FUEL OR HIGHER ONLY. BEFORE YOU RUN YOUR MERCEDES WITH THE WEISTEC M113K SUPERCHARGER INSTALLED EVEN ONCE, YOU MUST EITHER DRAIN THE FUEL TANK COMPLETELY AND FILL IT UP WITH 91 OCTANE, OR BEGIN USING 91 OCTANE IN YOUR MERCEDES TWO COMPLETE FILLUPS BEFORE INSTALLATION. 2
4 WARNING! IF YOU ARE NOT EXPERIENCED IN THE AREA OF AUTOMOTIVE MECHANICS, WE STRONGLY URGE THAT YOU REFER THIS INSTALLATION TO A CERTIFIED INSTALLER OR TECHNICIAN. 3
5 WARNING! THE WEISTEC M113K SUPERCHARGER MUST BE FILLED WITH 160 ml OF PROVIDED OIL PRIOR TO ROTATION OF THE COMPRESSOR SCREW SYSTEM OR YOUR WARRANTY WILL BE VOIDED. 4
6 WEISTEC M113K SUPERCHARGER Installation Guide for MERCEDES AMG 55 Thank you for your purchase of the Weistec M113K Supercharger for the Mercedes AMG 55 with the 5.5L Kompressor motor. We appreciate your business, and we know you will enjoy your product. For your benefit, please read the following instructions completely and thoroughly before attempting to install the supercharger. Many questions we have received from customers about the installation of our products that could have been easily solved by information listed in the accompanying installation guide. We want you to enjoy the product in its fully functional state, and reading this tutorial is the first step to getting you on your way to a more rare and powerful Mercedes AMG. PLEASE NOTE THAT IF YOU HAVE ANY AFTERMARKET POWERTRAIN PARTS ALREADY INSTALLED ON YOUR VEHICLE, YOU MUST RETURN THE CAR TO STOCK STATUS THIS INCLUDES PULLEYS, PROGRAMMING, ETC. THE CAR WILL NOT FUNCTION AND PARTS MAY NOT FIT PROPERLY IF OTHER AFTERMARKET PARTS ARE INSTALLED. We strongly urge that you also have at least one person to help you install the supercharger, as the unit is heavy. You will soon be on your way to installing the World's First Supercharger Upgrade for the 5.5L Kompressor! Again, thank you for choosing Weistec Engineering! 5
7 Table of Contents Tools Required... Error! Bookmark not defined. I. Disassembly... 2 II. M113K Supercharger System Assembly III. M113K FEAD System Install IV. M113K Supercharger Assembly Install
8 Tools Required Hydraulic Jack or service lift Jack Stands or transmission stand 1/4 Drive Ratchet 12" Long 1/4" Drive Extension 6.5mm 1/4 Drive Deep Well Socket 8mm 1/4 Drive Deep Well Socket 10mm 1/4 Drive Deep Well Socket 17mm 3.8" Drive Deep Well Socket 10mm Open End Wrench 13mm Open End Wrench 14mm Open End Wrench 15mm Open End Wrench 17mm Open End Wrench 1" Open End Wrench 8mm Ratcheting Wrench 3/8 Drive Ratchet 13mm 3/8" Drive Socket 16mm 3/8 Drive Deep Well Socket Vice 17mm 3/8" Drive Deep Well Socket 19mm Heavy Duty Deep Well Socket T-25 1/4" Drive Torx Bit T 30 1/4" or 3/8 Drive Torx Bit T-45 3/8" Drive Torx Bit T-50 3/8" Drive Torx Bit E-8 3/8" Drive Reverse Torx Bit E-14 3/8" Drive Reverse Torx Bit Flat Head Screw Driver Wire Cutter Pushpin Removal Tool 6mm Drive Hex Bit 8mm Drive Hex Bit Mechanics Rags Vacuum Painters Tape Fluid evacuator Impact Gun (Optional) 7
9 Crimp Style clamp tool 5mm Drill bit Drill Grinder (Optional) Torque Wrench Ultra Black RTV Silicone 1

10 I. Disassembly Before removing battery terminal, double check vehicle is in Park, and driver side window is completely down. 1. Disconnect the Negative battery terminal by: a. Swinging spare tire panel in truck upward to access battery. b. Pulling top battery panel forward and sliding out. 2. Using 10mm Drive Socket, and 12" extension to remove batter ground strap. Raise and support the hood. 3. Remove ECU by: a. Removing engine bay liner in the upper corner of the engine bay by turning the two plastic screws ¼ counter-clockwise 2


11 b. Sliding the two plastic locks to the unlock position and lifting out the ECU/Fuse Box cover c. Removing ECU by unlocking the grey locks on the connectors, unplugging the harness plugs, and removing the ECU from the car. 3

12 BEFORE MOVING ON, PLEASE FILL OUT THE VEHICLE INFORMATION/TUNE REQUEST FORM AND MAIL THE ECU AND FORM TO 1701 E. EDINGER AVE. SUITE G4, SANTA ANA, CA 92705, USA. ELECTRONIC COMPONENTS SUCH AS THE ECU ARE VERY FRAGILE. PLEASE BE SURE TO SECURELY PACK THE ECU WITH PROTECTIVE COVERING WHEN MAILING. THE VEHICLE INFORMATION/TUNE REQUEST FORM IS INCLUDED WITH THE SUPERCHARGER SYSTEM DOCUMENTATION, AND CAN ALSO BE FOUND AT 4. Remove the air intake system from the vehicle by: a. Gently pulling up on the Mercedes engine cover b. Removing both air box inlet tubes. c. Using Flat Head Screw Driver or 6.5mm Socket to loosen Clamps on the inlet Y and air boxes. d. Lifting the air box assemblies from the vehicle. 4


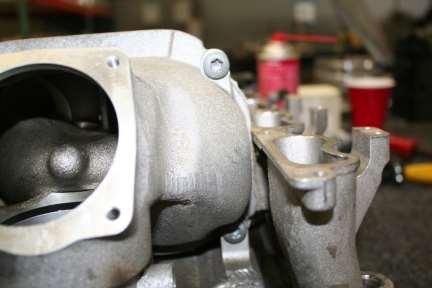
13 5. Remove AMG manifolds by: a. Using Flat Head Screw Driver or 6.5mm Socket to loosen Clamps on the supercharger outlet 5


14 b. Removing all 7 screws from each AMG Manifold c. Removing AMG Manifolds from the engine bay 6


15 6. Remove Throttle Body and EVAP Lines by: a. Unplugging Throttle body harness. b. Removing all 4 throttle body bolts using a T-30 Torx Bit. c. Disconnecting Throttle Body EVAP line. d. Removing Throttle Body from vehicle and placing it somewhere clean and safe. e. Removing EVAP line from Right Valve Cover. 7


16 f. Removing EVAP line from Left Valve Cover. 7. Remove Fuel Rails and Injectors by: Please be aware that the fuel system may retain fuel pressure that can be extremely dangerous if removed suddenly. Proceed with caution. Please be aware of dripping fuel may get on parts that can be affected. Please cover fuel line with a shop rag in this case. a. Removing 4 bolts for fuel rail removal. 8


17 b. Disconnecting fuel line using 17mm Open End Wrench. c. Unplugging all 8 fuel injectors. d. Lifting up on the fuel rails to remove them along with the injectors 9


18 8. Remove Air Valves by: a. Disconnecting vacuum lines and air lines from both of the air valves b. Unbolting Air Valves from the intake manifold runners and placing them somewhere clean and safe as they will be reused. 10


19 9. Remove Supercharger by: a. Removing Supercharger Belt b. Removing Intercooler water line bracket 11

20 c. Disconnecting rubber intercooler water lines from the hard lines d. Removing Intake manifold bolts e. Removing EVAP Solenoid line by unbolting it from the right Valve cover and disconnecting both ends. f. Unplugging all sensor clips, hoses, and fasteners and make Supercharger free for removal. Supercharger Clutch clip Rear IAT Sensor clip Bypass Valve harness from engine harness 1 map sensor clip (Left side of supercharger outlet) g. Removing Supercharger assembly from engine bay and placing it on a clean work bench h. Vacuuming and cleaning engine valley and intake ports. i. Using painter s tape to seal intake ports until the Weistec M113K Supercharger system is bolted onto the engine. 10. Remove Bypass Valve by: a. Removing MAP Sensor by removing two screws 12


21 b. Removing IAT Sensor by carefully unclipping it c. Removing all screws that attach the Intercooler to the supercharger 13
22 14


23 d. Gently prying the intercooler and supercharger apart e. Removing Bypass Valve rubber gasket and 4 Bypass Valve Bolts 15


24 f. Placing Bypass Valve on a clean workbench as it will be reused. 11. Remove Factory Supercharger Belt Tensioner by: a. Removing Tensioner pulley 16


25 b. Removing Tensioner bolts 17


26 II. M113K Supercharger System Assembly 1. Install IAT Sensor by: a. Installing IAT Sensor into Intake Manifold in the location shown below. Make sure to lubricate the O-Ring to prevent damage during installation 2. Install MAP Sensor by: a. Pressing in MAP Sensor in the location shown below and bolt in using original bolts. Use Blue Loctite on the bolts and make sure to lubricate the O-Ring. 3. Install Bypass Valve by: 18


27 a. Trimming Bypass Valve rubber cover as shown below. Some early models do not have the rubber cover. If your Bypass Valve does not have the cover, skip this step. b. Lubricating included Bypass O-Ring and positioning it in the groove as shown below. c. Bolting on Bypass valve using original hardware. d. Pressing on included Bypass Coupler and loosely fitting on two included 60-80mm European hose clamps 4. Install Inlet Manifold by: 19


28 a. Cleaning then applying Black RTV Silicone to Inlet Manifold as shown below. b. Mounting Inlet Manifold onto Supercharger inlet making sure the Bypass Coupler properly attaches to Inlet Manifold. Be sure to install the Inlet Manifold as shown below to avoid smearing the Black Silicone RTV applied in the previous step. Line up the top of the Inlet Manifold so that is touching the Supercharger inlet. Then press the back of the Inlet Manifold down so that it is properly seating in the Bypass Coupler as well as mated with the Supercharger Inlet It is highly important that care be taken with this step to ensure there are no vacuum leaks. 20


29 c. Bolting on Inlet Manifold using 4 included M8x1.25x25 bolts, Torque to 40 Nm. One of the bolts must be bolted from the opening of the Inlet Manifold as shown below. d. Wiping away excess silicone e. Position and tighten the two 60-80mm European hose clamps on bypass valve coupler 21


30 III. Weistec M113K FEAD System Install 1. Install M113K FEAD System by: a. Tapping the indicated hole using an M8x1.25 Tap. b. Bolting on the M113K FEAD Bracket using the included bolts as shown below. 22

31 c. Bolting on included 8 Rib Belt Tensioner Assembly using included M10x1.5x80 bolt and M10 washer. Make sure tensioner is aligned so that the alignment peg is fully inserted into the alignment hole on the FEAD Bracket. 23

32 IV. Weistec M113K Supercharger Assembly Install 1. Install Supercharger Assembly by: a. Pressing on included ¾ 90 degree molded heater hose onto barbed fittings at back of the Supercharger System using one clamp on each hose. Make sure that the hoses are aligned so that they will be pointing to the left side of the engine bay. b. Removing painters tape from intake ports on the cylinder heads c. Placing on included M113K Intake Manifold Gaskets d. Lowering Supercharger Assembly onto engine with the ¾ hoses routed to the left side of the engine bay, making the assembly is properly seated and no lines or wiring are pinched. 24


33 e. Bolting down the Supercharger Assembly with the included M8x1.25x25 bolts, Torque to 40 Nm 2. Connect All Electrical Connections by: a. Connecting MAP Sensor 25
 using a soldering iron and heat shrink to")
34 b. Connecting IAT Sensor c. Connecting all 8 Fuel Injectors There are two options, one is to use the plug and play injector clips. The other is to cut off the factory injector clips and wire in the EV6 Female Pigtails (Polarity does not matter) using a soldering iron and heat shrink to cover the solder joints. 26


35 d. Connecting Bypass Harness to Engine Harness 3. Install Air Valves by: a. Pressing in left and right Air Valves and bolting them to the manifold using the original bolts and included gaskets 27


36 b. Connecting 1/8 inch vacuum lines. Be sure to have the filters installed in the proper direction c. Pressing on M113K Air Tube d. Trimming Air Pump hose and pressing it onto the barbed fitting installed in the M113K Air Tube 28


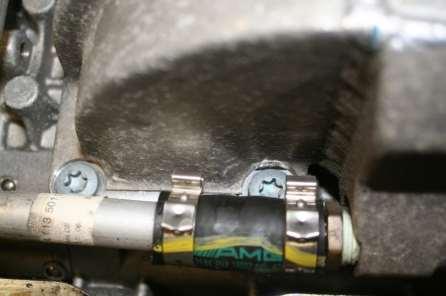
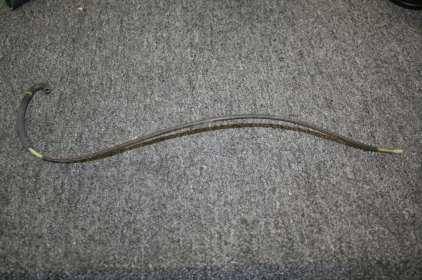
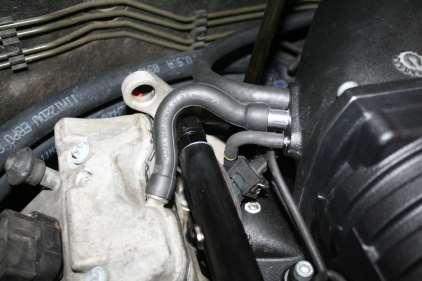
37 4. Connect Fuel Lines by: a. Routing fuel line under the Inlet Manifold between the Bypass Valve and the Supercharger unit. Make sure the side with the 90 degree AN fitting is on the left side of the engine b. Screwing on hose fittings to the fittings on the fuel rails c. Screwing on factory fuel line to the right side fuel rail fitting. 5. Connect Emissions Lines by: a. Fitting the OEM hose shown below to the left side valve cover and connecting it to the middle vacuum port on the Inlet Manifold 29


38 b. Fitting the OEM hose shown below to the right side valve cover and connecting it to the vacuum port on the right side of the Inlet Manifold 30


39 c. Removing the OEM hose shown below from the factory air box. If the plastic barbed coupler comes off in the OEM hose, remove it. Press in the included brass barbed fitting and install an included clamp. 31


40 d. Pressing on the included -10 hose section onto the other end of the brass barbed fitting and installing an included clamp e. Pressing the OEM hose onto the port on the right valve cover and routing the hose as shown below. The other end of the hose will be pressed and clamped onto the M113K Intake Tube 32


41 f. Disassembling the factory EVAP Solenoid hard line as shown below 33


42 g. Installing the Factory EVAP Solenoid hard line as shown below. One end connects the OEM solenoid vacuum line with an included 3/8 clamp. h. Pressing and clamping on the included 3/8 EVAP hose to EVAP hard line 34


43 i. Routing 3/8 EVAP line behind the Inlet Manifold and connecting it to the 3/8 vacuum port on the left side of the Inlet Manifold as shown below. j. Connecting 1/8 Air Valve vacuum line to the 1/8 vacuum port on the left side of the Inlet Manifold, routing it under the left side fuel rail and connecting it to the Air Valve Solenoid line that has the blue filter. 35
44 36


45 6. Install Throttle Body by: a. Holding the Throttle Body in a vice and tapping the hole using the included 1/8 NPT Tap as shown below b. Screwing in the included 1/8 NPT Stainless Plug using pipe sealant. 37


46 c. Screwing in included 1/8 NPT Stainless Plug into Inlet Elbow. Use Teflon Tape to ensure a proper seal d. Pressing Inlet Elbow Gasket into the gasket groove on the Inlet Manifold 38

47 e. Bolting on Inlet Elbow using included 4 M6x1x20 Socket Head Screws torque to 16 Nm f. For 74mm Throttle Body: Positioning Throttle body gasket in the gasket groove on the Inlet Elbow the bolting on the 74mm Throttle Body Throttle Body using included M6x1x30 button head screws as shown below. Torque to 16 Nm. 39

48 g. For 82mm Throttle Body: Applying Black RTV Silicone to the Inlet Elbow and bolting on the 82mm Throttle Body using included M6x1x30 button head screws as shown below. Torque to 16 Nm. 40

49 7. Connect Intercooler Plumbing by: a. Pressing the 5/8 barb side of the included 5/8 to ¾ Barb Couplers into the factory intercooler lines and clamping them with the included 5/8 clamps as shown below. b. Running the ¾ Intercooler lines towards the front of the engine 41


50 c. Pressing the ¾ Intercooler lines onto the ¾ sides of the barb couplers and clamping them on with the included ¾ clamps as shown below 8. Install Intake by: a. For 74mm Throttle Body: Fitting the smaller side of included silicone coupler onto the throttle body and clamping it on using the provided 70-90mm European style hose clamp as shown below 42
51 b. For 82mm Throttle Body: Fitting the included silicone coupler onto the throttle body and clamping it on using the provided SAE No.60 hose clamp c. Pressing in M113K Intake tube and clamping it on using the included SAE No.60 hose clamp d. Pressing the -10 hose onto the vacuum port on the M113K Intake Tube and clamping it on using the included 5/8 hose clamp 43

52 e. Fitting Weistec Air Filter onto the M113K Intake Tube and clamping it on using the included SAE NO.60 clamp 9. Fill Supercharger With Oil by: a. Removing plug on top of supercharger with a 5mm allen bit. 44


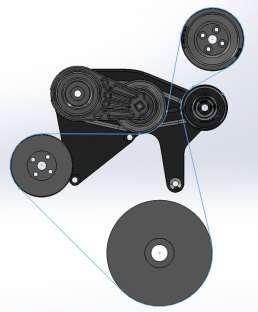
53 b. Filling Supercharger unit with supplied oil c. Reinstalling plug on top of supercharger using Black RTV Silicone 10. Install Supercharger Belt by: a. Using a 3/8 drive ratchet to pull back on the tensioner and routing the included 8 Rib Supercharger Belt per the routing diagram shown below. 45
54 46
55 Thank you from Weistec Engineering! Always enjoy the added horsepower and torque of the M113K supercharger responsibly. Use best judgment when driving, and remember to have fun! NOTES: 47
SL63 Weistec M156 Supercharger System Installation Guide Stage 1 / Stage 2
 SL63 Weistec M156 Supercharger System Installation Guide Stage 1 / Stage 2 WARNING! DO NOT HAVE YOUR ECU REPROGRAMMED ANYWHERE BUT AT WEISTEC FOR THIS SUPERCHARGER. THE AMG 63 USES AN ELECTRONIC THROTTLE
CLS63 Weistec M156 Supercharger System Installation Guide Stage 1 / Stage 2
 CLS63 Weistec M156 Supercharger System Installation Guide Stage 1 / Stage 2 WARNING! DO NOT HAVE YOUR ECU REPROGRAMMED ANYWHERE BUT AT WEISTEC FOR THIS SUPERCHARGER. THE AMG 63 USES AN ELECTRONIC THROTTLE
C63 Weistec M156 Supercharger System Installation Guide Stage 3
 C63 Weistec M156 Supercharger System Installation Guide Stage 3 WARNING! DO NOT HAVE YOUR ECU REPROGRAMMED ANYWHERE BUT AT WEISTEC FOR THIS SUPERCHARGER. THE AMG 63 USES AN ELECTRONIC THROTTLE CONTROL
CLK63 (Black Series) Weistec M156 Supercharger System Installation Guide Stage 3
 Weistec M156 Supercharger System Installation Guide Stage 3") CLK63 (Black Series) Weistec M156 Supercharger System Installation Guide Stage 3 WARNING! DO NOT HAVE YOUR ECU REPROGRAMMED ANYWHERE BUT AT WEISTEC FOR THIS SUPERCHARGER. THE AMG 63 USES AN ELECTRONIC
CLK63 (Black Series) Weistec M156 Supercharger System Installation Guide Stage 3 WARNING! DO NOT HAVE YOUR ECU REPROGRAMMED ANYWHERE BUT AT WEISTEC FOR THIS SUPERCHARGER. THE AMG 63 USES AN ELECTRONIC
SLS825 Weistec Supercharger System Installation Guide
 SLS825 Weistec Supercharger System Installation Guide 2010-Present SLS AMG (Gullwing and Roadster) 2014 SLS Black Series WARNING! DO NOT HAVE YOUR ECU REPROGRAMMED ANYWHERE BUT AT WEISTEC FOR THIS SUPERCHARGER.
Weistec True Downpipes
 Weistec True Downpipes Installation Guide, W212, W218, AWD 2014+ E63 2014+ CLS63 WARNING! IF YOU ARE NOT EXPERIENCED IN THE AREA OF AUTOMOTIVE MECHANICS, WE STRONGLY URGE THAT YOU REFER THIS INSTALLATION
Weistec M177 WMI System
 Weistec M177 WMI System Installation Guide 2015+ C63(S) Sedan 2016+ C63(S) Coupe This product is legal in California for racing vehicles only and should never be used upon a highway. This product is legal
Weistec M157 WMI System
 Weistec M157 WMI System Installation Guide 2012-2013 E63 2014+ E63 4matic(S) 2011-2013 CLS63 2014+ CLS63 4matic(S) 2015+ S63 AMG (Without ABC Suspension) This product is legal in California for racing
Weistec M156/M159 ENGINE
 Weistec M156/M159 ENGINE Oil / Air Separator System Installation Guide 2007-2011 S63 AMG 2007-2011 ML63 AMG 2007 R63 AMG 2007-2008 CLK63 AMG 2008 CLK63 Black Series 2007-2011 CLS63 AMG 2008-Present C63
SALEEN SPEEDLAB BOOST AND WATER TEMPERATURE GAUGE POD KIT
 = SALEEN SPEEDLAB BOOST AND WATER TEMPERATURE GAUGE POD KIT INSTALLATION MANUAL: 2005-09 Mustang 4.6L 3V P/N: 10-8002-C12000B KIT P/N: 10-2903-B11511* Saleen Performance, Inc. 1225 East Maple Rd. Troy,
2010+ Audi B8 S4/S5 3.0T S-FLO Intake Kit INSTALLATION GUIDE FOR RACING USE ONLY
 INSTALLATION GUIDE 2010+ Audi B8 S4/S5 3.0T S-FLO Intake Kit FOR RACING USE ONLY Congratulations on your purchase of the AWE Tuning S-FLO Intake for the 2010+ Audi B8 S4 and B8 S5 3.0T. Exquisite build
2015+ HELLCAT 6.2L HEMI System vehicle specific plate system xx
 These installation instructions will guide you through installing the Nitrous Outlet 2015+ Hellcat 6.2L Hemi Vehicle Specific Plate System on your vehicle. Before you get started, remember to never use
INSTALLATION INSTRUCTIONS AIR/OIL SEPARATOR KIT
 INSTALLATION INSTRUCTIONS AIR/OIL SEPARATOR KIT 2015+ SUBARU WRX (LHD ONLY) Document: 19-0136 Support: info@radiumauto.com This document covers the installation of the Radium brake master cylinder brace
Edelbrock E-Force Supercharger Part #1538: Dodge 1500 Truck 5.7L V8 HEMI
 Edelbrock E-Force Supercharger Part #1538: 2009-2014 Dodge 1500 Truck 5.7L V8 HEMI 2009-14 Dodge 5.7L Hemi 1500 Truck INTRODUCTION Thank you for purchasing the Edelbrock Supercharger System for the 2009-15
Edelbrock Victor II Intake Manifold. For Chrysler 5.7L (Eagle), 6.1L and 6.4L Gen III HEMI Engines Part #7179
, 6.1L and 6.4L Gen III HEMI Engines Part #7179") For Chrysler 5.7L (Eagle), 6.1L and 6.4L Gen III HEMI Engines PLEASE study these instructions carefully before beginning this installation. You should be familiar with and comfortable working on your
For Chrysler 5.7L (Eagle), 6.1L and 6.4L Gen III HEMI Engines PLEASE study these instructions carefully before beginning this installation. You should be familiar with and comfortable working on your
2017+ L5P Duramax 3 ½ Down Pipe & EGR Fix Kit
 2017+ L5P Duramax 3 ½ Down Pipe & EGR Fix Kit Covers installation of PN s: WCF100630, WCF100829 Note: This Kit is for off road competition use only! Off Road Competition Use Tuning & Exhaust System is
Always wear safety glasses when working on your vehicle.
 90-93 MAZDA MIATA SUPERCHARGER KIT The KraftWerks 90-93 Mazda Miata Supercharger Kit was designed for easy installation. Competent mechanics with the appropriate tools will find the process to be relatively
3 October 2016 PN# V Dodge Twin Turbo Kit (I-00274) ½ D o d g e 2 4 v I S B
 ½ D o d g e 2 4 v I S B") 3 October 2016 PN#1045320 24V Dodge Twin Turbo Kit (I-00274) 1 DOWNLOAD ENHANCED INSTALL MANUALS AT dieselperformance.com BD Twin Turbo Kit 1998½- 2 0 0 2 D o d g e 2 4 v I S B Part# 1045320 PLEASE READ
3 October 2016 PN#1045320 24V Dodge Twin Turbo Kit (I-00274) 1 DOWNLOAD ENHANCED INSTALL MANUALS AT dieselperformance.com BD Twin Turbo Kit 1998½- 2 0 0 2 D o d g e 2 4 v I S B Part# 1045320 PLEASE READ
Procharger Stage II Intercooled Supercharger System (11-14 GT)
") Procharger Stage II Intercooled Supercharger System (11-14 GT) Installation Time: Approximately one day. Installed on 2012 Mustang GT 5.0/Manual Required Tools 3/8 Socket Set (Standard and Metric) 1/2
Procharger Stage II Intercooled Supercharger System (11-14 GT) Installation Time: Approximately one day. Installed on 2012 Mustang GT 5.0/Manual Required Tools 3/8 Socket Set (Standard and Metric) 1/2
BBK Intake Manifold Kit ( L) - Installation Instructions
 - Installation Instructions") BBK Intake Manifold Kit (86-93 5.0L) - Installation Instructions The below installation instructions work for the following products: BBK Intake Manifold Kit (86-93 5.0L) Please read through the instructions
BBK Intake Manifold Kit (86-93 5.0L) - Installation Instructions The below installation instructions work for the following products: BBK Intake Manifold Kit (86-93 5.0L) Please read through the instructions
INSTALLATION INSTRUCTIONS FUEL RAIL
 INSTALLATION INSTRUCTIONS FUEL RAIL MITSUBISHI EVO X Document# 19-0067 Support: info@radiumauto.com WARNING: DON'T SMOKE OR WORK WITH OPEN SPARKS WHILE WORKING ON THE FUEL SYSTEM PREPARING THE VEHICLE:
IAG Air / Oil Separator (AOS) For STi
 For STi") IAG Air / Oil Separator (AOS) For 2008-14 STi Part# IAG-ENG-7000 Tools Required: Ratchet, torque wrench, extensions, needle nose pliers, hose cutter, snips/scissors Sockets: 10mm, 12mm 13mm Wrenches: 10mm,
IAG Air / Oil Separator (AOS) For 2008-14 STi Part# IAG-ENG-7000 Tools Required: Ratchet, torque wrench, extensions, needle nose pliers, hose cutter, snips/scissors Sockets: 10mm, 12mm 13mm Wrenches: 10mm,
IAG Competition Series Air / Oil Separator (AOS) For 2017 STI
 For 2017 STI") P IAG Competition Series Air / Oil Separator (AOS) For 2017 STI Part# IAG-ENG-7251 Tools Required: Ratchet, torque wrench, extensions, needle nose pliers, hose cutter, snips/scissors, flat head screw driver,
P IAG Competition Series Air / Oil Separator (AOS) For 2017 STI Part# IAG-ENG-7251 Tools Required: Ratchet, torque wrench, extensions, needle nose pliers, hose cutter, snips/scissors, flat head screw driver,
L Intake Manifold Part #
 86-93 5.0L Intake Manifold Part #5001-5002 I N S T A L L A T I O N I N S T R U C T I O N S Supplied Materials Bottom cover, Upper manifold, Lower manifold, Plenum cover plate, 1501 Throttle body (comes
IAG Street Series Air / Oil Separator (AOS) For WRX & WRX STI
 For WRX & WRX STI") IAG Street Series Air / Oil Separator (AOS) For 2006-07 WRX & 2004-07 WRX STI Part# IAG-ENG-7100 Tools Required: Ratchet, torque wrench, extensions, needle nose pliers, hose cutter, snips/scissors, flat
IAG Street Series Air / Oil Separator (AOS) For 2006-07 WRX & 2004-07 WRX STI Part# IAG-ENG-7100 Tools Required: Ratchet, torque wrench, extensions, needle nose pliers, hose cutter, snips/scissors, flat
7B1210 COBB BMW N54 Charge Pipe
 7B1210 COBB BMW N54 Charge Pipe Installation Instructions Congratulations on your purchase of the COBB BMW N54 Charge Pipe for your BMW. The following instructions will assist you through your installation
2006 Honda Civic SI Supercharger Kit Installation Instruction Kit #
 2006 Honda Civic SI Supercharger Kit Installation Instruction Kit #350-091 3239 MONIER CIRCLE, STE.5 RANCHO CORDOVA, CA 95742 916.635.4550 FAX 916.635.4632 www.ct-engineering.com INS-157 VERSION: 3.25.2009
3.4L V6 SUPERCHARGER 7 TH INJECTOR KIT
 Part Number: 00602-17620-260 00602-17620-261 00602-17620-263 00602-17620-264 00602-17620-274 00602-17620-275 00602-17620-276 Section I Installation Preparation Kit Contents Item # Quantity Reqd. Description
RZR SUPERCHARGER KIT INSTALLATION INSTRUCTIONS POLARIS RZR 1000 SUPERCHARGER KIT. 1 of 33
 POLARIS RZR 1000 SUPERCHARGER KIT 1 of 33 POLARIS RZR 1000 SUPERCHARGER KIT Part Number(s): 150-17-1000 TABLE OF CONTENTS Introduction / Pre-Installation Instructions C.A.D. Drawings Pre-Installation /
PowerMax Diesel Upgrade For Cummins Engines
 PowerMax Diesel Upgrade For Cummins Engines 00.5-007.5 Dodge Ram With Cummins 5.9L Item 3 4 5 6 7 8 9 0 3 4 5 6 7 8 Parts List Description Turbocharger Ancillary kit 773069- (includes) Installation Instructions
Performance Inlet Manifold
 Performance Inlet Manifold Tools needed (some tools not required on some models): 13mm Combination Wrench Flat Blade Screwdriver T30 Torx Driver T25 Torx Driver 10mm Combination Wrench and/or Socket with
IAG Competition Series Air / Oil Separator (AOS) For WRX
 For WRX") P IAG Competition Series Air / Oil Separator (AOS) For 2015-16 WRX Part# IAG-ENG-7252 Tools Required: Ratchet, torque wrench, extensions, needle nose pliers, hose cutter, snips/scissors, flat head screw
P IAG Competition Series Air / Oil Separator (AOS) For 2015-16 WRX Part# IAG-ENG-7252 Tools Required: Ratchet, torque wrench, extensions, needle nose pliers, hose cutter, snips/scissors, flat head screw
IAG Street Series Air / Oil Separator (AOS) For WRX
 For WRX") P IAG Street Series Air / Oil Separator (AOS) For 2015-16 WRX Part# IAG-ENG-7152 Tools Required: Ratchet, torque wrench, extensions, needle nose pliers, hose cutter, snips/scissors, flat head screw driver,
P IAG Street Series Air / Oil Separator (AOS) For 2015-16 WRX Part# IAG-ENG-7152 Tools Required: Ratchet, torque wrench, extensions, needle nose pliers, hose cutter, snips/scissors, flat head screw driver,
INSTALLATION INSTRUCTIONS BILLET FUEL RAIL KIT
 INSTALLATION INSTRUCTIONS BILLET FUEL RAIL KIT MITSUBISHI LANCER EVOLUTION X Document# 19-0067 Support: info@radiumauto.com WARNING: DON'T SMOKE OR WORK WITH OPEN SPARKS WHILE WORKING ON THE FUEL SYSTEM
IAG Street Series Air / Oil Separator (AOS) For WRX & WRX STI
 For WRX & WRX STI") IAG Street Series Air / Oil Separator (AOS) For 2006-07 WRX & 2004-07 WRX STI Part# IAG-ENG-7150 Tools Required: Ratchet, torque wrench, extensions, needle nose pliers, hose cutter, snips/scissors, flat
IAG Street Series Air / Oil Separator (AOS) For 2006-07 WRX & 2004-07 WRX STI Part# IAG-ENG-7150 Tools Required: Ratchet, torque wrench, extensions, needle nose pliers, hose cutter, snips/scissors, flat
INSTALL MANUAL D o d g e 1 2 v 6 B T A PLEASE READ ALL INSTRUCTIONS BEFORE INSTALLATION.
 PN#1045310 12V Dodge Twin Turbo Kit (I-00273) 1 INSTALL MANUAL BD Twin Turbo Kit 1994-1 9 9 8 D o d g e 1 2 v 6 B T A Part# 1045310 PLEASE READ ALL INSTRUCTIONS BEFORE INSTALLATION. * Picture as shown
Slingshot Rotrex Supercharger Kit
 Slingshot Rotrex Supercharger Kit This supercharger kit improves on the Slingshot by forcing more dense air into the engine and creating more power. Installation time of the supercharger depends on you
8 Zip Tie Zip Tie 1 Union Fitting 1 ½ ½ Union Reducer Fitting Union 1 5/8 ½ (For Plastic Intake Manifold Vehicles)
") P IAG Street Series Air / Oil Separator (AOS) For 2017 STI Part# IAG-ENG-7151 Tools Required: Ratchet, torque wrench, extensions, needle nose pliers, hose cutter, snips/scissors, flat head screw driver,
P IAG Street Series Air / Oil Separator (AOS) For 2017 STI Part# IAG-ENG-7151 Tools Required: Ratchet, torque wrench, extensions, needle nose pliers, hose cutter, snips/scissors, flat head screw driver,
2015 Corvette Supercharger System Instructions
 2015 Corvette Supercharger System Instructions These instructions are meant to serve as a guide to the installation of the ECS 2015 Corvette Supercharging system. Please be sure to use all safety equipment
Edelbrock E-Force Supercharger JEEP WRANGLER JK 3.6L V6 Part #1527 and 15270
 Edelbrock E-Force Supercharger 2012-14 JEEP WRANGLER JK 3.6L V6 Part #1527 and 15270 INTRODUCTION Thank you for purchasing the Edelbrock Supercharger System for the Jeep Wrangler with 3.6L V6 Pentastar.
Edelbrock Victor II Intake Manifold. For Chrysler 5.7L (Eagle) and 6.1L Gen III HEMI Engines Part #7179
 and 6.1L Gen III HEMI Engines Part #7179") For Chrysler 5.7L (Eagle) and 6.1L Gen III HEMI Engines PLEASE study these instructions carefully before beginning this installation. You should be familiar with and comfortable working on your vehicle.
For Chrysler 5.7L (Eagle) and 6.1L Gen III HEMI Engines PLEASE study these instructions carefully before beginning this installation. You should be familiar with and comfortable working on your vehicle.
#TL T EA888 GEN 3 FUELING SYSTEM/ INSTALLATION INSTRUCTIONS
 #TL100069 2.0T EA888 GEN 3 FUELING SYSTEM/ INSTALLATION INSTRUCTIONS Notes: These instructions were written for a North American specification MkVII GTI. Other models, like the Golf R, are similar. When
Edelbrock 5.4L F-150 Supercharger Part #1583
 Edelbrock 5.4L F-150 Supercharger INTRODUCTION Edelbrock 5.4L Ford Supercharger System Thank you for purchasing the Edelbrock 5.4L Ford Supercharger System for the F-150. The Edelbrock E-Force Supercharger
INSTALLATION MANUAL: MUSTANG DUAL FUEL PUMP KIT P/N: C14057B
 INSTALLATION MANUAL: 05-09 MUSTANG DUAL FUEL PUMP KIT P/N: -8002-C157B Saleen Performance, Inc. 800-888-8945 www.saleen.com STOP IF YOU ARE NOT EXPERIENCED IN THE AREA OF AUTOMOTIVE MECHANICS, WE STRONGLY
Wrenches: ⅞, 8mm, 10mm, 13mm, 19mm P. allen, Other: Electrical Tape
 IAG Street Series Air / Oil Separator (AOS) For 2008-14 STI Part# IAG-ENG-7100 Tools Required: Ratchet, torque wrench, extensions, needle nose pliers, hose cutter, snips/scissors, flat head screw driver,
The M7 Direct Flow Intercooler (DFIC) Installation Guide
 Installation Guide") The M7 Direct Flow Intercooler (DFIC) Installation Guide This information is meant only as a guide. The author of this information,, or any M7 Tuning employees assumes no liabilities for any outcomes resulting
The M7 Direct Flow Intercooler (DFIC) Installation Guide This information is meant only as a guide. The author of this information,, or any M7 Tuning employees assumes no liabilities for any outcomes resulting
Installation Instructions for: Radix Max. Intercooled Supercharger System GM 6.0L & 6.2L TRUCKS
 Installation Instructions for: Radix Max Intercooled Supercharger System 07-13 GM 6.0L & 6.2L TRUCKS Step-by-step instructions for installing the best in supercharger systems. * PREMIUM GASOLINE FUEL REQUIRED
2015+ dodge charger dedicated fuel system
 This Nitrous Outlet Dedicated Fuel System is designed specifically for the 2015+ Dodge Charger. If you need any assistance during installation or if you have questions about this item, call our Tech Help
INTERCOOLED SUPERCHARGER SYSTEM FORD 5.4L 3V F-150 TRUCK
 Installation Instructions for: INTERCOOLED SUPERCHARGER SYSTEM 2004-2006 FORD 5.4L 3V F-150 TRUCK Step-by-step instructions for installing the best in supercharger systems. 89-89-65-001 Rev C Magnuson
LChevrolet Camaro Supercharger Kit
 PART #92000A Important Notes: 2010-2013 6.2LChevrolet Camaro Supercharger Kit The use of fuel additives (ie. octane boosters) is not recommended. There is a possibility that these chemicals can damage
IAG Street Series Air / Oil Separator (AOS) For WRX & WRX STI
 For WRX & WRX STI") IAG Street Series Air / Oil Separator (AOS) For 2006-07 WRX & 2004-07 WRX STI Part# IAG-ENG-7150 Tools Required: Ratchet, torque wrench, extensions, needle nose pliers, hose cutter, snips/scissors, flat
IAG Street Series Air / Oil Separator (AOS) For 2006-07 WRX & 2004-07 WRX STI Part# IAG-ENG-7150 Tools Required: Ratchet, torque wrench, extensions, needle nose pliers, hose cutter, snips/scissors, flat
Installation Manual v1.0: Aurora Plus Turbo Kit ( ) 5.9L Dodge. Please read all instructions before installation.
 5.9L Dodge. Please read all instructions before installation.") Installation Manual v1.0: Aurora Plus - 4000 Turbo Kit (2003-2007) 5.9L Dodge Please read all instructions before installation. Figure 1: Aurora Plus - 4000 Kit Contents 1 Figure 2: Aurora Plus Hardware
Installation Manual v1.0: Aurora Plus - 4000 Turbo Kit (2003-2007) 5.9L Dodge Please read all instructions before installation. Figure 1: Aurora Plus - 4000 Kit Contents 1 Figure 2: Aurora Plus Hardware
IAG Street Series Air / Oil Separator (AOS) For 2017 WRX
 For 2017 WRX") P IAG Street Series Air / Oil Separator (AOS) For 2017 WRX Part# IAG-ENG-7152 Tools Required: Ratchet, torque wrench, extensions, needle nose pliers, hose cutter, snips/scissors, flathead screwdriver,
P IAG Street Series Air / Oil Separator (AOS) For 2017 WRX Part# IAG-ENG-7152 Tools Required: Ratchet, torque wrench, extensions, needle nose pliers, hose cutter, snips/scissors, flathead screwdriver,
2015+ EcoBoost F150 & Raptor Intercooler Install
 2015+ EcoBoost F150 & 2017+ Raptor Intercooler Install Note: This entire job can be performed with the truck on the ground - No need to raise the vehicle. The most difficult part is removing the grille
4. Remove (4) 10mm and (1) 7mm bolt that holds fascia at front corners, on each side
 10mm and (1) 7mm bolt that holds fascia at front corners, on each side") 2010 Camaro LS3 1. Disconnect battery ground 2. Remove front wheels 3. Remove (5) push pins and (5) #20 torx screws on inner front wheel well liners and remove liners on each side 4. Remove (4) 10mm and
2010 Camaro LS3 1. Disconnect battery ground 2. Remove front wheels 3. Remove (5) push pins and (5) #20 torx screws on inner front wheel well liners and remove liners on each side 4. Remove (4) 10mm and
Owner smanual. Banks Monster-Ram Intake and Grid Heater Delete Kit. For Racing Only Ram 6.7L Pickup Trucks. with Installation Instructions
 with Installation Instructions Owner smanual Banks Monster-Ram Intake and Grid Heater Delete Kit For Racing Only 2007-2017 Ram 6.7L Pickup Trucks THIS MANUAL IS FOR USE WITH SYSTEM 42788, 42788-PC, 42790,
M-9424-M50CJ INTAKE MANIFOLD INSTALLATION INSTRUCTIONS
 Please visit www.fordracingparts.com for the most current instruction information!!! PLEASE READ ALL OF THE FOLLOWING INSTRUCTIONS CAREFULLY PRIOR TO INSTALLATION. AT ANY TIME YOU DO NOT UNDERSTAND THE
VR6 Supercharger System Golf III and Jetta III VR6 Installation Manual Model Year
 VR6 Supercharger System Golf III and Jetta III VR6 Installation Manual Model Year 1994-1999.5 Date 10/28/00 Page 1 Index 1.0 Parts List 1.1 Required Tools 1.2 Required Standard Parts 1.3 Required Misc.
Installation Instructions for: HOT ROD SUPERCHARGER SYSTEM
 Installation Instructions for: HOT ROD SUPERCHARGER SYSTEM 89-89-57-007 Step-by-step instructions for installing the best in supercharger systems. Magnuson Products Inc 1990 Knoll Drive, Ventura, CA. 93003
G2 INSTALLATION MANUAL
 PERFORMANCE ENGINEERED SYSTEMS G2 INSTALLATION MANUAL FOR RACING OR OFF ROAD USE 1 INTRODUCTION PLEASE PURCHASE AUDI- ONLY POWER STEERING FLUID (PENTOSIN CHF 11S) Please note this an older version, and
7 th Gen. Celica GTS Turbo Kit Installation Guide This kit has not been CARB approved and is intended for racing / offroad purposes only.
 7 th Gen. Celica GTS Turbo Kit Installation Guide This kit has not been CARB approved and is intended for racing / offroad purposes only. The purpose of this guide is to serve as a reference for use when
ENGINE DEVELOPMENT INC.
 2003 Ford Expedition 4.6L& 5.4L We encourage you to read this manual thoroughly before you begin work, and perform the following: 1. A quick parts check to make certain your kit is complete. If you discover
2015+ SUBARU STI FRONT-MOUNT INTERCOOLER PARTS LIST AND INSTALLATION GUIDE INSTALL DIFFICULTY DISCLAIMER CAUTION INSTALL PROCEDURE TOOLS NEEDED
 PARTS LIST AND PARTS INCLUDED 1PC ALUMINUM INTAKE PIPE 1PC BAR-AND-PLATE INTERCOOLER 1PC STEEL CRASH BAR W/ MOUNTING HARDWARE 2PC HOT-SIDE INTERCOOLER PIPES 2PC COLD-SIDE INTERCOOLER PIPES 1PC BPV FLANGE
Fizzle Intercooler Kit Installation Instructions
 Fizzle Intercooler Kit Installation Instructions Note: The minimum exhaust modification required for the installation of this intercooler is the removal of the OEM black plastic resonator box. It can easily
W205 C63 Suspension Adjustable Suspension Installation Guide
 W205 C63 Suspension Adjustable Suspension Installation Guide 2015+ C63 AMG Sedan 2015+ C63S AMG Sedan Thank you for your purchase of the Weistec W205 C63 Adjustable Suspension. Please follow all directions,
TOP FEED FUEL RAIL KIT for WRX
 TOP FEED FUEL RAIL KIT for 2002-14 WRX Thank you for purchasing this PERRIN product for your car! Installation of this product should only be performed by persons experienced with installation of aftermarket
3 WRX/STI TURBO INLET HOSE
 3 WRX/STI TURBO INLET HOSE Thank you for purchasing this PERRIN product for your car! Installation of this product should only be performed by persons experienced with installation of aftermarket performance
DOWNLOAD ENHANCED INSTALL MANUALS
 U 3 October 2016 1041564 6.7L Performance Intake Plate Manual (I-00371) 1 DOWNLOAD ENHANCED INSTALL MANUALS Cummins 6.7L High Flow Intake Plenum Cover 1041564 2008-2016 6.7L RAM 2500-3500 Pickup PLEASE
INSTALLATION INSTRUCTIONS STILLEN SUPERCHARGER KIT Nissan 350Z P/N &
 Equipment needed: 1. Assorted sockets and wrenches 2. +,- Screwdrivers 3. Assorted pliers/ Clamps 4. Wire cutting/crimping tools 5. Thread locking compound (blue) 6. Solder gun/ shrink wrap (optional)
ALL AMERICAN BILLET. Front Drive System - Small Block Ford Installation Instructions
 ALL AMERICAN BILLET Front Drive System - Small Block Ford Installation Instructions Small Block Ford with AC & PS All American Billet Store (800) 764-0926 www.allamericanbilletstore.com Items needed for
Equipped with AEM Dryflow Filter No Oil Required! INSTALLATION INSTRUCTIONS PART NUMBER C (Gun Metal Grey Finish) 2015 Ford Mustang 2.
 2015 Ford Mustang 2.") Equipped with AEM Dryflow Filter No Oil Required! INSTALLATION INSTRUCTIONS PART NUMBER 26-3001C (Gun Metal Grey Finish) 2015 Ford Mustang 2.3 Turbo ITEM NO. PART NUMBER DESCRIPTION QTY. 1 2-1523C TUBE;
Equipped with AEM Dryflow Filter No Oil Required! INSTALLATION INSTRUCTIONS PART NUMBER 26-3001C (Gun Metal Grey Finish) 2015 Ford Mustang 2.3 Turbo ITEM NO. PART NUMBER DESCRIPTION QTY. 1 2-1523C TUBE;
Installation Instructions General Motors 8.1 Sequential Vapor Injection (S.V.I.) System 7500/6500 Series Trucks model year.
 System 7500/6500 Series Trucks model year.") Installation Instructions General Motors 8.1 Sequential Vapor Injection (S.V.I.) System 7500/6500 Series Trucks 2003-2005 model year. Technocarb Equipment (2004) Ltd. 4-30435 Progressive Way Abbotsford,
Installation Instructions General Motors 8.1 Sequential Vapor Injection (S.V.I.) System 7500/6500 Series Trucks 2003-2005 model year. Technocarb Equipment (2004) Ltd. 4-30435 Progressive Way Abbotsford,
Installation Instructions For The Lingenfelter High Flow LS9 Supercharger Front Cover (6.2L LS9 V8 engine)
") Installation Instructions For The Lingenfelter High Flow LS9 Supercharger Front Cover (6.2L LS9 V8 engine) PN: L250110309 Lingenfelter Performance Engineering 1557 Winchester Road Decatur, IN 46733 (260)
Installation Instructions For The Lingenfelter High Flow LS9 Supercharger Front Cover (6.2L LS9 V8 engine) PN: L250110309 Lingenfelter Performance Engineering 1557 Winchester Road Decatur, IN 46733 (260)
IAG Street Series Air / Oil Separator (AOS) For WRX
 For WRX") IAG Street Series Air / Oil Separator (AOS) For 2008-14 WRX Part# IAG-ENG-7100 Tools Required: Ratchet, extensions, needle nose pliers, hose cutter, snips/scissors, flat head screw driver, hose clamping
IAG Street Series Air / Oil Separator (AOS) For 2008-14 WRX Part# IAG-ENG-7100 Tools Required: Ratchet, extensions, needle nose pliers, hose cutter, snips/scissors, flat head screw driver, hose clamping
INSTALLATION INSTRUCTIONS CATCH CAN KIT
 INSTALLATION INSTRUCTIONS CATCH CAN KIT FORD FOCUS Document: 19-0150 Support: info@radiumauto.com STEPS 1 TO 19 COVER THE PCV CATCH CAN KIT (P/N: 20-0315) STEPS 20-32 COVER THE CRANKCASE CATCH CAN KIT
INSTALLATION INSTRUCTIONS PORT INJECTION KIT (PIK)
") INSTALLATION INSTRUCTIONS PORT INJECTION KIT (PIK) FORD FOCUS 2.3L ECOBOOST Document: 19-0155 Support: info@radiumauto.com IMPORTANT NOTES: 1. This installation requires minor metal cutting. Air tools
INSTALLATION INSTRUCTIONS PORT INJECTION KIT (PIK) FORD FOCUS 2.3L ECOBOOST Document: 19-0155 Support: info@radiumauto.com IMPORTANT NOTES: 1. This installation requires minor metal cutting. Air tools
4.0L XJ Supercharger install instructions
 4.0L 1996-2001 XJ Supercharger install instructions Preinstall 1) Tuning is required when using a pulley smaller than 3.00. An AFR gauge is recommended when tuning the fuel map. We are happy to assist
Edelbrock E-Force Supercharger Stage II System Ford Mustang 4.6L Part # s: 15856
 2005-2009 Ford Mustang 4.6L Part # s: 15856 INTRODUCTION Thank you for purchasing the Edelbrock 4.6L Ford Supercharger System for the Mustang GT. The Edelbrock E-Force Supercharger System for the 2005-2009
WARNING: IF YOU ARE NOT EXPERIENCED IN THE AREA OF AUTOMOTIVE MECHANICS WE STRONGLY URGE THAT YOU REFER THIS INSTALLATION TO YOUR MECHANIC.
 INSTALLATION INSTRUCTIONS STILLEN SUPERCHARGER KIT 2003+ Infiniti G35 Materials supplied: See attached list Equipment needed: 1. Assorted sockets and wrenches 2. +,- Screwdrivers 3. Assorted pliers/ Clamps
INSTALLATION INSTRUCTIONS CATCH CAN KIT
 INSTALLATION INSTRUCTIONS CATCH CAN KIT FORD FOCUS Document: 19-0150 Support: info@radiumauto.com STEPS 1 TO 19 COVER THE PCV SIDE CATCH CAN KIT (P/N: 20-0315) STEPS 20-32 COVER THE CRANKCASE CATCH CAN
Owner smanual. Banks Monster-Ram Intake and Grid Heater Delete Kit. For Racing Only Ram 6.7L Pickup Trucks. with Installation Instructions
 with Installation Instructions Owner smanual Banks Monster-Ram Intake and Grid Heater Delete Kit For Racing Only 2007-2017 Ram 6.7L Pickup Trucks THIS MANUAL IS FOR USE WITH SYSTEM 42788, 42788-PC, 42790,
Dodge/Chrysler Cold Air Kit
 Dodge/Chrysler Cold Air Kit INSTALLATION MANUAL: 2005 2009 5.7L & 6.1L Dodge Charger, Challenger, Magnum, and Chrysler 300C Intake P/N: 004Z A02 C000873 A Techco 3125 E. Coronado St, Anaheim, CA 92806
Installation Instructions for: Radix. INTERCOOLED SUPERCHARGER SYSTEM 2008 Hummer H3-Alpha
 Installation Instructions for: Radix INTERCOOLED SUPERCHARGER SYSTEM 2008 Hummer H3-Alpha Step-by-step instructions for installing the best in supercharger systems. ATTENTION! Your MAGNA CHARGER intercooler
Edelbrock E-Force Supercharger Ford F L Lincoln Mark LT 5.4L Part #1581
 Edelbrock E-Force Supercharger 2004-08 Ford F-150 5.4L Part #1581 INTRODUCTION Thank you for purchasing the Edelbrock 5.4L Ford Supercharger System for the 2004-2008 F-150 and 2006-2008 Lincoln Mark LT.
Edelbrock 5.4L Supercharger Ford Expedition & F-150 Lincoln Navigator Part #1583
 Edelbrock 5.4L Supercharger Ford Expedition & F-150 Lincoln Navigator INTRODUCTION Thank you for purchasing the Edelbrock 5.4L Ford / Lincoln Supercharger System for the F-150, Expedition, and Navigator.
INSTALLATION INSTRUCTIONS PORT INJECTION KIT (PIK)
") INSTALLATION INSTRUCTIONS PORT INJECTION KIT (PIK) FORD FOCUS 2.3L ECOBOOST Document: 19-0155 Support: info@radiumauto.com IMPORTANT NOTES: 1. This installation requires minor metal cutting. Air tools
INSTALLATION INSTRUCTIONS PORT INJECTION KIT (PIK) FORD FOCUS 2.3L ECOBOOST Document: 19-0155 Support: info@radiumauto.com IMPORTANT NOTES: 1. This installation requires minor metal cutting. Air tools
GEN-3 Super-duty Supercharger Shaft Kit PART# - RY17040-UK-6S5-3
 GEN-3 Super-duty Supercharger Shaft Kit PART# - RY17040-UK-6S5-3 We strongly recommend the use of a service manual to familiarize yourself with the various components and procedures involved with this
Huron Speed Products Twin Turbo Install Gen 2 CTS-V (09-15)
") Huron Speed Products Twin Turbo Install Gen 2 CTS-V (09-15) 1 2 Remove two bolts in trunk cover with 8mm socket. Pull up on cover to remove. Unscrew net tie down on side cover where battery is located
Huron Speed Products Twin Turbo Install Gen 2 CTS-V (09-15) 1 2 Remove two bolts in trunk cover with 8mm socket. Pull up on cover to remove. Unscrew net tie down on side cover where battery is located
Huron Speed Products Twin Turbo Install Gen 2 CTS-V (09-15)
") Huron Speed Products Twin Turbo Install Gen 2 CTS-V (09-15) The following install guide is simply that, a guide to help you with installation. It is by no means the exact method to perform installation,
Huron Speed Products Twin Turbo Install Gen 2 CTS-V (09-15) The following install guide is simply that, a guide to help you with installation. It is by no means the exact method to perform installation,
MAZDASPEED3 Intercooler Instructions
 MAZDASPEED3 Intercooler Instructions Congratulations on your purchase of the COBB Tuning Front Mount Intercooler System for your 2007-2009 Mazdaspeed3. The following instructions should assist you through
SLP Camaro ZL1 STAGE 3 (650 HP)
") SLP - 2012 Camaro ZL1 STAGE 3 (650 HP) PART #26002 PACKING LIST Before installation, use this check list to make sure all necessary parts have been included. ITEM QTY CHECK PART NUMBER DESCRIPTION 1. 1
SLP - 2012 Camaro ZL1 STAGE 3 (650 HP) PART #26002 PACKING LIST Before installation, use this check list to make sure all necessary parts have been included. ITEM QTY CHECK PART NUMBER DESCRIPTION 1. 1
SALEEN SPEEDLAB S331SC GAUGE POD KIT
 SALEEN SPEEDLAB S331SC GAUGE POD KIT INSTALLATION MANUAL: 2005-08 F150 P/N: 10-8001-C17139A Saleen Performance, Inc. 1225 East Maple Rd. Troy, MI 48083 800-888-8945 www.saleen.com 2 IF YOU ARE NOT EXPERIENCED
Edelbrock E-Force Supercharger JEEP WRANGLER JK 3.6L V6 Part #1527, 1528, and 15270
 Edelbrock E-Force Supercharger 2012-16 JEEP WRANGLER JK 3.6L V6 Part #1527, 1528, 15282 and 15270 WARNING! The supercharger bypass valve is factory installed and adjusted intended to be vacuum operated
Turner M50 Manifold Adapter Install. April 26, 2012
 April 26, 2012 Models: 1996-99 E36 328i/M3; 1997-98 E39 528i, 1997-98 Z3 2.8, 1998-2000 MZ3 S52 Product(s): Turner M50 Manifold Adapter Kit Subject: Installation Guidelines and Tips This guide will aid
Front Drive System - Big Block Chevy Installation Instructions Big Block Chevy with AC & with PS
 Front Drive System - Big Block Chevy Installation Instructions Big Block Chevy with AC & with PS All American Billet Store (800) 764-0926 www.allamericanbilletstore.com Items needed for install Jack Jack
INSTALLATION INSTRUCTIONS. PART NUMBER C (Gun Metal Gray Finish) 2016 HYUNDAI TUCSON 1.6 Turbo
 2016 HYUNDAI TUCSON 1.6 Turbo") INSTALLATION INSTRUCTIONS PART NUMBER 26-3002C (Gun Metal Gray Finish) 2016 HYUNDAI TUCSON 1.6 Turbo 1 ITEM NO. PART NUMBER DESCRIPTION QTY. 1 08483K HOSE CLAMP #28, BLACK ZINC PLATED 2 2 5-1070 COUPLER;1.75-2.50X3.25"
INSTALLATION INSTRUCTIONS PART NUMBER 26-3002C (Gun Metal Gray Finish) 2016 HYUNDAI TUCSON 1.6 Turbo 1 ITEM NO. PART NUMBER DESCRIPTION QTY. 1 08483K HOSE CLAMP #28, BLACK ZINC PLATED 2 2 5-1070 COUPLER;1.75-2.50X3.25"
Edelbrock LS3 Corvette Supercharger Part #1590, 1591 & 1592
 Edelbrock LS3 Corvette Supercharger Part #1590, 1591 & 1592 INTRODUCTION Thank you for purchasing the Edelbrock 6.2L GM Superchager System for the Chevy Corvette. The Edelbrock E-Force Supercharger System
Installation manual BMW E TS1/TS2
 Installation manual BMW E46 330 TS1/TS2 Technical support Europe: +4741558555 Technical support USA: (858)314-2954 Email support: support@esstuning Installation manual BMW E46 330 TS1/TS2 Remove and send
Installation Instructions for: CORVETTE SUPERCHARGER SYSTEM 1997 TO 2004 C5 & Z06 CORVETTE
 Installation Instructions for: CORVETTE SUPERCHARGER SYSTEM 1997 TO 2004 C5 & Z06 CORVETTE Step-by-step instructions for installing the best in supercharger systems. * PREMIUM FUEL REQUIRED * ATTENTION!
INSTALLATION INSTRUCTIONS CATCH CAN KIT
 INSTALLATION INSTRUCTIONS CATCH CAN KIT FORD FOCUS Document: 19-0150 Support: info@radiumauto.com STEPS 1-19 COVER THE PCV SIDE CATCH CAN KIT (P/N: 20-0315) STEPS 20-32 COVER THE CRANKCASE CATCH CAN KIT