PACKAGE CONTENTS
|
|
|
- Adrian Thornton
- 5 years ago
- Views:
Transcription

1 Thank you for purchasing the Electronic Jet Kit (EJK) from Dobeck Performance. This EFI controller is designed to be used on stock or modified vehicles. The following instructions will walk you through a generic installation and go over controller tuning basics. More advanced install instructions, technical information, controller settings, etc can be found at: PLEASE BE SURE TO CHECK OUT THE ADJUSTMENT DEMO LOCATED AT THE BOTTOM OF THE HOME PAGE!! PLEASE READ ALL INSTRUCTIONS BEFORE STARTING INSTALLATION. BE SURE YOUR VEHICLE S ENGINE IS COLD. IMPORTANT PLEASE READ CAREFULLY The EJK is legal ONLY for closed course vehicles. The EJK is not applicable, nor intended for use on Emissions Controlled street, highway or off-road vehicles. The EJK is not applicable, nor intended for use on aircraft. PACKAGE CONTENTS FUEL CONTROLLER INSTRUCTIONS SET 3 x ZIP TIES VELCRO PATCH REFERENCE CARD (GREEN #5) EJK Sticker Dobeck Performance Sticker The following are optional parts: OXYGEN SENSOR BYPASSES The following may be purchased separately: HANDLE BAR MOUNTING DP DOCKING STATION USB TO IRDA ADAPTER POWERLAB ACCOUNT Check out updated and advanced information at Dobeck Performance 157 Progressive Drive, Belgrade, MT USA Mon-Fri 9am-5pm MST PH: (406) Toll Free USA: (877) Fax: (406) info@dobeckperformance.com
2 TUNING INSTRUCTIONS The EJK controller can be adjusted on the fly to tune your vehicle. No computer or other external device is needed to make tuning adjustments. All that is required is for your vehicle to be running which provides power to the EJK controller. Most EJK controllers come pre-programmed to the recommended base light settings which represents a typical stage 1 (intake + exhaust) vehicle modification. It is recommended to install the EJK controller and take a test ride first before making any mode adjustments. Six modes are available to make adjustments. You enter the adjustment mode by pressing the MODE button. Correctly entering the adjustment mode will display flashing LEDs on the LED display. Pressing the MODE button repetitively will move you through all the modes. Note: The MODE button is sensitive and will at times skip a mode. Pressing the MODE button at the last mode will bring you back to the first mode. To exit the adjustment mode and return to operation mode you just wait several seconds until the LED display reverts back to solid LED colors. The six modes available are distinguished by an LED color combination. The six modes in respective order are as follows: Green, Yellow, Red, Green-Blue, Yellow-Blue, and Red-Blue. All six modes have 15 possible light settings. The settings are adjusted by pressing the PLUS (+) and MINUS (-) buttons. For easy reference the LEDs are numbered 1 through 8. Half step settings are represented by two same color LEDs flashing (ex: 4.5 has 4th and 5th LEDs lit). The 0.5 setting is represented by the 1st LED blinking at a much faster rate. Modes 4, 5, and 6 are distinguished by the 8th LED also blinking blue. Every mode represents an adjustable feature within your vehicle s drive cycle. Reference the Example Drive Cycle diagram to gain a visual understanding. Each mode can be defined as either a FUELING mode or a SWITCH POINT mode as follows: FUELING MODES - Modify the fuel amount compared to the stock fuel when the corresponding zone is active. The higher the light setting the MORE fuel is being added. The lower the light setting the closer you are to running STOCK fuel levels. Light settings for GEN 3.5 controllers can be SUBTRACTING fuel from the STOCK fuel level. Note: The EJK controller can be set to stock fueling without uninstalling the unit. GEN 3 controllers Set the FUELING modes all to light setting 0.5 to revert back to stock. GEN 3.5 controllers Stock FUEL settings vary according to application. Check ElectronicJetKit.com for info. SWITCH POINT MODES Determine the transition point between two corresponding zones. The higher the light setting the longer it takes for a zone to engage. The lower the light setting the faster a zone will engage. Note: Switch point modes do not have to be adjusted that frequently. Mode 1 GREEN CRUISE FUEL Represents fuel modification under CRUISE conditions. When the LED display shows solid GREEN lights then the GREEN zone is active and fuel is modified by this mode. Mode has the largest affect on fuel mileage. Mode 2 YELLOW ACCELERATION FUEL Represents fuel modification under ACCELERATION conditions. When the LED display shows solid YELLOW lights then the YELLOW zone is active and fuel is modified by this mode. Mode 3 RED FULL THROTTLE FUEL Represents fuel modification under FULL THROTTLE conditions. When the LED display shows solid RED lights then the RED zone is active and fuel is modified by this mode. Mode has the largest affect on tuning for the vehicle s top horsepower value. Mode 4 GREEN-BLUE CRUISE UPPER SWITCH POINT Represents point when GREEN zone shuts off. Light settings correspond to RPM values. Used to target a low RPM range for idle/cruise fuel or target range to run back on the stock fuel curve before entering YELLOW zone. Mode 5 YELLOW-BLUE MODE ACCELERATION SWITCH POINT Represents transition between GREEN and YELLOW zones which relates to cruising and accelerating conditions. The YELLOW zone is load based and engages differently between gears and riding conditions. Mode 6 RED-BLUE MODE FULL THROTTLE SWITCH POINT Represents transition between YELLOW and RED zones which relates to accelerating and full throttle conditions. The RED zone is load based and engages differently between gears and riding conditions.


3 EXAMPLE DRIVE CYCLE CONTROLLER LAYOUT _ RECORD INITIAL RECOMMENDED SETTINGS We highly suggest recording the preset settings before you start changing any of the modes. Your vehicle will need to be started in order to go through the modes. You can also find the initial preset settings at ElectronicJetKit.com. GRN YEL RED G/B Y/B R/B
4 Installation Instructions Honda CBR 600RR Make sure the vehicle is completely cool before starting the installation. Also make sure the vehicle is secure and will not roll around. 2. Remove rider and passenger seats. 3. Remove the 3 Allen bolts from the large side panel (FIG 1), remove the 2 plastic screw type fasteners (FIG 2), and the 2 plastic pull style fasteners all located on the inside of the main fairing. Remove the fairing and repeat on the opposite side. 4. Remove the 12mm bolt and the 2 plastic fasteners from the rear tank cover (FIG 3). Also remove the 5mm Allen bolt from the side panel on both sides (FIG 4). Remove plastic style fasteners and remove tank cover (FIG 5). 5. Remove the fuel tank support bolts on both sides (FIG 6) and raise or remove the fuel tank. 6. Place the EJK in the tail section and route the EJK harness towards the injectors. 7. Locate the lower injectors. Note: This bike is equipped with two sets of injectors classified as lower and uppers. The EJK only plugs into the 4 lower injectors and 1 upper injector. The EJK connector pair with a solid WHITE wire plugs into the upper injector. 8. Disconnect the stock injectors one at a time and plug in the EJK connector to the bike s injector and then plug in the bike injector connector into the EJK black connector. Repeat on remaining 3 lower cylinders and 1 upper cylinder (FIG7). 9. Attach the black ground wire from the EJK to the negative post of the battery or suitable frame grounding location. 10. Start the bike. The LED s should scroll green from left to right and back for a couple of seconds. The display should then go to 1 or 2 solid green LED s or very slow blinking LED s. This indicates a proper installation. 11. Bike reassembly is opposite of the disassembly procedures listed beforehand. Final Installation Note Re-check your wire routing and the controller location to make certain that in no way the wires can come into contact with any moving parts or high heat source. The controller should be mounted in a way as to not cause a handling problem with the machine. Troubleshooting Please make sure you are trying to START your vehicle and NOT just turning the key on. If the number 1 LED is flashing green and the number 8 LED is flashing red at IDLE then this indicates a connection issue. Re-check the wires from the controller and make sure they are connected to the proper wire of your vehicle s stock harness. The controller only needs power (RED wire) and a proper ground (BLACK wire) to show this error display. If the motorcycle fails to start then you will also need to re-check the wiring. If you have not connected the ground wire to the negative post of the battery then make sure you have attached the wire to a proper grounding source on the frame. Support All controllers are backed by a great support team. First contact your dealer or product representative where you purchased the product and check if they can assist you. If all else fails then feel free to contact the manufacturer directly to gain additional support. Call toll free within the USA at or for international customers.


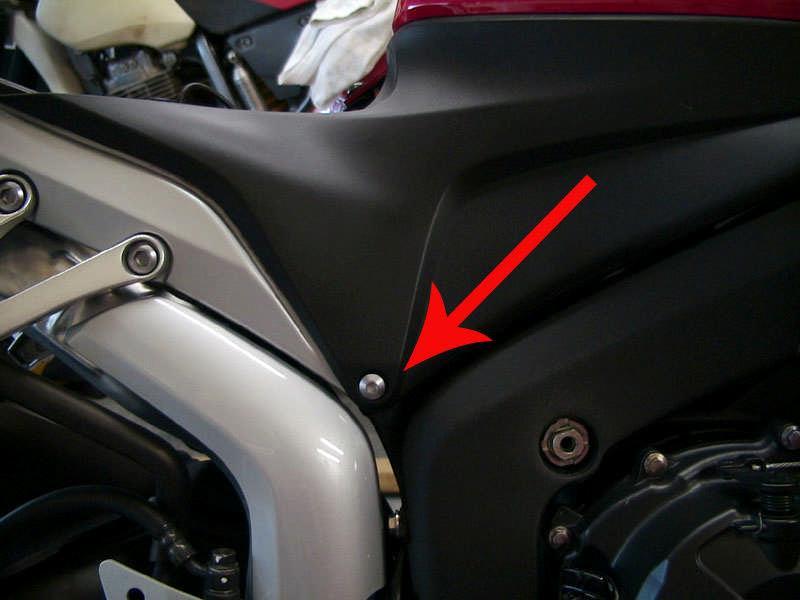

5 Figure 1 Figure 5 Figure 2 Figure 6 Figure 3 Figure 7 Figure 4
TOURING Models
 P/N FI-1252HPST Patent Numbers: 7,000,599 & 7,124,742 Electronic Jet Kit Instructions Thank you for choosing the Techlusion Electronic Jet Kit, the TFI. This TFI model is ONLY usable for the following
Electronic Jet Kit Instructions
 MFG P/N FI-1049ST Patent Number: 7,000,599 & 7,124,742 Electronic Jet Kit Instructions Thank you for choosing the Techlusion Electronic Jet Kit, the TFI. This TFI is usable for the following models: Polaris
Application(s) > Items Supplied > Instruction Manual >
 > Items Supplied > Instruction Manual >") 301 E. La Palma Ave., Yorba Linda, Ca 97 Ph. 714.69.10, Fax. 714.69.5016 Items Supplied > Application(s) > www.fi000r.com 1 Fi000R Fuel Injection Module Zip Ties 1 Velcro Strip Oxygen Sensor Eliminators
301 E. La Palma Ave., Yorba Linda, Ca 97 Ph. 714.69.10, Fax. 714.69.5016 Items Supplied > Application(s) > www.fi000r.com 1 Fi000R Fuel Injection Module Zip Ties 1 Velcro Strip Oxygen Sensor Eliminators
INSTALLATION INSTRUCTIONS UNLEASH. THE SMARTEST PERFORMANCE TUNING TECHNOLOGY
 INSTALLATION INSTRUCTIONS R UNLEASH. THE SMARTEST PERFORMANCE TUNING TECHNOLOGY FUEL MANAGEMENT FUEL + QS + TRACTION CONTROL YAMAHA FZ-07 2015 F793 T793 1>READ WARNINGS > INSTALLING We strongly suggest
FMI (Fuel Management Interface) Part# Can-Am DS450. FMI kit bill of materials
 Part# Can-Am DS450. FMI kit bill of materials") 18550 Minthorn Street, Lake Elsinore, CA, 92530 (951) 587-9222 (951) 296-1552 fax FMI (Fuel Management Interface) Part# 80-6001 2008 Can-Am DS450 FMI kit bill of materials 1 Instruction sheet 1 Adhesive
18550 Minthorn Street, Lake Elsinore, CA, 92530 (951) 587-9222 (951) 296-1552 fax FMI (Fuel Management Interface) Part# 80-6001 2008 Can-Am DS450 FMI kit bill of materials 1 Instruction sheet 1 Adhesive
INSTALLATION INSTRUCTIONS UNLEASH. THE SMARTEST PERFORMANCE TUNING TECHNOLOGY
 INSTALLATION INSTRUCTIONS UNLEASH. THE SMARTEST PERFORMANCE TUNING TECHNOLOGY FUEL MANAGEMENT FUEL + QS + TRACTION CONTROL SUZUKI SV650 2017 F649 T649 1>READ WARNINGS > INSTALLING We strongly suggest that
Thank you for choosing the Techlusion Electronic Jet Kit, the TFI. The TFI is usable for sequential fuel injection 2 cylinder Suzuki motorcycles **.
 Rev 1.1.1 2055ST TFI TFI Patent Numbers: 7,000,599 & 7,124,742 TFI Instructions Suzuki Thank you for choosing the Techlusion Electronic Jet Kit, the TFI. The TFI is usable for sequential fuel injection
Honda VTX1800
 2801191 Rev 06-28-05 User Manual 2002-2005 Honda VTX1800 Part Number DFCM-1 Congratulations on your purchase of this Dynatek product. Please take a moment to read these instructions completely before installing
INSTALLATION INSTRUCTIONS UNLEASH. THE SMARTEST PERFORMANCE TUNING TECHNOLOGY
 INSTALLATION INSTRUCTIONS UNLEASH. THE SMARTEST PERFORMANCE TUNING TECHNOLOGY FUEL MANAGEMENT FUEL + QS + TRACTION CONTROL KAWASAKI Z125 PRO 2017 F4415 T4415 1>READ WARNINGS > INSTALLING We strongly suggest
Electronic Jet Kit Instructions
 Rev 1.0.3 FI-1040ST Electronic Jet Kit Instructions Thank you for choosing the Techlusion Electronic Jet Kit, the TFI. The TFI is usable for both early and late model fuel injected Harley Davidson s. This
INSTALLATION INSTRUCTIONS UNLEASH. THE SMARTEST PERFORMANCE TUNING TECHNOLOGY
 INSTALLATION INSTRUCTIONS R UNLEASH. THE SMARTEST PERFORMANCE TUNING TECHNOLOGY TRIUMPH DAYTONA 675 2013 F1540 FUEL CONTROL 1>READ WARNINGS > INSTALLING We strongly suggest that an experienced technician
INSTALLATION INSTRUCTIONS UNLEASH. THE SMARTEST PERFORMANCE TUNING TECHNOLOGY
 INSTALLATION INSTRUCTIONS UNLEASH. THE SMARTEST PERFORMANCE TUNING TECHNOLOGY FUEL MANAGEMENT FUEL + QS + TRACTION CONTROL YAMAHA FZ-10 2017 F795 T795 1>READ WARNINGS > INSTALLING We strongly suggest that
INSTALLATION INSTRUCTIONS UNLEASH. THE SMARTEST PERFORMANCE TUNING TECHNOLOGY FUEL MANAGEMENT FUEL + QS + TRACTION CONTROL KTM RC F545 T545
 INSTALLATION INSTRUCTIONS R UNLEASH. THE SMARTEST PERFORMANCE TUNING TECHNOLOGY FUEL MANAGEMENT FUEL + QS + TRACTION CONTROL KTM RC390 2015 F545 T545 1>READ WARNINGS > INSTALLING We strongly suggest that
Electronic Jet Kit Instructions
 Ver. 1.01 KFX 450 TFI-6040ST Thank you for choosing the Techlusion Electronic Jet Kit for your KFX 450, the TFI. The TFI is usable only for the following models: Kawasaki KFX 450 Thank you for choosing
INSTALLATION INSTRUCTIONS UNLEASH. THE SMARTEST PERFORMANCE TUNING TECHNOLOGY
 INSTALLATION INSTRUCTIONS R UNLEASH. THE SMARTEST PERFORMANCE TUNING TECHNOLOGY HONDA NC700X, 2012-2013 F380 FUEL CONTROL 1>READ WARNINGS > INSTALLING We strongly suggest that an experienced technician
INSTALLATION INSTRUCTIONS UNLEASH. THE SMARTEST PERFORMANCE TUNING TECHNOLOGY
 INSTALLATION INSTRUCTIONS R UNLEASH. THE SMARTEST PERFORMANCE TUNING TECHNOLOGY FUEL HONDA PCX150 2012-2015 F370 1>READ WARNINGS > INSTALLING We strongly suggest that an experienced technician install
WILD THINGS FUEL INJECTION CONTROLLER 9219
 I N S TA L L AT I O N WILD THINGS FUEL INJECTION CONTROLLER 9219 BY D O B E C K P E R F O R M A N C E FITS: 06-UP SOFTAIL, DRESSER, AND ROAD KING WITH DELPHI FUEL INJECTION Thank you for choosing the Wild
INSTALLATION INSTRUCTIONS UNLEASH. THE SMARTEST PERFORMANCE TUNING TECHNOLOGY FUEL + QUICKSHIFT + TRACTION CONTROL HONDA CBR600RR 2013 T347S, T347R
 INSTALLATION INSTRUCTIONS R UNLEASH. THE SMARTEST PERFORMANCE TUNING TECHNOLOGY FUEL + QUICKSHIFT + TRACTION CONTROL HONDA CBR600RR 2013 T347S, T347R 1>READ WARNINGS > INSTALLING We strongly suggest that
INSTALLATION INSTRUCTIONS UNLEASH. THE SMARTEST PERFORMANCE TUNING TECHNOLOGY
 INSTALLATION INSTRUCTIONS R UNLEASH. THE SMARTEST PERFORMANCE TUNING TECHNOLOGY TRIUMPH SPEED TRIPLE 2012-2013 F1591 FUEL CONTROL (ABS MODEL) 1>READ WARNINGS > INSTALLING We strongly suggest that an experienced
Items Supplied > Application(s) > Instruction Manual > 1 Fi2000R Fuel Injection Module 2 Zip Ties 1 Velcro Strip
 > Instruction Manual > 1 Fi2000R Fuel Injection Module 2 Zip Ties 1 Velcro Strip") 301 E. La Palma Ave., orba Linda, Ca 97 Ph. 714.69.10, Fax. 714.69.5016 Items Supplied > 1 Fi000 Fuel Injection Module Zip Ties 1 Velcro Strip Application(s) > HALE SOFTAIL 01 05 DNA 04 05 Fuel Injection
301 E. La Palma Ave., orba Linda, Ca 97 Ph. 714.69.10, Fax. 714.69.5016 Items Supplied > 1 Fi000 Fuel Injection Module Zip Ties 1 Velcro Strip Application(s) > HALE SOFTAIL 01 05 DNA 04 05 Fuel Injection
INSTALLATION INSTRUCTIONS F1641 FUEL CONTROL UNLEASH. THE SMARTEST PERFORMANCE TUNING TECHNOLOGY
 INSTALLATION INSTRUCTIONS R UNLEASH. THE SMARTEST PERFORMANCE TUNING TECHNOLOGY MV AGUSTA F3 2013 F1641 FUEL CONTROL 1>READ WARNINGS > INSTALLING We strongly suggest that an experienced technician install
Ducati 848 Streetfighter
 Ducati 848 Streetfighter 2012-2013 Z-Fi Installation Instructions Part # F193 Parts List: Z-Fi Control Unit Fuel Harness O2 Eliminator (2) Scotchlok (2) Cable Ties Velcro USB Cable Swingarm Stickers Download
INSTALLATION INSTRUCTIONS UNLEASH. THE SMARTEST PERFORMANCE TUNING TECHNOLOGY
 INSTALLATION INSTRUCTIONS R UNLEASH. THE SMARTEST PERFORMANCE TUNING TECHNOLOGY FUEL + QUICKSHIFT + TRACTION CONTROL MV AGUSTA F3 2013 BRUTALE 675 2013 T1641S, T1641R 1>READ WARNINGS > INSTALLING We strongly
INSTALLATION INSTRUCTIONS UNLEASH. THE SMARTEST PERFORMANCE TUNING TECHNOLOGY
 INSTALLATION INSTRUCTIONS R UNLEASH. THE SMARTEST PERFORMANCE TUNING TECHNOLOGY FUEL MANAGEMENT FUEL + QS + TRACTION CONTROL HARLEY DAVIDSON TRIKE 2008-2013 F253 T253 1>READ WARNINGS > INSTALLING We strongly
Z-Fi MX Installation Instructions Part # s F532
 KTM 500XC-W 2012 Z-Fi MX Installation Instructions Part # s F532 Parts List: Z-Fi Control Unit Fuel Harness Cable Ties Velcro USB Cable Swingarm Stickers Download Z-Fi Mapper Software at www.bazzaz.net
INSTALLATION INSTRUCTIONS UNLEASH. THE SMARTEST PERFORMANCE TUNING TECHNOLOGY
 INSTALLATION INSTRUCTIONS R UNLEASH. THE SMARTEST PERFORMANCE TUNING TECHNOLOGY FUEL + QUICKSHIFT + TRACTION CONTROL HONDA CB500F CB500X CBR500R 2013 T392S, T392R 1>READ WARNINGS > INSTALLING We strongly
Honda ST1300 Z-Fi Installation Instructions P/N F351
 2002-2012 Honda ST1300 Z-Fi Installation Instructions P/N F351 WARNING! USE ONLY IN RACE OR OTHER CLOSED COURSE APPLICATIONS AND NEVER ON PUBLIC ROADS Z-Fi products do not meet California CARB highway
INSTALLATION INSTRUCTIONS UNLEASH. THE SMARTEST PERFORMANCE TUNING TECHNOLOGY
 INSTALLATION INSTRUCTIONS R UNLEASH. THE SMARTEST PERFORMANCE TUNING TECHNOLOGY FUEL + QUICKSHIFT FUEL + QS + TRACTION CONTROL TRIUMPH DAYTONA 675 2013 S1540S, S1540R, T1540S, T1540R 1>READ WARNINGS >
INSTALLATION INSTRUCTIONS UNLEASH. THE SMARTEST PERFORMANCE TUNING TECHNOLOGY
 INSTALLATION INSTRUCTIONS R UNLEASH. THE SMARTEST PERFORMANCE TUNING TECHNOLOGY FUEL MANAGEMENT FUEL + QS + TRACTION CONTROL HONDA GROM 2014-2017 F393 T393 1>READ WARNINGS > INSTALLING We strongly suggest
Electronic Jet Kit Instructions
 Rev 1.0.3 8027ST-TFI Patent Numbers: 7,000,599, 7,124,742 Electronic Jet Kit Instructions Thank you for choosing the Dobeck Performance Electronic Jet Kit for you re Arctic Cat F/M1000 Snowmobile. Dobeck
INSTALLATION INSTRUCTIONS UNLEASH. THE SMARTEST PERFORMANCE TUNING TECHNOLOGY
 INSTALLATION INSTRUCTIONS R UNLEASH. THE SMARTEST PERFORMANCE TUNING TECHNOLOGY / KAWASAKI VN1700 2013-2014 F422 / T422 1>READ WARNINGS > INSTALLING We strongly suggest that an experienced technician install
Z-Fi TC Installation Instructions Part # F4418/T4418. In order to fit the Bazzaz quickshifter on this application, aftermarket rearsets must be used
 Kawasaki ZX14R 2016 Z-Fi TC Installation Instructions Part # F4418/T4418 In order to fit the Bazzaz quickshifter on this application, aftermarket rearsets must be used Parts List: Z-Fi or Z-Fi TC Control
Honda VFR
 Honda VFR800 2002-2010 Z-Fi Installation Instructions Part # F352 Parts List: Z-Fi Control Unit Fuel Harness Scotchlok (3) O2 Eliminator (2) Cable Ties Velcro USB Cable Swingarm Stickers Download Z-Fi
SUZUKI SV
 SUZUKI SV650 2007-2011 Z-Fi Installation Instructions Part # F640 May result in the activation of the FI light (indicating injector fault) but does NOT cause actual running issues Parts List: Z-Fi Control
Kawasaki ZX14R
 Kawasaki ZX14R 2012-2013 Z-Fi Installation Instructions Part # F445 Parts List: Z-Fi Control Unit Fuel Harness Scotchlok (3) Cable Ties Velcro USB Cable Swingarm Stickers Download Z-Fi Mapper Software
INSTALLATION INSTRUCTIONS UNLEASH. THE SMARTEST PERFORMANCE TUNING TECHNOLOGY
 INSTALLATION INSTRUCTIONS R UNLEASH. THE SMARTEST PERFORMANCE TUNING TECHNOLOGY HONDA GOLD WING 1800 2001-2013 HONDA GOLD WING FB6 2013 F353 FUEL CONTROL 1>READ WARNINGS > INSTALLING We strongly suggest
2010 Honda VFR 1200F Z-Fi QS / Z-Fi TC Installation Instructions P/N S350S, S350R, T350S, T350R
 R 2010 Honda VFR 1200F Z-Fi QS / Z-Fi TC Installation Instructions P/N S350S, S350R, T350S, T350R WARNING! USE ONLY IN RACE OR OTHER CLOSED COURSE APPLICATIONS AND NEVER ON PUBLIC ROADS Z-Fi products do
PLEASE READ ALL DIRECTIONS BEFORE STARTING INSTALLATION
 PARTS LIST 2010-2012 MV Agusta Brutale 1090 Installation Instructions 1 Power Commander 1 USB Cable 1 Installation Guide 2 Power Commander Decals 2 Dynojet Decals 2 Velcro strips 1 Dual Lock strip 1 Alcohol
Kawasaki Ninja 250R / 2013 Kawasaki Ninja 300 Z-Fi Installation Instructions P/N F442
 2011-2013 Kawasaki Ninja 250R / 2013 Kawasaki Ninja 300 Z-Fi Installation Instructions P/N F442 WARNING! USE ONLY IN RACE OR OTHER CLOSED COURSE APPLICATIONS AND NEVER ON PUBLIC ROADS Z-Fi products do
PLEASE READ ALL DIRECTIONS BEFORE STARTING INSTALLATION
 PARTS LIST 2010 MV Agusta Brutale 1090 Installation Instructions 1 Power Commander 1 USB Cable 1 CD-ROM 1 Installation Guide 2 Power Commander Decals 2 Dynojet Decals 2 Velcro 1 Dual Velcro 1 Alcohol swab
WARNING! USE ONLY IN RACE OR OTHER CLOSED COURSE APPLICATIONS AND NEVER ON PUBLIC ROADS
 2010-2013 Ducati Multistrada 1200 Z-Fi INSTALLATION INSTRUCTIONS P/N F182 WARNING! USE ONLY IN RACE OR OTHER CLOSED COURSE APPLICATIONS AND NEVER ON PUBLIC ROADS Z-Fi products do not meet California CARB
PLEASE READ ALL DIRECTIONS BEFORE STARTING INSTALLATION
 PARTS LIST 2009 MV Agusta Brutale 1078 Installation Instructions 1 Power Commander 1 USB Cable 1 Installation Guide 2 Power Commander Decals 2 Dynojet Decals 2 Velcro strips 1 Alcohol swab 1 O2 Optimizer
Honda CB1000R Z-Fi Installation Instructions P/N F390
 2008-2013 Honda CB1000R Z-Fi Installation Instructions P/N F390 WARNING! USE ONLY IN RACE OR OTHER CLOSED COURSE APPLICATIONS AND NEVER ON PUBLIC ROADS Z-Fi products do not meet California CARB highway
BMW S1000RR Z-Fi QS / Z-Fi TC Installation Instructions P/N S541S, S541R, T541S, T541R
 2009-2013 BMW S1000RR Z-Fi QS / Z-Fi TC Installation Instructions P/N S541S, S541R, T541S, T541R WARNING! USE ONLY IN RACE OR OTHER CLOSED COURSE APPLICATIONS AND NEVER ON PUBLIC ROADS Z-Fi products do
KAWASAKI CONCOURS
 KAWASAKI CONCOURS 2010-2013 Z-Fi Installation Instructions Part # F450 Parts List: Z-Fi Control Unit Fuel Harness Scotchlok (2) Cable Ties Velcro USB Cable Swingarm Stickers Download Z-Fi Mapper Software
Honda VFR 1200F Z-Fi Installation Instructions P/N F350
 2010-2012 Honda VFR 1200F Z-Fi Installation Instructions P/N F350 WARNING! USE ONLY IN RACE OR OTHER CLOSED COURSE APPLICATIONS AND NEVER ON PUBLIC ROADS Z-Fi products do not meet California CARB highway
Kawasaki Ninja 250R / 2013 Kawasaki Ninja 300 Z-Fi QS / TC Installation Instructions P/N T442S, T442R
 2011-2013 Kawasaki Ninja 250R / 2013 Kawasaki Ninja 300 Z-Fi QS / TC Installation Instructions P/N T442S, T442R WARNING! USE ONLY IN RACE OR OTHER CLOSED COURSE APPLICATIONS AND NEVER ON PUBLIC ROADS Z-Fi
Kawasaki Ninja 250R / 2013 Kawasaki Ninja 300 QS4 Installation Instructions P/N Q442S, Q442R
 2011-2013 Kawasaki Ninja 250R / 2013 Kawasaki Ninja 300 QS4 Installation Instructions P/N Q442S, Q442R WARNING! USE ONLY IN RACE OR OTHER CLOSED COURSE APPLICATIONS AND NEVER ON PUBLIC ROADS Z-Fi products
Innovative Racing Electronics
 MPS Fast FI Mixture Control Installation Instructions The MPS Fast FI Mixture Control P/N 1-0337 is a simple means to adjust the fuel curves on your fuel-injected motorcycle. This allows for tuning after
SUZUKI SV
 SUZUKI SV650 2007-2011 Z-Fi QS (Quickshift) / Z-Fi TC (Traction Control) Installation Instructions Part # T640 May result in the activation of the FI light (indicating injector fault) but does NOT cause
PLEASE READ ALL DIRECTIONS BEFORE STARTING INSTALLATION
 PARTS LIST 2013 Honda CBR600RR Installation Instructions 1 Power Commander 1 USB Cable 1 CD-ROM 1 Installation Guide 2 Power Commander Decals 2 Dynojet Decals 2 Velcro 1 Alcohol swab 1 O2 Optimizer THE
Please read ALL directions before starting installation
 Parts List 2009 Honda CB1000R I n s t a l l a t i o n I n s t r u c t i o n s 1 Power Commander 1 USB Cable 1 CD-ROM 1 Installation Guide 2 Power Commander Decals 2 Dynojet Decals 2 Velcro 1 Alcohol swab
PLEASE READ ALL DIRECTIONS BEFORE STARTING INSTALLATION
 2006-2011 Kawasaki EX650 / ER6n / Versys Installation Instructions PARTS LIST 1 Power Commander 1 USB Cable 1 Installation Guide 2 Power Commander Decals 2 Dynojet Decals 2 Velcro strips 1 Alcohol swab
Items Supplied > Application(s) > Instruction Manual >
 > Instruction Manual >") Items Supplied > Application(s) > 1 Powrpro Black Fuel Injection Module 6 Zip Ties 8 2 Zip Ties 2 1 Velcro Stripe Vegas 8-Ball 2008-2014 Victory High Ball 2012-2014 Victory Judge 2013-2014 Hammer 8 Ball
Items Supplied > Application(s) > 1 Powrpro Black Fuel Injection Module 6 Zip Ties 8 2 Zip Ties 2 1 Velcro Stripe Vegas 8-Ball 2008-2014 Victory High Ball 2012-2014 Victory Judge 2013-2014 Hammer 8 Ball
Aprilia Shiver 750 Z-Fi Installation Instructions P/N F991
 2008-2013 Aprilia Shiver 750 Z-Fi Installation Instructions P/N F991 WARNING! USE ONLY IN RACE OR OTHER CLOSED COURSE APPLICATIONS AND NEVER ON PUBLIC ROADS Z-Fi products do not meet California CARB highway
PLEASE READ ALL DIRECTIONS BEFORE STARTING INSTALLATION
 PARTS LIST 2013-2014 Honda CB500 / CBR500R Installation Instructions 1 Power Commander 1 USB Cable 1 Installation Guide 2 Power Commander Decals 2 Dynojet Decals 2 Velcro strips 1 Alcohol swab 1 Posi-tap
Honda CBR600RR
 Parts List 2007-2012 Honda CBR600RR Installation Instructions 1 Power Commander 1 USB Cable 1 CD-ROM 1 Installation Guide 2 Power Commander Decals 2 Dynojet Decals 2 Velcro Strip 1 Alcohol Swab The ignition
WARNING! USE ONLY IN RACE OR OTHER CLOSED COURSE APPLICATIONS AND NEVER ON PUBLIC ROADS
 2004-2007 CBR1000RR Z-Fi TC /INSTALLATION INSTRUCTIONS P/N T349 WARNING! USE ONLY IN RACE OR OTHER CLOSED COURSE APPLICATIONS AND NEVER ON PUBLIC ROADS Z-Fi products do not meet California CARB highway
Z-Fi QS (Quickshift) / Z-Fi TC (Traction Control) Installation Instructions Part # s S445S, S445R, T445S, T445R
 / Z-Fi TC (Traction Control) Installation Instructions Part # s S445S, S445R, T445S, T445R") Kawasaki ZX14R 2012 Z-Fi QS (Quickshift) / Z-Fi TC (Traction Control) Installation Instructions Part # s S445S, S445R, T445S, T445R In order to fit the Bazzaz quickshifter on this application, aftermarket
Kawasaki ZX14R 2012 Z-Fi QS (Quickshift) / Z-Fi TC (Traction Control) Installation Instructions Part # s S445S, S445R, T445S, T445R In order to fit the Bazzaz quickshifter on this application, aftermarket
PLEASE READ ALL DIRECTIONS BEFORE STARTING INSTALLATION
 PARTS LIST 2015 Yamaha FJ-09 Installation Instructions 1 Power Commander 1 USB Cable 1 Installation Guide 2 Power Commander Decals 2 Dynojet Decals 3 Velcro strips 1 Alcohol swab 1 Posi-tap 1 O2 Optimizer
PLEASE READ ALL DIRECTIONS BEFORE STARTING INSTALLATION
 PARTS LIST FUEL AND IGNITION 2012 Kawasaki EX650 / ER6n / Versys Installation Instructions 1 Power Commander 1 USB Cable 1 CD-ROM 1 Installation Guide 2 Power Commander Decals 2 Dynojet Decals 2 Velcro
PLEASE READ ALL DIRECTIONS BEFORE STARTING INSTALLATION
 PARTS LIST 2009-2011 Moto Guzzi Stelvio Installation Instructions 1 Power Commander 1 USB Cable 1 Installation Guide 2 Power Commander Decals 2 Dynojet Decals 1 O2 Optimizer 3 Velcro strips 1 Alcohol swab
US Models Only EFI Harley Davidson Twin Cam 88 Touring Models. Floppy Disc Request Form
 Floppy Disc Request Form If you do not have a CD-Rom drive and would like to receive the program and the alternate maps for your model on a 3 1/2 floppy disc, please fax this form to Dynojet at 1-702-399-1431
2011 Yamaha Apex Snowmobile
 PARTS LIST 2011 Yamaha Apex Snowmobile Installation Instructions quantity description 1 power commander 1 USB cable 1 cd-rom 1 installation guide 2 power commander decals 2 dynojet decals 2 velcro strip
PLEASE READ ALL DIRECTIONS BEFORE STARTING INSTALLATION
 PARTS LIST 2009-2011 Yamaha R1 Installation Instructions 1 Power Commander 1 USB Cable 1 Installation Guide 2 Power Commander Decals 2 Dynojet Decals 2 Velcro strips 1 Dual Lock strip 1 Alcohol swab 1
PLEASE READ ALL DIRECTIONS BEFORE STARTING INSTALLATION
 PARTS LIST 2005-2006 Kawasaki ZX-6R (636cc) & ZX-6RR (600cc) Installation Instructions 1 Power Commander 1 USB Cable 1 CD-ROM 1 Installation Guide 2 Power Commander Decals 2 Dynojet Decals 2 Velcro 1 Alcohol
EFI Harley Davidson 1340 EVO
 Floppy Disc Request Form If you do not have a CD-Rom drive and would like to receive the program and the alternate maps for your model on a 3 1/2 floppy disc, please fax this form to Dynojet at 1-702-399-1431
WARNING! USE ONLY IN RACE OR OTHER CLOSED COURSE APPLICATIONS AND NEVER ON PUBLIC ROADS
 2013-2014 Ducati Multistrada 1200 Z-Fi INSTALLATION INSTRUCTIONS P/N F185 WARNING! USE ONLY IN RACE OR OTHER CLOSED COURSE APPLICATIONS AND NEVER ON PUBLIC ROADS Z-Fi products do not meet California CARB
YAMAHA YZF R
 YAMAHA YZF R1 2009-2012 Z-Fi QS (Quickshift) / Z-Fi TC (Traction Control) Installation Instructions Part #s 800805CS, 800805CR, 800805TS, 800805TR Parts List: Z-Fi QS/TC Control Unit Fuel Harness Coil
2011 KTM RC8 / 2011 KTM RC8R Z-Fi Installation Instructions P/N F543
 R 2011 KTM RC8 / 2011 KTM RC8R Z-Fi Installation Instructions P/N F543 WARNING! USE ONLY IN RACE OR OTHER CLOSED COURSE APPLICATIONS AND NEVER ON PUBLIC ROADS Z-Fi products do not meet California CARB
WARNING! USE ONLY IN RACE OR OTHER CLOSED COURSE APPLICATIONS AND NEVER ON PUBLIC ROADS
 2010-2013 Ducati Streetfighter Z-Fi INSTALLATION INSTRUCTIONS P/N F190 WARNING! USE ONLY IN RACE OR OTHER CLOSED COURSE APPLICATIONS AND NEVER ON PUBLIC ROADS Z-Fi products do not meet California CARB
ELECTRONIC POSITIVE AIR SHUTOFF
 12 January 2015 103675X Electronic positive air shutdown (I-00336) 1 ELECTRONIC POSITIVE AIR SHUTOFF 1036750 2007-2009 Dodge 6.7L 1036751 2010-2015 Dodge 6.7L 1036754 2008-2010 Ford 6.4L 1036755 2011-2014
PLEASE READ ALL DIRECTIONS BEFORE STARTING INSTALLATION
 PARTS LIST 2006-2011 Yamaha MT-03 Installation Instructions 1 Power Commander 1 USB Cable 1 Installation Guide 2 Power Commander Decals 2 Dynojet Decals 2 Velcro strips 1 Alcohol swab 1 O2 Optimizer THE
2009 Yamaha Apex Snowmobile
 PARTS LIST 2009 Yamaha Apex Snowmobile Installation Instructions quantity description 1 power commander 1 USB cable 1 cd-rom 1 installation guide 2 power commander decals 2 dynojet decals 2 velcro strip
Installation and use. Controller for Rapid Bike Evo and Rapid Bike Racing modules. Issued by: PM approved by DG Rev.00 date 09/01/15 pag.
 Installation and use Controller for Rapid Bike Evo and Rapid Bike Racing modules Issued by: PM approved by DG Rev.00 date 09/01/15 pag. 1/10 Description YOUTUNE is a calibration device showing data relative
Automotive Application ET01 Software Revision A 12/06
 Automotive Application ET01 Software Revision A 12/06 INTRODUCTION... 2 FUNCTIONAL DESCRIPTION... 3 INSTALLATION... 4 COMPONENT PLACEMENT... 4 PLUMBING AND WIRING... 5 MSBC OPERATION (ET-01)... 14 TIMED
Suzuki Burgman
 Suzuki Burgman 650 2003-2013 Z-Fi Installation Instructions Part # F670 Parts List: Z-Fi Control Unit Fuel Harness Scotchlok (1) Cable Ties Velcro USB Cable Swingarm Stickers Download Z-Fi Mapper Software
ENGINE MANAGEMENT SYSTEM. System Sensors
 ENGINE MANAGEMENT SYSTEM System Sensors Throttle position sensor - Used to relay throttle position information to the ECU. Throttle opening angle is used by the ECU to determine fuelling and ignition requirements
Ducati Monster Ducati Monster 796 (Euro Spec Only) Z-Fi Installation Instructions P/N F192
 Z-Fi Installation Instructions P/N F192") 2009-2013 Ducati Monster 696 2010-2013 Ducati Monster 796 (Euro Spec Only) Z-Fi Installation Instructions P/N F192 WARNING! USE ONLY IN RACE OR OTHER CLOSED COURSE APPLICATIONS AND NEVER ON PUBLIC ROADS
2009-2013 Ducati Monster 696 2010-2013 Ducati Monster 796 (Euro Spec Only) Z-Fi Installation Instructions P/N F192 WARNING! USE ONLY IN RACE OR OTHER CLOSED COURSE APPLICATIONS AND NEVER ON PUBLIC ROADS
PLEASE READ ALL DIRECTIONS BEFORE STARTING INSTALLATION
 PARTS LIST 2010-2012 Ducati Hypermotard 1100 EVO Installation Instructions 1 Power Commander 1 USB Cable 1 Installation Guide 2 Power Commander Decals 2 Dynojet Decals 2 Velcro strips 1 Alcohol swab 4
Engine Management System
 Engine Management System 6 0 4-0 0 1 I N S T R U C T I O N S For 2005-2007 Harley-Davidson FL Models 2 Revolution Performance was founded with two major goals in mind to go that extra mile providing a
PLEASE READ ALL DIRECTIONS BEFORE STARTING INSTALLATION
 PARTS LIST 2006-2014 Suzuki M109R / C109R Installation Instructions 1 Power Commander 1 USB Cable 1 Installation Guide 2 Power Commander Decals 2 Dynojet Decals 2 Velcro strips 1 Alcohol swab 1 Zip tie
Dynojet Research 2191 Mendenhall Drive North Las Vegas, NV (800)
") 007 Ducati 098 I n s ta l l a t i o n I n s t r u c t i o n s Parts List Power Commander CD-ROM Button Adjustment Display USB Cable Installation Guide Power Adapter Wire Tap Power Commander Decals Dynojet
007 Ducati 098 I n s ta l l a t i o n I n s t r u c t i o n s Parts List Power Commander CD-ROM Button Adjustment Display USB Cable Installation Guide Power Adapter Wire Tap Power Commander Decals Dynojet
WARNING! USE ONLY IN RACE OR OTHER CLOSED COURSE APPLICATIONS AND NEVER ON PUBLIC ROADS
 2009-2011 Kawasaki Ninja 650R 2009-2011 Kawasaki ER-6N Z-Fi QS / Z-Fi TC Installation Instructions P/N S443S, S443R, T443S, T443R In order to fit the Bazzaz quickshift, aftermarket rearsets must be used
WARNING! USE ONLY IN RACE OR OTHER CLOSED COURSE APPLICATIONS AND NEVER ON PUBLIC ROADS
 2008-2010 KTM RC8 2009-2010 RC8 R Z-Fi TC / Z-FI QS INSTALLATION INSTRUCTIONS P/Ns S542S, S542R, T542S, T542R WARNING! USE ONLY IN RACE OR OTHER CLOSED COURSE APPLICATIONS AND NEVER ON PUBLIC ROADS Z-Fi
Installation Instructions PLEASE READ ALL INSTRUCTIONS BEFORE INSTALLATION
 1 GMC/CHEVY LMM DURAMAX (2007.5-10) FOR 2500 & 3500 SERIES PICKUPS V A R I A B L E V A N E E X H A U S T B R A K E Installation Instructions P/N# 2001030 PLEASE READ ALL INSTRUCTIONS BEFORE INSTALLATION
WARNING! USE ONLY IN RACE OR OTHER CLOSED COURSE APPLICATIONS AND NEVER ON PUBLIC ROADS
 2010-2012 Ducati Hypermotard 1100 EVO / EVO SP 2010-2013 Ducati Hypermotard 796 Z-Fi INSTALLATION INSTRUCTIONS PN F183, F184 WARNING! USE ONLY IN RACE OR OTHER CLOSED COURSE APPLICATIONS AND NEVER ON PUBLIC
Quick-Kill Installation Manual V1.0 (Universal Motorcycle Application)
") Quick-Kill Installation Manual V1.0 (Universal Motorcycle Application) THIS INSTALLATION MANUAL IS FOR UNIVERSAL FUEL INJECTED MOTORCYCLE APPLICATIONS (NON PLUG AND PLAY), WITH OR WITHOUT A GEAR POSITION
Quick-Kill Installation Manual V1.0 (Universal Motorcycle Application) THIS INSTALLATION MANUAL IS FOR UNIVERSAL FUEL INJECTED MOTORCYCLE APPLICATIONS (NON PLUG AND PLAY), WITH OR WITHOUT A GEAR POSITION
PLEASE READ ALL DIRECTIONS BEFORE STARTING INSTALLATION
 PARTS LIST 2014 BMW R ninet Installation Instructions 1 Power Commander 1 USB Cable 1 Installation Guide 2 Power Commander Decals 2 Dynojet Decals 2 Velcro strips 1 Alcohol swab THE IGNITION MUST BE TURNED
PLEASE READ ALL DIRECTIONS BEFORE STARTING INSTALLATION
 PARTS LIST FUEL AND IGNITION 2014-2015 Yamaha Bolt 950 Installation Instructions 1 Power Commander 1 USB Cable 1 Installation Guide 2 Power Commander Decals 2 Dynojet Decals 2 Velcro strips 1 Alcohol swab
To get started with RLINK, install the RLINK Smart Device on your bike using this guide.
 To get started with RLINK, install the RLINK Smart Device on your bike using this guide. For more info, visit RLINK.com/help 2 Download the REVER app and sign up for an account. Then, enter your IMEI and
A Simple View of Fuel Injection
 A Simple View of Fuel Injection Your engine is an air pump, the more air you pump through it, the more power you make. Figure 1 Any internal combustion engine will flow air at a rate determined by many
Instruction Manual. What s In The Box? CANsmart Controller DNL.WHS BMW K1600 Series. Kit Contents DENALIELECTRONICS.COM
 Instruction Manual Instruction Rev0 Thank you for choosing DENALI We know you would rather be riding your bike than wrenching on it, so we go the extra mile to make sure our instructions are clear and
PLEASE READ ALL DIRECTIONS BEFORE STARTING INSTALLATION
 Parts List 2013-2014 Honda CBR600RR Installation Instructions 1 Power Commander FC 1 USB Cable 1 Installation Guide 2 Dynojet Decals 2 Velcro 1 Alcohol swab 1 O2 Optimizer THE IGNITION MUST BE TURNED OFF
Honda CBR600F4i PCIII/PCIIIr
 Floppy Disc Request Form If you do not have a CD-Rom drive and would like to receive the program and the alternate maps for your model on a 3 1/2 floppy disc, please fax this form to Dynojet at 1-702-399-1431
PLEASE READ ALL DIRECTIONS BEFORE STARTING INSTALLATION
 Parts List 2004-2007 Honda CBR1000RR Installation Instructions 1 Power Commander FC 1 USB Cable 1 Installation Guide 2 Dynojet Decals 2 Velcro 1 Alcohol swab THE IGNITION MUST BE TURNED OFF BEFORE INSTALLATION!
E.C.C. Airtail Compressor Kit for Airtail Suspension System Installation Instructions
 E.C.C. Airtail Compressor Kit for Airtail Suspension System Installation Instructions The following document will cover Installation Instructions for the following applications: 2000-2006 Harley Davidson
PLEASE READ ALL DIRECTIONS BEFORE STARTING INSTALLATION
 PARTS LIST 2018 Honda CRF1000L Installation Instructions 1 Power Commander 1 USB Cable 1 Installation Guide 2 Power Commander Decals 2 Dynojet Decals 2 Velcro strips 1 Alcohol Swab 2 Posi-taps THE IGNITION
PLEASE READ ALL DIRECTIONS BEFORE STARTING INSTALLATION
 PARTS LIST 2012 Ducati Streetfighter 848 Installation Instructions 1 Power Commander 1 USB Cable 1 CD-ROM 1 Installation Guide 2 Power Commander Decals 2 Dynojet Decals 2 Velcro 1 Alcohol swab 4 Zip ties
PLEASE READ ALL DIRECTIONS BEFORE STARTING INSTALLATION
 PARTS LIST 2011-2013 KTM 690R Enduro Installation Instructions 1 Power Commander 1 USB Cable 1 Installation Guide 2 Power Commander Decals 2 Dynojet Decals 2 Velcro strips 1 Alcohol swab 3 Zip ties 1 O2