LAMBO VERTICAL DOOR HOW TO GUIDE
|
|
|
- Clare Holland
- 5 years ago
- Views:
Transcription
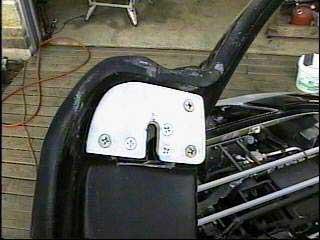
1 -1 LAMBO VERTICAL DOOR HOW TO GUIDE Despite what you may believe, scissor doors are not that difficult to install. There are plenty of body shops out there that will charge you $2,000 - $10,000 for this modification, but that is a ridiculous price to pay for what you are really getting. Yes, it looks like an extreme mod, but in reality, all that you need is a pair of custom hinges, and a pair of pressurized gas struts, and a little welding experience! The toughest part of this project is to find a hinge for your needs and to get it welded in the proper position so that everything aligns properly. OVERVIEW OF THE PROCESS 1. Remove the door from the vehicle. 2. Remove the factory hinges. 3. Remove the door latch. 4. Inspect the electrical wires and make sure they are long enough for the door to swing vertically 90 degrees. If not, extend the wires so they will reach. 5. With the help of a couple friends, hold the detached door in place and mimic the desired motion of the door. This will let you know how the hinge needs to work and where it needs to be mounted so that the door will function properly. 6. Purchase or manufacture a sturdy hinge that will allow the door to swing in the motion determined previously in step Temporarily attach the door to the vehicle with the new hinge and, with the help of your friends, lift the door up and down making sure that everthing aligns properly and that nothing is in the way. 8. Purchase a pressurized gas strut and mount one end to the vehicle chassis and the other to the door. This will raise the door and keep it from falling when you are climbing in and out of your vehicle. 9. Redesign the latching mechanism for the door. Since the door doesnt open horizontally anymore, the system will need to be rotated so that it can latch vertically. This may require that the end of the door be shaved in an inch or two. No big deal for anyone with a little welding experience. 10. Test the operation of the door. Make sure that the gas strut is strong enough to hold the weight of the door, and test the redesigned latching mechanism. Make sure that everything is permanently welded in place. 11. Repeat for the other door. This will be easier and go much quicker now that you know what needs to be done. 12. Refinish the paint on the inner door surfaces. OBTAINING THE HINGES you know someone that works at a machine shop, have them look at your door and they should be able to manufacture a pair of custom hinges for your vehicle. Otherwise, you will need to purchase a pair of hinges. Street Dreams (website: ) Street Dreams offers 5 different packages of scissor door conversions. You can purchase a pair of hinges for just over $400, or you can buy the entire installation kit for $685. The installation kit includes everything you will need such as hinges, mounting plates, gas struts, and mount hardware. And is the cheapest place i've seen.

2 OBTAINING GAS STRUTS If you purchase the entire installation kit from Street Dreams you will receive a pair of gas struts. If you are trying to do this installation practically free, you can find a cheap pair of struts at a salvage yard. Look for strong hood struts at a salvage yard. They will need to be very strong in order to hold up the weight of your door. This is especially true if you intend to mount the strut to the door very close to the hinge. Less force will be required to lift the door if you mount the strut as far away from the hinge as possible. However, the farther you mount the strut down the door, the longer the strut will need to extend. This is why you need to analyze your door and determine where you will need to mount the gas strut on the door and on the chassis of the vehicle. Before choosing a pair of struts, you will need to make sure that they are long enough to reach from the mounting position on the chassis to the mounting position on the door when the door is fully extended. Also, they must be very strong. The stronger the better. The last thing you want is a door that wont stay up on its own. If you install the strut and find that the door wont stay up on its own, you will have to mount the strut further down the door away from the hinge. This will require less force to lift the door. If this still doesnt help, or if you cant position the strut any lower, you will have to find a stronger set of struts or you could add another strut to the door. To order a stronger pair of struts go to an auto parts store and ask for thier assistance. They will then order a pair of struts that will work for your particular application. CONVERTING THE DOOR LATCH


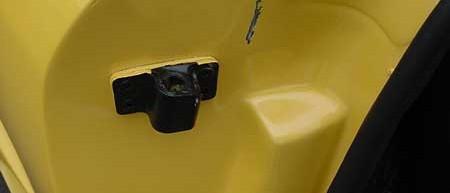
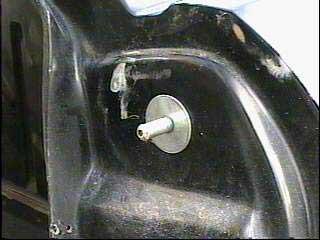
3 At this stage, you should have the door mounted and the gas strut installed and working. The door should go up easily and smoothly (on its own or with a little help). When the door is shut everything should be aligned properly, and you should make sure that the door will be snuggly against the rubber seals around the top of the door. Now that the door looks great on your vehicle, you'll need to convert the latch so that you can keep your door shut and locked. Previously, your door latch probably consisted of a stiker pin mounted to the vehicle and a latch in the door with a horizontal opening to accept this striker pin. Now that the door will be closing vertically, the latching system will have to be redesigned. Option 1: Try to save money bu using your existing latches The door should still be take apart from the hinge and strut installation. So take a look at how your latch works. Would it be possible to use the existing latch with a little cutting, welding and engineering? A possible solution would be to cut the latch out of the door and engineer a way for it to mount vertically within the door. Keep in mind that you'll also have to reposition the stiker pin on the vehicle. Below is a picture of an Eclipse striker pin installation: It appears to be some kind of pneumatic striker. It probably pulls the door in against the car, and or pushes it away from the car when being opened.) If you have T-Tops or a vehicles that requires the door to be pushed away from the door frame before swinging up, you can look into installing such a system. However, you can accomplish the same thing by simply mounting the hinge at an angle. Instead of mounting it straight up and down, you can mount it angled so that the top of the hinge is angles up and away from the vehicle. This way the door will swing away from the vehicle and not straight up and down. This will allow the top of the door to clear the top of the car, and it will also keep the lower bottom corner from wedging in the doorway. Also, since the door will be swinging down onto the striker pin, you will probably have to modify the end of the door to allow the stiker pin to pass through. For example, you can cut a small groove up the middle of the end of the door up to the opening of the latch. This will allow the striker pin to pass through. (Note that this solution will NOT work with the

 Option 2: Try to save time and aggretion by purchasing new latches If you dont want to use your existing latches,")
4 way the striker pin is position above. For the striker position pictured above, the door latch will need to protrude from the door, or a couple inches will need to be shaved from the end of the door.) Option 2: Try to save time and aggretion by purchasing new latches If you dont want to use your existing latches, you can simply purchase a new set specifically designed for scissor door applications. Usually, these latches are designed like the ones pictured below

5


6 For $85, you can obtain a set of scissor door latches and striker pins from: To install them, you'll have to cut out the existing latch, taking note of exactly how it functions. Then you'll have to weld in the new latch, and you'll have to cut and weld to install the new striker pin as well. You'll probably have to modify the end of the door to allow the striker pin to pass by without hitting the door, but if you've made it this far it should be a piece of cake. (Note how the circled area above has been shaved in to allow the striker pin to pass.) To allow the striker pin to pass by, you will probably have to modify the end of the door like in the picture above. Shaving most of the end of the door, like in the picture aboce, will produce the best results. If you just try to cut a groove up the middle of the end of the door, then the door must swing perfectly along that axis. For example, if you cut a groove straight down the middle of the end of the door, then the door must swing perfectly up and down in order for the striker pin to pass through. If there is any flex at all in the door, the pin will scrape the door, chip the paint and maybe even get stuck from time to time. So it is definitely best to shave the entire area on the end of the door like in the picture above. Installation Tips
7 1. After mounting the door to the hinge, wrap a flexible plastic hose over the electrical wires running to the door and secure the hose alongside the door hinge. This will prevent the wires from being stretched when the door is being raised. 2. If the bottom corner of the door hits the door frame when being opened, the hinge needs to be mounted with the top edge angled up and away from the vehicle. (Instead of just mounting it straight up and down.) This will cause the door to open out and up instead of coming straight up. 3. You should only angle the hinge enough to allow the door to open properly. If you have it swinging out too far, your door wont have enough room to open in tight parking spaces.
Disconnect the negative battery cable!
 Understanding Mod-3 on a C90 With Wiring Diagrams By DrJones18LC I do not have a C90 at my disposal (or audio/video equipment for that matter) so I can't make a live step by step how-to on doing Mod-3.
Troubleshooting Guide for Limoss Systems
 Troubleshooting Guide for Limoss Systems NOTE: Limoss is a manufacturer and importer of linear actuators (motors) hand controls, power supplies, and cables for motion furniture. They are quickly becoming
Troubleshooting Guide for Okin Systems
 Troubleshooting Guide for Okin Systems More lift chair manufacturers use the Okin electronics system than any other system today, mainly because they re quiet running and usually very dependable. There
Another CJ picture guide to replacing the key cylinder in a non-tilt steering column
 Another CJ picture guide to replacing the key cylinder in a non-tilt steering column by John Strenk Well I'm sure it's happened to all of us one time or another. You park your jeep and go to turn off your
Another CJ picture guide to
 Another CJ picture guide to replacing the key cylinder in a non-tilt steering column by John Strenk Well I'm sure it's happened to all of us one time or another. You park your jeep and go to turn off your
Rear Wheel Removal (by BassCliff)
") Rear Wheel Removal (by BassCliff) Hello to my GS riding friends! After picking up a nail in my rear tire (while on the freeway at 75mph!) I thought I would take a few pictures to help illustrate the rear
Rear Wheel Removal (by BassCliff) Hello to my GS riding friends! After picking up a nail in my rear tire (while on the freeway at 75mph!) I thought I would take a few pictures to help illustrate the rear
How to Build with the Mindstorm Kit
 How to Build with the Mindstorm Kit There are many resources available Constructopedias Example Robots YouTube Etc. The best way to learn, is to do Remember rule #1: don't be afraid to fail New Rule: don't
Utility Trailer 5 x 8 Building Notes
 Utility Trailer 5 x 8 Building Notes This is a standard utility trailer model that is currently on the market (at least in Minnesota). The price tag seems to average around $900 - $1100. There is no doubt
Connecting the rear fog light on the A4 Jetta, while keeping the 5 Light Mod
 Connecting the rear fog light on the A4 Jetta, while keeping the 5 Light Mod DISCLAIMER: I'm human and make mistakes. If you spot one in this how to, tell me and I'll fix it This was done on my 99.5 Jetta.
what you need to do is hit the taper housing as hard as you can with your hammers AT THE SAME TIME and at a slight angle, what will happen is you
 first things first, get the car on axle stands and the wheels off. Open the bonnet to let more light through to the area in which you'll be working. The following guide shows the passenger side being done
As stated, these are solely based off of how I like to do the Pre-Trip. I give my personal opinions as well as some helpful tips.
 Here are our sections: Engine Compartment Drivers Door Fuel Area Coupling System Trailer (Please note in the type of suspension your trailer has) Light Check In-Cab Inspection and Brake Tests You will
J&M Mustang Adjustable Panhard Rod (05-09) - Installation Instructions
 - Installation Instructions") J&M Mustang Adjustable Panhard Rod (05-09) - Installation Instructions The below installation instructions work for the following products: J&M Mustang Adjustable Panhard Rod (05-09) Please read through
J&M Mustang Adjustable Panhard Rod (05-09) - Installation Instructions The below installation instructions work for the following products: J&M Mustang Adjustable Panhard Rod (05-09) Please read through
BMW 528i E39 Sunroof Repair
 These instructions will help guide you through the repair process for broken sunroof control rails on an E39 chassis. Before I get started, I want to give a shout-out to a couple people who also posted
CHASSIS DYNAMICS TABLE OF CONTENTS A. DRIVER / CREW CHIEF COMMUNICATION I. CREW CHIEF COMMUNICATION RESPONSIBILITIES
 CHASSIS DYNAMICS TABLE OF CONTENTS A. Driver / Crew Chief Communication... 1 B. Breaking Down the Corner... 3 C. Making the Most of the Corner Breakdown Feedback... 4 D. Common Feedback Traps... 4 E. Adjustment
Replacing MK4 Golf/Jetta radiator mounts in-car
 Replacing MK4 Golf/Jetta radiator mounts in-car This is a guide to replacing the radiator mounts in a MK4 Golf/Jetta. This involves moving the core support to the service position which allows you to do
*Some speedometers have these additional electronic connections. If yours does, then remove the smaller slotted screws shown.
 www.odometergears.com 1981-1985 240 Cable-Driven Speedometers (NOT for 1986 and later electronic units) http://www.davebarton.com/240-odometer-repair.html For this set of instructions below, I will not
Fourth Grade. Multiplication Review. Slide 1 / 146 Slide 2 / 146. Slide 3 / 146. Slide 4 / 146. Slide 5 / 146. Slide 6 / 146
 Slide 1 / 146 Slide 2 / 146 Fourth Grade Multiplication and Division Relationship 2015-11-23 www.njctl.org Multiplication Review Slide 3 / 146 Table of Contents Properties of Multiplication Factors Prime
Fourth Grade. Slide 1 / 146. Slide 2 / 146. Slide 3 / 146. Multiplication and Division Relationship. Table of Contents. Multiplication Review
 Slide 1 / 146 Slide 2 / 146 Fourth Grade Multiplication and Division Relationship 2015-11-23 www.njctl.org Table of Contents Slide 3 / 146 Click on a topic to go to that section. Multiplication Review
VEHICLE TOWING SAFETY
 When you've got the correct gear, some practice and confidence, towing can be as easy as single-vehicle driving. Yet safety should always be your main concern when you're pulling a trailer. Because no
There is hence three things you can do - add oil, adjust the temp that the clutch begins to engage, or do both.
 As most of you may be aware, I have been doing a lot of research lately on our cooling system in the 80's including the fact that we have a dead spot on the OEM temp gauge which prompted me to not rely
Steeda Sport Mustang Lowering Springs (2005+) - Installation Instructions
 - Installation Instructions") Steeda Sport Mustang Lowering Springs (2005+) - Installation Instructions The below installation instructions work for the following products: Steeda Sport Mustang Lowering Springs (2005+) Please read
Steeda Sport Mustang Lowering Springs (2005+) - Installation Instructions The below installation instructions work for the following products: Steeda Sport Mustang Lowering Springs (2005+) Please read
U-Score U-Score AAC Rank AAC Rank Vocabulary Vocabulary
 go 1 927 you 2 7600 i 3 4443 more 4 2160 help 5 659 it 6 9386 want 7 586 in 8 19004 that 9 10184 like 10 1810 what 11 2560 make 12 1264 is 13 10257 on 14 6674 out 15 2350 do 16 2102 here 17 655 eat 18
Physics Work with your neighbor. Ask me for help if you re stuck. Don t hesistate to compare notes with nearby groups.
 Physics 9 2016-04-13 Work with your neighbor. Ask me for help if you re stuck. Don t hesistate to compare notes with nearby groups. Today we ll build on what we did Monday with batteries and light bulbs.
Front Suspension Redo
 Front Suspension Redo Message: First, thanks to all the previous posters for guidance in my doing the suspension. As thanks, here s the updated document for doing the front suspension. Procedure: While
The Starter motor. Student booklet
 The Starter motor Student booklet The Starter motor - INDEX - 2006-04-07-13:20 The Starter motor The starter motor is an electrical motor and the electric motor is all about magnets and magnetism: A motor
Prerequisites: Shop Manual (recommended) pages 3-9 through 3-13.
 pages 3-9 through 3-13.") Prerequisites: Order your gaskets average about $25.00 bucks X 2 so $50.00 4NK-11193-00-00 Obtain a shim kit (Should have several 265 and 270s) (Some dealers will exchange) Obtain a Valve Bucket Tool YM-33961
Prerequisites: Order your gaskets average about $25.00 bucks X 2 so $50.00 4NK-11193-00-00 Obtain a shim kit (Should have several 265 and 270s) (Some dealers will exchange) Obtain a Valve Bucket Tool YM-33961
Here's the difference (externally) in the and 04+ bumper and headlights: (00-03 on top, 04 on bottom)
 in the and 04+ bumper and headlights: (00-03 on top, 04 on bottom)") OK guys, I've been meaning to post this for awhile.. well here it goes. I did the '04 front end conversion on my '01 about 4-5 months ago, but then the dealer had to buy the car back for legal reasons.
OK guys, I've been meaning to post this for awhile.. well here it goes. I did the '04 front end conversion on my '01 about 4-5 months ago, but then the dealer had to buy the car back for legal reasons.
Getting a Car J. Folta
 Getting a Car Getting a Car J. Folta As the head of a family, I have many decisions to make about how my husband and I spend our money. We need to figure out the way to get the most out of what we make
10 Critical Paint Meter Mistakes That Cost Unsuspecting Car Dealers A Fortune
 10 Critical Paint Meter Mistakes That Cost Unsuspecting Car Dealers A Fortune What You Learn In This Report Can Add $1,000's Of Additional Profit To Your Bottom Line...Every Month And Help You Avoid Disastrous
CADILLAC CTS & CTS-V: (HAYNES REPAIR MANUAL) BY EDITORS OF HAYNES MANUALS
 BY EDITORS OF HAYNES MANUALS") CADILLAC CTS & CTS-V: 2003-2012 (HAYNES REPAIR MANUAL) BY EDITORS OF HAYNES MANUALS DOWNLOAD EBOOK : CADILLAC CTS & CTS-V: 2003-2012 (HAYNES REPAIR Click link bellow and free register to download ebook:
CADILLAC CTS & CTS-V: 2003-2012 (HAYNES REPAIR MANUAL) BY EDITORS OF HAYNES MANUALS DOWNLOAD EBOOK : CADILLAC CTS & CTS-V: 2003-2012 (HAYNES REPAIR Click link bellow and free register to download ebook:
Днепр) Russian Motorcycle Carburetors Part 2B: PZ-24 and PZ-28 Carburetor Assembly and Jet Drilling
 Russian Motorcycle Carburetors Part 2B: PZ-24 and PZ-28 Carburetor Assembly and Jet Drilling") Ural (Урал( Урал) - Dnepr (Днепр( Днепр) Russian Motorcycle Carburetors Part 2B: PZ-24 and PZ-28 Carburetor Assembly and Jet Drilling (applies also to K-37 K and K-38 K carbs) Ernie Franke eafranke@tampabay.rr.com
Ural (Урал( Урал) - Dnepr (Днепр( Днепр) Russian Motorcycle Carburetors Part 2B: PZ-24 and PZ-28 Carburetor Assembly and Jet Drilling (applies also to K-37 K and K-38 K carbs) Ernie Franke eafranke@tampabay.rr.com
This guide will explain how to remove the old springs from the car and replace them with lowering springs.
 fubar Guide: Fitting lowering springs to the Mk2 Clio The method described below worked for me. I am not saying it is the only method to complete the task. I will not accept any responsibility for damage
HOW TO MODIFY A STOCK DODGE KEGGER INTAKE MANIFOLD
 HOW TO MODIFY A STOCK DODGE KEGGER INTAKE MANIFOLD Even though this 3.9L V6 intake manifold is smaller than the 5.2L and 5.9L V8 intake manifolds, the same instructions apply to all 3 engines. If you are
Installation Instructions for TJ Jeep s Fiberglass Replacement Bodies and Parts
 Installation Instructions for 1997-2006 TJ Jeep s Fiberglass Replacement Bodies and Parts Getting started: We recommend that you take pictures as you dismantle your Jeep. These pictures will help you when
Brake System Rebuilding the brake calipers
 Page 1 of 39 Brake System Rebuilding the brake calipers Written by the backyard hack mechanic Sean750 Document history: # 14 Jan 2004 added pictures of rear caliper rebuild kit # 13 Nov 2004 added more
4TH GEN SEATS IN A 3RD GEN TRUCK
 4TH GEN SEATS IN A 3RD GEN TRUCK by Flopster843 02 Oct 2016 If you drive a 3rd generation Dodge Ram truck, I am sure you have discovered that the OEM seats are not the greatest (Figure 1.) They are extremely
YOUR CAR's COOLANT MUST BE COLD TO DO THIS. DON'T BE STUPID AND SCALD YOURSELF.
 I just read through the service manual, checked out Billman's recommendations, and tackled the coolant change on my 2003 s2000. I'm not a mechanic by trade but have done valve adjustments, head gaskets,
OFFICE CHAIR WONT STAY UP
 30 January, 2018 OFFICE CHAIR WONT STAY UP Document Filetype: PDF 147.7 KB 0 OFFICE CHAIR WONT STAY UP You sit down in your favorite chair, pull the lever to recline and nothing happens. Cerita Hantu Malaysia
The kit includes everything seen here, and there are only a few upgrades or mods available.
 The kit includes everything seen here, and there are only a few upgrades or mods available. Complete Kit $1,445.00 1 pair trailing arms LH/RH, with poly lined Monster balls. Pinion angle corrected 1 pair
How to Fix the Altitude Clutch Problem in the Meade DS Mount By John Zimmerman September 2005
 How to Fix the Altitude Clutch Problem in the Meade DS Mount By John Zimmerman September 2005 Note: I claim no personal credit for the solution described here. Other DSX owners, whose real names I do not
Installation Instructions LamboStyleDoors
 Installation Instructions LamboStyleDoors (The instruction refers only to one side of the car, but is valid for both sides) Preparations: (Dismantling according to the regulation of the car manufacturer)
Installation Instructions LamboStyleDoors
 Installation Instructions LamboStyleDoors (The instruction refers only to one side of the car, but is valid for both sides) Preparations: (Dismantling according to the regulation of the car manufacturer)
Suicide Door Hinge Installation Before installing: Modified or installed parts cannot be returned for a refund
 PLEASE CAREFULLY READ ALL INSTRUCTIONS BEFORE ATTEMPTING TO INSTALL THIS PRODUCT. Vertical Doors Inc. assumes no responsibility for any damages caused by improper installation Suicide Door Hinge Installation
Troubleshooting Guide for Dewert Systems
 Troubleshooting Guide for Dewert Systems Dewert electronics aren t as common as Okin systems as they re mainly used by one manufacturer (Pride). However, Pride is the largest lift chair manufacturer in
GOALS: You should aim for a qualifying lap of about 1:27.50 to 1: That should put you pretty far up the grid. During the race you should aim for
 THE 1.954 MILE circuit de Monaco is one of the toughest circuits in GPL, along with the Nurburgring. The track is very tight and twisty and, with just one exception, quite slow. The barriers are everywhere
Timing belt change. Timing belt change
 Timing belt change Put 2 new Gates T275 timing belts on today. Tensioner drilled smooth and tight with less than 16,000 miles on her decided not to change the tensioners just the belts. You'll need some
Changing the Power Steering Belt
 Changing the Power Steering Belt Brett Dukes (Maverick) from the BigJimny Forum has contributed this article to the Website. Many thanks. Whilst off-roading on Sunday, my alternator Fan Belt snapped -
TONY S TECH REPORT. Basic Training
 TONY S TECH REPORT (Great Articles! Collect Them All! Trade them with your friends!) Basic Training OK YOU MAGGOTS!! Line up, shut up, and listen good. I don t want any of you gettin killed because you
Mercedes W123 Fuel Cap and Oil Cap Seal
 Mercedes W123 Fuel Cap and Oil Cap Seal Replacement The fuel and oil caps on the W123 have rubber seals to prevent fuel and engine oil, respectively, from leaking past the cap. Leaking fuel can damage
Installation Instructions LamboStyleDoors (The instruction are to be used as a reference. Please repeat for both doors)
") Installation Instructions LamboStyleDoors (The instruction are to be used as a reference. Please repeat for both doors) Mercedes C-Class Sport coupé type W203 Part number 500 25 009 Pre installation check
Installation Instructions LamboStyleDoors (The instruction are to be used as a reference. Please repeat for both doors) Mercedes C-Class Sport coupé type W203 Part number 500 25 009 Pre installation check
Converting an A to 12v and Adding Turn Signals Bill Lee
 Converting an A to 12v and Adding Turn Signals Bill Lee Bill@WRLee.com When I bought my 1929 Tudor, it had been restored about 20 years earlier. It had halogens and had been converted to 12v negative ground,
Corvette Set Separator (Glove Box) Lock Removal
 Lock Removal") 1956-62 Corvette Set Separator (Glove Box) Lock Removal The materials here were gathered from several Corvette Forum Threads as well as from the Web Pages of Rich Mozzetta (rich5962 on the CF). Our colleagues
1956-62 Corvette Set Separator (Glove Box) Lock Removal The materials here were gathered from several Corvette Forum Threads as well as from the Web Pages of Rich Mozzetta (rich5962 on the CF). Our colleagues
Switchback Carrier Rack System
 Switchback Carrier Rack System Installation Instructions 1 Rocky Mountain Westy Ph. (970)310-3441 Introduction Thank you for purchasing the Rocky Mountain Westy Switchback Carrier Rack System. We pride
RAMPAGE POWER LIFT RAMP
 RAMPAGE POWER LIFT RAMP INSTALLATION AND OPERATING INSTRUCTIONS (3/10/07) The Rampage Power Lift Ramp is the fast, easy, and safe way to load a motorcycle into a truck. One person can load or unload a
CAPTUREPRO USER GUIDE
 CAPTUREPRO USER GUIDE Updated: September 2015 Power12 and CapturePro 2013, 2014, 2015 by Power12 Company v1.1 Table of Contents CapturePro Purpose and Design... 3 Why was CapturePro developed?... 3 How
Lincoln Mark VII Hood Insulation Repair Version written by AZMarkVII
 Lincoln Mark VII Hood Insulation Repair Version 20061223 written by AZMarkVII My hood insulator was, for the most part, intact. It had some tears and the surface material was missing in areas as large
GM A-Body Instructions 3 & 2½ Header Applications w/ Balance Tube Crossover
 GM A-Body Instructions 3 & 2½ Header Applications w/ Balance Tube Crossover Included with this kit are the following: 2 Collector Reducers 1 Balance Tube Kit A 2 Headpipes 2 Tailpipes 2 Tailpipe Extensions
This document goes through the basic steps required to utilize the electric window motors from the Ford Mk3 Mondeo.
 Modifying Ford Mk3 Mondeo door glass motors The options for installing electric windows in a Diablo replica are limited to only a few options; You can install the original motor and cable runners at 500
Ford F-150 Speaker Replacement Instructions
 Ford F-150 Speaker Replacement Instructions This article was downloaded from http://www.fordf150.net Be sure to go there to view and download the other how-to articles. Thanks to John Meyer for contributing
CAPTUREPRO USER GUIDE FOR TESLA MODEL S, MODEL X, AND MODEL 3. Updated: September Power12 and CapturePro by Power12 Company v1.
 CAPTUREPRO FOR TESLA MODEL S, MODEL X, AND MODEL 3 USER GUIDE Updated: September 2018 Power12 and CapturePro 2013 2018 by Power12 Company v1.2 Table of Contents CapturePro Purpose and Design... 3 Why was
Maximum Motorsports Camber Caster Plates (05-10):
:") Maximum Motorsports Camber Caster Plates (05-10): Tools Required: Lug Wrench 21mm Deep Socket 18mm Deep Socket 15mm Deep Socket 17mm Socket 13mm Socket 10mm Socket Torque Wrench (requires 166lb-ft capacity
Maximum Motorsports Camber Caster Plates (05-10): Tools Required: Lug Wrench 21mm Deep Socket 18mm Deep Socket 15mm Deep Socket 17mm Socket 13mm Socket 10mm Socket Torque Wrench (requires 166lb-ft capacity
W123 Transmission Vacuum Modulator Adjustment DIY - measure it the 'right' way
 W123 Transmission Vacuum Modulator Adjustment DIY - measure it the 'right' way Why do you need to do this?: You need to do this to properly check the internal hydraulic pressure of the transmission, either
JEEVES. JEEVES Installation Manual. Installation Manual The Easiest Do-It-Yourself Dumbwaiter on the Market
 1 888-323-8755 www.nwlifts.com JEEVES Installation Manual The Easiest Do-It-Yourself Dumbwaiter on the Market This manual will cover the installation procedure step-by-step. The installation of this dumbwaiter
AL LACKI'S ENGINE CART ASSEMBLY NOTES
 AL LACKI'S ENGINE CART ASSEMBLY NOTES BEFORE STARTING. Please refer to the drawings and photos at the end of this document. FOR MORE PHOTOS, LOG ON TO FACEBOOK USING THIS ADDRESS. https://www.facebook.com/media/set/?set=oa.10152545415424017&type=1
[0. Title] Biased Weight Alignment Procedure for Bent Axle Alignment by Stan Pope, 4 August 2013
![[0. Title] Biased Weight Alignment Procedure for Bent Axle Alignment by Stan Pope, 4 August 2013](/thumbs/87/96968278.jpg "[0. Title] Biased Weight Alignment Procedure for Bent Axle Alignment by Stan Pope, 4 August 2013") [0. Title] Biased Weight Alignment Procedure for Bent Axle Alignment by Stan Pope, 4 August 2013 [1] Hello, pinewood derby racers! I'm Stan Pope. For a lot of years, I've been helping youngsters and their
[0. Title] Biased Weight Alignment Procedure for Bent Axle Alignment by Stan Pope, 4 August 2013 [1] Hello, pinewood derby racers! I'm Stan Pope. For a lot of years, I've been helping youngsters and their
HOW TO REPARE A DENT
 HOW TO REPARE A DENT Sometimes your car will receive a dent or gouge that's too small to justify the expense of a full body shop repair but too big to simply ignore. You can cut your repair costs by doing
Regents Physics Summer Assignment. Physics: Balloon Car Lab
 Regents Physics Summer Assignment Name: Physics: Balloon Car Lab A rocket is simply a chamber filled with pressurized gas. A small opening called a nozzle allows the air to escape, causing thrust that
Brake Caliper Rebuild - Part Numbers & Tips Per Jim Millet, 3/15/2005
 Per Jim Millet, 3/15/2005 Not too difficult a job. Rears are easier than fronts to access. You ll need the following gasket sets: Front caliper gasket set, P/N 34 11 1 157 037, MSRP $13.58 Rear caliper
How Many Gears Does A Manual Car Have
 How Many Gears Does A Manual Car Have There are 20 reasons to drive manual cars and only 1 reason not. But I had SO MANY reasons not to do that! have a manual override, where you can drop cars down into
1986 Rear Disk Brake Upgrade. All hard lines mounted to the rear axle with mounting screws. 1/4" fittings
 1986 Rear Disk Brake Upgrade Being well prepared for a project of this size is the key to success. I thought I was well prepared by doing a lot of research and getting all of the required parts before
Installation Instructions LamboStyleDoors (The instruction are to be used as a reference. Please repeat for both doors)
") Installation Instructions LamboStyleDoors (The instruction are to be used as a reference. Please repeat for both doors) Pre installation check list: - Double check vehicles data with TUV certificate -
Installation Instructions LamboStyleDoors (The instruction are to be used as a reference. Please repeat for both doors) Pre installation check list: - Double check vehicles data with TUV certificate -
Kobo/XCSoar Large Battery Notes -
 Kobo/XCSoar Large Battery Notes - www.50k-or-bust.com These notes relate to the modification of Kobo Mini and Touch ebook readers by fitting a GPS chip (technically a GPS module) for navigation only or
Installation Instructions LamboStyleDoors
 Installation Instructions LamboStyleDoors (The instruction refers only to one side of the car, but is valid for both sides) Preparations: (Dismantling according to the regulation of the car manufacturer)
The Invision kit comes with everything you need to install the DVD players into your X5; two leather headrests with integrated DVD players, two
 Our BMW X5 plays a lot of roles in our life daily driver, tow vehicle, household hauler, etc. but the most important is Mommy Mobile and road trip car. The X5 makes a great long distance cruiser; it comfortably
In summary, the procedures includes removal of the belly pans, draining of the engine block, draining of the radiator, coolant mixing and refilling.
 COOLANT DRAIN AND CHANGE PROCEDURE Recently, there was a request for a picture guide for draining/changing coolant (Robot808 and James-man) and since I was going to do this operation on Idaho (88), I took
AIR BRAKES THIS SECTION IS FOR DRIVERS WHO DRIVE VEHICLES WITH AIR BRAKES
 Section 5 AIR BRAKES THIS SECTION IS FOR DRIVERS WHO DRIVE VEHICLES WITH AIR BRAKES AIR BRAKES/Section 5 SECTION 5: AIR BRAKES THIS SECTION COVERS Air Brake System Parts Dual Air Brake Systems Inspecting
1 of 2 9/4/ :27 AM
 Ford Mustang IAC IAB - Solving your idle problems http://www.muscularmustangs.com/iac.php 1 of 2 9/4/2010 10:27 AM Solving idle problems part 1 - Cleaning your IAC Does your idle rise and fall over and
At Mark's suggestion I thought I'd write this up so future Coupe lovers can have as much fun* as I did with this job.
 At Mark's suggestion I thought I'd write this up so future Coupe lovers can have as much fun* as I did with this job. My enormous thanks to forum members, particularly glorfindel, for their advice when
Drum 2 disk brake conversion. Stop That Car!
 Page 1 of 9 Stop That Car! From the February 1993 issue of "Petersen's Musclecar Restoration and Performance". Illustration by: Dennis Ellefson GM BUILT PLENTY OF CARS WITH FRONT DISC BRAKES. IF YOUR A-BODY
Combine Cover Manual
 Combine Cover Manual Installation Instructions Page 26 Operating Instructions Page 7 Warranty Page 7 Trouble Shooting Page 8 10 For Big Top Extension Model s: Case I.H. 8010, 8120 Please forward onto Customer
ECT Display Driver Installation for AP2 Module
 ECT Display Driver Installation for AP2 Module Overview The ECT Display Driver is a small module with a removable wire harness that mounts behind the driver's foot well cover. All wiring connections are
Solenoid Valves: Increase Efficiency And Economy For Irrigation Systems
 Solenoid Valves: Increase Efficiency And Economy For Irrigation Systems In agriculture, the economics of water supply and demand is driving the development of water conservation controls in irrigation
The Savage X 4.6 Reverse SS power and upgrades with REVERSE!
 The Savage X 4.6 Reverse SS power and upgrades with REVERSE! Introducing the Savage X 4.6 REVERSE! This latest addition to the Savage line-up combines huge power and reversing capability for the ultimate
Overhauling Shimano Dynamo Hubs
 1 of 8 09/27/2007 02:37 PM? About Us Components & Accessories Services Framesets and Bicycles Gallery Custom Wheelbuilding How to Order Commuting Racing Touring Fixed-Gear & Singlespeed Randonneuring Dynohubs
ROPE DANCER INSTRUCTION MANUAL:
 Educational Design Robot ROPE DANCER INSTRUCTION MANUAL: Model WTR-RD1 2010 AREXX - THE NETHERLANDS CONTENT 1. Product information Rope Dancer 3 2. General assembly information 4 2.1 Parts list Rope Dancer
What do I need to do when my parts are delivered via Truck Freight Delivery? When the shipment arrives, verify you have received all your items.
 GENERAL QUESTIONS Do your products come with a warranty? (Disclaimer: All claims are handled on a case by case basis) All products come with a limited manufacturer's warranty. The warranty covers shipping
RS-2 SINGLE ACTION REAR BUMPER WITH TIRE CARRIER INSTALL MANUAL FOR JEEP WRANGLER ALL MODELS.
 RS-2 SINGLE ACTION REAR BUMPER WITH TIRE CARRIER INSTALL MANUAL FOR 2007-2016 JEEP WRANGLER ALL MODELS. Rear Bumper Installation Instructions 1) Remove factory rear bumper, (this includes all tow hitch
55-64 Full Size GM (Impala, Bel Air, etc.) This kit is for axles with a 3 3/8 spread center to center on the top two bolt holes (pictured left).
 This kit is for axles with a 3 3/8 spread center to center on the top two bolt holes (pictured left).") SUM-BK1624A Full Size GM Installation Instructions Rear Disc Conversion 55-64 Full Size GM (Impala, Bel Air, etc.) This kit is for axles with a 3 3/8 spread center to center on the top two bolt holes (pictured
SUM-BK1624A Full Size GM Installation Instructions Rear Disc Conversion 55-64 Full Size GM (Impala, Bel Air, etc.) This kit is for axles with a 3 3/8 spread center to center on the top two bolt holes (pictured
INSTALLATION OF A WARN M8000 WINCH IN A HIDDEN MOUNT ON THE 2001 EXPLORER SPORT TRAC
 INSTALLATION OF A WARN M8000 WINCH IN A HIDDEN MOUNT ON THE 2001 EXPLORER SPORT TRAC By: Kyle Schwulst Email: bigmellon@yahoo.com BACKGROUND I have always wanted a winch on my vehicle. There is just something
A /F/X Body Instruction Packet Rear Disc Conversion
 A /F/X Body Instruction Packet Rear Disc Conversion 64-72 A Body / 67-81 F Body / 62-74 X Body This kit is for axles with a 3 1/8 spread center to center on the top two bolt holes (pictured left). Rotor
Timing the 9N/2N Steering Sector Gears
 Timing the 9N/2N Steering Sector Gears by John Korschot - www.johnsoldiron.com (May 2010) The procedure for timing a set of steering gears in the 9/2n tractors is published in the I&T FO4 shop manual.
GM G-BODY LSD INSTALLATION
 GM G-BODY 1979-1987 LSD INSTALLATION INSTALLATION INTRODUCTION 1. REMOVING THE FENDER AND DOORS FROM THE A-PILLAR AND DISCONNECTING THE WIRE HARNESS @ THE DOOR JAM 2. REMOVING THE EXISTING DOOR HINGES
STEP #1: Remove the wheels from the truck. There are (6) 21mm lug nuts holding each wheel on... Remember Lefty Loosy, Righty Tighty.
 21mm lug nuts holding each wheel on... Remember Lefty Loosy, Righty Tighty.") - CustomTacos.com Page 1 of 36 How-To: Toytec Lift Install Read all of these install instructions prior to installing Toytec's suspension lift. I cannot be held responsible for any damages or personal
- CustomTacos.com Page 1 of 36 How-To: Toytec Lift Install Read all of these install instructions prior to installing Toytec's suspension lift. I cannot be held responsible for any damages or personal
Hub Stands -- VERSION 5.0
 Hub Stands -- VERSION 5.0 Thanks for choosing our Alignment Hub Stands for your chassis setup needs. We hope you'll find them as handy, accurate, and easy to use as we do! Each stand has a max capacity
Mustang Radiator Conversion DIY. By GearHeadPeter. January 27, 2011
 1964-1966 Mustang Radiator Conversion DIY By GearHeadPeter January 27, 2011 We all know that the radiators in our cars are not the best, especially if you have done any customization to the engine, which
FULL LENGTH HEADERS/ CATTED HEAD PIPES
 INSTALLATION INSTRUCTIONS INS232 2016-2018 CAMARO 6.2L V8 FULL LENGTH HEADERS/ CATTED HEAD PIPES Part #4044 and 40440 Special Tools required: 10mm, 12mm, 13mm, 15mm Socket and Wrenches, Pliers, Saw, Welder
Projector39/Umnitza BMW Headlight & Re-Installation for E39s Predator Angel Eyes, and Lamin-X Installation
 Projector39/Umnitza BMW Headlight & Re-Installation for E39s Predator Angel Eyes, and Lamin-X Installation Now it is time to remove the headlights! Obviously you have to open the hood to do this. 100_3630.jpg
Subaru Front Mount Intercooler Kit STI Subaru Front Mount Intercooler Kit STI
 Subaru Front Mount Intercooler Kit STI 2008-2014 715500 Subaru Front Mount Intercooler Kit STI 2008-2014 Congratulations on your purchase of the Subaru Front Mount Intercooler Kit STI 2008-2014. The following
B&W Turnover Ball Installation
 B&W Turnover Ball Installation by Flopster843 02 Jan 2012 I wanted to start this article out by stating one very important thing. Installing a gooseneck hitch is not a task to be taken lightly. If you
B o d y S t r u c t u r e
 B o d y S t r u c t u r e Body Glass Glass replacement should meet standards in specification FMVSS 205 and 217. [Warning] When replacing broken or damaged glass, use extreme care at all times to prevent