Aluminum Valve Cover Adapter Small Block Chevy to LS Engine
|
|
|
- Leslie Summers
- 5 years ago
- Views:
Transcription
 1 Passenger s Side Aluminum Adapter Plate (RH) 8 LS Adapter Plate Mounting Bolts w/ Washers (2-15/16 long) 16 SBC Valve Cover / Coil")
 2 Block-Off Plugs (1/2 ) 2 PVC Baffle Block-Off Plate + Screws REQUIRED TOOLS: ¼ Ratchet 10mm Wrench 10mm Socket 6mm Allen Head Socket In/lbs.")
1 Aluminum Valve Cover Adapter Small Block Chevy to LS Engine PARTS LIST: (Polished Finish) (Black Finish) (Natural Cast Finish) Instruction Sheet 199R11685 Qty. Description 1 Driver s Side Aluminum Adapter Plate (LH) 1 Passenger s Side Aluminum Adapter Plate (RH) 8 LS Adapter Plate Mounting Bolts w/ Washers (2-15/16 long) 16 SBC Valve Cover / Coil Mounting Studs (1-15/16 long) 16 Coil Mounting Spacers (3/4 tall) 16 Coil Mounting Stud Nuts 24 Lock Washers for SBC Valve Covers / Coil Mounting Studs 8 Grommets for LS Adapter Plate Mounting Bolts 2 Barbed PVC Fittings (1/2 ) 2 Block-Off Plugs (1/2 ) 2 PVC Baffle Block-Off Plate + Screws REQUIRED TOOLS: ¼ Ratchet 10mm Wrench 10mm Socket 6mm Allen Head Socket In/lbs. Torque Wrench
 Mr. Gasket P/N: 61040G SBC Perimeter Bolt Valve Cover Gaskets (set of 2) Mr.")
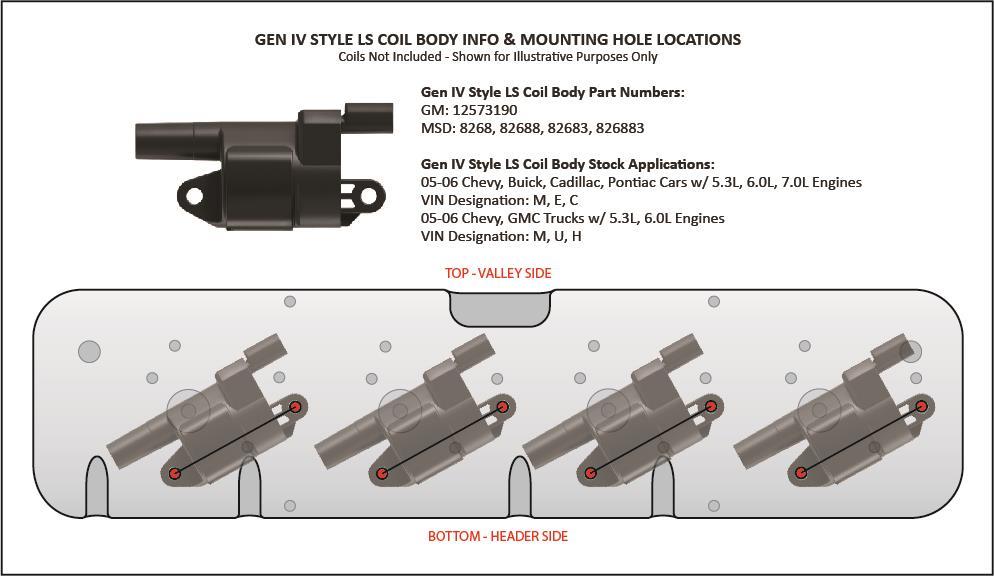
2 OPTIONAL PARTS: Purchasing new LS valve cover gaskets and Small Block Chevy valve cover gaskets is recommended, but not required. These components can be purchased separately. LS Valve Cover Gaskets (Set of 2) Mr. Gasket P/N: 61040G SBC Perimeter Bolt Valve Cover Gaskets (set of 2) Mr. Gasket P/N: 5860 *SBC gasket materials and thicknesses will vary by customer preference and valve cover flange requirements APPLICATIONS: Fits LS1, LS2, LS3, LS6, and LS7 engines using the following style of GM LS coils shown below. These cast aluminum adapter plates are designed to accommodate (3) different styles of common GM LS coils. Please take a look at the diagrams below to identify which style coil you are using. Each diagram will identify the holes you will use for mounting each coil body, as well as the orientation of each coil so that the coil harness and spark plug wires can be routed correctly and reside underneath the valve cover. LS COIL BODY IDENTIFICATION: Holley s SBC to LS valve cover adapter plates are designed to work with 3 specific LS coil bodies. Each type can be identified by the look of the coil body, OEM and aftermarket part numbers, and original VIN number applications using the diagrams below. Once you have identified your LS coil body, be sure to make note of which mounting holes should be used to install the corresponding coil mounting studs, spacers, and coil bodies onto your LS valve cover adapter plate. It is strongly recommended that the coil mounting studs be installed into the adapter plates, using the supplied mounting studs (1-15/16 long) prior to installing each LS valve cover adapter onto the cylinder head. This will allow you to easily and accurately orient your coils.

3 LS COIL BODY IDENTIFICATION (CONTINUED):
4 INSTALLATION INSTRUCTIONS: 1) Remove your existing GM LS style valve cover and any corresponding components (ventilation hoses, coil harness plugs, spark plug boots, coil mounting brackets, etc). 2) Remove the gasket from the valve cover you uninstalled in Step 1, or use a new replacement if necessary, and install it into the channel on the underside of the LS valve cover adapter plate. Make sure the gasket fully seats into the adapter plate channel. 3) Carefully clean the mounting surface on the LS cylinder head to ensure that the surface is free of any debris or residue and will provide a proper seal. Be careful not to allow any loose debris to enter the cylinder head. 4) Place the LS valve cover adapter plate onto the LS cylinder head mounting flange. Check to make sure the adapter plate is flush to the mounting surface to eliminate the possibility of any leaks 5) Locate (4) of the LS adapter plate bolts (x2-15/16 long), (x4) flat washers, and (x4) grommets. Slide a washer onto each bolt, then a grommet onto each bolt. The four depressed mounting holes near the center of the LS adapter plate should be aligned with the mounting holes on the LS cylinder head. Thread each bolt assembly, by hand, into each of the four holes until hand tight. Once all four bolt assemblies are hand tight, check sealing surface of the plate to make sure the LS adapter plate is flush and the gasket is not pinched and protruding outside of the channel. Tighten each bolt to factory spec of 106 in/lbs. 6) Once the LS valve cover adapter is bolted down, slide (x1) coil spacer (3/4 tall) onto each of the coil mounting studs (1-15/16 long). You will need two mounting studs and spacers for each LS coil body. 7) Slide each coil onto the mounting studs with the installed spacers according to the coil identification diagrams (above). Each LS coil body should be oriented according to the diagrams so that the coil harness connectors and the spark plug wires will properly connect and feed through the indentations in the top and bottom lips of the LS valve cover adapter plate. 8) Once the coil(s) are installed onto the mounting studs with spacers, install (x1) supplied lock washer and (x1) nut onto each mounting post and tighten to 30 in/lbs. 9) At the top of the LS adapter plate, there is a 2 depression where your coil harness connectors should feed into the valve cover. Feed the harness into this area and connect each of the (x4) coil packs. Once all coil packs are securely plugged in, move to the lower side of the adapter plate and connect the (x4) ends of your coil bodies to each of the spark plug wires. At the bottom of the adapter plate, there are (x4) ¾ wide depressions which will be the routing channels for each spark plug wire to come out from underneath. 10) Install (x4) SBC perimeter bolt mounting studs (1-15/16 long) into the holes along the top edge and bottom edge of the LS adapter plate. These will be the mounting studs for your SBC perimeter bolt valve cover. 11) Screw in (x1) of the provided barbed PCV fittings into the hole of your choice on either end of the plate. The other hole without the barb fitting should be filled with one of the provided ½ block off plugs. 12) Install a Small Block Chevy Valve Cover gasket using the (x4) mounting studs as guide points for the gasket. This is not a functional sealing gasket its purpose is to reduce vibrations, and secure the spark plug wires and coil harness feeding through the depression at the top and bottom of the LS valve cover adapter. 13) Connect the PCV hose to the barbed fitting in the LS valve cover adapter and route the hose through the oil fill/breather opening in your SBC valve cover in order to connect the other end of the hose. 14) Make sure all coil connector wiring and spark plug wires are tucked neatly within the perimeter of the LS valve cover so as not to be pinched when sliding the SBC valve cover down onto the LS adapter plate. 15) Install the Small Block Chevy (SBC) perimeter bolt valve cover of your choice over the (x4) mounting studs that were installed in Step 10.
5 16) Install valve cover mounting hardware and tighten each fastener to 36 in/lbs. 17) Repeat Steps 1-16 for adapter plate on the opposite side of the engine.
6 Holley Technical Support 1801 Russellville Road Bowling Green, KY or Holley Performance Products. All Rights Reserved. Tous Droits Réservés. 199R11685 Date:
Complete Holley Mid-Mount Accessory Drive Kit
 Complete Holley Mid-Mount Accessory Drive Kit Part Numbers: 20-181, 20-181BK, 20-181P, 20-182, 20-182BK, 20-182P, 20-191, 20-191BK, 20-191P, 20-192, 20-192BK, 20-192P, 20-201, 20-201BK, 20-201P, 20-202,
Complete Holley Mid-Mount Accessory Drive Kit
 Complete Holley Mid-Mount Accessory Drive Kit Part Numbers: 20-180, 20-180BK, 20-180P, 20-185, 20-185BK, 20-185P, 20-190, 20-190BK, 20-190P, 20-200, 20-200BK, and 20-200P 20-200 shown Holley s Mid-Mount
Duramax LMM EGR Delete With Intake Tube
 Duramax LMM EGR Delete With Intake Tube PACKING LIST: QTY. 4 2 2 2 Description Intake Charge Pipe w/ O-Ring M8 Flange Nut M8x25 Flange Hex Bolt M0x20 Hex Head Bolts M8x25 Socket Head Bolts M8x20 Hex Head
INSTALLATION INSTRUCTIONS CATCH CAN KIT
 INSTALLATION INSTRUCTIONS CATCH CAN KIT FORD FIESTA ST Document: 19-0175 Support: info@radiumauto.com STEPS 1-14 COVER THE PCV SIDE CATCH CAN KIT (P/N: 20-0377) STEPS 15-31 COVER THE CRANKCASE CATCH CAN
Installation Instructions
 Installation Instructions Transverse K04 Tools Required Jack and jack stands Drain pan for coolant and oil 3" and 6" extensions Channel locks 7mm, 8mm, 10mm, 11mm, 12mm, 13mm, and 16mm sockets Oxygen sensor
INSTALLATION INSTRUCTIONS AIR/OIL SEPARATOR KIT
 INSTALLATION INSTRUCTIONS AIR/OIL SEPARATOR KIT 2015+ SUBARU WRX (LHD ONLY) Document: 19-0136 Support: info@radiumauto.com This document covers the installation of the Radium brake master cylinder brace
EXPANSION TANK PARTS LIST AND INSTALLATION GUIDE
 PARTS LIST AND INSTALLATION GUIDE PARTS LIST 2 PC APPLICATION-SPECIFIC MOUNTING BRACKETS 2 PC BLACK, ANODIZED 6061 ALUMINUM CATCH CANS 4 PC SILICONE HOSES 4 PC PLASTIC BARBED FITTINGS 4 PC WORM-GEAR CLAMPS
WATER PUMP INSTALLATION INSTRUCTIONS WEIAND WATER PUMPS ACTION PLUS & TEAM G APPLICATIONS FOR SMALL BLOCK & BIG BLOCK CHEVROLETS
 WATER PUMP INSTALLATION INSTRUCTIONS WEIAND WATER PUMPS ACTION PLUS & TEAM G APPLICATIONS FOR SMALL BLOCK & BIG BLOCK CHEVROLETS APPLICATIONS: Weiand Action Plus aluminum water pumps are designed for street/performance
DISTRIBUTORLESS IGNITION SYSTEM Installation and Adjustment Instructions
 DISTRIBUTORLESS IGNITION SYSTEM Installation and Adjustment Instructions 1.0 INTRODUCTION: Congratulations on your purchase of a Holley Distributorless Ignition System! Holley cannot and will not be responsible
WEIAND STREET WARRIOR INTAKE MANIFOLD P/N s 8125, 8125P, 8126, & 8126P SMALL BLOCK CHEVROLET
 APPLICATIONS: WEIAND STREET WARRIOR INTAKE MANIFOLD P/N s 8125, 8125P, 8126, & 8126P 262-400 SMALL BLOCK CHEVROLET INSTALLATION INSTRUCTIONS The P/N 8125 & 8126 WEIAND STREET WARRIOR series intake manifolds
Installation Instructions Camaro ZL1 ( Z) ( ZB)
 ( ZB)") Installation Instructions Camaro ZL1 (501-1099-10-Z) (501-1099-10-ZB) Parts List 1 Insulated Air Box \ Lid 1 Thermal Coated Intake Tube / MAF Housing with (2) M4 x.7 thread 8mm long Stainless Screws; 1
Installation Instructions Camaro ZL1 (501-1099-10-Z) (501-1099-10-ZB) Parts List 1 Insulated Air Box \ Lid 1 Thermal Coated Intake Tube / MAF Housing with (2) M4 x.7 thread 8mm long Stainless Screws; 1
Installation Instructions
 SLP GM/Chevrolet LS3 COIL COVER KIT 2010+ Camaro 5.3L/6.2L 2007+ GMT900 5.3L/6.2L PN: 620038 Installation Instructions Important Notes: Before installing your SLP Coil Cover Kit, please read the installation
DOOR KIT P/N , APPLICATION BEFORE YOU BEGIN KIT CONTENTS. Verify accessory fitment at Polaris.com.
 DOOR KIT P/N 2882561, 2882562 APPLICATION Verify accessory fitment at Polaris.com. BEFORE YOU BEGIN Read these instructions and check to be sure all parts and tools are accounted for. Please retain these
IAG Street Series Air / Oil Separator (AOS) For WRX
 For WRX") IAG Street Series Air / Oil Separator (AOS) For 2008-14 WRX Part# IAG-ENG-7100 Tools Required: Ratchet, extensions, needle nose pliers, hose cutter, snips/scissors, flat head screw driver, hose clamping
IAG Street Series Air / Oil Separator (AOS) For 2008-14 WRX Part# IAG-ENG-7100 Tools Required: Ratchet, extensions, needle nose pliers, hose cutter, snips/scissors, flat head screw driver, hose clamping
2017+ L5P Duramax 3 ½ Down Pipe & EGR Fix Kit
 2017+ L5P Duramax 3 ½ Down Pipe & EGR Fix Kit Covers installation of PN s: WCF100630, WCF100829 Note: This Kit is for off road competition use only! Off Road Competition Use Tuning & Exhaust System is
8 Zip Tie Zip Tie 1 Union Fitting 1 ½ ½ Union Reducer Fitting Union 1 5/8 ½ (For Plastic Intake Manifold Vehicles)
") P IAG Street Series Air / Oil Separator (AOS) For 2017 STI Part# IAG-ENG-7151 Tools Required: Ratchet, torque wrench, extensions, needle nose pliers, hose cutter, snips/scissors, flat head screw driver,
P IAG Street Series Air / Oil Separator (AOS) For 2017 STI Part# IAG-ENG-7151 Tools Required: Ratchet, torque wrench, extensions, needle nose pliers, hose cutter, snips/scissors, flat head screw driver,
UNIVERSAL PUMP HANGER INSTALLATION INSTRUCTIONS
 UNIVERSAL PUMP HANGER INSTALLATION INSTRUCTIONS WARNING! THESE INSTRUCTIONS MUST BE READ AND FULLY UNDERSTOOD BEFORE BEGINNING INSTALLATION. FAILURE TO FOLLOW THESE INSTRUCTIONS MAY RESULT IN POOR PERFORMANCE,
INSTALLATION INSTRUCTIONS CATCH CAN KIT
 INSTALLATION INSTRUCTIONS CATCH CAN KIT FORD FIESTA ST Document: 19-0175 Support: info@radiumauto.com STEPS 1-14 COVER THE PCV SIDE CATCH CAN KIT (P/N: 20-0377) STEPS 15-35 COVER THE CRANKCASE CATCH CAN
Weistec M156/M159 ENGINE
 Weistec M156/M159 ENGINE Oil / Air Separator System Installation Guide 2007-2011 S63 AMG 2007-2011 ML63 AMG 2007 R63 AMG 2007-2008 CLK63 AMG 2008 CLK63 Black Series 2007-2011 CLS63 AMG 2008-Present C63
INSTALLATION INSTRUCTIONS PORT INJECTION KIT (PIK)
") INSTALLATION INSTRUCTIONS PORT INJECTION KIT (PIK) FORD FOCUS 2.3L ECOBOOST Document: 19-0155 Support: info@radiumauto.com IMPORTANT NOTES: 1. This installation requires minor metal cutting. Air tools
INSTALLATION INSTRUCTIONS PORT INJECTION KIT (PIK) FORD FOCUS 2.3L ECOBOOST Document: 19-0155 Support: info@radiumauto.com IMPORTANT NOTES: 1. This installation requires minor metal cutting. Air tools
ROAD RACE BAFFLE for LT OIL PANS P/N
 ROAD RACE BAFFLE for LT OIL PANS P/N 302-30 Instruction Sheet 199R11191 NOTE: This instruction sheet is intended for installation after a Holley LT oil pan (302-20) has previously been installed. If installing
UNIVERSAL PUMP HANGER INSTALLATION INSTRUCTIONS
 UNIVERSAL PUMP HANGER INSTALLATION INSTRUCTIONS WARNING! THESE INSTRUCTIONS MUST BE READ AND FULLY UNDERSTOOD BEFORE BEGINNING INSTALLATION. FAILURE TO FOLLOW THESE INSTRUCTIONS MAY RESULT IN POOR PERFORMANCE,
INSTALLATION INSTRUCTIONS FUEL SURGE TANK KIT
 INSTALLATION INSTRUCTIONS FUEL SURGE TANK KIT BMW E46 3-Series, Excl Convertible Document: 19-0056 Support: info@radiumauto.com Relieve fuel pressure in vehicle before beginingthe installation. Disconnect
INTERCOOLER PIPE KIT CHEVY CAMARO 2.0T PARTS LIST AND INSTALLATION GUIDE PARTS INCLUDED CAUTION INSTALL PROCEDURE TOOLS NEEDED
 PARTS LIST AND PARTS INCLUDED 2PC ALUMINUM PIPES W/ CNC-MACHINED QUICK-DISCONNECTS 1PC ALUMINUM PIPE W/ CNC-MACHINED 2-BOLT FLANGE 2PC QUICK-DISCONNECT SPRING CLIPS 1PC 2.75" 90 SILICONE COUPLER 1PC 2.25"
IAG Competition Series Air / Oil Separator (AOS) For 2017 STI
 For 2017 STI") P IAG Competition Series Air / Oil Separator (AOS) For 2017 STI Part# IAG-ENG-7251 Tools Required: Ratchet, torque wrench, extensions, needle nose pliers, hose cutter, snips/scissors, flat head screw driver,
P IAG Competition Series Air / Oil Separator (AOS) For 2017 STI Part# IAG-ENG-7251 Tools Required: Ratchet, torque wrench, extensions, needle nose pliers, hose cutter, snips/scissors, flat head screw driver,
TITAN Fuel Tanks. INSTALLATION INSTRUCTIONS G e n e r a t i o n V. Extended Capacity Replacement Tank for Diesel Chevrolet / GMC Trucks
 Important: Please read these instructions carefully and completely before starting the installation. TITAN Fuel Tanks INSTALLATION INSTRUCTIONS G e n e r a t i o n V Extended Capacity Replacement Tank
Detroit Speed, Inc. Rear Coilover Tower Brace Kit Camaro P/N:
 Detroit Speed, Inc. Rear Coilover Tower Brace Kit 2016+ Camaro P/N: 042433 The Detroit Speed, Inc. 2016+ Camaro Rear Coilover Tower Brace Kit is a bolt-in design that increases overall vehicle stiffness.
INSTALLATION INSTRUCTIONS Dual Catch Can Kit Subaru Turbo and STi Document# Support:
 INSTALLATION INSTRUCTIONS Dual Catch Can Kit 02-14 Subaru Turbo and 2015+ STi Document# 19-0099 Support: info@radiumauto.com This document covers the installation of a Radium dual catch can kit for the
97-04 CHEVROLET CORVETTE C5
 97-04 CHEVROLET CORVETTE C5 IMPORTANT! WARRANTY AND INSTALLATION INSTRUCTIONS Please Forward All Information to Consumer Be sure to review the enclosed instructions prior to beginning the installation
Sniper Fabricated Intake Manifold Kits (Carbureted & EFI versions) Installation Instruction Sheet
 Installation Instruction Sheet") Sniper Fabricated Intake Manifold Kits (Carbureted & EFI versions) Installation Instruction Sheet GM LS1/LS2/LS6 820031 Hi-Rise Fabricated Intake Manifold LS1/LS2/LS6 92mm TB opening + Fuel Rail Kit Silver
Sniper Fabricated Intake Manifold Kits (Carbureted & EFI versions) Installation Instruction Sheet GM LS1/LS2/LS6 820031 Hi-Rise Fabricated Intake Manifold LS1/LS2/LS6 92mm TB opening + Fuel Rail Kit Silver
Part Numbers: Complete Kits: C5 Base/Z06 Complete Header Package with Cats C5 Base/Z06 Complete Header Package without Cats
 Product: Corvette Tri-Y Headers & Mid-Pipe Part Numbers: Complete Kits: 1150042 C5 Base/Z06 Complete Header Package with Cats 1150043 C5 Base/Z06 Complete Header Package without Cats Applications: Chevrolet
Holley GM LS1/2/6, LS3, and LS7 Hi-Ram Modular Intake Manifold Kits
 Holley GM LS1/2/6, LS3, and LS7 Hi-Ram Modular Intake Manifold Kits Holley P/N Engine Application & Induction Configuration 300-112 LS3 Hi-Ram, Carbureted, 2 x 4500 Dominator, 2 throttle bores (sideways
Cut zip ties and remove 2 plastic wiring harness brackets.
 TROUBLESHOOTING: Please read and understand all installation instructions before proceeding with the installation. Included parts: 1 - New Bosch Cp3 Pump 1 - HSM Pulley 1 - Serpentine Belt 1 - Pump Bracket/
IAG Air / Oil Separator (AOS) For STi
 For STi") IAG Air / Oil Separator (AOS) For 2008-14 STi Part# IAG-ENG-7000 Tools Required: Ratchet, torque wrench, extensions, needle nose pliers, hose cutter, snips/scissors Sockets: 10mm, 12mm 13mm Wrenches: 10mm,
IAG Air / Oil Separator (AOS) For 2008-14 STi Part# IAG-ENG-7000 Tools Required: Ratchet, torque wrench, extensions, needle nose pliers, hose cutter, snips/scissors Sockets: 10mm, 12mm 13mm Wrenches: 10mm,
INSTALLATION INSTRUCTIONS FOR
 For high temperature wells STEP 1 Clean Stuffing Box F8 & F8H Tools required: ratchet with 9/16 socket, 9/16 wrench, 3/32 Allen wrench, wire brush, cleaner/solvent, rags. DUAL PACK Dual Pack Stuffing Box
INSTALLATION INSTRUCTIONS DUAL OIL CATCH CAN KIT
 INSTALLATION INSTRUCTIONS DUAL OIL CATCH CAN KIT SUBARU WRX FA20F ENGINE Document: 19-0135 Support: info@radiumauto.com This dual catch can kit installs in the right-hand side of the engine bay and intercepts
Fitting Instructions. Revo MQB Golf/GTi/Octavia/Leon Intercooler. Recommended Tools. Contents RV581M Dealer installation advised.
 RV581M100100 Recommended Tools Contents No. Description Tools Size Intercooler Torx Bit T25, T30 Bracket Kit llen Key 4, 5 mm Silicone Hoses Socket 7, 10, 16, 19 mm Hose Clamps Flat Head Screwdriver Small,
INSTALLATION INSTRUCTIONS FUEL RAIL
 INSTALLATION INSTRUCTIONS FUEL RAIL MITSUBISHI EVO X Document# 19-0067 Support: info@radiumauto.com WARNING: DON'T SMOKE OR WORK WITH OPEN SPARKS WHILE WORKING ON THE FUEL SYSTEM PREPARING THE VEHICLE:
Description: Heavy Rate Racing Sway Bars Part Number: N C N C6
 Description: Heavy Rate Racing Sway Bars Part Number: 440-401004-N 1997-2004 C5 440-401005-N 2005-2013 C6 Tools Needed: 18mm box end wrench 15mm open end wrench 2 x 9/16 open end wrenches 3/4 box end wrench
Pre-Installed. 1 Seal Kit 10 Silicone O-ring, 3/32 W, Intake Port Seals 1 Throttle Body Seal
 Atomic AirForce Intake Manifold for LS7, 2006-2013 Corvette and 2014 Z28 Camaro - PN 2701 LS2, 2005-2007 Corvette and CTS-V, 2005-2006 GTO and SSR PN 2702 LS1/6*, 1997-2004 Corvette, 1998-2002 Camaro/Firebird,
INSTALLATION INSTRUCTIONS
 INSTALLATION INSTRUCTIONS COOLANT EXPANSION TANK FORD FOCUS Document: 19-0151 Support: info@radiumauto.com WARNINGS: DO NOT WORK ON THE COOLANT SYSTEM WHEN THE ENGINE IS AT OPERATING TEMPERATURE. WAIT
DURAMAX LMM EGR DELETE
 007.5-010 DURAMAX LMM EGR DELETE Duramax LMM EGR Delete B K I J F D G H A C PACKING LIST: E Part # A B C D E F G H I J K QTY. 1 1 1 1 Description Billet Intake Block Off Plate with O-ring Exhaust Block
INSTALLATION INSTRUCTIONS
 1. Note: It is recommended this install be done with a minimal amount of fuel in the tank. This will reduce fuel spills and make installation easier and safer. Draining the tank is recommended. INSTALLATION
INSTALLATION INSTRUCTIONS
 AUTOMOTIVE PRODUCTS, INC. INSTALLATION INSTRUCTIONS ULTIMATE BULL BAR APPLICATION: 2017 Ford F-250/350 PART NUMBER: 32-3900, 32-3905, 32-3900L, 32-3905L ITEM QUANTITY DESCRIPTION TOOLS NEEDED 1 1 ULTIMATE
Engine. Special Tool(s) Compressor, Piston Ring 303-D032 (D81L-6002-C) or equivalent. Compressor, Valve Spring (T93P-6565-AR)
 Compressor, Piston Ring 303-D032 (D81L-6002-C) or equivalent. Compressor, Valve Spring (T93P-6565-AR)") SECTION 303-01C: Engine 5.4L (4V) 2009 Mustang Workshop Manual ASSEMBLY Procedure revision date: 12/12/2008 Engine Special Tool(s) Compressor, Piston Ring 303-D032 (D81L-6002-C) or equivalent Compressor,
SECTION 303-01C: Engine 5.4L (4V) 2009 Mustang Workshop Manual ASSEMBLY Procedure revision date: 12/12/2008 Engine Special Tool(s) Compressor, Piston Ring 303-D032 (D81L-6002-C) or equivalent Compressor,
INSTALLATION INSTRUCTIONS PORT INJECTION KIT (PIK)
") INSTALLATION INSTRUCTIONS PORT INJECTION KIT (PIK) FORD FOCUS 2.3L ECOBOOST Document: 19-0155 Support: info@radiumauto.com IMPORTANT NOTES: 1. This installation requires minor metal cutting. Air tools
INSTALLATION INSTRUCTIONS PORT INJECTION KIT (PIK) FORD FOCUS 2.3L ECOBOOST Document: 19-0155 Support: info@radiumauto.com IMPORTANT NOTES: 1. This installation requires minor metal cutting. Air tools
BD Twin Turbo Cobra Kit
 14 September 2017 1045780-94 Dodge Cobra Kit (I-00377) 1 BD Twin Turbo Cobra Kit 2003-2012 Dodge HPCR Machined BD turbochargers only BUILDERS KIT Installation reccomendations to aid asssembly Does not
M14 AUTOMOTIVE SPARK PLUGS AND WIRES CONVERSION KIT INSTALLATION INSTRUCTIONS
 M14 AUTOMOTIVE SPARK PLUGS AND WIRES CONVERSION KIT INSTALLATION INSTRUCTIONS (It is highly recommended you read the instructions completely before beginning) 1. Be sure the magneto switches are turned
Description: These racing sway bars are engineered to be a lightweight, adjustable racing sway bar system for C5 and C6 Corvettes.
 Product: Corvette Racing Sway Bars Part umbers: 1110212 Heavy Rate 1110213 C6 Z06 Heavy Rate 1110292 Light Rate Applications: Chevrolet Corvette, 1997 - Current Description: These racing sway bars are
Sikky Oil Pan Install Guide
 Sikky Oil Pan Install Guide **If you have a double chain timing belt or after market oil pump setup then further modifications may need to be made in order for the pan to fit.** Remove starter Remove plastic
Detroit Speed, Inc. Detroit Speed C7 Rear Full Floater Kit P/N: , , , , &
 Detroit Speed, Inc. Detroit Speed C7 Rear Full Floater Kit P/N: 070512, 070607, 070616, 070626, 070636 & 070649 Thank you for purchasing the Detroit Speed Inc., C7 Rear Full Floater Kit. The Detroit Speed
Fitment and Required Components Guide. Holley Accessory Drive Kit Part Number
 Fitment and Required Components Guide Holley Accessory Drive Kit Part Number 20-132 Table of Contents Introduction:... 2 Crank Pulley Belt Alignment Determination:... 3 Overview of Parts Required (but
IAG Street Series Air / Oil Separator (AOS) For WRX
 For WRX") P IAG Street Series Air / Oil Separator (AOS) For 2015-16 WRX Part# IAG-ENG-7152 Tools Required: Ratchet, torque wrench, extensions, needle nose pliers, hose cutter, snips/scissors, flat head screw driver,
P IAG Street Series Air / Oil Separator (AOS) For 2015-16 WRX Part# IAG-ENG-7152 Tools Required: Ratchet, torque wrench, extensions, needle nose pliers, hose cutter, snips/scissors, flat head screw driver,
POLY TIP-DOWN WINDSHIELD KIT
 POLY TIP-DOWN WINDSHIELD KIT P/N 2881919 APPLICATION Verify accessory fitment at Polaris.com. BEFORE YOU BEGIN Read these instructions and check to be sure all parts and tools are accounted for. Please
IAG Street Series Air / Oil Separator (AOS) For 2017 WRX
 For 2017 WRX") P IAG Street Series Air / Oil Separator (AOS) For 2017 WRX Part# IAG-ENG-7152 Tools Required: Ratchet, torque wrench, extensions, needle nose pliers, hose cutter, snips/scissors, flathead screwdriver,
P IAG Street Series Air / Oil Separator (AOS) For 2017 WRX Part# IAG-ENG-7152 Tools Required: Ratchet, torque wrench, extensions, needle nose pliers, hose cutter, snips/scissors, flathead screwdriver,
Wrenches: ⅞, 8mm, 10mm, 13mm, 19mm P. allen, Other: Electrical Tape
 IAG Street Series Air / Oil Separator (AOS) For 2008-14 STI Part# IAG-ENG-7100 Tools Required: Ratchet, torque wrench, extensions, needle nose pliers, hose cutter, snips/scissors, flat head screw driver,
INSTALLATION & OWNER S MANUAL
 Rev. C p. 1 of 21 INSTALLATION & OWNER S MANUAL F5205 HARD SIDED CAB KIT INSTALLATION & OWNER S MANUAL The contents of this envelope are the property of the owner. Be sure to leave with the owner when
IAG Street Series Air / Oil Separator (AOS) For WRX & WRX STI
 For WRX & WRX STI") IAG Street Series Air / Oil Separator (AOS) For 2006-07 WRX & 2004-07 WRX STI Part# IAG-ENG-7100 Tools Required: Ratchet, torque wrench, extensions, needle nose pliers, hose cutter, snips/scissors, flat
IAG Street Series Air / Oil Separator (AOS) For 2006-07 WRX & 2004-07 WRX STI Part# IAG-ENG-7100 Tools Required: Ratchet, torque wrench, extensions, needle nose pliers, hose cutter, snips/scissors, flat
Sniper EFI Fuel Kits P/N 526-5/526-8 (20 ft. hose) & (40 ft. hose)
 & (40 ft. hose)") Sniper EFI Fuel Kits P/N 526-5/526-8 (20 ft. hose) & 526-7 (40 ft. hose) 1.0 FUEL SYSTEM INSTALLATION DANGER! Take precautions to ensure that all fuel components are away from heat sources, such as the
Sniper EFI Fuel Kits P/N 526-5/526-8 (20 ft. hose) & 526-7 (40 ft. hose) 1.0 FUEL SYSTEM INSTALLATION DANGER! Take precautions to ensure that all fuel components are away from heat sources, such as the
Valve Rocker Arm and Push Rod Installation (6.2L LS3)
") 9. Tighten the cylinder head bolts: 10.1. Tighten the M11 cylinder head bolts (1-10) a first pass in sequence to 30 N m (22 lb ft). 10.2. Tighten the M11 cylinder head bolts (1-10) a second pass in sequence
9. Tighten the cylinder head bolts: 10.1. Tighten the M11 cylinder head bolts (1-10) a first pass in sequence to 30 N m (22 lb ft). 10.2. Tighten the M11 cylinder head bolts (1-10) a second pass in sequence
OIL PAN with DRAG RACE BAFFLING P/N
 OIL PAN with DRAG RACE BAFFLING P/N 302-22 Instruction Sheet 199R11161 CONGRATULATIONS on your purchase of a Holley LT Retro-fit Oil Pan! We feel that you have purchased the finest performance oil pan
Holley Accessory Drive System Part Number Table of Contents
 Holley Accessory Drive System Part Number 20-138 Table of Contents Introduction:... 2 Crank Pulley Belt Alignment Determination:... 3 Overview of Parts Required (but NOT included with 20-138 accessory
VISOR AUDIO KIT P/N , APPLICATION BEFORE YOU BEGIN KIT CONTENTS. Verify accessory fitment at Polaris.com.
 VISOR AUDIO KIT P/N 2882888, 2882891 APPLICATION Verify accessory fitment at Polaris.com. BEFORE YOU BEGIN Read these instructions and check to be sure all parts and tools are accounted for. Please retain
GP1-R FULL EXHAUST SUZUKI GSX-R600 / GSX-R
 THIS EXHAUST SYSTEM IS DESIGNED FOR USE IN CLOSED COURSE RACING ONLY, AND IS NOT INTENDED FOR PUBLIC HIGHWAY USE. IN THE STATE OF CALIFORNIA, IT IS ILLEGAL TO MODIFY THE EMISSION CONTROL SYSTEM ON ANY
HOLLEY LS-SWAP WATER PUMPS WATER PUMP INSTALLATION INSTRUCTIONS FOR GM LS-ENGINE APPLICATIONS:
 HOLLEY LS-SWAP WATER PUMPS WATER PUMP INSTALLATION INSTRUCTIONS FOR GM LS-ENGINE APPLICATIONS: Holley LS- Swap cast water pumps are designed for street/performance applications and provide optimum performance
WEIAND INTAKE MANIFOLD P/N 7550 SMALL BLOCK CHEVROLET 3x2 BBL
 WEIAND INTAKE MANIFOLD P/N 7550 SMALL BLOCK CHEVROLET 3x2 BBL INTAKE MANIFOLD INSTALLATION INSTRUCTIONS 199R10703 APPLICATIONS: The P/N 7550 WEIAND intake manifold is designed for Holley 3x2 BBL, model
INSTALLATION GUIDE PREMIUM FRONT BUMPER FOR RAM AEV30304AA Last Updated: 09/18/17
 AEV30304AA Last Updated: 09/18/17 PREMIUM FRONT BUMPER FOR RAM 1500 INSTALLATION GUIDE PLEASE READ BEFORE YOU START To guarantee a quality installation, we recommend reading these instructions thoroughly
Bill of Materials: Please take time to read and understand these installation instructions.
 Please take time to read and understand these installation instructions. CORSA recommends that installation of this system be performed by a qualified service center or professional muffler installer who
Assist Step Kit Installation (Side Assist Step)
") Page 1 of 6 2015 Chevrolet Silverado - 2WD Cheyenne, Sierra, Silverado Accessory Installation Manual Accessories Exterior Trim Accessories Accessories Document ID: 2741491 Assist Step Kit Installation
Page 1 of 6 2015 Chevrolet Silverado - 2WD Cheyenne, Sierra, Silverado Accessory Installation Manual Accessories Exterior Trim Accessories Accessories Document ID: 2741491 Assist Step Kit Installation
Holley GM BBC Single-Plane EFI Intake Manifold Kits
 Holley GM BBC Single-Plane EFI Intake Manifold Kits 300-561 Oval Port, 4150 Flange 300-562 Oval Port, 4500 Flange 300-563 Rectangular Port, 4150 Flange 300-564 Rectangular Port, 4500 Flange INSTALLATION
IAG Competition Series Air / Oil Separator (AOS) For WRX
 For WRX") P IAG Competition Series Air / Oil Separator (AOS) For 2015-16 WRX Part# IAG-ENG-7252 Tools Required: Ratchet, torque wrench, extensions, needle nose pliers, hose cutter, snips/scissors, flat head screw
P IAG Competition Series Air / Oil Separator (AOS) For 2015-16 WRX Part# IAG-ENG-7252 Tools Required: Ratchet, torque wrench, extensions, needle nose pliers, hose cutter, snips/scissors, flat head screw
LT Assembly Instructions
 LT Assembly Instructions These instructions supersede bracket instructions. See bracket instructions for Fitment and Required Components and Final Assembly. Installation Kit for High Mount Accessory Drive
Holley HydraMat Kits
 Holley HydraMat Kits 16-100 16-101 16-102 16-103 16-104 16-105 16-106 16-107 16-108 Part # Description Leg Width Acceptable Tank Opening Recommended Magnet Kit 16-100 15 x 15 cross-center outlet 3/8 NPT
Product: Cadillac ATS 2.0T Downpipe. Part Numbers: Downpipe 2.0T - with catalytic converter Downpipe 2.
 Product: Cadillac ATS 2.0T Downpipe Part Numbers: 1180111 Downpipe 2.0T - with catalytic converter 1180112 Downpipe 2.0T - Race Only Applications: Cadillac ATS 2.0T, 2013 - Current Description: These downpipe
INSTALLATION INSTRUCTIONS
 INSTALLATION INSTRUCTIONS FUEL PUMP HANGER FORD MUSTANG: 2011+ S197 AND S550 Support: info@radiumauto.com Document# 19-0161 WARNING: DO NOT EXPOSE WORK AREA TO ANY SPARKS OR FIRE. DO NOT SMOKE WHILE WORKING
STEP 1 STEP 2. Disconnect the negative terminal from both batteries.
 TROUBLESHOOTING: Please read and understand all installation instructions before proceeding with the installation. If you have questions during the installation of this product, please email H&S Motorsports
TJ 231/241 CABLE SHIFTER
 KIT CONSISTS OF: # Qty Part No. Description P.O. Box 247, 4320 Aerotech Center Way PAGE 1 OF 10 Page Rev. Date: 08-29-16 1 1 300474 WASHER-RUBBER YOKE SEAL 32 SPLINE 2 1 300476 NUT- 7/8"-20 FLANGE LOCKNUT
1501 Industrial Way N., Toms River, NJ Fax: PACKING LIST
 1/6/04 1501 Industrial Way N., Toms River, NJ 08755 732-349-2109 Fax:732-244-0867 MODERATE - Installation requires metric tools and possibly cutting and drilling. The ability to closely follow instructions
Assembly & Installation Instructions
 TM P R O D U C T S Assembly & Installation Instructions FOR 28 SERIES SNOWPLOW PIVOT ASSEMBLY AND FLOAT LIMITER 99103000 FOR SERIAL NUMBERS 28D100000 TO 28D100770 97100552A 1. THINK SAFETY, ALWAYS WEAR
INSTALLATION INSTRUCTIONS PART NUMBER AEM C (GUN METAL GRAY FINISH)
") Equipped with AEM Dryflow Filter No Oil Required! INSTALLATION INSTRUCTIONS PART NUMBER AEM-21-805C (GUN METAL GRAY FINISH) 2016.5-17 CHEVROLET CRUZE 1.4T ITEM NO. PART NUMBER DESCRIPTION QTY. 1 21-2038DK
Equipped with AEM Dryflow Filter No Oil Required! INSTALLATION INSTRUCTIONS PART NUMBER AEM-21-805C (GUN METAL GRAY FINISH) 2016.5-17 CHEVROLET CRUZE 1.4T ITEM NO. PART NUMBER DESCRIPTION QTY. 1 21-2038DK
Cylinder Head. Special Tool(s) Compressor, Valve Spring (T93P-6565-AR) Heavy Duty Floor Crane or equivalent
 Compressor, Valve Spring (T93P-6565-AR) Heavy Duty Floor Crane or equivalent") SECTION 303-01C: Engine 5.4L (4V) 2009 Mustang Workshop Manual INSTALLATION Procedure revision date: 04/03/2009 Cylinder Head Special Tool(s) Compressor, Valve Spring 303-452 (T93P-6565-AR) Heavy Duty
SECTION 303-01C: Engine 5.4L (4V) 2009 Mustang Workshop Manual INSTALLATION Procedure revision date: 04/03/2009 Cylinder Head Special Tool(s) Compressor, Valve Spring 303-452 (T93P-6565-AR) Heavy Duty
Edelbrock LS3 Corvette Supercharger Part #1590, 1591 & 1592
 Edelbrock LS3 Corvette Supercharger Part #1590, 1591 & 1592 INTRODUCTION Thank you for purchasing the Edelbrock 6.2L GM Superchager System for the Chevy Corvette. The Edelbrock E-Force Supercharger System
B. B. 4. Remove the bed bolts A.) Using a 1/2 socket, remove the four inner bed bolts. B.) Using a T-25 Torx driver, remove the four outer bed bolts
 Using a 1/2 socket, remove the four inner bed bolts. B.) Using a T-25 Torx driver, remove the four outer bed bolts") Installation Instructions Part Number 883-275 Scoop and Snorkel Kit 2008-11 Polaris Ranger RZR 800 800 E.F.I. Thank you for purchasing the iraid Intake System. Contact iraid @ (800) 498-6951 8:00 M - 5:00
Installation Instructions Part Number 883-275 Scoop and Snorkel Kit 2008-11 Polaris Ranger RZR 800 800 E.F.I. Thank you for purchasing the iraid Intake System. Contact iraid @ (800) 498-6951 8:00 M - 5:00
3 Turbo Downpipe Installation Audi A3 / Volkswagen GTI / Volkswagen Jetta 2.0L FSI/TSI Turbo CD100013
 Please take time to read and understand these installation instructions. APR recommends that installation of this system be performed by a qualified service center or professional muffler installer who
INSTALLATION INSTRUCTIONS 88029
 INSTALLATION INSTRUCTIONS 88029 FOR SUSPENSION SYSTEMS RS6503: JEEP WRANGLER (TJ) READ ALL INSTRUCTIONS THOROUGHLY FROM START TO FINISH BEFORE BEGINNING INSTALLATION REV F IMPORTANT NOTES! WARNING: This
WATTS LINK REAR SUSPENSION KIT
 WATTS LINK REAR SUSPENSION KIT INSTALLATION MANUAL: Saleen S-Series / H-Series / Mustang GT 05-09 Model Years P/N: -8002-C6859B Saleen Performance Inc. -800-888-8945 www.saleen.com STOP IF YOU ARE NOT
Installation Instructions For Part Number: Scoop and Snorkel Kit
 Installation Instructions For Part Number: 883-275 Scoop and Snorkel Kit 2008-14 Polaris Ranger RZR 800 800 E.F.I. Tools Required For Installation: 7/16 and 1/2 Wrenches. 10mm, 7/16, and 1/2 Sockets. T-25
SADDLEBAG AUDIO WIRE HARNESS KIT P/N
 SADDLEBAG AUDIO WIRE HARNESS KIT P/N 2880986 APPLICATION ALL INDIAN MOTORCYCLES WITH BOTH TRUNK AND SADDLEBAG AUDIO INSTALLED BEFORE YOU BEGIN Read these instructions and check to be sure all parts and
POLY TIP-DOWN WINDSHIELD KIT
 POLY TIP-DOWN WINDSHIELD KIT P/N 2883261 APPLICATION Verify accessory fitment at Polaris.com. BEFORE YOU BEGIN Read these instructions and check to be sure all parts and tools are accounted for. Please
Detroit Speed, Inc. Selecta-Speed Wiper Kit Corvette P/N:
 Detroit Speed, Inc. Selecta-Speed Wiper Kit 1963-67 Corvette P/N: 121620 A downpour of rain will no longer hinder your ability to clearly see the road. The Detroit Speed Selecta-Speed Wiper Kit provides
Important: Please read these instructions carefully and completely before starting the installation. TITAN Fuel Tanks INSTALLATION INSTRUCTIONS
 TITAN pt. no.: 03 0000 0141 Important: Please read these instructions carefully and completely before starting the installation. TITAN Fuel Tanks INSTALLATION INSTRUCTIONS Extended Capacity Replacement
IAG Street Series Air / Oil Separator (AOS) For WRX & WRX STI
 For WRX & WRX STI") IAG Street Series Air / Oil Separator (AOS) For 2006-07 WRX & 2004-07 WRX STI Part# IAG-ENG-7150 Tools Required: Ratchet, torque wrench, extensions, needle nose pliers, hose cutter, snips/scissors, flat
IAG Street Series Air / Oil Separator (AOS) For 2006-07 WRX & 2004-07 WRX STI Part# IAG-ENG-7150 Tools Required: Ratchet, torque wrench, extensions, needle nose pliers, hose cutter, snips/scissors, flat
Seat Cover Installation for Bucket Seats
 for Bucket Seats Step 1 Headrest Removal Headrests need to be removed prior to installation of the seat cover. Most headrests remove by pressing the adjustment button located at the base of the post (Figure
Tooling List 10mm Socket 3 Extension Ratchet Large Jaw Pliers Needle Nose Pliers
 Thank you for purchasing! The CorkSport Binary VTA BPV provides features and performance to suit stock cars and on up to big turbo high power setups. The CorkSport Binary VTA BPV holds 50psi, responds
BBK Intake Manifold Kit ( L) - Installation Instructions
 - Installation Instructions") BBK Intake Manifold Kit (86-93 5.0L) - Installation Instructions The below installation instructions work for the following products: BBK Intake Manifold Kit (86-93 5.0L) Please read through the instructions
BBK Intake Manifold Kit (86-93 5.0L) - Installation Instructions The below installation instructions work for the following products: BBK Intake Manifold Kit (86-93 5.0L) Please read through the instructions
IE B9 A4/A5 Cold Air Intake Install Guide
 IE B9 A4/A5 Cold Air Intake Install Guide Thank you for purchasing another high quality Integrated Engineering product! This instruction guide is used for installation of IE s Cold Air Intake Kit for Audi
Engine. Special Tool(s) Compressor, Valve Spring (T97P-6565-AH) Compressor Spacer, Valve Spring (T91P-6565-AH)
 Compressor, Valve Spring (T97P-6565-AH) Compressor Spacer, Valve Spring (T91P-6565-AH)") Page 1 of 41 SECTION 303-01A: Engine 5.4L (2V) 2000 F-Super Duty 250-550/Excursion/F-53 Motorhome Chassis Workshop Manual ASSEMBLY Procedure revision date: 04/04/2003 Engine Special Tool(s) Compressor,
Page 1 of 41 SECTION 303-01A: Engine 5.4L (2V) 2000 F-Super Duty 250-550/Excursion/F-53 Motorhome Chassis Workshop Manual ASSEMBLY Procedure revision date: 04/04/2003 Engine Special Tool(s) Compressor,
IAG Street Series Air / Oil Separator (AOS) For WRX & WRX STI
 For WRX & WRX STI") IAG Street Series Air / Oil Separator (AOS) For 2006-07 WRX & 2004-07 WRX STI Part# IAG-ENG-7150 Tools Required: Ratchet, torque wrench, extensions, needle nose pliers, hose cutter, snips/scissors, flat
IAG Street Series Air / Oil Separator (AOS) For 2006-07 WRX & 2004-07 WRX STI Part# IAG-ENG-7150 Tools Required: Ratchet, torque wrench, extensions, needle nose pliers, hose cutter, snips/scissors, flat
INSTALLATION INSTRUCTIONS: 2017 HARLEY-DAVIDSON TOURING POWER DUALS PART# 16871
 INSTALLATION INSTRUCTIONS: 2017 HARLEY-DAVIDSON TOURING POWER DUALS PART# 16871 Congratulations, you have purchased the finest exhaust system available for your motorcycle. Your Vance & Hines exhaust is
The Original Trapper
 INSTALLATION INSTRUCTIONS FOR STEP 1 Wrap Gasket Around Threads US Patent #8,127,838; 8,342,237; 8,365,817 pollutioncontrolcorp.com For colder climates, antifreeze can be added to prevent freezing of fluid