Electric Pilot System
|
|
|
- Marjorie Robinson
- 5 years ago
- Views:
Transcription


1 Electric Pilot System Assembly, Operation & Maintenance Congratulations on your purchase, and thank you for selecting the Pro Pilot System from Blichmann Engineering. We are confident that it will provide you years of service and many gallons of outstanding beer. This manual will familiarize you with the assembly, operation, and maintenance of the Pro Pilot System. IMPORTANT!! **** PLEASE READ THOROUGHLY PRIOR TO USE FOR IMPORTANT SAFETY INFORMATION **** Warning: Sections labeled Warning can lead to serious injury or death if not followed. Please read these thoroughly and understand them completely before use. If you do not understand them or have any questions, contact your retailer or Blichmann Engineering ( before use. Do NOT at ANY time operate the product until you thoroughly read and understand these instructions! Caution: Important: Sections labeled Caution can lead to equipment damage or unsatisfactory performance of the equipment. Please read these sections thoroughly. If you have any questions, contact your retailer or Blichmann Engineering ( before use. Sections labeled Important are critical to the proper performance and life of the product. Warning: The equipment is heavy. Single person lifting could cause injury. Two people may be required to lift and maneuver the table top during assembly. Practice proper lifting techniques and use team lift concepts during handling. Hire a professional to assemble the unit if you cannot safely lift heavy equipment. Failure to comply with proper lifting techniques could result in injury or death. Table Top Legs Casters Shelf 1
2 Table Assembly: Step 1: Set the table top upside down on the floor. Step 2: There will be either 4 or 6 slots for legs on your table. Loosen all lock screws on the table and shelf. Set all legs in place and leave all set screws loose. Step 3: Slide the shelf upside down onto the legs until the leg extends through the shelf bracket about 1 to 1 1/2 inches and tighten all set screws with the included allen wrench. Step 4: Once the shelf and the set screws are tight, it s time to install the casters. The caster has a bolt running through it with a rubber outer casing. When the bolt is tightened the rubber will expand. Once the caster is placed into the leg, tighten the caster bolt to insure its securely in place. Flip the table over onto the casters. Installing the RipTide Pumps Step 1: Mount the RipTide to the table with the 1/4-20 hardware. Make sure the pump head is facing to the left and the cord is on the right. Fig. 1 Step 2: Cut the plug off the end of the cable leaving as much of the cable as possible and strip wires. Refer to the RipTide manual for instructions on stripping wires. You will not need this seal Step 3: Step 4: Use the grommet (Fig. 1), take off the grommet seal nut, remove and throw away the seal (Fig. 2). Slide the stripped wire through the grommet and grommet nut. Attach the grommet to the table with the grommet nut (Fig. 3) Fig. 2 Fig. 3 2


 Step 4: Using the wire nuts, secure the wires together(fig.")


 Fig. 4 Fig. 5 Fig. 6 Fig. 7 Fig.")

3 Wiring the RipTide Pumps Step 1: After the RipTide pumps are mounted, punch out three holes in the junction box. (Fig. 4) Step 2: Mount the RipTide wires and the power cable through the 1/2 conduit connector. (Fig. 5) Step 3: Mount the extra ground wire to the junction box. (Fig. 6) Step 4: Using the wire nuts, secure the wires together(fig. 7). Use the wire chart to determine what colors to secure together. Wire Chart Green & Green wire together White & Blue wire together Black & Brown wire together Step 5: Attach the junction box plate. Your parts kit will come with velcro straps with adhesive for cable managment. Stick underneath table to support the cables. (Fig. 8) Fig. 4 Fig. 5 Fig. 6 Fig. 7 Fig. 8 Installing the RIMS-Rocket Mount the RIMS-Rocket with the HopRocket Mounting Bracket. Use the 5/16 hardware to secure the mounting bracket to the table. (Fig. 9) Fig. 9 Note: The Mounting Bracket will come with a t-slot plate that is used for the TopTier stand. This will not be needed for the Pilot System. Not Needed 3


4 Installing the Therminator Mount the Quick Release plate to the table using the hardware provided. Make sure to use 2 washers between the bracket and table on each hole to give enough clearance. (Fig. 10) 2 washers There will be 1 or 2 cable pass-through holes in the back of the table to run the controller cords through. If you are using the Dual Element Controller it is possible for all four cables to fit through a single grommet. Step 1: Remove Grommet Fig. 10 Installing the Temperature Controllers Step 2: One cable at a time, route cables through the table and grommet. Step 3: Re-install grommet into table. (See images below.) *Pictures shown for 55 gallon systems only. All other systems will have 2 cables running through the grommet. 4 5 Thread Sealing Tape Use thread tape on all male threads except when using QuickConnectors. 4

 Fig.")

 Your parts kit will come with zip ties to label your hose. Fig.")
5 Cord Management Your parts kit will contain Velcro straps with adhesive. Use the small straps underneath the table to hold the RipTide pump wires. Use the large velcro straps to mount to the back of the table. Your table will have 3 or 5 studs on the back to mount your large velcro straps to. Attach the large Velcro straps to the back of the table with the adhesive and use the acorn nut to lock them in place. This will add extra reinforcement to the straps. The stud in the center of the table is for the RipTide cord and the 2 studs closest to the cable hole and grommet is for the BoilCoil cables. (Fig. 11) Fig. 11 Installing Hose Familiarize yourself with the function of the brewhouse. Attach QuickConnectors where needed. Install the hardware and accessories as shown in the picture of your particular system. Your kit will come with 20 feet of hose. Attach the hose to the QuickConnectors, stretch to the desired length, and cut. Once you are satisfied with the length and location of the hoses, crimp the hoses with a crimping tool. (Fig. 12) Your parts kit will come with zip ties to label your hose. Fig. 12 AutoSparge Upgrade Kit The AutoSparge will come with a kit to use for 30 gallon and 55 gallon kettles. This will include a longer stem and hose, as well as an extra float ball. (Fig. 13) Fig. 13 *For systems using smaller kettles use what is provided in the AutoSparge box. It will have the correct hose length, ball, and stem. 5
 Refer to all manuals of each individual component for assembly and operation.")
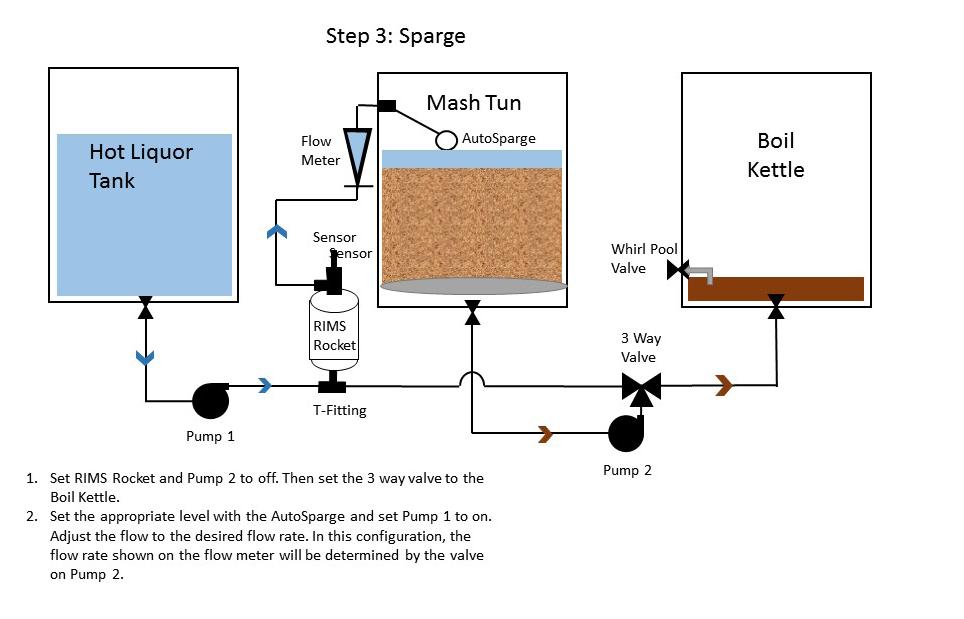
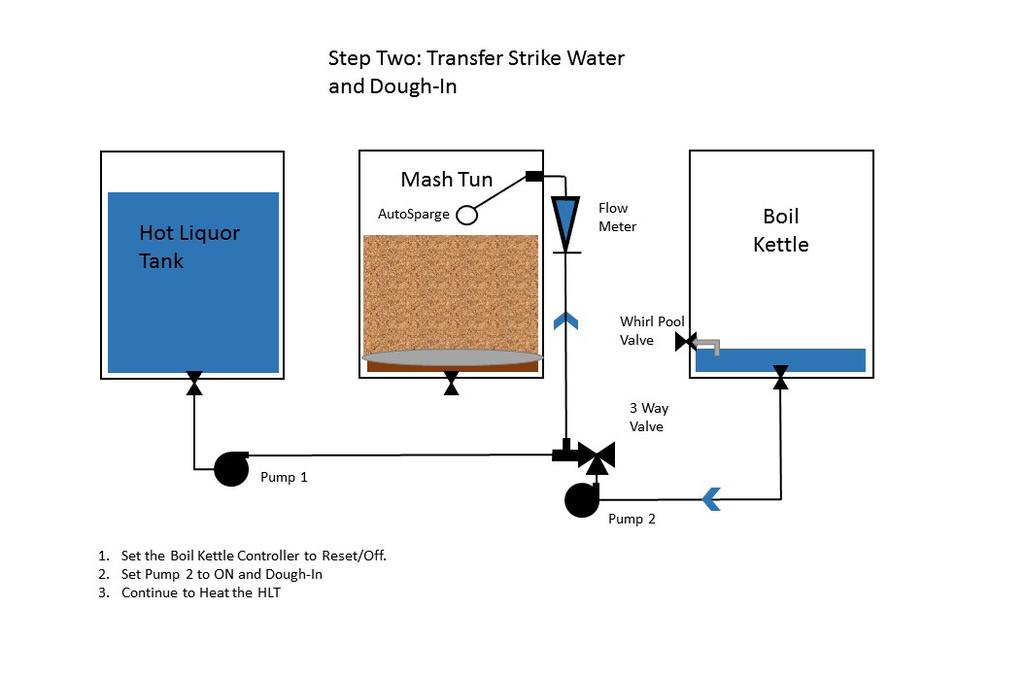
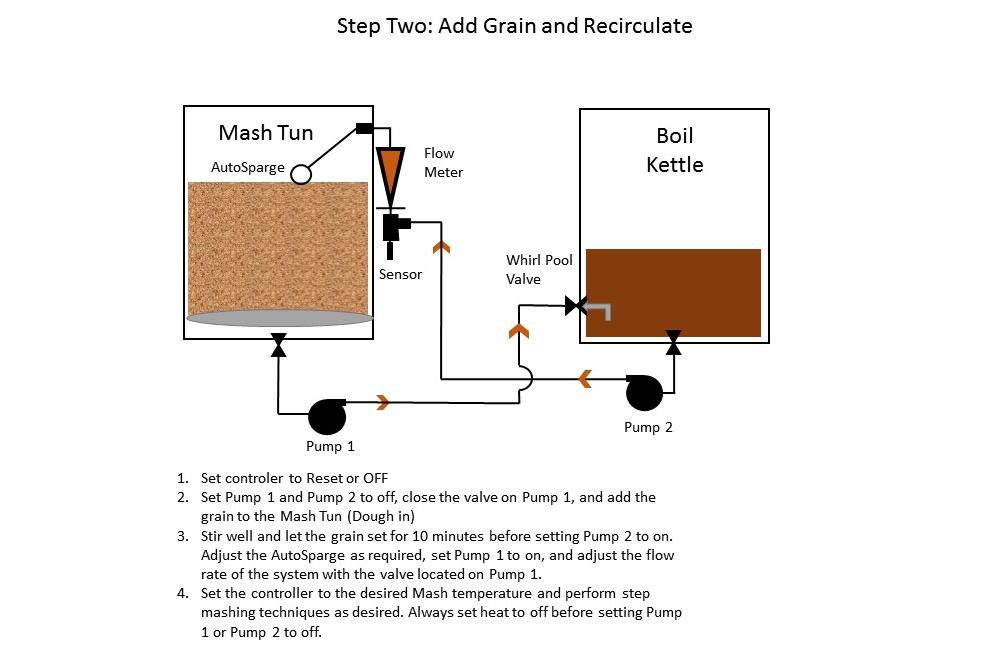
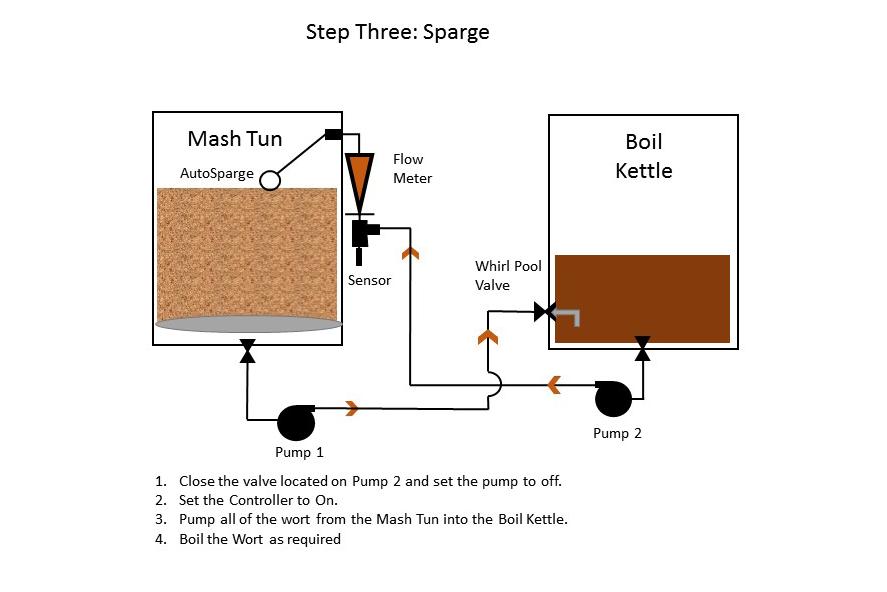
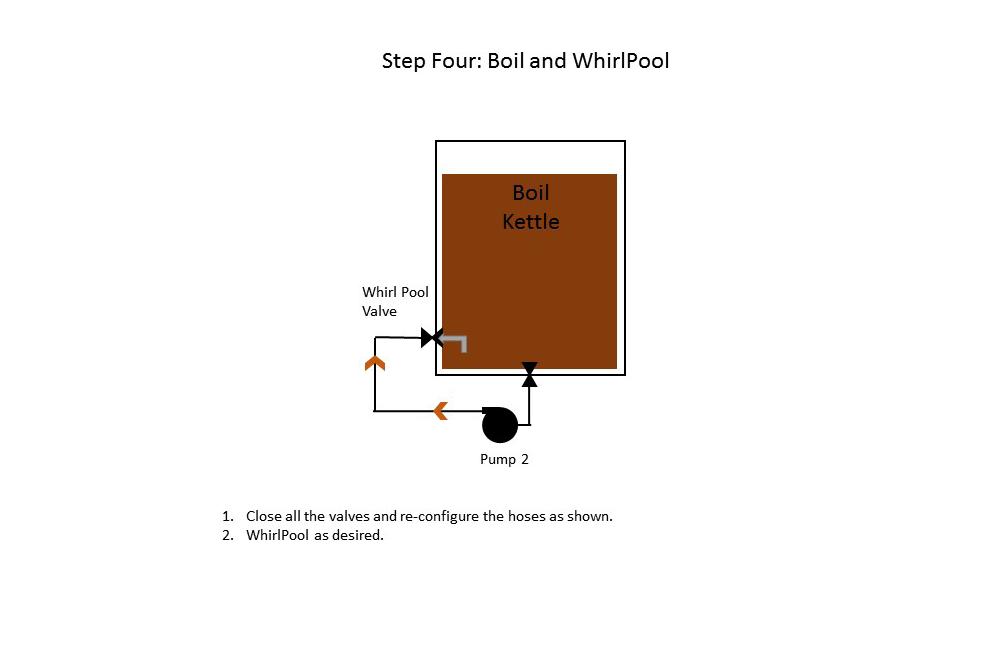
6 Assembling your system There are different system configurations we offer. Use the diagram that best suits your needs. 3 Vessel RIMS System (5 gal - 20 gal) Refer to all manuals of each individual component for assembly and operation. Plumbing and Hardware Schematic: 3 Vessel, 1BBL System *20 Gallon Shown 6
7 7
8 8
9 9
 *1 BBL")
10 3 Vessel Single Infusion (1 BBl) *1 BBL Shown 10
11 11
12 12
13 13
 *1 BBL Shown")
14 Horizontal BrewEasy (20 gal - 1 BBl) *1 BBL Shown 14
15 15
16 16
17 17
18 Blichmann Engineering Product Warranty A. Limited Warranty Blichmann Engineering warrants to the original purchaser that this product will be free from manufacturing defects in material and workmanship for a period of one (1) year from the date of purchase by the customer. Proof of purchase is required. Blichmann Engineering s obligation to repair or replace defective materials or workmanship is the sole obligation of Blichmann Engineering under this limited warranty. This product is for home use only. The limited warranty covers only those defects that arise as a result of normal use of the product and does not cover any other problems, including, but not limited to, those that arise as a result of: a. Improper maintenance or modification; b. Damage due to incorrect voltage or improper wiring by customer; c. Operation outside of the product s specifications; d. Carelessness or neglect to operate the product in accordance with instructions provided with the product; e. Damaging the tamper label on the product; f. Damage by over-tightening the fasteners; g. Failure to follow cleaning and / or maintenance procedures; or h. Exceeding published operational temperatures. Blichmann Engineering reserves the right to request delivery of the defective component for inspection before processing the warranty claim. If Blichmann Engineering receives, during the applicable warranty period, notice of a defect in any component that is covered by the warranty, Blichmann Engineering shall either repair or replace the defective component with a new or rebuilt component at Blichmann Engineering s option. Blichmann Engineering must be notified within seven (7) days of the delivery date of any shipping damage. Customer is responsible for shipping damage outside of this time period. Approval for return must be provided by Blichmann Engineering prior to any return. Customer is responsible for keeping all original packaging material for warranty returns. Blichmann Engineering is not responsible for damage from improperly packaged warranty returns, and these repair costs will be the sole responsibility of the customer. Shipping costs for warrantee returns are covered only for the contiguous United States. Blichmann Engineering s limited warranty is valid in any country where the product is distributed. B. Limitations of Warranty Any implied warranty that is found to arise by way of state or federal law, including any implied warranty of merchantability or any implied warranty of fitness, is limited in duration to the terms of this limited warranty and is limited in scope of coverage to this warranty. Blichmann Engineering disclaims any express or implied warranty, including any implied warranty of fitness for a particular purpose or merchantability, on items excluded from coverage as set forth in this limited warranty. Blichmann Engineering makes no warranty of any nature beyond that contained in this limited warranty. No one has authority to enlarge, amend, or modify this limited warranty, and Blichmann Engineering does not authorize anyone to create any other obligation for it regarding this product. Blichmann Engineering is not responsible for any representation, promise, or warranty made by any independent dealer or other person beyond what is expressly stated in this limited warranty. Any selling or servicing dealer is not Blichmann Engineering s agent, but an independent entity. C. Limitations of Liability The remedies provided in this warranty are the customer s sole and exclusive remedies. Except for the obligations specifically set forth in this warranty, in no event shall Blichmann Engineering be liable for direct, indirect, special, incidental, or consequential damages, whether based on contract, tort, or any other legal theory and whether or not advised of the possibility of such damages. This warranty does not cover, and in no event shall Blichmann Engineering be liable for, travel, lodging, or any other expense incurred due to manufacturing defects in material and workmanship, or any other reason. Any performance of repairs after the warranty coverage period has expired or performance of repairs regarding anything excluded from coverage after this limited warranty shall be considered good-will repairs and they will not alter the terms of this limited warranty, or extend any warranty coverage period. Venue for any legal proceedings relating to or arising out of this warranty shall be in Tippecanoe County, Indiana, United States, which courts will have exclusive jurisdiction. D. Local Law This warranty gives the customer specific legal rights. The customer may also have other rights that vary from state to state in the United States or other countries. To the extent that this warranty is inconsistent with local law, it shall be deemed modified, only to the extent necessary to be consistent with such local law. This product uses FDA and/or NSF approved food grade materials anywhere the product touches the beverage. Warning: This product contains or may contain chemical(s) known to the State of California to cause cancer, birth defects, or other reproductive harm. 18
Electric Pilot System Assembly, Operation, & Maintenance
 Electric Pilot System Assembly, Operation, & Maintenance Congratulations on your purchase, and thank you for selecting the Electric Pilot System from Blichmann Engineering Pro Series. We are confident
Gas Pilot System. Sections labeled Important should specifically be followed to ensure satisfactory results with the product.
 15 Gallon - 1BBL Gas Pilot System Assembly, Operation, & Maintenance Congratulations on your purchase, and thank you for selecting the Gas Pilot System from Blichmann Engineering Pro Brewing. We are confident
RipTide. Brewing Pump. Assembly, Operation, & Maintenance
 RipTide Brewing Pump Assembly, Operation, & Maintenance Congratulations on your purchase, and thank you for selecting the RipTide brewing pump from Blichmann Engineering. We are confident that it will
AutoSparge. Lauter Tun Level Control. Operation, Assembly & Maintenance Manual
 AutoSparge Lauter Tun Level Control Operation, Assembly & Maintenance Manual Congratulations on your purchase, and thank you for selecting the AutoSparge lauter tun level control from Blichmann Engineering.
Power Controller IMPORTANT INFORMATION. What s In the Box? Assembly, Operation, & Maintenance
 Power Controller Assembly, Operation, & Maintenance Congratulations on your purchase, and thank you for selecting the Power Controller from Blichmann Engineering. We are confident that it will provide
5 BBL Hybrid Brewhouse
 5 BBL Hybrid Brewhouse Installation Congratulations on your purchase, and thank you for selecting the 5 BBL Hybrid Brewhouse from Blichmann Engineering. We are confident that it will provide you years
60 PSI Boost Gauge. For Product Numbers: MT-DV01_60, MT-WDV01_60
 60 PSI Boost Gauge For Product Numbers: MT-DV01_60, MT-WDV01_60 Red: 12v Constant (un-switched) Source (+) Orange: 12v Dimmer (switched) Source (+) (optional) White: 12v Ignition (switched) Source (+)
Fitting Instruction for EZI-GRIP Bike Rack
 Fitting Instruction for EZI-GRIP Bike Rack Congratulations on purchasing Ezi-Grip to carry your valued bicycles. We are sure you will get many years of enjoyable use from your Ezi-Grip Bike Rack. These
INSTRUCTIONS: JOEY 30 CART (MK2)
") INSTRUCTIONS: JOEY 30 CART (MK2) Congratulations on your purchase. Follow these instructions for easy and fast set-up of your Joey 30 Cart. For video instructions, go to https://vimeo.com/144317620 Warranty:
INSTRUCTIONS: JOEY 30 CART (MK2) Congratulations on your purchase. Follow these instructions for easy and fast set-up of your Joey 30 Cart. For video instructions, go to https://vimeo.com/144317620 Warranty:
Adjustable Shop Stool with Backrest
 Adjustable Shop Stool with Backrest Owner s Manual WARNING: Read carefully and understand all ASSEMBLY AND OPERATION INSTRUCTIONS before operating. Failure to follow the safety rules and other basic safety
Users Guide for Ac-sync
 Problem solved. Users Guide for Ac-sync Thank you for choosing Anywhere Cart! The AC-SYNC is designed to sync, charge and store 1-36 ipads or tablets. Adjustable device divider bays allow fitment of any
Installation Instructions
 85-4209 rev. 05 11-18 Installation Instructions Thank you for purchasing this anti-sway bar kit. Please read through these instructions before installation. Factory Replacement Anti-Sway Bar Kit part #1129-135
Installation Instructions
 85-3910 rev. 03 01-18 Installation Instructions Thank you for purchasing the antisway bar kit. Please read through these instructions before installation. Rear Anti-Sway Bar Kit for Ford F-250/F-350 part
Installation Instructions
 85-3511 rev. 04 11-15 Installation Instructions Polyurethane Bushing Kit for Ford F-53 (Front) (replaces OE bushings and brackets) part #4139-127 1-5/8 diameter INTRODUCTION Thank you for purchasing this
Utility Jack Model Number: HD HD HD
 Utility Jack Model Number: 74407 74407HD 74410 74410HD 74413 74413HD 74412 74415 70429 Rolled Acme Thread and Anti-Friction thrust Bearings High Strength Tubing This Instruction Sheet contains IMPORTANT
Installation Instructions
 85-4592 rev. 08 02-18 Installation Instructions Thank you for purchasing our sway bar kit. Please read through these instructions before installation. Auxiliary Rear Anti-Sway Bar Kit for Ford F53 part
Installation Instructions
 85-3700 rev. 08 05-18 Installation Instructions Thank you for purchasing this antisway bar kit. Please read through these instructions before installation. Front Anti-Sway Bar Kit for the F53 Chassis part
Installation Power Management Unit Battery Cables and Battery Harness
 Installation Power Management Unit Battery Cables and Battery Harness Important Safety Messages SAVE THESE INSTRUCTIONS - This manual contains important instructions that should be followed during installation
Low Profile Creeper. Owner s Manual
 Low Profile Creeper Owner s Manual WARNING: Read carefully and understand all ASSEMBLY AND OPERATION INSTRUCTIONS before operating. Failure to follow the safety rules and other basic safety precautions
Installation Instructions
 Equipment Required: Installation Instructions Fastener Kit: F Wrenches: 15/16, 10 mm Drill Bits: 1/4 Other Tools: Drill, Reciprocating Saw 9464/9474 HIDE-A-GOOSE HITCH All Fasteners Typical, Both Sides
Installation Instructions **THIS RAIL MOUNTING KIT USES 11 BOLTS**
 Installation Instructions CUSTOM QUICK INSTALL MOUNTING KIT FORD SUPER DUTY Part Numbers: 50074 WARNING:Under no circumstances do we recommend exceeding the towing vehicle manufacturers recommended vehicle
DUAL WIDEBAND AIR/FUEL RATIO GAUGE Product Numbers: GS-W702W_Dual, GS-C702W_Dual, GS-T702W_Dual
 Installation Instructions Tech Support: 856.768.8300 TechSupport@GlowShiftGauges.com DUAL WIDEBAND AIR/FUEL RATIO GAUGE Product Numbers: GS-W702W_Dual, GS-C702W_Dual, GS-T702W_Dual (1) Gauge (2) Controllers
INSTALLATION GUIDE DIRECT-REPLACEMENT
 DIRECT-REPLACEMENT INSTALLATION GUIDE TACOMA (05+) 880-06-376-2.5 Factory Series Coil-Over Reservoir - Adjustable 880-06-418-2.5 Factory Series Coil-Over Reservoir - Adjustable 880-02-376-2.5 Factory Series
PVI 1800/PVI Residential/Commercial Grid-Tied Photovoltaic Inverter WARRANTY MANUAL. Subject to Change REV , Solectria Renewables
 PVI 1800/PVI 2500 WARRANTY MANUAL Residential/Commercial Grid-Tied Photovoltaic Inverter 2009, Solectria Renewables Subject to Change REV 10.09 1 Product Warranty & RMA Policy 1.1 Warranty Policy The Solectria
Installation Instructions
 85-3195 rev. 12 04-18 Installation Instructions Thank you for purchasing this antisway bar kit. Please read through these instructions before installation. Part #1139-117 Rear Anti-Sway Bar Kit 1½ diameter
G500REC Manual Covering System for Containers
 10 Boulder Parkway N. Oxford, MA 01537 866-353-5826 pioneersales@wastequip.com www.pioneercoverall.com G500REC Manual Covering System for Containers Installation Manual WARNING: In order to prevent damage,
Drum Deheader. Owner s Manual
 Drum Deheader Owner s Manual WARNING: Read carefully and understand all ASSEMBLY AND OPERATION INSTRUCTIONS before operating. Failure to follow the safety rules and other basic safety precautions may result
Utility Cart. Owner s Manual
 Utility Cart Owner s Manual WARNING: Read carefully and understand all ASSEMBLY AND OPERATION INSTRUCTIONS before operating. Failure to follow the safety rules and other basic safety precautions may result
2000 lb Adjustable Gantry Crane
 2000 lb Adjustable Gantry Crane Owner s Manual WARNING: Read carefully and understand all ASSEMBLY AND OPERATION INSTRUCTIONS before operating. Failure to follow the safety rules and other basic safety
Internal PVC Rod-Style Fluid Level Sensor
 Internal PVC Rod-Style Fluid Level Sensor New Providence Marine Systems INTERNAL PVC ROD SENSOR Copyright 2006 Topic Table of Contents Page 1:Introduction 2 2:Installation Guide 3 3:Limited Warranty 5
Installation Instructions
 Installation Instructions CUSTOM QUICK INSTALL MOUNTING KIT 2011 & UP Ford Super Duty F-250/F-350/F-50 2011 & UP Part Number: 50073 WARNING: Under no circumstances do we recommend exceeding the towing
Transmission Guardian
 Transmission Guardian Thank you for purchasing the Transmission Guardian from Bowler Performance Transmissions. We hope you are 100 percent satisfied with your purchase and if for any reason you are not,
INSTALLATION GUIDE DIRECT-REPLACEMENT
 DIRECT-REPLACEMENT INSTALLATION GUIDE TUNDRA (07+) 985-02-004: 2.0 Performacne Series Coil-over IFP 883-02-021: 2.5 Factory Series Coil-over IFP 880-02-367: 2.5 Factory Series Coil-over Reservoir 880-06-367:
1000-LB. ENGINE STAND
 1000-LB. ENGINE STAND WARNING: Read carefully and understand all ASSEMBLY AND OPERATION INSTRUCTIONS before operating. Failure to follow the safety rules and other basic safety precautions may result in
Installation Instructions
 85-4341 rev. 04 10-15 Installation Instructions Thank you for purchasing this antisway bar kit. Please read through these instructions before installation. Rear Anti-Sway Bar Kit for Chevy 2500/3500/4500
Owner's Manual. Safety Instructions Customer Care Warranty. Safety Instructions. This Product is Distributed Exclusively by
 Product May Vary Slightly From Pictured. Safety Instructions This Product is Distributed Exclusively by 2040 N. Alliance, Springfield, MO 65803 Customer Care 1 (800) 375-7520 customer.care@staminaproducts.com
Service Guide JATCO Environmental Protection Tank Model J-7000
 Service Guide JATCO Environmental Protection Tank Model J-7000 Listed below are a series of steps to follow if the JATCO tank fails to dump properly. #1. Be sure there is an adequate supply of gas pressure
Installation Instructions
 Equipment Required: Installation Instructions Fastener Kit: F Wrenches: 3/4, 15/16 Drill Bits: 1/4 Other Tools: Drill WARNING: Under no circumstances do we recommend exceeding the towing vehicle manufacturers
END USER TERMS OF USE
 END USER TERMS OF USE The following is the End Users Terms of Use as it currently appears in the Mobileye User Manual and Warranty information. This is here for your review and information; it is subject
3000-Lb. Vehicle Positioning Jacks. Owner s Manual
 3000-Lb. Vehicle Positioning Jacks Owner s Manual WARNING: Read carefully and understand all ASSEMBLY AND OPERATION INSTRUCTIONS before operating. Failure to follow the safety rules and other basic safety
Installation Instructions
 Equipment Required: Fastener Kit: F Wrenches: 15/16, 15/16 Crowfoot Adaptor Drill Bits: 1/4 Other Tools: Drill, Reciprocating saw Optional, Raise Bed: 18mm socket, 15 extension As an option you can loosen
AWE Tuning W205 C300 SwitchPath Edition or Touring Edition cat back exhaust system.
 Thank you for your purchase of the AWE Tuning 2015+ W205 C300 SwitchPath Edition or Touring Edition cat back exhaust system. For up to the minute fitment information, be sure to visit the W205 C300 section
AEROMOTIVE Part # & Mustang 5.0L Stealth Fuel System Kit INSTALLATION INSTRUCTIONS
 AEROMOTIVE Part # 18653 & 18654 86-93 Mustang 5.0L Stealth Fuel System Kit INSTALLATION INSTRUCTIONS CAUTION: Installation of this product requires detailed knowledge of automotive systems and repair procedures.
2000-LB. ENGINE STAND
 2000-LB. ENGINE STAND WARNING: Read carefully and understand all ASSEMBLY AND OPERATION INSTRUCTIONS before operating. Failure to follow the safety rules and other basic safety precautions may result in
HATCHGRIP Installation Instructions/Operation and Maintenance Manual
 HATCHGRIP Installation Instructions/Operation and Maintenance Manual Models: HTG-PCG Contact Information Table of Contents: Safety Precautions... 2 Product Information... 2 Operation... 3 Installation
37SCENE 46SCENE 79SCENE
 Installation and Operation Instructions LED SCENE LIGHT LED SCENE LIGHT 37SCENE 46SCENE 79SCENE 37SCENE 46SCENE Introduction The 37SCENE, 46SCENE, 79SCENE LED Scene Lights are designed for the emergency
Installation Instructions
 Equipment Required: Fastener Kit: F Wrenches: 3/4, 15/16, 13mm Drill Bits: 1/4, some older models a 1/2 Other Tools: Drill, Saber Saw 5/8 Fasteners From Hitch Fastener Kit Installation Instructions GOOSENECK
Use/Installation Guide
 Use/Installation Guide 5 Series Outdoor Gas Grill Carts IMPORTANT: PLEASE READ AND FOLLOW 1. Before beginning, please read these instructions completely and carefully. 2. Do not remove permanently affixed
Installation Instructions Winch Quick Connect Kit Part # (8 ) Part # (24 )
 Part # (24 )") Please read instructions entirely before installing/using this part. Parts Included (Part# 35220) Qty Parts Included (Part# 35210) Qty 3 Winch Quick Connect Wire 1 3 Winch Quick Connect Wire 1 8 Quick
Please read instructions entirely before installing/using this part. Parts Included (Part# 35220) Qty Parts Included (Part# 35210) Qty 3 Winch Quick Connect Wire 1 3 Winch Quick Connect Wire 1 8 Quick
Fifth Wheel Power Hitch Operations Manual
 Fifth Wheel Power Hitch Operations Manual ITD1253 Fifth Wheel Power Hitch 208 587 7960 www.intheditch.com This page is intentionally left blank. Operations Manual 1 TABLE OF CONTENTS TABLE OF CONTENTS...
INSTALLATION GUIDE DIRECT-REPLACEMENT
 DIRECT-REPLACEMENT INSTALLATION GUIDE FJ CRUISER (10+) 4RUNNER (10+) 883-06-111-2.5 Factory Series Coil-Over Reservoir - Adjustable 883-02-111-2.5 Factory Series Coil-Over Reservoir 880-02-361-2.5 Factory
Installation Instructions
 Equipment Required: Installation Instructions Fastener Kit: F Wrenches: 8mm, 13mm, 3/4, 15/16 Drill Bits: 1/4 Other Tools: Drill, Reciprocating Saw, File WARNING: Under no circumstances do we recommend
Installation Instructions
 85-3207 rev. 03 05-06 Installation Instructions Thank you for purchasing this anti-sway bar kit. Please read through these instructions before installation. Rear Anti-Sway Bar Kit for the Freightliner
INSTALLATION/OWNER'S MANUAL DP " Woofer in Enclosure
 INSTALLATION/OWNER'S MANUAL DP1000 10" Woofer in Enclosure Installation Thank you for purchasing the DP1000 10" Woofer with enclosure. Although Dual has attempted to make sure all of the information contained
Model AS-RC3260 TV Cart. Rolling Cart for Audio Mount System & Flat Panel TVs
 Model AS-RC3260 TV Cart Rolling Cart for Audio Mount System & Flat Panel TVs GETTING STARTED Introduction Congratulations on the purchase of your new Helios AS-RC3260 Rolling Cart. For maximum benefit,
7.3L POWERSTROKE BANJO BOLT KIT Fits L Powerstroke Diesel. Installation Guide
 7.3L POWERSTROKE BANJO BOLT KIT Fits 94-03 7.3L Powerstroke Diesel Installation Guide INSPECT CONTENTS OF THIS KIT THOROUGHLY BEFORE STARTING THE INSTALLATION PROCESS! IF YOU FIND A PROBLEM WITH YOUR PACKAGE:
Installation Instructions
 85-3214 rev. 07 03-11 Installation Instructions Thank you for purchasing this anti-sway bar kit. Please read through these instructions before installation. Rear Anti-Sway Bar Kit Freightliner FL Series
COVER PAGE CUSTOM QUICK INSTALL MOUNTING KIT NOTE!
 COVER PAGE NOTE! Prior to installing product, please visit one of our websites to assure your kit contains the most recent revision to installation instruction and verify vehicle application. www.reeseproduct.com
Poly Strapping Tensioner & Cutter
 Poly Strapping Tensioner & Cutter Owner s Manual WARNING: Read carefully and understand all ASSEMBLY AND OPERATION INSTRUCTIONS before operating. Failure to follow the safety rules and other basic safety
Installation Instructions PART NUMBERS: 76128, 84128, CQT76128
 Installation Instructions LIMITED LIFETIME WARRANTY To prevent SERIOUS INJURY, DEATH or PROPERTY DAMAGE: ALWAYS read, understand and follow warnings and instructions for your hitch BEFORE installation.
Model E600 Tarping System
 10 Boulder Parkway N. Oxford, MA 01537 866-353-5826 pioneersales@wastequip.com www.pioneercoverall.com Model E600 Tarping System Installation Instructions WARNING: In order to prevent damage, the tarp
Installation Instructions
 85-5029 rev. 03 06-17 Installation Instructions Thank you for purchasing our anti-sway bar kit. Please read through these instructions before installation. Rear Anti-Sway Bar Kit for Workhorse W22, Holiday
Installation Instructions
 85-3909 rev. 01 09-09 Installation Instructions Thank you for purchasing this anti-sway bar kit. Please read through these instructions before installation. Rear Anti-Sway Bar Kit for Chevrolet G30 part
MOTORIZED FOLDING CAMPER WINCH
 OWNER'S MANUAL MOTORIZED FOLDING CAMPER WINCH With 1200lb Lift Capacity The 12 Volt Motorized Folding Camper Winch is used to raise and lower folding campers with the touch of the switch, eliminating hand
PVI 60KW, PVI 82KW, PVI 95KW
 PVI 60KW PVI 82KW PVI 95KW WARRANTY MANUAL Commercial, Grid-Tied Photovoltaic Inverters 2008, Solectria Renewables LLC Subject to Change DOC-020099 rev 024 1 1 Product Warranty & RMA Policy Warranty Policy
Installation Instructions
 85-3209 rev. 07 03-11 Installation Instructions Thank you for purchasing this anti-sway bar kit. Please read through these instructions before installation. Front Anti-Sway Bar Kit for Workhorse W22, Holiday
AWE Tuning F30 328i and 428i SwitchPath Edition cat back exhaust system.
 INSTALLATION GUIDE Thank you for your purchase of the AWE Tuning 2012+ F30 328i and 428i SwitchPath Edition cat back exhaust system. For up to the minute fitment information, be sure to visit the F30 328i
MLS KICK-OFF TABLETOP SOCCER TABLE ASSEMBLY INSTRUCTIONS
 MLS KICK-OFF TABLETOP SOCCER TABLE ASSEMBLY INSTRUCTIONS NGD1028 1 THANK YOU! Thank you for your purchase of this Harvil product. We work around the clock and around the globe to ensure that Harvil products
Mini Manual Tire Changer
 Mini Manual Tire Changer Owner s Manual WARNING: Read carefully and understand all ASSEMBLY AND OPERATION INSTRUCTIONS before operating. Failure to follow the safety rules and other basic safety precautions
stroller kit Burley Stroller Kit Owner s Instruction and Safety Manual For D Lite, Solo, Encore, Cub, Honeybee, and Tailwagon
 stroller kit Burley Stroller Kit Owner s Instruction and Safety Manual For D Lite, Solo, Encore, Cub, Honeybee, and Tailwagon Congratulations! By purchasing the Burley Stroller Kit, you ve increased the
Preassembled Clutch/Electrically Released Brake Module
 P-273-2 819-0346 Preassembled Clutch/Electrically Released Brake Module Installation Instructions Contents For These UM Combinations Use These Installation Steps: Introduction...........................
HEAVY-DUTY STEEL WAGON
 HEAVY-DUTY STEEL WAGON Owner s Manual WARNING: Read carefully and understand all ASSEMBLY AND OPERATION INSTRUCTIONS before operating. Failure to follow the safety rules and other basic safety precautions
ValveSentry USER S MANUAL PLEASE READ CAREFULLY AND SAVE
 ValveSentry USER S MANUAL IMPORTANT! PLEASE READ CAREFULLY AND SAVE This user s manual contains important information about your ValveSentry device s operation. If you are installing this ValveSentry device
INSTALLATION AND MAINTENANCE MANUAL FORM #PM-122 REV A 12/09
 HAND CRANK WELDING CABLE REEL: SERIES 100WC COXREELS The technical data and images which appear in this manual are for informational purposes only. NO WARRANTIES, EXPRESS OR IMPLIED, INCLUDING WARRANTIES
AEROMOTIVE Part # & Mustang Stealth Fuel Tank w/fuel pump INSTALLATION INSTRUCTIONS
 AEROMOTIVE Part # 18685 &18686 86-98.5 Mustang Stealth Fuel Tank w/fuel pump INSTALLATION INSTRUCTIONS CAUTION: Installation of this product requires detailed knowledge of automotive systems and repair
Guardian FBA Flywheel Coupling
 Guardian FBA Flywheel Coupling P-8602-GC GUA-MRK-DOC-010 Service & Installation Instructions TABLE OF CONTENTS NOTICES AND WARNINGS PAGE 2 SECTION 1 COUPLING OVERVIEW PAGE 3 SECTION 2 TOOLS/MATERIALS REQUIRED
V-Twin Forward Control Installation Instructions
 V-Twin Forward Control Installation Instructions Thank you for a choosing a Supreme Legends USA product. Supreme Legends forward controls are designed to add style and performance to your bike. Our extended
MaxLite LED Linear HighBay Fixtures
 Operating Instructions MaxLite LED Linear HighBay Fixtures General Safety Information To reduce the risk of death, personal injury or property damage from fire, electric shock, falling parts, cuts/abrasions,
Dolly with Pneumatic Tires
 Dolly with Pneumatic Tires Owner s Manual WARNING: Read carefully and understand all ASSEMBLY AND OPERATION INSTRUCTIONS before operating. Failure to follow the safety rules and other basic safety precautions
ASSEMBLY & PACKING INSTRUCTIONS FOR THE MULTICHAIR 3000
 ASSEMBLY & PACKING INSTRUCTIONS FOR THE MULTICHAIR 3000 NOTICE: Please see section 3: LIMITED WARRANTY of these instructions. If warranty is not acceptable, return the chair for a full refund. Contact
Guardian NV Flywheel Coupling
 Guardian NV Flywheel Coupling P-8605-GC GUA-MRK-DOC-014 Service & Installation Instructions TABLE OF CONTENTS NOTICES AND WARNINGS PAGE 2 SECTION 1 COUPLING OVERVIEW PAGE 3 SECTION 2 TOOLS/MATERIALS REQUIRED
Auto-Locking Trailer Coupler
 Auto-Locking Trailer Coupler 7-Ton Capacity Owner s Manual WARNING: Read carefully and understand all ASSEMBLY AND OPERATION INSTRUCTIONS before operating. Failure to follow the safety rules and other
INSTALLATION GUIDE DIRECT-REPLACEMENT
 DIRECT-REPLACEMENT INSTALLATION GUIDE FORD T6 RANGER (12+) 983-02-085-2.0 Performance Series Coil-Over IFP 883-02-093-2.5 Factory Series Coil-Over Reservoir 883-06-093-2.5 Factory Series Coil-Over Reservoir
Installation / Operation Instructions Sunnex ORION Series Exam Lights
 Installation / Operation Instructions Sunnex ORION Series Exam Lights OR-120 OR-127 OR-220 OR-227 Models: OR-300 OR-400 OR-500 OR-600 1. APPLICATIONS The Sunnex ORION Series light was designed specifically
RACE PPE Manifolds and Up-Pipes
 RACE ONLY High-Flow Exhaust Manifolds with Up-pipes GM DURAMAX 6.6L 2001-2015 DISCLAIMER OF LIABILITY This is a performance product which increases horsepower above factory specifications. Additional horsepower
Installation Instructions PART NUMBERS: 76192, 84192, CQT76192
 Installation Instructions LIMITED LIFETIME WARRANTY To prevent SERIOUS INJURY, DEATH or PROPERTY DAMAGE: ALWAYS read, understand and follow warnings and instructions for your hitch BEFORE installation.
VAN STORAGE SOLUTIONS FOR THE WAY YOU WORK
 WWW.WEATHERGUARD.COM VAN STORAGE SOLUTIONS FOR THE WAY YOU WORK Weather Guard / KNAACK 420 E. Terra Cotta Ave. Crystal Lake, IL 60014 USA 800-456-7865 (Toll Free) 800-334-2981 (Fax) Knaack.OrderEntry@wernerco,.com
Installation Instructions
 85-3180 rev. 07 03-14 Installation Instructions Thank you for purchasing this antisway bar kit. Please read through these instructions before installation. Front Anti-Sway Bar Kit for the Ford E350/450
Please read BOTH these Installation Instructions and the General Information sheet prior to installing or operating this equipment.
 Attachment Tab Height: 24-1/4 Serial Number Attachment Tab Width: 24 Please read BOTH these and the General Information sheet prior to installing or operating this equipment. 1. Blue Ox towing products
SUNTURA SOLAR TRACKER
 WindyNation SUNTURA SOLAR TRACKER SOT-TRKS-NF User s Manual Page 1 of 10 WindyNation 08/09/2012 Table of Contents 1 Introduction... 3 1.1 Limited Warranty... 3 1.2 Restrictions... 3 1.3 Warranty Claims
Model P-40 & Model P-25 POWER PUSHER
 Power Pusher Description INSTRUCTION MANUAL The Power Pusher provides ram capability by using the spreading power of the POWER HAWK P-16 Rescue Tool. (The Power Pusher may also be used with other spreader
AWE S-FLO Carbon Intake System Mini F5X. AWE website here
 Thank you for purchasing the AWE S-FLO Carbon Intake System for the 2014+ Mini F5X. For up to the minute fitment information, be sure to visit the Mini section of the AWE website. As always, AWE Performance
INSTALLATION GUIDE DIRECT-REPLACEMENT
 DIRECT-REPLACEMENT INSTALLATION GUIDE TITAN (04+) 883-06-120-2.5 Factory Series Coil-Over Reservoir - Adjustable 883-02-120-2.5 Factory Series Coil-Over Reservoir 983-02-053-2.0 Performance Series Coil-Over
Doing Our Best to Provide You the Best. Toyota Tacoma. Pin height: 17 Centers: 30-1/2. BOlT TORQuE specifications TP20190,Rev 7
 10-13 TP20190,Rev 7 Toyota Tacoma BOlT TORQuE specifications standard BOlTs: metric BOlTs: size grade Torque size Torque 5/16 5 20 ft/lbs. 8mm 22 ft/lbs. 3/8 5 35 ft/lbs. 10mm 42 ft/lbs. 7/16 5 56 ft/lbs.
AEROMOTIVE Volkswagen 1.8T Fuel Rail Part # INSTALLATION INSTRUCTIONS
 AEROMOTIVE Volkswagen 1.8T Fuel Rail Part # 14163 INSTALLATION INSTRUCTIONS CAUTION: Installation of this product requires detailed knowledge of automotive systems and repair procedures. We recommend that
1. Contents 1. CONTENTS INTRODUCTION SAFETY WARNINGS POWER TILT STANDARD OPERATING INSTRUCTIONS... 5.
 1. Contents 1. CONTENTS..... 2. INTRODUCTION..... 3. SAFETY WARNINGS..... 4. POWER TILT STANDARD OPERATING INSTRUCTIONS....... 5. POWER SEAT LIFT STANDARD OPERATING INSTRUCTIONS...... 6. POWER TILT / SEAT
Machinery Skate. Owner s Manual
 Machinery Skate Owner s Manual WARNING: Read carefully and understand all ASSEMBLY AND OPERATION INSTRUCTIONS before operating. Failure to follow the safety rules and other basic safety precautions may
Hydraulic Drum Transporter
 Hydraulic Drum Transporter Owner s Manual WARNING: Read carefully and understand all ASSEMBLY AND OPERATION INSTRUCTIONS before operating. Failure to follow the safety rules and other basic safety precautions
Convertible Car Dolly
 Convertible Car Dolly ATD-7469 Operating Instructions & Parts Manual Capacity 2,000 lbs. per Dolly! This is the safety alert symbol. It is used to alert you to potential personal injury hazards. Obey all
idrive Power Cord Extender Installation Instructions MODELS: 3960M/3961S (1) 25 POWER CORD DRILL WITH 3/32 DRILL BIT
 25 POWER CORD DRILL WITH 3/32 DRILL BIT") Wayne-Dalton Corp. P.O. Box 67 Mt. Hope, OH 44660 (888) 827-3667 www.wayne-dalton.com idrive Power Cord Extender Installation Instructions MODELS: 3960M/3961S The idrive Power Cord Extender is intended
Wayne-Dalton Corp. P.O. Box 67 Mt. Hope, OH 44660 (888) 827-3667 www.wayne-dalton.com idrive Power Cord Extender Installation Instructions MODELS: 3960M/3961S The idrive Power Cord Extender is intended