INCLUDED TOOLS REQUIRED TOOLS ITEMS REQUIRED FOR OPERATION. 6-Cell Battery DTXC2054. Onyx 200 Peak Charger DTXP4200. Charge Adapter DTXC2209
|
|
|
- Griselda Stewart
- 6 years ago
- Views:
Transcription


1 Ready to Run 1/5-Scale Brushless EP Motorcycle


 DTXR0291 (3mm)")


2 INCLUDED TOOLS 2mm Wrench Cleaning Brush REQUIRED TOOLS Needle Nose Pliers DTXR0300 Phillips Screwdriver DTXR0124 Flat Blade Screwdriver DTXR0102 Threadlocker DTXR0288 Hex Wrenches DTXR0288 (1.5mm) DTXR0291 (3mm) ITEMS REQUIRED FOR OPERATION 6-Cell Battery DTXC2054 Onyx 200 Peak Charger DTXP4200 Charge Adapter DTXC2209 2
3 SAFETY PRECAUTIONS When these safety precautions are followed, the DX450 will provide years of enjoyment. Use care and good sense at all times when operating this radio controlled motorcycle. Failure to use this vehicle in a safe, sensible manner can result in injury or damage to property. You and you alone must ensure that the instructions are carefully followed and all safety precautions are obeyed. Do not operate the DX450 near people. Spectators should be behind the driver or at a safe distance away from the bike. Make sure to read the instructions included with the battery and charger before charging the battery. Do not leave any charger unattended during charging. If the battery or charger become hot at any time, disconnect the battery from the charger immediately! Failure to do so may cause permanent damage to the charger and battery and may cause bodily harm or property damage. Do not cover the air intake holes on the charger during charging. This may cause the charger to overheat. Do not allow the electronic speed control (ESC) or other radio equipment to come into contact with moisture. Water can cause electronics to short out and can cause permanent damage. Always turn on the transmitter before turning on the ESC. Always turn off the ESC before turning off the transmitter. Allow the motor and ESC to cool before each run. SPECIFICATION AND DESCRIPTION CHANGES All pictures, descriptions and specifications found in this instruction manual are subject to change without notice. DuraTrax maintains no responsibility for inadvertent errors in this manual. Visit duratrax.com for the latest updates and information for your model. HELPFUL HINTS Avoid working over a deep pile carpet. If you drop a small part or screw, it may be diffi cult to fi nd. Place a mat or towel over your work area. This will prevent parts from rolling off and protect the work surface. Avoid running the motorcycle in cold weather. The plastic and metal parts can become brittle at low temperatures. In addition, grease and oil become thick, causing premature wear and poor performance. Test fi t all parts before attaching them permanently. STRESS-TECH PARTS GUARANTEE We have engineered the DX450 to take the rough and tumble abuse that makes R/C fun. We are so confident of the quality and durability of the Stress-Tech plastic parts that we will replace any Stress-Tech plastic part you break during the first 12 months you own the motorcycle. Just send in the part to us and we will send you a FREE replacement. Please see the parts list for the items covered under the Stress-Tech guarantee. WARRANTY DuraTrax guarantees this kit to be free from defects in both material and workmanship at the date of purchase. DuraTrax will warranty this kit for 90 days after the purchase date. DuraTrax will repair or replace, at no charge, the incorrectly made part. Make sure you save the receipt or invoice you were given when you bought your model! It is your proof of purchase and we must see it before we can honor the warranty. Further, DuraTrax reserves the right to change or modify this warranty without notice. In that DuraTrax has no control over the fi nal user assembly or material used for fi nal user assembly, no liability shall be assumed nor accepted for any damage resulting from the use by the user of the fi nal userassembled product. By the act of using the user-assembled product, the user accepts all resulting liability. To return your DX450 for repairs covered under warranty, you should send your motorcycle to: Hobby Services 3002 N. Apollo Drive Suite 1 Champaign, Illinois Attn: Service Department Phone: (217) :00 am 5:00 pm Central Time M-F hobbyservices@hobbico.com hobbyservices.com If you are not prepared to accept the liability associated with the use of this product, you are advised to return this kit immediately in new and unused condition to the place of purchase. REPAIR SERVICE Repair service is available anytime. After the 90 day warranty, you can still have your DX450 repaired for a small charge by the experts at DuraTrax s authorized repair facility, Hobby Services. To speed up the repair process, please follow the instructions listed below. 1. Under most circumstances return the ENTIRE vehicle. The exception would be sending in a Stress-Tech part. See the instruction under the Stress-Tech Guarantee. 2. Make sure the transmitter is turned off, and all of the batteries are removed. 3. Send written instructions which include: a list of all items returned, a THOROUGH explanation of the problem, the service needed and your phone number during the day. If you expect the repair to be covered under warranty, be sure to include a proof of date of purchase (your store receipt or purchase invoice). To receive your free replacement part please send the following to the Hobby Services address listed under the warranty. 1. The broken part must be included. 2. The part number and description of the broken part. 3. Copy of the dated invoice or purchase receipt. 4. Your name, phone number and shipping address. 3


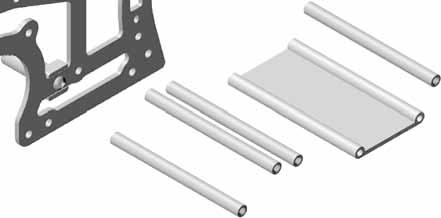
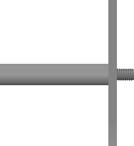
4 TRANSMITTER PREPARATION Slide off the batttery tray door and install four AA batteries. Make sure the polarity is correct. RED BATTERY LIGHT Raise the antenna at the top of the transmitter. The receiver should be factory bound to the transmitter. However, if you ever need to bind, follow these steps: Turn on the transmitter and check the battery light. If the red light glows steadily, the batteries have enough voltage. If the red light blinks, the batteries are low and should be replaced. 1. Turn on the transmitter. 2. Turn on the receiver via the switch on the ESC. If the receiver is not bound, the LED light will not be on. 3. Push and hold the bind button on the receiver until the light glows red. 4. Release the bind button. 5. If the binding is successful, the LED will flash once and then remain ON. STABILIZER BAR INSTALLATION 1. Slide the metal collar onto the stabilizer bar. 4x4mm Set Screw 4x4mm Set Screw 4. Secure the bar to the bike using set screws. 3x3mm Set Screw 3. Bend the rod and insert the ends into the bike. 4x4mm Set Screw 2. Make sure the collar is mounted on the center of the bar and tight the set screw. 4x4mm Set Screw ASSEMBLE THE BIKE STAND 4


5 RIDER ASSEMBLY Note: Rider assembly requires a screw, washer and nut in all locations. Insert screw through both halves from the outside. Install the washer and nut from the inside. 2x5mm Washers 2mm Nuts x6mm Note: Assemble the rider figure in the correct order. 3 4 Position chestplate inside the rider. 4mm E-clips 3x6mm 7 8 Washers 5


 where the direction between the transmitter")
6 BATTERY INSTALLATION Remove the body clips from the battery door posts and open the door. With the ESC off, plug the battery into the ESC lead. Tuck the battery/esc leads into the pocket in the battery holder. Install the battery into the battery holder, close the battery door and secure it in place with the body clips. STEERING SETUP The Dirt Bike comes with a CG Steering System (counter-steering) where the direction between the transmitter steering wheel and the Dirt Bike s front wheel are opposite. LEFT NEUTRAL RIGHT 6


7 Longer stabilizer bars (250mm) are better more steering. IMPORTANT OPERATION NOTES The best place to operate your dirt bike is on an parking lot, baseball diamond or at your local R/C track. For better stability, be sure to get the gyro spinning before launching the dirt bike. BEFORE the cycle. Always turn the cycle off before the transmitter. gyro, making the cycle more stable at low speeds. until you get used to the way the cycle handles. Display For easier starts, use the bike stand as shown. To start a right turn, gently turn the transmitter to the right. The bike will lean to the right. To Start If the stabilizer bar touches the ground, the bike will not turn well. Return the transmitter wheel to neutral to lift the bike When you want to go straight again, turn the transmitter wheel in the opposite direction of the turn. 7

8 The weight can be adjusted by adding or removing weights in the flywheel: SHOCK OIL by using different weight shock oil in the 8


9 MAINTENANCE GUIDE The following section is provided to help you with maintenance and repairs to your DX450. Pay extra attention to the notes and tips for proper assembly. 1 Note: The direction of the one-way bearing. FH Screws 2 6x13mm 2.5x8mm FH Screws 3 5mm E-clip 6x10mm s 9


10 4 Pin Pin Note the direction of the clutch shoes. Pin Clutch Shoe Spring 5 IMPORTANT! The gyro weights must always be evenly distributed in the gyro to keep it balanced. 3x6mm FH Screws 3x6mm FH Screws 6 5mm E-clip 6x13mm 6x13mm 6x9mm Metal Bushing 3x6mm 10


11 7 6x13mm 5mm E-clip 8 4mm Set Screw 6x13mm 5mm E-clip 6x13mm Keep chain clean & oiled! 9 Keys into the 6x13mm ball bearing. 5mm E-Clip 6x13mm NOTE: Make sure the left and right are the same. 4x16mm SHC Screw 4x10mm Washer 3x6mm BH Screw 4x10mm Washer Washer Keys into the 6x13mm ball bearing. 5mm E-Clip NOTE: Make sure the left and right chain adjustment are the same x16mm SHC Screw Washer 3x6mm BH Screw 6x13mm 11


12 10 5x10mm 4mm E-clip 5x10mm 2mm O-Ring 4mm E-clip 11 3mm Nut 3x6mm BH Screw 3x6mm 12 3x12mm SHC Screw 8mm O-Ring 4x12mm SHC Screw 12


13 13 6x13mm 6x13mm 3x6mm 14 4x12mm SHC Screw 4x10mm Washer 4x12mm SHC Screw 4x10mm Washer 3x6mm 15 4mm Locknuts 4x25mm SHC Screws Note the orientation of the servo. Washers 3x12mm 13 NOTE: Do not overtighten!


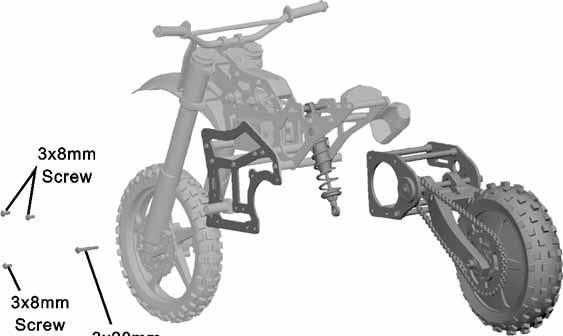
14 16 3x6mm 17 3x3mm Set Screw 2.5x12mm BH Screw 3x3mm Set Screw 2.5mm Locknut Screw included with servo. Remove 3 arms. 17mm 17mm Approximately x16mm Set Screw BH Screw BH Screw 4mm 3x16mm Set Screw 4mm 3x10mm BH Screw 14


15 mm Locknut 9mm O-ring Fill the shock body with shock oil. Work the shock shaft up and down in the shock. Install the shock cap. Push the shock shaft to the top of the shock body. Slowly tighten the shock cap. Wipe off any excess oil. 4mm E-clips 3mm Nut Shock Oil 2 7mm C-clip 3mm O-ring 3mm O-ring x6mm 3mm Locknut 3x40mm BH Screw 3x6mm 15


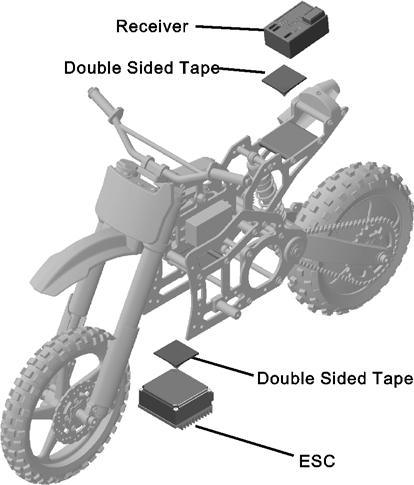
16 22 3x20mm Screws Screws 23 4mm BH Screw 3x10mm BH Screw 3x16mm Set Screws Receiver Double-sided Tape 2x12mm Pin 5mm E-clip Double-sided Tape ESC 16
 Black ( ) Blue")


17 26 Washers Motor Red (+) Black ( ) Blue Motor ESC Red (+) Black ( ) Blue 3x3mm Set Screw Tighten the screw with one sheet of paper inserted between both gears. 27 Washer 28 Use threadlock BH Screw Washer BH Screw Washer Use threadlock 17


18 29 3mm Nut 3x12mm BH Screw (Do NOT overtighten!) 2.5x20mm BH Screw 2.5x20mm BH Screw 30 Washer Washers Washer 31 4x4mm Set Screw 3x3mm Set Screw NOTE: Make sure the collar is mounted in the center of the rod. 4x4mm Set Screw 4x4mm Set Screw 4x4mm Set Screw 18


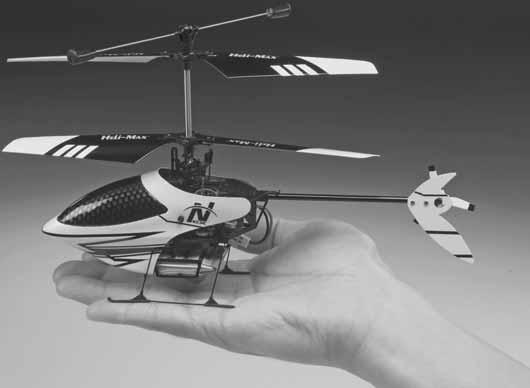


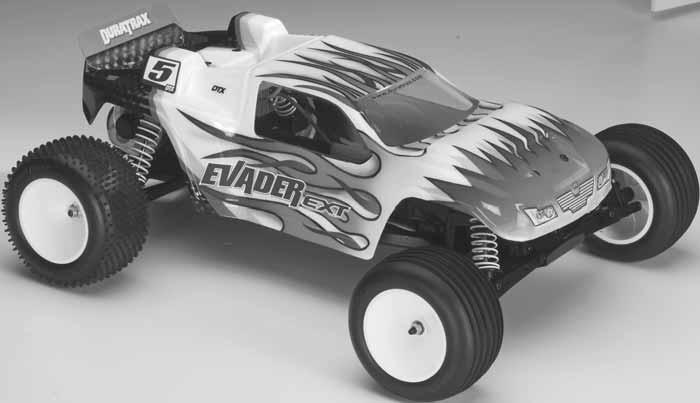


19 OTHER ITEMS AVAILABLE DuraTrax 1/18 Vendetta SC RTR DTXD17** duratrax.com DuraTrax Evader EXT EP ST RTR DTXD29** duratrax.com Heli-Max Novus CX 2.4GHz Nano Sized Coaxial RTF Heli HMXE0803 helimax-rc.com 19

20 Copyright 2009 DTXZ1150 fordtxd02xx
ASSEMBLY AND OPERATION MANUAL
 ASSEMBLY AND OPERATION MANUAL www.duratrax.com ITEMS INCLUDED The following items are included with your Vendetta Rally. Chassis Transmitter Body Decal Sheet Instruction Manual Exploded View/Parts Listing
ASSEMBLY AND OPERATION MANUAL
 Length: 9.5" [240mm] Width: 7.4" [185mm] Height: 4.7" [120mm] Ground Clearance: 1.25" [32mm] Weight: 25 oz [725g] approx. running weight with battery/motor/esc Technical Support Information For technical
ASSEMBLY AND OPERATION MANUAL
 Length: 28.1" [715mm] Width: 16.5" [420mm] Height: 11" [279mm] Weight: 18.8 lb [8.5kg] Wheelbase: 18.6" [472mm] Technical Support Information For technical assistance, contact: DuraTrax Product Support
PREBUIL UILT ASSEMBLY AND OPERATION MANUAL
 PREBUIL UILT Length: 15.2" [385mm] Width: 13" [330mm] Height: 5.8" [147mm] Weight: 3.3 lb [1500g] Wheelbase: 11.6" [295mm] Technical Support Information For technical assistance, contact: DuraTrax Product
ASSEMBLY AND OPERATION MANUAL
 Weight: 1lb 14oz Length: 17.25" [435mm] Width: 8" [205mm] Height: 4.5" [115mm] Wheelbase: 10.5" [265mm] Motor: 20 Turn Photon Speed Radio: 2 channel surface frequency Technical Support Information For
ASSEMBLY AND OPERATION MANUAL
 ASSEMBLY AND OPERATION MANUAL www.duratrax.com ITEMS INCLUDED The following items are included with your Raze ST. Chassis Body Body Clips (Qty 4) Decal Sheet Transmitter Transmitter Antenna Receiver Antenna
IMPORTANT SAFETY PRECAUTIONS: HELPFUL HINTS: These are included with your Evader EXT2.4.
 www.duratrax.com These are included with your Evader EXT2.4. Chassis Body Transmitter 7.2V 1500mAh NiMH Battery 7.2V Charger AA Batteries (8) Receiver Antenna Tube Instruction Manual Replacement Parts
ASSEMBLY AND OPERATION MANUAL
 AEMBLY AND OPERATION MANUAL www.duratrax.com ITEM INCLUDED The following items are included with your Evader EXT. Chassis Body Body Clips (Qty 4) Transmitter Transmitter Antenna Receiver Antenna Tube Decal
2-SPEED TRANSMISSION CON- VERSION FOR THE MAXIMUM BX, MT, ST
 2-SPEED TRANSMISSION CON- VERSION FOR THE MAXIMUM BX, MT, ST 2) Remove the engine by unscrewing the four 4 x 12mm engine mounting screws. Disconnect the throttle rod from the carburetor by rotating the
ASSEMBLY AND OPERATION MANUAL
 AEMBLY AND OPERATION MANUAL www.duratrax.com ITEM INCLUDED The following items are included with your Evader EXT2 Chassis Body Body Clips (Qty 4) Transmitter Transmitter Antenna Receiver Antenna Tube Decal
INDEX SPECIFICATIONS
 The DuraTrax Onyx 210 charger is great for a wide variety of applications! Charge current options of 800mA, 1.5A, 3A, and 5 amps, plus 4 to 8 cell NiCd or NiMH compatibility makes this charger great for
INSTRUCTION MANUAL. Specifi cations. Length: 9.0 in [229mm] Width: 2.7 in [68mm] Height: 3.3 in [84mm] Rotor Span: 7.9 in [200mm]
![INSTRUCTION MANUAL. Specifi cations. Length: 9.0 in [229mm] Width: 2.7 in [68mm] Height: 3.3 in [84mm] Rotor Span: 7.9 in [200mm]](/thumbs/77/74699350.jpg "INSTRUCTION MANUAL. Specifi cations. Length: 9.0 in [229mm] Width: 2.7 in [68mm] Height: 3.3 in [84mm] Rotor Span: 7.9 in [200mm]") INSTRUCTION MANUAL Specifi cations Length: 9.0 in [229mm] Width: 2.7 in [68mm] Height: 3.3 in [84mm] Rotor Span: 7.9 in [200mm] Flying Weight: 2 oz [57.2g] with supplied fl ight battery IMPORTANT PRECAUTIONS
INSTRUCTION MANUAL Specifi cations Length: 9.0 in [229mm] Width: 2.7 in [68mm] Height: 3.3 in [84mm] Rotor Span: 7.9 in [200mm] Flying Weight: 2 oz [57.2g] with supplied fl ight battery IMPORTANT PRECAUTIONS
It is strongly recommended to completely read this manual before use! Damage resulting from misuse or modification will void your warranty.
 The DuraTrax Onyx 240 charger is two chargers in one! It s an excellent choice for electric powered models which use two NiCd or NiMH batteries simultaneously, or modelers who rotate through multiple batteries
ASSEMBLY INSTRUCTIONS
 TM ASSEMBLY INSTRUCTIONS i Every dream has a beginning and an end. This one just happened to start out in the O Donnell family garage back in 1980. Young Steve O Donnell wasn t satisfi ed with the mediocre
IMPORTANT. These are included with your VW Baja Bug. These are items you will need to run your VW Bug. ONYX 6C 7.2V 2000MAH NIMH STICK DTXC2035
 www.duratrax.com These are included with your VW Baja Bug. Chassis Body Transmitter Receiver Antenna Tube Instruction Manual Replacement Parts Guide IMPORTANT These are items you will need to run your
 ASSEMBLY Y AND OPERATION MANUAL AL www.duratrax.com www.warheadmt.com YOU WILL NEED SPARE GLOW PLUGS DTXG3005 AFTER RUN OIL HCAP3000 FUEL FILLER BOTTLE DTXP0150 20% O DONNELL FUEL DTXP0720 WRENCH DTXR1170
ASSEMBLY AND OPERATION MANUAL
 TM Length: 16.5" [435mm] Width: 7.7" [195mm] Height: 4.6" [115mm] Weight: 3.1 lb [1.4kg] Wheelbase: 10.1" [255mm] Technical Support Information For technical assistance, contact: DuraTrax Product Support
ASSEMBLY INSTRUCTIONS
 TM ASSEMBLY INSTRUCTIONS i Every dream has a beginning and an end. This one just happened to start out in the O Donnell family garage back in 1980. Young Steve O Donnell wasn t satisfi ed with the mediocre
AXE100 CX Instruction Manual
 NOTICE AXE100 CX Instruction Manual The instruction manual, warranties and other associated documentation are subject to change without notice. Hobbico assumes no responsibility for inadvertent errors
Boat Features. Introduction. Important LiPo Performance and Care Information! Items Included. Parts Needed to Complete Your Model
 Introduction Thank you for purchasing the AquaCraft Atlantic II Harbor Tugboat. We want the time you spend with your new R/C boat to be fun and successful so please fully read the manual. If for any reason
ASSEMBLY AND OPERATION MANUAL
 TM Length: 17-3/4" [450mm] Width: 12-5/8" [320mm] Height: 4-15/16" [125mm] Weight: 5lbs 6oz Wheelbase: 11-7/16" [290mm] Radio: 2 channel surface frequency Engine: Velocity.17 ASSEMBLY AND OPERATION MANUAL
ASSEMBLY AND OPERATION MANUAL
 TM ASSEMBLY AND OPERATION MANUAL Warranty DuraTrax will warranty this kit for 90 days after the purchase date from defects in materials or workmanship. DuraTrax will either repair or replace, at no charge,
ASSEMBLY AND OPERATION MANUAL
 ASSEMBLY AND OPERATION MANUAL Warranty DuraTrax will warranty this kit for 90 days after the purchase date from defects in materials or workmanship. DuraTrax will either repair or replace, at no charge,
ASSEMBLY AND OPERATION MANUAL
 ASSEMBLY AND OPERATION MANUAL Warranty DuraTrax will warranty this kit for 90 days after the purchase date from defects in materials or workmanship. DuraTrax will either repair or replace, at no charge,
ASSEMBLY AND OPERATION MANUAL
 TM ASSEMBLY AND OPERATION MANUAL Warranty DuraTrax will warranty this kit for 90 days after the purchase date from defects in materials or workmanship. DuraTrax will either repair or replace, at no charge,
Novus CP Specifi cations
 Novus CP Specifi cations Length: 10.7 in [272mm] Width: 2 in [50mm] Height: 3.74 in [95mm] Rotor Span: 12 in [305mm] Flying Weight: 2.41 oz [68.4g] (with supplied fl ight battery) Entire Contents Copyright
Wing Loading: Length: Radio: 6 channel
 INSTRUCTION MANUAL SPECIFICATIONS Wingspan: 56.5 in [1435mm] Wing Area: 421 in 2 [27.2 dm 2 ] Weight: 61 oz [1729 g] Wing Loading: Length: Radio: 20.9 oz/ft 2 [63.7 g/dm 2 ] 44.5 in [1130mm] 6 channel
Boat Features. Introduction. Important LiPo Performance and Care Information! Items Included. Parts Needed to Complete Your Model
 Introduction Thank you for purchasing the AquaCraft Bristol Trawler. We want the time you spend with your new R/C boat to be fun and successful so please fully read the manual. If for any reason you think
1/10 Competition Ready to Run Truck Little Orchard St. San Jose CA,
 1/10 Competition Ready to Run Truck RC4WD WWW.RC4WD.COM 1855 Little Orchard St. San Jose CA, 95125 E-mail: rcrock@rc4wd.com Check out Precautions To Prevent Serious Personal injury and/or property damage,
AC/DC LIPO CHARGER INSTRUCTION MANUAL
 DTXP4195 AC/DC LIPO CHARGER INSTRUCTION MANUAL The Onyx 150 AC/DC LiPo balancing charger is the perfect entry-level LiPo charger for modelers using up to 3S LiPo batteries. Inexpensive and very easy to
Special Features. Specifications Motor Types: Sensored Motor Limit: 2.5T (on 2S) Input Voltage: 2-3S LiPo Direction: Forward, Brake, Reverse
 Input Voltage: 2-3S LiPo Direction: Forward, Brake, Reverse") MS-1 ELECTRONIC SPEED CONTROL Thank you for choosing TrakPower as your source for brushless electronics. The MS-1 ESC was specifically developed for 1/10th competition. The MS-1 ESC features an aluminum
MS-1 ELECTRONIC SPEED CONTROL Thank you for choosing TrakPower as your source for brushless electronics. The MS-1 ESC was specifically developed for 1/10th competition. The MS-1 ESC features an aluminum
ITEMS INCLUDED INTRODUCTION WARRANTY SPECIFICATIONS
 WARNING: Never attempt to swim after a stalled RC boat. Never operate your RC boat while standing in the water. Never operate your RC boat in the presence of swimmers. Always use a Personal Flotation Device
ASSEMBLY AND OPERATION MANUAL
 ASSEMBLY AND OPERATION MANUAL Warranty AquaCraft will warrant this kit for 90 days after the date of purchase from defects in materials or workmanship. AquaCraft will either repair or replace, at no charge,
INSTRUCTION. FOX4x4 Kit Features:
 INSTRUCTION Congratulations on your purchase of the new SWORKz 1/10 scale FOX4x4 off-road ready to run brushless power CAGE buggy. Please read this manual thoroughly before you attempt to drive your FOX4x4.
RTR Instruction Manual
 RTR Instruction Manual OFNA RACING 22692 Granite Way, Ste. B Laguna Hills, CA. 92653 PRE-ASSEMBLED ASSEMBLED CHASSIS WITH RADIO AND ENGINE REQUIRED FOR OPERATION THINGS NEEDED You will need to buy a few
TOWC Universal Drive Shaft Set...15,16 x2pcs. TOWC Engine Mount...98 x1pc. TOWC Dogbone (Rear)...19 x1pc
...19 x1pc") Replacement Parts Stock # Description Included DTXC5...5x0mm Bearing...x2pcs DTXC5...x6mm Bearing...x2pcs DTXC6...mm Bearing...x2pcs TOWC6032...Air Filter Set...02,03,0,05 xpc TOWC600...Rear Axle... xpc
Replacement Parts Stock # Description Included DTXC5...5x0mm Bearing...x2pcs DTXC5...x6mm Bearing...x2pcs DTXC6...mm Bearing...x2pcs TOWC6032...Air Filter Set...02,03,0,05 xpc TOWC600...Rear Axle... xpc
RECOMMENDED TOOLS INCLUDED EQUIPMENT PRECAUTIONS
 Thank you for purchasing Pro-Line s Ambush Mini Scale Crawler! For Over 30 years, Pro-Line has designed and manufactured the best RC products in the world. This crawler has been developed from the ground
The following items are needed to install your Speed Kit. Phillips head screw driver 3/16" nut driver 1.5mm hex wrench
 BRUSHLESS SPEED KIT INSTALLATION INSTRUCTIONS REQUIRED TOOLS The following items are needed to install your Speed Kit. Phillips head screw driver 3/16" nut driver 1.5mm hex wrench 1. REMOVE STEERING LINKAGE
RJS2021 LTO SPORT OVAL RACER LESS ELECTRICS
 RJS2021 LTO SPORT OVAL RACER LESS ELECTRICS THANKS FOR BUYING THE RJ SPEED 1/10 LTO SPORT KIT FOR OVAL RACING. THE ASSEMBLY WILL NOT BE DIFFICULT IF YOU READ THE TEXT, LOOK AT THE PICTURES, AND THE EXPLODED
Operating Instructions
 Operating Instructions 2.4GHz Radio Controlled Model Boat Please read instruction manual carefully before operating. DESIGNED FOR FRESH WATER USE ONLY! SPECIFICATIONS: Hull length: Overall length: Battery:
Sportwerks Raven RTR Assembly and Operation Manual
 Sportwerks Raven RTR Assembly and Operation Manual Specifications: Scale.............. 1/10 Length............. 16 in (406mm) Front Track.......... 12.75 in (324mm) Rear Track.......... 12.5 in (318mm)
FTX Banzai RTR Brushed 2.4GHz 4WD Drift Car
 FTX Banzai-Manual_Banzai 11/12/2013 16:12 Page 1 FTX Banzai-Manual_Banzai 11/12/2013 16:12 Page 2 FTX Banzai RTR Brushed 2.4GHz 4WD Drift Car Congratulations on your purchase of the FTX Banzai electric
These are included with your Brushless Evader. IMPORTANT. These are items you will need to run your Brushless Evader.
 www.duratrax.com These are included with your Brushless Evader. Chassis Body Transmitter Decal heet Receiver Antenna Tube Instruction Manual Replacement Parts Guide IMPORTANT The receiver in this car will
INSTRUCTION MANUAL SPECIFICATIONS
 INSTRUCTION MANUAL SPECIFICATIONS Span: 13.6 in [ 345 mm] Size: Height: 19.7 in [500 mm] diagonal span 9.25 in [ 235mm] Weight RTF: Flight Time: 3.91 lbs (1774 g) with 5000 mah LiPo Up to 15 minutes WARNING
Specifications ASSEMBLY INSTRUCTIONS
 ASSEMBLY INSTRUCTIONS Specifications Length : 6 mm Height : 218 mm Main Blade : 325 mm Main Rotor Diameter : 723 mm Tail Rotor Diameter : 150 mm Motor Pinion Gear : 16T (14T) Main Drive Gear : 150T Main
RTR Instruction Manual
 OFNA Racing 22692 Granite Way, Ste. B Laguna Hills, Ca. 92653 (949) 586-2910 Www.ofna.com RTR Instruction Manual PURE COMPETITION... PRE-ASSEMBLED ASSEMBLED CHASSIS WITH RADIO AND ENGINE REQUIRED FOR OPERATION
I N S T R U C T I O N M A N U A L
 INSTRUCTION MANUAL The TrakPower DPS Power Supply is perfect for competition-level racing as it is capable of maintaining 25 amps output current at 12V DC. This power supply delivers clean, smooth, reliable
Specifications. Introduction. Safety Precautions. Manual Specifications & Description Changes. Warranty Service
 Never attempt to swim after a stalled RC boat. Never operate your RC boat while standing in the water. Never operate your RC boat in the presence of swimmers. Always use a Personal Flotation Device (PFD)
IMPORTANT PRECAUTIONS
 Rotor Span: 10.6 in [270mm] Height: 5.9 in [150mm] Length: 10.8 in [275mm] Width: 2.5 in [65mm] Weight: 2.65 oz [75g] no battery Flying Weight: 4.26 oz [121g] with supplied fl ight battery INSTRUCTION
ITEMS INCLUDED. 2.4GHz Controller
 READ THESE INSTRUCTIONS BEFORE FLYING! ITEMS INCLUDED.4GHz Controller Flight Battery Charger SKY Cruiser LiPo Flight Battery AA Batteries AC Power Supply WARNINGS FOR YOUR SAFETY PLEASE READ AND UNDERSTAND
INSTRUCTION MANUAL WARRANTY
 INSTRUCTION MANUAL Rotor Diameter: 27.5 in [700mm] Weight: 19 22 oz [580 760g] Length: 25.4 in [645mm] Height: 9 in [225mm] Motor: ElectriFly Ammo 28-45-2700kV (GPMG5215) Heli-Max guarantees this kit to
J & D Machine / Hyperdrive / MSA 3711 Moon Bend Rd. Chapel Hill, TN 37034
 J & D Machine / Hyperdrive / MSA 3711 Moon Bend Rd. Chapel Hill, TN 37034 www.hyperdriveracing.com 1 You now own a state of the art 1/10 scale oval race car. The Hyperdrive Assault has gone through months
AC/DC Dual Touch Charger Instruction Manual
 DTXP4261 AC/DC Dual Touch Charger Instruction Manual It is strongly recommended to completely read this manual before use! Damage resulting from misuse or modification will void your warranty. WARNING!!
Specifications. Wingspan: 600mm (23-5/8") Length: 460mm (18-1/8") 3.7V 1S 300mAh LiPo (2 included) Coreless Direct Drive
 Length: 460mm (18-1/8) 3.7V 1S 300mAh LiPo (2 included) Coreless Direct Drive") Specifications Wingspan: 600mm (23-5/8") Length: 460mm (18-1/8") Flying Weight: 60g (2-1/8 oz.) Battery: 3.7V 1S 300mAh LiPo (2 included) Motor: Coreless Direct Drive Charger: USB 1S LiPo Charger Transmitter:
Specifications Wingspan: 600mm (23-5/8") Length: 460mm (18-1/8") Flying Weight: 60g (2-1/8 oz.) Battery: 3.7V 1S 300mAh LiPo (2 included) Motor: Coreless Direct Drive Charger: USB 1S LiPo Charger Transmitter:
AVIATOR 25 ARF Almost Ready-to-Fly
 AVIATOR 25 ARF Almost Ready-to-Fly Instruction Manual Specifications Wingspan: 54.3 in (1380mm) Length: 45.2 in (1150mm) Wing Area: 438 sq in (34sq dm) Flying Weight: 3.8 b (1700g) Dear Customer, Congratulations
STRX-9 100% TAKE CONTROL INSTRUCTION MANUAL READY-TO-RUN. w/ Adult Supervision
 STRX-9 w/ Adult Supervision INSTRUCTION MANUAL 18005 100% READY-TO-RUN TAKE CONTROL Index Included Items Important Notes Battery Installation Charging Instructions Transmitter/Receiver Binding Basic Controls
Radio control glider
 Radio control glider Contents SPECIFICATIONS 01 STATEMENT 02 SAFETY PRECAUTIONS 02~03 CHARGING METHOD AND CAUTIONS 03~05 ASSEMBLY 06~07 2.4GHz RADIO SYSTEM 08~10 PRE-FLIGHT INSPECTION AND ADJUSTMENT 10~11
Shown with optional GFR-1017R Body Posts. J & D Machine / Hyperdrive / MSA 3711 Moon Bend Rd. Chapel Hill, TN
 Shown with optional GFR-1017R Body Posts J & D Machine / Hyperdrive / MSA 3711 Moon Bend Rd. Chapel Hill, TN 37034 www.hyperdriveracing.com 1 You now own a state of the art 1/10 scale oval race car. The
40 EP Gee Bee Y Scale ARF V2 Instruction Manual Specs:
 40 EP Gee Bee Y Scale ARF V2 Instruction Manual Specs: Wing Span: 40" Overall length: 30" Wing area: 306 sq. in Ready to fly weight: 28~32 oz Motor/Engine: Electric: Uranus-28309 brushless outrunner motor,
Wing Area: 1050 in 2 [67.7 dm 2 ] Wing Loading: 10 oz/ft 2 [31 g/dm 2 ]
![Wing Area: 1050 in 2 [67.7 dm 2 ] Wing Loading: 10 oz/ft 2 [31 g/dm 2 ]](/thumbs/75/71828779.jpg "Wing Area: 1050 in 2 [67.7 dm 2 ] Wing Loading: 10 oz/ft 2 [31 g/dm 2 ]") MANUAL ADDENDUM This manual addendum provides additional instructions for assembling the power system onto the Bird of Time. Please read through this addendum before you start the assembly of the Bird
MANUAL ADDENDUM This manual addendum provides additional instructions for assembling the power system onto the Bird of Time. Please read through this addendum before you start the assembly of the Bird
Power Meter with Balancing INSTRUCTION MANUAL
 Power Meter with Balancing INSTRUCTION MANUAL INSTRUCTIONS The PowerMatch meter is a perfect device for matching electronic components to optimize electric fl ight performance and satisfaction. An easy-to-read
MiG-29 Retract Kit (for the HET-RC Mini Air Retract System)
") MiG-29 Retract Kit (for the HET-RC Mini Air Retract System) The MiG-29 Retract Kit was designed to allow the easy installation of the HET-RC mini Air Retract system into the twin EDF MiG-29. We recommend
MiG-29 Retract Kit (for the HET-RC Mini Air Retract System) The MiG-29 Retract Kit was designed to allow the easy installation of the HET-RC mini Air Retract system into the twin EDF MiG-29. We recommend
VAN LADDER RACK FOR ULR-E INSTRUCTIONS P/N ULRDD-1
 VAN LADDER RACK FOR ULR-E INSTRUCTIONS P/N ULRDD-1 Before you begin: Remove all components from the shipping carton. The rack should be assembled on a padded surface such as carpet to prevent scratching
ASSEMBLE ONLY WITH ADULT SUPERVISION
 ASSEMBLE ONLY WITH ADULT SUPERVISION Please read through this instruction booklet to THOROUGHLY familiarize yourself with the assembly and flight characteristics of this airplane prior to assembly. Please
INSTRUCTION MANUAL WARRANTY
 INSTRUCTION MANUAL Rotor Diameter: 23 in [588mm] Weight: 20.5 23 oz [580 650 g] Length: 25 in [630mm] Height: 9 in [225mm] Motor: 200W brushless, 28mm diameter Heli-Max guarantees this kit to be free from
INSTRUCTION MANUAL WARRANTY
 INSTRUCTION MANUAL Rotor Span: 13.5 in [340mm] Height: 7 in [180mm] Length: 14.5 in [370mm] Weight: 7.5 oz [213g] Radio: Tactic 4-Channel FM Motor: 130 Brushed motor Heli-Max guarantees this kit to be
AIRPLANE COMPLETE RTF R
 COMPLETE RTF R AIRPLANE Quiet Electric Flight Requires 6 C and 1 9V Alkaline Batteries (Not Included) ASSEMBLE ONLY WITH ADULT SUPERVISION Please read through this instruction booklet to THOROUGHLY familiarize
CHARGING INSTALL THE BATTERIES INTO THE CONTROLLER
 CHARGING 1. Plug charger into computer or USB charge adapter. The LED on the charger will turn on. 2. Make sure that the On/Off switch on the Nano Hexagon is off and connect charger. The LED on the charger
INSTRUCTION MANUAL WARNING
 INSTRUCTION MANUAL WARNING Please make sure you read the entire instruction manual to become familiar with the features of your aircraft before operating. Failure to operate this product correctly can
INSTRUCTION MANUAL Hobbico, Inc. HMXR4854
 INSTRUCTION MANUAL 2013 Hobbico, Inc. HMXR4854 INTRODUCTION Thank you for purchasing the Heli-Max Digital Pitch Gauge. This product is intended to measure the angle on the helicopter s main and tail rotor
RTR Instruction Manual
 RTR Instruction Manual OFNA RACING 22692 Granite Way, Ste. B Laguna Hills, CA. 92653 PRE-ASSEMBLED ASSEMBLED CHASSIS WITH RADIO AND ENGINE REQUIRED FOR OPERATION THINGS NEEDED You will need to buy a few
ACTUAL SIZE (WHEN PRINTED AT 100%) 2x14MM FLAT HEAD SCREW. 2.5x8MM FLAT HEAD SCREW. 2.5x8MM SOCKET HEAD SCREW. 2.5x14MM SOCKET HEAD CAP SCREW
 2x14MM FLAT HEAD SCREW. 2.5x8MM FLAT HEAD SCREW. 2.5x8MM SOCKET HEAD SCREW. 2.5x14MM SOCKET HEAD CAP SCREW") RUSLSS ASSMLY AND MAINTNANC UID LPFUL INTS Avoid working over a deep pile carpet. If you drop a small part or screw, it may be diffi cult to fi nd. Place a mat or towel over your work area. This will prevent
RUSLSS ASSMLY AND MAINTNANC UID LPFUL INTS Avoid working over a deep pile carpet. If you drop a small part or screw, it may be diffi cult to fi nd. Place a mat or towel over your work area. This will prevent
WARNING: CHOKING HAZARD Small parts. Not for children under 3 years of age. Contents. Main Features
 www.revell.com Contents Proto CX EP 2.4GHz Transmitter 3.7V 110mAh LiPo Helicopter Battery Main Features Revell, Inc., a subsidiary of Hobbico, Inc., Champaign, IL 61826 Four AA Alkaline Batteries Spare
INSTALLATION INSTRUCTIONS: 2018 HARLEY-DAVIDSON STREET BOB BIG RADIUS 2-2 PART# / 46077
 INSTALLATION INSTRUCTIONS: 2018 HARLEY-DAVIDSON STREET BOB BIG RADIUS 2-2 PART# 26077 / 46077 Congratulations, you have purchased the finest exhaust system available for your motorcycle. Your Vance & Hines
SPECTRE DRONE USER MANUAL
 SPECTRE DRONE USER MANUAL PRODUCT CODE: ZXSPT www.zero-x.com.au www.zero-x.co.nz v2 Thanks for purchasing a Zero-X Spectre Drone, get ready to have the time of your life! We re sure your Zero-X Spectre
Installation Manual TWM Performance Kia Forte Short Shifter
 Installation Manual TWM Performance Kia Forte 2009+ Short Shifter Begin the installation by parking on a flat surface, as you will have to engage and disengage the hand brake and shift from gears to neutral.
Instruction Manual book
 Instruction Manual book ITEM CODE:BH118. SPECIFICATION Wingspan : 1,050 mm 41.34 inches. Length : 950mm 37.4 inches. Weight : 1 kg 2.2 lbs. Radio : 04 channels. Servo : 4 mini servos. Motor : KMS 2814/05
1:8 SCALE GAS POWERED OFF-ROAD BUGGY
 Instruction RTR Manual 1:8 SCALE GAS POWERED OFF-ROAD BUGGY PLEASE READ INSTRUCTIONS CAREFULLY BEFORE ASSEMBLING THIS MODEL. KEEP THIS MANUAL FOR PARTS NUMBERS WHEN ORDERING. REQUIRED FOR OPERATION THINGS
INSTALLATION INSTRUCTIONS: HARLEY-DAVIDSON SOFTAIL BIG SHOTS STAGGERED PART# / 47941
 INSTALLATION INSTRUCTIONS: HARLEY-DAVIDSON SOFTAIL BIG SHOTS STAGGERED PART# 17941 / 47941 Congratulations, you have purchased the finest exhaust system available for your motorcycle. Your Vance & Hines
2101 NITRO PRO STOCK DRAG KIT 2104 NITRO PRO MOD DRAG KIT
 2101 NITRO PRO STOCK DRAG KIT 2104 NITRO PRO MOD DRAG KIT THANKS FOR BUYING RJ SPEED S NITRO DRAG KIT. IT IS A LITEWEIGHT CAR MADE FOR STRAIGHT LINE DRAG RACING AND CAN BE BROKEN IF RUN INTO SOLID OBJECTS
FEATURES Charges two 6- to 8-cell NiCd/NiMH battery packs simultaneously Fully automatic operation Multi-color LEDs indicate state of charge at a
 FEATURES Charges two 6- to 8-cell NiCd/NiMH battery packs simultaneously Fully automatic operation Multi-color LEDs indicate state of charge at a glance 8-bit MHz CPU intelligence control Advanced Pulse
INSTALLATION INSTRUCTIONS: 2018 HARLEY-DAVIDSON SOFTAIL FAT BOY / BREAKOUT BIG RADIUS 2-2 PART# / 46075
 INSTALLATION INSTRUCTIONS: 2018 HARLEY-DAVIDSON SOFTAIL FAT BOY / BREAKOUT BIG RADIUS 2-2 PART# 26075 / 46075 Congratulations, you have purchased the finest exhaust system available for your motorcycle.
ASSEMBLY AND MAINTENANCE GUIDE
 SSMLY ND MINTNNC UID LPFUL INTS void working over a deep pile carpet. If you drop a small part or screw, it may be diffi cult to fi nd. Place a mat or towel over your work area. This will prevent parts
COMPLETE RTF R AIRPLANE
 COMPLETE RTF R AIRPLANE Quiet Electric Flight Radio-Controlled Model Requires 8 (AA) Alkaline Batteries (not included) ASSEMBLE ONLY WITH ADULT SUPERVISION Please read through this instruction booklet
Installation Manual TWM Performance Short Shifter Nissan 350Z, 370Z Infiniti G35, G37
 Installation Manual TWM Performance Short Shifter Nissan 350Z, 370Z Infiniti G35, G37 It is preferable to park on a flat surface, as you will have to engage and disengage the hand brake and shift from
Instruction Manual book
 book ITEM CODE:BH 115. SPECIFICATION Wingspan : 6,000 mm 236,22 in. Length : 2,740 mm 107,87 in. Weight : 17.5kg 38.5Lbs. Radio : 08 channels. Servo : 07-08 HS-5685MH(HITEC) Battery : 2 Cells-Li-Po 7.4V
SebArt professional line
 SebArt professional line Mini L39 1,46m ARF 90mm EDF-6S or P20-K30 turbine ASSEMBLY MANUAL The all new L39 Jet ARF was designed by Italy aerobatic pilot Sebastiano Silvestri. This sport ARF jet-model design
Sportwerks Chaos Assembly and Tuning Manual
 1/16 Scale Ready-To-Run 4WD Nitro Buggy Scale: 1/16 Overall Length: 10.2" (260mm) Width: 7.08" (180mm) Height: 3.7" (95mm) Wheelbase: 6.7" (172mm) Engine:.05 cu in w/recoil starter Clutch: 3-shoe centrifugal
User Manual. Brushless Speed Controller XERUN 80A/150A. Copyright 2009 Hobbywing Technology Co., Ltd. All Rights Reserved
 User Manual Brushless Speed Controller XERUN 80A/150A Copyright 2009 Hobbywing Technology Co., Ltd. All Rights Reserved CONTENTS DECLARATION FEATURES SPECIFICATIONS BEGIN TO USE THE NEW ESC PROGRAM THE
Installation Manual TWM Performance Short throw shifter 2001 and up Hyundai Accent
 Installation Manual TWM Performance Short throw shifter 2001 and up Hyundai Accent 1. Place the vehicle on a flat surface with blocks in front and behind the wheels preventing unwanted movement. The car
MEMO. No.4341 Specification: Wing Span: 29.1 (740mm) Length: 36.6 (930mm) 2. Warranty
 Length: 36.6 (930mm) 2. Warranty") MEMO No.4341 Specification: Wing Span: 29.1 (740mm) Length: 36.6 (930mm) 2 Wing Area: 299 sq.in. (19.29 dm ) Weight: 18.9oz. (536.5g) 2 Wing loading: 0.58 oz./sq.ft (27.8g/dm ) Motor: OBL 29/27-07A Warranty
MEMO No.4341 Specification: Wing Span: 29.1 (740mm) Length: 36.6 (930mm) 2 Wing Area: 299 sq.in. (19.29 dm ) Weight: 18.9oz. (536.5g) 2 Wing loading: 0.58 oz./sq.ft (27.8g/dm ) Motor: OBL 29/27-07A Warranty
14 + INSTRUCTION MANUAL COX MODELS
 COX MODELS 14 + Assemble Only With Adult Supervision Please read through this instruction booklet to THOROUGHLY familiarize yourself with the assembly and flight characteristics of this airplane prior
* Ql! ^0f. B-17 Flying Fortress. 3 axis stabilization
 G3&nw * Ql! ^0f B-17 Flying Fortress 3 axis stabilization (HK)EASYSKY ENTERPRISE LIMITED Website: www.easy-sky.net E-mail: rcmodel@easy-sky.net sales@easy-sky.net Tel: 86-755-27891 659 Fax:86-755-27372071
BOOMERANG. A Classic Trainer Goes Micro...
 BOOMERANG A Classic Trainer Goes Micro... Micro Wingspan: 457mm (18 ) Length: 343mm (13 1/2 ) Flying Weight: 34g (1.2 oz.) ERC3000 MICRO BOOMERANG RTF (Ready To Fly) Mode 1 ERC3000-2 MICRO BOOMERANG RTF
INSTRUCTIONS SPECIAL FEATURES
 INSTRUCTIONS Discharge Termination: auto-cut based on individual cell voltages 2.75V per cell in Quick-Balance Mode 3.0V per cell in Interface Mode with separate discharger Discharge Current: 120mA per
SPARC! is distributed exclusively by Horizon Hobby, Inc.
 SPARC! is distributed exclusively by Horizon Hobby, Inc. 05 Fieldstone Road Champaign, IL 68 006 CHOKING HAZARD Small parts. Not for children under years. OWNER S MANUAL Keep these instructions for future
Installation Instructions
 86-89 Suzuki Samurai Pedal Rebuild Kit SKU# SIB-PRB! Instructions also includes clutch adjustment procedures. Installation Instructions W e a l s o s u p p l y replacement peddle pads. Click HERE for more
Specifications. 750mm (29.52 inches) 520mm (20.47 inches) 180 Brushed/Geared 10A Brushed. PASS (Pilot Assist Stability Software)
 520mm (20.47 inches) 180 Brushed/Geared 10A Brushed. PASS (Pilot Assist Stability Software)") Wingspan: Length: Flying Weight: Battery: Motor: ESC: Charger: Gyro: Transmitter: Specifications 750mm (29.52 inches) 520mm (20.47 inches) 210g (7.40 oz.) 7.4V 2S 500mAh LiPo 180 Brushed/Geared 10A Brushed
Wingspan: Length: Flying Weight: Battery: Motor: ESC: Charger: Gyro: Transmitter: Specifications 750mm (29.52 inches) 520mm (20.47 inches) 210g (7.40 oz.) 7.4V 2S 500mAh LiPo 180 Brushed/Geared 10A Brushed
MS:159 ASSEMBLY MANUAL. Graphics and specifications may change without notice.
 ASSEMBLY MANUAL MS:159 Graphics and specifications may change without notice. Specifications: Wing span ----------------------------61.8in (157cm). Wing area -----------------1100.5sq.in (71.0sq dm). Weight
EXTRA 330LX. Specifications: Code: SEA274. Graphics and specifications may change without notice. ASSEMBLY MANUAL
 ASSEMBLY MANUAL EXTRA 330LX Code: SEA274 Graphics and specifications may change without notice. Specifications: Wingspan---------------82.0 in (208.2 cm). Wing area---------------1349.4 sq.in ( 87.1 sq.dm).