BACKHOE. Installation, Operation and Maintenance Manual. Backhoe: Digs trenches in earth up to 7ft. deep.
|
|
|
- Verity Taylor
- 5 years ago
- Views:
Transcription

1 BACKHOE Installation, Operation and Maintenance Manual Backhoe: Digs trenches in earth up to 7ft. deep.
2 Import-Rules for safe Operation 1) Read the Owner s Manual completely before attempting to use this backhoe. 2) Do not allow anyone to operate your backhoe who has not read the Operator s Manual or has not been instructed on the safe operation of the backhoe. 3) Never allow children or untrained adults to operate this machine. 4) Never allow anyone to ride on the backhoe while towing. 5) Never transport cargo on the backhoe. 6) High fluid pressures are developed in hydraulic backhoes. Pressurized fluid escaping though a pin hole opening can puncture skin and cause severe blood poisoning. Therefore, the following instructions should be followed at all times. (a) Do not operate the unit with frayed, kinked, cracked or damaged hoses, fitting, or tubing. (b) Stop the engine and relieve hydraulic system pressure before leaving the backhoe unattended or servicing fittings, hoses, tubing, or other system components. (c) Do not adjust the pressure settings of the pump or control valve. (d) Do not check for leaks with your hand. Leaks can be located by passing cardboard or wood over the suspected area. Look for discoloration. If injured by escaping fluid, see a doctor at once. Serious infection or reaction can develop if proper medical treatment is not administered immediately. 7) Keep the operator zone and adjacent area clear for safe trenching. Use extreme caution when operating near structures, utility line, or when other workers are present. Call utilities before you dig.do not straddle trench with backhoe.move backhoe backward and away form the trench as you dig. 8) If your backhoe is intended for use near any unimproved forest, brush, or grass covered land, the engine exhaust should be equipped with a spark arrestor. Make sure you comply with applicable local, state, and federal codes. Take appropriate fire-fighting equipment with you. 9) Backhoes should be only used for trenching. Do not use for other purpose. 10) Never alter the backhoe or any part of its manufactured design. Preparation 1) Contact municipalities and utilities to locate buried lines before digging. Do not dig until you have fully investigated the area. Use extreme caution when overhead or buried utility lines are present. 2) Be thoroughly familiar with all controls and with the proper use of the equipment. (a) Always wear safety shoes or heavy boots (b) Always wear safety glasses or goggles and approved safety headgear when operating the machine. (c) Never wear jewelry or loose fitting clothing that might become entangled in moving or rotating parts of the machine. (d) Always wear protective hearing devices when operating the backhoe. Continued exposure to loud machinery can cause hearing loss. 2
3 3) Make sure the backhoe is on a level surface with no more than 10 incline. Block the machine as required to prevent unintended movement. Do not operate near soft-shouldered inclines that may not provide adequate support. 4) Always operate the backhoe from the operator seat with hands positioned near valve controls and feet flat on the area provided. 5) Handle fuel with care; it is highly flammable. (a) Use an approved fuel container. (b) Never add fuel to a running or hot engine. (c) Fill fuel tank outdoors with extreme care. Never fill fuel tank indoors. (d) Replace gasoline cap securely and clean up spilled fuel. 6) Only use the backhoe in daylight or adequate artificial light. Closely inspect all contents in the shipping carton. Unpacking Due to the weight of the backhoe, two people are needed to unpack. The following procedure prepares the backhoe for towing. 3
,Flat Washer Ø24(#115),and lock with Cotter Pin Ø4x50 (#55). 4")
4 Assembly Instructions STEP 1: Assemble the Wheel Leg. a. Insert the wheel leg into the Backhoe Frame, insert the Safety pin (#42) then lock with R Pin (#41). STEP 2: Assemble the Arm. a. Connect the Short Arm assembly with Long Arm Assembly by using Axis Pin (#86),Washer Ø38 (#114) and lock with Cotter Pin (#84). b. Connect the cylinder on the long boom to the short boom by using Short PinØ30x97 (#63),Flat Washer Ø24(#115),and lock with Cotter Pin Ø4x50 (#55). 4
,Flat Washer Ø24 (#115), and lock with Cotter Pin Ø4x50 (#55). Note: The Pin (#85) is a safety Pin.")

5 c. Attach the Long Arm to the Swivel Bracket Assembly by using Axis Pin(#86), Washer Ø38 (#114) and lock with Cotter Pin (#84). d. Put the Arm to the Backhoe Frame by using Long PinØ30x170 (#85),Flat Washer Ø24 (#115), and lock with Cotter Pin Ø4x50 (#55). Note: The Pin (#85) is a safety Pin. Remove it before using the machine and insert it when you want remove. STEP 3: Assemble the Swivel Cylinder. a. Attach the Cylinder (#59) to the Swivel Cylinder Base by using the Pin Ø30x124 (#54),Flat Washer Ø24 (#115),then lock with Cotter Pin Ø4x50(#55). b. Connect the Cylinder (#59) to the Swivel Bracket Assembly by using Short PinØ30x97 (#63),Flat Washer Ø24 (#115),then lock with Cotter Pin Ø4x50 (#55). 5
,Flat WasherØ8 (#21),Lock Washer Ø8 (#22). b. Attach the assembled of co")
6 STEP 4: Assemble the Seat, Control Valve and Coupler a. Attach the Seat (#16) to the Frame by using Hex Bolt /4 (#68),Flat WasherØ8 (#21),Lock Washer Ø8 (#22). b. Attach the assembled of control valve to the valve plate by using Bolt M10x20 (#81) and Nylon Lock Nut M10 (#19). c. Insert the Outrigger (#78) to the square tube, then insert the Pin (#42) and lock with R Pin Ø3x55 (#41). d. Insert the Fixed Pin Ø19x50 (#89) into the Backhoe Frame, lock with R pin (#41). e. Attach the coupler (#37) to the tow bar by using Hex Bolt M12x80 (#38),Flat Washer Ø12 (#39) and Nylon Lock Nut M12 (#40). f. Attach the two chains (#103) to the tow bar by using Hex Bolt M12x90 (#107),Flat Washer Ø12 (#39), Nylon Lock Nut M12 (#40) and Thick Flat Washer Ø12 (#67). Note: The Pin (#89) is a safety Pin. Remove it before using the machine and insert it when you want remove. STEP 5: Connect the Hydraulic Hose. a. Attach the Hydraulic hose 1A to the Connector of Valve 1A (as the label). b. Attach the Hydraulic hose 1B to the Connector of Valve 1B(as the label). c. Assemble others as above. Note: 1. HYDRAULIC HOSE LINE: Attach the Hydraulic Hose 1A & 1B at the right side of Arm, use the Clamp Clip to lock it. Attach other Hydraulic Hoses at the left side of Arm, use the Clamp Clip to lock the hydraulic hose of 2A & 2B. 6

7 2. FUELING METHOD: first time to fill the oil to between red and black lines at oil window, starting the engine, operating the control valve handles to make each Hydraulic cylinder stroke stretch out and draw back one time, let the oil fill full the cylinders, then to refill the oil to between red and black lines at oil window. 24 Hydraulic Hose Hydraulic Hose Hydraulic Hose Hydraulic Hose Hydraulic Hose Hydraulic Hose Hydraulic Hose
8 Hydraulic Oil Add the Hydraulic Oil 1) There is a Oil Screw behind the seat, screw off the Oil Screw. Fill the tank slowly with 10wt hydraulic oil while checking the oil sight gauge. Once the tank is full, stop to add hydraulic oil and screw the Oil Screw back on the tank. When the first time to add Hydraulic Oil, the oil should between the black and red line of Oil window. Then start the engine, manipulate the control handle, make every cylinder stretch out and draw back for one time, let the cylinder with full oil. Then, add oil between the black and red line of Oil window for the second time. 2) Start the engine and run at slow idle 3) Push and pull lever#4 back and forth 6-8 times to remove air from the hydraulic lines. While moving the lever, watch the clear hose on the right side under the control levers. If there is a steam of bubbles, that is normal. If a foamy solution is moving through the tube, air is still in the oil. Keep pushing a pulling the lever until the stream of bubbles appears. After lever#4 is completed, do the same with lever#3, lever#2, and lever#1.watch the oil levers. Once all four levers are done, fill the tank up to the black line on the oil sight gauge in the hydraulic tank. The whole hydraulic system contains about 3 gallons of oil. 4) Shut off the engine, screw the Oil Screw back on the tank. Changing the Hydraulic Oil 1) Remove the Inlet Filter on the bottom part of the frame below the engine. Once the old hydraulic oil is removed, tighten the Filter back onto the tank. Be sure to properly dispose of the old hydraulic oil. 2) Screw off the Oil Screw behind the seat. Fill the tank with 10wt hydraulic oil. While checking the oil level on the sight gauge. Screw the Oil Screw back onto the tank. 3) Remove the up-down travel pin and the side-to-side travel pin. 4) Start the engine and run at slow idle 5) Push and pull lever#4 back and forth 6-8 times to remove air from the hydraulic lines. While moving the lever, watch the clear hose on the right side under the control levers. If there is a steam of bubbles, that is normal. If a foamy solution is moving through the tube, air is still in the oil. Keep pushing a pulling the lever until the stream of bubbles appears. After lever#4 is completed, do the same with lever#3, lever#2, and lever#1.watch the oil levers. Once all four levers are done, fill the tank up to the black line on the oil sight gauge in the hydraulic tank. The whole hydraulic system contains about2-1/2 gallons of oil. Shut off the engine, 6) Reattach the up-down and side-to-side traveling pins. 8
9 Towing the Backhoe 1) Always obey all state and local regulations when towing the backhoe on public roads or highways. 2) Never allow anyone to sit or ride on your backhoe. They could easily fall off and be injured. 3) The backhoe is not a trailer. Do not carry any cargo on the backhoe. It can fall off and endanger you and other drivers. 4) Be certain the backhoe is securely attached to the towing vehicle before towing.the safety chains should be hooked onto the vehicle with sufficient slack for turning allowance. Always secure trailer hitch with locking bolt. 5) Be sure to secure the boom up and centered with the up-down and side-to-side travel pins provided. With the engine off, slightly lower the boom to lock it in place and prevent it from swinging. Also, curl the bucket and arm in to achieve a compact towing configuration. 6) Be sure the outriggers are secured in the vertical position before towing. Do not tow with outriggers down. 7) Be aware of the added length of the backhoe when you are towing it behind a vehicle. Be careful not to jack-knife your backhoe when backing the vehicle. 8) Towing speed should be according to driving conditions. Use a Slow Moving Vehicle sign when driving on roads.take extra care when driving on rough terrain. 9) Disconnect the backhoe from the towing vehicle before using backhoe. 10) Grease wheel bearings annually, or after long trips, to extend the lift of your bearings. 9


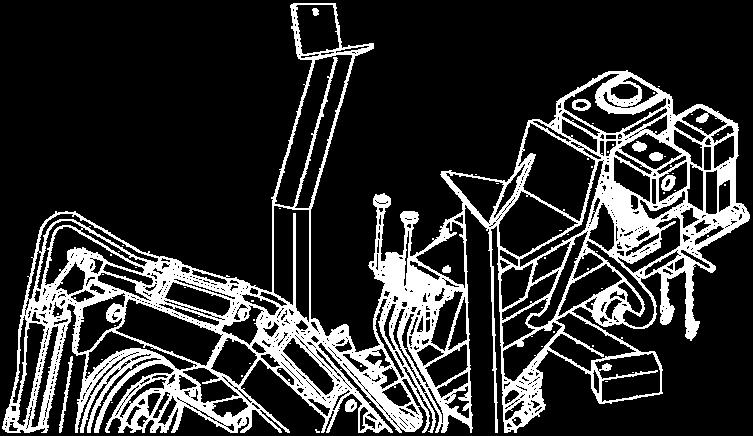

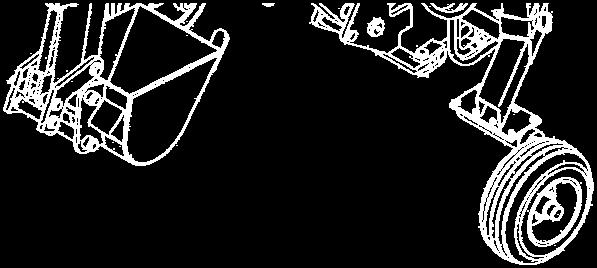
10 Digging Mode and Towing Mode DIGGING MODE (Travel Pins Removed) TOWING MODE (Travel Pins Installed) 10
11 Digging Mode After towing the backhoe to the desired location, follow these set-up instructions. Do not sit on the backhoe while setting it up. 1) Remove outriggers from vertical and set them aside. This reduces weight. Outriggers are heavy, use cart when lifting. 2) Be sure to remove the up-down and side-to side travel pins. Keep these two pins to re-insert for towing. Disconnect the backhoe from the towing vehicle. 3) Pull lever #2 towards left until wheels elevate off the ground 4-5 inches. 4) Remove wheels. Looking at until as if you were sitting is operator seat, put outrigger in front left slot, secure with pin and put front wheel by rear right slot. Install other outrigger in front right slot, secure with pin and put front right wheel by rear left slot. Lower wheels by pushing lever #2 right. 5) Position bucket next to the right side outrigger. Elevate the right side of the unit by pulling lever #2 left until right side balances enough to install back-right wheel into slot. The right outrigger should be about 2feet of the ground.install back right wheel into slot and secure with pin. 6) Lower right side of until by pushing lever #2 right to where the outrigger is touching the ground and the flat part of the bucket is flush to the ground.insert the back-left wheel into the slot and secure with pin. If needed, move bucket next to the left outrigger and elevate the left side to allow wheel to be inserted in to slot. Make sure all pins are secure. The backhoe is now in digging mode. Read the entire manual before attempting to operate the backhoe. Like any industrial tool, proper training and preparation are needed to safely and efficiently operate the backhoe. 11
12 Maintenance and Storage Before performing any maintenance on the backhoe, it must be placed in maintenance mode. (a) Turn off engine (b) Move the control valves handle back and forth with the engine OFF to relieve hydraulic pressure (c) Rest boom on the ground. (d) Unplug spark plug wire from spark plug 1) Clean debris from the engine cylinder, cylinder head fins, blower housing rotating screen, and muffler areas. If the engine is equipped with a spark arrestor muffler, clean and inspect it regularly. Replace if damaged. Clear debris from movable parts, but only after the power source is shut off. 2) Check to be sure all nuts and bolts are tight to assure the equipment is in safe working condition. 3) Inspect all hoses and fitting for wear and leaks. Perform all inspections and replace all damaged and worn parts prior to starting the engine. 4) Be sure all guards, shields, and safety features are in place. 5) Inspect the suction filter. What to check When to check What to do Tires Each Trip Check Pressure. The pressure rating is listed on the tire Hoses Each Use Inspect for wear and leaks. Replace all worn or damaged hoses before starting engine. Hydraulic Fittings Each Use Inspect for wear and leaks. Replace all damaged fittings before starting engine. Nuts and Bolts Each Use Check for loose bolts Hydraulic Oil Each Use Add oil as needed. Replace annually or when it appears dark or cloudy. Boom Pins Each Use Grease Suction Filter Annually Replace Wheel Bearings Annually Repack with grease. Storage Before you store your backhoe, make sure you do the following. 1) Remove gasoline from the engine or add fuel stabilizer to the gasoline to prevent gumming. 2) If adding stabilizer, run engine for five minutes. 3) Turn engine OFF. 4) Move the control valve handles back and forth with the engine OFF to relieve hydraulic pressure. 5) Remove the spark plug 6) Pour one teaspoon of engine oil into spark plug hole. Cover spark plug hole with a rag and turn engine over several times to lubricate the cylinder. 7) Replace spark plug. 8) Never store the backhoe where fumes might reach an open flame or spark. Allow the engine to cool before storing in any enclosure. 12
13 Troubleshooting PROBLEM Cylinder rod will not move Slow cylinder shaft speed when extending or retracting Backhoe will not dig or digs extremely slowly Engine stalls during digging motion Engine will not turn or stalls under low load conditions Leaking pump shaft seal CAUSE A-Broken driveshaft on pump B-Engine/ pump misalignment C-Loose shaft coupling D-Small gear section damaged E-Gear sections damaged F-Frozen or seized pump G-Poorly positioned shaft seal H-Pump check valve leaking I-Plugged oil breather J-Excessive pump inlet vacuum K-Low horsepower/weak engine L-Slow engine speed M-Low relief valve setting N-High relief valve setting O-Damaged relief valve P-High unloading valve setting Q-Hydraulic lines blocked R-Too little oil to the pump S-Air in the hydraulic oil T-Control valve leaking internally U-Damaged control valve V-Blocked control valve W-Internally damaged cylinder SOLUTION:A,C,E,O,Q,R,U,V SOLUTION:E,J,L,O,R,S,T,W SOLUTION:D,H,J,M,R,S,T,W SOLUTION:K,N,P SOLUTION:B,F,K,Q,V SOLUTION:A,B,E,G,I SOLUTION Return pump for authorized repair Correct the engine/pump alignment Correct the engine/pump alignment Items D through H require repair of the pump by an authorized service center Make sure the reservoir is properly vented Clean inlet hoses and free them of any leaks Have engine serviced at an authorized service center Have engine serviced at an authorized service center Adjust while using a pressure gauge and with assistance of a professional Adjust while using a pressure gauge and with assistance of a professional Return directional valve for authorized repair Adjust while using a pressure gauge and with assistance of a professional Flush and clean the hydraulic system Add oil to the reservoir Clean reservoir and add oil Return directional valve for authorized repair Return directional value for authorized repair Flush and clean the hydraulic system Return cylinder for authorized repair 13
14 Operation Instructions 1) Before starting this backhoe, review the Rules for Safe Operation. Failure to follow these rules may result in serious injury to the operator or bystanders. The machine owner should instruct all operators in safe backhoe operation. Call all utilities or a one-call service to mark utility lines. 2) Before digging with the backhoe, make sure backhoe is in digging mode. 3) Run your engine only in well ventilated areas. Carbon monoxide fumes are odorless and colorless. Inhaling these gases can cause carbon monoxide poisoning. Never leave the machine unattended with the engine running. 4) Never operate the machine when under the influence of alcohol, drugs, or medication. 5) Always operate the backhoe with all safety equipment in place and all controls properly adjusted for safety operation. 6) Always operate the backhoe at the manufacturers recommended speed. Always be ready to stop the engine and disengage the boom in case of emergency. 7) Always keep hands, feet, and all other body parts clear of moving parts. 8) Do not straddle or climb over the boom. Serious injury can result from a slip while straddling or climbing. 9) BE sure the terrain allows wheels and outriggers to make firm contact with ground. 10) Before digging, take the time to learn the control valves and the function each performs. Learn how they work in conjunction with each other. A description of what each control valve does is illustrated on the valve mounting plate Practice using the control valves before digging, it will make for safer and more efficient trenching. 11) Position bucket with teeth perpendicular to the ground. 12) Extend the arm out. Then, lower the boom until resistance is met. Do not make the outriggers leave the ground. 13) Curl the arm or bucket to scoop earth. Should either of these movements make the outriggers move, raise the boom slightly to make the outriggers dig in to provided support. 14) Once the digging motion is complete, completely curl the bucket. Raise rotate the boom to clear the trench. 15) Empty the bucket. Repeat steps for each scoop. 16) Do not attempt to straddle the backhoe over a trench. It could fall into the excavation site and cause serious injury. Move backhoe backward and away from trench as you dig. 17) Do not refuel the engine until it has cooled for several minutes. 14
15 Moving the backhoe WARNING! It is possible to move the backhoe under its own power when it is digging mode. This movement should be done with caution. Do not attempt these maneuvers until fully comfortable with the controls and only when the backhoe is away from hazards. DO not attempt to straddle the backhoe over a trench. It could fall into the excavation site and cause serious injury. Move backhoe backward and away from trench as you dig. Move Backward 1) Make sure backhoe is in digging mode. 2) Curl the arm in and lower the boom to rest bucket teeth into the ground. The bucket should rest in the center of the work area, two feet from the front of the backhoe frame. 3) Raise the until off its outriggers by lowering the boom. 4) Once the outriggers are clear of the ground, rotate the arm out. 5) This will cause the backhoe to move backward. 6) Raise the boom until weight is on the outriggers again. Move Forward 1) Mark sure backhoe is in digging mode. 2) Rotate the arm out and lower the boom to rest bucket teeth into the ground. The bucket should rest in the center of the work area. 3) Raise the until off its outriggers by lowering the boom. 4) Once the outriggers are clear of the ground, curl the arm in. This will cause the backhoe to move forward. 5) Raise the boom until weight is on the outriggers again. Move Side to Side 1) Make sure backhoe is in digging mode. 2) Raise boom and swing boom to the side where the new work area is located. 3) Lower boom to rest bucket teeth into the ground and raise outriggers off the ground 4) Swing boom in the direction opposite the desired movement of the machine. 5) Once the unit is facing the new work area, raise the boom until weight is on the outriggers again. 15
16 Specification Bucket Size: 10 Engine Power: 9HP Engine Speed:3600 rpm Cylinder Working Pressure:16 Mpa Cylinder Diameter & Stroke: Ø63x300mm Cylinder Qty: 4pcs Bucket Swivel Degree:120º Max.Dig Depth: 2040mm Max.Dig Semidiameter:2560mm Max.Load Height:1400mm Coupler Size: 2 Ball for easy towing Oil Capacity:14.6L Wheel Size:16 16
17 Parts Drawing 17
18 Parts List PART# DESCRITION QTY PART# DESCRITION QTY 1 Cotter Pin 4x R Pin Ø3x Slotted Nut M20x Safety Pin 4 3 Wheel Axle Cap 2 43 Flat Washer Ø6 6 4 Lug Bolt 8 44 Lock Washer Ø6 6 5 Wheel 2 45 Hex Bolt M6x Taper Roller Bearing 4 46 Hex Bolt M10X Flange 2 47 Inlet Filter 1 8 Oil Seal 2 48 Rubber Washer 1 9 Axle Assembly 2 49 Filter Fix Plate 1 10 Rubber Rod 8 50 Valve Return Oil Hose Rubber Skateboard 8 51 Inlet Connector of Filter 1 12 Square Axle Base 2 52 Outlet Filter 1 13 Lock WasherØ Outlet Connector of Filter 1 14 Flat Washer Ø Pin Ø30X Hex Bolt M10x Cotter Pin Ø4x Seat 1 56 Swivel Cylinder Base 1 17 Engine 1 57 Hex Bolt M10x Wheel Frame Connector Tube (Right) 1 58 Single Throttling Valve 1 19 Nylon Lock Nut M Cylinder 4 20 Hex Bolt M8x Right Angle ConnectorⅠ 5 21 Flat Washer Ø Hydraulic Hose Lock Washer Ø Connector of Throttling Valve 1 23 Hex Bolt M8x Short Pin Ø30x Hydraulic Hose Hex Bolt M12x Nylon Lock Nut M Gauge 1 26 Outlet Connector of Pump 1 66 Frame Weldment 1 27 Semicircular Key 1 67 Thick Flat WasherØ Gear Pump Connector 1 68 Hex Bolt M5/ Engine Connector 1 69 Oil Screw ZG Flat Key Ø8x Hydraulic Hose Bushing Ø25x Hydraulic Hose Gear Pump Stand 1 72 Antiskid Plate Gear Pump 1 73 Antiskid Plate Clamp 4 74 Rivet 4x Gear Pump Oil Pipe Half-round Screw M5x Wheel Frame Connector Tube (Left) 1 76 Switch Wire for Engine mm Coupler 1 77 Control Valve 1 38 Hex Bolt M12x Outrigger 2 39 Flat Washer Ø Connector of Valve 7 40 Nylon Lock Nut M Outlet Connector of Valve 1
19 PART# DESCRITION QTY PART# DESCRITION QTY 81 Hex Bolt M10x Hydraulic Hose Oil Cup M Safety Chain 2 83 Axis Pin of Swivel Bracket Inlet Connector of Valve 2 84 Cotter Pin 4x Coupling Guard 1 85 Long Pin Ø30x Screw M6x Axis Pin of Swivel Arm Ø48x Hex Bolt M12X Swivel Bracket Weldment Flat Washer Ø Long Arm Weldment Hex Bolt M5x Fixed Pin Ø19x Block 4 90 Bucket Hex Bolt M10x Long Pin Ø30x Plug Screw 1 92 Short Pin Ø30x Washer Ø Bucket Linkage Flat Washer Ø Arm Linkage I Angle Connector of Swivel cylinder III 2 95 Arm Linkage II Oil Plug 1 96 Short Arm Weldment Hex Bolt M8x Pin of Bucket Ø30x Spring of seat 4 98 Angle Connector of Cylinder Ⅱ Nylon Lock Nut M Hydraulic Hose Hydraulic Hose Hydraulic Hose
BH620 Backhoe. User Manual. [Revision 4.0 October 2017]
![BH620 Backhoe. User Manual. [Revision 4.0 October 2017]](/thumbs/90/104330894.jpg "BH620 Backhoe. User Manual. [Revision 4.0 October 2017]") ser Manual [Revision 4.0 October 2017] READ THIS MANAL CAREFLLY BEFORE SE FAILRE TO DO SO MAY RESLT IN INJRY, PROPERTY DAMAGE AND MAY VOID WARRANTY. KEEP THIS MANAL FOR FTRE REFERENCE. Products covered
ser Manual [Revision 4.0 October 2017] READ THIS MANAL CAREFLLY BEFORE SE FAILRE TO DO SO MAY RESLT IN INJRY, PROPERTY DAMAGE AND MAY VOID WARRANTY. KEEP THIS MANAL FOR FTRE REFERENCE. Products covered
9HP EARTH AUGER W/5 AUGER BIT
 9HP EARTH AUGER W/5 AUGER BIT Owner s Manual 1 ! Hazard Signal Word Definition!! DANGER!WARNING!CAUTION! CAUTION This is the safety alert symbol. It is used to alert you to potential personal injury hazards.
Log Splitter. Owner/Operator Manual. Models HCWP1-26
 Log Splitter Owner/Operator Manual Models HCWP1-26 SAFETY..........................2 SAFETY WARNING SYMBOL.........3 SAFETY RULES.................. 4-5 SPECIFICATIONS................. 6 CONTROLS AND FEATURES.......
RedGum GP160 Splitter. Owner s Manual
 RedGum GP160 Splitter Owner s Manual Product Description & Intended Purpose: This Log Splitter / Wood Splitter is an outdoor product that splits wood logs for use as fuel in a fireplace or a woodstove.
TOWABLE EXCAVATOR USER MANUAL. Please read and understand all instructions before use. Retain this manual for future reference.
 TOWABLE EXCAVATOR USER MANUAL Please read and understand all instructions before use. Retain this manual for future reference. 10005833-10 REV2 TABLE OF CONTENTS Introduction 2 Functions 2 Specifications
MODEL HD99 HYDRAULIC ONE MAN TOWABLE EARTHDRILL
 DO NOT THROW AWAY IMPORTANT MANUAL MODEL HD99 HYDRAULIC ONE MAN TOWABLE EARTHDRILL Operators Manual GROUND HOG, INC. P.O.BOX 290 San Bernardino, CA. 92402 Phone (909) 478-5700 Fax (909) 478-5710 E-mail:
Table of Contents. Safety symbols... 3 Assembly 6. Operation Maintenance Troubleshooting 11. Storage. 12. Notes. 13
 Table of Contents Safety symbols... 3 Assembly 6 Operation... 8 Maintenance... 10 Troubleshooting 11 Storage. 12 Notes. 13 2 Safety Information Attention; this machine can be dangerous! All operators should
North Dakota State University Grounds Maintenance Equipment
 North Dakota State University Grounds Maintenance Equipment I. Introduction Grounds maintenance equipment is an important part of the work activities on NDSU campus. They can make grounds maintenance jobs
Firewood Processor Operator s Manual SSA400Z
 Distribution Limited Firewood Processor Operator s Manual SSA400Z FOR YOUR SAFETY READ AND UNDERSTAND THE ENTIRE MANUAL BEFORE OPERATING THIS MACHINE Warranty Registration Form Model: Serial Number: Type
SAFE OPERATION 1. BEFORE OPERATION
 1 The best insurance against accidents is to abide by the safety regulations. Read and understand this manual carefully before operating the excavator. Every user, however experienced, should carefully
W & A 12 ROW TOP LEVELING STACKER LEVEL BANDER
 W & A 12 ROW TOP LEVELING STACKER LEVEL BANDER NO. 3640 OPERATOR S MANUAL TO THE OWNER: Congratulations on your purchase of a new W & A Top Leveling Stacker Level Bander. Your selection is an indication
Safe Operation Practices Set-Up Operation Maintenance Service Troubleshooting Warranty. Compact Log Splitter
 Safe Operation Practices Set-Up Operation Maintenance Service Troubleshooting Warranty Operator s Manual Compact Log Splitter WARNING READ AND FOLLOW ALL SAFETY RULES AND INSTRUCTIONS IN THIS MANUAL BEFORE
1 2 " H Y D R AU L I C V E H I C L E P O S I T I O N I N G J A C K OWNER S MANUAL
 2 " H Y D R AU L I C V E H I C L E P O S I T I O N I N G J A C K OWNER S MANUAL WARNING: Read carefully and understand all INSTRUCTIONS before operating. Failure to follow the safety rules and other basic
ALUMINUM CARGO CARRIER WITH FOLDING RAMP
 ALUMINUM CARGO CARRIER WITH FOLDING RAMP OWNER S MANUAL WARNING: Read carefully and understand all ASSEMBLY AND OPERATION INSTRUCTIONS before operating. Failure to follow the safety rules and other basic
Owner s Manual. Mortar / Plaster Mixer. Models M785 M1000 M1200
 Owner s Manual Mortar / Plaster Mixer Models M785 M1000 M1200 Tiger Equipment LLC. 15 Byrd Lane Rocky Mount, VA 24151 Tel: 540-489-7777 Fax: 540-489-7778 www.tigerequip.com 1. PREFACE This manual contains
Model: CW8T Electric / Hydraulic Log Splitter OPERATOR S MANUAL
 EU Model: CW8T520 1314 Electric / Hydraulic Log Splitter OPERATOR S MANUAL Please read the manual first. It will help you assemble, prepare, operate and maintain the unit for best performance. Pay special
20 TON AIR/MANUAL BOTTLE JACK
 ESCO Equipment Supply Company 1 20 TON AIR/MANUAL BOTTLE JACK ESCO Part #10450 ESCO Equipment Supply Company 2 Instruction Manual Please read this instruction manual carefully before use. IMPORTANT PLEASE
Policy Sponsor: Assistant Vice President. Responsible Unit: Facilities Management
 Policy Sponsor: Assistant Vice President Approval Date: January 2010 Gas Powered Pole Pruners/Saws Safe Work Instructions Responsible Unit: Revisions: Service: Environmental Services Shop: Grounds and
Package Contents Part A (3) I-Beam (1) Base (2) Other parts
 I-Beam (1) Base (2) Other parts") Page 1 Installation Instructions for 81245 Adjustable Height Gantry Crane 1-Ton Capacity Table of Contents Important Safety Information pg. 2 Specific Operation Warnings pg. 2 Main Parts of Product pg.
Page 1 Installation Instructions for 81245 Adjustable Height Gantry Crane 1-Ton Capacity Table of Contents Important Safety Information pg. 2 Specific Operation Warnings pg. 2 Main Parts of Product pg.
MODELS 1324 & 1624 & 1824
 THE MODELS 1324 & 1624 & 1824 HYDRAULIC TRENCHERS CONGRATULATIONS! You are now the proud owner of a BARRETO trencher. Please take a moment of your time to look over the following information. Familiarize
Voltmaster Centrifugal Trash Pumps
 Voltmaster Centrifugal Trash Pumps Model TSP2, TSP3 and TSP4 Owner s Manual February 2011 Table of Contents 1 Introduction............................ 1 1.1 Read before using..................... 1 1.2
Model 858-RH. Operating and Assembly Manual. Palmor Products Inc Serum Plant Road Thorntown, IN 46071
 Model 5-RH Operating and Assembly Manual Palmor Products Inc. 55 Serum Plant Road Thorntown, IN 6071 3/31/015 SAFETY RULES Remember, any power equipment can cause injury if operated improperly or if the
EZ Hauler 2500 Training & Procedure Manual
 EZ Hauler 2500 Training & Procedure Manual Load Capacity One of the most important considerations when operating this machine is the Load Capacity of the EZ Hauler 2500 s boom. The maximum weight capacity
Safe Operation Practices Set-Up Operation Maintenance Service Troubleshooting Warranty LS 33T
 Safe Operation Practices Set-Up Operation Maintenance Service Troubleshooting Warranty Operator s Manual LS 33T WARNING READ AND FOLLOW ALL SAFETY RULES AND INSTRUCTIONS IN THIS MANUAL BEFORE ATTEMPTING
Read instructions carefully and follow rules for safe operation. Failure to do so could result in serious injury. Fradan Manufacturing Corp.
 OPERATOR MANUAL FRADAN POWER BLOWERS Part No. 888-011-222-0 Read instructions carefully and follow rules for safe operation. Failure to do so could result in serious injury. Fradan Manufacturing Corp.
Operating and Assembly Manual
 Model 455-IC/PRO/H Operating and Assembly Manual Midwest Equipment Manufacturing, Inc. 5225 Serum Plant Road Thorntown, IN 46071 03-08-12 SAFETY RULES Remember, any power equipment can cause injury if
Operating and Assembly Manual
 Model 1080 Operating and Assembly Manual Midwest Equipment Manufacturing, Inc. 5225 Serum Plant Road Thorntown, IN 46071 08-02-16 SAFETY RULES Remember, any power equipment can cause injury if operated
610 BUSHEL MANURE SPREADER
 610 BUSHEL MANURE SPREADER RODA MANUFACTURING 1008 LOCUST ST. HULL, IA. 51239 Art s-way Manufacturing 712-439-2366 Co., Inc. Hwy 9 West - PO Box 288 WWW.RODAMFG.COM Armstrong, IA. 50514 U.S.A 2 INTRODUCTION
Operating and Assembly Manual
 Model 455-IC/PRO/H Operating and Assembly Manual Palmor Products Inc. 5225 Serum Plant Road Thorntown, IN 46071 03-08-12 SAFETY RULES Remember, any power equipment can cause injury if operated improperly
125LB TOW-BEHIND SPREADER
 125LB TOW-BEHIND SPREADER Instruction & Assembly SAVE THESE INSTRUCTIONS FOR FUTURE REFERENCE REV122116 BT1200 SAFETY RULES READ THE DIRECTIONS BEFORE ASSEMBLY Read the towing vehicle owners manual and
1000-lb Hydraulic Truck Crane
 1000-lb Hydraulic Truck Crane Owner s Manual WARNING: Read carefully and understand all ASSEMBLY AND OPERATION INSTRUCTIONS before operating. Failure to follow the safety rules and other basic safety precautions
Operating and Assembly Manual
 Model 470-/H/PRO/IC Operating and Assembly Manual Midwest Equipment Manufacturing, Inc. 5225 Serum Plant Road Thorntown, IN 46071 11-11-11 SAFETY RULES Remember, any power equipment can cause injury if
GRACO INC. P.O. BOX 1441 MINNEAPOLIS, MN
 REPAIR J Line Driver Model 233725 U.S. Patent Number 6,883,633 Important Safety Instructions Read all warnings and instructions in this manual. Save these instructions. 10 mph (16 kph) Maximum Operating
OPERATOR S MANUAL IMPORTANT: READ SAFETY RULES AND INSTRUCTIONS CAREFULLY
 OPERATOR S MANUAL Log Splitter 27-Ton Model Number 24AA570H190 IMPORTANT: READ SAFETY RULES AND INSTRUCTIONS CAREFULLY Warning: This unit is equipped with an internal combustion engine and should not be
800 LB ATV DOLLY OWNER S MANUAL
 800 LB ATV DOLLY OWNER S MANUAL WARNING: Carefully read and understand all ASSEMBLY AND OPERATION INSTRUCTIONS before operating. Failure to follow the safety rules and other basic safety precautions may
Owner s Manual Pressure Washer: Machine that cleans dirty surfaces with high pressure water.
 M1577541A TM ITEM NUMBERS: 1577541, 1577542 Owner s Manual Pressure Washer: Machine that cleans dirty surfaces with high pressure water. WARNING Read this manual. Serious injury or death can result if
3500-LB. TRAILER JACK OWNER S MANUAL
 3500-LB. TRAILER JACK OWNER S MANUAL WARNING: Read carefully and understand all INSTRUCTIONS before operating. Failure to follow the safety rules and other basic safety precautions may result in serious
Fradan Truck Loader Tail Gate Leaf Vacuum
 Fradan Truck Loader Tail Gate Leaf Vacuum 14 HP TailGate Model = LV- 14RS Warning Danger Read instructions carefully and follow rules for safe operation. Failure to do so could result in serious injury.
DIAMOND CONCRETE SAW MODEL CC1800XL P R O D U C T S OPERATOR S MANUAL. February Part #
 DIAMOND P R O D U C T S OPERATOR S MANUAL CONCRETE SAW MODEL CC1800XL February 2007 Part #1801038 Intentionally Blank GENERAL SAFETY WARNINGS AND PRECAUTIONS PERSONAL SAFETY Read and understand all operating
48 in. DELUXE ALUMINUM CARGO CARRIER WITH RAMP
 48 in. DELUXE ALUMINUM CARGO CARRIER WITH RAMP OWNER S MANUAL WARNING: Read carefully and understand all ASSEMBLY AND OPERATION INSTRUCTIONS before operating. Failure to follow the safety rules and other
Operation Manual. All Terrain Power Cart MODEL #
 All Terrain Power Cart MODEL # 101872 Operation Manual This safety alert symbol identifies important safety messages in this manual. Failure to follow this important safety information may result in serious
READ AND UNDERSTAND THIS MANUAL AND ALL INSTRUCTIONS BEFORE OPERATING THIS DR BACKHOE.
 DR DIRT BOSS TOWABLE BACKHOE SAFETY & OPERATING INSTRUCTIONS Serial No. Order No. READ AND UNDERSTAND THIS MANUAL AND ALL INSTRUCTIONS BEFORE OPERATING THIS DR BACKHOE. Congratulations on your purchase
STANDARD STEEL PLOW BLADE ASSEMBLY INSTRUCTIONS
 WESTERN PRODUCTS, P.O. BOX 245038, MILWAUKEE, WI 53224-9538 FORM NO. 13590 September 1, 1999 STANDARD STEEL PLOW BLADE Blade No. 60120 or 60125, or 60018 A, Q, & L Box No. 61720 Hydraulics Box No. 56365
BEFCO. Operator s Manual POST HOLE DIGGER ACCESSORIES DOWN FORCE KIT. PHD-002 (fits models MOLE 300 & 400) PHD-005 (fits model MOLE 200) HOOKUP STAND
 PHD-005 (fits model MOLE 200) HOOKUP STAND") BEFCO Operator s Manual POST HOLE DIGGER ACCESSORIES DOWN FORCE KIT PHD-00 (fits models MOLE 300 & 400) PHD-005 (fits model MOLE 00) HOOKUP STAND 009-985 (fits models MOLE 00, 00, 300 & 400) POSITIONING
BEFCO Operator s Manual POST HOLE DIGGER ACCESSORIES DOWN FORCE KIT PHD-00 (fits models MOLE 300 & 400) PHD-005 (fits model MOLE 00) HOOKUP STAND 009-985 (fits models MOLE 00, 00, 300 & 400) POSITIONING
THE MODEL 916/918 HYDRAULIC REAR TINE TILLER
 THE MODEL 916/918 HYDRAULIC REAR TINE TILLER CONGRATULATIONS! You are now the proud owner of the BARRETO Model 916/918 tiller. Please take a moment of your time to look over the following information.
4400-Lb. Capacity Extra-Long Pallet Jack
 4400-Lb. Capacity Extra-Long Pallet Jack Owner s Manual WARNING: Read carefully and understand all ASSEMBLY AND OPERATION INSTRUCTIONS before operating. Failure to follow the safety rules and other basic
WARNING this attachments capacity changes depending on the Skid Steer Loader it is hooked up to. CAPACITY AT 24 LOAD CENTER
 SKID STEER FORKLIFT ATTACHMENT Any piece of equipment can be dangerous if not operated properly. YOU are responsible for the safe operation of this equipment. The operator must carefully read and follow
Table of Contents. Safety Assembly Pre-operation / Starting. 7. Operation.. 8. Maintenance. 9. Storage 10
 Table of Contents Safety... 3 Assembly... 6 Pre-operation / Starting. 7 Operation.. 8 Maintenance. 9 Storage 10 Parts drawings..11 Parts list by number..12 Notes.13 2 Safety Information Attention; this
AND OPERATING INSTRUCTIONS IMPORTANT:
 WOOD CHIPPER User Manual FM6.5WC SAFETY AND OPERATING INSTRUCTIONS IMPORTANT: Read safety rules and instructions carefully before operating equipment. Table of Contents Table of Contents PART I: General
TP300 INDUSTRIAL TRASH PUMP OPERATOR S MANUAL
 TP300 INDUSTRIAL TRASH PUMP OPERATOR S MANUAL IT IS EXTREMELY IMPORTANT TO READ AND UNDERSTAND THE ENTIRE CONTENTS OF THIS OPERATOR S MANUAL BEFORE ATTEMPTING TO OPERATE THE PRODUCT. THIS EQUIPMENT IS
600 LB. ADJUSTABLE TRAILER DOLLY
 600 LB. ADJUSTABLE TRAILER DOLLY OWNER S MANUAL Model # TMD-600AFF WARNING: Carefully read and understand all ASSEMBLY AND OPERATION INSTRUCTIONS before operating. Failure to follow the safety rules and
SBCNNS. Abrasive Blast Cabinet Assembly & Operating Instructions
 SBCNNS Abrasive Blast Cabinet Assembly & Operating Instructions READ ALL INSTRUCTIONS AND WARNINGS BEFORE USING THIS PRODUCT. This manual provides important information on proper operation & maintenance.
Mini Skid Steer Training
 Safe Operating Practices Mini Skid Steer Training This product is capable of amputating hands and feet. Always follow all safety instructions to avoid serious injury or death. Engine exhaust contains carbon
TJ lb Capacity Trailer Jack. 2-in-1 Combo With Swing Back Design. Assembly & Operating Instructions
 TJ1500 1500 lb Capacity Trailer Jack 2-in-1 Combo With Swing Back Design Assembly & Operating Instructions READ ALL INSTRUCTIONS AND WARNINGS BEFORE USING THIS PRODUCT. This manual provides important information
OXDALE PRODUCTS LTD POST HOLE BORER KEEP FOR FUTURE REFERENCE
 OXDALE PRODUCTS LTD POST HOLE BORER KEEP FOR FUTURE REFERENCE 1 Safety 1 Safety Signs 6 Mounting Instructions 7 Operating Instructions 11 Borer Operation 13 Special Operating Conditions 14 Removing the
Hydraulic Bead Breaker Kit
 Hydraulic Bead Breaker Kit Owner s Manual WARNING: Read carefully and understand all ASSEMBLY AND OPERATION INSTRUCTIONS before operating. Failure to follow the safety rules and other basic safety precautions
Boring Unit Sitework Systems Attachment
 FORM NO. 6 Boring Unit Sitework Systems Attachment Model No. 0 89000 & Up Operator s Manual English (CE) Contents Page Introduction................................. Safety......................................
Model 452-DIC/DH. Operating and Assembly Manual
 . Model 452-DIC/DH Operating and Assembly Manual Palmor Products Inc. 5225 Serum Plant Road Thorntown, IN 46071 02-14-12 SAFETY RULES Remember, any power equipment can cause injury if operated improperly
Owner s Manual. Instructions for Assembly, Testing, Operation, and Servicing. Trailer Kit: High speed upgrade kit used with Item# WARNING
 M268176D.1 ITEM NUMBER: 268176 SERIAL NUMBER: Owner s Manual Instructions for Assembly, Testing, Operation, and Servicing Trailer Kit: High speed upgrade kit used with Item# 268175 WARNING READ and UNDERSTAND
Hydraulic PTO Flow Device
 Safety, Operation, and Maintenance Manual WARNING Improper use of this tool can result in serious bodily injury This manual contains important information about product function and safety. Please read
2000-lb Hand Winch Truck Crane
 2000-lb Hand Winch Truck Crane Owner s Manual WARNING: Read carefully and understand all ASSEMBLY AND OPERATION INSTRUCTIONS before operating. Failure to follow the safety rules and other basic safety
100 Ton Shop Press Operating Instructions
 S U P E R D U T Y 100 Ton Shop Press Operating Instructions MOD NO. 859SD Hazard Symbols Used in the Manual This manual includes the hazard symbols defined below when the operations or maintenance job
MANUAL FLUID EXTRACTOR
 Please read and save these instructions. Read through this owner s manual carefully before using product. Protect yourself and others by observing all safety information, warnings, and cautions. Failure
MODEL 565CKG Operating and Assembly Manual Midwest Equipment Manufacturing, Inc Serum Plant Road Thorntown, IN 46071
 MODEL 565CKG Operating and Assembly Manual Midwest Equipment Manufacturing, Inc. 5225 Serum Plant Road Thorntown, IN 46071 11-20-14 SAFETY RULES Remember, any power equipment can cause injury if operated
SPORT/UTILITY BLADE ASSEMBLY INSTRUCTIONS
 WESTERN PRODUCTS, P.O. BOX 245038, MILWAUKEE, WI 53224-9538 FORM NO. 13629 September 1, 1999 SPORT/UTILITY BLADE ASSEMBLY INSTRUCTIONS Sport/Utility Blade No. 61300 A, Q & L Box No. 61930 Hydraulics Box
Operator s Manual. Power V Plow Toro 7200/7210
 Operator s Manual Power V Plow Toro 7200/7210 M-B Companies, Inc.: 1615 Wisconsin Avenue, P.O. Box 200 New Holstein, WI 53061 Telephone: 800-558-5800 FAX: (920) 898-4588 CONTENTS: Table of Contents Safety...
OPERATOR S MANUAL. 20-bu 3-Point Hitch Material Collection System. LP65048 Supplier ST /07/2017 English. North American Edition Printed in USA
 OPERATOR S MANUAL 20-bu 3-Point Hitch Material Collection System LP65048 Supplier ST48289 11/07/2017 English North American Edition Printed in USA Introduction Using Your Operator s Manual Read this entire
Owner s Manual Trencher/Edger: Cuts trenches in dirt.
 M191185C.7 ITEM NUMBER: 191185 SERIAL NUMBER: Owner s Manual Trencher/Edger: Cuts trenches in dirt. Any Questions, Comments, Problems or Parts Orders Call NorthStar Product Support 1-800-270-0810 Table
accidents which arise due to nonobservance and the safety information herein. SPECIFICATIONS
 22 TON LOG SPLITTER Model: 6212 CALIFORNIA PROPOSITION 65 WARNING: You can create dust when you cut, sand, drill or grind materials such as wood, paint, metal, concrete, cement, or other masonry. This
Safety Assembly Operation Service and Adjustment Repair Parts 1602 CORPORATE DRIVE, WARRENSBURG, MISSOURI PHONE FAX
 swisherinc.com OWNER S MANUAL MODEL NO. LS722X STARTING SERIAL #: L206-010001 LOG SPLITTER IMPORTANT Read and follow all Safety Precautions and Instructions before operating this equipment. Rev. 07-199
TurfMaker TAILGATE MULCHER
 TurfMaker TAILGATE MULCHER OPERATORS MANUAL AND PARTS LIST FOREWORD Congratulations on your purchase of a TurfMaker Tailgate Mulcher. You will find this to be one of the most versatile and work-saving
ECSS. Electric Chain Saw Chain Sharpener Assembly & Operating Instructions
 ECSS Electric Chain Saw Chain Sharpener Assembly & Operating Instructions READ ALL INSTRUCTIONS AND WARNINGS BEFORE USING THIS PRODUCT. SAVE THESE INSTRUCTIONS FOR FUTURE REFERENCE. This manual provides
WARNING! Decals. IMPORTANT INFORMATION Xxxx xxx xxxx xx xxxx x xxxx. Xxxx xxx xxxx xx xxxx x xxxx.
 symbols and decals Xxxx xxx xxxx xx xxxx x xxxx. Used in this publication to notify the reader of a risk of personal injury, particularly if the reader DOES NOT follow the instructions given in the manual.
Operating and Assembly Manual
 Model CV385-PRO Operating and Assembly Manual Midwest Equipment Manufacturing, Inc. 5225 Serum Plant Road Thorntown, IN 46071 2-09-16 SAFETY RULES Remember, any power equipment can cause injury if operated
48 INCH SWEEPER. with Quick Height Adjustment Handle OWNER S MANUAL
 48 INCH SWEEPER with Quick Height Adjustment Handle OWNER S MANUAL WARNING: Read carefully and understand all ASSEMBLY AND OPERATION INSTRUCTIONS before operating. Failure to follow the safety rules and
4400-Lb. Capacity Pallet Jack
 Read carefully and understand all ASSEMBLY AND OPERATION INSTRUCTIONS before operating. Failure to follow the safety rules and other basic safety precautions may result in serious personal injury. Item#
MODEL 1324ST ST HYDRAULIC TRENCHER OPERATOR S MANUAL
 THE MODEL 1324ST - 1624ST HYDRAULIC TRENCHER OPERATOR S MANUAL TRENCHER INTENDED USE This machine is designed for digging trenches in normal ground of reasonably soft dirt and stones up to 6 (15cm) in
Model 462 IC/H/PRO/EL. Operating and Assembly Manual Midwest Equipment Manufacturing, Inc Serum Plant Road Thorntown, IN
 Model 462 IC/H/PRO/EL Operating and Assembly Manual Midwest Equipment Manufacturing, Inc. 5225 Serum Plant Road Thorntown, IN 46071 03-08-12 SAFETY RULES Remember, any power equipment can cause injury
Trencher Dingo Attachment
 Form No. 3326-453 Trencher Dingo Attachment Model No. 22459 2000000 & Up Operator s Manual English (CE) Contents Page Introduction................................ 2 Safety.....................................
MODEL 912RM/912HM HYDRAULIC TRENCHER OPERATOR S MANUAL
 THE MODEL 912RM/912HM HYDRAULIC TRENCHER OPERATOR S MANUAL TRENCHER INTENDED USE This machine is designed for digging trenches in normal ground of reasonably soft dirt and stones up to 6 (15cm) in diameter.
Table of Contents. Safety symbols... 3 Assembly 6. Hydraulic oil Towing safety. 12 Pre-operation / Starting Operation Guidelines.
 Table of Contents Safety symbols... 3 Assembly 6 Hydraulic oil.. 11 Towing safety. 12 Pre-operation / Starting.. 13 Operation Guidelines. 14 Operation 16 Maintenance... 18 Storage... 19 Troubleshooting.
H E AV Y- D U T Y G A R D E N W A G O N w i t h R A I L S OWNER S MANUAL
 H E AV Y- D U T Y G A R D E N W A G O N w i t h R A I L S OWNER S MANUAL WARNING: Read carefully and understand all INSTRUCTIONS before operating. Failure to follow the safety rules and other basic safety
Trench Filler for Compact Utility Loaders
 Form No. 3353-608 Rev A Trench Filler for Compact Utility Loaders Model No. 22472 260000001 and Up Operator s Manual Register your product at www.toro.com Original Instructions (EN) Contents Page Introduction................................
Operating and Assembly Manual
 Model 380/385-IC/385-LH Operating and Assembly Manual Midwest Equipment Manufacturing, Inc. 5225 Serum Plant Road Thorntown, IN 46071 2-0916 SAFETY RULES Remember, any power equipment can cause injury
ALUMINUM JACK. 3,000 lb. Jack Capacity & JACK STAND COMBO. Model ASSEMBLY AND OPERATING INSTRUCTIONS
 ALUMINUM JACK 3,000 lb. Jack Capacity & JACK STAND COMBO 6,000 lb. Jack Stand Capacity (when used in pairs) Model 91850 ASSEMBLY AND OPERATING INSTRUCTIONS 3491 Mission Oaks Blvd., Camarillo, CA 93011
Pressure Washer Hose Reel
 Pressure Washer Hose Reel Owner s Manual WARNING: Read carefully and understand all ASSEMBLY AND OPERATION INSTRUCTIONS before operating. Failure to follow the safety rules and other basic safety precautions
Operating and Assembly Manual
 Model 462-ZIC/ZH/ZPRO Operating and Assembly Manual Midwest Equipment Manufacturing, Inc. 5225 Serum Plant Road Thorntown, IN 46071 12-14-16 SAFETY RULES Remember, any power equipment can cause injury
Model: HT9605H HT0165B. Hurricane Plus OPERATION SERVICE PARTS CARE. Revised 9/04
 Model: HT9605H HT0165B Hurricane Plus OPERATION SERVICE PARTS CARE Revised 9/04 TABLE OF CONTENTS General Safety Instructions 1 & 2 Warning Decal Placement 3 Assembly Instructions 4 Blower Assembly HT
Installation Instructions
 Fisher Engineering P.O. Box 529 Rockland, Maine 04841 June 15, 2004 Lit. No. 27589 Installation Instructions Table of Contents Safety Information... 2 Blade and A-Frame Assembly... 5 Blade Assembly and
MODELS 58, 903. Intake Hose Kit for LBC Series 1 Walk- Behind Leaf Blowers For Leaf Blower models: LBC55151BV LBC915751BV
 INSTALLATION INSTRUCTIONS OPERATING INSTRUCTIONS PARTS LIST Intake Hose Kit for LBC Series 1 Walk- Behind Leaf Blowers For Leaf Blower models: LBC55151BV LBC915751BV MODELS 58, 903 Actual product may differ
MODEL 712MT HYDRAULIC MICRO TRENCHER OPERATOR S MANUAL
 THE MODEL 712MT HYDRAULIC MICRO TRENCHER OPERATOR S MANUAL TRENCHER INTENDED USE This machine is designed for digging trenches in normal ground of reasonably soft dirt and stones up to 3 (7.62cm) in diameter.
20- G A L L O N O I L D R A I N W I T H C A S T E R S OWNER S MANUAL
 20- G A L L O N O I L D R A I N W I T H C A S T E R S OWNER S MANUAL WARNING: Read carefully and understand all INSTRUCTIONS before operating. Failure to follow the safety rules and other basic safety
DM-135 DRUM MOWER USER S MANUAL
 DM-135 DRUM MOWER USER S MANUAL 1 DM135 DRUM MOWER INSTRUCTIONS CHAPTER 1 SAFE OPERATION Do not attempt to operate the mower until you have read the operator s manual and all the safety signs on the mower.
W & A 12 ROW TOP LEVELING STACKER LEVEL BANDER
 W & A 12 ROW TOP LEVELING STACKER LEVEL BANDER NO. 3640 OPERATOR S MANUAL TO THE OWNER: Congratulations on your purchase of a new W & A Top Leveling Stacker Level Bander. Your selection is an indication
Model 655-IC/PRO/H/R. Operating and Assembly Manual
 Model 655-IC/PRO/H/R Operating and Assembly Manual Midwest Equipment Manufacturing, Inc. 5225 Serum Plant Road Thorntown, IN 46071 07-02-14 SAFETY RULES Remember, any power equipment can cause injury if
Air-Operated Waste Oil Drainer
 Air-Operated Waste Oil Drainer 20-Gallon Tank Owner s Manual WARNING: Read carefully and understand all ASSEMBLY AND OPERATION INSTRUCTIONS before operating. Failure to follow the safety rules and other
Model 854/856. Operating and Assembly Manual. Midwest Equipment Manufacturing, Inc Serum Plant Road Thorntown, IN 46071
 Model 854/856 Operating and Assembly Manual Midwest Equipment Manufacturing, Inc. 55 Serum Plant Road Thorntown, IN 46071 10/10/2018 SAFETY RULES Remember, any power equipment can cause injury if operated
5000- LB. C A PA C I T Y P O R TA B L E W I N C H OWNER S MANUAL
 5000- LB. C A PA C I T Y P O R TA B L E W I N C H OWNER S MANUAL WARNING: Read carefully and understand all INSTRUCTIONS before operating. Failure to follow the safety rules and other basic safety precautions
Owner s Manual & Safety Instructions
 Owner s Manual & Safety Instructions 2000LB DUAL WHEEL TRAILER JACK (SKU#1227931) Save This Manual Keep this manual for the safety warnings and precautions, assembly, operating, inspection, maintenance
3-Pt. Boom Pole. Owner s Manual
 3-Pt. Boom Pole Owner s Manual WARNING: Read carefully and understand all ASSEMBLY AND OPERATION INSTRUCTIONS before operating. Failure to follow the safety rules and other basic safety precautions may