PTF1000 & PTF (5th Wheel Transport Stretcher)
|
|
|
- Barnard Fisher
- 6 years ago
- Views:
Transcription
 Read and understand all of the")

1 INSTRUCTION MANUAL PTF1000 & PTF (5th Wheel Transport Stretcher) Read and understand all of the instructions and safety information in this manual before operating this product. MAN-020 Rev E 2017 MAC Medical, Inc. 11/2017
2 DESCRIPTION OF PRODUCT The 5th Wheel Transport Stretcher is capable of transporting 750 lbs. It features a 5th wheel for directional movement, cornering and pivoting, Trendelenburg/reverse Trendelenburg bed positions, six IV pole configurations, ergonomically located oxygen tank holder, six brake/steer locations, Dual Fowler assisted adjustable back rest and large storage area for patient belongings. The 5th Wheel Transport Stretcher comes as either a 29 bed width or a 31 bed width. PURPOSE OF THIS MANUAL This manual provides the parts list, operation, cleaning and maintenance instructions for the 5th Wheel Transport Stretcher. This manual pertains to both the PTF1000 (29 bed with) and the PTF (31 bed width). To place an order, contact our customer service department at or or by at sales@macmedical.com TABLE OF CONTENTS Warnings and Cautions Icon Key 3 Warnings and Cautions When Installing or Operating This Product 3 General Material Specifications of the PTF1000 and PTF th Wheel Transport Stretcher 4 Overall Stretcher Dimensions 4 Parts List of PTF1000 and PTF th Wheel Transport Stretcher 5 Operation of the PTF1000 and PTF th Wheel Transport Stretcher 8 Fowler Adjustment for PTF1000 and PTF th Wheel Transport Stretcher 13 Stretcher Optional Features 15 Cleaning 15 Transportation and Storage Conditions 15 Transportation Damage And Claims 16 Limited Lifetime Warranty 16 KEEP THIS MANUAL MAN
3 Warnings and Cautions Icon Key The following is a list identifying the various warning and caution icons used in this manual. Cautions Icon Type Icon Description (Yellow triangle with an exclamation point) indicate the potential minor injury to personnel and damage to equipment. Note: The exclamation point will not be visible where only equipment damage is present. Warnings and Cautions When Installing or Operating This Product 1. Prior to installation or operation, the user must read the warnings and cautions listed below. 2. The following is a list of the safety precautions, which must be observed when operating this equipment. WARNINGS indicate the potential for danger to personnel. CAUTIONS indicate the potential for damage to equipment. These precautions are repeated (in whole or in part), where applicable, throughout the manual. It is important to review these precautions before using the equipment. WARNING-INJURY HAZARD - REPAIRS AND ADJUSTMENTS should be only attempted by experienced service agents fully acquainted with this equipment. The use of inexperienced, unqualified persons to service the equipment, or the installation of unauthorized parts, could cause serious personal injury, or result in costly damage. CAUTION-POSSIBLE EQUIPMENT DAMAGE - When cleaning the stretcher - See complete Cleaning Instructions in this manual. NOTE: This product is to be used strictly for the purpose it was designed for. If this product is used in a manner not specified by MAC Medical, Inc., the protection provided by the equipment may be impaired. MAC Medical, Inc disclaims all liability for the consequences of this product being used for purposes other than its intended design. Product modification or misuse can be dangerous. MAC Medical, Inc disclaims all liability for the consequences of product alterations or modifications, as well as for the consequences which might result from the combination of this product with other products, whether supplied by MAC Medical, Inc or by other manufacturers, unless such a combination has been specifically endorsed by MAC Medical, Inc. MAN

![Stretcher Dimensions [889 mm] 35 (fully extended height) [558.8mm] 22 (lowest height position) [1295.](/docs-images/74/69633869/images/4-1.jpg "39 mm] 51 (fully extended height) [965.")
![19 mm] 38 (lowest height position) A B C Patient Surface D Patient Surface Width and Length Dimensions (in millimeters](/docs-images/74/69633869/images/4-2.jpg "and inches) Model # A B C D PTF1000 [2116.14mm] 83 5/16 [852.49mm] 33 9/16 [739.77mm] 29 1/8 [1916.")
4 General Material Specifications of the PTF1000 and PTF th Wheel Transport Stretcher Chassis Shroud: LDR33/1 552 ABS FS8039 Wheel Lock Pedal: Hot Rolled Bar Stock Mattress Pad: Polyurethane Foam Core Pedals: Flexible PVC Overall Stretcher Dimensions [889 mm] 35 (fully extended height) [558.8mm] 22 (lowest height position) [ mm] 51 (fully extended height) [ mm] 38 (lowest height position) A B C Patient Surface D Patient Surface Width and Length Dimensions (in millimeters and inches) Model # A B C D PTF1000 [ mm] 83 5/16 [852.49mm] 33 9/16 [739.77mm] 29 1/8 [ mm] 75 7/16 PTF [ mm] 83 5/16 [903.29mm] 35 9/16 [790.57mm] 31 1/8 [ mm] 75 7/16 MAN


5 Parts List of PTF1000 and PTF th Wheel Transport Stretcher The main structural and operational Stretcher components called out in the following illustrations are identified in the table on Page 7. The operational components will be covered in more detail in this installation manual. 39 For either 29 width or 31 width stretchers Detail A Top view with Pad removed. MAN


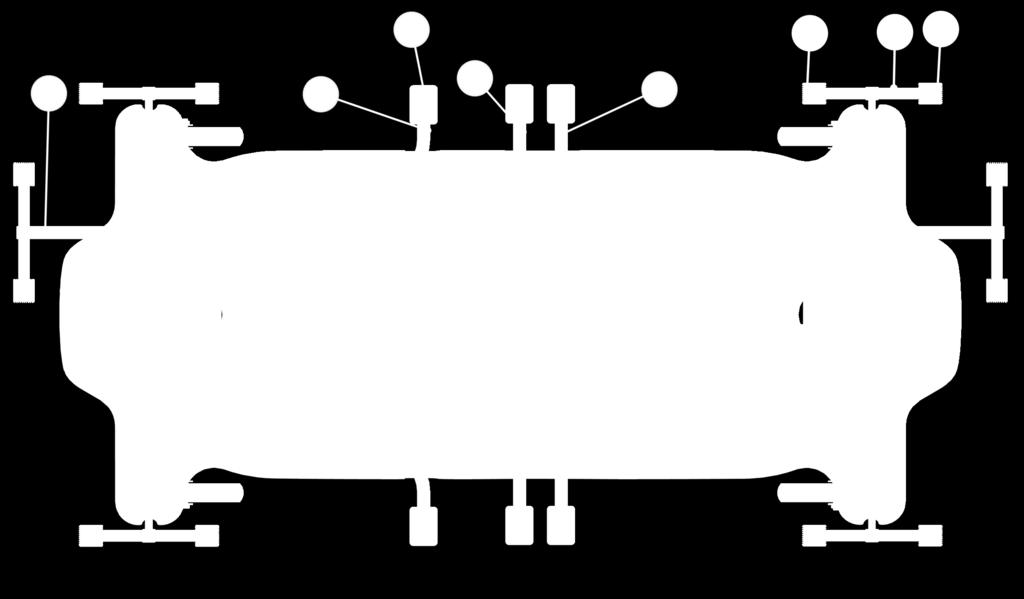
6 Top view of the stretcher bed with Pad and Back Rest removed for clarity. Top view of the bottom half of the stretcher. Side view of the bottom half of the stretcher. MAN
7 ID # Part # Description Qty 1 ST Pad, 29" 5th Wheel Stretcher, 27 X 75 X ST Pad, 31" 5th Wheel Stretcher, 29 X 75 X STR0112-P Rail Assembly 2 3 STR0064 Stretcher Arm, 16" Straight 8 4 STR0067 Stretcher Arm, 20.5" Locking 2 5 STR0066 Stretcher Arm, Head Of Bed (Arched) 2 6 H Rivet, 2-piece compression 12 7 W Washer 24 8 STR0075 Large Pole, I.V. Pole 1 9 STR Tube, Small Pole I.V ST0098 NEW Knob, Adjustment I.V STR I.V. Hook Clamp Bottom, Small Pole I.V ST0029 Roller, Side Rail 12/Stretcher SMST0004L-01 Rail Slide Latch (Left) (rail release) 1 14 SMST0004R-01 Rail Slide Latch (Right) (rail release) 1 15 STR Release Handle 1 16 ST0026 Pole, I.V. Deli Socket 6 17 STR Back Rest-Stretcher Bed 1 18 STR Headrest Tube 1 19 ST0058-R Decal, Stretcher "Rail Release" 2 20 ST0058-P Decal, "Push From This End" 1 21 ST Bumper, Blue 1 22 STR Uni Strut 29" Stretcher Hoop 1 22 STR Uni Strut 31" Stretcher Hoop 1 23 STR Back Rest Stop Brace 2 24 STR Fowler Release Mechanism Cover 1 25 STABILUS-1 Fowler, Adjustment 2 26 ST0006F13-02 O2 Holder, Plastic Stretcher 1 27 ST0015 Foot Pedal Tread, Stretcher 6 28 STR Lift Pedal "Head End" 1 29 STR0039 Release Pedal "Center" 1 30 STR0036 Release Pedal "Foot End" 1 31 STR " Round Tube, Fifth Wheel Pedal 1 32 ST0031 Pedal, Red 6 33 ST0032 Pedal, Green 6 34 STR0211-P Painted Brake Pedal Assembly 6 35 ST0006F14 Stretcher Boot 2 36 ST0006F5-02 Chassis Shroud 1 37 STR " Dia. Wheel W/Bearing, ST0004 Caster 4 39 STR0600 I.V. Pole Assembly 1 40 ST0058-PTF1000 MAC 5th Wheel Transport Stretcher Decal Set (for PTF1000 & PTF ) 1 MAN


 or pedal C (for foot-down Trendelenburg). D.")
8 Operation of the PTF1000 and PTF th Wheel Transport Stretcher 1. Height Adjustment A. The Height Adjustment Mechanism pedals are located on both sides of the stretcher. B. Raise the stretcher surface by depressing the height adjustment pedal downwards to the floor. C. Each time the pedal is depressed, the stretcher will rise. For maximum patient comfort, use long smooth strokes. D. Lower the stretcher by simultaneously depressing the two smaller pedals. The stretcher lowers itself as long as both pedals are depressed, or until reaching lowest position. 2. Trendelenburg and Reverse Trendelenburg Position Mechanism A. The Trendelenburg mechanism allows ±18 of tilt movement as shown in the first picture at right. B. To obtain the Trendelenburg or reverse Trendelenburg positions, first raise the stretcher from lowest position (pedal A). C. Then depress pedal B (for head-down Trendelenburg) or pedal C (for foot-down Trendelenburg). D. Horizontal level may be regained either by lowering one end until the surface is horizontal, or by activating the height adjustment pedal A. This will raise the stretcher surface to a tilt position until one end reaches maximum height. Continued depression of the height adjustment pedal will then raise the other end to maximum height. C B A MAN
 and steering pedals (green) that are located")


 position to allow all wheels to swivel")

9 3. Casters and Wheel Movement A. Casters are central locking type with brake pedals (red) and steering pedals (green) that are located on both stretcher sides, front and rear ends. B. Depressing any of the brake pedals will lock the stretcher into position and prevent its movement in any direction. C. Depressing any of the steering pedals will engage the 5th wheel to allow straight steering, pivoting and cornering. D. Place the brake/steering pedal in an horizontal (non-depressed) position to allow all wheels to swivel in any direction for parking maneuvers. E. Caution: When stretcher is stationary or unattended, lock the wheels. 5th Wheel Brake/Steering Pedals (side view) in horizontal (non-depressed) position. Retractable center 5th wheel provides straight line steering, pivoting and cornering (red arrows). Brake/Steering Pedals (end view) in horizontal (non-depressed) position. When 5th wheel is not engaged, all wheels capable of directional and pivotal steering (green arrows). MAN


10 4. Back Rest Adjustment A. The Back Rest is raised by lifting upward on the red Release Lever located beneath the Back Rest section at the head-end of the stretcher and lifting the Back Rest section of the bed. B. The Back Rest can be elevated to a 90 position and adjusted to any incremental position. Release Lever Squeeze up on the red Release Lever to release Back Rest and lift up. C. The Back Rest is lowered by squeezing up the Release Lever and pushing the Back Rest down. D. The Back Rest can be fixed in any intermediate position by releasing the release handle when the Back Rest reaches the desired angle of adjustment. E. Squeeze up on the Release Lever and push the Back Rest down. MAN


 with one hand while pushing downward on the rail with the other hand. C.")
11 5. Rail Adjustment A. Side rails are raised from a folded position by simply pulling up the rail and pushing it forward until it locks securely into its fully extended position. Caution: Patients should not be left unattended until it is confirmed that both side rails are locked securely into its fully extended position. B. Side Rails are lowered back to its folded position by lifting up the Rail Side Latch rail release (circled in red) with one hand while pushing downward on the rail with the other hand. C. Note: If the rails fall down, tighten the nuts for each rail on the inside of the Support Brace (6 places - both sides). Support Brace MAN


")


12 6. Other Features IV poles provided with the stretcher are telescopic. Turn the knob to release the second tube and raise to desired height. Maximum extension of the pole (from IV hook to mounting stretcher socket) is 43 1/2. Insert IV poles in the any or all of the six IV sockets. Four are located at the foot of the stretcher and two at the head. Place oxygen tank in the ergonomically located oxygen tank holder located under the bed frame. Patient belongings can be stored here for transport. MAN


13 Fowler Adjustment for PTF1000 and PTF th Wheel Transport Stretcher 1. At times, it may be necessary to adjust the Fowlers on the 5th Wheel Transport Stretcher. To do this, first unscrew the 4 screws securing the Fowler Release Cover. 2. After unscrewing the 4 screws, remove the Fowler Release Cover. 5. In the views below, the retaining pin can be seen. 3. The retaining pin is located in this enclosed area which is located on both sides of the stretcher. 4. Adjust the hex nuts on both Fowlers (red circled area) which will move the retaining pin up or down on the Fowlers. MAN
, the retaining pin is depressed. 7.")

14 6. When the stretcher Release Lever is pulled back (as shown in the picture at left), the retaining pin is depressed. 7. The picture below shows the retaining pin (in red circle) being depressed by the Release Lever. 8. After adjusting the hex nuts on both Fowlers, re-install the Fowler Release Cover. MAN
15 Stretcher Optional Features 29 or 31 Stretchers may be ordered to include these features: PH = Fold Down Push Handles K = Knee Gatch Example: PTF1000 with features Knee Gatch and push handles would be order model #PTF1000-K-PH. The same for PTF would be PTF K-PH. Optional Accessories: Only standard MAC Medical accessories should be used on MAC Medical beds. Use of other non-mac Medical products may cause damage or malfunction of the structure of the stretcher. Part # ST0010 STR0273 STR ST0122 (Set) Maintenance Description Fold Down Push Handles Paper Roll Dispenser Kit Detachable Foot Board Envelope Style Stretcher Rail Bumper Pads 1. Maintenance - Every Two Months Check all components, height adjustment mechanisms, back rest and leg rest adjustments, side rails, casters and brakes, head and foot boards, Trendelenburg mechanism, and make sure all plastic parts are fitted and not broken. The mattress surface should be checked to see that it is dry, without any remains of food, urine, blood, etc. The mattress should be checked to ensure that it is not torn or split and that it is not permitting urine to leak through onto the mattress surface. Should any signs of corrosion be observed, the manufacturer should be advised immediately in order to obtain preventive instructions. Any defects should be repaired at once. 2. Maintenance - Six Month Check Repeat the checks carried out every two months. In addition, any chips, cracks or scratches on the paintwork should be repaired/touched up by paint brush in order to prevent the spread of corrosion. Casters should be checked and accumulated hair, etc. removed from inside the wheels. The outside wheel cover should be opened and the caster lightly greased with silicon based grease. 3. Maintenance - General It is recommended that all beds be numbered and marked so that the maintenance operations can be recorded for each bed in a card index. Use a lubricant on the moving parts to allow free movement of sliding parts and help reduce noise. Cleaning All bed parts may be cleaned by use of a soft cloth or sponge, soap and water. Do NOT use agents containing chlorine or solvents. Caution: In no circumstances should a cleaning agent containing chlorine be used. All chemical/solutions must be diluted to the manufacturer s recommendations. No chemical or solution should be left to dry on the pad surface. After the alloted time has passed to insure disinfection, the pad surface should be wiped again with a wet cloth to remove any remaining chemical or solution. Aside from these restrictions, there are no other limitations as to the type of cleaning agent, or detergent which may be used, or as to the water temperature. Warning: Do not submerge, sterilize or hose down the mattress pad at any time. This could result in damage to the mattress pad. Wait minutes until the mattress surface is completely dry before replacing the mattress. Ensure that traces of blood, urine, iodine, and food waste is cleaned as soon as possible to prevent any development of corrosion particularly underneath the mattress. Materials such as Scotch Brite, steel wool or similar abrasives, which may damage the protective paint surface, should not be used. Cleaning of the mattress should be carried out according to the instructions on the mattress care label. After washing, stretchers should be placed at an incline of at least 4 degrees for drying. Transportation and Storage Conditions Ambient temperature range: -30 C to +60 C (-22ºF to 140ºF) Relative Humidity 10% to 90% (non-condensing) Atmospheric Pressure 500hPa to 1060hPa (0.49atm to 1.05atm) MAN
16 Transportation Damage And Claims All MAC Medical Inc. equipment is sold F.O.B shipping point, and when accepted by the carrier, such shipments become the property of consignee. Should damage occur in shipment, it is a matter between the carrier and the consignee. In such cases, the carrier is assumed to be responsible for the safe delivery of the merchandise, unless negligence can be established on the part of the shipper. 4. Make an immediate inspection while the equipment is still in the truck or immediately after it is moved to the receiving area. Do not wait until after the material is moved to a storage area. 5. Do not sign a delivery reciept or a freight bill until you have made a proper count and inspection of all merchandise received. 6. Note all damage to packages directly on the carrier s delivery receipt. 7. Make certain the driver signs this receipt. If he refuses to sign, make a notation of this refusal on the receipt. 8. If the driver refuses to allow inspection, write the following on the delivery receipt: Driver refuses to allow inspection of containers for visible damage. 9. Telephone the carrier s office immediately upon finding damage, and request an inspection. Mail a written confirmation of the time, date and the person called. 10. Save any packages and packing material for further inspection by the carrier. 11. Promptly file a written claim with the carrier and attach copies of all supporting paperwork. We will continue our policy to assisting our customers in collecting claims which have been properly filed and actively pursued. We cannot, however, file any damage claims for you, assume the responsibility of any claims, or accept deductions in payment for such claims. Limited Lifetime Warranty MAC Medical warrants to the original purchaser that its Proprietary Products will be free from defects in workmanship or materials under normal use and service for the life of the product, so long as owned by the original purchaser, according to the limitations set forth below. Defective products shall be repaired or replaced at MAC Medical s option at no cost to the original purchaser provided: 1. The customer must obtain a written return authorization supplied by MAC Medical s customer service department. The product must be returned, properly packaged, with a copy of the original sales receipt and copy of the RMA authorization. Please call (877) or (618) to receive a return authorization. 2. The customer must pre-pay freight charges to and from MAC Medical and must ship merchandise properly packaged, in a way the product will not be damaged during transit to the factory. MAC Medical does not warranty any freight damage to or from the factory. It is the customer s responsibility to inspect the product for packaging damage before signing the BOL. This warranty does not apply to products, which have been subject to abuse, misuse, accident, modification, alteration, tampering, negligence, lack of routine maintenance or misapplication; or products that have been repaired by other than MAC Medical or its authorized representatives. This warranty does not apply to glass, fabrics, vinyl, seat coverings, cushions, padding or their stitching, gluing or installation. Component parts not manufactured by MAC Medical, such as casters, caster inserts, any components made from rubber or plastic, circuit boards, fan heaters, plumbing parts, electrical switches and other components are also excluded. For these component parts, MAC Medical will pass on the original manufacturer s warranty to MAC Medical equipment original purchasers. Please consult factory for questions regarding the warranties of these component parts. This warranty does not apply to custom fabricated products. Consult factory. UNLESS EXPRESSLY SET FORTH IN THIS WARRANTY, THERE ARE NO OTHER WARRANTIES, WHETHER EXPRESS OR IMPLIED, OF FITNESS AND / OR MERCHANTABILITY OR ANY OTHER WARRANTY IMPLIED BY CUSTOM, USAGE OR COURSE OF DEALING. Liability of MAC Medical under this warranty is limited to the repair and / or replacement of any products. MAC Medical specifically excludes and disclaims any responsibility for any incidental or consequential damages claimed to have arisen from any defect in workmanship or materials. No representative has any authority to change or enlarge the above warranty or MAC Medical liability. This document supersedes all previous warranty provisions. Customer needs are our first priority. MAC Medical, Inc. Printed in USA Publication No. MAN-020 Rev E November 2017 Information regarding this product is subject to change without prior notice. Corporate Office 325 West Main Street Belleville, IL Manufacturing Plant 820 South Mulberry Street Millstadt, IL Phone: Toll Free:
STRETCHERS PT1000 SERIES
 STRETCHERS PT1000 SERIES INSTALLATION-OPERATION-MAINTENANCE USER MANUAL Mac Medical Inc. 820 S Mulberry St. Millstadt, IL 62260 (618) 476-3550 phone (618) 476-3337 fax MAN-006 Rev. B August, 2012 Contents
IV STANDS. Assembly, Usage and Maintenance INSTRUCTION MANUAL
 INSTRUCTION MANUAL IV STANDS Assembly, Usage and Maintenance Read and understand all of the instructions and safety information in this manual before operating this product. MAN-045 REV A 2018 MAC Medical,
Stainless Steel Kick Bucket and Stand
 INSTRUCTION MANUAL Stainless Steel Kick Bucket and Stand Assembly, Operation and Cleaning Instructions Read and understand all of the instructions and safety information in this manual before operating
ONE AND TWO STEP STEP STOOLS
 INSTRUCTION MANUAL ONE AND TWO STEP STEP STOOLS Usage and Maintenance Read and understand all of the instructions and safety information in this manual before operating this product. MAN-049 REV A 2018
PASS THROUGH WINDOWS
 INSTRUCTION MANUAL PASS THROUGH WINDOWS Installation and Maintenance Read and understand all of the instructions and safety information in this manual before operating this product. MAN-079 REV A 2018
1000 Emergency Care Stretcher 1500 PACU Stretcher OPERATIONS MANUAL. For Parts or Technical Assistance
 1000 Emergency Care Stretcher 1500 PACU Stretcher OPERATIONS MANUAL For Parts or Technical Assistance 1 800 327 0770 Table of Contents INTRODUCTION........................................................................
Renaissance Series Full Length X Ray Stretcher OPERATIONS MANUAL. For Parts or Technical Assistance
 Renaissance Series 1026 Full Length X Ray Stretcher OPERATIONS MANUAL For Parts or Technical Assistance 1 800 327 0770 Table of Contents INTRODUCTION.......................................................................
USER MANUAL. EC+ Extra Care Bariatric Trauma Stretcher Model ConvaQuip Ind., Inc. P.O. Box 3417 Abilene, TX
 USER MANUAL EC+ Extra Care Bariatric Trauma Stretcher Model 1600 ConvaQuip Ind., Inc. P.O. Box 3417 Abilene, TX 79604 www.convaquip.com Table of Contents Parts Locator 3 Safety Notes 5 Weight Limit 6
Prep & Pack Workstation Table
 INSTRUCTION MANUAL Prep & Pack Workstation Table Read and understand all of the instructions and safety information in this manual before operating this product. MAN-042 rev C 2018 MAC Medical, Inc. 07/2018
FHC7100. FHC 7100 MobileCare Transport Stretcher TRANSPORT STRETCHERS
 FHC7100 FHC 7100 MobileCare Transport Stretcher Standard Features: Specifications: 8 Tente total/directional locking casters Overall dimensions: 83 long x 31 wide Brake steer pedals all 4 corners Patient
OPERATION and SERVICE MANUAL EC TRANS. CHAIR
 OPERATION and SERVICE MANUAL EC TRANS. CHAIR MODEL 900EC THE SERIAL NUMBER WILL BE FOUND ON THE LOWER FRAME AT THE HEAD END. RECORD THE NUMBER BELOW: SERIAL NUMBER: DATE OF PURCHASE ConvaQuip Ind., Inc.
2100 Childbearing Bed OPERATIONS MANUAL. For Parts or Technical Assistance
 2100 Childbearing Bed OPERATIONS MANUAL For Parts or Technical Assistance 1 800 327 0770 Table of Contents INTRODUCTION........................................................................... 2 SPECIFICATIONS.........................................................................
EZ Way Shower Trolleys
 EZ Way Shower Trolleys 2000/3000 Operator s Instructions EZ Way, Inc. PO Box 89 Clarinda, IA 51632 1-800-627-8940 www.ezlifts.com Form 2-207 Rev. 12/14/11 The EZ Way Shower trolley is unique with its side-mounted
Podiatry Procedures Chair. For Models: Barrier-Free. User s Guide
 Podiatry Procedures Chair For Models: 646 647 Barrier-Free User s Guide Product Information (The information below is required when calling for service.) Dealer : Date of Purchase: Model / Serial Number:
Owner s Manual. Bariatric Manual Wheelchairs. Specializing in Bariatric Patient Aids
 Owner s Manual Bariatric Manual Wheelchairs 700 LB CAPACITY XL Series Wheelchair by ConvaQuip Specializing in Bariatric Patient Aids P.O. Box 3417 * Abilene, TX 79604 U.S.A. Toll 800/637-8436 * FAX 325/677-7217
Installation Instructions Cable Top Twill Replace-a-top with Tinted Windows
 Installation Instructions Cable Top Twill Replace-a-top with Tinted Windows Vehicle Application Jeep Wrangler Unlimited (JK) 4 Door 2011 and newer Part Number: 79847 Will fi t 54723 Upper Door Skins not
1250 LB. CAPACITY MECHANICAL WHEEL DOLLY
 1250 LB. CAPACITY MECHANICAL WHEEL DOLLY 67287 SET-UP AND OPERATING INSTRUCTIONS Visit our website at: http://www.harborfreight.com Read this material before using this product. Failure to do so can result
Installation Instructions Sunrider for Hardtop
 Installation Instructions Sunrider for Hardtop Installation Instructions Sunrider for Hardtop Vehicle Application: Jeep Wrangler / Wrangler Unlimited 2007- current Part Number 52450 Installation Tips Before
Installation Instructions Twill Replace-a-top
 Installation Instructions Twill Replace-a-top Upper Door Skins Not Included Vehicle Application Jeep Wrangler TJ 1997-2006 Tinted Glass Windows Part Number: 79841 www.bestop.com - We re here to help! Visit
Renaissance Series Critical Care Bed OPERATIONS MANUAL. For Parts or Technical Assistance
 Renaissance Series 2020 Critical Care Bed OPERATIONS MANUAL For Parts or Technical Assistance 1 800 327 0770 Table of Contents Introduction...............................................................................
TR 2000/3000. Operating manual. Shower Trolleys. Hygiene Equipment Designed for People
 Operating manual Always study this manual carefully before operating the Shower Trolley. Operating instructions and recommended maintenance procedures are explained in the following pages. Only qualified
INSTALLATION AND OPERATION MANUAL
 TRANSMISSION JACKS MODELS: RTJ-1 RTJ-660 RTJ-1100 RTJ-3000 PLEASE READ THE ENTIRE CONTENTS OF THIS MANUAL PRIOR TO INSTALLATION AND OPERATION. BY PROCEEDING YOU AGREE THAT YOU FULLY UNDERSTAND AND COMPREHEND
Installation Instructions Supertop NX Twill
 Installation Instructions Supertop NX Twill Vehicle Application: Jeep Wrangler Unlimited 2007 Current Part Number: 54823 www.bestop.com - We re here to help! Visit our web site and click on Ask a Question.
Installation Instructions Twill Replace-a-top with Tinted Windows
 Installation Instructions Twill Replace-a-top with Tinted Windows Vehicle Application Jeep Wrangler Unlimited (JK) 4 Door 2007 2009 Part Number: 79837 Upper Door Skins not included www.bestop.com - We
Installation Instructions Twill Replace-a-top
 Installation Instructions Twill Replace-a-top Upper Door Skins Not Included Vehicle Application Jeep Wrangler TJ 2003-2006 Tinted Glass Windows Part Number: 79841 www.bestop.com - We re here to help! Visit
Installation Instructions Cable Top Twill Replace-a-top with Tinted Windows
 Installation Instructions Cable Top Twill Replace-a-top with Tinted Windows Vehicle Application Jeep Wrangler (JK) 2 Door 2011 and newer Part Number: 79846 Will fi t 54722 Upper Door Skins not included
Installation Instructions Twill Replace-a-top with Tinted Windows
 INSTALLATION TIME Installation Instructions Twill Replace-a-top with Tinted Windows SKILL LEVEL Upper Door Skins not included Vehicle Application Jeep Wrangler (JK) 2 Door 2007 2009 Part Number: 79836
Junior Sandblaster. Model #51 WARNING! FOR YOUR SAFETY PLEASE READ INSTRUCTIONS BEFORE OPERATING TOOL & WEAR EYE PROTECTION
 Junior Sandblaster Model #51 WARNING! FOR YOUR SAFETY PLEASE READ INSTRUCTIONS BEFORE OPERATING TOOL & WEAR EYE PROTECTION PARTS LIST AND PART NUMBERS 01.Red Rubber Air Hose (5Ft) P51-01 02. Male Insert
ASSEMBLY / OPERATION INSTRUCTIONS. Low Profile Motorcycle Dolly
 ASSEMBLY / OPERATION INSTRUCTIONS 1,500LB CAPACITY Low Profile Motorcycle Dolly Model: 03-CG1500-01(B1) WARNING BEFORE USE PLEASE READ ALL WARNINGS AND INSTRUCTIONS TO PREVENT SERIOUS INJURY Drop-Tail
Apollo Tilt Wheelchair 18" and 20" Instruction Manual
 Apollo Tilt Wheelchair 18" and 20" Instruction Manual Table of Contents Contents Table of Contents... 2 Introduction... 3 Warning... 4 Safety Guidelines... 5 Parts of the Tilt Wheelchair... 6 Setup & Operation...
540/545 Universal Procedures Stretchers
 Go To Table Of Contents 540/545 Universal Procedures Stretchers Installation and Manual 503-027-00 Rev. H (/05) Important Information Page 2 Installation Page 4 Description Page 5 Components Overview Page
Heavy Duty Four Wheeled Walker
 Heavy Duty Four Wheeled Walker Weight Capacity: 500 lbs. ITEM # W1802 Made in China 2011 ESSENTIAL MEDICAL SUPPLY, INC. Manufactured for Orlando, FL 32822 -- SAVE THESE INSTRUCTIONS -- Do not attempt to
2 Piece Soft Door Installation Instructions
 2 Piece Soft Door Installation Instructions For: Wrangler/TJ (1997-on) Part Number: 51789 Note: Use of this product will eliminate the factory side mirrors and requires the removal of the entry light bulbs.
The Esteem Steel Self Propel Wheelchair Instructions
 The Page 1 Instructions for Steel Self propel Wheelchair Fold down back lever Arm release pull Fold away armrest lever Quick release wheels Brake lever Footrest Pegs Footrest adjustment bolt Footrest It
Fastback Top Installation Instructions and Owner s Manual
 Fastback Top Installation Instructions and Owner s Manual MODEL: Suzuki Samurai 1985-1989 PART NUMBER Congratulations on your purchasing decision. Bestop designed the Convertible Top to give you years
QA4 Surgery Trolley System Manual Function Operating Instructions
 QA4 Surgery Trolley System Manual Function Operating Instructions Catalogue No. 21310 Anetic Aid Ltd. Queensway Guiseley West Yorkshire, LS20 9JE United Kingdom T +44 (0) 1943 878647 F +44 (0) 1943 870455
Installation Instructions Trektop NX Twill
 Installation Instructions Trektop NX Twill Vehicle Application: Jeep Wrangler TJ 1997 2006 Part Number: 56920 www.bestop.com - We re here to help! Visit our web site and click on Ask a Question. Click
OPERATION AND ASSEMBLY MANUAL HIGH JACK STANDS Models: RJS-1T RJS-1TF RJS-2TH
 PLEASE READ THE ENTIRE CONTENTS OF THIS MANUAL PRIOR TO INSTALLATION AND OPERATION. BY PROCEEDING YOU AGREE THAT YOU FULLY UNDERSTAND AND COMPREHEND THE FULL CONTENTS OF THIS MANUAL. FORWARD THIS MANUAL
Installation Instructions Trektop NX
 Installation Instructions Trektop NX Vehicle Application: Jeep Wrangler (JK) 2 Door 2007 Current Part Number: 56822 www.bestop.com - We re here to help! Visit our web site and click on Ask a Question.
Aplos Single Lever Basin Faucet
 INSTALLATION GUIDE Aplos Single Lever Basin Faucet KEF-15301 www.kraususa.com I Toll Free: 1.800.775.0703 I 2017 Kraus USA Inc. I REV. October 25, 2017 Congratulations on the purchase of your new Kraus
1500 Series Roll Off Hoist. Owner s Manual (5-06)
") 1500 Series Roll Off Hoist Owner s Manual (5-06) Section 1: General Information Introduction Safety Information Warranty Information Table of Contents Section 2: Operation Operating the P.T.O. Operating
1500 Series Roll Off Hoist Owner s Manual (5-06) Section 1: General Information Introduction Safety Information Warranty Information Table of Contents Section 2: Operation Operating the P.T.O. Operating
Operator's Manual. Storage System. Ultrasound Probe Cabinet. Manufactured by:
 Storage System Ultrasound Probe Cabinet Operator's Manual Manufactured by: CIVCO Medical Solutions 102 First Street South Kalona, IA 52247 USA 319.248.6757 / 800.445.6741 WWW.CIVCO.COM Copyright 2018 All
Geo Arch Single Lever Pull-Down Kitchen Faucet With Soap Dispenser
 INSTALLATION GUIDE Geo Arch Single Lever Pull-Down Kitchen Faucet With Soap Dispenser KPF-1702 www.kraususa.com I Toll Free: 1.800.775.0703 I 2017 Kraus USA Inc. I REV. October 25, 2017 Congratulations
Dispenser & Warmer RIC-1909 RIC-1909EXP
 Dispenser & Warmer RIC-1909 RIC-1909EXP Safety Precautions CAUTION This equipment is designed and sold for commercial use only. This equipment is not to be used by the consumer in home use. Do not allow
INSTALLATION AND OPERATION MANUAL Low Profile Long Frame Floor Jack Model: RFJ-3000LPF REV B
 PLEASE READ THE ENTIRE CONTENTS OF THIS MANUAL PRIOR TO INSTALLATION AND OPERATION. BY PROCEEDING YOU AGREE THAT YOU FULLY UNDERSTAND AND COMPREHEND THE FULL CONTENTS OF THIS MANUAL. FORWARD THIS MANUAL
Installation Instructions Trektop NX
 Installation Instructions Trektop NX Vehicle Application: Jeep Wrangler (JK) 2 Door 2007 Current Part Number: 56822 www.bestop.com - We re here to help! Visit our web site and click on Ask a Question.
3000-Lb. Vehicle Positioning Jacks. Owner s Manual
 3000-Lb. Vehicle Positioning Jacks Owner s Manual WARNING: Read carefully and understand all ASSEMBLY AND OPERATION INSTRUCTIONS before operating. Failure to follow the safety rules and other basic safety
CANT-Series Cantilever Carts Instruction Manual
 Vestil Manufacturing Corp. 2999 North Wayne Street, P.O. Box 507, Angola, IN 46703 Telephone: (260) 665-7586 Toll Free (800) 348-0868 Fax: (260) 665-1339 www.vestilmfg.com e-mail: HUinfo@vestil.comU CANT-Series
PACIFICA Shower Cabin Installation Instructions
 PACIFICA Shower Cabin Installation Instructions IMPORTANT Please read carefully the following instructions before installing your shower cabin. If you have any questions on this shower cabin installation
Tiller Lock Assembly
 2 1 4 1 2 4 1 2 4 1 7 6 7 8 Positioning Pin Assembly 1 Positioning Pin 2 Spring Black Knob 5 4 1 2 2 1 Tiller Lock Assembly 1 2 4 Threaded Rod Rotating Rod Spring Flat Washer 5 6 7 8 C Type Plastic Washer
Mechanical Filter Box Kit
 Mechanical Filter Box Kit REMINDER CALL 1-888-755-4497 BEFORE RETURNING TO STORE. MODEL #MFBX500P Questions, problems, missing parts? Before returning to your retailer, call our customer service department
Installation / Operation Instructions Sunnex ORION Series Exam Lights
 Installation / Operation Instructions Sunnex ORION Series Exam Lights OR-120 OR-127 OR-220 OR-227 Models: OR-300 OR-400 OR-500 OR-600 1. APPLICATIONS The Sunnex ORION Series light was designed specifically
Effective June 1, 2013 This guide supersedes all previous versions
 Effective June 1, 2013 This guide supersedes all previous versions 3842 Redman Drive 1-800-797-7974 Fort Collins, CO 80524 www.commandlight.com L-CAS THANK YOU Please allow us to express a simple thank
Lubricator Gun: 10,000 psi (700 bar) Maximum Delivery Pressure when disconnected from Dispenser
 Maximum Delivery Pressure when disconnected from Dispenser") INSTRUCTIONS-PARTS LIST 30 455 INSTRUCTIONS This manual contains important warnings and information. READ AND KEEP FOR REFERENCE. Rev. C Supercedes B Hand-Operated Portable Grease Dispenser Buckshot Luber
INSTRUCTIONS-PARTS LIST 30 455 INSTRUCTIONS This manual contains important warnings and information. READ AND KEEP FOR REFERENCE. Rev. C Supercedes B Hand-Operated Portable Grease Dispenser Buckshot Luber
Installation Instructions Sailcloth Replace-a-top with Tinted Windows
 INSTALLATION TIME Installation Instructions Sailcloth Replace-a-top with Tinted Windows SKILL LEVEL Upper Door Skins not included Vehicle Application Jeep Wrangler (JK) 2 Door 2007 2009 Part Number: 79136
MODEL 7400 STRUT SPRING COMPRESSOR
 MODEL 7400 STRUT SPRING COMPRESSOR Installation, Operation & Repair Parts Information Branick Industries, Inc. 4245 Main Avenue P.O. Box 1937 Fargo, North Dakota 58103 REV112712 P/N: 81-0103A TABLE OF
Installation Instructions Supertop NX
 Installation Instructions Supertop NX Vehicle Application: Jeep Wrangler Unlimited 2007 Current Part Number: 54723 www.bestop.com - We re here to help! Visit our web site and click on Ask a Question. Click
2 Hours. Skill Level. 1 - Easy
 Installation Instructions Window Kit for Trektop NX Twill Vehicle Application: Jeep Wrangler Unlimited (JK) 4 Door 2007 Current Part Number: 58423 Installation Tips Before you begin installing your new
Installation Instructions For: Suzuki Samurai, All Years Part Number: TM
 Installation Instructions For: Suzuki Samurai, All Years Part Number: 51761 TM Patent Pending WARNING This product is designed to enhance the appearance of the vehicle and to shield the occupants from
MODEL TC400 TIRE CART. Installation, Operation & Repair Parts Information REV P/N:
 MODEL TC400 TIRE CART Installation, Operation & Repair Parts Information REV061614 P/N: 81-0245 1 TABLE OF CONTENTS SAFETY INSTRUCTIONS 2 DEFINITIONS 2 SPECIFICATIONS 3 INSTALLATION INSTRUCTIONS 3 OPERATING
Assembly Instructions
 Assembly Instructions Aluminum Padded Sling Chaise Lounge Questions, problems, or missing parts? Before returning to the store, call Customer Service. -866-988-3300 8 a.m. -5 p.m., PST Monday - Friday
Adjustable Base. CONTENTS Advisory Setup and Installation Innova Wired Hand Control year Warranty 1-10
 Adjustable Base #201 Wired Owner Manual CONTENTS Advisory Setup and Installation Innova Wired Hand Control 1-2-10 year Warranty 1-10 WARNING Attention: Read the following information before using this
MODEL 7600 STRUT SPRING COMPRESSOR
 MODEL 7600 STRUT SPRING COMPRESSOR Installation, Operation & Repair Parts Information Branick Industries, Inc. 4245 Main Avenue P.O. Box 1937 Fargo, North Dakota 58103 REV6162014 P/N: 81-0246 TABLE OF
Installation Guide Document N Cleanroom Mirrors Copyright 2016 Terra Universal Inc. All rights reserved. Revised November 2016
 Document N0. 1800-09 Copyright 2016 Terra Universal Inc. All rights reserved. Revised November 2016 Terra Universal, Inc. TerraUniversal.com 800 S. Raymond Ave. Fullerton, CA 92831 TEL: (714) 578-6000
Copy OWNER S MANUAL MODEL N Keep this Identification Number in case you must contact our Customer Service Department.
 MODEL N 9044 OWNER S MANUAL Copy Keep this Identification Number in case you must contact our Customer Service Department. Safety Glasses BEFORE BEGINNING ASSEMBLY Keep the hardware bags and their contents
Installation Manual TWM Performance Short Shifter Cobalt SS/SC, SS/TC, HHR SS, Ion Redline and Saab 9-3
 Page 1 Installation Manual TWM Performance Short Shifter Cobalt SS/SC, SS/TC, HHR SS, Ion Redline and Saab 9-3 Please Note: It is preferable to park on a flat surface, as you will have to engage and disengage
Installation Instructions Supertop NX
 Installation Instructions Supertop NX Vehicle Application: Jeep Wrangler JK 2 Door 2007 Current Part Number: 54722 www.bestop.com - We re here to help! Visit our web site and click on Ask a Question. Click
INSTALLATION INSTRUCTIONS TOP MOUNT SINKS
 These instructions are for installing top mount stainless steel sinks. (CH365 and CH366 NOT included) Please read all instructions carefully before starting the installation. TABLE OF CONTENTS Preparation
Oletto Single Lever Bar/Prep Faucet
 INSTALLATION GUIDE Oletto Single Lever Bar/Prep Faucet KPF-2600 www.kraususa.com I Toll Free: 1.800.775.0703 I 2017 Kraus USA Inc. I REV. January 23, 2018 Congratulations on the purchase of your new Kraus
Fabric Replacement Top and Doors with Tinted Side and Rear Curtains Installation Instructions
 Fabric Replacement Top and Doors with Tinted Side and Rear Curtains Installation Instructions For: Wrangler/TJ 1997-2002 Part Number: 51124 www.bestop.com DO NOT INSTALL THIS PRODUCT ON ANY VEHICLE OTHER
INSTRUCTION MANUAL MODELS COVERED: CART-300-S-HR, FOR PREMIUM SCISSOR LIFT CARTS CART-600-S-HR,, CART-1000-S-HR, CART-400-D-HR - 1 -
 INSTRUCTION MANUAL FOR PREMIUM SCISSOR LIFT CARTS MODELS COVERED: CART-300-S-HR, CART-600-S-HR,, CART-1000-S-HR, CART-400-D-HR - 1 - Content 1. Warning.3 2. Caution..4 3. Name of parts...5 4. Daily inspection
INSTALLATION GUIDE KPF Single Lever Kitchen Faucet With Pull-Out Sprayer
 INSTALLATION GUIDE KPF-21 Single Lever Kitchen Faucet With Pull-Out Sprayer www.kraususa.com I Toll Free: 1.800.775.0703 I 2017 Kraus USA Inc. I REV. August 7, 2017 Congratulations on the purchase of your
Replay Fabric Replacement Top
 Replay Fabric Replacement Top Installation Instructions For: GEO Tracker, Suzuki Sidekick Part Number: 51137 & Vitara 1986-1994 WARNING This product is designed to enhance the appearance of the vehicle
Installation Instructions. Application List Dodge 24V PLEASE READ ALL INSTRUCTIONS BEFORE INSTALLATION
 1 BD DODGE CUMMINS 03-055 C O O L - I T I N T E R C O O L E R Installation Instructions Application List 2003-2006 Dodge 24V 1042510 PLEASE READ ALL INSTRUCTIONS BEFORE INSTALLATION KIT CONTENTS: Please
Cincinnati, OH USA
 Part No. 87630PE Revised November 2007 Hot Dog Roller Grills Non-Stick Instruction Manual Model #8023PE, Model #8024PE and Model #8025PE Model #8023SLPE, Model #8024SLPE and Model #8025SLPE Model #8023PE
Installation Guide VHM Arm Kit for Philips Heartstart MRx and Heartstart XL+
 Installation Guide VHM Arm Kit for Philips Heartstart MRx and Heartstart XL+ The purpose of this guide is to: 1. Describe installation of Arm in channel (page 2). 2. Describe mounting of defibrillator
Reach ins, Freeezers & Refrigerators Installation & Operation Manual
 Reach ins, Freeezers & Refrigerators Installation & Operation Manual BSR23 BSF23 BSR49 BSF49 BSR72 BSF72 IMPORTANT SAFETY INSTRUCTIONS (SAVE THESE INSTRUCTIONS) Visit us on the web at www.blueairinc.com
MOVE ON TO THE REAR BAR INSTALLATION
 22410 STREET SWAY BAR SET 2001-UP LEXUS IS300 Thank you for your purchase from our line of Lexus parts. Please call us at (877) 4NO-ROLL if you have any questions regarding the service or installation
Push Down Wheeled Walker
 Push Down Wheeled Walker Push down hand grip Handle height adjustment knob Backrest Padded seat with concealed pouch Side brace Bag with shopping basket inside Push down brake stopper 6 inch (150 mm) wheels
Single Lever Pull-Out Kitchen Faucet
 INSTALLATION GUIDE Single Lever Pull-Out Kitchen Faucet KPF-1602 www.kraususa.com I Toll Free: 1.800.775.0703 I 2017 Kraus USA Inc. I REV. October 25, 2017 Congratulations on the purchase of your new Kraus
ATD Gallon Pressurized Oil Drain Owner s Manual
 ATD-5203 30 Gallon Pressurized Oil Drain Owner s Manual TECHNICAL SPECIFICATIONS Model: ATD-5203 Capacity: 30 Gallon Drain Funnel Working Height: 47.25 to 70.5 Drain Funnel Diameter: 15.75 Plastic Tray:
KidWalk KidWalk II Dynamic Mobility System
 OWNER S MANUAL KidWalk KidWalk II Dynamic Mobility System Manufactured By Prime Engineering A Division of Axiom Industries, Inc. Supplier Info 70111KWOM 2 TABLE OF CONTENTS This owner s manual is organized
Installation Instructions Headliner
 Installation Instructions Headliner For Original Equipment Soft Top and Bestop Supertop Vehicle Application Jeep TJ Wrangler Unlimited 2004 2006 Part Number: 51819 www.bestop.com - We re here to help!
Stretchers. Titan Transport and Titan Bariatric
 Stretchers Titan Transport and Titan Bariatric w w w. a m i c o. c o m Designed for Caregivers to Provide More Care with Less Effort The Amico Titan Stretcher uses an innovative design and incorporates
Euro Lightweight Wheeled Walker
 Euro Lightweight Wheeled Walker Handle with lever brake Backrest Brake cable Handle height adjustment button Removable shopping bag 8 inch (200 mm) wheels Cane holder user guide Prior to use please read
MCHT-350 MAGNETIC CYLINDER HAND TRUCK INSTRUCTION MANUAL
 VESTIL MANUFACTURING CORP. 2999 North Wayne Street, P.O. Box 507, Angola, IN 46703 Telephone: (260) 665-7586 -or- Toll Free (800) 348-0868 Fax: (260) 665-1339 www.vestilmfg.com e-mail: sales@vestil.com
ASSEMBLY & OPERATION MANUAL. CDVK2 Power Tower RECORD SERIAL NUMBER HERE
 ASSEMBLY & OPERATION MANUAL CDVK2 Power Tower RECORD SERIAL NUMBER HERE www.inspirefitness.net by Health In Motion LLC Feb. 2011 TABLE OF CONTENTS Section Description.. Page Instructions.. 1 Tools Required
Stop! Read This Important Information.
 Stop! Read This Important Information. Stop, Do Not Proceed, Read This This door replacement kit is designed for the replacement of doors on a Supertop ONLY! This door will not work on any other style
Sheven Single Lever Vessel Faucet
 INSTALLATION GUIDE Sheven Single Lever Vessel Faucet FVS-1002 www.kraususa.com I Toll Free: 1.800.775.0703 I 2017 Kraus USA Inc. I REV. October 24, 2017 Congratulations on the purchase of your new Kraus
Table of Contents pg Rev. A
 Cable Top Sailcloth Replay Top with Tinted Windows Installation Instructions For: Jeep Wrangler Unlimited (JK) 4 Door 2010 and Newer Part Number: 51204 Table of Contents WRANGLER REPLAY TOP PARTS LIST...
MODEL L/R/EF Sectional Tire Spreader
 MODEL L/R/EF Sectional Tire Spreader Installation, Operation & Repair Parts Information Branick Industries, Inc. 4245 Main Avenue P.O. Box 1937 Fargo, North Dakota 58103 REV08032016 P/N: 81-0195E TABLE
EZ Carrier 3. Owner s Manual. Keep instructions for future reference
 EZ Carrier vv Owner s Manual Keep instructions for future reference Introduction The EZ Carrier provides all the flexibility you may need to transport your mobility scooter. The features include: The capability
Instruction Manual. Fudge Puppy Display Case
 Instruction Manual Fudge Puppy Display Case Model No. 5535 10700 Medallion Drive, Cincinnati, Ohio 45241-4807 USA 2014 Gold Medal Products Co. Part No. 89074 SAFETY PRECAUTIONS DANGER Machine must be properly
Mighty Mack Wheeled Walker
 Mighty Mack Wheeled Walker Handle with lever brake Backrest Handle height adjustment knob Brake cable Extra wide padded seat Shopping basket Side brace 7 inch (180 mm) wheels user guide Prior to use please
Users Guide for Ac-sync
 Problem solved. Users Guide for Ac-sync Thank you for choosing Anywhere Cart! The AC-SYNC is designed to sync, charge and store 1-36 ipads or tablets. Adjustable device divider bays allow fitment of any
Sport Sway Bar Kit C-10 Truck
 Sport Sway Bar Kit 22390 67-72 C-10 Truck Thank you for your purchase from our new line of Chevy parts. Please call us at 877-4NO - ROLL if you have any questions regarding the service or installation
Aquila Single Lever Vessel Faucet
 INSTALLATION GUIDE Aquila Single Lever Vessel Faucet FVS-13900 www.kraususa.com I Toll Free: 1.800.775.0703 I 2017 Kraus USA Inc. I REV. October 24, 2017 Congratulations on the purchase of your new Kraus
Convertible Top Installation Instructions
 Convertible Top Installation Instructions For: 1995-1998 Geo Tracker & Suzuki Sidekick Part Number: 51364 Parts List Top, Soft (1) Window (1) Quater Window, Rt. (1) Quarter Window, Lt. (1) WARNING This
Mechanical Filter Pump Kit Up to 500 gallons
 Mechanical Filter Pump Kit Up to 500 gallons REMINDER CALL 1-888-755-6750 BEFORE RETURNING TO STORE. ITEM #FM002P Questions, problems, missing parts? Before returning to your retailer, call our customer
Installation Instructions Sport Bar Covers
 Installation Instructions Sport Bar Covers Vehicle Application Jeep TJ Wrangler 2003-2006 Part Number: 80022 Jeep TJD Wrangler Unlimited 2004-2006 Part Number: 80023 www.bestop.com - We re here to help!