Little Buddy II Conveyor Dryer with built in Heat Control
|
|
|
- Bennett Barber
- 5 years ago
- Views:
Transcription
1 Little Buddy II Conveyor Dryer with built in Heat Control 18 wide by 5 long conveyor dryer Document # Rev: G Assembly and Operating Instructions Please review all of these instructions prior to assembly. The Little Buddy is packaged in 2-cartons for shipment. Please make sure all pieces have been received before attempting assembly. Tools Required: Two ½ wrenches & needle nose pliers Label on Box Qty Contents LB15-C-120-HC, LB15-C-240-HC or 1 Drive half of Conveyor Bed, with motor LB15-C-HC-CE 1 Take Up half of Conveyor Bed 1 Conveyor Belt 4 Conveyor Leg Assy 2 Leg Cross Assy 1 Shelf LB C-HC LB C-HC or LB C-HC-CE 1 Assembly Instructions 1 Heating Chamber 1 4 inch Duct Collar 2 End Shield Accessories: LB02-EX Exhaust Kit LB15-HK Height Kit (Raises chamber 5 ) Note: Portions of the assembly procedure require 2 people. Unpack, identify, and inspect all parts. Report any missing or damaged items. Cover a 3 x 7 area on the floor with towels, cardboard, carpet, etc. to protect the painted parts from being scratched during assembly.
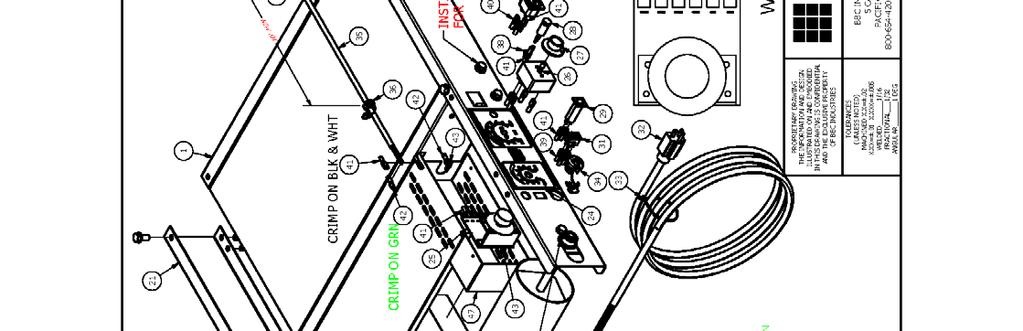
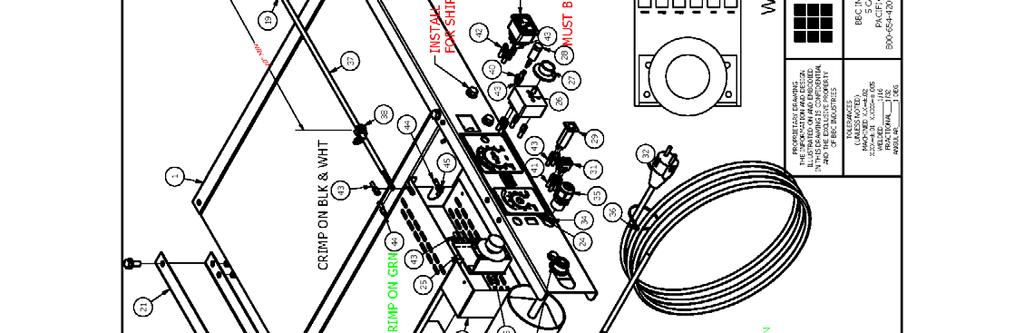
2 Conveyor Bed Assembly: 1. Place the Conveyor Drive Assembly on the covered floor.(see Fig. 1) 2. Remove 4 nuts & bolts from end of conveyor. 3. Butt the Conveyor Take-Up Assembly to the Drive Assembly. Be sure that the groove on each roller drum is on the same side of the bed. 4. Bolt the bed assembly together using 4 bolts & nuts from step Plug motor cord to take-up cord. (round plug) 6. Remove 8 bolts from sides of conveyor. 7. Install 4 legs with 8 bolts from step 5. Leave bolts loose. (see Fig. 1). 8. Remove 16 bolts from 2 leg crosses. 9. Install 2 leg crosses to legs with 16 bolts from step Tighten all bolts. 11. Using two people turn conveyor bed over onto its casters. 12. Install shelf on top of leg crosses. (see Fig. 2) Maximum Capacity 50 Pounds
3 Conveyor Belt Installation: 1. Determine the product side of the belt. A rubber guide is stitched onto one edge of the belt. This guide is designed to ride in the roller drum grooves to provide Hassle- Free-Tracking. 2. Carefully remove the splice pin from the inside teeth of the splice connector by pulling gently with needle nose pliers. DO NOT BEND; this pin will be reinserted later. 3. Lay the belt on the conveyor bed aligning the edge guide with the roller drum grooves. 4. Pull the ends of the belt together meshing the teeth of the splice while a second person reinserts the splice pin (removed earlier) into the channel formed by the interlocked metal teeth. It may be easier to rotate the belt so that the splice is on top of the conveyor bed before inserting pin. Using needle nose pliers, fully insert the pin until it is centered. 5. Adjust belt tension: Loosen 2 hex bolts at Take up Roller (See Fig 2). Pull roller at groove end till you have sag of inches below the cross-members as the belt travels under the conveyor bed. Tighten hex bolt. 6. Adjust opposite end of roller to same location and tighten hex bolt.
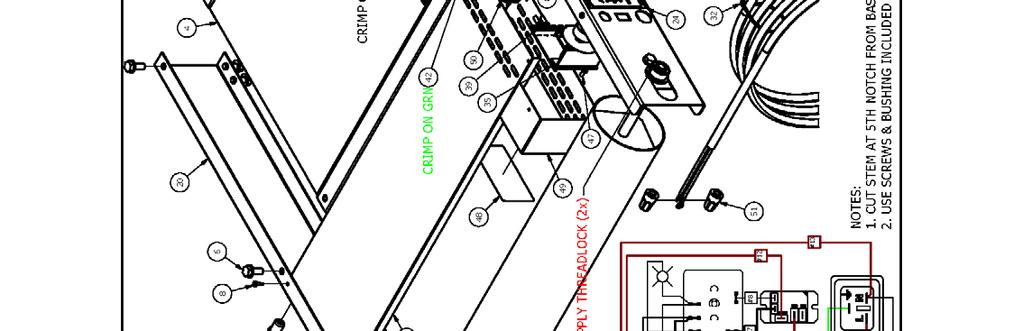
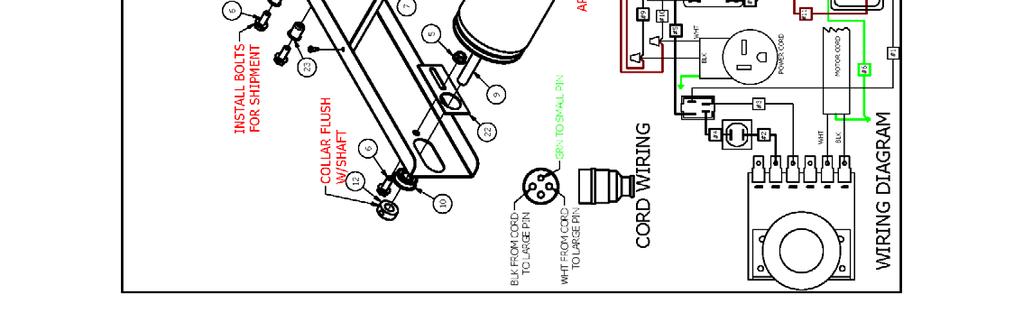
4 Attaching Heating Chamber: 1. Using two people set the chamber onto the conveyor bed (see Fig. 3). The Heating Chamber cord must be on the same side of the Conveyor Bed as the Conveyor cord. 2. The Heating Chamber has openings on the underside rails that fit over the hex-head bolts. The chamber should rest flatly on the conveyor bed. 3. Insert the Duct Start Collar into the hole in the top of the Heating Chamber. Once in position, bend the tabs at the base of the collar outward to secure it in place..note: The chamber will function properly with only the duct start collar installed. Installing a two to three foot section of 4 diameter ductwork on the start collar will improve the capture of heat and vapors created during the curing process. Optional exhaust kit (LB02-EX) available. 4. Plug the Heating Chamber cord into the receptacle on the Conveyor. Recommended Initial Start-Up Procedure: 1. DO NOT plug the equipment in (or apply power) until instructed to do so. Note: The Little Buddy LB HC requires a 120 Volt, 20 Amp circuit. The Little Buddy LB HC & LB HC-CE requires a 240 Volt, 20
5 Amp circuit. Any attempt to operate the Little Buddy without the cord/plug provided by the manufacturer will void the warranty. 2. Plug the conveyor drive into a suitable power source. 3. Turn Belt Speed to 5. Flip rocker switch on conveyor to ON position to start belt. Listen for any unusual noises. Check to see if the rubber edge guide is riding in the roller drum grooves. 4. Turn Heat Control to 5. The green indicator light will illuminate. Caution: DO NOT operate Heating Chamber unless belt is moving. Heat will damage an idle belt. 5. Verify that the heating element is functioning: after about a minute of operation, briefly feel just inside both the entrance and exit ends of the chamber. The area should be warm. Caution: Heating element is exposed inside the chamber and is operating at very high temperatures. Keep your hand close to the moving belt (without touching it). Note: Some smoke/vapor and odor may be noticed during initial start-up due to residual material from the manufacturing process burning off the elements. 6. Working temperature will be reached after a ten-minute warm-up. Test articles may be run to determine the optimal speed and heat setting for your environment and products. Belt speed can be determined by placing a small item that will not melt, like a coin, on the conveyor belt and recording the time it takes to travel through the chamber. Note: The speed and temperature of the unit may vary slightly with fluctuations in power/voltage servicing the equipment. Process an item through the dryer. Evaluate the completed article according to your quality standards. If the equipment is being used for curing of ink on garments, we recommend washing the processed garment as the definitive test. The conveyor dryer is now ready for normal Use and Operation. Routine Maintenance: Performed after first week and every 100 hours of operation. 1. The belt should be replaced if it has any tears, voids, separations, fraying, or no longer rides in the roller drum groove due to excessive wear. 2. Belt tension: the belt will relax over time and tension may have to be adjusted by the instructions above. 3. Brush wear or noise: Replace motor brushes. Contact BBC.

6 WARRANTY BBC Industries, Inc. warrants their products to be free from defects in workmanship at the time of shipment. The obligation under the above warranty shall be limited to the repair or replacement of any part or parts manufactured by BBC Industries, Inc. without charge F.O.B. factory that may prove defective within 12 months from the date of shipment, which are returned to BBC Industries, Inc. The above warranties are the only warranties made with respect to the equipment. There is no implied warranty of merchantability or of fitness. EXCLUSIONS: There is no warranty on parts not manufactured by BBC Industries, Inc., other than the respective manufacturer s warranty, if any. The warranty against defects shall not extend to damage caused from any of the following: Transport by carrier Corrosion Operation or use in a manner inconsistent with specifications and/or operating instructions Ordinary wear, accident, improper installation, or maintenance Alterations made to equipment in any way BBC Industries, Inc. shall not be liable for any losses or damages, including but not limited to incidental or consequential damages, suffered or incurred because the equipment proves to be defective either upon installation or during its operation or use. Shipment of defective parts to BBC Industries, Inc. and the return shipment of any repaired or replacement parts from BBC Industries, Inc. shall be the purchaser s/user s expense. BBC Industries, Inc. - (800)
7

8


9

10

11
12


13
14

15
16
Little Buddy II Conveyor Dryer
 Little Buddy II Conveyor Dryer 18 wide by 5 long conveyor dryer Document # 16-437 Assembly and Operating Instructions Please review all of these instructions prior to assembly. **If you have ordered the
BBAIR V Conveyor Dryer
 BBAIR-08-0V Conveyor Dryer wide by 8 long conveyor dryer with forced air and infrared Document # 6- Assembly and Operating Instructions Please review all these instructions prior to assembly. The Big Buddy-Air
Installation Instructions for Drapery System Drapery
 Installation Instructions for Drapery System 5060 Drapery - 5060 Table of Contents Tools Required: Power Screwdriver w/phillips bit Installing the 5060.............................. 3 Splicing the 5060...............................4
INSTALLATION INSTRUCTIONS
 INSTALLATION INSTRUCTIONS Thank you for purchasing ACCESS Original Roll-Up Cover. Agri-Cover, Inc. proudly manufactured this cover using superior quality materials and workmanship. With proper care, your
INSTALLATION INSTRUCTIONS AND OWNER S MANUAL
 INSTALLATION INSTRUCTIONS AND OWNER S MANUAL Thank you for purchasing the AlloyCover from WeatherTech. Manufactured with pride using superior quality materials and workmanship. With proper care, your cover
LIFT MATE BOAT LIFT MOTOR ASSEMBLY. Assembly and Operating Manual.
 LIFT MATE BOAT LIFT MOTOR ASSEMBLY Assembly and Operating Manual www.boatliftmotor.com 03/26/2010 LIMITED WARRANTY Shoreline Industries, Inc. warrants its products shall be free from defects in materials
HANDY GATE ASSEMBLY, INSTALLATION AND OPERATING INSTRUCTIONS
 ASSEMBLY, INSTALLATION AND OPERATING INSTRUCTIONS BEFORE INSTALLING OR USING THE, REVIEW THE VEHICLE LOADING LIMITATIONS OUTLINED IN THE VEHICLE OWNER S MANUAL AND THE SAFETY COMPLIANCE CERTIFICATION LABEL
Q20 5th wheel hitch WARNINGS. warning: never exceed your vehicle manufacturer's recommended towing capacity
 Installation instructions warning: never exceed your vehicle manufacturer's recommended towing capacity Q20 5th wheel hitch Table of contents Page# Description 1 Warnings & Precautions 2 Assembly & Installation
Automated I.V. Stand Cat. No OPERATOR S MANUAL. Operation& Maintenance Instructions. Raising the Standard of Care!
 Automated I.V. Stand Cat. No. 741314 OPERATOR S MANUAL Operation& Maintenance Instructions Raising the Standard of Care! Table of Contents Warranty....................... 2 Hardware.......................
User Manual SH Slag Removal Tool for use on laser cutting machines with minimum 1.25 between slats
 User Manual SH2 67087 Slag Removal Tool for use on laser cutting machines with minimum 1.25 between slats 1. Description The tool is moved along the slats on the bed of a laser machine to remove slag that
Installation Instructions
 Equipment Required: Fastener Kit: F Wrenches: 15/16, 15/16 Crowfoot Adaptor Drill Bits: 1/4 Other Tools: Drill, Reciprocating saw Optional, Raise Bed: 18mm socket, 15 extension As an option you can loosen
**DO NOT EXCEED RECOMMENDED VEHICLE TOWING WEIGHT!** FORD F-250, F-350
 6065 SUBKIT 7/7/0 **DO NOT EXCEED RECOMMENDED VEHICLE TOWING WEIGHT!** FORD F-50, F-50 PAGE OF WARNING!! BRAKE, FUEL, AND ELECTRICAL LINES MAY NEED TO BE LOOSENED OR REPOSITIONED TO PROVIDE CLEARANCE FOR
Installation Instructions
 Part Numbers: ALL 5AB-XXXX DEALER/INSTALLER: (1) Provide this Manual to end user END USER: (1) Read and follow this Manual every time you use this product. PIN BOX SHOWN ASSEMBLED Equipment Required: Wrenches:
INSTALLATION INSTRUCTIONS
 INSTALLATION INSTRUCTIONS Thank you for purchasing VANISH Roll-Up Cover. Agri-Cover, Inc. proudly manufactured this cover using superior quality materials and workmanship. With proper care, your cover
INSTALLATION INSTRUCTIONS MOUNTING KIT FOR ELITE SERIES
 INSTALLATION INSTRUCTIONS MOUNTING KIT FOR ELITE SERIES DO NOT EXCEED VEHICLE MANUFACTURER S RATING FOR 5th WHEEL TOWING OR MAXIMUM GROSS TRAILER WEIGHT OF 18,000lb. / 8160kg. DEALER/INSTALLER: (1) Provide
MODEL TC400 TIRE CART. Installation, Operation & Repair Parts Information REV P/N:
 MODEL TC400 TIRE CART Installation, Operation & Repair Parts Information REV061614 P/N: 81-0245 1 TABLE OF CONTENTS SAFETY INSTRUCTIONS 2 DEFINITIONS 2 SPECIFICATIONS 3 INSTALLATION INSTRUCTIONS 3 OPERATING
Read this entire manual before operation begins.
 Read this entire manual before operation begins. Record below the following information which is located on the serial number data plate. Serial No. Model No. Date of Installation Contents Specifications.............
INSTALLATION INSTRUCTIONS AND OWNER S MANUAL
 INSTALLATION INSTRUCTIONS AND OWNER S MANUAL Thank you for purchasing the AlloyCover from WeatherTech. Manufactured with pride using superior quality materials and workmanship. With proper care, your cover
INSTALLATION INSTRUCTIONS
 INSTALLATION INSTRUCTIONS Thank you for purchasing TONNOSPORT Roll-Up Cover. Agri-Cover, Inc. proudly manufactured this cover using superior quality materials and workmanship. With proper care, your cover
Installation Instructions **THIS RAIL MOUNTING KIT USES 11 BOLTS**
 Installation Instructions CUSTOM QUICK INSTALL MOUNTING KIT FORD SUPER DUTY Part Numbers: 50074 WARNING:Under no circumstances do we recommend exceeding the towing vehicle manufacturers recommended vehicle
Read this entire manual before operation begins.
 Read this entire manual before operation begins. Record below the following information which is located on the serial number data plate. Serial No. Model No. Date of Installation Contents Specifications.............
Heavy Duty Four Wheeled Walker
 Heavy Duty Four Wheeled Walker Weight Capacity: 500 lbs. ITEM # W1802 Made in China 2011 ESSENTIAL MEDICAL SUPPLY, INC. Manufactured for Orlando, FL 32822 -- SAVE THESE INSTRUCTIONS -- Do not attempt to
Anthro Mobile Device Charging Carts and Cabinets Owners Manual
 Anthro Mobile Device Charging Carts and Cabinets Owners Manual TECHNOLOGY FURNITURE Hello! Thank you for choosing Anthro. Anthro's Tablet Charging Carts and Cabinets are designed to automatically charge
Easy Packer. Industrial Case Erecting, Packing and Taping System. User Guide
 Easy Packer Industrial Case Erecting, Packing and Taping System User Guide Easy Packer Industrial Case Erecting, Packing and Taping System User Guide Revised 04/19/2012 P/N XXXXXXX Rev A Copyright and
**DO NOT EXCEED RECOMMENDED VEHICLE TOWING WEIGHT!** FORD F-250, F-350
 60647 SUBKIT 7/3/204 **DO NOT EXCEED RECOMMENDED VEHICLE TOWING WEIGHT!** FORD F-250, F-350 PAGE OF 4 WARNING!! BRAKE, FUEL, AND ELECTRICAL LINES MAY NEED TO BE LOOSENED OR REPOSITIONED TO PROVIDE CLEARANCE
Installation Guide TB499 Conveyor/Dryer/Stacker Part #: M-3250 Revision Date:
 Installation Guide TB499 Conveyor/Dryer/Stacker Part #: M-3250 Revision Date: 12-2-03 Rena Systems Inc. 136 Green Tree Road STE 140 Oaks, PA 19456-1069 610-650-9170 610-650-9171 (FAX) E-Mail: support@renausa.com
Read this entire manual before operation begins.
 Read this entire manual before operation begins. Record below the following information which is located on the serial number data plate. Serial No. Model No. Date of Installation Contents Specifications.............
Cargo Cover. Installation Instructions. For: Wrangler Part Number: Installation Tips WARNING
 Cargo Cover Installation Instructions For: Wrangler 1997-2002 Part Number: 41825 Note: This kit is designed to be installed on vehicles equipped with a Production Soft Top Only. WARNING This product is
MOTORIZED FOLDING CAMPER WINCH
 OWNER'S MANUAL MOTORIZED FOLDING CAMPER WINCH With 1200lb Lift Capacity The 12 Volt Motorized Folding Camper Winch is used to raise and lower folding campers with the touch of the switch, eliminating hand
Read this entire manual before operation begins.
 Read this entire manual before operation begins. Record below the following information which is located on the serial number data plate. Serial No. Model No. Date of Installation Contents Specifications.............
2 Piece Soft Door Installation Instructions
 2 Piece Soft Door Installation Instructions For: Wrangler/TJ (1997-on) Part Number: 51789 Note: Use of this product will eliminate the factory side mirrors and requires the removal of the entry light bulbs.
Installation / Owners Manual
 DEALER/INSTALLER: (1) Provide this Manual to end user END USER: Part Number: 94621 94622* *Packaged for Individual sale. (1) Read and follow this Manual for Reese Installation. (2) Save this Manual for
Installation Instructions GOOSENECK MOUNTING KIT Toyota Tundra
 GOOSENECK MOUNTING KIT Toyota Tundra 446 Equipment Required: Fastener Kit: 446F Wrenches: 10mm, 1mm, /4, 7/8, 15/16 Drill Bits: 1/4 Other Tools: Drill WARNING: Do not store hitch ball upside down in head.
Lumina 28 Traction Drive Model: Battery Burnisher M28036TDQP OPERATION SERVICE PARTS CARE
 Lumina 28 Traction Drive Model: Battery Burnisher M28036TDQP OPERATION SERVICE PARTS CARE Table of Contents IMPORTANT SAFETY INSTRUCTIONS...1 OPERATING INSTRUCTIONS...2 INSPECTION...2 ELECTRICAL...2 BATTERIES...2
INSTALLATION INSTRUCTIONS
 INSTALLATION INSTRUCTIONS Thank you for purchasing a LOMAX TM Hard Tri-Fold or Professional Series Cover. Agri-Cover, Inc. proudly manufactured this cover using superior quality materials and workmanship.
Dodge Ram 1500, Quad/Reg. Cab, w/6.4ft. & 8ft. Bed, 2 & 4 WD. For updates see PRODUCT SUPPORT tab at
 Assembly, Installation, Operation and Maintenance Instructions 2009-2016 Dodge Ram 1500, Quad/Reg. Cab, w/6.4ft. & 8ft. Bed, 2 & 4 WD. Part # 30665 Dealer / Installer: Provide a copy of these Instructions
ASSEMBLY / OPERATION INSTRUCTIONS. Low Profile Motorcycle Dolly
 ASSEMBLY / OPERATION INSTRUCTIONS 1,500LB CAPACITY Low Profile Motorcycle Dolly Model: 03-CG1500-01(B1) WARNING BEFORE USE PLEASE READ ALL WARNINGS AND INSTRUCTIONS TO PREVENT SERIOUS INJURY Drop-Tail
Fig Series. Installation and Spare Parts Manual Pilot House Control Solar-Ray Sealed Beam 7 & 8 Searchlights
 Fig. 0314 Series Installation and Spare Parts Manual Pilot House Control Solar-Ray Sealed Beam 7 & 8 Searchlights 16490 N.W. 13th Avenue Miami, FL 33169-5707 www.perko.com 0314PTD5 Rev: 9/2016 Fig. 0314
Fabric Replacement Top and Doors with Tinted Side and Rear Curtains Installation Instructions
 Fabric Replacement Top and Doors with Tinted Side and Rear Curtains Installation Instructions For: Wrangler/TJ 1997-2002 Part Number: 51124 www.bestop.com DO NOT INSTALL THIS PRODUCT ON ANY VEHICLE OTHER
16K and 19K Sidewinder TM Service Kit Instructions 86005
 86005 Equipment Required: Wrenches: 15/16, 1 1/8, Torque Wrench, Rubber Mallet Included Service Kit Items: 1 Qty. (1) Wear Plate 2 Qty. (6) 5/8 Conical Washer 3 Qty. (2) Wedge Bolt, 5/8-11 X 1 3/4 GRD
Installation Instructions
 Equipment Required: Installation Instructions Fastener Kit: F Wrenches: 15/16, 10 mm Drill Bits: 1/4 Other Tools: Drill, Reciprocating Saw 9464/9474 HIDE-A-GOOSE HITCH All Fasteners Typical, Both Sides
8700 Series 8900 Series Rolling Air Jacks
 8700 Series 8900 Series Rolling Air Jacks Installation, Operation & Repair Parts Information - NOTICE - AIR SUPPLY MUST HAVE IN-LINE FILTER/REGULATOR/LUBRICATOR (NOT INCLUDED) TO VALIDATE THE ROLLING AIR
USER S OPERATING AND INSTRUCTION MANUAL
 Grand Rapids, Michigan, U.S.A. 49504-5298 USER S OPERATING AND INSTRUCTION MANUAL MODEL 600-R3 SERIES DOUGH MOULDERS 600-R3S20000-CV THIS PAGE WAS INTENTIONALLY LEFT BLANK. GEN020319 SAFETY INSTRUCTIONS
Electromagnetic Particle Brakes Model: PRB-H
 P-223-3 819-0370 Electromagnetic Particle Brakes Model: PRB-H Installation Instructions Table of Contents Introduction............................2 Installation Instructions....................3 Start
Installation Instructions
 Equipment Required: Fastener Kit: F Wrenches: 3/4, 15/16, 13mm Drill Bits: 1/4, some older models a 1/2 Other Tools: Drill, Saber Saw 5/8 Fasteners From Hitch Fastener Kit Installation Instructions GOOSENECK
GETZ EQUIPMENT INNOVATORS SYSTEM DUST 120V ECONOMY PART NUMBER: 4G59542 OPERATING AND INSTRUCTION MANUAL
 GETZ EQUIPMENT INNOVATORS SYSTEM DUST 120V ECONOMY PART NUMBER: 4G59542 OPERATING AND INSTRUCTION MANUAL 2320 Lakecrest Drive, Pekin IL 61554 PH. (888) 747-4389 Fax (309) 495-0625 Website: www.getzequipment.com
Installation Instructions
 Equipment Required: Fastener Kit: F Wrenches: 15/16, 15/16 Crowfoot Adaptor Drill Bits: 1/4 Other Tools: Drill, Reciprocating saw Optional, Raise Bed: 18mm socket, 15 extension As an option you can loosen
INSTALLATION INSTRUCTIONS MOUNTING KIT 2010-CURRENT Dodge 2500 & 3500
 INSTALLATION INSTRUCTIONS MOUNTING KIT 2010-CURRENT Dodge 2500 & 3500 DEALER/INSTALLER: (1) Read all instructions before installation (2) Provide this Manual to end user. END USER: (1) Save this Manual
MODEL G300 BRAKE BLEEDER
 MODEL G300 BRAKE BLEEDER Installation, Operation & Repair Parts Information Branick Industries, Inc. 4245 Main Avenue P.O. Box 1937 Fargo, North Dakota 58103 REV120716 P/N: 81-0035H THIS PAGE INTENTIONALLY
MULTI MOVER WITH FOLD DOWN REAR WHEELS INSTRUCTION MANUAL
 MULTI MOVER WITH FOLD DOWN REAR WHEELS INSTRUCTION MANUAL 67243-75 Revised: JULY 2017 CONTENTS Specs...3 Parts Diagram...4 Assembly...5-7 WARRANTY 3 Year Limited Warranty. Carts, excluding any finishes,
User s Manual and Operating Instructions
 User s Manual and Operating Instructions Model Numbers: CL-36-BDF-A, CL-42-BDF-A, CL-48-BDF-A E355088 READ AND SAVE THESE INSTRUCTIONS IMPORTANT: Read and understand all of the instructions in this manual
48" and 52" Hyflo Fans Installation and Operators Instruction Manual
 48" and 52" Hyflo Fans Installation and Operators Instruction Manual Thank You The employees of Chore-Time Equipment would like to thank your for your recent Chore-Time purchase. If a problem should arise,
Installation Instructions
 Equipment Required: Installation Instructions Fastener Kit: F Wrenches: 3/4, 15/16 Drill Bits: 1/4 Other Tools: Drill WARNING: Under no circumstances do we recommend exceeding the towing vehicle manufacturers
COVER PAGE CUSTOM QUICK INSTALL MOUNTING KIT NOTE!
 COVER PAGE NOTE! Prior to installing product, please visit one of our websites to assure your kit contains the most recent revision to installation instruction and verify vehicle application. www.reeseproduct.com
MLS KICK-OFF TABLETOP SOCCER TABLE ASSEMBLY INSTRUCTIONS
 MLS KICK-OFF TABLETOP SOCCER TABLE ASSEMBLY INSTRUCTIONS NGD1028 1 THANK YOU! Thank you for your purchase of this Harvil product. We work around the clock and around the globe to ensure that Harvil products
**DO NOT EXCEED RECOMMENDED VEHICLE TOWING WEIGHT!**
 60660 SUBKIT 7/8/0 **DO NOT EXCEED RECOMMENDED VEHICLE TOWING WEIGHT!** DODGE 500 / 3500 SHORT AND LONG BED PAGE OF 5 WARNING!! BRAKE, FUEL, AND ELECTRICAL LINES MAY NEED TO BE LOOSENED OR REPOSITIONED
Installation Instructions
 Equipment Required: Fastener Kit: F Wrenches: 3/4, 15/16, 10mm, 18mm Drill Bits: 1/4 Other Tools: Drill, Reciprocating saw 9465/9475 HIDE-A-GOOSE HITCH INSTALLATION All Fasteners Typical, Both Sides WARNING:
MODEL 7400 STRUT SPRING COMPRESSOR
 MODEL 7400 STRUT SPRING COMPRESSOR Installation, Operation & Repair Parts Information Branick Industries, Inc. 4245 Main Avenue P.O. Box 1937 Fargo, North Dakota 58103 REV112712 P/N: 81-0103A TABLE OF
The Da-Lite Difference.
 The Da-Lite Difference. Instruction Book for tensioned Advantage Electrol DA-LITE SCREEN COMPANY, INC. 3100 North Detroit Street Post Office Box 137 Warsaw, Indiana 46581-0137 Phone: 574-267-8101 800-622-3737
HUSTLER 7' & 8' POOL TABLE ASSEMBLY INSTRUCTIONS
 HUSTLER 7' & 8' POOL TABLE ASSEMBLY INSTRUCTIONS NG2515PB/NG2520PB THANK YOU! Thank you for purchasing this product. We work around the clock and around the globe to ensure that our products maintain the
Compressor Clutch Replacement Procedure
 P-1411 819-0361 Compressor Clutch Replacement Procedure Installation Instructions World Clutch with Unidamp Armature for Ford FX-15 and FS-10 Compressors and all Denso Models with 30mm bearing fit. Keep
Installation Instructions
 Installation Instructions CUSTOM QUICK INSTALL MOUNTING KIT 2011 & UP Ford Super Duty F-250/F-350/F-50 2011 & UP Part Number: 50073 WARNING: Under no circumstances do we recommend exceeding the towing
2100 Childbearing Bed OPERATIONS MANUAL. For Parts or Technical Assistance
 2100 Childbearing Bed OPERATIONS MANUAL For Parts or Technical Assistance 1 800 327 0770 Table of Contents INTRODUCTION........................................................................... 2 SPECIFICATIONS.........................................................................
MODEL 7600 STRUT SPRING COMPRESSOR
 MODEL 7600 STRUT SPRING COMPRESSOR Installation, Operation & Repair Parts Information Branick Industries, Inc. 4245 Main Avenue P.O. Box 1937 Fargo, North Dakota 58103 REV6162014 P/N: 81-0246 TABLE OF
Easy/Tran TF STANDBY POWER FURNACE SWITCH TOOLS NEEDED FOR INSTALLATION. PARTS LIST for Easy / Tran TF FURNACE TRANSFER SWITCH
 STANDBY POWER FURNACE SWITCH Easy/Tran TF Congratulations on your purchase of the Reliance Controls Easy/Tran TF furnace transfer switch. Reliance has been manufacturing transfer switches and equipment
Replacement Steering Stabilizer Kit
 Replacement Steering Stabilizer Kit Installation Manual: for 87-95 (YJ) and 97-06 (TJ) Wrangler # 16116.0200 PARTS LIST: Steering Damper Black Boot & Boot Tie Decal Hourglass Bushing - Qty 2 Sleeve - Qty
UNIVERSAL CUSTOMIZABLE MUD FLAP INSTALLATION INSTRUCTIONS
 UNIVERSAL CUSTOMIZABLE MUD FLAP INSTALLATION INSTRUCTIONS Thank you for purchasing ROCKSTARTM Splash Guard Mud Flaps. Agri-Cover, Inc. proudly manufactured these mud flaps using superior quality materials
SPECIALTY TOP CO. STC. INSTALLATION INSTRUCTIONS TOYOTA FAST TRAC Z TOP Toyota FJ PART #222-31X 82 1/8" 82 1/8"
 STC INSTALLATION INSTRUCTIONS TOYOTA FAST TRAC Z TOP Toyota FJ-40 1963-1983 PART #222-31X SPECIALTY TOP CO. Thank you for purchasing Specialty's Convertible Top for your Toyota. It has been designed for
Assembly, Installation, Operation and Maintenance Instructions. Base Rail Bracket Kit. For updates see PRODUCT SUPPORT tab at
 Assembly, Installation, Operation and Maintenance Instructions P/N: 32831 Base Rail Kit For updates see PRODUCT SUPPORT tab at www.huskytow.com Provide a copy of these Instructions to the end user of this
1000-LB. ENGINE STAND
 1000-LB. ENGINE STAND WARNING: Read carefully and understand all ASSEMBLY AND OPERATION INSTRUCTIONS before operating. Failure to follow the safety rules and other basic safety precautions may result in
IMPORTANT INSTRUCTIONS - OPERATING MANUAL
 IMPORTANT INSTRUCTIONS - OPERATING MANUAL AB Series Range Hood READ AND SAVE THESE INSTRUCTIONS READ CAREFULLY BEFORE ATTEMPTING TO ASSEMBLE, INSTALL, OPERATE OR MAINTAIN THE PRODUCT DESCRIBED. PROTECT
MODEL EF Full Circle Tire Spreader
 MODEL EF Full Circle Tire Spreader Installation, Operation & Repair Parts Information Branick Industries, Inc. 4245 Main Avenue P.O. Box 1937 Fargo, North Dakota 58103 REV. 062917 P/N: 81-0050C CAUTION
FLEETWOOD TRAVEL TRAILER SLIDEOUT SYSTEM OWNER S MANUAL
 FLEETWOOD TRAVEL TRAILER SLIDEOUT SYSTEM OWNER S MANUAL 82-S0150-01 REV. 1 April, 2002 TABLE OF CONTENTS PAGE # OPERATIONS MANUAL... 1 1. SYSTEM DESCRIPTION... 1 1.1 MAJOR COMPONENTS... 1 2. HOW TO OPERATE
Installation Instructions
 Equipment Required: Fastener Kit: F Wrenches: 3/4, 15/16 Drill Bits: 1/4 Other Tools: Drill, Reciprocating saw WARNING: Under no circumstances do we recommend exceeding the towing vehicle manufacturers
Supertop Replacement Top with Tinted Side and Rear Windows Installation Instructions
 Supertop Replacement Top with Tinted Side and Rear Windows Installation Instructions TM Inc. For: Wrangler TJ 1997 2002 Part Number: 55629 Does Not Include Hardware This product is only designed for the
READ CAREFULLY - FAILURE TO FOLLOW INSTRUCTIONS AND SAFETY RULES MAY RESULT IN SERIOUS INJURY
 Owner s Manual LSP20H + LSP04H Cantilever Pontoon Lift LSP20H LS3120 mainframe bundle LS3102H H-unit bundle LS3103 accessory box LSP04H LS3104 extension bundle LS3113 accessory box 4' READ CAREFULLY -
PORTABLE MAGNETIC DRILLS
 HMD914 SERIES PORTABLE MAGNETIC DRILLS COVERS DRILL PART NUMBER 0914102 FOR USE WITH 12,000-SERIES HOUGEN CUTTERS HOUGEN Portable Magnetic Drills Models HMD914 Welcome to Hougen Congratulations on your
DISC BRAKE CALIPER TOOL SET
 DISC BRAKE CALIPER TOOL SET 40732 ASSEMBLY AND OPERATING INSTRUCTIONS Diagrams within this manual may not be drawn proportionally. Due to continuing improvements, actual product may differ slightly from
Instruction Sheet SRSR SERIES. Rotating Sliding Rail System
 Instruction Sheet SRSR SERIES Rotating Sliding Rail System THANK YOU Thank you for purchasing the SRSR Series Rotating Sliding Rail System. Please read these instructions thoroughly before assembling this
Read this entire manual before operation begins.
 Read this entire manual before operation begins. Record below the following information which is located on the serial number data plate. Serial No. Model No. Date of Installation Contents Specifications.............
Harvil 4 Foot Air Hockey Table
 Harvil 4 Foot Air Hockey Table Thank you for your purchase of this Harvil product! We work around the clock and around the globe to ensure that Harvil products maintain the highest possible quality. However,
Models PR-12F PR-12C PR-15C SURFACE MOUNTED TWO-POST LIFTS INSTALLATION AND OPERATION MANUAL
 Forward this manual to all operators. Failure to operate this equipment as directed may cause injury. INSTALLATION AND OPERATION MANUAL SURFACE MOUNTED TWO-POST LIFTS Models PR-12F PR-12C PR-15C Keep this
PLAYOFF 48" FOOSBALL TABLE ASSEMBLY INSTRUCTIONS
 PLAYOFF 48" FOOSBALL TABLE ASSEMBLY INSTRUCTIONS NG1031F THANK YOU! Thank you for purchasing this product. We work around the clock and around the globe to ensure that our products maintain the highest
Installation Instructions GOOSENECK MOUNTING KIT Chevrolet/GMC 1500/2500/3500 All except 4-door Crew-Cab
 GOOSENECK MOUNTING KIT Equipment Required: Fastener Kit: F Wrenches: 3/4, 7/8, 15/16 Drill Bits: 1/4 Other Tools: Drill WARNING: Under no circumstances do we recommend exceeding the towing vehicle manufacturers
SUPERPLUS WATER FILTRATION SYSTEM
 SUPERPLUS WATER FILTRATION SYSTEM For Model #: SP20-1 INSTRUCTIONS/ASSEMBLY USE AND CARE MANUAL (Important: Read this manual thoroughly before install) TABLE OF CONTENTS 2 3 4 6 8 9 10 11 12 General Notes
INSTALLATION INSTRUCTIONS
 INSTALLATION INSTRUCTIONS Thank you for purchasing ROLTECTM Electric Hopper Conversion. Agri-Cover, Inc. proudly manufactured this hardware using superior quality materials and workmanship. With proper
AZTECH CONVERTING SYSTEMS 212 W Lodge Drive TEMPE, AZ PHONE (480) FAX (480)
 FAX (480)") 212 W Lodge Drive TEMPE, AZ 85283 PHONE (480) 951-8351 FAX (480) 998-5409 www.aztechconverting.com ROLL RUNNER User Manual MH-800 TABLE OF CONTENTS SECTION 1: GENERAL INFORMATION 1-4 SECTION 2: MACHINE
212 W Lodge Drive TEMPE, AZ 85283 PHONE (480) 951-8351 FAX (480) 998-5409 www.aztechconverting.com ROLL RUNNER User Manual MH-800 TABLE OF CONTENTS SECTION 1: GENERAL INFORMATION 1-4 SECTION 2: MACHINE
2000-LB. ENGINE STAND
 2000-LB. ENGINE STAND WARNING: Read carefully and understand all ASSEMBLY AND OPERATION INSTRUCTIONS before operating. Failure to follow the safety rules and other basic safety precautions may result in
Installation Instructions
 Equipment Required: Fastener Kit: F Wrenches: 3/4, 15/16, 13mm Drill Bits: 1/4, some older models a 1/2 Other Tools: Drill, Saber Saw 5/8 Fasteners From Hitch Fastener Kit Installation Instructions GOOSENECK
VICTORY TABLE TENNIS TABLE ASSEMBLY INSTRUCTIONS
 VICTORY TABLE TENNIS TABLE ASSEMBLY INSTRUCTIONS NG2322 THANK YOU! Thank you for your purchase of our product. We work around the clock and around the globe to ensure that our products maintain the highest
Amarr SuperFlex. Installation Instructions and Owner's Manual. Entrematic 165 Carriage Court Winston Salem, NC
 Entrematic 165 Carriage Court Winston Salem, NC 27105 www.amarr.com 877-512-6277 Amarr SuperFlex Installation Instructions and Owner's Manual Do not install, operate or service this product unless you
Service/Installation Manual Full Wall Slide Systems
 Service/Installation Manual Full Wall Slide Systems 7 East 7th Street Mishawaka, IN 65 888-9-57 Fax 57-56-67 www.powergearus.com 8-S079 Rev Page CONTENTS Page Major Components Full Wall Slide System Operation
Quadratec Dual Steering Stabilizer Kit
 Quadratec Dual Steering Stabilizer Kit Installation Manual: for 97-06 (TJ) Wrangler # 16116.0202 PARTS LIST: Steering Damper - Qty 2 Black Boot & Boot Tie - Qty 2 (each) Decal - Qty 2 Hourglass Bushing
HA/HAB Fiberglass Wall Mount Ventilators
 HA/HAB Fiberglass Wall Mount Ventilators INSTALLATION, OPERATION & MAINTENANCE MANUAL IM-3100 August 2015 Throughout this manual, there are a number of HAZARD S that must be read and adhered to in order
Duster Deck Cover Installation Instructions
 Duster Deck Cover Installation Instructions For: Jeep Wrangler, 1997-2002 Part Number: 90019 with Factory Original Soft Top DO NOT INSTALL THIS PRODUCT ON ANY VEHICLE OTHER THAN THOSE LISTED ABOVE. This
Mini Cement Mixer. Owner s Manual
 Mini Cement Mixer Owner s Manual WARNING: Read and understand all instructions, warnings, and cautions before using this product. Failure to follow the instructions, warnings, and cautions may result in
SAVE FOR CONSUMER INSTALLATION / OWNER'S MANUAL. Single Handle Kitchen Faucet Model # LK2500. Important! You choose the flow rate!
 INSTALLATION / OWNER'S MANUAL Single Handle Kitchen Faucet Model # LK500 Important! You choose the flow rate! This faucet ships with an eco-friendly.5gpm flow regulator installed. If you desire higher
Model Beretta Tactical Light. Users Manual. Beretta 1200 PF 12 Gauge Shotgun Protected by US. Patent 4,856,218 Revision D 7_1_97
 Model 306 606 Beretta Tactical Light Users Manual Beretta 1200 PF 12 Gauge Shotgun Protected by US. Patent 4,856,218 Revision D 7_1_97 Introduction The Model 306 & 606 Tactical Lights provide a rugged
NUTONE RANGE HOOD NTM SERIES
 INSTALLATION INSTRUCTIONS READ AND SAVE THESE INSTRUCTIONS HB0043 NUTONE RANGE HOOD NTM SERIES IMPORTANT SAFETY INSTRUCTIONS IMPORTANT SAFETY INSTRUCTIONS! WARNING TO REDUCE THE RISK OF FIRE, ELECTRIC
RENEGADE SLATE BUMPER POOL TABLE ASSEMBLY INSTRUCTIONS
 RENEGADE SLATE BUMPER POOL TABLE ASSEMBLY INSTRUCTIONS NG2404PG THANK YOU! Thank you for purchasing this product. We work around the clock and around the globe to ensure that our products maintain the