PLEASE READ THIS MANUAL CAREFULLY, PRIOR TO USE.
|
|
|
- Geoffrey Laurence Strickland
- 5 years ago
- Views:
Transcription


363-8103 PLEASE")
1 For questions and concerns please contact: Fastfish Motorsports (352) or (813) PLEASE READ THIS MANUAL CAREFULLY, PRIOR TO USE.
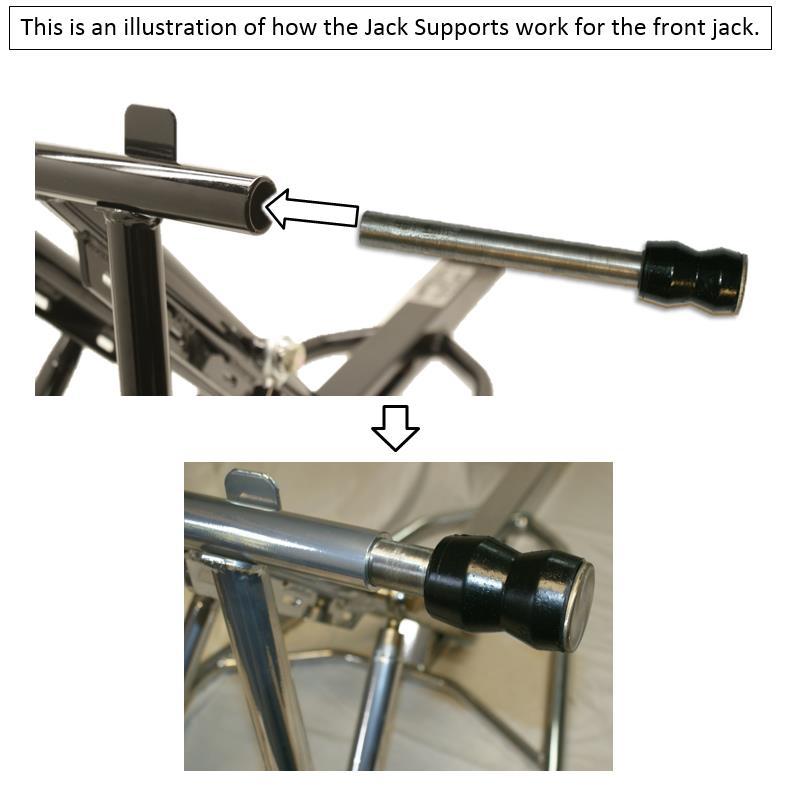
2 Door Car Set Up: The race car lifting jacks come with tabs for the front and rear of the car. These tabs are then welded to the chassis allowing the jacks to rest on these tabs to lift the race car. These tabs must be welded to the chassis by a professional welder before you can use the jacks on your race car. Unpack the jacks along with the pump and hoses. The pump should be placed on the same side that the hydraulic couplers are facing on the jacks placing the pump center to the car. (This is generally the left driver side of the race car). Position one of the jacks just in front of the four-link cross member on the main frame rails. Make sure jack is centered on the vehicle so that it makes contact with the welded tabs on the chassis. Position the front jack in line with the welded tabs on the chassis. If using saddles on the front of chassis align the saddles with the left and right frame rails. See page Make sure that the vent is open on the pump for proper operation. It may be left open except while shipping. If you are using the option of the saddles, they are made to fit a 1 5 / 8 chassis tube and should fit on the left and right side of the chassis frame rails and will rotate as the car lifts. Lifting Car: After properly setting up jack system, attach air hose to foot pedal pump (or plug in if electric model). Engage foot peddle to start the lifting of the race car. (This may take a few moments on the initial charge due to the hoses being empty of hydraulic fluid. The system is self- bleeding as any trapped air will be returned to the pump.) Continue engaging the pump until the car is completely raised and the pump begins to slow down (which is clearly detectable by sound.) Using the Ball Valves to lift and lower the car is the best method. Do not open and close the valves fully but use them to regulate the oil flow from the pump by cracking them open slowly. If you have any questions please call or check out our demonstration video at Once the car is completely lifted, move the locking arms into place. Releasing the pressure on the pump will allow the race car to lower into the lock position. With the pressure released, the jacks now become a solid work stand. At this point you can now begin working on the race car. Lowering Car: *NOTE* If using Deltrol valves, the first use of the system will require the setting of the flow control on the Deltrol valve to be completely closed. After the car is completely raised, pull the locking arm out and away on both jacks away from the lock position. Then release the pressure by depressing the foot peddle. Then slowly open the flow control valve in order to achieve the desired drop rate of speed. Once set, lock with small set screws located on the side of the flow control valves. The drop rate will now be consistent each time the system is used. Engage pump in order to lift car off of locking arms. Clear arms away from locking position and engage release on the pump. The car will then lower back to the ground. If you are not using a Deltrol valve on the jack system you will have to control the foot peddle by hand to control the speed of the lowering of your car. Maintenance Lubricate lower base pivot rods periodically with a quality penetrating lubricant. Tighten and inspect nuts and bolts periodically. Inspect hoses and fittings for wear and tear and replace as needed. Check hydraulic fluid level.
3 Warning EXTREME CAUTION SHOULD BE USED WHEN OPERATING ANY JACK SYSTEM. BE SURE THAT THE JACKS ARE SECURELY IN THE LOCK POSITION BEFORE ATTEMTING ANY WORK ON THE CAR. JACKS ARE TO BE USED SIMULTANEOUSLY AS ONE UNIT. DO NOT USE JACK TO LIFT SIDE OF RACE VEHICLE. KEEP HANDS AND BODY CLEAR OF JACKS UNDERNEATH CAR UNLESS LOCKING ARMS ARE SECURELY IN PLACE. OPERATE JACK SYSTEM ONLY ON A FIRM LEVEL SURFACE AND MAKE SURE RACE CAR IS IN PARK. JACK IS INTENDED FOR RACE CAR USE ONLY NOT ON HIGHWAY MOTOR VEHICLES. LIFTING CAPACITY OF STANDARD JACK SYSTEM IS 3,200 LBS. OVER LOAD OR CARELESS USE MAY CAUSE DAMAGE TO JACK SYSTEM OR VEHICLE, DESTRUCTION OF JACK SYSTEM, OR PERSONAL INJURY OR DEATH. IT IS THE RESPONSIBILITY OF THE PERSON WHO IS WORKING WITH THE CAR JACK SYSTEM TO INSTALL THEM CORRECTLY ON THE CAR UTILIZING WELDED TABS ON THE CHASSIS. IF YOU ARE NOT SURE HOW TO SAFELY USE THIS JACK SYSTEM, YOU SHOULD NOT INSTALL ON THE VEHICAL OR USE IT. DO NOT ASSUME ANYTHING. IMPROPERLY INSTALLED JACKS ARE DANGEROUS AND CAN CAUSE INJURY OR EVEN DEATH. IF YOU ARE NOT SURE, GET HELP OR RETURN THE PRODUCT. YOU MAY OBTAIN ADDITIONAL INFORMATION AND TECHNICAL SUPPORT BY CALLING FASTFISH MOTORSPORTS (813) , OR VISIT OUR WEB SITE AT USE OF TECHNICAL SUPPORT DOES NOT GUARANTEE PROPER INSTALLATION OR USE. YOU, OR THE PERSON(S) WHO DOES THE INSTALLATION OR USE, MUST KNOW HOW TO PROPERLY USE THIS PRODUCT. IT IS NOT POSSIBLE OVER THE PHONE TO UNDERSTAND OR FORESEE ALL THE ISSUES THAT MIGHT ARISE IN YOUR INSTALLATION OR USE. LIABILITY ON DEFECTIVE MERCHANDISE, OR MERCHANDISE NOT CONFORMING TO MANUFACTURER S SPECIFICATIONS IS LIMITED TO THE REPAIR OR REPLACEMENT OF THE DEFECTIVE ITEM. RACING EQUIPMENT MUST BE MAINTAINED AND SHOULD BE CHECKED REGULARLY FOR FATIGUE, DAMAGE, AND WEAR. DO NOT OPERATE JACKS UNLESS YOU FULLY UNDERSTAND THE PRODUCT. Return Policy USE OF THIS PRODUCT IS ACCEPTANCE OF SELLER'S DISCLAIMER OF WARRANTY THE PURCHASER IS RESPONSIBLE FOR DETERMINING THE SUITABLITY AND ACCEPTABILITY OF ANY AND ALL PRODUCTS PURCHASED FROM FASTFISH MOTORSPORTS, INC. Purchaser understands and recognizes that racing parts, equipment and services provided by or manufactured and/or sold by Fastfish Motorsports, Inc. are subject to varied conditions due to the manner in which they are to be installed and used. The acceptability and suitability of any part sold or manufactured by Fastfish Motorsports, Inc. for particular application is solely the purchaser's decision. Fastfish Motorsports, Inc. makes no warranties whatsoever, expressed or implied, oral or written. The right to make changes in design or add to or improve on their product without incurring any obligation to install the same on products previously manufactured is expressly reserved. Buyer agrees to indemnify and hold Seller harmless from any claim, action or demand arising out of or incident to the Buyer's installation or use of products purchased from Fastfish Motorsports, Inc. FASTFISH MOTORSPORTS, INC. WILL NOT ACCEPT RETURNS OR EXCHANGES AFTER 30 DAYS FROM INVOICE. ALL ITEMS RETURNED WITHIN THE 30 DAY PERIOD MUST BE IN NEW CONDITION UNUSED AND IN RESELLABLE CONDITION. ALL RETURNED ITEMS ARE SUBJECT TO A 30% RESTOCKING FEE. CUSTOM OR SPECIAL ORDERS ARE NOT RETURNABLE, NOR CAN WE ACCEPT FREIGHT COLLECT RETURN SHIPMENTS.
4


5
6


7 You can see here that the coupler is not fully screwed together. This will not allow the jack to work, not allowing the fluid into the jack. Proper Engagement. This shows coupler completely engaged. Jacks will only work properly when couplers are fully screwed together.


8 Do not forget to open the brass vent before using. The vent is closed only for shipping purposes. This is how the hydraulic T and hoses assemble to the foot pump.


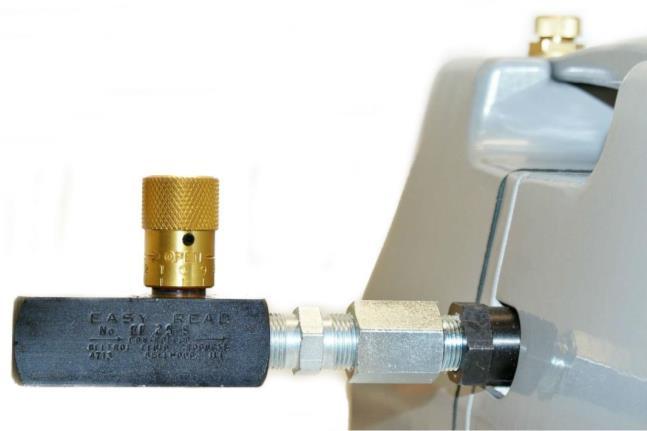
9 Valve Assembly This Valve Assembly allows you to lift and lower your car evenly by slowly opening and closing the valves regulating the oil flow through the pump. Check out our demonstration video on how the Valve Assembly works in the link below!


10 This is an option using a deltrol valve to help regulate the flow of hydraulic oil from the pump to control both jacks on lowering. This does not control the jacks going up. This is how the hydraulic T and hoses assemble to the control valve, which then attaches to the foot pump. NOTE: Use thread tape to make sure all fittings are tight and do not leak.


11 Hydraulic Cylinder (Inside Jack) 3 Attach hose coupler to Deltrol Valve. 2 Attach Deltrol Valve to union. 1 Attach union to cylinder through opening in jack. THIS IS AN OPTION This is an illustration showing how to set up the deltrol valve to the lifting jack. This will give you the ability to control the lifting jacks individually.

12 Portable Electric Pump (Optional)


13 ADDITIONAL O PTIONS QUICK PIN KIT The tabs in this Quick Pin Kit are welded to the chassis. The pins are then used to lock the jacks into place. NEOPRINE SADDLES These rubber end style saddles will easily slide into the race jacks for added support. JACK BOX These boxes are used to store your race jacks to keep them safe and secure in your trailer or shop.


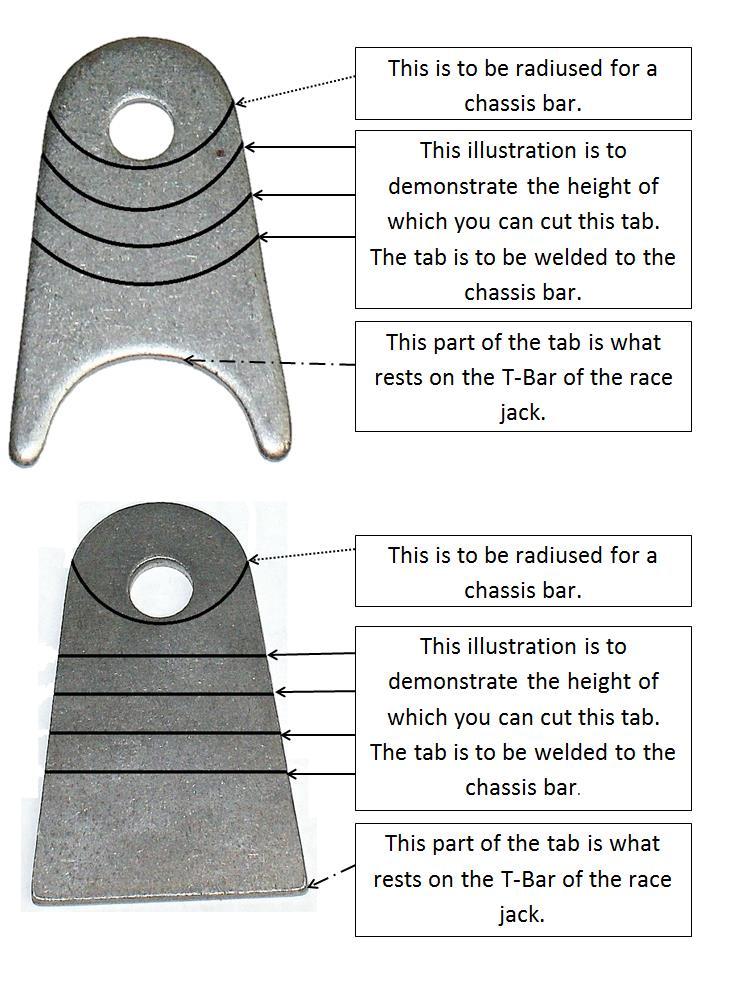
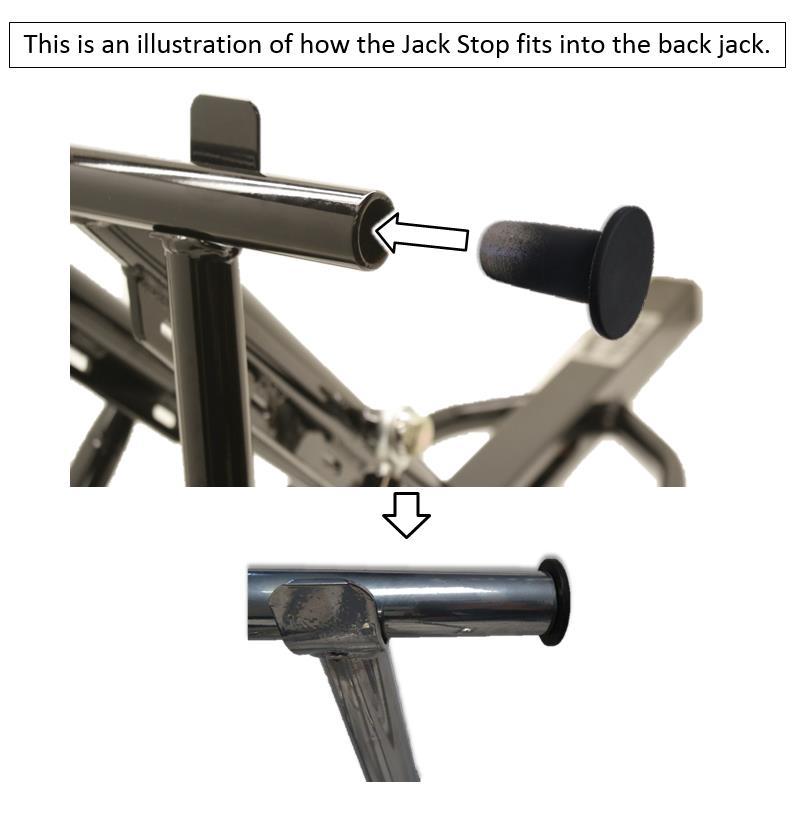
14 Quick Pin Illustration The tabs in this Quick Pin Kit are welded to the chassis. The pins are then used to lock the jacks into place. Chassis Race Jack T Bar Tab Quick Pin
INSTRUCTIONS TUBULAR CONTROL ARMS & COIL-OVER CONVERSION FOR AMC MUSCLE CARS: 1970 AMX JAVELIN SPIRIT, HORNET, GREMLIN, CONCORD
 AMC TUBULAR CONTROL ARMS & COIL OVER KIT INSTRUCTIONS TUBULAR CONTROL ARMS & COIL-OVER CONVERSION FOR AMC MUSCLE CARS: 1970 AMX 1970-74 JAVELIN SPIRIT, HORNET, GREMLIN, CONCORD Revised 6/1/2012 www.freakride.com
DISCLAIMER FOR OFF ROAD USE ONLY
 DISCLAIMER FOR OFF ROAD USE ONLY THE PURCHASER IS RESPONSIBLE FOR DETERMINING THE SUITABILITY OF ANY AND ALL PRODUCTS PURCHASED Purchaser understands and recognizes that off road and racing equipment and
NOTICE- THIS K-MEMBER REQUIRES THE USE OF COIL OVER SUSPENSION. K-MEMBER WILL NOT WORK WITH FACTORY STYLE SPRINGS.
 Technical Support Line: (952) 985-5675 Email: Info@QA1.net 21730 Hanover Ave. Lakeville, MN 55044 www.qa1.net INSTALLATION INSTRUCTIONS MUSTANG K-MEMBER P/N MUK11, MUK12, MUK13 NOTICE- THIS K-MEMBER REQUIRES
INSTALLATION INSTRUCTIONS QA1 P/N x400, x500, x600, x400, x500, x F100 Front Coil-over Suspension System
 INSTALLATION INSTRUCTIONS QA1 P/N 52620-x400, 52620-x500, 52620-x600, 52621-x400, 52621-x500, 52621-x600 65-72 F100 Front Coil-over Suspension System TOOLS AND SUPPLIES REQUIRED Floor Jack Two (2) Jack
Front Axle Assembly: Hairpin Radius Rods
 INSTRUCTIONS 916-395 *916-395* August 2011, Speedway Motors, Inc. Front Axle Assembly: Hairpin Radius Rods This radius rod front end kit is used with OEM or aftermarket tube or I-beam axles that use a
Air-Boss VP Intake Plenum
 Installation Manual P/N 98502-ABIP 98.5-02 DODGE CUMMINS Air-Boss VP Intake Plenum Installation Instructions P/N 98502-ABIP GDP Air-Boss VP Plenum Installation PLEASE READ ALL INSTRUCTIONS BEFORE BEGINNING
INSTRUCTIONS. Triangulated 4-Link Coil Over Rear Suspension System (RS-2450) For FORD Muscle Cars: FAIRLANE
 For FORD Muscle Cars: FAIRLANE") FORD 1962-65 FAIRLANE 4-LINK TRIANGULATED SYSTEM INSTRUCTIONS Triangulated 4-Link Coil Over Rear Suspension System (RS-2450) For FORD Muscle Cars: 1962-1965 FAIRLANE Revised: 10-1-2011 1962-1965 Fairlane
FORD 1962-65 FAIRLANE 4-LINK TRIANGULATED SYSTEM INSTRUCTIONS Triangulated 4-Link Coil Over Rear Suspension System (RS-2450) For FORD Muscle Cars: 1962-1965 FAIRLANE Revised: 10-1-2011 1962-1965 Fairlane
INSTALLATION INSTRUCTIONS QA1 P/N R , R , R R , R , R F100 Rear Coil-over Conversion System
 INSTALLATION INSTRUCTIONS QA1 P/N R120-170, R120-200, R120-250 R220-170, R220-200, R220-250 65-72 F100 Rear Coil-over Conversion System TOOLS AND SUPPLIES REQUIRED Floor Jack Two (2) Jack Stands Drill
Installation Instructions
 Nov 25, 2013 Custom Bent Brake Line Kit '67-'69 Camaro and '68-'74 Nova Installation Instructions The following instructions are intended for professional installers and are guidelines only. Speedtech
INSTRUCTIONS. 4-Link Parallel With Adjustable Panhard Bar Rear Suspension System FOR MOPAR MUSCLE CARS: A-BODY (RS-5435)
") MOPAR A-BODY 4-LINK PARALLEL COIL OVER SYSTEM INSTRUCTIONS 4-Link Parallel With Adjustable Panhard Bar Rear Suspension System FOR MOPAR MUSCLE CARS: 1967-1976 A-BODY (RS-5435) Revised: 6-1-2011 Page 2
MOPAR A-BODY 4-LINK PARALLEL COIL OVER SYSTEM INSTRUCTIONS 4-Link Parallel With Adjustable Panhard Bar Rear Suspension System FOR MOPAR MUSCLE CARS: 1967-1976 A-BODY (RS-5435) Revised: 6-1-2011 Page 2
Chicane Coilover Kit For '64 to '72 Chevelle/ A Body. Installation Instructions
 Nov 3, 2017 Chicane Coilover Kit For '64 to '72 Chevelle/ A Body Installation Instructions Actual parts may vary from photo depending on application. 1 P a g e The following instructions are intended for
'64-72 Chevelle/ A Body Rear Coilover Conversion Kit
 Nov 3, 2017 '64-72 Chevelle/ A Body Rear Coilover Conversion Kit Includes instructions for Currie Brand Axles The following instructions are intended for professional installers and are guidelines only.
78-88 G Body Rear Trailing Arm Kit
 May 14, 2014 78-88 G Body Rear Trailing Arm Kit Parts in this kit may vary slightly from photo. The following instructions are intended for professional installers and are guidelines only. Speedtech Performance
Chicane Coilover Kit For '70 to '81 Camaro/Firebird
 Nov 25, 2013 Chicane Coilover Kit For '70 to '81 Camaro/Firebird 1 P a g e Installation Instructions The following instructions are intended for professional installers and are guidelines only. Speedtech
DODGE CUMMINS Arctic-Heat Grid Relocation Kit
 Installation Manual P/N 07509-350-GRK 2007.5-09 DODGE CUMMINS Arctic-Heat Grid Relocation Kit Installation Instructions P/N 07509-350-GRK GDP Arctic-Heat Grid Heater Installation PLEASE READ ALL INSTRUCTIONS
Installation Instructions
 Nov 3, 2017 G-Body Rear Coilover Conversion Kit 1 P a g e Installation Instructions The following instructions are intended for professional installers and are guidelines only. Speedtech Performance assumes
INSTRUCTIONS TUBULAR CONTROL ARMS & COIL-OVER CONVERSION FOR FORD MUSCLE CARS: FORD FAIRLANE CO-2330 Small Block CO-2335 Big Block
 FORD 1962-65 FAIRLANE CONTROL ARMS & COIL OVER SYSTEM INSTRUCTIONS TUBULAR CONTROL ARMS & COIL-OVER CONVERSION FOR FORD MUSCLE CARS: 1963-1965 FORD FAIRLANE CO-2330 Small Block CO-2335 Big Block Revised:
INSTALLATION INSTRUCTIONS GM Lower Control Arms P/N 52337, 52437, 52364, 52464, 52319, 52419, 52320, 52420, 52366, 52466, 52368, 52468
 INSTALLATION INSTRUCTIONS GM Lower Control Arms P/N 52337, 52437, 52364, 52464, 52319, 52419, 52320, 52420, 52366, 52466, 52368, 52468 TOOLS AND SUPPLIES REQUIRED Floor Jack Jack Stands Wrench Set Hex
51201 INSTALLATION INSTRUCTIONS
 7929 Lincoln Ave. Riverside, CA 92504 Phone: 951.689.ICON Fax: 951.689.1016 PART # 51201 51201 INSTALLATION INSTRUCTIONS DESCRIPTION 07-UP TUNDRA MULTI-RATE RXT LEAF SPRING KIT 1-22-2019 REV.B COMPONENTS
SPECIFICATIONS CONTENTS: Specifications Warning Information. Operating Instructions Preventative Maintenance and Troubleshooting
 Model 3322 22 Ton Air/Hydraulic Truck Axle Jack OWNER'S MANUAL CONTENTS: Page 1 Page 2 Page 3-4 Page 4-5 Page 5 Page 6 Page 7 Page 8 Specifications Warning Information Assembly Operating Instructions Preventative
94-96 Impala SS/ B-Body Rear Coilover Conversion Kit
 January 29, 2014 94-96 Impala SS/ B-Body Rear Coilover Conversion Kit The following instructions are intended for professional installers and are guidelines only. Speedtech Performance assumes NO responsibility
97-03 Volkswagen 1.9L TDI Injector Nozzles
 97-03 Volkswagen 1.9L TDI Injector Nozzles Product Description Part Number.205 Injector Nozzels #44200.216 Injector Nozzels #44201 VW INJECTOR NOZZLES Introduction These instructions outline how to install
'64-72 Chevelle/ A Body Rear Coilover Conversion Kit
 February 3, 2014 '64-72 Chevelle/ A Body Rear Coilover Conversion Kit Includes instructions for Currie Brand Axles The following instructions are intended for professional installers and are guidelines
Installation Instructions
 Mar 13, 2018 1955-1957 Chevy Smooth Firewall Part number 81511 Installation Instructions The following instructions are intended for professional installers and are guidelines only. Speedtech Performance
Wilwood Brake Kit for Total Performance Spindle
 INSTRUCTIONS 835-140170 Speedway Motors, Inc. May 2011 Wilwood Brake Kit for Total Performance Spindle Note: NOTE: Disc brakes operate in a harsh environment. To prevent bolts from working loose, every
Dual Fueler Kit Dodge Cummins 6.7L kit w/no pump ( ) package w/pump ( ) Installation Guide
 package w/pump ( ) Installation Guide") Pacific Performance Engineering, Inc. www.ppediesel.com Dual Fueler Kit Dodge Cummins 6.7L 2007.5-2010 kit w/no pump (2130030) 2007.5-2010 package w/pump (2130031) Installation Guide Technical Support
Pacific Performance Engineering, Inc. www.ppediesel.com Dual Fueler Kit Dodge Cummins 6.7L 2007.5-2010 kit w/no pump (2130030) 2007.5-2010 package w/pump (2130031) Installation Guide Technical Support
Aug 24, 2017 ATS AFX Spindle Installation Instructions
 Aug 24, 2017 ATS AFX Spindle Installation Instructions 1 P a g e The following instructions are intended for professional installers and are guidelines only. Speedtech Performance assumes NO responsibility
Dec 1, 2017 ATS AFX Spindle Installation Instructions
 Dec 1, 2017 ATS AFX Spindle Installation Instructions 1 P a g e The following instructions are intended for professional installers and are guidelines only. Speedtech Performance assumes NO responsibility
Feb 22, 2018 '67-69 Camaro & '68-74 Nova Bumpsteer Adjustment Kit
 Feb 22, 2018 '67-69 Camaro & '68-74 Nova Bumpsteer Adjustment Kit 10552 The following instructions are intended for professional installers. Speedtech Performance assumes NO responsibility for the installation
Straight-Bore Clutch LSCC-32, 44, 54
 Straight-Bore Clutch LSCC-32, 44, 54 1 In accordance with Nexen s established policy of constant product improvement, the specifications contained in this manual are subject to change without notice. Technical
Please Read Instructions Completely Before Starting Your Installation QTY. PART NO. DESCRIPTION
 INSTRUCTIONS 916-31926 Master Cylinder and Pedal Assembly Speedway Motors, Inc. 2015 Master Cylinder and Pedal Assembly Model T Model A, and '32 Fords The master cylinder is suitable for 4-wheel disc or
INSTALLATION AND MAINTENANCE MANUAL FORM #PM-122 REV A 12/09
 HAND CRANK WELDING CABLE REEL: SERIES 100WC COXREELS The technical data and images which appear in this manual are for informational purposes only. NO WARRANTIES, EXPRESS OR IMPLIED, INCLUDING WARRANTIES
Female Plug. connecting to Fuel Quantity
 **Ag Diesel Solutions recommends replacing the Transorb/Suppressor Diode before the installation of this module*** Red wire = 12V Constant power. Male Plug connecting to Fuel Quantity Valve Black wire
Assembly Instructions
 TOOLS REQUIRED: _(2) 3/4 wrenches _7/16 wrench _3/8 wrench _5/16 allen wrench Display/work stand is for assembly procedure only. May be purchased separately. CONTENTS (PARTS & HARDWARE) _(1) Receiver tube
Parkit360 Force. Owner s Manual V2.6.2
 Parkit360 Force Owner s Manual V2.6.2 2 Introduction We know you re busy, and need to get that trailer moved. Now. So with that in mind, we ve kept these instructions as brief as possible, but they are
DISC BRAKE/DUAL MASTER CYLINDER CONVERSION. Tools, Equipment and Supplies Needed:
 Please take the time to read the enclosed instructions carefully. If you have any questions, call our Product Assistance personnel for clarification. It is important to note that these instructions contain
Technical Support Line: (952) Fax Line: (952) Hanover Ave. Lakeville, MN
 Fax Line: (952) Hanover Ave. Lakeville, MN") Technical Support Line: (952) 985-5675 Fax Line: (952) 985-5679 21730 Hanover Ave. Lakeville, MN 55044 www.qa1.net INSTALLATION INSTRUCTIONS QA1 P/N CC104MU Camber Caster Plates 1994-2004 Mustang 5.0/4.6
Technical Support Line: (952) 985-5675 Fax Line: (952) 985-5679 21730 Hanover Ave. Lakeville, MN 55044 www.qa1.net INSTALLATION INSTRUCTIONS QA1 P/N CC104MU Camber Caster Plates 1994-2004 Mustang 5.0/4.6
INSTRUCTIONS
 INSTRUCTIONS 910-34489 SOCALOOK RADIUS ROD BRACKET ASSEMBLY One side only/repeat for opposite side. Figure 1 STEP 1. LOCATING RADIUS ROD BRACKETS From under the vehicle, remove the 2 bolts that secure
Technical Support Line: (952) Hanover Ave. Lakeville, MN
 Hanover Ave. Lakeville, MN") Technical Support Line: (952) 985-5675 Email: Sales@QA1.net 21730 Hanover Ave. Lakeville, MN 55044 www.qa1.net INSTALLATION INSTRUCTIONS QA1 1967-1979 Mopar A-Body Rear 6 link Conversion System QA1 p/n
Technical Support Line: (952) 985-5675 Email: Sales@QA1.net 21730 Hanover Ave. Lakeville, MN 55044 www.qa1.net INSTALLATION INSTRUCTIONS QA1 1967-1979 Mopar A-Body Rear 6 link Conversion System QA1 p/n
SPECIFICATIONS CONTENTS: Specifications Warning Information. Operating Instructions Preventative Maintenance Troubleshooting
 Model 3182 2,500 Lbs Power Train Table/Lift OWNER'S MANUAL CONTENTS: Page 1 Page 2-3 Page 3 Page 4 Page 5 Page 5 Page 6 Page 7 Page 8 Specifications Warning Information Setup Operating Instructions Preventative
Ultimate 5th Wheel Connection Rail Mount. Part #3200 Gooseneck Mount, 20,000 lbs GTWR - 4,500 lbs Tongue INSTALLATION MANUAL
 Ultimate 5th Wheel Connection Rail Mount Part #3200 Gooseneck Mount, 20,000 lbs GTWR - 4,500 lbs Tongue INSTALLATION MANUAL andersenhitches.com Table of Contents Table of Contents Important Safety Information...
Installation Instructions
 Nov 25, 2013 Upper Control Arms Installation Instructions The following instructions are intended for professional installers and are guidelines only. Speedtech Performance assumes NO responsibility for
INSTRUCTIONS. Triangulated 4-Link Coil Over Rear Suspension System. For FORD / MERCURY Muscle Cars: MUSTANG COUGAR
 FORD Tech Line: 888-325-6462 MUSTANG / COUGAR 4-LINK TRIANGULATED SYSTEM INSTRUCTIONS Triangulated 4-Link Coil Over Rear Suspension System For FORD / MERCURY Muscle Cars: 1965-1970 MUSTANG 1967-1969 COUGAR
DODGE CUMMINS 24V ISB OEM BYPASS LIFT PUMP KIT Installation Instructions Part #
 2/15/2006 2000-2002 Dodge Cummins OEM Bypass Lift Pump Kit # 1050229-1 - 2000-02 DODGE CUMMINS 24V ISB OEM BYPASS LIFT PUMP KIT Installation Instructions Part # 1050229 PLEASE READ ALL INSTRUCTIONS CAREFULLY
PVI 1800/PVI Residential/Commercial Grid-Tied Photovoltaic Inverter WARRANTY MANUAL. Subject to Change REV , Solectria Renewables
 PVI 1800/PVI 2500 WARRANTY MANUAL Residential/Commercial Grid-Tied Photovoltaic Inverter 2009, Solectria Renewables Subject to Change REV 10.09 1 Product Warranty & RMA Policy 1.1 Warranty Policy The Solectria
CU6703 Module Installation Guide
 Up to 30% More Horsepower 10-20% Fuel Savings Cummins 6.7L Tier III Engines CU6703 Module Installation Guide AgDieselSolutions.com MAP sensor male and female connectors. Power and Ground wires. Module
Technical Support Line: (952) Fax Line: (952) Hanover Ave. Lakeville, MN
 Fax Line: (952) Hanover Ave. Lakeville, MN") Technical Support Line: (952) 985-5675 Fax Line: (952) 985-5679 21730 Hanover Ave. Lakeville, MN 55044 www.qa1.net ASSEMBLY INSTRUCTIONS QA1 Quad Adjust Shocks QA1 P/N D4x01 READ ALL INSTRUCTIONS CAREFULLY
Technical Support Line: (952) 985-5675 Fax Line: (952) 985-5679 21730 Hanover Ave. Lakeville, MN 55044 www.qa1.net ASSEMBLY INSTRUCTIONS QA1 Quad Adjust Shocks QA1 P/N D4x01 READ ALL INSTRUCTIONS CAREFULLY
INSTALLATION AND OPERATION MANUAL Low Profile Long Frame Floor Jack Model: RFJ-3000LPF REV B
 PLEASE READ THE ENTIRE CONTENTS OF THIS MANUAL PRIOR TO INSTALLATION AND OPERATION. BY PROCEEDING YOU AGREE THAT YOU FULLY UNDERSTAND AND COMPREHEND THE FULL CONTENTS OF THIS MANUAL. FORWARD THIS MANUAL
Operating Instructions & Parts Manual. Supa-Lite Lever Grease Gun. Model 48UJ77
 Operating Instructions & Parts Manual EN Supa-Lite Lever Grease Gun Model 48UJ77 PLEASE READ AND SAVE THESE INSTRUCTIONS. READ CAREFULLY BEFORE ATTEMPTING TO ASSEMBLE, INSTALL, OPERATE OR MAINTAIN THE
INSTALLATION INSTRUCTIONS
 JK LED LICENSE PLATE & 3RD BRAKE LIGHT 41-06-040 LED License Plate & 3rd Brake Light - PSC Connectors Thank you for purchasing Poison Spyder s JK LED License Plate & 3rd Brake Light - PSC Connectors. This
Installation Instructions and Warranty Information
 Installation Instructions and Warranty Information For 2004-05 Nissan Titan 5.6L Part#1400S Read all instructions carefully before attempting installation. Rev. 10/05 Installation instructions for JBA
FORCE 5K & 10K 8AM-6PM EST OFFICE HOURS (WEEKDAYS) CALL US TOLL-FREE:
 CALL US TOLL-FREE:") SUMMER 2018 VERSION 3.0 PARKIT360 FORCE 5K & 10K INSTRUCTION MANUAL / USER GUIDE CALL US TOLL-FREE: 1-888-926-5517 Ext. 1 - Sales Ext. 2 - Administration Ext. 4 - Technical Support OFFICE HOURS (WEEKDAYS)
SUMMER 2018 VERSION 3.0 PARKIT360 FORCE 5K & 10K INSTRUCTION MANUAL / USER GUIDE CALL US TOLL-FREE: 1-888-926-5517 Ext. 1 - Sales Ext. 2 - Administration Ext. 4 - Technical Support OFFICE HOURS (WEEKDAYS)
½ DODGE CUMMINS OEM BYPASS LIFT PUMP KIT Installation Instructions Part #
 29 July 2005 2003-04.5 Dodge Cummins OEM Bypass Lift Pump Kit # 1050227-1 - 2003-04½ DODGE CUMMINS OEM BYPASS LIFT PUMP KIT Installation Instructions Part # 1050227 PLEASE READ ALL INSTRUCTIONS CAREFULLY
RACE PPE Manifolds and Up-Pipes
 RACE ONLY High-Flow Exhaust Manifolds with Up-pipes GM DURAMAX 6.6L 2001-2015 DISCLAIMER OF LIABILITY This is a performance product which increases horsepower above factory specifications. Additional horsepower
Power Edge Juice Module Ford 6.0 Powerstroke Diesel
 Power Edge Juice Module Ford 6.0 Powerstroke Diesel 2004, Edge Products Incorporated All rights reserved. Edge Products Incorporated 1080 South Depot Dr. Ogden, UT 84404 (801) 476-3343 www.edgeproducts.com
Installation Instructions. Application List Dodge 24V PLEASE READ ALL INSTRUCTIONS BEFORE INSTALLATION
 1 BD DODGE CUMMINS 03-055 C O O L - I T I N T E R C O O L E R Installation Instructions Application List 2003-2006 Dodge 24V 1042510 PLEASE READ ALL INSTRUCTIONS BEFORE INSTALLATION KIT CONTENTS: Please
Installation Instructions and Warranty Information
 Installation Instructions and Warranty Information 1999 2003 Ford SuperDuty Truck and Excursion Part# 1669S, 1669S-1, 1669S-2 Read all instructions carefully before attempting installation. Rev. 10/05
Cognito Motorsports, Inc., GM Lug Truck and SUV Pitman/Idler Arm Support Kit SKU# PISK2008 **UTILITY PATENT US 7,475,891 B2** Introduction
 Cognito Motorsports, Inc., GM 2001-2010 8-Lug Truck and SUV Pitman/Idler Arm Support Kit SKU# PISK2008 **UTILITY PATENT US 7,475,891 B2** Introduction - This application is for stock and lifted applications
Installation Guide 2016 Kawasaki ZX10-R Exhaust Kit
 Installation Guide 2016 Kawasaki ZX10-R Exhaust Kit!! THIS PRODUCT IS DESIGNED FOR USE IN CLOSED COURSE RACING AND IS NOT INTENDED FOR HIGHWAY USE!! Congratulations on the purchase of your new TaylorMade
DODGE CUMMINS Air-Boss CR Intake Plenum
 Installation Manual P/N 0307-ABIP 2003-07 DODGE CUMMINS Air-Boss CR Intake Plenum Installation Instructions P/N 0307-ABIP GDP Air-Boss CR Plenum Installation PLEASE READ ALL INSTRUCTIONS BEFORE BEGINNING
PVI 60KW, PVI 82KW, PVI 95KW
 PVI 60KW PVI 82KW PVI 95KW WARRANTY MANUAL Commercial, Grid-Tied Photovoltaic Inverters 2008, Solectria Renewables LLC Subject to Change DOC-020099 rev 024 1 1 Product Warranty & RMA Policy Warranty Policy
Speedometer Interface
 Pacific Performance Engineering, Inc. www.ppediesel.com Speedometer Interface Technical Support (714) 985-4825 Rev: 12/19/12 v5 DISCLAIMER OF LIABILITY This is a performance product which can be used with
PMD DRIVER RELOCATION KIT For Chevy 6.5L Diesel Trucks
 - 1 - PMD DRIVER RELOCATION KIT For 1994-1999 Chevy 6.5L Diesel Trucks Part# 1036520 -- Installation Instructions -- PLEASE READ ALL INSTRUCTIONS CAREFULLY BEFORE INSTALLATION. - 2 - Kit Contents BD P/N#
Installation Instructions and Warranty Information For Ford F-250 & F-350 Trucks with 7.5L V8 Auto. Transmission Only
 Installation Instructions and Warranty Information For 1988-1998 Ford F-250 & F-350 Trucks with 7.5L V8 Auto. Transmission Only Part# 1629SJT, 1629-1SJT, Requires part# 1629YJT, 1629Y-1JT, 1629Y-2JT, or
1250 LB. CAPACITY MECHANICAL WHEEL DOLLY
 1250 LB. CAPACITY MECHANICAL WHEEL DOLLY 67287 SET-UP AND OPERATING INSTRUCTIONS Visit our website at: http://www.harborfreight.com Read this material before using this product. Failure to do so can result
WARRANTY POLICY. Grid-Tied Photovoltaic Inverters. Revision D. 2014, Solectria Renewables, LLC DOCIN
 WARRANTY POLICY Revision D 2014, Solectria Renewables, LLC DOCIN-070360 1 Product Warranty & RMA Policy 1. Warranty Policy Warranty Registration: It is important to have updated information about the inverter
Cognito Motorsports, Inc. Upper Control Arm Kit for 2011-Present GM 8-Lug #UCAK100051
 Cognito Motorsports, Inc. Upper Control Arm Kit for 2011-Present GM 8-Lug #UCAK100051 Introduction - Installation requires a qualified mechanic. - Read instructions carefully and study the pictures (if
Dual Fueler CP3 Pump Kit Installation Guide for LBZ/LMM
 Dual Fueler CP3 Pump Kit Installation Guide for LBZ/LMM Supplied Parts: 19b 19c 19a 1. Control Module 2. 3/8 Inlet Fuel Line with Attached 1/2 x 1/2 x 3/8 T Connector 3. 5/16 Return Fuel Line with Attached
INSTALLATION AND MAINTENANCE MANUAL FORM #PM-126 REV A 12/09
 HAND CRANK & MOTORIZED POWER CORD REELS: SERIES 1125PC SERIES: 1125PC HAND CRANK SERIES: 1125PC MOTORIZED COXREELS The technical data and images which appear in this manual are for informational purposes
Cummins N14 Celect & Celect Plus Engine Module. For Agricultural Applications Only. Part # 31200
 1994-2003 Cummins N14 Celect & Celect Plus Engine Module For Agricultural Applications Only Part # 31200 31200_revA Adjustable Switch Agricultural Cummins N14 Engine Module Power and Ground terminals Timing
Gen 2 Portal Gear Hubs for Polaris Ranger Crew 570/900
 2753 Michigan Road Madison, Indiana 47250 855-743-3427 INSTALLATION INSTRUCTIONS Gen 2 Portal Gear Hubs for Polaris Ranger Crew 570/900 A Item Description Qty A Rotor 4 B Gear Box, L 2 C Gear Box, R 2
Mechanical Filter Box Kit
 Mechanical Filter Box Kit REMINDER CALL 1-888-755-4497 BEFORE RETURNING TO STORE. MODEL #MFBX500P Questions, problems, missing parts? Before returning to your retailer, call our customer service department
Stage4 Installation Guide STAGE 4 TRANSMISSION KIT INSTALLATION GUIDE Allison LB7/ LLY only for 5 speed trasmissions
 STAGE 4 TRANSMISSION KIT INSTALLATION GUIDE 2001-2005 Allison LB7/ LLY only for 5 speed trasmissions DISCLAIMER OF LIABILITY This is a performance product which can be used with increased horsepower above
SPORT COIL SPRINGS Scion xa & xb Part #19412 INSTALLATION OF HOTCHKIS FRONT COIL SPRINGS
 SPORT COIL SPRINGS 2004+ Scion xa & xb Part #19412 Thank you for your purchase from our new line of Scion xa / xb parts. Please call us at (877) 4NO-ROLL if you have any questions regarding the service
20250 Module Installation Guide
 20250 Module Installation Guide 2013.5-2017 RAM 6.7L Cummins Up to 90HP Gain 1-3 MPG Fuel Savings AgDieselSolutions.com Adjustable switch connector Power +12 volts (Red wire) & Ground (Black wire) Injector
THIS IS A HIGH PERFORMANCE PRODUCT - USE AT YOUR OWN RISK!!!
 9/15/08 6.6 GM Duramax Aurora 5000 Turbo Installation Guide THIS IS A HIGH PERFORMANCE PRODUCT - USE AT YOUR OWN RISK!!! Do not use this product until you have carefully read the following agreement. This
DODGE CUMMINS MK-2 Micro-Kleen System
 Installation Manual P/N MK20306 2003-07 DODGE CUMMINS MK-2 Micro-Kleen System Installation Instructions P/N MK20306 2 Micron Fuel Filter Installation PLEASE READ ALL INSTRUCTIONS BEFORE BEGINNING INSTALLATION
INSTRUCTIONS FOR AMC MUSCLE CARS: AMX JAVELIN AMX / JAVELIN ADJUSTABLE REAR SWAY BAR. Tech Line:
 AMC Tech Line: 888-325-6462 1968-74 AMX / JAVELIN ADJUSTABLE REAR SWAY BAR INSTRUCTIONS FOR AMC MUSCLE CARS: 1968-1970 AMX 1968-74 JAVELIN Requires Control Freak Rear Suspension Systems RS-1400T, RS-1400P
Camaro / Firebird. Please read the following key points before installing this kit.
 Please read the following key points before installing this kit. 1 Before performing the subframe connector installation, the vehicle must be completely assembled with all body and component parts installed
Mega-Rail System Installation
 Installation Manual Mega-Rail System P/N 030767-MRS 2003-2007 DODGE CUMMINS Mega-Rail System Installation Installation Instructions GDP 03-07 Mega-Rail System P/N 030767-MRS PLEASE READ ALL INSTRUCTIONS
Installation and Operation Manual
 1645 Lemonwood Dr. Santa Paula, CA 93060 USA Toll Free: 1 (800) 253-2363 Tel: 1 (805) 933-9970 rangerproducts.com Ranger Floor Jack Installation and Operation Manual Manual Revision B July 2017 Manual
V-Twin Forward Control Installation Instructions
 V-Twin Forward Control Installation Instructions Thank you for a choosing a Supreme Legends USA product. Supreme Legends forward controls are designed to add style and performance to your bike. Our extended
Installation Instructions and Warranty Information
 Installation Instructions and Warranty Information 1625S 96-98 Mustang 4.6L 2v 1-1/2 1625S-8 96-98 Mustang 4.6L 2v 1-5/8 1625S-1 99-04 Mustang 4.6L 2v 1-1/2 1625S-9 99-04 Mustang 4.6L 2v 1-5/8 1625S-5JT
Dodge Ram 5.9L Cummins LOW FUEL PRESSURE ALARM LIGHT - Installation Manual -
 29 September 2005 Dodge Cummins Low Fuel Pressure Alarm Light Kit 1081130-33 1 1999-2005 Dodge Ram 5.9L Cummins LOW FUEL PRESSURE ALARM LIGHT - Installation Manual - Part Number Sequence: 1081130 Red 1081133
Lubricator Gun: 10,000 psi (700 bar) Maximum Delivery Pressure when disconnected from Dispenser
 Maximum Delivery Pressure when disconnected from Dispenser") INSTRUCTIONS-PARTS LIST 30 455 INSTRUCTIONS This manual contains important warnings and information. READ AND KEEP FOR REFERENCE. Rev. C Supercedes B Hand-Operated Portable Grease Dispenser Buckshot Luber
INSTRUCTIONS-PARTS LIST 30 455 INSTRUCTIONS This manual contains important warnings and information. READ AND KEEP FOR REFERENCE. Rev. C Supercedes B Hand-Operated Portable Grease Dispenser Buckshot Luber
GM 6.6L Duramax. Up to 90HP Gain. AgDieselSolutions.com
 21700 Module Installation Guide 2017 GM 6.6L Duramax *L5P* Up to 90HP Gain 1-3 MPG Fuel Savings AgDieselSolutions.com Adjustable Switch Female Fuel Pressure Sensor Connector Male Fuel Pressure Sensor Connector
Festoon Manual Standard Duty C-Track
 Festoon Manual Standard Duty C-Track 966301.4 Standard Duty C-Track Manual CONDUCTIX INCORPORATED The technical data and images which appear in this manual are for informational purposes only. NO WARRANTIES,
Owners Manual. 64 1/2 to early 67 (Straight Shaft) with Rag Joint
 with Rag Joint") Owners Manual 64 1/2 to early 67 (Straight Shaft) 67-70 with Rag Joint WARNING Please read and understand this manual before installing your EPAS kit. The installation of this system should be done by
Owners Manual 64 1/2 to early 67 (Straight Shaft) 67-70 with Rag Joint WARNING Please read and understand this manual before installing your EPAS kit. The installation of this system should be done by
Tractor Applications Rapid Power Model Number
 INSTALLATION Manual Tractor Applications Rapid Power Model Number John Deere 8130 to 8530 40605 John Deere 8230 (T) to 8430 (T) 40605 TABLE OF CONTENTS TROUBLESHOOTING: If you have questions during the
ASSEMBLY / OPERATION INSTRUCTIONS. Low Profile Motorcycle Dolly
 ASSEMBLY / OPERATION INSTRUCTIONS 1,500LB CAPACITY Low Profile Motorcycle Dolly Model: 03-CG1500-01(B1) WARNING BEFORE USE PLEASE READ ALL WARNINGS AND INSTRUCTIONS TO PREVENT SERIOUS INJURY Drop-Tail
INSTALLATION AND OPERATION MANUAL Aluminium Racing Jack Model: RFJ-3000AL
 PLEASE READ THE ENTIRE CONTENTS OF THIS MANUAL PRIOR TO INSTALLATION AND OPERATION. BY PROCEEDING YOU AGREE THAT YOU FULLY UNDERSTAND AND COMPREHEND THE FULL CONTENTS OF THIS MANUAL. FORWARD THIS MANUAL
DODGE CUMMINS GDP Big Line Kit
 Installation Manual P/N 9852BLK 1998.5-2002 DODGE CUMMINS GDP Big Line Kit Installation Instructions P/N 9852BLK GDP Big Line Kit Installation PLEASE READ ALL INSTRUCTIONS BEFORE BEGINNING INSTALLATION
Vehicle Programming Instructions Ford Powerstroke 7.3 liter
 Vehicle Programming Instructions 1994 2003 FORD Powerstroke 7.3 liter 2003, Edge Products Incorporated All rights reserved. Edge Products Incorporated 1080 South Depot Dr. Ogden, UT 84404 (801) 476-3343
JD2800 Module Installation Guide
 Up to 30% More Horsepower 10-20% Fuel Savings John Deere 9.0L Tier III Denso Common Rail Engines JD2800 Module Installation Guide AgDieselSolutions.com Ground Terminal Power (+12V constant) Terminal Injector
30100 Module Installation Guide L
 30100 Module Installation Guide 1997-2006 12.0L Mack Engines Up to 30% HP Gain 10-20% Fuel Savings AgDieselSolutions.com 1997-2006 Mack 12.0L Engine Module +12 volts red wire. Ground black wire Injector
INSTALLATION INSTRUCTIONS FOR M.O.R.E. SHACKLE REVERSAL SYSTEM (S.R.S. ) PART # THIS SYSTEM FITS Jeep CJ-5, CJ-7, CJ-8 VEHICLES.
 PART # THIS SYSTEM FITS Jeep CJ-5, CJ-7, CJ-8 VEHICLES.") INSTALLATION INSTRUCTIONS FOR M.O.R.E. SHACKLE REVERSAL SYSTEM (S.R.S. ) PART # 7686-6 THIS SYSTEM FITS 1976-1986 Jeep CJ-5, CJ-7, CJ-8 VEHICLES. Please read all instructions carefully (including terms-policies)
INSTALLATION INSTRUCTIONS FOR M.O.R.E. SHACKLE REVERSAL SYSTEM (S.R.S. ) PART # 7686-6 THIS SYSTEM FITS 1976-1986 Jeep CJ-5, CJ-7, CJ-8 VEHICLES. Please read all instructions carefully (including terms-policies)
Twin Turbo Installation Instructions
 Twin Turbo Installation Instructions Pacific Performance Engineering 303 N Placentia Ave. Fullerton, CA 92831 www.ppediesel.com Legal in California only for racing vehicles which may never be used on the
Mercedes MBE 906/ L & 7.2L Engine Module. Part # Installation Instructions
 1999-2006 Mercedes MBE 906/926 6.4L & 7.2L Engine Module Part # 15000 Installation Instructions 15000_revC 1999-2006 Mercedes 6.4L & 7.2L Engine Module +12 volts red wire. Ground black wire Injector Terminals
Elgin Hydraulic Clutch-Brake ECB-240, Product Number FORM NO. L F FORM NO. L F-0704
 Elgin Hydraulic Clutch-Brake ECB-20, Product Number 96225 FORM NO. L-20283-F-070 1 FORM NO. L-20283-F-070 In accordance with Nexen s established policy of constant product improvement, the specifications
INSTALLATION, OPERATION, & MAINTENANCE MANUAL
 INSTALLATION, OPERATION, & MAINTENANCE MANUAL VPJ-1500EZ & VPJ-1500EZ-XL Hydraulic Vehicle Positioning Jacks FOLLOW THIS MANUAL CAREFULLY TO ENSURE THE PRODUCT WILL FUNCTION CORRECTLY AND PROVIDE MANY