How to change front brake pads, and rotors and bleed brakes on a 98 VW Jetta GLS (Other models, like BMW, and Audi are similar)
|
|
|
- Jennifer Annis Holt
- 5 years ago
- Views:
Transcription
1 How to change front brake pads, and rotors and bleed brakes on a 98 VW Jetta GLS (Other models, like BMW, and Audi are similar) This "how to" assumes you have some basic tools, and safety gear. Safety glasses should be worn at all times when working with tools and automotive fluids. Always use a hydraulic jack and safety stands when lifting or getting under a vehicle. If you are unsure on where to safety lift your vehicle, refer to its owners guide. Brake dust can contain asbestos which has been found to cause cancer. The writer of this how to assumes zero liability in how to use this guide, or any damages that may come from it to you, your property, or others and others property. If you are uncertain at any point, refer to a qualified automotive technician. Basic Rules, clean brake fluid up with cold water. Keep all fluids, water, dirt, and oil out of the brake system (except for clean brake fluid). Keep all and any grease off pads, shoes, and rotor brake surfaces. If pads become contaminated with grease or oil, throw them out and buy new ones. If rotors become oily, clean them with brake clean, or hot soapy water. For a quick primer on brake systems, please visit - Tools you ll need. Hydraulic Jack (at least 2 tons) Safety Stands and Wheel chocks 17mm ½ socket ½ Breaker bar Torque wrench that can go from 15 to 95 Ft/Lbs 6mm wrench 13 mm socket 3/8" drive ratchet 15 mm wrench 17 mm wrench 11 mm wrench Flathead screwdriver Phillips screwdriver Impact Screwdriver (set) Small prybar MityVac Vacuum pump w/ bleeder cup Ball been hammer (16 oz) Clean small funnel Brake pad spreader or 8 C-Clamp Consumables Disk Brake Caliper Slide Pin Grease Anti-Seize compound Blue-Loctite Brake Clean (Spray Can) 600 grit sand paper DOT 4 brake fluid (2 Qts or 2L) 1. Start with good stuff. ATE Power Disk rotors, ATE DOT 4 Fluid, and ECB GreenStuff brake pads. Recommended replacement caliper bolts. - ( I got everything I needed from - ) Always use brake fluid from a sealed container, never reuse brake fluid. If brake fluid
 into a vehicles brake system. DOT (Department of Transportation) 3, 4, and 5.1 are all the same base fluid.")
2 comes in contact with painted surfaces immediately wash them with plenty of cold water and soap. Brake fluid absorbs moisture, never leave the container open to atmosphere. Never put anything but brake fluid (as specified by the manufacturer) into a vehicles brake system. DOT (Department of Transportation) 3, 4, and 5.1 are all the same base fluid. DOT 5 is a silicone based brake fluid and has a pretty blue/purple color. DOT 5 should never be used in a brake system that takes DOT 3, 4, and 5.1. VW uses DOT 4 as the OEM (Original Equipment Manufacturing) fluid. Any fluid sold in North America marked as DOT 4 will be acceptable. DOT 3 will work as well, but has a lower boiling point. Clean brake fluid will be anything from a clear, to a gold color. More on brake fluids here and here. VW recommends that you change your brake fluid every two years regardless of mileage. Fluid should be changed any time it becomes contaminated, some North American makes never spec any brake fluid change (I don t feel this is a good idea, but how hard can you push a Ford Windstar?). While this is a very mild upgrade, these parts are better than stock, and will provide the sporting driver some added brake control and prevent brake fade. The EBC pads also claim (and they do) to put out less dust and have a better grip on the rotors. The slotting on the ATE power disks prevents gas fade (where the pad breaks down and a small layer of gas (fade) starts, and also acts as a sweep cleaning the pads for maximum bite. 2. Park the vehicle on a level paved surface. Set the vehicles parking brake AND place it in either 1st gear, or PARK. Use wheel chocks on the opposite side to block the front and back of 1 wheel. Remove ignition key. 3. Remove the wheel covers. Loosen the lug nuts (17mm). Do not remove them, only loosen them at this

3 point. Only loosen the side you intend to work on at this point. 4. Raise vehicle at the front lift point, support weight of vehicle with safety stand. It may be useful to use a 2X4 block of wood to distribute the vehicle weight over the safety stand. On the Jetta and Golf models you can raise an entire side of the vehicle with one stand at the front lift point. 5. Remove the wheels and tires that you loosened. 6. Inspect your brakes (front) rotors and pads.


4 bad, I am tired of them.. While these are not Your Starting point

5 sir Open the hood, and gain access to the master cylinder. If it is dirty wipe off any debris on to of it. It is critical that no debris fall into the master cylinder. This is the heart of your brake system. Never use any other fluid than specific by the manufacturer in a master cylinder. cylinder has the yellow cover. The master 8. Using your vacuum pump, and adapter (make sure you read how to use it) suck out the brake fluid in the master cylinder. Don t worry you can t get it all right now, that s ok.

6 9. If you want to you can take a small screw driver and remove the filter, set it aside on a clean cloth. This will allow you to get more of the fluid out. DO NOT STEP ON THE BRAKES AT THIS POINT! When done empty out the vacuum pump. If you pump the brakes, you risk pumping air into the brake system. AT NO POINT ALLOW THE MASTER CYLINDER TO RUN DRY!

7 master cylinder filter. Pulling out the 10. Fill the master cylinder up with clean DOT 4 fluid. Use a very clean funnel. I like to keep one that I only use for brake fluid, and I do not allow any dirt to settle it side of it.
 about ½ a turn. Do not remove the bleeder.")
8 way full Fluid level is 1/2 11. Go to the rear brake. For this example, we are looking at a drum brake. Remove the rubber dust cap from the bleeder screw. Attach the bleeder hose to the end of the bleeder screw. Open the bleeder (6mm) about ½ a turn. Do not remove the bleeder. Old brake fluid should start to flow out into the tube.

9 If the bleeder screw is stuck, make sure that you are turning it the right way. If it continues to be stuck, as you try to turn it, gently strike the head of it with the ball peen hammer. Avoid using WD-40 or other types of penetrating lubricants as they will harm the rubber components of the brake system. Do not use a torch to heat a stuck bleeder as it may cause the brake fluid to boil and then come out and burn you. Do NOT open the brake fluid line (the metal line running into the back of the brake assy.) 12. With the bleeder line open, create suction with the vac. pump. Fill the vac. bleeder bottle once, then close the bleeder valve. Check the fluid level in the master cylinder, and if needed top it off again. Perform this cycle 2 times. MAKE SURE THAT AT NO TIME THE MASTER CYLINDER RUNS DRY, THIS IS VERY VERY SERIOUS. If you see bubbles, that's OK, what you are seeing is some air being drawn past the threads of the bleeder screw. This does NOT mean that there is air in the brake system. Air in a brake system is bad and will lead to a low, spongy brake pedal. For more help on bleeding brakes, visit here. Side note, with the wheel off, paint your ugly gray drums. Use a nice black high temperature paint, or the color of your choice. Now is also a nice time to sit down and clean the wheel face and backside! Also, take a look at the condition of your tires, and check the brake lines for damage or abrasion. And make sure the tire pressure is set to spec! 13. Torque the bleeder screw to Ft Lbs, and replace the dust cap. The dust cap will keep crud out of the bleeder screw and prevent it from seizing up next time you have to bleed the brakes.

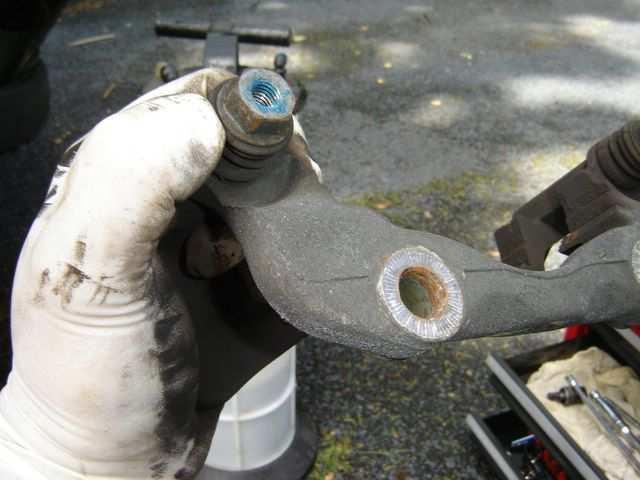
10 14. Check and top off the master cylinder fluid level, and depress the brake pedal. Check for leaks at the point where you just worked. 15. Reinstall the rear wheel, and torque the lugs down to 81 Ft Lbs, in a star pattern. Congratulations, you just flushed ¼ of your brake system with new fluid. 16. Moving onto the front wheel. Remove the dust cap and open the front bleeder screw. (This will ensure that it is not stuck when we bleed the brakes in the next few steps.) Close the bleeder screw. screw (w/ dust cap) Caliper bleeder 17. Using the 13mm and 15mm wrenches remove the brake caliper by holding the 15mm and turning the 13mm nut on the back side of the caliper carrier. Do this for the top and bottom bolts.

11 18. The caliper should come off. Do NOT overly flex, or allow the caliper to hang by the brake line. Doing so may damage the brake line. Use some wire, or the strut body to hold the caliper up while you are working on the brakes. From this point on, do not step on the brakes or the piston will be forced out of the caliper!

12 Inspect the pads for equal wear, they should look like this, if so - everything is/was working as it should be...


13 sandwich! Mmm.. Pad If needed, hang the

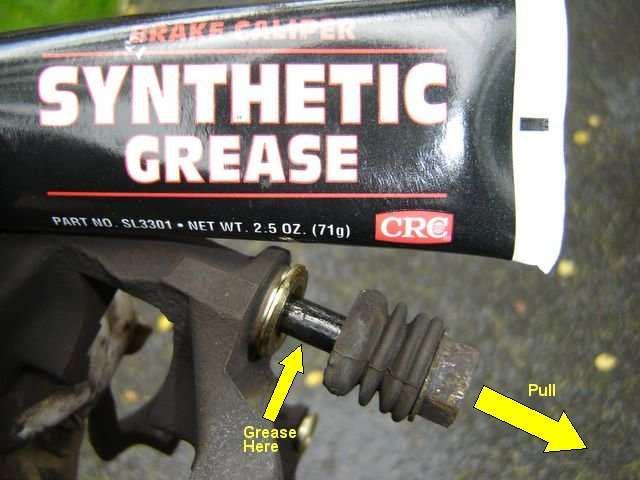
14 caliper on the strut tower. 19. Take the 17mm wrench and remove the caliper carrier (also know as the torque member, or caliper frame) bolts. These bolts are very tight. You may need to use the 17mm breaker bar you used to loosen the wheels. Make sure you don't damage the caliper slide pins! 20. Once the caliper carrier is removed, clean its mounting points, and remove the slide pins, and apply a small amount of caliper slide grease to them. They should slide smooth and free. This operation is critical to the performance and longevity of the brakes. Inspect the boots for tears or cracks that will allow water and dirt to enter the pins, and the grease to become contaminated.
15

16 21. Take some 600 grit sand paper and clean the mounting surfaces of the caliper carrier, and the pad seats. Remove any rust, scale, or old brake dust. Doing this step will ensure a noise free brake system. 22. Using the impact screwdriver remove the rotor hold-down screw. If this screw gets destroyed it will need to be drilled out and removed. The impact screwdriver is the fastest and safest way to remove this stubborn screw.

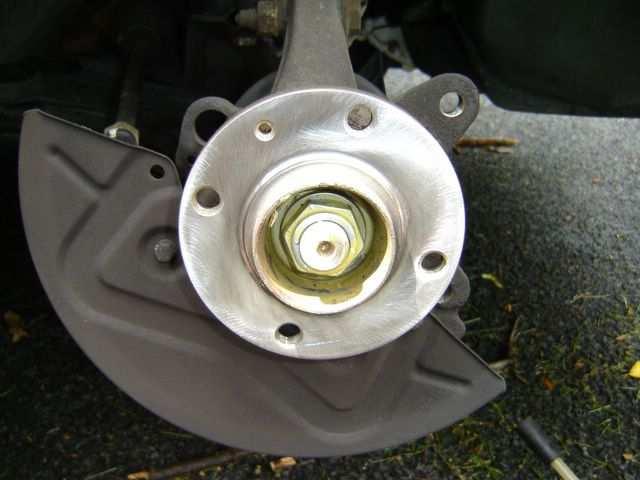
17 23. If the rotor is stuck to the hub (And it will be). Strike the inner surface of the rotor face. A few good hammer blows should shock the rotor off. Never strike the rotor brake surface, unless you are sure you never plan to use the rotors again. Rotors can crack and shatter. 24. With the hub exposed, let s clean it up a little. Use the 600 grit paper to clean any rust or scale off the hub and its center. This step ensures that the rotor will mate perfectly with your hub, and prevent brake shutter and roughness.

18 Before After!

19 25. Apply a very thin film of anti-seize compound to the hub face. Take care in NOT getting it into the lugholes. This will prevent your new rotor from getting stuck like the old one did.

20 From this point foreword, we start to put stuff back together. 26. Install your new rotor. If needed, clean off the rotor before hand with a clean rag, and brake clean to remove any chemicals that the rotor may have been treated with while it was in storage. (Note, the ATE Power Disks do not need to be cleaned, they can go on the vehicle as they come out of the box.) 27. Coat the rotor hold-down screw with anti-seize compound and torque it to 11 Ft. Lbs. 28. Reinstall the caliper carrier, and torque the carrier bolts (the big ones) to a whopping 92 Ft Lbs. These are the bolts that hold the brakes to your car. 29. Reattach the vacuum pump the calipers bleeder valve. Open the bleed screw. 30. Using your disk brake pad spreader, take an old pad and place it against the piston of the caliper. As you screw the spreader in, it will force the piston back and force the old fluid into the bottle. Screw the piston in until it bottoms out.

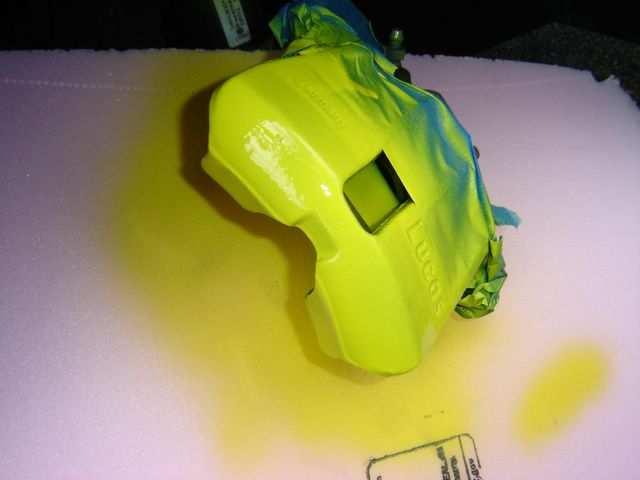
21 31. With the bleeder line open, create suction with the vac. pump. Fill the vac. bleeder bottle once, then close the bleeder valve. Check the fluid level in the master cylinder, and if needed top it off again. Perform this cycle 2 times. AGAIN MAKE SURE THE MASTER CYLINDER DOES NOT RUN DRY. Side note, I prepped, and cleaned ½ of my caliper and used caliper paint for a flashy look. It s not necessary to do the whole caliper with my wheel setup. Follow the directions on the caliper paint.

22

23 32. Close the bleeder screw, and torque it to FT LBS, and replace the dust cap. 33. Compare the old brake pads to the new ones, to make sure they are a perfect match. Do not worry if the shim (the metal part that is stuck to the pads) is slightly different. This is ok.

24 34. Apply a small amount of disk-brake quiet to the backing plates of the pads. This material will harden up, and conform to the caliper carrier and caliper and prevent brake squealing. Do not use a ton of this stuff,


25 only a little. not needed to do brake job.. Silly monster garage gloves
. 36. Swing the caliper down on to the pads assy.")
26 35. Allow the anti-squeal compound to dry for 10 min (as per the directions). And then place the pads into the caliper carrier. Add some Blue-Loctite to the threads of the caliper pin bolts. VW says to replace this hardware, but it s only needed IF you do not re apply the blue-thread locker (My opinion). 36. Swing the caliper down on to the pads assy. Reinstall the small bolts that held the caliper to its carrier. Hold the 15mm slide pins, and torque the bolts to 25 Ft Lbs. Note, make sure the caliper shim on the piston side does not shift out of place. This can be tricky. The Jetta/Golf pads on the GLS have small spring like clips to keep them from making noise. This can be stiff and some force must be used to swing the caliper into position. Make sure all 4 of these little buggers are seated inside the caliper. Start with the top bolt in place (finger tight), and them swing the caliper down. Press firmly to get the lower bolt to line up. Keep an eye out for the slide pin, if it s out too far it can block the caliper from swinging into position. 37. Reinstall and torque the wheel to 81 Ft Lbs. Remember, star pattern.

27 38. Lower vehicle. 39. Do steps 1-38 on the other side. 40. PUMP THE BRAKES BEFORE DRIVING! Road test the vehicle to confirm proper function of the brakes. USE CAUTION THE FIRST TIME YOU DRIVE YOUR CAR AFTER MODIFICATION TO ENSURE THE PROPER FUNCTION OF ALL VEHICLE SYSTEMS! 41. Bed in your new shoes enjoy your perfect brake job, quiet, and good stopping! Finished Pictures!


28 End of article - Questions? Comments - danjreed@gmail.com
29 Back
Installation Instructions
 Preparing your vehicle to install your brake system upgrade 1. Rack the vehicle. 2. If you don t have a rack, then you must take extra safety precautions. 3. Choose a firmly packed and level ground to
How I installed new brake pads on my i with Sport Package (should be fine for other E39 s) By Robert B.
 By Robert B.") How I installed new brake pads on my 1999 528i with Sport Package (should be fine for other E39 s) How I installed new brake pads on my 1999 528i with Sport Package (should be fine for other E39 s) By
How I installed new brake pads on my 1999 528i with Sport Package (should be fine for other E39 s) How I installed new brake pads on my 1999 528i with Sport Package (should be fine for other E39 s) By
INSTALLATION INSTRUCTIONS
 INSTALLATION INSTRUCTIONS BIG ROTOR / CALIPER RELOCATION REAR KIT SUM-BK1423 1999-2009 GM 1/2 Ton Trucks & SUVs Thank you for choosing SUMMIT RACING for your braking needs. Pleases take the time to read
INSTALLATION INSTRUCTIONS
 INSTALLATION INSTRUCTIONS BIG ROTOR / CALIPER RELOCATION FRONT KITS SUM-BK1422, BK1423, BK1424 1999-2006 GM 1/2 Ton Trucks & SUVs Thank you for choosing SUMMIT RACING for your braking needs. Pleases take
Installing Rear Brake Pads on a WK Jeep
 Installing Rear Brake Pads on a WK Jeep Step by Step By Chirpz Disclaimer: I do not claim that this procedure is the right way or even the best way to change your rear brake pads. This is what I did after
Rear drum to disk conversion for a 00 Toyota Camry LE 4 cylinder
 Rear drum to disk conversion for a 00 Toyota Camry LE 4 cylinder *** Read and use at your own discretion I assume no liability for what you or anyone else does with this information. By reading this, you
A/F/X Body GM Installation Instructions
 A/F/X Body GM Installation Instructions Power Disc Conversion 64-72 A Body / 67-69 F Body / 68-74 X Body 9 slimline booster pictured Your new disc brake conversion kit can be bolted up with standard hand
1969 Camaro. Concourse Style Disc Brake Conversion Kit Instllation Instructions
 Concourse Style Disc Brake Conversion Kit Instllation Instructions 1969 Camaro (1970 Chevelle Kit Shown) This document contains our regular disc brake conversion instructions with the addition of GM assembly
INSTALLATION INSTRUCTIONS
 INSTALLATION INSTRUCTIONS DISC BRAKE CONVERSION KITS A121-1, A121-2, A121-3, A121-4 1967-69 Ford & Mercury Thank you for choosing STAINLESS STEEL BRAKES CORPORATION for your braking needs. Pleases take
Installation Guide: Front Brake Pad
 Installation Guide: Front Brake Pad Ninety percent of the brake pad changes you make during the life of your vehicle will be to the front brakes because they do 60% to 70% of the braking. On most cars,
INSTALLATION INSTRUCTIONS
 INSTALLATION INSTRUCTIONS DISC BRAKE CONVERSION KITS A120-4 & A120-5 1964-1/2-66 Ford & Mercury Thank you for choosing STAINLESS STEEL BRAKES CORPORATION for your braking needs. Pleases take the time to
A/F/X Body GM Installation Instructions Manual Disc Conversion
 A/F/X Body GM Installation Instructions Manual Disc Conversion 64-72 A Body / 67-69 F Body / 62-74 X Body DBMC09 & PVK71 pictured above (Booster, master & valve setups may vary by upgrades selected) Your
2008 Toyota Tundra 4WD Brake Job: A Quick Job and Even Quicker Write-Up.
 FRONT BRAKES: 2008 Toyota Tundra 4WD Brake Job: A Quick Job and Even Quicker Write-Up. 1. Remove this bolt holding brake line bracket to the suspension. 2. I had to replace all 4 rotors at 60K miles, so
Ford Focus Front Brake Pad Replacement
 2005-2007 Ford Focus Front Brake Pad Replacement Replacing the brake pads on all 2005-2007 Focus models with rear drum brakes. Written By: David Hodson ifixit CC BY-NC-SA www.ifixit.com Page 1 of 16 INTRODUCTION
A/F/X Body GM Installation Instructions Manual Disc Conversion
 A/F/X Body GM Installation Instructions Manual Disc Conversion 64-72 A Body / 67-69 F Body / 62-74 X Body DBMC09 & PVK71 pictured above (Booster, master & valve setups may vary by upgrades selected) Your
INSTALLATION INSTRUCTIONS
 INSTALLATION INSTRUCTIONS PERFORMANCE AT THE WHEELS KIT W120-22, W120-23 1964 1/2-69 MUSTANG Thank you for choosing STAINLESS STEEL BRAKES CORPORATION for your braking needs. Pleases take the time to read
INSTALLATION INSTRUCTIONS
 INSTALLATION INSTRUCTIONS REAR DISC CONVERSION KIT A126-2 1988-98 C1500 2WD 10" REAR DRUM Thank you for choosing STAINLESS STEEL BRAKES CORPORATION for your braking needs. Pleases take the time to read
INSTALLATION INSTRUCTIONS
 INSTALLATION INSTRUCTIONS Disc Brake Spindle Kit SUM-BKA2447 1964-72 A-BODY 1967-69 F-BODY 1968-74 X-BODY Thank you for choosing SUMMIT RACING for your braking needs. Please take the time to read and carefully
Mopar 8 3/4 & 9 3/4 (Dana) Installation Instructions Rear Disc Conversion
 Installation Instructions Rear Disc Conversion") Mopar 8 3/4 & 9 3/4 (Dana) Installation Instructions Rear Disc Conversion This kit is for either Mopar 8 ¾ or Mopar 9 ¾ (Dana). This kit is designed to work with axles with either GM 5 x 4.75 Bolt Pattern
Mopar 8 3/4 & 9 3/4 (Dana) Installation Instructions Rear Disc Conversion This kit is for either Mopar 8 ¾ or Mopar 9 ¾ (Dana). This kit is designed to work with axles with either GM 5 x 4.75 Bolt Pattern
INSTALLATION INSTRUCTIONS
 INSTALLATION INSTRUCTIONS DISC BRAKE CONVERSION KIT A120-20, A120-21 1964 1 /2-66 Ford & Mercury Thank you for choosing STAINLESS STEEL BRAKES CORPORATION for your braking needs. Pleases take the time
Installation Instructions
 Installation Instructions Rear Disc Brake Conversion Kit Item # RC4001, RC4001X Applications: Mopar 7.25, 8.25, 9.25 Axles Thank you for choosing Leed Brakes for your automotive product needs. Before you
How to Change Front Brake Pads on a Toyota Corolla
 How to Change Front Brake Pads on a Toyota Corolla Link to this article on (All other links in this document are disabled) Follow this picture guide to change the front brake pads on a 2003-2008 Toyota
The following information shows the steps to change the rear brake pads and rotors on an E36 chassis.
 1 of 20 1/18/2010 9:15 PM See More DIY Articles Bookmark Site! The following information shows the steps to change the rear brake pads and rotors on an E36 chassis. Disclaimer: The following information
OVERHAULING BRAKE CALIPERS GUIDE by Mr. Stefnwolf. This guide is for a 1982 GSX750ET but I expect most of the GS series to be similar if not the same.
 OVERHAULING BRAKE CALIPERS GUIDE by Mr. Stefnwolf This guide is for a 1982 GSX750ET but I expect most of the GS series to be similar if not the same. Badly corroded calipers (caused by moisture in the
Ford 8, 9 Small Bearing Installation Instructions Rear Disc Conversion
 Ford 8, 9 Small Bearing Installation Instructions Rear Disc Conversion This kit is for Ford 9 rear axles with the small (2.835 ) style bearing and Ford 8 rear ends. This kit is designed to work with axles
INSTALLATION INSTRUCTIONS
 INSTALLATION INSTRUCTIONS REAR DISC BRAKE CONVERSION KIT A126-1 1973-87 CHEVROLET 1/2 TON 2WD Thank you for choosing STAINLESS STEEL BRAKES CORPORATION for your braking needs. Pleases take the time to
LEXUS IS 250 Front Performance Brake Kit Section I - Installation Preparation
 LEXUS IS 250 Front 2006- Performance Brake Kit Section I - Installation Preparation Part Number: PTR09-53080 Kit Contents Item # Quantity Reqd. Description 1 1 Brake Rotor, LH Front 2 1 Brake Rotor, RH
INSTALLATION INSTRUCTIONS
 INSTALLATION INSTRUCTIONS FX4 ELITE REAR DISC CONVERSION KITS WITH INTERNAL PARKING BRAKE A110-14, A111-25, A111-29 for FORD 8" & 9" REAR ENDS Thank you for choosing STAINLESS STEEL BRAKES CORPORATION
REMOVAL & INSTALLATION
 REMOVAL & INSTALLATION FRONT DISC BRAKE PADS 1. Raise and support front of vehicle. Remove wheels. Remove caliper bolt and brakeline bracket bolts. Pivot caliper aside. Remove pads and pad shim. Remove
Installation Instructions
 86-95 Suzuki Samurai Rear Wheel Bearing Kit (SKU# SAX-RWB) Instructions also include:! Rear Hub Bolt Kit!!!! (SKU# SAX-AS)!! SJ410 Backing Plate!!!! (SKU# SAX-410)! SJ413 Rear Drum Brake Hardware Kit!
Performance Brake Caliper Guide Bushing Set Installation Guide
 Performance Brake Caliper Guide Bushing Set Installation Guide Proper service and repair procedures are vital to the safe, reliable operation of all motor vehicles as well as the personal safety of those
Installation Instructions
 Installation Instructions Rear Disc Brake Conversion Kit Item # RC2001, RC2001X Applications: Mopar 8-3/4 & 9-3/4 Rear Axles Thank you for choosing Leed Brakes for your automotive product needs. Before
INSTALLATION INSTRUCTIONS
 INSTALLATION INSTRUCTIONS POWER FRONT DISC CONVERSION KIT A126-7 1963-66 CHEVY C10 PICKUP NON-POWER FRONT DISC CONVERSION KIT A126-8 1963-72 CHEVY C10 PICKUP Thank you for choosing STAINLESS STEEL BRAKES
Installation Notes: #86000-R Race Series +3.5 L/T Kit
 159 North Maple St. Unit J, CORONA CA 92880 P. 951-737-9682 F. 951-737-9006 WWW.CHAOSFAB.COM Installation Notes: #86000-R Race Series +3.5 L/T Kit Factory manual is recommended for removal and re-installation
DYNATRAC PRODUCTS V5.3
 DYNATRAC PRODUCTS V5.3 2000-2008 Dodge Hub Kit Stage 1 4x4, Front Axle Free Spin Conversion Kit Note: This Kit is not Approved for 2007 & up 3500 Cab and Chassis Trucks Due to a Larger U-Joint (If U-Joint
Installation Instructions
 Suzuki Samurai Rear Disk Brake Kits by Low Range Off Road (SKU# SB-LRD) Also included in the instructions are:!!! SB-LRDB Suzuki Samurai Disk Brake Bracket Kit by Low Range Off Road!!! SB-LRDB-FK-1 Suzuki
55-64 Full Size GM (Impala, Bel Air, etc.) This kit is for axles with a 3 3/8 spread center to center on the top two bolt holes (pictured left).
 This kit is for axles with a 3 3/8 spread center to center on the top two bolt holes (pictured left).") SUM-BK1624A Full Size GM Installation Instructions Rear Disc Conversion 55-64 Full Size GM (Impala, Bel Air, etc.) This kit is for axles with a 3 3/8 spread center to center on the top two bolt holes (pictured
SUM-BK1624A Full Size GM Installation Instructions Rear Disc Conversion 55-64 Full Size GM (Impala, Bel Air, etc.) This kit is for axles with a 3 3/8 spread center to center on the top two bolt holes (pictured
Mustang 7.5 Limited Slip Differential (28 Spline) V8; V6:
 V8; V6:") Mustang 7.5 Limited Slip Differential (28 Spline) 79-85 V8; 86-10 V6: Required Tools: Ratchet Wrench Torque Wrench 1/2", 5/16, 3/4", 12mm and 15mm Sockets Lug nut Wrench Dial Indicator Digital Measuring
Mustang 7.5 Limited Slip Differential (28 Spline) 79-85 V8; 86-10 V6: Required Tools: Ratchet Wrench Torque Wrench 1/2", 5/16, 3/4", 12mm and 15mm Sockets Lug nut Wrench Dial Indicator Digital Measuring
A /F/X Body Instruction Packet Rear Disc Conversion
 A /F/X Body Instruction Packet Rear Disc Conversion 64-72 A Body / 67-81 F Body / 62-74 X Body This kit is for axles with a 3 1/8 spread center to center on the top two bolt holes (pictured left). Rotor
60 76 A Body Mopar Power Disc Conversion Installation Instructions
 62-72 B & E BodyMopar 60 76 A Body Mopar Power Disc Conversion Installation Instructions Special A-Body only parts shown below (In addition to parts above for A-Body cars, part # MDC66DC & MDC46DC) Your
INSTALLATION INSTRUCTIONS
 INSTALLATION INSTRUCTIONS PERFORMANCE AT THE WHEELS KITS W156-6 & W156-7 1965-74 MOPAR B & E BODY Thank you for choosing STAINLESS STEEL BRAKES CORPORATION for your braking needs. Pleases take the time
55-64 Full Size Chevy
 55-64 Full Size Chevy Installation Instructions Power Disc Conversion 9 slimline booster pictured Your new disc brake conversion kit can be bolted up with standard hand tools. The only tools you may not
J&M Stainless Steel Teflon Brake Lines - Front (94-98 Cobra)
") J&M Stainless Steel Teflon Brake Lines - Front (94-98 Cobra) Time Required: 30min-1 hour. Tools and Supplies Required: Jack Jack Stands Lug Wrench or 13/16 Socket 10mm Socket Socket Wrench Torque Wrench
J&M Stainless Steel Teflon Brake Lines - Front (94-98 Cobra) Time Required: 30min-1 hour. Tools and Supplies Required: Jack Jack Stands Lug Wrench or 13/16 Socket 10mm Socket Socket Wrench Torque Wrench
EGR Performance Brakes Assembly Instructions DODGE DANA 70 '87 - '93 (Will not fit stock sized dual rear wheels)
") EGR Performance Brakes Assembly Instructions DODGE DANA 70 '87 - '93 (Will not fit stock sized dual rear wheels) Got Brakes? Parts List (2) Vented Rotors (2) Multi hole Cable Mount & L Brkt (2) Axle Tube
EGR Performance Brakes Assembly Instructions DODGE DANA 70 '87 - '93 (Will not fit stock sized dual rear wheels) Got Brakes? Parts List (2) Vented Rotors (2) Multi hole Cable Mount & L Brkt (2) Axle Tube
INSTALLATION INSTRUCTIONS
 INSTALLATION INSTRUCTIONS R1 REAR DRUM TO DISC BRAKE CONVERSION KIT A130-3 JEEP CJ SERIES W/AMC-20 REAR AXLES AND 5 x 5-1/2" BOLT CIRCLE Thank you for choosing STAINLESS STEEL BRAKES CORPORATION for your
A/F/X Body GM Installation Instructions Power Disc Conversion
 A/F/X Body GM Installation Instructions Power Disc Conversion 64-72 A Body / 67-69 F Body / 62-74 X Body DBMC09, PVK71 & RPB1001 pictured above (Booster, master & valve setups may vary by upgrades selected)
INSTALLATION INSTRUCTIONS
 INSTALLATION INSTRUCTIONS REAR DISC BRAKE CONVERSION KIT A157 1991-2004 Dodge Dakota 2WD 1991-2002 Dodge Dakota 4WD 1998-2002 Dodge Durango Thank you for choosing STAINLESS STEEL BRAKES CORPORATION for
WARNING: Only perform this installation if you are experienced, fully equipped mechanic.
 DYNATRAC V3.2 2005-Present Ford Super Duty 250/350-4x4, Front Axle, Free Spin Conversion Kit Some of the less common tools, which will be required: 6 point Spanner socket (OTC #7090-A or equivalent). These
RHINO SUSPENSION SYSTEM INSTALLATION INSTRUCTIONS
 PARTS INCLUDED: 2 FRONT UPPER A-ARMS 2 FRONT LOWER A-ARMS 2 UNI-BALL JOINTS 2 UNI-BALL JOINT STUDS 2 UNI-BALL JOINT CAPS 2 RETAINING RINGS 1 FRONT SHOCK ASSEM. 2 DELRON STEERING STOPS 2 SHOCK MOUNT SPACERS
TOYOTA TUNDRA BIG BRAKE KIT Section I - Installation Preparation
 TOYOTA TUNDRA 2007- BIG BRAKE KIT Section I - Installation Preparation Part Number: PTR09-34070 Kit Contents Item # Quantity Reqd. Description 1 1 Brake Rotor, LH Front 2 1 Brake Rotor, RH Front 3 1 Brake
Front Suspension Redo
 Front Suspension Redo Message: First, thanks to all the previous posters for guidance in my doing the suspension. As thanks, here s the updated document for doing the front suspension. Procedure: While
55-64 Full Size Chevy Installation Instructions Standard Disc Conversion
 55-64 Full Size Chevy Installation Instructions Standard Disc Conversion DBMC09, PV71 & PVB71 Pictured (Booster, master cylinder & valve setups may vary by upgrades selected) Your new disc brake conversion
INSTALLATION INSTRUCTIONS
 INSTALLATION INSTRUCTIONS REAR DRUM TO DISC BRAKE CONVERSION KIT A118 pre-1985 Ford F150 (except 1983-1984 w/super H/D axle) Thank you for choosing STAINLESS STEEL BRAKES CORPORATION for your braking needs.
NEW BRAKE INSTALLATION. Let us show you how a
 Tech Article From Newsletter 17.2-2nd Quarter of 2011 NEW BRAKE INSTALLATION Let us show you how a Big Brake Install is easier than you think!! So, you have a 572 (or a hot 383) in your shoebox... you
A proportioning valve is used to regulate brake pressure between front and rear brakes. Rear brakes on all models are self-adjusting.
 Page 1 of 21 ARTICLE BEGINNING DESCRIPTION & OPERATION WARNING: For warnings and procedures regarding vehicles equipped with Anti- Lock Brake Systems (ABS), see ANTI-LOCK BRAKE SYSTEM article in the BRAKES
Installation Instructions
 Instructions Created by an: 86-95 Suzuki Samurai Samurai Front Axle Knuckle Rebuild Kits (SKU# SAX-KRK) Installation Instructions Revised 6-6-14 Suggested Tools: CAUTION: Safety glasses should be worn
Installation Instructions
 Installation Instructions Rear Disc Brake Conversion Kit Item # RC1001, RC1001X Applications: 64-72 A-body, 67 F-Body, 63-67 X-body with Non Staggered Shocks Thank you for choosing GPS Auto for your automotive
Mirrored from:
 Mirrored from: http://www.wranglerforum.com/f274/install-synergy-suspension-ball-joints-write-up-147062.html 03-18-2012, 02:43 AM #1 SilverSport Supporting Member WF Supporting Member Install Synergy Suspension
Brake Caliper Rebuild - Part Numbers & Tips Per Jim Millet, 3/15/2005
 Per Jim Millet, 3/15/2005 Not too difficult a job. Rears are easier than fronts to access. You ll need the following gasket sets: Front caliper gasket set, P/N 34 11 1 157 037, MSRP $13.58 Rear caliper
Changing the Struts on a WK Jeep CRD
 Changing the Struts on a WK Jeep CRD Step by Step By Chirpz Disclaimer: I do not claim that this procedure is the right way or even the best way to change your struts. This is what I did after reading
Brake Fluid Exchange
 Brake Fluid Exchange OJT / Practice DTOG Proficiency Exam Date: Trainee: Trainer: Service Center: Brake Fluid Exchange 1. Prepare for service Wear proper Personal Protective Equipment Recommended PPE:
Signature Series A/F/X Body GM Installation Instructions Power Disc Conversion
 Signature Series A/F/X Body GM Installation Instructions Power Disc Conversion 64-72 A Body / 67-69 F Body / 62-74 X Body Your new disc brake conversion kit can be bolted up with standard hand tools. The
INSTALLATION INSTRUCTIONS
 INSTALLATION INSTRUCTIONS PERFORMANCE AT THE WHEELS KIT W155-5 CHRYSLER 8 3 /4" & 9 3 /4" REAR AXLES Thank you for choosing STAINLESS STEEL BRAKES CORPORATION for your braking needs. Please take the time
DYNATRAC PRODUCTS V1.3
 DYNATRAC PRODUCTS V1.3 2007-2017 Jeep JK Wrangler ProGrip Performance Brake Kit Front & Rear Required tools: 13mm wrench 15mm wrench 18mm socket 21mm socket Calibrated torque wrench. Anti-Seize compound.
M-2300-T 6-Piston Mustang Brake Kit INSTALLATION INSTRUCTIONS
 Please visit www.fordracingparts.com for the most current instruction information!!! PLEASE READ ALL OF THE FOLLOWING INSTRUCTIONS CAREFULLY PRIOR TO INSTALLATION. AT ANY TIME YOU DO NOT UNDERSTAND THE
Ford Racing Front Rotor Upgrade Kit (05-10 V6) Installation Instructions
 Installation Instructions") Ford Racing Front Rotor Upgrade Kit (05-10 V6) Installation Instructions Time Necessary: Approximately 1.5 hours Tools Required: 15 MM Socket Ratchet PryBar Floor Lift or: o Floor Jack o (2) Jack Stands
Ford Racing Front Rotor Upgrade Kit (05-10 V6) Installation Instructions Time Necessary: Approximately 1.5 hours Tools Required: 15 MM Socket Ratchet PryBar Floor Lift or: o Floor Jack o (2) Jack Stands
INSTALLATION INSTRUCTIONS
 INSTALLATION INSTRUCTIONS FRONT DISC BRAKE CONVERSION KIT A129-2 1959-64 Full Size Chevrolet Car and FRONT DISC BRAKE CONVERSION KITS A129-3 & A129-4 1965-68 Full Size Chevrolet Car Thank you for choosing
Instructions Suzuki Samurai Brake System Bleeding. Suggested Tools:
 86-95 Suzuki Samurai Brake System Bleeding Instructions CAUTION: Safety glasses should be worn at all times when working with vehicles and related tools and equipment. Suggested Tools: Brake Fluid, DOT
DYNATRAC V6.0. WARNING: Only perform this installation if you are experienced, fully equipped mechanic.
 DYNATRAC V6.0 1999-2004 Ford Super Duty 250/550-4x4, Front Axle, Free Spin Conversion Kit Some of the less common tools, which will be required: 6 point Spanner socket (OTC #7090-A or equivalent) OR 4
INSTALLATION INSTRUCTIONS
 INSTALLATION INSTRUCTIONS REAR DISC BRAKE CONVERSION KIT A125-3 1965-72 GM A-BODY 10 & 12 BOLT AXLES Thank you for choosing STAINLESS STEEL BRAKES CORPORATION for your braking needs. Pleases take the time
INSTALLATION INSTRUCTIONS
 INSTALLATION INSTRUCTIONS FRONT BIG BRAKE CONVERSION KIT A112-5 1987-93 FORD MUSTANG Thank you for choosing STAINLESS STEEL BRAKES CORPORATION for your braking needs. Pleases take the time to read and
INSTALLATION INSTRUCTIONS
 INSTALLATION INSTRUCTIONS FRONT DISC BRAKE CONVERSION KITS A148-9 & A148-15 1949-54 Chevy Trucks Thank you for choosing STAINLESS STEEL BRAKES CORPORATION for your braking needs. Please take the time to
SCOTT S HOTRODS n CUSTOMS STANDARD FRONT STEER IFS INSTALLATION INSTRUCTIONS 1
 SCOTT S HOTRODS n CUSTOMS STANDARD FRONT STEER IFS INSTALLATION INSTRUCTIONS 1 Installation Manual for Scott s Hotrods Standard Front Steer IFS ***READ THIS FIRST*** Check the parts list thoroughly to
Mopar 8 3/4 & 9 3/4 (Dana) Installation Instructions Rear Disc Conversion
 Installation Instructions Rear Disc Conversion") Mopar 8 3/4 & 9 3/4 (Dana) Installation Instructions Rear Disc Conversion This kit is for either Mopar 8 ¾ or Mopar 9 ¾ (Dana). This kit is designed to work with axles with either GM 5 x 4.75 Bolt Pattern
Mopar 8 3/4 & 9 3/4 (Dana) Installation Instructions Rear Disc Conversion This kit is for either Mopar 8 ¾ or Mopar 9 ¾ (Dana). This kit is designed to work with axles with either GM 5 x 4.75 Bolt Pattern
GM FULL SIZE REAR DISC BRAKE KIT
 GM FULL SIZE REAR DISC BRAKE KIT This kit is for axles with a 3 3/8 spread center to center on the top two bolt holes (pictured left). If your axle flange measures 3 1/8 from center to center, you need
VW & Audi TDI CR140 ECO KIT Installation Guide
 VW & Audi TDI CR140 ECO KIT Installation Guide This guide is to help you install your new Rawtek DPF, EGR & Adblue Delete Exhaust ECO Kit on your (2009-2014) VW / Audi with 2.0l CR140 Diesel Engine. Note:
BIG BRAKE KIT FOR TJ, ZJ, XJ D44 & D30
 BIG BRAKE KIT FOR TJ, ZJ, XJ D44 & D30 16 KIT PART NUMBER 41002010AA 17 KIT PART NUMBER 41002015AA Installation Guide (Updated 12/01/09) Page 1 of 11 PLEASE READ BEFORE YOU START IN ORDER TO INSTALL THIS
INSTALLATION INSTRUCTIONS
 INSTALLATION INSTRUCTIONS REAR DISC CONVERSION KIT A136-1 1976-86 AMC 20 AXLES WITH WARN FULL FLOATING AXLE CONVERSION Thank you for choosing STAINLESS STEEL BRAKES CORPORATION for your braking needs.
INSTALLATION INSTRUCTIONS
 INSTALLATION INSTRUCTIONS REAR DISC BRAKE CONVERSION KIT A158 1994-97 Dodge Ram 1500 (2WD & 4WD) and REAR DISC BRAKE CONVERSION KIT A158-1 1998-01 Dodge Ram 1500 (2WD & 4WD) Thank you for choosing STAINLESS
Eibach Pro-System-Plus
 Eibach Pro-System-Plus Tools : - Floor Jack - 3 Jack Stands (4 preferred) - 2 wheel stoppers - Car wrench set - Fire torch - Bolt thread locker (use on every bolt you tight) Disclaimer: This guide is not
Maximum Motorsports Camber Caster Plates (05-10):
:") Maximum Motorsports Camber Caster Plates (05-10): Tools Required: Lug Wrench 21mm Deep Socket 18mm Deep Socket 15mm Deep Socket 17mm Socket 13mm Socket 10mm Socket Torque Wrench (requires 166lb-ft capacity
Maximum Motorsports Camber Caster Plates (05-10): Tools Required: Lug Wrench 21mm Deep Socket 18mm Deep Socket 15mm Deep Socket 17mm Socket 13mm Socket 10mm Socket Torque Wrench (requires 166lb-ft capacity
INSTALLATION INSTRUCTIONS
 INSTALLATION INSTRUCTIONS COMP. R AND COMP. S QUICK CHANGE KITS A200, A200-1 Thank you for choosing STAINLESS STEEL BRAKES CORPORATION for your braking needs. Pleases take the time to read and carefully
SCION tc BIG BRAKE KIT Section I - Installation Preparation
 SCION tc 2005- BIG BRAKE KIT Section I - Installation Preparation Part Number: PTR09-21080 Kit Contents Item # Quantity Reqd. Description 1 1 Brake Rotor, LH Front 2 1 Brake Rotor, RH Front 3 1 Brake Caliper
Full Size GM Installation Instructions
 Full Size GM Installation Instructions Rear Disc Conversion 55 64 Full Size GM (Impala, Bel Air, etc.) This kit is for axle with a 3 3/8 spread center to center on the top two bolt holes (pictured left).
1986 Rear Disk Brake Upgrade. All hard lines mounted to the rear axle with mounting screws. 1/4" fittings
 1986 Rear Disk Brake Upgrade Being well prepared for a project of this size is the key to success. I thought I was well prepared by doing a lot of research and getting all of the required parts before
A. Adapter A metal component that fastens the caliper to the knuckle. Some brake systems do not use adapters.
 BRAKES UNIT 5: DISC BRAKE DIAGNOSIS AND REPAIR LESSON 3: SERVICE DISC BRAKE CALIPERS I. Terms and definitions A. Adapter A metal component that fastens the caliper to the knuckle. Some brake systems do
BRAKE SYSTEM Return To Main Table of Contents
 BRAKE SYSTEM Return To Main Table of Contents GENERAL... 2 BRAKE PEDAL... 10 MASTER CYLINDER... 13 BRAKE BOOSTER... 16 BRAKE LINE... 18 PROPORTIONING VALVE... 19 FRONT DISC BRAKE... 20 REAR DRUM BRAKE...
INSTALLATION INSTRUCTIONS
 INSTALLATION INSTRUCTIONS FORCE 10 SPORT R1 REAR DISC CONVERSION KIT A126-50 2005-10 Chevrolet Silverado and GMC Sierra Thank you for choosing STAINLESS STEEL BRAKES CORPORATION for your braking needs.
Rear End Installation and Bearing Kit - 8.8in (86-12 V8; V6)
") Rear End Installation and Bearing Kit - 8.8in (86-12 V8; 11-13 V6) Tools Required: Jack Stands 5 Floor Jack 2 Oil Pans 1 Wheel Blocks 2 Differential Oil 3 qts Friction Modifier 3 bottles Tube of Black
Rear End Installation and Bearing Kit - 8.8in (86-12 V8; 11-13 V6) Tools Required: Jack Stands 5 Floor Jack 2 Oil Pans 1 Wheel Blocks 2 Differential Oil 3 qts Friction Modifier 3 bottles Tube of Black
PRE-INSTALLATION. INSTALLATION INSTRUCTIONS STEP 1: Park vehicle on level surface and chock rear wheels.
 2007-2013 7.5" GMC/Chevrolet 1500 4WD Suspension Lift kit PRE-INSTALLATION 15004 2 - Cross-member (Fr/Rr) 2 - Sway Bar Drop Bracket 2 - Knuckle (Dr/Pass) 1 - Driver Diff. Bracket 1 - Passenger Diff. Bracket
INSTALLATION INSTRUCTIONS R1 REAR CONVERSION KIT
 INSTALLATION INSTRUCTIONS R1 REAR CONVERSION KIT INSTRUCTION FOR ASSEMBLY OF JEEP CJ SERIES W/AMC 20 REAR AXLES, 5 x 5-1/2" BOLT CIRCLE WITH A130-4 FULL FLOATING AXLE OR A130-5 (1 PIECE AXLE) Thank you
INSTALLATION INSTRUCTIONS
 INSTALLATION INSTRUCTIONS REAR DISC BRAKE CONVERSION KIT A126-3 1988-98 CHEVY K1500 4WD 10" DRUMS Thank you for choosing STAINLESS STEEL BRAKES CORPORATION for your braking needs. Pleases take the time
Self Adjusting Disc Brakes
 Disc Brakes Four advantages of Disc Brakes to Drum Brakes 1) Resistance to heat fade 2) Resistance to water fade 3) Less of a tendency to pull 4) Automatically adjust to lining wear Self Adjusting Disc
COBB Tuning Catback Exhaust System MAZDASPEED3
 572101 COBB Tuning Catback Exhaust System 2010+ MAZDASPEED3 Congratulations on your purchase of the COBB Tuning SS Catback Exhaust System for your 2010+ MAZDASPEED3. The following instructions will assist
INSTALLATION INSTRUCTIONS
 INSTALLATION INSTRUCTIONS COMP CALIPER QUICK CHANGE KIT A213 1968-73 MUSTANG Thank you for choosing STAINLESS STEEL BRAKES CORPORATION for your braking needs. Pleases take the time to read and carefully
DBK FULL-SIZE CHEVY DISC BRAKE conversion KIT
 DBK5964 1959-1964 FULL-SIZE CHEVY DISC BRAKE conversion KIT impala, bel air, biscayne Installation Instructions does not fit 14" rims must ust 15" or larger for this kit to be installed correctly on your
M-2300-M Mustang GT Rear Disc Brake Bracket Kit INSTALLATION INSTRUCTIONS
 Please contact the Tech Line for the most current instruction information (800) 367-3788!!! PLEASE READ THE FOLLOWING INSTRUCTIONS CAREFULLY PRIOR TO INSTALLATION!!! INTRODUCTION: This kit allows for the
Turboback Exhaust
 501301 Turboback Exhaust 2014+ Ford Fiesta ST 501200 High Flow Catted Downpipe Page 2 501100 Catback Exhaust System Page 10 501200 High Flow Catted Downpipe 2014+ Ford Fiesta ST Congratulations on your
XJ CHEROKEE LIFT KIT
 921633XN200 Thank you for choosing Rough Country for your suspension needs. 84-01 4.5 XJ CHEROKEE LIFT KIT Rough Country recommends a certified technician installs this system. In addition to these instructions,
BMW 745Li E65/E66 Rear Brake Pad Replacement By Jerry Incollingo (Jerry 745Li)
") Page 1 of 11 BMW 745Li E65/E66 Rear Brake Pad Replacement By Jerry Incollingo (Jerry 745Li) This guide will detail how to change the rear brakes on late model BMW E65 / E66 s. It was performed on a 2003
Page 1 of 11 BMW 745Li E65/E66 Rear Brake Pad Replacement By Jerry Incollingo (Jerry 745Li) This guide will detail how to change the rear brakes on late model BMW E65 / E66 s. It was performed on a 2003