Elite Skimmer Installation Manual. Manufacturers of Quality Pond Equipment & Supplies Item #PBESIM
|
|
|
- Joseph Edwards
- 5 years ago
- Views:
Transcription


1 Elite Skimmer Installation Manual Manufacturers of Quality Pond Equipment & Supplies Item #PBESIM


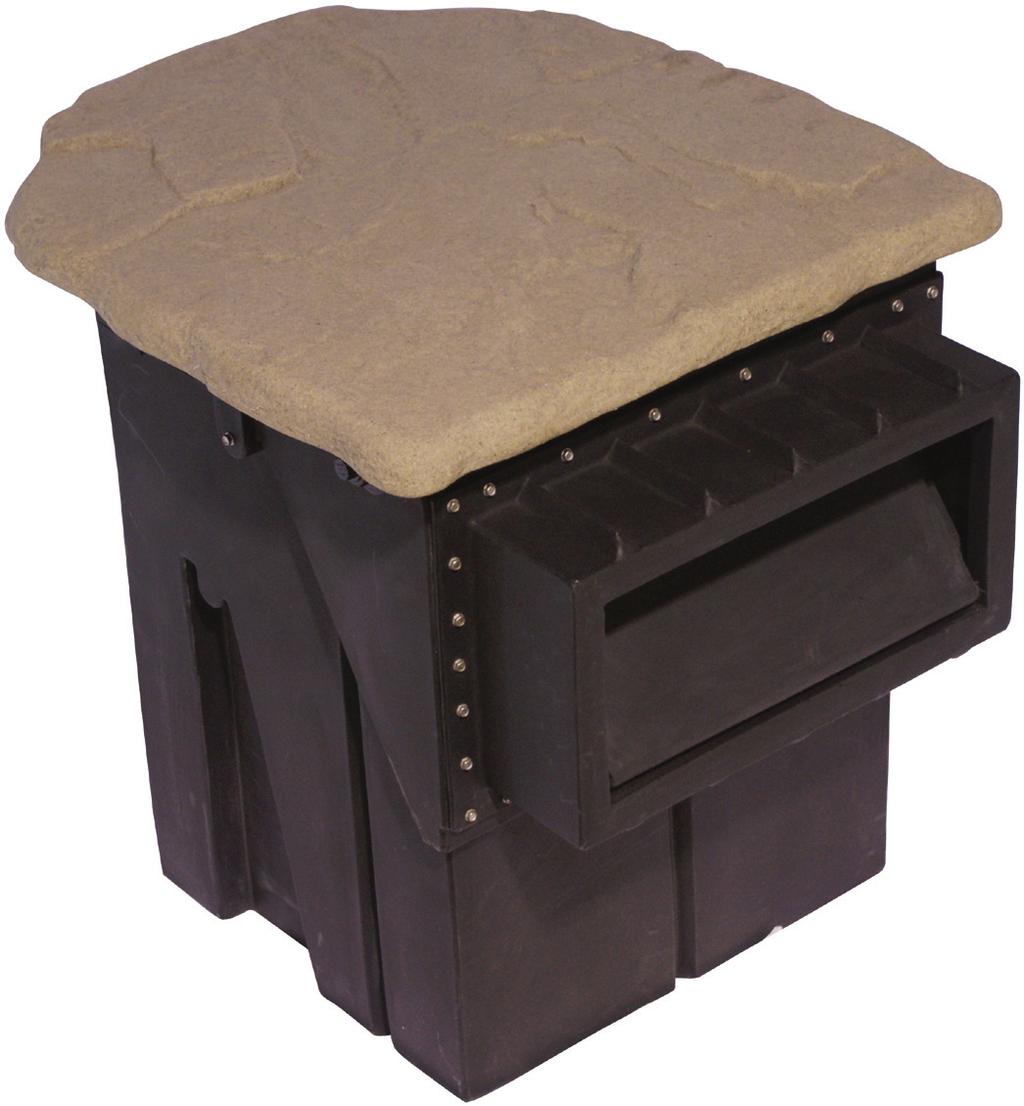
2 A C G B F E D H I A B C D Biological Waterfall Box Filters harmful waste and toxins from water, keeping your pond clean and clear. Provides excellent surface area for beneficial bacteria growth while making a simple and artistic way of creating a waterfall. Easy to camouflage-especially when using the Landscape Lid. Black PVC Flex Hose Carries water from skimmer box up to the biological waterfall box. Much easier to install than rigid PVC. Aquatic Plants Add beauty to any pond! Plants can be placed throughout or along the pond s edge. There are many varieties: floating, marginal, sinking, oxygenators and lilies. Watergarden kits are great when your desire is to keep many colorful and beautiful aquatic plants. Rocks & Gravel Provides additional surface area for beneficial bacteria to colonize. Protects liner from harmful UV rays and damage from animals. Creates a very natural look. E F G H I Fish Adding colorful koi and goldfish creates an even more dramatic display. Watergardens are great for Goldfish and Koi. High-Efficiency Pump Pump sits in back pump chamber protected from clogging by nets and filter mats. PondBuilder pumps are recommended as they will use far less electricity and are meant to operate continuously. Mechanical Skimmer Box Simplifies routine maintenance by removing floating debris before it sinks to the bottom of the pond. Protects the pump and hides unsightly plumbing. Protective Underliner A non-woven, protective underliner fabric forms a soft padding for the liner. Fish-Friendly Rubber Liner Super-strong Rubber EPDM liner is the best choice when building a pond. Very flexible - conforms to pond s curves and slopes. Choose Skimmer Location 1a. a. The skimmer should be positioned at the pond edge, opposite the waterfall, to circulate the water properly.


3 Excavation of Skimmer Area a. Set skimmer box in intended area and spray outline of skimmer for area to be excavated. b. The skimmer should be positioned so that the face of the skimmer will meet with the pond liner at the side of the pond. Excavate the hole a few inches larger than the width and length of the skimmer box. c. The skimmer should be set at a depth that positions the top of the skimmer box approximately 5 above your desired pond water level. This will set your water level 1 below the top edge of the snout opening allowing clearance for surface debris to flow into the skimmer during normal operation. 2a. 2b. 2c. Install Overflow Assembly a. From inside the skimmer, screw the threaded PVC 90 degree elbow into the overflow spinweld located on the back of the skimmer box (use Teflon tape on the threads). You can rotate the elbow fitting to one side to control the pond water level. The water level in the pond and skimmer will be able to rise until it begins overflowing into the top of the elbow. The further the elbow is angled down the lower the maximum pond water level will be maintained. Use additional flexible hose to take overflow water from skimmer to drainage or low area. 3a.
.")


.")


4 b. From outside the skimmer, screw the male adapter into the overflow spinweld (use Teflon tape on the threads). Then glue flexible PVC hose into the male adapter and run the hose to wherever you d like the overflow water to drain to. 3b. Insert UniSeal Fittings 4a. a. From outside the skimmer, insert the UniSeal rubber fittings into the pipe discharge holes of the skimmer. When you are ready to run your pipe into your skimmer you will slide the pipe in through the UniSeal (you may need to lubricate the UniSeal slightly to slide the pipe through). If you are only using one discharge line insert the PVC slip plug into the unused UniSeal. Install Automatic Water Fill Assembly a. If you have purchased the optional PondBuilder Automatic Water Fill Assembly for this system install it now using the instructions provided with the auto-fill kit. b. If you are not using the auto-fill kit, from the outside of the skimmer, install the plug into the auto-fill spin weld. 5b. Position & Backfill Skimmer a. Your skimmer should be level from front to back and side to side. b. Make sure the base below your skimmer is compacted well to prevent settling in the future. 6a.


5 c. Once the skimmer is properly positioned insert the support pipe and begin fi lling the soil in around the back and sides. Be sure to pack the soil as you go to help keep the skimmer in position and to limit any settling around the skimmer. You should pack the soil tight enough so that the skimmer is held in position tightly but not so much as to distort the sides of the skimmer. d. When installing the larger skimmers, it helps to have someone stand inside the skimmer during the backfi ll process to keep the skimmer from moving while you are packing the dirt around it. 6d. Attach Rubber Liner to Skimmer a. Bring the liner up to the skimmer and check the positioning of the liner against the skimmer. Use the liner clips to temporarily hold the liner to the face of the skimmer. Be sure the liner follows the contours of the pond and the face of the skimmer. It is a good idea to leave a little slack in the liner where it transitions from the pond ledge to the face of the skimmer. This will ensure that the weight of any rockwork and water in the pond do not pull down on the liner where it is attached to the skimmer. b. Kneel in front of the skimmer and have the following within reach: cordless screwdriver (set to lowest torque), 5/16 nut driver bit, 3 bit extension, plastic nail (included), skimmer snout (included), silicone (included), stainless steel self-drilling screws (included), black vinyl screw caps (included), utility knife (with new blade), & a clean rag. c. Kneeling in front of the skimmer remove the liner clips and fold the liner back toward you leaving it rest on your lap. Using the clean rag wipe down the face of the skimmer. Also, wipe the surface of the liner that will be coming in contact with the area you cleaned on the skimmer box. 7a. 7c.


.")


6 7d. 7e. 7f. 7f. 7g. d. Apply a bead of silicone along the sides and bottom of the opening of the face of the skimmer. Use one of the two guide holes at the top corners of the opening as the starting point and begin by running your bead straight down from that point. The bead of silicone should be about an inch out from the edge of the opening; this will position it in-line with the screws when we attach the skimmer snout. e. Bring the liner back up into position against the face of the skimmer. Hold the liner in place again with the liner clips to help keep it from moving around as we prepare to attach the snout. Gently run your fingers along the liner over the area you applied the silicone and flatten the bead out slightly. This will help ensure a more even distribution of the silicone as we compress it while screwing down the snout. f. Push the guide nails through the guide holes and liner from the inside of the skimmer (this will puncture a small hole in the liner). Place the snout into position by sliding the top corner holes of the snout over the guide nails. (The snout should be installed so that the snout door hinges at the bottom). While holding the snout in position remove one of the guide nails and drive the first screw into that hole. Keeping the snout in position, remove the other guide nail and drive a screw into the second guide hole. With the snout now held into position by the first two screws, continue driving the remaining screws into the pre-drilled holes around the snout. Be sure to install screws into all pre-drilled holes to prevent water from leaking around the snout. g. From inside the skimmer use your utility knife to cut out the liner in the snout area so water can flow from the pond into the skimmer. Simply follow the edge of the skimmer opening with your knife to cut away liner. This works best with a new, sharp blade.


7 h. At this time you can also trim away any excess liner that extends above the front top edge of the skimmer box. i. Use your remaining silicone to run an additional bead along the joint inside of the snout where the skimmer, liner, and snout come together. Use your finger to smooth out the excess silicone. 7h. Install Black Screw Caps a. Push the black screw caps onto each of the screw tips on the inside of the skimmer box. We recommend placing a small dab of silicone on the end of the screw first before pushing the black cap over the screw. This will help keep the screw caps in place. Install Submersible Pump 7i. 8a. (not included) a. Screw your pre-assembled pump discharge assembly into your pump. b. Position your pump and discharge assembly in the back chamber of the skimmer so that the top of the discharge assembly faces your chosen discharge hole. c. Bring the flexible pipe into the skimmer through the discharge hole/uniseal and attach it to your discharge assembly. d. Run the pump power cord over to the power source and position the cord so that it transitions out of the skimmer at the cord notch; this will allow the Natural Landscape Lid to sit flush on the skimmer. 9a. 9c. 9d.


8 Finishing Touches 10a. 10b. 10d. a. Slide the mechanical media mat into position. b. Slide the black mesh skimmer net into position. c. During normal operation the skimmer net will remove larger leaves and debris while the mat will remove the smaller particles allowing the clean water to flow into the pump chamber area where it can be recirculated back to the pond, preferably via the appropriately sized PondBuilder Biological Waterfall Filter. d. Place Natural Landscape Lid on top of skimmer to disguise the skimmer within the landscape. View the skimmer attachment steps and a complete water garden installation on the PondBuild n Steps DVD. a. Remove Net & Mat to Clean: The net & mat located inside your skimmer will become filled with leaves and other debris. Unplug your pump so that the skimmer is no longer operating. Remove the debris net and mat and clean. Reinstall the net and mat into position and plug your pump back in. Manufacturers of Quality Pond Equipment & Supplies
Product Manual PS3900 / PS4600 / PS7000 / PS15000 / BF1600 / BF1900 / BF2600 / BF
 WG Product Manual PS3900 / PS4600 / PS7000 / PS15000 / BF1600 / BF1900 / BF2600 / BF3800 1.330.274.8317 www.atlanticwatergardens.com Table of Contents Pond Volume... 2 Surface Area... 3 Streambed Construction...
Product Manual Manuel du Produit Manual del Producto
 WG Product Manual Manuel du Produit Manual del Producto PS3900 / PS4600 / PS7000 / PS15000 / BF1600 / BF1900 / BF2600 / BF3800 1.330.274.8317 www.atlanticwatergardens.com Table of Contents Product Overview...Page
PRO-MAX ULTRAVIOLET STERILIZER
 PRO-MAX ULTRAVIOLET STERILIZER Lifegard Aquatics introduces the Pro-MAX UV Sterilizer, featuring a patent-pending, flow-through design with less restrictive angled inlet and outlet ports requiring less
MASTER COALESCER JR & PORTABLE MASTER COALESCER JR AIR PUMP MODEL INSTALLATION MANUAL
 MASTER COALESCER JR & PORTABLE MASTER COALESCER JR AIR PUMP MODEL INSTALLATION MANUAL INSTALLATION: CHOOSING THE LOCATION: Locate the coalescer as near to the intended point of use as possible. Avoid high
FiltoSkim Operating instructions Notice d emploi Instrucciones de uso
 FiltoSkim 3000 Operating instructions Notice d emploi Instrucciones de uso REMINDER CALL 1-866-627-3435 BEFORE RETURNING TO STORE. Part Description QTY A Skimmer 1 B Debris basket 1 C Cover 1 D Adapter
HydroCycle Vertical NFT Lettuce & Herb Systems
 HydroCycle Vertical NFT Lettuce & Herb Systems 2016 Growers Supply All Rights Reserved. Reproduction is prohibited without permission. STK# DIMENSIONS 11510950 51" W x 80" H x 58" L* *Dimensions have been
PRE-PLUMBED SEWAGE SYSTEM
 PRE-PLUMBED SEWAGE SYSTEM Zoeller is a registered trademark of Zoeller Co. All Rights Reserved. MODEL #1910-0009 Español p. 13 ATTACH YOUR RECEIPT HERE Serial Number Purchase Date Questions, problems,
P.O. Box East F St. Suite B Oakdale, Ca
 P.O. Box 1476 1006 East F St. Suite B Oakdale, Ca. 95361 randy@rpmracingca.com http://www.rpmracingca.com Thank you for purchasing the RPM oil cooler kit. These instructions are designed and written to
200 / 300 Overflow / By-Pass Kits
 NEXOF21311131MAN NEXUS 210 / 310 UPGRADE KIT INSTALLATION 200 / 300 Overflow / By-Pass Kits Installation and instruction manual for: Nexus Overflow / Universal By-Pass Kits (Adds an Overflow / By-Pass to
PRESSURIZED DIATOMACEOUS EARTH FILTER SYSTEM
 PRESSURIZED DIATOMACEOUS EARTH FILTER SYSTEM This filter system is designed for use with aboveground and semi-inground swimming pools. DO NOT operate this filter system without adding D.E. as it will cause
FPU SYSTEMS OPERATION MANUAL BOH PORTABLE DRAWER MODULE (PDM) (INCLUDING REPAIR PARTS & SPECIAL TOOL LIST) BOH FPU Field Pack-up Units CHAPTER 5
 (INCLUDING REPAIR PARTS & SPECIAL TOOL LIST) BOH FPU Field Pack-up Units CHAPTER 5") FPU SYSTEMS OPERATION MANUAL BOH PORTABLE DRAWER MODULE (PDM) (INCLUDING REPAIR PARTS & SPECIAL TOOL LIST) BOH FPU Field Pack-up Units CHAPTER 5 UNIT MAINTENANCE INSTRUCTIONS 06 BOH Environmental LLC This
FPU SYSTEMS OPERATION MANUAL BOH PORTABLE DRAWER MODULE (PDM) (INCLUDING REPAIR PARTS & SPECIAL TOOL LIST) BOH FPU Field Pack-up Units CHAPTER 5 UNIT MAINTENANCE INSTRUCTIONS 06 BOH Environmental LLC This
HydroCycle 6" Pro NFT Lettuce Systems
 HydroCycle 6" Pro NFT Lettuce Systems Designed to grow healthy plants without soil using mineral-nutrient solutions. 2016 Growers Supply All Rights Reserved. Reproduction is prohibited without permission.
Installation Guide Current Ford F-250 & Ford F-350 Super Duty. Product Code: 109 & 119
 Installation Guide 2008 - Current Ford F-250 & Ford F-350 Super Duty Product Code: 109 & 119 September 1, 2012 Tools Needed Components Included 3/8" Drill P2 Tip #2 Philips Screwdriver 1/2" Drill Bit Hinged
INSTALLATION GUIDES OUTDOOR LIVING
 S OUTDOOR LIVING TABLE OF CONTENTS 12 Volt 12 Watt DC Transformer Page 2 12 Volt 50 Watt DC Smart Transformer Page 3 12 Volt 50 Watt Smart Transformer Control Page 4-5 Waterproof Dimmer For 12W Transformer
RAINWATER HARVESTING INSTALLATION GUIDE RH High Capacity Vortex Rainwater Fine Filter for Above or Below Grade Application
 RAINWATER HARVESTING INSTALLATION GUIDE RH9521-12 High Capacity Vortex Rainwater Fine Filter for Above or Below Grade Application RH9521-12 Vortex Filter Operation and Maintenance Overview The RH9521-12
House Hydrant Installation Instructions
 House Hydrant Installation Instructions Please read all instructions and warnings before installing. WARNING Failure to turn off water supply prior to installation can result in personal injury or damage
1464. Interior Installation. Cover Rear Seat Support Cut the vinyl to approximately the size of the rear seat support.
 Chapter 37 (Video Clip 37) - Interior Installation 1464. Interior Installation Cover Rear Seat Support 1465. Cut the vinyl to approximately the size of the rear seat support. 1466. Make a dry fit of the
Bag 1. Bag 1. Center Pivot. Center Pivot
 8 00734 01901 5 Center Pivot Bag 1 3374 - Center Pivot Socket 4019 - Alum Pivot ball 3254-2-56 Button Head *Note - Sometimes it is helpful to slightly over-tighten the top clamp screws, then work the ball
COCA-COLA NORTH AMERICA EQUIPMENT BULLETIN... SERVICE DATE: May 30, 2008 NUMBER: SERV - 239
 COCA-COLA NORTH AMERICA EQUIPMENT BULLETIN... SERVICE DATE: May 30, 2008 NUMBER: SERV - 239 SUBJECT: Drop-in Tower Mold Barriers SITUATION/BACKGROUND: Up through 2005, drop-in dispensers with foam insulated
Make sure the rail is clamped square as shown. Start at the front, and place the first clamp approx 6 to 9 inches back.
 INSTALLATION SHEET Any damaged or missing parts? Parts will be shipped to you directly. Call 844-779-8986 Mon - Fri 5:30 am - 4 pm Pacific Time TOOLS RECOMMENDED 9/16 Wrench or socket 7/8 Drill bit & drill
Product Manual Manuel du Produit Manual del Producto
 L Product Manual Manuel du Produit Manual del Producto SOLCC2 / SOLCC6 / SOLCCLR / SOLCCH06 / SOLCCH12 / SOLCCSL2 / SOLCCMX3 / SOLCCMX7 / SOLTRANS88 1.330.274.8317 www.atlanticwatergardens.com Introduction
Pressurized Bead Filters
 Pressurized Bead Filters Installation Instructions Table of Contents Safety Information Installation Assembly Start Up Maintenance Troubleshooting Warranty Safety Information: 1. Installation should be
SuperFlo 9,000 High Volume Pump Product Manual
 SuperFlo 9,000 High Volume Pump Product Manual For Model: SuperFlo 9,000 (Item #120225) Table of Contents: Important Information... 2 Technical Specs... 3-4 Installing Your SuperFlo Pump... 4-5 Cleaning
Product Manual Manuel du Produit Manual del Producto
 L Product Manual Manuel du Produit Manual del Producto SOLW2 / SOLW6 / SOLWLR / SOLWH06 / SOLWH12 / SOLWSL2 / SOL30X4 / SOLW88X10 / SOLTRANS88 1.330.274.8317 www.atlanticwatergardens.com Introduction Thank
INSTALLATION GUIDE DODGE PRODUCT CODE:
 INSTALLATION GUIDE 2002-09 DODGE 1500-3500 PRODUCT CODE: 445 & 455 May 17, 2011 TOOLS NEEDED COMPONENTS INCLUDED 3/8" Drill P2 Tip 1/2" Drill Bit #2 Philips Screwdriver Flange(s) x 2 Hinged Lid Track(s)
A B C D E F. Tools Required (supplied by others)
") Page 1 of 17 Parts List Below Deck Automatic Retractable Security Cover Kit (1) Tube End Bearing Plate (A) (1) Rope Reel and Cover Drum Motor Assembly (B) (1) Cover Drum (1) Pulley Support Channel (2)
Page 1 of 17 Parts List Below Deck Automatic Retractable Security Cover Kit (1) Tube End Bearing Plate (A) (1) Rope Reel and Cover Drum Motor Assembly (B) (1) Cover Drum (1) Pulley Support Channel (2)
HydroCycle 4" Pro NFT Lettuce Systems
 HydroCycle 4" Pro NFT Lettuce Systems 112251 Hydroponic Lettuce Table* Designed to grow healthy plants without soil using mineral-nutrient solutions. *Actual system may differ from what is shown. 2016
MODEL TRIMMER. Operating and Maintenance Instructions. Item and
 MODEL TRIMMER Item 043-4415 and 043-4399 Operating and Maintenance Instructions Sales, Service, and Technical Assistance Call Toll Free 800 / 654-4519 Patterson Dental 1031 Mendota Heights Road Saint Paul,
AMERICAN CAR CRAFT INSTRUCTIONS
 AMERICAN CAR CRAFT INSTRUCTIONS C7 CORVETTE STINGRAY 4pc Mud Guards CARBON FIBER WRAPPED PART #052024 PARTS INCLUDED 4- stainless mud guard s w/carbon fiber wrap protection for the inner wheel well 2-
Installation Instructions
 Installation Instructions Jeep JK 2-Door (2011 Present) Mounting Bracket and Air Line System Kit for ARB On-Board Twin Air Compressor (CKMTA12) Made in the USA Kit Contents: 1 Flat Bracket 1 Formed Bracket
INSTALLATION GUIDE STANDARD PRODUCT CODES:
 INSTALLATION GUIDE STANDARD PRODUCT CODES: 100, 105, 110, 111, 112, 113, 115, 120, 130, 140, 145, 146, 150, 200, 210, 240, 250, 255, 260, 300, 305, 405, 406, 407, 408, 425, 426, 435, 447, 500, 505, 510,
Sunroof Repair. Sunroof Repair TSB. The sunroof repair kit available for the J30 is part number Y20. See images at bottom of document.
 Sunroof Repair This document is the text/images from the TSB (technical service bulletin) issued by Infiniti concerning the repair procedure for sunroof issues. Be advised that this is a LARGE, TIME-CONSUMING
LPE C5 Battery Relocation Kit
 LPE C5 Battery Relocation Kit The LPE C5 Corvette battery relocation kit improves vehicle weight distribution by moving weight to the rear of the vehicle. The improved weight distribution increases traction
$1.00 FOR THE TQIO/RCIO
 $1.00 FOR THE TQIO/RCIO m mm HDBBYSHOP Champion Jay Halsey has an impressive track record. One of Jay's advantages is a whisper smooth tranny thanks to his dad, Jim. Now you can build a Halsey transmission!
Prepare to install kit
 4. Park the vehicle on a clean, dry, flat, level surface and block the tires so the vehicle cannot roll in either direction. Prepare to install kit 2011-2012 JEEP WRANGLER (JK) SPORT CAGE INSTALLATION
Industrial Injections Compound Turbo Installation For 6.7L Scorpion
 Industrial Injections Compound Turbo Installation For 6.7L Scorpion Step 1: Whenever you are doing an installation the first thing you should do is unhook the batteries to avoid arcing. You will need an
INSTALLATION AND OPERATING INSTRUCTIONS FOR CONCRETE VAULT TYPE UNITS
 INSTALLATION AND OPERATING INSTRUCTIONS FOR CONCRETE VAULT TYPE UNITS CONTENTS Introduction Safety Operating Principle System Installation Initial Startup System Operations Troubleshooting Maintenance
INSTALLATION INSTRUCTIONS
 INSTALLATION INSTRUCTIONS FUEL SURGE TANK INSTALLATION KIT 1999-2006 BMW E46 COUPE Document# 19-0056 Support: info@radiumauto.com Note: This kit was designed for a standard single pump Radium Engineering
IMPORTANT: PLEASE RETAIN THIS INSTRUCTION MANUAL FOR FUTURE REFERENCE
 IMPORTANT: PLEASE RETAIN THIS INSTRUCTION MANUAL FOR FUTURE REFERENCE 2009 Toyota RAV-4 Stainless Steel Mesh Grilles L 30 G8P Fine Mesh Part #30-002-09 Quantity Description Part No. Upper Mesh Grille (includes):
A B C D E F. b.tools Required (supplied by others) 3/16" Drill Bit 3/8" Wrench Phillips Head Screwdriver
 3/16 Drill Bit 3/8 Wrench Phillips Head Screwdriver") Page 1 of 13 5E.1 Parts List a. Below Deck Automatic Retractable Security Cover Kit (1) Tube End Bearing Plate (A) (1) Rope Reel with Motor Attached (B) (1) Rope Reel Cover (C) (1) Cover Drum (1) Cover
Page 1 of 13 5E.1 Parts List a. Below Deck Automatic Retractable Security Cover Kit (1) Tube End Bearing Plate (A) (1) Rope Reel with Motor Attached (B) (1) Rope Reel Cover (C) (1) Cover Drum (1) Cover
Installation Instructions Supertop for Truck
 Installation Instructions Supertop for Truck Vehicle Application: Ford F-150 Regular / Super Cab 2004 2011 (6.5 ft.) Part Number: 76305 US Patent 6827391 www.bestop.com - We re here to help! Visit our
RAM BOX INSTALLATION SHEET
 RAM BOX INSTALLATION SHEET Any damaged or missing parts? Parts will be shipped to you directly. Call 844-779-8986 Mon - Fri 8:30 am - 7 pm EST or email support@bakindustries.com 6.5 bed Front (cab) 5.5
THE SERIES-E POWR Slider
 C.R. LAURENCE CO., INC. PATENT NO. 4,920,698 THE SERIES-E POWR Slider MODEL: EPC814S 2014+ CHEVY/GMC SILVERADO/SIERRA 1500 NAGS: DY90122PK5 ELECTRIC SLIDING REAR WINDOW 2014 + CHEVY/GMC SILVERADO/SIERRA
DEFENDER SERIES. 5 Gallon, Double Walled, Field Replaceable Spill Container Model Series INSTALLATION, OPERATION, & MAINTENANCE
 DEFENDER SERIES 5 Gallon, Double Walled, Field Replaceable Spill Container Model 705-550 Series INSTALLATION, OPERATION, & MAINTENANCE Franklin Fueling Systems 3760 Marsh Rd. Madison, WI 53718 USA Tel:
Breezair TBA 550 Installation Manual
 Breezair TBA 550 Installation Manual Table of Contents ITEM Safety Instructions Specifications Exploded View of the Air Cooler Components of the Air Cooler Dismantling the Air Cooler Installing the Transition
Instruction Manual Includes:
 Instruction Manual Includes: Page 1: HydraHorse Installation for Basic 2- Horse System Part I: Tank, pump, and electrical supply Page 6: Page 9: Part II: Page Bowls, Brackets, Pipes and Fittings Installing
Dual Remote Filtration System Installation and Servicing Instructions
 IMPORTANT NOTICE Read all instructions completely before attempting to install this unit. Improper installation could result in serious system and/or equipment damage. The installation of this system is
Pool Skimmers and Skim Filters / Renegade Gunite In-Ground Skimmers IMPROVED SNAP LOCK-DOWN BASKET HANDLE! Skimmers / Skim Filters
 NSF Approved with Flow Rate of 75 GPM PVC sockets for better glue joints 2" socket is 2 1/2" spigot for more flow 1 1/2" socket is 2" spigot for easier plumbing 1/2" socket for overflow hose Large locking
Tank Wall Installation Procedure
 Tank Wall Installation Procedure Preparation for Delivery 1. If the Tank Walls are dropped on site prior to installation ensure there is a flat area the tanks can be off-loaded to. 2. Ensure Tank Walls
Recirculating Media Filters OWNER'S MANUAL
 3649 Cane Run Road Louisville, KY 40211-1961, USA 1-800-928-7867 1-502-778-2731 Fax: 1-502-774-3624 clarusenvironmental.com SECTION: C3.20.140 CL0064 0515 Supersedes 1011 Recirculating Media Filters Register
Installation Instructions Supertop for Truck
 Installation Instructions Supertop for Truck Vehicle Application: Toyota Tacoma Double Cab 2005 - Current (5 ft.) Part Number: 76308 US Patent 6827391 www.bestop.com - We re here to help! Visit our web
Assembly Manual. 1/10th Formula 1 Car
 Assembly Manual 1/10th Formula 1 Car Center Pivot Bag 1 3374 - Center Pivot Socket 40194 - Hard Anodized Alum Pivot ball 3254-2-56 *Note - Sometimes it is helpful to slightly over-tighten the top clamp
INSTALLATION GUIDE. Model #GB1 20/25 GPM Grease Interceptor For Indoor Use. Contents
 INSTALLATION GUIDE Model #GB1 20/25 GPM Grease For Indoor Use Contents Special Precautions............................................ 2 Getting to Know the GB1........................................
RFI COLD AIR INTAKE INSTALLATION MANUAL. Nissan Titan-Armada 5.6L
 INSTALLATION MANUAL Applications RFI Part Number Nissan Titan-Armada 5.6L 2004+ 54200 Not legal for sale or use in California on pollution-controlled vehicles. Introduction This manual provides step-by-step
Front Bucket Seat Upholstery
 Specter Off-Road, Inc. 21600 Nordhoff St. Chatsworth, CA 91311 USA www.sor.com, (818)882-1238, Fax: (818) 882-7144 sor@sor.com Luxury Seat Upholstery Installation Instructions Front Bucket Seat Upholstery
Installation Manual. AdvanTex AX100 Treatment Systems. Commercial Applications
 Installation Manual AdvanTex AX100 Treatment Systems Commercial Applications 1-800-348-9843 +1-541-459-4449 www.orenco.com How To Use This Manual....Page 2 Before You Begin....Page 3 Standard System Components...Page
Standard Duty Oil Filter Relocation Kit (OC-3)
") 3430 Sacramento Dr., Unit D San Luis Obispo, CA 93401 Telephone: 805/544-8748 Fax: 805/544-8645 www.maximummotorsports.com Standard Duty Oil Filter Relocation Kit (OC-3) Read all of the instructions before
3430 Sacramento Dr., Unit D San Luis Obispo, CA 93401 Telephone: 805/544-8748 Fax: 805/544-8645 www.maximummotorsports.com Standard Duty Oil Filter Relocation Kit (OC-3) Read all of the instructions before
E-Z Treat Installation Guidelines
 E-Z Treat Installation Guidelines E-Z Treat Company or its representative will conduct on-site training with each installer before they are certified to install E-Z Treat systems. The training will include
GB2 35/50 GPM Grease Interceptor for Indoor Use
 INSTALLATION GUIDE GB2 35/50 GPM Grease for Indoor Use Contents Special Precautions.........................................2 Getting to Know the GB2....................................3 On the Floor Installation..................................
Mustang CDC Lightbar (94-04) - Installation Instructions
 - Installation Instructions") Mustang CDC Lightbar (94-04) - Installation Instructions The below installation instructions work for the following products: Classic Design Concepts Mustang Convertible Lightbar (94-04 Carbon Fiber) Classic
Mustang CDC Lightbar (94-04) - Installation Instructions The below installation instructions work for the following products: Classic Design Concepts Mustang Convertible Lightbar (94-04 Carbon Fiber) Classic
INSTALLATION INSTRUCTIONS
 INSTALLATION INSTRUCTIONS Part# 69-0717 AIR IT UP 4 Tire On Board Installed Air Delivery System with Rear Mounted Controller (Requires External Air Source) For the most up-to-date instructions please visit
Fluid-O-Tech ROTOFLOW ROTARY VANE PUMP REBUILD MANUAL
 Fluid-O-Tech PUMP TECHNOLOGY AT ITS BEST WWW.FLUID-O-TECH.COM Office: 161 Atwater St., Plantsville, CT 06479 Phone: (860) 276-9270 Fax: (860) 620-0193 ROTOFLOW ROTARY VANE PUMP REBUILD MANUAL 08/09 Ed.,
BEST MANAGEMENT PRODUCTS, INC. The SNOUT INSTALLATION INSTRUCTIONS U.S. Patent # Canadian Patent #
 PRODUCT NAME The SNOUT Oil-Water-Debris Separator U. S. Patent # 6126817 Canadian Patent # 2285146 MANUFACTURER Best Management Products, Inc. 53 Mt. Archer Rd. Lyme CT 06371 Phone: (800) 504-8008 Fax:
Pool Skimmers and Skim Filters / Renegade Gunite In-Ground Skimmers
 Pool Skimmers and Skim Filters / Renegade Gunite In-Ground Skimmers NSF Approved with Flow Rate of 75 GPM PVC sockets for better glue joints 2" socket is 2 1/2" spigot for more flow 1 1/2" socket is 2"
Installation Operation Parts
 OWNER S MANUAL BATTERY BACKUP SUMP Installation Operation Parts For further operating, installation or maintenance assistance, Call 98-8-05 PRINTED IN U.S.A. M-8 (/9) RULES FOR SAFE INSTALLATION AND OPERATION
Owner smanual. Banks Ram-Air Intake System Chevrolet 6.6L (LML) Duramax Turbo-Diesel Pickups. with Installation Instructions
 Duramax Turbo-Diesel Pickups. with Installation Instructions") with Installation Instructions Owner smanual Banks Ram-Air Intake System 2015 Chevrolet 6.6L (LML) Duramax Turbo-Diesel Pickups THIS MANUAL IS FOR USE WITH KIT 42250 & 42250-D Gale Banks Engineering 546
with Installation Instructions Owner smanual Banks Ram-Air Intake System 2015 Chevrolet 6.6L (LML) Duramax Turbo-Diesel Pickups THIS MANUAL IS FOR USE WITH KIT 42250 & 42250-D Gale Banks Engineering 546
Installation Instructions Supertop for Truck
 Installation Instructions Supertop for Truck US Patent 6827391 Vehicle Application: Toyota Tacoma Double Cab 2005-2011 (5 ft.) Part Number: 76308 INSTALLATION TIME SKILL LEVEL 1-1/2 Hours 2 - Moderately
Installation Instructions
 Roller & Roman Shades Lifting Systems Cassette and Sure-Lift EZ Lift Cordless EZ Pull Standard and Cassette R-Series Clutch SL-Series Clutch Spring Roller Fascias and Valances 3, 4 Flat and 4 Curved Fascia
OIL COOLER KIT INSTALLATION INSTRUCTIONS PART NUMBER D
 OIL COOLER KIT INSTALLATION INSTRUCTIONS PART NUMBER D570-0904 APPLICATION: 2011-2012 E90 335i/xi (N55 engine) with BMW standard bumper and with stock oil cooler Congratulations for being selective enough
Owner smanual. Banks Ram-Air Intake System Chevrolet/GMC 8.1L Workhorse Class-A Motorhome. with Installation Instructions
 Owner smanual with Installation Instructions Banks Ram-Air Intake System 2001-2008 Chevrolet/GMC 8.1L Workhorse Class-A Motorhome THIS MANUAL IS FOR USE WITH SYSTEMS 49194 AND 49195 Gale Banks Engineering
Trackspeed Engineering, LLC 1289 Reamwood Ave #A, Sunnyvale, CA
 Trackspeed Engineering, LLC 1289 Reamwood Ave #A, Sunnyvale, CA 94089 650-701-7223 info@trackspeedengineering.com Trackspeed DIY Turbocharger System Installation Instructions v1.00 (10/12/16) Thanks for
2004 Ford Taurus By Gilbert R. Gutierrez
 2004 Ford Taurus By Gilbert R. Gutierrez Vehicle Information: Vehicle type: Four-door sedan. NAGS number*: Windshield part number is DW01528GBYN or TYN. The door glass is DD08853-54GTNN R-L. Rear-door
Subaru Front Mount Intercooler Kit STI Subaru Front Mount Intercooler Kit STI
 Subaru Front Mount Intercooler Kit STI 2008-2014 715500 Subaru Front Mount Intercooler Kit STI 2008-2014 Congratulations on your purchase of the Subaru Front Mount Intercooler Kit STI 2008-2014. The following
 Phone: +45 57 600 606 Fax: +45 57 600 681 info@aqua-tech.dk www.aqua-tech.dk info@aqua-tech.dk www.aqua-tech.dk Dear Customer, We hereby have the pleasure to introduce our new Aqua-Tech products, which
Part# JL AIR IT UP 4 Tire On Board Air Delivery System. (Requires External Air Source)
") Part# 18-1819 JL AIR IT UP 4 Tire On Board Air Delivery System (Requires External Air Source) The most up-to-date instructions always visit www.updownair.com www.updownair.com 833-226-4863 I M P O R T
Part# 18-1819 JL AIR IT UP 4 Tire On Board Air Delivery System (Requires External Air Source) The most up-to-date instructions always visit www.updownair.com www.updownair.com 833-226-4863 I M P O R T
Installation Instructions
 Installation Instructions Models: SLP Venting System These venting system components have been tested for use with approved HHT Direct Vent appliances. Check with your local building code agency before
James Barone Racing Custom Fabrication of Aftermarket Parts and Accessories Mazda 3 and MAZDASPEED 3 Mud Flap Installation Instructions
 James Barone Racing Custom Fabrication of Aftermarket Parts and Accessories 2010+ Mazda 3 and MAZDASPEED 3 Mud Flap Installation Instructions To protect and avoid damage to your new JBR Mud Flaps care
INSTALLATION INSTRUCTIONS
 COLD AIR INTAKE INSTALLATION INSTRUCTIONS PART NUMBER D760-0390C APPLICATION: 1999-2003 E39 M5 PARTS LIST 1 Left Aluminum Intake Tube 1 Air Pump Bracket (A) 1 Right Aluminum Intake Tube 1 Air Pump Bracket
Mercedes E63/CLS AMG Carbon Turbo Intake System Instructions
 Mercedes E63/CLS AMG Carbon Turbo Intake System Instructions The goal of Alpha Performance is to provide the highest quality, best performing products available. By utilizing research and development,
Shaver Industries. Assembly Instructions Spring Assist Vertical Vinyl Curtain Door Projection Mount
 Shaver Industries 20 Steckle Place, Kitchener, ON N2E 2C3 Ph 1(888) 766 8328 www.shaverinc.com Assembly Instructions Spring Assist Vertical Vinyl Curtain Door Projection Mount Valued Shaver Customer: We
Pump Installation and Service Manual JB-1 System Sewage Ejector Pump Package
 Pump Installation and Service Manual JB-1 System Sewage Ejector Pump Package NOTE! To the installer: Please make sure you provide this manual to the owner of the pumping equipment or to the responsible
The M7 Direct Flow Intercooler (DFIC) Installation Guide
 Installation Guide") The M7 Direct Flow Intercooler (DFIC) Installation Guide This information is meant only as a guide. The author of this information,, or any M7 Tuning employees assumes no liabilities for any outcomes resulting
The M7 Direct Flow Intercooler (DFIC) Installation Guide This information is meant only as a guide. The author of this information,, or any M7 Tuning employees assumes no liabilities for any outcomes resulting
(2) #10 Washers (1) ¼ Washers (6) 5/16 Washers (2) Locknuts (2) 5/16 Locknuts
 #10 Washers (1) ¼ Washers (6) 5/16 Washers (2) Locknuts (2) 5/16 Locknuts") INSTALLATION INSTRUCTIONS TJ Speaker / Storage Security Console #066 Please read and fill out the enclosed warranty registration card to activate your warranty. SHIPMENT CONTENTS Console Front Shift Lever
INSTALLATION INSTRUCTIONS TJ Speaker / Storage Security Console #066 Please read and fill out the enclosed warranty registration card to activate your warranty. SHIPMENT CONTENTS Console Front Shift Lever
FLUIDART TECHNOLOGIES SYSTEM ULTIMATE INSTRUCTION MANUAL
 FLUIDART TECHNOLOGIES ULTIMATE SYSTEM INSTRUCTION MANUAL Typical installation of FluidArt Ultimate System BACKWASH WASTE LINES Water flow SKIMMER BOTTOM DRAIN LINE RETURNING TO POND THIS T MAY BE SUBSTITUTED
Installation Instructions Supertop for Truck
 Installation Instructions Supertop for Truck US Patent 6827391 Vehicle Application: Ford F150 1987-1996 (8 ft.) Part Number: 76315 Ford F250 1987-1998 (8 ft.) Part Number: 76315 Ford F350 1987-1998 (8
INSTALLATION AND INSTRUCTION MANUAL
 Upgrade kits now available NEX320161117MAN UK English INSTALLATION AND INSTRUCTION MANUAL Easy to automate your Nexus IMPORTANT PLEASE READ: Your Nexus 320 MUST be installed on a solid, level base, a minimum
INSTALLATION GUIDE. Model #GB2 35/50 GPM Grease Interceptor For Indoor Use. Contents
 INSTALLATION GUIDE Model #GB2 35/50 GPM Grease For Indoor Use Contents Special Precautions............................................ 2 Getting to Know the GB2....................................... 3
WET WALL. EvApORATIvE COOLINg SySTEm. 10" x 8" Tee INSTALLATION INSTRUCTIONS
 WET WALL EvApORATIvE COOLINg SySTEm 10" x 8" Tee INSTALLATION INSTRUCTIONS 800-779-3267 sales@schaeferfan.com www.schaeferfan.com 2012 Schaefer Ventilation Equipment 2-8-12 / M-WetWall SingleStack Table
Owner smanual. Banks Ram-Air Intake System Chevrolet 6.6L Duramax Turbo-Diesel Pickups. with Installation Instructions
 with Installation Instructions Owner smanual Banks Ram-Air Intake System 2017-2019 Chevrolet 6.6L Duramax Turbo-Diesel Pickups THIS MANUAL IS FOR USE WITH KIT 42249,42249-D Gale Banks Engineering 546 Duggan
Lincoln Mark VII Hood Insulation Repair Version written by AZMarkVII
 Lincoln Mark VII Hood Insulation Repair Version 20061223 written by AZMarkVII My hood insulator was, for the most part, intact. It had some tears and the surface material was missing in areas as large
2011 Cadillac CTS Coupe EGX Exhaust Tip & Rear Valance Mesh Accent Kit Part #: Complete E
 BILLET GRILLS IMPORTANT: PLEASE KEEP THIS INSTRUCTION MANUAL FOR FUTURE REFERENCE! 2011 Cadillac CTS Coupe EGX Exhaust Tip & Rear Valance Mesh Accent Kit Part #: Complete 5122-1900-11E TOOLS REQUIRED Automotive
Lane Reverse Q Pond Outlet Installation and Maintenance Guide
 Lane Reverse Q Pond Outlet Installation and Maintenance Guide Introduction The Lane Reverse Q (RQ) Pond Outlet is a unique and extremely cost effective storm water Best Management Practices (BMP), which
LAWN SPRINKLER, IRRIGATION PUMP
 LAWN SPRINKLER, IRRIGATION PUMP MODEL #, SP0P, SP5P, SP20P, EL0P, EL5P, EL20P SAFETY INFORMATION Please read and understand this entire manual before attempting to assemble, operate or install the product.
Athearn Pacific Digital Sound Decoder Installation Notes
 New Dimensions in Digital Sound Technology TM APPLICATION NOTE Overview This application note describes how to install a DSD-100LC Digital Sound Decoder into the Athearn Pacific Locomotive. All of the
Mini Cooper Mini Cooper. Vehicle Type: Two-Door Hatchback. Windshield. AutoGlass Field Guide 53
 Vehicle Type: Two-Door Hatchback NAGS number:* FW02305GTY (Heat) (Rain Sensor) or FW02304GTY. Original-equipment-manufacturer part numbers are 51311505850 (Heat) (Rain Sensor), or 51311505875. FD21652-53
C. Biotec 30. Gebrauchsanweisung Directions for use Mode d emploi Gebruiksaanwijzing
 29739-06C Biotec 30 Gebrauchsanweisung Mode d emploi Gebruiksaanwijzing 1 Direction for use Product description Biotec 30 is a multi-zone filter for large ponds up to 130 m³, or up to 65 m³ for fish ponds.
Inst all a ti o n and Oper a tin g Instru c ti o n s
 Inst all a ti o n and Oper a tin g Instru c ti o n s Congratulations, you are now the proud owner of an Aqua2use GWDD! INSTALLATION OF PUMP OPERATED AQUA2USE GWDD The Matala Aqua2use GWDD is specifically
TABLE OF CONTENTS TABLE OF CONTENTS ABOUT US 02 (405)
") 2018 TABLE OF CONTENTS TABLE OF CONTENTS 03. Pond Liners 05. Pond Liner Accessories 06. Pond Kits 08. Disappearing Waterfall Kits 09. Pondless Water Feature Components 17. Filters 23. Filter Media 25.
2018 TABLE OF CONTENTS TABLE OF CONTENTS 03. Pond Liners 05. Pond Liner Accessories 06. Pond Kits 08. Disappearing Waterfall Kits 09. Pondless Water Feature Components 17. Filters 23. Filter Media 25.
Assembly Manual. 1/10th World GT car
 Assembly Manual 1/10th World GT car Center Pivot Bag 1 3374 - Center Pivot Socket 40194 - Hard Anodized Alum Pivot ball 3254-2-56 Button Head *Note - Sometimes it is helpful to slightly over-tighten the
INDUSTRIAL WATER PROCESSING SYSTEMS CENTRAL BRINE DRUM INSTALLATION INSTRUCTIONS
 INDUSTRIAL WATER PROCESSING SYSTEMS CENTRAL BRINE DRUM INSTALLATION INSTRUCTIONS Manufactured by: Kinetico Incorporated Newbury, OH 44065 440.564.9111 The pioneer in non-electric water processing systems.