MX-T3x(TM94E) AC SYSTEM SERVICE MANUAL
|
|
|
- Sarah Ada Cox
- 5 years ago
- Views:
Transcription

1 MX-T3x(TM94E) AC SYSTEM SERVICE MANUAL 1
2 TABLE OF CONTENTS SECTION 1:SERIAL NUMBER LOCATION SECTION 2:MOVING THE UNIT SECTION 3:IMPORTANT SAFETY INSTRUCTIONS SECTION 4:PREVENTATIVE MAINTENANCE 4.1 Maintenance check list 4.2 Recommended cleaning tips 4.3 Deck and belt replacement 4.4 Check for damaged parts 4.5 Adjusting the belt 4.6 Clean the grooves procedures SECTION 5:MANAGER MODE SECTION 6:TROUBLESHOOTING 6.1 Electrical block diagram 6.2 Wire pin definition 6.3 MCB LED instructions 6.4 Error messages on the console 6.5 Hand pulse can not work 6.6 MX-T3x maintenance lamp 2
3 TABLE OF CONTENTS SECTION 7:PART REPLACEMENT GUIDE 7.1 Removal of plastic shroud 7.2 Rear roller removal 7.3 Side rail removal 7.4 Deck Removal/Replacement 7.5 Deck cushion replacement 7.6 Front roller removal 7.7 Running belt replacement 7.8 Incline power board removal 7.9 Inverter removal 7.10 Motor Removal 7.11 Drive Belt Removal 7.12 Incline motor removal/replacement 7.13 PCB Removal 7.14 PCB software installation SOP SECTIOM8:UPGRADES 3
4 SECTION 1 SERIAL NUMBER LOCATION 4
5 Matrix T3x(TM94E) Serial Number Location 5
6 SECTION 2 MOVING THE UNIT 6
7 UNPACKING THE TREADMILL : The MATRIX treadmill is inspected before it is packaged. It is shipped in two separate pack- ages: the frame and the console. Carefully unpack the unit and dispose of the box material. CAUTION: This unit weights 487 lbs / 221 kgs pounds. Be sure to have proper assistance to remove and move the unit, to avoid injury to the user and the unit. Frame : 1.Treadmill Base 2.Console Supports 3.Hardware Fasteners and Washer Bag Console : 1.Handle Bar Set 2.Console OPTIONAL EQUIPMENT Optional equipment may be available for the users of MATRIX product. Please visit our web site at for more information. 7
8 SECTION 3 IMPORTANT SAFETY I N S T R U C T I O N S 8
9 1.1 Before getting Started It is the sole responsibility of the purchaser of Matrix Fitness Systems products to instruct all individuals, whether they are the end user or supervising personnel, on proper usage of the equipment. It is recommended that all users of Matrix Fitness Systems exercise equipment be informed of the following information prior to its use. 1.2 proper usage 1. Do not use the equipment in any way other than designed or intended by the manufacturer. It is imperative that all Matrix Fitness Systems equipment is used properly to avoid injury. 2. Keep hands and feet clear of moving parts at all times to avoid injury. 3. Unsupervised children must be kept away from this equipment. 4. Do not wear loose clothing while on equipment. 5. When it is necessary to immobilize the treadmill, set the display to read CHOOSE PROGRAM USING QUICK KEYS OR SPEED UP OR DOWN KEYS, then hold down the RESET & ENTER keys. The treadmill will now display IMMOBILIZED. In this state the treadmill can not be operated; both the drive motor & elevation motor are disabled. The treadmill will remain in this state across power cycles, resets, etc. To return to normal operation mode repeat the same key sequence, hold down the RESET & ENTER keys. The display will now read CHOOSE PROGRAM USING QUICK KEYS OR SPEED UP OR DOWN KEYS 9
10 1.3 Before getting Started This Treadmill is intended for commercial use. To ensure your safety and protect the equipment, read all instructions before operating the MATRIX treadmill. When using an electrical product, basic precautions should always be followed including the following: DANGER: To reduce the risk of electric shock: Always unplug this equipment from the electrical outlet immediately after using and before cleaning. WARNING : To reduce the risk of burns, fire, electrical shock or injury to persons that may be associated with using this product. An appliance should never be left unattended when plugged in. Unplug from outlet when not in use and before putting on or taking off parts. This product must be used for its intended purpose described in this lower case owner s manual. Do not use other attachments that are not recommend by the manufacturer. Attachments may cause injury. To prevent electrical shock, never drop or insert any object into any opening Do not remove the console covers. Service should only be done by an authorized service technician. Never operate the treadmill with the air opening blocked. Keep the air opening clean, free of lint and hair. Never operate product if it has a damaged cord or plug, if it is working properly, if it has been damaged, or immersed in water. Return the unit to a service center for examination and repair. Do not carry this unit by it s supply cord or use the cord as a handle. Keep any power cord away from heated surfaces. Close supervision is necessary when treadmill is used by or near children or disable persons. Do not use outdoors Do not operate where aerosol (spray) products are being used or when oxygen is being administered. To disconnect, turn all controls to the off position, then remove plug from outlet. Connect this treadmill to a properly grounded outlet only. Caution: If you experience chest pain, nausea, dizziness or shortness or breath, STOP exercising immediately and consult a physician before continuing. 10
11 1.4 Electrical Requirements For your safety and treadmill performance, the ground on this circuit must be non-looped. Please refer to NEC article and Your Treadmill is provided with a power cord with a plug and requires a dedicated line according to the electric configurations listed in the chart below. Any alteration of this power cord could void all warranties of this product. 1.5 grounding instructions The treadmill must be grounded. If it should malfunction or breakdown, grounding provides a path of least resistance for electric current to reduce the risk of electric shock. The treadmill is equipped with a cord having an equipment- grounding conductor and a grounding plug. The plug must be plugged into an appropriate outlet that is properly installed and grounded in accordance with all local codes and ordinances. If the user does not follow these grounding Instructions, the user could void the Matrix limited warranty. danger: Improper connection of the equipment-grounding conductor can result in a risk of electric shock. Check with a qualified electrician or serviceman if the user is in doubt as to whether the product is properly grounded. Do not modify the plug provided with the product if it will not fit the outlet; have a proper outlet installed by a qualified technician. 11
12 SECTION 4 PREVENTATIVE MAINTENANCE 12
13 4.1 MAINTENANCE CHECKLIST FOR BEST PERFORMANCE WE RECOMMEND THE FOLLOWING MAINTENANCE SCHEDULE: Item Weekly Monthly BI-annually Annually Console Bolts Inspect Frame Clean Inspect Running Belt Clean Inspect Power Code Inspect Console Clean Inspect Bottle Holders Clean Handlebars Clean Inspect Handlebars Bolts Inspect Front / Rear Roller Inspect Stop Key Inspect Motor Drive Belt Inspect Deck Bolts Tighten Drive Belt Tighten Running Belt Assure Tighten 13
14 4.2 RECOMMENDED CLEANING TIPS 1. Use a soft, clean cotton cloth. DO NOT use paper towels to clean surfaces on the treadmill. Paper towels are abrasive and can damage surfaces. 2. Use a mild soap and damp cloth. DO NOT use ammonia based cleaner. This will cause discoloring of the aluminum and plastics it comes into contact with. 3. Do not pour water or cleaning solutions on any surface. This could cause electrocution. 4. Wipe the console and side rails after every use. 5. Brush away any wax deposits from the deck and belt area. This is a common occurrence until the wax is worked into the belt material. 6. Be sure to remove any obstructions from the path of the elevation wheels including power cords. 7. Monthly, unplug the treadmill and remove the motor cover. Check for debris and clean with a dry cloth or small vacuum nozzle. WARNING: Do not plug the treadmill in until the motor cover has been reinstalled. CAUTION : T5x-02 Weighs 450 lbs / 204 kg. Be sure to have proper assistance to install and move the unit in order to avoid injury to you or the unit. 14
15 4.3 DECK AND BELT REPLACEMENT One of the most common wear and tear items on a treadmill is the Deck and Belt combination. If these two items are not properly maintained they can cause damage to other components. This product has been provided with the most advanced maintenance free lubricating system on the market. WARNING: Do not run the treadmill while cleaning the belt and deck. This can cause serious injury damage the machine. and can Maintain the belt and deck by wiping the sides of the belt and deck with a clean cloth. The user can also wipe under the belt 2 inches / 5 centimeters on both sides removing any dust or debris. The deck can be flipped and reinstalled or replaced by an authorized service technician. Please contact Matrix Fitness Systems or authorized dealers for more information. 15
16 4.4 CHECK FOR DAMAGED PARTS DO NOT : use any equipment that is damaged or has worn or broken parts. Use only replacement parts supplied by Matrix Fitness Systems. MAINTAIN LABELS AND NAMEPLATES : Do not remove labels for any reason.. They contain important information. If unreadable or missing, contact local service window for a replacement. MAINTAIN ALL EQUIPMENT: Preventative maintenance is the key to smooth operating equipment, as well as keeping the users liability to a minimum. Equipment needs to be inspected at regular intervals. Defective components must be replaced immediately. Improperly working equipment must be kept out of use until it is repaired. Ensure that any person making adjustments or performing maintenance or repair of any kind is qualified to do so. Matrix Fitness Systems will provide service and maintenance training at our corporate facility upon request or in the field if proper arrangements are made. 16
17 4.5 ADJUSTING THE BELT After placing the treadmill in the position it will be used, the belt must be checked for proper tension and centering. The belt might need to be adjusted after the first two hours of use. Temperature, humidity, and use cause the belt to stretch at different rates. If the belt starts to slip when a user is on it, be sure to follow the directions below. STEP 1: Locate the two hex head bolts on the rear of the treadmill. The bolts are located at each end of the frame at the back of the treadmill. These bolts adjust the rear belt roller. Do not adjust until the treadmill is on. This will prevent over tightening of one side. STEP 2 : The belt should have equal distance on either side between the frame. If the belt is touching one side, do not start the treadmill. Turn the bolts counter clockwise approximately one full turn on each side. Manually center the belt by pushing the belt from side to side. Tighten the bolts the same amount as when the user loosened them, approximately one full turn. Inspect the belt for damage. STEP3 : While the treadmill is running at 3 mph / 4.8 kph, observe the belt position. If it is moving to the right, tighten the right bolt by turning it clockwise?turn, and loosen the left bolt turn. If it is moving to the left, tighten the left bolt by turning it clockwise?turn and loosen the right?turn. Repeat Step 3 until the belt remains centered for several minutes. STEP 4 : Check the tension of the belt. The belt should be very snug. When a person walks or runs on the belt, it should not hesitate or slip. If this occurs, tighten the belt by turning both bolts clockwise?turn. Repeat if necessary. 17
18 4.6 CLEAN THE GROOVES PROCEDURE Frequency: Every 3 months Caution: If dirty grooves in the drive belt, motor and roller pulley, there will be noises while running. Procedure: 1.Remove the drive belt and check the grooves in belt for dirt or dust and clean it. 2.Check the grooves in motor pulley for dirt or dust and clean it 3.Check the grooves in roller pulley for dirt or dust and clean it. 18
19 SECTION 5 MANAGER MODE 19

20 MX-T3x OPERATION MANUAL- Engineer mode How to enter into the engineering mode? 1. Press & Hold both ELEVATION UP and SPEED DOWN at the same time for 3-5 sec. Then, the display will show MANAGER MENU. 2. Press the "ELEVATION UP or DOWN" to select you want and press the SELECT" key enter. ENGINEERING MODE Engineering screens allow the viewing and editing of variables that would be necessary for a club operator/manager to customize. Unless otherwise noted, engineering screens consist of the initial screen, the editing or action screen, and the saving screen. The initial screen displays the variable type, and in most cases, the current value. Edit or action screens are where the editing of the variable take place. The saving screen indicates the variable is being saved. To access the Engineering screens press and hold the ELEVATION UP and SPEED DOWN buttons for three seconds. The display will now display 'Engineering Mode'. Use the ELEVATION UP or DOWN arrows to scroll through the different engineering screens. Press SELECT to edit the selected engineering screen. Use the SPEED UP or DOWN arrows to set the variable. Press START to save the selected variable. 20
21 KEY BEHALE FUNCTION key name UP DOWN FAST SLOW START SELECT function Arrows to scroll through the different screens Arrows to scroll through the different screens Arrow to set the variable Arrow to set the variable To save the selected variable To edit the selected screen The list manager s custom setting CUSTOM SETTING DEFAULT MIN MAX DESCRIPTION P0 LOW SPEED 77 This variable controls the low for limit for the speed of the TM P1 MIDDLE SPEE 300 This variable controls the middle for limit for the speed of the TM P2 HIGH SPEED 600 This variable controls the high for limit for the speed of the TM P4 LOW ELEVATION 55 This variable controls the low for limit for the elevation of the TM P5 HIGH ELEVATION 200 This variable controls the high for limit for the elevation of the TM P6 UNIT MPH Change the standard KM or Mile P7 LIMIT TIME 90:00 5:00 95:00 This variable controls the program max time 21
22 P8 SET WEIGHT KPH80 / MPH150 KRH2 2 / MPH 50 KRH 180 / MPH 400 This variable controls the default weight used in the calorie calculations. P9 TOTAL TIME Display total accumulated time P10 TOTAL DISTANCE Display total accumulated distance P11 VERSION Display the product s software version P12 LANGUAGE Language in which information is display P13 USER SPEED 0.5MPH / 0.8KPH 0.5 MPH / 0.8 KPH 12 MPH / 16 KPH This variable controls the default program speed P14 USER TIME 20:00 5:00 95:00 This variable controls the default program time PRODUCT TEST AUTO CHECK DISPLAY TEST KEYPAD TEST OUT OF ORDER Only for factory test mode The console will do the auto calibration including speed and incline LED test mode Test the keypad Error information Remarks : If you want to the clean accumulate time and distance. please enter engineer mode select P9 or P10 and Hole the Down & Slow key for 3 s, to clean accumulate time and distance. 22
23 SECTION 6 TROUBLE SHOOTINGS 23
24 6.1 Electrical block diagram 24
25 6.2 Wire pin definition P01-- Console Wire 25
26 P04 -- Inverter Wire N24 -- Pulse Board Wire 26
27 P11 -- CTRL Overlay Wire ;Left P12 -- CTRL Overlay Wire ; Right 27

28 6.3 MCB LED instructions +12(B) +12(A) SPEED PWM FAIL UP DOWN AC RUN +18V LED +12(A) +12(B) SPEED PWM FAIL UP DOWN AC RUN +18V Description Indicates is incline power board have provide the +12V power for console. Indicates is incline power board have provide the +12V power for PUMP. Indicates the motor is moving via the encoder's feedback by blinking. Indicates if Console is commanding speed. Inverter is damage Indicates if the upper console is commanding Elevation UP. Indicates if the upper console is commanding Elevation DOWN. Indicates if the AC Buss is Energized (Voltage Present). Indicates if inverter is commanding speed. Indicates the presence of the unregulated 18 volt for MCB 28
29 6.4 Error Messages on the Console Error E1 E2 E3 E6 Inverter error Definition Treadmill will not start Panel control board the MCU not answer Incline motor not to movement Incline motor the signal not answer Inverter problem Error message 1 troubleshooting (1) Check the connector MCB and Speed sensor cable Speed sensor [Symptom 1 of treadmill will have start ] Press start and after 10 sec. the LED display will show Error 1 [Cause] The speed sensor can t sense the speed [Solution] 1. Check the connector condition of the speed sensor cable. 2. Replace the speed sensor. 3. Check the magnet on the front roller if it s too far away from the speed sensor Magnet 29
![Error message 1 troubleshooting(2) [Symptom 2 of treadmill will not start ] Press start and after 10 sec. the LED display will show Error 1 [Cause] 1. 20-pin console cable is damaged. 2. PCB is damaged.](/docs-images/80/81749581/images/30-0.jpg "3. Motor is damaged. [Solution] 1. Open MCB cover, connect all cable to Inverter again turn on the power, verify the LED indicator of PWM is to glitter.")
30 Error message 1 troubleshooting(2) [Symptom 2 of treadmill will not start ] Press start and after 10 sec. the LED display will show Error 1 [Cause] pin console cable is damaged. 2. PCB is damaged. 3. Motor is damaged. [Solution] 1. Open MCB cover, connect all cable to Inverter again turn on the power, verify the LED indicator of PWM is to glitter. (If that PWM is not glitter, replace console cable) 2. If PWM LED also do not glitter, replace PCB. 3. Verify wire connection Motor wire and inverter cable on the Inverter, then plug in the power cord and turn on the power switch. (Then press START button, if motor do not to run, replace the motor.) PWM 30
![Error message 2 troubleshooting [Symptom] Press Start](/docs-images/80/81749581/images/31-0.jpg "key then the console display show Error 2 [Cause] Panel")


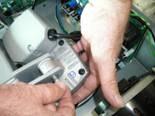
31 Error message 2 troubleshooting [Symptom] Press Start key then the console display show Error 2 [Cause] Panel control board cause by static destroy, make the panel control board inside parts MCU damage. [Solution] 1.Turn on power again, if console still show Error 2,replace PCB. 2. Please check the console ground wire whether connect to PCB. (Please refer the below photo and check the machine ground between the console and incline power board whether connect.) Check the machine ground whether have connect. Console back screw Incline power board ground 31
![Error message 3,6 troubleshooting [Symptom] Press start then the console display show Error 3 or 6 [Cause] 1. The 20-pin console cable is damaged. 2. Incline motor is damaged. 3. PCB is damaged. 4.](/docs-images/80/81749581/images/32-0.jpg "Incline power board is damaged. 5. The incline setting is not correct. [Solution] 1.")
32 Error message 3,6 troubleshooting [Symptom] Press start then the console display show Error 3 or 6 [Cause] 1. The 20-pin console cable is damaged. 2. Incline motor is damaged. 3. PCB is damaged. 4. Incline power board is damaged. 5. The incline setting is not correct. [Solution] 1.Enter the Engineer mode select P4:LOW ELEVATION console display will show incline motor parameter (Please refer the below photo), if display not show right parameter, please check the between Incline power board and incline motor whether connect is OK, if it is OK, please replace new console cable to test again. 2. If display still show Error 3 or 6, please replace the incline motor. 3. If display still show Error 3 or 6, please replace the PCB. 4. If display still show Error 3 or 6, please replace the incline power board. 5. Enter Engineering Mode to Auto-calibration place to renew the Autocalibration elevation parameter (Please refer the page 22). Incline motor Default Value place parameter Incline motor right now place parameter 32
![Error message 4 troubleshooting [Symptom] Running the](/docs-images/80/81749581/images/33-0.jpg "Auto check can t finish. [Cause] 1.")


33 Error message 4 troubleshooting [Symptom] Running the Auto check can t finish. [Cause] 1. Check the connector condition of the speed sensor cable. 2. Replace the speed sensor. 3. Check the magnet on the front roller if it s too far away from the speed sensor [Solution] 1. Check the connector MCB and Speed sensor cable 2. Speed sensor 3. Magnet 33
34 Error message Inverter error [Symptom] Press start then the console display show INVERTER ERROR [Cause] 1. Connector condition of the console cable. 2. Connector condition of the inverter wire. 3. Inverter damage. [Solution] 1. Check the connector condition of the console cable. 2. Check the connector condition of the inverter wire. 3. Check the inverter display show the which error code and refer the 35 page Faults displayed list to find the root cause. 4. Replace the inverter. 34

35 35


36 6.5 Hand pulse can not work 1. Please make sure then user hold the hand pulse whether windows show picture. Remark: Heart rate figure show up on the screen about in 5~10 sec. 2. If the heart rate figure still doesn't show up on the screen, Please inspect according to the step as below. Step 1: Please make use of tools to confirm line have conduct. 36


37 Step 2: Please check the connection. Check whether the heart rate cable is touching hand pulse metal (both of left hand and right hand). Besides the other side of the heart rate cable should be connected with HR board. Step 3: If you can't find any problem with above step, and the heart rate figure still can't showup, Please replace the heart rate board. 37

38 6.6 MX-T3x maintenance lamp Maintenance lamp 1. When the distance accumulate to 5000KM the lamp will be lighted in blue. 2. There has to do some maintenance 2.1 Test the running belt if loose or not? 2.2 Lubricate the running belt 2.3 Remove the motor cover and clean the dust inside 2.4 Clean the frame 2.5 Check the running belt is in the center or not. 3. There can hold "Elevation Down" & "Speed Slow" for 3 seconds to turn off the light 38
39 SECTION 7 PARTS REPLACEMENT 39


40 7.1 Plastic shroud removal 1. Remove the front shroud using 4 screws. (Figure A) 2. Front covers are removed (Figure B) Figure A Figure B 40


")


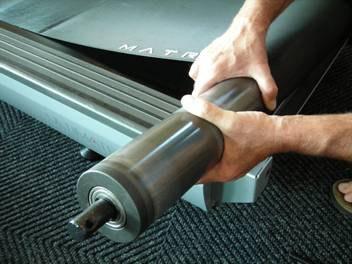
41 7.2 Rear roller removal 1. Turn off power and disconnect the cord from the machine 2. Remove one of the end caps using a screwdriver (Figure A) 3. Remove both roller adjustment screws using an 8mm hex-tip tools ( Figure B and C) 4. Remove roller from running belt (Figure D and E) Figure A Figure B Figure C 41

42 Figure D Figure E 42


43 7.3 Side rail removal 1. Remove the end cap as outlined in section Loosen the two screws under the end cap reinforce set using a 5mm hex-tip tools (Figure A) 3. Slide the rail off the back of the treadmill ( Figure B ) 4. After reinstalling the side rail, make sure end cap is on first before. Figure A Figure B 43

 3.")

44 7.4 Deck removal 1. Remove the front shroud as outlined in section 8.1 and 8.3 side rail removal. 2. Remove eight deck screws using a 5mm hex-tip tools (Figure A) 3. Remove deck from the running belt (Figure B and C) 4. Be careful not to pinch fingers during removal/installation of deck board 5. *New deck surfaces must ALWAYS be matched to a new running belt* Figure A Figure B Figure C 44


45 7.5 Deck cushion replacement 1. Remove the deck as outlined in section Holding the cushion and remove the 13mm nut. (Figure A and B) Figure A Figure B 45

 3.")
 4.")

46 7.6 Front roller removal Figure A 1. Remove shrouds as outlined in section Using a 5mm hex-tip tools, remove the tension set. (Figure A and B) 3. Remove the front roller mounting screws using 8mm hex-tip tools (Figure C and D) 4. Remove the drive belt from the front roller and remove the roller from the running belt (Figure E) Figure B Figure C Figure D Figure E 46
 7.")
47 7.7 Running belt removal 1. Remove shrouds as outlined in section Remove rear roller as outlined in section Remove side rail as outlined in section Remove deck as outlined in section Remove front roller as outlined in section Remove the running belt and replace with new belt (Figure A ) 7. *New running belts must ALWAYS be installed to a new deck surface* Figure A 47

, not include the two inverter power wire. 3.")

48 7.8 Incline power board removal (MCB) 1. Remove shroud as outlined in section Disconnect connect wires from the MCB seven connections total (Figure A), not include the two inverter power wire. 3. Remove two MCB mounting screws using screwdriver (Figure B) 4. Disconnect the inverter power wire from MCB two connections (Figure C) Figure A Figure B Figure C 48


49 7.9 Inverter removal 1. Remove shroud as outlined in section Disconnect connect wires from the inverter connections total (Figure A) 3. Remove two inverter mounting screws using screwdriver and 6mm hex-tip tools (Figure B) Figure A Figure B 49

 3.")
 5.")
50 7.10 Motor removal Figure A 1. Remove the front shroud as outlined in section Release drive belt tensioner as described in section Cut any wire ties (Figure A) 3. Disconnect the motor power cable from the inverter (Figure B) 4. Using the 8mm Allen wrench, remove 4 motor mounting screws (Figure C) 5. Lift the motor away from the treadmill (Figure D) 6. When reinstalling the motor, make sure the red vibration pad is in place. Figure B Figure C Figure D 50
 4. Lift roller and remove old drive belt (Figure B) 5.")
51 7.11 Drive belt replacement Figure A 1. Remove plastic shroud from machine as outlined in section Release belt tensioner from drive belt as outlined in section Remove the front roller screw on the drive belt side, and loosen the screw on the opposite side (Figure A) 4. Lift roller and remove old drive belt (Figure B) 5. After installing new belt, check it for correct alignment to the motor pulley before setting tensioner in place Figure B 51

 3.")
 5.")
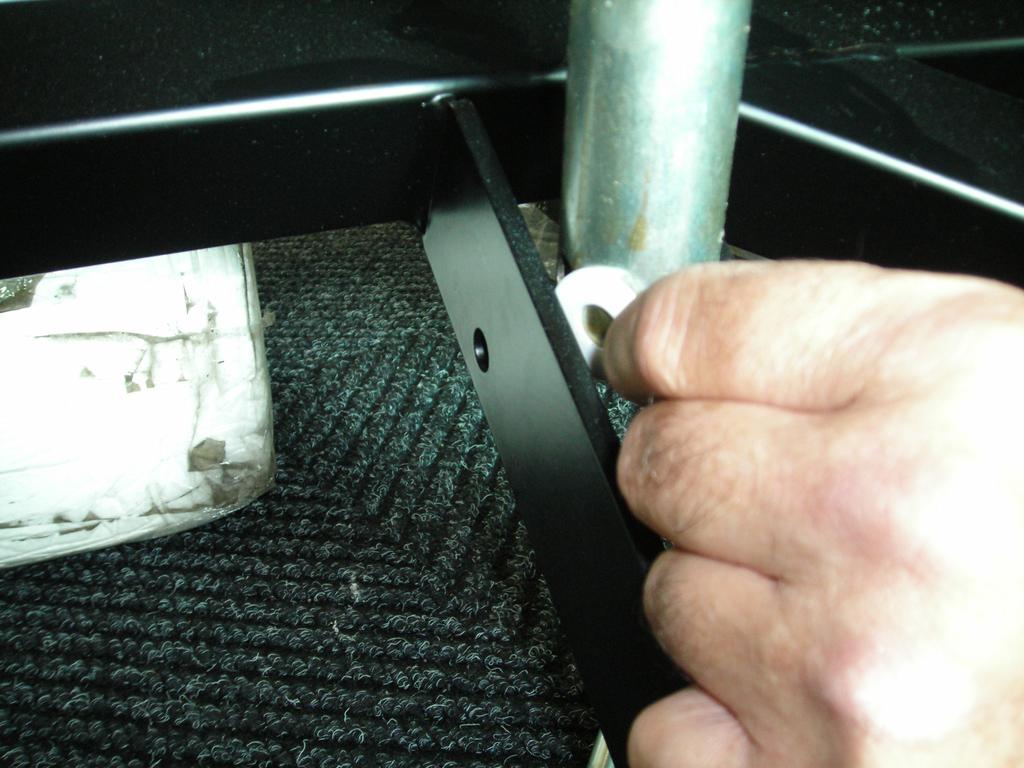
52 7.12 Incline motor removal Figure A 1. Lift the treadmill and support it so that the wheels are off the floor, or the unit may be tipped onto it s side (Figure A) 2. Remove the clip from the pin attaching motor shaft to the rack (Figure B and C) 3. Disconnect the incline motor power cable from the motor control board ( Figure D) 4. Disconnect the pin from the incline motor ( Figure E) 5. Lift the incline motor away from the treadmill (Figure F) 6. When installing the incline motor, make sure to replace the white washers at the top and bottom (Figure G) Figure B Figure C 52


53 Figure D Figure E Figure F Figure G 53

 2.")
 3.")
 Figure")
54 7.13 PCB replacement 1. Remove the two screws from underneath the console. (Figure A) 2. Disconnect the wires from the PCB (Figure B) 3. Remove the seven screw from PCB (Figure C and D) Figure A Figure B Figure C 54 Figure D
 2. Parts NO: MT00L-039 3.")
55 7.14 PCB software installation SOP A. Service Tools & Accessories: 1. MSP-FET430 (Please refer the bulletin NB ) 2. Parts NO: MT00L Software 55

56 Please refer the above photo to set the parameter. Press the File Name Find out the software version file in the computer and then actuate/open the file. 56


57 Computer Install the MSP430 Tools 57

58 Press the Load Image, Installation software to MSP430 Tools. 58


59 MSP430 Installing the MSP430 cable to console. 59


60 1. Press the MSP430 START key, the MODE light will to glitter about 10 sec, If installing pass, the OK LET light. 2. Drive the machine to provide power for console and then enter into the engineering mode to confirm if the software had been installed/upgraded 60
61 SECTION 8 UPGRADES 61
S-Drive Performance Trainer
 S-Drive Performance Trainer SERVICE MANUAl Table of contents CHAPTER 1: Serial number location... 1 CHAPTER 2: Important Safety instructions 2.1 Read and Save These Instructions... 2 2.2 Before Getting
LS10.0T Service Manual
 LS10.0T Service Manual 1 TABLE OF CONTENTS CHAPTER 1: SERIAL NUMBER LOCATION...3 CHAPTER 2: PREVENTATIVE MAINTENANCE 2.1 Preventative Maintenance. 4 2.2 Tension and Centering the Running Belt....6 CHAPTER
2013 Elite T4000 (TM461C) Service Manual
 Service Manual") 2013 Elite T4000 (TM461C) Service Manual 1 TABLE OF CONTENTS CHAPTER 1: SERIAL NUMBER LOCATION...3 CHAPTER 2: PREVENTATIVE MAINTENANCE 2.1 Preventative Maintenance. 4 2.2 Tension and Centering the Running
2013 Elite T4000 (TM461C) Service Manual 1 TABLE OF CONTENTS CHAPTER 1: SERIAL NUMBER LOCATION...3 CHAPTER 2: PREVENTATIVE MAINTENANCE 2.1 Preventative Maintenance. 4 2.2 Tension and Centering the Running
LS8.0T Service Manual
 LS8.0T Service Manual 1 TABLE OF CONTENTS CHAPTER 1: SERIAL NUMBER LOCATION...3 CHAPTER 2: PREVENTATIVE MAINTENANCE 2.1 Preventative Maintenance. 4 2.2 Tension and Centering the Running Belt....6 CHAPTER
2006 Johnson T8000E(TM97) SERVICE MANUAL
 SERVICE MANUAL") 2006 Johnson T8000E(TM97) SERVICE MANUAL 1 TABLE OF CONTENTS SECTION 1: MAINTENANCE PROCEDURE... 3 1. MAINTENANCE CHECK LIST...4 2. TENSIONING THE BELT PROCEDURE.....5-6 3. DECK RE-WAXING PROCEDURE.. 7-8
2006 Johnson T8000E(TM97) SERVICE MANUAL 1 TABLE OF CONTENTS SECTION 1: MAINTENANCE PROCEDURE... 3 1. MAINTENANCE CHECK LIST...4 2. TENSIONING THE BELT PROCEDURE.....5-6 3. DECK RE-WAXING PROCEDURE.. 7-8
T 1 x T r e a d m i l l S e r V i C e m a N U a l
 T1x-04 Treadmill SERVICE MANUAl Table of contents CHAPTER 1: Serial number location... 1 CHAPTER 2: Important Safety instructions 2.1 Before Getting Started... 2 2.2 Read and Save These Instructions...
T 3 x T r e a d m i l l S e r V i C e m a N U a l
 T3x-05 Treadmill SERVICE MANUAl Table of Contents CHAPTER 1: Serial number location... 1 CHAPTER 2: Important Safety instructions 2.1 Before Getting Started... 2 2.2 Read and Save These Instructions...
T & T Service Manual
 T101-04 & T202-03 Service Manual 1 2 3 Contents CHAPTER 1: SERIAL NUMBER LOCATION... 6 CHAPTER 2: PREVENTATIVE MAINTENANCE 2.1 Preventative Maintenance... 8 2.2 Tension and Centering the Running Belt...
OWNERS MANUAL. Versa Single-Station Strength VS-S53 Abdominal
 OWNERS MANUAL Versa Single-Station Strength VS-S53 Abdominal Table Of Contents Safety, General Care & Maintenence... 3 Getting Started (Product Specifications)... 5 Assembly Information... 6 Markings...
OWNERS MANUAL. ULTRA Single-Station Strength G7-S42 Triceps Press
 OWNERS MANUAL ULTRA Single-Station Strength G7-S42 Triceps Press Table Of Contents Safety, General Care & Maintenence... 3 Getting Started (Product Specifications)... 5 Assembly Information... 6 Parts
SPACE SAVING FOLDING TREADMILL SF-T7632 USER MANUAL
 SPACE SAVING FOLDING TREADMILL SF-T7632 USER MANUAL IMPORTANT: Read all instructions carefully before using this product. Retain owner s manual for future reference. For customer service, please contact:
1. OVERVIEW DRAWING 2
 1 1. OVERVIEW DRAWING 2 2. IMPORTANT SAFETY INSTRUCTIONS When using an electrical appliance, basic precautions should always be followed, including the followings: Read all instructions before using the
OWNERS MANUAL. ULTRA Single-Station Strength G7-S13 Chest Press
 OWNERS MANUAL ULTRA Single-Station Strength G7-S13 Chest Press Table Of Contents Safety, General Care & Maintenence...3 Getting Started (Product Specifications)...5 Assembly Information...6 Markings...7
OWNERS MANUAL. ULTRA Single-Station Strength G7-S34 Seated Row
 OWNERS MANUAL ULTRA Single-Station Strength G7-S34 Seated Row Table Of Contents Safety, General Care & Maintenence...3 Getting Started (Product Specifications)...5 Assembly Information...6 Markings...7
OWNERS MANUAL. Versa Single-Station Strength VS-S33 Lat Pulldown
 OWNERS MANUAL Versa Single-Station Strength VS-S33 Lat Pulldown Table Of Contents Safety, General Care & Maintenence...3 Getting Started (Product Specifications)...5 Assembly Information...6 Parts List...7
EASY ASSEMBLY FOLDING TREADMILL SF-T7610 USER MANUAL
 EASY ASSEMBLY FOLDING TREADMILL SF-T7610 USER MANUAL IMPORTANT! Please retain owner s manual for maintenance and adjustment instructions. Your satisfaction is very important to us, PLEASE DO NOT RETURN
SF-T7610 TREADMILL USER MANUAL
 SF-T7610 TREADMILL USER MANUAL IMPORTANT: Read all instructions carefully before using this product. Retain owner s manual for future reference. For customer service, please contact: support@sunnyhealthfitness.com
Symptom Possible Cause Test Procedure Repair
 Troubleshooting Guide: E2 Error/Erratic Speed Prepared by: Regina Templeton Date Prepared: 12/07/2015 E2 error on a unit with an analog speed sensor (The analog speed encoder signal indicates speed is
Horizon Fitness Treadmill Service Manual
 Horizon Fitness 2003-2004 Treadmill Service Manual Horizon Series Treadmill Models T40, T30, T20 If you have any questions, please call the Horizon Fitness Service Hotline at 1-888-993-3199 TABLE OF CONTENTS
E3x-01 elliptical Trainer
 E3x-01 elliptical Trainer SERVICE MANUAl chapter 1: Serial Number Location CHAPTER 1: Serial number location... 1 CHAPTER 2: Important Safety instructions 2.1 Read and Save These Instructions... 2 2.2
PREVENTIVE MAINTENANCE
 PREVENTIVE MAINTENANCE Overview Preventive maintenance (PM) is a schedule of planned maintenance actions aimed at the prevention of failures. PM is the best way to preserve and enhance equipment reliability
WALKING TREADMILL SF-T1407M USER MANUAL
 WALKING TREADMILL SF-T1407M USER MANUAL IMPORTANT! Please retain owner s manual for maintenance and adjustment instructions. Your satisfaction is very important to us, PLEASE DO NOT RETURN UNTIL YOU HAVE
IT ALL STARTS WITH A VISION IT ALL STARTS WITH A VISION FITNESS U 6 0 B I K E S E R V I C E M A N U A L
 IT ALL STARTS WITH A VISION IT ALL STARTS WITH A VISION FITNESS U 6 0 B I K E S E R V I C E M A N U A L TABLE OF CONTENTS CHAPTER 1: SERIAL NUMBER LOCATION... 1 CHAPTER 2: IMPORTANT SAFETY INSTRUCTIONS
G3-MS20 G3-MS40 G3-MS24 G3-MS51 G3-MS52 G3-MS53 G3-MS50 G3-MS80 AURA SERIES
 AURA SERIES G3-MS G3-MS5 G3-MS5 G3-MS53 G3-MS0 G3-MS0 G3-MS50 G3-MS80 IMPORTANT SAFETY INFORMATION It is the sole responsibility of the purchaser of MATRIX products to instruct all individuals, whether
R 3 x B i k e S e R V i C e M A N U A l
 R3x-01 Bike SERVICE MANUAl table of contents CHAPTER 1: Serial number location... 1 CHAPTER 2: Important Safety instructions 2.1 Read and Save These Instructions... 2 2.2 Electrical Requirements... 2
C 5 X C L I M B M I L L S E R V I C E M A N U A L
 C 5 X - 0 1 C L I M B M I L L S E R V I C E M A N U A L TABLE OF CONTENTS CHAPTER 1: SERIAL NUMBER LOCATION... 1 CHAPTER 2: IMPORTANT SAFETY INSTRUCTIONS 2.1 Read and Save These Instructions... 3 2.2 Electrical
R 3 X B I K E S E R V I C E M A N U A L
 R 3 X - 0 2 B I K E S E R V I C E M A N U A L TABLE OF CONTENTS CHAPTER 1: SERIAL NUMBER LOCATION... 1 CHAPTER 2: IMPORTANT SAFETY INSTRUCTIONS 2.1 Read and Save These Instructions... 2 2.2 Electrical
A935 OWNER'S MANUAL ASSEMBLY INSTRUCTIONS
 2013.02 A935 OWNER'S MANUAL ASSEMBLY INSTRUCTIONS A. SAFETY INSTRUCTIONS Read all cautions/warnings and obtain proper instruction on use of the machines prior to using. Use appropriate positioning and
EXERPEUTIC TF2000 Fitness Walking and Rehab Treadmill
 hh EXERPEUTIC TF2000 Fitness Walking and Rehab Treadmill IMPORTANT: Read all instructions carefully before assembling and/or using this product. Retain this owner s manual for future reference. The specifications
E5x-02 elliptical Trainer
 E5x-02 elliptical Trainer SERVICE MANUAl table of contents CHAPTER 1: Serial number location... 1 CHAPTER 2: Important Safety instructions 2.1 Read and Save These Instructions... 3 2.2 Electrical Requirements...
CARE AND MAINTENANCE INSTRUCTIONS
 STRONG. SMART. BEAUTIFUL. CARE AND MAINTENANCE INSTRUCTIONS In order to maximize life span, and minimize down time, all MATRIX equipment requires regular cleaning, and maintenance items performed on a
INDEX 1. OVERVIEW DRAWING IMPORTANT SAFETY INSTRUCTIONS GROUNDING INSTRUCTIONS PRE-ASSEMBLY CHECK LIST ASSEMBLY STEPS...
 1 INDEX 1. OVERVIEW DRAWING...2 2. IMPORTANT SAFETY INSTRUCTIONS...3 3. GROUNDING INSTRUCTIONS...4 4. PRE-ASSEMBLY CHECK LIST...6 5. ASSEMBLY STEPS...7 6. CAUTION...9 7. MAINTENANCE...9 8. COMPUTER OPERATION
A5x-02 Ascent Trainer
 A5x-02 Ascent Trainer SERVICE MANUAl table of contents CHAPTER 1: Serial number location... 1 CHAPTER 2: Important Safety instructions 2.1 Moving the Unit... 3 2.2 Read and Save These Instructions...
Treadmill OWNER S MANUAL
 Treadmill 1030.10-082917 OWNER S MANUAL PLEASE DO NOT RETURN THIS PRODUCT TO THE STORE. STOP. Contact customer service if you have any questions regarding assembly or proper operation of the machine. Email
2.1 Read and Save These Instructions Electrical Requirements... 4
 E5x-03 Suspension elliptical SERVICE MANUAl E5X-04 SUSPENSION ELLIPTICAL SERVICE MANUAl Table of contents CHAPTER 1: Serial number location... 1 CHAPTER 2: Important Safety instructions 2.1 Read and Save
R o w e R ( A R 1 1 ) S e R V I C e M A N U A l
 S e R V I C e M A N U A l") Rower-02 (AR11) SERVICE MANUAl Table of contents CHAPTER 1: Serial number location... 1 CHAPTER 2: Important Safety instructions 2.1 Read and Save These Instructions... 2 2.2 Locating the Unit... 2 2.3
Rower-02 (AR11) SERVICE MANUAl Table of contents CHAPTER 1: Serial number location... 1 CHAPTER 2: Important Safety instructions 2.1 Read and Save These Instructions... 2 2.2 Locating the Unit... 2 2.3
TABLE OF CONTENTS CHAPTER 1: SAFETY PRECAUTIONS. 2.3 COMPONENTS in the Hardwars Kit COMPONENTS on the Product SETP SETP2...
 TABLE OF CONTENTS CHAPTER : SAFETY PRECAUTIONS. SAFETY PRECAUTIONS... CHAPTER 2: INSTRUCTIONS 2. DIMENSIONS... 2.2 LIST OF PARTS... 2.3 COMPONENTS in the Hardwars Kit.... 2.4 COMPONENTS on the Product...
G1 STRENGTH 3-STACK MULTI-GYM
 G STRENGTH 3-STACK MULTI-GYM IMPORTANT SAFETY INFORMATION It is the sole responsibility of the purchaser of MATRIX Fitness Systems products to instruct all individuals, whether they are the end user or
GFTMB GFTVRT GFTFS GFTWM GFTEXP GFTLM GFTCB GFTHB CONNEXUS
 CONNEXUS GFTFS GFTWM GFTEXP GFTLM GFTMB GFTVRT GFTCB GFTHB IMPORTANT SAFETY INFORMATION It is the sole responsibility of the purchaser of MATRIX products to instruct all individuals, whether they are the
FitBike 1 DBT. Instructions / Manual / Maintenance
 FitBike 1 DBT Instructions / Manual / Maintenance SAFETY PRECAUTIONS Please read all instructions carefully before using this product. Retain this manual for future reference. The specifications of this
TROUBLESHOOTING TROUBLESHOOTING
 FOR 2007 TREADMILLS: (T9200 SIMPLE, T9500 SIMPLE, T9600 SIMPLE, T9250 SIMPLE, T9450 SIMPLE) (T9200 DELUXE, T9500 DELUXE, T9600 DELUXE, T9250 DELUXE, T9450 DELUXE) (T9200 PREMIER, T9500 PREMIER, T9600 PREMIER,
9.33, 9.35 Treadmill
 9.33, 9.35 Treadmill Warning: This service manual is for use by Precor trained service providers only. If you are not a Precor Trained Servicer, you must not attempt to service any Precor Product; Call
How to Keep your Treadmill Running
 How to Keep your Treadmill Running Buying a treadmill is hard enough. Choosing the best out of many treadmills in the market is nigh impossible. But once you ve got the treadmill you ve always wanted,
WARNING: ALWAYS UNPLUG THE TREADMILL FROM THE ELECTRICAL OUTLET BEFORE SERVICING THE UNIT.
 Z100-A81 CE Treadmill WARNING: ALWAYS UNPLUG THE TREADMILL FROM THE ELECTRICAL OUTLET BEFORE SERVICING THE UNIT. Table of Contents TABLE OF CONTENTS Table of Contents...1 Table of Figures...3 Description...4
WARNING: ALWAYS UNPLUG THE TREADMILL FROM THE ELECTRICAL OUTLET BEFORE SERVICING THE UNIT.
 Z700-A82 / 120V Treadmill WARNING: ALWAYS UNPLUG THE TREADMILL FROM THE ELECTRICAL OUTLET BEFORE SERVICING THE UNIT. Table of Contents TABLE OF CONTENTS Table of Contents...1 Table of Figures...3 Description...4
E7xE-01 elliptical Trainer
 E7xE-01 elliptical Trainer SERVICE MANUAl Table of contents CHAPTER 1: Serial number location... 1 CHAPTER 2: Important Safety instructions 2.1 Read and Save These Instructions... 3 2.2 Electrical Requirements...
Magnetic Elliptical Trainer
 Magnetic Elliptical Trainer ITEM NO.: 400 OWNER S MANUAL IMPORTANT: Read all instructions carefully before using this product. Retain this owner s manual for future reference. The specifications of this
U 3 X B I K E S E R V I C E M A N U A L
 U 3 X - 0 2 B I K E S E R V I C E M A N U A L TABLE OF CONTENTS CHAPTER 1: SERIAL NUMBER LOCATION... 1 CHAPTER 2: IMPORTANT SAFETY INSTRUCTIONS 2.1 Read and Save These Instructions... 3 2.2 Electrical
OWNERS MANUAL MODEL ECT-2100 ELLIPTICAL CROSSTRAINER
 OWNERS MANUAL MODEL ECT-00 ELLIPTICAL CROSSTRAINER QUESTION? As a quality home gym supplier we are committed to your complete satisfaction. If you have questions, or find missing or damaged parts, we will
TOSHIBA Thermal Printer B-852-R SERIES. Maintenance Manual. Document No. EO Original Mar., 2006 (Revised ) PRINTED IN JAPAN
 PRINTED IN JAPAN") TOSHIBA Thermal Printer B-852-R SERIES Maintenance Manual Original Mar., 2006 (Revised ) Document No. EO18-33018 PRINTED IN JAPAN EO18-33018 TABLE OF CONTENTS Page 1. UNPACKING --------------------------------------------------------------------------------------------1-1
TOSHIBA Thermal Printer B-852-R SERIES Maintenance Manual Original Mar., 2006 (Revised ) Document No. EO18-33018 PRINTED IN JAPAN EO18-33018 TABLE OF CONTENTS Page 1. UNPACKING --------------------------------------------------------------------------------------------1-1
PaceMaster Bronze XRC
 PaceMaster Bronze XRC OWNER S MANUAL Aerobics Inc., 34 Fairfield Place West Caldwell, NJ 07006, (973) 276-9700 www.pacemaster.com Part # BRONZE XRC Rev. 11/13/07 1 TABLE OF CONTENTS INTRODUCTION 3 IMPORTANT
Manual Treadmill with Pulse
 Manual Treadmill with Pulse V1.0-082715 OWNER S MANUAL Item #1005 TABLE OF CONTENTS SERVICE ------------------------------------------------------------------------ 2 IMPORTANT LABELS --------------------------------------------------------
Oreck Magnesium Series Service Manual. The Oreck Manufacturing Company
 Oreck Magnesium Series Service Manual The Oreck Manufacturing Company 08/2012 10/2011 The Oreck Manufacturing Company Contents Covering all Magnesium Upright Models Including: LW100, LW125, LW1000, AND
PRODUCT MANUAL TILE CUTTING MACHINE. . Operation. Parts List and Diagram SPECIFICATIONS CAUTION:
 FLORCRAFTT TM PRODUCT MANUAL SKU NUMBER 709-4242 SERIAL NUMBER: CAUTION: FOR YOUR OWN SAFETY READ INSTRUCTION MANUAL COMPLETELY AND CAREFULLY BEFORE OPERATING THIS 7 TILECUTTING MACHINE SPECIFICATIONS
JOHNSON T8000. Treadmill. Service Manual
 JOHNSON T8000 Treadmill Service Manual Make by JearyCheng, KevinChang Aug.25.2004 TABLE OF CONTENTS SECTION 1: LIMITED WARRANTY..1-1 SECTION 2: EXPLODED DIAGRAM.2-1 SECTION 3: WIRING DIAGRAM 3-1 SECTION
ASSEMBLY MANUAL 9GU - COMMERCIAL UPRIGHT BIKE
 ASSEMBLY MANUAL 9GU - COMMERCIAL UPRIGHT BIKE IMPORTANT SAFETY INSTRUCTIONS Read this Owner s Manual and follow it s instructions carefully before using the machine. Make sure that it is properly assembled
table of contents 3.1 Legal Disclaimer Training Notice Read and Save These Instructions Electrical Requirements...
 Ascent Trainer SERVICE MANUAl table of contents CHAPTER 1: Serial number location... 1 CHAPTER 2: Moving the unit... 2 CHAPTER 3: Important Safety instructions 3.1 Legal Disclaimer... 3 3.2 Training Notice...
Sears Canada Service Manual
 Sears Canada Service Manual Treadmills Models 30750, 30727 Table of Contents >> Table of Contents Section One Section Two Safety Instructions 3 Horizon Fitness 5-Step Diagnostic Process 13 Recommended
Marsh Shipping Supply Co. LLC. Marsh TD2100 Electric Taper Technical Manual
 Marsh Shipping Supply Co. LLC Marsh TD2100 Electric Taper Technical Manual 2 A wall-socket must be close to the product and readily accessible. The overall system is protected against overload by the branch
Checker Unload Checkstand Installation Instructions
 Front-End Checkouts Commercial Refrigeration Equipment Display Merchandisers Store Fixtures Checker Unload Checkstand Installation Instructions Attention Store Manager: Please find enclosed in this packet
The Walkstation. Care & Maintenance. FitWork Walkstation
 The Walkstation Care & Maintenance FitWork Walkstation Treadbelt Adjustment: Your treadmill s running belt has been properly aligned at the factory. However, when the treadmill is used on an uneven surface,
Motion System Components Diagram. Note: #2 Mirror Cover and X-Axis Motor Cover have been removed for visibility. Maintenance.
 Professional Laser System PLS3.75, PLS4.75, PLS6.75 and PLS6.150D Keeping the laser system clean will ensure the highest quality engraving. A clean laser system is the best performing laser system. The
ASSEMBLY INSTRUCTIONS / OWNERS MANUAL AIR BIKE AB-1
 AIR BIKE AB- ASSEMBLY INSTRUCTIONS / OWNERS MANUAL IMPORTANT : READ ALL ASSEMBLY INSTRUCTIONS AND SAFETY PRECAUTIONS BEFORE USING THIS PRODUCT. REFERENCE ALL SAFETY GUIDELINES AND WARNING LABELS. RETAIN
PRO INDOOR CYCLING BIKE
 PRO INDOOR CYCLING BIKE SF-B901 USER MANUAL IMPORTANT! Please retain owner s manual for maintenance and adjustment instructions. Your satisfaction is very important to us, PLEASE DO NOT RETURN UNTIL YOU
ACCORD ELLIPTICAL TRAINER ITEM NO: 93470
 ACCORD ELLIPTICAL TRAINER ITEM NO: 93470 OWNER S MANUAL IMPORTANT: Read all instructions carefully before using this product. Retain this owner s manual for future reference. The specifications of this
EASY ADJUSTABLE SEAT RECUMBENT BIKE
 EASY ADJUSTABLE SEAT RECUMBENT BIKE SF-RB4616 USER MANUAL IMPORTANT! Please retain owner s manual for maintenance and adjustment instructions. Your satisfaction is very important to us, PLEASE DO NOT RETURN
MAGNETIC RECUMBENT BIKE
 MAGNETIC RECUMBENT BIKE SF-RB4417 USER MANUAL IMPORTANT: Please read this manual carefully before using the product. Retain owner s manual for future reference. For Customer Service, please contact: support@sunnyhealthfitness.com
Maintenance Adjustments
 4 Maintenance and Adjustments Chapter Contents Cleaning the Printer and Paper Handling Accessories..... 158 Cleaning the HP Digital Copier....................... 161 Cleaning ADF and Glass............................
9.31, 9.33, 9.35 Treadmill
 9.31, 9.33, 9.35 Treadmill Warning: This service manual is for use by Precor trained service providers only. If you are not a Precor Trained Servicer, you must not attempt to service any Precor Product;
XPS-ProFeed Shuttle SERVICE MANUAL. Revised:
 XPS-ProFeed Shuttle SERVICE MANUAL Revised: 1-14-15 RENA SYSTEMS INC. 910 East Main Street; Suite 200 Norristown, PA 19401-4110 Phone: (610) 650-9170 Fax: (610) 270-3947 Web Site: www.renausa.com SAFETY
9.57 Treadmill Warning:
 9.57 Treadmill Warning: This service manual is for use by Precor trained service providers only. If you are not a Precor Trained Servicer, you must not attempt to service any Precor Product; Call your
ismart 500 TREADMILL USER MANUAL Visit facebook.com/trojanhealth
 CAUTION READ ALL PRECAUTIONS AND INSTRUCTIONS IN THIS MANUAL before USING THIS EQUIPMENT. KEEP THIS MANUAL for future REfERENCE. TM ismart 500 TREADMILL USER MANUAL Visit facebook.com/trojanhealth www.trojanhealth.co.za
SMITH MACHINE F-SM. Model F-SM. Retain This Manual for Reference OWNER'S MANUAL
 -- NOTE: Please read all instructions carefully before using this product Table of Contents Safety Notice SMITH MACHINE F-SM Hardware Identifier Assembly Instruction Parts List Model F-SM Retain This Manual
XPS-ProFeed Shuttle SERVICE MANUAL. Revised:
 XPS-ProFeed Shuttle SERVICE MANUAL Revised: 9-14-15 RENA SYSTEMS INC. 910 East Main Street; Suite 200 Norristown, PA 19401-4110 Phone: (610) 650-9170 Fax: (610) 270-3947 Web Site: www.renausa.com SAFETY
SUNNY PRO INDOOR CYCLING BIKE
 SUNNY PRO INDOOR CYCLING BIKE SF-B901 USER MANUAL IMPORTANT! Please retain owner s manual for maintenance and adjustment instructions. Your satisfaction is very important to us, PLEASE DO NOT RETURN UNTIL
ESSENTIAL TIPS. Official Guide MAINTENANCE GUIDE XM-PRO II & XM-PRO III XM-PRO II & III. LIVE LONGER! LOOK AFTER YOUR TREADMILL & SAVE s
 TREADMILL MAINTENANCE GUIDE ESSENTIAL TIPS XM-PRO II & XM-PRO III Official Guide TREADMILL COMPONENTS? UNDERSTAND YOUR TREADMILL XM-PRO II & III MAINTENANCE SCHEDULE LIVE LONGER! LOOK AFTER YOUR TREADMILL
Uplift Premium Power Lifting Seat
 Uplift Premium Power Lifting Seat User Guide Read all instructions before using the Uplift Power Seat DANGER - To reduce the risk of electric shock: IMPORTANT SAFETY INSTRUCTIONS Always unplug the Uplift
Cybex Arc Trainer Owner s & Service Manual. 7 - Service
 7 - Service Table of Contents......... iii Warnings/Cautions All warnings and cautions listed in this chapter are as follows:! WARNING: All maintenance activities shall be performed by qualified personnel.
T621 Repair Manual (Electronics)
") T621 Repair Manual (Electronics) Table of Contents 1-1-1. Product Picture-T621 1-2-1. Display-T621 1-3-1. Component Placement-T621 Display 1-3-2. Component Placement-T621 Drive Board Area 1-4-1. Block
T621 Repair Manual (Electronics) Table of Contents 1-1-1. Product Picture-T621 1-2-1. Display-T621 1-3-1. Component Placement-T621 Display 1-3-2. Component Placement-T621 Drive Board Area 1-4-1. Block
9.31, 9.33, 9.35 Treadmill
 9.31, 9.33, 9.35 Treadmill Warning: This service manual is for use by Precor trained service providers only. If you are not a Precor Trained Servicer, you must not attempt to service any Precor Product;
Florham Park, NJ USA Call (ASCO) for sales or service
 for sales or service") Operator s Manual 4000 Series ATS Automatic Open-Transition Transfer Switches D design 30 230A, J design 260 600A, H-design 800 1200A, G-design 1600 4000A, F-design 4000A DANGER is used in this manual
Operator s Manual 4000 Series ATS Automatic Open-Transition Transfer Switches D design 30 230A, J design 260 600A, H-design 800 1200A, G-design 1600 4000A, F-design 4000A DANGER is used in this manual
1 2 3a 3b THREADING CARD 9 10 ABC Office
 1 2 3a 3b 4 5 6 7 8 9 10 THREADING CARD Important Safety instructions YOUR SAFETY AS WELL AS THE SAFETY OF OTHERS IS IMPORTANT TO GBC. IN THIS INSTRUCTION MANUAL AND ON THE PRODUCT ARE IMPORTANT SAFETY
Snapshot LX5 USER MANUAL. OK on Dimmer Outdoor OK Sound Activated DMX512 Master/Slave 115V/230V Switch Replaceable Fuse User Serviceable Duty Cycle
 LX5 Snapshot OK on Dimmer Outdoor OK Sound Activated DMX512 Master/Slave 115V/230V Switch Replaceable Fuse User Serviceable Duty Cycle USER MANUAL Chauvet, 5200 NW 108th Avenue, Sunrise, FL 33351 U.S.A.
BELT DRIVE PRO INDOOR CYCLING BIKE SF-B901B USER MANUAL
 BELT DRIVE PRO INDOOR CYCLING BIKE SF-B901B USER MANUAL IMPORTANT! Please retain owner s manual for maintenance and adjustment instructions. Your satisfaction is very important to us, PLEASE DO NOT RETURN
RECUMBENT BIKE WITH ARM EXERCISER
 RECUMBENT BIKE WITH ARM EXERCISER SF-RB4631 USER MANUAL IMPORTANT! Please retain owner s manual for maintenance and adjustment instructions. Your satisfaction is very important to us, PLEASE DO NOT RETURN
THIS PRODUCT IS FOR PROFESSIONAL LABORATORY USE ONLY USER'S MANUAL. WELLS ENGINE UNIT 230 VOLT Product No. U905, U906, U907, U908
 DENTAL, INC. TECHNICAL BULLETIN U807-022510 5860 FLYNN CREEK ROAD READ ALL INSTRUCTIONS P.O. BOX 106 BEFORE PROCEEDING COMPTCHE, CALIFORNIA, U.S.A. 95427 SAVE THIS FOR FUTURE REFERENCE THIS PRODUCT IS
TOSHIBA Thermal Printer B-SX6T/SX8T SERIES. Maintenance Manual. Document No. EO Original Mar., 2006 (Revised ) PRINTED IN JAPAN
 PRINTED IN JAPAN") TOSHIBA Thermal Printer B-SX6T/SX8T SERIES Maintenance Manual Original Mar., 2006 (Revised ) Document No. PRINTED IN JAPAN TABLE OF CONTENTS Page 1. UNPACKING--------------------------------------------------------------------------------------------------------
TOSHIBA Thermal Printer B-SX6T/SX8T SERIES Maintenance Manual Original Mar., 2006 (Revised ) Document No. PRINTED IN JAPAN TABLE OF CONTENTS Page 1. UNPACKING--------------------------------------------------------------------------------------------------------
C524, C524i Elliptical Fitness Crosstrainer
 C524, C524i Elliptical Fitness Crosstrainer Warning: This service manual is for use by Precor trained service providers only. If you are not a Precor Trained Servicer, you must not attempt to service any
Foldable Semi-Recumbent Bike
 Foldable Semi-Recumbent Bike IMPORTANT: Read all instructions carefully before using this product. Retain this owner s manual for future reference. The specifications of this product may vary from this
Instruction Manual AVTM for. Strip Chart Recorder Catalog Nos and
 AVTM220003 Rev. B January 2003 Instruction Manual AVTM220003 for DC µa Strip Chart Recorder Catalog Nos. 220003 and 220003-47 PO Box 9007 Valley Forge, PA 19485-1007 U.S.A. 610-676-8500 Shipping Address:
OWNER'S MANUAL WARNING DANGER. Propane cylinders sold separately. The propane cylinder must be disconnected when this firebowl is not use.
 OWNER'S MANUAL READ BEFORE USE! Model No.: BH5003-3 Style No.: 66646 For Outdoor Use Only! Use Propane Gas Only! Propane cylinders sold separately. USE PROPANE GAS ONLY! -Do not store or use gasoline or
MARCY Recumbent Bike PL-960
 NOTE: Please read all instructions carefully before using this product Table of Contents Safety Notice Hardware Identifier MARCY Recumbent Bike PL-960 Assembly Instruction Parts List Computer Warranty
RECUMBENT BIKE IMPORTANT: Read all instructions carefully before using this product. Retain this
 RECUMBENT BIKE IMPORTANT: Read all instructions carefully before using this product. Retain this owner s manual for future reference. The specifications of this product may vary from this photo, subject
PERFORM THE FOLLOWING SAFETY CHECK DAILY:
 FITNESS Introduction We at Vectra Fitness appreciate your selection of our product for your fitness program, and invite your questions and comments. We're sure that you ll be pleased with your new Vectra
T611 Repair Manual (Electronics)
") T611 Repair Manual (Electronics) Table of Contents 1-1-1. Product Picture T611 1-2-1. Overlay T611 1-3-1. Component Placement T611 Display Board 1-3-2. Component Placement T611 Lower Compartment 1-4-1.
T611 Repair Manual (Electronics) Table of Contents 1-1-1. Product Picture T611 1-2-1. Overlay T611 1-3-1. Component Placement T611 Display Board 1-3-2. Component Placement T611 Lower Compartment 1-4-1.
Pro Bike 6000 Series
 Pro Bike 6000 Series Preliminary Service Manual June 28, 2004 Pro Bike (6000 Series) Service Manual Table of Contents 1. Preventative Maintenance 2. Display Settings 3. Diagnostic Lights 4. Parts & Diagrams
Magnetic Rowing Machine with Aluminum Slide Rail User Manual RW026 USER MANUAL
 Magnetic Rowing Machine with Aluminum Slide Rail User Manual MODEL NO.: RW026 IMPORTANT! Read all instructions carefully before using this product. Save this manual for future reference. EXERCISE EQUIPMENT
ADJUSTABLE TENSION MAGNETIC TREADMILL
 ADJUSTABLE TENSION MAGNETIC TREADMILL SF-T7614 USER MANUAL IMPORTANT : Read all instructions carefully before using this product. Retain this manual for future reference. For customer service, contact
CROSS TRAINING MAGNETIC RECUMBENT BIKE
 CROSS TRAINING MAGNETIC RECUMBENT BIKE SF-RB4708 USER MANUAL IMPORTANT! Please retain owner s manual for maintenance and adjustment instructions. Your satisfaction is very important to us, PLEASE DO NOT
TR22F Repair Manual (Electronics)
") TR22F Repair Manual (Electronics) Table of Contents 1-1-1. Product Picture - TR22F 1-2-1. Overlay - TR22F 1-3-1. Component Placement - TR22F Display Board 1-3-2. Component Placement - TR22F Lower Compartment
TR22F Repair Manual (Electronics) Table of Contents 1-1-1. Product Picture - TR22F 1-2-1. Overlay - TR22F 1-3-1. Component Placement - TR22F Display Board 1-3-2. Component Placement - TR22F Lower Compartment