The words gasoline, petrol and fuel are used interchangably throughout this manual.
|
|
|
- Imogen Gilbert
- 6 years ago
- Views:
Transcription
1 The words gasoline, petrol and fuel are used interchangably throughout this manual. RISK OF DEATH AND INJURY TO THE USER AND THOSE AROUND THE WORK AREA: THE ENTIRE MANUAL MUST BE READ AND UNDERSTOOD BEFORE USING THE CHAINSAW. USERS MUST COMPLETE SUITABLE TRAINING BEFORE USING THE SAW IF THE USER IS NOT FAMILIAR WITH CORRECT USE OF THE SAW, DANGERS ASSOCIATED WITH SAW USE, ANY PART OF THIS MANUAL OR IS IN ANY WAY LACKING COMPETENCE WITH CHAINSAW USE.
2 ... Pg 3...Pg 4... Pg 7... Pg 9... Pg Pg Pg Pg Pg Pg Pg Pg Pg 27
3 Thanks for buying the, another high-quality machine from our company. To get the most out of your purchase, please read the manual before use. We ask you to please read this manual carefully beforehand in order to familiarise yourself with this product and after reading, please store this instructional manual for future reference. Failure to follow the proper protocols listed in the manual may cause personal injury to the operator or damage to equipment. 3


4 4
5 5

6 6
7 Failure to follow the instructions listed below may result in electric shock, fire and/or serious injury. The term power tool in all of the information listed below refers to the Chainsaw. Observe local safety regulations issued by your government, insurance or safety authorities. Chainsaws should only be used after completing training carried out by a qualified person or organisation conducting training approved by relevant authorities in your jurisdiction. The user is responsible for damage, risks or accidents while using the saw or completing the job. The saw must only be loanded to / used by people who are trained in chainsaw use and familiar with this model. The instruction manual must be with the machine when being loaned/used. Before starting work ensure there are no power lines or other hazards in the surrounding area. Keep the working area clean and well lit. Do not work in conditions that may affect work site safety such as darkness, rain, fog or wind. Do not operate the power tool in the presence of flammable liquids, gases or dust. Minors must not be allowed to use the chainsaw. Ensure the saw, work area and surrounds are kept clear of all bystanders, children and animals. Keep the area free of all distractions. Only users in good physical health and mental state should use the saw. Do not use the chainsaw if you have any condition that might be aggravated by strenuous work. Stay alert, watch what you are doing and use common sense when operating a power tool. Do not use a power tool while you are tired or under the influence of drugs, alcohol, medecines or medication. A moment of inattention while operating any power tools may result in serious personal injury. Always use safety equipment. Always wear eye protection. Safety equipment such as cut resistant pants, dust masks, non-skid cut resistant steel cap safety shoes, hard hat, heavy duty non-slip gloves, face shields and hearing protection used for appropriate conditions must be used and will help reduce personal injuries. Safety equipment is often available at equipment retailers, hardware stores or specialty safety equipment retailers. Never wear loose clothing, accessories or jewelry that could become caught in moving chainsaw parts or the material being cut. Long hair must be covered after being tied up to reduce chances of it being caught in the saw, work material or on anything around the site. 7
8 Always wear earplugs to protect your ears. Do not overreach. Keep proper footing and balance at all times. This enables better control of the power tool in unexpected situations. Dress properly. Do not wear loose clothing or jewelry. Keep your hair, clothing and gloves away from moving parts. Loose clothes, jewelry or long hair can be caught in moving parts. Properly store, check and maintain your power tools. Check for misalignment or binding of moving parts, breakage of parts and any other condition that may affect operation. If damaged, have the power tool repaired before use. Many accidents are caused by poorly maintained power tools. Keep the chain sharp and clean. Properly maintained cutting tools with sharp cutting edges are less likely to bind and are easier to control. Use the power tool accessories in accordance with these instructions and in the manner intended for the particular type of power tool, taking into account the working conditions and the work to be performed. Using the power tool for operations different from its intended use could result in hazardous situations. A low power electomagnetic field is produced by the ignition system. An effect on pacemakers can not be excluded, therefore the chainsaw should not be used by those with a pacemaker. Chainsaws must only be used to cut wood. Do not use if there is a risk of foreign matter being in/on the wood. Do not let the chain come into contact with any material other than wood. Do not modify the saw. Do not use it in any way other than for which it was designed. Only use parts and accessories that are technically eqivalent to whart is supplied with the saw when new. Stop the engine, engage the chainbrake and attach the chain cover when transporting the saw even for small distances. Never touch hot surfaces such as the exhaust/muffler system, chain or bar. Never allow hot exhaust gasses to come into contact with your skin. Drain the fuel when transporting in a vehicle or an enclosed area. Always secure the saw when transporting in/on a vehicle to help protect the saw, passangers and other property being transported. Have your power tool serviced by a qualified repair person using only original replacement parts. 8
9 Kickback may occur when the nose or tip of the guide bar touches an object, or when the wood closes in and pinches the chainsaw in the cut. If the tip comes in contact with an object, it may cause a lightning fast reverse reaction, that will kick the guide bar/chain up and back towards the operator. Alternately, pinching the chainsaw along the top of the guide bar will push the guide bar rapidly back towards the operator. Either of these reactions may cause you to lose control of the saw, which can result in serious personal injury or death. Do not rely exclusively on the safety devices built into your saw. As a chainsaw user, you should take several steps to reduce chances of accident or injury. The following list is not full or exhaustive - attend proper training before using a chainsaw. With a basic understanding of kickback you can reduce the element of surprise. Sudden surprise contributes to accidents. Never touch the front tip section of the guidebar against wood or any object. Do not attempt to cut wood using the top section of the guidebar unless you have completed training on this operation. Keep a good grip on the saw with both hands, the right hand on the rear handle, and the left hand on the front handle, when the engine is running. Use a firm grip with thumbs and fingers encircling the chainsaw handles. A firm grip will help you reduce kickback and maintain control of the saw. Make certain that the area in which you are cutting is free from obstructions. Do not let the nose of the guide bar come into contact with logs, branches, or any other obstruction which could be hit while you are operating the saw. Almost all situations requiring cutting at high engine speeds. Do not overreach or cut above shoulder height. Only use replacement bars and chains specified by the manufacturer. F19 9
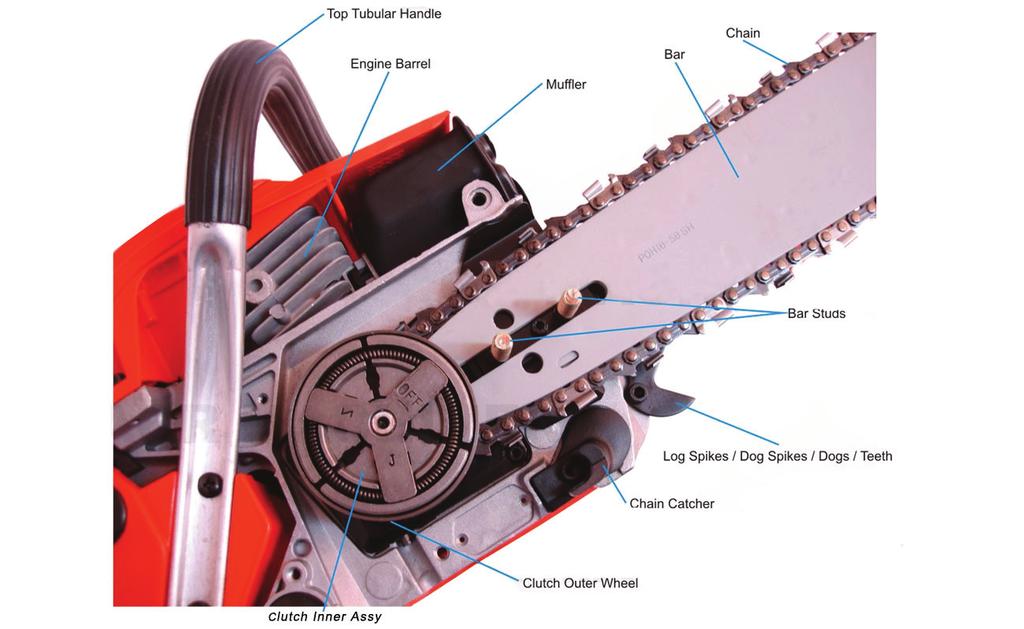
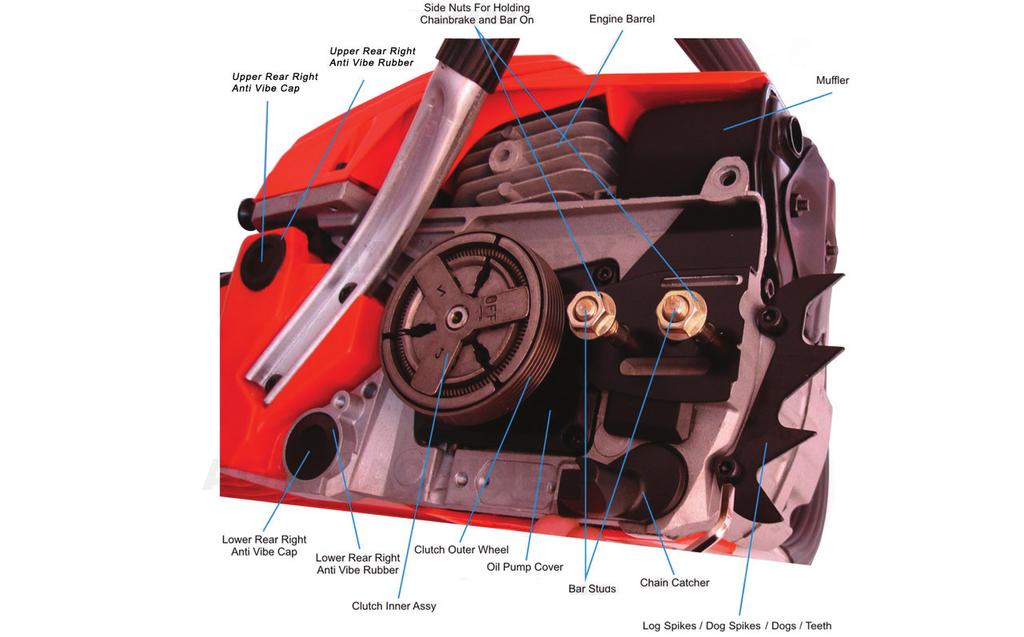
10 Refer to the identification diagrams on Pages 4, 5, 6. Open the box and install the guide bar and the chainsaw on the power unit as follows: The chainsaw has very sharp edges. Use thick protective gloves for safety. 1. Pull the chainbrake handle toward the rear of the saw (or pull in the direction that would be toward the rear of the saw if the chainbrake was installed onto the saw). 2. Loosen the nuts and remove the chain cover. 3. Install the attached spike to the power unit (Models greater than 45cc only). 4. Gear the chain to the sprocket and, while fitting the chain around the guide bar, mount the guide bar to the power unit. Adjust the position of the chain tensioner. 5. Fit the chain cover to the power unit and fasten the nuts to finger tightness. 6. While holding up the tip of the bar, adjust the chain tension by turning the tensioner screw until the tie straps just touch the bottom side of the bar rail (F4). F3 (1) (1) Moving Direction (2) Loosen (3) Tighten (4) Tensioner Screw 7. Tighten the nuts securely with the bar tip held up (12-15 N.m.). Then check the chain for smooth rotation and proper tension while moving it by hand. If necessary, readjust with the chain cover loose. 8. Tighten the tensioner screw. F4 (2) (3) (4) A new chain will stretch when first used. Check and readjust the tension frequently as a loose chain can easily derail and cause rapid wear of itself and the guide bar. 10
11 RISK OF EXPLOSION AND/OR FIRE - SEVERE INJURY, BURNS OR DEATH. Gasoline is extremely flammable. Never smoke or bring any flame or sparks near fuel, fuel storage containers or the saw. Stop the engine and allow it to cool before refueling the unit. Select outdoor bare ground when handling fuel and move at least 10 metres away from the fueling point before starting the engine. Open the fuel cap slowly to allow controlled pressure/vapour release. Clean up fuel spills immediately. Change your clothes if they come into contact with fuel. Wipe all spilled fuel off the machine before use. Replace the fuel cap securely after refuelling to reduce chances of accidental fuel leaks. Only use normal 2-stroke oil to mix with the fuel. Do not use BIA or TCW (2 stroke water cooling type) mixed oils. Do not use Ethanol blended fuels. Poor quality gasoline or oils may damage sealing rings, fuel lines or fuel tank of the engine. Keep open flames away from the area where fuel is handled or stored. Mix and store fuel only in an approved gasoline container. Most engine troubles are caused, directly or indirectly, by the fuel used on the machine. Take special care not to mix motor oil for 4 cycle engines. F5 2 25:1 Mixing Chart Gasoline Litres Cycle Oil ml Recommended Mixing Ratio Condition Gasoline:Oil Up to 20 hours use 20:1 After 20 hours use 25:1 11
12 Fuel must be fully mixed. 1. Measure out the quantities of gasoline and oil to be mixed. 2. Put some of the gasoline into a clean, approved fuel container. 3. Pour in all of the oil and agitate well. 4. Pour in the rest of gasoline and agitate (mix) again for at least one minute. As some oils may be difficult to agitate depending on oil ingredients, sufficient agitation is necessary to ensure long engine service life. Be careful that, if the agitation is insufficient, there is an increased danger of early piston seizing. 5. Put a clear indication on the outside of the container to avoid mixing up with gasoline or other containers. 6. Indicate the contents on outside of container for easy identification. 1. Untwist and remove the fuel cap. Rest the cap on a dustless place. 2. Pour fuel into the fuel tank to 80% of the full capacity. 3. Fasten the fuel cap securely and wipe up any fuel spillage around the unit. Select clear bare ground for fueling. Move at least 10ft (3m) away from the fueling point before starting the engine. Stop the engine before refueling the unit. At the time, be sure to sufficiently agitate the mixed gasoline in the container before filling the fuel tank. For your engine life, avoid: 1. FUEL WITH NO OIL (RAW GASOLINE) it will cause severe damage to the internal engine parts very quickly. 2. GASOHOL it can cause deterioration of rubber and/or plastic parts and disruption of engine lubrication. 3. OIL FOR 4-CYCLE ENGINE USE it can cause spark plug fouling, exhaust port blocking, or piston ring sticking. 4. Mixed fuels which have been left unused for a period of one month or more may clog the carburetor and result in the engine failing to operate properly. 5. In the case of storing the product for a long period of time, clean the fuel tank after rendering it empty. Next, activate the engine and empty the Carburetor of the composite fuel. Use motor oil SAE #10W-30 all year round or SAE #30-#40n in summer and SAE #20 in winters. F6 Do not use waste oil that can cause damage to the oil pump. 12
13 It is very dangerous to run a chainsaw that has broken parts or lacks any parts. Before starting the engine, make sure that all the parts including bar and chain are installed properly. Ensure handle surfaces are clean and dry, the chainsaw has not been modified, all cables/wires are correctly connected, wire/cable insulating covers are correctly installed, the on/off switch is functioning correctly, any safety interlock system is functioning correctly, all parts are installed/mounted correctly, the chain is tensioned correctly and that the chainbrake is functional before attempting to start the saw. Move at least 10 meters away from any fuel storage before starting the engine. There must be no bystanders or animals in the work area when starting or using the saw. Do not attempt to start the saw if the chain is in a cut or in contact with anything. Move the on/off switch to OFF, STOP or 0 in the case of impending danger or an emergency, or any time when the engine is to be switched off. Never let the engine run unattended. Note that the chain will not immediately stop moving when the throttle trigger is released. Only attempt to use the saw when work area conditions are completely safe. Pay special attention to uneven surfaces, slippery surfaces, slopes, water/ice, trip hazards, wood that could move when cut or due to gravity. Note that it will be harder to hear warning sounds when using hearing protection and because of engine noise. Never work alone - while all bystanders must be away from the work area, the saw should only be used when a competent adult is within calling distance in case assistance is needed. The saw must not be used in the presence of easily combustable materials such as dry grass / plant material. Exhaust gasses and the exhaust system pose a risk of ignition. Ensure proper ventilation - The engine produces fuel vapours, fumes and Carbon Monoxide, an odourless colourless poisenous gas that can cause death if inhaled in sufficient quantities or may lead to reduced ability to use the saw safely. Pay special attention not to work in confined situations. If you feel sick while using the saw, immediately cease use and seek medical help. 13
14 1. Fill fuel and chain oil tanks respectively, and tighten the caps securely. 2. Set the switch to I or ON position (F8). F8 Switch 3. Pull out the choke knob to choke the engine for starting (F10). F10 4. While holding the saw unit securely on the ground, pull the starter rope vigorously (F11). F11 Do not start the engine while you have the chainsaw in one hand. This can be dangerous because you may lose control of the chainsaw and injure yourself. 5. When engine sounds like it is about to start, push in the choke knob to the first-stage position and then pull the starter again to start the engine. 6. Allow the engine to warm up with the throttle lever pushed slightly. Keep clear of the chain as it will start rotating upon starting of engine. Before you start the engine, make sure the chainsaw is not in contact with anything. 14
15 Make sure to set up the bar and chain when checking the oil supply. If not, the rotating parts may be exposed. It is very dangerous. After starting the engine, run the chain at medium speed and see if the chain oil is scattered off as shown in the figure.(f12). F12 The chain oil flow can be changed by inserting a screwdriver in the hole on bottom of the clutch side. Only adjust the oil flow when the engine is switched off. Some models may have a top mounted oil flow adjuster. Adjust according to your work conditions. F13 Adjuster The oil tank should become nearly empty by the time fuel is used up. Be sure to refill the oil tank every time when refueling the saw. The carburetor on your unit has been factory adjusted, but may require fine tuning due to a change in operating conditions. Before adjusting the carburetor, make sure that the provided air/fuel filters are clean and fresh and the fuel is properly mixed. When adjusting, take the following steps: Be sure to adjust the carburetor with the bar chain attached. 1. Stop the engine and screw in both the H and L needles until they stop. Never force them. Then set them back to the initial number of turns. H needle: 1 ¼ +=1/4 L needle: 1 ½ +=1/4 2. Start the engine and allow it to warm up at half-throttle. 3. Turn the L needle slowly clockwise to find the maximum idling speed point, then set the needle back a quarter (1/4) turn counterclockwise. 4. Turn the idle adjusting screw (T) counterclockwise so that the chainsaw does not turn. If the idling speed is too slow, turn the screw clockwise. 5. Make a test cut and adjust the H needle for best cutting power, not for maximum speed. 15
16 The chain brake is a device which stops the chain if the chainsaw recoils due to kickback. The brake is activated manually by pushing the chainbrake lever toward the front of the saw. The action of a saw kicking back toward the user will generally engage the chainbrake and help to stop the chain. To disengage (unlock) the chainbrake before use or after the chainbrake was engaged due to kickback, pull the chainbrake handle back toward the rear of the saw. This disengages the brake. The handle can then be released and the saw can be used as normal. When the brake operates, release the throttle lever to slow down the engine speed. Continuous operation with the brake engaged will generate heat from the clutch and may cause trouble. 1. Release the throttle lever to allow the engine to idle for a few moments. 2. Move the switch down to the O (STOP) position. F17 16
17 It is recommended that you practice cutting up smaller logs. This also helps you become accustomed to your chainsaw. Always follow the safety regulations. The chainsaw must only be used for cutting wood. Do not use it to cut other types of material. Vibrations and kickback will vary with different materials. Do not use the chainsaw as a lever for lifting, moving or splitting objects. It is not necessary to force the saw into the cut. Apply only light pressure while running the engine at full throttle. When the chainsaw is caught in the cut, do not attempt to pull it out by force, but use a wedge or a lever to split the cut apart and release the chain/bar. This saw is equipped with a chain brake that will stop the chain in the event of kickback if operating properly. Check the chain brake operation before each usage by running the saw at full the throttle for approximately 1-2 seconds while pushing the front hand guard forward. The chain should stop immediately with the engine at full speed. If the chain does not stop, replace the brake band and clutch drum before use. It is extremely important that the chain brake be checked for proper operation before each use and that the chain must be sharp each use in order to maintain the kickback safety level of this saw. Removal of the safety devices, inadequate maintenance, or incorrect replacement of the bar or chain may increase the risk of serious personal injury due to kickback. 17
18 USERS MUST COMPLETE SUITABLE TRAINING BEFORE USING THE SAW IF THE USER IS NOT FAMILIAR WITH CORRECT METHODS FOR FELLING A TREE, CORRECT USE OF THE SAW, DANGERS ASSOCIATED WITH SAW USE, ANY PART OF THIS MANUAL OR IS IN ANY WAY LACKING COMPETENCE WITH CHAINSAW USE. Always observe which way the tree leans. It is generally easier and safer to fell a tree in the direction it is already leaning. This makes for a cleaner fall while allowing gravity to do the work. 1. Decide the felling direction by considering wind direction, lean of the tree, location of heavy branches and ease of completing the task afterwards. 2. While clearing the area around the tree, make sure that you have a good foothold as well as an available retreat path. 3. Make a notch cut one-third of the way into the tree on the felling side. 4. Make a felling cut from the opposite side of the notch and a level slightly higher than the bottom of the notch (F20). (3) F20 (1) Notch Cut (2) Felling Cut (3) Felling Direction (2) (1) Don t turn your back on a falling tree. Back quickly away to a distance of 20 feet from the falling tree. Position yourself behind a standing tree if possible. Before you begin felling the tree, ensure bystanders are kept a safe distance away. F21 18
19 Always ensure your foothold. Do not stand on the log. A log lying on the ground Saw down halfway, then roll the log over and cut from the opposite side. Always make sure the log is in a stable position when you do this, as rolling or sliding will occur when you are on a slope (F21). A log suspended off the ground (F22) In area A, saw from the bottom one-third and finish by sawing down from the top. In area B, saw down from the top one-third and finish by sawing up from the bottom. F22 B A (1) (2) (2) (1) Cutting the limb of a fallen tree (F23) First check as to which side is bent. Then make the initial cut from the bent side and finish by sawing from the opposite side. F23 (1) (2) Pruning of Standing Tree (F24) Cut up from the bottom, finish down from the top. Do not use an unstable foothold or ladder. Do not overreach. Do not cut above shoulder height. Always use both your hands to hold the saw. F24 (2) (1) 19
20 Before cleaning, inspecting or repairing the unit, make sure that engine has stopped and is cool. Disconnect the spark plug to prevent accidental starting. Air Filter Loosen the knob and remove the air cleaner cover. Take off the filter elements and tap off attached saw dust. If it is extremely dirty, blow it out with compressed air. Oiling Port Dismount the guide bar and check the oiling port for clogging. Guide Bar When the guide bar is dismounted, remove sawdust in the bar groove and the oiling port. F26 (1) (1) Oiling Port (2) Grease Port (3) Sprocket F27 (1) F28 (2) (3) Grease the nose sprocket from the feeding port on the tip of the bar. Others Check for fuel leakage and loose fastenings and damage to major parts, especially handle joints and guide bar mounting. If any defects are found, make sure to have them repaired before operating the saw again. 20
21 Cylinder fins Remove the starter case. Remove sawdust between the cylinder fins. F29 Fuel Filter Using a wire hook, take out the filter from the filler port. Wash the filter with gasoline. Replace with new one if clogged with dirt completely. Oil filter With a wire hook, take out the oil filter from the feeding port. Wash the filter with gasoline. When returning the filter, use a pinch and make sure it is not folded. Spark Plug (F30) Clean the electrodes with a wire brush and reset the gap to 0.65mm as necessary. F mm 21
22 Sprocket (F31) Check for cracks and for excessive wear interfering with the chain drive. If there is wearing, replace it with a new one. Never fit a new chain on a worn sprocket, or a worn chain on a new sprocket. F31 (1) (4) (5) (1) Sprocket (2) Needle Bearing (3) Clutch Drum (4) Spacer (5) Clutch Shoe (2) (3) Air Cooling The engine metal parts can burn your skin. Never touch the cylinder, muffler or ignition plug during operation or right after stopping the engine. Before starting the engine, check around the muffler and clean off sawdust. If you do not do this, it will cause overheating which can start a fire. Keep the muffler clean. This engine is air-cooled. Dust clogging between the inlet port of the cooling air and cylinder fins will cause overheating of the engine. Periodically, check and clean the cylinder fins after removing the air cleaner and the cylinder cover. When installing the cylinder cover, make sure that the switch wires and grommets are positioned correctly in place. Muffler If you do not attach the muffler correctly, the muffler will be loosened through the vibration of the chainsaw. Ensure the muffler body, muffler cover and baffle are attached correctly Make sure the gasket is in working condition. If it s not then replace it with a new one. Before tightening the muffler screw, rub grease on it. After a test run, retighten the screw (TORQUE: N.m./70-80 kg-cm) After stopping the engine, do not touch the muffler with bare hands. If carbon clogs between the muffler, it will cause poor output and trouble in starting. After 100 hours, check and clean the insides of the muffler. 22
23 These sharpening instructions are a guide only, designed for people experienced in chain sharpening. An incorrectly sharpened chain can cause unpredictable cutting behaviour. Attend training by a qualified chainsaw technician before attempting to sharpen a chain. Most users simply purchase a new chain. New chains are presharpened. It is very important for smooth and safe operation to always keep the cutters sharp. The cutters on the chain need to be sharpened when: Sawdust becomes powder-like. You need to use extra force. The cutting path is no longer straight. Vibration increases. Fuel consumption increases. Before filing: Make sure the chainsaw is held securely. Make sure the engine is stopped. Use a round file of proper size for the chain. Chain type: 91VG / 25AP File size: 5 / 32 in (4.0 mm) Place the file on the cutter and push straight forward. Keep the file position as illustrated (F32). F /5 23
24 After each cutter has been filed, check the depth gauge and file it to the proper level as illustrated (F33). F33 (1) (2) (3) 21BP, 21VB: 0.25 (0.65mm) Be sure to round off the front edge to reduce the chance of kickback or tie-sharp breakage. Make sure every cutter has the same length and edge angles as illustrated. F34 (4) (5) (6) (1) Appropriate Gauge (5) Filing Angle (2) Make the shoulder (6) Side Plate Angle round (3) Depth Gauge Standard (4) Cutter Length (7) Top Plate Cutting Angle 60 (7) Reverse the bar occasionally to prevent partial wear. The bar rail should always be square. Check for wear of the bar rail. Apply a ruler to the bar and the outside of a cutter. If a gap is observed between them the rail is normal. Otherwise, the rail is worn and the bar needs to be corrected or replaced (F35). (1) Ruler (2) Gap (3) No Gap (4) Chain Tilts F35 (1) (2) (3) (4) 24
25 Task Before Every Every 6Hrs Every 30Hrs Every 75Hrs As Needed Use If any issue is found then it must be rectified before use of the saw Clean and visually inspect for leaks Check operation of switches, levers, interlocks and controls Check that no screw, bolt, fastener or part is loose or missing Check operation of the chainbrake Check fuel filter Clean fuel filter Clean fuel tank Clean chain oil tank Check chain oil lubrication system Check chain condition, sharpness and tension Clean the guidebar and check for wear, damage and the need for replacement Check sprocket condition Clean air filter and replace if necessary Check anti vibration components Clean cooling vents and fins Carby/tuning adjustment Replace spark plug Check the chain catcher 25
26 Check fuel for water or substandard mixture. Replace with proper fuel. Check for engine flooding. Remove and dry the spark pug. Then pull the starter again with no choke. Check spark ignition Replace with a new plug. Check fuel for water or substandard mixture. Replace with proper fuel. Check air filter and fuel filter for clogging Clean Check carburetor for inadequate adjustment. Readjust speed needles. Check oil for substandard quality Replace Check oil passage and ports for clogging Clean 26
27 Displacement (cm 3 ) 62cc Fuel 25:1 Fuel to 2 Stroke Oil Fuel Tank Capacity (ml) 550 Chain Oil Motor Oil SAE# 10W-30 or similar Oil Tank Capacity (ml) 260 Carburetor Diaphragm Type Oil Feeding System Mechanical Pump Dry Weight Power Unit 5.5 Guide Bar (Cutting Length/ Tip to Tip) 20 /22 Type Sprocket Nose Chain 10, p 0.325, g0.058, 76 Links In order to qualify for warranty cover, the following points need to be observed: The saw must only be used with fuel and oil grades/mixes as listed in this manual. The fuel/oil mix must be sufficiently mixed to prevent separation of the fuel/oil in the fuel tank before/during use. The saw fuel/air ratio must never be tuned too lean. The carby is pre-adjusted when leaving the factory however your local conditions may require it to be retuned. The saw must be serviced by a qualified service technician after every 50 hours of use. Service receipts showing dates and work completed must be produced in the case of a warranty claim. 27
28 Some experts believe the incorrect or prolonged use of almost any product could cause serious injury or death. For information that may reduce your risk of serious injury or death consult thepoints below and additionally, the information available at - Consult all documentation, packaging and product labelling before use. Note that some products feature online documentation which should be printed and kept with the p roduct. - Check product for loose / broken / damaged / missing parts, wear or leaks (if applicable) be fore each use. Never use a product with loose / broken / damaged / missing parts, wear or leaks (if applicable). - Products must be inspected and serviced (if applicable) by a qualified specialist every 6 months assuming average residential use by a person of average weight and strength, ab ove average technical aptitude, on a property matching average metropolitan specification. Intended use outside these guidelines could indicate the product is not suitable for intended use or may require more regular inspection or servicing. - Ensure all possible users of the p roduct have completed an industry recognised training course before being given access to the product. - The product has been supplied by a general merchandise retailer that may not be familiar with your specific applic ation or your description of the application. Be sure to attain third party approval for your application from a qualified specialist before use regardless of prior assurances by the retailer or its representatives. - This product is not intended for use where fail-safe operation is required. As with any product (take an automobile, aircraft, computer or ball point pen for example) there is always a small chance of a technical issue that needs to be repaired or may require replacement of the product or a part. If the possibility of such failure and the associated time it takes to rectify could in any situation inconvenience the user, business or employee or could financially affect the user, business or employee then the product is not suitable for your requirements. This p roduct is not for use where incorrect operation or a failure of any kind, including but not limited to a condition requiring product return, replacement, service by a technician or replacement of parts could cause a financial loss, loss of empl oyee time or an in convenience requiring compensation. - If this item has been purchased in error considering the points above simply contact the retailer directly for details of their returns policies if required.
This mark indicates instructions which must be followed in order to prevent accidents which could lead to serious injury or death.
 Table of Contents Safety Warnings...2 Different Warning Types...2 Chainsaw Layout...2 Warning Labels on the Chainsaw...2 Symbols on the Chainsaw...3 Safety Precautions...3 Before Use...3 Work Gear and
10 26CC CHAINSAW OWNER S MANUAL FOR YOUR SAFETY PLEASE READ THESE INSTRUCTIONS CAREFULLY AND RETAIN THEM FOR FUTURE USE.
 10 26CC CHAINSAW OWNER S MANUAL FOR YOUR SAFETY PLEASE READ THESE INSTRUCTIONS CAREFULLY AND RETAIN THEM FOR FUTURE USE. CONTENTS 1. For Safe Operation 3-8 2. Kick Back Prevention 9-11 3. Protecting Yourself
This mark indicates instructions which must be followed in order to prevent accidents which could lead to serious injury or death.
 Table of Contents Safety Warnings...2 Different Warning Types...2 Chainsaw Layout...2 Warning Labels on the Chainsaw...2 Symbols on the Chainsaw...3 Safety Precautions...3 Before Use...3 Work Gear and
18V Cordless Chain Saw INSTRUCTION MANUAL
 18V Cordless Chain Saw INSTRUCTION MANUAL WARNING: Read and understand RULES FOR SAFE OPERATION and instructions carefully before operating. Failure to follow the safety rules and other basic safety precautions
20 58CC CHAINSAW OWNER S MANUAL FOR YOUR SAFETY PLEASE READ THESE INSTRUCTIONS CAREFULLY AND RETAIN THEM FOR FUTURE USE.
 20 58CC CHAINSAW OWNER S MANUAL FOR YOUR SAFETY PLEASE READ THESE INSTRUCTIONS CAREFULLY AND RETAIN THEM FOR FUTURE USE. CONTENTS 1. FOR SAFE OPERATION 1. For Safe Operation 3-8 2. Kick Back Prevention
20 58CC CHAINSAW OWNER S MANUAL FOR YOUR SAFETY PLEASE READ THESE INSTRUCTIONS CAREFULLY AND RETAIN THEM FOR FUTURE USE.
 20 58CC CHAINSAW OWNER S MANUAL FOR YOUR SAFETY PLEASE READ THESE INSTRUCTIONS CAREFULLY AND RETAIN THEM FOR FUTURE USE. CONTENTS 1. For Safe Operation 3-8 2. Kick Back Prevention 9-10 3. Protecting Yourself
4V LITHIUM-ION SCREWDRIVER OWNER S OPERATING MANUAL
 CSD-4107BG 4V LITHIUM-ION SCREWDRIVER OWNER S OPERATING MANUAL Your screwdriver has been engineered and manufactured to our high standard for dependability, ease of operation, and operator safety. When
EC DECLARATION OF CONFORMITY
 EC DECLARATION OF CONFORMITY 14 2500W INVERTER GENERATOR IM2500I CERTIFICATE OF GUARANTEE This product is guaranteed for a period of 1 Year, with effect from the date of purchase and applies only to the
Operator's Manual & Parts Chain Saw CS3814/CS4116
 Operator's Manual & Parts Chain Saw CS3814/CS4116 WARNING Before using our products, please read this manual carefully to understand the proper use of your unit. GetEarthquake.com OMCS3814_CS4116 R082809
RMT1201. ORIGINAL INSTRUCTIONS Cordless Multi-Tool
 RMT1201 ORIGINAL INSTRUCTIONS Cordless Multi-Tool Important! It is essential that you read the instructions in this manual before operating this machine. Subject to technical modifications. Safety GENERAL
1200W CaR PoliSheR en RS4900
 1200W Car Polisher RS4900 RS4900 8 1 2 7 3 4 5 6 A B flat nozzle C D E F 1200W Car Polisher RS4900 G H flat nozzle I J K L 4 1200W Car Polisher COMPONT LIST 1 2 3 4 5 6 7 Variable speed control Switch
25.4CC COMPACT CHAINSAW
 25.4CC COMPACT CHAINSAW PCH25 INSTRUCTION MANUAL 1 Black Cyan Magenta Yellow Code: PCH25 Date: 080318 Edition: 11 Op: DJ Contents Warranty 2 Description of symbols 3 Symbols on the machine 4 Specifications
3500-LB. TRAILER JACK OWNER S MANUAL
 3500-LB. TRAILER JACK OWNER S MANUAL WARNING: Read carefully and understand all INSTRUCTIONS before operating. Failure to follow the safety rules and other basic safety precautions may result in serious
Table of Contents. Safety symbols... 3 Assembly 6. Operation Maintenance Troubleshooting 11. Storage. 12. Notes. 13
 Table of Contents Safety symbols... 3 Assembly 6 Operation... 8 Maintenance... 10 Troubleshooting 11 Storage. 12 Notes. 13 2 Safety Information Attention; this machine can be dangerous! All operators should
FSG175 FENCE STAPLE GUN
 Kencove Farm Fence Supplies 344 Kendall Rd Blairsville, PA 15717 1-800-KENCOVE sales@kencove.com www.kencove.com OPERATING MANUAL FSG175 FENCE STAPLE GUN To reduce the risk of possible injury, read the
Owner s Manual. Petrol Chainsaws. Important MCS25, MCS38, MCS46, MCS52, YR4503
 Petrol Chainsaws MCS25, MCS38, MCS46, MCS52, YR4503 Owner s Manual Important Please read this Owner s Manual and the Express Warranty before using this product. The Warranty does not cover damage due to
14/18/20 INCH CHAINSAW
 14/18/20 INCH CHAINSAW CALIFORNIA PROPOSITION 65 WARNING: You can create dust when you cut, sand, drill or grind materials such as wood, paint, metal, concrete, cement, or other masonry. This dust often
Policy Sponsor: Assistant Vice President. Responsible Unit: Facilities Management
 Policy Sponsor: Assistant Vice President Approval Date: January 2010 Gas Powered Pole Pruners/Saws Safe Work Instructions Responsible Unit: Revisions: Service: Environmental Services Shop: Grounds and
AIR PAINT SHAKER OWNER'S MANUAL
 AIR PAINT SHAKER OWNER'S MANUAL WARNING: Read carefully and understand all INSTRUCTIONS before operating. Failure to follow the safety rules and other basic safety precautions may result in serious personal
eclipse Instruction Manual 4.0V Li-Ion Screwdriver Part #:
 eclipse Instruction Manual 4.0V Li-Ion Screwdriver Part #: 902-588 Test Equipment Depot - 800.517.8431-99 Washington Street Melrose, MA 02176 TestEquipmentDepot.com Test Equipment Depot - 800.517.8431-99
Instruction Manual. CORDLESS DRILL 18V Li-ion WITH IMPACT FUNCTION. Model SROM 1172
 Instruction Manual CORDLESS DRILL 18V Li-ion WITH IMPACT FUNCTION Model SROM 1172 Our tool range has you covered for DIY. Whatever the job, make light work of it with MAKO tools. Product Features: 1. Keyless
ALUMINUM CARGO CARRIER WITH FOLDING RAMP
 ALUMINUM CARGO CARRIER WITH FOLDING RAMP OWNER S MANUAL WARNING: Read carefully and understand all ASSEMBLY AND OPERATION INSTRUCTIONS before operating. Failure to follow the safety rules and other basic
WR 22SE WR 25SE WR25SE. Handling instructions
 WR 22SE WR 25SE WR25SE Handling instructions GENERAL POWER TOOL SAFETY WARNINGS WARNING Read all safety warnings and all instructions. Failure to follow the warnings and instructions may result in electric
Earth Auger MAG500 MAG500RS
 Earth Auger MAG500 MAG500RS US Owner s/operator s Manual Completely read and understand this manual before using this product. - 0 - Foreword This Owner s/ Operator s Manual is designed to familiarize
SAFETY AND OPERATING MANUAL. Lithium-Ion cordless hammer drill WX372 WX372.1 WX372.9
 SAFETY AND OPERATING MANUAL 2 Original Instructions General Power Tool Safety Warnings WARNING: Read all safety warnings and all instructions. Failure to follow the warnings and instructions may result
Air-Operated Waste Oil Drainer
 Air-Operated Waste Oil Drainer 20-Gallon Tank Owner s Manual WARNING: Read carefully and understand all ASSEMBLY AND OPERATION INSTRUCTIONS before operating. Failure to follow the safety rules and other
MANUAL EN 3 MAINS CABLE ABSORPTION, READY TO USE ANALYSE FLOAT, FULLY CHARGED PULSE, MAINTENANCE CHARGING BULK DESULPHATION SOFT START.
 MODE 12V/ MANUAL MXS 15 CONGRATULATIONS to the purchase of your new professional switch mode battery charger. This charger is included in a series of professional chargers from CTEK SWEDEN AB and represents
4-VOLT LITHIUM-ION AUTO-LOAD SCREWDRIVER w/led WORKLIGHT
 SKU 241-1394 4-VOLT LITHIUM-ION AUTO-LOAD SCREWDRIVER w/led WORKLIGHT Operation Manual WARNING! Please read this manual before using this product. Failure to do so can result in serious injury. SAVE THIS
SIP Direct Drive Oil-Lube Air Compressors - Operating & Maintenance Instructions
 SIP Direct Drive Oil-Lube Air Compressors - Operating & Maintenance Instructions Please read and fully understand the instructions in this manual before operation. Keep this manual safe for future reference.
OWNER S MANUAL. Item #
 GAS-POWERED CONCRETE SCREED OWNER S MANUAL WARNING: Read carefully and understand all INSTRUCTIONS before operating. Failure to follow the safety rules and other basic safety precautions may result in
BENCH GRINDER MODEL NO. OZBG150WA
 BENCH GRINDER 150mm MODEL NO. OZBG150WA OPERATING INSTRUCTIONS To view our entire range visit www.ozito.com.au SPECIFICATIONS MODEL NO. OZBG150WA Input Power: 150W Input Voltage: 230V ~ 50Hz No Load Speed:
Safety First. Owning Lawn And Garden Equipment Doesn t Have To Cost An Arm And A Leg.
 Safety First Owning Lawn And Garden Equipment Doesn t Have To Cost An Arm And A Leg. When operating equipment... Children should be seen, not hurt. Kids and power equipment do not mix. Do not allow children
ECSS. Electric Chain Saw Chain Sharpener Assembly & Operating Instructions
 ECSS Electric Chain Saw Chain Sharpener Assembly & Operating Instructions READ ALL INSTRUCTIONS AND WARNINGS BEFORE USING THIS PRODUCT. SAVE THESE INSTRUCTIONS FOR FUTURE REFERENCE. This manual provides
Electric Chainsaw Sharpener With Bar Mount
 Electric Chainsaw Sharpener With Bar Mount Owner s Manual WARNING: Read carefully and understand all ASSEMBLY AND OPERATION INSTRUCTIONS before operating. Failure to follow the safety rules and other basic
Cordless Rechargeable Saw Instructions for Use
 Technical data Voltage: DC 10.8V Weight: 1.25Kg Stroke rate: 0-2100/min Stroke: 15mm Cutting capacity: max diameter in wood 80mm / in soft metal 7mm Charging time: Between 5.0-5.5 Hours Battery: 1.3Ah
Package Contents Part A (3) I-Beam (1) Base (2) Other parts
 I-Beam (1) Base (2) Other parts") Page 1 Installation Instructions for 81245 Adjustable Height Gantry Crane 1-Ton Capacity Table of Contents Important Safety Information pg. 2 Specific Operation Warnings pg. 2 Main Parts of Product pg.
Page 1 Installation Instructions for 81245 Adjustable Height Gantry Crane 1-Ton Capacity Table of Contents Important Safety Information pg. 2 Specific Operation Warnings pg. 2 Main Parts of Product pg.
Sawhorse with Chainsaw Holder
 Sawhorse with Chainsaw Holder Owner s Manual Chainsaw not included. WARNING: Read carefully and understand all ASSEMBLY AND OPERATION INSTRUCTIONS before operating. Failure to follow the safety rules and
original instructions 18V Torch RFP1801
 original instructions 18V Torch RFP1801 Important! It is essential that you read the instructions in this manual before operating this machine. Subject to technical modifications. Safety GENERAL POWER
W6VB3 W8VB2. Handling instructions
 Screw Driver Model W 6VM W 6V4 W 6VA4 W 6VB3 W 8VB2 Handling instructions W6VM W6V4 W6VA4 W6VB3 W8VB2 Note: Before using this Electric Power Tool, carefully read through these HANDLING INSTRUCTIONS to
15-GALLON OIL DRAIN DOLLY WITH 12 VOLT PUMP
 15-GALLON OIL DRAIN DOLLY WITH 12 VOLT PUMP OWNER S MANUAL WARNING: Read carefully and understand all ASSEMBLY AND OPERATION INSTRUCTIONS before operating. Failure to follow the safety rules and other
3-Pt. Quick Hitch. Owner s Manual
 3-Pt. Quick Hitch Owner s Manual WARNING: Read carefully and understand all ASSEMBLY AND OPERATION INSTRUCTIONS before operating. Failure to follow the safety rules and other basic safety precautions may
WR 16SE. de fr it nl es pt sv da no fi el pl hu cs tr ro sl sk bg sr hr uk ru. Handling instructions
 en WR 16SE de fr it nl es pt sv da no fi el pl hu cs tr ro sl sk bg sr hr uk ru Handling instructions GENERAL POWER TOOL SAFETY WARNINGS WARNING Read all safety warnings and all instructions. Failure to
Make/Model/Type/Size Hands On- Training w/employee participation on starting and handling of Chain Saw. What Are The Risks?
 -Tool Kit- Gloves, Hearing Protection, Face Shield, Due to the nature of our work, it is necessary at times to use chainsaws. In order to ensure your safety and the safety of your Brieser co-workers, it
Owner s/operator s Manual
 Water Pump MP2533E2 Owner s/operator s Manual Completely read and understand this manual before using this product. Foreword This Owner s/ Operator s Manual is designed to familiarize the operator with
RedGum GP160 Splitter. Owner s Manual
 RedGum GP160 Splitter Owner s Manual Product Description & Intended Purpose: This Log Splitter / Wood Splitter is an outdoor product that splits wood logs for use as fuel in a fireplace or a woodstove.
Instruction Manual CORDLESS DRILL & DRIVER 18V. Model SROM 1170
 Instruction Manual CORDLESS DRILL & DRIVER 18V Model SROM 1170 Product Features: Dear Valued Customer, Thank you for purchasing this Samson Power Tool. We are dedicated to providing quality Samson Power
1 2 " H Y D R AU L I C V E H I C L E P O S I T I O N I N G J A C K OWNER S MANUAL
 2 " H Y D R AU L I C V E H I C L E P O S I T I O N I N G J A C K OWNER S MANUAL WARNING: Read carefully and understand all INSTRUCTIONS before operating. Failure to follow the safety rules and other basic
48 in. DELUXE ALUMINUM CARGO CARRIER WITH RAMP
 48 in. DELUXE ALUMINUM CARGO CARRIER WITH RAMP OWNER S MANUAL WARNING: Read carefully and understand all ASSEMBLY AND OPERATION INSTRUCTIONS before operating. Failure to follow the safety rules and other
Model TC-20. Tube Cut-Off Machine. Operator s Manual REV H
 Model TC-20 Tube Cut-Off Machine Operator s Manual 90-2333 REV H Scientific Systems, Inc. 349 N. Science Park Road State College, PA 16803 www.ssihplc.com Phone: 800-441-4752 Fax: 814-238-7532 Email: sales@ssihplc.com
User Manual CC PETROL CHAINSAW. Read all safety warnings and all instructions thoroughly before operating this product.
 User Manual 51488 45CC PETROL CHAINSAW www.909.com Read all safety warnings and all instructions thoroughly before operating this product. Contents Intended use of the 2 Contents of carton 2 Description
RPS1215 ORIGINAL INSTRUCTIONS. Cordless Pruner
 RPS5 ORIGINAL INSTRUCTIONS Cordless Pruner Important! It is essential that you read the instructions in this manual before assembling, operating and maintaining the product. Subject to technical modification.
E-DRIV MD-Series DC Torque Control System Calibration Procedure
 Revision: 1.1 July 05, 2017 E-DRIV MD-Series DC Torque Control System Calibration Procedure www.mountztorque.com 1080 N 11 th St - San Jose CA 95112-408.292.2214 1 GENERAL SAFETY RULES WARNING! Read and
North Dakota State University Grounds Maintenance Equipment
 North Dakota State University Grounds Maintenance Equipment I. Introduction Grounds maintenance equipment is an important part of the work activities on NDSU campus. They can make grounds maintenance jobs
1/2 HP SUMP PUMP OWNER'S MANUAL
 TM 1/2 HP SUMP PUMP OWNER'S MANUAL WARNING: Read carefully and understand all INSTRUCTIONS before operating. Failure to follow the safety rules and other basic safety precautions may result in serious
AIR-COOLED DIESEL GENERATOR OWNERʼS MANUAL. This manual contains important safety information. TDG2500E TDGW7000E TDG7000SE TDG4500E
 AIR-COOLED DIESEL GENERATOR OWNERʼS MANUAL This manual contains important safety information. TDG2500E TDGW7000E TDG7000SE TDG4500E TDG8000-3 TDG7000SE-3 TDG7000E TDG8000E TDGW7000SE TDG7000E3 TDGW8000E
Heavy-Duty Welding Fabrication Table
 Heavy-Duty Welding Fabrication Table with Fix-Up Kit Owner s Manual WARNING: Read carefully and understand all ASSEMBLY AND OPERATION INSTRUCTIONS before operating. Failure to follow the safety rules and
INSTRUCTION MANUAL. Cordless Angle Drill XAD01
 INSTRUCTION MANUAL Cordless Angle Drill XAD0 0474 ENGLISH (Original instructions) SPECIFICATIONS Model XAD0 Capacities Steel 0 mm (3/8") Wood 25 mm (") No load speed (RPM) 0 -,800 /min Overall length 34
2500 LB ELECTRIC A-FRAME JACK OWNER S MANUAL
 2500 LB ELECTRIC A-FRAME JACK OWNER S MANUAL SPECIFICATIONS: Models Applicable: 2500 lb Electric A-Frame Jack Maximum Lift Capacity: 2500 lbs (continuous use) Retracted Height: 31 3 /8 Vertical Travel:
Cordless Impact Wrench
 ENGLISH INSTRUCTION MANUAL Cordless Impact Wrench BTW0 00534 WARNING: For your personal safety, READ and UNDERSTAND before using. SAVE THESE INSTRUCTIONS FOR FUTURE REFERENCE. ENGLISH SPECIFICATIONS Capacities
Adjustable Steel Welding Table
 Adjustable Steel Welding Table Owner s Manual WARNING: Read carefully and understand all ASSEMBLY AND OPERATION INSTRUCTIONS before operating. Failure to follow the safety rules and other basic safety
Cordless two speed drill/driver K 10613
 Cordless two speed drill/driver K 10613 SAFETY AND PRECAUTION 1 Consider work area environment. Do not expose tools to rain. Do not use tools in damp or wet locations Keep work area clean and well lit.
Instructions manual / Position Controller 1. GY-G Series INSTRUCTIONS MANUAL
 Instructions manual / Position Controller 1 GY-G Series INSTRUCTIONS MANUAL Instructions manual / GY-G Series 2 IMPORTANT The tool delivered with this manual may been modified for specific needs. In that
Cordless Driver Drill
 INSTRUCTION MANUAL Cordless Driver Drill MT064 MT065 003947 IMPORTANT: Read Before Using. ENGLISH (Original instructions) SPECIFICATIONS Model MT064 MT065 Steel 0 mm 3 mm Capacities Wood 25 mm 28 mm Wood
WARNING! Decals. IMPORTANT INFORMATION Xxxx xxx xxxx xx xxxx x xxxx. Xxxx xxx xxxx xx xxxx x xxxx.
 symbols and decals Xxxx xxx xxxx xx xxxx x xxxx. Used in this publication to notify the reader of a risk of personal injury, particularly if the reader DOES NOT follow the instructions given in the manual.
Read instructions carefully and follow rules for safe operation. Failure to do so could result in serious injury. Fradan Manufacturing Corp.
 OPERATOR MANUAL FRADAN POWER BLOWERS Part No. 888-011-222-0 Read instructions carefully and follow rules for safe operation. Failure to do so could result in serious injury. Fradan Manufacturing Corp.
Cordless Driver Drill
 INSTRUCTION MANUAL Cordless Driver Drill FD0 008796 ENGLISH (Original instructions) SPECIFICATIONS Model FD0 Steel 0 mm (3/8") Capacities Wood 2 mm (3/6") Wood screw 5. mm x 63 mm (7/32" X 2-/2") Machine
MODEL HD99 HYDRAULIC ONE MAN TOWABLE EARTHDRILL
 DO NOT THROW AWAY IMPORTANT MANUAL MODEL HD99 HYDRAULIC ONE MAN TOWABLE EARTHDRILL Operators Manual GROUND HOG, INC. P.O.BOX 290 San Bernardino, CA. 92402 Phone (909) 478-5700 Fax (909) 478-5710 E-mail:
Gasoline Inverter Generator
 user manual Gasoline Inverter Generator table of contents Preface Introduction... Safety Information Exhaust fumes are poisonous... Fuel is highly flammable and poisonous... Engine and muffler may be hot...
Operator's Manual & Parts
 Operator's Manual & Parts Chain Saw CS3814/CS3816/CS4116 WARNING Before using our products, please read this manual carefully to understand the proper use of your unit. GetEarthquake.com OMCS3814_CS4116
PETROL CHAINSAW. 25.4cc-305mm (12 ) INSTRUCTION MANUAL SPECIFICATIONS. ozito.com.au PCS-305A WHAT S IN THE BOX. Petrol Chainsaw.
 INSTRUCTION MANUAL SPECIFICATIONS. ozito.com.au PCS-305A WHAT S IN THE BOX. Petrol Chainsaw.") WHAT S IN THE BOX PETROL CHAINSAW 25.4cc-305mm (2 ) INSTRUCTION MANUAL SPECIFICATIONS Engine: 25.4cc 2-Stroke Output Power: 0.9kw No Load Idling Motor Speed: 3,500/min Max. No Load Motor Speed:,000/min
WHAT S IN THE BOX PETROL CHAINSAW 25.4cc-305mm (2 ) INSTRUCTION MANUAL SPECIFICATIONS Engine: 25.4cc 2-Stroke Output Power: 0.9kw No Load Idling Motor Speed: 3,500/min Max. No Load Motor Speed:,000/min
TOOLPRO 18V Li-Ion Brushless Impact wrench
 TOOLPRO 18V Li-Ion Brushless Impact wrench Instruction Manual CIW180HB.9 After Sales Support FREE CALL 1300 889 028 EMAIL:salesau@positecgroup.com Important - Please read these instructions fully before
TABLE OF CONTENTS. 3. Warnings Check List. 4. Part Location. 5. What Is In Your Box / Installing The Guide Bar And Chain. 6. How To Mix Fuel Page
 JCX62 CHAINSAW TABLE OF CONTENTS 3. Warnings Check List 4. Part Location 5. What Is In Your Box / Installing The Guide Bar And Chain 6. How To Mix Fuel Page 7. Starting Sequence Page 8. Checking Oil Supply/Adjusting
Cordless Driver Drill
 ENGLISH (Original instructions) INSTRUCTION MANUAL Cordless Driver Drill 607D 637D 6337D 6347D 0089 IMPORTANT: Read Before Using. ENGLISH (Original instructions) SPECIFICATIONS Model 607D 637D 6337D 6347D
Log Splitter. Owner/Operator Manual. Models HCWP1-26
 Log Splitter Owner/Operator Manual Models HCWP1-26 SAFETY..........................2 SAFETY WARNING SYMBOL.........3 SAFETY RULES.................. 4-5 SPECIFICATIONS................. 6 CONTROLS AND FEATURES.......
CAMBELT TENSION GAUGE
 CAMBELT TENSION GAUGE Model 96557 Operating Instructions Diagrams within this manual may not be drawn proportionally. Due to continuing improvements, actual product may differ slightly from the product
SBC12 H Operating instructions Mode d emploi Manual de instrucciones
 *254901* 254901 SBC12 H Operating instructions Mode d emploi Manual de instrucciones Safety Precautions Read all Instructions GENERAL SAFETY RULES FOR ALL BATTERY OPERATED TOOLS WARNING! Read and understand
800 LB ATV DOLLY OWNER S MANUAL
 800 LB ATV DOLLY OWNER S MANUAL WARNING: Carefully read and understand all ASSEMBLY AND OPERATION INSTRUCTIONS before operating. Failure to follow the safety rules and other basic safety precautions may
WORKSHOP MANUAL. Chainsaw GS35 GS350 MT350 MT3500
 WORKSHOP MANUAL Chainsaw GS35 GS350 MT350 MT3500 General failures analysis Suggested tools I. Emak tool kit II. Compression tester: to check thermal group III. Electronic tachometer: for 2 and 4 stroke
ALUMINUM JACK. 3,000 lb. Jack Capacity & JACK STAND COMBO. Model ASSEMBLY AND OPERATING INSTRUCTIONS
 ALUMINUM JACK 3,000 lb. Jack Capacity & JACK STAND COMBO 6,000 lb. Jack Stand Capacity (when used in pairs) Model 91850 ASSEMBLY AND OPERATING INSTRUCTIONS 3491 Mission Oaks Blvd., Camarillo, CA 93011
Alligator Staple Gold Class Plus
 Safety and Operating Manual Alligator Staple Gold Class Plus WARNING This manual contains important information about product function and safety. Please read and understand this manual BEFORE operating
S Q UA R E T U B E T R A I L E R J A C K OWNER S MANUAL
 S Q UA R E T U B E T R A I L E R J A C K OWNER S MANUAL WARNING: Read carefully and understand all INSTRUCTIONS before operating. Failure to follow the safety rules and other basic safety precautions may
16 Inch Surface Cleaner
 16 Inch Surface Cleaner Owner s Manual WARNING: Read and understand all instructions, warnings, and cautions before using this product. Failure to follow the instructions, warnings, and cautions may result
Propane torch. Model Assembly And Operation Instructions
 Propane torch Model 39953 Assembly And Operation Instructions Due to continuing improvements, actual product may differ slightly from the product described herein. 3491 Mission Oaks Blvd., Camarillo, CA
WHAT S IN THE BOX METAL CUTTING SHEARS. Metal Cutting Shears 500W INSTRUCTION MANUAL SPECIFICATIONS. Hex Key. Max. Thickness: ozito.com.
 WHAT S IN THE BOX METAL CUTTING SHEARS 500W INSTRUCTION MANUAL SPECIFICATIONS Motor: No load speed: Max. Thickness: Tool weight: 500W 0 1,600 rpm 1.2mm 2.2kg Metal Cutting Shears Hex Key ozito.com.au MCS-5000
Manual Chain Hoist. Owner s Manual
 Manual Chain Hoist Owner s Manual WARNING: Read carefully and understand all ASSEMBLY AND OPERATION INSTRUCTIONS before operating. Failure to follow the safety rules and other basic safety precautions
Water pump Owner's Manual
 Water pump Owner's Manual Safety Precautions I. General Safeguards Please read this operation manual to have a thorough understanding of the content there before use the product. Failure to do so may lead
Owner s Manual. Mortar / Plaster Mixer. Models M785 M1000 M1200
 Owner s Manual Mortar / Plaster Mixer Models M785 M1000 M1200 Tiger Equipment LLC. 15 Byrd Lane Rocky Mount, VA 24151 Tel: 540-489-7777 Fax: 540-489-7778 www.tigerequip.com 1. PREFACE This manual contains
1 MECHANICAL FUEL METER
 1 MECHANICAL FUEL METER USER S MANUAL WARNING: Read carefully and understand all INSTRUCTIONS before operating. Failure to follow the safety rules and other basic safety precautions may result in serious
AG-HA-2500N GASOLINE GENERATOR
 AG-HA-2500N GASOLINE GENERATOR OWNER S MANUAL BEFORE OPERATING THIS EQUIPMENT PLEASE READ THESE INSTRUCTIONS CAREFULLY (I)WARNING 1. Read the operator s instruction manual. 2. Attention! Exhaust gases
Drum Deheader. Owner s Manual
 Drum Deheader Owner s Manual WARNING: Read carefully and understand all ASSEMBLY AND OPERATION INSTRUCTIONS before operating. Failure to follow the safety rules and other basic safety precautions may result
MANUAL FLUID EXTRACTOR
 Please read and save these instructions. Read through this owner s manual carefully before using product. Protect yourself and others by observing all safety information, warnings, and cautions. Failure
1500-LB. HEAVY-DUTY WHEEL DOLLY (SET OF 2) OWNER S MANUAL
 OWNER S MANUAL") 1500-LB. HEAVY-DUTY WHEEL DOLLY (SET OF 2) OWNER S MANUAL WARNING: Read carefully and understand all ASSEMBLY AND OPERATION INSTRUCTIONS before operating. Failure to follow the safety rules and other basic
1500-LB. HEAVY-DUTY WHEEL DOLLY (SET OF 2) OWNER S MANUAL WARNING: Read carefully and understand all ASSEMBLY AND OPERATION INSTRUCTIONS before operating. Failure to follow the safety rules and other basic
BUFFER/POLISHER SYSTEM
 Owner s Manual Double Insulated BUFFER/POLISHER SYSTEM Model No. 646.10729 NRTL CAUTION: Read and follow all safety rules and operating instructions before first use of this product. Safety Rules Operation
Cordless Driver Drill
 INSTRUCTION MANUAL Cordless Driver Drill XFD0 0360 ENGLISH (Original instructions) SPECIFICATIONS Model XFD0 Steel 3 mm (/") Capacities Wood 38 mm (-/") Wood screw 0 mm x 89 mm (3/8" X 3-/") Machine screw
Instruction Manual 4.0V Li-Ion Screwdriver. Part #: ECLIPSE ENTERPRISES, INC Chula Road, Amelia Court House, VA 23002, U.S.
 Instruction Manual 4.0V Li-Ion Screwdriver Part #: 902-588 ECLIPSE ENTERPRISES, INC. 13302 Chula Road, Amelia Court House, VA 23002, U.S.A 2 3 Intended use Your ECLIPSE ENTERPRISES, INC. 902-588 screwdriver
SBCNNS. Abrasive Blast Cabinet Assembly & Operating Instructions
 SBCNNS Abrasive Blast Cabinet Assembly & Operating Instructions READ ALL INSTRUCTIONS AND WARNINGS BEFORE USING THIS PRODUCT. This manual provides important information on proper operation & maintenance.
Petrol Tiller Rotavator Instructions for Use
 Specifications Engine: 52cc 2-stroke, air-cooled Power: 1.45kw (2HP) Fuel & oil mix: 40:1 Fuel tank capacity: 1000ml Starter type: Recoil No load speed Idle: 3000 ±400 rpm Max.: 7500 rpm Tilling width:
150-Lb. Drywall and Panel Hoist
 150-Lb. Drywall and Panel Hoist Owner s Manual WARNING: Read carefully and understand all ASSEMBLY AND OPERATION INSTRUCTIONS before operating. Failure to follow the safety rules and other basic safety
C O R D L E S S I M PA C T D R I V E R W I T H 1 2 V LI- I O N B AT T E RY OWNER S MANUAL
 C O R D L E S S I M PA C T D R I V E R W I T H 1 2 V LI- I O N B AT T E RY OWNER S MANUAL WARNING: Read carefully and understand all ASSEMBLY AND OPERATION INSTRUCTIONS before operating. Failure to follow
PROPANE TORCH WITH TURBO BURNER
 PROPANE TORCH WITH TURBO BURNER MODEL 91894 ASSEMBLY AND OPERATING INSTRUCTIONS 3491 Mission Oaks Blvd., Camarillo, CA 93011 Visit our Web site at http://www.harborfreight.com TO PREVENT SERIOUS INJURY,