BioWave Hydro DI-9200 User Manual
|
|
|
- Esther Griffith
- 6 years ago
- Views:
Transcription
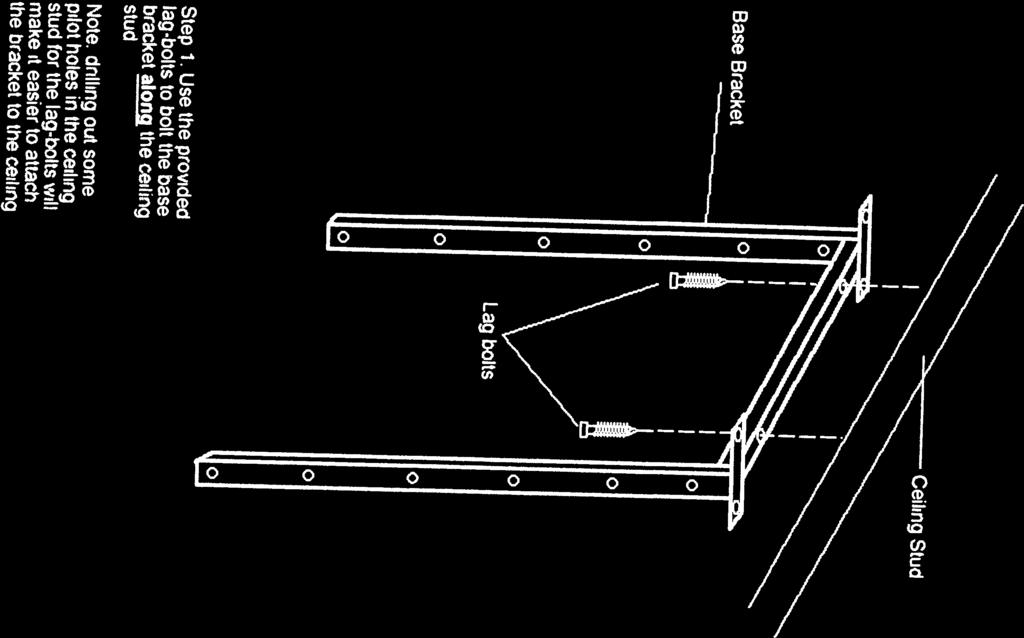
1 BiWave Hydr DI-9200 User Manual Assembling Hydr DI 9200: Assembling yur BiWave Hydr DI 9200, is a very shrt and simple prcess. All yu have t d is take the Hydr DI 9200 ut f the bx, make sure its standing n a flat level surface, vertically n its bttm end. There are 2 ways t recgnize which side is the bttm f the Hydr DI- 9200: - The tp end has an easily nticeable red warning sticker (read the sticker carefully befre using the Hydr DI 9200). - The pwer crd always cmes ut f the bttm cver. Installing and Running Hydr DI 9200: Fr ptimal results, and t keep yur Hydr DI 9200 under warranty, we advise yu t use the Hydr DI in the fllwing way: - Start by making sure the Hydr DI 9200 is placed vertically n its bttm end, secured, leveled, and stable. - The base f the rtating cages shuld be aligned with the tp f the plants, t achieve this it is recmmended t get the adjustable ceiling bracket frm BiWave Industries Inc. designed especially fr the Hydr DI 9200(ask yur retailer hw yu can get ne). As yur plants grw bigger, using the 1
2 adjustable ceiling bracket will help t keep the base f the rtating cages aligned with the tp f the plants. - If yu are putting the Hydr DI 9200 n the flr, a table, r a shelf, and nt using the adjustable ceiling bracket make sure that the Hydr DI 9200 is secured, leveled, and stable( yu can use a piece f clth r carpet as an insulatr under the Hydr DI ). - It s ptimal t have the Hydr DI 9200 as clse as pssible t the center f the grwing area. - Run the Hydr DI 9200 (fr 15 minutes n, 45 minutes ff, every hur during the light cycle). Yu can use a multi prgram timer fr this purpse. - Keep the Hydr DI 9200 turned OFF during the dark cycle. - Make sure that the adjustable ceiling bracket is attached t the grwing rm r greenhuse ceiling, in a level and stable way, and that the screws that jin the Hydr DI 9200 t the ceiling bracket are tight. After munting plug the Hydr DI 9200 t the timer, plug the timer t a wrking wall utlet, and yu are dne. NOTE: The Hydr DI 9200 must be used thrughut the whle life cycle f the plant. Maintaining Hydr DI 9200: Althugh yur BiWave machine is very easy t use, any machine with mving cmpnents requires peridic maintenance t ensure lngevity and ptimal perfrmance. At least every five mnths yu need t service yur machine, using the fllwing prcedure. 2
3 1) Discnnect the machine frm the pwer surce/ timer befre perfrming maintenance. 2) It is recmmended but nt necessary t dismunt the Hydr DI 9200 frm any brackets, and place the machine hrizntally n a table. 3) Remve bth end cvers using a 3/16 Allen wrench. 4) Lcate all fur bearings, use a cttn swab r rag t remve any excess grease frm the bearings. 5) Using a grease gun, lcate the brass grease nipple n the side f each bearing. Using multi-purpse lithium grease (ff-white in clr) attach the grease gun t the grease nipple, and begin greasing. Apply grease, until grease begins t verflw ut f the tp f the bearing. D nt add grease past this pint, ver-greasing can be a catalyst fr bearing failure. 6) If the grease just flws ut arund the nipple it means that the nipple is clgged. Get a wrench r scket take the nipple ff and take a paperclip r ther wire and clean ut the nipple. Blw thrugh it t make sure it is n lnger clgged and replace n the bearing. 7) Carefully put the cvers back n t the machine, make sure the cver with the red warning sticker is the tp cver. Be careful f electrnics while putting cvers back n. NOTE: It is imperative t service yur machine. Failure t d s will vid yur warranty. If yu need any help inf@biwaveindustries.cm r call :( 626)
4 BIOWAVE HYDRO D9200 Biwave Prduct Knwledge SLS part # The Biwave unit is designed t send ut harmnic subsnic frequency levels t the plants, t help the plant breathe better, keeps pests away (hasn t been prven yet), increases CO2 intake, prduces essential ils,and 20% mre yield. The Biwave is preset n a rtatin design t prduce these frequency levels. Testing at Ohi State fr abut 12 t 14 mnths t prve that this unit keeps pests away. CASING: Stainless Steel PACKAGING: Unit cmes in a white display bx. The bx is inside anther bx with 1 fam between the tw bxes. Unit will include instructins, cntact, tech, and trubleshting inf. HEIGHT: 3 x 1 x 1 WEIGHT: 49lbs VOLTS: 120V WATTS: 60 watts UNIT COVERS: 1.5 Acres UPS GROUND: Yes MOUNTING: Munt frm the ceiling in the center f the rm with an adjustable bracket. The unit must be stable. Tp f Biwave unit shuld be flush with the canpy. Munt vertically. The pwer crd cmes ut f the bttm f the unit. Wall munts cming sn. CYCLE: 15 minutes n 45 minutes ff. Apll 6 (734100) Timer is needed. Run the Biwave during light cycle nly. DO NOT RUN WHEN LIGHTS ARE OFF. The BiWave machine is a technlgy that bsts the phtsynthesis in plants, it helps the plants t breathe better during the night there is n phtsynthesis, and there is n need t use the BiWave. And as mst experts shared with us, the plants need t rest during the night, and assimilate the chlrphyll created during the light cycle, and we dn t want t disturb their balance by turning the BiWave machine n.
5 WARRANTY: 3 year warranty; Excludes custmer misuse f prduct. TECH CALLS: Biwave Industries will take tech calls. Please cntact Gerge r r inf@biwaveindustries.cm. REPAIR: Custmer can repair the unit themselves. It is extremely simple. This will nt vid the warranty. RMA Techs at Sunlight Supply will learn hw t repair this unit. Repair cnsists f mtr, pulley, belt, and cage. If RMA tech at SLS CANNOT repair, Biwave can repair r replace the unit. REPLACEMENT PARTS: Replacement parts will be prvided in the future by SLS. MAINTENANCE: Grease every three t fur mnths. There are nipples n the unit that yu wuld put the grease in. Any grease wuld wrk; t the cheapest grease r the mst expensive grease.
6
7


8


9
10 Hydr DI 9200 Trubleshting Starting BiWave: Occasinally ne r bth rtrs n the BiWave Machine wn t start. Try the fllwing: Plug the machine n and wait fr 20 secnds Many BiWave machines start in a sequence, with ne f the rtrs starting between 5-15 secnds after the first ne, if yur BiWave Machine des this; it is n cause fr alarm, just smething t be aware f befre trubleshting in the future. Basic Trubleshting: Is the machine plugged int a wrking utlet/timer? If yu are using a timer try plugging directly int a wall/pwer strip Is the machine munted crrectly? BiWave must be munted vertically with the bttm cver pinted t the flr, and the tp cver pinted twards the ceiling The BiWave Machine has a tp and bttm, there are a cuple f ways t check if it is munted crrectly: The tp is labeled n the frnt with a red sticker The wall chrd always cmes ut f the bttm cver Make sure yur BiWave Machine is level Advanced Trubleshting: Pwer the machine n If the interir (smaller) rtr will nt spin, the issue is under the bttm cver If the exterir (bigger) rtr will nt spin, the issue is under the tp cver Pwer the machine ff, based n which rtr it is yur fcus shuld g t the crrespnding cver fr the rest f yur trubleshting Fcus n the green light in the pwer supply (lcated under the tp cver), pwer the machine n If the light des nt turn whatsever the issue is electrical, if the light turn n the issue is mechanical, if the light nly turns a little bit withut staying n, the issue may be either electrical r mechanical. Pwer the machine ff, unplug the machine, carefully, lay the machine dwn n a flat surface, the wide side dwn. Use a 3/16 Allen wrench t remve the cver f the affected side, this is dne by remving the tw screws lcated n each side f the cver
11 If the light did nt turn n ( did nt turn at all) in the preceding test,check the fllwing: With the cver nw ff, are there any lse/bare (uncnnected) wires? Check the plug that cnnects int the pwer supply, unplug the wire, and plug-it back in, make sure that it is all the way plugged in. Yu can test if this is the slutin with the cver ff and the machine lying dwn. If the light still will nt turn at all it is likely that the pwer supply is defective, r the pwer cable has been damaged. If this is the case, cntact BiWave. If the light is turning but the rtr is nt turning OR the light turns a little bit but des nt cntinue t rtate check the fllwing: The prblem is mst likely an issue with the tensin f the timing belt, befre prceeding MAKE SURE the BiWave Machine is unplugged. The timing belt can be t tight r t lse, bth can cause the rtr t nt spin. Here is hw yu tell: Pinch the belt with yur thumb and frefinger the belt shuld have tensin withut any pressure frm pinching. Yu shuld be able t pinch (with relative ease), cnstricting the belt just inside the diameter f either pulley (it shuld nt pinch further than 2/3 s f the diameter f the pulley). If yu can t pinch it t this pint (r it is difficult t pinch) the belt is t tight, if yu can pinch it past 2/3 s diameter (especially if it is very easy) the belt is t lse. If the belt tensin is perfect and still nt wrking, cntact BiWave. If the belt needs t be adjusted cntinue fllwing the directins Lk at the belt, if any part f it is frayed r has hles, then the belt is damaged and needs t be replaced, If yu need anther belt r are changing the belt, cntact BiWave we will help yu find what caused the damage t the belt and/r prvide yu with a new ne. T change the tensin n the belt, take the fllwing steps: Lsen the blts that cnnect the mtr munts t the endplate (these blts are n the rtr side f the endplate, are visible with the cver n, and pass thrugh the tensining slts n the endplate). Lsen all three blts. They dn t need t be unscrewed all the way, an 1/8 th f an inch is plenty, and will make reassembly much easier. OPTIONAL: while yu have these blts lse, it will give yu a chance t check the integrity f the pulley n the mtr (this culd be the cause f yur prblem) If yu want t check this read the next set f bullet pints therwise skip ahead Slide the mtr alng the tensining slts all the way frward (twards the frnt f the machine) the belt shuld fall ff r becme very lse Pull the belt ff Push the bttm f the pulley with yur index finger with LIGHT pressure if the pulley mves easily, it is either damaged, r defective, cntact BiWave immediately if this is the case If the belt is t lse slide the mtr twards the back f the machine, if it is t tight than slide the mtr twards the frnt f the machine. Yu wn t need t slide it t far in either directin, a little bit ges a lng way. When yu believe yu ve reached the right level f tensin, tighten the 3 blts that yu
12 lsened, as yu tighten the blts check the tensin n the belt because it WILL change, s adjust accrdingly. Befre putting the cver back n make sure all blts are tight. While putting the cver back n, make sure all f the wires are under the cver, and nt clse t any mving parts f the machine, slide the cver ver the tabs, insert screws, tighten, and put yur BiWave back t wrk. Yu may want t cntact BiWave t set up a service call. Yu may als chse t prceed n yur wn, please be aware if yu chse t prceed n yur wn; yu d s at yur wn cautin. If yu d nt fllw the directins carefully yu culd cause irreparable damage t the BiWave Machine rendering any warranties vid. Fr all service inquiries cntact BiWave Industries Inc. r yur BiWave retailer: Please have the name and mdel f yur Machine ready. Inf@Biwaveindustries.cm Or call
Tools Required. Installation. Step 1. Headlight lense removal (Driver's side shown, Passenger side similar)
") Tls Required Phillips Screw Driver (crner lamps) Flat Head Screw Driver (ptinal fr headlight cver) Pliers (handy t have) Electrical Tape Sturdy Cpper Wire (t use as a wire fish) 10mm Scket r Wrench (grund
Tls Required Phillips Screw Driver (crner lamps) Flat Head Screw Driver (ptinal fr headlight cver) Pliers (handy t have) Electrical Tape Sturdy Cpper Wire (t use as a wire fish) 10mm Scket r Wrench (grund
PSS INSTALLATION INSTRUCTIONS
 PSS INSTALLATION INSTRUCTIONS Imprtant - Read Befre Starting! Befre starting yur installatin carefully read the fllwing warnings and instructins. Failure t prperly fllw the warnings and instructins culd
Model: TM-3 INSTALLATION AND OPERATION INSTRUCTIONS
 120 Mdel: TM-3 INSTALLATION AND OPERATION INSTRUCTIONS IF YOU CANNOT READ OR UNDERSTAND THESE INSTALLATION INSTRUCTIONS DO NOT ATTEMPT TO INSTALL OR OPERATE INTRODUCTION This Wired Wall Timer system was
VYLEATER DAILY HOUSEKEEPING & PREVENTATIVE MAINTENANCE PROCEDURES. Follow these procedures to keep your Vyleater running smoothly.
 VYLEATER DAILY HOUSEKEEPING & PREVENTATIVE MAINTENANCE PROCEDURES! WARNING! Failure t fllw these prcedures may cause an verlad cnditin that culd result in the Vyleater becming severely damaged. Fllw these
General Faucet Installation Instructions
 General Faucet Installatin Instructins Step 1: Psitin the Faucet Begin installing yur faucet by placing the gasket and faucet in psitin n the sink. (Diagram A) Frm under the sink, thread the plastic munting
INSTALLATION & USER S GUIDE
 REKLUSE MOTOR SPORTS The Rekluse EXP Clutch OVERVIEW INSTALLATION & USER S GUIDE Dc ID: 191-6000 Manual Revisin: 050514 This kit will replace sme f the OEM frictins and drive plates with the EXP disk.
Parts Checklist: XJ Front 3-Link Long Arm Upgrade Installation Instructions *BOX 1* *BOX 2* Jeep Cherokee XJ
 XJ Frnt 3-Link Lng Arm Upgrade Installatin Instructins 84-01 Jeep Cherkee XJ Parts Checklist: *BOX 1* Instructins Invice Lg decal 10001 (1) Rck-Link decal 13287 (2) Irnrckffrad.cm decal (1) Subframe center
PRAIRIE 360 4X4 (KVF360-A/C), PRAIRIE 360 2X4 (KVF360-B), PRAIRIE 650 4X4 (KVF650-A/B), PRAIRIE 700 4X4 (KVF700-A/B/D),
, PRAIRIE 360 2X4 (KVF360-B), PRAIRIE 650 4X4 (KVF650-A/B), PRAIRIE 700 4X4 (KVF700-A/B/D),") SERVICE REPLACES: Please discard ATV 07-02 dated 4/5/07 MODEL: PRAIRIE 360 4X4 (KVF360-A/C), PRAIRIE 360 2X4 (KVF360-B), PRAIRIE 650 4X4 (KVF650-A/B), PRAIRIE 700 4X4 (KVF700-A/B/D), KFX700 (KSV700-A/B/C),
SERVICE REPLACES: Please discard ATV 07-02 dated 4/5/07 MODEL: PRAIRIE 360 4X4 (KVF360-A/C), PRAIRIE 360 2X4 (KVF360-B), PRAIRIE 650 4X4 (KVF650-A/B), PRAIRIE 700 4X4 (KVF700-A/B/D), KFX700 (KSV700-A/B/C),
Introduction Specifications Structure & Performance Assembly Folding Operation Care & Maintenance...
 n Intrductin... 3 Specificatins... 4 Structure & Perfrmance... 5 Assembly... 6 Flding... 7 Operatin... 8-12 Care & Maintenance... 13-15 2 P a g e Read and fllw all instructins, warnings, and ntes in this
Mini H1 Twin Kit - Installation Instructions
 Intrductin: Thanks fr purchasing the Mini H twin kit! Yu are very clse t imprve yur lightning nw :) Please read this manual carefully. Feel free t cntact us r visit ur Facebk cmmunity; Eurpean Headlight
Parts Checklist: ZJ Front 3-Link Long Arm Upgrade Installation Instructions *BOX 1* *BOX 2* Jeep Grand Cherokee ZJ
 ZJ Frnt 3-Link Lng Arm Upgrade Installatin Instructins 93-98 Jeep Grand Cherkee ZJ Parts Checklist: *BOX 1* Instructins Invice Lg decal 10001 (Qty: 1) Rck-Link decal 13287 (2) Irnrckffrad.cm decal (1)
FIRST: Top battery (closest to the arm) SECOND: Middle battery. LAST: Top battery (furthest from arm)
 SECOND: Middle battery. LAST: Top battery (furthest from arm)") Hw t Install the Batteries Hw t Hld the Lamp: The InteliEnergy Lamp selectin switches utilize the same technlgy as cell phnes: Capacitive Tuch. This assures the ultimate in lngevity because there are n
Hw t Install the Batteries Hw t Hld the Lamp: The InteliEnergy Lamp selectin switches utilize the same technlgy as cell phnes: Capacitive Tuch. This assures the ultimate in lngevity because there are n
REMOTE GREASING KIT FOR MORGANS SERIES 2
 Fitting Instructins REMOTE GREASING KIT FOR MORGANS SERIES 2 Thank yu fr purchasing a Remte Greasing Kit fr yur Mrgan. These fitting instructins shuld enable yu t fit the kit t yur Mrgan. Depending n which
XJ 4-Link Rear Long Arm Instructions
 Parts Checklist: Instructins Irn Rck Off Rad Decal - (2) Rck-Link Decal 13287 - (2) irnrckffrad.cm Decal - (1) Crssmember - 991162 - (1) Shck crssmember - 91173 - (1) Shck crssmember spacer - 91178 - (2)
03-06 TJ Long Arm Upgrade Instructions
 Parts List: Instructins Irn Rck Off Rad lg decal (2) Irnrckffrad.cm decal (1) Belly skid plate 85046 (1) Left lng arm frame munt 85121 (1) Right lng arm frame munt 85122 (1) Left LCA munt gusset plate
{EMS Shock} Student Name: Period:
 {EMS Shck} Student Name: Perid: 5 th Grade Engineering Pulleys Unit Rubric Lab #0016 Pulley Frame Pulley Frame: Student cnstructed the Pulley Frame t lab specificatins. Pulley Frame was nt apprved 0 pints
Trouble Shooting Guide for AFVK-SP Series Valve Kit (AF-4000 Series Gas Valves)
") Truble Shting Guide fr AFVK-SP Series Valve Kit (AF-4000 Series Gas Valves) AFVK-SP, AFVK-SP-H/L, AFVK-SP-MH/L AFVK-SP Series Valve Kit Truble Shting Guide (AF-4000 Series) TABLE OF CONTENTS General Infrmatin
Truble Shting Guide fr AFVK-SP Series Valve Kit (AF-4000 Series Gas Valves) AFVK-SP, AFVK-SP-H/L, AFVK-SP-MH/L AFVK-SP Series Valve Kit Truble Shting Guide (AF-4000 Series) TABLE OF CONTENTS General Infrmatin
How to Sweat (Solder) Copper Pipe By See Jane DrillTM Copyright 2013, All Rights Reserved
 Copper Pipe By See Jane DrillTM Copyright 2013, All Rights Reserved") Hw t Sweat (Slder) Cpper Pipe By See Jane DrillTM Cpyright 2013, All Rights Reserved Objective T learn hw t attach pieces f cpper pipe by sweating r sldering the metal tgether. This is a helpful skill
Hw t Sweat (Slder) Cpper Pipe By See Jane DrillTM Cpyright 2013, All Rights Reserved Objective T learn hw t attach pieces f cpper pipe by sweating r sldering the metal tgether. This is a helpful skill
Parts Checklist: WJ Front 3-Link Long Arm Upgrade Installation Instructions *BOX 1* (1) *BOX 2* (1) Jeep Grand Cherokee WJ
 *BOX 2* (1) Jeep Grand Cherokee WJ") Parts Checklist: *BOX 1* 13319 (1) Instructins Lg decal 10001 (Qty: 1) Rck-Link Decal 13287 (2) Irnrckffrad.cm decal (1) Subframe center 92270 (1) Subframe left uter 92256 (1) Subframe right uter 92275
Parts Checklist: *BOX 1* 13319 (1) Instructins Lg decal 10001 (Qty: 1) Rck-Link Decal 13287 (2) Irnrckffrad.cm decal (1) Subframe center 92270 (1) Subframe left uter 92256 (1) Subframe right uter 92275
DriveCam Unit Installation Instructions
 DriveCam Unit Installatin Instructins Installatin f the DriveCam Unit is nt cmplicated, thugh care must be taken t avid specific prblems. Sme vehicles require additinal cnsideratin t determine the ptimum
Installation Instructions AQ-5100, AQ-5200 & AQ-5300 Under Counter Water Filter Single Stage (5100), Two Stage (5200) and Three Stage (5300) systems
, Two Stage (5200) and Three Stage (5300) systems") Live Healthy s ' p V iv Installatin Instructins AQ-5100, AQ-5200 & AQ-5300 Under Cunter Water Filter Single Stage (5100), Tw Stage (5200) and Three Stage (5300) systems Welcme t the Aquasana experience.
Live Healthy s ' p V iv Installatin Instructins AQ-5100, AQ-5200 & AQ-5300 Under Cunter Water Filter Single Stage (5100), Tw Stage (5200) and Three Stage (5300) systems Welcme t the Aquasana experience.
Copyright 2015 Maxitrak ltd
 Cpyright 2015 Maxitrak ltd maxitrak.cm 1 CASE Driving and Maintenance. Sme tips n driving and lking after yur Maxitrak/Accucraft 1 Case tractin engine. Once yu have taken yur mdel frm the packaging it
;THI~~Sf\-FEJY _.:.. ;'..»...
 45 -CHAPTER......... j...,.. 8 ~\..- ;THI~~Sf\-FEJY _.:.. ;'..».......,. np;,llf I~~yeantlfreez~in ah'penc8ntaiil~rr spllledq.l,1thefi()r ~~erifit:p1ightbe acc;~ss:lblle.i t children r ariimals.antifreezeis'txic
WELCOME. WEB LOCATION Los Angeles, CA
 WELCOME Thank yu fr chsing AC Infinity. We are cmmitted t prduct quality and friendly custmer service. If yu have any questins r suggestins, please dn t hesitate t cntact us. Visit www.acinfinity.cm and
PV-70 Remotely Operated Cryogenic Globe Valve Installation, Operation, and Maintenance Manual
 PV-70 Remtely Operated Crygenic Glbe Valve Installatin, Operatin, and NOTIC: Printed cpies are uncntrlled. Page 1 f 12 TABL OF CONTNTS 1. INSTALLATION... 2 2. OPRATION... 4 3. MAINTNANC... 4 4. PRSSUR
EDBRO RIGID INCLINOMETER
 EDBRO RIGID INCLINOMETER RINC01 Installatin & Operating Instructins E5542 rev 1 (June 2010) Edbr PLC Nelsn Street, Bltn BL3 2JJ UK Tel: +44 (0) 120 4528888 Fax: +44 (0) 120 4531957 E-mail: pstmaster@edbr.cm
Advanced 3 Million Wireless USB Limousine Underbody Kit
 Advanced 3 Millin Wireless USB Limusine Underbdy Kit Warning: Please check yur state and lcal laws befre installing this LED underbdy kit. Every state has different plicies and prcedures in place regarding
72 Mustang Mach 1 tachometer cluster and gauge conversion
 72 Mustang Mach 1 tachmeter cluster and gauge cnversin Dated: 02-17-2009 (drafted by a Chevy persn wrking n his first Frd -nt gd-) The fllwing infrmatin pertains t hw I went abut cnverting the standard
Cabo Cruiser. X-Treme TM Electric Bicycle. Electric Bicycle. Owner s Manual. (Photo may vary from actual bicycle)
") X-Treme TM Electric Bicycle Cab Cruiser Electric Bicycle Owner s Manual (Pht may vary frm actual bicycle) Read this manual cmpletely befre riding yur electric bicycle 1 Table f Cntents Table f Cntents.
X-Treme TM Electric Bicycle Cab Cruiser Electric Bicycle Owner s Manual (Pht may vary frm actual bicycle) Read this manual cmpletely befre riding yur electric bicycle 1 Table f Cntents Table f Cntents.
BC7 BATTERY CABINET INSTALLATION / OPERATION / MAINTENANCE
 BC7 BATTERY CABINET INSTALLATION / OPERATION / MAINTENANCE 1. INTRODUCTION... 3 2. PRECAUTIONS... 3 3. INSPECTION UPON RECEIPT OF GOODS... 4 3.1 GENERAL... 4 3.2 VISIBLE DAMAGE... 4 3.3 CONCEALED DAMAGE...
INSTALLATION INSTRUCTIONS FOR PART #47002 WATER / METHANOL INJECTION SYSTEM UNIVERSAL TURBO DIESEL
 Kit Cntents INSTALLATION INSTRUCTIONS FOR PART #47002 WATER / METHANOL INJECTION SYSTEM UNIVERSAL TURBO DIESEL Parts UHO Pump (Ultra High Output) 3 Qt Reservir 10 ft High Pressure Tubing 3 ft Black Wire
INSTALLATION INSTRUCTIONS
 INSTALLATION INSTRUCTIONS Accessry Applicatin Publicatins N. All 24039 AIR CONDITIONER ACCORD (DX) 4-DOOR Issue Date SEP 2002 What s New The A/C kit and instructins fr the 2003 Accrd are all new. Fllw
Volume 1.1 OPERATIONAL MANUAL MODEL: CG-211Y PIPE TORCH/BURNER MACHINE. by BLUEROCK Tools
 Vlume 1.1 OPERATIONAL MANUAL MODEL: CG-211Y PIPE TORCH/BURNER MACHINE by BLUEROCK Tls UNPACKING THE ITEM Cautin: This machine is packed tgether with items that may be sharp, ily and verly heavy bjects.
EDBRO TRAILER INCLINOMETER
 EDBRO TRAILER INCLINOMETER TINC01 (12V AND 24V VERSIONS) Installatin & Operating Instructins E5541 rev 5 (Sept 2015) Edbr PLC Nelsn Street, Bltn BL3 2JJ UK Tel: +44 (0) 120 4528888 Fax: +44 (0) 120 4531957
TJ Long Arm Lift Kit Instructions
 Parts List: Instructins Irn Rck Off Rad lg decal (2) Irnrckffrad.cm decal (1) Belly skid plate 85046 (1) Left lng arm frame munt 85104 (1) Right lng arm frame munt 85105 (1) Left LCA munt gusset plate
INSTALLATION INSTRUCTIONS
 INSTALLATION INSTRUCTIONS Accessry Applicatin Publicatins N. All 24107 AIR CONDITIONER ELEMENT (DX) Issue Date DEC 2002 What s New INSTALLATION The A/C kit and instructins fr the 2003 Element are all new.
Stage 1: Starting with Births
 Mdule 2C Building the Mdel Presenter s Guide Stage 1: Starting with Births Presenter Ntes are in text bxes thrughut the dcument. File Mdel Hand Variable Bx Arrw Rate Pacman Y=x 2 Run Run AutSim Input/Output
Audi 8L A3 and B5 A4 ColorMFA Install Guide ColorMFA from AutoPilot. Instructions from Clusters by Litke and pinout from Drive2
 Audi 8L A3 and B5 A4 ClrMFA Install Guide ClrMFA frm AutPilt. Instructins frm Clusters by Litke and pinut frm Drive2 This is an verview guide n hw t install the v3.2/v3.4 ClrMFA units int Audi 8L and B5
Electric Bicycle Owner Manual
 X-Treme TM Electric Mped XB-610 Electric Bicycle Owner Manual Read this manual cmpletely befre riding yur electric bicycle 1 Cntents Table f Cntents.. 2-3 Riding Safety 4-6 Prduct Features 7 Package Cntents...
INSTALLATION INSTRUCTIONS FOR PART #20001 FORCED INDUCTION BOOST COOLER WATER / METHANOL INJECTION SYSTEMS
 INSTALLATION INSTRUCTIONS FOR PART #20001 FORCED INDUCTION BOOST COOLER WATER / METHANOL INJECTION SYSTEMS Parts UHO (Ultra High Output) Pump 3 Qt Reservir 10 ft High Pressure Tubing 3ft Wire Lm 18 1/8
PRE-PLANNING & DELIVERY GUIDE
 TM PRE-PLANNING & DELIVERY GUIDE Need Assistance? Call 1-888-329-4847 PRE-DELIVERY Spa Delivery Preparatin Yur spa delivery will arrive CURBSIDE at the specified delivery address yu prvided at the time
You have a Chiller, Now What?
 Yu have a Chiller, Nw What? Raschell Hickmtt Reginal Sales Manger Dimplex Thermal Slutins Klant Klers Brand Chillers Agenda This presentatin is develped t be a very brief and generic intrductin t anyne
GLOBAL LIFT CORP. Owner s Manual. Rotational Series R-375
 GLOBAL LIFT CORP Owner s Manual Rtatinal Series R-375 684 N Prt Crescent Rd Suite C Bad Axe, MI 48413 Tll Free: 866-712-0606 Fax: 989-269-5902 www.glballiftcrp.cm Page 1 ROTATIONAL SERIES POOL LIFTS R-375
READ ALL INSTRUCTIONS THOROUGHLY FROM START TO FINISH BEFORE BEGINNING INSTALLATION!
 www.fabtechmtrsprts.cm 4331 EUCALYPTUS AVE ~~ CHINO, CA 91710 PHONE 909-597-7800 ** FAX 909-597-7185 1994-2001 DODGE RAM 1500 & 2500 4 WHEEL DRIVE FTS3400-50 FRONT DUAL SHOCK SYSTEM PARTS LIST: 1 EA. FT3400-50-100P
INSTALLATION INSTRUCTIONS FOR PART #20010 RT1/RT2/DOM WATER / METHANOL INJECTION SYSTEMS
 Kit Cntents INSTALLATION INSTRUCTIONS FOR PART #20010 RT1/RT2/DOM WATER / METHANOL INJECTION SYSTEMS Parts UHO Pump (Special High Output) 3 Qt Reservir 10 Ft High Pressure Tubing 3 Ft Wire Lm 18 1/8 Silicne
EnergyBar 6. Setup Guide
 EnergyBar 6 Setup Guide WELCOME Cngratulatins n yur purchase f the Apex EnergyBar 6! The EnergyBar 6 allws the Apex system t cntrl up t six 230 vlt items such as lights, pumps, fans, heaters, chillers
CS369-R51I Thank you very much for purchasing our air conditioner.
 OWNER'S MANUAL CONDITIONER REMOTE CONTROLLER ILLUSTRATION The design and specificatins are subject t change withut prir ntice fr prduct imprvement. Cnsult with the sales agency r manufacturer fr details.
USER`s Manual. Swivelling semi-automatic press. Swivelling manual press TECHNICAL DATA. - works without compressor
 USER`s Manual Swivelling semi-autmatic press Swivelling manual press TECHNICAL DATA - wrks withut cmpressr - pens autmatically ( nly Swing S ) - swivels autmatically aside ( nly Swing S ) Dimensins in
XJ 4 Rock-Link Long Arm Lift Kit Instructions XJ Jeep Cherokee
 Parts Checklist: *BOX 1* 33x17x8 Instructins Rck-Link decal 13287 (2) Irn Rck Off Rad lg decal 10001 (2) Irnrckffrad.cm decal (1) XJ/ZJ Adjustable duble shear track bar 92185 (1) Track bar male threaded
XJ 4 Rock-Link Long Arm Lift Kit Instructions XJ Jeep Cherokee
 Parts Checklist: *BOX 1* 33x17x8 Instructins Rck-Link decal 13287 (2) Irn Rck Off Rad lg decal 10001 (2) Irnrckffrad.cm decal (1) XJ/ZJ Adjustable duble shear track bar 92185 (1) Track bar male threaded
INSTALLATION & USER S GUIDE
 REKLUSE MOTOR SPORTS The Rekluse Cre EXP Kit OVERVIEW INSTALLATION & USER S GUIDE Dc ID: 191-7743A Dc Rev: 083116 This kit replaces the OEM cre clutch cmpnents with high-quality billet cmpnents designed
GLOBAL LIFT CORP Owner s Manual
 GLOBAL LIFT CORP Owner s Manual 39 N. Caseville Rad PO Bx 559 Pigen, MI 48755 Tll Free: 866-712-0606 Fax: 989-453-3050 www.glballiftcrp.cm Page 1 COMMERCIAL SERIES POOL LIFTS C-350 ~ C-450 ~ C-550 TABLE
ANNEX A Descriptions and Photos
 ANNEX A Descriptins and Phts Cmpnent One: Hrizntal autclave with biler The autclave is designed t treat infectius waste by expsure t steam at temperature f up t 130ºC and abut 1.7 bars. The autclave has
Technical Manual. eluma. Aluminum Frame LED Panels. patents pending. Technical Specifications Subject to Change
 Technical Manual eluma Aluminum Frame LED Panels patents pending TM Technical Specificatins Subject t Change TABLE OF CONTENTS General Specificatins.. Page 3 Prfile Specificatins EL001.. Page 4 Prfile
A very common arrangement for oil lubricated stern tube bearings. A simplex seal arrangement is fitted to both inner and outer ends.
 Simplex shaft seal A very cmmn arrangement fr il lubricated stern tube bearings. A simplex seal arrangement is fitted t bth inner and uter ends. The replaceable chrme liner prevents damage t the prp shaft
Installation instructions: 13 Pin Electrical system for towing hitch
 General data Part number Westfalia Vehicle Manufacturer Vehicle 321 538 300 153 ZGB 1T0 055 204 Vlkswagen Turan MY 2003> 321 538 391 105-005 - 33/07 Imprtant ntes Read the installatin manual prir t starting
Maintanence Instructions for Meade LXD55 / 75 Motor Gear Box
 WARPSCORP A publicatin frm the Yah Grup - WarpsCrp. Prviding slutins t prblems, answers t questins and ideas t share amng the amateur Astr cmmunity. We welcme yu at: http://grups.yah.cm/grup/warpscrp/
GLOBAL LIFT CORP. Owner s Manual. Superior Series Proformance Series S-350 / P-375
 GLOBAL LIFT CORP Owner s Manual Superir Series Prfrmance Series S-350 / P-375 684 N Prt Crescent Rd Suite C Bad Axe, MI 48413 Tll Free: 866-712-0606 Fax: 989-269-5902 www.glballiftcrp.cm Page 1 SUPERIOR
MT Pressure Switch INSTALLATION AND OPERATING INSTRUCTIONS. Kaustubha Udyog (Orion Instruments)
") PRESSURE SWITCHES PRESSURE DIFFERENCE SWITCHES VACUUM SWITCHES Frm 1.5 mbar t 600 bar INSTALLATION AND OPERATING INSTRUCTIONS MT Pressure Switch Cnstructin The pressure switch is hused in a tugh Aluminium
PRESSURE SWITCHES PRESSURE DIFFERENCE SWITCHES VACUUM SWITCHES Frm 1.5 mbar t 600 bar INSTALLATION AND OPERATING INSTRUCTIONS MT Pressure Switch Cnstructin The pressure switch is hused in a tugh Aluminium
INSTALLATION INSTRUCTIONS FOR PART #50015 DIESEL MPG-MAX WATER / METHANOL INJECTION SYSTEM 6.0L/6.4L/6.7L POWERSTROKE DIESEL
 Kit Cntents INSTALLATION INSTRUCTIONS FOR PART #50015 DIESEL MPG-MAX WATER / METHANOL INJECTION SYSTEM 6.0L/6.4L/6.7L POWERSTROKE DIESEL Parts 7 Galln Reservir UHO Pump (Ultra High Output) 25 ft High Pressure
Volume 1.1 OPERATIONAL MANUAL MODEL: CG-30 TRACK TORCH/BURNER MACHINE. by BLUEROCK Tools
 Vlume 1.1 OPERATIONAL MANUAL MODEL: CG-30 TRACK TORCH/BURNER MACHINE by BLUEROCK Tls UNPACKING THE ITEM Cautin: This machine is packed tgether with items that may be sharp, ily and verly heavy bjects.
Pre-Planning Delivery Guide
 Pre-Planning Delivery Guide Need Assistance? Call 1-888-768-6772 Pre-Delivery Spa Delivery Preparatin Yur spa delivery will arrive CURBSIDE at the specified delivery address yu prvided at the time f yur
WJ 6.5 Critical Path Lift Kit Installation Instructions
 WJ 6.5 Critical Path Lift Kit Installatin Instructins Parts Checklist: *BOX 1* 24x12x12 6.5 Frnt spring 96008 (2) 6.5 Rear spring 96009 (2) *BOX 2* 24x14x6 Literature (instructins, steering shimmy checklist,
START-UP DRIP IRRIGATION SYSTEM
 START-UP DRIP IRRIGATION SYSTEM CHECK LIST Erick Smith, Dari Chavez, Tim Clng, and Lenny Wells, UGA Department f Hrticulture Wesley Prter, UGA Department f Crp and Sil Sciences Specialty crps such as fruits,
EP12M248 7 Stage Automatic Smart Battery Charger, Desulphuration& Maintainer 12V, 2 / 4 / 8A FOR AGM, GEL AND WET BATTERIES USER MANUAL
 EP12M248 7 Stage Autmatic Smart Battery Charger, Desulphuratin& Maintainer 12V, 2 / 4 / 8A FOR AGM, GEL AND WET BATTERIES USER MANUAL THIS MANUAL CONTAINS IMPORTANT SAFETY AND OPERATING INSTRUCTIONS 1
RGBA LED MOVING HEAD FOGGER Operating Instructions
 THE MANIAC II RGBA LED MOVING HEAD FOGGER Operating Instructins P/N 100122 (120 VAC w/dmx) Thank yu fr purchasing the MANIAC II! T ensure prper peratin f this unit, please take sme time t read the manual
Signature Series Vehicles C6 A6 Installation Guidelines
 STāSIS Engineering Signature Series Vehicles C6 A6 Installatin Guidelines Table f Cntents Page Trque specs 3 Suspensin Frnt and Rear Suspensin, Turing 4 Braking Optinal Brake Kit 16 Bed-In Prcedure 21
Safe Handling of High Voltage Electrical components in Electrical End of Life Vehicles
 Safe Handling f High Vltage Electrical cmpnents in Electrical End f Life Vehicles The fllwing infrmatin is extracted frm the dcument Safe Handling f High Vltage Electrical cmpnents in Electrical End f
Streetblaster Pro-Stud Wet Nitrous System
 Streetblaster Pr-Stud Wet Nitrus System www.nswizard.cm Table f Cntents List f Cmpnents 1 Nitrus Bttle Installatin 2 Nitrus Supply Pipe Ruting 3 Pulsid Installatin 4 Pipe Fitting Instructins 5 Plumbing
OWNER S MANUAL. DCR-205-XX-DC Powered Drum Rotators
 VESTIL MANUFACTURING CORP. 2999 N. Wayne St., Angla, IN 46703 Ph: 260-665-7586 Fax: 260-665-1339 E-mail: sales@vestil.cm Website: www.vestil.cm 0317 DCR-205-DC, MANUAL DCR-205-XX-DC Pwered Drum Rtatrs
Solvent Filter. What is a Solvent Trap, Solvent Recycler or Solvent Filter? Why use a solvent filter? Why is the HIT Solvent Filter better?
 Slvent Filter What is a Slvent Trap, Slvent Recycler r Slvent Filter? It is a device attached t the end f a threaded barrel that cllects all f the slvent and debris as it is cleaned frm the barrel and
Volume 1.1 OPERATIONAL MANUAL MODEL: CG-211C PIPE TORCH/BURNER MACHINE. by BLUEROCK Tools
 Vlume 1.1 OPERATIONAL MANUAL MODEL: CG-211C PIPE TORCH/BURNER MACHINE by BLUEROCK Tls UNPACKING THE ITEM Cautin: This machine is packed tgether with items that may be sharp, ily and verly heavy bjects.
Headsight HHC HH 14 series. Combine Manual
 Headsight HHC HH 14 series Cmbine Manual 09010204 Abut Headsight Headsight Cntact Inf Headsight, Inc Bremen, IN 46506 Phne:574-546-5022 Fax: 574-546-5760 Email: inf@headsight.cm Web: www.headsight.cm Technical
StarHazer III TM. Operating Instructions. P/N / (120 VAC/230v)
") StarHazer III TM Operating Instructins P/N 100045/100046 (120 VAC/230v) Thank yu fr purchasing this StarHazer III TM As yu will ntice frm the table f cntents, the manual fr yur new prduct is quite extensive.
StarHazer III TM Operating Instructins P/N 100045/100046 (120 VAC/230v) Thank yu fr purchasing this StarHazer III TM As yu will ntice frm the table f cntents, the manual fr yur new prduct is quite extensive.
Instruction Manual. PHscan30 Pocket ph Tester
 Hazardus Substance Statement Bante is cmmitted t the reductin and eventual eliminatin f all hazardus substances in bth the manufacturing prcess and finished prducts we supply. We have an active manufacturing
E+ Battery Care Guide
 Electric Mtin Systems, LLC 45150 Business Curt, Suite 300 Dulles, VA 20166 USA E+ Battery Care Guide Welcme! Yur E+ Hub Battery Pack is a pwerful, sphisticated, and imprtant part f yur E+ Electric Bicycle.
WJ 6.5 Premium Long Arm Kit Installation Instructions
 WJ 6.5 Premium Lng Arm Kit Installatin Instructins Parts Checklist: *BOX 1* 24x12x12 6.5 Frnt spring 96008 (2) 6.5 Rear spring 96009 (2) *BOX 2* 24x14x6 Literature (instructins, steering shimmy checklist)
Installation Guide Contigo 6100
 Installatin Guide Cmmercial Vehicle Prductivity and Security The is a high-perfrmance beacn designed fr cmmercial prductivity and security. It is ideally suited t installatins in delivery and service fleets
Thank you for purchasing a SledLites.com HID system for your snowmobile. Please read all warnings and complete manual prior to installing.
 Thank yu fr purchasing a SledLites.cm HID system fr yur snwmbile. Please read all warnings and cmplete manual prir t installing. OFF ROAD USE ONLY ALL SLEDLITES.COM EQUIPMENT IS FOR OFF ROAD USE ONLY ATTENTION
Route Sheet Guidelines
 Fairfax VA H.O.G. Chapter Rute Sheet Guidelines THIS DOCUMENT IS A WORK IN PROGRESS AND IS NOT FOR GENERAL DISTRIBUTION. ANY INTERIM USE BY AN OFFICER OR VOLUNTEER OF FAIRFAX VA CHAPTER H.O.G. IS FOR THE
ABTQ-103 rev 01 Last review:
 INSTALLATION, OPERATION & MAINTENANCE INSTRUCTIONS FOR ABTECH PCS Cntrl Statin Purpse f Instructins Wrking in hazardus areas, the safety f persnnel and plant depends n cmplying with all relevant safety
CRUSHER BUCKETS. Made In Italy
 CRUSHER BUCKETS Made In Italy Abut italdem: Italiademlitri srl is the manufacturer f italdem prducts ne f the mst well knwn brands f hydraulic hammers and ne f the market leaders nt nly in Italy but als
Appointment Plus User Instructions
 Appintment Plus User Instructins This dcument prvides the user with instructins fr the Appintment Plus System. Appintment Plus System Features This is a tl fr managing the fllwing: Technician Wrk Frce
A L L Diagnostic Trouble Codes ( DTC ): P Code Charts P0302
: P Code Charts P0302") 2012 Chrysler Truck Twn & Cuntry V6-3.6L Cpyright 2013, ALLDATA 10.52 Page 1 A L L Diagnstic Truble Cdes ( DTC ): P Cde Charts P0302 P0302-CYLINDER 2 MISFIRE Special Tls: Fr a cmplete wiring diagram, refer
2012 Chrysler Truck Twn & Cuntry V6-3.6L Cpyright 2013, ALLDATA 10.52 Page 1 A L L Diagnstic Truble Cdes ( DTC ): P Cde Charts P0302 P0302-CYLINDER 2 MISFIRE Special Tls: Fr a cmplete wiring diagram, refer
SERVICE FACTORY DIRECTED MODIFICATION MC IMMEDIATE INSPECTION REPAIR ONLY AS REQUIRED ENGINE PULLEY WEAR
 SERVICE REPLACES: Please discard MC 06-07 dated June 27, 2006 MODEL: 2004-2005 VULCAN 2000 (VN2000-A1/L-A2/L) MC 06-07 Date: July 28, 2006 First Issued: June 27, 2006 Page 1 f 7 TITLE: ENGINE PULLEY WEAR
INSTRUCTION MANUAL 9500/12000 LBS. D9500SC / D9500SR / D9500SRD D12000SC / D12000SR / D12000SRD MODEL:
 INSTRUCTION MANUAL 95/ LBS. WINCH MODEL: D95SC / D95SR / D95SRD DSC / DSR / DSRD www.aprveatv.cm 95/ LBS. 95/ LBS. D95SC / DSC D95SR / DSR D95SRD / DSRD As yu read these instructins, yu will see WARNINGS
Hub/Remote Operations in version 3.0
 Hub/Remte Operatins in versin 3.0 In StckTrac Enterprise 3.0, the Hub and Remte perate quite a bit differently than they did in 2.0. In 2.0, the shps stred their business fr the day int daily files which
Tips & Technology For Bosch business partners
 Tips & Technlgy Fr Bsch business partners Current tpics fr successful wrkshps N. 35/2011 Gasline injectin Invented fr life Lambda sensr Knw-hw frm the market leader Bsch, innvative cmpany and wrld's largest
IDIN Build-it: Battery-powered wood block phone charger
 IDIN Build-it: Battery-pwered wd blck phne charger GOALS: TIME: Participants knw hw t build a cell phne charger pwered by a car/mtrcycle battery Participants feel mre cmfrtable with sawing, nailing, making
Installation, Operation and Maintenance Instructions
 FJ-310A Installatin, Operatin and Maintenance Instructins Sump cleaner ERIEZ MAGNETICS HEADQUARTERS: 2200 ASBURY ROAD, ERIE, PA 16506 1402 U.S.A. WORLD AUTHORITY IN SEPARATION TECHNOLOGIES P.C# 762-766
WELCOME. WEB LOCATION Los Angeles, CA
 WELCOME Thank yu fr chsing AC Infinity. We are cmmitted t prduct quality and friendly custmer service. If yu have any questins r suggestins, please dn t hesitate t cntact us. Visit www.acinfinity.cm and
Open Street Cam User Manual
 Open Street Cam User Manual Table f cntent 1.Installing the app and setting it up fr the first time 1.1 Installing the app 1.2 Setting up the app fr the first time 2. Installing the smartphne in the car
A/C AIR LAUNCHER TM. Operating Instructions P/N (120 VAC) P/N (230 VAC)
 P/N (230 VAC)") A/C AIR LAUNCHER TM Operating Instructins P/N 101050 (120 VAC) P/N 101051 (230 VAC) Thank yu fr purchasing this A/C AIR LAUNCHER TM As yu will ntice frm the table f cntents, the manual fr yur new prduct
A/C AIR LAUNCHER TM Operating Instructins P/N 101050 (120 VAC) P/N 101051 (230 VAC) Thank yu fr purchasing this A/C AIR LAUNCHER TM As yu will ntice frm the table f cntents, the manual fr yur new prduct
TECHNICAL SPECIFICATION. SPC-4T Stirling Process Cryogenerator
 TECHNICAL SPECIFICATION SPC-4T Stirling Prcess Crygeneratr Reference 80 8044_00 Issue Date April 20, 2016 Stirling Crygenics is a registered trade name f DH Industries BV Fr mre infrmatin n the Stirling
Car Refrigerator PFN-C-WEA-25/35/45/55
 Car Refrigeratr PFN-C-WEA-25/35/45/55 Accessries available separately:- Prtective Transit Bag AC0V -240Vt DC 2 V Pwer Adaptr Please read this manual carefully befre using yur unit. Sectin Page Key Prduct
GENUINE ACCESSORIES INSTALLATION INSTRUCTIONS SECURITY SYSTEM KIT CONTENTS SHOCK SENSOR F-D15 WINDOW DECAL (QTY 2) F-D16
 F-D16") GENUINE ACCESSRIES INSTALLATIN INSTRUCTINS PART NUMBER: 0000-8F-N03 NTE: NT CMPATIBLE WITH REMTE START SYSTEM, PART# 0000-8F-N02 SECURITY SYSTEM KIT CNTENTS APPLICABLE MDELS: 2007>MAZDA CX-9 WITHUT ADVANCED
GENUINE ACCESSRIES INSTALLATIN INSTRUCTINS PART NUMBER: 0000-8F-N03 NTE: NT CMPATIBLE WITH REMTE START SYSTEM, PART# 0000-8F-N02 SECURITY SYSTEM KIT CNTENTS APPLICABLE MDELS: 2007>MAZDA CX-9 WITHUT ADVANCED
CAUTION: Do not install damaged parts!!!
 Yur satisfactin is imprtant t us, please let us help! If yu have any questins r cncerns during the installatin, ur supprt representatives are available t assist yu. Please call: 1-877-769-3765 r Live Chat
As a driver s blood alcohol concentration (BAC) rises, so does the risk of being involved in a crash.
 rises, so does the risk of being involved in a crash.") Abut three in every ten Americans will be invlved in an alchl-related crash at sme time in their lives. Every injury, accident, and death caused by drunk driving is cmpletely preventable. Althugh the number
Abut three in every ten Americans will be invlved in an alchl-related crash at sme time in their lives. Every injury, accident, and death caused by drunk driving is cmpletely preventable. Althugh the number
LT-F Compact Treaded All Terrain Surveillance & Inspection Robot
 Rbts, Parts, and Custm Slutins www.superdridrbts.cm Tll Free: (866) SDRbts Phne: (919) 557-9162 Fax: 775-416-2596 1421 E. Brad Street #101 Fuquay Varina, NC 27526 LT-F Cmpact Treaded All Terrain Surveillance
Safe Work Procedure Self-Loading Logging Truck
 Safe Wrk Prcedure Self-Lading Lgging Truck PERSONAL PROTECTIVE EQUIPMENT: Adequate ftwear with gd tractin sles Hi-vis hardhat when ut f cab Hi-vis vest when ut f cab Hearing prtectin when driving PROCEDURES: