SECTION O LUBRICATION AND MAINTENANCE. Section Description Page No. O.1 MAINTENANCE GENERAL 3 O.2 FREE AFTER SALES SERVICE (300 MILES) 3
|
|
|
- Edmund Gibson
- 6 years ago
- Views:
Transcription
1 SECTION O LUBRICATION AND MAINTENANCE Section Description Page No. O.1 MAINTENANCE GENERAL 3 O.2 FREE AFTER SALES SERVICE (300 MILES) 3 O.3 FREE AFTER SALES SERVICE (1,200 MILES) 4 O.4 'A ' SERVICE 5 O.5 'B ' SERVICE 6 O.6 'C' SERVICE 7 O.7 LUBRICATION GENERAL 9 O.8 ENGINE LUBRICATION 9 O.9 TRANSMISSION LUBRICATION 10 O.10 LOWER STEERING SWIVELS 10 O.11 BRAKE FLUID RESERVOIRS 11 O.12 RECOMMENDED LUBRICANTS 12
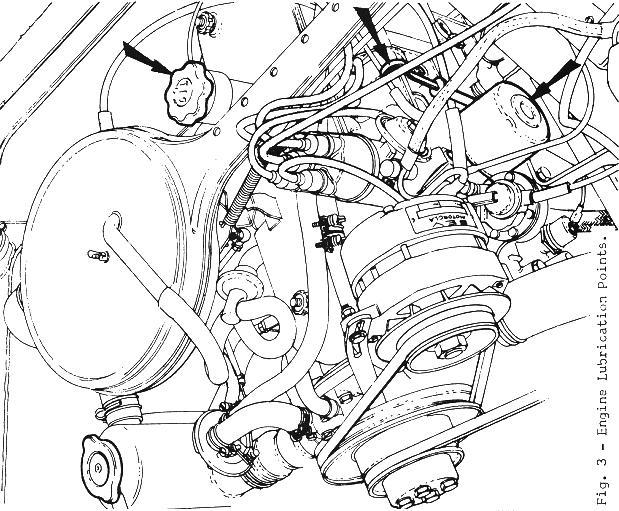
2 PAGE 2 O LUBRICATION AND MAINTENANCE ILLUSTRATIONS Fig. No. Description Page No. 1 Servo Unit 7 2 Engine and Transmission - Lubrication Points. 8 3 Engine Lubrication Points 8 4 Removing the Filter 9 5 Lower Steering Swivel Plug 10 6 Standard Master Cylinder Reservoir 11 7 Tandem Master Cylinder Reservoir 11
3 SECTION O LUBRICATION AND MAINTENANCE PAGE 3 O.l - MAINTENANCE - GENERAL. In order to maintain this vehicle in an efficient, safe and economical running condition, regular and thorough servicing is essential. The Lotus voucher scheme has been established to provide this service and covers both lubrication and regular mechanical maintenance using recommendations laid down by the technical staff of Lotus Cars Limited. The voucher service commences with a FREE "After Sales Service" which is carried out at 300 miles (500 km.), followed by a further FREE "After Sales Service" at 1,200 miles (2,000 km.). Further vouchers are included in the book to cover lubrication and maintenance at intervals of every 3,000 miles (5,000km.) up to and including 60,000 miles (100,000 km.). Regular lubrication is essential for long life and sustained performance. Make full use of these vouchers, which will be accepted by any Lotus Dealer throughout the United Kingdom or Overseas Territories. It is very important that the vouchers should be used in the correct sequence and at the appropriate mileage. If any particular service is accidentally omitted, the remaining sequence of operations will be affected. Owners should appreciate that Warranty shall not apply to defect arising in any product which has not received the periodical maintenance as detailed in the Service Voucher Book. It must be understood that all oils and materials used in these services will be charged for in addition to the charges for the services. A lubrication chart and list of recommended lubricants are included within this section. In line with our policy of continuous product improvement, Lotus Dealers are informed of all technical developments or improvements that have been made to subsequent vehicles, which could improve the performance of all vehicles. Lotus Cars (Service) Limited reserve the right to change prices, specifications and equipment at any time without notice. IMPORTANT - Brake seals, Hoses and Fluid. The brake manufacturers recommend that at intervals NOT EXCEEDING 40,000 miles (65,000 km.) or 3 years, whichever is reached first, that the braking system be completely overhauled and all washers, seals and hoses renewed. Hydraulic servo units (if fitted) should be stripped, all old seals discarded, component parts cleaned and examined, and if in good condition, the unit rebuilt with the appropriate service repair kit. It is also recommended that the brake fluid is renewed every 18 months. Additionally, if a continental journey (or similar long distance strip) is being undertaken, it is recommended that the fluid is renewed, if this has not already been done in the previous 9 months. O.2 - FREE AFTER SALES SERVICE. 300 miles (500 kilometres). 1. Lubrication. Drain engine without flushing and refill with new oil. Check sump for leaks. Fit new oil filter (DO NOT use the original filter, coloured orange, beyond this mileage). Check gearbox/differential oil level. 2. Engine. Retighten cylinder head bolts to a torque loading of 58 lbs. ft.(8 kg.m.) after loosening a quarter-turn.
4 PAGE 4 O LUBRICATION AND MAINTENANCE Readjust valve clearances. Check engine mountings for security. Check carburettor mountings for security. Examine water hose connections and radiator expansion chamber level. Check, and adjust if necessary, the alternator and water pump drive belts. 3. Ignition. Check, and adjust if necessary, the distributor contact breaker points, and the static ignition timing. Check sparking plug gaps. 4. Brakes. Check braking system including handbrake for operation and correct adjustment. Check pipework, hoses, front wheel discs and calipers, rear wheel backplates for security. Check brake fluid reservoir level (correct level is marked on reservoir); if low, check for leaks and rectify where necessary. 5. Clutch. Check operation of clutch and adjust clearance if necessary. 6. Electrical. Check electrical system throughout and operation of all circuits, including voltage regulator output. Check electrolyte level of battery and top-up if necessary. Check for tightness of terminals. 7. Wheels and tyres. Check all road wheel nuts for tightness. Check all tyre pressures, including spare. 8. Body. Check body operation generally and body securing points. Check operation of all locks, catches, hinges, on doors and luggage compartment covers. Check operation of screen washers. Check seat sliding mechanism. 9. General. Check fuel pipes, unions, fuel tank drain plug for security. O.3 - FREE AFTER SALES SERVICE - 1,200 miles (2,000 kilometres). 1. Lubrication. Drain engine without flushing and refill with new oil. Drain gearbox/differential and refill with new oil. 2. Engine. Retighten cylinder head bolts to a torque loading of 58 lbs. ft. (8kg.m.) after loosening a quarter turn. Check tightness of rocker arm securing bolts. Adjust valve clearances. Check tightness of inlet and exhaust manifold securing nuts. Check level of coolant in engine cooling system. Check, and adjust if necessary the alternator and water pump drive belts.
5 SECTION O LUBRICATION AND MAINTENANCE PAGE 5 3. Brakes. Check brake fluid reservoir level. If low, check for leaks and rectify where necessary. 4. Electrical. Check electrical system throughout and operation of all circuits, including voltage regulator output. Check security of battery terminals. Check electrolyte level of battery. Check the condition of the ignition distributor contact points, adjust if necessary. Check sparking plug gaps. 5. Steering and Suspension. Check that all steering connections, including rack and pinion mountings, steering column adjusting clamps are secure. Check front wheel alignment. Check wishbone and damper connections on front and rear suspension units. 6. Wheels and tyres. Check all tyre pressures including spare. 7. Body. Check operation and lubricate all door locks, hinges, catches on doors and luggage compartment covers. Check operation of windscreen wiper and washers. 8. General. Check tightness of drive shaft universal joints securing bolts. Carry out brief road test and make necessary adjustments. Wash car. Ensure steering wheel and upholstery are free from grease. Exhaust Emission Control System Vehicles. Check the initial timing of the ignition distributor; adjust if necessary. Check the tightness of the intake and exhaust manifold nuts and of the carburettor securing nuts. Tighten if necessary, but not excessively. Check the operation of the solenoid valve. Check the idle R.P.M. adjust if necessary. O.4 - "A" SERVICE - every 3,000 miles (5,000 kilometres) or 3 months (whichever is sooner). 1. Lubrication. Drain engine without flushing and refill with new oil. Fit new oil filter. (Fit new oil filter at first 3,000 miles- 5,000 Km. and 6,000 miles - 10,000 Km. then subsequently every 6,000miles - 10,000 Km). Check gearbox/differential oil level and top-up if required. Lubricate drive shaft universal joints with grease. Lubricate all door and luggage-compartment locks, catches and hinges. 2. Engine. Check coolant level in radiator expansion chamber. Check air cleaner element for condition, Remove as much as possible of any accumulated dust. 3. Brakes. Check brake fluid reservoir level and top-up if necessary. Check brakes, system and operation, including handbrake; adjust if necessary. If front wheel disc pads are down to 3/32 in. (2.5 mm.), replace pads. Check security and condition of all brake hydraulic and, vacuum pipes and unions (where fitted). 4 Ignition. Check distributor settings and adjust if necessary.
6 PAGE 6 O LUBRICATION AND MAINTENANCE Check the condition of the ignition distributor contact points, adjust if required. Check sparking plug gaps and adjust if necessary. 5. Electrical. Check operation of all electrical circuits. Check electrolyte level of battery. Clean battery posts and terminals and smear with silicone grease. Ensure tightness of earth (negative) terminal. 6. Steering and Suspension. Check steering assembly for general condition. Check front wheel alignment and adjust if necessary. 7. Wheels and Tyres. Dynamically balance wheel and tyre assemblies. Check all tyre pressures, including spare. B. Body. Check correct operation of all door locks, hinges and catches on luggage compartment covers. Check body condition generally, and all attachment points, including bumper mounting bolts. Check heater system and operation of valve. Check level of water in windscreen washer container. Exhaust Emission Control System Vehicles. Check the initial timing of the ignition distributor; adjust if required. Check the tightness of the intake and exhaust manifold nuts and of the carburettor securing nuts. Tighten if necessary, but not excessively. Check the operation of the solenoid valve. Check the idle R.P.M., adjust if necessary. O.5 "B" SERVICE - every 6,000 miles (10,000 kilometres) or 6 months (whichever is sooner). "A" Service, plus the following: 1. Lubrication. Drain gearbox/differential and refill with new oil. 2. Engine. Fit new crankcase ventilation filter element. Renew air cleaner element. Check securing bolts for tightness on carburettor, inlet and exhaust manifolds, and exhaust system. Check and adjust if necessary, alternator and water pump drive belts. Check and adjust if necessary, valve rocker clearances. 3. Brakes. Renew servo unit air filter element (if fitted). 4. Ignition. Check each sparking plug for condition and gap. Adjust gap if required, or replace sparking plug with new one if condition or mileage make replacement necessary. Lubricate distributor cam and counterweights sparingly. 5. Clutch. Check operation of clutch and adjust if necessary.
7 SECTION O LUBRICATION AND MAINTENANCE PAGE 7 6 Steering and Suspension. Lubricate lower steering swivels. Repack front hub bearings with grease. 7 Electrical. Check headlamps focusing and reset if necessary. Check voltage regulator output.. Check windscreen wiper operation, and arc. 8. General. Check tightness of nuts and bolts securing front wheel discs, caliper mountings, drive shaft universal joints, steering rack and pinion mountings, front and rear suspension attachment points and damper mountings. Exhaust Emissions Control System Vehicles. Replace the air filter element with a new one. Clean the PCV system flame arrestor. 9. Servo unit. The vacuum servo unit, when fitted is situated in the left-hand side of the lower front luggage compartment (see Fig. 1). Servicing The air filter should be changed every "B" Service 6,000 miles (10,000 Km.). O.6 "C" SERVICE Every 12,000 miles (20,000 kilometres) or 12 months (whichever is sooner). "A" and "B" Service, plus the following: 1. Engine. Drain, fluid out and refill the cooling system, including heater, with a suitable anti-freeze solution. 2. Ignition. Fit new sparking plugs. 3. General. Check for wear on all foot pedal operating cables, linkages and bearings. Lubricate steering unit. NOTE: Any faults or inconsistencies in the operation of any components should be brought to the Owner's attention. Emissions Control System Vehicles. Clean the exposed parts of the carburettor, DO NOT dismantle it. Clean the "AC" valve, or replace it with a new one if necessary.
8 PAGE 8 O LUBRICATION AND MAINTENANCE O.7 - LUBRICATION - GENERAL.
 should be strictly followed. It is most important that only the grade of lubricant shown in the table is used, otherwise serious damage may result.")
9 SECTION O LUBRICATION AND MAINTENANCE PAGE 9 Regular lubrication is essential for long life and sustained performance, and the correct intervals for lubrication, as given in the Service Voucher Book (Part No. 46T 326) should be strictly followed. It is most important that only the grade of lubricant shown in the table is used, otherwise serious damage may result. Recommended lubricants: see table page 12. O.8 - ENGINE LUBRICATION. To ensure their longevity new engines should have two initial oil changes (both carried out during the "After Sales Service"). Engine should have their oil drained after first 300 miles (500 km.) and refill with fresh oil. They should also be drained at 1,200 miles (2,000 km.) and be refilled with new oil. Subsequent oil changes should be made at 3,000 miles (5,000 Km.) intervals. The correct level is to the top mark on the dipstick, which is located to the right-hand side of the cylinder block. The oil filler cap is at the forward end of the rocker cover. Inspect the oil level daily, topping-up if necessary to the correct level. DO NOT overfill. Replace the oil filler cap securely otherwise an oil loss will occur and could result in a complete failure of the engine lubrication system. Draining the sump. Draining the sump will be greatly facilitated if carried out when the car has just completed a run and the oil is warm, thus flowing more readily. Allow to drain thoroughly. Clean the drain plug and replace. Ensure that your garage attendant replaces the cap correctly. The drain plug is located at the right-hand rear of the sump. NOTE: If the engine oil is renewed at the recommended intervals there is no necessity to use a flushing oil. The use of a flushing oil is NOT recommended because of the difficulty in draining it completely. Oil filter. It is recommended that the oil filter element be renewed at intervals of every 10,000 Km. (6,000 miles). It is pointed out that it is false economy to fit a new oil filter alone; always refill engine with new oil after draining the sump. Loosen the filter by means of tool (Part no 46E 6432). -Pass the strap round the filter and insert it into the stirrup. - Tension the strap. - Loosen the filter. - Remove the tool and unscrew the filter by hand. - Oil the new filter seal with engine oil. - Screw in the filter until the seal makes contact with the locating area on the cylinder block.
10 PAGE 10 O LUBRICATION AND MAINTENANCE Tighten the filter by hand by ¼ of a turn: the reference and 4 on the can help one to carry out this operation correctly. Unscrew the filter, bring it in contact with its locating base and re-tighten it by ½ to ¾ of a turn. NOTE - Use only oil filters with crimped seals. Refill engine with fresh oil. Run engine and check for leaks. O.9 - TRANSMISSION LUBRICATION. The transmission oil level should be checked every 3,000 miles (6,000 km.) and replenished if necessary. A combined filler/level plug is located on the left-hand side of the casing, while the drain plug is at the bottom of the casing. To maintain the correct quantity of lubricant, ensure that the oil reaches the bottom of the filler/level plug orifice when the vehicle is standing in a level condition. It is suggested that this check is not performed immediately after the vehicle has been used as the 'churning' effect may result in a false reading. Lubricant should be drained at intervals of every 6,000 miles (10,000 km.) preferably when the oil is warm when the car has just completed a run, thus allowing it to flow more readily. Allow to drain thoroughly, clean the drain plug and replace. It is important that only Hypoid oils of the approved grade be used in the transmission if damage to the gears is to be avoided. O.10 - LOWER STEERING SWIVELS. At intervals of every 6,000 miles (10,000 km.), remove the plug "A" (Fig. 5) [1] and fit a screwed nipple. Apply a grease gun filled with 90 EP Hypoid oil to the nipple and pump the gun until oil exudes from the swivel. Remove the nipple, refit the plug, and repeat with the opposite swivel.
11 SECTION O LUBRICATION AND MAINTENANCE PAGE 11 O.11 - BRAKE FLUID RESERVOIRS. The brake fluid reservoir is located in the front luggage compartment, on the driving side (see Fig. 6) [2]. Check fluid level in the reservoir at intervals of every 3,000 miles (5,000 Km) topping-up if necessary to within 12 mm (½ in.) of the top. Use only the specified fluid for topping-up.
12 PAGE 12 O LUBRICATION AND MAINTENANCE O.12 - RECOMMENDED LUBRICANTS. (The products shown are not listed in order of preference). Shell Esso B.P. Castrol Mobil Engine (above O C) Shell Esso Super Castrol Mobil Super l00 Uniflo Viscostatic GIX Mobiloil 20W/50 Super Engine (below O C) Shel Esso Super Castrolite Mobiloil Super l0l Uniflo Viscostatic Special l0w/30 Transmission Shell Esso B.P. Castrol Mobilube Spirax Gear Oil Gear Oil Hypoy GX EP GX EP Light Front Hubs Shell Esso B.P. Castrol Mobil- Retinax 'A' Multi- Energrease Grease Grease purpose L.2 LM MP Grease Steering swivels Shell Esso B.P. Castrol Mobilube Spirax Gear Oil Gear Oil Hypoy GX EP GP 90/140 SAE 90 EP Steering Unit Shell Esso B.P. Castrol Mobil Retinax 'A' Multi- Energrease Grease Grease Purpose L.2. LM MP Grease Pivots and Linkages Hinges, locks, catches Engine oil. Engine oil or silicone grease Brake master cylinder reservoir: Castrol Girling Brake and Clutch Fluid Crimson to specification SAE 70 R.3.
13 SECTION O LUBRICATION AND MAINTENANCE PAGE 13 Editors notes: [1] Original text referenced Fig. 4. Corrected to Fig. 5 [JJ] [2] Original text referenced Fig. 5. Corrected to Fig. 6 [JJ] [3] Image was labeled Fig 6. Renamed Fig. 8 to eliminate duplication. [JJ]
SECTION O. LUBRICATION/MAINTENANCE. Section Description. Page No.
 SECTION O. LUBRICATION/MAINTENANCE. Section Description. Page No. O.1. General Page 2 O.2. Periodic Services Page 2 O.3. Air Horns Lubrication Page 7 O.4. Recommended Lubricants Page 7 O.5. Exhaust Emission
Hillman Minx Maintenance Schedule
 Hillman Minx Maintenance Schedule The maintenance schedule for most Series Minxes can be found as a large fold-out sheet, pasted inside the back cover of the Owner's Handbook. Series V and VI have a much
MG RV8 Maintenance Schedule
 Action required at 6, 12 & 24 months page 6 12 24 3 Check engine & transmission Check for oil leaks from engine, gearbox & rear axle 3 Engine oil & filter Check oil level & top up Every 12 months or 20,000km
Building Level Technology Issues
 Session: Technology Is Great, But What if We Can t Manage It? Paul Kistler Naval Facilities Engineering And Expeditionary Warfare Center August 11, 2016 Rhode Island Convention Center Providence, Rhode
Light condition and operation Windshield glass condition Wiper blade condition Paint condition and corrosion Fluid leaks Door and hood lock condition
 GENERAL CHECKS Engine Compartment The following should be checked regularly: Engine oil level and condition Transmission fluid level and condition Brake fluid level Clutch fluid level Engine coolant level
Chapter D LUBRICATION AND MAINTENANCE
 LUBRCATON AND MANTENANCE L SE CTlO N PAGE Dl Approved Lubricants Dl D2 Periodic Lubrication and Maintenance 03 D3 Lubrication of the Steering Linkage Joints D4 Rolls-Royce Silver Shadow B Bentley T Series
Maintenance Schedules - Diesel Engines
 Published: Jun 9, 2005 Maintenance Schedules - Diesel Engines Torque Specifications Description Nm lb-ft Seat frame fixing Torx screws 40 30 Seat belt fixing Torx screws 40 30 Road wheel nuts 140 103 CAUTION:
Service/Inspection Checklist and Report
 Fastrac 2155 and 2170 Service/Inspection Checklist and Report Fastrac 2155 and 2170 Issued by JCB Technical Publications, JCB Service, World Parts Centre, Beamhurst, Uttoxeter, Staffordshire, ST14 5PA,
SECTION H STEERING. Section Description Page No. H.1 GENERAL DESCRIPTION 3 H.2 STEERING WHEEL 3 H.3 INNER COLUMN 5 H.
 SECTION H STEERING Section Description Page No. H.1 GENERAL DESCRIPTION 3 H.2 STEERING WHEEL 3 H.3 INNER COLUMN 5 H.4 OUTER COLUMN 5 H.5 STEERING UNIT LOCK STOPS 6 H.6 STEERING UNIT 6 H.7 STEERING ARMS
Hosted and optimised by
 - - - - --- -- - - -- - - - Section Section B Servicing Requirements a" -- - --- :: =- -=- - -- - - 6000 mile Service Please Note: When servicing work is undertaken on any TVR car an official TVR Service
Alvis 12/50 Maintenance - Schedule Date =
 Weekly 1000 1,000 2,000 Annual 3,000 4,000 10,000 Ad Hoc 10 years AlvisMaintenanceSchedule-August-11-2013 1 of 9 Alvis 12/50 Maintenance - Schedule Date = Frequency < Frequency - assuming 2,000 miles per
LUBRICATION CONTENTS
 CHRYSLER SERVICE MANUAL LUBRICATION-403 Section XV LUBRICATION CONTENTS Page Engine Oil Recommendations 403 Engine Oil Change Periods 405 Lubrication Recommendations 406 1. ENGINE OIL RECOMMENDATIONS (FIG.
Maintenance Schedules - Diesel Engines
 Page 1 of 12 Published: Nov 20, 2008 Maintenance Schedules - Diesel Engines Description Nm lb-ft Seat frame fixing Torx screws 40 30 Seat belt fixing Torx screws 40 30 Road wheel nuts 140 103 M12 tie rod
Alvis Six Maintenance - Schedule
 AlvisMaintenanceSchedule- SIX- June- 23-2014.xlsx 1 of 9 Alvis Six Maintenance - Schedule Frequency < Frequency - assuming 2,000 miles per year in a six month period > > TVAM - Chapter/Para
A SYSTEMATIC SEQUENCE FOR PM INSPECTIONS
 A SYSTEMATIC SEQUENCE FOR PM INSPECTIONS TYPE OF INSPECTION UNDER THE HOOD GASOLINE AND DIESEL 1 Fuel, oil, exhaust leaks - inspect 2 Oil and fuel lines inspect for kinks and wear 3 Automatic transmission
Maintenance. Lubricants and Fluids Maintenance Minder General Information... Maintenance Main Items... Maintenance Sub Items...
 Maintenance Lubricants and Fluids... 3-2 Maintenance Minder General Information.... 3-4 Maintenance Main Items.... 3-7 Maintenance Sub Items.... 3-8 Lubricants and Fluids For details of the lubrication
INDEX , ,
 r LOTUS EUROPA OWNER'S HANDBOOK . _.mu.- ---. LDTUS"EURDPA OWNERJS HANDBOOK LOTUS CARS [Service) L TO. Norwich Norfolk Nor. S2W England Telephone: Wymondham 3411 Telex: 97401 Cables Lotus Norwich Part
Service/Inspection Checklist and Report
 Workmax 800D Workmax 800D T024580-6 Dealer Stamp Note: Original copy to customer, Photocopy to distributor. Machine Type Serial No. Distributor Depot Job No. Hourmeter Reading Date of Registration Date
Periodic Lubrication and Attention
 PERIODIC LUBRICATION AND ATTENTION. 13 CHAPTER II Periodic Lubrication and Attention LUBRICANTS RECOMMENDED Rolls-Royce Limited recommend a first quality oil of viscosity S.A.E. 30 for the engine and gearbox
Maintenance and Specifications
 SCHEDULED MANTENANCE Schedule Normal Driving Conditions/Emission Control Systems Follow Schedule if the vehicle is operated mainly where none of the following conditions apply. f any do apply follow Schedule.
Maintenance GENERAL INFORMATION
 GENERAL INFORMATION Protect the environment We must all play our part in protecting the environment. Correct vehicle usage and disposal of waste cleaning and lubrication materials are significant steps
Fuel and exhaust systems 4A 21
 Fuel and exhaust systems 4A 21 15.40 Unscrew the union nuts and disconnect the fuel feed and return hoses from the manifold 41 Disconnect the injector wiring harness connector and the vacuum hose from
RELIANT REBEL 700 & 750
 RELIANT REBEL 700 & 750 Saloon, Estate and Van Workshop Manual The Reliant Motor Company Limited July 1967 Remastered June 2012 by Atodini Page 1 Introduction This Workshop Manual contains all the relevant
Service/Inspection Checklist and Report
 500 Series Loadalls (JCB Dieselmax SA, SB, SC, SD and SF Engines) 500 Series Loadalls (JCB Dieselmax SA, SB, SC, SD and SF Engines) 795270 Dealer Stamp Note: Original copy to customer, Photocopy to distributor.
Service Schedule Chevrolet Utility
 1. This Service Schedule will have preference over the Owner's Manual and Warranty & Service Guide 2. Refer to the Warranty and Service Guide for Severe Driving Conditions. 3. Consult the Owner/Customer
Fluid level checks ENGINE OIL CHECK
 Fluid level checks ENGINE OIL CHECK Check the engine oil weekly. If any significant or sudden drop in oil level is noted, seek qualified assistance. If the message ENGINE OIL PRESSURE LOW is displayed,
LINCOLN. Continental 1
 3154_U01.qxd 8/1/03 7:28 AM Page 1 Continental 1 BRAKES...1-27 DRIVE TRAIN...1-21 ENGINE REPAIR...1-7 FUEL SYSTEM...1-20 PRECAUTIONS...1-7 SPECIFICATION CHARTS...1-2 STEERING AND SUSPENSION...1-22 A Air
FRONT GENERAL A X L E
 GENERAL General diagram of braking circuits 30 FRONT AXLE GENERAL Tightening torques (in dan.m) 30 FRONT AXLE GENERAL Tightening torques (in dan.m) 30 REAR AXLE GENERAL Tightening torques (in dan.m) 30
SECTION D REAR SUSPENSION. Section Description Page D.1. REMOVING AND REFITTING A REAR SUSPENSION UNIT 5
 SECTION D REAR SUSPENSION Section Description Page D.1. REMOVING AND REFITTING A REAR SUSPENSION UNIT 5 D.2. REMOVING AND REFITTING THE COMPONENTS OF THE REAR SUSPENSION 8 D.3. CHECKING AND OVERHAULING
1983 BMW 320i. 1.8L 4-CYL 1983 Engines - 1.8L 4-Cylinder Engines - 1.8L 4-Cylinder
 ENGINE IDENTIFICATION 1.8L 4-CYL 1983 Engines - 1.8L 4-Cylinder For engine repair procedures not covered in this article, see ENGINE OVERHAUL PROCEDURES - GENERAL INFORMATION article in the GENERAL INFORMATION
Preventive maintenance 4
 00 Series Preventive maintenance Preventive maintenance periods Use the procedures in this chapter to maintain your engine in accordance with the preventive maintenance schedule. Check the periods given
SECTION 5 MAINTENANCE
 SECTION 5 Maintenance requirements................................ 166 General maintenance..................................... 167 Does your vehicle need repairing?......................... 170 Scheduled
1991 Volkswagen Vanagon Syncro
 corner of radiator. See Fig. 1. Fig. 1: Bleeding Cooling System 2. Open bleeder valve in engine compartment (turn counterclockwise). See Fig. 1. Fill expansion tank until full. Start and run engine at
1997 Volvo 850 GLT. Fig. 2: Removing Drive Shaft, Engine Mount Bolt & Torque Arm (5-Cylinder) Courtesy of VOLVO CARS OF NORTH AMERICA.
 Courtesy of VOLVO CARS OF NORTH AMERICA.") Fig. 2: Removing Drive Shaft, Engine Mount Bolt & Torque Arm (5-Cylinder) 4. Remove front exhaust pipe nuts and springs. Remove front exhaust pipe bolts. Disconnect speedometer. Remove engine mounting
Fig. 2: Removing Drive Shaft, Engine Mount Bolt & Torque Arm (5-Cylinder) 4. Remove front exhaust pipe nuts and springs. Remove front exhaust pipe bolts. Disconnect speedometer. Remove engine mounting
SRT OPERATIONS MANUAL
 MAINTENANCE SECTION PAGE # VEHICLE DAILY INSPECTION.......................................1 P.M. INSPECTION #1.................................................3 P.M. INSPECTION #2.................................................6
MAINTENANCE SCHEDULES
 MAINTENANCE SCHEDULES EMISSION CONTROL SYSTEM MAINTENANCE The Scheduled maintenance services, listed in bold type on the following pages must be done at the times or mileages specified to assure the continued
SERVICE MANUAL Gearbox - Allison AT545 - Gearbox Installation
 Gearbox - Allison AT545 - Gearbox Installation Oil level dipstick Gearbox oil cooler Auxiliary oil filter Modulator Page 3.4 Gearbox - Allison AT545 Checking Oil Level The dipstick and filler are situated
MAINTENANCE & LUBRICATION SECTION OJ. Recommended Lubricants 2. Maintenance Schedule 3. Pre-Delivery Inspection 6. Body Paint Inspection 8
 MAINTENANCE & LUBRICATION SECTION OJ Page Recommended Lubricants 2 Maintenance Schedule 3 Pre-Delivery Inspection 6 Body Paint Inspection 8 Licence Plate Fitment 9 Page 1 RECOMMENDED LUBRICANTS Engine
Service precautions. Emission control system maintenance. Maintenance
 Maintenance Service precautions Vehicle maintenance is an important yet frequently neglected item. Proper maintenance will aid in retaining the level of performance that has been engineered into your Mitsubishi
INSPECTION/ADJUSTMENT
 3 3 INSPECTION/ADJUSTMENT SERVICE INFORMATION----------------------------------------------------------------------- 3-1 MAINTENANCE SCHEDULE-------------------------------------------------------------------
*[BK00050( ALL)05/95]
![*[BK00050( ALL)05/95]](/thumbs/95/123627048.jpg "*[BK00050( ALL)05/95]") General Information 1 Table of Contents General Maintenance Information... 3 What Maintenance Schedule Do You Follow?... 5 Normal Schedule... 6 Severe Duty Schedule... 16 Owner Maintenance Checks... 30
General Information 1 Table of Contents General Maintenance Information... 3 What Maintenance Schedule Do You Follow?... 5 Normal Schedule... 6 Severe Duty Schedule... 16 Owner Maintenance Checks... 30
L_All_Vocational_Ed_Auto. Sector: Automobile. S.No Specialization Page No. 1 Automobile 2-15
 L_All_Vocational_Ed_Auto Sector: Automobile S.No Specialization Page No. 1 Automobile 2-15 1 NATIONAL VOCATIONAL EDUCATION QUALIFICATION FRAMEWORK SECTOR: AUTOMOBILE SPECIALIZATION: AUTOMOBILE S.No. Certificate
A SERVICE SCHEDULE Use in conjunction with Vehicle Service Table and/or Additional Service Table
 PERIODIC INSPECTION AND MAINTENANCE SCHEDULE (14.5 MY ZJ OUTLANDER PHEV) A SERVICE SCHEDULE Engine Compartment Under Vehicle In Car and Road Test Replace the following items Check the following items Check
SERVICING INSTRUCTION
 TRUCK, CARGO, MEDIUM, MC2 UNIMOG SERVICING INSTRUCTION This instruction is authorised for use by command of the Chief of Army. It provides direction, mandatory controls and procedures for the operation,
Timing Chain - Renew ( )
") «Scorpio '95 Table of Contents» «Section 21: Engine» «Subsection 21-05: 2,9 V6 24V Cosworth Engine» «REMOVAL AND INSTALLATION» Timing Chain - Renew (21 314 0) Special Tools 21-140-01Adaptor for 21-140
«Scorpio '95 Table of Contents» «Section 21: Engine» «Subsection 21-05: 2,9 V6 24V Cosworth Engine» «REMOVAL AND INSTALLATION» Timing Chain - Renew (21 314 0) Special Tools 21-140-01Adaptor for 21-140
FREE $15 Gift Card for every $100 spent on Ship To Home orders. Find Out How
 1 of 29 10/12/2011 5:05 PM FREE $15 Gift Card for every $100 spent on Ship To Home orders. Find Out How Ford Ranger/Explorer/Mountaineer 1991-1999 Intake Manifold REMOVAL & INSTALLATION Print The engines
3. INSPECTION/ADJUSTMENT
 3 3 INSPECTION/ADJUSTMENT SERVICE INFORMATION -------------------------------------------- 3-1 MAINTENANCE SCHEDULE ---------------------------------------- 3-2 FUEL LINE/FUEL FILTER -------------------------------------------
SECTION 6 2 SERVICE PROCEDURES AND SPECIFICATIONS. Engine. Specifications
 SERVICE PROCEDURES AND SPECIFICATIONS Engine SECTION 6 2 Specifications........................................... 170 Fuel.................................................... 172 Facts about engine oil
Supercharged MK1 MR2 Part Diagrams
 Supercharged MK1 MR2 Part Diagrams Created by: Charles K. (ckowalc) 1 Table of Contents PART DIAGRAM PAGE ACCELERATOR LINK 9 AIR CLEANER 10 AIR CLEANER 4AGZE 11 ALTERNATOR 4AGZE 12 ANTENNA 13 ARMREST &
2006 MINI Cooper GENINFO Maintenance - Overview - MINI
 2002-07 GENINFO Maintenance - Overview - MINI SERVICE Model: All Production: All MINI Service SERVICE MAINTENANCE The following are typical service maintenance tasks: Oil Service Change oil and filter
ENGINE OIL RECOMMENDATIONS
 LUBRICATION 404 CHRYSLER SERVICE MANUAL 10,000 MILES 5,000 MILES 1 j j 15,,000 MILES 1,000 MILES III 20,000 MILES UPPER AND LOWER BALL JOINTS 4 fittings CL K E Y TO L U B R I C A N T S CL Chassis Lubricant
Asset Maintenance Policy
 Asset Maintenance Policy Grantees are required to maintain project equipment at a high level of cleanliness, safety, and mechanical soundness. At a minimum, grantees will perform maintenance according
15 (9) (18) (27) 36. Engine Oil (Use API SG, SH, or SJ oil) R R R R R R R R R R
 (18) (27) 36. Engine Oil (Use API SG, SH, or SJ oil) R R R R R R R R R R") Perform at kilometres (miles) or month intervals, whichever comes first NSSN NP0 20l & l PETROL PERODC MNTENNCE The following tables show the normal maintenance schedule Depending on weather and atmospheric
Perform at kilometres (miles) or month intervals, whichever comes first NSSN NP0 20l & l PETROL PERODC MNTENNCE The following tables show the normal maintenance schedule Depending on weather and atmospheric
WEBER CARBURETOR TROUBLESHOOTING GUIDE
 This guide is to help pinpoint problems by diagnosing engine symptoms associated with specific vehicle operating conditions. The chart will guide you step by step to help correct these problems. For successful
Engine Dismantle and Assemble ( )
") Engine Dismantle and Assemble ( 34 8) Special Tools 5 053 Slide hammer 47 Vibration damper remover 47 5053 00 Splined head socket, cylinder head bolts 87 Mounting stand with geared drive 00 059C Installer
Engine Dismantle and Assemble ( 34 8) Special Tools 5 053 Slide hammer 47 Vibration damper remover 47 5053 00 Splined head socket, cylinder head bolts 87 Mounting stand with geared drive 00 059C Installer
TMC LMV & LMXp series
 TMC LMV & LMXp series AIR SUSPENSION SERVICE MANUAL TMC Australia Pty Ltd Telephone: + 61 3 8786 3688 78 Star Crescent Facsimile: + 61 3 8786 3699 Hallam E-Mail: info@tmcaus.com.au Victoria 3803 Australia
Service precautions. Emission control system maintenance. Maintenance
 Maintenance Service precautions Vehicle maintenance is an important yet frequently neglected item. Proper maintenance will aid in retaining the level of performance that has been engineered into your Mitsubishi
26 - COOLING SYSTEM CONTENTS ENGINE COOLING - DESCRIPTION... 3 ENGINE COOLING - OPERATION... 9 COOLING SYSTEM FAULTS... 1
 26 - COOLING SYSTEM CONTENTS Page LAND ROVER V8 DESCRIPTION AND OPERATION ENGINE COOLING - DESCRIPTION... 3 ENGINE COOLING - OPERATION... 9 FAULT DIAGNOSIS COOLING SYSTEM FAULTS... 1 REPAIR COOLANT - DRAIN
Timing Chain Renew ( ) Renew. Section Title. Special Tools. Proprietary Tools Scraper Engine support bar
 Renew. Section Title. Special Tools. Proprietary Tools Scraper Engine support bar") Timing Chain Renew ( 34 0) Special Tools 40 400 40 Engine support bar 40 0 Adaptor for -40 40 03 Adaptor for -40 Proprietary Tools Scraper Workshop Equipment Transmission jack Materials Cable ties Sealer
Timing Chain Renew ( 34 0) Special Tools 40 400 40 Engine support bar 40 0 Adaptor for -40 40 03 Adaptor for -40 Proprietary Tools Scraper Workshop Equipment Transmission jack Materials Cable ties Sealer
FBC CODES AND TRANSLATIONS TRANSLATION
 FBC CODES AND TRANSLATIONS CODE TRANSLATION 500 air cleaning system checked 501 air cleaner housing found cracked 502 repaired cracked air cleaner housing 503 renewed air cleaner housing 504 air intake
SECTION 6 2 SERVICE PROCEDURES AND SPECIFICATIONS. Engine. Specifications
 SERVICE PROCEDURES AND SPECIFICATIONS Engine SECTION 6 2 Specifications........................................... 162 Fuel.................................................... 164 Facts about engine oil
I: INSPECT AND CLEAN, ADJUST, LUBRICATE OR REPLACE IF NECESSARY C: CLEAN A: ADJUST R: REPLACE L: LUBRICATE I: INSPECTION D: DIAGNOSE
 2. Periodic Maintenance > Periodic Maintenance Chart XCITING 400i Maintenance Schedule Perform the pre-ride inspection (Owner's Manual) at each scheduled maintenance period. This interval should be judged
ADJUSTMENTS Mazda MX-3. Fig. 1: Identifying Engine Code & Number Courtesy of MAZDA MOTORS CORP. VALVE CLEARANCE ADJUSTMENT
 Fig. 1: Identifying Engine Code & Number Courtesy of MAZDA MOTORS CORP. ADJUSTMENTS VALVE CLEARANCE ADJUSTMENT 1. No valve clearance adjustment is required, as hydraulic valve lash adjusters are used.
Home About Us Products Certificate Contact Us
 Home About Us Products Certificate Contact Us http://www.bksmotors.in/products/skoda/skoda octavia wagon spare parts/ 1/10 Skoda Octavia (Wagon) Spare Parts Home Products Skoda Skoda Octavia (Wagon) Spare
CHAPTER 20: Operation and maintenance
 Pressurized Irrigation Techniques 20.1 CHAPTER 20: Operation and maintenance INTRODUCTION The efficient operation of an irrigation system depends mainly on the ability of the farmer to make the best use
BRAKE SYSTEM Article Text 1996 Toyota RAV4 For Copyright 1998 Mitchell Repair Information Company, LLC Wednesday, September 13, :30PM
 Article Text ARTICLE BEGINNING 1996 BRAKES Toyota - Disc & Drum RAV4 * PLEASE READ THIS FIRST * WARNING: For warnings and procedures regarding vehicles equipped with Anti-Lock Brake Systems (ABS), see
Technical data. Part Thread (mm) Nm ±10% Tolerance Sidestand
 Nm ±10% Tolerance Sidestand") section 3 - Torque settings Frame torque settings Sidestand Stand sensor bolt 5 Pre-applied threadlocker Stand plate fixing screw M10x25 43 Pre-applied threadlocker Side stand fastening pin Side stand
section 3 - Torque settings Frame torque settings Sidestand Stand sensor bolt 5 Pre-applied threadlocker Stand plate fixing screw M10x25 43 Pre-applied threadlocker Side stand fastening pin Side stand
Engine Dismantle and Assemble ( )
") Engine Dismantle and Assemble (2 34 8) Special Tools 2-036A Remover for pilot bearing 2-37 Oil seal installer/aligner 237 2036A 2-044A Installer/Aligner, Pilot Bearing/Clutch Plate 244 2-44 Inlet manifold
Engine Dismantle and Assemble (2 34 8) Special Tools 2-036A Remover for pilot bearing 2-37 Oil seal installer/aligner 237 2036A 2-044A Installer/Aligner, Pilot Bearing/Clutch Plate 244 2-44 Inlet manifold
TC Series Cooling Systems
 TC Series Cooling Systems Table of Contents Table of Contents...1 List of Figures...1 Safety...2 Introduction...2 General Specifications...2 Types of Coolant...2 Routine Maintenance...2 Surge Tank Coolant
Part 7 DO IT YOURSELF MAINTENANCE
 Part 7 DO IT YOURSELF MAINTENANCE Chapter 7 2 Engine and Chassis Checking the engine oil level Checking the engine coolant level Checking brake fluid Checking power steering fluid Checking tire pressure
Engine Remove and Install ( ) Remove. 2,5l TCI Diesel Engine. Special Tools. Workshop Equipment Transmission jack Trolley jack Workshop crane
 Remove. 2,5l TCI Diesel Engine. Special Tools. Workshop Equipment Transmission jack Trolley jack Workshop crane") Engine Remove and Install ( 34 0) Special Tools 068 A 068A Engine lifting tackle 4 003 Coolant hose clamp removal and fitting tool Workshop Equipment Transmission jack Trolley jack Workshop crane Materials
Engine Remove and Install ( 34 0) Special Tools 068 A 068A Engine lifting tackle 4 003 Coolant hose clamp removal and fitting tool Workshop Equipment Transmission jack Trolley jack Workshop crane Materials
SECTION 1D1 M162 ENGINE COOLING
 SECTION 1D1 M162 ENGINE COOLING CAUTION: Disconnect the negative battery cable before removing or installing any electrical unit or when a tool or equipment could easily come in contact with exposed electrical
MAINTENANCE & LUBRICATION SECTION OK. Fluid Change Intervals 2. Severe Service Conditions 2. Maintenance Schedule 3. Pre-Delivery Inspection 6
 MAINTENANCE & LUBRICATION SECTION OK Page Fluid Change Intervals 2 Severe Service Conditions 2 Maintenance Schedule 3 Pre-Delivery Inspection 6 Pre-Delivery Paint Mark Up 8 Licence Plate Fitment 9 Updated
1999 Toyota RAV BRAKES Disc & Drum - Trucks & Vans
 DESCRIPTION & OPERATION 1999-2000 BRAKES Disc & Drum - Trucks & Vans WARNING: For warnings and procedures regarding vehicles equipped with Anti-Lock Brake Systems (ABS), see appropriate ANTI-LOCK article.
SECTION G HUBS, WHEELS AND TYRES. Section Description Page G.1 GENERAL DESCRIPTION 3 G.2 FRONT HUBS 3 G.3 FRONT HUBS - REMOVE AND REPLACE 4
 SECTION G HUBS, WHEELS AND TYRES Section Description Page G.1 GENERAL DESCRIPTION 3 G.2 FRONT HUBS 3 G.3 FRONT HUBS - REMOVE AND REPLACE 4 G.4 REAR HUBS - REMOVE AND REPLACE 5 G.5 WHEELS 6 G.6 TYRES 6
SECTION 7 2 DO IT YOURSELF MAINTENANCE MR2 U. Engine and Chassis
 SECTION 7 2 DO IT YOURSELF MAINTENANCE Engine and Chassis Checking the engine oil level................................. 168 Checking the engine coolant level............................ 169 Checking brake
301 0 Row Crop. and Standard
 John Deere MODEL: 301 0 Row Crop and Standard THIS IS A MANUAL PRODUCED BY JENSALES INC. WITHOUT THE AUTHORIZATION OF JOHN DEERE OR IT'S SUCCESSORS. JOHN DEERE AND IT'S SUCCESSORS ARE NOT RESPONSIBLE FOR
SECTION 8 2 DO IT YOURSELF MAINTENANCE. Chassis
 DO IT YOURSELF MAINTENANCE Chassis SECTION 8 2 Checking the coolant level of the traction motor................ 184 Checking the radiator....................................... 185 Checking brake fluid........................................
Never attempt to modify the fuel system, and always have maintenance performed by an authorized Honda Civic GX dealer.
 Schedule The Schedule specifies how often you should have your Civic GX serviced and what things need attention. It is essential that you have your vehicle serviced as scheduled to retain its high level
Engine Remove and Install ( ) Remove. Section Title. Special Tools. Workshop Equipment Trolley jack A Engine lifting tackle
 Remove. Section Title. Special Tools. Workshop Equipment Trolley jack A Engine lifting tackle") Engine Remove and Install ( 4 0) Special Tools 068A 068A0-068A Engine lifting tackle -068A-0 Lifting eyebolts Workshop Equipment Trolley jack Materials High-temperature grease ESDM-C0-A Proprietary Tools
Engine Remove and Install ( 4 0) Special Tools 068A 068A0-068A Engine lifting tackle -068A-0 Lifting eyebolts Workshop Equipment Trolley jack Materials High-temperature grease ESDM-C0-A Proprietary Tools
Cylinder head/gasket, replacing
 1(16) Cylinder head/gasket, replacing Special tools: 951 2666, 951 2767, 999 5450, 999 5452, 999 5454, 999 5670, 999 5718, 999 5719, 999 5750, 999 5972 Removing the cylinder head gasket Note! As the illustrations
Chapter 5 Part A: Starting and charging systems
 Chapter 5 Part A: Starting and charging systems Contents Alternator drivebelt - removal, refitting and tensioning............6 Alternator -.............................7 Alternator - testing and overhaul.............................8
IN-VEHICLE REPAIR. Upper Intake Manifold
 303-01-1 Engine 3.9L and 4.2L 303-01-1 IN-VEHICLE REPAIR Upper Intake Manifold Special Tool(s) Remover, Spark Plug Wire 303-106 (T74P-6666-A) Material Item Silicone Brake Caliper Grease and Dielectric
2017 Audi Maintenance Schedule - All Models
 2017 Audi Maintenance Schedule - All Models MY 2017 Maintenance Intervals - USA Service intervals in miles 10,000 miles 1 or 1 year after delivery, whichever occurs first 20,000 miles 2 or 1 year after
PARTIAL ENGINE ASSY (2TR FE)
") COMPONENTS 147 1421Z01 Clip Hood Subassy x9 Radiator Support to Frame Seal LH 30 (306, 22) 30 (306, 22) Fan and Generator V Belt 5.0 (51, 44 in. lbf) Fan Shroud Fan Pulley Fan w/ Fluid Coupling PRE RUNNER
COMPONENTS 147 1421Z01 Clip Hood Subassy x9 Radiator Support to Frame Seal LH 30 (306, 22) 30 (306, 22) Fan and Generator V Belt 5.0 (51, 44 in. lbf) Fan Shroud Fan Pulley Fan w/ Fluid Coupling PRE RUNNER
This information covers the proper procedure for replacing the Volvo D16F engine in a VT or VNL chassis.
 Volvo Trucks North America Greensboro, NC USA Engine, Replacement DService Bulletin Trucks Date Group No. Page 10.2007 210 139 1(47) Engine, Replacement Volvo D16F VNL, VT W2005773 This information covers
MODEL: 310A and 3108 Tractor, Loader and Backhoe Volume 1 of 2
 John Deere MODEL: 310A and 3108 Tractor, Loader and Backhoe Volume 1 of 2 THIS IS A MANUAL PRODUCED BY JENSALES INC. WITHOUT THE AUTHORIZATION OF JOHN DEERE OR IT'S SUCCESSORS. JOHN DEERE AND IT'S SUCCESSORS
Disconnect the APP sensor harness connector. See Fig. 4. Remove the accelerator pedal mounting nuts. Remove the APP assembly.
 ENGINE CONTROLS - REMOVAL, OVERHAUL & INSTALLATION - 6.6L DIESEL... Page 1 of 41 FUEL SYSTEMS ACCELERATOR PEDAL POSITION SENSOR Removal & Installation Disconnect the APP sensor harness connector. See Fig.
DESCRIPTION AND OPERATION
 100-03-1 Maintenance Schedule 100-03-1 DESCRIPTION AND OPERATION Maintenance Schedule Gasoline Engines The maintenance schedule is designed to protect against major repairs resulting from neglect or inadequate
2017 Audi Maintenance Schedule - All Models
 2017 Audi Maintenance Schedule - All Models MY 2017 Maintenance Intervals - Canada Service Intervals If you are not sure when you should bring your Audi in for service or which services are to be performed
2003 Jaguar X-Type BRAKES' 'Disc - X-Type
 REAR DISC BRAKE CALIPER WARNING: Brake dust, if inhaled can damage your health. Always remove brake dust using a vacuum brush. Do not use a compressed air line to disperse brake dust into the atmosphere.
REMOVAL & INSTALLATION
 REMOVAL & INSTALLATION NOTE: For reassembly reference, label all electrical connectors, vacuum hoses and fuel lines before removal. Also place mating marks on engine hood and other major assemblies before
A proportioning valve is used to regulate brake pressure between front and rear brakes. Rear brakes on all models are self-adjusting.
 Page 1 of 21 ARTICLE BEGINNING DESCRIPTION & OPERATION WARNING: For warnings and procedures regarding vehicles equipped with Anti- Lock Brake Systems (ABS), see ANTI-LOCK BRAKE SYSTEM article in the BRAKES
DISTANCE TRAVELED 1 (miles/km) LUBRICANT &/OR PART 2. LUBRICATION AND SERVICING SCHEDULE Item. Months
 LUBRICANT &/OR PART 2. LUBRICATION AND SERVICING SCHEDULE Item. Months") GENERAL Flexible hoses, thoroughly inspect all hoses - 12 ------- Front discharge tube, qty:2, check to see if clogged 3-3 ------- 01 ENGINE Air cleaner, inspect, clean, replace element if required 27
GENERAL Flexible hoses, thoroughly inspect all hoses - 12 ------- Front discharge tube, qty:2, check to see if clogged 3-3 ------- 01 ENGINE Air cleaner, inspect, clean, replace element if required 27
Chapter 1 Routine maintenance and servicing
 1 1 Chapter 1 Routine maintenance and servicing Contents Air cleaner element renewal.........31 Air cleaner temperature control check.29 Auxiliary drivebelt check...................................20 Battery
MODEL: 120 Hydrostatic Tractor
 John Deere MODEL: 120 Hydrostatic Tractor THIS IS A MANUAL PRODUCED BY JENSALES INC. WITHOUT THE AUTHORIZATION OF JOHN DEERE OR IT'S SUCCESSORS. JOHN DEERE AND IT'S SUCCESSORS ARE NOT RESPONSIBLE FOR THE
JACKALL HYDRAULIC SYSTEM
 JACKALL HYDRAULIC SYSTEM FIG. 1. Layout of a typical installation. Servicing Instructions for Red Jackall. The Red Jackall hydraulic system requires no attention other than a periodical examination of
SECTION C FRONT SUSPENSION. Section Description Page C.1 REMOVING AND REFITTING A FRONT SUSPENSION UNIT 5
 SECTION C FRONT SUSPENSION Section Description Page C.1 REMOVING AND REFITTING A FRONT SUSPENSION UNIT 5 C.2 REMOVING AND REFITTING THE COMPONENTS OF THE FRONT SUSPENSION 8 C.3 CHECKING AND OVERHAULING
PERIODIC MAINTENANCE SCHEDULE (months or km whichever occurs earlier)
") PERIODIC SCHEDULE (months or km whichever occurs earlier) Period 1 month 3 months 6 months 9 months 1 months 15 months Item Km 500-750 500-3000 5000-6000 8500-9000 11500-1000 1500-15000 Engine cum transmission
PERIODIC SCHEDULE (months or km whichever occurs earlier) Period 1 month 3 months 6 months 9 months 1 months 15 months Item Km 500-750 500-3000 5000-6000 8500-9000 11500-1000 1500-15000 Engine cum transmission
2003 Land Rover Freelander S. CAUTION: DO NOT rotate crankshaft or camshafts with timing belt removed and cylinder heads installed.
 FRONT TIMING BELT CAUTION: DO NOT rotate crankshaft or camshafts with timing belt removed and cylinder heads installed. Removal CAUTION: Camshaft timing belt must be replaced if cylinder head is to be