BW500 and BW750 Trailer Sprayer OPERATION MANUAL Fast Manufacturing, Inc County Road 44 Mountain Lake, MN 56159
|
|
|
- George Collins
- 6 years ago
- Views:
Transcription


1 BW0 and BW7 Trailer Sprayer OPERATION MANUAL Fast Manufacturing, Inc County Road 44 Mountain Lake, MN 56159
2 General Information All rights, especially copying and distribution rights are reserved. No part of this publication may be reproduced in any form or by any means, electronic or mechanical, including photocopying, without express written permission from Fast Manufacturing, Inc. Parts information in this manual represents components installed when product was manufactured based upon the best available information. Modifications made subsequent to initial delivery are not included. Always verify the parts and color required with Fast Manufacturing, Inc at If you have any questions, please contact your dealer or our Parts and Service Department. 2
3 Limited Warranty Fast Manufacturng Inc. warrants to the buyer that the new machinery is free from defects in material and workmanship. This warranty is only effective as to any new machinery which has not been altered, changed, repaired or treated since its delivery to the buyer, other than by Fast Manufacturng Inc. or its authorized dealers or employees, and does not apply to accessories, attachments, tools or parts, sold or operated with the new machinery, if they have not been manufactured by Fast Manufacturng Inc. Fast Manufacturng Inc. shall only be liable for defects in the materials or workmanship attributable to faulty material or bad workmanship that can be proved by the buyer, and specifically excludes liability for repairs arising as a result of normal wear and tear of the new machinery or in any other manner whatsoever, and without limiting the generality of the foregoing, excludes application or installation of parts not completed in accordance with Fast Manufacturng Inc. operator s manual, specifications, or printed instructions. Written notice shall be given by registered mail, to Fast Manufacturng Inc. within seven (7) days after the defect shall have become apparent or the repairs shall have become necessary, addressed as follows: FAST MANUFACTURING INC County Road 44, Mountain Lake, MN This warranty shall expire one (1) year after the date of delivery of the new machinery. If these conditions are fulfilled, FAST shall at its own cost and at its own option either repair or replace any defective parts provided that the buyer shall be responsible for all expenses incurred as a result of repairs, labor, parts, transportation or any other work, unless FAST has authorized such expenses in advance. The warranty shall not extend to any repairs, changes, alterations, or replacements made to the new equipment other than by FAST or its authorized dealers or employees. This warranty extends only to the original owner of the new equipment. Rubber parts (including tires, hoses, grommets) are not warranted. This warranty is limited to the terms stated herein and is in lieu of any other warranties whether express or implied, and without limiting the generality of the foregoing, excluded all warranties, express or implied or conditions whether statutory or otherwise as to quality and fitness for any purpose of the new equipment. FAST disclaims all liability for incidental or consequential damages. This Sprayer is subject to design changes and FAST MANUFACTURING INC. shall not be required to retrofit or exchange items on previously sold units except at its own option. Fast Manufacturng Inc. Warranty void if not registered. 3
4 Warranty Registration Form & Inspection Report FAST MANUFACTURING WARRANTY REGISTRATION Warranty Registration This form must be filled out by the dealer and signed by both the dealer and the customer at the time of delivery. Customer s Name Address City, State, Code Phone Number Dealer Name Address City, State, Code Model Serial Number Delivery Date DEALER INSPECTION REPORT All Fasteners Tight Wheel Bolts Torqued Hydraulic Hoses and Fittings Free and Tight Fertilizer Hoses and Fittings Free and Tight Wheel Drive Turns Freely Lubricate Machine Check Tire Pressure Frame and Wings Level Monitors and Controllers Function Wiring Harness Connected SAFETY Safety Chain Installed All Guards Installed All Safety Signs Installed Reflectors, SMV and Lights Clean Review Operating and Safety Instructions I have thoroughly instructed the buyer on the above described equipment which review included the Operator s Manual content, equipment care, adjustments, safe operation and applicable warranty policy. Date Dealer s Rep. Signature The above equipment and Operator s Manual have been received by me and I have been thoroughly instructed as to care, adjustments, safe operation and applicable warranty policy. Date Owner s Signature White - Fast Manufacturing Yellow - Dealer Pink - Customer 4
5 Contents General Information... 2 Fast Manufacturing Warranty Registration Form... 4 Serial Number Location Introduction Safety Safety Alert Symbol And Signal Words General Safety Operating Safety Maintenance Safety Power Source Shutdown Procedure Implement Safety Chemical Safety Hydraulic Safety Transport Safety Storage Safety Tire Safety Safety Signs Sign-Off Form Safety Sign Locations Reflective Decal Locations Delivery Pre-Delivery Check List Delivery Check List Sprayer Setup And Assembly Wheel Spacing Implement Driveline (PTO Drive Pumps Only) Hitching Sprayer To Tractor Hitching Hydraulic Drive Sprayer Pump Hose Hook Up (Optional) Control Box Installation Electrical Connections To Tractor
6 5.4 Electric Sprayer Controls Hydraulic Hose Connections - Boom Control EF & EFT Boom Hydraulic Hose Connections EFT Boom Electrical Connections HC Boom Hydraulic Hose And Electrical Connections HC Boom Electrical Connections Sprayer Accessories Unhitching Sprayer From Tractor Unhitching... 7 Transporting Sprayer Transport Lighting SMV Emblem and Reflectors Safety Chain Sprayer Accessories Foam Marker Switch Box Fence Line Kit (Right Side, Left Side Or Both) In-Cab Electric Gallon Rinse System Operation New Operator Or Owner Break-In Pre-Operation Checklist Measuring Travel Speed Spraying Solutions Other Than Water Tip Selection Spray Tip Wear Air Induction Spray Tips (Greenleaf Turbo Drop Nozzles) Inch Nozzle Spacing Inch Nozzle Spacing Teejet Air Induction Spray Tips Inch Spacing Teejet Application Rates In Gallons Per Acre Inch Tip Spacing Inch Tip Spacing
7 9.10 Teejet Floodjet Wide Angle Flat Spray Tips Inch Spacing Equipment Matching Sprayer Controls Standard Primary Filter In Line Filter Kit Self Cleaning Filter (Optional) Filling The Product Tank Fill Through Top Lid (Standard Configuration) Filling With Transfer Pump Filling With Sprayer Pump Priming The Sprayer Priming The Sprayer Equipped With A Raven Rate Controller Calibrating The Sprayer Teejet Electric Control System Raven Rate Control System (Optional) Tank Tie Down Straps Chemical Inductor (Optional) Hand Rinse Gun For Chemical Inductor (Optional) Standard System Optional Electric System Personal Fresh Water Tank External Sight Gauge Rinse Tank Flush System (Optional) Manual Control System Filling The Rinse Tank Fill Through Top Lid Filling With Transfer Pump Filling With Sprayer Pump Electric Control System Filling The Rinse Tank Fill Through Top Lid
8 Filling With Transfer Pump Filling With Sprayer Pump Cleaning The Sprayer Manual Control Rinse System Short Term Shutdown Long Term Shutdown Electric Control Rinse System Short Term Shutdown Long Term Shutdown Cleaning Your Sprayer Manually Hydraulic Boom Operation EF & EFT Boom EFT Boom HC Boom Service And Maintenance Service Fluids And Lubricants Daily Lubrication Interval Weekly Lubrication Interval Hour Lubrication Interval Maintenance General Fasteners Tire Pressure Filters Sprayer Tips Storing And Winterizing Chemical Inductor Foam Marker Cleaning The Outside Of The Sprayer Boom Adjustments HC Boom Only EF & EFT Boom Only
9 10.5 Service Record Troubleshooting Specifications Mechanical Hydraulic Fitting Torque Raven Console Calibration Information Optional Accessories In Line Filter Kit

10 Serial Number Location Always give your dealer the serial number of your Fast Manufacturing, Inc. Sprayer when ordering parts or requesting service or other information. The serial number is stamped into the frame where indicated. Please write number in space provided for easy reference. 1. Introduction Congratulations on your choice of a Fast Manufacturing, Inc. Sprayer to complement your operation. This equipment has been designed and manufactured to meet the needs of a discriminating buyer for the efficient application of spray mix. Safe, efficient and trouble free operation of your Fast Manufacturing, Inc. Sprayer requires that you and anyone else who will be operating or maintaining the sprayer, read and understand the Safety, Operation, Maintenance and Trouble Shooting information contained in the Operator s Manual. This manual covers the BW 0/7 Series Sprayers built by Fast Manufacturing, Inc. Use the Table of Contents as a guide when searching for specific information. Date Purchased Model Number Sprayer Serial Number Keep this manual handy for frequent reference and to pass on to new operators or owners. Call your Fast Manufacturing, Inc. dealer or distributor if you need assistance or information. OPERATOR ORIENTATION - The directions left, right, front and rear, as mentioned throughout this manual, are as seen from the tractor driver s seat and facing in the direction of travel. If you have any questions not answered in this manual or require additional copies or the manual is damaged, please contact your dealer or Fast Manufacturing, Inc Country Road 44, Mountain Lake, MN (Telephone) (FAX)
11 2. Safety ^ YOU are responsible for the SAFE operation and maintenance of your Fast Manufacturing, Inc. Sprayer. YOU must ensure that you and anyone else who is going to operate, maintain or work around the Sprayer be familiar with the operating and maintenance procedures and related SAFETY information contained in this manual. This manual will take you step-by-step through your working day and alerts you to good safety practices that should be adhered to while operating the sprayer. Remember, YOU are the key to safety. Good safety practices not only protect you but also the people around you. Make these practices a working part of your safety program. Be certain that EVERYONE operating this equipment is familiar with the recommended operating and maintenance procedures and follows all the safety precautions. Most accidents can be prevented. Do not risk injury or death by ignoring good safety practices. Sprayer owners must give operating instructions to operators or employees before allowing them to operate the unit, and at least annually thereafter per OSHA regulation The most important safety device on this equipment is a SAFE operator. It is the operator s responsibility to read and understand ALL Safety and Operating instructions in the manual and to follow these. All accidents can be avoided. A person who has not read and understood all operating and safety instructions is not qualified to operate the machine. An untrained operator exposes himself and bystanders to possible serious injury or death. Do not modify the equipment in any way. Unauthorized modification may impair the function and/or safety and could affect the life of the equipment. 2.1 Safety Alert Symbol And Signal Words This symbol means ATTENTION! BECOME ALERT! YOUR SAFETY IS INVOLVED! ^ The level of risk is indicated by the following signal words: ^ DANGER DANGER - Indicates a hazardous situation, which, if not avoided, WILL result in death or serious injury. ^ Warning WARNING - Indicates a hazardous situation, which, if not avoided, could result in death or serious injury. ^ CAUTION CAUTION - Indicates a hazardous situation, which, if not avoided, could result in minor or moderate injury. NOTICE NOTICE - Indicates a situation that could result in damage to the equipment or other property. Think SAFETY! Work SAFELY! 11


12 2.2 General Safety 1. Read and understand Operator s Manual and all safety signs before operating, maintaining or adjusting sprayer. 2. Only trained competent persons shall operate sprayer. An untrained operator is not qualified to operate machine. 3. Have a first-aid kit available for use should the need arise and know how to use it. 4. Have a fire extinguisher available for use should the need arise and know how to use it. 2.3 Operating Safety ^ 1. Read and understand Operator s Manual and all safety signs before using. 2. Lower machine to ground, place all controls in neutral, stop engine, set park brake, remove ignition key, and wait for all moving parts to stop before servicing, adjusting, repairing or unplugging. 3. Install and secure all guards and shields before starting or operating. 4. Keep hands, feet, hair and clothing away from all moving and/or rotating parts. 5. Do not allow riders on sprayer or tractor during operation or transporting. 6. Clear area of all bystanders, especially children, before starting or filling with chemical or fertilizer. 5. Do not allow riders. 6. Wear appropriate protective devices as instructed on the chemical or fertilizer MSDS. 7. Read chemical or fertilizer manufacturers warnings, instructions and procedures before starting and follow them exactly. 8. Do not breathe, touch or ingest chemicals or fertilizer. Always wear protective clothing and follow safe handling procedures. 9. Stay away from wings when folding or extending wings. Keep others away. 10. Clean reflectors, SMV and lights before transporting. 11. Attach securely to towing unit using a hardened pin with a retainer and a safety chain. 12. Do not exceed a safe travel speed. 7. Lower machine to ground, place all controls in neutral, stop engine, set park brake, remove ignition key, and wait for all moving parts to stop before servicing, adjusting, repairing or unplugging. 8. Read chemical manufacturers warnings, instructions and procedures before starting and follow them exactly. 9. Post Poison Control Emergency telephone number for your area on sprayer before using Agricultural chemicals. 13. Use hazard flasher on tractor and sprayer when transporting. 14. Stay away from overhead power lines when folding or extending wings and during transport. 15. Before applying pressure to hydraulic system, make sure all components are tight, hoses and couplings are in good condition. 16. Review safety instructions annually. Washington: (2) Ottawa: (613) Have container label handy when seeking medical attention. 10. Review safety related items with all personnel annually. 12

13 2.4 Maintenance Safety ^ 1. Review Operator s Manual and all safety items before working with, maintaining or operating sprayer. 2. Lower machine to ground, place all controls in neutral, stop engine, set park brake, remove ignition key, and wait for all moving parts to stop before servicing, adjusting, repairing or unplugging. 3. Follow good shop practices: Keep service area clean and dry. Be sure electrical outlets and tools are properly grounded. Use adequate light for job at hand. 4. Before applying pressure to a hydraulic system, make sure all components are tight, hoses and couplings are in good condition. 5. Relieve pressure from hydraulic circuit before servicing or disconnecting from tractor. 6. Keep hands, feet, clothing and hair away from all moving and/or rotating parts. 7. Clear area of bystanders, especially children, when carrying out any maintenance and repairs or making any adjustments or filling. 8. Place stands or blocks under frame before working beneath machine or when changing tires. 9. Be sure all guards are in place and secured when maintenance work is completed. 10. Use only tools, jacks and hoists of sufficient capacity for the job Power Source Shutdown Procedure Before cleaning, unclogging, adjusting, lubricating or servicing this machine: 1. Disengage the tractor PTO. 2. Deactivate tractor hydraulic controls. 3. Shut off the tractor engine, remove the starter key and take it with you. 4. Wait for all machine motion to stop. 5. Remove the telescoping PTO driveline and ALL power connections from the tractor. 2.5 Implement Safety ^ Some photographs used herein may show doors, guards and shields opened or removed. BE SURE that all doors, guards and shields are fastened in their proper position before machine is operated. Know how to stop sprayer operation BEFORE starting it. 1. BE ALERT for people and/or animals in front of or around machine, when about to start machine. 2. KEEP hands, feet and clothing away from PTO when in operation! 3. DO NOT wear loose or baggy clothing when operating this unit! 4. DO NOT allow people other than a qualified operator near the unit! 5. DO NOT allow minors to be near the machine unless properly supervised. 6. KEEP riders off sprayer. 7. DO NOT unclog, adjust, lubricate or service your sprayer until you disengage the tractor PTO and shut off the tractor engine. Failure to follow this procedure may result in serious bodily injury! 8. AVOID high pressure fluids. Escaping fluid under pressure can penetrate skin causing serious injury. 9. DO NOT exceed a maximum towing speed of (32 KPH) while transporting the sprayer. 10. REDUCE speed on rough or hilly ground. 11. BE EXTRA careful when going through fence gates or nearing confined quarters. 12. ALWAYS follow state and local regulations regarding use of a safety chain, slow moving vehicle signs and transport lighting, when towing farm equipment on public highways. 13. ALWAYS engage the tractor parking brake before dismounting. 14. BE SURE the hitch jack locking pin is completely engaged and that the machine is properly blocked and prevented from rolling BEFORE disconnecting the sprayer from the tractor. 15. ALWAYS securely block sprayer up when working under sprayer. Failure to follow these precautions could result in death or serious injury DO NOT stand between tractor and sprayer when hitching or unhitching sprayer unless engine is stopped and parking brake is engaged.


14 17. KEEP ALL personnel at a safe distance when folding or unfolding boom.. KEEP all persons away from sprayer and boom while in operation. 19. KEEP clear of hydraulically controlled booms. Booms may move suddenly, without warning.. AVOID sudden turns when transporting sprayer. Slow tractor before turning. 21. BE AWARE of sprayer width and boom swing to avoid hitting other objects or personnel. 22. ALWAYS shut off remote hydraulic supply and relieve pressure before disconnecting. 23. Provide adequate clearance in all directions when folding or unfolding boom. 24. KEEP clear of ALL electrical power lines when operating sprayer or when folding or unfolding booms. 2.6 Chemical Safety ^ Handle ALL agricultural chemicals with care. Use chemicals ONLY as directed on the manufacturer s warning label. 1. WEAR protective clothing (such as goggles, rubber or chemical resistant gloves and respirator) while handling chemicals. 2. KEEP protective clothing clean and in good condition. Discard if damaged. 3. ALWAYS wash hands and face thoroughly with soap and clean water after handling chemicals. 4. NEVER eat, smoke, drink or put hands to mouth before washing. 5. Know the phone number and location of the nearest poison control center. 6. KEEP a list of all chemicals used and the chemical manufacturer s names. fittings or hoses by using tape, clamps or cements. 5. The hydraulic system operates under extremely highpressure. Such repairs will fail suddenly and create a hazardous and unsafe condition. 6. Pressurized fluids can penetrate the skin. Hydraulic hoses can fail from age, damage and exposure. Do not search for hydraulic leaks without body and face protection. A tiny, almost invisible leak can penetrate the skin, thereby requiring immediate medical attention. Use wood or cardboard to detect hydraulic leaks, never use your hands. 7. If injured by a concentrated high-pressure stream of hydraulic fluid, seek medical attention immediately. Serious infection or toxic reaction can develop from hydraulic fluid piercing skin surface. 8. Before applying pressure to system, verify all components are tight, hoses and couplings are in good condition. 2.8 Transport Safety ^ 1. Read and understand ALL information in Operator s Manual regarding procedures and SAFETY when operating sprayer in field and/or on road. 2. Check with local authorities regarding sprayer transport on public roads. Obey all applicable laws and regulations. NOTICE Prevent equipment damage. Verify main tank is empty before transporting on road. 2.7 Hydraulic Safety ^ 1. Always place all tractor hydraulic controls in neutral before dismounting. 2. Make sure that all components in hydraulic system are kept in good condition and are clean. 3. Replace any worn, cut, abraded, flattened or crimped hoses. 4. Do not attempt any makeshift repairs to hydraulic lines, Always travel at a safe speed. Use caution when making corners or meeting traffic. 4. Make sure the SMV (Slow Moving Vehicle) emblem and all lights and reflectors that are required by the local highway and transport authorities are in place, are clean and can be seen clearly by all overtaking and oncoming traffic. 5. Daybreak and dusk are particularly dangerous and pilot vehicles are recommended.
15 6. Be sure sprayer is properly connected to towing vehicle and a retainer is used through drawbar pin. Always attach a safety chain between frame and towing vehicle. 7. Keep right and yield right-of-way to allow faster traffic to pass. Drive on road shoulder, if permitted by law. 8. Do not exceed mph (32 km/h). Reduce speed on rough roads and surfaces. 9. Always use hazard warning flashers on tractor when transporting unless prohibited by law. 10. Stay away from overhead power lines during transport. Electrocution can occur without direct contact. 2.9 Storage Safety ^ 1. Store unit in an area away from human activity. 2. Do not permit children to play on or around the stored sprayer Tire Safety ^ How to Install Safety Signs: Be sure that the installation area is clean and dry. Be sure temperature is above F (10 C). Decide on exact position before you remove backing paper. Remove the smallest portion of the split backing paper. Align the sign over the specified area and carefully press the small portion with the exposed sticky backing in place. Slowly peel back the remaining paper and carefully smooth the remaining portion of the sign in place. Small air pockets can be pierced with a pin and smoothed out using the piece of sign backing paper. 1. Failure to follow proper procedures when mounting a tire on a wheel or rim can produce an explosion which may result in serious injury or death. 2. Do not attempt to mount a tire unless you have the proper equipment and experience to do the job. 3. Have a qualified tire dealer or repair service perform required tire maintenance Safety Signs ^ 1. Keep safety signs clean and legible at all times. 2. Replace safety signs that are missing or have become illegible. 3. Replaced parts that displayed a safety sign should also display the current sign. 4. Safety signs are available from your Distributor or the factory. 15
16 2.12 Sign-Off Form Fast Manufacturing, Inc. follows the general Safety Standards specified by the American Society of Agricultural Engineers (ASAE) and the Occupational Safety and Health Administration (OSHA). Anyone who will be operating and/or maintaining the Fast Manufacturing, Inc. Sprayer must read and clearly understand ALL Safety, Operating and Maintenance information presented in this manual. Do not operate or allow anyone else to operate this equipment until such information has been reviewed. Annually review this information before season start-up. A sign-off sheet is provided for your record keeping to show that all personnel who will be working with the equipment have read and understand the information in the Operator s Manual and have been instructed in the operation of the equipment. Sign-Off Form DATE EMPLOYEES SIGNATURE EMPLOYERS SIGNATURE 16


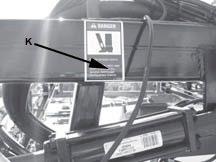
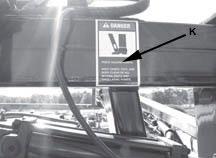
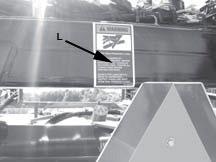
17 2.13 Safety Sign Locations Safety signs and locations on machine are shown in the following illustrations. Familiarize yourself with safety signs, type of warning and area, or particular function related to that area, that requires your SAFETY AWARENESS. 17
18


19 Decal A Decal C Decal B Decal D 19


20 Decal E Decal H Decal F Decal I Decal G Decal J

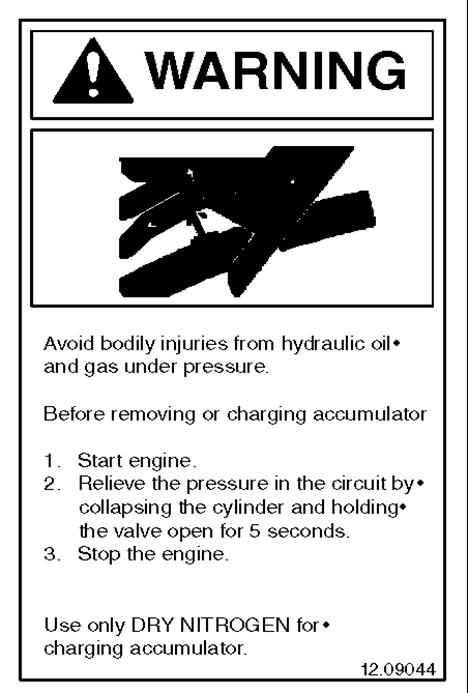
21 Decal K Decal L 21
 Left Side Shown (Part No. 9072) 3 - SMV Emblem (Part No. 907224) 4 - Red Reflector (Qty.2) Left Side Shown (Part No. 907219) 5 - Yellow Reflector (Qty.")
22 2.14 Reflective Decal Locations 1 - Yellow Reflector (Qty. 2) (Part No. 9072) Not Shown, One On Each Side Of Hitch 2 - Yellow Reflector (Qty. 2) Left Side Shown (Part No. 9072) 3 - SMV Emblem (Part No ) 4 - Red Reflector (Qty.2) Left Side Shown (Part No ) 5 - Yellow Reflector (Qty. 2) (Part No. 9072) 22
23 3. Delivery 3.1 Pre-Delivery Check List After the Fast Sprayer has been completely set-up, the following inspections MUST be made before delivering it to the customer. Check off each item after prescribed action is taken. NO parts on the unit have been damaged in shipment. Check for such things as dents and loose or missing parts; correct or replace components as required. Verify correct nozzle spacing. Adjust axles per customer s wheel spacing request. If applicable, sprayer has the correct hydraulically driven centrifugal pump for the customer s tractor hydraulics. Inflate tires to recommended pressure as described in the Maintenance Section of the Operator Manual. Tighten wheel nuts to correct torque (135 ft lb). Make sure all bolts and other fasteners are tightened or adjusted properly. As applicable, the Cylinders, Hoses and Fittings are NOT damaged, leaking or loosely connected. Rotating PTO Shields turn freely. Lubricate grease fittings. Safety decals are in place and legible. Hook the sprayer to the appropriate RPM tractor and test run it while checking that proper operation is exhibited by all components. Check that: Partially fill tank with water, and operate sprayer to inspect fittings and hose connections for leaks. With water in tank, be sure tank bands are tight. All accessories function correctly. Transport lights operate properly. Hoses secured and not in contact with any moving parts. Hydraulic systems operate properly. Dealership s Name Dealer Representative s Name Date Checklist Filled Out Model Number Serial Number 3.2 Delivery Check List The following check list is an important reminder of valuable information that MUST be passed on to the customer at the time the unit is delivered. Check off each item as you explain it to the customer. Sprayers with power take off (PTO) driven pumps must have the tractor drawbar adjusted per instructions. Make sure customers know how to connect hydraulic pumps on sprayers that are equipped for tractor hydralics. Install electric control box per instructions in separate control box manual. Give the customer this operator s manual. Instruct them to be sure to read and completely understand its contents before attempting to operate the unit. Give the customer the Agricultural Implement Driveline safety manual (9072). Instruct the customer to be ure to read and completely understand its contents before attempting to operate the unit. Explain the warranty. Explain that regular lubrication and proper adjustments are required for continued proper operation and long life. Review the maintenance section of this manual with the customer. Complete the dealer and warranty registration card. Have the customer sign it and return it to Fast Manufacturing, Inc. Included with this manual are separate operator/ installation manuals for some components. Be sure to read and completely understand the contents of these before operating the sprayer. I acknowledge that the above points were reviewed with me at the time of delivery. Customer s Signature Date Delivered (Customer Copy) 23

24 4. Sprayer Setup And Assembly 4.1 Wheel Spacing Wheel spacing can be adjusted from 62 inches (minimum) to 80 inches (maximum). To change wheel spacing proceed as follows: ^ DANGER Sprayer can fall during wheel spacing adjustment and crush person working under sprayer. Death or serious injury will result. Support the sprayer securely when adjusting wheel spacing. 1. Hitch sprayer to tractor (refer to the Hitching section on page 13 of this manual). Place chocks or blocks in front of and behind wheel on opposite side of wheel to be adjusted. 2. Measure and mark center of sprayer frame to assure equal spacing of wheels from sprayer centerline. 3. Place a hydraulic or screw jack under the sprayer frame behind the axle on the same side as the wheel to be adjusted. Jack up the sprayer high enough to raise the wheel from the ground. 4. Block the sprayer frame to keep sprayer from dropping if jack should fail or lose pressure. 5. Loosen the nuts on the U-bolts securing the wheel and hub assembly to the sprayer frame. 6. Slide the wheel and hub assembly in or out to the desired distance. Measure from the centerline of the sprayer to the centerline of the tire. DO NOT exceed the minimum 62 inch or maximum 80 inch distances. 4.2 Implement Driveline (PTO Drive Pumps Only) ^ WARNING Before working on PTO shaft or connecting or disconnecting it, STOP tractor, apply the parking brake, and make sure that the tractor motor has stopped turning. The Fast Sprayer is designed to be used with a tractor having a 5 RPM PTO unless your sprayer has a 1000 RPM centrifugal pump (Optional). Adjust the tractor drawbar so the distance from the end of the PTO shaft to the center of the drawbar hitch pin hole (Dimension A) is for 5 RPM PTO or for 1000 RPM PTO. NOTE: If the hitch pin hole is located well behind the tractor tires, the operator can make a turn sharp enough to damage the driveline. 7. Tighten the hex nuts on the U-bolts. 8. Lower the wheel to the ground. 9. Repeat steps 3 through 8 for the wheel assembly on the other side of the sprayer. 24


25 5. Hitching Sprayer To Tractor ^ CAUTION DO NOT stand between the tractor and prayer when hitching or unhitching the sprayer unless tractor engine is STOPPED and parking brake is applied. 5.1 Hitching 1. Align the tractor drawbar with the sprayer clevis hitch. 2. Shut down and lockout the power source. Refer to Power Source Shutdown Procedure on Page 3 of this manual. Follow these procedures to correctly lockout the power source. 4. Remove the hitch pin and clip from their storage positions. 5. Install the hitch pin. Insert the clip through the side of the hitch pin to lock in place. 6. Turn the leveling crank on the jack stand until the jack no longer touches the ground. NOTE: Safety chains are available for your sprayer by ordering from Fast Manufacturing, Inc. 7. Store the jack during operation. a. Remove the pin and clip from the jack mount on the sprayer hitch. b. Remove the jack from the mount. 3. If necessary, adjust the position of the hitch so that the sprayer is as level as possible when hitched to the tractor. Adjust the hitch as follows: a. Remove the four bolts securing the hitch to the flanges on the sprayer tongue. b. Raise or lower the hitch or rotate the hitch 0 to a position that will ensure that the sprayer is as level as possible. c. Insert all four bolts through the flanges on the sprayer tongue and the hitch. Tighten securely. 1 - Sprayer Tongue 2 - Hitch 3 - Bolts 1 - Pin and Clip 2 - Jack In Hitch/Unhitch Position c. Position the jack onto the storage mount on the sprayer frame. d. Secure in place with the pin and clip.

26 ^ WARNING Be certain that the driveline is securely attached to the PTO shaft on the power source. Install all shield system components before beginning operation. 1 - Pin and Clip 2 - Jack In Stored Position Important: Always secure the jack in the storage position before beginning any operation or transport of the sprayer. Damage to the jack can result if jack is not stored during operation or transport. ^ WARNING Connect 5 RPM sprayer pumps ONLY to 5 RPM tractor PTO output shafts. Connect Optional 1000 RPM sprayer pumps ONLY to 1000 RPM tractor PTO output shafts. 5. Pull the collar on the tractor end of the driveline to the rear (toward the sprayer), and slide the driveline onto the tractor s PTO output shaft as far as possible. 6. Release the collar. Pull the driveline to the rear (toward the sprayer) until the collar snaps into the locked position, and the driveline cannot be moved forward or backward. 26

27 5.2 Hydraulic Drive Sprayer Pump Hose Hook Up (Optional) Hydraulic Hose Hook Up: ^ WARNING Hydraulic oil under pressure can spray into eyes and cause physical injury. Follow tractor operator manual instructions for shutting off hydraulic supply and relieving hydraulic pressure before connecting or disconnecting hydraulic hoses. 2. Install control box in the tractor cab in a location where it can be used easily and is readily visible. 3. Determine best routing for control cable and pressure tube. Be sure the cables and/or tubes DO NOT interfere with any moving parts on tractor or sprayer. 4. Install Mounting bracket. 5. Make tractor connections for power input, ground and pressure tubing if so equipped. TeeJet Controller (Standard): 1. Assemble the sprayer hydraulic pump hoses to the tractor hydraulic couplers. IMPORTANT: Assemble the hoses to the tractor, but DO NOT activate hydraulics until the pump has been properly primed. 2. Place the tractor hydraulic control lever in the position next to the float position. The pump should operate. If the pump does not operate, place the tractor hydraulic control lever in the float position. 3. Disconnect and reverse the sprayer hose connections at the tractor. The pump should operate. IMPORTANT: Always use the float position to STOP the hydraulic sprayer pump. Note: If sprayer is being hitched to the tractor for the first time, charge the sprayer hydraulic system with oil. IMPORTANT: The storage slots for the hydraulic hoses should ONLY be used when sprayer is disconnected from the tractor and being stored. Hydraulic hoses MUST always be connected to tractor during transport of sprayer. 5.3 Control Box Installation Electrical Connections To Tractor When connecting the electrical control boxes to the tractor, it is recommended that you purchase a wiring harness pigtail adaptor from your tractor dealer or Fast Manufacturing, Inc. Be sure to ONLY connect to tractors with a 12 Volt Positive electrical system. a. Connect the 2 RED wires to the 12 volt power source (positive). b. Connect the 2 BLACK wires to a ground point on the tractor (negative). c. Connect the single BLUE wire to the tractor headlight system. The BLUE wire powers the light in the pressure gauge and does not turn OFF with the control box switch. DO NOT connect directly to a power source that does not disconnect when the tractor is shut OFF. d. Using the pressure tube coupler and fittings, connect the tube in the control wiring harness to the tube in the extension wiring harness. Install the coupler outside the tractor cab in case it would leak. A gauge isolator (Part No ) is available to use in place of the pressure tube coupler. If it is installed outside the tractor cab, it prevents chemicals from entering the tractor cab. It also protects the control box gauge when liquid nitrogen is sprayed. 5.4 Electric Sprayer Controls Note: Refer to the separate control box owner s manual for detailed installation instructions. 1. Turn OFF all switches. 27

28 Raven Rate Controller (Optional): hoses which must be connected to the appropriate couplers on the tractor. All three male tips are an ASAE standard tip (Pioneer). The single hose will operate the entire boom UP or DOWN & for EFT boom with switch activated will tilt left wing UP or DOWN. The pair of hoses will operate the fold IN or OUT & for EFT boom with switch activated will tilt right wing UP or DOWN a. Connect the RED wire directly to the battery (12 volt - positive). DO NOT connect to a remote power source. b. Connect the WHITE wire directly to the battery (12 volt - ground). DO NOT connect to a remote ground source. c. The Raven rate controller will need to be programed. See Raven rate controller manual for proper procedure. Verify the values and note them in the controller book for reference. 6. Complete the final assembly and make the final connections. Test system to make sure it is working properly. 5.5 Hydraulic Hose Connections - Boom Control There are three types of booms available for your sprayer. EF Hydraulic fold with boom width of: 45 ft. EFT Hydraulic fold & wing tilt with boom width of: 45 ft. HC Hydraulic fold with boom width of: ft. 2. The hoses on the sprayer are marked with colored tie wraps to identify the hoses for proper connection to the tractor. The pair of hoses for the fold IN or OUT will have one color and the boom UP or DOWN will be another color. 3. There is an extra set of the colored tie wraps shipped with your sprayer. Attach these tie wraps to the proper tractor hydraulic couplers to aid in the correct reattaching of the sprayer hydraulic hoses. Note: If sprayer is being hitched to the tractor for the first time, charge the sprayer hydraulic system with oil. IMPORTANT: The storage slots for the hydraulic hoses should ONLY be used when sprayer is disconnected from the tractor and being stored. Hydraulic hoses MUST always be connected to tractor during transport of sprayer EFT Boom Electrical Connections There are three wires that are to be connected to the tractor. 1. Connect the two RED wires to the positive (+) 12 volt power source of the tractor. The RED wires can be connected directly to the battery or to an auxiliary connection such as the fuse block. 2. Connect the WHITE wire to the negative (-) ground source of the tractor. The WHITE wire can be connected directly to the negative battery or to an auxiliary connection as long as a good ground is maintained. ^ WARNING Hydraulic oil under pressure can spray into eyes and cause physical injury. Follow tractor operator manual instructions for shutting off hydraulic supply and relieving hydraulic pressure before connecting or disconnecting hydraulic hoses EF & EFT Boom Hydraulic Hose Connections 1. The EF & EFT boom utilizes three separate hydraulic HC Boom Hydraulic Hose and Electrical Connections Your sprayer has been shipped from the factory set-up for use with a tractor that has Closed Center Hydraulics. Determine if your tractor has this type of hydraulics. Connect sprayer hydraulic hoses to the tractor hydraulic system. When the HC boom is in use, the hydraulic valve on the tractor MUST be locked open to assure a constant supply of oil to the cylinder valve control bank located at the back of the sprayer.

29 5.5.4 HC Boom Electrical Connections There are two wires that are to be connected to the tractor. 1. Connect the RED wire to the positive (+) 12 volt power source of the tractor. The RED wire can be connected directly to the battery or to an auxiliary connection such as the fuse block. 5.6 Sprayer Accessories Make all required electrical connections for sprayer accessories. Refer to the Accessories section of this manual for proper instructions on electrical connections. 2. Connect the WHITE wire to the negative (-) ground source of the tractor. The WHITE wire can be connected directly to the negative battery or to an auxiliary connection as long as a good ground is maintained. If your tractor has Closed Center Hydraulics, turn the flow rate on your tractor hydraulic system down to 5 to 6 GPM and try the sprayer boom functions. If the sprayer functions are not satisfactory, the valve block located at the rear of the boom can be altered to operate with Open Center Hydraulic systems. To change from Closed Center Hydraulic system set-up to Open Center Hydraulics: 1. Locate the valve block at the rear of your sprayer on the rear tower. 2. Locate the plug on the left hand end of block, remove and insert cartridge p/n 36 (FV2717) into block (torque to ft/#), install coil and torque to 5 ft/#. Connect loose lead to coil. 3. Your sprayer is now set-up to be used with Open Center Hydraulics. Note: If sprayer is being hitched to the tractor for the first time, charge the sprayer hydraulic system with oil. IMPORTANT: The storage slots for the hydraulic hoses should ONLY be used when sprayer is disconnected from the tractor and being stored. Hydraulic hoses MUST always be connected to tractor during transport of sprayer. Valve Block 1 - Replace This Wire Coil and Open Center Bypass Valve With Plug For Closed Center Hydraulics 29


30 6. Unhitching Sprayer From Tractor 6.1 Unhitching ^ CAUTION DO NOT stand between the tractor and sprayer when hitching or unhitching the sprayer unless tractor engine is STOPPED and parking brake is applied. ^ WARNING Before disconnecting the PTO shaft, make sure that the tractor motor has stopped turning before getting off the tractor. ^ WARNING Hydraulic oil under pressure can spray into eyes and cause physical injury. Follow tractor operator manual instructions for shutting off hydraulic supply and relieving hydraulic pressure on sprayers with remote hydraulic controls. 1. Park sprayer on a firm, level surface. Block both sprayer wheels to prevent any unexpected movement when the sprayer is unhitched from the tractor. 1 - Pin and Clip 2 - Jack In Stored Position 4. Position the jack onto the mounting hub on the sprayer hitch. Align the holes in the jack with the holes in the mount and insert the pin and clip to secure the jack in place. 5. Turn the leveling crank on the jack until the hitch begins to rise up off the tractor drawbar. 2. Shut down and lockout the power source. Refer to Power Source Shutdown Procedure on Page 3 of this manual. Follow these procedures to correctly lockout the power source. 3. Remove the pin and clip from the jack mount and remove the jack from the stored position on the sprayer frame. 1 - Collar On Tractor End Of Driveline 2 - Hitch Pin IMPORTANT: The storage slots for the hydraulic hoses should ONLY be used when sprayer is disconnected from the tractor and being stored. Hydraulic hoses MUST always be connected to tractor during transport of sprayer.

31 7. Transporting Sprayer IMPORTANT: Observe the safety precautions when transporting the sprayer to another location: 1. DO NOT allow anyone to ride on sprayer or tractor. 2. DO NOT transport the sprayer unless the booms are fully folded and boom is securely placed in the boom transport rests. 3. AVOID sudden turns which may reduce operator control of the tractor or cause sprayer to tip. Sprayers tend to be top heavy when tank is filled and wheels are set at 62 inches. 4. ALWAYS be aware of the location of the ends of the booms in order to avoid collisions with stationary or moving objects. IMPORTANT: NEVER exceed the maximum towing speed of (32 Kmh). Reduce speed when turning or traveling on rough or hilly terrain. 7.1 Transport Lighting The sprayer is equipped with transport lighting for transporting the sprayer on public highways. The light cord supplied with the sprayer has a standard seven prong plug. Contact your tractor dealer if your tractor does not have the appropriate receptacle. 7.2 SMV Emblem and Reflectors The sprayer is provided with reflective strips and a slow moving vehicle (SMV) emblem. Unless prohibited, always use a SMV emblem. 7.3 Safety Chain Sprayers can be equipped with a safety chain for travel on public highways. Contact Fast Manufacturing, Inc. to order. When attaching chain, be sure to allow enough slack for turning. 31
32 8. Sprayer Accessories Listed are the accessories available and the connection instructions if required. For ease of connecting accessories to your tractor, see your tractor dealer or Fast Manufacturing, Inc. for an accessory connecting pigtail harness that connects directly to your tractor electrical system and allows your accessory to be keyed to the tractor ignition. NOTE: If your sprayer is equipped with the HC boom, all connections for these accessories will be incorporated into the HC control box and wire harness. Connect the in-cab rinse system as follows: Connect the RED wire to the Positive (+) 12 volt power source on your tractor. Connect the BLACK wire to the Negative (-) ground source on your tractor or a good ground. NOTE: This system is not fused. It is recommended that this system be connected to a fused power source on the tractor. The instructions listed are for sprayers with EF booms only. 8.1 Foam Marker Switch Box A foam marking system is an optional accessory. If your sprayer is equipped with a foam marker, refer to the owner s manual supplied with the unit for installation instructions. Connect the foam marker kit as follows: Connect the WHITE wire to the Positive (+) 12 volt power source on your tractor. Connect the BLACK wire to the Negative (-) ground source on your tractor or a good ground. 8.2 Fence Line Kit (Right Side, Left Side or Both) A fence line kit is an optional accessory. Refer to the Optional Accessories section later in this manual for operation of this accessory. NOTE: This system is not fused. It is recommended that this system be connected to a fused power source on the tractor. Connect the fence line kit as follows: Connect the RED wire to the Positive (+) 12 volt power source on your tractor. Connect the BLACK wire to the Negative (-) ground source on your tractor or a good ground. 8.3 In-Cab Electric Gallon Rinse System A in-cab electric rinse system is a option for your sprayer. This system requires connection to the tractor electrical system. 32
33 9. Operation Read and understand Operator s Manual and all safety signs before using. ^Lower machine to the ground, place all controls in neutral, stop engine, set park brake, remove ignition key, and wait for all moving parts to stop before servicing, adjusting, repairing or unplugging. ^ Install and secure all guards and shields before starting or operating. ^ Keep hands, feet, hair and clothing away from all moving and/or rotating parts. ^ Do not allow riders on the sprayer or tractor during operation or transporting. ^ Clear area of all bystanders, especially children, before starting or filling with chemical or fertilizer. ^ Read chemical or fertilizer manufacturers warnings, instructions and procedures before starting and follow them exactly. ^ Do not breathe, touch or ingest chemicals or fertilizer. Always wear protective clothing and follow safe handling procedures. ^ Stay away from wings when folding or extending wings. Keep others away. ^ Clean reflectors, SMV and lights before transporting. ^ Attach securely to towing unit using a hardened pin with a retainer and a safety chain. ^ Do not exceed a safe travel speed. ^ Use hazard flasher on tractor when transporting. ^ Stay away from overhead power lines when folding or extending the wings and during transport. ^ Review safety instructions before operating machine. 9.1 New Operator Or Owner The Fast Manufacturing, Inc. Sprayer is designed to meter out and distribute liquid chemical or fertilizer and place it where required. It is the responsibility of the owner or operator to read this manual and to train all other operators before they start working with the machine. Follow all safety instructions exactly. Safety is everyone s business. By following recommended procedures, a safe working environment is provided for the operator, bystanders and the area around the worksite. Untrained operators are not qualified to operate the machine. Many features incorporated into this machine are the result of suggestions made by customers like you. Read this manual carefully to learn how to operate the machine safely and how to set it to provide maximum field efficiency. By following the operating instructions in conjunction with a good maintenance program, your sprayer will provide many years of trouble-free service. 9.2 Break-In Perform the following steps on a new sprayer: A. After 1 hour of operation: 1. Tighten all wheel lugs to 135 lb/ft of torque. 2. Tighten all other fasteners and hardware to required torque. 3. Check that no chemical or hydraulic lines are being pinched or crimped. Re-route as required. 4. Check that all nozzles and placement components are clean and working properly. Clean as required. 5. Check that the pump is functioning properly. Adjust as required. 6. Lubricate all grease fittings. B. After 5 hours of operation: 1. Tighten all wheel lugs to 135 lb/ft of torque. C. After 10 hours of operation: 1. Tighten all fasteners and hardware to required torque. ^ Before applying pressure to the hydraulic system, make sure all components are tight, hoses and couplings are in good condition Check chemical and hydraulic line routing. 3. Check that all placement components are clean and working properly.
34 D. After hours of operation: 1. Tighten all wheel lugs to 135 lb/ft of torque. 2. Then follow normal servicing and maintenance schedule as defined in Maintenance Section. 9.3 Pre-Operation Checklist Efficient and safe operation of the Fast Manufacturing, Inc. Sprayer requires that each operator reads and understands operating procedures and all related safety precautions outlined in this section. A pre-operational checklist is provided for the operator. It is important for both personal safety and maintaining the good mechanical condition of the sprayer that this checklist be followed. Before operating sprayer, check the following items: the following equation or the table to determine ground speed. Speed Travel Time Required (seconds) (mph) 100 Feet 0 Feet 0 Feet Lubricate machine per schedule outlined in Maintenance Section. 2. Use only a tractor of adequate power and weight to operate sprayer. 3. Be sure that machine is properly attached to tractor. Be sure that a mechanical retainer is installed through drawbar pin and safety chain is installed. 4. Inspect all hydraulic lines, hoses, fittings and couplers for tightness. 5. Check tires and verify they are inflated to specified pressure. 6. Calibrate sprayer if at start of season or a new sprayer rate is being used. 7. Check condition and routing of all fluid hoses and lines. Be sure that all lines are routed in large arcs. Replace any that are damaged. Re-route those that are rubbing, pinched or crimped. 8. Check placement components. Remove and replace any that are worn. 9. Remove all entangled material. 9.4 Measuring Travel Speed Measure a test course in the area to be sprayed or in an area with similar surface conditions. Minimum lengths of 100 and 0 feet are recommended for measuring speeds up to 5 and 10 miles per hour, respectively. Determine the time required to travel the test course. To help ensure accuracy, conduct the speed check with a loaded sprayer and select the engine throttle setting and gear that will be used when spraying. Repeat the above process and average the times that were measured. Use 34 Useful Formulas and Conversions GPA= Application rate in gallon per acre GPM= Flow rate in gallons per minute S= Speed in miles per hour W= Nozzle spacing in inches Calculate flow rate per nozzle when application rate, speed and nozzle spacing are known: GPM (per Nozzle) = GPA x S x W 59 Calculate application rate when nozzle spacing, speed and flow rate are known: GPA = 59 x GPM S x W Calculate speed when flow rate, application rate and nozzle spacing are known: S = 59 x GPM GPA x W Convert speed from feet per second to miles per hour: S = Feet per second x Spraying Solutions Other Than Water Since all the tabulations are based on spraying water, which weighs 8.34 lbs. per US gallon, conversion factors must be used when spraying solutions which are heavier or lighter than water. To determine the proper size nozzle for the solution to be sprayed, first multiply the desired GPM or GPA of solution by the water rate conversion factor. Then use the new converted GPM or GPA rate to select the proper size nozzle.
35 Example: Desired application is GPA of %N. Determine the correct nozzle size as follows: GPA (solution) x Conversion factor = GPA (from table) GPA (%) x 1.13 = 22.6 GPA (water) The sprayer operator should choose a nozzle size that will supply 22.6 GPA of water at the desired pressure. Weight Of Solution Specific Gravity Conversion Factors 8.34 lbs per gallon - Water lbs per gallon - % Nitrogen lbs per gallon - 32% Nitrogen You must know the following information to use the nozzle selection tables: The type of nozzle (flat fan, cone, or flood) The spraying pressure you will be using (psi) The application rate (GPA) The nozzle spacing (in inches) The operating speed in miles per hour 9.5 Tip Selection Proper application of agricultural chemicals is essential to good performance. Applying the correct amount and effectively covering the target are key factors in proper application. Too often, poor weed, disease, or insect control can be traced to problems with spray distribution along the boom. Spray distribution refers to the uniformity of spray coverage across the boom swath. The goal in broadcast spraying is even (uniform) spray distribution. Factors affecting spray distribution include nozzle type, spray pattern angle, nozzle spacing and boom height. When selecting nozzles to be used on a boom for broadcast application, finding the correct combination of these factors is important. The nozzle spray angle and the height of the boom will determine the overlap between adjacent tips, which is critical to uniform distribution. Unless otherwise specified at the time of manufacture, your sprayer is equipped with flat fan spray nozzles having the following characteristics: Volume: approximately GPA at psi at 5 mph Spray angle: 110 degrees Nozzle spacing: inches If you want to change the application rate or the type of nozzle, the tables on the following pages provide the information needed to help you choose the right nozzle for common applications. (Refer to the Fast Manufacturing, Inc. product catalog for more specific information). IMPORTANT: Your chemical supplier can give you accurate information about the recommended chemical mixture and the application rate. Check with your supplier before you select a different tip. 35

36 9.6 Spray Tip Wear 36
37 9.7 Air Induction Spray Tips (Greenleaf Turbo Drop Nozzles) Inch Nozzle Spacing Medium Pressure TurboDrop XL Nozzle (TDXL, TDCXL) Optimal pressure range is -90 psi. Targeting psi operating pressure will allow for greater changes in speed and pressure. Max pressure is 1 psi. Higher pressures are recommended for contact pesticides (-1 psi). At lower pressures, the spray angle of the exit tip will narrow by approximately 10-15% (making a 110 degree tip essentially a degree tip). Make necessary boom height adjustment for desired overlap. (For spacing, a height of -36 is recommended.) Complete Nozzle # AM11001 TDXL TDCXL mesh screen Liquid Pressure PSI Nozzle Capacity GPM GALLONS PER ACRE BASED ON 15 NOZZLE SPACING AM TDXL TDCXL mesh screen AM11002 TDXL TDCXL mesh screen
38 38 Complete Nozzle # Liquid Pressure PSI Nozzle Capacity GPM GALLONS PER ACRE BASED ON 15 NOZZLE SPACING AM1100 TDXL-1100 TDCXL-1100 mesh screen AM11003 TDXL TDCXL mesh screen AM11004 TDXL TDCXL mesh screen AM11005 TDXL TDCXL mesh screen
39 39 AM11006 TDXL TDCXL mesh screen TDXL TDCXL TDXL TDCXL
40 9.7.2 Inch Nozzle Spacing Medium Pressure TurboDrop XL Nozzle (TDXL, TDCXL) Optimal pressure range is -90 psi. Targeting psi operating pressure will allow for greater changes in speed and pressure. Max pressure is 1 psi. Higher pressures are recommended for contact pesticides (-1 psi). At lower pressures, the spray angle of the exit tip will narrow by approximately 10-15% (making a 110 degree tip essentially a degree tip). Make necessary boom height adjustment for desired overlap. (For spacing, a height of -36 is recommended.) Complete Nozzle # Liquid Pressure PSI Nozzle Capacity GPM 4 5 GALLONS PER ACRE BASED ON NOZZLE SPACING AM11001 TDXL TDCXL mesh screen AM TDXL TDCXL mesh screen AM11002 TDXL TDCXL mesh screen
41 41 Complete Nozzle # Liquid Pressure PSI Nozzle Capacity GPM GALLONS PER ACRE BASED ON NOZZLE SPACING AM1100 TDXL-1100 TDCXL-1100 mesh screen AM11003 TDXL TDCXL mesh screen AM11004 TDXL TDCXL mesh screen AM11005 TDXL TDCXL mesh screen
42 42 AM11006 TDXL TDCXL mesh screen TDXL TDCXL TDXL TDCXL

43 9.8 TeeJet Air Induction Spray Tips Inch Spacing At Various Speeds And Pressures 43
44 TeeJet Application Rates in Gallons Per Acre Inch Tip Spacing At Various Speeds And Pressures Tip Size Pressure (PSI) Nozzle Capacity (GPM) Nozzle Capacity (oz/min) 15 INCH TIP SPACING XR11001VS XR11015VS XR11002VS XR11003VS
45 45 Tip Size Pressure (PSI) Nozzle Capacity (GPM) Nozzle Capacity (oz/min) 15 INCH TIP SPACING XR11004VS XR11005VS XR11006VS XR11008VS XR11010-SS
46 46 Tip Size Pressure (PSI) Nozzle Capacity (GPM) Nozzle Capacity (oz/min) 15 INCH TIP SPACING XR11015-SS Inch Tip Spacing At Various Speeds And Pressures Tip Size Pressure (PSI) Nozzle Capacity (GPM) Nozzle Capacity (oz/min) INCH TIP SPACING XR11001VS XR11015VS XR11002VS
47 47 Tip Size Pressure (PSI) Nozzle Capacity (GPM) Nozzle Capacity (oz/min) INCH TIP SPACING XR11003VS XR11004VS XR11005VS XR11006VS XR11008VS
48 48 Tip Size Pressure (PSI) Nozzle Capacity (GPM) Nozzle Capacity (oz/min) INCH TIP SPACING XR11010-SS XR11015-SS

49 9.10 TeeJet FloodJet Wide Angle Flat Spray Tips Inch Spacing At Various Speeds And Pressures 49

50 9.11 Equipment Matching To insure the safe and reliable operation of the sprayer, it is necessary to use a tractor with appropriate specifications. As a guideline, insure that these requirements are met: 1. Tractor Requirement: The fully loaded sprayer should be no more than 1.5 times the tractor weight. This insures that the unit has the required stability and control in hilly terrain and during transport. 2. Front End Weights: By following recommendations for tractor power, tractor will have sufficient weight to provide stability during field operation or when transporting. It is also recommended that each tractor be equipped with a full compliment of suitcase weights on front of tractor. This will provide the required weight on front for turning and extra traction if equipped with front wheel assist. 1 - Electric Ball Valves 2 - Electric Pressure Regulating Valve 3. Hydraulic System: Tractor hydraulic system must be capable of 8 gpm (24 lpm) at 00 psi (13,800 kpa) to operate lift cylinders and drive motor. Either closed center or open-centered systems can be used. However an open centered hydraulic system is limited to 8 gpm maximum. Note: Contact factory for an optional flow control for use with high flow open center system. Two or three remote outlets are required to operate the sprayer. 1. BW0EF & EFT main lift (single acting, powered up, gravity down). BW7/ (double acting, controls all folding function). 2. BW0EF & EFT, folds wings in or out. 3. For optional hydraulic drive centrifugal pump. Note: Always place hydraulic control lever in detent to provide a constant flow of oil to pump drive motor Sprayer Controls Sprayer operation and liquid flows are controlled by a combination of controls on the tractor and the sprayer. 1. Triple Electric Control: This system consists of three electric ball valves and a electric pressure regulating valve which are all mounted on the top of the boom mid section of the sprayer. The control box is mounted on the tractor. 2. Control Box: Standard Control Box The control box consists of the following components: MASTER ON/OFF switch which controls power to the valves for each boom section. When power is supplied to the valves, the valves open, allowing liquid to flow to the boom sections. NOTE: The toggle switches for the individual boom sections must be ON to energize the valves. Individual toggle switches which allow the operator to control flow to the individual boom sections (L, left; C, center; and R, right). Turning a switch OFF allows the valve for that section to close. PRESSURE ADJUST toggle switch which allows the operator to INCREASE (+) or DECREASE (-) the pressure of the liquid supplied to the boom sections. When the operator releases the switch after adjusting the pressure, the switch automatically returns to its center NEUTRAL position. NOTE: When making adjustments, monitor pressure carefully. The control system does not have automatic HIGH or LOW pressure limit switches.


51 PRESSURE GAUGE which indicates the pressure of the liquid supplied to the operating boom sections. If the operator shuts OFF a boom section, the pressure of liquid supplied to the other two boom sections will increase because the same volume of liquid is being pumped through fewer nozzles. The operator must use the pressure adjust switch on the control box to manually reduce the pressure to the operating pressure desired. 1 - Pressure Gauge 2 - Pressure Adjust Switch 3 - Master ON/OFF Switch 4 - Boom Section Switches 3. Optional Automatic Rate Controller: Automatic rate controllers are an optional accessory on all sprayers. Refer to the separate owners manual for detailed instructions for using the system. 4. Optional Four-Way Electric Control System with RAVEN Rate Control System Only: The four-way electric control system has the same features as the three-way control system. However, it uses four motorized ball valves which allow the boom to be split into four sections: Left, Left Center, Right Center and Right. The control box has additional switches to provide four section boom control. 5. Valve Control Center: The valve control center is located in front of the sprayer platform. The number of valves on the control center will vary, depending upon if the sprayer is equipped with group A or C option package. Each valve controls the following (top to bottom): Top Valve is for hand spray gun Valve A is for rinse tank fill Valve B is for product tank rinse Valve C is for product tank fill Valve D is for the chemical inductor Bottom Valve is the agitation throttling valve Valve Control Center 1 - Hand Gun Valve A - Valve A B - Valve B C - Valve C D - Valve D 2 - Agitation Throttling Valve 6. Agitation System: Your sprayer is equipped with an adjustable agitation system. The throttling valve to adjust the system can be located in one of two locations, depending on which accessories your sprayer is equipped with. If the sprayer does not have a self cleaning filter, the agitation throttling valve will be located near the front left corner of the sprayer platform. 51

52 2. Place a container under the filter canister. 3. SLOWLY loosen and remove the drain plug from the bottom of the canister and let filter drain completely. 4. Unscrew the filter canister, remove the screen and rinse in clean water. 5. Wipe the inside of the canister with a clean rag. 1 - Agitation Throttling Valve If the sprayer has a self cleaning filter, the agitation throttling valve will be the first valve located at the bottom of the valve control center tower. See preceding page for location. There are three agitation jets inside the product tank. Two are located in the sump near the front of the tank and one is located at the rear of the tank. NOTE: If the sprayer is equipped with a self cleaning filter the jet at the rear of the tank will be controlled by the self cleaning filter. See the self cleaning filter section for details. It is recommended that you have the agitation throttling valve completely OPEN unless foaming occurs Standard Primary Filter Your sprayer is equipped with a primary filtration system. This filter could be in the form of a Y strainer (standard) or a self cleaning filter (optional). The filter is located on the right side of the sprayer under the sprayer platform. The filter is installed on the pressure side of the pump and has a mesh screen. Other size mesh screens are available through Fast Manufacturing, Inc In Line Filter Kit 6. Lightly oil the O-rings on the filter canister and the drain plug. 7. Reassemble the filter screen into the canister and the canister to the filter head. DO NOT over tighten. 8. Reinstall the drain plug into the canister. DO NOT over tighten. 9. Dispose of the waste material properly Self Cleaning Filter (Optional) Refer to the Maintenance section of this manual for filter maintenance interval and procedures. A self cleaning filter is an optional accessory. This filter has a throttling valve located in the front left hand side of the sprayer. A quick coupler system and hose is mounted to the bottom of the filter cannister. The unmixed chemical that does not go through the mesh screen is returned to the product tank through the rear agitation jets, reagitated and sent back through the system. The throttling valve should remain completely open for the self cleaning filter to operate properly. When the cannister is removed from the filter head, the throttling valve MUST be closed. The in line filters are located on the mid section of the boom and are attached to the ON/OFF valves. There will be one filter per ON/OFF valve and are equipped with mesh screens. Optional size screens are available through your Fast Manufacturing parts dealer. ^ Warning Wear protective clothing (such as goggles, rubber or chemical resistant gloves and a respirator) while handling or working with chemicals. Keep protective clothing clean and in good condition or discard. To clean the filter screen: ^ DANGER Agricultural chemicals are TOXIC, chemicals not safely used, handled, stored and disposed of can cause serious injury or death to individuals or harm the environment. Wear protective clothing and equipment. Read, understand and follow the chemical manufacturer s label. To clean screens: Contact your chemical supplier, county extension agent or other qualified person if 1. Use caution when removing filter canisters or boom you have questions on chemical usage. lines. There could be residual pressure in the filter or boom lines. 1. Turn the product pump OFF. 52
 to Product Tank (handle pointed toward")
53 2. Turn the emergency shut off valve (located under tank) OFF. 3. Turn the agitation throttling valve (located in front of sprayer) OFF. If Equipped With Manual Control Rinse System: Turn the manual three way ball valve identified as Valve E (located under the platform on left side of sprayer) to Product Tank (handle pointed toward rear of sprayer). 4. Turn self cleaning filter on/off (located in front of sprayer) OFF - If so equipped. 5. Place a container under the filter, remove the canister and screen, rinse the screen off with clean water. 6. Lightly oil the O-ring on the canister. Reinstall the canister and screen. DO NOT over tighten. 7. OPEN all valves previously closed. 8. Dispose of all captured chemicals properly Filling The Product Tank NOTE: All poly tanks are not identical in capacity due to different tank molds, heat and/or cold. Tank sizes can and do vary. It is recommended that you measure by an independent means the amount of liquid being loaded. The sprayer can be equipped in one of three ways: No fast fill attachment - Standard configuration 2 Fast Fill via transfer pump - Optional (Group A) 2 Fast Fill via transfer pump or sprayer pump - Optional (Group C) NOTE: If Group C is ordered, you have the option of manual or Electric controls for the rinse system. If Equipped With Electric Control Rinse System: Locate the electric rinse control switch on the tractor control box and move the switch to the Product Tank position. 3. Slowly open the Fast Fill valve, marked as Valve F and let run until the product tank is full, turn off the Fast Fill valve. There is a breather on the product tank lid to allow air to escape during the filling operation. IMPORTANT: If you are filling with a high volume transfer pump, it may be necessary to remove the center lid from the manhole cover. 4. Close the Fast Fill Valve. Refer to the appropriate set of instructions that follows, depending on your sprayers configuration Fill Through Top Lid (Standard Configuration) 1. Remove the lid from the top of the product tank. Fill the tank using a garden hose or similar means. 2. Replace the lid when complete Filling With Transfer Pump Your sprayer is equipped with a 2 male fast fill connector and a ON/OFF valve (identified as Valve F ) located on the left side of the sprayer, directly behind the step. Fill as follows: 1. Connect the fill hose to the 2 connector. 2. Charge the fill hose with water using the transfer pump. 5. Disconnect the fill hose and replace the dust cap. Use care when removing the fill hose from the connector, there could still be liquid in the line. 6. Replace the center lid on the manhole cover, if it was removed Filling With Sprayer Pump Your sprayer has the ability to fill itself by using the sprayer product pump. Your sprayer is equipped with a 2 male fast fill connector and a ON/OFF valve (identified as Valve F ) located on the left side of the sprayer, directly behind the step. Fill as follows: 1. Connect the fill hose to the 2 connector. 53


54 2. Open the water supply valve to fill the hose. IMPORTANT: The water source MUST be higher than the sprayer pump. NEVER run the sprayer pump dry. The sprayer pump will not draw water from a source lower than the pump, until the pump is primed. If Equipped With Manual Control Rinse System: Turn the manual three way ball valve identified as Valve E (located under the platform on left side of sprayer) to the OFF position (handle pointed down). If Equipped With Electric Control Rinse System: Located under the operator platform on the left side of the sprayer is an electric three way ball valve. Directly behind this valve is a manual ON/OFF valve with a yellow handle. Turn this valve OFF (handle should point toward rear of sprayer). When handle is pointed toward right side of sprayer the valve is ON. 3. Open the Fast Fill valve marked as Valve F. 4. Start the product pump and run at full capacity. 1 - Valve C 5. Slowly open the Product Tank Fill valve marked Valve C located on the front control stand. Let run until the product tank is full, then turn OFF Product Tank Fill valve. There is a breather on the product tank lid to allow air to escape during filling. 6. Stop the product pump. 7. Close the Fast Fill valve. If Equipped With Manual Control Rinse System: Turn the manual three way ball valve identified as Valve E (located under the platform on left side of sprayer) to the Product Tank position (handle pointed toward rear of sprayer). If Equipped With Electric Control Rinse System: Located under the operator platform on the left side of the sprayer is an electric three way ball valve. Directly behind this valve is a manual ON/OFF valve with a yellow handle. Turn this valve ON (handle should point toward right side of sprayer). When handle is pointed toward rear of sprayer the valve is OFF. 8. Turn off the external water source. 9. Remove the fill hose and replace the dust cap. Be careful when removing the fill hose from the connector, there could still be some liquid in the line. 1 - Yellow Handle 9.17 Priming The Sprayer NOTE: Before you prime the sprayer, make sure you are familiar with the information in the pump owner s manual. 1. Determine appropriate operating pressure for the sprayer system. 2. Fill the sprayer tank half full of water. DO NOT add chemicals. IMPORTANT: Water must be in pump before pump is started. Pump may be damaged if pump and suction lines are empty. Use the transfer pump or fill through top port Open the emergency shut-off valve to allow water to flow from the tank into the suction line and pump.
55 Make sure the three-way valve (if so equipped) is open to the product tank. 4. Fold out the boom. (Refer to the Hydraulic Booms section of this manual for instructions). 5. Start the tractor. Start the pump and operate at desired speed. 6. Toggle the MASTER switch on the sprayer control box to the ON position to open the boom control valves. The individual boom switches on the control box must also be ON. 7. Make the pressure adjustment using the PRESSURE ADJUST switch on the control box. 8. Check and adjust for adequate agitation in the sprayer tank. If the pressure drops, adjust the pressure setting at the sprayer control box. 9. Check for uniform flow at all the spray nozzles. The sprayer is now ready for calibration Priming The Sprayer Equipped With A RAVEN Rate Controller If your sprayer is equipped with a RAVEN rate controller, you must do the following to allow the spray boom to function while standing still. 1. Disconnect the radar cable between the tractor and the sprayer. 2. Turn RAVEN console master switch ON. 3. Press the Self Test button so the red light stays on. 4. Press Enter so the red light stays on. 5. Press the No.5 key and the No. 0 key. 6. Press Enter again. Now the RAVEN rate controller is programmed with a signal telling it that it is moving, allowing the spray boom to operate while standing still. To Disengage Signal 1. Reconnect the radar cable between the tractor and the sprayer. 2. Move the tractor and sprayer or turn the rate controller OFF and then back ON. 9. Calibrating The Sprayer Your sprayer will be equipped with one of two different control systems: TeeJet Electric Control System (standard) Raven Rate Control System (optional) The two systems need to be calibrated in different ways TeeJet Electric Control System 1. Make sure sprayer is clean. 2. Select nozzle and pressure. 3. Fill sprayer half full with water. DO NOT add chemical. 4. Set up two stakes at the following measurements, depending on nozzle spacing: 272 feet apart for 15 nozzle spacing 4 feet apart for nozzle spacing 136 feet apart for nozzle spacing 102 feet apart for nozzle spacing 5. Under field conditions and at spraying speed, drive the distance and note both engine RPMs and the time. Do this at least twice to get the average time. 6. Stop the tractor. Put the tractor in park. 7. Unfold the sprayer booms. (Refer to the Hydraulic Booms section of this manual for instructions). 8. Start the sprayer and run at desired RPMs and pressure. 9. While parked, collect the liquid from the nozzle. Hold a container graduated in ounces below a nozzle. Record the output for the same time period as the average driving time determined in step 5. The average output in ounces is equivalent to the application rate in gallons per acre (GPA). NOTE: Measuring the output from each tip helps assure balanced spraying from the tips. It will also help you identify worn tips which may need replacement. 10. Repeat the procedures for the remaining nozzles. 11. Compare the actual application rate with the intended rate. If the actual rate varies from the desired rate, you must adjust the pressure or speed or change tip size to compensate. 55

56 9..2 Raven Rate Control System (Optional) The rate controller needs to be programmed for your sprayer. You should verify that the programming matches your sprayer specifications. It is very important that the radar gun calibration number is correct. Refer to the Raven owner s manual Tank Tie Down Straps IMPORTANT NOTE: Sprayer tanks will change shape and Settle In to the tank saddle when fully loaded. Retighten the tank tie down straps on all the tanks when the tanks are filled the first time each year. Check all the tie down straps for proper tightness. 1. Fill all tanks completely. 2. Check the straps for proper tightness. Straps should be snug around the tank. 3. If straps require tightening, adjust each strap by tightening the hex nut on the appropriate strap adjusting bolt. NOTE: Check the tension of the tie down straps periodically during the spraying season and tighten as required. 1 - Tank Tie Down Straps 2 - Strap Adjusting Bolt 3 - Hex Nut 56

57 Instructions Valve Settings For Accessory Kits Refer To The Operator s Manual For Detailed Instructions 57
58 9. Chemical Inductor (Optional) The 5 gallon Chemical Inductor is an optional accessory and is mounted on the front left corner of the spray platform. The chemical inductor is used to add chemical to the product tank from ground level. ^ DANGER Handle ALL agricultural chemicals with care. Use chemicals ONLY as directed on the manufacturer s warning label. Wear protective clothing (such as goggles, rubber or chemical resistant gloves and a respirator) while handling chemicals. Keep protective clothing clean and in good condition or discard. Wash hands and face thoroughly with clean water after handling chemicals. Never eat, smoke, drink or put hands to mouth before washing. Follow these procedures to properly use the chemical induction system: 1. Sprayer product tank MUST have at least gallons of water. 2. Check that the emergency shut off valve located under the product tank is OPEN. 3. Start the product pump and run at rated speed. 4. OPEN the Chemical Fill Control valve. 5. If you are going to use the measuring marks on the chemical inductor tank to measure the amount of chemical being added, make sure the valve on the bottom of the chemical inductor tank is CLOSED. Add desired amount of chemical, then OPEN the valve at the bottom of the chemical inductor tank. The chemical will be transferred from the chemical inductor tank to the product tank. 1 - Chemical Inductor Tank Cover 2 - Chemical Inductor Tank 3 - Close This Valve To Measure Chemical 4 - Chemical Fill Control Valve 6. When transfer is complete, use the hand rinse gun to rinse the chemical inductor tank. Allow the rinse water to go through the chemical inductor into the product tank. NOTE: If the hand rinse gun is supplied with water from the product pump, the water will come from the product tank and will be contaminated with diluted chemical. If the hand rinse gun is supplied with water from the optional 12 volt electric pump, the water will come from the rinse tank. 7. Always turn the valve under the chemical inductor tank OFF before turning the Chemical Fill valve OFF. 8. Replace the chemical inductor tank lid. 9. Fully OPEN the Agitation valve and allow the product pump to run long enough to thoroughly mix the product tanks contents. NOTE: Poly tanks can vary in size and expand and contract from hot to cold weather. It is not recommended to use the measuring marks on the chemical inductor tank for precise measuring. If you do not need to use the chemical inductor tank to measure, you can OPEN the valve at the bottom of the chemical inductor tank prior to adding the chemical. The chemical inductor will transfer the chemical to the product tank as you are filling. 1 - Hand Rinse Gun 58

59 1 - Chemical Inductor Tank Cover 2 - Chemical Inductor Tank 3 - Chemical Inductor Venturi 4 - Valve At Bottom Of Inductor Tank 5 - Agitation Control Valve 6 - Chemical Fill Control Valve 7 - Hand Rinse Gun NOTE: Some chemicals tend to foam when agitated. If foaming occurs, throttle back the agitation valve until the foaming stops. If you change the agitation valve setting, you may have to adjust the pressure on the tractor control box. This adjustment would not be necessary with a RAVEN rate controller. NOTE: There are anti foaming agents available: Part No Shakedown, Liquid - 1 Pint Part No Shakedown, Dry - 1/2 lb. jar Part No Shakedown, Water Soluble Packets - per case 10. If you are mixing more than one chemical into the product tank, you should check with your chemical supplier to make sure you add the chemicals in the correct sequence to insure proper mixing. 11. Be certain to clean and dispose of empty chemical containers properly. Follow the instructions on the container. NOTE: DO NOT use the chemical inductor system for powder type chemicals. Flowable granular chemicals are acceptable. Control Box 1 - Pressure Gauge 2 - Pressure Adjust Switch 9.21 Hand Rinse Gun for Chemical Inductor (Optional) The chemical inductor is supplied with a hand gun with approximately 5 feet of hose to rinse the chemical inductor tank. There are two ways the hand gun can be supplied with water: Standard system via the product pump Optional electric system via a 12 volt electric pump Standard System The standard system supplies water from the sprayer tank via the product pump and has an ON/OFF valve located at the top of the control center. The control center is located at the front of the sprayer. The water supplied will be contaminated with diluted mixed chemical. To Operate: 1. Start the product pump. Be certain to have water in the product tank and the emergency shut off valve under the product tank is open. 2. Open the ON/OFF valve located at the top of the control center. 3. Remove the hand gun from the storage bracket and rinse the chemical inductor tank. IMPORTANT: The Tee fitting at the bottom of the chemical inductor is a special fitting with a venturi nozzle on the inside. NEVER operate the chemical inductor without the venturi nozzle installed When finished close the ON/OFF valve, point the hand gun into the chemical inductor tank and squeeze the trigger to drain the pressure from the hand gun and hose.


60 5. Replace the hand gun to the storage bracket and replace the lid on the chemical inductor tank Optional Electric System The optional electric system has a 12 volt pump located under the gallon rinse water tank. There is an electric ON/OFF switch located at the top of the control center. The water is supplied from the gallon rinse water tank. To Operate: 1. There must be water in the gallon rinse water tank. 2. Turn ON the electric switch located at the top of the control center. 3. Remove the hand gun from the storage bracket and rinse the chemical inductor tank. 4. When finished turn OFF the electric switch, point the hand gun into the chemical inductor tank and squeeze the trigger to drain the pressure from the hand gun and hose. 5. Replace the hand gun to the storage bracket and replace the lid on the chemical inductor tank. NOTE: There is a filter assembly located on the electric 12 volt pump. This filter should be serviced at least once per season. Rinse tank must be empty to remove filter. 1 - Hand Rinse Gun 2 - Chemical Inductor Tank 3 - Storage Bracket 9.22 Personal Fresh Water Tank For your safety all Fast Manufacturing, Inc. sprayers have a personal 5 gallon fresh water tank as standard equipment. The fresh water tank is an integral part of the product tank. This tank is a source for clean, chemical free water for washing hands or other personal use. Use a water hose to fill the tank with clean water from an uncontaminated source. 1 - Hand Rinse Gun 1 - Personal Fresh Water Tank 2 - Personal Fresh Water Tank Fill 3 - Personal Fresh Water Tank Petcock


61 9.23 External Sight Gauge An external sight gauge is available for the product tank of your sprayer. This sight gauge is a clear tube mounted to the product tank on the front side. This gauge is visible from the operators position and is used as an indicator as to how much water is left in the tank. This gauge indicates the amount of water in the tank by volume only. It does not indicate gallons. Rinse the product pump, product tank, controls and boom lines. There are two types of control systems available for the rinse system: Manual controls located on the sprayer - Standard Electric controls located on the tractor - Optional NOTE: If the external sight gauge tube becomes discolored, it can be replaced by ordering from Fast Manufacturing, Inc. 1 - Personal Fresh Water Tank 2 - External Sight Gauge 9.24 Rinse Tank Flush System (Optional) A gallon fresh water rinse system is an optional accessory. The major components consist of: A gallon clean water tank located on the right side of the sprayer. Three way ball valve located on the left side of the sprayer under the operator platform. ON/OFF valve located at the front of the sprayer on the control stand. (3) rinse balls located in the product tank. The rinse system can do two different functions: Rinse the product pump, controls and boom lines and leave the product tank undisturbed. 1 - Rinse Tank Fill Valve 2 - Product Tank Rinse Valve 3 - Product Tank Fill Valve 4 - Chemical Fill Valve 9. Manual Control System 9..1 Filling The Rinse Tank The gallon rinse tank can be filled 3 different ways: 9..2 Fill Through Top Lid 1. Remove the lid from the top of the rinse tank. Fill the tank using a garden hose or similar means. 2. Replace the lid when complete Filling With Transfer Pump Your sprayer is equipped with a 2 male fast fill connector and a ON/OFF valve (identified as Valve F ) located on the left side of the sprayer, directly behind the step. 61

62 Fill as follows: 1. Connect the fill hose to the 2 connector. 2. Charge the fill hose with water using the transfer pump. 5. Start the product pump and run at full capacity. 6. Slowly open the Rinse Tank valve marked as Valve A located on the front control stand and let run until the rinse tank is full. Turn off the Rinse Tank Fill valve. There is a breather hose on the rinse tank to allow air to escape. 7. Stop the product pump. 8. Return the 3 way ball valve to the desired position ( Rinse Tank or Product Tank ). 9. Close the Fast Fill valve. 10. Shut off the external water source. 3. Turn the manual three way ball valve identified as Valve E (located under platform on left side of sprayer) to Rinse Tank (Point handle forward). 11. Disconnect the fill hose and replace the dust cap. Be careful removing the fill hose from the connector - there could be some liquid in the line. 4. Slowly open the Fast Fill valve marked as Valve F and let run until rinse tank is full. Turn off Fast Fill valve. There is a breather hose on the rinse tank to allow air to escape. IMPORTANT: If you are filling with a high volume transfer pump, be careful NOT to open the Fast Fill valve to full flow. 5. Disconnect the fill hose and replace the dust cap. Be careful removing the fill hose from the connector - there could be some liquid in the line Filling With Sprayer Pump Your sprayer has the ability to fill the clean water rinse tank its self by using the sprayer product pump. Your sprayer is equipped with a 2 male fast fill connector and a ON/OFF valve (identified as Valve F ) located on the left side of the sprayer, directly behind the step. Fill as follows: 1. Connect the fill hose to the 2 connector. 2. Open the water supply valve to fill the hose. IMPORTANT: The water source MUST be higher than the sprayer pump. NEVER run the sprayer pump dry. The sprayer pump will not draw water from a source lower than the pump, until the pump is primed. 3. Turn the manual 3 way ball valve identified as Valve E (located under platform on left side of sprayer to the OFF position (Point handle down). 4. Open the Fast Fill valve marked as Valve F. 1 - Valve A 9.26 Electric Control System Filling The Rinse Tank The gallon rinse tank can be filled 3 different ways: 62
 located on the left side of the sprayer, directly behind the step. Fill as follows: 1.")
63 Fill Through Top Lid 1. Remove the lid from the top of the rinse tank. Fill the tank using a garden hose or similar means. 2. Replace the lid when complete Filling With Transfer Pump Your sprayer is equipped with a 2 male fast fill connector and a ON/OFF valve (identified as Valve F ) located on the left side of the sprayer, directly behind the step. Fill as follows: 1. Connect the fill hose to the 2 connector. 2. Charge the fill hose with water using the transfer pump. 2. Open the water supply valve to fill the hose. IMPORTANT: The water source MUST be higher than the sprayer pump. NEVER run the sprayer pump dry. The sprayer pump will not draw water from a source lower than the pump, until the pump is primed. 3. Located under the operator platform on the left side of the sprayer is an electric 3 way ball valve. Directly behind this valve is a manual ON/OFF valve with a yellow handle (1). Turn this valve OFF (handle pointed toward rear of sprayer). 4. Open the Fast Fill valve marked as Valve F. 5. Start the product pump and run at full capacity. 6. Slowly open the Rinse Tank valve marked as Valve A located on the front control stand and let run until the rinse tank is full. Turn off the Rinse Tank Fill valve. There is a breather hose on the rinse tank to allow air to escape. 7. Stop the product pump. 8. Close the Fast Fill valve. 3. Locate the electric rinse control switch on the control box on the tractor. Move the switch to Rinse Water or Rinse Tank (depending on which control switch your sprayer has). 4. Slowly open the Fast Fill valve marked as Valve F and let run until rinse tank is full. Turn off Fast Fill valve. There is a breather hose on the rinse tank to allow air to escape. 9. Turn the valve under the platform ON (handle pointed toward right side of sprayer). 10. Shut off the external water source. 11. Disconnect the fill hose and replace the dust cap. Be careful removing the fill hose from the connector - there could be some liquid in the line. IMPORTANT: If you are filling with a high volume transfer pump, be careful NOT to open the Fast Fill valve to full flow. 5. Disconnect the fill hose and replace the dust cap. Be careful removing the fill hose from the connector - there could be some liquid in the line Filling With Sprayer Pump Your sprayer has the ability to fill the clean water rinse tank its self by using the sprayer product pump. Your sprayer is equipped with a 2 male fast fill connector and a ON/OFF valve (identified as Valve F ) located on the left side of the sprayer, directly behind the step. Fill as follows: 1. Connect the fill hose to the 2 connector. 1 - Valve A 63


64 3. Turn the manual 3 way ball valve identified as Valve E (located under platform on left side of sprayer) to Rinse Tank (Point handle forward). 4. Start product pump, drive at normal speed, turn complete boom ON and spray as normal until clean liquid comes out of sprayer tips. 5. Turn boom OFF, stop the product pump and stop the tractor. 6. Turn the manual 3 way ball valve identified as Valve E (located under platform on left side of sprayer) to Product Tank (Point handle toward rear of sprayer). Electric 3 Way Ball Valve 1 - Yellow Handle 9.27 Cleaning The Sprayer Keeping your sprayer clean helps assure a long service life. Many pesticides can quickly corrode metal parts in the spraying system. Chemicals remaining in the sprayer can react with a second chemical introduced to the system and offset its effectiveness. 9. Manual Control Rinse System 9..1 Short Term Shutdown Rinsing the Product Pump, Controls and Boom Lines Leaving the Product Tank Undisturbed: 1. Turn OFF the Agitation Valve located on the front control stand - If so desired. 2. Turn OFF the Self Cleaning Filter valve located at the front left corner of the operator platform - If so desired. 7. Turn ON the Agitation Valve located on the front control stand - If so desired. 8. Turn ON the Self Cleaning Filter valve located at the front left corner of the operator platform Long Term Shutdown Rinsing the Product Pump, Product Tank, Controls and Boom Lines: NOTE: It is important to Triple rinse the system to insure proper cleaning. The use of a Neutralizer is recommended for cleaning when changing chemicals. Products are available from your Fast Manufacturing, Inc. 1. Add the recommended amount of Neutralizer to the clean water rinse tank. 2. Turn the manual 3 way ball valve identified as Valve E (located under platform on left side of sprayer) to Rinse Tank (Point handle forward). 3. Start the product pump and run at full speed. 4. Open Valve B located in the front of the sprayer on the control stand. Let the pump run until you have used a third of the water in the clean water rinse tank. 5. Close Valve B located in the front of the sprayer on the control stand. 1 - Agitation Valve 2 - Self Cleaning Filter Valve Turn the manual 3 way ball valve identified as Valve E (located under platform on left side of sprayer) to Product Tank (Point handle toward rear of sprayer).

65 7. Drive at normal speed, turn complete boom on and spray as normal until product tank is empty. 8. Repeat the cleaning procedure two more times to ensure proper cleaning. 1 - Agitation Valve 2 - Self Cleaning Filter Valve 3. Locate the electric rinse control switch on the control box on the tractor. Move the switch to Rinse Water or Rinse Tank (depending on which control switch your sprayer has). 4. Start product pump, drive at normal speed, turn complete boom ON and spray as normal until clean liquid comes out of sprayer tips. 1- Valve B 5. Turn boom OFF, stop the product pump and stop the tractor. 6. Move the electric rinse switch on the tractor control box to the Product Tank position. 7. Turn ON the Agitation Valve located on the front control stand - If so desired. 8. Turn ON the Self Cleaning Filter valve located at the front left corner of the operator platform Electric Control Rinse System Short Term Shutdown Rinsing the Product Pump, Controls and Boom Lines Leaving the Product Tank Undisturbed: 1. Turn OFF the Agitation Valve located on the front control stand - If so desired. 2. Turn OFF the Self Cleaning Filter valve located at the front left corner of the operator platform - If so desired Long Term Shutdown Rinsing the Product Pump, Product Tank, Controls and Boom Lines: NOTE: It is important to Triple rinse the system to insure proper cleaning. The use of a Neutralizer is recommended for cleaning when changing chemicals. Parts are available from your Fast Manufacturing, Inc. 1. Add the recommended amount of Neutralizer to the clean water rinse tank Locate the electric rinse control switch on the control box on the tractor. Move the switch to Rinse Water or Rinse Tank (depending on which control switch your sprayer has). 3. Start the product pump and run at full speed.

66 4. Locate the electric control switch on the tractor control box and move the switch to Rinse Balls or Product Tank Rinse and let run until you have used a third of the water in the clean water rinse tank. 5. On the tractor control box, move the Rinse Balls switch to the Product Tank position (HC control) and/ or Product Tank Rinse switch to the OFF position and the Product Tank / Rinse Tank switch to the Product Tank position (Standard electric control). 6. Drive at normal speed, turn complete boom on and spray as normal until product tank is empty. 7. Repeat the cleaning procedure two more times to ensure proper cleaning Cleaning Your Sprayer Manually Keeping your sprayer clean helps assure a long service life. Many pesticides can quickly corrode metal parts in the spraying system. Chemicals remaining in the sprayer can react with a second chemical introduced to the system and offset its effectiveness. Following are instructions for cleaning your sprayer if it is not equipped with a factory installed rinse system. 1. Select an area where the cleaning solution can be safely sprayed out of the system. 2. Check the label on the chemical container for specific cleaning instructions. 3. Wash the entire sprayer system using a water hose and a brush. Use a soft brush to clean nozzle tips and screens. ^ Warning To avoid personal injury, make sure that everyone is at a safe distance from the sprayer before folding or unfolding the sprayer boom. Keep a safe distance from the boom while in operation. Hydraulic booms may move suddenly without warning EF & EFT Boom After the sprayer and hydraulic hoses have been properly attached to the tractor, unfold the boom using the following procedure: 1. Raise the complete boom until the boom wings clear the transport rest. 2. Place the tractor in park and/or set the brakes and stop the engine. 3. Remove the transport lock from the lift cylinder at the rear of the sprayer and place in the storage position provided. 4. Restart the tractor and unfold the boom wings until the boom is in the working position. 5. Lower the entire boom to the desired height. IMPORTANT: DO NOT lower boom to the full down position. There must be a minimum of 1-1/2 of hydraulic lift cylinder shaft showing before the suspension can work properly. 4. Flush with clean water. 5. Dispose of the cleaning solution properly according to local regulatory agency requirements. 9. Hydraulic Boom Operation Three types of hydraulically operated booms are available. They are EF Booms, EFT Booms and HC Booms. ^ DANGER To avoid personal injury or death, KEEP clear of ALL electrical power lines when operating sprayer or when folding or unfolding booms. 1 - Transport Lock 2 - Hydraulic Lift Cylinder 66


67 9..2 EFT Boom After the sprayer booms have been unfolded and lowered to the correct height, tilt the boom wings using the following procedure: 1. Flip the wing tilt switch on the control box to the tilt position. 2. Using the tractor hydraulic controls tilt the individual wings up or down to the desired position. a. The tractor control for the single hose control will tilt the left wing. b. The tractor control for the dual hose control will tilt the right wing HC Boom The HC Boom uses five separate hydraulic cylinders which allow the operator maximum control of the boom. Boom components are controlled independently with the boom control box mounted on the tractor. The switches on the control box operate the following boom functions: The Yellow middle switch control raises or lowers the complete boom. The Blue switch controls the folding of wings IN or OUT depending on the position of the switch. The RIGHT and LEFT switches, control the tilt of their respective wing UP or DOWN. 1 - Wing Tilt Switch Fold the boom using the following procedure: NOTE: For EFT booms, level both boom wings before proceeding. 1. Raise the boom to the full lift height. 2. Fold the boom inward until the boom is over the top of the transport rest. 3. Place the tractor in park and/or set the brakes and stop the engine. 4. Remove the transport lock from the storage position on the boom stabilizer arm and put in place on the hydraulic lift cylinder. Control Box The HC Boom controls are designed for a tractor with a open or closed center hydraulic system. Refer to page 2 HC Boom Hydraulic Hose and Electrical Connections for a detailed explanation of the hydraulic settings. Whenever the HC boom is in use, the tractor hydraulic valve on the tractor MUST be locked open to assure a constant supply of oil to the cylinder valve control bank at the back of the sprayer. 5. Restart the tractor and lower the boom on to the boom transport rest. Cylinder Valve Control Bank Transport Lock In Storage Position On Boom Stabilizer Arm 67
68 10. Service And Maintenance ^ Review the Operator s Manual and all safety items before working with, maintaining or operating the sprayer. ^ Lower machine to the ground, place all controls in neutral, stop engine, set park brake, remove ignition key, and wait for all moving parts to stop before servicing, adjusting, repairing or unplugging. ^ Follow good shop practices: Keep service area clean and dry. Be sure electrical outlets and tools are properly grounded. Use adequate light for the job at hand. dirt, moisture and other contaminants Daily Lubrication Interval PTO Shaft There are a total of 8 grease fittings on the PTO assembly. Grease with a high quality grease before starting work each day or after every 8 hours of operation. Clean and grease PTO shaft before each prolonged period of nonuse. Grease the shield tubes to prevent seizing. Follow any other service instructions from the manufacturer. ^ Before applying pressure to a hydraulic system, make sure all components are tight, hoses and couplings are in good condition. ^ Relieve pressure from hydraulic circuit before servicing or disconnecting from tractor. ^ Keep hands, feet, clothing and hair away from all moving and/or rotating parts. 1 - Grease Fittings PTO Shaft ^ Clear the area of bystanders, especially children, when carrying out any maintenance and repairs or making any adjustments or filling. ^ Place stands or blocks under the frame before working beneath the machine or when changing tires. ^ Be sure all guards are in place and secured when maintenance work is completed. Sprayer Pump ^ Warning ALWAYS replace any shielding after any servicing or lubrication of the pump. NEVER operate the sprayer unless ALL shielding is in place and secure. Contact with rotating parts can cause death or personal injury. ^ Use only tools, jacks and hoists of sufficient capacity for the job Service Fluids And Lubricants 1. Grease: Use an SAE multi-purpose high temperature grease with extreme pressure (EP) performance. Also acceptable is an SAE multi-purpose lithium base grease. 2. Storing Lubricants: Your machine can operate at top efficiency only if clean lubricants are used. Use clean containers to handle all lubricants. Store them in an area protected from dust, 68 Your sprayer may be equipped with one of several pumps. To help assure proper lubrication, refer to the pump owner s manual for detailed lubrication information Weekly Lubrication Interval EF & EFT Boom Primary and Secondary Boom Pivot Points Lubricate ALL the pivot points on each side of the boom assembly using a good quality grease. Clean off grease fittings before attaching grease gun. Wipe up any excess grease when finished. NOTE: There are a total of 9 grease fittings on the EF boom assembly and 11 grease fittings on the EFT boom assembly.


69 1 - Grease Fitting Boom Pivots Upper Boom Pivots Secondary Boom 1 - Grease Fitting EF & EFT Boom Center Boom Mounting Arm Pivot Points Lubricate ALL the pivot points on each mounting arm and the center pivot using a good quality grease. The center pivot is located directly behind the slow moving vehicle (SMV) emblem. Clean off grease fittings before attaching grease gun. Wipe up any excess grease when finished. Boom Pivots Lower EF Boom 1 - Grease Fitting Boom Pivot Center 1 - Grease Fitting Boom Pivots Lower EF Boom 1 - Grease Fittings 69 Mounting Arm Pivots (Left and Right Sides) 1 - Grease Fitting


 1 - Grease Fittings 1 - Grease Fitting")


 1 - Grease Fitting Boom Pivots (Three on")
70 HC Boom Lubricate ALL the pivot points on each side of the boom assembly using a good quality grease. Clean off grease fittings before attaching grease gun. Wipe up any excess grease when finished. 1 - Grease Fitting Secondary Boom Wing Pivot Point (Three at Top) 1 - Grease Fittings 1 - Grease Fitting Boom Tower Slides (HC Boom Only) Weekly lubricate the boom tower slides with liquid graphite. If operating in extremely dusty conditions, shorten the lubrication interval as required. Secondary Boom Wing Pivot Point (One at Lower Pivot on each side) 1 - Grease Fitting Boom Pivots (Three on each side of sprayer). 1 - Boom Tower Slides 1 - Grease Fitting
71 Hour Lubrication Interval Wheel Bearings Every 0 hours (or yearly), repack the wheel bearings using a good quality wheel bearing grease Maintenance General Repair or replace damaged or broken parts immediately. Check all safety and operating decals. If any decals are illegible or missing, replace any decals immediately. DO NOT operate sprayer with missing or damaged decals. Refer to the Safety Decal section of this manual for all safety decal locations. Refer to your parts manual for all operating decals Fasteners After the first hour of use, check all the fasteners and tighten any found to be loose. Thereafter, check all fasteners periodically and tighten as required Tire Pressure Check the tire pressure daily. The recommended tire pressure is: ply tires psi ply tires... psi ply tires psi Filters Remove and clean the water filters daily. Clean the filters on the optional foam marking system at intervals as specified in the foam system owner s manual. IMPORTANT: Always wear gloves and eye protection while servicing the sprayer. To manually clean the self cleaning filter: 6. Remove the canister from the filter head by rotating counter clockwise. 7. Rinse the canister and screen in clean water. 8. Before reinstalling the canister to the filter head, lubricate the canister O-ring with clean engine oil. Reinstall the canister and hand tighten only. 9. Connect the bypass hose to the bottom of the filter, open the bypass and agitation valves. Open the emergency shut off valve at the bottom of the product tank. 10. Start the sprayer pump with water in the tank and check for leaks. 11. This procedure also applies to sprayer equipped with the standard filter Sprayer Tips Refer to the information Spray Tip Wear for tip cleaning Storing and Winterizing Storing your sprayer properly during the off season will help reduce the time needed to get the sprayer ready for the next spraying season. If at all possible, store your prayer in a dry building to protect it from the harmful effects of the weather. Ultraviolet light in the sun s rays softens and weakens rubber used for hoses and tires. ^ Warning Wear protective clothing (such as goggles, rubber or chemical resistant gloves and a respirator) while handling or working with chemicals. Keep protective clothing clean and in good condition or discard. IMPORTANT: It is very important that you thoroughly clean the sprayer inside and out. Cleaning the Inside of the sprayer 1. Make sure the product pump is turned OFF. 2. Close the emergency shut off valve under the product tank. 3. Make sure the agitation valve and self cleaning filter bypass agitation valve are both closed. 4. Place a clean empty container under the filter base to catch any water and chemicals. 5. Very carefully disconnect the bypass line from the bottom of the filter and allow the water and chemicals to flow into the container Add about gallons of clean water along with a Neutralizing agent into the sprayer product tank. Refer to Cleaning the Sprayer in this manual. 2. Start the product pump and run at rated volume. 3. Open and close ALL valves on the sprayer to ensure you have clean water through the entire system. NOTE: The pressure gauge hose is supplied from the rear of the sprayer and is a dead end circuit. The following procedure is recommended for cleaning.
72 a. With the sprayer pump turned off, carefully remove the pressure line from the bottom of the pressure gauge. b. Hold the end of the hose above a bucket and have an assistant start the sprayer pump momentarily at an idle ONLY. Leave run at idle until clean liquid comes out of the hose. Be careful of any splash back in the bucket. c. Stop the sprayer pump and reattach the hose to the gauge. 4. Spray liquid out through the boom at a proper location. Manually drain as much water as possible. Dispose of liquid properly. 5. Check entire sprayer for worn or damaged components. Replace as necessary. 6. Add approximately gallons of environmentally safe antifreeze suitable for the climate in your area. 7..Start the product pump and run at rated volume. 8. Open and close ALL valves on the sprayer to ensure you have clean antifreeze through the entire system. NOTE: The pressure gauge hose is supplied from the rear of the sprayer and is a dead end circuit. The following procedure is recommended for winterizing. a. With the sprayer pump turned off, carefully remove the pressure line from the bottom of the pressure gauge. b. Hold the end of the hose above a bucket and have an assistant start the sprayer pump momentarily at an idle ONLY. Leave run at idle until clean antifreeze comes out of the hose. Be careful of any splash back in the bucket. c. Stop the sprayer pump and reattach the hose to the gauge. 9. Turn on the boom until antifreeze begins spraying from the spray tips. Shut off the sprayer and let the antifreeze remain in the system. 1. Remove the in-line filter bowl at the bottom of the tank and flush tank with warm water. 2. Replace the filter bowl. Fill the tank with at least 2 gallons of hot water. Turn on the machine and allow to run out each side until no foam is generated. Repeat if necessary. 3. Add RV type antifreeze to the tank. Do not use windshield washer fluid because it can clog the foamer. 4. Turn on machine until antifreeze solution reaches each foamhead. 5. Check the air and liquid lines for holes and replace as required. Be sure to flush and drain all liquid from the system prior to storage in freezing temperatures Cleaning the outside of the sprayer 1. Thoroughly clean the outside of the sprayer with soap and water until all surfaces are clean. A high pressure washer would help this process. 2. Paint all scratched or rusty surfaces. 3. Check all safety decals, reflectors and lights that they are in good condition and function properly. Replace or repair as needed. 4. Grease and lubricate all fittings and slide areas. Refer to the Lubrication section of this manual Boom Adjustments HC Boom Only Boom Slides The poly slides on the boom tend to wear over time. Adjust the pressure on the poly slides as needed to compensate for wear. To adjust the pressure on the poly slide pads, locate the large locknuts (located by each pad) on the tank side of the slide tower. Tighten the locknuts to increase the pressure on the poly slide pads. Tighten all the pads equally Chemical Inductor Be sure to drain the chemical inductor system, flush with clean water then run environmentally safe antifreeze (RV antifreeze) through the system. Open all inductor valves to insure antifreeze has been run through the entire inductor system Foam Marker IMPORTANT: The liquid lines and tank must be drained completely prior to storage. If liquid in this system is allowed to freeze, several components may be damaged. 72 Boom Breakaways The tension of the boom breakaways should be checked and adjusted as needed. If the tension on the breakaways is too great, the boom may be damaged if it strikes a stationary object. Tightening the nuts on the extension spring for the breakaway increases the tension. Turning the nuts out decreases the tension. The springs are located between the primary and secondary boom wings.


, the wing assemblies can be raised or lowered.")

73 Boom Level If the boom does not hang level, secure the boom with an overhead hoist or other suitable means. Loosen the six nuts on the bolts which hold the boom to the tower slides. These bolts fit through slotted holes. Level the boom and retighten the nuts EF & EFT Boom Only Boom Level If the entire boom is not level side to side adjust the threaded rod and spring assembly at the rear of the center boom. Tighten the locknuts after adjustment is complete. Boom Wing Alignment Align boom inner and outer wings with the parallel connecting link. Remove the pin from the clevis on the end of the link. Turn the clevis in or out on the threaded shaft until the link is properly aligned. Reinstall the pin. 1 - Threaded Rod and Spring Assembly Boom Wing Assembly Alignment If the wing assemblies are not aligned (up or down), the wing assemblies can be raised or lowered. Secure the boom wing assembly with an overhead hoist or other suitable means. Loosen the four nuts at the pivot between the center boom and the primary boom wing. Use the overhead hoist to level the boom wing assembly. Tighten the four nuts securely. 1 - Tower Slides 2 - Boom Level Adjustment Bolts (Three Per Slide) 1 - Boom Wing Level Adjustment Nuts 3 - Extension Springs 4 - Spring Anchor 5 - Adjustment Nuts Boom Wing Fold Out Adjustment If the secondary boom wings do not unfold properly, with the boom in the folded position, adjust the turnbuckle at the rear of the primary boom wing until the cable is tight. Recheck the boom breakaway tension and adjust if necessary. 73

. Adjust as required. Tighten the locknuts against the turnbuckle when complete.")
74 1 - Boom Fold Out Turnbuckle Boom Breakaways The tension of the boom breakaways should be checked and adjusted as needed. If the tension on the breakaways is too great, the boom may be damaged if it strikes a stationary object. Adjust the tension as needed by turning the turnbuckles located on the front side of the boom wings (when boom is completely unfolded). Adjust as required. Tighten the locknuts against the turnbuckle when complete. 1 - Boom Breakaway Turnbuckle 74
75 10.5 Service Record See Lubrication and Maintenance for details of service. Copy this page to continue record. Action Code: CL Clean L Lubricate Item 8 hours Or Daily L Flip Wing Hinges L Inner Wing Hinges CL Strainer Screen L Tool Bar Parallel Linkage Hours Serviced By Annually L Wheel Bearings CL Wash Machine 75
76 11. Troubleshooting Following are troubleshooting guides to help you solve common operating problems. If you have difficulty resolving operating problems, call your dealer for assistance. PROBLEM POSSIBLE CAUSE SOLUTION No pressure in spray system Air leak in suction line Tighten clamps, check hoses for cracks or breaks Dirty or clogged filter Clean filter Kinked hose Straighten hose, route hose for gradual bends Pump not primed Prime pump (see priming pump and pump owners manual) Water not flowing from tank Empty tank; refill Check tank outlet; clear debris if any Make sure emergency shut off valve is open Make sure throttling valve is open Pump is defective; repair or replace Spray system pressure low Primary filter beginning to plug Clean filter Pressure regulating or throttling valve Adjust valve out of adjustment Spray tips to large Verify spray tip size Speed to slow Increase travel speed Pump running to slow Increase pump speed Erratic spray system pressure Air leaks in suction line Tighten clamp; check hoses for cracks or breaks Tank getting empty Refill tank Vacuum developing in tank Remove tank cover; clean tank vent Spray system pressure can t be regulated Pressure regulating valve not working Check electric wiring to valve; tighten electrical connections Replace valve if defective Spray system pressure increasing Tips plugging Clean tips Tip screens plugging Clean screens In line filter plugging Clean in line filter Application rate to low Sprayer not calibrated properly Calibrate sprayer Speed sensor not calibrated correctly Calibrate speed sensor Spray tip to small Verify spray tip size No pressure in spray system Air leak in suction line Tighten clamps, check hoses for cracks or breaks Dirty or clogged filter Clean filter Kinked hose Straighten hose, route hose for gradual bends Pump not primed Prime pump (see priming pump and pump owners manual) Water not flowing from tank Empty tank; refill Check tank outlet; clear debris if any Make sure emergency shut off valve is open Make sure throttling valve is open Pump is defective; repair or replace 76
77 PROBLEM POSSIBLE CAUSE SOLUTION Spray system pressure low Primary filter beginning to plug Clean filter Pressure regulating or throttling valve Adjust valve out of adjustment Spray tips to large Verify spray tip size Speed to slow Increase travel speed Pump running to slow Increase pump speed Erratic spray system pressure Air leaks in suction line Tighten clamp; check hoses for cracks or breaks Tank getting empty Refill tank Vacuum developing in tank Remove tank cover; clean tank vent Spray system pressure can t be regulated Pressure regulating valve not working Check electric wiring to valve; tighten electrical connections Replace valve if defective Spray system pressure increasing Tips plugging Clean tips Tip screens plugging Clean screens In line filter plugging Clean in line filter Application rate to low Sprayer not calibrated properly Calibrate sprayer Speed sensor not calibrated correctly Calibrate speed sensor Spray tip to small Verify spray tip size RAVEN Controller No speed reading Blown out fuse Check and replace fuse Poor wire connection or bad wire Clean and check connection Check for break in wire Speed reading to slow or to fast Wrong calibration number Verify calibration number SP-1 or SP-2 setting wrong SP-1 Wheel drive SP-2 Radar gun Verify setting - See RAVEN owners manual No rate in rate window Flow meter not working Check connections and wires Check for foreign material in rotor Check transducer See RAVEN owners manual for instructions Rate will not change or adjust Regulating valve not working Check connections and wiring Check for foreign material in valve See RAVEN owners manual for instructions Nozzle output not equal Tips plugging Clean tips Tip screens plugging Clean screens In line filter plugging Clean in line filter Nozzle check valve sticky or swollen Clean or replace check valve Boom section output not equal ON/OFF valve not opening completely Clean or replace ON/OFF valve Boom section will not turn on No signal from control box Check connections and wires for breaks Circuit breaker released in ON/OFF boom ball valve Poor tank agitation Agitation valve closed Open valve Agitation valve not completely open Open valve Unplug ON/OFF valve connection on sprayer for one minute and replug 77
78 PROBLEM POSSIBLE CAUSE SOLUTION Poor tank agitation (cont.) Self cleaning filter ON/OFF valve not Open valve open Plugged agitation nozzle(s) Clean nozzles Hydraulic drive pump keeps stopping To much oil flow from tractor Reduce oil flow from tractor See pump owners manual for details EF & EFT Boom Boom bounces excessively Low pressure in accumulator See dealer for service Field to rough Slow down Weak shock absorber Replace shock absorber Boom settles Bad seals in lift cylinder Replace seals Tractor hydraulic valve leaks Replace seals in valve Boom not level Coil spring out of adjustment Adjust coil spring Boom wing sagging Adjust top boom wing support HC Boom Boom bounces excessively Weak S-Tine(s) Replace S-Tine(s) Weak shock absorbers Replace shock absorbers Field to rough Slow down Tower slides out of adjustment or worn Adjust tower slide and/or replace Boom not level Tower slides out of adjustment Adjust tower slide Boom settles or creeps up Bad cylinder seals Replace seals Dirt in HC valve block spool Clean spool 78
79 12. Specifications 12.1 Mechanical Dimensions BW0/45 BW7/ Length 17' 17 Width Field Transport 45' 8' 1'' ' 9' 1'' Transport Height 8' 4'' 8' 4'' Tank Capacity 0 Gal. 7 Gal. Tires ply ply psi psi ply 42 psi Empty Weight Of Unit (lbs) Loaded Tongue Weight (lbs) Transport Field Specifications subject to change without notice 12.2 Hydraulic Fitting Torque Tightening flare type tube fittings* 1. Check flare and flare seat for defects that might cause leakage. 2. Align tube with fitting before tightening. 3. Lubricate connection and hand tighten swivel nut until snug. 4. To prevent twisting tubes or hoses, use two wrenches. Place one wrench on connector body and with second wrench tighten swivel nut to torque shown. *Torque values shown are based on lubricated connections. 00 est. 16 est. 79
80 Bolt Size Dry lb-ft N m SAE Torque-Tension Values Grade 2 Grade 5 Grade 8 Lubricated lb-ft N m Dry lb-ft N m Lubricated lb-ft N m Dry lb-ft N m Lubricated lb-ft N m 1/4-6 (9) 5 (6) 10 (13) 7 (10) 14 (19) 10 (14) 1/4-6 (8) 4 (6) 8 (11) 6 (9) 12 () 9 (12) 5/ (17) 9 (13) 19 (23) 14 () 27 (37) () 5/16-11 (15) 8 (11) 17 (24) 12 () (33) () 3/ (31) 17 (23) 35 (48) 26 (36) 49 (59) 37 (44) 3/8-16 (27) 15 () 31 (42) 23 (31) 44 (59) 32 (44) 7/16-36 (48) 27 (36) 55 (75) 41 (56) 78 (106) 58 (79) 7/ (43) 24 (33) 49 (67) 37 () (95) 52 (71) 1/2-55 (75) 41 (56) 85 (115) 64 (86) 1 (163) 90 (122) 1/ (66) 37 () 75 (102) 57 (77) 106 (144) 80 (108) 9/16-78 (106) 59 (80) 121 (164) 91 (123) 171 (232) 1 (174) 9/16-12 (95) 53 (72) 109 (148) 82 (111) 154 (9) 115 (156) 5/8-110 (149) 82 (111) 1 (231) 127 (172) 2 (326) 0 (244) 5/ (132) 73 (99) 1 (4) 113 (153) 212 (8) 159 (216) 3/ (261) 144 (195) 297 (3) 223 (3) 4 (5) 315 (427) 3/ (233) 129 (175) 269 (365) 1 (273) 376 (510) 2 (383) (955) 5 (716) 995 (13) 746 (1012) (874) 483 (655) 909 (1233) 681 (924) Bolt Size Dry lb-ft N m Metric Torque-Tension Values Class 4 8 Class 4 8 Class 4 9 Class 4 9 Lubricated lb-ft N m Dry lb-ft N m Lubricated lb-ft N m Dry lb-ft N m Lubricated lb-ft N m Dry lb-ft N m Lubricated lb-ft N m M6 4.7 (3.5) 6 (4.5) 8.9 (6.5) 11.3 (8.5) 13 (9.5) 16.5 (12) 15.5 (11.5) 19.5 (14.5) M (8.5) 14.5 (10.5) 22 (16) 27.5 () 32 (23.5) (29.5) 37 (27.5) 47 (37) M10 23 (17) 29 (21) 43 (32) 55 () 63 (46) 80 (59) 75 (55) 95 () M12 (29.5) (37) 75 (55) 95 () 110 (80) 1 (105) 1 (95) 165 (1) M14 63 (46) 80 (59) 1 (88) 1 (110) 175 (1) 2 (165) 5 (1) 2 (190) M (74) 1 (92) 190 (1) 2 (175) 275 (0) 3 (5) 3 (235) 0 (0) M 135 (100) 1 (1) 265 (195) 3 (245) 375 (275) 475 (3) 4 (3) 5 (410) M 190 (1) 245 (0) 375 (275) 475 (3) 5 (390) 675 (0) 6 (4) 790 (580) M (195) 3 (245) 510 (375) 6 (480) 7 (535) 9 (680) 8 (6) 1080 (800) M24 3 (245) 4 (315) 6 (480) 8 (0) 9 (680) 11 (8) 1080 (800) 13 (1000) 80
81 12.3 Raven Console Calibration Information 81
82 13. Optional Accessories 13.1 Fence Line Kit(s) The fence line kit(s) are an optional accessory. There are three different styles of fence row kits available: Manual ON/OFF valve Electric solenoid ON/OFF valve Electric Ball ON/OFF valve You may order a fence line nozzle for the left, right or both sides of the boom. (Right side is the most common). Manual Fence Row Nozzle Operation: 1. Before operating sprayer, with the boom unfolded, adjust the spray body to the desired position (located at end of spray boom). 2. With the spray boom turned OFF walk to the end of the boom and turn ON the fence row nozzle valve. When handle is at a right angle from the valve it is in the OFF position. 3. Start the sprayer and spray as normal. 4. When finished turn OFF the boom, stop the tractor and walk to the end of the boom and turn OFF the fence row nozzle valve. 5. Resume spraying as normal. Electric Fence Row Nozzle Operation: 1. Before operating sprayer, with the boom unfolded, adjust the spray body to the desired position (located at end of spray boom). 2. Locate the electric switch marked Fence Row located on the sprayer control panel. 3. This switch can be turned ON or OFF at any time. You will have the ability to spray with this nozzle if the boom is turned ON or OFF. NOTE: The Electric Fence Row Nozzle is supplied with a non drip check valve to prevent the line from draining. 82
83 Notes 83

84 Fast Sprayers County Road 44 Mountain Lake, MN Toll Free Voice Fax BW0 and BW7 Part #963 Trailer Sprayer Operation Manual 84 Released 2/06/14
TRAILER SPRAYER MODEL: 500 BW OPERATOR'S MANUAL DO NOT OPERATE THIS EQUIPMENT UNTIL THIS MANUAL HAS BEEN READ AND UNDERSTOOD.
 TRAILER SPRAYER MODEL: 500 BW OPERATOR'S MANUAL DO NOT OPERATE THIS EQUIPMENT UNTIL THIS MANUAL HAS BEEN READ AND UNDERSTOOD. Part Number: 07.09145D November 2007 MILLER-ST.NAZIANZ,INC. P.O. BOX 127 ST.
W & A 12 ROW TOP LEVELING STACKER LEVEL BANDER
 W & A 12 ROW TOP LEVELING STACKER LEVEL BANDER NO. 3640 OPERATOR S MANUAL TO THE OWNER: Congratulations on your purchase of a new W & A Top Leveling Stacker Level Bander. Your selection is an indication
W & A 12 ROW TOP LEVELING STACKER LEVEL BANDER
 W & A 12 ROW TOP LEVELING STACKER LEVEL BANDER NO. 3640 OPERATOR S MANUAL TO THE OWNER: Congratulations on your purchase of a new W & A Top Leveling Stacker Level Bander. Your selection is an indication
MK AUGERS POWER SWING KIT ASSEMBLY & OPERATION MANUAL
 MK AUGERS POWER SWING KIT ASSEMBLY & OPERATION MANUAL Read this manual before using product. Failure to follow instructions and safety precautions can result in serious injury, death, or property damage.
LIQUID FERTILIZER APPLICATOR 8100 SERIES SINGLE AND DOUBLE BAR MODELS
 Single Bar Double Bar LIQUID FERTILIZER APPLICATOR 8100 SERIES SINGLE AND DOUBLE BAR MODELS OPERATOR'S MANUAL LIMITED WARRANTY Fast Distributing Inc. warrants to the buyer that the new machinery is free
AG SHIELD. 12 Cross Auger for MacDon FD 70 headers FD70 35 foot asm part# FD70 40 foot asm part# OPERATOR S HANDBOOK AND PARTS MANUAL
 AG SHIELD 12 Cross Auger for MacDon FD 70 headers FD70 35 foot asm part# 405767 FD70 40 foot asm part# 405769 OPERATOR S HANDBOOK AND PARTS MANUAL Ag Shield Manufacturing Box 9, Benito, Manitoba R0L 0C0
Mulcher Operators Manual
 Mulcher Operators Manual Skid Pro Attachments PO Box 982 Alexandria, MN 56308 October 2015 1 2 Contents 1. Introduction And Warranty... 4 1.1 Introduction... 4 1.2 Warranty... 4 2. Component Identification...
Two-Stage Snow Blower For 4WD Pick Up Trucks. Operator s Manual
 Two-Stage Snow Blower For 4WD Pick Up Trucks Operator s Manual Distrubuted by: Metal Fabricating LLC P.O. Box 831 Brodheadsville, PA 18322 Phone: 570-992-9989 SnowVac.com WARRANTY POLICY Metal Fabricating
610 BUSHEL MANURE SPREADER
 610 BUSHEL MANURE SPREADER RODA MANUFACTURING 1008 LOCUST ST. HULL, IA. 51239 Art s-way Manufacturing 712-439-2366 Co., Inc. Hwy 9 West - PO Box 288 WWW.RODAMFG.COM Armstrong, IA. 50514 U.S.A 2 INTRODUCTION
OPERATOR S MANUAL. 20-bu 3-Point Hitch Material Collection System. LP65048 Supplier ST /07/2017 English. North American Edition Printed in USA
 OPERATOR S MANUAL 20-bu 3-Point Hitch Material Collection System LP65048 Supplier ST48289 11/07/2017 English North American Edition Printed in USA Introduction Using Your Operator s Manual Read this entire
Smart-Till. Models ST101, ST151, ST203, and ST303. HCC, inc st Avenue Mendota, IL
 Owners Manual Smart-Till Models ST101, ST151, ST203, and ST303 HCC, inc. 1501 1st Avenue Mendota, IL 61342 815-539-9371 www.hccincorporated.com C-1159 May 2010 Safety Most work related accidents are caused
SAC Liquid Manure Flow Meter
 LM300000 REV A 11/11/2009 QUALITY PEOPLE, QUALITY PRODUCTS SAC Liquid Manure Flow Meter Operation and Service Manual ASSEMBLY CALIBRATION OPERATION REPLACEMENT PARTS READ complete manual CAREFULLY BEFORE
W & A RIGID PULVAMIZER MODEL NO & 3544 OPERATOR S MANUAL
 W & A RIGID PULVAMIZER MODEL NO. 3504 & 3544 OPERATOR S MANUAL TO THE OWNER: Congratulations on your purchase of a new W & A Rigid Pulvamizer. Your selection is an indication of your awareness of the need
ENGINE DRIVEN ROTARY MOWER
 ENGINE DRIVEN ROTARY MOWER Operation, Service & Parts Manual For Models ERM-413, 416, & 617 April 2009 Form: ERMHydMower TABLE OF CONTENTS SECTION DESCRIPTION...PAGE 1 Introduction... 1 2 Preparation...2
Predelivery Instructions
 Predelivery Instructions TSF1080, TSF1090, TSF1280 and TSF1290 Front Fold Boom Sprayer Manufacturing, Inc. www.greatplainsmfg.com! Read the operator s manual entirely. When you see this symbol, the subsequent
GRAIN BELT CONVEYOR 1300, 1500, 1800, 2000, 2400 SERIES ( ) OPERATION MANUAL
 OPERATION MANUAL") GRAIN BELT CONVEYOR 1300, 1500, 1800, 2000, 2400 SERIES (30-120 ) OPERATION MANUAL This manual applies to the following models: 1335, 1340, 1345, 1355 1535, 1540, 1545, 1550, 1555, 1565, 1575, 1585, 1590,
GRAIN BELT CONVEYOR 1300, 1500, 1800, 2000, 2400 SERIES (30-120 ) OPERATION MANUAL This manual applies to the following models: 1335, 1340, 1345, 1355 1535, 1540, 1545, 1550, 1555, 1565, 1575, 1585, 1590,
Walker Loader Bucket OPERATOR S AND PARTS MANUAL
 Walker Loader Bucket OPERATOR S AND PARTS MANUAL Please Read and Save These Instructions For Safety, Read all Safety and Operation Instructions Prior To Operating Machine P/N 6690 TABLE OF CONTENTS Introduction
OPERATION MANUAL DBW Bale Wagon DFW Feeder Wagon
 OPERATION MANUAL DBW Bale Wagon DFW Feeder Wagon To the Owner/Operator/Dealer All implements with moving parts are potentially hazardous. There is no substitute for a cautious, safe-minded operator who
Operator s/parts Manual
 Operator s/parts Manual 3-Point Solid Stand Drills Pull Hitch Package Manufacturing, Inc. P.O. Box 5060 Salina, Kansas 67402-5060! Read the operator s manual entirely. When you see this symbol, the subsequent
E Q U I P M E N T 1302 K ROAD MINDEN, NE
 Snout Cone 2018 DISTRIBUTED BY E Q U I P M E N T 1302 K ROAD MINDEN, NE 68959 1-800-264-6587 WWW.PATRIOTEQUIP.COM SAFETY AND OPERATION RULES...3 SAFETY ALERT SYMBOL...4 LIGHTING AND MARKING...4 SAFETY
Operator s Manual and Assembly
 Operator s Manual and Assembly Published: Mar 24, 2017 Manual Part No. AH02-00-MAN Gatco Manufacturing Inc. www.gatcomfg.com Location: 2524 South Service Road West, Swift Current, SK, Canada Mail: Box
LOG CHOP. Hydraulic Wood Guillotine. Owners Illustrated Instruction Book & Parts List
 LOG CHOP Hydraulic Wood Guillotine Owners Illustrated Instruction Book & Parts List Grovebury Road, Leighton Buzzard, Bedfordshire. LU7 4UX. UK. Tel:01525 375157. Fax:01525 385222. Email: enquires@brownsagricultural.co.uk
25 BUSHEL MANURE SPREADER
 25 BUSHEL MANURE SPREADER RODA MANUFACTURING 338 MAIN ST. HULL, IA. 51239 Art s-way Manufacturing 712-439-2366 Co., Inc. Hwy 9 West - PO Box 288 WWW.RODAMFG.COM Armstrong, IA. 50514 U.S.A 2 INTRODUCTION
LEWIS WINDROWER OWNER / OPERATOR MANUAL
 LEWIS WINDROWER OWNER / OPERATOR MANUAL MODEL # WR-1 WINDROWER Manufactured by: LEWIS BROTHERS MANUFACTURING, INC. Post Office Box 146 Baxley, GA 31513 Tel: (912) 367-4651 Fax: (912) 367-3958 2-21-14 1
BRAKE ASSIST SYSTEM INSERT SHEET
 BRAKE ASSIST SYSTEM INSERT SHEET 246779 v1.1 DEGELMAN INDUSTRIES LTD. BOX 830-272 INDUSTRIAL DRIVE, REGINA, SK, CANADA, S4P 3B1 FAX 306.543.2140 PH 306.543.4447 1.800.667.3545 DEGELMAN.COM M28 & M34 MANURE
OPERATORS MANUAL FOR KAFURTER ROTARY TOPPERS MODELS: TP110, TP140, TP160, TP170
 OPERATORS MANUAL FOR KAFURTER ROTARY TOPPERS MODELS: TP110, TP140, TP160, TP170 SAFETY WARNING: Do not use or operate this this manual and assembly instructions (where applicable) has been read and understood.
FRONT MOUNT CENTER PIVOT SUSPENDED BOOM FIELD SPRAYER FM9400 SERIES
 FRONT MOUNT CENTER PIVOT SUSPENDED BOOM FIELD SPRAYER FM9400 SERIES OPERATOR'S MANUAL LIMITED WARRANTY Fast Distributing Inc. warrants to the buyer that the new machinery is free from defects in material
BUCKET SWEEPER OPERATORS & PARTS MANUAL 2852 & 3174 SERIES
 OM628 BUCKET SWEEPER OPERATORS & PARTS MANUAL 2852 & 3174 SERIES MODEL 12002-5 FOOT WIDE X 24 INCH DIAMETER (SKID-STEER) MODEL 12004-6 FOOT WIDE X 24 INCH DIAMETER (SKID-STEER) MODEL 12017-6 FOOT WIDE
3800 SERIES SINGLE HYDRAULIC LOCKING TOOLBAR
 3800 SERIES SINGLE HYDRAULIC LOCKING TOOLBAR 2565-774_REV_D 02/2018 OPERATOR S MANUAL PART IDENTIFICATION YETTER MANUFACTURING CO. FOUNDED 1930 Colchester, IL 62326-0358 Toll free: 800/447-5777 309/776-3222
OVER CONVEYOR OPERATOR'S MANUAL HYDRAULIC AND ELECTRIC MODEL DOSNH
 CONVEY-ALL Electric Hydraulic DRIVE OVER CONVEYOR OPERATOR'S MANUAL HYDRAULIC AND ELECTRIC MODEL DOSNH 1426 LIMITED WARRANTY Convey-All warrants to the buyer that the new machinery is free from defects
BEFORE YOU START!! Read the safety messages on the implement as shown in your manual. Observe the rules of safety and common sense!
 To the Owner/Operator/Dealer All implements with moving parts are potentially hazardous. There is no substitute for a cautious, safe-minded operator who recognizes the potential hazards and follows reasonable
CONVEY-ALL. Swing Away. Standard
 CONVEY-ALL Swing Away Standard BELT TUBE CONVEYOR OPERATOR'S MANUAL TCH MODELS 35', 45', 70' & 85' TC MODELS 35', 45', 55', 65', 70', 75', 80' & 85' LIMITED WARRANTY Convey-All warrants to the buyer that
Operator and Parts Manual. Power Mover
 Operator and Parts Manual Power Mover 042010 26089 Table of Contents - Power Mover Table of Contents Introduction...4 Safety...5 Safety...5 General Safety...6 Start-up Safety...6 Operation Safety...6
Operator s Manual. Go Galvanized! YOU'RE ALWAYS AHEAD...WITH A MODERN BEHIND.
 SUMMER 2008 C2 tilting grader blade Operator s Manual YOU'RE ALWAYS AHEAD...WITH A MODERN BEHIND. 003-5336 003-5342 003-5531 003-5544 P.O. Box 790 Beaumont, Tx 77704 409.833.2665 1.800.231.8198 Fax: 409.726.8333
Coulter Applicator. Operator s & Parts Manual R0 Printed In The USA Specifications & Design Subject To Change Without Notice!
 Coulter Applicator Operator s & Parts Manual 4-15-18 17-011R0 Printed In The USA Specifications & Design Subject To Change Without Notice! Warranty Information This equipment was carefully designed and
Owner s Manual. Instructions for Assembly, Testing, Operation, and Servicing. Trailer Kit: High speed upgrade kit used with Item# WARNING
 M268176D.1 ITEM NUMBER: 268176 SERIAL NUMBER: Owner s Manual Instructions for Assembly, Testing, Operation, and Servicing Trailer Kit: High speed upgrade kit used with Item# 268175 WARNING READ and UNDERSTAND
Owners Manual
 11202 38th St S, Horace, ND 58047 372-772 Owners Manual ****IMPORTANT NOTE**** ****REPLACING SCREENS**** WHEN FACING THE MACHINE AT THE HOPPER END, IT IS IMPORTANT TO PUT THE SCREENS IN SO THAT THE OUTSIDE
Swing-Away Grain Auger
 Swing-Away Grain Auger MKX 100 Operator s Manual This manual applies to: MKX 100-53, MKX 100-63, MKX 100-73, MKX 100-83 Original Instructions Read this manual before using product. Failure to follow instructions
LOG SPLITTER. Heavy Duty PTO Driven. Owners Illustrated Instruction Book & Parts List
 LOG SPLITTER Heavy Duty PTO Driven Owners Illustrated Instruction Book & Parts List Grovebury Road, Leighton Buzzard, Bedfordshire. LU7 4UX. UK. Tel:01525 375157. Fax:01525 385222. Email: enquires@brownsagricultural.co.uk
TIRE & WHEEL SERVICING CAN BE DANGEROUS! MOUNTING/DISMOUNTING MUST BE DONE BY TRAINED PERSONNEL ONLY!
 Index Scale Manual Warranty Form Tire Warning Message -------------------------------------------------------------- page 2 Introduction-----------------------------------------------------------------------------
tRIPr Chief Grain Cart. Operator s Manual. Operator s Manual
 125-000-01 125-000-01 1tRIPr 1tRIPr Operator s Manual 1210 Chief Grain Cart Operator s Manual Operator s Manual TO THE DEALER Predelivery/Delivery Checklist 1210 Grain Cart PREDELIVERY/DELIVERY CHECKLIST
Poultry House Sprayer
 Poultry House Sprayer Operator s & Parts Manual 5-10-09 09-02R1 Printed In The USA Specifications & Design Subject To Change Without Notice Warranty Information A Message To The Owner And Operator This
Operator s Manual. Go Galvanized! YOU'RE ALWAYS AHEAD...WITH A MODERN BEHIND.
 fall 2010 3pt & quick attach Bale spears & 3pt bale carrier Operator s Manual YOU'RE ALWAYS AHEAD...WITH A MODERN BEHIND. 318-1006-i 318-1005-i 020-1500 020-1502 P.O. Box 790 Beaumont, Tx 77704 409.833.2665
AG SHIELD. 12 Cross Auger for MacDon Flex headers 30ft 974- asm part # ft 974- asm part # OPERATOR S HANDBOOK AND PARTS MANUAL
 AG SHIELD 12 Cross Auger for MacDon Flex headers 30ft 974- asm part # 405884 36ft 974- asm part # 405881 OPERATOR S HANDBOOK AND PARTS MANUAL Ag Shield Manufacturing Box 9, Benito, Manitoba R0L 0C0 phone
DURABILT INDUSTRIES, LLC
 DURABILT INDUSTRIES, LLC Pocahontas, AR 72455 Phone: 870-892-4501 www.durabiltindustries.com 1 To the Owner/Operator/Dealer All implements with moving parts are potentially hazardous. There is no substitute
Operator s Manual. Ground Drive Fertilizer Spreader PTS PTS-160
 Operator s Manual Ground Drive Fertilizer Spreader PTS-100 - PTS-160 Publication #: April 2009 TABLE OF CONTENTS INTRODUCTION... 1 SAFETY... 1 SAFETY SIGNAL WORDS... 2 GENERAL SAFETY GUIDELINES... 2 SAFETY
OPERATOR S MANUAL. 3 cu. ft Salt Spreader X700 Click N Go Model. LP67403 Supplier ST /28/2016 English. North American Edition Printed in USA
 OPERATOR S MANUAL 3 cu. ft Salt Spreader X700 Click N Go Model LP67403 Supplier ST50665 12/28/2016 English North American Edition Printed in USA Introduction Using Your Operator s Manual Read this entire
Log Splitter. Owner/Operator Manual. Models HCWP1-26
 Log Splitter Owner/Operator Manual Models HCWP1-26 SAFETY..........................2 SAFETY WARNING SYMBOL.........3 SAFETY RULES.................. 4-5 SPECIFICATIONS................. 6 CONTROLS AND FEATURES.......
OWNER S, INSTALLATION AND PARTS MANUAL
 OWNER S, INSTALLATION AND PARTS MANUAL QUICK HITCH CONVERSION KIT CONVERTS 24/MT TO 26 SERIES HITCH FOR PLOW SERIAL NUMBERS AFTER 24G100000 24D100000 MTD200000 MTG200000 2005 Sno-Way International 97101198A
OPERATOR AND PARTS MANUAL
 OPERATOR AND PARTS MANUAL Backsaver Auger Models 684 &604 0806 FK370 Revision 3 6990633 (-3) Printed in U.S.A. Bobcat Company 03 0603 Rev 8866496 Table of Contents - Backsaver Auger 684 & 604 TABLE OF
Patriot Pivot Track Closer TM Owners Manual
 Patriot Pivot Track Closer TM Owners Manual Manufactured by Minden Machine Shop Inc. 1302 K Road Minden NE 68959 1-800 264-6587 Patriot Pivot Track Closer Serial # Date of Purchase TABLE OF CONTENTS TABLE
3-Pt. Quick Hitch. Owner s Manual
 3-Pt. Quick Hitch Owner s Manual WARNING: Read carefully and understand all ASSEMBLY AND OPERATION INSTRUCTIONS before operating. Failure to follow the safety rules and other basic safety precautions may
180 Lake Ave North Paynesville, MN Phone: (320) MASTER MANUFACTURING MASTER GARDNER
 MASTER MANUFACTURING MASTER GARDNER") 180 Lake Ave North Paynesville, MN 56362 Phone: (320) 340-6464 www.master-mfg.com MASTER MANUFACTURING MASTER GARDNER Part Number PCD-E3-009B-MM July 2017 Note: Do not return product to the distributor/dealer
180 Lake Ave North Paynesville, MN 56362 Phone: (320) 340-6464 www.master-mfg.com MASTER MANUFACTURING MASTER GARDNER Part Number PCD-E3-009B-MM July 2017 Note: Do not return product to the distributor/dealer
OPERATOR AND PARTS MANUAL. Snowblower. Model 5010, 6010, FK312
 OPERATOR AND PARTS MANUAL Snowblower Model 5010, 6010, 6610 032016 FK312 5010, 6010, 6610 Table Of Contents Manufacturer s Statement: For technical reasons, Buhler Industries Inc. reserves the right to
71 South 215 West - Rupert ID, Phone: (208) Fax: (208)
 Fax: (208)") 71 South 215 West - Rupert ID, 83350 Phone: (208) 436-1770 Fax: (208) 436-1776 www.norwest-mfg.com Norwest Pivot Track Filler OWNER S MANUAL 71 SOUTH 215 WEST RUPERT, IDAHO 83350 Phone: (208) 436-1770
71 South 215 West - Rupert ID, 83350 Phone: (208) 436-1770 Fax: (208) 436-1776 www.norwest-mfg.com Norwest Pivot Track Filler OWNER S MANUAL 71 SOUTH 215 WEST RUPERT, IDAHO 83350 Phone: (208) 436-1770
ROTARY RAKE OPERATOR'S MANUAL
 MODEL 1150 ROTARY RAKE OPERATOR'S MANUAL DO NOT OPERATE THIS EQUIPMENT UNTIL THIS MANUAL HAS BEEN READ AND UNDERSTOOD. Part Number: 17.00801C May 2005 Miller-St. Nazianz, Inc. P.O. Box 127 St. Nazianz,
3-Pt. Boom Pole. Owner s Manual
 3-Pt. Boom Pole Owner s Manual WARNING: Read carefully and understand all ASSEMBLY AND OPERATION INSTRUCTIONS before operating. Failure to follow the safety rules and other basic safety precautions may
GRADING SCRAPERS INDUSTRIAL SERIES OPERATION, SERVICE & PARTS MANUAL FOR MODELS: GSI7-SS, GSI7, GSI8, GSI10, & GSI12.
 GRADING SCRAPERS INDUSTRIAL SERIES OPERATION, SERVICE & PARTS MANUAL FOR MODELS: GSI7-SS, GSI7, GSI8, GSI10, & GSI12 September 2006 FORM: IndGradingScrpr.QXD TABLE OF CONTENTS Safety Information......................1-2
NEERALTA GRAIN BAGGER
 NEERALTA GRAIN BAGGER OPERATOR'S MANUAL GRAIN BAGGER WARRANTY POLICY The warranty policy begins upon delivery of the unit to the original customer. Neeralta Manufacturing Inc. (hereafter referred to as
OPERATOR AND PARTS MANUAL
 OPERATOR AND PARTS MANUAL Vortex Tedder 17 & 19 052016 R0002 6990633 (1-13) Printed in U.S.A. Bobcat Company 2013 062013 Rev 1 88664296 Table of Contents - 17 & 19 Vortex Tedder TABLE OF CONTENTS Manufacturer
MidCap Rake MCR8 MCR10 MCR12
 MidCap Rake MCR8 MCR10 MCR12 Operator s Manual Counter Balance Valves for Steady Single Side Raking Model MCR8 3 Collection width Settings Individual Spring Adjustment THIS MANUAL MUST BE READ AND UNDERSTOOD
X-SERIES 13" AUGERS X130-74, X130-84, X ASSEMBLY AND OPERATION MANUAL
 X-SERIES 13" AUGERS ASSEMBLY AND OPERATION MANUAL ORIGINAL INSTRUCTIONS Read this manual before using product. Failure to follow instructions and safety precautions can result in serious injury, death,
Operator and Parts Manual. Tandem Disc. 4490N Model - Medium Duty - 3 Section
 Operator and Parts Manual Tandem Disc 4490N Model - Medium Duty - 3 Section 052011 88705164 Table of Contents - 4490N Tandem Disc Table of Contents Introduction...5 Safety...6 Safety Instructions...6
WARRANTY REGISTRATION AND POLICY
 WARRANTY REGISTRATION AND POLICY Buhler Manufacturing products are warranted for a period of twelve (12) months from original date of purchase, by original purchaser, to be free from defects in material
CAM-LIFT WHEEL MOVE KIT 1500-SERIES S-DRIVE STANDARD CONVEYORS ASSEMBLY MANUAL
 CAM-LIFT WHEEL MOVE KIT ASSEMBLY MANUAL This manual applies to the following models: 1565, 1575, 1585, 1590, 15100 ORIGINAL INSTRUCTIONS Read this manual before using product. Failure to follow instructions
OPERATOR AND PARTS MANUAL. Fertilizer Applicator Model Rev
 OPERATOR AND PARTS MANUAL Fertilizer Applicator Model 460 03206 88663040 6990633 (-3) Printed in U.S.A. Bobcat Company 203 06203 Rev 88664296 Table of Contents - Fertilizer Applicator 460 TABLE OF CONTENTS
OPERATOR AND PARTS MANUAL. Snowblower. Model 500, 600, FK311
 OPERATOR AND PARTS MANUAL Snowblower Model 500, 600, 660 062017 FK311 500, 600, 660 Table Of Contents Manufacturer s Statement: For technical reasons, Buhler Industries Inc. reserves the right to modify
Trench Filler for Compact Utility Loaders
 Form No. 3353-608 Rev A Trench Filler for Compact Utility Loaders Model No. 22472 260000001 and Up Operator s Manual Register your product at www.toro.com Original Instructions (EN) Contents Page Introduction................................
TABLE OF CONTENTS DESCRIPTION. Safety Instructions & Safety Sign Locations Operating Instructions Assembly Instructions...
 TABLE OF CONTENTS DESCRIPTION PAGE Warranty... 1 Safety Instructions & Safety Sign Locations... 2 Operating Instructions... 3 Assembly Instructions... 5 500 & 600 Snowblower Drawings... 8 500 & 600 Snowblower
Tube-Line Techno-Bale 960. Operator's Manual
 Tube-Line Techno-Bale 960 Operator's Manual One- Year Manufacturer's Warranty For Normal Use With The Exception Of Tires If the Equipment does not function properly, or if a piece is defective due to a
CLAMP-ON BUCKET FORKS
 CLAMP-ON BUCKET FORKS OPERATOR'S MANUAL MODELS BF-1000, BF-2000, BF-3000, BF-4000 & BF-6000 MANUFACTURER'S LIMITED WARRANTY Manufacturer warrants to original Purchaser that its product is free from major
TUBE CONVEYOR with PADDLE BELT Models: TCP-1645, TCP-1640, TCP-1635, TCP-1630,TCP-1625, TCP-1620
 TUBE CONVEYOR with PADDLE BELT Models: TCP-1645, TCP-1640, TCP-1635, TCP-1630,TCP-1625, TCP-1620 OPERATOR S MANUAL LIMITED WARRANTY Convey-All warrants to the buyer that the new machinery is free from
OPERATOR'S MANUAL Drawn Box Scraper LL1208 LL1210 LL1212 LL1 2_ 5DDP00538_5_1_09
 OPERATOR'S MANUAL Drawn Box Scraper LL1208 LL1210 LL1212 LL1 2_ 5DDP00538_5_1_09 TO THE DEALER: Assembly and proper installation of this product is the responsibility of the Frontier dealer. Read manual
TIRE & WHEEL SERVICING CAN BE DANGEROUS! MOUNTING/DISMOUNTING MUST BE DONE BY TRAINED PERSONNEL ONLY!
 Index Scale Manual Warranty Form Tire Warning Message -------------------------------------------------------------- page 2 Introduction-----------------------------------------------------------------------------
Printed in Canada - 6/28/16 REV 2 -Part No
 12 Cross Auger for Honey Bee Headers: 25 ft (ASM # 405801); 30ft (# 405802); 36ft (# 405803); 39ft (# 405811); 40ft (# 405810); 42ft (# 405812) Direct Drive OPERATOR S HANDBOOK AND PARTS MANUAL Ag Shield
HIGH-CLEARANCE CENTER PIVOT SUSPENDED BOOM 3 PT. FIELD SPRAYER 9553P 9573P SERIES
 HIGH-CLEARANCE CENTER PIVOT SUSPENDED BOOM 3 PT. FIELD SPRAYER 9553P 9573P SERIES OPERATOR'S MANUAL 1 LIMITED WARRANTY Fast Manufacturing Inc.. warrants to the buyer that the new machinery is free from
MT2000 HYDRAULIC SWATH ROLLER COMMON HYDRAULIC ASSEMBLY INSTRUCTIONS Kit Part No
 Free Form PLASTICS MT2000 HYDRAULIC SWATH ROLLER COMMON HYDRAULIC ASSEMBLY INSTRUCTIONS Kit Part No. 7101-02 ASSEMBLY INSTRUCTIONS & OPERATION EFFECTIVE S/N: 39632SR01 - DATE It is recommended to carefully
MT2000 HYDRAULIC SWATH ROLLER MODEL - MACDON M150/M200 SERIES & JOHN DEERE W150
 MT2000 HYDRAULIC SWATH ROLLER MODEL - MACDON M150/M200 SERIES & JOHN DEERE W150 ASSEMBLY INSTRUCTIONS & OPERATION EFFECTIVE S/N: 39632SR01 - DATE View an installation on our Youtube Channel! It is recommended
Hose Reel Kit for Multi-Pro 1200 and 1250 Sprayers. Installation Instructions. Form No Model No Serial No.
 Hose Reel Kit for Multi-Pro 00 and 50 Sprayers Model No. Serial No. 000000 and Up Form No. 9-8 Installation Instructions Installation Important You will need to purchase Teflon tape before installing this
FORAGE BOX MODEL 5300 REAR UNLOAD OPERATOR'S MANUAL DO NOT OPERATE THIS EQUIPMENT UNTIL THIS MANUAL HAS BEEN READ AND UNDERSTOOD.
 FORAGE BOX MODEL 5300 REAR UNLOAD OPERATOR'S MANUAL DO NOT OPERATE THIS EQUIPMENT UNTIL THIS MANUAL HAS BEEN READ AND UNDERSTOOD. Miller-St. Nazianz, Inc. Art s-way Manufacturing Co., Inc. P.O. Box 127
SUNDOWN Operation. & Parts Manual. for Box Blade Models BB15-48, 60 BB20-48, 60, 72 BB30-60, 72, 84, & 96
 SUNDOWN Operation & Parts Manual for Box Blade Models BB15-48, 60 BB20-48, 60, 72 BB30-60, 72, 84, & 96 Operations and Parts Manual Table of Contents Section Page Table of Contents 2 Retail Customer Responsibility
OWNER S MANUAL 40 LAWN AERATOR SAT-40 BH. Assembly Installation Operation Repair Parts. Visit us on the web! MODEL:
 OWNER S MANUAL 40 LAWN AERATOR MODEL: SAT-40 BH Assembly Installation Operation Repair Parts For the latest product updates & setup tips: Visit us on the web! www.brinly.com Important: This manual contains
DRILL 2300 SAFETY SECTION
 DRILL 2300 SAFETY SECTION RECOGNIZE SAFETY ALERT SYMBOL WARNING: KEEP RIDERS OFF UNIT Riding on any agricultural equipment is very dangerous. People can be killed or seriously injured when accidentally
Prime Attachments & Custom Fab Brush Mower Owners/Operators Manual
 Prime Attachments & Custom Fab Brush Mower Owners/Operators Manual The operator is responsible for the safe operation and maintenance of the machine. It is important that anyone who uses the machine is
INSTALLATION MANUAL SWS
 INSTALLATION MANUAL SWS 30-30 Gallon Auxiliary Tank FOR RVB1500, 2000, 2500 SPREADERS Sno-Way, Down Pressure and EIS are registered trademarks of Sno-Way International, Inc. ProControl, MegaBlade, V-Wing,
1000-lb Hydraulic Truck Crane
 1000-lb Hydraulic Truck Crane Owner s Manual WARNING: Read carefully and understand all ASSEMBLY AND OPERATION INSTRUCTIONS before operating. Failure to follow the safety rules and other basic safety precautions
4745 Drill OWNER'S MANUAL (06-08) #
 #") 4745 Drill OWNER'S MANUAL (06-08) # 605865 Identification Your CrustBuster drill is identified by a Serial Number and Model Number. Record these numbers in the spaces provided in this manual and refer
4745 Drill OWNER'S MANUAL (06-08) # 605865 Identification Your CrustBuster drill is identified by a Serial Number and Model Number. Record these numbers in the spaces provided in this manual and refer
BEFCO. Operator s Manual BABY HOP & HOP FERTILIZER SPREADERS ACCESSORIES SIDE ROW DISCHARGE. AA4-120 (fits models Hop 209 & 212) DEFLECTOR
 DEFLECTOR") BEFCO Operator s Manual BABY HOP & HOP FERTILIZER SPREADERS ACCESSORIES SIDE ROW DISCHARGE AA-0 (fits models Hop 09 & ) DEFLECTOR AA-0 (fits models Baby Hop 0 & 06) 009-95 (fits models Hop 0 & 06) 009-968
BEFCO Operator s Manual BABY HOP & HOP FERTILIZER SPREADERS ACCESSORIES SIDE ROW DISCHARGE AA-0 (fits models Hop 09 & ) DEFLECTOR AA-0 (fits models Baby Hop 0 & 06) 009-95 (fits models Hop 0 & 06) 009-968
MAYO SCOOPER HOG CO VEYOR MODEL 1000 SERIES
 MAYO SCOOPER HOG CO VEYOR MODEL 1000 SERIES OPERATOR'S MANUAL MAYO MANUFACTURING, INC. LIMITED WARRANTY THE FOLLOWING WARRANTIES FOR MACHINERY, EQUIPMENT OR PARTS SOLD BY MAYO MANU- FACTURING, INC. ARE
OPERATOR S MANUAL REPAIR PARTS CATALOG. Models: SCP-51 & SCP-71 SCP-52 & SCP-72 SCP-91 & SCP-111 SCP-92 & SCP-112 BRILLION FARM EQUIPMENT
 OPERATOR S MANUAL REPAIR PARTS CATALOG Subsoil Chisel Plow Models: SCP-51 & SCP-71 SCP-52 & SCP-72 SCP-91 & SCP-111 SCP-92 & SCP-112 IMPORTANT! Repairs cannot be purchased retail direct from factory. Order
OPERATOR AND PARTS MANUAL
 OPERATOR AND PARTS MANUAL Square Bale Carrier Model 4480 204 FK83000068 6990633 (-3) Printed in U.S.A. Bobcat Company 203 06203 Rev 88664296 Table of Contents - Square Bale Carrier 4480 TABLE OF CONTENTS
Model No. LG55-3PT 55 Gallon Sprayer 3 Point Lawn & Garden Sprayer Model No. LG27-3PT 25 Gallon Sprayer GENERAL INFORMATION
 5300587 Model No. LG27-3PT 25 Gallon Sprayer 5300576 Model No. LG55-3PT 55 Gallon Sprayer 3 Point Lawn & Garden Sprayer Join the center boom to the carrier frame with the two u-bolts, and flange locknuts.
MAYO TOTE BAG FILLER
 Single Unit Double Unit MAYO TOTE BAG FILLER OPERATOR'S MANUAL MAYO MANUFACTURING, INC. LIMITED WARRANTY THE FOLLOWING WARRANTIES FOR MACHINERY, EQUIPMENT OR PARTS SOLD BY MAYO MANU- FACTURING, INC. ARE
R T SERIES ROTARY TILLER
 R T SERIES ROTARY TILLER Operating and Maintenance Manual TABLE OF CONTENTS 1. PRODUCT WARRANTY. 3 2. CHECKLIST Dealer s File Copy. 4 Customer s File Copy.. 5 3. INTRODUCTION 6 4. SPECIFICATIONS.. 7 5.
CRUSTBUSTER OWNER / OPERATOR MANUAL
 CRUSTBUSTER OWNER / OPERATOR MANUAL MODEL # CB-1 CRUSTBUSTER Manufactured by: LEWIS BROTHERS MANUFACTURING, INC. Post Office Box 146 Baxley, GA 31513 Tel: (912) 367-4651 Fax: (912) 367-3958 5-2-17 1 INTRODUCTION
4" UTILITY GRAIN AUGERS
 4" UTILITY GRAIN AUGERS OPERATION & ASSEMBLY MANUAL Read this manual before using product. Failure to follow instructions and safety precautions can result in serious injury, death, or property damage.
DURABILT INDUSTRIES, LLC
 DURABILT INDUSTRIES, LLC Pocahontas, AR 72455 Phone: 870-892-4501 www.durabiltindustries.com 1 To the Owner/Operator/Dealer All implements with moving parts are potentially hazardous. There is no substitute
OWNER S, INSTALLATION AND PARTS MANUAL
 OWNER S, INSTALLATION AND PARTS MANUAL QUICK HITCH CONVERSION KIT CONVERTS ST TO 22 SERIES HITCH FOR PLOW SERIAL NUMBERS AFTER STD100000 STG100000 2006 Sno-Way International 97101306A TABLE OF CONTENTS
RAPID ROLLER OPERATOR S MANUAL. L&C ENTERPRISES - U.S.A, Inc N.75 Drive, Escanaba, MI OWNER S NAME MODEL
 RAPID ROLLER OPERATOR S MANUAL OWNER S NAME MODEL SERIAL NUMBER DATE OF PURCHASE L&C ENTERPRISES - U.S.A, Inc. 6652 N.75 Drive, Escanaba, MI 49829 906-786-1008 1-866-786-1009 LIMITED WARRANTY L&C Enterprises-USA,
POST HOLE DIGGER. Operation, Service & Parts Manual For Models D20 & D40. FORM: D20_40DigRev.QXD
 POST HOLE DIGGER Operation, Service & Parts Manual For Models D20 & D40 FORM: D20_40DigRev.QXD September 2006 Revised August 2009 TABLE OF CONTENTS Introduction.............................1 Preparation..............................2