OWNER S MANUAL. Hawk Dirt Bike. Minimum age requirement: 16
|
|
|
- Lenard Pearson
- 6 years ago
- Views:
Transcription

1 OWNER S MANUAL Hawk Dirt Bike Minimum age requirement: 16 Always wear a helmet; It could save your Life! This manual should be considered as a permanent part of the vehicle and should remain with the vehicle when resold or otherwise transferred to a new user or operator. The manual contains important safety information and instructions which should be read carefully before operating the vehicle.
2 Introduction Congratulations on your purchase of the Ricky Power Sports LLC Hawk 250cc Dirt Bike. Take time to understand how your motorcycle works before riding. Scheduled service is a must and it is important to follow the break-in guidelines and pre-ride instructions. Make certain that you read the warranty coverage information provided and understand your responsibilities. If you have any questions, comment or concerns contact Ricky Power Sports, LLC at All information, illustrations, photographs and specifications contained in this manual are based on the latest product information available at the time of publication. Due to improvements or other changes, there will be some discrepancies in this manual. We reserve the right to make product changes at any time, without notice and without incurring any obligation to make the same or similar changes to the vehicle previously built or sold. Safety The most important thing to remember is your safety and the safety of others. We have included procedures and labels to help you make safe informed decisions. This information is provided to make you aware of potential hazards that could hurt you and/or others. It is impossible to warn you of ALL potential hazards so you must use your own best judgement. The following are different kinds of safety information you will find in this manual: Safety Labels - On your bike Safety Messages - Warning, Caution and Danger The meaning of Warning, Caution and Danger Safety Messages: Death or serious injury CAN occur if proper instructions are not followed. Death or serious injury WILL occur if proper instructions are not followed. You CAN be hurt if proper instructions are not followed. II
3 Contents Warranty... Pg. 1 Safety Information... Pg. 2 Safety Labels... Pg. 3 Component Locations... Pg. 4 Indicators... Pg. 6 Controls... Pg. 7 Before Riding... Pg. 10 Pre-ride Inspection... Pg. 11 Loading Guidelines and Load Limits... Pg. 12 Starting Procedures... Pg. 13 Starting and Stopping Engine... Pg. 14 Shifting Gears... Pg. 15 Braking... Pg. 16 Parking... Pg. 17 Maintenance Safety... Pg. 18 Tool Kit and Owner s Manual Storage... Pg. 24 Side Cover Removal... Pg. 24 Fuel... Pg. 25 Fuel and Engine Oil... Pg. 26 Air Cleaner... Pg. 30 Crankcase Breather and Throttle... Pg. 31 Clutch... Pg. 32 Engine Idle Speed... Pg. 34 Spark Plug... Pg. 35 Suspension... Pg.36 Brakes... Pg. 37 Tires... Pg.39 Drive Chain... Pg. 41 Battery... Pg. 44 Appearance Care...Pg. 46 Vehicle Identification...Pg. 47 Specifications...Pg. 48 Wire Diagram...Pg. 51 Emission Control System Warranty... Pg. 52 III
4 Warranty Congratulations on your purchase of the Ricky Power Sports, LLC Hawk 250cc Dirt Bike. It is warranted to be free of manufacturing defects in the material of workmanship for a period of 90 days from the date of purchase. During the warranty period Ricky Power Sports, LLC will at its option repair, provide replacement parts or replace your Ricky Power Sports, LLC Hawk 250cc Dirt Bike at no charge. This warranty does not cover normal wear items or damage caused by neglect or misuse of the product. Engine Warranty - 90 days Frame Warranty - 90 days Warranty is void if: Frame is bent or broken due to abuse. Wheels are bent or broken. Fender bent of broken due to abuse. Any sign of impact, accident, jumping, spin-outs or roll over. Ricky Power Sports, LLC is not liable for any damage claim or liability claim person or otherwise resulting from the operation of this product in any way. Should you experience a problem or need to return your Ricky Power Sports, LLC Hawk 250cc dirt bike for repair, please call the Ricky Power Sports, LLC customer service department TOLL FREE at You will be instructed how to proceed. A COPY OF THE SALE RECEIPT IS REQUIRED. 1
5 Safety Information This user s manual contains important safety and maintenance information. Read it carefully before riding. Failure to follow the warnings contained in this manual could result in INJURY or DEATH. ALWAYS WEAR A HELMET The operator and passenger (if any) of this vehicle should always wear a helmet approved by agencies such as the Department of Transportation (DOT), Safety Helmet Council of America (SHCA), or Snell Memorial Foundation (SNELL). Most accident fatalities are due to head injuries. The operator should also wear face shields or goggles, boots or closed-toe shoes, gloves and other appropriate protective clothing. TAKE TIME TO LEARN AND PRACTICE Take time to get to know this vehicle. The operator s ability to operate this bike safely is largely dependent upon the operator s ability to exercise proper judgment. The operator must be of sufficient age, understanding, mental capacity, and physical capability to safely operate this vehicle. This vehicle should only be operated after sufficient practice in a decongested area. Safe operation includes responsibility for the safety of a passenger (if any). We recommend that any inexperienced driver should take a certified course approved by the Motorcycle Safety Foundation (MSF). RIDE DEFENSIVELY A common accident happens when a car suddenly moves into your lane. Most motorcycle collisions happen when a car turns left in front of a motorcycle. Pay extra attention to other vehicles around you, never expect that they can see you. MAKE YOURSELF VISIBLE Make yourself more visible by wearing bright reflective clothing. Use your horn when it helps others see you and before turning use your turn signal. RIDE WITHIN YOUR LIMITS You should not ride beyond your abilities and never faster than the posted speed limit. NEVER OPERATE THIS VEHICLE WHILE UNDER THE INFLUENCE OF ALCOHOL, DRUGS OR MEDICATION OF ANY KIND. SUCH OPERATION COULD BE DANGEROUS TO YOURSELF AND/OR OTHERS. KEEP YOUR VEHICLE IN A SAFE CONDITION Proper maintenance will ensure a safe ride. Perform all recommended maintenance and inspect your vehicle before each ride. Never modify your vehicle in any way to make it unsafe. 2


6 Safety Labels The safety labels on your motorcycle provide you with important information do not remove them. If a label becomes too difficult to read or comes off contact Ricky Power Sports, LLC for replacements. 3

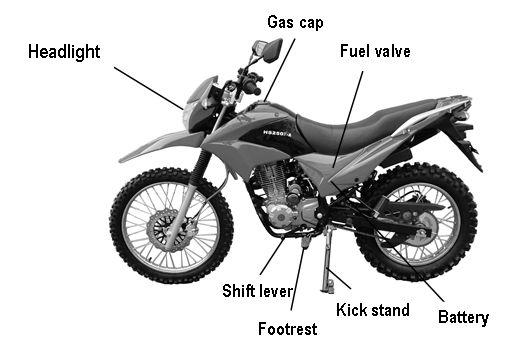
7 Components Locations 4
8 5

9 Indicators The indicators on your motorcycle help make you aware of possible issues, refer to them often. Speedometer - Shows the speed you are traveling miles per hour. Odometer - Tracks the total miles driven. Trip meter - Tracks the total miles driven on your trip. High beam indicator - Illuminates when hi beam lights are on. Turn signal indicator - Flashes when left/right turn signal is on. Neutral indicator - Illuminates when transmission is in neutral. Oil level indicator - Flashes when oil is low. Trip meter reset know - Turn this knob to reset the trip meter. 6

10 Controls FUEL VALVE Fuel valve - Used to control the flow of gasoline from the fuel tank to the carburetor. ON - gasoline can flow to the carburetor. OFF - gasoline cannot flow to the carburetor. RES - gasoline can flow to the carburetor when you have run out of gas in the gas tank. Make sure to refuel as soon as possible. 7


11 Controls IGNITION SWITCH START BUTTON AND ENGINE STOP SWITCH Start button - Pushing the start button will start the engine. When button is pressed in the start motor will crank the engine, See starting procedures. Engine stop switch- In case of an emergency and a quick stop is necessary turn switch to the OFF position. This switch must be in the RUN position in order to start the vehicle, and should remain in this position even while the engine is off. If you leave ignition switch on and engine stop switch off, the lights will stay on, causing the battery to lose life. 8


12 Controls HEADLIGHT DIMMER SWITCH, TURN SIGNAL SWITCH AND HORN TRIP METER RESET Trip meter reset knob- By turning the knob counter clockwise you can reset the trip meter to zero (0). 9
13 Before Riding Before your first ride on your new motorcycle we strongly recommend you: Read the owner s manual. Understand all safety labels. Know how to operate all controls. Before you ride each time, make sure: You are in good physical and mental health. You are wearing protective gear (helmet, clothing, eye protection etc.) If you have a passenger, be sure also having protective wears for passenger. You do not have ANY alcohol or drugs in your system. Protective Clothing For your protection we urge you to ALWAYS wear protective clothing. The proper clothes can protect you from injury. Wear an approved motorcycle helmet, goggles, a good pair of gloves, strong boots that cover the ankle, long pants, and a long sleeve shirt every time you ride. Helmets and Eye protection A DOT approved motorcycle helmet is the most important part of your protective gear. A DOT approved motorcycle helmet can help prevent a serious head injury. Choose a helmet that fits snug. Motorcycle dealers can help in selecting a good quality helmet which fits properly. 10
 and others around you.")
14 Pre-Ride Inspection Before each ride check the condition of your bike to make sure that it does not have mechanical problems. Your motorcycle should always be in good riding condition to ensure the safety of you, your passenger (if any) and others around you. Be sure to check the following items before each ride: BRAKES - Press on the brake pedal and hold in brake lever to ensure that the brakes are operating correctly. THROTTLE - Rotate the throttle handle to ensure it moves smoothly. LEAKS and LOOSE ENDS - Check all hoses for leaks and cables that may be loose. LIGHTS - Be sure that your headlight, tail light, brake light and turn signals are working properly. CHAIN - Check the condition. Adjust the slack (if any) and lubricate (if needed). TIRES - Use an air pressure gauge to check the pressure. If needed add air. Look for excessive wear or damage. If you are riding with a passenger or carrying cargo check: LOAD LIMIT - Do not exceed the load limit. CARGO - Secure all cargo. REAR SUSPENSION - Adjust the suspension according to the weight of the load you are carrying. Make certain that you keep with the Periodic maintenance (see periodic maintenance section). 11
: 331 lbs (150kg) Maximum cargo weight: 25lbs (10kg) Loading guidelines Improper loading of your bike may affect")

15 Loading guidelines and load limits Your bike has been designed to carry you and one passenger. When a passenger is riding with you there will be a difference in the acceleration and braking. Load Limits Maximum weight capacity (including rider, passenger, accessories and cargo): 331 lbs (150kg) Maximum cargo weight: 25lbs (10kg) Loading guidelines Improper loading of your bike may affect your stability. With the motorcycle properly loaded always ride at a reduced speed. If you have questions about carrying cargo contact Ricky Power Sports LLC. for advice. Check the following when carrying a passenger or cargo: Both tires are properly inflated. Rear suspension may need adjusting. Secure all cargo. Balance cargo weight Do not attach large or heavy items to the front of your bike. Starting and Stopping the Engine Always follow proper starting procedures. 12
16 Starting procedures Insert key hexagon into the groove turning anti-clockwise to OPEN Insert key into ignition, turn to ON position. Make sure the transmission is in the NEUTRAL position. Turn the engine stop switch to RUN. Turn fuel valve to ON. If you are restarting a warm engine, follow procedure for High Air Temperature. Normal Air Temperature : 10º -35ºC (50º -95ºF) Starting and Stopping the Engine High Air Temperature: 35ºC (95ºF) or above DO NOT OPEN CHOKE 1) Slightly open throttle 2) Start engine Low Air Temperature : 10ºC (50ºF) or below 1) Follow Normal Air Temperature procedures ) After RPM s pick up, open the choke to keep fast idle. 3) Keep warming the engine until it responds to the throttle when choke is closed. NOTICE: Extensive use of the choke can cause damage to the piston and cylinder wall. Fast idling for more than 5 minutes at Normal Air Temperature can cause exhaust pipe discoloration. Flooded Engine The engine may be flooded with extra gasoline, if it does not start after several attempts. Try the following to clear a flooded engine: 1) Turn the engine stop switch to the OFF position. 2) Close the choke lever. 3) Open the throttle completely. 4) Push and hold in the start button for 5 seconds. 5) Wait 10 seconds and turn the engine stop switch to the RUN position. Next, follow the High Air Temperature starting procedures. 13
17 Starting and Stopping the Engine, Shifting Gears How to stop the engine Normal Engine Stop Shift into neutral and turn the ignition switch OFF. DO NOT leave the ignition switch ON while the engine stop switch if OFF, this will allow the lights to stay ON causing the battery to loose life. Emergency Engine Stop If an emergency stop is necessary, use the engine stop switch. Simply press the emergency stop switch to OFF. Shifting Gears Your bike is equipped with a cable-operated clutch. It has five forward gears, one down and four up. Tips for learning how to shift for the inexperienced rider: Shift while moving a straight line. Let loose on the throttle and pull in clutch lever completely before shifting (improper shifting may cause damage to the engine). Recognize the engaging point when you release the clutch lever. 14
18 Shifting Gears Tips for learning how to shift for the inexperienced rider (continued): Reduce the throttle or shift to a higher gear before engine RPM s get too high. Shift to a lower gear before the engine RPM s get too low. When the engine RPM s are too high do not downshift to slow your bike, this could cause damage. Do not coast or tow your motorcycle for a long period of time while the engine is off. If your speed drops below 9mph (15km/h) pull in clutch lever and shift down to 1st gear or stalling can occur. Recommended shift point To get the best fuel economy possible ride in the highest gear that allows the engine to run and accelerate the smoothest. Shifting up from: 1st to 2nd - 12mph (20km/h) 2nd to 3rd - 19mph (30km/h) 3rd to 4th - 25mph (40km/h) 4th to 5th - 31mph (50km/h) Shifting down from: 5th to 4th - 22mph (35km/h) 4th to 3rd - 16mph (25km/h) 15
19 Braking Your bike is equipped with a hand operated front hydraulic disc brake and a foot operated rear hydraulic disc brake. Your front brake provides 70% of your braking power. By using both front and rear brakes you will achieve faster, more stable and effective braking. To slow down or stop your bike apply front and rear brakes while down shifting. Slowly increase brake as you feel your speed reduce. In order to prevent stalling, pull in clutch lever before stopping completely. If you apply you brakes too abruptly you may lock the wheels, slide and loose control of your bike. If this should happen, release the brakes and steer straight until you have completely regained control. Before making a turn, reduce your speed. Try not to brake or close the throttle too quickly while turning or you may loose control of your bike. When traveling down a steep grade, reduce your speed by down shifting rather than braking. Applying your brakes for a long period of time can reduce their effectiveness. You should never ride with your foot resting on the brake pedal or you hand on the brake lever. This mat causes your brakes to overheat and indicate false braking to other motorist s. 16
20 Parking Try, when possible, to park on level ground. If you have no paved surface to park on, make sure the ground is firm. If it is necessary for you to park on a hill, position your rear wheel against the curb at an angle and leave the transmission in gear. While parked, use the side stand for support. - Use your foot to guide the side stand down. - Put something solid under the side stand if you must park on a soft surface. Theft-Prevention tips You should park your bike in a garage if possible, otherwise make certain to park in a well lit area. Never leave the ignition key with the bike. You should invest in a good quality anti-theft device that will secure your bike to a stationary object. Keep the owner s manual, registration and insurance with the bike to help authorities find you if it has been stolen and recovered. Servicing your bike This section is provided to help you keep your bike in good running condition. The following table provides you with the three types of inspections recommended for your bike. Type of inspection/ service When to perform? Who performs? Pre-ride inspection Before every ride You Maintenance schedule Interval on schedule Service Center It is essential to your safety that you keep your bike well maintained. A properly maintained bike will help protect your investment, avoid break-downs and assure having maximum performance. The maintenance of your motorcycle is YOUR responsibility. In the event of an accident have a service center inspect ALL parts even if they appear to be undamaged. 17
21 Maintenance Safety This section will instruct you on how to perform some important routine maintenance. You can perform many of these tasks with the tools provided with the motorcycle. The more difficult tasks, such as wheel removal, should be performed by a professional technician. If you do not feel capable of performing any one task do not hesitate to contact your local service center for help. Important Safety Precautions Always turn the engine off before performing any maintenance or repairs. Let the engine cool before touching any related parts. Do not touch any moving parts while engine is running. Make sure you have the tools and skills required before performing any maintenance repairs. Use the side stand or maintenance stand to prevent the bike from falling over. Keep cigarettes, sparks, and flames away from all fuel-related parts. Use a non-flammable solvent when cleaning parts. Keep in mind that your local service center is equipped with the proper tools and knowledge to help service your bike. If necessary please contact them to ensure greater quality and reliability. 18
22 Maintenance Safety Including the regular maintenance and pre-ride inspection, perform the periodic checks once a month and once a week if you ride frequently. Check the odometer and perform any scheduled maintenance necessary. Tires - Check the air pressure and add air if needed. Check for any excessive wear on the tread. Check for any damage that may have occurred. Check the rims and spokes for any possible damage. Fluids - Check the level of engine oil. Check the level of the brake fluid. Add the correct fluids if necessary. Lights - Check the headlight, brake light, tail light and turn signals. Make certain they all work properly. Free play - Check the clutch lever, rear brake pedal and throttle grip. Drive Chain - Check the condition, adjust the slack and lubricate if necessary. Fuses - Always have spare fuses. Nut and bolts - Check all nuts and bolts, tighten if needed. 19
23 Maintenance Schedule This portion of the manual will tell you how often to perform maintenance. The maintenance schedule is based on average riding conditions. If you ride more frequently than usual and in dusty or wet weather be sure to maintain your bike more often. We recommend that you have your local service center perform extensive maintenance and repairs unless you have advanced mechanical skills. Every maintenance item requires some mechanical knowledge. some parts require more technical information and tools than others. * Unless you have proper tools and service information, have your local service center perform these tasks. ** For safety reason, ONLY your local service center should perform these tasks. NOTES: 1. Repeat the frequency interval at higher odometer readings. 2. Service more frequently if you are ridding in dusty or wet areas. 3. Service more frequently if you are ridding at full throttle or in rain. 4. Replace every 2 years or at indicated odometer reading, which ever comes first. 20
24 Maintenance Safety I - Inspect, clean, adjust, lubricate or replace if necessary C - Clean A - Adjust L - Lubricate R Replace 21
25 Maintenance Schedule I - Inspect, clean, adjust, lubricate or replace if necessary C - Clean A - Adjust L - Lubricate R Replace 22
26 Maintenance Records To ensure proper maintenance keep record. If the motorcycle is sold be sure to include the maintenance records. All scheduled maintenance is considered normal operator cost if a service center performs these tasks you will be charged. Please use the tables below to keep track of all maintenance performed. 23


27 Tool kit and Owner s manual storage Your tool kit is located in the tool kit bag. These tools may come in handy during minor roadside repairs and adjustments. Tools in tool kit: Open end wrench Standard Phillips screw driver Screw driver handle Spark plug wrench Tool bag Store the owner s manual, along with the tool kit and any other important documents. Side Cover Removal Left Side Cover In order to clean and maintain the battery and fuses you must remove the right side cover. Removal 1. Remove bolt. 2. Remove cover. Installation 1. Align prongs 2. Reverse removal steps. Right Side Cover In order to clean and maintain the air cleaner you must remove the left side cover. Removal 1. Remove bolt. 2. Remove cover. Installation 1. Align prongs. 2. Reverse removal steps. 24
28 Fuel Fuel Recommendation Type - Unleaded Octane number - 90 or above Unleaded fuel procedures fewer engine deposits and will extend the life of the exhaust system components. We suggest you use regular unleaded fuel. Be sure to only use an octane number of 90 or higher. Using a lower octane gasoline can cause severe damage to the engine. Never use stale or contaminated gasoline or an oil/gasoline mixture. Fuel Capacity Fuel tank capacity, including reserve - 14L Reserve capacity 1.78L After using the reserve tank you should refill the gas tank immediately. Then turn the fuel valve to the ON position so you do not run out fuel in the reserve tank. 25
.")
29 Fuel and Engine Oil Refueling 1. Insert ignition key in the fuel fill cap and turn clockwise. 2. Open cap. 3. Add fuel to the bottom of the filler neck. Do not overfill. 4. After refueling, push cap into the filler neck until it snaps and locks. 5. Turn the fuel valve back to the ON position (if it was in the RESERVE position). By using, checking, adding and changing the recommended engine oil you can prolong the life of your engine. Changing your engine oil helps get rid of dirt or debris that can damage the engine. Always be sure to keep the right amount of oil in the engine or serious damage can occur. If you are driving in dusty areas you should change the oil more frequently. 26


30 Engine Oil Recommended Oil API classification SF Viscosity(weight) SAE 15W-40 Use the recommended oil, the oil does not need additives. Do not use graphite oil or oil with molybdenum additives. Do not use castor based racing oil, vegetable oil or non-detergent oil. 27

31 Engine Oil Checking and Adding Oil 1. Park your motorcycle on level ground and use the side stand for support. 2. Start the engine and let it run for 3-5 minutes. 3. Turn the engine off and wait for at least 3 minutes. 4. Remove the oil fill plug/dipstick and wipe clean. 5. Hold the motorcycle in an upright position. 6. Insert the dipstick in the oil fill until it rests on the metal, do not screw it in. 7. Remove the dipstick and check the oil level. If the oil is at or near the upper level mark there is no need to add oil. If the oil is at or near the lower level mark, add the recommended oil until it reaches the upper level mark and do not overfill. 8. Screw in the oil fill plug/dipstick. 9. Check for any leaks. Changing Engine Oil This procedure will require some mechanical skill and special tools such as a torque wrench. If you are not capable of performing this procedure contact your local service center. Draining Engine Oil 1. Park your bike on level ground and use the side stand for support. 2. Start the engine and let it run for 3-5 minutes. 3. Turn the engine off and wait for at least 3 minutes. Draining Engine Oil (continued) 4. Remove the oil fill plug/dipstick, engine oil drain bolt and washer, to drain the oil into an oil pan. NOTICE: Improper disposal of oil can be hazardous to the environment. 5. Dispose of oil in an appropriate manner. 6. Make sure the sealing washer is in good condition, if not replace it. You should replace every other time you change the oil. 28
32 Adding Engine Oil 7. Install the engine drain bolt and torque to 18lbs.ft (25Nm). 8. Fill crankcase with recommended oil US qt. 9. Reinstall the oil fill plug/dipstick 10. Start engine and let idle for 3-5 minutes. 11. Turn engine off and let stand for 2-3 minutes. 12. Hold the motorcycle in an upright position, and check the oil level. 13. Make sure there are no leaks. 29

33 Air Cleaner Be sure to clean the air cleaner more frequently if you are ridding in dusty or wet areas. You local service center can help you determine the correct service interval for your riding conditions. Use only the air cleaner specified for your motorcycle or one of equivalent quality. NOTICE: Using the correct air cleaner can prevent engine wear, damage, repairs, spark plug fouling and poor gas mileage. If you use the incorrect air cleaner you may cause sever engine damage. NOTICE: Improper air cleaner maintenance can cause early engine wear or poor performance. Replacing Air Cleaner 1. You will need to remove the seat in order to access the bolt that needs to be removed in order to take the side cover off. Remove seat by inserting ignition key into key slot on side cover. Turn key clockwise and seat will unlatch. 2. Remove bolt. 3. Remove left side cover and unscrew 3 screws holding air cleaner cover on. 4. Discard air cleaner. 5. Install new air cleaner. 6. Replace air cleaner cover using screws. 7. Replace left side cover using bolt to secure. 30

34 Crankcase Breather and Throttle Crankcase Breather You should service the crankcase breather more often if you are riding at full throttle or in rain. Be sure to service, if there are deposits in the transparent section of the drain tube. Draining 1. Place a drain, oil pan under the crankcase breather tube plug. 2. Remove the plug so that the rube drains into the pan. 3. Re-install the crankcase breather tube plug. THROTTLE Inspection Check the free play at the throttle grip. Free play: 1/16-1/4 inch (2-6mm). If needed, adjust to specified free play. Adjustment 1. Turn lock nut. 2. After the adjustment has been made, check the full rotation of throttle grip from all steering positions. Throttle Inspection 1. Make sure that all nuts and bolts are securely fastened and the throttle assembly is positioned correctly. 2. Check the full rotation of the throttle grip from all steering positions. 31

35 Clutch System The proper free play adjustment of the clutch allows for a gradual, smooth engagement when shifting gears. Early wear can occur if you do not properly adjust the free play. Clutch Free Play Left handlebar inspection 1. Check free play, if needed adjust to specified adjustment. Upper Adjustment Always adjust using the upper clutch cable adjuster before using the lower adjustment. 1. Loosen upper lock nut. 2. Rotate the upper clutch cable adjuster until the proper free play has been accomplished. 3. Tighten the upper lock nut and check that the free play is correct. 32

36 Clutch System If the upper clutch cable adjuster has reached its limit or you cannot obtain the correct free play, you may also use the lower clutch cable adjuster. 1. Loosen the upper lock nut and rotate the upper clutch cable adjuster in to maximum free play. 2. Tighten the upper lock nut. 3. Loosen lower lock nut. 4. Rotate lower adjusting nut until the proper free play has been accomplished. 5. Tighten lower lock nut and check adjustment. 6. Start engine, hold in clutch lever and shift into gear. Make sure the engine does not stall and the motorcycle does not move. Slowly release the clutch lever and open the throttle, your motorcycle should accelerate gradually and move smoothly. If you cannot accomplish the correct free play using both adjustments, contact your local service center. 33
37 Engine Idle Speed For the best servicing you should visit your local service center. Adjusting the idle speed will not cure all problems in the engine fuel delivery system. Idle Speed Adjustment 1. If the engine is cold, start it and run for 10 minutes of stop and go riding. Turn the engine off. 2. Park the bike on a level surface using the side stand. 3. Connect tachometer to the engine. 4. Shift into neutral and start engine. 5. Adjust the idle speed with throttle stop screw. Idle Speed (in neutral): 1,500 rpm±150rpm. 34
38 Spark Plug Spark Plug Recommendation Do not use any spark plug other than the one recommended in the heat recommended. NOTICE: If you use a spark plug in the improper heat range you can cause engine damage. Spark Plug Replacement: 1. Clean any/all dirt around the spark plug base. 2. Disconnect the spark plug caps and make certain you do not damage the wires. 3. Remove the spark plug using the spark plug wrench provided in the tool kit. 4. Inspect the electrodes on the spark plug for corrosion and deposits, if it has great corrosion replace the plug. 5. Using a wire-type feeler, check the gap on every new spark plug. If an adjustment is needed, bend the electrode carefully, the gap should be: inch ( mm). 6. Thread spark plug in by hand so there is no cross-threading. 7. Tighten, old but still good, spark plug: 1/8-1/4 turn after it seat. Tighten new spark plug: 1/2 turns after seated. 8. Reinstall the spark plug caps. NOTICE: Incorrect tightening of the spark plug can cause severe damage to the engine. Too loose can damage piston, too tight can damage the threads. 35
39 Suspension The front and rear suspension systems consist of springs and hydraulic damping devices. The rear suspension system has a spring pre-load which adjusts the force needed to begin compression of the spring. Traction and comfort are acquired by the oil damper system. It hydraulically controls the compression and rebound of the suspension. Whenever you change the load on your motorcycle (add passenger or cargo), or when riding conditions change, be sure to adjust the rear suspension pre-load. If you set the spring pre-load to a lower setting would accomplish a softer ride. This setting should be used with a light load and smooth roads. For a more firm ride set the spring preload to a higher setting, used for heavy loads, rough roads and a more challenging ride. Rear Suspension Adjustment Adjustment to the spring pre-load on the rear suspension should be done for the weight of a rider and passenger (if any) and different riding conditions. The adjustments in this manual are limited. Do not disassemble or service the dampers, have your local service center perform these tasks. 36

40 Brakes Your bike uses hydraulic disc brakes( front and rear). Hydraulic Liquid Front Brake The brake fluid will drop as the or if there is a leak. To ensure there are no leaks, often check the brake system. You should also check the brake pads for wear and the brake fluid level. If you feel abnormal free play in the brake lever, check for wear on the brake pads. If you discover the brake pads to be worn you should replace them immediately. If the pads are still in good condition there may be air in the brake system. You will need to bleed the brakes, visit your local service center for help. Brake Fluid Recommendation We recommend that you use DOT3 brake fluid or any brake fluid of the same quality. Always use a fresh, new container of brake fluid, never use an opened container that may be contaminated. Brake Fluid Level Inspection 1. Park your bike on level ground in an upright position. 2. Check the fluid level. It should be above the lower mark, if not, check for wear on the brakes. If the pads are worn, replace immediately. Have your local service center do this. 37


41 Brakes Other Inspections Make sure there are no leaks in the fluid lines. Check for loose fittings or damage to the fluid lines. NOTICE: Brake fluid can damage painted surfaces and plastic, handle with care. Clean any spills immediately. In case of contact with skin, wash thoroughly. Contact with eyes, wash thoroughly and see a doctor immediately. Brake Pads Wear Brake pad wear depends on how much you use the brakes, the type of riding and road conditions. Normally brake pads tend to wear quicker on wet and dirty roads. Be sure to check the pads for wear during each maintenance interval. You can inspect the wear on pad by using the wear indicator mark. If the pads are worn, replace immediately. Have your local service center do this. Brakes Rear Brake Pedal Free Play Brake Pedal Height Adjustment The height of the brake pedal can be adjusted by using the stopper bolt. 1. Loosen lock nut and turn stopper bolts to adjust. 2. Tighten lock nut. Inspection 1. Park your bike on the side stand for support. 2. Depress the brake pedal until it starts to engage to check the free play: inch (20-30mm). If needed, adjust to specified range. 38

42 Tires The tires on your motorcycle should be the proper type and size. They should be in good condition and properly inflated for the load that you are carrying. Air Pressure Check the air pressure in both tires before riding. Improper air pressure would effect handling, steering response, traction, tire life and rider comfort. We suggest you visually check the tire pressure before each ride and check the pressure each month by using an air pressure gauge. Be sure that the tires are inflated to the pressures shown below. Tire pressure should only be measured or adjusted when the tires are cold. Inspection Always look for the following when checking tire pressure: Bumps or bulges on the tire, if there are any replace the tire. Cuts or cracks, replace tire if any fabric is visible. Any foreign objects such as nails embedded in the tire. Excessive wear. Pull to the side of the road if you drive over a pothole or any hard objects to inspect the tire for possible damage. You should replace the tires if the thread wear reaches the following limits: 39


43 Replace tire immediately if the wear indicators are not visible. Tires and Tube Repair If your tire in punctured or damaged, please replace the tire, do not repair. A repaired tube may fail while riding, and is not as reliable as a new one. A temporary repair can be made in an emergency situation, but will not perform at its best. Ride at slow speeds and do not carry a passenger with a repaired tire. Have the tire and tube replaced as soon as possible. If you replace only the tube and not the tire do not exceed 50mph for the first 24hrs and 80mph anytime after. Tire Replacement When tire replacement is needed always replace them with the same size, load range and speed rating. Recommended Tire Size: Front - 80/ Rear - 110/ When replacing a tire: Have the wheel balanced after installation. If possible, have tire replaced by your local service center. Replace the tube. Safety Reminders Do not replace tire with a Radial tire. Using a different type of tire may affect stability and handling. Do not replace with car tires. The tire may forcefully separate from the rim during installing causing serious injury or death. 40


44 Drive Chain There is a riveted master link on the chain which connects the counter-shaft to the rear wheel sprockets. To keep moisture and dirt out the O-ring chain uses rubber rings between the side plates of the pin and roller links to seal in the lubricating grease. Proper lubrication and adjustment will help extend the life of the chain. You should always perform the pre-ride inspection to check the adjustment and lubrication before riding. If you are riding in dusty or muddy conditions remember to maintain and service the chain more often than usual. Before any servicing to the chain occurs be sure the engine id off and in neutral. You do not need to remove the chain to perform service in the maintenance schedule Inspection 1. Check the slack of the lower drive chain right between the two sprockets. 2. The slack should remain consistent along the entire chain, if not, check to make sure their are no kinks or binds. You can sometimes eliminate kinks or binds by lubricating the chain. 3. Inspect chain for: - Damaged rollers - Kinks or binds - Dry or rusty links - Improper adjustment - Excessive wear - Damaged or missing o-rings. The chain should be replaced if there is damage to the rollers, or if there are loose pins. Lubricate any kinks or binds to work them out. If the chain appears too dry or rusty, lubricate. 4. Check both the front and rear sprocket teeth for excessive wear or damage. If needed replace the sprocket. NOTICE : The use of a new chain with a worn sprocket will cause quick wear to the chain. 41

 turn the adjusting nuts counter-clockwise. Adjust the slack in between the drive sprocket and the rear wheel sprocket.")
45 Adjustment Every 500 miles you should check and adjust (if needed) the slack of the drive chain. If you are riding at high speeds the chain may need adjusting more often. 1. Place the bike on level ground using the side stand. Make sure the transmission is in neutral and the ignition switch if in the OFF position. 2. Loosen the axle nut. 3. Loosen the lock nuts on both sides of swing arm. 4. Turn both adjusting nuts the same amount of turns until you have reached the correct slack. To tighten the chain, turn the adjusting nuts clockwise. To loosen the chain (provide slack) turn the adjusting nuts counter-clockwise. Adjust the slack in between the drive sprocket and the rear wheel sprocket. Move the bike forward, stop and park it on the side stand. Recheck the slack, it should allow vertical movement by hand: 9/16 inch (15-30mm) 5. You can check the rear axle alignment by making sure the index marks align with the rear edge of the adjusting slots both marks should be at some point. If they do not match up, turn the left or right adjusting nut until the marks correspond and 42
46 recheck the chain slack. 6. Torque the rear axle nut to 65ft.lbs (88Nm). If you do not have a torque wrench available make sure to have your local service center perform this task. 7. Lightly tighten the adjusting nuts and tighten the lock nuts while holding the adjusting nuts with a wrench. Lubrication Lubricate the chain every 500 miles and more often if it appears to be dry. Only use SAE 90 gear oil for lubrication, other chain lubricants may contain solvents that can damage the rubber o-rings. Removal, Cleaning and Replacement Your motorcycle has a riveted master link and should only be removed or replace by your local service center. Do not use a steam cleaner, high pressure washer or certain solvents. These products can damage the o-rings. 1. Use a dry cloth to clean the side surface of the chain. Use a high flash point solvent, not gasoline. Do not use a solvent or brush to clean the o-rings. 2. Check to make sure the chain is not damaged or worn. If needed, replace the chain. 43


47 Battery Your bike is equipped with battery. Please check the electrolyte level or add distilled water when they are shortage. NOTICE: If you remove the cap strip you can permanently damage the battery. Any electrical accessory will use currents from the battery. If you have electrical accessories on your motorcycle and you ride often, be sure to charge the battery frequently. You should remove the battery or disconnect the battery cables if you do not plan to ride for two weeks or more. Battery Storage We recommend that you remove the battery from your bike if you are planning to store it for a long period of time. In order to maintain the life of the battery while storing you should slow trickle charge the battery every 30 days. If you do not remove the battery you should disconnect the battery wires (negative wire first). Battery The battery can be found in the battery box under the right side cover below the driver seat. 1. Remove the right side cover. 2. Remove the rubber strap holding the battery in place. 3. Disconnect the Negative terminal lead first, then the Positive terminal lead. 4. Remove the battery from the battery box. 5. Unless you have been riding on a regular basis, charge the battery. 6. Store the battery in an easily accessible, neutral climate location (off of the floor and out of reach of children). 7. Clean battery box before storing. 8. Use a slow trickle charger every 30 days to maintain life of the battery. 44

48 Charging the Battery Charging the battery incorrectly may cause damage. Always read the instructions that came with the battery charger and follow all directions on the battery. For home charging we suggest you use a trickle charger. A trickle charger can be left connects for a long period of time without causing damage to the battery. Do not leave the battery connected to the charger longer than the recommended amount of time. Do not use an automotive battery charger as this can cause permanent damage to your battery. 45
49 Appearance Care You should always clean and polish your bike on a regular basis to keep it looking newer longer. General Recommendations You may use the following to clean your bike: - a mild, neutral detergent and water - a mild spray and cleaner/polisher - a mild cleaner/de greaser Do not use products that contain chemical solvents or harsh detergents. Before cleaning, make sure the engine is cool. Wash your bike in a shady area. Direct sunlight can cause water spots and fading. Do not use a high pressure washer to clean, we suggest you use a garden hose. NOTICE: High pressure washers can cause damage to certain parts of your bike. When you are finished cleaning your bike, always check for wear or leaks. 46

 can be found on the left side of the front forks stamped")
50 Vehicle Identification Serial Numbers The frame (VIN) and engine serial numbers will be required when you register your bike. You may also need this information when ordering parts, make sure to keep these numbers in a safe spot. Frame number (VIN- Vehicle Identification Number) can be found on the left side of the front forks stamped into a metal plate. Engine number can be found stamped into the left side of the crankcase. 47
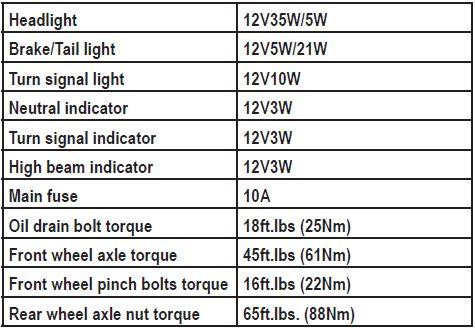
51 Specifications Overall length Overall width Overall height Wheel base Curb mass Fuel recommendation Fuel tank capacity Engine oil recommendation Passenger 2090mm 920mm 1400mm 1370mm 126kg Octane 90 or above 14L API service classification SF SAE 15W-40 One driver or one passenger only 48
52 Specifications Displacement Bore and stroke Top speed 229cc 67 65mm 97km/h Compression ratio 9.0:1 Spark plug(standard) Spark plug gap Idle speed Valve lash TORCH D8RTC 0.6~0.8mm 1500±150rpm 0.05mm Front tire size 80/ Rear tire size 110/ Front tire pressure COLD Rear tire pressure COLD Battery 32psi(225kpa) 40psi(280kpa) 12V-9AH 49
53 Specifications 50
54 Wire Diagram 51
55 Ricky Power Sports, LLC. EMISSION CONTROL SYSTEM WARRANTY YOUR WARRANTY RIGHTS AND OBLIGATIONS The emission control system warranty period for this vehicle begins on the date the vehicle is delivered to the first purchaser other than an authorized dealer, or the date it is first used as a demonstrator, lease, or company vehicle, whichever comes first and continues for 30 months after that date, or 5,000km, whichever comes first, provided there has been no abuse, neglect or improper maintenance of your vehicle. Where a warrantable condition exists, Ricky Power Sports, LLC will repair your vehicle at no cost to you, including diagnosis, parts and labor. If an emission-related part on your vehicle is defective, the part will be repaired or replaced by the Ricky Power Sports, LLC. This is your emission control defects warranty. OWNER S WARRANTY RESPONSIBILITIES As the vehicle owner, you are responsible for the performance of the required maintenance. You should maintain a record of all maintenance performed on your vehicle and retain all receipts covering maintenance on your vehicle. You may not be denied a warranty claim solely because of your failure to ensure the performance of all scheduled maintenance or lack of maintenance records or receipts. You are responsible for presenting your vehicle to an authorized dealer as soon as a problem exists. The warranty repairs should be completed in a reasonable amount of time, not to exceed 30 days. As the vehicle owner, you should be aware that you may be denied your warranty coverage if your vehicle or a part has failed due to abuse, neglect, improper maintenance, or unapproved modifications. WARRANTY COVERAGE Ricky Power Sports, LLC warrants that each new 2016 and later vehicle: is designed, built, and equipped so as to conform at the time of initial retail purchase with all applicable regulations of the United States Environmental Protection Agency; and is free from defects in material and workmanship which cause such vehicle to fail to confirm with applicable regulations of the United States Environmental Protection Agency for the periods specified above. Your emission control system warranty covers components whose failure would increase an engine s emission, including electronic controls, fuel injection system, carburetor, the ignition system, catalytic converter, or any other system utilized in this vehicle to control emission if it is originally equipped. Also included may be hoses, connectors and other emission-related assemblies. Replacing or repairing other components (including parts, labor, and other costs) not covered by this emission control system warranty or the standard warranty is the responsibility of the owner. Coverage of repairs under this warranty applies only when repairs are completed at an authorized dealer or repair 52
56 facility. Ricky Power Sports, LLC will not cover repairs performed outside of an authorized dealer or repair facility. The use of replacement parts not equivalent to the original parts may impair the effectiveness of your vehicle s emission control system. If such a replacement part is used and an authorized dealer determines it is defective or causes a failure of a warranted part, your claim for repair to bring your vehicle into compliance with applicable standards may be denied. This Emission Control System Warranty is in addition to the standard Limited Warranty. EXCLUSIONS AND LIMITATIONS This warranty does not cover the following: Failures or malfunctions of the emission control systems caused by abuse, alteration, accident, misuse, the use of leaded gasoline. Replacement of expendable maintenance items unless they are original equipment defective in material or workmanship under normal use, and the first required replacement interval for the item has not been reached. Expendable maintenance items include but not limited to spark plugs, filters, coolant, lubricants, gaskets, hoses, and belts. Replacements of parts and other services and adjustments for required maintenance. Any vehicle equipped with an odometer or hour meter where the reading is altered so that actual mileage cannot be readily determined. Repairs or replacements as a result of: o Accident o Misuse o Use of replacement parts or accessories not conforming to the original specifications which adversely affect performance Physical damage, corrosion, or defects caused by fire, explosions or similar causes beyond the control of the Distributor. Failures not caused by a defect in material or workmanship. Use of the vehicle in any type of competitive racing or related events immediately and completely voids this and all other warranties. LIMITED LIABILITY The liability of Ricky Power Sports, LLC under this Emission Control System Warranty is limited solely to the remedying of defects in material workmanship by an authorized dealer at its place of business during customary business hours. This warranty does not cover inconvenience or loss of use of the vehicle or transportation of the vehicle to/from the authorized dealer. Ricky Power Sports, LLC is not liable to any person for incidental, 53
57 consequential or special damages of any description, whether arising out of express or implied warranty or any other contract, negligence or other tort or otherwise. No express emission control system warranty is given by Ricky Power Sports, LLC except as specifically set forth herein. Any emission control system warranty implied by law, including any warranty of merchantability or fitness for a particular purpose is limited to the express emission control system warranty terms stated in this warranty. The foregoing statements of warranty are exclusive and in lieu of all other remedies. All express warranties not stated in this warranty are disclaimed. Some states do not allow limitations on how long an implied warranty lasts, so the above limitations may not apply if it is inconsistent with the controlling state law. No dealer is authorized to modify this Emission Control System Warranty. If you have any questions regarding your warranty rights and responsibilities, you should contact Ricky Power Sports, LLC( ). 54
Phoenix 250 Owner s Manual
 Phoenix 250 Owner s Manual Minimum age requirement: 16 REV. B 030909 Always wear a helmet; It could save your Life! This manual should be considered as a permanent part of the vehicle and should remain
NOTES FOR SAFETY OPERATOR-ONLY.
 NOTES FOR SAFETY Both the parents and their child must fully understand everything in this manual before riding. This vehicle is for OPERATOR-ONLY. This vehicle is only designed for operation on level,
ATV-320 R OWNER S MANUAL
 ATV-320 R OWNER S MANUAL FOREWORD May we, the manufacturer, take this opportunity to thank you for choosing our ATV to serve you. This Owner s Manual is prepared for you to properly operate in safety.
3. INSPECTION/ADJUSTMENT
 3 3 INSPECTION/ADJUSTMENT SERVICE INFORMATION -------------------------------------------- 3-1 MAINTENANCE SCHEDULE ---------------------------------------- 3-2 FUEL LINE/FUEL FILTER -------------------------------------------
INSPECTION/ADJUSTMENT
 3 3 INSPECTION/ADJUSTMENT SERVICE INFORMATION----------------------------------------------------------------------- 3-1 MAINTENANCE SCHEDULE-------------------------------------------------------------------
3. INSPECTION/ADJUSTMENT
 3 SERVICE INFORMATION...3-0 FINAL REDUCTION GEAR OIL...3-7 MAINTENANCE SCHEDULE...3-2 DRIVE BELT...3-7 FUEL FILTER...3-3 BRAKE SHOE...3-8 THROTTLE OPERATION...3-3 BRAKE ADJUSTING NUT...3-8 AIR CLEANER...3-4
ATV-320 S/U ATV-320SD S/U OWNER S MANUAL V
 ATV-320 S/U ATV-320SD S/U OWNER S MANUAL V1.0 2014.03.01 0 FOREWORD May we, the manufacturer, take this opportunity to thank you for choosing our ATV to serve you. This Owner s Manual is prepared for you
3. INSPECTION/ADJUSTMENT
 SERVICE INFORMATION...3-0 FINAL REDUCTION GEAR OIL...3-7 MAINTENANCE SCHEDULE...3-2 DRIVE BELT...3-7 FUEL FILTER...3-3 BRAKE SHOE...3-8 THROTTLE OPERATION...3-3 BRAKE ADJUSTING NUT...3-8 AIR CLEANER...3-4
Table of Contents. Technical Information Warning Statement
 Table of Contents Technical Information-----------------------------------1 Warning Statement--------------------------------------2 Read Before Riding-------------------------------------3 List of Parts-----------------------------------------------4
Part 7 DO IT YOURSELF MAINTENANCE
 Part 7 DO IT YOURSELF MAINTENANCE Chapter 7 2 Engine and Chassis Checking the engine oil level Checking the engine coolant level Checking brake fluid Checking power steering fluid Checking tire pressure
MOTOX 70cc Assembly Manual
 MOTOX 70cc Assembly Manual Assembly Manual This manual should be considered a permanent part of the motorcycle and should remain if it is resold. This manual contains the latest product information available
I: INSPECT AND CLEAN, ADJUST, LUBRICATE OR REPLACE IF NECESSARY C: CLEAN A: ADJUST R: REPLACE L: LUBRICATE I: INSPECTION D: DIAGNOSE
 2. Periodic Maintenance > Periodic Maintenance Chart XCITING 400i Maintenance Schedule Perform the pre-ride inspection (Owner's Manual) at each scheduled maintenance period. This interval should be judged
QUICK REFERENCE GUIDE
 QUICK REFERENCE GUIDE www.familygokarts.com CUSTOMER SERVICE Customer Service is our top prority and checking these simple steps will help us in better serving you needs. Please remember that although
Follow the Age Recommendation Adult Supervision should be present for all people under the age of 18.
 Your Kart will provide you with many years of service and pleasure. Providing you take responsibility for your own safety and understand the challenges you can meet while driving. There is much that you
May we, the manufacturer, take this opportunity to thank you for choosing our ATV to serve you.
 FOREWORD May we, the manufacturer, take this opportunity to thank you for choosing our ATV to serve you. This Owner s Manual is prepared for you the details as to operate and maintenance necessarily to
US Patent 0540, 400 Other Patents Pending. Read this manual completely before assembling and riding our PET PRO-FLEX 500. Always wear a Helmet!
 US Patent 0540, 400 Other Patents Pending Read this manual completely before assembling and riding our 500 Always wear a Helmet! Priority Electric Transportation, LLC. 1007 West College Ave. #293 Santa
ATV-50/90/100 I/II/V OWNER S MANUAL
 1 ATV-50/90/100 I/II/V OWNER S MANUAL FOREWORD May we, the manufacturer, take this opportunity to thank you for choosing our ATV to serve you. This Owner s Manual is prepared for you the details as to
SECTION 8 2 DO IT YOURSELF MAINTENANCE. Chassis
 DO IT YOURSELF MAINTENANCE Chassis SECTION 8 2 Checking the coolant level of the traction motor................ 184 Checking the radiator....................................... 185 Checking brake fluid........................................
Owner s Manual for 16 Slider
 Owner s Manual for 16 Slider This manual contains important safety, assembly, operation and maintenance information. Please read and fully understand this manual before operation. Save this manual for
1000-LB. MOTORCYCLE LIFT TABLE OWNER S MANUAL
 1000-LB. MOTORCYCLE LIFT TABLE OWNER S MANUAL WARNING: Read carefully and understand all ASSEMBLY AND OPERATION INSTRUCTIONS before operating. Failure to follow the safety rules and other basic safety
Light condition and operation Windshield glass condition Wiper blade condition Paint condition and corrosion Fluid leaks Door and hood lock condition
 GENERAL CHECKS Engine Compartment The following should be checked regularly: Engine oil level and condition Transmission fluid level and condition Brake fluid level Clutch fluid level Engine coolant level
EMISSION CONTROL WARRANTY STATEMENT
 EMISSION CONTROL WARRANTY STATEMENT YOUR WARRANTY RIGHTS AND OBLIGATIONS The California Air Resources Board, U.S. EPA and Zenith Power Products LLC (ZPP) are pleased to explain the emission control system
SECTION 7 2 DO IT YOURSELF MAINTENANCE MR2 U. Engine and Chassis
 SECTION 7 2 DO IT YOURSELF MAINTENANCE Engine and Chassis Checking the engine oil level................................. 168 Checking the engine coolant level............................ 169 Checking brake
PERIODIC MAINTENANCE
 PERIODIC MAINTENANCE CONTENTS PERIODIC MAINTENANCE SCHEDULE 2 1 MAINTENANCE PROCEDURES 2 3 2 BATTERY 2 3 CYLINDER HEAD NUTS AND EXHAUST PIPE NUTS 2 4 CYLINDER HEAD AND CYLINDER 2 4 SPARK PLUG 2 4 FUEL
1000-lb Hydraulic Truck Crane
 1000-lb Hydraulic Truck Crane Owner s Manual WARNING: Read carefully and understand all ASSEMBLY AND OPERATION INSTRUCTIONS before operating. Failure to follow the safety rules and other basic safety precautions
SECTION 6 3 SERVICE PROCEDURES AND SPECIFICATIONS. Chassis
 SERVICE PROCEDURES AND SPECIFICATIONS Chassis SECTION 6 3 Specifications........................................... 208 Checking brake fluid...................................... 210 Checking power steering
PF-4000, PF-4010, PF-4210 MULTI-PURPOSE ENGINE
 PF-4000, PF-4010, PF-4210 MULTI-PURPOSE ENGINE Date 09-26-01 Supplier To The Outdoor Power Equipment Industry ISM, Inc. 1028 4 th Street SW Auburn, WA 98001 Phone: (253) 333-1200 Fax: (253) 333-1212 WWW.TANAKA-USA.COM
OWNER S/OPERATOR S MANUAL
 OWNER S/OPERATOR S MANUAL Always wear a helmet it could save your life! Never allow any child under the age of 16 to operate this Mini Bike without continual adult supervision. RIVET Provincial / Municipal
SECTION 6 3 SERVICE PROCEDURES AND SPECIFICATIONS. Chassis
 SECTION 6 3 SERVICE PROCEDURES AND SPECIFICATIONS Chassis Specifications 206 Checking brake fluid 208 Checking power steering fluid 209 Checking tire pressure 210 Rotating tires 211 Checking and replacing
3000-Lb. Vehicle Positioning Jacks. Owner s Manual
 3000-Lb. Vehicle Positioning Jacks Owner s Manual WARNING: Read carefully and understand all ASSEMBLY AND OPERATION INSTRUCTIONS before operating. Failure to follow the safety rules and other basic safety
KING CANADA 950W PORTABLE GENERATOR MODEL: KCG-951G INSTRUCTION MANUAL COPYRIGHT 2011 ALL RIGHTS RESERVED BY KING CANADA TOOLS INC.
 KING CANADA 950W PORTABLE GENERATOR MODEL: KCG-951G INSTRUCTION MANUAL COPYRIGHT 2011 ALL RIGHTS RESERVED BY KING CANADA TOOLS INC. WARRANTY & SERVICE INFORMATION 1-YEAR LIMITED WARRANTY FOR THIS 950W
Air-Operated Waste Oil Drainer
 Air-Operated Waste Oil Drainer 20-Gallon Tank Owner s Manual WARNING: Read carefully and understand all ASSEMBLY AND OPERATION INSTRUCTIONS before operating. Failure to follow the safety rules and other
Large Hydraulic Bead Breaker
 Large Hydraulic Bead Breaker Owner s Manual WARNING: Read carefully and understand all ASSEMBLY AND OPERATION INSTRUCTIONS before operating. Failure to follow the safety rules and other basic safety precautions
SANTA CRUZ BICYCLES MY18 Hightower Suspension Setup
 SANTA CRUZ BICYCLES MY18 Hightower Suspension Setup Copyright Santa Cruz Bicycles 2017 TABLE OF CONTENTS SAFETY INSTRUCTIONS... 3 SAG SETUP...3 AIR SPRING FORKS...3 AIR SHOCKS...3 FORK SETUP... 4 FOX 36
Giant Hydraulic Disc Brake System
 Giant Hydraulic Disc Brake System INSTALLATION INSTRUCTI IMPORTANT NOTICE Contact the place of purchase or Authorized Giant Retailer for information on detail of installation and maintenance. Read this
OWNERS MANUAL. Two Stroke Dirt Bike. Distributed by SSR Motorsports. Address: Alondra Blvd, Norwalk CA
 OWNERS MANUAL Two Stroke Dirt Bike Distributed by SSR Motorsports Address: 12825 Alondra Blvd, Norwalk CA 90650 www.ssrmotorsports.com Please note that this is a general manual. The model of the vehicle
AG-HA-2500N GASOLINE GENERATOR
 AG-HA-2500N GASOLINE GENERATOR OWNER S MANUAL BEFORE OPERATING THIS EQUIPMENT PLEASE READ THESE INSTRUCTIONS CAREFULLY (I)WARNING 1. Read the operator s instruction manual. 2. Attention! Exhaust gases
Warning Statement Read Before Riding
 Table of Contents Technical Information-----------------------------------1 Warning Statement--------------------------------------2 Read Before Riding------------------------------------- List Of Parts-----------------------------------------------4
SANTA CRUZ BICYCLES MY18 Nomad Suspension Setup
 SANTA CRUZ BICYCLES MY18 Nomad Suspension Setup Copyright Santa Cruz Bicycles 2017 TABLE OF CONTENTS SAFETY INSTRUCTIONS... 3 SAG SETUP...3 AIR SPRING FORKS...3 AIR SHOCKS...3 COIL SHOCKS...4 FORK SETUP...
OFF-ROAD MOTORCYCLE / PITBIKE LIMITED WARRANTY POLICY
 OFF-ROAD MOTORCYCLE / PITBIKE LIMITED WARRANTY POLICY DEALER CONTACT INFORMATION If you have any questions regarding your new SSR Motorsports Off-Road Motorcycle / Pitbike, your dealer will be glad to
Owner s Manual & Safety Instructions
 Owner s Manual & Safety Instructions Save This Manual Keep this manual for the safety warnings and precautions, assembly, operating, inspection, maintenance and cleaning procedures. Write the product s
3. INSPECTION/ADJUSTMENT
 3 3 INSPECTION/ADJUSTMENT SERVICE INFORMATION-------------------------------------------------- 3-1 MAINTENANCE SCHEDULE---------------------------------------------- 3-3 FUEL LINE---------------------------------------------------------------------
Hydraulic Bead Breaker Kit
 Hydraulic Bead Breaker Kit Owner s Manual WARNING: Read carefully and understand all ASSEMBLY AND OPERATION INSTRUCTIONS before operating. Failure to follow the safety rules and other basic safety precautions
1000-LB. ENGINE STAND
 1000-LB. ENGINE STAND WARNING: Read carefully and understand all ASSEMBLY AND OPERATION INSTRUCTIONS before operating. Failure to follow the safety rules and other basic safety precautions may result in
1.CONTENTS 1. Contents Control location Before riding Safe riding Driving Use genuine spare parts Use
 1.CONTENTS 1. Contents... 1 2. Control location... 3 3. Before riding... 4 4. Safe riding... 4 5. Driving... 5 6. Use genuine spare parts... 5 7. Use of each component... 6 Gauges... 6 Operation of ignition
CHASSIS CONTENTS EXTERIOR PARTS 7-1 FRONT WHEEL 7-2 FRONT BRAKE 7-6 HANDLEBARS 7-13 FRONT FORK 7-15 STEERING 7-23 REAR WHEEL 7-26 REAR BRAKE 7-30
 CHASSIS CONTENTS EXTERIOR PARTS 7- FRONT WHEEL 7-2 FRONT BRAKE 7-6 HANDLEBARS 7-3 FRONT FORK 7-5 STEERING 7-23 REAR WHEEL 7-26 REAR BRAKE 7-30 REAR SHOCK ABSORBER 7-32 SWING ARM 7-33 7 7- CHASSIS EXTERIOR
2000-LB. ENGINE STAND
 2000-LB. ENGINE STAND WARNING: Read carefully and understand all ASSEMBLY AND OPERATION INSTRUCTIONS before operating. Failure to follow the safety rules and other basic safety precautions may result in
MODEL NO & UP SAFETY INSTRUCTIONS. Keep this Operator s Manual in the plastic tube behind the operator seat.
 FORM NO. 94-7276 MODEL NO. 41026-60101 & UP OPERATOR S INSTRUCTIONS HOSE REEL KIT To assure maximum safety, optimum performance, and to gain knowledge of the product, it is essential that you or any other
Garden Hose Reel with 3/4In. x 100Ft. Hose. Owner s Manual
 Garden Hose Reel with 3/4In. x 100Ft. Hose Owner s Manual WARNING: Read carefully and understand all ASSEMBLY AND OPERATION INSTRUCTIONS before operating. Failure to follow the safety rules and other basic
SANTA CRUZ BICYCLES MY17 Nomad Suspension Setup
 SANTA CRUZ BICYCLES MY17 Nomad Suspension Setup Copyright Santa Cruz Bicycles 2017 TABLE OF CONTENTS SAFETY INSTRUCTIONS... 3 SAG SETUP...3 AIR SPRING FORKS...3 AIR SHOCKS...3 FORK SETUP... 4 LYRIK SOLO
16 Inch Surface Cleaner
 16 Inch Surface Cleaner Owner s Manual WARNING: Read and understand all instructions, warnings, and cautions before using this product. Failure to follow the instructions, warnings, and cautions may result
1200W INVERTER GENERATOR
 1200W INVERTER GENERATOR MODEL NO: IG1200 PART NO: 8877070 OPERATION & MAINTENANCE INSTRUCTIONS LS0117 INTRODUCTION Thank you for purchasing this CLARKE 1200W Inverter Generator. Before attempting to use
40 V LITHIUM-ION BATTERY ATTACH YOUR RECEIPT HERE AB13786C 1. kobalttools.com ITEM # /
 ITEM #0506882 / 0506883 40 V LITHIUM-ION BATTERY MODEL #KB 240-06 / KB 440-06 Français p. 7 Español p. 13 ATTACH YOUR RECEIPT HERE Serial Number Purchase Date AB13786C 1 PRODUCT SPECIFICATIONS Battery
110 Volt/12 Volt Portable Inflator
 110 Volt/12 Volt Portable Inflator Owner s Manual WARNING: Read carefully and understand all ASSEMBLY AND OPERATION INSTRUCTIONS before operating. Failure to follow the safety rules and other basic safety
YK1900i DIGITAL INVERTER GASOLINE GENERATOR OWNER S MANUAL PLEASE READ THIS MANUAL CAREFULLY. IT CONTAINS IMPORTANT SAFETY INFORMATION.
 YK1900i DIGITAL INVERTER GASOLINE GENERATOR OWNER S MANUAL PLEASE READ THIS MANUAL CAREFULLY. IT CONTAINS IMPORTANT SAFETY INFORMATION. PREFACE Thank you for purchasing YANGKE generator. This manual covers
Owner s/operator s Manual
 Water Pump MP2533E2 Owner s/operator s Manual Completely read and understand this manual before using this product. Foreword This Owner s/ Operator s Manual is designed to familiarize the operator with
BT49QT-9O3 User s Manual
 BT49QT-9O3 User s Manual Preface Thank you very much for purchasing BAOTIAN brand motorcycle of model BT49QT-9O3, which developed by BAOTIAN MOTORCYCLE INDUSTRIAL CO., LTD. And welcome to join the driver
OWNER S/OPERATOR S MANUAL. Always wear a helmet it could save your life!
 OWNER S/OPERATOR S MANUAL MINI BIKE Always wear a helmet it could save your life! Never allow any child under the age of 13 to operate this Mini Bike. Persons age 13 to 16 should operate this mini bike
OWNER S/OPERATOR S MANUAL
 OWNER S/OPERATOR S MANUAL Never allow any child under the age of 16 to operate this Dirt Bike without continual adult supervision. Always wear a helmet it could save your life! Model: 125DX Provincial
CLEVELAND CYCLEWERKS THA HEIST / HEIST 250CC / HEIST 125CC USER MANUAL
 CLEVELAND CYCLEWERKS THA HEIST / HEIST 250CC / HEIST 125CC USER MANUAL 8.1.2011 rev 2 DO NOT RIDE IF YOU ARE UNDER THE AGE OF 16. Always wear all necessary and properly fitting protective equipment when
DR49 Dirt Bike OWNER S MANUAL. Read this manual carefully. It contains important safety information.
 DR49 Dirt Bike Read this manual carefully. It contains important safety information. OWNER S MANUAL No one under the age of 16 should operate this Dirtbike without adult supervision. Parents should consider
CHASSIS CONTENTS EXTERIOR PARTS 6-1 FRAME COVER 6-2 REAR FRAME COVER 6-4 FRONT WHEEL 6-6 FRONT BRAKE 6-10 HANDLEBARS 6-17 FRONT FORK 6-19
 CHASSIS CONTENTS EXTERIOR PARTS 6- FRAME COVER 6- REAR FRAME COVER 6-4 FRONT WHEEL 6-6 FRONT BRAKE 6-0 HANDLEBARS 6-7 FRONT FORK 6-9 STEERING 6-6 REAR WHEEL 6-3 REAR BRAKE 6-39 6 REAR SHOCK ABSORBER 6-43
Hydraulic Wheel Dolly
 Hydraulic Wheel Dolly Operating Instructions & Parts Manual Model Number HW93766 Capacity 3/4 Ton Made in the U.S.A. This is the safety alert symbol. It is used to alert you to potential personal injury
No part of this publication may be reproduced without written permission.
 This manual should be considered a permanent part of the motorcycle and should remain with the motorcycle when it is resold. This publication includes the latest production information available before
4400-Lb. Capacity Pallet Jack
 Read carefully and understand all ASSEMBLY AND OPERATION INSTRUCTIONS before operating. Failure to follow the safety rules and other basic safety precautions may result in serious personal injury. Item#
150-Lb. Drywall and Panel Hoist
 150-Lb. Drywall and Panel Hoist Owner s Manual WARNING: Read carefully and understand all ASSEMBLY AND OPERATION INSTRUCTIONS before operating. Failure to follow the safety rules and other basic safety
Adjustable Steel Welding Table
 Adjustable Steel Welding Table Owner s Manual WARNING: Read carefully and understand all ASSEMBLY AND OPERATION INSTRUCTIONS before operating. Failure to follow the safety rules and other basic safety
Hydraulic Drum Transporter
 Hydraulic Drum Transporter Owner s Manual WARNING: Read carefully and understand all ASSEMBLY AND OPERATION INSTRUCTIONS before operating. Failure to follow the safety rules and other basic safety precautions
 3 Protecting Your Xedos Vehicle FUEL REQUIREMENTS EMISSION CONTROL SYSTEM BEFORE DRIVING RUNNING-IN ECONOMICAL OPERATION SPECIAL DRIVING CONDITIONS LABEL INFORMATION 3-2 3-2 3-3 3-4 3-4 3-5 3-8 3-1 3-2
AIR-COOLED DIESEL GENERATOR OWNERʼS MANUAL. This manual contains important safety information. TDG2500E TDGW7000E TDG7000SE TDG4500E
 AIR-COOLED DIESEL GENERATOR OWNERʼS MANUAL This manual contains important safety information. TDG2500E TDGW7000E TDG7000SE TDG4500E TDG8000-3 TDG7000SE-3 TDG7000E TDG8000E TDGW7000SE TDG7000E3 TDGW8000E
ATV Log Arch and Holder
 ATV Log Arch and Holder Owner s Manual WARNING: Read carefully and understand all ASSEMBLY AND OPERATION INSTRUCTIONS before operating. Failure to follow the safety rules and other basic safety precautions
3-Pt. Quick Hitch. Owner s Manual
 3-Pt. Quick Hitch Owner s Manual WARNING: Read carefully and understand all ASSEMBLY AND OPERATION INSTRUCTIONS before operating. Failure to follow the safety rules and other basic safety precautions may
Mini Lever Hoist. Owner s Manual
 Mini Lever Hoist Owner s Manual WARNING: Read carefully and understand all ASSEMBLY AND OPERATION INSTRUCTIONS before operating. Failure to follow the safety rules and other basic safety precautions may
Heavy-Duty Drywall Dolly Cart
 Heavy-Duty Drywall Dolly Cart Owner s Manual WARNING: Read carefully and understand all ASSEMBLY AND OPERATION INSTRUCTIONS before operating. Failure to follow the safety rules and other basic safety precautions
PLEASE BE SAFE WHEN RIDING ALWAYS WEAR A HELMET AND OBEY ALL LAWS!
 X-Treme TM Electric Scooters X-10 Electric Scooter Owner s Manual PLEASE BE SAFE WHEN RIDING ALWAYS WEAR A HELMET AND OBEY ALL LAWS! Page1 IMPORTANT BATTERY MAINTENANCE and CHARGING INSTRUCTIONS 1. You
POWERSPORTS OWNER S MANUAL
 POWERSPORTS OWNER S MANUAL CT200U Recommended Age 13+ Provincial / Municipal governments have different regulations pertaining to owning and operating an off-road vehicle, learn the regulations in your
Quadratec 3 Add-A-Leaf Suspension Lift Kit
 Quadratec 3 Add-A-Leaf Suspension Lift Kit Installation Manual: for 1984-2001 Cherokee (XJ) # 16400.005X PARTS LIST: Front Coil Springs - QTY 2 Add-A-Leafs - QTY 2 5/16 x 3 Tie Bolts - QTY 2 5/16 Tie Bolt
OWNER S MANUAL SELF-PRIMING PORTABLE UTILITY PUMP
 Model 54011-0 OWNER S MANUAL SELF-PRIMING PORTABLE UTILITY PUMP Questions, problems, missing parts? Before returning to the store call AQUAPRO Customer Service 8 a.m. - 5 p.m., EST, Monday-Friday 1-844-242-2475
Heavy-Duty Welding Fabrication Table
 Heavy-Duty Welding Fabrication Table with Fix-Up Kit Owner s Manual WARNING: Read carefully and understand all ASSEMBLY AND OPERATION INSTRUCTIONS before operating. Failure to follow the safety rules and
MANUAL SERVICE MANUAL FOR HYDRASTAR HYDRAULIC TRAILER BRAKE ACTUATORS
 MANUAL 440-1008 SERVICE MANUAL FOR HYDRASTAR HYDRAULIC TRAILER BRAKE ACTUATORS THIS DOCUMENT TO BE USED FOR HBA-10, HBA-12, HBA-16, MHBA-10, MHBA-12, MHBA-16 ACTUATORS ECN 04007 Manual 440-1008 Rev E Page
GRAVELY CONVERTIBLE 10 CONVERTIBLE 12 OWNERS MANUAL
 A SAFETY MESSAGE The product for which you have requested information or replacement parts is not a current product. The replacement models incorporate product designs, safety features, safety instruction
Manual Operated Floor Jack
 Manual Operated Floor Jack OPERATING INSTRUCTIONS Note: There may be some slight differences in the appearance of the various manually-operated floor jacks, however the instructions in this manual apply
MODELS 1324 & 1624 & 1824
 THE MODELS 1324 & 1624 & 1824 HYDRAULIC TRENCHERS CONGRATULATIONS! You are now the proud owner of a BARRETO trencher. Please take a moment of your time to look over the following information. Familiarize
2000-lb Hand Winch Truck Crane
 2000-lb Hand Winch Truck Crane Owner s Manual WARNING: Read carefully and understand all ASSEMBLY AND OPERATION INSTRUCTIONS before operating. Failure to follow the safety rules and other basic safety
1250 LB. CAPACITY MECHANICAL WHEEL DOLLY
 1250 LB. CAPACITY MECHANICAL WHEEL DOLLY 67287 SET-UP AND OPERATING INSTRUCTIONS Visit our website at: http://www.harborfreight.com Read this material before using this product. Failure to do so can result
1000 lb. Adjustable Gantry Crane
 1000 lb. Adjustable Gantry Crane Owner s Manual WARNING: Read carefully and understand all ASSEMBLY AND OPERATION INSTRUCTIONS before operating. Failure to follow the safety rules and other basic safety
Angle Grinder Holder
 Angle Grinder Holder Owner s Manual WARNING: Read carefully and understand all ASSEMBLY AND OPERATION INSTRUCTIONS before operating. Failure to follow the safety rules and other basic safety precautions
User Manual of Bagibike Electric Bicycles
 User Manual of Bagibike Electric Bicycles Model: Bagibike B16. http://www.bagibike.com Page 1 FOREWORD The following operation manual is a guide to assist you. This manual is not a complete document on
Drum Deheader. Owner s Manual
 Drum Deheader Owner s Manual WARNING: Read carefully and understand all ASSEMBLY AND OPERATION INSTRUCTIONS before operating. Failure to follow the safety rules and other basic safety precautions may result
60 Watt Industrial LED Low Bay Light
 60 Watt Industrial LED Low Bay Light Owner s Manual WARNING: Read carefully and understand all ASSEMBLY AND OPERATION INSTRUCTIONS before operating. Failure to follow the safety rules and other basic safety
12 Volt Heavy-Duty Air Inflator
 12 Volt Heavy-Duty Air Inflator Owner s Manual WARNING: Read carefully and understand all ASSEMBLY AND OPERATION INSTRUCTIONS before operating. Failure to follow the safety rules and other basic safety
OPERATIONS MANUAL LEVER CHAIN HOIST
 OPERATIONS MANUAL LEVER CHAIN HOIST IMPORTANT SAFETY INFORMATION Please read, understand and follow all safety information contained in these instructions prior to the use of this hoist. Retain these instructions
SECTION 3 STARTING AND DRIVING MR2 U
 STARTING AND DRIVING SECTION 3 Before starting the engine................................... 122 How to start the engine...................................... 122 Tips for driving in various conditions...........................
CHASSIS CONTENTS EXTERIOR PARTS 6-1 FRONT WHEEL 6-2 FRONT BRAKE 6-6 HANDLEBARS 6-12 REAR WHEEL 6-30 REAR BRAKE 6-34 REAR SHOCK ABSORBER 6-36
 CHASSIS CONTENTS EXTERIOR PARTS 6-1 FRONT WHEEL 6-2 FRONT BRAKE 6-6 HANDLEBARS 6-12 FRONT FORK ( ) 6-14 FRONT FORK ( ) 6-20 STEERING 6-27 REAR WHEEL 6-30 REAR BRAKE 6-34 REAR SHOCK ABSORBER 6-36 6 SWING
BATTERY & STARTER ANALYSER (BSA-12) User Manual
 User Manual") BATTERY & STARTER ANALYSER (BSA-12) User Manual Introduction BSA-12 Battery Starter Analyser does not carry internal batteries but is powered up from external DC source ranging from 9V to 15V DC. It is
BATTERY & STARTER ANALYSER (BSA-12) User Manual Introduction BSA-12 Battery Starter Analyser does not carry internal batteries but is powered up from external DC source ranging from 9V to 15V DC. It is
Owner s Manual & Safety Instructions
 Owner s Manual & Safety Instructions Save Save This This Manual Keep Keep this this manual manual for for the the safety safety warnings warnings and and precautions, assembly, assembly, operating, inspection,
12V Oil Extractor Pump
 12V Oil Extractor Pump Owner s Manual WARNING: Read carefully and understand all ASSEMBLY AND OPERATION INSTRUCTIONS before operating. Failure to follow the safety rules and other basic safety precautions
THANK YOU FOR CHOOSING ATOM ELECTRIC.
 THANK YOU FOR CHOOSING ATOM ELECTRIC. We have worked hard to make sure your board meets or exceeds your expectations. If for any reason it doesn t, or if you have any suggestions for improvements please
Manual Chain Hoist. Owner s Manual
 Manual Chain Hoist Owner s Manual WARNING: Read carefully and understand all ASSEMBLY AND OPERATION INSTRUCTIONS before operating. Failure to follow the safety rules and other basic safety precautions
Owner s Manual Supplement. Liquefied Petroleum Gas (LPG) Fuel System for 1998 GM Medium Duty Chassis (C-60/C-70) with 6.0L and 7.
 Fuel System for 1998 GM Medium Duty Chassis (C-60/C-70) with 6.0L and 7.") Owner s Manual Supplement Liquefied Petroleum Gas (LPG) Fuel System for 1998 GM Medium Duty Chassis (C-60/C-70) with 6.0L and 7.0L V8 OWNERS MANUAL SUPPLEMENT Table of Contents Refueling Your Vehicle...1
Owner s Manual Supplement Liquefied Petroleum Gas (LPG) Fuel System for 1998 GM Medium Duty Chassis (C-60/C-70) with 6.0L and 7.0L V8 OWNERS MANUAL SUPPLEMENT Table of Contents Refueling Your Vehicle...1