RESIDUE MANAGER FOR KINZE UNIT MOUNTED COULTER OPERATOR S MANUAL
|
|
|
- Jayson Johns
- 6 years ago
- Views:
Transcription

 Website: www.yetterco.")
1 RESIDUE MANAGER FOR KINZE UNIT MOUNTED COULTER OPERATOR S MANUAL /2018 YETTER MANUFACTURING CO. FOUNDED 1930 Colchester, IL Toll free: 800/ / (Fax) Website: info@yetterco.com
2 FOREWORD You ve just joined an exclusive but rapidly growing club. For our part, we want to welcome you to the group and thank you for buying a Yetter product. We hope your new Yetter products will help you achieve both goals-increase your productivity and increase your efficiency so that you may generate more profit. This operator s manual has been designed into four major sections: Foreword, Safety Precautions, Installation Instructions and Parts Breakdown. This SAFETY ALERT SYMBOL indicates important safety messages in the manual. When you see this symbol, be alert to the possibility of PERSONAL INJURY and carefully read the message that follows. The word NOTE is used to convey information that is out of context with the manual text. It contains special information such as specifications, techniques and reference information of a supplementary nature. The word IMPORTANT is used in the text when immediate damage will occur to the machine due to improper technique or operation. Important will apply to the same information as specified by note only of an immediate and urgent nature. It is the responsibility of the user to read the operator s manual and comply with the safe and correct operating procedure and to lubricate and maintain the product according to the maintenance schedule in the operator s manual. The user is responsible for inspecting his machine and for having parts repaired or replaced when continued use of the product would cause damage or excessive wear to the other parts. It is the user s responsibility to deliver his machine to the Yetter dealer who sold him the product for service or replacement of defective parts, which are covered by the warranty policy. If you are unable to understand or follow the instructions provided in this publication, consult your local Yetter dealer or contact: YETTER MANUFACTURING CO. 309/ / / (FAX) Website: info@yetterco.com WARRANTY Yetter Manufacturing warrants all products manufactured and sold by it against defects in material. This warranty being expressly limited to replacement at the factory of such parts or products as shall appear to be defective after inspection. This warranty does not obligate the Company to bear cost of labor in replacement of parts. It is the policy of the Company to make improvements without incurring obligations to add them to any unit already sold. No warranty is made or authorized to be made, other than herein set forth. This warranty is in effect for one year after purchase. DEALER Yetter Manufacturing warrants its own products only and cannot be responsible for damages to equipment on which mounted. 2
3 SAFETY PRECAUTIONS A brief description of signal words that may be used in this manual: CAUTION: Used as a general reminder of good safety practices or to direct attention to unsafe practices. WARNING: Denotes a specific potential hazard. DANGER: Denotes the most serious specific potential hazard. CAUTION Consult your implement and tractor operator s manual for correct and safe operating practices. Be aware of towed implement width and allow safe clearance. CAUTION: SAFETY SIGNS Safety decals are placed on the implement to alert the operator and others to the risk of personal injury or unsafe operation during normal operations and servicing. 1. The safety decals must be kept clean and in good condition to ensure that they are legible. 2. Safety decals must be replaced if they are missing or illegible. 3. When components are replaced during repair or servicing, check that the new components include the necessary safety signs. 4. Replacement safety decals may be obtained from your local dealer. WARNING Read these instructions carefully to acquaint yourself with the Equipment. Working with unfamiliar equipment can lead to accidents. Never park the equipment on a steep incline or leave the equipment running unattended. Never clean, lubricate or adjust a machine that is in motion. Always check that straps are secure. Make sure latches are in pinned position when moving equipment. Do not allow children to operate this equipment. Do not allow riders on the equipment, trailer and/or pick-up. Use speed and caution dictated by the terrain being traversed. Do not operate on any slope steep enough to cause tipping or loss of control. Read and understand the operator s manual and require all other persons who will operate the equipment to do the same. If operating on public roadways, where legal, be certain all lighting is operating properly and observe all traffic laws. Beware of increased stopping distances and control effort when operating with implements attached. Be familiar with all controls and be prepared to stop equipment quickly in an emergency. FAILURE TO HEED MAY RESULT IN PERSONAL INJURY OR DEATH. 3

4 INTRODUCTION The RESIDUE MANAGER has been designed as a universal fitment for several models of Kinze Unit Mounted Coulters Planter Models 2000, 3000, TABLE OF CONTENTS Foreword... 2 Safety... 3 Torque Specifications... 5 Image Identifications Assembly Instructions Operation... 22,24 Planter Height Adjustment Maintenance Part Identification Wheel Options Images
5 BOLT TORQUE Before operating the Residue Manager for the first time, check to be sure that all hardware is tight. Check all hardware again after approximately 50 hours of operation and at the beginning of each planting season. All hardware used on the Residue Manager is Grade 5 unless otherwise noted. Grade 5 cap screws are marked with three radial lines on the head. If hardware must be replaced, be sure to replace it with hardware of equal size, strength and thread type. Refer to the torque values chart when tightening hardware. Important: Over tightening hardware can cause as much damage as when under tightening. Tightening hardware beyond the recommended range can reduce its shock load capacity. The chart below is a guide for proper torque. Use it unless a specified torque is called out elsewhere in the manual. Torque is the force you apply to the wrench handle or the cheater bar, times the length of the handle or bar. Use a torque wrench whenever possible. The following table shows torque in ft. lbs. for coarse thread hardware. Lubricate all bearings and moving parts as assembled and make certain that they work freely. WARNING: Never work around the toolbar/implement while in a raised position without using safety lockups. CAUTION: The Residue manager attachments are very heavy. Pay extra attention to lifting techniques while handling and or maneuvering the opener during assembly. Failure to do so may lead to personal injury. 5

6 6 IMAGE IDENTIFICATION
7 IMAGE IDENTIFICATION 7


8 8 IMAGE IDENTIFICATION
9 IMAGE IDENTIFICATION 9
10 10 IMAGE IDENTIFICATION


11 IMAGE IDENTIFICATION 11


12 12 IMAGE IDENTIFICATION


13 IMAGE IDENTIFICATION 13
14 ASSEMBLY INSTRUCTIONS STEP 1. Remove the bottom left hand bolt from the coulter. Install the mount bracket with the ½ X 2 cap screw, ½ flat washers and ½ locknut. 14
15 ASSEMBLY INSTRUCTIONS STEP 1A. CAST IRON COULTER Remove the bottom left hand bolt from the coulter. Install the mount bracket with the ½ X 2-1/4 cap screw, ½ flat washers, adapter and ½ locknut. 15
16 ASSEMBLY INSTRUCTIONS STEP 2. Attach the combo arm to the coulter and mount bracket using the ¾ X 10 cap screw, ¾ flat washers, bushings, adjustment plate and ¾ locknut. 16
17 ASSEMBLY INSTRUCTIONS STEP 2A. Attach the combo arm to the coulter and mount bracket using the ¾ cap screws, ¾ flat washers, bushings and adjustment plate. 17
18 ASSEMBLY INSTRUCTIONS STEP 3. Attach adjustment plate to the mount bracket using the ½ x 2 cap screw and ½ locknut. DO NOT FULLY TIGHTEN UNTIL STEP 4. 18
19 ASSEMBLY INSTRUCTIONS STEP 4. Install the pin to align the adjustment holes of the combo arm, mount bracket and adjustment plate. NOW FULLY TIGHTEN THE ½ X 2 cap screw to secure the adjustment plate in position. 19
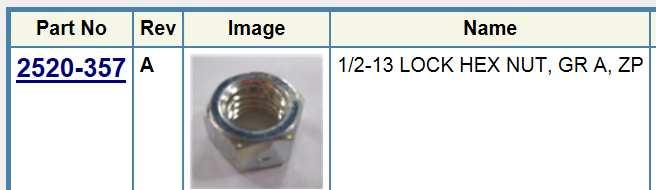
20 ASSEMBLY INSTRUCTIONS STEP 5. Attach the left hand, right hand wheel assemblies and scrapers to the combo arm. Secure with the 5/8 flange lock hex nuts. 20
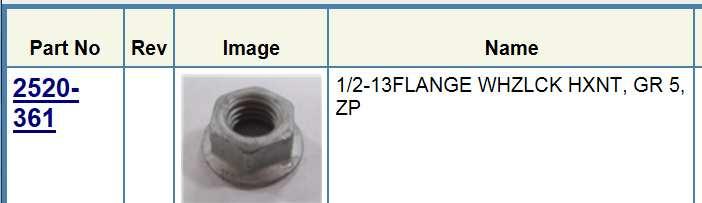
21 ASSEMBLY INSTRUCTIONS STEP 6. OPTIONAL: Attach the cylinder anchor to the combo arm using the ½ carriage bolts, spacers and ½ flange lock nuts. Attach the air cylinder to the mount bracket using the 7/16 X 1-1/2 cap screw and 7/16 flange lock nut. 21
22 OPERATION PRECAUTIONS - MACHINE OPERATION STOP Read this before using the Yetter product. IMPORTANT: failure to properly set the planter frame height and levelness can result in less than successful operation of the planter and the Yetter product and may result in damaged equipment. All operators should read and thoroughly understand the instructions given prior to using the Yetter product. NOTE: DO NOT use this product if the planter is not adjusted properly! Leveling the planter: With the planter lowered to proper operating height (Usually ). Read the planter operator s manual for recommended setting. Check to be sure the toolbar and row unit parallel arms are level fore and aft. Recheck when the planter is in the field and has been fully loaded with seed, fertilizer, granular chemicals, etc. Also, a field check with a bubble level on the frame should be made of the hitch height to ensure level operation front to back. It is important for the planter to operate level laterally. Tire pressure must be maintained at pressures specified by the manufacturer. Field and actual planting conditions change and will dictate planter frame heights. You must ensure that the row unit parallel arms are approximately parallel with the ground. IMPORTANT: For proper operation of the planter attachments and row units, it is imperative that the planter toolbars and row unit parallel arms be level side-to-side and front-to-rear. The toolbar frame should operate at a height from the planting surface. Check the manufacturer s operator s manual for instructions on how to adjust the frame height and levelness. 22
23 PLANTER HEIGHT ADJUSTMENT Figure A. The planter hitch and frame are both 20 off the ground. To ensure this, visually check to see that the planter boxes are level and that the planter unit parallel arms are also parallel with the ground. When using planter attachments located in front of the planter unit, this setting is very important. Figure B. The planter hitch is set too low while the planter frame remains at 20 off the ground! Notice from the illustration that the unit mounted coulter is running deeper in the ground than the planter unit. This condition can result in the formation of an air pocket below the seedbed, which will in turn dramatically decrease seed growth. NOTE: Both illustrations are strictly for reference only. They are intended to show that proper adjustment of the hitch height is critical. Consult your planter operator s manual for the proper height adjustment of the hitch. 23
24 OPERATION CAUTION: Where rocks are present the residue manager should be set in the float position, not locked down. Adjust the residue manager to move crop residue aside and not move any soil. Adjustments to the residue manager may have to be made when changing field conditions and type and amount of residue. - Float setting install the adjustment pin under the residue manager arm. - Rigid setting install the adjustment pin through the residue arm. ROW CLEANER DO S AND DON TS 1. DO NOT move soil; Residue Managers are designed to move crop residue only. 2. DO NOT operate planter at slow speeds, ground speed affects how aggressive the spoke wheels are; operate at sufficient speed (4-6 mph) to maintain good residue flow. 3. DO NOT expect 100% of crop residue to be cleared, it is not necessary and would necessitate engaging the soil. The width of path cleared depends on ground conditions, depth setting and ground speed. 4. DO expect to see wheels occasionally quit turning, indicates ideal (shallow) setting which is not moving soil. 5. DO adjust toolbar frame height and drawbar correctly. Very important to ensure planter opener will follow ground contours properly. IMPORTANT: For proper operation, the planter frame must operate level (for, aft and side to side) and at the correct height, typically Regularly inspect the residue manager for loose or worn bolts. Repair and replace as needed. 24
25 MAINTENANCE BEARING ASSEMBLY AND LUBRICATION Practice Safety Understand and practice safe service procedures before doing work. Follow ALL the operating, maintenance and safety information in the equipment operator manual. Clear the area of bystanders, especially small children, when performing any maintenance or adjustments. Keep work area clean and dry. Use adequate lighting for the job. Use only tools, jacks and hoists of sufficient capacity for the job. Never lubricate, service, or adjust machine while it is moving. Keep hands, feet, and clothing from power-driven moving and rotating parts. Disengage all power and operate controls to relieve pressure. Lower equipment to the ground and stop the engine. Remove the key. Wait for all moving parts to stop before servicing, adjusting, repairing or unplugging. Securely support any machine elements with blocks or safety stands that must be raised for service work. Keep all parts in good condition and properly installed. Fix damaged equipment immediately. Replace worn or broken parts. Remove any buildup of grease, oil, or debris. Make sure all guards are in place and properly secured when maintenance work is completed. Assembly 25
26 MAINTENANCE NOTE: Be certain to align the grease fitting with the slot in the wheel and the hubcap so that the grease can flow freely. 26


27 MAINTENANCE Grease must fill this Hubcap cavity. 27
28 MAINTENANCE CAUTION: To help prevent serious injury or death to you or others caused by unexpected movement, service machine on a level surface. Lower machine to ground or sufficiently lock or block raised machine before servicing. If machine is connected to tractor, engage parking brake and place transmission in "PARK", shut off engine and remove key. If machine is detached from tractor, block wheels and use shop stands to prevent movement. CAUTION: Do not clean, lubricate, or adjust machine while in motion. Use grease based on NLGI consistency numbers and the expected air temperature range during the service interval. Use a multi-purpose polyurea, water resistant, moderate speed, and NLGI grade #2 grease. Other greases may be used if they meet the following NLGI Performance Classification: GC-LB IMPORTANT: Some types of grease thickener are not compatible with others. Consult your grease supplier before mixing different types of grease. Conditions in certain geographical areas may require special lubricants and lubrication practices which do not appear in the operator's manual. If there are any questions, consult Yetter Manufacturing Co. to obtain latest information and recommendation. PART # DESCRIPTION OUNCES OF GREASE TAPER TOOTH R.M. WHEEL 1.12 OZ SHARK TOOTH R.M. WHEEL 1.12 OZ FLOATER WHEEL KIT W/R.M. WHEEL 2.08 OZ HEAVY DUTY OR BEVEL R.M. WHEEL W/ FLOATER WHEEL KIT 2.40 OZ Storing Lubricants Your machine can operate at top efficiency only if clean lubricants are used. Use clean containers to handle all lubricants. Store them in an area protected from dust, moisture and other contaminants. 28
29 Lubrication Symbols MAINTENANCE Lubricate with grease at hourly interval indicated on symbol. Lubrication Intervals IMPORTANT: The recommended service intervals are based on normal conditions; severe or unusual conditions may require more frequent lubrication. Perform each lubrication and service procedure at the beginning and end of each season. Clean grease fittings before using grease gun, to avoid injecting dirt and grit into the bearing. Replace any lost or broken fittings immediately. If a fitting fails to take grease, remove and clean thoroughly, replace fitting if necessary. Also check for failure of adjoining parts. BEARING REPLACEMENT INSTALLATION 1. When assembling the spoke wheels, bearing assembly and hubcap, be sure to align the grease transfer hole in the spoke wheel with the groove in the hubcap and hole in the hub to allow grease passage. 2. Assemble the wheels, hubs and caps. 3. Grease the wheel/hub/bearing assembly. 29
30 MAINTENANCE Storing the Equipment Store the machine in an area away from human activity Store machine in RAISED position. Install service locks on all wheel cylinders. At the end of the season, the machine should be thoroughly inspected and prepared for storage. Repair or replace any worn or damaged components to prevent down time at the start of the next season. Store machine under cover with all parts in operating condition. Clean machine thoroughly to remove all dirt, debris, and crop residue, which would hold moisture and cause rusting. Inspect machine for worn or broken parts. See your Yetter Farm Equipment dealer during the off-season so that parts or service can be acquired when machine is not needed in the field. Lubricate bearings as outlined in the Lubrication section Paint all parts which are chipped or worn and require repainting. Store machine in a clean, dry place with the planting unit out of the sun. If the machine cannot be stored inside, cover with a waterproof tarpaulin and tie securely in place. Do not allow children to play on or around the machine 30
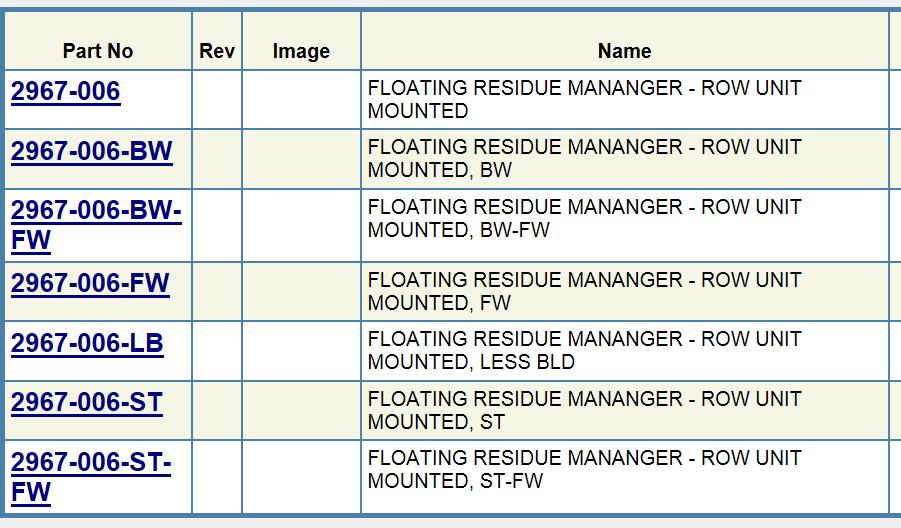
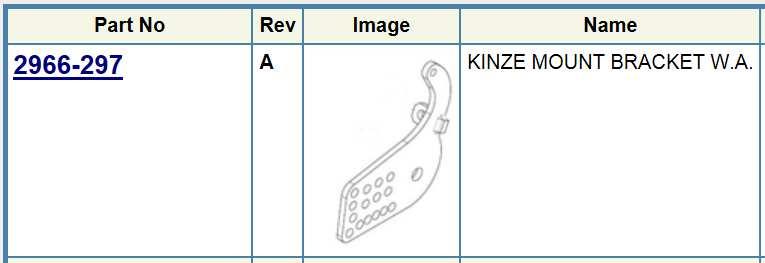
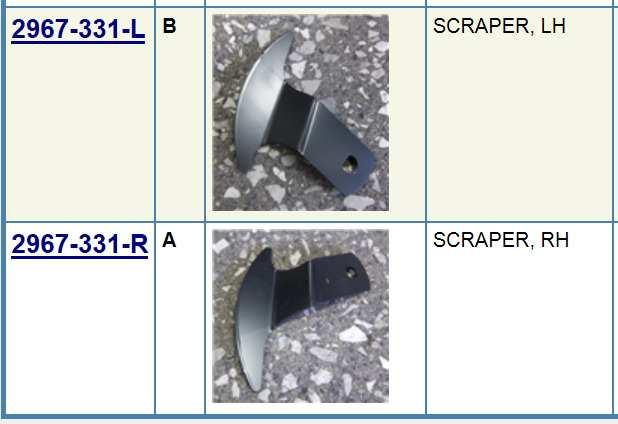
31 PART IDENTIFICATION
32 32 PART IDENTIFICATION

33 PART IDENTIFICATION
34 34 PART IDENTIFICATION
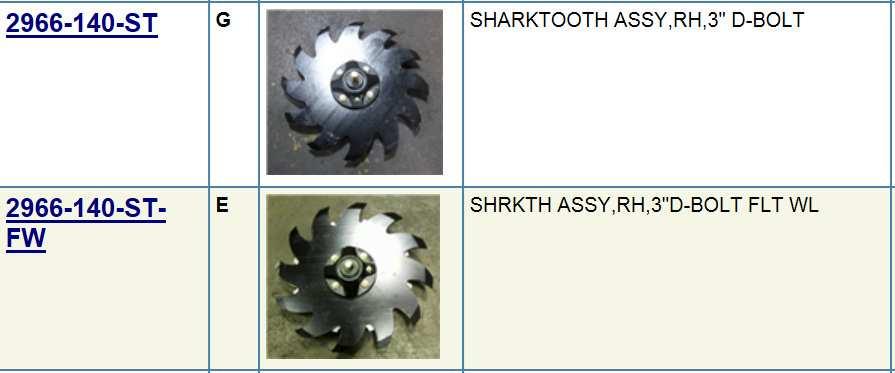
35 PART IDENTIFICATION ST-FW (SHOWN) ITEM PART # DESCRIPTION QTY WHEEL COVER (NOT SHOWN) /16-18 FLANGE LOCK NUT D-BOLT, FLGD, 5/8-11 X GR HUB AND BEARING ASS Y., 4 BOLT SEAL BEARING INSERT HUB CAP CASTING, 4 BOLT BLACK FLOATER WHEEL /16-18 X 1 ¾ CRBLT GR5 ZP (FLOATER WHEEL) SHOWN /16-18 X 1 1/4 CRBLT GR5 ZP (SHARK TOOTH) /16-18 X 1 ½ CRBLT GR 5 (BEVELED WHEEL) SHARKTOOTH WHEEL (SHOWN) TAPERTOOTH (OPTION) BEVELED WHEEL LH (OPTION) BEVELED WHEEL RH (OPTION) 1 35
36 36 WHEEL OPTIONS
37 37
38 38
39 39
40 /2018
RESIDUE MANAGER TWIN ROW PLANTER
 2966-020 RESIDUE MANAGER TWIN ROW PLANTER OPERATOR S MANUAL PART IDENTIFICATION 2565-780_REV_A 01/2014 YETTER MANUFACTURING CO. FOUNDED 1930 Colchester, IL 62326-0358 Toll free: 800/447-5777 309/776-3222
SINGLE WHEEL RESIDUE MANAGER FOR MONOSEM PLANTER
 2967-003 SINGLE WHEEL RESIDUE MANAGER FOR MONOSEM PLANTER OPERATOR S MANUAL PART IDENTIFICATION 2565-768_REV_B 02/2016 YETTER MANUFACTURING CO. FOUNDED 1930 Colchester, IL 62326-0358 Toll free: 800/447-5777
TITAN SERIES SHORT U.N.T SHORT U.N.T. CNH
 TITAN SERIES 2967-029 SHORT U.N.T. 2967-097 SHORT U.N.T. CNH RESIDUE MANAGER OPERATOR S MANUAL PART IDENTIFICATION 2565-696_REV_F 12/2015 YETTER MANUFACTURING CO. FOUNDED 1930 Colchester, IL 62326-0358
TITAN SERIES / NARROW ROW SHORT U.N.T.
 TITAN SERIES 2967-013/2967-014 NARROW ROW SHORT U.N.T. RESIDUE MANAGER OPERATOR S MANUAL PART IDENTIFICATION 2565-748_REV_G 03/2016 YETTER MANUFACTURING CO. FOUNDED 1930 Colchester, IL 62326-0358 Toll
STRIP FRESHENER
 2984-150 STRIP FRESHENER OPERATOR MANUAL PARTS IDENTIFICATION 2565-963 02/2018 YETTER MANUFACTURING CO. FOUNDED 1930 Colchester, IL 62326-0358 Toll free: 800/447-5777 309/776-3222 (Fax) Website: www.yetterco.com
TITAN SERIES SHORT U.N.T SHORT U.N.T. CNH
 TITAN SERIES 2967-029 SHORT U.N.T. 2967-097 SHORT U.N.T. CNH RESIDUE MANAGER OPERATOR S MANUAL PART IDENTIFICATION 2565-696_REV_G 09/2015 YETTER MANUFACTURING CO. FOUNDED 1930 Colchester, IL 62326-0358
TITAN TM SERIES A SHORT U.N.T. TM A SHORT U.N.T. TM CNH
 TITAN TM SERIES 2967-029A SHORT U.N.T. TM 2967-097A SHORT U.N.T. TM CNH RESIDUE MANAGER Owner s Manual Part Identification 2565-696_Rev_I - 01/2018 YETTER MANUFACTURING CO. Founded 1930 Colchester, IL
TITAN SERIES A/ A NARROW ROW SHORT U.N.T.
 TITAN SERIES 2967-013A/2967-014A NARROW ROW SHORT U.N.T. RESIDUE MANAGER OPERATOR S MANUAL PART IDENTIFICATION 2565-748_I JULY 2017 YETTER MANUFACTURING CO. FOUNDED 1930 Colchester, IL 62326-0358 Toll
OPERATOR S MANUAL PARTS IDENTIFICATION _REV_F 11/2016 YETTER MANUFACTURING CO. FOUNDED 1930
 2920-012 DISC SEALER 12 SMOOTH 2920-015 DISC SEALER 13 RESIDUE WHEEL 2920-016 DISC SEALER 16 SMOOTH 2920-016-N DISC SEALER NOTCHED 2920-016-ST DISC SEALER SHARK TOOTH 2920-021 DISC SEALER FOR 2995/2996
TITAN / /
 TITAN 2967-033/2967-038/2967-039 RESIDUE MANAGER OPERATOR S MANUAL PART IDENTIFICATION 2565-736_REV_F 02/2016 YETTER MANUFACTURING CO. FOUNDED 1930 Colchester, IL 62326-0358 Toll free: 800/447-5777 309/776-3222
MAINTENANCE BEARING ASSEMBLY AND LUBRICATION
 2570-594 BEARING ASSEMBLY AND LUBRICATION Practice Safety Understand and practice safe service procedures before doing work. Follow ALL the operating, maintenance and safety information in the equipment
TITAN RESIDUE MANAGER FOR CNH PLANTER UNITS OPERATOR S MANUAL PART IDENTIFICATION _REV_G 02/2016
 TITAN RESIDUE MANAGER FOR CNH PLANTER UNITS 2967-008 OPERATOR S MANUAL PART IDENTIFICATION 2565-695_REV_G 02/2016 YETTER MANUFACTURING CO. FOUNDED 1930 Colchester, IL 62326-0358 Toll free: 800/447-5777
YETTER MANUFACTURING CO. FOUNDED 1930 Colchester, IL Toll free: 800/ / (Fax) Website:
 Website:") YETTER MANUFACTURING CO. FOUNDED 1930 Colchester, IL 62326-0358 Toll free: 800/447-5777 309/776-3222 (Fax) Website: www.yetterco.com E-mail: info@yetterco.com FOREWORD You ve just joined an exclusive but
YETTER MANUFACTURING CO. FOUNDED 1930 Colchester, IL 62326-0358 Toll free: 800/447-5777 309/776-3222 (Fax) Website: www.yetterco.com E-mail: info@yetterco.com FOREWORD You ve just joined an exclusive but
TITAN UNIVERSAL UNIT MOUNTED FLOATING RESIDUE MANAGER
 2967-030 TITAN UNIVERSAL UNIT MOUNTED FLOATING RESIDUE MANAGER YETTER MANUFACTURING CO. FOUNDED 1930 Colchester, IL 62326-0358 Toll free: 800/447-5777 309/776-3222 (Fax) Website: www.yetterco.com E-mail:
RESIDUE MANAGER FOR JD SCREW ADJUST _REV_C 02/2016
 2967-081 RESIDUE MANAGER FOR JD SCREW ADJUST 2565-448_REV_C 02/2016 REVISED 02/23/16 Key Qty. Part No. Description 1 8 2505-208 5/16-18 X 1 1/2 Car. Bolt Gr. 5 2 2 2965-352 Hub Cap Casting, 4 Bolt, Black
TITAN SERIES 2960 U.N.T. COULTER U.N.T. RESIDUE MANAGER OPERATOR S MANUAL
 TITAN SERIES 2960 U.N.T. COULTER 2967-007 U.N.T. RESIDUE MANAGER OPERATOR S MANUAL 2565-692_REV_I 12/2017 YETTER MANUFACTURING CO. FOUNDED 1930 Colchester, IL 62326-0358 Toll free: 800/447-5777 309/776-3222
2960 SERIES II UNIT MOUNTED CONSERVATION COULTER
 2960 SERIES II UNIT MOUNTED CONSERVATION COULTER YETTER MANUFACTURING CO. FOUNDED 1930 Colchester, IL 62326-0358 Toll free: 800/447-5777 309/776-3222 (Fax) Website: www.yetterco.com E-mail: info@yetterco.com
2965 TRASHMASTER 2967 RESIDUE MANAGER
 2965 TRASHMASTER 2967 RESIDUE MANAGER SET-UP & PARTS MANUAL 2565-631_REV_G 11/2016 YETTER MANUFACTURING CO. FOUNDED 1930 Colchester, IL 62326-0358 Toll free: 800/447-5777 309/776-3222 (Fax) Website: www.yetterco.com
HD HEAVY DUTY COULTER
 2910-130-HD HEAVY DUTY COULTER OPERATOR S MANUAL PART IDENTIFICATION 2565-743_REV_A 11/2016 YETTER MANUFACTURING CO. FOUNDED 1930 Colchester, IL 62326-0358 Toll free: 800/447-5777 309/776-3222 (Fax) Website:
2995 XFC Fertilizer Coulter 2995 XCC Cutting Coulter OPERATORS MANUAL
 2995 XFC Fertilizer Coulter 2995 XCC Cutting Coulter OPERATORS MANUAL WITH PARTS IDENTIFICATION 2565-788_REV_A 09/2017 YETTER MANUFACTURING CO. FOUNDED 1930 Colchester, IL 62326-0358 Toll free: 800/447-5777
2987 NH3 MAGNUM _REV_M 02/2017
 2987 NH3 MAGNUM 2565-758_REV_M 02/2017 YETTER MANUFACTURING CO. FOUNDED 1930 Colchester, IL 62326-0358 Toll free: 800/447-5777 309/776-3222 (Fax) Website: www.yetterco.com E-mail: info@yetterco.com 2 3
10000 SERIES MAGNUM FERTILIZER COULTER _Rev_D 02/2018
 10000 SERIES MAGNUM FERTILIZER COULTER 2565-957_Rev_D 02/2018 YETTER MANUFACTRURING CO. Founded 1930 Colchester, IL 62326-0358 Toll free: 800-447-5777 Fax: 309-776-3222 Website: www.yetterco.com Email:
INSTRUCTION MANUAL AND PARTS CATALOG V-CLOSE WHEEL KIT CNH ROW UNIT
 INSTRUCTION MANUAL AND PARTS CATALOG V-CLOSE WHEEL KIT CNH ROW UNIT YETTER MANUFACTURING CO. FOUNDED 1930 Colchester, IL 62326-0358 Toll free: 800/447-5777 309/776-3222 (Fax) Website: www.yetterco.com
3800 SERIES SINGLE HYDRAULIC LOCKING TOOLBAR
 3800 SERIES SINGLE HYDRAULIC LOCKING TOOLBAR 2565-774_REV_D 02/2018 OPERATOR S MANUAL PART IDENTIFICATION YETTER MANUFACTURING CO. FOUNDED 1930 Colchester, IL 62326-0358 Toll free: 800/447-5777 309/776-3222
2984 MAVERICK OPENER OPERATOR & PARTS MANUAL
 2984 MAVERICK OPENER OPERATOR & PARTS MANUAL YETTER MANUFACTURING CO. FOUNDED 1930 Colchester, IL 62326-0358 Toll free: 800/447-5777 309/776-3222 (Fax) Website: www.yetterco.com E-mail: info@yetterco.com
ROW UNIT MID-MOUNT FERTILIZER INJECTION OPENER MODELS A, A SINGLE WHEEL MODELS , DUAL WHEEL
 ROW UNIT MID-MOUNT FERTILIZER INJECTION OPENER MODELS 2968-020A, 2968-012A SINGLE WHEEL MODELS 2968-040, 2968-041 DUAL WHEEL SET UP & PARTS MANUAL 2565-951_REV_B 12/2018 YETTER MANUFACTURING CO. FOUNDED
2984 MAVERICK OPENER GENERATION II OPERATOR & PARTS MANUAL _REV_B 11/2016
 2984 MAVERICK OPENER GENERATION II OPERATOR & PARTS MANUAL 2565-679_REV_B 11/2016 YETTER MANUFACTURING CO. FOUNDED 1930 Colchester, IL 62326-0358 Toll free: 800/447-5777 309/776-3222 (Fax) Website: www.yetterco.com
6150 SERIES MARKERS OPERATOR & SET-UP MANUAL
 6150 SERIES MARKERS OPERATOR & SET-UP MANUAL 2565-376_REV_G 01/2018 YETTER MANUFACTURING CO. FOUNDED 1930 Colchester, IL 62326-0358 Toll free: 800/447-5777 309/776-3222 (Fax) Website: www.yetterco.com
5000 SERIES STALK DEVASTATOR CORN STALK ROLLER
 5000 SERIES STALK DEVASTATOR CORN STALK ROLLER *PATENTED* 5000-026A 8 ROW JD (608C, 843, 893) OWNER S MANUAL PART IDENTIFICATION 2565-794_RevC 08/2017 YETTER MANUFACTURING CO. Founded 1930 Colchester,
5000 SERIES STALK DEVASTATOR CORN STALK ROLLER
 5000 SERIES STALK DEVASTATOR CORN STALK ROLLER *PATENTED* 5000-025A, 5000-026A, 5000-027A, 5000-028A, 5000-034A John Deere Model Corn Heads (606C, 643, 693, 706C, 608C, 843, 893, 708C, 612C, 612FC Folding,
5000 SERIES STALK DEVASTATOR CORN STALK ROLLER *PATENTED*
 5000 SERIES STALK DEVASTATOR CORN STALK ROLLER *PATENTED* OPERATOR S MANUAL PART IDENTIFICATION 2565-771_REV_G 04/2017 YETTER MANUFACTURING CO. FOUNDED 1930 Colchester, IL 62326-0358 Toll free: 800/447-5777
9010 TrackTill Manual
 9010 TrackTill Manual OPERATOR S / INSTRUCTION MANUAL W/ PARTS IDENTIFICATION 2565-958 04/2018 YETTER MANUFACTURING CO. FOUNDED 1930 Colchester, IL 62326-0358 Toll free: 800/447-5777 309/776-3222 (Fax)
FRAME MOUNTED SPRING LOADED CONSERVATION COULTER
 FRAME MOUNTED SPRING LOADED CONSERVATION COULTER MODEL 2991 AND 2999 SET-UP & PARTS CATALOG YETTER MANUFACTURING CO. FOUNDED 1930 Colchester, IL 62326-0358 Toll free: 800/447-5777 309/776-3222 (Fax) Website:
6010 PLANTER UNIT OPERATOR S MANUAL & PARTS IDENTIFICATION _REV_C 06/2015 YETTER MANUFACTURING CO. FOUNDED 1930
 6010 PLANTER UNIT OPERATOR S MANUAL & PARTS IDENTIFICATION 2565-724_REV_C 06/2015 YETTER MANUFACTURING CO. FOUNDED 1930 Colchester, IL 62326-0358 Toll free: 800/447-5777 309/776-3222 (Fax) Website: www.yetterco.com
Planting Components. Operator s/parts Manual Terra-Tine. Row Cleaner
 Operator s/parts Manual Terra-Tine Row Cleaner Planting Components! Read the operator s manual entirely. When you see this symbol, the subsequent instructions and warnings are serious - follow without
Walker Loader Bucket OPERATOR S AND PARTS MANUAL
 Walker Loader Bucket OPERATOR S AND PARTS MANUAL Please Read and Save These Instructions For Safety, Read all Safety and Operation Instructions Prior To Operating Machine P/N 6690 TABLE OF CONTENTS Introduction
K -HART. Coulter. Owner s Manual Model 1600, 1620, 1601, 1602, 1603
 K -HART INDUSTRIES LTD. www.khartindustries.com Coulter Owner s Manual Model 600, 620, 60, 602, 603 Box 520 Elrose, Saskatchewan S0L 0Z0 Canada Ph: (306)378-2258 Fax: (306)378-2926 E-mail:sales@khartindustries.com
Planting Components. Operator s/parts Manual. Row Cleaner VIII. Terra-Tine
 Operator s/parts Manual Terra-Tine Row Cleaner VIII Planting Components! Read the operator s manual entirely. When you see this symbol, the subsequent instructions and warnings are serious - follow without
Operator s Manual. Go Galvanized! YOU'RE ALWAYS AHEAD...WITH A MODERN BEHIND.
 SUMMER 2008 rock & landscape rake Operator s Manual 003-7445 003-7450 003-7460 003-7440 003-7445 003-7450 YOU'RE ALWAYS AHEAD...WITH A MODERN BEHIND. P.O. Box 790 Beaumont, Tx 77704 409.833.2665 1.800.231.8198
Model 858-RH. Operating and Assembly Manual. Palmor Products Inc Serum Plant Road Thorntown, IN 46071
 Model 5-RH Operating and Assembly Manual Palmor Products Inc. 55 Serum Plant Road Thorntown, IN 6071 3/31/015 SAFETY RULES Remember, any power equipment can cause injury if operated improperly or if the
Operator's Manual. VC-60 & VC-60 Plus Harper Industries, Inc. 7/03 Part No
 Operator's Manual VC-60 & VC-60 Plus 2003 Harper Industries, Inc. 7/03 Part No. 970066 Thank you for purchasing a Harper/Goossen Verti-Cutter. As with all Harper/Goossen products, the Harper/Goossen Verti-Cutter
OPERATOR S MANUAL. 20-bu 3-Point Hitch Material Collection System. LP65048 Supplier ST /07/2017 English. North American Edition Printed in USA
 OPERATOR S MANUAL 20-bu 3-Point Hitch Material Collection System LP65048 Supplier ST48289 11/07/2017 English North American Edition Printed in USA Introduction Using Your Operator s Manual Read this entire
2. PREPARATION 1. SAFETY 3. FRAME 4. TRANSMISSION 5. DRIVE 6. ROW UNIT 7. OPTIONAL EQUIPMENT Monosem Inc.
 TABLE OF CONTENTS 1. SAFETY 2. PREPARATION 3. FRAME 4. TRANSMISSION 5. DRIVE 6. ROW UNIT 7. OPTIONAL EQUIPMENT For the initial preparation of the planter, lubricate the planter and row units. Make sure
AG PRODUCTS, LTD. YOU RE ALWAYS AHEAD... WITH A MODERN BEHIND.
 SUMMER 2016 BADGER DISC HARROW Operator s Manual 011-1156 011-1166 001-1501 001-1501-1 011-1167 001-1501-2 001-1501-3 011-1176 001-1501-4 011-1177 MODERN AG PRODUCTS, LTD. YOU RE ALWAYS AHEAD... WITH A
CAUTION. IMPORTANT SAFETY INFORMATION Please stay alert for these signs.
 For safe operation, read rules and instructions carefully. The following safety precautions should be thoroughly understood before attempting to begin the assembly of this machine. 1. Select an area for
OPE R AT O R S MANU A L QUICK-HITCH ADAPTER. 5BP (Field conversion kit)
") OPE R AT O R S MANU A L 5BP006750 (Field conversion kit) Manual 5BP97378B Date 06/8/05 SAFETY Take note! This safety alert symbol found throughout this manual is used to call your attention to instructions
OPE R AT O R S MANU A L 5BP006750 (Field conversion kit) Manual 5BP97378B Date 06/8/05 SAFETY Take note! This safety alert symbol found throughout this manual is used to call your attention to instructions
Operator s Manual. Go Galvanized! YOU'RE ALWAYS AHEAD...WITH A MODERN BEHIND.
 SUMMER 2008 C2 tilting grader blade Operator s Manual YOU'RE ALWAYS AHEAD...WITH A MODERN BEHIND. 003-5336 003-5342 003-5531 003-5544 P.O. Box 790 Beaumont, Tx 77704 409.833.2665 1.800.231.8198 Fax: 409.726.8333
610 BUSHEL MANURE SPREADER
 610 BUSHEL MANURE SPREADER RODA MANUFACTURING 1008 LOCUST ST. HULL, IA. 51239 Art s-way Manufacturing 712-439-2366 Co., Inc. Hwy 9 West - PO Box 288 WWW.RODAMFG.COM Armstrong, IA. 50514 U.S.A 2 INTRODUCTION
Planting Components. Operator s/parts Manual
 Operator s/parts Manual Unit Mount Conservation Coulter and Spring Package Attachment for JD 7000, JD 7200, White 6100, Kinze Planters and Great Plains Row Units Planting Components! Read the operator
2. PREPARATION 1. SAFETY 3. FRAME 4. TRANSMISSION 5. DRIVE 6. ROW UNIT 7. OPTIONAL EQUIPMENT
 TABLE OF CONTENTS 1. SAFETY 2. PREPARATION 3. FRAME 4. TRANSMISSION 5. DRIVE 6. ROW UNIT 7. OPTIONAL EQUIPMENT For the initial preparation of the planter, lubricate the planter and row units. Make sure
W & A 12 ROW TOP LEVELING STACKER LEVEL BANDER
 W & A 12 ROW TOP LEVELING STACKER LEVEL BANDER NO. 3640 OPERATOR S MANUAL TO THE OWNER: Congratulations on your purchase of a new W & A Top Leveling Stacker Level Bander. Your selection is an indication
OWNER S, INSTALLATION AND PARTS MANUAL
 OWNER S, INSTALLATION AND PARTS MANUAL QUICK HITCH CONVERSION KIT CONVERTS 24/MT TO 26 SERIES HITCH FOR PLOW SERIAL NUMBERS AFTER 24G100000 24D100000 MTD200000 MTG200000 2005 Sno-Way International 97101198A
GRASS CATCHER PART S & OPERATORS MANUAL
 GRASS CATCHER PART S & OPERATORS MANUAL WORLDLAWN POWER EQUIPMENT, INC. WORLDLAWN.COM 2415 ASHLAND AVE BEATRICE, NE 68310 800-267-4255 FAX 402-223-4103 2 3 4 OPERATORS MANUAL This catcher manual is for
KING COBRA/CALIBER GRASS COLLECTION SYSTEM PARTS & OPERATORS MANUAL
 KING COBRA/CALIBER GRASS COLLECTION SYSTEM PARTS & OPERATORS MANUAL GRASS CATCHER W/WEIGHTS: TUBE KITS: BLOWER KITS: 52 542128 52 542119 5101002 60 542129 60 542120 5101003 2 WORLDLAWN POWER EQUIPMENT
GRADING SCRAPERS INDUSTRIAL SERIES OPERATION, SERVICE & PARTS MANUAL FOR MODELS: GSI7-SS, GSI7, GSI8, GSI10, & GSI12.
 GRADING SCRAPERS INDUSTRIAL SERIES OPERATION, SERVICE & PARTS MANUAL FOR MODELS: GSI7-SS, GSI7, GSI8, GSI10, & GSI12 September 2006 FORM: IndGradingScrpr.QXD TABLE OF CONTENTS Safety Information......................1-2
DIAMONDBACK/EDGE GRASS COLLECTION SYSTEM PARTS & OPERATORS MANUAL
 DIAMONDBACK/EDGE GRASS COLLECTION SYSTEM PARTS & OPERATORS MANUAL GRASS CATCHER W/WEIGHT: TUBE KIT: BLOWER KIT: 48 5101305 632093 632078 52 5101305 542119 632074 60 632086 542120 632081 3 WORLDLAWN POWER
Wheel Horse. 36 Tiller. Model No & Up. Operator s Manual
 FORM NO. 8 9 Rev. A Wheel Horse 6 Tiller for Classic Garden Tractors Model No. 7970 690000 & Up Operator s Manual IMPORTANT: Read this manual carefully. It contains information about your safety and the
Operating and Assembly Manual
 Model 1080 Operating and Assembly Manual Midwest Equipment Manufacturing, Inc. 5225 Serum Plant Road Thorntown, IN 46071 08-02-16 SAFETY RULES Remember, any power equipment can cause injury if operated
25 BUSHEL MANURE SPREADER
 25 BUSHEL MANURE SPREADER RODA MANUFACTURING 338 MAIN ST. HULL, IA. 51239 Art s-way Manufacturing 712-439-2366 Co., Inc. Hwy 9 West - PO Box 288 WWW.RODAMFG.COM Armstrong, IA. 50514 U.S.A 2 INTRODUCTION
ROTARY TILLER. Operation, Service & Parts Manual For "AS" Series. FORM: ASTillerBook.QXD
 ROTARY TILLER Operation, Service & Parts Manual For "AS" Series FORM: ASTillerBook.QXD April 2002 TABLE OF CONTENTS Preparation......................................1 Assembly Instructions.............................2
INSTALLATION MANUAL SWS
 INSTALLATION MANUAL SWS 30-30 Gallon Auxiliary Tank FOR RVB1500, 2000, 2500 SPREADERS Sno-Way, Down Pressure and EIS are registered trademarks of Sno-Way International, Inc. ProControl, MegaBlade, V-Wing,
FIELD KIT FITTING INSTRUCTIONS FOR TR3
 24795G-GB (rev.1) FIELD KIT FOR TR3 Rear Roller Brush Kit LMAC185-TR3-F for "Fairway" style Cutting Units Series: AAG, AAH, AAJ, AAK IMPORTANT NOTE - TR3 ONLY Grassboxes cannot be used with these Cutting
DRILL 2300 SAFETY SECTION
 DRILL 2300 SAFETY SECTION RECOGNIZE SAFETY ALERT SYMBOL WARNING: KEEP RIDERS OFF UNIT Riding on any agricultural equipment is very dangerous. People can be killed or seriously injured when accidentally
POST HOLE DIGGER. Operation, Service & Parts Manual For Models D20 & D40. FORM: D20_40DigRev.QXD
 POST HOLE DIGGER Operation, Service & Parts Manual For Models D20 & D40 FORM: D20_40DigRev.QXD September 2006 Revised August 2009 TABLE OF CONTENTS Introduction.............................1 Preparation..............................2
Trench Filler for Compact Utility Loaders
 Form No. 3353-608 Rev A Trench Filler for Compact Utility Loaders Model No. 22472 260000001 and Up Operator s Manual Register your product at www.toro.com Original Instructions (EN) Contents Page Introduction................................
Instruction Manual. ATV Manual Plow Lift
 Instruction Manual ATV Manual Plow Lift Manual Conventions This manual uses the following symbols to help differentiate between different kinds of information. The safety symbol is used with a key word
Gopher Eliminator GE-1000 User Manual For all Gopher Eliminator Machines
 Gopher Eliminator GE-1000 User Manual For all Gopher Eliminator Machines 1 Gopher Eliminator GE-1000 Operator s Manual This manual is applicable to all models of the Gopher Eliminator Series. For inquiries
Mulcher Operators Manual
 Mulcher Operators Manual Skid Pro Attachments PO Box 982 Alexandria, MN 56308 October 2015 1 2 Contents 1. Introduction And Warranty... 4 1.1 Introduction... 4 1.2 Warranty... 4 2. Component Identification...
Operator s Manual & Repair Parts Manual. Do Not Use or Operate This Equipment Until You Have Read and Understand This Manual
 Operator s Manual & Repair Parts Manual Do Not Use or Operate This Equipment Until You Have Read and Understand This Manual The purpose of this manual is to explain maintenance requirements and adjustments
OWNER S, INSTALLATION AND PARTS MANUAL
 OWNER S, INSTALLATION AND PARTS MANUAL QUICK HITCH CONVERSION KIT CONVERTS ST TO 22 SERIES HITCH FOR PLOW SERIAL NUMBERS AFTER STD100000 STG100000 2006 Sno-Way International 97101306A TABLE OF CONTENTS
3-Pt. Box Scraper. Owner s Manual
 3-Pt. Box Scraper Owner s Manual WARNING: Read carefully and understand all ASSEMBLY AND OPERATION INSTRUCTIONS before operating. Failure to follow the safety rules and other basic safety precautions may
03-SERIES 4 & 6-ROW RIGID & FOLDING PEANUT VINE CONDITIONER OPERATOR S MANUAL THIS MANUAL TO ACCOMPANY MACHINE
 03-SERIES 4 & 6-ROW RIGID & FOLDING PEANUT VINE CONDITIONER OPERATOR S MANUAL THIS MANUAL TO ACCOMPANY MACHINE PART NO. 03-OM-03 Printing Date: SEPT 2012 WARRANTY POLICY KELLEY MANUFACTURING COMPANY (KMC)
STOP. Broadcast Spreader. Operator's Manual. Model No Safety Assembly Operation Maintenance Parts
 Operator's Manual STOP Broadcast Spreader Model No. 486.2400 DO NOT RETURN TO STORE For Missing Parts or Assembly Questions Call 1-866-56-8388 CAUTION: Before using this product, read this manual and follow
TABLE OF CONTENTS. Warranty Disclaimers Delivery Checklist After Sale Checklist Safety Set Up... 8
 TABLE OF CONTENTS Pickett Equipment Warranty... 2 Warranty Disclaimers... 3 Delivery Checklist... 4 After Sale Checklist... 4 Safety... 5-7 Set Up... 8 Machine Adjustments and Operation... 9 Maintenance
Operator s Manual. Go Galvanized! YOU'RE ALWAYS AHEAD...WITH A MODERN BEHIND.
 fall 2010 3pt & quick attach Bale spears & 3pt bale carrier Operator s Manual YOU'RE ALWAYS AHEAD...WITH A MODERN BEHIND. 318-1006-i 318-1005-i 020-1500 020-1502 P.O. Box 790 Beaumont, Tx 77704 409.833.2665
MODEL M400 POST HOLE DIGGER
 MODEL M400 POST HOLE DIGGER MANUAL, OPERATORS & S THIS SAFETY ALERT SYMBOL IDENTIFIES IMPORTANT SAFETY MESSAGES IN THIS MANUAL. FAILURE TO FOLLOW THIS IMPORTANT SAFETY INFORMATION MAY RESULT IN SERIOUS
BEFCO. Operator s Manual BABY HOP & HOP FERTILIZER SPREADERS ACCESSORIES SIDE ROW DISCHARGE. AA4-120 (fits models Hop 209 & 212) DEFLECTOR
 DEFLECTOR") BEFCO Operator s Manual BABY HOP & HOP FERTILIZER SPREADERS ACCESSORIES SIDE ROW DISCHARGE AA-0 (fits models Hop 09 & ) DEFLECTOR AA-0 (fits models Baby Hop 0 & 06) 009-95 (fits models Hop 0 & 06) 009-968
BEFCO Operator s Manual BABY HOP & HOP FERTILIZER SPREADERS ACCESSORIES SIDE ROW DISCHARGE AA-0 (fits models Hop 09 & ) DEFLECTOR AA-0 (fits models Baby Hop 0 & 06) 009-95 (fits models Hop 0 & 06) 009-968
Wheel Horse. 44 Snowthrower. for 5xi Lawn and Garden Tractors. Model No & Up. Operator s Manual
 FORM NO. 8 Rev A Wheel Horse Snowthrower for 5xi Lawn and Garden Tractors Model No. 7966 890050 & Up Operator s Manual IMPORTANT: Read this manual, and your tractor manual, carefully. They contain information
36 Tiller Wheel Horse Lawn and Garden Tractor Attachment
 Form No. 9 6 Rev B 6 Tiller Wheel Horse Lawn and Garden Tractor Attachment Model No. 797 890000 and Up Operator s Manual English(En) Contents Page Introduction................................ Safety.....................................
THANK YOU FOR PURCHASING THIS PRODUCT
 Hardware Kit Middle Buster, Sub Soiler, 80900200 Combo SC Middle Buster & Sub Soiler THANK YOU FOR PURCHASING THIS PRODUCT Congratulations on your purchase. Behlen Country has been in the business of providing
BEFORE YOU START!! Read the safety messages on the implement as shown in your manual. Observe the rules of safety and common sense!
 To the Owner/Operator/Dealer All implements with moving parts are potentially hazardous. There is no substitute for a cautious, safe-minded operator who recognizes the potential hazards and follows reasonable
Multi-Purpose Tool Sitework Systems Attachment
 FORM NO. 22 648 Multi-Purpose Tool Sitework Systems Attachment Model No. 2242 89000 & Up Operator s Manual English (CE) Contents Page Introduction................................. 2 Safety......................................
OPERATION MANUAL DBW Bale Wagon DFW Feeder Wagon
 OPERATION MANUAL DBW Bale Wagon DFW Feeder Wagon To the Owner/Operator/Dealer All implements with moving parts are potentially hazardous. There is no substitute for a cautious, safe-minded operator who
Two-Stage Snow Blower For 4WD Pick Up Trucks. Operator s Manual
 Two-Stage Snow Blower For 4WD Pick Up Trucks Operator s Manual Distrubuted by: Metal Fabricating LLC P.O. Box 831 Brodheadsville, PA 18322 Phone: 570-992-9989 SnowVac.com WARRANTY POLICY Metal Fabricating
QUADBOSS UTV STRAIGHT PUSH TUBE OWNER S MANUAL
 PAGE of 6 PART #938 QUADBOSS UTV STRAIGHT PUSH TUBE OWNER S MANUAL This owner s manual covers all aspects of your new push tube including assembly, replacement parts, installation, warranty, and troubleshooting.
2. PREPARATION 1. SAFETY 3. FRAME 4. TRANSMISSION 5. DRIVE 6. ROW UNIT 7. OPTIONAL EQUIPMENT
 TABLE OF CONTENTS 1. SAFETY 2. PREPARATION 3. FRAME 4. TRANSMISSION 5. DRIVE 6. ROW UNIT 7. OPTIONAL EQUIPMENT For the initial preparation of the planter, lubricate the planter and row units. Make sure
Worldlawn Power Equipment, Inc. Industrial Park 2415 Ashland Ave. Beatrice, NE Toll Free Number:
 Operator s Manual R WYZ48/52/60CS BAGGER Worldlawn Power Equipment, Inc. Industrial Park 2415 Ashland Ave. Beatrice, NE 68310 Toll Free Number: 1-800-267-4255 OPERATOR S MANUAL This catcher manual is for
AET48 Owner s Manual. TOW AERATOR Owner s Manual AET48 Beginning Serial #: Replacement Parts
 Tine Row Kit Complete tine row set for replacement of one complete row of tines. Includes mounting plates, spacer, and all hardware. TOW AERATOR Owner s Manual AET48 Beginning Serial #: 0206001 Tine Kit
IMPORTANT READ ME FIRST
 IMPORTANT READ ME FIRST Thank you for purchasing your Kushlan Mixer. We hope that you will enjoy using it for many years to come. SHOULD YOU REQUIRE ANY SET-UP OR OPERATING ASSISTANCE WITH YOUR PRODUCT,
3-Pt. Quick Hitch. Owner s Manual
 3-Pt. Quick Hitch Owner s Manual WARNING: Read carefully and understand all ASSEMBLY AND OPERATION INSTRUCTIONS before operating. Failure to follow the safety rules and other basic safety precautions may
Operator s Manual. Ground Drive Fertilizer Spreader PTS PTS-160
 Operator s Manual Ground Drive Fertilizer Spreader PTS-100 - PTS-160 Publication #: April 2009 TABLE OF CONTENTS INTRODUCTION... 1 SAFETY... 1 SAFETY SIGNAL WORDS... 2 GENERAL SAFETY GUIDELINES... 2 SAFETY
W & A 12 ROW TOP LEVELING STACKER LEVEL BANDER
 W & A 12 ROW TOP LEVELING STACKER LEVEL BANDER NO. 3640 OPERATOR S MANUAL TO THE OWNER: Congratulations on your purchase of a new W & A Top Leveling Stacker Level Bander. Your selection is an indication
Lift Arm Pivot Boss Kits
 24800G-GB (rev.0) LMC244 - Kit - Lift rm Pivot Boss x 2 LMC247 - Kit -Lift rm Pivot Boss x 3 LMC247 - For Serial No. FG000301 to FG000332 EJ000301 to EJ000455 EK000301 to EK000450 Lift rm Pivot Boss Kits
Broadcast Seeder/Spreader
 OWNER S/ OPERATOR S MANUAL MODEL NO. s CS-694 CS-1094 CSP-1094 CAUTION For Safe Operation Read Rules And Instructions Carefully SINO LEEINGLES, PIDA AYUDA A AIGUIEN QUE SI LO LEA PARA QUE LE TRADUZCA LAS
OPERATOR S MANUAL. 3 cu. ft Salt Spreader X700 Click N Go Model. LP67403 Supplier ST /28/2016 English. North American Edition Printed in USA
 OPERATOR S MANUAL 3 cu. ft Salt Spreader X700 Click N Go Model LP67403 Supplier ST50665 12/28/2016 English North American Edition Printed in USA Introduction Using Your Operator s Manual Read this entire
DEBRIS BLOWER 3600 OPERATOR S MANUAL. Debris Blower
 DEBRIS BLOWER 3600 OPERATOR S MANUAL 9-208 Thank you for purchasing a Harper. As with all Harper products, the has been developed through tough design and testing procedures to produce a top quality machine.
DM-135 DRUM MOWER USER S MANUAL
 DM-135 DRUM MOWER USER S MANUAL 1 DM135 DRUM MOWER INSTRUCTIONS CHAPTER 1 SAFE OPERATION Do not attempt to operate the mower until you have read the operator s manual and all the safety signs on the mower.
GROUNDSMASTER. 52 Recycler. for 120 Traction Unit. Model No & UP. Operator s Manual
 FORM NO. 8-980 Rev A GROUNDSMASTER 5 Recycler for 0 Traction Unit Model No. 077 79000 & UP Operator s Manual IMPORTANT: Read this manual carefully. It contains information about your safety and the safety
SUNDOWN Operation. & Parts Manual. for Box Blade Models BB15-48, 60 BB20-48, 60, 72 BB30-60, 72, 84, & 96
 SUNDOWN Operation & Parts Manual for Box Blade Models BB15-48, 60 BB20-48, 60, 72 BB30-60, 72, 84, & 96 Operations and Parts Manual Table of Contents Section Page Table of Contents 2 Retail Customer Responsibility
DEBRIS BLOWER 2700 OPERATOR S MANUAL. Debris Blower
 DEBRIS BLOWER 2700 OPERATOR S MANUAL 6-2015 Thank you for purchasing a Harper. As with all Harper products, the has been developed through tough design and testing procedures to produce a top quality