Table of Contents I. STINKY FEET DUCK OPERATOR S MANUAL
|
|
|
- Lewis Golden
- 6 years ago
- Views:
Transcription

 677-0761 Fax -")

1 Bob s Space Racers Inc th Street, Daytona Beach, Florida Phone - (386) Fax - (386) tech@bobsspaceracers.com Operator s Manual
2 Table of Contents I. STINKY FEET DUCK OPERATOR S MANUAL A. Introduction... iii A.1: Overview. iii A.2: Use only a GROUNDED AC receptacle iii A.3: Maintenance for the Games... iii A.4: Average Power Requirements. iii A.5: Check Packing List. iii A.6: Specifications. iv B. Setup. v Chapter 1 : Operator s Procedure : Object of Game : How to Start a game : How to Play Walkthrough Chapter 2 : Maintenance : Maintenance Recommendations : Periodic Maintenance 2-1 Chapter 3 : Maintenance Tip Maintenance Introduction : Unclogging a Brass Tip of a Water Gun Chapter 4 : Draining the Tank Automatic Draining Clean The Filter Manual Draining Winterizing the Game & Pump Chapter 5 : Troubleshooting : Troubleshooting Philosophy Chapter 6 : Option Settings Chapter 7 : Service Calling for Service. 7-1 Chapter 8 : Family Entertainment Center (FEC) Options Calling for Service. 8-1 Appendix A : Policies... A-1 A.1: Service Policy.. A-1 A.2: Advance Replacement Policy... A-1 Appendix B : Warranty.... B-1 B.1: Game warranty. B-1 B.2: Advanced replacement item(s) shipping requirements.... B-2 Appendix C : Federal Communications Commission statement.. C-1 Appendix D : Parts... D-1 Appendix E : Revision.. E-1 Bob s Space Racer s Inc ii
3 A. Introduction A.1 Overview This manual contains information about Stinky Feet version Duck, Kid, and FEC. The manual contains: Information on how to setup, scoring, maintenance, water pumps, some tech tips, troubleshooting, the options, and service. The appendixes A-D contain information about policies, warranty, the FCC statement, and the revision status. A.2 Use only a GROUNDED AC Receptacle. Failure to do so could result in improper operation or damage to the game and could void your warranty. If you are unsure that your AC receptacle is properly grounded, have a qualified electrician perform this check for you. A.3 Maintenance for the games Always be sure power to the game is turned off when doing even routine maintenance. Otherwise moving parts could activate unexpectedly and cause injury. A.4 Average Power Requirements. Amperage & Watts will vary depending on game. Voltage Amperage Watts Hertz Service Power Recommendation A.4.1 Domestic Game Power: 110V ± 10V ~ 8.0 Amps ~ 960 W at 60Hz 20 Amps A.4.2 Domestic Water Pump Power: 220V ± 10V ~ 9.6 Amps ~ 2112 W at 60Hz 20 Amps A.4.3 Domestic Lights Power: 110V ± 10V ~ 5.0 Amps ~ 600 W at 60Hz 15 Amps A.4.4 Export Game Power: 220V ± 10V ~ 5.0 Amps ~ 1100 W at 50/60Hz 10 Amps A.4.5 Export Water Pump Power: 220V ± 10V ~ 9.6 Amps ~ 2112 W at 50/60Hz 15 Amps A.4.6 Export Lights Power: 220V ± 10V ~ 5.0 Amps ~ 600 W at 50/60Hz 10 Amps WARNING! Ensure that this product is compatible with your facilities power supply, voltage and frequency requirement. A label describing Electrical Specifications is attached to the product. Non-compliance with the Electrical Specifications can cause a fire and electric shock. Ensure the game is level before applying power. A.5 Check Packing List Check the packing list prior to installation. Verify that all parts that have been received and are in good condition. Bob s Space Racer s Inc iii
4 A.6 Game Specifications Bob s Space Racer s Inc iv


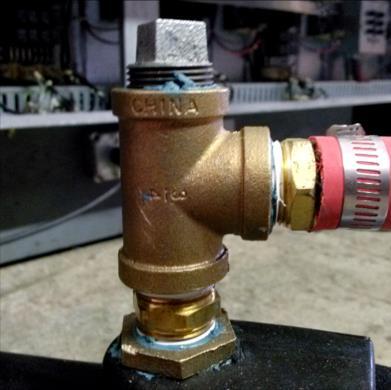
5 B. Setup B.1 The initial setup up of the game. B.1.1 Initial setup involves creating a location for the game. B Ensure the game is level. Use Shims as necessary, see Figure B.1. Figure B.1 B Make necessary game connections. B.1.2 Hook up the power to the game. B.1.3 Close drain valves. See Figure B.2 as an illustration. Figure B.2 B.1.4 Fill the front tank with water. B.1.5 Priming the Pump. B Priming a pump requires at least ¾ of a gallon of water. B Unscrew the top bolt. See Figure B.3. B Use a funnel and fill the pump. B Screw in the top bolt finger tight, then finish by using a wrench to tighten fully. B This is the completion of priming the pump. Figure B.3 B.1.5 Test each unit separately on the game. See chapter one. B Ensure all players work properly. Note: If there is a problem, call BSR s tech support: Bob s Space Racer s Inc v
6 Chapter 1: Operator s Procedures 1.1 Object of Game. Shoot lighted target with water gun. This will advance the toy upwards. Players shoot the target until the toy reaches the win position. 1.2 Operate / Race Bob s Space Racers Inc
7 Chapter 2: Maintenance 2.1 Maintenance Recommendations Clean the outer surfaces of the game with a commercial spray type cleaner DO NOT USE a glass cleaner or commercial chemical sprays on vinyl graphics DO USE a good quality spray type furniture polish to keep the game looking good Vacuum the inside of the game occasionally to help keep the dust and ticket debris off of all the electronics. 2.2 Periodic Maintenance Never Add Lime-Away, bleach, or any other corrosives to cleaning solutions Daily Cleaning Cleaning Formica (Lacquer Thinner, Clean-On-The-Go Glass, De-Solve-It, Old English, Baby oil) Cleaning Glass (Windex, Clean-On-The-Go Glass, Lacquer Thinner, Brillianize ) Cleaning Stainless Steel (Mineral Spirits, Clean-On-The-Go Glass, Soft Scrub, Old English, Baby oil) Cleaning Plexiglas (Mineral Spirits, De-Solve-it, Brillianize, 3812S Enamel Reducer) Cleaning Other Metals (Mineral Spirits, Soft Scrub, Old English, Baby oil) Daily Check Check all individual unit push buttons Check all ID lights Check to see that each unit turns on and wins when played by shooting each gun Check all lights Check all microphone and sound equipment. Working and physical condition Check Accounting system. See Chapter 6 for more information Check each target switch for activation and proper motion Check to see that all guns work properly Daily Pump Maintenance Check water level Water level should be up to the bottom of the water tank screens. Approximately 3 to 4 inches Remove the water tank screen and strainer Remove all debris from the water tank screens, strainer, and filter Check the suction Check for any water leaks Weekly Maintenance for Water Games. Includes daily maintenance Drain all water Clean water tank and all screens Clean pump filter Fill tank with clean water. Add two ounces of BSR recommended water conditioner Monthly. Includes daily and weekly maintenance Rotate water pumps Yearly. Includes daily, weekly, and monthly maintenance Run the game in bally mode. Lubricate sprockets as needed. Bob s Space Racers Inc


8 Chapter 3: Maintenance Tip 3.1 Maintenance Introduction Section 3.2 is the procedure how to unclog the water gun tip. Note: If at any time you require more assistance, please do not hesitate to call tech support: Unclogging a brass tip of a water gun. Introduction This easy step-by-step process will show how to unclog the brass tip of a water gun. Water Gun Figure 1.1 Tools Needed 3/8 Open-Ended Wrench Drill Bit #59 or BSR Gun tip Cleaner. BSR Part # M Small Bucket NOTE: Using anything other than the suggested tools could cause unwanted damage to the Brass Gun Tip and is not recommended. Step 1 Removing Gun Tip Using the 3/8 Wrench, remove the brass gun tip by turning the brass gun tip counter-clockwise until the brass gun tip and the rubber washer, BSR Part # M , come off of the end of the gun. Water Gun Barrel Water Gun Tip Figure 1.2 Figure 1.3 Note: Do not misplace the fiber washer, it is needed to form a good seal around the gun tip and prevent water leaking from the gun tip. Step 2 Unclogging Brass Tip Carefully insert drill bit into brass gun tip. It may be necessary to blow air through gun tip to remove any remaining debris. Inserting Removing Step 3 Clearing the Line Use a small bucket or pan to catch any water that comes from the water gun. With tip removed from gun start the race. This will flush out any debris from the water line. Re-install gun tip and washer. Figure 1.4 Figure 1.5 Note: To stop the race press the STOP push button and then press and hold the RESET button to deactivate the active unit(s). Note: After clearing the line just re-install the gun tip. Do Not Overtighten the Brass Gun Tip! Bob s Space Racers Inc


9 Chapter 4: Draining the Tank 4.1 Automatic Draining Procedure requires power and uses the existing pump Depending on the system, there might be a slight difference in the output valve. Figure 1.1 and Figure 1.2 will be similar to your setup Open the valve to allow water to exit the system To initiate the 2017 automatic draining system, press the pedal that says, FOR DRAINING WATER TANK ONLY PUSH TO START PUMP TO DRAIN TANK. See Figure If the game is indoors, it is recommended to use a 5-gallon bucket and the supplied drain hose, to empty the system bucket by bucket. Example: Figure 1.4. Push the pedal and fill up the bucket to a manageable level, then release the pedal. This will stop water flow. Empty the bucket and repeat until tank is empty. Figure 1.1 Figure 1.2 Figure 1.3 Figure Clean The Filter The filter valve is normally closed see Figure Rotate valve counter-clockwise to open valve, see Figure 1.6. Note: See Figure 1.7, This is the latest version of the filtration assembly. There is a hose attached to the bottom of the filter for easy removal of debris into a container of your choosing Press the FOR DRAINING WATER TANK ONLY PUSH Switch/Pedal TO START PUMP TO DRAIN TANK, Figure 1.3, until the filter is clear and clean. Note: If filter still appears to be dirty, it is recommended to unscrew filter bowl and wash the filter manually. While cleaning the filter, inspect the O-rings and filter to ensure they are in good condition. When re-assembling, check to see that the filter is seated properly as well as the O-rings. Do not over tighten filter bowl. Once snug a quarter turn more will be sufficient When the filter has been cleaned, remember to close the filter valve before running the game. Open Clear-Vu Filter Valve Figure 1.5 Figure 1.6 Figure 1.7 Drain Hose Bob s Space Racers Inc


, screw the bottom drain plug or cap back in.")

10 4.3 Manual Draining Procedure uses gravity The secondary drain uses gravity. The location may vary based on the model. The below, Figure 1.9 is a close up. Figure 1.8 is from a different model, but gives an idea where it is located To open the valve turn the red handle 90 degrees, either to the left or right. Note: The manual drain does not include a hose, but maybe necessary to add one to control where the water drains. Drain Valve Figure 1.8 Figure Winterizing the Game & Pump Complete steps 4.1 or 4.3 to remove water Unplug the pump and then put the game into, Forward, this will open all water valves. If the guns have a button or trigger, use a zip-tie, tape or rubber band to hold the trigger. Next, open up the drain on the pump and allow to drain. Open up the filters and remove water. Remove filter and re-seal bowl or canister, make sure to seat the O-rings properly. Note: Once winterizing is complete, re-install a clean filter Connect air hose to the pump s drain plug port, then blow no more than 50 psi back through the pump. This will blow the water out of lines and guns. Allow to run until there is no visual mist of water being pushed through the guns. Repeat and if the system has a second pump. Note: This may not remove all the water trapped inside the jet area of the pump. Proceed to for winterizing the pump To winterize the pump(s), screw the bottom drain plug or cap back in. Then fill the front cavity with RV antifreeze or 99.9% Food Grade propylene glycol and then seal it up. Note: Remember to drain the RV antifreeze or food grade propylene glycol before opening the following season. Cycle water or flush fresh water through the system. Note: The jet is a closed off to the rest of the pump. Meaning if there is water inside and freezes it could rupture or crack the casing. Figure are a visual of where water can be trapped and if not removed could damage the pump. Jet Figure 1.11 Figure 1.10 Drain Plug or Cap Freeze Points Freeze Points Figure 1.12 Figure 1.13 Bob s Space Racers Inc
11 Chapter 5: Troubleshooting 5.1 Troubleshooting Philosophy. When troubleshooting any product, certain general guidelines should be followed Always check to be sure that your game power is turned on. Ensure that all of the fuses in the game are functional and that the AC voltage is in the proper operating range for your game Ensure that all of the game harnessing is plugged in properly and that all of the pins are firmly seated in the connectors. It is always possible that a harness can be damaged by rough shipping or moving Inspect game harnessing to be sure that none of the wires have become or are damaged. Utilize a handheld multi-meter, and check continuity of the wires to make sure they are not broken Inspect for obvious damage to the P.C. Boards or electrical components If you have multiple similar games or multiple parts for a game, swap or exchange the parts to see if the problem goes away or moves to another location. You can quickly eliminate certain parts as being the problem within the game When changing electronic or electrical components, ALWAYS turn off all external power and unplug the game Ensure that all power supplies are delivering the specified voltages to the P.C. Boards and components as shown in the manual. Symptom Possible Problem Solution Sound Problems Low Volume Check Volume Control and adjust as necessary -No sound Faulty speaker harnessing Check connections and/or repair harnessing -Low Sound Faulty speaker Check and/or replace speaker -Intermittent Sound Faulty sound board or sound board harnessing Check connections or Replace Sound Board Faulty Main P.C. Board and or BSR Sound unit Check and/or repair or replace Main P.C. Board or BSR Sound unit Game will not start or pump Game power off Check on/off switch and power cord will not run Main fuse blown Check and/or replace fuse as necessary Faulty solid state relay Check and replace solid state relay Faulty pump Check and replace pump Power Supply problem or failure Check Power Supply output and connections Faulty P.C. board or component Repair and/or replace main P.C. board Game stops or is stopped The power connector is disconnected. Reconnect the connector securely. with nothing displayed Possible faulty connection or short circuit. Check all circuitry for faulty connections or short circuits. Water stream crooked or weak Pressure regulator Clogged gun tip Adjust pressure regulator Check and clean gun tip Partially clogged filter Check filter and clean if necessary Kinked hose Check all hoses Low water level or no water Check water level and fill if necessary Score won t increase Faulty target switch Check target switch Faulty or disconnected harness Check and repair harnessing Faulty IO board Repair or replace IO board Water not coming out of gun Clogged gun tip Clean tip with paper clip Kinked hose Check hoses for kinks Low water level or no water Check water level and fill if necessary Faulty solenoid valve Check or replace solenoid valve Faulty Pump Repair or replace pump Faulty Main P.C. board Repair or replace Main P.C. Board Programming button and Disconnected programming Check connector counters Panel harness Check connector Bob s Space Racers Inc
12 Chapter 6: Options Settings BSR 3000 Electronics Revision Approved BSR Stinky Feet Program: WTR3K.V20 FEC January 3, 2017 Name Description Default Min Max UNIT ID NUMBER Each Unit(s) ID assignment. When Programmed: 0 = Master 33 = Factory Reset Default ID Number # of Players Set to the total number of players in a game. <<FEC only supports up to 12-players>> 1 32 Game Volume The decibel level of the output audio Bell Volume The decibel level of the bell audio Bell Time The amount of time the bell is active. << In Seconds>> Win Lite Time The amount of time the beacon is active. << In Seconds>> Unused NOT USED FOR GAME << Leave at Default Value >> Unused NOT USED FOR GAME << Leave at Default Value >> Unused NOT USED FOR GAME << Leave at Default Value >> Win Score The score to reach to win the race. Increments by 10 points Attract Mode 0 = Just play audio 1 = Turn on shower heads with audio Attract Interval The time it takes from the game is turned on until the start of attract mode. <<In Minutes>> Cost Per Play Dollar amount displayed on Dollar Sign and used for accounting Game Time Limit When a game starts and if inactive will run for a set time. << In Seconds>> Factory Default is 90 seconds Game Difficulty The Target speed and random setting. Oscillating: 0 = easy 1 = medium 2 = hard; Random: 3 = easy 4 = medium 5 = hard Money Prompt Displays the different type of initialization options. 0 = Swipe Card 1 = Insert Coin Stack Credits Allows or denies the ability to coin up more than once per race. 0 = No Stacking 1 = Stacking Ticket Mode Ticket Mode: 0 = FEC Table 1 = High Ticket + Min Ticket 2 = High Ticket and Zero Min Tickets Winner Ticket FEC Ticket Payout Option. Tickets given to the winner multiplied by players played. Small Ticket only or 0 = FEC off Minimum Ticket FEC Ticket Payout Option. Tickets given to the non-winning player(s). 0 = FEC mode OFF Ticket Divider Divides total amount of tickets given to the Winner and Non-winner Reset Defaults Allows User to reset the board to its default settings. If need, set option to "1" and then press ENTER WARNING! DO NOT ENTER PROGRAMMING MODE UNLESS YOU ABSOLUTELY HAVE TO! Inadvertently, changing program settings can cause undesirable results to your game. Bob s Space Racers Inc. has set these options to achieve the highest turn-around time and optimal game performance. Programming Mode 1. Locate the Master Board. Note: This is located on the backside of the game. It may be labeled Master, Master Board or M. 2. Hold down the Select and Enter buttons for 4 seconds to enter program mode. 3. Press either Up or Down to scroll through the options. 4. Press either Left or Right to change the options value. Note: Changing the value, sets and saves the value. 5. Press the Select button to exit programming mode. Note: While programing, the master board has a timed limit and if left idle, the master board will exit programing mode. Bob s Space Racers Inc

13 LCD Display For further assistance, please call Bob's Spacer Racers Technical Support at ext:146 or at Bob s Space Racers Inc
14 Chapter 7: Service 7.1 Calling for Service When calling for service, please check the service manual first. You may find a solution to your problem within this manual. Please make sure you have the serial number of the game ready when you call. If this is a repeat call, please tell the service technician that you have made a previous call regarding this problem. This way we will be able to retrieve the history on your game allowing us to efficiently serve you better. Please retain proof of purchase for your product. This may be requested for warranty repairs. If at all possible, please call us from and with access to the game as we may need you to check certain things on the game while we are on call with you. IF YOU HAVE ANY QUESTIONS OR COMMENTS PLEASE CALL BSR. BSR s Parts Contact Info Phone: 1-(386) Opened: Monday Friday Office Hours: 8:30AM 5:00PM EST Parts@bsrgames.com EXCLUDING HOLIDAYS BSR s Tech Contact Info Phone: 1-(386) Opened: Monday Friday Office Hours: 8:30AM 5:00PM EST Has afterhours support, charges may apply. Tech@bobsspaceracers.com EXCLUDING HOLIDAYS Visit Our Website for More Information A great resource on our website is the CUSTOMER SUPPORT page. Bob s Space Racers Inc


, or a (4 inch x 2 inch) large ticket (Figure 8.4). Either size tickets can be set to a specific payout, depending on the customer s needs.")
15 Chapter 8: Family Entertainment Center (FEC) Options 8.1 FEC Options for Bob s Space Racer s Game The FEC swipe card option will allow the game to be operated without an attendant. These options have a few different types of configurations. BSR will run the wires for the card swipe, but on most occasions the customer usually has their own swipe system. If the customer pre-purchases the swipe card system, BSR can install them on the game. Below Figure 8.1 are a few styles that customers use. Figure BSR can also set up the FEC game to use coins to start the game. See Figure 8.2 Figure FEC payout options can be a small ticket (Figure 8.3), or a (4 inch x 2 inch) large ticket (Figure 8.4). Either size tickets can be set to a specific payout, depending on the customer s needs. Figure 8.3 Figure 8.4 Bob s Space Racers Inc
16 Appendix A: Policies A.1 Service Policy A.1.1 Here at BOB S SPACE RACERS INC., we pride ourselves in providing the highest quality, long lasting, and easy to maintain equipment. A.1.2 Technical Support Service hours are from 8:30 am to 5:00 pm, EST, Monday through Friday, excluding holidays. The direct technical number is (386) ext:146. During all other times, follow the prompts on our Automated Phone System to relay your problem to the technician on call. Technical Support will assist you in troubleshooting a service problem or setting equipment options. A.1.3 You can also your technical question to: tech@bobsspaceracers.com. A.1.4 Customer Service hours are from 8:30 am to 5:00 pm, EST, Monday through Friday, excluding holidays. Customer Service staff can be reached at (386) They will also take parts orders and research the status of previous orders. A.2 Advance Replacement Policy A.2.1 After speaking with our Technical Department it may be necessary for Bob s Space Racers Inc., to ship an assembly item or part to repair your game. Note: We will not ship anything to P.O. Boxes via the US Postal Service. You will be billed per your account status for the total cost of the shipment, which includes shipping charges. A.2.2 Upon shipment of the new item(s) a Return Merchandise Authorization Number (RMA #) will be issued for you to use when returning the defective item(s) to Bob s Space Racers Inc., or you may use the order number. After the defective item(s) is received by Bob s Space Racers Inc. your account will be issued either a: A.2.3 Warranty credit: if your game is under warranty. See the Warranty Policy page. Note: this credit does not include return shipping charges. A.2.4 Credit for the item(s). Note: this credit does not include return shipping charges, nor does it include the repair charges for the item(s). A.2.5 If the item(s) cannot be repaired to the point where it could be shipped to another customer as an Advanced Replacement item (i.e. cosmetic damage), we will ship your original item(s) back to you. You will be required to return the Advanced Replacement item(s) or pay for it. You will be responsible for all shipping charges, should you decide to not keep, and pay for, the Advanced Replacement item(s). Bob s Space Racers Inc A - 1
17 Appendix B: Warranty B.1 Game Warranty BOB S SPACE RACERS INC YEAR GAME WARRANTY B.1.1 INCLUDED IN THIS WARANTY Bob s Space Racers Inc., warrants to the original purchaser only that the equipment that is the subject of this sale conforms to its specifications, and is free from defects under normal service for one-year period from the original date of deliver. This warranty does not include any damages resulting from occurrences listed in paragraph 2 below. This warranty is not transferable under any circumstance. Any claims under this warranty must be received in writing by Bob s Space Racers Inc. within 120-days from date of delivery. Within a reasonable time of such written notification Bob s Space Racers Inc. will replace or repair any defective component of the equipment or part thereof which fails for reasons other than normal service, use, or wear. Bob s Space Racers Inc. reserves the right to request dated proof of purchase by the end user (original purchaser) at any time. Light bulbs are specifically excluded from this warranty and shall be the sole responsibility of the purchaser. Bob s Space Racers Inc., within its sole discretion, makes the final determination as to whether to repair or replace any component and whether any such repair or replacement shall be performed where the equipment is located or at its home facility in Volusia County, Florida, or another facility of its sole choice. Any and all freight charges for the purposes of repair or replacement shall be paid by the original purchaser. All defective parts shall be returned to Bob s Space Racers Inc. if requested. Bob s Space Racers Inc. does not warrant that the equipment will meet any original purchaser s specific requirements or that the operation of the equipment will be uninterrupted. These remedies are the original purchaser s exclusive remedies for breach of warranty. B.1.2 EXCLUDED BY THIS WARRANTY Bob s Space Racers Inc. does not warrant (a) any product, components or parts not manufactured by Bob s Space Racers Inc.; (b) damages caused by use of the equipment for purposes other than those for which it was designed; (c) defects caused by failure to provide a suitable installation environment for the equipment; (d) damage caused by unauthorized attachments, modification, or service; damage caused by normal wear and tear or improper power supply; (f) damage caused by accident or disaster such as fires, flood, lightning, and wind; or (g) any other abuse or misuse of the equipment. B.1.3 EXCLUSIVE WARRANTY. THE FORGOING WARRANTY IS EXCLUSIVE AND IN LIEU OF ALL OTHER WARRANTIES OR REMEDIES, WHETHER WRITTEN, ORAL OR IMPLIED. THERE ARE NO WARRANTIES WHICH EXTEND BEYOND THE DESCRIPTION ON THE FACE HEREOF. ANY AND ALL IMPLIED WARRANTIES OF MERCHANTABILITY, FITNESS FOR A PARTICULAR PURPOSE, COURSE OF DEALING OR USAGE OF TRADE ARE HEREBY EXPRESSLY DISCLAIMED AND EXCLUDED. B.1.4 REMEDIES LIMITED. UNDER NO CIRCUMSTANCES, EXCEPT TO THE EXTENT PROHIBITED BY APPLICABLE LAW, SHALL BOB S SPACE RACERS INC. BE LIABLE FOR ANY LOSS OR DAMAGE, DIRECT OR INDIRECT, SPECIAL INCIDENTAL OR CONSEQUENTIAL ARISING OUT OF THE USE OR INABILITY TO USE THIS EQUIPMENT INCLUDING BUT NOT LIMITED TO ANY CLAIM FOR LOSS OR PROFITS, LOSS OF SAVINGS OR REVENUE, LOSS OF USE OF THE EQUIPMENT, OR ANY ASSOCIATED EQUIPMENT, FACILITIES OR SERVICE, DOWNTIME, THE CLAIMS OR COSTS OF THIRD PARTIES INCLUDING CUSTOMERS AND INJURY TO PROPERTY. Some states do not allow limitations on how long an implied warranty lasts or the exclusion or limitation of incidental or consequential damages, so the above limitations or exclusion may not apply to you. This warranty gives you specific legal rights, and you may also have other rights which vary from state to state. B.1.5 NO OTHER WARRANTIES. Unless modified in writing and signed by both parties, this agreement is understood to be the complete and exclusive agreement between the parties, superseding all prior agreements, oral or written, and all other communications between the parties relating to the subject matter of this agreement. No employee or representative of Bob s Space Racers Inc. or any other party is authorized to make any other warranty or to assume any other liability in connection with the sale of its equipment. Bob s Space Racers Inc B - 1
18 B.1.6 TIME LIMIT FOR CLAIMS. Any claim for breach of warranty or claims under this warranty must be received in writing by Bob s Space Racers Inc. within 120-days following delivery of the equipment. B.1.7 FUTURE CHANGES. Bob s Space Racers Inc. reserves the right to reserve, change or modify the construction and design of its equipment or any component part or parts thereof without incurring the obligations to make such changes or modifications in present equipment. B.1.8 ALLOCATION OF RISKS. This agreement allocates the risks of equipment failure between Bob s Space Racers Inc. and the original purchaser. This allocation is recognized by both parties and is reflected in the price of the goods. THE PURCHASER ACKNOWLEDGES THAT HE HAS READ THIS AGREEMENT, UNDERSTANDS IT, AND IS BOUND BY ITS TERMS. B.1.9 TO OBTAIN WARRANTY SERVICE. The original purchaser must, at his/her own expense, bring or ship the equipment to an authorized location for service. Additionally, the original purchaser must pay all freight, shipping or transportation charges for the return of the equipment from Bob s Space Racers Inc. to the original purchaser. B.2 Advanced Replacement Item(s) Shipping Requirements B.2.1 When you request an Advanced Replacement item from us, we recommend you to follow B.2.2 DO NOT try to repair the defective item(s) on your own; DO NOT disassemble the defective item(s) prior to returning it to Bob s Space Racers Inc. this could cause further damage and the possibility of you not receiving any credit at all on the item(s). There are no user serviceable parts contained within, and our vendors may void their warranty on disassembled parts. (Please review the last paragraph of the Advanced Replacement Policy (pg. A-1). B.2.3 Wait for the Advanced Replacement item(s) to arrive prior to returning the defective item(s). B.2.4 When the new item(s) arrive, verify that it is the correct part. If it is not, please note what the differences are and contact Bob s Space Racers Inc. at B.2.5 Return the defective item(s) in the exact same packaging the Advanced Replacement item(s) came in. This insures no more damage will be done to the item(s) during the return shipping. Thank You! Bob s Space Racers Inc B -2
19 C. Federal Communications Commission (FCC) Statement This equipment has been tested and found to comply with limits for a Class A digital device, pursuant to part 15 of the FCC Rules. These limits designed to provide reasonable protection against harmful interference when the equipment is operated in a commercial environment. This equipment generates, uses, and can radiate frequency energy, and, if not installed and used in accordance with the instruction manual may cause harmful interference to radio communications. Operation of this equipment in a residential area is likely to cause harmful interference in which case the user will be required to correct the interference at his/her own expense. Note: All games from Bob s Space Racers Inc. are shipped with the same factory keys and lock sets. Bob s Space Racers Inc. recommends changing the keys and locks on your games upon receipt. Bob s Space Racers Inc C - 1


 1 4 M0006330")
 1 5 P0009955")

 1 Bob s")
20 Appendix D: Parts List D.1 Customer Parts List Item # Part # Descriptions Qty Picture 1 EM BOARD-ASSY 1 BSR-3000 REV C 2 M WATER GUN TIP CLEANER 1 3 M BRASS TIPS WATER GUN (RUBBER WASHER INCLUDED) 1 4 M BARREL GUN (NEW GUN BARRELS DO NOT USE A WASHER) 1 5 P FILTER PVC 1 INCH CLEAR VU-FLO Kit 1 6 P INCH CLEAR VU-FLO BOWL 1 7 P O RING FILTER 1" VU-FLO (SET) 1 Bob s Space Racers Inc D - 1


21 8 P PLASTIC PUMP: ¾ HP 9 P CAST IRON PUMP: 1.0 HP 10 P WATER PRESSURE REDUCING VALVE 11 P CANISTER: ¾ INCH X ¾ INCH WATER FILTER HOUSING 12 P CANISTER WATER FILTER 13 EX MOTOR STEPPING ASSY-NEW VERSION 1 14 MX BOOT HURST WATER GAME 1 INCH HOLE 1 15 M RING BOOT STAINLESS STEEL 1 16 E SWITCH PUSHBUTTON 1 Bob s Space Racers Inc D - 2


22 17 E MICRO SWITCH STANDARD BZ 1 18 M DECAL SHOOT HERE CLEAR 1 19 ARWB2014 SENSOR MAGNETIC WIRED 1 20 ARWB2003 SENSOR MAGNETIC MAGNET 1 21 E FUSEPOST PANEL MOUNT 1 22 EX ACCOUNTING LCD 1 23 E PRINTER DOT IMPACT IN GAME ACCTG 1 24 E THERMAL PRINTER STAR MICRONICS PRINTING RIBBON 1 Bob s Space Racers Inc D - 3


23 25 E PRINTER PAPER 3" NON-THERMAL 1 26 E TRANSFORMER 120/ KVA BK/BST 1 27 E V BLUE DOME BEACON ASSEMBLY 1 28 E BULB - BLUE BEACON 1 29 E ID LIGHT 12V AMBER 1 Bob s Space Racers Inc D - 4
24 Appendix E: Revision Information Revision Date of Revision Description of Revision Approved by A April 14, Jack Cook Bob s Space Racers Inc E - 1
25
26 Bob s Space Racers Inc th Street, Daytona Beach, Florida Phone - (386) Fax - (386) tech@bobsspaceracers.com
Pirate Loot Operation Manual
 Preliminary Pirate Loot Operation Manual WARNING Be sure to read this Operation Manual before using your machine to ensure safe operation. 2012 Bob s Space Racers Incorporated 427 15 th Street, Daytona
ARCADE OPERATIONS MANUAL Version
 ARCADE OPERATIONS MANUAL Version 062711 WARNING Be sure to read this Operation Manual before using your machine to ensure safe operation. Table of Contents 2011 Bob s Space Racers Incorporated 427 15 th
ARCADE OPERATION MANUAL
 ARCADE OPERATION MANUAL 11-08-11 WARNING Be sure to read this Operation Manual before using your machine to ensure safe operation. 2011 Bob s Space Racers Incorporated 427 15 th Street, Daytona Beach,
ARCADE GAME MANUAL WARNING. Be sure to read this Operation Manual before using your machine to ensure safe operation.
 ARCADE GAME MANUAL WARNING Be sure to read this Operation Manual before using your machine to ensure safe operation. 2011 Bob s Space Racers Incorporated 427 15 th Street, Daytona Beach, Florida 32117
To Purchase This Item, Visit BMI Gaming (800) ARCADE GAME MANUAL WARNING
 ARCADE GAME MANUAL WARNING") ARCADE GAME MANUAL WARNING Be sure to read this Operation Manual before using your machine to ensure safe operation. 2011 Bob s Space Racers Incorporated 427 15 th Street, Daytona Beach, Florida 32117
ARCADE GAME MANUAL WARNING Be sure to read this Operation Manual before using your machine to ensure safe operation. 2011 Bob s Space Racers Incorporated 427 15 th Street, Daytona Beach, Florida 32117
Speed Bag Operation Manual
 Speed Bag Operation Manual WARNING Be sure to read this Operation Manual before using your machine to ensure safe operation. 2011 Bob s Space Racers Incorporated 427 15 th Street, Daytona Beach, Florida
MANUAL VERSION FEBRUARY
 MANUAL VERSION FEBRUARY 2008 MAINTENANCE AND TROUBLESHOOTING Quick Troubleshooting: WARNING For your safety and to reduce risk of damage to your game read the Important Safety Information in Chapter 1-2
WARNING. Be sure to read this Operation Manual before using your machine to ensure safe operation.
 WARNING Be sure to read this Operation Manual before using your machine to ensure safe operation. November 2010 2 Federal Communications Commission (FCC) Statement Note: This equipment has been tested
WARNING. Be sure to read this Operation Manual before using your machine to ensure safe operation.
 WARNING Be sure to read this Operation Manual before using your machine to ensure safe operation. NOVEMBER 2008 WATER BLAST ARCADE 2 1. INTRODUCTION 1-1. Overview and Technical Features: 1-2. Important
Whac-A-Mole pro Operation Manual
 Whac-A-Mole pro Operation Manual WARNING Be sure to read this Operation Manual before using your machine to ensure safe operation. 2011 Bob s Space Racers Incorporated 427 15 th Street, Daytona Beach,
StormPro BA Series Sump Pump
 Page 1 of 8 Marks & Meanings DANGER: Keep the pump equipment out of the reach of children! Warns that the failure to follow the directions given could cause serious risk to individuals or objects. WARNING:
Users Guide for Ac-sync
 Problem solved. Users Guide for Ac-sync Thank you for choosing Anywhere Cart! The AC-SYNC is designed to sync, charge and store 1-36 ipads or tablets. Adjustable device divider bays allow fitment of any
WARNING. Be sure to read this Operation Manual before using your machine to ensure safe operation.
 WARNING Be sure to read this Operation Manual before using your machine to ensure safe operation. DECEMBER 2008 COMET CATCHER ARCADE 2 TABLE OF CONTENTS 1. SPECIFICATIONS 2. INTRODUCTION 2-1. Overview
Drip-n-Gro Dual Top Feed Drip System Instruction Manual
 Notes: Hydrogardening Bucket Systems Drip-n-Gro Dual Top Feed Drip System Instruction Manual 1 Square = 1 Foot Exclusively distributed by: Exclusively distributed by: www.sunlightsupply.com www.flo-n-gro.net
PVI 60KW, PVI 82KW, PVI 95KW
 PVI 60KW PVI 82KW PVI 95KW WARRANTY MANUAL Commercial, Grid-Tied Photovoltaic Inverters 2008, Solectria Renewables LLC Subject to Change DOC-020099 rev 024 1 1 Product Warranty & RMA Policy Warranty Policy
OWNER S MANUAL SELF-PRIMING PORTABLE UTILITY PUMP
 Model 54011-0 OWNER S MANUAL SELF-PRIMING PORTABLE UTILITY PUMP Questions, problems, missing parts? Before returning to the store call AQUAPRO Customer Service 8 a.m. - 5 p.m., EST, Monday-Friday 1-844-242-2475
CLEAN ROOM DEVICES, LLC "WHERE TUBING AND FITTINGS COME TOGETHER"
 CLEAN ROOM DEVICES, LLC "WHERE TUBING AND FITTINGS COME TOGETHER" CRD600 Automatic Fitting Inserter OPERATIONS MANUAL VERSION 2.1 LAST EDITED 7.25.14 DOCUMENT NUMBER 001 cleanroomdevices.com 1 Table of
READ THIS MANUAL CAREFULLY BEFORE USING THE PUMP
 OWNER S MANUAL Pond Pump READ THIS MANUAL CAREFULLY BEFORE USING THE PUMP Important Notice: This manual contains important information about the installation, operation and safe use of this product. This
Installation Instructions
 85-3195 rev. 12 04-18 Installation Instructions Thank you for purchasing this antisway bar kit. Please read through these instructions before installation. Part #1139-117 Rear Anti-Sway Bar Kit 1½ diameter
CRD600 Automatic Fitting Inserter
 CRD600 Automatic Fitting Inserter OPERATIONS MANUAL VERSION 2.3 LAST EDITED 12.07.2018 cleanroomdevices.com 1 Table of Contents Title Page.. 1 Table of Contents. 2 1.0 General Product & Safety Information...3
CRD610 Automatic Fitting Inserter
 CRD610 Automatic Fitting Inserter OPERATIONS MANUAL VERSION 1.2 LAST EDITED 12.12.2018 cleanroomdevices.com 1 Table of Contents Title Page. 1 Table of Contents...2 1.0 General Product & Safety Information....3
Installation Instructions
 85-4341 rev. 04 10-15 Installation Instructions Thank you for purchasing this antisway bar kit. Please read through these instructions before installation. Rear Anti-Sway Bar Kit for Chevy 2500/3500/4500
Installation Instructions
 85-3909 rev. 01 09-09 Installation Instructions Thank you for purchasing this anti-sway bar kit. Please read through these instructions before installation. Rear Anti-Sway Bar Kit for Chevrolet G30 part
QUICK START GUIDE OWNER S MANUAL AL50 SERIES SAND FILTRATION TECHNOLOGY PLEASE CALL DO NOT RETURN TO STORE
 QUICK START GUIDE OWNER S MANUAL SAFETY, INSTALLATION, OPERATION & PARTS AL50 SERIES SAND FILTRATION TECHNOLOGY PLEASE CALL 877-278-2797 DO NOT RETURN TO STORE! WARNING This equipment must be installed
Submersible Waterfall Pump 1200 Gallons Per Hour
 ITEM # LL1200 Submersible Waterfall Pump 1200 Gallons Per Hour REMINDER CALL 1-888-412-6001 EFORE RETURNING TO STORE. PACKAGE CONTENTS Questions, problems, missing parts? efore returning to your retailer,
StormPro BCV400 Sewage Ejector Pump
 Page 1 of 8 Marks & Meanings DANGER: Keep the pump equipment out of the reach of children! Warns that the failure to follow the directions given could cause serious risk to individuals or objects. WARNING:
Premium Pond Pump 330 Gallons Per Hour
 Premium Pond 330 Gallons Per Hour REMINDER CALL 1-888-755-4497 BEFORE RETURNING TO STORE. MODEL #PDP330 Questions, problems, missing parts? Before returning to your retailer, call our customer service
ECLIPSE Laundry Dispenser Controller
 ECLIPSE Laundry Dispenser Controller Reference Manual Programming and Operation Online and downloadable Product Manuals and Quick Start Guides are available at www.hydrosystemsco.com Please check online
Model , Series A 9 in. (23 cm) roller frame with 45 angle and 12 in. reach 1/2 in. (13 mm) nap roller cover
 roller frame with 45 angle and 12 in. reach 1/2 in. (13 mm) nap roller cover") Operating Instructions 309899 Rev. A This manual contains important warnings and information. READ AND KEEP FOR REFERENCE. INSTRUCTIONS Manufactured by Model 246818, Series A 9 in. (23 cm) roller frame
Operating Instructions 309899 Rev. A This manual contains important warnings and information. READ AND KEEP FOR REFERENCE. INSTRUCTIONS Manufactured by Model 246818, Series A 9 in. (23 cm) roller frame
37SCENE 46SCENE 79SCENE
 Installation and Operation Instructions LED SCENE LIGHT LED SCENE LIGHT 37SCENE 46SCENE 79SCENE 37SCENE 46SCENE Introduction The 37SCENE, 46SCENE, 79SCENE LED Scene Lights are designed for the emergency
OWNER S MANUAL Please read and understand all precautions prior to use.
 INPUT: 120V AC 60Hz 250mA. OUTPUT: 14.4V DC 500mA. OWNER S MANUAL Please read and understand all precautions prior to use. Thank you for choosing a premium New Bright product. USA & Canada 30-Day Limited
WARRANTY POLICY. Grid-Tied Photovoltaic Inverters. Revision D. 2014, Solectria Renewables, LLC DOCIN
 WARRANTY POLICY Revision D 2014, Solectria Renewables, LLC DOCIN-070360 1 Product Warranty & RMA Policy 1. Warranty Policy Warranty Registration: It is important to have updated information about the inverter
Submersible Pond Pump with UV 800 Gallons Per Hour
 Submersible Pond Pump with UV 800 Gallons Per Hour REMINDER CALL 1-888-755-6750 BEFORE RETURNING TO STORE. PACKAGE CONTENTS ITEM #PP800UV Questions, problems, missing parts? Before returning to your retailer,
Premium Waterfall Pump 1200 Gallons Per Hour
 Premium Waterfall 1200 Gallons Per Hour REMINDER CALL 1-888-755-4497 BEFORE RETURNING TO STORE. MODEL #PWP1200 Questions, problems, missing parts? Before returning to your retailer, call our customer service
Illumifalls Patio Pond
 Illumifalls Patio Pond REMINDER CALL 1-888-755-4497 BEFORE RETURNING TO STORE. Questions, problems, missing parts? Before returning to your retailer, call our customer service department at 1-888-755-4497,
CLEAN ROOM DEVICES, LLC "WHERE TUBING AND FITTINGS COME TOGETHER"
 CLEAN ROOM DEVICES, LLC "WHERE TUBING AND FITTINGS COME TOGETHER" CRD600AF Automatic Fitting Inserter With Auto Feed OPERATIONS MANUAL (Shown with optional alcohol dispenser) 1 VERSION 1.1 LAST EDITED
Container Fountain Kit with LED Light
 Container Fountain Kit with LED Light REMINDER CALL 1-888-755-6750 BEFORE RETURNING TO STORE. PACKAGE CONTENTS Questions, problems, missing parts? Before returning to your retailer, call our customer service
QUALITY MISTING PUMPS
 DIRECT DRIVE TOTALLY ENCLOSED FAN COOLED 60200KH, 60201KH MISTING PUMP MANUAL INCLUDING: SPECIFICATION DATA, GENERAL SAFETY PRECAUTIONS, OPERATION, INSTALLATION, PARTS, MAINTENANCE & WARRANTY QUALITY MISTING
Model AS-RC3260 TV Cart. Rolling Cart for Audio Mount System & Flat Panel TVs
 Model AS-RC3260 TV Cart Rolling Cart for Audio Mount System & Flat Panel TVs GETTING STARTED Introduction Congratulations on the purchase of your new Helios AS-RC3260 Rolling Cart. For maximum benefit,
Pressurized Pond Filter Up to 850 gallons
 Pressurized Pond Filter Up to 850 gallons REMINER CALL 1-888-755-4497 EFORE RETURNING TO STORE. MOEL/MOELO #PZF850 Questions, problems, missing parts? efore returning to your retailer, call our customer
Installation Instructions
 85-4592 rev. 08 02-18 Installation Instructions Thank you for purchasing our sway bar kit. Please read through these instructions before installation. Auxiliary Rear Anti-Sway Bar Kit for Ford F53 part
QUALITY MISTING PUMPS
 TOTALLY ENCLOSED DIRECT DRIVE 60030KH, 60031KH, 60050KH, 60051KH 60100KH, 60101KH, 60150KH, 60151KH MISTING PUMP MANUAL INCLUDING: SPECIFICATION DATA, GENERAL SAFETY PRECAUTIONS, OPERATION, INSTALLATION,
TERMS OF USE TERMS AND CONDITIONS. Plumbing and Heating Products (PL-WR)
") TERMS OF USE 1. Watts pricing and product data is subject to change without notice and such changes supersede all previous versions. 2. Watts data is to be used as provided. Watts is not responsible for
TERMS OF USE 1. Watts pricing and product data is subject to change without notice and such changes supersede all previous versions. 2. Watts data is to be used as provided. Watts is not responsible for
PVI 1800/PVI Residential/Commercial Grid-Tied Photovoltaic Inverter WARRANTY MANUAL. Subject to Change REV , Solectria Renewables
 PVI 1800/PVI 2500 WARRANTY MANUAL Residential/Commercial Grid-Tied Photovoltaic Inverter 2009, Solectria Renewables Subject to Change REV 10.09 1 Product Warranty & RMA Policy 1.1 Warranty Policy The Solectria
A/C PRESSURE MONITOR INSTALLATION INSTRUCTIONS SYSTEM OPERATION GREEN INDICATOR LIGHT
 A/C PRESSURE MONITOR INSTALLATION INSTRUCTIONS Do not attempt to clean or inspect anything while the engine is running. Cleaning and inspection must be done by a certified mechanic. All A/C service must
SUNC1200 / ITEM #40882 SUBMERSIBLE UTILITY PUMP OPERATIONS MANUAL
 SUNC1200 / ITEM #40882 SUBMERSIBLE UTILITY PUMP OPERATIONS MANUAL WWW.SUNRUNNERPOOL.COM Performance Model HP GPH of Water @ Total Feet Of Lift 0 ft. 5 ft. 10 ft. 15 ft. 20 ft. 25 ft. Max. Lift SUNC1200
HOW TO INSTALL YOUR BOV
 Product Name: Product Description: Product Number: BMW Kompact BOV Kit Model specific BOV Kit TS-0203-1050/TS-0203-1250 ------------------------------------------------------------------------------------------------------------------------
Power. On Your Terms.
 Power. On Your Terms. 10 YEAR LIMITED WARRANTY PHI 1310 TM 1 SIMPLIPHI POWER, INC. REV102016 10 YEAR LIMITED WARRANTY: PHI 1310 TM LIMITED PRO-RATED WARRANTY COVERAGE The SimpliPhi Power PHI 1310 as supplied
Installation Instructions
 85-3207 rev. 03 05-06 Installation Instructions Thank you for purchasing this anti-sway bar kit. Please read through these instructions before installation. Rear Anti-Sway Bar Kit for the Freightliner
DODGE CUMMINS 24V ISB OEM BYPASS LIFT PUMP KIT Installation Instructions Part #
 2/15/2006 2000-2002 Dodge Cummins OEM Bypass Lift Pump Kit # 1050229-1 - 2000-02 DODGE CUMMINS 24V ISB OEM BYPASS LIFT PUMP KIT Installation Instructions Part # 1050229 PLEASE READ ALL INSTRUCTIONS CAREFULLY
Firstmate Installation Manual and User's Guide May, 2003
 Firstmate Installation Manual and User's Guide May, 2003 Aqualogic Marine, Inc. 506-D Terry Lane - Washington - Missouri - 63090 Warning No user serviceable parts are located inside your Firstmate unit.
Mechanical Filter Pump Kit Up to 500 gallons
 Mechanical Filter Pump Kit Up to 500 gallons REMINDER CALL 1-888-755-6750 BEFORE RETURNING TO STORE. ITEM #FM002P Questions, problems, missing parts? Before returning to your retailer, call our customer
Submersible Waterfall Pump 1250 Gallons Per Hour
 Submersible Waterfall Pump 1250 Gallons Per Hour REMINDER ALL 1-888-755-6750 EFORE RETURNING TO STORE. PAKAGE ONTENTS ITEM #PW1250 Questions, problems, missing parts? efore returning to your retailer,
INSTRUCTIONS FOR OUTDOOR WALL LANTERN, MODEL LPT-1107
 INSTRUCTIONS FOR OUTDOOR WALL LANTERN, MODEL LPT-1107 Page 1 Thank you for purchasing this Langport Lighting outdoor wall lantern. This product has been manufactured with the highest standards of safety
Aqua Ultraviolet Sunami Series Pumps 1/3HP, 3/4HP, 3HP, 4HP, 5HP
 TM 42371 Avenida Alvarado Temecula, CA 92590 TOLL FREE (800) 454-2725 TEL (951) 296-3480 FAX (951) 296-3490 www.aquauv.com Aqua Ultraviolet Sunami Series Pumps 1/3HP, 3/4HP, 3HP, 4HP, 5HP Sunami Warranty
Model AS-FM64 Wall Mount. Full Motion Television Wall Mount
 Model AS-FM64 Wall Mount Full Motion Television Wall Mount Getting Started Introduction Congratulations on the purchase of your new Audio Solutions AS-FM64 Television Wall Mount. For maximum benefit, please
Installation Instructions
 85-3511 rev. 04 11-15 Installation Instructions Polyurethane Bushing Kit for Ford F-53 (Front) (replaces OE bushings and brackets) part #4139-127 1-5/8 diameter INTRODUCTION Thank you for purchasing this
10 Year Limited Warranty
 Power. On Your Terms. 10 Year Limited Warranty PHI 2.7 TM PHI 3.5 TM 60A SIMPLIPHI POWER, INC. REV020618 10 Year Limited Warranty: PHI 2.7 TM PHI 3.5 TM 60A 24V 48V Limited Pro-Rated Warranty Coverage
HOW TO INSTALL YOUR BOV
 Product Name: Product Description: Product Number: Subaru Dual port Fits WRX 01 07, WRX STI 01 08, Forester XT 06 TS-0205-1015/TS-0205-1016 ------------------------------------------------------------------------------------------------------------------------
80 LB Rotary Spreader Optional Equipment Calibration
 030710/Epoxy, 021820/Stainless Steel 80 LB Rotary Spreader Optional Equipment Calibration Model #: 030710 Starting Serial #:0307101B070Z10001- Model #: 021820 Starting Serial #:0218201B070Z10001-2/00 5:1
AEROMOTIVE Part # and F-Body Fuel System Kit INSTALLATION INSTRUCTIONS
 AEROMOTIVE Part # 17101 and 17102 93-97 F-Body Fuel System Kit INSTALLATION INSTRUCTIONS CAUTION: Installation of this product requires detailed knowledge of automotive systems and repair procedures. We
BAK1500 INSTALLATION/OWNER'S MANUAL Compact Amplified Subwoofer
 BAK1500 INSTALLATION/OWNER'S MANUAL Compact Amplified Subwoofer PREPARATION Getting Started Thank you for purchasing the Dual BAK1500 compact amplified subwoofer. Although Dual has attempted to ensure
PACIFICA Shower Cabin Installation Instructions
 PACIFICA Shower Cabin Installation Instructions IMPORTANT Please read carefully the following instructions before installing your shower cabin. If you have any questions on this shower cabin installation
MetroPrime 22MPC Self-Priming Centrifugal Pump
 Page 1 of 6 prevent priming or reduce pump capacity. OPERATION The 22 MPC-Metropolitan Pump is a self-priming centrifugal pump and only requires priming prior to its initial start. The pump will retain
TBX10A INSTALLATION/OWNER'S MANUAL 10" Sealed Enclosure with Built-in Amplifier
 TBX10A INSTALLATION/OWNER'S MANUAL 10" Sealed Enclosure with Built-in Amplifier Getting Started Thank you for purchasing the Dual TBX10A 10" ported enclosure with built-in amplifier. Although Dual has
User s Manual. ClipperCreek, Inc. Innovative Infrastructure for Electric and Hybrid Vehicles. Model PCS-15
 ClipperCreek, Inc. Innovative Infrastructure for Electric and Hybrid Vehicles User s Manual ClipperCreek, Inc. 11850 Kemper Rd., Suite E Auburn, CA 95603 www.clippercreek.net Model PCS-15 THIS PAGE INTENTIONALLY
HALLMARK INDUSTRIES INC
 Performance Part No. HP. CONVERTIBLE JET PUMP USER S MANUAL GPH of Water @ Total Discharge Pressure of 40 psi Max. Pressure Max suction (shallow well) Max Suction (deep well) Max GPM (@0 head) Max Discharge
BroadBand PowerShield. 20 AHr Battery. User Manual
 BroadBand PowerShield 20 AHr Battery User Manual 990-1316A 10/2004 Chapter 1 General Information The PowerShield provides a power source for broadband telephony applications. Important Safety Instructions
Installation Instructions
 85-3910 rev. 03 01-18 Installation Instructions Thank you for purchasing the antisway bar kit. Please read through these instructions before installation. Rear Anti-Sway Bar Kit for Ford F-250/F-350 part
Mechanical Filter Box Kit
 Mechanical Filter Box Kit REMINDER CALL 1-888-755-4497 BEFORE RETURNING TO STORE. MODEL #MFBX500P Questions, problems, missing parts? Before returning to your retailer, call our customer service department
Installation Instructions
 85-3209 rev. 07 03-11 Installation Instructions Thank you for purchasing this anti-sway bar kit. Please read through these instructions before installation. Front Anti-Sway Bar Kit for Workhorse W22, Holiday
Installation Instructions To ensure that your installation proceeds smoothly--please read these instructions carefully before you begin.
 Single Lever Vessel Faucet Installation Instructions To ensure that your installation proceeds smoothly--please read these instructions carefully before you begin. P r o d u c t s Luxury Faucets and Accessories
Installation Instructions
 Installation Instructions To ensure that your installation proceeds smoothly--please read these instructions carefully before you begin. P r o d u c t s Luxury Faucets and Accessories Savina Product Numbers
Conserve Insight Energy Use Monitor. User Guide
 Conserve Insight Energy Use Monitor User Guide Find out how much energy your devices really use including watts, the cost of operation, and the amount of carbon dioxide (CO 2 ) produced in generating the
Dear Customer, User Memo: Please visit us on facebook or twitter! Thank you for purchasing this product.
 Owner s Manual 1 Dear Customer, Thank you for purchasing this product. For optimum performance and safety, please read these instructions carefully. User Memo: Date of purchase: Dealer name: Dealer address:
Installation Instructions
 85-3214 rev. 07 03-11 Installation Instructions Thank you for purchasing this anti-sway bar kit. Please read through these instructions before installation. Rear Anti-Sway Bar Kit Freightliner FL Series
Easy-On Wireless Tail Lights User s Guide
 Easy-On Wireless Tail Lights User s Guide TAKE NOTICE: BY INSTALLING OR OTHERWISE USING THE EASY-ON WIRELESS TAIL LIGHTS YOU AGREE TO FOLLOW THE BELOW DIRECTIONS CAREFULLY AND BE BOUND BY THE LIMITATION
½ DODGE CUMMINS OEM BYPASS LIFT PUMP KIT Installation Instructions Part #
 29 July 2005 2003-04.5 Dodge Cummins OEM Bypass Lift Pump Kit # 1050227-1 - 2003-04½ DODGE CUMMINS OEM BYPASS LIFT PUMP KIT Installation Instructions Part # 1050227 PLEASE READ ALL INSTRUCTIONS CAREFULLY
Owner s Guide. ca5154
 PROFESSIONAL SERIES Owner s Guide for models: ca5154 Automatic / Manual Transmission Remote Start and Keyless Entry System IMPORTANT NOTE: The operation of the Security and Convenience System as described
Installation Instructions
 85-5029 rev. 03 06-17 Installation Instructions Thank you for purchasing our anti-sway bar kit. Please read through these instructions before installation. Rear Anti-Sway Bar Kit for Workhorse W22, Holiday
Exterior Digital Load Scale 201-EDG-01(B) Installation and Operation Manual Please read carefully before installation
 Installation and Operation Manual Please read carefully before installation") Exterior Digital Load Scale 201-EDG-01(B) Installation and Operation Manual Please read carefully before installation 2 Exterior Digital Load Scale 201-EDG-01(B) Table of Contents Specifications & Overview
Exterior Digital Load Scale 201-EDG-01(B) Installation and Operation Manual Please read carefully before installation 2 Exterior Digital Load Scale 201-EDG-01(B) Table of Contents Specifications & Overview
The Da-Lite Difference.
 The Da-Lite Difference. Instruction Book for Cosmopolitan Electrol For Sizes Up To 9'x12' DA-LITE SCREEN COMPANY, INC. 3100 North Detroit Street Post Office Box 137 Warsaw, Indiana 46581-0137 Phone: 574-267-8101
Model T2642 Wall Mount. Television Wall Mount with Tilt Option
 Model T2642 Wall Mount Television Wall Mount with Tilt Option Getting Started Introduction Congratulations on the purchase of your new Audio Solutions T2642 Television Wall Mount. For maximum benefit,
Mega-Rail System Installation
 Installation Manual Mega-Rail System P/N 030767-MRS 2003-2007 DODGE CUMMINS Mega-Rail System Installation Installation Instructions GDP 03-07 Mega-Rail System P/N 030767-MRS PLEASE READ ALL INSTRUCTIONS
Natural Fiber Planter Fountain
 Natural iber Planter ountain REMINDER CALL 1-888-755-5641 BEORE RETURNING TO STORE. PACKAGE CONTENTS Questions, problems, missing parts? Before returning to your retailer, call our customer service department
BD Ford 1999½ L Power Stroke CRANKCASE VENTILATION KIT
 30 October 2008 1999.5 2003 FORD 7.3L CCV Kit 1 BD Ford 1999½-2003 7.3L Power Stroke CRANKCASE VENTILATION KIT P/N#: 1032170 PLEASE READ ALL INSTRUCTIONS BEFORE INSTALLATION 30 October 2008 1999.5 2003
STC 2P025 Series Solenoid Valve
 STC 2P025 Series Solenoid Valve 2P025 Series Solenoid Valve Specifications Valve Model Valve Type Action Cv (Orifice) Operating Pressure Operating Temperature 2P025 2 Way, Normally Closed (NC) Direct Acting
This document describes:
 Thank you for purchasing this product from ERM. We appreciate your interest in our unique product line as we try to offer our customers an alternative to today s traditional products. This programmable
PENBERTHY MODELS GL AND GH GAS OPERATED JET PUMPS INSTALLATION, OPERATION AND MAINTENANCE INSTRUCTIONS
 Before installation, these instructions must be read carefully and understood. PRODUCT WARRANTY Emerson warrants its Penberthy products as designed and manufactured to be free of defects in the material
RANGE HOODS USER INSTRUCTIONS
 RANGE HOODS USER INSTRUCTIONS Model: Advanta Pro III 30 & 36 IMPORTANT SAFETY INSTRUCTIONS Carefully read the following important information regarding installation safety and maintenance. Keep these instructions
 Product Name: Product Description: Product Number: Comp-Gate40 40mm External TS-0505-1XXX ------------------------------------------------------------------------------------------------------------------------
REAR SWAY BAR 2207R GM CAMARO/FIREBIRD
 REAR SWAY BAR 2207R 67-69 GM CAMARO/FIREBIRD Thank you for your purchase of this Hotchkis Performance product. Your stabilizer bar set was designed with the performance and durability you ve come to expect
Users Manual Certified Series Direct Drive Pump 1-7 LPM
 Users Manual Certified Series Direct Drive Pump 1-7 LPM Safety, Operating, Installation, and Maintenance Instructions 600 S 56 th Street #9 Chandler, AZ 85226 Phone: 480-507-6478 Fax: 480-838-2232 www.fogco.com
The Da-Lite Difference.
 The Da-Lite Difference. Instruction Book for Large Advantage Electrol DA-LITE SCREEN COMPANY, INC. 3100 North Detroit Street Post Office Box 137 Warsaw, Indiana 46581-0137 Phone: 574-267-8101 800-622-3737
Series: PFUEG 1/12HP, 5000 RPM, 60 Hz Utility Pumps
 INSTALLATION MANUAL Series: 1/12HP, 5000 RPM, 60 Hz ISP No: - 6/09 General Safety Information Before installation, read the following instructions carefully. Failure to follow instruction and Safety information
Thermometer models / 00831A
 Instruction Manual Thermometer models 00822 / 00831A CONTENTS Unpacking Instructions... 2 Package Contents... 2 Product Registration... 2 Features & Benefits... 3 Setup... 4 Install or Replace Batteries...
CLASSIC II Portable Braking System
 39495 CLASSIC II Portable Braking System Inventor and Leader in Portable Technology! INSTRUCTIONS NEED HELP? CALL - 1-800-470-2287 (MONDAY - FRIDAY 8AM - 5PM CST) WARNING Read all instructions before installing
BEFORE YOU BEGIN LIST OF COMPONENTS. Isopropyl SWITCH SCOTCH-BRITE PAD ALCOHOL PREP PAD SWITCH HARNESS REVOLVER PCM COVER STICKER
 User Manual TABLE OF CONTENTS BEFORE YOU BEGIN...3 LIST OF COMPONENTS... 3 REVOLVER INSTALLATION 95-97 Trucks...4 REVOLVER INSTALLATION 98-03 Trucks...7 SWITCH INSTALLATION...12 SAFETY WARNING & CAUTION...14
Installation Instructions
 85-4209 rev. 05 11-18 Installation Instructions Thank you for purchasing this anti-sway bar kit. Please read through these instructions before installation. Factory Replacement Anti-Sway Bar Kit part #1129-135
CRANKCASE VENTILATION KIT
 30 October 2008 2004-07 Ford 6.0L CCV Kit 1 BD Ford 2004-2007 6.0L Powerstroke CRANKCASE VENTILATION KIT P/N# 1032175 PLEASE READ ALL INSTRUCTIONS BEFORE INSTALLATION 30 October 2008 2004-07 Ford 6.0L