GRASS TRIMMERS INSTRUCTIONS IMPORTANT: PLEASE READ THESE INSTRUCTIONS CAREFULLY TO ENSURE THE SAFE AND EFFECTIVE USE OF THIS TOOL.
|
|
|
- Hannah George
- 6 years ago
- Views:
Transcription
1 GRASS TRIMMERS STOCK No PART No.GT3525T GT4729DA INSTRUCTIONS IMPORTANT: PLEASE READ THESE INSTRUCTIONS CAREFULLY TO ENSURE THE SAFE AND EFFECTIVE USE OF THIS TOOL. 11/2000 SPECIFICATION Whilst every effort has been made to ensure that the information given in this manual is correct at the time of going to print, the Draper Tools policy of continuous improvement determines the right to change specification without notice. STOCK No PART No GT3525T GT4729DA VOLTAGE V V POWER W W CUTTING WIDTH mm mm LINE FEED SYSTEM "Tap n Go" Fully Automatic LINE Single 6M Double 2x5M SUPPORT HANDLE Adjustable Adjustable WEIGHT kg kg. SOUND POWER LEVEL dbA dbA SOUND PRESSURE LEVEL dbA dbA VIBRATION LEVEL m/s m/s 2
2 POWER SUPPLY CONNECTING YOUR MACHINE TO THE POWER SUPPLY: To eliminate the possibility of an electric shock, your machine has been fitted with a BS approved, non-rewirable moulded plug and cable which incorporates a fuse, the value of which is indicated on the pin face of the plug. Should the fuse need to be replaced, an approved BS1362 fuse must be used of the same rating, marked thus. The fuse cover is detachable, never use the plug with the cover omitted. If a replacement fuse cover is required, ensure it is of the same colour as that visible on the pin face of the plug (i.e. red). If the fitted plug is not suitable, it should be cut off and destroyed. *The end of the cable should now be suitably prepared and the correct type of plug fitted. See below. *WARNING: A plug with bare flexible wires exposed is hazardous if engaged in a live power socket outlet. WARNING: THIS APPLIANCE IS DOUBLE INSULATED. Blue - Neutral, Brown - Live. As these colours may not correspond with the coloured markings identifying the terminals in your plug, proceed as follows: The wire which is coloured blue must be connected to the terminal which is marked with the letter 'N' or coloured black or blue. The wire which is coloured brown must be connected to the terminal which is marked with the letter 'L' or coloured red or brown. DECLARATION OF CONFORMITY We Draper Tools Ltd. Hursley Road, Chandlers Ford, Eastleigh, Hampshire. SO53 1YF. England. Declare under our sole responsibility that the product: Stock No & Part No. GT3525T & GT4729DA Description: GRASS TRIMMERS To which this declaration relates is in conformity with the following directive(s): 98/37/EEC, 89/336/EEC & 73/23/EEC. With reference to: DINVDE0730-2ZP, DINVDE0730-1, EN , EN , EN & EN JOHN DRAPER Managing Director 01/99 GUARANTEE Draper Garden Power tools have been carefully tested and inspected before shipment and are guaranteed to be free from defective materials and workmanship for a period of 12 months from the date of purchase except where tools are hired out when the guarantee period is ninety days from the date of purchase. Should the machine develop any fault, please return the complete tool to your nearest authorized warranty repair agent or contact Draper Tools Limited, Hursley Road, Chandler s Ford, Eastleigh, Hampshire, SO53 1YF. England. Telephone: (023) If upon inspection it is found that the fault occurring is due to defective materials or workmanship, repairs will be carried out free of charge.this guarantee does not apply to normal wear and tear, nor does it cover any damage caused by misuse, careless or unsafe handling, alterations, accident, or repairs attempted or made by any personnel other than the authorized Draper warranty repair agent. This guarantee applies in lieu of any other guarantee expressed or implied and variations of its terms are not authorized. Your Draper guarantee is not effective unless you can produce upon request a dated receipt or invoice to verify your proof of purchase within the 12 month period. Please note that this guarantee is an additional benefit and does not affect your statutory rights. Draper Tools Limited, Hursley Road, Chandler s Ford, Eastleigh, Hampshire. SO53 1YF. U.K.
3

4
.")


5 GB 1 Wear eyes and ear protectors! 2 Warning! 3 Read the operation instructions 4 Keep third persons out of the danger zone 2. General Safety Instructions Machine noise information regulation 3, GSGV: the noise pressure level at the place of work can exceed 85 db(a). In such cases the operator will require noise protection (e.g. wearing of ear protectors). Attention: Using electric power tools, you must observe following fundamental safety instructions to protect yourself against electric shock, against danger of injuries and danger of fire. Read all these instructions before using the grass trimmer and observe them. Keep these safety instructions at a safe place. The machine has been constructed according to the latest technology and in accordance with the recognised technical safety regulations. Nevertheless, use of the machine can involve risks to the user or third persons, and can cause damage to the machine or other objects. Use the machine in a safety conscious manner for suitable applications and in technically perfect condition only and according to the operating instructions! Immediately rectify or have any faults rectified which could adversely affect safety! Read the instruction manual carefully. It is important that you fully understand and observe the safety precautions and warnings before starting and using your trimmer for the first time. Careless or improper use of any trimmer may cause serious or fatal injury. Observe all applicable safety regulations, standards and ordinances. Please familiarise yourself with the machine before the first use. 3. Application The machine is exclusively intended for cutting decorative lawn, i.e. lawn edges. Any other use or use going beyond that, such as the cutting of brushwood and hedges or large areas of lawn, is 5 After-running of the appliance! 6 Do not use tool in wet weather conditions 7 Remove plug immediately if the power flex is damaged or cut considered improper use. The manufacturer / supplier is not liable for damages resulting from such use. The risk is borne by the user alone. A proper utilisation also includes the observance of the operating manual and the compliance with the conditions of control and maintenance. Keep the operating manual always at hand near the place the machine is used! 4. Safety Instructions A. General Instructions 1. Your electric trimmer is a high-speed, fastcutting power tool. The electrical connection and cutting tool are potential sources of danger. Therefore, special safety precautions must be observed to reduce the risk of personal injury. 2. Always switch off the trimmer and disconnect the plug from the power supply before carrying out any maintenance or repair work on the unit. Always unplug the trimmer if you leave it without supervision. 3. Have your dealer or a specialist show you how to operate your trimmer. 4. Minors should never be allowed to use an electric trimmer. Never lend or rent your electric trimmer without these operating instructions. Be sure that anyone using your trimmer understands the information contained in these operating instructions. 5. You must be fit to operate an electric trimmer - rested, healthy and in good physical condition. If you get tired while operating your trimmer, take a break. Never work with an electric trimmer while under the influence of alcohol or drugs. 6. Never attempt to modify your trimmer in any way since it may increase the risk of personal injury. Do not use wire or metal reinforced line. This excludes all liability for personal injury or damage to property


6 caused by improper use or impermissible modification. 7. Do not use the trimmer if other persons, above all children, or animals are near the working area. 8. The high-speed cutting head may catch and fling stones and other foreign objects a great distance. To reduce the risk of injury, ensure that bystanders / children and animals are at least 15 m (50 ft) away from your own position. B. Operational Precautions 9. Only use your trimmer for cutting grass and weeds next to walls, under fences, around trees and posts, on steps, garden paths and patios, under bushes and hedges, on steep slopes, in gaps between paving stones, etc. C. Instructions regarding to safe handling 10. A power circuit breaker must be installed in the power outlet to which the trimmer is connected or on the electric cord to the trimmer. Contact an electrician for further information. For a safe operation, it is recommended to supply the machine over a fault current safety breaker (RCD) with a fault current not over 30 ma. 11. Before starting work check that your electric trimmer is in good condition and that it is operating properly. Pay special attention to the power supply cord, extension cord, power outlet, switch and cutting head. 12. Before using the machine, the line and extension cords have to be checked for signs of damage or ageing. Do not use the trimmer when the cords are damaged or worn. 13. If the cord is damaged during utilisation, it must be disconnected immediately from the mains. DO NOT TOUCH THE CORD BEFORE IT IS DISCONNECTED FROM THE MAINS. 14. Attention! Danger. The cutting head continues to rotate after switch-off (flywheel effect). Keep your fingers and feet well clear to avoid injury. 15. Use only extension cords that are approved for outdoor applications and that comply with specifications. Couplings and plugs must be splashwater-proof. Never operate your trimmer without a properly mounted and secured safety cover. Check tightness of cutting head. 16. Do not use damaged power supply cords, extension cords, couplings, plugs or cutting heads. 17. Do not switch on the unit when hands or feet are near the cutting elements. 18. Wear goggles or properly fitted safety glasses, sturdy closed shoes with non-slip soles, snug-fitting work clothes, gloves and ear protectors (ear plugs or ear mufflers). 19. Careless use can cause injuries to hand and feet by the rotating cutting elements. 20. Always hold your trimmer firmly, if possible with both hands - make sure you always maintain a good balance and secure footing. 21. Work calmly and stay alert. Operate the trimmer under good visibility and daylight conditions only. 22. Arrange the extension cord so that it cannot be damaged and does not cause a hindrance. 23. Be careful not to chafe the extension cord on corners, pointed or sharp objects. Do not squeeze extension cord, e.g. through narrow gaps in doors or windows. 24. Make sure the open side of the protection guard is pointing away from yourself before you switch on the trimmer. 25. Never tug the extension cord to disconnect the plug. Always grip the plug. 26. Use particular caution while working in dense growth areas where your view of the ground is obscured. 27. Never leave your trimmer outdoors in rain. 28. Do not cut wet grass or other growth. Never use in rain. 29. Hold the extension cord so that it is always away from the rotating nylon line. 30. Transporting the electric trimmer, e.g. carrying it to another site: Switch of the unit, disconnect the plug. 31. Take special care in slippery conditions - on slopes and uneven ground. 32. Work in a line across the slope and take special care when turning around. 33. Watch for hidden obstacles such as tree stumps and roots to avoid stumbling. 34. Clean the cutting head at regular intervals. 35. Check the condition of the cutting head at frequent intervals. If the behaviour of the cutting head changes (vibration, noise), check immediately as follows: Switch off the trimmer, hold it firmly and bring the cutting head to a standstill by pressing it against the ground. Then disconnect plug from power supply. Check condition of cutting head - look for cracks.

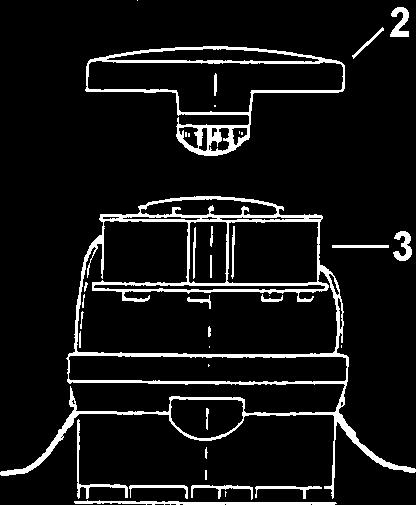
7 36. Warning! Danger of injury by the line cutting device. After replacing a spool or lengthening the cutting line, be sure to bring the unit onto normal working position before turning it on again. 37. Have a damaged cutting head replaced immediately - even if it only has superficial cracks. Never attempt to repair a damaged cutting head. 38. Always switch off your trimmer and disconnect it from the power supply before taking a break and after finishing work. Do not forget maintenance. (Plug disconnected!) Only carry out maintenance and repairs described in these operating instructions. Any other work should be performed by your dealer. 39. Inspect cooling air slots on the motor housing at regular intervals for clog-ups and clean as necessary. 40. Only use original spare parts. 41. Only use original cutting heads and replacement spools. Never use metal cutting devices. 42. Clean plastic parts with a damp cloth. Do not use aggressive cleaning chemicals. 43. Never hose down the electric trimmer! 44. Store trimmer indoors in a dry, high or locked place and always keep out of reach of children. Important notice - so your guarantee does not expire: Always keep the air-intake clean. Never use a longer line than the blade-retainer allows to use. Only use original monofilaments with 1,4 mm ø and original spools. Never press the cutting head on the ground, while motor is running. Never hit the cutting head on a hard underground, otherwise you will unbalance and damage the motor shaft. 5. Connecting the trimmer (fig. 1) The machine can only be used on single-phase AC current. It is double-insulated in accordance with Class II VDE 0740 and EEC 20 and therefore, it can be used from sockets without earth wire. Before using the trimmer, ensure that the mains voltage is the same as the operating voltage shown on the rating plate. Wires of extension cord must have the following minimum cross sectional area: up to 25 m (80 ft): 1 mm² more than 25 m (80 ft): 1,5 mm² Make a loop in the extension cord, push it through the opening in the handle and hook over the lug (strain relief). After finishing work, unhook loop from lug and pull it out of the handle. 6. Mounting the protection cover (fig. 3+4) Remove the spool cover by pushing the spool cover tab (fig. 15, pos. 1) at the side of the cutting head inwards. Remove the spool and the spring. Place the protection cover onto the trimmer housing in such a way that the 2 guide edges of the protection cover are located in the corresponding gaps of the motor housing. Now turn the protection cover by 90 up to the right position as shown in the illustration. The guide edges of the protection cover must be placed properly in the corresponding groove of the motor housing. Finally, fix the protection cover with the enclosed screw. Insert spring and spool. Thereafter, position spool cover and fix it on the cutting head. Attention: With model GT 3525 T and GRT 4729 DA the protection cover can be assembled without removing the cutting head. 7. Switching on / off (fig. 2) To operate your grass trimmer: Make sure you have a secure footing. Hold the trimmer firmly (with both hands). Stand upright - hold trimmer in relaxed position. Do not rest the cutting head on the ground. Squeeze the switch. The trimmer is switched off when you release the switch. 8. Cutting Angle and Height Adjustment Height adjustment-(fig. 5): Press button 1 and adjust length of shaft to the most comfortable of the three positions. Press button 2 and adjust front handle as required. Cutting angle adjustment: Press button 3 to release cutting head (fig. 6) - it can now be swivelled to two other positions. Press button 1 and rotate handle 180 degrees as far as to the stop (ill 7). Position for edging-(fig. 8) 9. Trimming Grass and Weeds (fig. 9) Sweep trimmer back and forth uniformly to cut small patches of grass or weeds. The trimmer is not constructed and suitable for cutting large areas.
8 Wherever possible, cut with left-hand side so that cuttings, dust and stones are thrown forwards, away from the user. Ideal working conditions are achieved if the trimmer is tilted to the left at an angle approx. of Adjusting Nylon Line GT 3525T Check the nylon line regularly if it is damaged or if it still has the correct length. When cutting performance deteriorates: Hold the running trimmer above a patch of grass. Tap the cutting head on the ground (fig. 10). Note the fresh line will be advanced only if lines are still at least 2.5 cm (1 inch) long. If the lines are shorter: Switch off the trimmer, disconnect plug from power supply. Press in the spool and pull end of lines firmly outwards (fig.11). If end of lines arenot visible - see point 11 (replacement of spool). For model GT 4729 DA the string is automatically adjusted to the proper length in the case that it becomes shorter than the minimum length The line(s) will automatically be cut to the correct length (when trimmer is running) if too much line has been released (ill 12). Attention: Clean the cutting blade from grass in order to avoid that the cutting effect will be influenced. WARNING: Hazard of injury through the cutting blade. 11. Replacement of Spool Model GT 3525 T: Switch off trimmer and disconnect from power supply. Wait until the nylon lines stop to rotate. Then push the two locking devices 1 at the sides of the cutting head, and remove the cutting head cover 2 (fig. 13). Remove the used thread coil and put in the new coil 3 such, that one end of the thread comes out of each outlet at the sides of the cutting head (fig. 14). Please take care that the spring 4 is pro-perly seated under the thread coil. Finally, close the cover by pushing it in its seat. Both locks must properly engage. Model GT 4729 DA: First, turn the machine off and pull plug out of socket. Wait until the nylon line completely stops moving. Then press both side buttons 1 (pic. 15) and take off the cover 2. Take out the empty spool and replace with the new spool 3 in such a way that one end of the line always stick out on the side of the cutting head from the button (pic. 16). With a slight turn secure the spool, so that it sits at the correct position in the base plate. Then replace the cover and snap both side buttons back. 12. Trouble Shooting Trimmer does not work: Check power supply (e.g. by testing on another socket or by means of a voltage tester). Should it still not work, although the socket is o.k., send it undismantled to an authorised service station for repair. Cutting line disappears into spool: Remove spool (acc. to point 11), pull end of line through the metal outlet and reinsert spool. In case nylon line is used up insert a new spool with line. Do not make any other repairs on your own; have your trimmer checked and repaired by an authorised service station. 13. Storing Clean the unit thoroughly, especially the cooling air slots on the motor housing. Store trimmer indoors in a dry, high or locked place and keep out of reach of children.
9 OPTIONAL ACCESSORIES Part No.AGP2 Stock No GT3525T Replacement Spool Part No.AGP4 Stock No GT4729DA Replacement Spool Part No.AGP5 Stock No Replacement Nylon Spool Lines FITTING ACCESSORIES Spool Line Replacement for Part Nos. AGP3 and AGP4: With the spool removed from the trimmer gently prize off the white nylon ring over the smaller rim. (Fig.1.) Remove any excess line from the spool. Feed the end of the new line (AGP5) through the securing holes (Fig.2.) and by applying heat melt the line end (Fig.3.) so it will not come back through the hole. Now repeat this process for the other line. Now position the spool with the recess (Fig.4.) facing downwards, wind the line around the upper race in a clockwise direction. When fully wound, feed the end of the line through the hole in the white nylon ring (Fig.5.), then slide the nylon ring over the upper race to stop the line unwinding. Now wind the other line in a clockwise direction round the lower race. When fully wound, hold in place while sliding down the nylon ring so the line passes through the slot (Fig.6.). Fig.1. Fig.2. Fig.3. Fig.4. Fig.5. Fig.6.
10 DRAPER TOOLS LIMITED, Hursley Road, Chandler's Ford, Eastleigh, Hants. SO53 1YF. U.K. Helpline: (023) Sales Desk: (023) General Enquiries: (023) Fax: (023) YOUR DRAPER STOCKIST Published by Draper Tools Ltd. No part of this publication may be reproduced, stored in a retrieval system or transmitted in any form or by any means, electronic, mechanical photocopying, recording or otherwise without prior permission in writing from Draper Tools Ltd.
AUTOMATIC/ INTELLIGENT BATTERY CHARGERS
 AUTOMATIC/ INTELLIGENT BATTERY CHARGERS PART No.66800 PART No.BC8A 66806 BCI INSTRUCTIONS IMPORTANT: PLEASE READ THESE INSTRUCTIONS CAREFULLY TO ENSURE THE SAFE AND EFFECTIVE USE OF THIS TOOL. 10/2001
2 TONNE TROLLEY JACK
 2 TONNE TROLLEY JACK 61829 IMPORTANT: Please read these instructions carefully to ensure the safe and effective use of this product and save these instructions for future reference. This manual has been
12V/24V DUAL VOLTAGE DIESEL FUEL TRANSFER PUMP
 12V/24V DUAL VOLTAGE DIESEL FUEL TRANSFER PUMP STOCK No.65673 PART No.FP1 INSTRUCTIONS IMPORTANT: PLEASE READ THESE INSTRUCTIONS CAREFULLY TO ENSURE THE SAFE AND EFFECTIVE USE OF THIS TOOL. 05/2001 GENERAL
CONTACTS RELAY TESTER 66249
 RELAY TESTER 66249 These instructions accompanying the product are the original instructions. This document is part of the product, keep it for the life of the product passing it on to any subsequent holder
12V POWER PACK WITH 230V/A.C. OUTPUT INVERTER INSTRUCTIONS
 12V POWER PACK WITH 230V/A.C. OUTPUT INVERTER STOCK No.56364. PART No.PP12/230V. INSTRUCTIONS IMPORTANT: PLEASE READ THESE INSTRUCTIONS CAREFULLY TO ENSURE THE SAFE AND EFFECTIVE USE OF THIS POWER PACK.
04979, 04980, 04981, 04982, 04983, 04984, 39054, 39055, 39056, 39057, 39225, 81459,
 Hydraulic Bottle Jacks 04979, 04980, 04981, 04982, 04983, 04984, 39054, 39055, 39056, 39057, 39225, 81459, 82132. These instructions accompanying the product are the original instructions. This document
3 TONNE TROLLEY JACK
 3 TONNE TROLLEY JACK 16407 These instructions accompanying the product are the original instructions. This document is part of the product, keep it for the life of the product passing it on to any subsequent
CONTACTS EGR VALVE TESTER 66248
 EGR VALVE TESTER 66248 These instructions accompanying the product are the original instructions. This document is part of the product, keep it for the life of the product passing it on to any subsequent
TESTER SET SOCKET & VOLTAGE
 SOCKET & VOLTAGE TESTER SET 82384 These instructions accompanying the product are the original instructions. This document is part of the product, keep it for the life of the product passing it on to any
APPLICATION GUIDE FOR: CAMSHAFT DRIVE CHAIN WEAR INDICATOR
 BRITISH MADE APPLICATION GUIDE FOR: CAMSHAFT DRIVE CHAIN WEAR INDICATOR 16239 This document is part of the product, keep it for the life of the product passing it on to any subsequent holder of the product.
DIAGNOSTIC TOOL BATTERY
 BATTERY DIAGNOSTIC TOOL 81164 These instructions accompanying the product are the original instructions. This document is part of the product, keep it for the life of the product passing it on to any subsequent
GENERAL INFORMATION. INSTRUCTIONS FOR 500A Lithium Jump Starter
 INSTRUCTIONS FOR 500A Lithium Jump Starter Stock No.15067 Part No.LJS136 IMPORTANT: PLEASE READ THESE INSTRUCTIONS CAREFULLY TO ENSURE THE SAFE AND EFFECTIVE USE OF THIS PRODUCT. GENERAL INFORMATION These
WORKLIGHTS 10W & 20W LED RECHARGEABLE 19546, 19562
 10W & 20W LED RECHARGEABLE WORKLIGHTS 19546, 19562 These instructions accompanying the product are the original instructions. This document is part of the product, keep it for the life of the product passing
2W COB + 1W LED Rechargeable Inspection Lamp Stock Nos Part Nos. CRIL/COB/BL CRIL/COB/OR CRIL/COB/GR CRIL/COB/YW
 INSTRUCTIONS FOR 2W COB + 1W LED Rechargeable Inspection Lamp Stock Nos.82679 Part Nos. CRIL/COB/BL 82684 CRIL/COB/OR 82685 CRIL/COB/GR 82688 CRIL/COB/YW IMPORTANT: PLEASE READ THESE INSTRUCTIONS CAREFULLY
TIMING KIT APPLICATION GUIDE FOR: ENGINE
 BRITISH MADE APPLICATION GUIDE FOR: ENGINE TIMING KIT 27021 This document is part of the product, keep it for the life of the product passing it on to any subsequent holder of the product. Read all information
1050W 230V SDS Max Breaker
 INSTRUCTIONS FOR 1050W 230V SDS Max Breaker Stock No.81077 Part No.PHD1050MAX IMPORTANT: PLEASE READ THESE INSTRUCTIONS CAREFULLY TO ENSURE THE SAFE AND EFFECTIVE USE OF THIS PRODUCT. GENERAL INFORMATION
ELECTRIC HOIST MODEL NO: CH2500B, CH4000B OPERATION & MAINTENANCE INSTRUCTIONS PART NO: , LS1010
 ELECTRIC HOIST MODEL NO: CH2500B, CH4000B PART NO: 7630386, 7630391 OPERATION & MAINTENANCE INSTRUCTIONS LS1010 INTRODUCTION Thank you for purchasing this CLARKE Electric Hoist. Before attempting to use
10/15L EPDM PRESSURE SPRAYERS
 10/15L EPDM PRESSURE SPRAYERS 82460, 82583 Stock No.82460 Stock No.82583 These instructions accompanying the product are the original instructions. This document is part of the product, keep it for the
STRUT SPRING COMPRESSOR
 OWNER S MANUAL PRODUCT CODE: 1221T STRUT SPRING COMPRESSOR Capacity Stroke Spring Coil Spring Spring Coil Net Weight (Maximum) Thickness Length Diameter 1,000kg 330mm 10-18mm 210-570mm 100-158mm 36kg Made
HT42/420 HT45/450 HT51/510 HT60/600
 HT42/420 HT45/450 HT51/510 HT60/600 IMPORTANT INFORMATION Read before use & retain for future reference For all customer enquiries or for replacement parts, contact:- 0870 609 1901 www.flymo.com customer.services@husqvarna.co.uk
ORIGINAL INSTRUCTIONS
 OPERATION & MAINTENANCE INSTRUCTIONS CBB200 Shown here BUFFER/POLISHER MODEL NO: CBB150, CBB200 PART NO: 6500485, 6500490 ORIGINAL INSTRUCTIONS LS0818 - ISS 1 INTRODUCTION Thank you for purchasing this
2 TONNE TROLLEY JACK INSTRUCTIONS IMPORTANT: PLEASE READ THESE INSTRUCTIONS CAREFULLY TO ENSURE THE SAFE AND EFFECTIVE USE OF THIS TOOL.
 2 TONNE TROLLEY JACK STOCK No.59341 PART No.TJ2B INSTRUCTIONS IMPORTANT: PLEASE READ THESE INSTRUCTIONS CAREFULLY TO ENSURE THE SAFE AND EFFECTIVE USE OF THIS TOOL. 11/2000 CAUTION CAUTION: Use only on
28W WORK LAMP Model: CTL28 Part No:
 28W WORK LAMP Model: CTL28 Part No: 4002905 INSTRUCTION MANUAL GC0609 INTRODUCTION Thank you for purchasing this CLARKE 28W Work Lamp. Before attempting to use the product, it is essential that you read
Stock No Part No.PT1250SF GENERAL INFORMATION
 STORM INSTRUCTIONS FOR 1250W 230V SDS+ Hammer Drill Kit Stock No.83589 Part No.PT1250SF IMPORTANT: PLEASE READ THESE INSTRUCTIONS CAREFULLY TO ENSURE THE SAFE AND EFFECTIVE USE OF THIS PRODUCT. GENERAL
HYDRAULIC BENCH PRESS 50,000kg
 OWNER S MANUAL PRODUCT CODE: 2037T HYDRAULIC BENCH PRESS 50,000kg Working Capacity Height Width Depth Weight 50,000kg 1660mm 1220mm 800mm 236kg Made in China to TQB Brands Pty Ltd specifications WARNING
HEAVY DUTY WHEEL LIFTER
 OWNER S MANUAL PRODUCT CODE: BTWD750 HEAVY DUTY WHEEL LIFTER Capacity Lift Arm Lifting Tilt Range Dimensions Net (Max) Spread Range (degrees) (L x W x H) Weight 750kg 533-635mm 60-275mm -2.5-10mm 787x1092x895mm
OPERATING INSTRUCTIONS ELECTRIC LAWNMOWER MODEL : LSM 1200 EL
 OPERATING INSTRUCTIONS ELECTRIC LAWNMOWER MODEL : LSM 1200 EL Thank you for purchasing the Lawn Star Lawnmower which is one of the finest and most advanced lawnmowers today s technology can produce. Before
SIP Direct Drive Oil-Lube Air Compressors - Operating & Maintenance Instructions
 SIP Direct Drive Oil-Lube Air Compressors - Operating & Maintenance Instructions Please read and fully understand the instructions in this manual before operation. Keep this manual safe for future reference.
GARDENA. N FIN P E I DK S NL F GB D
 GARDENA AccuCut 400 Li Art. 8840 D Betriebsanleitung Operating Instructions F Mode d emploi Coupe bordures NL Instructies voor gebruik S Bruksanvisning freeetrim DK Brugsanvisning freeetrim I Istruzioni
6 x 10 Belt Disc Sander
 6 x 10 Belt Disc Sander FOR HELP OR ADVISE ON THIS PRODUCT PLEASE CALL OUR CUSTOMER SERVICE HELP LINE : 01509 500400 THE MANUFACTURER RESERVES THE RIGHT TO ALTER THE DESIGN OR SPECIFICATION TO THIS PRODUCT
500kg HYDRAULIC TABLE LIFT
 Product Code: 6007T OWNER S MANUAL PRODUCT CODE: 6007T 500kg HYDRAULIC TABLE LIFT Working Load Limit 500kg Maximum Height 1575mm Minimum Height 440mm Table Dimensions 1010x520mm Wheel Diameter 150mm Made
AIR COMPRESSOR CORDLESS 12V
 12V CORDLESS AIR COMPRESSOR 20582 These instructions accompanying the product are the original instructions. This document is part of the product, keep it for the life of the product passing it on to any
OWNER S OPERATING MANUAL
 OWNER S OPERATING MANUAL MIG 100 GASLESS WELDER TABLE OF CONTENTS Page Safety instructions 3-4 MIG Welders 5 Welder Information 5 Gasless welder set up 6 Operation 6-10 Troubleshooting Guide 11-12 Spare
ELECTRIC HOIST MODEL NO: CH2500B, CH4000B OPERATION & MAINTENANCE INSTRUCTIONS PART NO: ,
 ELECTRIC HOIST MODEL NO: CH2500B, CH4000B PART NO: 7630386, 7630391 OPERATION & MAINTENANCE INSTRUCTIONS ORIGINAL INSTRUCTIONS LS0517 - Iss 5 INTRODUCTION Thank you for selecting this Clarke Electric Hoist.
HD18F2M1.
 HD18F2M1 www.blackanddecker.com 3 2 1 5 A 4 5 B 4 7 10 9 C 4 6 D 4 8 1 11 12 E 2 F 3 2 G H 13 I 14 13 14 K 3 J 3 L M 16 15 4 Intended use Your Black & Decker hand held vacuum cleaner has been designed
19 LED Rechargeable Torch/Lantern
 INSTRUCTIONS FOR 19 LED Rechargeable Torch/Lantern Stock No.31940 Part No.RLEDL19/B IMPORTANT: PLEASE READ THESE INSTRUCTIONS CAREFULLY TO ENSURE THE SAFE AND EFFECTIVE USE OF THIS PRODUCT. GENERAL INFORMATION
TIMING KIT APPLICATION GUIDE FOR: ENGINE
 BRITISH MADE APPLICATION GUIDE FOR: ENGINE TIMING KIT 19114 This document is part of the product, keep it for the life of the product passing it on to any subsequent holder of the product. Read all information
Mountfield El 33 Lawnmower Owner s Manual
 DEUTSCH D Mountfield El 33 Lawnmower Owner s Manual 811-0400-01 S SVENSKA 4 1 3 1 = 0 mm = 30 mm 3 = 40 mm 4 = 50 mm 1 130 mm 4 3 3. 160 mm 1 A C B 1. 4. 1 8 4 3 5 9. SVENSKA S 5. 6.. 3 STOP SAFETY INSTRUCTIONS
Mountfield. Princess Lawnmower Owner s Manual
 DEUTSCH D Princess Lawnmower Owner s Manual 8211-0408-01 GB ENGLISH SAFETY INSTRUCTIONS SYMBOLS The following symbols can be found on the machine to remind you of the care and attention that are required
PRESSURE WASHER SPARE PARTS LISTING 03/99. STOCK No PART No.PW YPW Hose connector. 36 YPW Washer
 PRESSURE WASHER STOCK 56456 PART PW2220 SPARE PARTS LISTING 03/99 KEY PART STOCK DESCRIPTION KEY PART STOCK DESCRIPTION 1 YPW-29602 56950 Hose connector 2 YPW-29600 56951 Hose adaptor 3 YPW-12702 56952
OPERATION & MAINTENANCE INSTRUCTIONS
 400W SUBMERSIBLE PUMP WITH FOLDING BASE AND FLOAT SWITCH MODEL NO: PSV6A PART NO: 7230695 OPERATION & MAINTENANCE INSTRUCTIONS LS0315 INTRODUCTION Thank you for purchasing this CLARKE 400W Submersible
SUBMERSIBLE PUMP. Model No: HIPPO 2 OPERATING & MAINTENANCE INSTRUCTIONS
 SUBMERSIBLE PUMP Model No: HIPPO 2 OPERATING & MAINTENANCE INSTRUCTIONS 0107 1 HIPPO 2 240 Volt and 110 Volt models Thank you for purchasing this Clarke Hippo 2 Pump. Before attempting to operate this
Yellow & Green connections to ensure that none is loose.
 instructions for: power belt sander model no: SM100 Thank you for purchasing a Sealey product. Manufactured to a high standard this product will, if used according to these instructions and properly maintained,
18 KG MOBILE SODA BLASTING UNIT
 OWNER S MANUAL PRODUCT CODE: 3043 18 KG MOBILE SODA BLASTING UNIT Working Air Hose Tank Volume Overall Dimensions Pressure Consumption Length 18KG 35 90psi 6-12CFM 2400mm 460 x 305 x 660 Made in China
INSTRUCTIONS FOR 150mm 150W Bench Grinder Stock No Part No.LD150
 INSTRUCTIONS FOR 150mm 150W Bench Grinder Stock No.83420 Part No.LD150 IMPORTANT: PLEASE READ THESE INSTRUCTIONS CAREFULLY TO ENSURE THE SAFE AND EFFECTIVE USE OF THIS PRODUCT. GENERAL INFORMATION These
PROFESSIONAL CORDLESS IMPACT SCREWDRIVER
 PROFESSIONAL CORDLESS IMPACT SCREWDRIVER Model CIS00 Part No 4500625 OPERATING & MAINTENANCE INSTRUCTIONS GC0309 INTRODUCTION Thank you for purchasing this CLARKE Impact Screwdriver. Before attempting
Bore Hole Pump Model Nos: CBB75 CBB100 Part Nos:
 Bore Hole Pump Model Nos: CBB75 CBB100 Part Nos: 7150710 7150715 USER INSTRUCTIONS ORIGINAL INSTRUCTIONS 1117 Thank you for purchasing this CLARKE Bore Hole Pump, which is designed for use in a domestic
Before use please read & understand this manual, paying particular attention to the safety instructions.
 OPERATOR S MANUAL AND PARTS LIST 800W ELECTRIC TILLER - THET-A Sales & Helpline 01793 333212 www.thehandy.co.uk Before use please read & understand this manual, paying particular attention to the safety
TIMING KIT APPLICATION GUIDE FOR: ENGINE
 BRITISH MADE APPLICATION GUIDE FOR: ENGINE TIMING KIT 19180 This document is part of the product, keep it for the life of the product passing it on to any subsequent holder of the product. Read all information
BENCH GRINDER MODEL CBG6RZ OPERATING & MAINTENANCE INSTRUCTIONS
 BENCH GRINDER MODEL CBG6RZ OPERATING & MAINTENANCE INSTRUCTIONS 0100 9 Thank you for purchasing this CLARKE BENCH GRINDER. Before attempting to operate this machine, please read this instruction manual
BENCH GRINDER MODEL CBG6RP OPERATING & MAINTENANCE INSTRUCTIONS 0101
 BENCH GRINDER MODEL CBG6RP OPERATING & MAINTENANCE INSTRUCTIONS 0101 Thank you for purchasing this CLARKE Bench Grinder Before attempting to operate this machine, please read this instruction manual thoroughly
ELECTRIC CAR POLISHER
 ELECTRIC CAR POLISHER MODEL NO: CP254 PART NO: 6462108 OPERATION & MAINTENANCE INSTRUCTIONS LS0610 INTRODUCTION Thank you for purchasing this CLARKE electric car polisher. Before attempting to use this
2-in-1 Cordless Li-ion Grass Trimmer/Edger EN Taille-haie/tondeuse 2 en 1 sans fil Li-ion
 Taille-haie/tondeuse 2 en 1 sans fil Li-ion F Podadora / bordeadora de césped sin cables 2 en 1 con batería de iones de litio ES P07 P15 P24 HELPLINE NUMBER 1-866-354-WORX (9679) WG151 1 2 10 5 3 4 8
Cordless Rechargeable Saw Instructions for Use
 Technical data Voltage: DC 10.8V Weight: 1.25Kg Stroke rate: 0-2100/min Stroke: 15mm Cutting capacity: max diameter in wood 80mm / in soft metal 7mm Charging time: Between 5.0-5.5 Hours Battery: 1.3Ah
850W 230V 115mm Angle Grinder
 INSTRUCTIONS FOR 850W 230V 115mm Angle Grinder Stock No.83605 Part No.AG850 IMPORTANT: PLEASE READ THESE INSTRUCTIONS CAREFULLY TO ENSURE THE SAFE AND EFFECTIVE USE OF THIS PRODUCT. GENERAL INFORMATION
HALOGEN FLOODLIGHTS Models CHL1260C & 1260T Part Nos: &
 HALOGEN FLOODLIGHTS Models CHL1260C & 1260T Part Nos: 5460600 & 5460595 OPERATING & MAINTENANCE INSTRUCTIONS GC0610 INTRODUCTION Thank you for purchasing this CLARKE Halogen Floodlight. Before attempting
PRODUCT MANUAL TILE CUTTING MACHINE. . Operation. Parts List and Diagram SPECIFICATIONS CAUTION:
 FLORCRAFTT TM PRODUCT MANUAL SKU NUMBER 709-4242 SERIAL NUMBER: CAUTION: FOR YOUR OWN SAFETY READ INSTRUCTION MANUAL COMPLETELY AND CAREFULLY BEFORE OPERATING THIS 7 TILECUTTING MACHINE SPECIFICATIONS
Heavy-Duty Welding Fabrication Table
 Heavy-Duty Welding Fabrication Table with Fix-Up Kit Owner s Manual WARNING: Read carefully and understand all ASSEMBLY AND OPERATION INSTRUCTIONS before operating. Failure to follow the safety rules and
Cordless String Trimmer
 ENGLISH (Original instructions) INSTRUCTION MANUAL Cordless String Trimmer BUR4 BUR8 0390 IMPORTANT: Read Before Using. ENGLISH (Original instructions) SPECIFICATIONS Model BUR4 BUR8 No load speed 6,000
250W PUDDLE PUMP WITH AUTO SENSOR MODEL NO: PSP105
 250W PUDDLE PUMP WITH AUTO SENSOR MODEL NO: PSP105 PART NO: 7230693 OPERATION & MAINTENANCE INSTRUCTIONS ORIGINAL INSTRUCTIONS LS0917 -- iss 3 INTRODUCTION Thank you for purchasing this CLARKE 250W Puddle
IMPORTANT INFORMATION. Read before use
 Sabre Trim Original Instructions IMPORTANT INFORMATION Read before use & retain for future reference For all customer enquiries or for replacement parts, contact:- 0325 300303 www.flymo.com customer.services@husqvarna.co.uk
Battery Charger JCB- SCH20LI.2
 Safety and operating manual Battery Charger JCB- SCH20LI.2 ORIGINAL INSTRUCTIONS SAFETY INSTRUCTIONS WARNING: Read all safety warnings and all instructions.failure to follow the warnings and instructions
700A Capacitor POWER PACK
 700A Capacitor POWER PACK 82957 IMPORTANT: Please read these instructions carefully to ensure the safe and effective use of this product and save these instructions for future reference. This manual has
500kg TELESCOPIC TRANSMISSION LIFTER
 Product Code: 2056T PRODUCT CODE: 2056T 500kg TELESCOPIC TRANSMISSION LIFTER Safe Working Capacity 500kg Base Dimension 540 x 570 mm Minimum Height 1175mm Maximum Height 1900mm Made in China to TQB Brands
OWNER S MANUAL PRODUCT CODE: 2006T
 Jul-18 Product Code: 2006T OWNER S MANUAL PRODUCT CODE: 2006T HYDRAULIC PIPE BENDER 12,000KG Model Capacity Bending Die No of Attachments 12,000kg 1/2", 3/4", 1", 1-1/4", 1-1/2", 2" 6 Made in China to
KNAPSACK PRESSURE SPRAYER
 12L EPDM KNAPSACK PRESSURE SPRAYER 82470 IMPORTANT: PLEASE READ THESE INSTRUCTIONS CAREFULLY TO ENSURE THE SAFE AND EFFECTIVE USE OF THIS PRODUCT. INSTRUCTIONS These instructions accompanying the product
MODEL Nos: CVAC20SS CVAC25SS CVAC30SSR OPERATING & MAINTENANCE INSTRUCTIONS. Distributed by CLARKE International Ltd.
 MODEL Nos: CVAC20SS CVAC25SS CVAC30SSR OPERATING & MAINTENANCE INSTRUCTIONS Distributed by CLARKE International Ltd. 1006 Thank you for selecting this VAC KING Stainless Steel Vacuum Cleaner, which will
OPERATION & MAINTENANCE INSTRUCTIONS
 750W SUBMERSIBLE PUMP WITH BUILT-IN FLOAT SWITCH MODEL NO: PSV5A PART NO: 7236046 OPERATION & MAINTENANCE INSTRUCTIONS ORIGINAL INSTRUCTIONS LS0917 iss 3 INTRODUCTION Thank you for purchasing this CLARKE
HOT AIR GUN MODEL No. CHG 1500B Part No
 HOT AIR GUN MODEL No. CHG 1500B Part No. 3400751 OPERATING & MAINTENANCE INSTRUCTIONS 0201 Thank you for selecting this CLARKE Hot Air Gun, which is designed for DIY and professional use alike. Before
Stock No Part No.PT6115D
 INSTRUCTIONS FOR 650W 230V 115mm Angle Grinder Stock No.53099 Part No.PT6115D IMPORTANT: PLEASE READ THESE INSTRUCTIONS CAREFULLY TO ENSURE THE SAFE AND EFFECTIVE USE OF THIS PRODUCT. GENERAL INFORMATION
OWNER S OPERATING MANUAL
 OWNER S OPERATING MANUAL ARC 140 AMP WELDER TABLE OF CONTENTS Page Safety instructions 3-4 Inverter Arc Welder 5 Welder Information 5 Arc 140 AMP welder set up 6 Assembly instructions 6 Operation 7 Welding
IMPORTANT INFORMATION. & retain for future reference. Read before use. For all customer enquiries or for replacement parts, contact:-
 EASICUT 500CT IMPORTANT INFORMATION Read before use & retain for future reference For all customer enquiries or for replacement parts, contact:- 0870 609 1901 www.flymo.com customer.services@husqvarna.co.uk
TIMING KIT APPLICATION GUIDE FOR: ENGINE
 BRITISH MADE APPLICATION GUIDE FOR: ENGINE TIMING KIT 15328 This document is part of the product, keep it for the life of the product passing it on to any subsequent holder of the product. Read all information
SUBMERSIBLE WATER PUMPS
 SUBMERSIBLE WATER PUMPS Model Nos. CS85S - CS85SA CS120S - CS120SA CS185S - CS185SA CS240S - CS240SA CS305S - CS305SA OPERATING & MAINTENANCE INSTRUCTIONS 1000 CONTENTS Warranty conditions... 3 Safety
Power Head E System. Owners Manual and Safety Instructions Mantis, Div. of Schiller-Pfeiffer Inc. All Rights Reserved.
 Power Head E System Owners Manual and Safety Instructions 2006 Mantis, Div. of Schiller-Pfeiffer Inc. All Rights Reserved. Table of Contents Important Information Introduction............................1
Hawk Enterprises of Elkhart THE BRUTE Owner s Manual
 Hawk Enterprises of Elkhart THE BRUTE Owner s Manual Operation Care Service COMMERICAL/INDUSTRIAL DUTY STONE RESTORATION MACHINE 13, 15, 17, 20 165 RPM 1.5 HP 180 FRAME TOTALLY ENCLOSED FAN COVERED MOTOR
Micro Lite IMPORTANT INFORMATION. Read before use. & retain for future reference. Original Instructions
 Micro Lite Original Instructions IMPORTANT INFORMATION Read before use & retain for future reference Carton Contents lock-off button cable clip switchbox start/stop lever upper handle plastic handle knob
Tri-Wheel Wheeled Walker
 Tri-Wheel Wheeled Walker Handle with lever brake Brake cable Handle height adjustment knob Removable basket and tray Large vinyl bag 8 inch (203 mm) wheels user guide Prior to use please read all instructions.
VSM480. Instruction Manual VARIABLE SPEED MIXER. Read instructions before operating this tool.
 VSM480 VARIABLE SPEED MIXER Instruction Manual Read instructions before operating this tool. Important Please read these operating and safety instructions carefully and completely. For your own safety,
OWNER'S MANUAL. Royal Sovereign International Inc. RET Desk Series
 OWNER'S MANUAL RET Desk Series Read all instructions carefully before use. For any Customer Support needs please choose the Customer Support tab on www.royalsovereign.com Royal Sovereign International
Cordless Line Trimmer
 RLT6X RLT6B ORIGINAL INSTRUCTIONS Cordless Line Trimmer Important! It is essential that you read the instructions in this manual before assembling, maintaining and operating this machine. Subject to technical
RLM36X46L50HI RLM36X46L40 RLM36B46L ORIGINAL INSTRUCTIONS. Cordless Lawn Mower
 RLM36X46L50HI RLM36X46L40 RLM36B46L ORIGINAL INSTRUCTIONS Cordless Lawn Mower Important! It is essential that you read the instructions in this manual before assembling, operating and maintaining this
RLM36X40H25 ORIGINAL INSTRUCTIONS. Cordless Lawn Mower
 RLM6X40H5 ORIGINAL INSTRUCTIONS Cordless Lawn Mower Important! It is essential that you read the instructions in this manual before assembling, operating and maintaining this machine. Subject to technical
SAFETY AND OPERATING MANUAL. Cordless Hedge Trimmer WG259E WG259E.5 WG259E.9
 SAFETY AND OPERATING MANUAL 2 General Power Tool Safety Warnings WARNING: Read all safety warnings and all instructions. Failure to follow the warnings and instructions may result in electric shock, fire
Operation Care Service
 HAWK ENTERPRISES OF ELKHART, INC Glide Floor Machine Owner s Manual Operation Care Service Hawk Enterprises 52744 Park Six Court Elkhart, IN 46514 Phone: 574-294-1910 Toll Free: 888-289-4295 Fax: 574-970-0289
Adjustable Steel Welding Table
 Adjustable Steel Welding Table Owner s Manual WARNING: Read carefully and understand all ASSEMBLY AND OPERATION INSTRUCTIONS before operating. Failure to follow the safety rules and other basic safety
EN Operator's manual PRLM21i
 EN Operator's manual 2-12 PRLM21i Contents INTRODUCTION... 2 SAFETY... 3 ASSEMBLY...6 OPERATION...8 MAINTENANCE...9 TRANSPORTATION AND STORAGE...12 Operator's manual The initial language of this operator's
POND PUMP Model Nos:SPP3 & SPP6 0200
 OPERATING & MAINTENANCE INSTRUCTIONS POND PUMP Model Nos:SPP3 & SPP6 0200 Thank you for purchasing this CLARKE Water Pump, which is particularly suitable for the filtration of small to medium size swimming
18V CORDLESS STAPLER/NAILER
 18V CORDLESS STAPLER/NAILER MODEL NO: CONSN18LI PART NO: 6487055 OPERATION & MAINTENANCE INSTRUCTIONS LS1213 INTRODUCTION Thank you for purchasing this CLARKE product. Before attempting to use this product,
Battery Charger JCB-FCH20LI2
 Safety and operating manual Battery Charger JCB-FCH20LI2 ORIGINAL INSTRUCTIONS SAFETY INSTRUCTIONS WARNING: Read all safety warnings and all instructions.failure to follow the warnings and instructions
IMPORTANT: PLEASE READ THESE INSTRUCTIONS CAREFULLY TO ENSURE THE SAFE AND EFFECTIVE USE OF THIS PRODUCT.
 6-30V/D.C. DIAGNOSTIC PROBE 16422 IMPORTANT: PLEASE READ THESE INSTRUCTIONS CAREFULLY TO ENSURE THE SAFE AND EFFECTIVE USE OF THIS PRODUCT. INSTRUCTIONS These instructions accompanying the product are
Battery Charger JCB-FCH12Li
 Safety and operating manual Battery Charger JCB-FCH12Li ORIGINAL INSTRUCTIONS SAFETY INSTRUCTIONS WARNING: Read all safety warnings and all instructions.failure to follow the warnings and instructions
x 10 Belt Disc Sander
 Please dispose of packaging for the product in a responsible manner. It is suitable for recycling. Help to protect the environment, take the packaging to the local amenity tip and place into the appropriate
SAFETY RULES SPECIFICATIONS READ ALL INSTRUCTIONS BEFORE OPERATING SAVE THESE INSTRUCTIONS
 READ ALL INSTRUCTIONS BEFORE OPERATING SAVE THESE INSTRUCTIONS Thank you for purchasing 7" Polisher. Before attempting to operate your new Polisher please read these instructions thoroughly. You will need
Operating and Assembly Manual
 Model 455-IC/PRO/H Operating and Assembly Manual Midwest Equipment Manufacturing, Inc. 5225 Serum Plant Road Thorntown, IN 46071 03-08-12 SAFETY RULES Remember, any power equipment can cause injury if
SUBMERSIBLE WATER PUMP OPERATING & MAINTENANCE INSTRUCTIONS. Model Nos. CSE400A. Part No iss 2
 SUBMERSIBLE WATER PUMP Model Nos. CSE400A Part No. 7231100 0917 iss 2 OPERATING & MAINTENANCE INSTRUCTIONS Thank you for purchasing this Clarke Submersible Pump. This highly efficient pump is designed
GT26 GT246 GT250 GT251 GT260 GT261 GT262
 GT26 GT246 GT250 GT251 GT260 GT261 GT262 1 2 Copyright Black & Decker 1 3 2 4 1 3 2 5 4 5 6 A 3 4 4 B 7 0-15 C D 4 HEDGETRIMMER GT26/GT246/GT250/ GT251/GT260/GT261/GT262 ENGLISH CONGRATULATIONS! You have
AIR FILTER MODEL NO: AF1000 OPERATION & MAINTENANCE INSTRUCTIONS PART NO:
 AIR FILTER MODEL NO: AF1000 PART NO: 6471160 OPERATION & MAINTENANCE INSTRUCTIONS 1208 INTRODUCTION Thank you for purchasing this Clarke Air Filter. Before you try to use this product, read this manual
BENCH GRINDER MODEL NO: CBG6250
 CBG6250 Bench Grinder.fm Page 1 Thursday, November 10, 2011 3:26 PM BENCH GRINDER MODEL NO: CBG6250 PART NO: 6500522 OPERATION & MAINTENANCE INSTRUCTIONS LS1111 CBG6250 Bench Grinder.fm Page 2 Thursday,
WHAT S IN THE BOX METAL CUTTING SHEARS. Metal Cutting Shears 500W INSTRUCTION MANUAL SPECIFICATIONS. Hex Key. Max. Thickness: ozito.com.
 WHAT S IN THE BOX METAL CUTTING SHEARS 500W INSTRUCTION MANUAL SPECIFICATIONS Motor: No load speed: Max. Thickness: Tool weight: 500W 0 1,600 rpm 1.2mm 2.2kg Metal Cutting Shears Hex Key ozito.com.au MCS-5000