SIDNEY MANUFACTURING
|
|
|
- Brianna Wheeler
- 6 years ago
- Views:
Transcription
1 SIDNEY MANUFACTURING SIDE WALL RETURNTM DRAG CONVEYOR INSTALLATION INSTRUCTIONS NOTICE BEFORE ANY MAINTENANCE OR SERVICE IS PERFORMED ON THIS DRAG CONVEYOR, IT MUST BE LOCKED OUT IN ACCORDANCE WITH CURRENT OSHA AND NEC REQUIREMENTS! Sidney Manufacturing Company 405 North Main Street Sidney, Ohio PH# : (937) FAX# : (937) Toll Free
2 SAFETY RESPONSIBILITY It is the responsibility of the contractor, installer, owner and user to supplement the materials and services furnished by The Sidney Manufacturing Company with the necessary items to make the conveyor installation comply with all laws. Electrical controls, machinery guards, inspection doors guards and conveyor lids, clear walkways and proper railings are some of the necessary items for a safe work site. The Side Wall Return Drag Conveyors are not normally designed to handle hazardous materials or operate in a hazardous environment. Hazardous materials can be those that are explosive, flammable or toxic. Special designs and constructions must be fabricated for these situations. Sidney Manufacturing Co. should be consulted for all such installations. SAFETY 1. Side Wall Return Drag Conveyors should be completely enclosed and all safety guards in place before powering up the conveyor. If the conveyor needs to be opened for inspection, cleaning or observation, the motor driving units needs to be locked out electrically in accordance to OSHA standards. This needs to be done in such a manner that the conveyor cannot be restarted by anyone, however remote the location from the area without the conveyor housing being put back into position and all guards put into proper place. 2. The conveyor is designed for specific purposes. Do not use the conveyor for anything but what it was designed to handle and do not overload the conveyor beyond its capacity. Do not walk on the top of the conveyor, do not remove any safety guards, do not place hands or feet in any of the conveyor openings. 3. The warning label shown below is secured to all Side Wall Return Drag Conveyor covers, inspection doors, end relief doors, and all head and tail sections of the conveyor. WARNING EXPOSED CONVEYORS AND MOVING PARTS CAN CAUSE SEVERE INJURY LOCK OUT POWER BEFORE REMOVING COVER OR INSPECTION DOOR 4. Always keep the areas around the conveyor and drive units free and clear at all times. 5. If the owner or installer needs help designing a safe installation or a safe work place, Sidney Manufacturing Company will be glad to assist in the selection of special devices or special equipment. 2
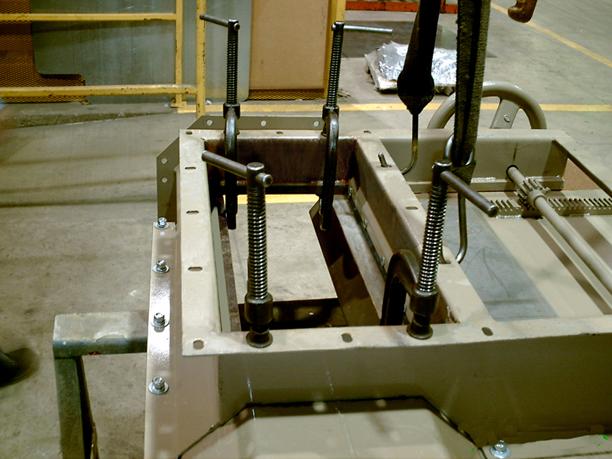
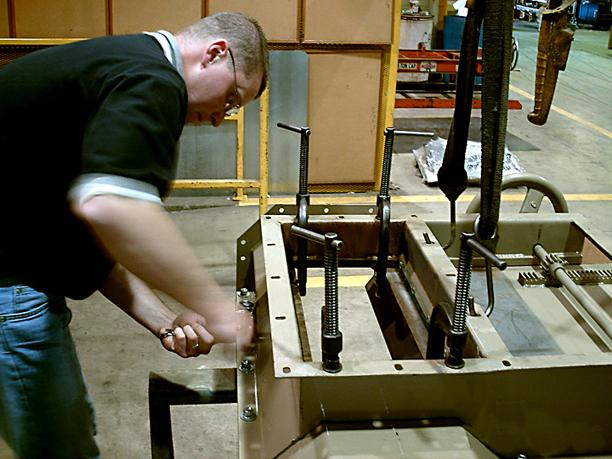
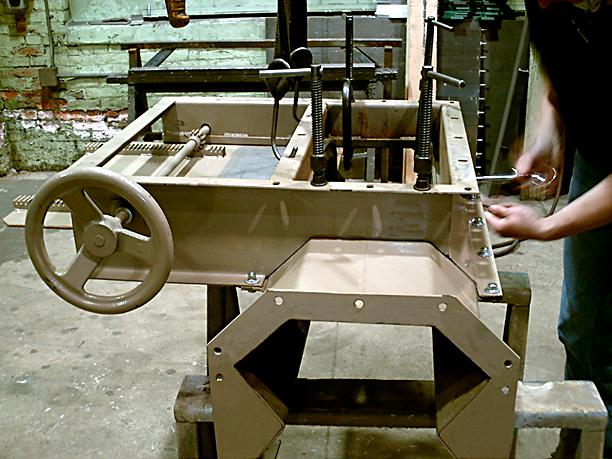
3 SIDNEY MANUFACTURING S SWR DRAG CONVEYOR Installation Instructions Drag type conveyors unlike screw type conveyors must be perfectly aligned at the flanges during the assembly process. Misalignment at the flange connection will cause the paddles to catch and jump, multiplied by every paddle and every bolted flange connection, resulting in tremendous noise and vibration. Damaged paddles could result effecting the final clean out of product in the conveyor. Each trough section must be perfectly matched at each flange location, to insure a smooth travel surface for paddles. End flanges are fabricated on a computer controlled high definition plasma machine. This results in a proper part of exact quality. Flanges are welded to trough in a flanging machine that squares each trough exactly to its flanges. With this process of precision flanges being welded on square conveyor troughs, the installer will be able to align the troughs at the job site. Use the following instructions to install the conveyor properly. Please feel free to contact Sidney Manufacturing Company if you have any questions about the installation, operation or maintenance of your Side Wall Return Drag Conveyor. Phone Numbers: (800) Fax Number: (937) (937) Installation of this drag conveyor must be done by personnel experienced in the installation of drag conveyors and familiar with general safety practices and State and Federal (OSHA) regulations pertaining to the construction industry that must be followed. 1.) Start by looking over the assembly print. This will show you the placement and proper sequence the trough sections will need to be installed in. It will also show you proper location of all inlets and discharges and any special items on the conveyor. 2.) Bolt trough sections together. There are 5 critical surfaces that must be perfectly aligned. See diagram below. To assist in this process use a drift punch to help align these surfaces. Start by aligning the bottom of the trough and working your way up each side of the flange. See surfaces marked A,B & C. These surfaces aligned first and secured with tightened bolts will help the remainder of the trough sides to line up easier. Continue this process until all trough sections are bolted together. Be sure to support the conveyor at a flange location every 20 or less. Support feet are supplied and manufacturers recommended locations are shown on the assembly prints. Be sure to use silicone caulking between all bolted conveyor connections. E D C A B 3
4 3.) Repeat step (2) when connecting the trough to the head section and to the tail section. Being sure to watch the five critical surfaces. When applicable the same process needs to be followed when bolting on by-pass inlet sections. 4.) Assemble paddles to chain. Use drawing D for proper placement of paddle on chain attachments. Be sure not to fully tighten bolts at paddle connection at this time. The bolts should only be finger tight so the paddles remain loose on the chain attachments. 5.) Feed chain into the lower trough of the conveyor through the head discharge. Be sure you are placing the trough chain into the conveyor so the paddles will be in proper placement in relation to the product flow. (See drawing D010-01) Feed the chain into the trough working it toward the tail section. Connecting chain sections as you proceed. 6.) Feed chain around tail sprocket so paddles start to appear in the return area of trough. Fill the return area with assembled chain. Be sure to turn chain over so paddles are in an upside down position. 7.) Connect chain and let take-up out to desired chain tightness. See drawing D on take-up detail for instructions and proper operation of take-up. 8.) Let paddles settle to the bottom of trough. Tighten paddles inside the lower portion of the trough along the whole bottom of the conveyor. (or at least most of this area) Mark the first and last paddles tightened. This may be done by leaving the next paddle off the next attachment. Rotate the conveyor to allow another group of paddles to fall into the lower trough area and tighten these. If it is not possible to manually rotate the tight paddles to return area and loose paddles to bottom trough area, it will have to be done under power. It is absolutely necessary to put all covers and guards in place prior to operating. Following this procedure, power must be locked out in accordance to OSHA lock out / tag out regulations before removing lids and guards. Mark last paddle done. Repeat sequence until all paddles are tight. This process is very important. Unlike round bottom drag conveyors, the Side Wall Return Drag Conveyors paddles must all be aligned with each other before they are tightened to the chain. This is necessary for proper return of the paddles on the side wall. For this reason do not tighten paddles to chain attachments outside the conveyor trough and always use the bottom of the conveyor trough as the alignment area. Proper positions of the paddles in the trough also ensures full clean out of the conveyor. 9.) Place lids on the conveyor. Reference the assembly print for proper inlet locations and joint cover locations. MAINTENANCE 4
5 After the conveyor is in operation and performing properly, only periodic inspections are necessary to ensure against unexpected failures or problem areas. Bearing lubrication, flight wear, chain and sprocket wear should be checked at these times. Tightness of the chain should be checked every 24 hours of operation until the initial stretch has been eliminated. Conduct periodic inspections of the entire conveyor and make a written maintenance schedule log for the conveyor. 5
6 Gate Mounting Instructions Gates must be mounted on the trough per these instructions to ensure a proper fit. Gates must be mounted before installing the drag conveyor. All gates are match marked to a trough section, mount the proper gate to the proper trough The trough is stamped on the trough gate mounting flange The gate is stamped on the lower gate side flange toward the rear of the gate. 1.) Turn trough over so that cutout opening in trough is facing up. Remove the factory mounted rubber wiper seal. Place gate on trough ensuring that the side of trough with bolts in and the extended portion of gate are on the same side. GATE OPENING IS FACING UP SIDE OF TROUGH WITH BOLTS 2.) Use C-clamps to draw the gate down to conform to the trough. These clamps are positioned in the actual gate trough opening. See sketch. C-CLAMPS DRAWS GATE DOWN TO CONFORM TO TROUGH PUT BOLTS IN FLANGE FLANGE WELDED TO TROUGH
7 3.) While clamps are in position, bolt the gate to the flange that is welded to the trough. Use 3/8 X 1 ¼ bolts with flat washers and lock washers on each gate. 4.) Mount the rubber wiper seals. The bolts were secured with temporary thread lock so that the bolts would not vibrate loose in shipment. This bond can be broken. The prepunched rubber seal gets mounted in the position shown below. Upper seal bolts are threaded into the trough piece. The lower bolts extend through the gate and require washers, lock washers and nuts. There is a wiper seal retainer supplied. This acts as a stiffener to the rubber to keep the bolt from sinking into the rubber seal. Be sure to install the top and bottom seal. This seals the gate from leaking back into the gate housing. METAL RETAINER FOR TOP SEAL METAL RETAINER FOR BOTTOM SEAL 5.) Mount air cylinder to gate and connect it to the slide. Run the gate with air to make sure everything lines up properly. MOUNT AIR CYLINDER TO CHANNEL CONNECT CLEVIS TO SLIDE 6.) The connection point where the gate meets up to the tough, needs caulked. This finishes sealing the gate area. A weld of permanent connection of some sort is not recommended. The gate may need to be removed or replaced in the future. Caulking the area would allow for this. Any connecting line between the trough and gate needs to be caulked with silicone. The clear silicone was supplied with the trough and gate shipment. CAULK ALONG THIS SEAM WHERE THE GATE AND TROUGH MEET
8
9
10
11
12
13
ANSI Z50.1. Safety Standards
 ANSI Z50.1. Safety Standards 5. Dry Ingredient Handling Equipment 5.1 General Requirements 5.1.1 Whenever a dry ingredient handling system is of such size that the beginning of its operation is remote
OPERATOR MANUAL Combo Belt Conveyor
 1 OPERATOR MANUAL Combo Belt Conveyor Document No. 11-01, Rev., 0816 2 WARNINGS THIS CONVEYOR IS DESIGNED FOR A SPECIFIC APPLICATION. CHECK FRAME AND METAL BELT FOR DAMAGE DURING SHIPMENT. READ THE MANUAL
Incline Drag Conveyor Manual
 Manufacturing, Inc. Incline Drag Conveyor Manual Manufacturing, Inc. 33 East 8th street Waconia, MN 55387 Phone-(952) 442-4450 Fax-(952) 442-5923 E-Mail-waconia@waconiamfg.com Web Site - waconiamfg.com
Safety, Operation, & Maintenance Manual Douglas CBM Cross Belt Magnetic Separator
 Safety, Operation, & Maintenance Manual Douglas CBM Cross Belt Magnetic Separator Warning: This manual must be read, understood, and followed by anyone that installs, operates, and maintains this product.
Installation and Operation Manual. Manufacturers of Innovative Materials Handling Equipment since 1957.
 SWINGSET DISTRIBUTOR Installation and Operation Manual Manufacturers of Innovative Materials Handling Equipment since 1957. 491 North Emerson Street * Cambridge MN 55008-1316 U.S.A. Toll Free (800) 328-8002
Safety, Operation & Maintenance Manual
 Safety, Operation & Maintenance Manual Douglas Titan IBA Adjustable Impact Bed Warning: This manual must be read, understood, and followed by anyone that installs, operates, and maintains this product.
ASSEMBLY INSTRUCTIONS L-LINE KTG ZMA0304GB
 ASSEMBLY INSTRUCTIONS L-LINE KTG ZMA0304GB 2012-12-01 Delivery information Goods inspection Check that the number of packages agrees with the delivery note and that the packing and goods are not damaged.
INSTALLATION AND MAINTENANCE MANUAL DRAG CHAIN CONVEYOR MODEL DC-60
 INSTALLATION AND MAINTENANCE MANUAL DRAG CHAIN CONVEYOR MODEL DC-60 Version 2014.1 - - TABLE OF CONTENTS INTRODUCTION Receiving, Inspection and Uncrating... 3 Ordering Replacement Parts... 3 SAFETY INFORMATION
Flip - Up Conveyor. for 10" BeltVeyors OWNER'S MANUAL (12/00)
") Flip - Up Conveyor for 10" BeltVeyors OWNER'S MANUAL 19023100 (12/00) Table of Contents Warranty Information............................ Inside Front Cover Operator Qualifications........................................
Flip - Up Conveyor for 10" BeltVeyors OWNER'S MANUAL 19023100 (12/00) Table of Contents Warranty Information............................ Inside Front Cover Operator Qualifications........................................
Polypropylene Piston Drum Pumps
 Please read and save this Repair Parts Manual. Read this manual and the General Operating Instructions carefully before attempting to assemble, install, operate or maintain the product described. Protect
Entanglement Hazards Guarding and Lockout
 Entanglement Hazards Guarding and Lockout Entanglement Hazards A Fairmount man who was caught waist-deep in a grain auger has died became entangled in the equipment after he was crawling over it. Zaloudek
Outload Trough Roller Conveyor
 Outload Trough Roller Conveyor OWNER'S MANUAL 00003400 (8/99) Table of Contents Warranty Information.............................. Inside Front Cover Operator Qualifications / Sign Off Sheet..............................
Horizontal Flat Bottom Drag Conveyors 17 Series 26 Series 33 Series
 Horizontal Flat Bottom Drag Conveyors 17 Series 26 Series 33 Series 17 Series 26 Series Made in the USA 33 Series OUR MISSION: To provide innovative quality solutions that create an extraordinary customer
NYL Resilient Seated Butterfly Valves Operation and Maintenance Instructions
 COMMERCIAL Bray Controls Commercial Division 13788 West Road, Suite 200A Houston, Texas 77041 BCDSales@Bray.com Phone: 1-888-412-2729 Fax: 1-888-412-2720 www.braycommercialdivision.com NYL Resilient Seated
Elevators & Conveyors
 Elevators & Conveyors Commercial Series 1 Your Complete Systems Manufacturer. Series 1 GSI Chain Conveyors Our material handling division can provide you with an extensive line of chain conveyors to meet
SECTION TWO MOUNTING INSTRUCTIONS
 SECTION TWO MOUNTING INSTRUCTIONS TRUCK-MOUNTED CONVEYORS FBR-FIBERGLASS SERIES TURNTABLES- RTH 3000, RTH 4000, RTH 6000 GENERAL 2-1 Parts Supplied by CM 2-1 Parts to be Supplied by the Customer or Installer
Twin Screw Undercar Conveyor
 Twin Screw Undercar Conveyor Owner s Manual #19015700 05-00 Table of Contents Operator Qualifications...................................... 1 Safety.................................................. 2-4
Slide Gates INSTALLATION, OPERATION & MAINTENANCE INSTRUCTIONS. 295-E-002 Effective
 295-E-002 Effective 7-1-2013 Slide Gates INSTALLATION, OPERATION & MAINTENANCE INSTRUCTIONS Your Source for Bulk Handling/Air Process Equipment Wm. W. Meyer & Sons, Inc. 1700 Franklin Blvd Libertyville,
MARTIN Air-Supported Conveyor System
 MARTIN Air-Supported Conveyor System Go to MARTIN Air-Supported Conveyor System web page Operator s Manual M3574 Important MARTIN ENGINEERING HEREBY DISCLAIMS ANY LIABILITY FOR: DAMAGE DUE TO CONTAMINATION
GENERAL INFORMATION SERIES 4204 LABORATORY ROTARY DIVIDER
 GENERAL INFORMATION SERIES 4204 LABORATORY ROTARY DIVIDER Gamet Manufacturing Incorporated 698 Prior Avenue North Saint Paul Minnesota 55104 651-647-5410, Fax 651-647-5412 e-mail: info@gametmfg.com ABOUT
Richmond Conveyor. Hydraulic Ultimate Manual. January 2013
 Richmond Conveyor Hydraulic Ultimate Manual January 2013 Table of Contents Operators Manual Removing conveyor from truck Maintenance checklist Maintenance kit material list Safety information Index Installation
Low Profile Tailgate Spreaders SWING AWAY Mount
 August 1, 2018 Lit. No. 43269, Rev. 02 Low Profile Tailgate Spreaders SWING AWAY Mount Not for Use on Ford F-250/350/450 2017 Installation Instructions Read this document before installing or operating
En-Masse Conveyor. Installation and Operation Manual PNEG Date: Version: 1.0 PNEG-2110
 En-Masse Conveyor Installation and Operation Manual PNEG-2110 Version: 1.0 Date: 09-15-16 PNEG-2110 All information, illustrations, photos, and specifications in this manual are based on the latest information
COYOTE ENTERPRISES, INC. 9/10 BLAST WHEEL MAINTENANCE & ASSEMBLY MANUAL
 COYOTE ENTERPRISES, INC. 9/10 BLAST WHEEL MAINTENANCE & ASSEMBLY MANUAL Parts & Machinery for the Abrasive Blast Industry 27301 East 121st Street Coweta, Oklahoma 74429 (918) 486-8411 Fax (918) 486-8412
INSTALLATION AND MAINTENANCE MANUAL TROUGH BELT CONVEYOR MODEL TBOH
 INSTALLATION AND MAINTENANCE MANUAL TROUGH BELT CONVEYOR MODEL TBOH Version 2014.1 - - TABLE OF CONTENTS INTRODUCTION Receiving, Inspection and Uncrating... 3 Ordering Replacement Parts... 3 SAFETY INFORMATION
Notice. Overhead Crane Safety and Inspection Requirements. Daily Operator Inspection Reuirements. Daily Operator Inspection Requirements
 Notice Overhead Crane Safety and Inspection Requirements It is the responsibility of the Owner/User to install, inspect, test, maintain, and operate a crane or associated lifting equipment in accordance
A1062 & A1072 AUGER ASSEMBLY MANUAL. Read & understand all instructions pertaining to this auger prior to use!
 A1062 & A1072 AUGER ASSEMBLY MANUAL Read & understand all instructions pertaining to this auger prior to use! Safety Alert Watch for this ALERT Symbol. It identifies potential hazards to Personal SAFETY
P239-1 Supply Pumper Instructions
 P239-1 Supply Pumper Instructions STOP! READ THIS SECTION NOW. The following information is critical to the proper installation and operation of this Oil Supply System! Read it carefully before starting
UTS 696 Under Tailgate Spreader Owner s Manual
 July 15, 2004 Lit. No. 94838 UTS 696 Under Tailgate Spreader Owner s Manual Read this manual before installing or operating the spreader. This manual is for UTS 696 Under Tailgate Spreaders with serial
Mixer Discharge Door Adjustment on models; 30, 42, 54, 81, 108, 135 mixers.
 Knowledge Base Article Type: Instructions Mixer Discharge Door Adjustment on models; 30, 42, 54, 81, 108, 135 mixers. Description: Instructions on How to set-up and adjust the discharge door on Columbia
PROJ. NO SECTION HYDRONIC PUMPS
 SECTION 23 21 23 HYDRONIC PUMPS PART 1 - GENERAL 1.1 RELATED DOCUMENTS A. Drawings and general provisions of the Contract, including General and Supplementary Conditions and Division 01 Specification Sections,
Best Diversified Products, Inc. Product Manual. BestReach Rigid Belt. Models BRB 230 OS BRB 230 SS BRB 460 OS BRB 460 SS
 Best Diversified Products, Inc. Product Manual TM BestReach Rigid Belt Models BRB 230 OS BRB 230 SS BRB 460 OS BRB 460 SS Best Diversified Products Inc. 107 Flint Street Jonesboro, AR 72401 Phone 870-935-0970
Power Heads. Standard Unload. Power Sweep. Commercial Unload. Bin Systems. Unloading
 Standard Unload Power Sweep Commercial Unload Power Heads Unloading Bin Systems Klean Sweep the finishing touch. The unique back-up shield and torque tube combination adjusts for close floor clearance
75918 Heavy Duty 3-Point Mount
 December 15, 2015 Lit. No. 75581, Rev. 00 75918 Heavy Duty 3-Point Mount Installation Instructions Read Owner's Manual before operating or servicing spreader. A DIVISION OF DOUGLAS DYNAMICS, LLC SAFETY
Heavy-Duty Welding Fabrication Table
 Heavy-Duty Welding Fabrication Table with Fix-Up Kit Owner s Manual WARNING: Read carefully and understand all ASSEMBLY AND OPERATION INSTRUCTIONS before operating. Failure to follow the safety rules and
Grain Cannon. Installation and Operation Manual. LAMBTON CONVEYOR LIMITED 102 Arnold Street Wallaceburg, ON N8A 3P4 Canada ONE SOURCE ONE SOLUTION
 Grain Cannon Installation and Operation Manual LAMBTON CONVEYOR LIMITED 102 Arnold Street Wallaceburg, ON N8A 3P4 Canada Telephone: (519) 627-8228 Toll free: (888) 239-9713 Fax: (519) 627-0250 www.lambtonconveyor.com
ATMOSPHERIC RELIEF VALVE
 IOM-ARV-0814 ATMOSPHERIC RELIEF VALVE INSTALLATION, OPERATION AND MAINTENANCE MANUAL GRAHAM CORPORATION Corporate and Sales Headquarters: 20 Florence Avenue, Batavia, New York 14020 Tel.: 585-343-2216
Installation, Operation and Maintenance Manual Stancor SSD & SL Series Pumps
 Installation, Operation and Maintenance Manual Stancor SSD & SL Series Pumps EI-700-008 Rev -- Table of Contents Safety Guidelines 3 Caution 4 Wiring 4 Maintenance 4 Nameplate format 4 Prior to Operation
ASSEMBLY, OPERATION & MAINTENANCE INSTRUCTION MANUAL TRAMCO MODEL G TM, MODEL RB TM, & BULK-FLO TM EN-MASSE CHAIN CONVEYORS
 ASSEMBLY, OPERATION & MAINTENANCE INSTRUCTION MANUAL TRAMCO MODEL G TM, MODEL RB TM, & BULK-FLO TM EN-MASSE CHAIN CONVEYORS Read this manual before using any En-Masse chain conveyor purchased from Tramco,
TECH HANDBOOK CHAIN DRIVEN LIVE ROLLERS 192CDLR.251CDLR.297CDLR.3530CDLR
 CHAIN DRIVEN LIVE ROLLERS TECH HANDBOOK 192CDLR.251CDLR.297CDLR.3530CDLR Installing and Maintaining Your Roach Conveyor DO NOT OPERATE BEFORE READING THIS HANDBOOK Important Safety Information Enclosed
Installation and Main te nance Manual. Model RB190, SB350, RBI190, & SBI350 Effective June, 2005
 Installation and Main te nance Manual Model RB190, SB350, RBI190, & SBI350 Effective June, 2005 Contents Warning Labels... 3 Receiving & Uncrating... 4 Installation Saftey...5 Assembly... 6 Set-Up... 7
TIN KNOCKER FOURPLEX CLEAT FORMER INSTRUCTIONS & PARTS DIAGRAM
 TIN KNOCKER FOURPLEX CLEAT FORMER INSTRUCTIONS & PARTS DIAGRAM Sheet Metal Equipment Sales Inc. Dean P. O'Connell, President Green Bay, Wisconsin Phone - (90)-66-9966 Fax - (90)-66-9969 Website: www.sheetmetalequip.com
Hydraulic Bead Breaker Kit
 Hydraulic Bead Breaker Kit Owner s Manual WARNING: Read carefully and understand all ASSEMBLY AND OPERATION INSTRUCTIONS before operating. Failure to follow the safety rules and other basic safety precautions
Operator s Manual and Assembly
 Operator s Manual and Assembly Published: Mar 24, 2017 Manual Part No. AH02-00-MAN Gatco Manufacturing Inc. www.gatcomfg.com Location: 2524 South Service Road West, Swift Current, SK, Canada Mail: Box
// COMPACT LIFT. The Original Compact Lift Table. Features and Benefits
 The Original Compact Lift Table Designed to support smaller lift projects with capacities large enough to get the job done right, Autoquip offers the original Compact lift table. With five times the number
Operating Instructions. High Energy Vibratory Finishing Bowl. Model FSV-25/50. Vibra Finish Company
 Operating Instructions High Energy Vibratory Finishing Bowl Model FSV-25/50 TM FSV-25/50 Contents Machine Safety Requirements 2 Machine Specifications 3 Installation 4 Pre-Operating Adjustments 5 Operation
ALUMINUM JACK. 3,000 lb. Jack Capacity & JACK STAND COMBO. Model ASSEMBLY AND OPERATING INSTRUCTIONS
 ALUMINUM JACK 3,000 lb. Jack Capacity & JACK STAND COMBO 6,000 lb. Jack Stand Capacity (when used in pairs) Model 91850 ASSEMBLY AND OPERATING INSTRUCTIONS 3491 Mission Oaks Blvd., Camarillo, CA 93011
TABLE OF CONTENTS PART 7 - MACHINERY AND MACHINERY GUARDING
 TABLE OF CONTENTS PART 7 - MACHINERY AND MACHINERY GUARDING Page DEFINITIONS...7-1 SAFEGUARDS...7-1 GUARDING...7-2 PULLEYS, BELTS AND BELT-SHIFTERS...7-3 CONTROLS...7-3 FLYWHEELS...7-3 GRINDING WHEELS...7-3
750 Series Press Conveyor Installation and Maintenance Manual
 750 Series Press Conveyor Installation and Maintenance Manual Metzgar Conveyor Co. - 2010 METZGAR CONVEYORS SAFETY PRECAUTIONS WARNING: DO NOT ATTEMPT MAINTENANCE ON ANY CONVEYORS WHILE IN OPERATION. BEFORE
Geared Drives 200Z PSRU Zero Offset Gearbox with Centrifugal Clutch Assembly
 Instructions for Removing and replacing Gen X Gearbox with Geared Drives 200Z Prior to your gear box arriving: Using a strap or chain and an engine hoist to hold your engine up in the mount, remove your
INSTALLATION AND MAINTENANCE MANUAL BELT CONVEYOR MODEL BS100B
 INSTALLATION AND MAINTENANCE MANUAL BELT CONVEYOR MODEL BS100B Version 2014.1 - - TABLE OF CONTENTS INTRODUCTION Receiving, Inspection and Uncrating... 3 Ordering Replacement Parts... 3 SAFETY INFORMATION
SUPERIOR PERFORMANCE
 REVERSE PULSE DUST COLLECTORS OPERATION & MAINTENANCE MANUAL M600-2C, M900-2C & M1200-2C SUPERIOR PERFORMANCE And Quality In Blast Cleaning Equipment! WARNING Read Manual Failure to read, understand &
Model 1000 Low Profile Tailgate Spreader Receiver Mount
 November 1, 2018 Lit. No. 94380, Rev. 06 Model 1000 Low Profile Tailgate Spreader Receiver Mount Installation Instructions Read this manual before installing or operating the spreader. The receiver mount
Introduction... Pg. 3. Safety Guidelines... Pg. 4. Level Drag Parts... Pg. 6. Assembly... Pg Chain Installation... Pg. 9. Return Cups... Pg.
 Level Drag Conveyor Owner s Manual LAMBTON CONVEYOR LIMITED 102 Arnold Street Wallaceburg, ON N8A 3P4 Canada Telephone: (519) 627-8228 Toll free: (888) 239-9713 Fax: (519) 627-0250 www.lambtonconveyor.com
30,000 lb. HEAVY DUTY PPF 195 POST PULLER
 OPERATION, MAINTENANCE AND PARTS MANUAL 30,000 lb. HEAVY DUTY PPF 195 POST PULLER Read and understand all of the instructions and safety information in this manual before operating or servicing this piece
SECTION CENTRIFUGAL HVAC FANS
 SECTION 233416 - CENTRIFUGAL HVAC FANS 1. PART 1 GENERAL 1.1. RELATED DOCUMENTS A. Drawings and general provisions of the Contract, including General and Supplementary Conditions and Division 01 Specification
ClariMax Inclined Plate Clarifier. Installation, Operation & Maintenance Manual
 THE ART & SCIENCE OF WASTEWATER TREATMENT ClariMax Inclined Plate Clarifier Installation, Operation & Maintenance Manual TABLE OF CONTENTS 1.1. WARRANTY 3 1.2. INSPECTION 3 1.3. STORAGE 3 1.4. ADDITIONAL
Cougar B Series Electric Vibrators 3 Frame
 Cougar B Series Electric Vibrators 3 Frame Go to Cougar B Series Electric Vibrators web page Operator s Manual M3929 Important MARTIN ENGINEERING HEREBY DISCLAIMS ANY LIABILITY FOR: DAMAGE DUE TO CONTAMINATION
610 BUSHEL MANURE SPREADER
 610 BUSHEL MANURE SPREADER RODA MANUFACTURING 1008 LOCUST ST. HULL, IA. 51239 Art s-way Manufacturing 712-439-2366 Co., Inc. Hwy 9 West - PO Box 288 WWW.RODAMFG.COM Armstrong, IA. 50514 U.S.A 2 INTRODUCTION
Hytrol's ABC Conveyor Book
 Hytrol's ABC Conveyor Book WHAT IS A CONVEYOR? A conveyor moves material. A conveyor moves cardboard boxes, wood boxes, metal boxes and plastic boxes. A conveyor can move material This is called a GRAVITY
TRUSS KITS FOR SPOUTING Installation Manual
 TRUSS KITS FOR SPOUTING Installation Manual LAMBTON CONVEYOR LIMITED 102 Arnold Street Wallaceburg, ON N8A 3P4 Canada Telephone: (519) 695-2316 Telephone: (519) 627-8228 ONE SOURCE ONE SOLUTION Toll free:
STEEL, ¾ DIAMETER HEADED STUB PIN ENDS ARE MILLED FLAT TO -BELT PANS
 ONE: BALE DEWIRING CONVEYOR FEED SYSTEM MODEL CB-6-60-11-23A35-27 -HEAVY DUTY CLOSED-OPEN FRAME STYLE CONVEYOR BUILT TO INDUSTRY STANDARDS WITH A HEAVY STEEL PAN ROLLER CHAIN BELT. -BELT WIDTH 60 -BELT
ELECTRICAL WINCH 60SPS12 60SPS24
 ELECTRICAL WINCH 60SPS12 60SPS24 Assembly & Operating Instructions INTRODUCTION Congratulations on your purchase of a winch. We design and build winches to strict specifications and with proper use and
Waste Master OWNER'S MANUAL. Rev: Page 1 Waste Master Owner's Manual
 Waste Master OWNER'S MANUAL Rev: 06.15.2015 Page 1 Waste Master Owner's Manual TABLE OF CONTENTS Introduction 2 Operation 3 Service 4 Removing The Hose Assembly 4 Field Changing Of Waste Master Nozzle
Change Your Tail Wheel Bearings (and Races)
") Change Your Tail Wheel Bearings (and Races) Note: You must have the approval of a certified aircraft mechanic (A&P) to perform this procedure. This procedure worked with my tail wheel but yours may differ.
Change Your Tail Wheel Bearings (and Races) Note: You must have the approval of a certified aircraft mechanic (A&P) to perform this procedure. This procedure worked with my tail wheel but yours may differ.
2014-Current. Adjustable wrench (that opens to about 1 ), 1/2 open end wrench, Phillips screwdriver, 3/8 socket, 7/16 socket, 7/32 Allen wrench
, 1/2 open end wrench, Phillips screwdriver, 3/8 socket, 7/16 socket, 7/32 Allen wrench") Installation Instructions Van: VNFD13TRAN65 FORD TRANSIT 148 WHEELBASE 2014-Current TOOLS REQUIRED Adjustable wrench (that opens to about 1 ), 1/2 open end wrench, Phillips screwdriver, 3/8 socket, 7/16
Installation Instructions Van: VNFD13TRAN65 FORD TRANSIT 148 WHEELBASE 2014-Current TOOLS REQUIRED Adjustable wrench (that opens to about 1 ), 1/2 open end wrench, Phillips screwdriver, 3/8 socket, 7/16
Installation Manual. For. Trident Boat Lifts
 Installation Manual For Trident Boat Lifts Page 2 Safety Precautions 1. Your boat lift is a heavy duty piece of equipment. It is important that all persons that may operate this unit have read and understood
Cargill World Wide Grain Equipment & Engineering Specifications. DRAG CHAIN CONVEYORS GRAIN SECTION Page 1 of 16.
 Page 1 of 16 Section 14557 1. GENERAL.1 DESCRIPTION.1 a. The Manufacturer shall design, and supply a drag chain conveyor for the product(s) specified, in accordance with this Section 14557..2 REQUIREMENTS.2
Installation, Operation & Service Manual. PPL Bag Filter Housings. Table of Contents Page No. Eaton Filtration, LLC
 Installation, Operation & Service Manual PPL Bag Filter Housings Eaton Filtration, LLC 900 Fairmount Avenue, Elizabeth, NJ 07207 Read all instructions before installation or operation of equipment. Failure
PFadvantage MF 6850/6855; Ideal 9080/9090
 MF 6850/6855; Ideal 9080/9090 Note: Indented items indicate parts included in an Quantity by Model assembly listed above MF Ideal Part Name/Description Part Number 6850 6855 9080 9090 Instruction Kit MF
FORAGE WAGONS STRENGTH / QUALITY / PERFORMANCE
 FORAGE WAGONS STRENGTH / QUALITY / PERFORMANCE FORAGE WAGONS 7.8 25m 3 MULTICROP 7.8-20m 3 You expect your farm machinery to go the distance, and McIntosh delivers with Forage Wagons built to the highest
NBC, TGW Nitta Belt Welding Instructions. NBC Full Welding Instruction with Nitta Blue Urethane Belt
 NBC, TGW Nitta Belt Welding Instructions NBC Full Welding Instruction with Nitta Blue Urethane Belt P/N: 1207439 Date: 12/11/2018 CONTENTS INTRODUCTION... 3 PURPOSE... 3 SCOPE... 3 TGW SAFETY INFORMATION...
<THESE INSTRUCTIONS MUST BE GIVEN TO THE END USER> B&W
 B&W Trailer Hitches 6 Hawaii Rd / PO Box 86 Humboldt, KS 66748 P:60.473664 F:60.869.903 Turnoverball Gooseneck Hitch Installation Instructions MODEL 08
Turning Air Into Solutions. PLUG FANS TYPE BCPL
 Turning Air Into Solutions. PLUG FANS TYPE BCPL CATALOG 350 December 2009 BCPL Plug Fans BCPL plug fans from Twin City Fan & Blower are compact and versatile. Their versatility allows them to be used for
Service Manual. Bolens 683 Series Box Frame Tractor IMPORTANT: READ SAFETY RULES AND INSTRUCTIONS CAREFULLY
 Service Manual Bolens 683 Series Box Frame Tractor IMPORTANT: READ SAFETY RULES AND INSTRUCTIONS CAREFULLY This Service Manual is not a substitute for the Operator s Manual. You must read, understand and
PRESENTER'S GUIDE "CRANE SAFETY" Part of the "SAFETY MEETING KIT" Series Quality Safety and Health Products, for Today...
 PRESENTER'S GUIDE "CRANE SAFETY" Part of the "SAFETY MEETING KIT" Series Quality Safety and Health Products, for Today...and Tomorrow OUTLINE OF MAJOR PROGRAM POINTS OUTLINE OF MAJOR PROGRAM POINTS The
RED23305 Owner s Manual
 RED23305 Owner s Manual 5 foot, 3-Point Mounted Snow Blower 270 West Park Avenue Huron, SD 57350 866-526-5682 Serial Number: Date of Purchase: Red Devil Snow Blower See Figure 1. 1. The Red Devil Snow
INSTALLATION INSTRUCTIONS AMBASSADOR DRUM OVERHEAD SERIES 100 DUMBWAITER
 INSTALLATION INSTRUCTIONS AMBASSADOR DRUM OVERHEAD SERIES 100 DUMBWAITER The installation of Matot Drum Dumbwaiters should only be performed by qualified, experienced, and trained elevator installers.
MOUNT KIT PERSONAL PLOW
 November 15, 2018 Lit. No. 40942, Rev. 01 33923 MOUNT KIT PERSONAL PLOW Dodge Ram 1500 2009-18 Dodge Ram 1500 Classic 2019 Dodge Ram 1500 Rebel 2016-18 Dodge Ram 1500 Rebel Classic 2019 Installation Instructions
Wrestling Mat Lifters Installation Instructions
 Wrestling Mat Lifters Installation Instructions Suspending Stationary Mat Lifter to Steel Beams (1) Inspect the entire system for any freight damage. It is the installer s responsibility to ensure the
OPERATOR MANUAL Magnetic Conveyor
 OPERATOR MANUAL Magnetic Conveyor Document No. 94-03, Rev. 0816-3 WARNINGS THIS CONVEYOR IS DESIGNED FOR A SPECIFIC APPLICATION. CHECK FRAME AND CHAIN FOR DAMAGE DURING SHIPMENT. READ THE MANUAL FOR PROPER
Series 550 Meyer Insulation Blower
 292-K-002 Effective 1-4-2016 Series 550 Meyer Insulation Blower INSTALLATION, OPERATION & MAINTENANCE INSTRUCTIONS Wm. W. Meyer & Sons, Inc. 1700 Franklin Blvd Libertyville, Illinois 60048-4407 800-963-4458
Hydraulic Jack Training
 Hydraulic Jack Training This Training Topic is a supplement to the Brieser Safety Training titled, Hand and Portable Powered Tool Safety, which discusses tool safety in general. This training summarizes
belt drive utility sets vent-pak series models vp-bi & fc january 2007 vp 1.07
 belt drive utility sets vent-pak series models vp-bi & fc january 2007 vp 1.07 model vp - belt drive utility set Application VENT-PAK fan wheels are the versatile, quiet, energy efficiency backward inclined
Batch Plant Maintenance
 Batch Plant Maintenance Batch Plant Maintenance Preventative Maintenance PM Schedules Mixer (Haarup) Skip Hoist Cement Systems Pneumatic Valve Panels Water Systems Aggregate Bins & Equip Dust Collectors
WOOD CHIPPER WC1103 5PQ (8/02/12)
") O P E R A T O R ' S M A N U A L WOOD CHIPPER WC1103 5PQ990101 (8/02/12) To the Owner; Thank-You for choosing a quality product from Frontier Equipment. We strive to give you the best equipment and the
O P E R A T O R ' S M A N U A L WOOD CHIPPER WC1103 5PQ990101 (8/02/12) To the Owner; Thank-You for choosing a quality product from Frontier Equipment. We strive to give you the best equipment and the
Tooling Assistance Center
 Safeguards are designed into this application equipment to protect operators and maintenance personnel from most hazards during equipment operation. However, certain safety precautions must be taken by
EXPRESS/SAVANNA 155 WHEELBASE. Installation Instructions Van: VNGM96EXSV65 TOOLS REQUIRED 1996-CURRENT. follow us : CHEVROLET & GMC
 Installation Instructions Van: VNGM96EXSV65 CHEVROLET & GMC EXPRESS/SAVANNA 155 WHEELBASE 1996-CURRENT TOOLS REQUIRED Adjustable wrench (that opens to about 1 ), 1/2 open end wrench, Phillips screwdriver,
UNPACKING SAFETY GUIDELINES GENERAL SAFETY INFORMATION. Operating Instructions & Maintenance Manual
 Please read and save this Repair Parts Manual. Read this manual and the General Operating Instructions carefully before attempting to assemble, install, operate or maintain the product described. Protect
IMPORTANT! READ BEFORE PROCEEDING! PHR Axial Flow Hooded Roof Ventilators
 PHR Axial Flow Hooded Roof Ventilators OPERATION & MAINTENANCE Revised: 08/24/15 IMPORTANT! READ BEFORE PROCEEDING! The information contained herein is, to the best of our knowledge, accurate and applicable
Solutions beyond products...
 ORIGINAL INSTRUCTIONS IH102C Installation, Operation & Maintenance Manual Model B177 External Automatic Bypass Valve Model B177 External Automatic Bypass Valve Warning: (1) Periodic inspection and maintenance
DIRECT GEAR DRIVE / CARRY-IN / U-TROUGH / LEAVE-IN / PADDLE SWEEP BIN UNLOADING SYSTEMS PROVEN & DEPENDABLE
 DIRECT GEAR DRIVE / CARRY-IN / U-TROUGH / LEAVE-IN / PADDLE SWEEP BIN UNLOADING SYSTEMS PROVEN & DEPENDABLE WWW.GRAINSYSTEMS.COM PROVEN & DEPENDABLE From planting to harvest, we recognize the hard work
Commercial Systems. Unloading
 Unloading Commercial Systems En Masse Mass-ter Mover Mass-ter Mover is pictured with 45 º corner, rack and pinion control, control pipe kit, center and intermediate wells. Klean Sweep has reducer drive
READ AND SAVE THESE INSTRUCTIONS. High Velocity Restaurant-Duty Utility Set Belt Driven for Roof Mounting
 READ AND SAVE THESE INSTRUCTIONS INSTALLATION, OPERATING INSTRUCTIONS & PARTS MANUAL High Velocity Restaurant-Duty Utility Set Belt Driven for Roof Mounting Electrical wiring and connections should be
Felco Industries, Ltd Grant Creek Road P O Box Missoula, Montana (406) Fax (406)
 Fax (406)") Standard Slider Bedding Conveyor Model Number: STD 10-20 Serial Number: Bedding Conveyor Patent Number: 4,462,747 Felco Industries, Ltd. 3660 Grant Creek Road P O Box 16750 Missoula, Montana 59808-6750
Standard Slider Bedding Conveyor Model Number: STD 10-20 Serial Number: Bedding Conveyor Patent Number: 4,462,747 Felco Industries, Ltd. 3660 Grant Creek Road P O Box 16750 Missoula, Montana 59808-6750
Owner s Manual. ELECTRIC WIRE ROPE HOIST and TROLLEY RH SERIES
 EFFECTIVE: September 25, 2007 Owner s Manual ELECTRIC WIRE ROPE HOIST and TROLLEY RH SERIES 2 Ton through 20 Ton Capacity Product Code and Serial Number WARNING This equipment should not be installed,
Razor Oil Sac Cutter 2007
 Davis Poultry Equipment Razor Oil Sac Cutter 2007 TABLE OF CONTENTS Table of Contents...1 Objective...2 General Description...3 Serial Number Description...4 Thank You...5 General Safety Precautions...6
COBB 3 SF INTAKE SYSTEM
 COBB 3 SF INTAKE SYSTEM 2015 Mustang Ecoboost Congratulations on your purchase of the COBB 3 SF Intake System for your 2015 Mustang Ecoboost. The following instructions will assist you through your installation
HUTCHINSON Chain & paddle conveyors
 HUTCHINSON Chain & paddle conveyors Grain Pump Commercial Grain Pump Double Run Mass-Ter Mover Mass-Ter Flow VES MO A WORLD OF GR AIN TH E W ORLD OVER GRAIN PUMP Photo A 4. 5. Shown with Support Tower
RolsplicerTM. Maintenance Manual And Illustrated Parts List
 RolsplicerTM Maintenance Manual And Illustrated Parts List List of Illustrations Figure Page. Rolsplicer 3 2. Roller Adjustment 4 3. Rolsplicer 6 4. Lid Hold Down Assembly 8 5. Automatic Lid Speed Adjustment