Installation Procedures Ford F150 2X4, 4X4, Flex Fuel & Eco boost SNS 42
|
|
|
- Shona Hodge
- 6 years ago
- Views:
Transcription


1 Installation Procedures Ford F150 2X4, 4X4, Flex Fuel & Eco boost SNS 42
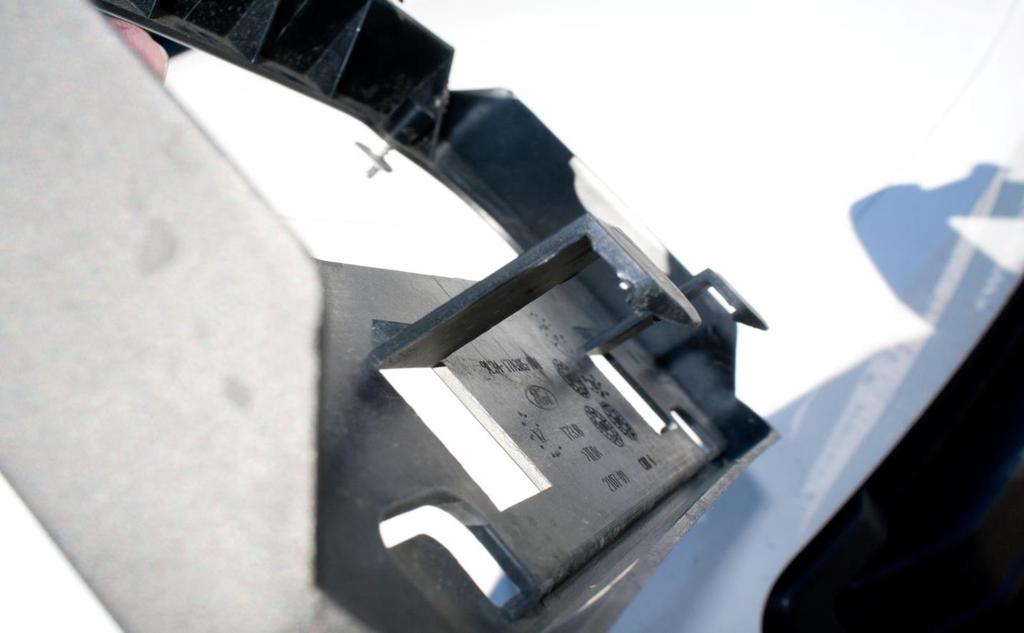
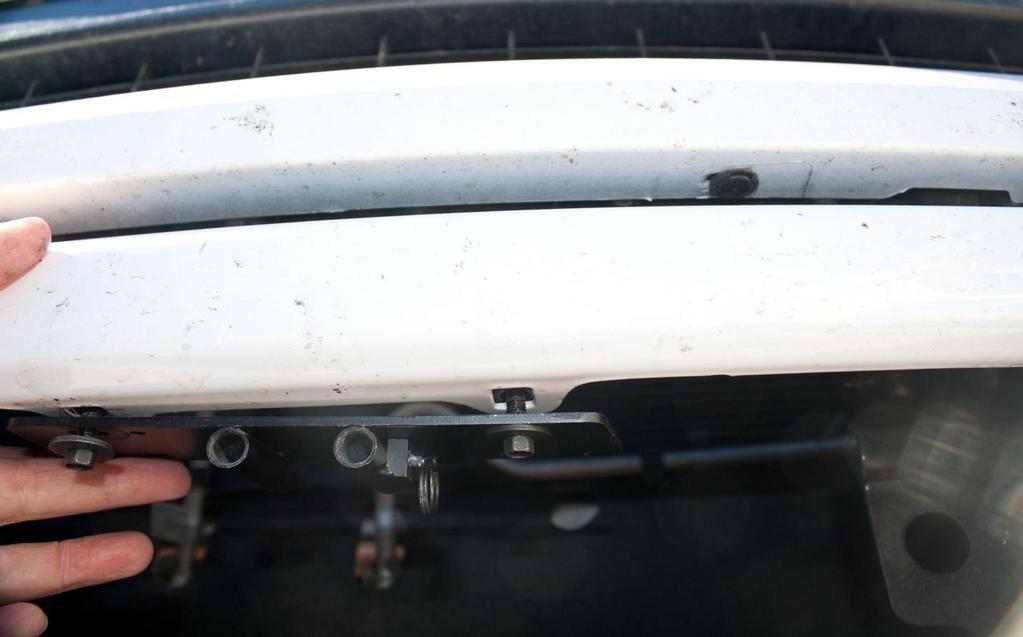
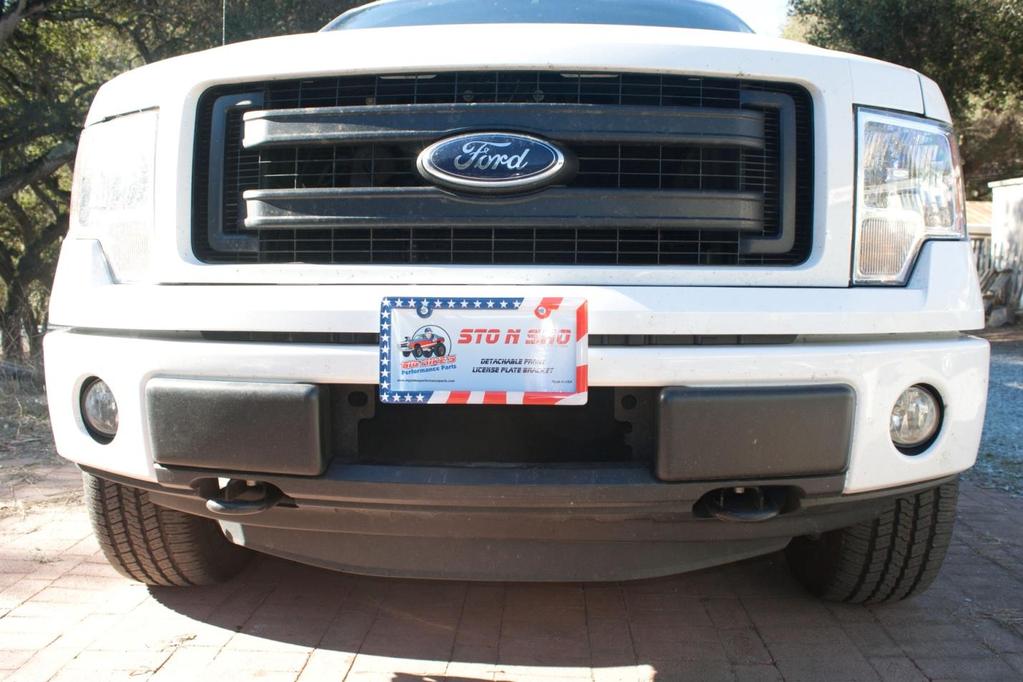
2 Warning: Please read directions completely before starting. If you have any questions please contact BMPP before beginning your installation. Also please check our website ( for any updates or changes. Thank You. Parts Included: License Plate mounting bracket Assembly. Includes Base Plate and License Plate Holder. License Plate mounting Screws: (2) 6mm X 16mm (Phillips head), (2) 6mm nuts with lock washers (10mm wench size) Base plate mounting bolts: (2) 6mmX20mm with washer & nut Tools Needed: 8mm sockets with ratchet Note: 1/4 inch drive preferred but 3/8 will work but extra caution will be needed when tightening screws. Phillips screwdriver and 10mm wrench Step 1: Insure all parts listed above are accounted for. Note: If at any time during the installation process you need assistance please call (831) Step 2: Separate the license plate holder from the base by simply pulling the pull pin ring outward and sliding apart. Step 3: Remove existing plastic mount if installed. See figure 1, 1a & 1b. Center base plate bracket using the two front holes and the two tabs as shown in figure 2. Step 4: Once base plate is correctly positioned install base plate using the two 6mm bolts and nuts included. Once the bolts are installed and before tightening, slide bracket all the way back and center. Then tighten bots. See figure 3 & 3a. Step 5: Secure the license plate and frame (optional) to the license plate bracket using the two screws and nuts provided. Requires the Phillips screwdriver and 10mmwrench (Not included). Step 6: Slide the license plate rods into the two tubes located on the base plate. Slide the rods into the tubes until the rods hit the pull pin. Simply pull the ring on the pull pin and advance the rods. Release ring and continue to advance rods until the pull pin locks into place. Note: The rods and spring loaded pull pin are required to be sprayed periodically with WD-40 or any other silicone type spray lube. Failure to do so could result in either the failure of the pull pin or the rods becoming difficult to remove or reinsert. Note: In harsh environments, such as areas where roads are either salted or sanded in the winter, spraying of the rods and pull pin should be performed on a regular basis. Failure to provide this maintenance may void your
3 warranty. See figure 4. In some occasions the license plate may require a little adjustment to level. Simply pull pin and slide plate out approximately two inches, grab frame at arrows (See figure 5) and rotate. If plate is high on left or right side, rotate high side down slightly and release. Verify alignment and repeat as necessary. Once leveled plate will remain level. Congratulations! You have just installed the STO N SHO TM (Patented) front license plate mounting system. Thank You for your purchase. Caution: Remove prior to entering automated car wash Medium skill level required. If unsure, have bracket installed by your local Dealer or Body shop. Limited Lifetime Warranty (Excluding Pull-pin). Pull pin will be warrantied for a period of 1 year (12 months) from the date of purchase. Big Mike's Performance Parts (BMPP) warrants to the original purchaser only that this product will be free of manufacturing defects in material and workmanship for the life of the product (Excluding pull-pin, see above) provided all maintenance is performed as required to the limitations and exclusions set forth below: Return product to any authorized dealer. Contact BMPP for the dealer nearest you. Upon examination, BMPP or its representative will, at its sole option and expense, repair or replace any product found to be defective. If product to be replaced via mail, BMPP will return the repaired or replaced unit to you via its usual shipping method from the factory to your address in the United States of America or Canada only. Any shipping costs for addresses outside of the United States or Canada shall be the responsibility of the purchaser. This warranty is not transferable. REMEDIES FOR BREACH OF WARRANTY. This Warranty does not include repair for damage caused by improper use or handling, including but not limited to damage caused by accident, mishandling, improper installation, abuse, negligence, or any defect caused by repair to the product by anyone other than BMPP. This warranty does not cover reimbursement for your costs of removing and transporting the product for warranty service evaluation, or installation of any replacement product provided under this warranty. This Warranty will be void if the product was not purchased from an authorized dealer or reseller.

4 THE FOREGOING WARRANTIES ARE EXCLUSIVE AND IN LIEU OF ALL OTHER EXPRESSED AND IMPLIED WARRANTIES. ALL SUCH OTHER WARRANTIES, INCLUDING BUT NOT LIMITED TO IMPLIED WARRANTIES OF MERCHANTABILITY, FITNESS FOR A PARTICULAR PURPOSE AND NON- INFRINGEMENT, WITH RESPECT TO THE PRODUCT. TO THE MAXIMUM EXTENT PERMITTED BY LAW, BMPP SHALL NOT BE RESPONSIBLE FOR ANY INCIDENTAL OR CONSEQUENTIAL DAMAGES EXCEPT TO THE EXTENT PROVIDED (OR PROHIBITED) BY APPLICABLE LAW, EVEN IF BMPP HAS BEEN ADVISED OF THE POSSIBILITY OF SUCH DAMAGES. Notwithstanding the above, if you qualify as a consumer under the Magnuson-Moss Warranty Act, or applicable state laws, then you may be entitled to any implied warranties allowed by law for the Warranty Period. Further, some states do not allow limitations on how long an implied warranty lasts or allow the exclusion or limitation of consequential damages, so such limitations may not apply to you. This warranty gives you specific legal rights, and you may also have other rights which vary from state to state. For the name of your nearest authorized STO N SHO dealer, contact: Big Mike's Performance Parts at (831) or go to Fig 1.

5 Fig 1a Fig 1b

6 Fig 2 Fig3

7 Fig 3a Fig 4
8 Fig 5
Installation Procedures Ford F150 Lightning SVT SNS 60
 Installation Procedures 1993-2003 Ford F150 Lightning SVT SNS 60 Warning: Please read directions completely before starting. If you have any questions please contact BMPP before beginning your installation.
Installation Procedures Dodge Challenger Hellcat (Upper Mount) SNS 1e
 SNS 1e") Installation Procedures 2015-16 Dodge Challenger Hellcat (Upper Mount) SNS 1e Warning: Please read directions completely before starting. If you have any questions, please contact BMPP before beginning
Installation Procedures 2015-16 Dodge Challenger Hellcat (Upper Mount) SNS 1e Warning: Please read directions completely before starting. If you have any questions, please contact BMPP before beginning
Installation Procedures Camaro 1LE & Factory Installed Spoiler SNS 89a
 Installation Procedures 2016-2017 Camaro 1LE & Factory Installed Spoiler SNS 89a Warning: Please read directions completely before starting. If you have any questions please contact BMPP before beginning
Installation Procedures Shelby GT500 Super Snake SNS 13a
 Installation Procedures 2007-2009 Shelby GT500 Super Snake SNS 13a Warning: Please read directions completely before starting. If you have any questions please contact BMPP before beginning your installation.
Installation Instructions Receiver Rack (Part # 7700) Universal Application
 Universal Application") NOTE: Carefully read entire instructions thoroughly before attempting to install this part. Parts Included Qty Tools Needed 2 Draw Bar 1 Ratchet Racks 2 Socket Set Curved Support Bars 2 Wrench Set Connecting
NOTE: Carefully read entire instructions thoroughly before attempting to install this part. Parts Included Qty Tools Needed 2 Draw Bar 1 Ratchet Racks 2 Socket Set Curved Support Bars 2 Wrench Set Connecting
Please visit for the latest version of these installation instructions.
 Please visit www.blueox.com for the latest version of these installation instructions. BX1126 Attachment Tab Height: 14-1/2 Serial Number Attachment Tab Width: 24 Please read BOTH these and the General
POST LANTERN ITEM # MODEL #39434 ATTACH YOUR RECEIPT HERE. Serial Number. Purchase Date
 ITEM #356-4894 POST LANTERN MODEL #39434 ATTACH YOUR RECEIPT HERE Serial Number Purchase Date Questions, problems, missing parts? Before returning to your retailer, call our customer service department
SmartRack 4-Post Heavy-Duty Open Frame Racks
 Assembly Instructions SmartRack -Post Heavy-Duty Open Frame Racks Models: SRPOST8HD, SRPOST50HD, SRPOST5HD, SRPOST58HD PROTECT YOUR INVESTMENT! Register your product for quicker service and ultimate peace
Please visit for the latest version of these installation instructions.
 Please visit www.blueox.com for the latest version of these installation instructions. BX2265 Attachment Tab Height: 12.5 Serial Number Attachment Tab Width: 23 Please read BOTH these and the General Information
3-LIGHT VANITY BAR ITEM # MODEL #34674 ATTACH YOUR RECEIPT HERE. Serial Number. Purchase Date
 ITEM #351-0599 3-LIGT VANITY BAR MODEL #34674 ATTAC YOUR RECEIPT ERE Serial Number Purchase Date Questions, problems, missing parts? Before returning to your retailer, call our customer service department
BATHROOM ACCESSORIES
 BATHROOM ACCESSORIES ORCA HARDWARE WARRANTY Orca Hardware warrants its products manufactured to be free from defects in materials and workmanship for a period of ten (10) years from the date of purchase,
POST LANTERN ITEM # MODEL #39487 ATTACH YOUR RECEIPT HERE. Serial Number. Purchase Date
 ITEM #356-4981 POST LANTERN MODEL #39487 ATTACH YOUR RECEIPT HERE Serial Number Purchase Date Questions, problems, missing parts? Before returning to your retailer, call our customer service department
Installation & Operators Manual
 Installation & Operators Manual Model Serial Number Purchase Date 2007-2008 SegVator, LLC Patent Pending All Rights Reserved Important Safety Information Make sure the vehicle has a properly installed
Installation Instructions / Warranty. Trio Stop
 Installation Instructions / Warranty Trio Stop 15980181 Trio Stop three way diverter 15980181 Installation 2 2 1 Spare parts 1 Service kit 25917000 2 Extension set 1 1 2 96241000 Note: A deep socket 24
Please visit for the latest version of these installation instructions.
 Please visit www.blueox.com for the latest version of these installation instructions. BX3623 2017-19 Subaru Impreza (Manual) (No Fog Lights) Attachment Tab Height: 13 Serial Number Attachment Tab Width:
Please visit for the latest version of these installation instructions.
 Please visit www.blueox.com for the latest version of these installation instructions. BX1728 2017-18 GMC Acadia (Includes Denali & All-Terrain) (No Limited) Attachment Tab Height: 16 Serial Number Attachment
5) The trailing arm should then pivot smoothly on the chassis. 6) Install the rear bolt. 7) Place one drop of blue Loctite
 The trailing arm should then pivot smoothly on the chassis. 6) Install the rear bolt. 7) Place one drop of blue Loctite") INSTALLATION INSTRUCTIONS 1301 / 1302 / 1305 / 1306 THANK YOU FOR CHOOSING HOTCHKIS PERFORMANCE PRODUCTS Removal of Stock Lower Trailing Arms 1) Place car on level surface. 2) Support rear of the car on
INSTALLATION INSTRUCTIONS 1301 / 1302 / 1305 / 1306 THANK YOU FOR CHOOSING HOTCHKIS PERFORMANCE PRODUCTS Removal of Stock Lower Trailing Arms 1) Place car on level surface. 2) Support rear of the car on
Please visit for the latest version of these installation instructions.
 Please visit www.blueox.com for the latest version of these installation instructions. BX1730 Attachment Tab Height: 16 Serial Number Attachment Tab Width: 23 Please read BOTH these and the General Information
TABLE OF CONTENTS. Important Safety Information 3. Parts List 4
 1 TABLE OF CONTENTS Important Safety Information 3 Parts List 4 Assembling THERACK 5 7 How To Unfold THERACK 8 How To Fold THERACK 9 THERACK Levels 10 Warranty 11 2 IMPORTANT SAFETY INFORMATION IMPORTANT:
Please visit for the latest version of these installation instructions.
 Please visit www.blueox.com for the latest version of these installation instructions. BX2409 2009-18 Dodge Ram 1500 Sport/ST/Laramie Limited Please read BOTH these and the General Information sheet prior
GM 2500,3500 Nerf Bar Installation Instructions
 GM 2500,3500 Nerf Bar Installation Instructions Part # 100-7023-00 Fitment: 07-17 GM 2500/3500 Crew Cab 1) Remove Battle Armor nerf bar and hardware from box. Hardware supplied is shown below. Contains
Instruction Sheet DWRSR-ZL. Zero Clearance Latch
 Instruction Sheet DWRSR-ZL Zero Clearance Latch US Patent 7,188,570 B2 THANK YOU Thank you for purchasing the DWRSR-ZL Zero Clearance Latch. Please read these instructions thoroughly before installing
Use/Installation Guide
 Use/Installation Guide 5 Series Outdoor Gas Grill Carts IMPORTANT: PLEASE READ AND FOLLOW 1. Before beginning, please read these instructions completely and carefully. 2. Do not remove permanently affixed
Please visit for the latest version of these installation instructions.
 Please visit www.blueox.com for the latest version of these installation instructions. Attachment Tab Height: 24-1/2 BX2675 (Incudes Super Duty & ACC) Serial Number Attachment Tab Width: 34-1/2 Please
Please visit for the latest version of these installation instructions.
 Please visit www.blueox.com for the latest version of these installation instructions. BX2412 2016-18 Ram 1500 Rebel 2016-18 Ram 1500 Bighorn/Laramie/Laramie Longhorn (Chrome Bumpers) 2018 Ram 1500 (Metal
Please visit for the latest version of these installation instructions.
 Please visit www.blueox.com for the latest version of these installation instructions. Attachment Tab Height: 19-1/2 Serial Number Attachment Tab Width: 19 Please read BOTH these and the General Information
BX7322 Adventurer Tow Bar Operator Manual & Installation Instructions
 Please visit www.blueox.com for the latest version of these installation instructions. BX7322 Operator Manual & Installation Instructions Serial Number (5,000 lb) 2 Inch Coupler 292-1263 Rev J Page 1 of
PLEASE ENSURE THE JUMP STARTER IS FULLY CHARGED PRIOR TO FIRST USE.
 PLEASE ENSURE THE JUMP STARTER IS FULLY CHARGED PRIOR TO FIRST USE.. (1) RG1000 EMERGENCY JUMP STARTER PORTABLE POWER SUPPLY (1) 3-IN-1 USB CABLE (1) RG1000 EMERGENCY JUMP STARTER PORTABLE POWER SUPPLY
AT-38 On-Demand. For Driving Safety and Convenience. Installation & Operation Manual for AT-38OD Unit
 The Leader in Heated Washer Systems AT-38 On-Demand For Driving Safety and Convenience Installation & Operation Manual for AT-38OD Unit Our Warmest Congratulations! You are now the Owner of a Heated Washer
Please visit for the latest version of these installation instructions.
 Please visit www.blueox.com for the latest version of these installation instructions. Attachment Tab Height: 18 Serial Number Attachment Tab Width: 18 Please read BOTH these and the General Information
Please visit for the latest version of these installation instructions.
 Please visit www.blueox.com for the latest version of these installation instructions. Attachment Tab Height: 16 Serial Number Attachment Tab Width: 35 Please read BOTH these and the General Information
Please visit for the latest version of these installation instructions.
 Please visit www.blueox.com for the latest version of these installation instructions. BX1986 Please read BOTH these and the General Information sheet prior to installing or operating this equipment. 1.
Installation Instructions / Warranty. Citterio 39115XX1
 Installation Instructions / Warranty Citterio 39115XX1 Citterio Wall-Mount Lavatory Trim 39115XX1 Technical Data Maximum incoming water pressure 145 psi Recommended incoming pressure 14.5-72 psi Recommended
Operating Instructions & Parts Manual. Fuel Tank Adapter
 Operating Instructions & Parts Manual Fuel Tank Adapter Model Number 40080 Capacity 80 lb.! This is the safety alert symbol. It is used to alert you to potential personal injury hazards. Obey all safety
Sport Sway Bar Kit (22431 ) Subaru Forester INSTALLATION OF HOTCHKIS FRONT SWAY BAR
 Subaru Forester INSTALLATION OF HOTCHKIS FRONT SWAY BAR") Sport Sway Bar Kit (22431 ) Subaru Forester Thank you for your purchase from our new line of Forester parts. Please call us at (877) 4NO - ROLL if you have any questions regarding the service or installation
Sport Sway Bar Kit (22431 ) Subaru Forester Thank you for your purchase from our new line of Forester parts. Please call us at (877) 4NO - ROLL if you have any questions regarding the service or installation
ValveSentry USER S MANUAL REVISED 8/6/16 IMPORTANT! PLEASE READ CAREFULLY AND SAVE
 ValveSentry USER S MANUAL REVISED 8/6/16 IMPORTANT! PLEASE READ CAREFULLY AND SAVE This user s manual contains important information about your ValveSentry device s operation. If you are installing this
INSTALLATION OF HOTCHKIS FRONT STABILIZER BAR
 22441 FRONT AND REAR SPORT SWAY BAR SET Infiniti G37/S Coupe & G35/S Sedan Thank you for your purchase from our Hotchkis line of suspension parts. Please call us at (877) 4NO-ROLL if you have any questions
Model:M5B/M5W/M5N. Installation Guide. Specifications Desktop Weight Capacity Keyboard Tray Weight Capacity Height Adjustable Range
 Model:M5B/M5W/M5N Installation Guide Website: www.flexispot.com Tel: 1-855-421-2808 Specifications Desktop Weight Capacity Keyboard Tray Weight Capacity Height Adjustable Range 33 Ibs (15 KG) 4.4 Ibs (2
SUPRA JZA80 TWIN TURBO BLOW-OFF VALVE ADAPTOR INSTRUCTIONS
 IMPORTANT NOTES ON FITTING YOUR SUPRA TWIN TURBO ADAPTOR Turbosmart recommends that your Blow Off Valve (BOV) and Adaptor kit is fitted by an appropriately qualified technician. ADAPTOR KIT CONTENTS Please
BX Jeep Liberty Renegade 2012 Jeep Liberty Sport Installation Instructions
 Attachment Tab Height: 17.5 Attachment Tab Width: 24 Serial Number Please read BOTH these and the General Instructions prior to installing or operating this equipment. 1. Blue Ox towing products and accessories
Installation Instructions / Warranty
 Installation Instructions / Warranty Citterio 27831XXX Terrano 27834XXX Carlton Phoenix 27835XXX Axor Citterio Wallbar Set 27831XXX Axor Terrano Wallbar Set 27834XXX Axor Carlton / Phoenix Wallbar Set
CT4880 Collaboration Huddle Table Assembly Instructions
 CT4880 Collaboration Huddle Table Assembly Instructions Monitor, monitor stand and chairs are not included. Thank you for choosing the CT4880 Collaboration Huddle Table from AmpliVox Portable Sound Systems.
Nissan Armada up A Nissan Titan Crew Cab up A Nissan Titan King Cab* up A
 INSTALLATION GUIDE APPLICATION MODEL YR PART # Nissan Armada 200 - up 75110-01A Nissan Titan Crew Cab 200 - up 75110-01A Nissan Titan King Cab* 200 - up 75110-01A *Modification required to running board
Installation Instructions / Warranty
 Installation Instructions / Warranty Terrano 37410XX1 Uno 38410XX1 Phoenix / Carlton 17420XX1 Citterio 39410XX1 Steel 35412801 Starck 10410XX1 Axor Tub Spouts 90973301 11/2004 Axor Tub Spouts Terrano 37410XX1
Please visit for the latest version of these installation instructions.
 Please visit www.blueox.com for the latest version of these installation instructions. Attachment Tab Height: 16.5 Serial Number Attachment Tab Width: 30.5 Please read BOTH these and the General Information
Please visit for the latest version of these installation instructions.
 Please visit www.blueox.com for the latest version of these installation instructions. BX2414 2019 Ram 1500 (Includes Rebel) (No Classic) Attachment Tab Height: 17 Serial Number Attachment Tab Width: 38.5
Installation manual. Front leveling kit. Part # Part # Important customer information: Ram WD Ram WD
 Installation manual Front leveling kit 2014-2018 Ram 2500 4WD 2013-2018 Ram 3500 4WD Part # 32909 sj10182013rev.02 Part # 32909 2014-2018 Ram 2500 4WD 2013-2018 Ram 3500 4WD Front leveling kit Part # Description
Installation Instructions
 Installation Instructions CUSTOM QUICK INSTALL MOUNTING KIT 2011 & UP Ford Super Duty F-250/F-350/F-50 2011 & UP Part Number: 50073 WARNING: Under no circumstances do we recommend exceeding the towing
MOVE ON TO THE REAR BAR INSTALLATION
 22410 STREET SWAY BAR SET 2001-UP LEXUS IS300 Thank you for your purchase from our line of Lexus parts. Please call us at (877) 4NO-ROLL if you have any questions regarding the service or installation
1401 / 1402 / 1403 ADJUSTABLE TRAILING ARM MOUNT BRACES INSTALLATION OF HOTCHKIS PERFORMANCE ADJUSTABLE TRAILING ARM MOUNT BRACES
 1401 / 1402 / 1403 ADJUSTABLE TRAILING ARM MOUNT BRACES 1401 78-88 GM A/G-BODY / 1402 68-72 GM A-BODY / 1403 64-67 GM A-BODY Thank you for your purchase. Please call us at (562) 907-7757 if you have any
TAILGATE SPREADER INSTALLATION & OWNER S MANUAL TABLE OF CONTENTS
 A Division of Northern Star Industries, Inc. P.O. Box 788 Iron Mountain MI 49801-0788 www.bossplow.com SMARTHITCH 1100 TAILGATE SPREADER INSTALLATION & OWNER S MANUAL TABLE OF CONTENTS S & CAUTIONS...
Harvil 4 Foot Air Hockey Table
 AH48-2 Harvil 4 Foot Air Hockey Table Thank you for your purchase of this Harvil product! We work around the clock and around the globe to ensure that Harvil products maintain the highest possible quality.
Harvil 4 Foot Air Hockey Table
 Harvil 4 Foot Air Hockey Table Thank you for your purchase of this Harvil product! We work around the clock and around the globe to ensure that Harvil products maintain the highest possible quality. However,
MOPAR PARTS & ACCESSORIES LIMITED WARRANTIES MOPAR BASIC LIMITED WARRANTY
 MOPAR BASIC LIMITED WARRANTY MOPAR PARTS & ACCESSORIES LIMITED WARRANTIES Subject to the terms and exclusions below, Mopar Parts and Magneti Marelli Parts offered by Mopar sold in Canada, on or after October
Installation Instructions To ensure that your installation proceeds smoothly--please read these instructions carefully before you begin.
 Single Lever Vessel Faucet Installation Instructions To ensure that your installation proceeds smoothly--please read these instructions carefully before you begin. P r o d u c t s Luxury Faucets and Accessories
Please read BOTH these Installation Instructions and the General Information sheet prior to installing or operating this equipment.
 Attachment Tab Height: 24-1/4 Serial Number Attachment Tab Width: 24 Please read BOTH these and the General Information sheet prior to installing or operating this equipment. 1. Blue Ox towing products
BX7322 Adventurer Tow Bar Operator Manual & Installation Instructions
 Please visit www.blueox.com for the latest version of these installation instructions. BX7322 Operator Manual & Installation Instructions Serial Number (5,000 lb) 2 Inch Coupler 292-1263 Rev J Page 1 of
Instruction Sheet. SFR Series. Swing Frame rack
 Instruction Sheet SFR Series Swing Frame rack THANK YOU Thank you for purchasing the SFR Series Swing Frame Rack. Please read these instructions thoroughly before installing/assembling this product. PRODUCT
INSTALL GUIDE Dodge/RAM 5.7L HEMI
 INSTALL GUIDE 2009-2017 Dodge/RAM 5.7L HEMI TABLE OF CONTENTS 3 GETTING STARTED 3 PARTS LIST 4 INSTALLATION INSTRUCTIONS 4 REMOVING THE STOCK INTAKE ASSEMBLY 6 INSTALLING THE AIR FILTER 7 INSTALLING THE
Installation manual. 1.5 front leveling kit. Nissan Titan. Part # Part # Important customer information: Nissan Titan
 Installation manual 1.5 front leveling kit 2004-2015 Nissan Titan Part # 52008 sj071408rev.01 Part # 52008 2004-2015 Nissan Titan 1.5 front leveling kit Part # Description Qty. 52008-01 Front strut spacers
I N S T A L L A T I O N G U I D E
 I N S T A L L A T I O N G U I D E APPLICATION LENGTH MODEL YR PART # Ford F-250 / F-350 / F-450 Regular Cab * (48 ) 2008-2016 76234-01A Ford F-250 / F-350 / F-450 Super Cab * (60 ) 2008-2016 76234-01A
Installation Instructions
 85-3511 rev. 04 11-15 Installation Instructions Polyurethane Bushing Kit for Ford F-53 (Front) (replaces OE bushings and brackets) part #4139-127 1-5/8 diameter INTRODUCTION Thank you for purchasing this
Installation manual 2 Leveling kit GM x 4. Part # Part # Important customer information: GM x 4
 Installation manual 2 Leveling kit 2007-2008 GM 1500 4 x 4 Part # 12000 sj121007rev.02 Part # 12000 2007-2008 GM 1500 4 x 4 2 leveling system Parts list: Part # Description Qty. 12000-01 Front leveling
MOPAR PARTS & ACCESSORIES LIMITED WARRANTIES MOPAR BASIC LIMITED WARRANTY
 MOPAR BASIC LIMITED WARRANTY MOPAR PARTS & ACCESSORIES LIMITED WARRANTIES Subject to the terms and exclusions below, Mopar Parts and Magneti Marelli Parts offered by Mopar sold in Canada, on or after October
SAVE FOR CONSUMER INSTALLATION / OWNER'S MANUAL. Single Handle Kitchen Faucet Model # LK2500. Important! You choose the flow rate!
 INSTALLATION / OWNER'S MANUAL Single Handle Kitchen Faucet Model # LK500 Important! You choose the flow rate! This faucet ships with an eco-friendly.5gpm flow regulator installed. If you desire higher
MLS KICK-OFF TABLETOP SOCCER TABLE ASSEMBLY INSTRUCTIONS
 MLS KICK-OFF TABLETOP SOCCER TABLE ASSEMBLY INSTRUCTIONS NGD1028 1 THANK YOU! Thank you for your purchase of this Harvil product. We work around the clock and around the globe to ensure that Harvil products
POWER GEAR SLIDE-OUT MANUAL
 POWER GEAR SLIDE-OUT MANUAL Operation Guide FLUSH FLOOR SLIDE-OUT SYSTEM FOR AMERICAN COACH PRODUCTS 82-S0220-01 Rev. 1 AMERICAN COACH SLIDE-OUT MANUAL FLUSH FLOOR SYSTEM TABLE OF CONTENTS SECTION PAGE
In-Tank Fuel Pump Installation Instructions P/N s GM110LP, GM155LP, GM190LP, GM255LP
 Granatelli Motor Sports, Inc. - 1000 Yarnell Place - Oxnard, CA 93033-2454 805-486-6644, Ext. 23 (Service Dept.) - 805-486-6684 (Fax) - Hours: M-F 8AM-5PM (PST) www.granatellimotorsports.com/techsupport.htm
2015 & 2018 Fender Brace Installation Instructions
 2015 & 2018 Fender Brace Installation Instructions Thank you for your purchase of this Hotchkis Performance product. Your Fender Brace set was designed with the performance and durability you ve come to
FLEETWOOD TRAVEL TRAILER SLIDEOUT SYSTEM OWNER S MANUAL
 FLEETWOOD TRAVEL TRAILER SLIDEOUT SYSTEM OWNER S MANUAL 82-S0150-01 REV. 1 April, 2002 TABLE OF CONTENTS PAGE # OPERATIONS MANUAL... 1 1. SYSTEM DESCRIPTION... 1 1.1 MAJOR COMPONENTS... 1 2. HOW TO OPERATE
Installation Instructions / Warranty
 Installation Instructions / Warranty Terrano Showerhead 28485XX1 Steel Showerhead 28484801 Arco/Starck/Steel/Uno Air Showerhead 28494XX1 Terrano Shower Arm 27448XX1 Phoenix Showerhead 28487XX1 Citterio
Installation Instructions / Warranty. Interaktiv
 Installation Instructions / Warranty Interaktiv 06646000 4-Hole Roman Tub Rough 06646000 Recommended operating pressure 45-80 psi Recommended hot water temperature 120 o - 140 o F* Flow rate - valves approx.
SOARER TT BLOW-OFF VALVE ADAPTOR INSTRUCTIONS
 IMPORTANT NOTES ON FITTING YOUR BOV SOARER TWIN TURBO ADAPTOR Turbosmart recommends that your Blow Off Valve (BOV) and Adaptor kit is fitted by an appropriately qualified technician. ADAPTOR KIT CONTENTS
Please visit for the latest version of these installation instructions.
 Please visit www.blueox.com for the latest version of these installation instructions. 2012-17 Chevy Sonic (LS/LT/LTZ/RS) Attachment Tab Height: 13-1/2 Serial Number Attachment Tab Width: 18 Please read
PVI 1800/PVI Residential/Commercial Grid-Tied Photovoltaic Inverter WARRANTY MANUAL. Subject to Change REV , Solectria Renewables
 PVI 1800/PVI 2500 WARRANTY MANUAL Residential/Commercial Grid-Tied Photovoltaic Inverter 2009, Solectria Renewables Subject to Change REV 10.09 1 Product Warranty & RMA Policy 1.1 Warranty Policy The Solectria
BX1681. Please read BOTH these Installation Instructions and the General Towing Instructions before attempting to install or operate this equipment.
 Serial Number BX1681 2007-13 Chevy Pickup 1500, 2500 & 3500 New Style Heavy Duty (2WD/4WD), 2007-11 GMC Pickup 2500 & 3500 New Style, 2008-10 GMC Yukon 2500 Please read BOTH these and the General Towing
Installation Instructions / Warranty. Starck 10444XX XX1
 Installation Instructions / Warranty Starck 10444XX1 10454XX1 90564101 06/2005 Starck 4-Hole Roman Tub Trim 10444XX1 10454XX1 10444XX1 10454XX1 Installation Considerations This trim kit must be used with
Installation Instructions / Warranty
 Installation Instructions / Warranty Citterio 39136XX1 39156XX1 Citterio 39236XX1 Axor Citterio Widespread Lav Mixer 39136XX1 Axor Citterio Bidet Mixer 39236XX1 39136XX1 User instructions Turn the right
INSTALLATION INSTRUCTIONS
 INSTALLATION INSTRUCTIONS 1301 / 1302 / 1305 / 1306 THANK YOU FOR CHOOSING HOTCHKIS PERFORMANCE PRODUCTS Removal of Stock Lower Trailing Arms 1) Place car on level surface. 2) Support rear of the car on
Please visit for the latest version of these installation instructions.
 Please visit www.blueox.com for the latest version of these installation instructions. BX1139 2018 Jeep Wrangler / Wrangler Unlimited (JL) (All Models w/standard Bumper) Attachment Tab Height: 18 Serial
= Experienced
 INSTALLATION GUIDE APPLICATION LENGTH MODEL YR PART # Ford F-250 / F-350 / F-450 Regular Cab (48 ) 2008 - up 75134-01A Ford F-250 / F-350 / F-450 Super Cab (60 ) 2008 - up 75134-01A Ford F-250 / F-350
Installation Instructions
 Installation Instructions Application Fits 2013-2014 BMW X5 X7265 2013-2014 BMW 500 lbs. Tongue Weight/5,000 lbs Weight Carrying X5 2 EcoHitch Invisi Torklift Central 315 Central Ave N Kent, WA 98032 253-854-1832
Installation Manual 2019 Ram wd. 2 front leveling kit. Part # Part # Ram wd (will not fit Air ride models)
") Installation Manual 2019 Ram 1500 4wd 2 front leveling kit Part # 32105 SS09062018 Part # 32105 2019 Ram 1500 4wd (will not fit Air ride models) 2 front leveling kit Part # Description Qty. 32105-01 Aluminum
Installation Manual 2019 Ram 1500 4wd 2 front leveling kit Part # 32105 SS09062018 Part # 32105 2019 Ram 1500 4wd (will not fit Air ride models) 2 front leveling kit Part # Description Qty. 32105-01 Aluminum
Please visit for the latest version of these installation instructions.
 Please visit www.blueox.com for the latest version of these installation instructions. Attachment Tab Height: 15-1/2 Serial Number Attachment Tab Width: 24 Please read BOTH these and the General Information
Installation Instructions
 85-3910 rev. 03 01-18 Installation Instructions Thank you for purchasing the antisway bar kit. Please read through these instructions before installation. Rear Anti-Sway Bar Kit for Ford F-250/F-350 part
Please visit for the latest version of these installation instructions.
 Please visit www.blueox.com for the latest version of these installation instructions. BX1715 2014-15 Chevy Malibu (All Models) 2016 Chevy Malibu Limited (No Active Shutter or E-Assist) Attachment Tab
Dummy Trailer Hitch Instructions
 Dummy Trailer Hitch Instructions Hiya. Thanks for buying a Surly Big Dummy trailer hitch. It is designed to replace the wheel yoke of your Surly Bill or Ted trailer, thereby making it possible to haul
Model T2642 Wall Mount. Television Wall Mount with Tilt Option
 Model T2642 Wall Mount Television Wall Mount with Tilt Option Getting Started Introduction Congratulations on the purchase of your new Audio Solutions T2642 Television Wall Mount. For maximum benefit,
22421 SPORT SWAY BAR SET TOYOTA COROLLA
 22421 SPORT SWAY BAR SET 98-01 TOYOTA COROLLA Thank you for your purchase from our line of Corolla parts. Please call us at (877) 4NO-ROLL if you have any questions regarding the service or installation
Please visit for the latest version of these installation instructions.
 Please visit www.blueox.com for the latest version of these installation instructions. BX2643 Please read BOTH these and the General Instructions prior to installing or operating this equipment. 1. Blue
6-TON DOUBLE LOCKING JACK STANDS OWNER S MANUAL
 6-TON DOUBLE LOCKING JACK STANDS OWNER S MANUAL WARNING: Read carefully and understand all ASSEMBLY AND OPERATION INSTRUCTIONS before operating. Failure to follow the safety rules and other basic safety
E24-E28 M88 & S38 Mass Air Flow Conversion System Instruction Manual
 E24-E28 M88 & S38 Mass Air Flow Conversion System Instruction Manual Miller Performance Ltd. Tel 855.BMW.TUNER 2009 Abbotsford Way, Abbotsford BC, V2S 6Y5 Millerperformancecars.com Table of Contents: 1.
Instruction Sheet SRSR SERIES. Rotating Sliding Rail System
 Instruction Sheet SRSR SERIES Rotating Sliding Rail System THANK YOU Thank you for purchasing the SRSR Series Rotating Sliding Rail System. Please read these instructions thoroughly before assembling this
Installation manual. Replacement front sway bar end link Dodge Ram Dodge Ram 1500 Part # 30927
 Part # 30927 1998-2012 Dodge Ram 2500-3500 1998-2001 Dodge Ram 1500 Replacement front sway bar end link Part # Description Qty. 30927NB1 Hardware bag 1 30927NB2 Hardware bag 1 30927INST Instruction manual
Installation manual. 2 front / 1 rear spacer kit Jeep Wrangler JK 2 & 4 door Part # 42005
 Part # 42005 2007-2015 Jeep Wrangler JK 2 & 4 door 2 front / 1 rear spacer kit Parts list: Part # Description Qty. 42005-01 Front coil spring spacers 2 42005-02 Rear coil spring spacers 2 42005INST Instruction
Installation Instructions
 Installation Instructions To ensure that your installation proceeds smoothly--please read these instructions carefully before you begin. P r o d u c t s Luxury Faucets and Accessories Savina Product Numbers
Please visit for the latest version of these installation instructions.
 Please visit www.blueox.com for the latest version of these installation instructions. BX2625 2011-15 Lincoln MKX (includes Adaptive Cruise Control) Attachment Tab Height: 18-1/4 Attachment Tab Width:
UPPER TRAILING ARM REMOVAL
 #1204 MUSTANG UPPER TRAILING ARMS Thank you for your purchase. Please call us at (562) 907-7757 if you have any questions regarding your Hotchkis Performance products. Visit us online @ www.hotchkis.net
A S S E M B L Y I N S T R U C T I O N S
 A S S E M B L Y I N S T R U C T I O N S Please Do Not Return This Product to the Store! Contact Escalade Sports customer service department at: Phone: 1-888-USA-GOAL Toll-Free! Fax: 1-866-873-3536 Toll-Free!
AutoSparge. Lauter Tun Level Control. Operation, Assembly & Maintenance Manual
 AutoSparge Lauter Tun Level Control Operation, Assembly & Maintenance Manual Congratulations on your purchase, and thank you for selecting the AutoSparge lauter tun level control from Blichmann Engineering.