36-1 DP PLEASE READ BEFORE USING THIS EQUIPMENT
|
|
|
- Susanna Pearson
- 5 years ago
- Views:
Transcription

1 36-1 DP PLEASE READ BEFORE USING THIS EQUIPMENT
2
3 DP 36-1 Assembly Instructions PLEASE READ INSTRUCTIONS COMPLETELY BEFORE STARTING We thank you for purchasing the DP-36 pressure system. This system has been specifically designed for the Dry Blast user who wishes to achieve quality results on a number of surfaces for both low and high volume requirements. Below you will find instructions on how to assemble your unit upon receipt. If you have any questions on how to proceed with any steps, contact Econoline Technical Service by phone at or fax at NOTICE: The DP36 is delivered skid-mounted to assure safe arrival. If any damage is evident upon receipt, contact the carrier immediately to file your claim. STEP 1 Unpacking Cut the packing straps by using heavy-duty scissors or wire cutter. Remove the protective plastic wrap and cardboard. Open the front door by unlatching and remove the light assembly, regulator and foot pedal. Using a crescent wrench, remove the bolts to loosen the unit from the skid. With assistance of others, slide unit gently off the skid and place unit in desired work area. STEP 2 Light Fixture Installation Unwrap the fluorescent light fixture and attach to the top of the cabinet with hardware provided. Be sure to place the plastic protective sheet between the light fixture and the cabinet to protect the light source from abrasive damage during blasting. STEP 3 Window Loosen wing nuts to remove window frame and peel protective covering off from the window. Re-install and firmly tighten wing nuts to prevent leakage around window.
4 STEP 4 Dust Collector set-up Unpack the dust collector and place within a few feet of the sandblast cabinet. (Note: vacuum hose is packed in bottom barrel of dust collector.) Attach one end of the plastic hose to the air inlet of the vacuum system and attach the other end to the air outlet on the rear of the blasting cabinet. Plug the dust collector line cord into outlet on the back of the lamp box. See your dust collector manual for details and operation of your dust collector. STEP 5 Regulator and gauge installation Connect regulator and gauge assembly (nos.1 & 9) to the inlet ball valve (no. 3). Be sure to place Teflon tape on the thread to assure a leak-free fit. Using a pipe wrench, tighten the connection. When the regulator and gauge has been installed, place the pipe tee (no. 2) and filter to the left of the regulator and gauge. STEP 6 Foot operated blast gun installation Connect the black hose from the foot pedal valve to the brass hose barb in the ¼ inch air filter (no. 12). Connect the red hose to the brass hose barb on the media valve (no. 11). *DO NOT USE QUICK DISCONNECTS* STEP 7 Attaching air line to sandblast system NOTE: WE STRONGLY SUGGEST YOU HAVE A WATER / AIR SEPARATOR PLACED BEFORE THE REGULATOR TO ASSURE NO MOISTURE ENTERS THE SYSTEM. MOISTURE MAY LEAD TO CLOGGING OF ABRASIVE MEDIA. Close your air inlet ball valve (no. 3) and attach the airline from your compressor to the pipe (1/2 inch NPT pipe thread) from your regulator and gauge (or water / air separator if you have installed one). The open position of the air inlet ball valve is when the lever is positioned over the length of the valve. The closed position is when the lever is perpendicular to the ball valve. When attaching the air supply to the DP- 36 the following assembly instructions are important for your system to function properly.
5 *Air to the plumbing of your unit should be supplied by hose or pipe with a minimum of 3/8 I.D. and we strongly suggest ½ I.D. *Do not attach your air supply to the unit with quick connects, as this greatly reduces the volume of air to the system and will adversely affect the units performance. *For your foot pedal and media valve to operate properly and to maximize the life of the media valve and diaphragm air line pressure supplied to the regulator of the system must be maintained at a constant psi. (Note: this pressure is required to close diaphragm in valve). STEP 8 Loading abrasive into pressure-pot Pour the abrasive media into the pressure pot. Brush excess media into the vessel to avoid it being sprayed into the air when filling the system with air. The pressure pot holds up to 100 pounds of media for long uninterrupted blasting. When reusing any abrasive media, be sure to use a filter to remove any extraneous materials which could clog the abrasive metering valve or the sandblast nozzle. STEP 9 Filling pressure-pot with air Grip the pressure pot handle located in the top of the pressure vessel and lift firmly to secure ball seal in the opening while simultaneously opening the air inlet ball valve (no. 3) slowly. A swishing sound will indicate that the vessel is being filled with air. After a few seconds, the handle will stay in place on its own. If this is not the case, open the ball valve further to allow the vessel to fully compress. When the system is fully compressed, the ball valve should be in the fully opened position. Check your regulator and gauge to assure the PSI is still at the desired setting. If not, adjust the regulator by turning the control located on top. Next, make sure that ball valve (no. 5) is in the open position.
6 STEP 10 Controlling the abrasive media flow The pressure-pot is fitted with an abrasive metering valve (no. 5) located on the bottom of the vessel. To adjust the valve, align the valve lever perpendicular to the valve body (closed position). Now turn the lever down approximately 30 degrees. This should be a good position to begin adjusting the media flow. Slide your arms into the gloves in the arm ports of the cabinet, grip the blast hose firmly, and depress the foot pedal to begin blasting (it is normal when starting to blast that one or two spurts of abrasives come out of the nozzle before uniform blasting begins). Best blasting is achieved when the abrasive can barely be seen as a mist in the air/media stream from the nozzle. Too much abrasive in the flow will reduce the ability of the system to blast effectively and will cause surging. Too little abrasive flow will slow your blasting and yield poor results. Opening the abrasive metering valve will put more media into the mix while closing it will deliver more air and less abrasive. Once the metering valve is properly set, it will require only occasional maintenance. STEP 11 Blasting Best results are achieved by sandblasting between 20 and 80 psi and holding the nozzle at a 90 degree angle to the surface at about 4 to 8 inches away. Maintain a continuous, even movement of the nozzle to prevent the media from cutting too deep into your work surface. NOTE: IF USING GLASS BEAD KEEP PRESSURE BELOW 40 PSI. GLASS BEAD SHATTERS INTO DUST ON CONTACT WITH ITS TARGET AT PRESSURES OF 40 PSI AND ABOVE. To stop blasting, release the foot pedal and the air media valve will shut itself off automatically. To begin again, just press down on the foot pedal. To shut down the system, simply close the air inlet ball valve (no. 3) and press down on the foot pedal. The pressure relief valve (no. 12) can be activated by pulling on the ring, however, depressing the foot pedal is easier and can be accelerated by pulling on the pressure relief valve simultaneously.
7 MAINTENANCE To assure a long efficient life of the system, it is recommended to: A. Replace nozzle when compressor can t keep up, or media usage is excessive. B. Rebuild media valve when it starts to leak or doesn t shut off. C. Check abrasive metering valve when you can t get correct abrasive flow. If worn badly, replace. D. Check hose barbs after 20 hours of use. If worn badly, replace. E. Replace abrasive hose when it begins to soften or leaks media or air. Water and/or oil in the air line will cause problems with the efficiency of your blasting. Before blasting, always drain water and/or oil from air line. We suggest that a quality water filter be installed in the air line between the compressor and the blast cabinet. Good visibility speeds up work. Clean dust from window often and replace the plastic window underlayment and window when needed. The lamp shield will also become frosted and require replacement. Visibility is also affected by the condition of the dust collection system. The filter should be cleaned often and the dust emptied from the canister regularly (more than a gallon of debris is too much.) If after extended use of the machine the gasket around the door or window becomes damaged or worn, it can be replaced (see diagram). This equipment is engineered to the finest point of simplicity. With reasonable care it should give you many years of excellent service. Blasting by its very nature is a high maintenance process. The same forces acting to separate materials from targeted pieces wear on the system itself. Keep service parts in stock to avoid down time.
8 HELPFUL HINTS 1. Air compressor choice: Secure an air compressor that has the capacity to produce a high volume (cfm) and high-pressure (psi) of moisture free air. You must maintain a constant air pressure, not high one minute and low the next, it must be constant. 2. Air supply line: Keep the air lines as short as possible. DO NOT reduce the air line down to a quick disconnect when attaching it to your blast equipment. In order to maintain the high CFM and PSI you need at the blast nozzle; we suggest using a minimum ½ I.D. air line from your compressor to the blast machine. 3. Blast Nozzles: the blast nozzle size and design will determine the cfm of air required. The larger the nozzle, the greater the cfm needed. 4. As you begin blasting, record all data, compressor delivery pressure, nozzle size (I.D.), regulator pressure, and abrasive type and mesh size. When you are totally satisfied with your results, be sure to record all data for future use and reference.
 411249 4.")
 411422 #5 #4 411245 Socket 411240 LED TUBE #3 411249 #2 411242")

9 PARTS LIST FOR LARGE LIGHT BOX COMPLETE ASSEMBLY # LED DESCRIPTION PART NUMBER 1. Light Box cover only Power Cord Light Switch (on/off) LED tube 7W / T8 / 5000K (2 required) Socket Lamp Shield large (not shown) #5 # Socket LED TUBE # # # # not shown WARNING: This fixture has been modified and no longer operates fluorescent lamps. Ballast has been removed and there is line voltage being supplied to sockets. DO NOT INSTALL FLUORESCENT LAMPS.
10 PARTS LIST FOR BLAST CABINET DESCRIPTION Part # 18. Window frame 19. Window plexi-glass 12 x Window underlayment 1 piece 24 x pieces 12 x Window gasket material (Specify number of feet required) 22. Latch assembly front door 23. Glove clamp (1 pair) 24. Gloves 24 x 6 seamless rubber (pair) left hand only right hand only 25. Armhole gasket 26. Front door gasket 27. Work table (expanded metal) 28. Side door handle assembly (set) Consists of: Handle Latch 29. Side door 30. Side door gasket 31. Lamp box gasket material 32. Lamp shield 33. Lamp box assembly complete NOT SHOWN: Trap door spring Trap door gasket L R LED
11
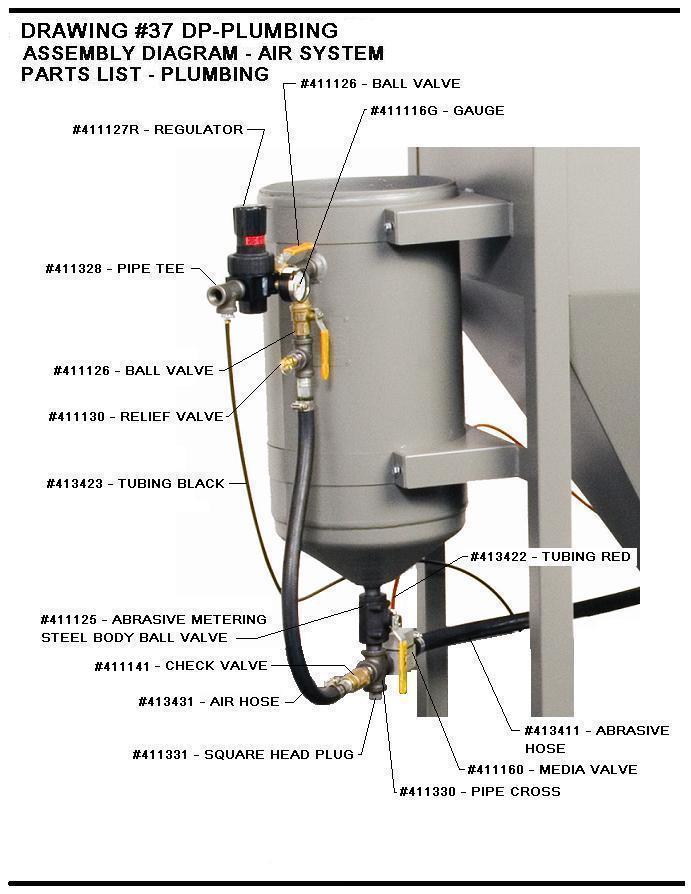
12 PARTS LIST FOR AIR SYSTEM PLUMBING DESCRIPTION PART NO. 1. Regulator Pipe Tee Inlet Ball Valve Air Hose ½ I.D Choke Ball Valve Abrasive Metering Valve Pipe Cross Square Head Pipe Plug Gauge G 10. Abrasive Hose (8 required) Media Valve Pressure Relief Valve Check Valve Foot Pedal Valve A. Foot Pedal Complete YW 16. Tubing (black) Tubing (red) Not shown - Gasket Closure 3 dia. red
13
14
15 PLEASE READ For optimum performance, we have included two different media valve diaphragms. Installed in the media valve is our high-pressure diaphragm part # If the media valve does not shut off immediately upon releasing the foot pedal, you may need to change the diaphragm. For lower pressure uses we recommend installing the low-pressure diaphragm part # Whenever the media does not shutoff, you should first inspect the diaphragm for wear.
16
17
18
19 TROUBLESHOOTING TIPS PROBLEM POSSIBLE SOLUTION Surging of blast flow? Air pressure too low See Lack of Air Too much media Adjust media valve Excessive media consumption? Media valve open too far Close slightly Air pressure too low Check pressure gauge Clogging and plugging of blast flow? Debris in media Purge & screen Media size too large Use smaller grit size Nozzle plugs Use larger nozzle Nozzle plugs Adjust media valve Wet media Dry media, drain water from air Moisture in abrasive media? Wet media Change or use dry media Water in air Drain water from air lines Water in tank Empty, dry out and refill Humid weather? Moderate humidity Keep media dry as possible Moderate humidity Use dryer or moisture separator High humidity Avoid usage if possible Overtaxed compressor? Compressor too small Restrict time used Nozzle size too large Use smaller size Too many leaks in plumbing Seal and tighten plumbing Holes in abrasive hose Replace Air filter on compressor Clean Lack of air pressure? Compressor too small Use smaller nozzle Supply valves not on full position--- Open valves Nozzle size too large Use smaller size Leaks in plumbing Seal & tighten plumbing Holes in abrasive hose Replace hose Air filter on compressor plugged----- Clean filter Urethane gasket worn or dirty Clean or replace gasket Lack of abrasive flow? Blaster tank empty Fill tank Moisture in media Dry media Not enough air pressure Check system Abrasive hose kinked Straighten Debris in media Clean or screen media
20 WARRANTY ECONOLINE THIS PRODUCT HAS BEEN MANUFACTURED AND ENGINEERED TO THE HIGHEST STANDARDS. FIVE YEAR WARRANTY ECONOLINE ABRASIVE PRODUCTS GUARANTEES ITS BLAST CABINETS AGAINST DEFECTS IN MATERIAL AND WORKMANSHIP FOR A PERIOD OF FIVE YEARS FROM THE ESTABLISHED PURCHASE DATE. ECONOLINE WILL REPAIR OR REPLACE, FREE OF CHARGE, ANY DEFECTIVE PARTS DETERMINED TO BE COVERED UNDER THIS WARRANTY BY OUR FACTORY SERVICE PERSONNEL. THE PARTS MUST BE RETURNED TO THE FACTORY, FREIGHT COLLECT, WITH A LETTER OF EXPLANATION. ON ACCEPTANCE OF CLAIM ECONOLINE WILL REPLACE DEFECTIVE PART. CONDITIONS THIS WARRANTY DOES NOT APPLY IF THE UNIT HAS BEEN MISUSED, ALTERED, OR USED FOR ANY PURPOSE OTHER THAN IN ACCORDANCE WITH THE OPERATING AND ASSEMBLY INSTRUCTIONS PROVIDED. THIS WARRANTY DOES NOT COVER TRANSPORTATION, INTERIOR OR EXTERIOR FINISHES, HOSE ASSEMBLIES, NOZZLES, AIR JETS, WINDOWS, FILTERS, LAMPSHIELDS OR MEDIA VALVE. OPERATION OF THIS UNIT WITH NATURAL SAND SHALL RENDER THIS WARRANTY NULL AND VOID. WARNING DO NOT USE SAND OR ANY ABRASIVE CONTAINING SILICA. USE OF COMPOUNDS CONTAINING SILICA IS A HEALTH HAZARD. FREE SILICA WHEN INHALED CAN LEAD TO SERIOUS, PERMANENT, DISABLING AND DEADLY DISEASE (SILICOSIS).
PB900-GT SLOTBLASTER D-A PLEASE READ BEFORE USING THIS EQUIPMENT
 PB900-GT SLOTBLASTER 101760D-A PLEASE READ BEFORE USING THIS EQUIPMENT PB900-GT Assembly Instructions PLEASE READ INSTRUCTIONS COMPLETELY BEFORE STARTING We thank you for purchasing the PB900-GT pressure
PORTABLE PRESSURE BLASTER Model 80 PX
 PORTABLE PRESSURE BLASTER Model 80 PX INSTRUCTION MANUAL & PARTS 1 Table of contents Page Read all instructions before using this machine 3 Safety instructions 4 Abrasive selection 5 Important safety instructions
37 LITRE MOBILE SANDBLASTING UNIT
 OWNER S MANUAL PRODUCT CODE: 3008 37 LITRE MOBILE SANDBLASTING UNIT Working Air Hose Overall Tank Volume Pressure Consumption Length Dimensions 37 Litre 65 125psi 6-25CFM 2400mm 480 x 290 x 830 Made in
WITH 300 CFM RECLAIM MANUAL NUMBER: 563 TABLE OF CONTENTS
 LITTLE BLASTER LARRY HESS AND ASSOCIATES, INC. BLAST-IT-ALL P.O. BOX 1615 SALISBURY, NC 28145 WWW.BLAST-IT-ALL.COM LITTLE BLASTER OYSTER SHELL WITH 300 CFM RECLAIM MANUAL NUMBER: 563 TABLE OF CONTENTS
PRODUCT OPERATING MANUAL
 PRODUCT OPERATING MANUAL PANBLAST TM CS37 SUCTION BLAST CABINET Manual Number: ZVP PC 0069 00 SECTION 1. GENERAL INFORMATION 2. ASSEMBLY & INSTALLATION INSTRUCTIONS 3. OPERATING INSTRUCTIONS 4. MAINTENANCE
PRESSURE CABINETS PROBLEM CAUSE SOLUTION
 BLAST CABINET TROUBLESHOOTING Page 1 PRESSURE CABINETS 1. Poor Visibility. Motor rotating backwards. The motor should rotate as indicated by the arrow on the housing. If it does not rotate in the proper
CONTENTS 2. NOTICE 3 3. SET UP 4 8. CABINET PART DRAWING 9,10 9. ERGO CABINET PLUMBING 11,12, DUAL REMOTE CONTROL VALVE 14,15
 CONTENTS 1. IMPORTANT WARNING 2 2. NOTICE 3 3. SET UP 4 4. GENERAL OPERATING INSTRUCTIONS 5 5. AIR REQUIREMENTS 6 6. P SERIES: Pressure cabinets 7 7. PRESSURE CABINET MAINTENANCE 8 8. CABINET PART DRAWING
Junior Sandblaster. Model #51 WARNING! FOR YOUR SAFETY PLEASE READ INSTRUCTIONS BEFORE OPERATING TOOL & WEAR EYE PROTECTION
 Junior Sandblaster Model #51 WARNING! FOR YOUR SAFETY PLEASE READ INSTRUCTIONS BEFORE OPERATING TOOL & WEAR EYE PROTECTION PARTS LIST AND PART NUMBERS 01.Red Rubber Air Hose (5Ft) P51-01 02. Male Insert
Top Side Door Door Model Work Area Height Door Options Opening Opening Gun Options Weight
 FLOOR MODEL STEEL CABINETS 40403 40413 Standard Features for All Models 100 CFM dust collector included with all steel cabinets HD 14 gauge steel - welded seams Full width top door Optional additional
High Pressure Abrasive Blast Cabinet 42000
 Please read and save these instructions. Read through this owner s manual carefully before using product. Protect yourself and others by observing all safety information, warnings, and cautions. Failure
The Reference in Surface Treatment. PORTABLE PRESSURE BLASTER Model 80 PX INSTRUCTION MANUAL & PARTS
 PORTABLE PRESSURE BLASTER Model 80 PX INSTRUCTION MANUAL & PARTS Table of contents Page READ ALL INSTRUCTIONS BEFORE USING THIS MACHINE...3 SAFETY INSTRUCTIONS FOR SANDBLASTER...4 ASSEMBLING THE SANDBLASTER...4
PRESSURISED SANDBLASTER
 PRESSURISED SANDBLASTER MODEL NO: CPSB100 PART NO: 7640130 OPERATION & MAINTENANCE INSTRUCTIONS LS0510 INTRODUCTION Thank you for purchasing this Clarke Pressurised Sandblaster. Before you try to use this
THE MAGNUM SUCTION SYSTEM
 LARRY HESS AND ASSOCIATES, INC. BLAST-IT-ALL P.O. BOX 1615 SALISBURY, NC 28145 WWW.BLAST-IT-ALL.COM THE MAGNUM SUCTION SYSTEM MANUAL NUMBER: 564 TABLE OF CONTENTS PAGE FIGURE 1 - SET-UP INSTRUCTIONS 2
MACHINES / RECLAIMS WITH DUST BAG
 WARNING SET-UP INSTRUCTIONS MACHINES / RECLAIMS WITH DUST BAG *** READ BEFORE OPERATING EQUIPMENT *** 1. Remove plastic from machine. 2. Remove lag bolts from each of the four legs, then remove machine
1. CONDITIONS FOR USE 2. SAFETY
 1. CONDITIONS FOR USE This micro abrasive blaster may only be operated: Indoors; Below 6500 ft above sea level altitude; Ambient air temperature between 40-105 F (5-40 C); Maximum relative humidity of
HIGH PRESSURE SANDBLASTING CABINET
 OWNER S MANUAL PRODUCT CODE: BSB3056 HIGH PRESSURE SANDBLASTING CABINET Media Operating Nett Weight Cabinet Dimensions Overall Dimensions Size Air Pressure 25-80 Grit 30-115psi 210kg 1170x850x890mm 1320x1580x2060mm
PRODUCT OPERATING MANUAL
 PRODUCT OPERATING MANUAL PANBLAST TM BP110 3 BLAST POT Manual Number: ZVP PC 0155 00 SECTION 1. GENERAL INFORMATION 2. INITIAL SETUP INSTRUCTIONS 3. OPERATING INSTRUCTIONS 4. MAINTENANCE 5. TROUBLE SHOOTING
PRESSURISED SANDBLASTER MODEL NO: CPSB200B
 PRESSURISED SANDBLASTER MODEL NO: CPSB200B PART NO: 7640134 OPERATION & MAINTENANCE INSTRUCTIONS ORIGINAL INSTRUCTIONS GC0218 ISS 1 INTRODUCTION Thank you for purchasing this CLARKE Pressurised Sandblaster.
ATD-8400 BENCH TOP BLAST CABINET OWNER S MANUAL
 ATD-8400 BENCH TOP BLAST CABINET OWNER S MANUAL Thank you for purchasing the ATD Bench Top Blast Cabinet, designed for professional workshop use. Please read this booklet thoroughly and follow the instructions
SBCNNS. Abrasive Blast Cabinet Assembly & Operating Instructions
 SBCNNS Abrasive Blast Cabinet Assembly & Operating Instructions READ ALL INSTRUCTIONS AND WARNINGS BEFORE USING THIS PRODUCT. This manual provides important information on proper operation & maintenance.
PRODUCT OPERATING MANUAL
 PRODUCT OPERATING MANUAL PANBLAST TM BP50 3 BLAST POT Manual Number: ZVP PC 0156 00 SECTION 1. GENERAL INFORMATION 2. INITIAL SETUP INSTRUCTIONS 3. OPERATING INSTRUCTIONS 4. MAINTENANCE 5. TROUBLE SHOOTING
PRESSURISED SANDBLASTER
 PRESSURISED SANDBLASTER MODEL NO: CPSB200 PART NO: 7640128 OPERATION & MAINTENANCE INSTRUCTIONS LS1211 INTRODUCTION Thank you for purchasing this Clarke Pressurised Sandblaster. Before you try to use this
PRODUCT OPERATING MANUAL
 PRODUCT OPERATING MANUAL PANBLAST TM BP600 3 BLAST POT Manual Number: ZVP PC 0154 00 SECTION 1. GENERAL INFORMATION 2. INITIAL SETUP INSTRUCTIONS 3. OPERATING INSTRUCTIONS 4. MAINTENANCE 5. TROUBLE SHOOTING
STRAIGHT DIE GRINDER MODEL EGA530 OWNERS MANUAL
 STRAIGHT DIE GRINDER MODEL EGA530 OWNERS MANUAL www.eaglecompressor.com 1-800-551-2406 READ THE ENTIRE MANUAL BEFORE PUTTING THIS TOOL IN SERVICE Limited Air Tool Warranty Eagle warrants air tools of its
PRESSURISED SANDBLASTER MODEL NO: CPSB100B PART NO: OPERATION & MAINTENANCE INSTRUCTIONS
 PRESSURISED SANDBLASTER MODEL NO: CPSB100B PART NO: 7640133 OPERATION & MAINTENANCE INSTRUCTIONS ORIGINAL INSTRUCTIONS GC0218 ISS1 INTRODUCTION Thank you for purchasing this CLARKE Pressurised Sandblaster.
SUPERHONE Installation * Operation * Maintenance * Replacement Parts
 SUPERHONE Installation * Operation * Maintenance * Replacement Parts I.C.M., Inc. 10630 South Garfield Avenue South Gate, CA 90280-7395 Telephone: 562/869-3004 888/351-2570 Fax: 562/869-3005 Website: www.icm2000.com
UR007 UR007-YEXP UR007-YJ UNI-RAM CORPORATION ONTARIO CANADA
 USER MANUAL RECLAIMING SAND BLASTERS MODELS UR007 UR007-YEXP UR007-YJ UNI-RAM CORPORATION ONTARIO CANADA Revised 2010-03 CONTENTS INTRODUCTION... 3 CAUTIONS AND WARNINGS... 3 PREPARATION... 4 NOTES ON
2034vx /2034vxa Sandcarving System
 2034vx /2034vxa Sandcarving System Table of Contents Section 1 - Safety Information Section 2 - Setup Guide Section 3 - Operation Section 4 - Maintenance Reference Drawing U U Air Pressure Regulator Knob
Operating Instructions for the. In Line Conveyor System West Cabot Boulevard Langhorne, PA w w w.empire-airblast.
 Operating Instructions for the IL-885 In Line Conveyor System 2101 West Cabot Boulevard Langhorne, PA 19047-1893 w w w.empire-airblast.com Model Number: Serial Number: Date of Purchase: Date of Installation:
SB20G. Large Pressurized Abrasive Blaster Assembly & Operating Instructions
 SB20G Large Pressurized Abrasive Blaster Assembly & Operating Instructions READ ALL INSTRUCTIONS AND WARNINGS BEFORE USING THIS PRODUCT. SAVE THESE INSTRUCTIONS FOR FUTURE REFERENCE. This manual provides
MODEL EGA200 OWNERS MANUAL
 3/8 RATCHET WRENCH MODEL EGA200 OWNERS MANUAL www.eaglecompressor.com 1-800-551-2406 READ THE ENTIRE MANUAL BEFORE PUTTING THIS TOOL IN SERVICE Limited Air Tool Warranty Wood Industries, Inc. warrants
1/4 ANGLE DIE GRINDER
 1/4 ANGLE DIE GRINDER MODEL EGA500 OWNERS MANUAL www.eaglecompressor.com 1-800-551-2406 READ THE ENTIRE MANUAL BEFORE PUTTING THIS TOOL IN SERVICE Limited Air Tool Warranty Wood Industries, Inc. warrants
1. CONDITIONS FOR USE 2. SAFETY
 1. CONDITIONS FOR USE This micro abrasive blaster may only be operated: Indoors; Below 6500 ft above sea level altitude; Ambient air temperature between 40-105 F (5-40 C); Maximum relative humidity of
PRODUCT OPERATING MANUAL
 PRODUCT OPERATING MANUAL PANBLAST TM BP300-1 BLAST POT Manual Number: ZVP-PC-PB-0014 SECTION 1. GENERAL INFORMATION 2. INITIAL SETUP INSTRUCTIONS 3. OPERATING INSTRUCTIONS 4. MAINTENANCE 5. TROUBLE SHOOTING
PNEUMATIC ABRASIVE CONVEYORS MODELS 16-PAC, 24-PAC, 30-PAC AND 36-PAC O.M MC FILE NUMBER: DATE OF ISSUE: 2/15/78 REVISION: C, 02/92
 PNEUMATIC ABRASIVE CONVEYORS MODELS 16-PAC, 24-PAC, 30-PAC AND 36-PAC O.M. 04117 MC FILE NUMBER: 145-1177 DATE OF ISSUE: 2/15/78 REVISION: C, 02/92 NOTICE TO PURCHASERS AND USERS OF OUR PRODUCTS AND THIS
LIQUID MEDIA BLASTER INSTRUCTIONS
 Item #20668 LIQUID MEDIA BLASTER INSTRUCTIONS Pressure Washer Not Included The EASTWOOD LIQUID MEDIA BLASTER is specifically designed to use high pressure water from a pressure washer as a source for powerful
MicroCoat System Operating Manual MC4000 Series MC785M, MC785M-WF Spray Valves
 MicroCoat System Operating Manual MC Series MC785M, MC785M-WF Spray Valves A NORDSON COMPANY Introduction The MicroCoat System provides precise lubrication control for metal stamping operations. The MC
18 KG MOBILE SODA BLASTING UNIT
 OWNER S MANUAL PRODUCT CODE: 3043 18 KG MOBILE SODA BLASTING UNIT Working Air Hose Tank Volume Overall Dimensions Pressure Consumption Length 18KG 35 90psi 6-12CFM 2400mm 460 x 305 x 660 Made in China
MODEL EGA220 OWNERS MANUAL
 1/4 MINI RATCHET MODEL EGA220 OWNERS MANUAL www.eaglecompressor.com 1-800-551-2406 READ THE ENTIRE MANUAL BEFORE PUTTING THIS TOOL IN SERVICE Limited Air Tool Warranty Wood Industries, Inc. warrants air
T1-Titanium Non-HVLP Spray Gun
 T1-Titanium Non-HVLP Spray Gun THE SPRAY GUN PEOPLE FOR PRODUCT INFORMATION CALL: 1-800-742-7731 Important Safety Instructions Read all warnings and instructions in this manual. Save these instructions.
Professional Series 1/2HP 2 YEAR WARRANTY CONVERTIBLE JET PUMP REPAIR PARTS
 Model T033 CONVERTIBLE JET PUMP /HP 900 GPH Suction lift Head of 5 (7.5m) in shallow well mode Professional Series YEAR WARRANTY Suction: /4 Discharge: NPT Maximum pressure: 85 PSI US GPH LPH 5 900 3400
OWNER S MANUAL. Model: UTV-65-BL ( ) (65 Gallon Lawn & Garden UTV Sprayer w/boomless Boom)
 (65 Gallon Lawn & Garden UTV Sprayer w/boomless Boom)") OWNER S MANUAL Model: UTV-65-BL (5302843) (65 Gallon Lawn & Garden UTV Sprayer w/boomless Boom) Technical Specifications 65 Gal. Corrosion-Resistant Polyethylene Tank Deluxe Pistol-Grip Handgun 25 Ft.
OWNER S MANUAL Model: UTV-65-BL (5302843) (65 Gallon Lawn & Garden UTV Sprayer w/boomless Boom) Technical Specifications 65 Gal. Corrosion-Resistant Polyethylene Tank Deluxe Pistol-Grip Handgun 25 Ft.
READ THE INSTRUCTIONS BEFORE OPERATING SAVE INSTRUCTION BOOK
 4005-0 10 Gallon AbrasiveBlaster SPECIFICATIONS Tank Size... 10 gallons Hose Length... 8 ft. Working Pressure... 60-125 psi Air Consumption... 6-25 cfm Overall Dimensions... 18.75 x 13 x 33.5 Gross Weight...
SPECIFICATIONS: Tank Size: 80 gallons PUMP RPMs: 1050 CFM: 40PSI; 90 PSI Max Pressure: 150 PSI Thermal overload protection
 5HP 80 GALLON TWO STAGE COMPRESSOR Models: 51866, 51870 CALIFORNIA PROPOSITION 65 WARNING: You can create dust when you cut, sand, drill or grind materials such as wood, paint, metal, concrete, cement,
Items # and #
 D I S P E N S E R T E C H N I C A L M A N U A L Items #91160-00 and #91161-00 1. System Description... 1 2. Equipment Included with the Green Earth II XL System... 2 3. Components Included with Green Earth
MODEL EGA130 OWNERS MANUAL
 3/4 IMPACT WRENCH MODEL EGA130 OWNERS MANUAL www.eaglecompressor.com 1-800-551-2406 READ THE ENTIRE MANUAL BEFORE PUTTING THIS TOOL IN SERVICE Limited Air Tool Warranty Wood Industries, Inc. warrants air
LARRY HESS AND ASSOCIATES, INC. 185 PIPER LANE SALISBURY, NC USA FAX
 WARNING DO NOT USE SAND. SAND WILL CAUSE SILICA DUST, WHICH IS THE CAUSE OF SILICOSIS DISEASE, A CONDITION OF MASSIVE FIBROSIS OF THE LUNGS. THIS STATEMENT INDICATES POTENTIAL PERSONNEL HAZARD. FAILURE
OWNER S MANUAL Model: TR-40-EX ( ) (40 Gallon Lawn & Garden Trailer Sprayer w/5-nozzle Boom Assembly)
 (40 Gallon Lawn & Garden Trailer Sprayer w/5-nozzle Boom Assembly)") OWNER S MANUAL Model: TR-40-EX (5301338) (40 Gallon Lawn & Garden Trailer Sprayer w/5-nozzle Boom Assembly) Technical Specifications 40 Gal. Corrosion-Resistant Polyethylene Tank 12 Volt Diaphragm Pump,
OWNER S MANUAL Model: TR-40-EX (5301338) (40 Gallon Lawn & Garden Trailer Sprayer w/5-nozzle Boom Assembly) Technical Specifications 40 Gal. Corrosion-Resistant Polyethylene Tank 12 Volt Diaphragm Pump,
Empire Finish & Reclaim Cabinets. Cabinet Models Options EFR-2636 SRC. Parts Cabinet Assembly Reclaimer Dust Bag Dust Collector Pipe String Blast Gun
 EFR Empire Finish & Reclaim Cabinets Section C: Table of Contents Cabinet Models Options EFR- SRB EFR- SRC Parts Cabinet Assembly Reclaimer Dust Bag Dust Collector Pipe String Blast Gun Options Details
OWNER S MANUAL. Model: FSUTV-45-12V ( ) (45 Gallon Lawn & Garden UTV Sprayer, Boom Ready) Technical Specifications. Assembly Instructions
 (45 Gallon Lawn & Garden UTV Sprayer, Boom Ready) Technical Specifications. Assembly Instructions") OWNER S MANUAL Model: FSUTV-45-12V (5302903) (45 Gallon Lawn & Garden UTV Sprayer, Boom Ready) Technical Specifications 45 Gal. Corrosion-Resistant Polyethylene Tank Deluxe Pistol-Grip Handgun 25 Ft. Handgun
OWNER S MANUAL Model: FSUTV-45-12V (5302903) (45 Gallon Lawn & Garden UTV Sprayer, Boom Ready) Technical Specifications 45 Gal. Corrosion-Resistant Polyethylene Tank Deluxe Pistol-Grip Handgun 25 Ft. Handgun
1. CONDITIONS FOR USE 2. SAFETY
 1. CONDITIONS FOR USE This micro abrasive blaster may only be operated: Indoors; Below 6500 ft above sea level altitude; Ambient air temperature between 40-105 F (5-40 C); Maximum relative humidity of
INSTALLATION/OPERATION/MAINTENANCE INSTRUCTIONS FOR ARCHON MODELS WD2010L, WD2010, WD2010H WASHDOWN STATIONS. ARCHON Industries, Inc.
 ARCHON Industries, Inc. Washdown Stations Models WD2010L, WD2010, WD2010H Installation / Operation / Maintenance Instructions 1 This manual has been prepared as an aid and guide for personnel involved
Model T Professional Series 1/2HP 2 YEAR WARRANTY SHALLOW WELL JET PUMP
 Model T03121 SHALLOW WELL JET PUMP Professional Series 2 YEAR WARRANTY 1/2HP 916 GPH Head of 25 (7,5 m) US GPH LPH Suction: 1 1/4 NPT Discharge: 1 NPT Maximum Pressure: 65 PSI Stainless steel shaft and
Heavy Duty Sprayer Owners Manual Model MS-O
 Heavy Duty Sprayer Owners Manual Model MS-O Table of Contents Warranty 4 Warning 5 Assembly and Preparation 6 Operation 7 Cleaning and Storage 7 Standard Spray Gun & Parts List 8 Trigger Style Spray Gun
All-in-One... Wet or Dry
 TM All-in-One... Wet or Dry Moisture Injection Schmidt Technology The Most Versatile Blasting System for Surface Preparation Professionals What is an AmphiBlast multi-purpose blasting system? Schmidt announces
AIR COMPRESSOR OPERATING INSTRUCTION AND PARTS LIST
 AIR COMPRESSOR OPERATING INSTRUCTION AND PARTS LIST BELT TYPE IMPORTANT PLEASE MAKE CERTAIN THAT THE PERSON WHO IS TO USE THIS EQUIPMENT CAREFULLY READS AND UNDERSTANDS THESE INSTRUCTIONS BEFORE STARTING
basic quattro No /
 basic quattro No. 2954-0000 / 2954-1000 Bedienungsanleitung Instruction manual Mode d emploi Istruzioni d uso Instrucciones para el servicio Gebruiksaanwijzing Instrukcja obsługi Инструкция по эксплуатации
OWNER S MANUAL. Model: LG-30-TRL ( ) (30 Gallon Lawn & Garden Trailer Sprayer)
 (30 Gallon Lawn & Garden Trailer Sprayer)") OWNER S MANUAL Model: LG-30-TRL (5302317) (30 Gallon Lawn & Garden Trailer Sprayer) Technical Specifications 30 Gal. Corrosion-Resistant Polyethylene Tank 12 Volt Diaphragm Pump, 2.1 g.p.m. 60 psi 15 Ft.
OWNER S MANUAL Model: LG-30-TRL (5302317) (30 Gallon Lawn & Garden Trailer Sprayer) Technical Specifications 30 Gal. Corrosion-Resistant Polyethylene Tank 12 Volt Diaphragm Pump, 2.1 g.p.m. 60 psi 15 Ft.
MGFHVLP. Instructions/Parts. Mini Gravity Feed System E. Part No Includes MGFHVLP Mini Gravity Feed Spray Gun and MGC 125 Gravity Cup.
 Instructions/Parts MGFHVLP Mini Gravity Feed System FOR PRODUCT INFORMATION CALL: 1-800-742-7731 309989E For gravity feed spraying of automotive colors and clears. Ideal for touch-up and detail work. Important
D Instructions/Parts. Siphon Feed Detail Spray Gun D
 Instructions/Parts D-5-55 Siphon Feed Detail Spray Gun FOR PRODUCT INFORMATION CALL: 1-800-742-7731 309991D Important Safety Instructions Read all warnings and instructions in this manual. Save these instructions.
LBT-3 WITH 300 CFM RECLAIM MANUAL NUMBER: 506 TABLE OF CONTENTS
 LITTLE BLASTER LITTLE BLASTER LBT-3 WITH 300 CFM RECLAIM MANUAL NUMBER: 506 TABLE OF CONTENTS PAGE FIGURE 1 - SET-UP INSTRUCTIONS 1 - OPERATING INSTRUCTIONS 1 - GENERAL MAINTENANCE 2 1 STANDARD CABINET
TWO-STAGE HYDRAULIC PUMP. RWP55-IBT-Air
 ORIGINAL INSTRUCTIONS Form No.1000458 5 SPX Corporation 5885 11th Street Rockford, IL 61109-3699 USA Tech. Services: (800) 477-8326 Fax: (800) 765-8326 Order Entry: (800) 541-1418 Fax: (800) 288-7031 Internet
HEAVY DUTY ONBOARD AIR SYSTEM PART NO
 IMPORTANT: It is essential that you and any other operator of this product read and understand the contents of this manual before installing and using this product. SAVE THIS MANUAL FOR FUTURE REFERENCE
LARRY HESS AND ASSOCIATES, INC. 185 PIPER LANE SALISBURY, NC USA FAX: WARNING
 LARRY HESS AND ASSOCIATES, INC. 185 PIPER LANE SALISBURY, NC 28144 USA 800-535-2612 FAX: 704-638-9311 WARNING DO NOT USE SAND. SAND WILL CAUSE SILICA DUST, WHICH IS THE CAUSE OF SILICOSIS DISEASE, A CONDITION
HALLMARK INDUSTRIES INC
 Performance Part No. HP. CONVERTIBLE JET PUMP USER S MANUAL GPH of Water @ Total Discharge Pressure of 40 psi Max. Pressure Max suction (shallow well) Max Suction (deep well) Max GPM (@0 head) Max Discharge
AUTO REWIND AIR HOSE REEL
 Model #s 46845, 46848 AUTO REWIND AIR HOSE REEL OPERATOR S MANUAL STORE THIS MANUAL IN A SAFE PLACE FOR FUTURE REFERENCE!? NEED HELP? Save time, contact us first. 888-648-8665 support@tekton.com WARNING:
OWNER S MANUAL. Model: ATV ( ) ***IMPORTANT REMINDER*** Technical Specifications. Assembly Instructions. General Information
 ***IMPORTANT REMINDER*** Technical Specifications. Assembly Instructions. General Information") OWNER S MANUAL Technical Specifications 25 Gal. Corrosion-Resistant Polyethylene Tank 12 Volt Diaphragm Pump, 2.1 g.p.m. 60 psi 15 Ft. Handgun Hose (3/8 I.D.) 15 Ft. Vertical throw, 30 Ft. Horizontal Throw
OWNER S MANUAL Technical Specifications 25 Gal. Corrosion-Resistant Polyethylene Tank 12 Volt Diaphragm Pump, 2.1 g.p.m. 60 psi 15 Ft. Handgun Hose (3/8 I.D.) 15 Ft. Vertical throw, 30 Ft. Horizontal Throw
BLASTING SYSTEMS INSTRUCTIONS FOR & Part #13667
 BLASTING SYSTEMS INSTRUCTIONS FOR 13943 & 13944 Part #13667 EASTWOOD BLASTING SYSTEMS Abrasive blasting has always been an alternative to chemical stripping on most parts of an antique or specialty car.
Specialty Pond Sprayer
 Specialty Pond Sprayer 2.75 Gallon Capacity Sprayer Installation & Maintenance Manual (Item # 580121) 1 Year Warranty Specialty Pond Sprayer 2.75 Gallon Capacity Sprayer Thank you for purchasing this compression
SHOT BLAST CABINET MODEL No. CSB20B Part No OPERATING & MAINTENANCE INSTRUCTIONS
 SHOT BLAST CABINET MODEL No. CSB20B Part No. 7640110 1001 OPERATING & MAINTENANCE INSTRUCTIONS Item Description Part No. Item Description Part No. SPARE PARTS AND SERVICING Please contact your nearest
PRODUCT OPERATING MANUAL
 PRODUCT OPERATING MANUAL PANBLAST TM BP600 1 BLAST POT Manual Number: ZVP PC 0157 00 SECTION 1. GENERAL INFORMATION 2. INITIAL SETUP INSTRUCTIONS 3. OPERATING INSTRUCTIONS 4. MAINTENANCE 5. TROUBLE SHOOTING
READ INSTRUCTIONS THOROUGHLY BEFORE OPERATING TC-6 TC-15 TC Fax
 OPERATING MANUAL TC-6, TC-15A & TC16 FILTER CRUSHER TC-6 TC-15 TC-16 READ INSTRUCTIONS THOROUGHLY BEFORE OPERATING Oct. 18, 2012 800.223.4540 3451 S. 40th Street Phoenix, AZ 85040 602.437.5020 www.tssissg.com
Rev: Flow Max 115V AC Fluid Pump
 Flow Max 115V AC Fluid Pump by Duraself Installation and Owner s Manual (For Aftermarket Applications) Table of Contents Introduction... 2 Parts List... 2 Resources Required... 3 Installation... 3 General
AIR/HYDRAULIC INJECTION GUN MODEL INSTRUCTIONS
 I. OPERATION & DESCRIPTION The Air / Hydraulic Injection Gun is a high-pressure tool that should be used with caution and according to these instructions. IMPORTANT: The Gun is 0,000 psi rated. Do not
OWNER S MANUAL. Model: UTL-60-12V ( ) (60 Gallon Lawn & Garden Utility Sprayer w/5-nozzle Boom)
 (60 Gallon Lawn & Garden Utility Sprayer w/5-nozzle Boom)") OWNER S MANUAL Model: UTL-60-12V (5301347) (60 Gallon Lawn & Garden Utility Sprayer w/5-nozzle Boom) Technical Specifications 60 Gal. Corrosion-Resistant Polyethylene Tank Deluxe Pistol-Grip Handgun w/25
OWNER S MANUAL Model: UTL-60-12V (5301347) (60 Gallon Lawn & Garden Utility Sprayer w/5-nozzle Boom) Technical Specifications 60 Gal. Corrosion-Resistant Polyethylene Tank Deluxe Pistol-Grip Handgun w/25
OWNER S MANUAL Model: LG ( ) (25 Gallon Lawn & Garden Trailer Sprayer)
 (25 Gallon Lawn & Garden Trailer Sprayer)") OWNER S MANUAL Model: LG-2500-304 (5301440) (25 Gallon Lawn & Garden Trailer Sprayer) Technical Specifications 25 Gallon Corrosion-Resistant Polyethylene Tank 12 Volt Diaphragm Pump, 2.1 g.p.m. 60 psi
OWNER S MANUAL Model: LG-2500-304 (5301440) (25 Gallon Lawn & Garden Trailer Sprayer) Technical Specifications 25 Gallon Corrosion-Resistant Polyethylene Tank 12 Volt Diaphragm Pump, 2.1 g.p.m. 60 psi
SOLUTION STATION Instruction Manual
 SOLUTION STATION Instruction Manual WAXIE Sanitary Supply 9353 WAXIE Way San Diego, CA 92123 Phone: 800.995.4466 www.waxie.com TABLE OF CONTENTS Unpacking Instructions Disclaimer..... Warranty... Introduction...
Mudhen Portable Slurry System Owners Manual
 Mudhen Portable Slurry System Owners Manual Industrial Contractors Supplies, Inc. 412. 824. 6933 www.icscompany.net Mudhen Manual Page 1 MUDHEN MANUAL 1 Disclaimer & Safety Notice 2 2 Safety Notice 3 3
LG-60-3PT-WP-309-BL-TSC
 55 Model No: LG-0-PT-WP-0-BL-TSC 0 Gallon Point Lawn & Garden Sprayer W/Pump & Coupler & Boomless Boom Assembly / Operation Instructions / Parts ASSEMBLY Most of the sprayer has been assembled at the factory..
50 Gallon Skid Sprayer
 50 Gallon Skid Sprayer Model #: KS50P5 User Manual Read this manual for complete instructions Model #: KS50P5 Table of Contents Warranty... 3 General Safety Information... 3 Hazardous Substance Alert...
PENBERTHY FROST PROOF EXTENSION INSTALLATION, OPERATION AND MAINTENANCE INSTRUCTIONS
 Before installation these instructions must be read fully and understood PRODUCT WARRANTY Emerson warrants its Penberthy products as designed and manufactured to be free of defects in the material and
MicroCoat. System Operating Manual MC2000 Series. MC785, MC785-WF Spray Valves. US: UK: Mexico:
 MicroCoat System Operating Manual MC2 Series MC785, MC785-WF Spray Valves A NORDSON COMPANY US: 8-498-8865 UK: 8 585733 Mexico: 1-8-556-3484 Introduction The MicroCoat System provides precise lubrication
OWNER S MANUAL Model: LG ( ) (15 Gallon Lawn & Garden Trailer Sprayer)
 (15 Gallon Lawn & Garden Trailer Sprayer)") OWNER S MANUAL Model: LG-1500-304 (5301439) (15 Gallon Lawn & Garden Trailer Sprayer) Technical Specifications 15 Gallon Corrosion-Resistant Polyethylene Tank 12 Volt Diaphragm Pump, 2.1 g.p.m. 60 psi
OWNER S MANUAL Model: LG-1500-304 (5301439) (15 Gallon Lawn & Garden Trailer Sprayer) Technical Specifications 15 Gallon Corrosion-Resistant Polyethylene Tank 12 Volt Diaphragm Pump, 2.1 g.p.m. 60 psi
MOISTURE MANAGEMENT SYSTEMS
 MOISTURE MANAGEMENT SYSTEMS Blastmaster Air Dryers Moisture Management Systems remove water vapor from the compressed air stream. Water entering an abrasive blasting system causes wet abrasive, the leading
Pump Operating and Maintenance Manual - Models
 Pump Operating and Maintenance Manual - Models 78-00111 - 78-0057 Thank you for purchasing the SDI Diaphragm Pump manufactured by Comet Pump. Comet produces quality products which are safe, efficient and
40000 and PRESSURE BLASTER with Deadman Control System
 40000 and 40002 PRESSURE BLASTER with Deadman Control System OPERATION GUIDE Rev. 9/8/15 DIVISION OF S&H INDUSTRIES 5200 Richmond Road Cleveland, OH 44146 Phone 216-831-0550 Toll Free 800-253-9726 Fax
DEMA 258BD-200C and 258BT-200C DRAIN MASTER Jr. INSTALLATION INSTRUCTION SHEET
 I-736 Pg. 1 of 10 Summary The 258BD-200C Drain Master is designed to feed chemicals into drains and grease traps to break up grease, detergent buildup and eliminate odors. The 258BT-200C Trash Master is
Warning and Safety Precautions
 EXPRESS WARRANTY AND DISCLAIMER OF IMPLIED WARRANTIES Lily Corporation unconditionally guarantees its products to be free of defects in material or workmanship and further warrants that, for a period of
HEAVY DUTY ONBOARD AIR SYSTEM
 HEAVY DUTY ONBOARD AIR SYSTEM PART NO. 10005 IMPORTANT: It is essential that you and any other operator of this product read and understand the contents of this manual before installing and using this
PIPECOATER-III /125 /300 /900 INTERNAL PIPE PAINTING TOOL
 OWNER S MANUAL /125 /300 /900 INTERNAL PIPE PAINTING TOOL IMPORTANT WARNING FOR SAFER BLAST CLEANING 1. Use protective equipment: Abrasive-resistant clothing, safety shoes, leather gloves, ear protection,
MODEL NUMBER: MEDIUM DUTY ONBOARD AIR SYSTEM
 MODEL NUMBER: 10003 MEDIUM DUTY ONBOARD AIR SYSTEM IMPORTANT: It is essential that you and any other operator of this product read and understand the contents of this manual before installing and using
ACHL Series Pump. Operation and Maintenance Manual Air Driven, Hand Operated High Pressure Liquid Pump
 ACHL Series Pump Operation and Maintenance Manual Air Driven, Hand Operated High Pressure Liquid Pump Catalog: 02-9245ME February 2013 Model # Serial # Drawing # Order # Mfg. Date Table of Contents page
INSTALLATION INSTRUCTIONS MODELS S S SHALLOW WELL & CONVERTIBLE JET PUMPS PAGE 3 PAGE 8
 INSTALLATION INSTRUCTIONS WWW.BURCAM.COM 2190 Blvd. Dagenais West LAVAL (QUEBEC) CANADA H7L 5X9 MODELS 503132S 503332 503232S 503732 TEL : 514.337.4415 FAX : 514.337.4029 info@burcam.com Your pump has
1600 PSI ELECTRIC PRESSURE WASHER
 MODEL NO.: XE03 SKU: 39-8508-6 1600 PSI ELECTRIC PRESSURE WASHER Owner s Manual QUESTIONS, PROBLEMS, MISSING PARTS? Before returning to your retailer, visit our web site or call our customer service at
MEDIUM DUTY ONBOARD AIR SYSTEM
 MEDIUM DUTY ONBOARD AIR SYSTEM PART NO. 10003 IMPORTANT: It is essential that you and any other operator of this product read and understand the contents of this manual before installing and using this
Safety, Operation and Maintenance Instructions For Long & Short Nose Upholstery Air Stapler (NS10 & NS11)
") Safety, Operation and Maintenance Instructions For Long & Short Nose Upholstery Air Stapler (NS10 & NS11) Important: Drop 3 drops of oil into the stapler air inlet BEFORE first use. See page 2. Please
Safety, Operation and Maintenance Instructions For Long & Short Nose Upholstery Air Stapler (NS10 & NS11) Important: Drop 3 drops of oil into the stapler air inlet BEFORE first use. See page 2. Please
SIPHON FEED SANDBLASTER
 SIPHON FEED SANDBLASTER MODEL NO: CSB10 PART NO: 7640117 OPERATION & MAINTENANCE INSTRUCTIONS LS0513 INTRODUCTION Thank you for purchasing this Clarke siphon feed sandblaster. Before you try to use this
MK Rittenhouse & Sons Ltd. 115 Litre/30 US Gallon Greenhouse Sprayer Manual
 MK Rittenhouse & Sons Ltd. 115 Litre/30 US Gallon Greenhouse Sprayer Manual TABLE OF CONTENTS Introduction 3 Precautions & Maintenance 4-5 Piston pump Care & Maintenance 5-6 Shut Down & Winterizing 6 Troubleshooting
OWNER S MANUAL. Model: FS-ATV-15 ( ) (15 Gallon Lawn & Garden/ATV Sprayer) Technical Specifications. Assembly Instructions. General Information
 (15 Gallon Lawn & Garden/ATV Sprayer) Technical Specifications. Assembly Instructions. General Information") OWNER S MANUAL Model: FS-ATV-15 (5301169) (15 Gallon Lawn & Garden/ATV Sprayer) Technical Specifications 15 Gal. Corrosion-Resistant Polyethylene Tank 12 Volt Diaphragm Pump, 1.8 g.p.m. 60 psi Spot Sprayer
OWNER S MANUAL Model: FS-ATV-15 (5301169) (15 Gallon Lawn & Garden/ATV Sprayer) Technical Specifications 15 Gal. Corrosion-Resistant Polyethylene Tank 12 Volt Diaphragm Pump, 1.8 g.p.m. 60 psi Spot Sprayer
Installation Notes for Ingersoll Rand KVG-123 Compressor Package (Up to 255 Gallon Sump Capacity) Ingersoll Rand KVG-123 Compressor Package
 Ingersoll Rand KVG-123 Compressor Package") Installation Notes for Ingersoll Rand KVG-23 Compressor Package Part # 9-00305MTS-DL9 Kit # 0-70006MTS-DL9 Puradyn Part # 5-70025-2 9-00305MTS- DL9 Ingersoll Rand KVG-23 Compressor Package Description
Installation Notes for Ingersoll Rand KVG-23 Compressor Package Part # 9-00305MTS-DL9 Kit # 0-70006MTS-DL9 Puradyn Part # 5-70025-2 9-00305MTS- DL9 Ingersoll Rand KVG-23 Compressor Package Description