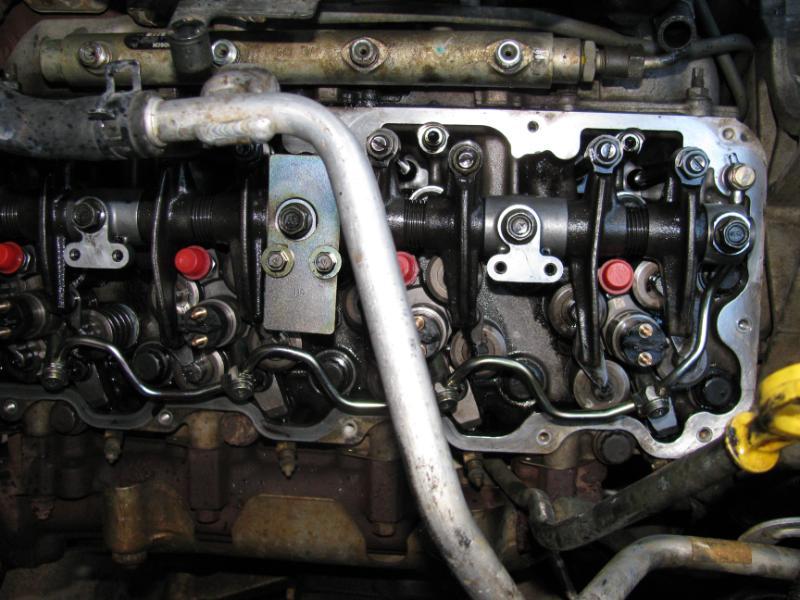
All the injectors have a bracket holding them in place, un screw them, they are pretty tight so make sure not to strip them with a 8mm allen bit.
|
|
|
- Andrew Wesley Williams
- 5 years ago
- Views:
Transcription


1 All the injectors have a bracket holding them in place, un screw them, they are pretty tight so make sure not to strip them with a 8mm allen bit.

2 To pop them out once the injector is loose give them a little twist first to make sure aren't stuck to the cup and then use a small pry bar to pop them out from the top using the bottom of the high pressure supply line on the injector as a pry point and the head bolt as your fulcrum. They should pop right out pretty easily. make sure to remove the copper washer from the bottom of the cup if it doesn't come out with the injector. be sure not to lose the steel button that rests under the bracket that holds down the injector, it usually stays in place, but make sure it doesn't go anywhere.


3 If the injector comes out with the cup, the coolant from the head will drain into the cylinder if you didnt drain the coolant first.


4 You can see the gunk built up on the injector that caused it to stick to the cup.


5 The Injector bore with out the cup in there
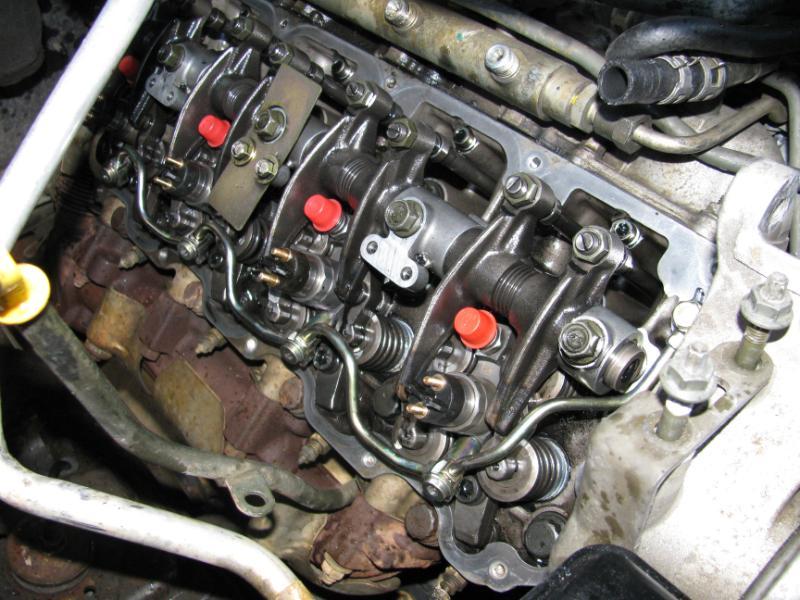
6 Make sure you get all the coolant out the cylinder by bumping the engine over a few times, itl make a huge mess but you gotta get it out somehow. To reinstall the cup clean up the locktite on the bottom of the cup and clean the insides real good and replace the o rings if you can. then prep the cup by using putting red locktite on the bottom of the cup where it begins to taper because that's where it seals with the head. and lube up the o rings with some vasoline or oil. Also clean the mating surface in the head where the cup contacts, need to get it very clean. Be very careful when re installing it and make sure it goes in straight, you can put your finger in the cup and slide it into the bore ad make sure its lined up and completely straight. slide the cup in until the first o ring goes in and check to see if the cup is still going straight down the bore and push it in a little more. GM says to use a brass drift to drive the cup into the bore the rest of the way, you can use a 24mm socket put onto an extension backwards. The extension barely fits in between the valves and since its backwards on the socket it gives it a large flat even surface to drive the cup in. drive it in until its flush with the bore. before putting the injectors back in you need to put on two new o rings in the picture im pointing where the o rings should be


7 Re install a new copper washer at the bottom of the injector cup.

8 and install the injector with the clamp and torque it down to 37 ft lbs

9 Re install the return lines with new seals. Tighten the banjo bolts to 12 Nm or 106 lbin. Tighten the 12mm banjo bolt that goes into the head to 11 lb ft
10

11 Install the lower valve cover and tighen bolts in sequence to 10Nm 89 lbin twice Install the injector harness and tighten the bracket bolts to 9 Nm or 80 lbin 7mm connectors to 2Nm or 18 lbin


12 Put a bead of sealant to the bottom of the upper valve cover about 2-3mm wide and 1mm high and install the upper valve cover.

13 Tighten bolts to 8 Nm or 71 lbin in this sequence Install injector lines and keepers

14 Now put the the FF and FICM back on and ur ready to do the driver side Thanks to mytmousemalibu (chris) for for giving me tips and hints on replacing the injectors
Prerequisites: Shop Manual (recommended) pages 3-9 through 3-13.
 pages 3-9 through 3-13.") Prerequisites: Order your gaskets average about $25.00 bucks X 2 so $50.00 4NK-11193-00-00 Obtain a shim kit (Should have several 265 and 270s) (Some dealers will exchange) Obtain a Valve Bucket Tool YM-33961
Prerequisites: Order your gaskets average about $25.00 bucks X 2 so $50.00 4NK-11193-00-00 Obtain a shim kit (Should have several 265 and 270s) (Some dealers will exchange) Obtain a Valve Bucket Tool YM-33961
ZZPerformance.com. Dual Pass Kit install AKA Option A upgrade
 ZZPerformance.com ZZ-DUALPIC rev A Dual Pass Kit install AKA Option A upgrade Tools you will need: Flat head screw driver Trim removal tool (H.E. install only, not required) 10mm socket 6mm socket 5/8
Sikky Oil Pan Install Guide
 Sikky Oil Pan Install Guide **If you have a double chain timing belt or after market oil pump setup then further modifications may need to be made in order for the pan to fit.** Remove starter Remove plastic
Installation Notes: #86000-R Race Series +3.5 L/T Kit
 159 North Maple St. Unit J, CORONA CA 92880 P. 951-737-9682 F. 951-737-9006 WWW.CHAOSFAB.COM Installation Notes: #86000-R Race Series +3.5 L/T Kit Factory manual is recommended for removal and re-installation
Replace front brake pads and discs * (Ford Galaxy )
") Replace front brake pads and discs * (Ford Galaxy 2006-2015) *Caution! This instructions are created by random users and must be used as a reference only! Please, take all safety precautions, and if you're
Replace front brake pads and discs * (Ford Galaxy 2006-2015) *Caution! This instructions are created by random users and must be used as a reference only! Please, take all safety precautions, and if you're
This is a hobby website dedicated to the Kawasaki KLR650 motorcycle. I make no claim concerning the
 KLR650 Homepage Contact Me You must remove the "REMOVE-THIS" in my email address for it to work. This is a hobby website dedicated to the Kawasaki KLR650 motorcycle. I make no claim concerning the accuracy
Step 6: Remove and save the MAP sensor for later use. Step 7: Remove the passenger side intercooler pipe and the EGR intake manifold.
 LBZ Twin kit Install Step 1: Disconnect both batteries. Step 2: Drain coolant and oil also remove passenger side inner fender. Step 3: Remove intake box and piping. (Remove and save the MAF sensor in the
OVERHAUL 1. REMOVE CYLINDER BLOCK WATER DRAIN COCK SUB ASSY
 1416 OVERHAUL 1. REMOVE CYLINDER BLOCK WATER DRAIN COCK SUBASSY 140RL01. INSPECT CONNECTING ROD THRUST CLEARANCE (a) Using a dial indicator, measure the thrust clearance while moving the connecting rod
Slave Cylinder Weep Hole Drilling Procedure
 Slave Cylinder Weep Hole Drilling Procedure Tools Required: T20 Torx Driver T25 Torx Driver T25 Torx Bit with ¼ Ratchet Wrench 4mm Hex Key (Allen wrench) 5mm Hex Key 6mm Hex Key 8mm Hex Key 12mm Hex Key
 Special Tools Needed: DrVanos.com Stage I Installation Instructions Camshaft locking tool TDC Crank pin Sprocket turning tool Tool rental is available with the purchase of a vanos kit *See website for
BEW engine timing belt replacement procedure from MOGolf (as demonstrated on a 2004 Jetta).
.") BEW engine timing belt replacement procedure from MOGolf (as demonstrated on a 2004 Jetta). Based on the procedure published by Volkswagen, but modified for the "average" shadetree mechanic. Some special
BEW engine timing belt replacement procedure from MOGolf (as demonstrated on a 2004 Jetta). Based on the procedure published by Volkswagen, but modified for the "average" shadetree mechanic. Some special
Ford Racing BOSS 302 Engine Oil Cooler (11-14 GT)
") Tools needed: 14mm hex socket 7mm socket/wrench 8mm socket/wrench Ford Racing BOSS 302 Engine Oil Cooler (11-14 GT) 10mm socket (for airbox removal) ¾ inch or 19mm wrench Torque wrench Appropriate ratchets
Tools needed: 14mm hex socket 7mm socket/wrench 8mm socket/wrench Ford Racing BOSS 302 Engine Oil Cooler (11-14 GT) 10mm socket (for airbox removal) ¾ inch or 19mm wrench Torque wrench Appropriate ratchets
iphone 5s Upper Component Cable Replacement
 iphone 5s Upper Component Cable Replacement Use this guide to replace the upper component cable containing the flash, microphone and sleep/power button cable. Written By: Sam Lionheart ifixit CC BY-NC-SA
DrVanos.com Stage II Installation Instructions. Tool rental is available with the purchase of a vanos kit *See website for more info*
 DrVanos.com Stage II Installation Instructions Special Tools Needed: Camshaft locking tool TDC Crank pin Sprocket turning tool Tool rental is available with the purchase of a vanos kit *See website for
G.A.S. M54 DISA Repair Kit D.I.Y. Instructions
 Home BMW Solutions Porsche Solutions DIY Tech Engine Services Dyno Services Machining About G.A.S. Contact G.A.S. M54 DISA Repair Kit D.I.Y. Instructions The installation of the German Auto Solutions DISA
BMW 528i E39 Sunroof Repair
 These instructions will help guide you through the repair process for broken sunroof control rails on an E39 chassis. Before I get started, I want to give a shout-out to a couple people who also posted
2.4.2 Removal of the Injector Tube and O-ring
 SERIES 60 SERVICE MANUAL 2.4.2 Removal of the Injector Tube and O-ring When removing an injector tube, use J 33880-4, part of J 33880 and J 5286-5. 1. Remove, disassemble, and clean the cylinder head.
Ford 6.0L Powerstoke Regulated Fuel Return
 Ford 6.0L Powerstoke Regulated Fuel Return ! WARNING REGARDING EMISSIONS LAWS Not legal for sale or use on pollution-controlled motor vehicles anywhere in the United States. Legal ONLY for off-road competition
Installation Instructions
 Installation Instructions 2.0T FSI Intake Manifold: Featuring better flow, higher boost capacity, 40% larger plenum volume, and integrated flapper delete; this product will take your 2.0L VW TSI and FSI
Timing belt change. Timing belt change
 Timing belt change Put 2 new Gates T275 timing belts on today. Tensioner drilled smooth and tight with less than 16,000 miles on her decided not to change the tensioners just the belts. You'll need some
#TL T EA888 GEN 3 FUELING SYSTEM/ INSTALLATION INSTRUCTIONS
 #TL100069 2.0T EA888 GEN 3 FUELING SYSTEM/ INSTALLATION INSTRUCTIONS Notes: These instructions were written for a North American specification MkVII GTI. Other models, like the Golf R, are similar. When
Z8004. KDT916 S197 Performance Watts Linkage
 Z8004 KDT916 S197 Performance Watts Linkage Kit Includes: Differential Cover o Magnetic Plug o Standard Plug o Main Brace o Center Pivot o Swivel Foot Bolts 2 o Swivel Foot Retaining nuts 2 o M12x30 Bolt
Replacing MK4 Golf/Jetta radiator mounts in-car
 Replacing MK4 Golf/Jetta radiator mounts in-car This is a guide to replacing the radiator mounts in a MK4 Golf/Jetta. This involves moving the core support to the service position which allows you to do
Installation Instructions for BMR Lowering Springs Performance ( Mustang GT)
") Installation Instructions for BMR Lowering Springs Performance (2015-2017 Mustang GT) Time Required: 3+ hours Notes: This install was done with the performance springs from BMR, but install should be the
Installation Instructions for BMR Lowering Springs Performance (2015-2017 Mustang GT) Time Required: 3+ hours Notes: This install was done with the performance springs from BMR, but install should be the
2001 Ford Windstar ENGINES 3.8L V6 - VIN 4 - Windstar
 COWL TOP VENT PANEL 1. Remove windshield wiper pivot arms. Remove cowl top vent panel retaining screws. Release cowl top vent panel retaining clips. Remove windshield wiper fluid hose. Remove cowl top
Thompson Automotive Products
 Installation instructions for Quick-Change Oil Filter relocator for NB (1999+) Miatas (MX-5) Before beginning, get your car up where you have access to the undercarriage (Rhino Ramps work well). Tools
Copper Sleeve, Unit Injector, Replacement
 Volvo Trucks North America Greensboro, NC USA This service bulletin replaces SB 237-46, Copper Sleeve, Unit Injector, Replacement dated 6.2007, publication no. PV776-20177417. DService Bulletin Trucks
Fuel Injector Replacement (Right Bank) EN Injector Bore and Sleeve Cleaning Kit J Fuel Injector Removal Tool
 EN Injector Bore and Sleeve Cleaning Kit J Fuel Injector Removal Tool") Page 1 of 7 Home Account Contact ALLDATA Log Out Help DAN GRIMWOOD DAN GRIMWOOD00002 Select Vehicle New TSBs Technician's Reference Component Search: OK 2002 Chevy Truck C 2500 Truck 2WD V8-6.6L DSL Turbo
Page 1 of 7 Home Account Contact ALLDATA Log Out Help DAN GRIMWOOD DAN GRIMWOOD00002 Select Vehicle New TSBs Technician's Reference Component Search: OK 2002 Chevy Truck C 2500 Truck 2WD V8-6.6L DSL Turbo
We recommend installing the TRS Racebars first as we have done
 Thanks for purchasing the 2 Front Lowering Kit for the Honda Grom (MSX125). This is a basic installation guide, and we tried to cover everything, but use your best judgment along the process. It is recommended
REMOVAL & INSTALLATION
 REMOVAL & INSTALLATION NOTE: For reassembly reference, label all electrical connectors, vacuum hoses and fuel lines before removal. Also place mating marks on engine hood and other major assemblies before
Vacuum and air hose replacement -- replacing all the old, crusty air and vacuum hoses under and around
 Vacuum and air hose replacement -- replacing all the old, crusty air and vacuum hoses under and around the intake manifold. Requires removing the intake manifold. While you've got the intake manifold off,
Kelsey-Hayes Brake Pressure Differential Valve Rebuild
 Home Kelsey-Hayes Brake Pressure Differential Valve Rebuild Sun, 05/30/2010-12:22pm SAH This document describes how to rebuild the D0OZ-2B257-C Kelsey-Hayes brake pressure differential valve by replacing
Detroit Tuned R56 Oil Service How-To
 Detroit Tuned R56 Oil Service How-To Welcome to Detroit Tuned s how-to guide for an oil service for an R56 MINI Cooper. It s always best to do an oil change on a hot engine as the hot oil will drain better
8/14/2016 8:12 PM. Bolt: Part No for Type B
 1 of 21 2 of 21 REMOVAL 1. DISCONNECT PS RESERVOIR AND REMOVE RESERVOIR BRACKET 2. DISCONNECT WIRE HARNESS BRACKET FOR DLC1 3. REMOVE GENERATOR 4. REMOVE GENERATOR BRACKET 5. w/ ABS: REMOVE NO.3 ABS ACTUATOR
Installing the Wireless Charging upgrade kit in a 2018 XT5 (Platinum version)
") Installing the Wireless Charging upgrade kit in a 2018 XT5 (Platinum version) September 2, 2018 Tools needed: Wireless charger upgrade kit Plastic trim tools 7 mm nut driver Background: I purchased the
Installing the Wireless Charging upgrade kit in a 2018 XT5 (Platinum version) September 2, 2018 Tools needed: Wireless charger upgrade kit Plastic trim tools 7 mm nut driver Background: I purchased the
Disassembly and Assembly
 K EN R 623 2-00 August 2006 Disassembly and Assembly 2506-15 Industrial Engine M G A (Engine) MGB (Engine) M G D (Engine) Important Safety Information Most accidents that involve product operation, maintenance
OEM Cruise Control Installation in GMC/Chevy NBS trucks
 OEM Cruise Control Installation in 99-02 GMC/Chevy NBS trucks May 2008 ~ Rampage_Rick Having just installed factory cruise control in my 00 Sierra, I thought I d share the fun. I followed the steps outlined
Installation Manual TWM Performance Short Shifter Cobalt SS/SC, SS/TC, HHR SS, Ion Redline and Saab 9-3
 Page 1 Installation Manual TWM Performance Short Shifter Cobalt SS/SC, SS/TC, HHR SS, Ion Redline and Saab 9-3 Please Note: It is preferable to park on a flat surface, as you will have to engage and disengage
M52tu-M54 VANOS Assembly & Timing Using G.A.S. Professional Cam Tool Kit
 Home BMW Solutions Porsche Solutions DIY Tech Engine Services Dyno Services Machining About Contact Store Tool Rental M52tu-M54 VANOS Assembly & Timing Using G.A.S. Professional Cam Tool Kit This procedure
Return to Instruction Sheet index TCI Installation Instructions for Turbo Hydramatic 350C & 250C
 Page 1 of 6 Return to Instruction Sheet index TCI 326300 Installation Instructions for Turbo Hydramatic 350C & 250C NOTE: This kit was not intended for installation in transmissions that are in poor general
M1A1 Thompson Upgrade
 M1A1 Thompson Upgrade If you are mechanically inclined at all. This should be no problem. I'll start off with a list of things you will need. Thompson M1A1 Whisky Cigarettes Tools: Flat screwdriver No.
W C-230 Kompressor Sports Sedan 1.8l Thermostat Replacement & Antifreeze flush
 W203 2003 C-230 Kompressor Sports Sedan 1.8l Thermostat Replacement & Antifreeze flush First, I have to thank everyone who has contributed to the MBworld.org forums without you; I would not have gotten
This information covers procedures for replacing the sealant for the crankshaft cover on the Volvo D16F engine.
 Volvo Trucks North America Greensboro, NC USA DService Bulletin Trucks Date Group No. Page 1.2008 216 50 1(17) Sealant Crankshaft Cover, Replacement D16F Sealant Crankshaft Cover, Replacement W2005773
Re-building a Caliper
 Re-building a Caliper by Leslie Henson The pistons in the calipers on the 90 are in very poor condition, and although the brakes work ok, it plays on our mind that the pistons are badly corroded, and it
Changing the Struts on a WK Jeep CRD
 Changing the Struts on a WK Jeep CRD Step by Step By Chirpz Disclaimer: I do not claim that this procedure is the right way or even the best way to change your struts. This is what I did after reading
Written By: Andrew Optimus Goldberg
 Remove the logic board from your iphone 5 Written By: Andrew Optimus Goldberg ifixit CC BY-NC-SA www.ifixit.com Page 1 of 27 INTRODUCTION Resurrect your iphone 5 with a new logic board. TOOLS: P2 Pentalobe
CHAPTER 2: HEAD, BARREL, SUMP, BIGENDS, ALTERNATOR
 CHAPTER 2: HEAD, BARREL, SUMP, BIGENDS, ALTERNATOR Posted on the Wildguzzi forum by Pete Roper: December 10, 2005: Contents: Head, barrel and sump off, bigend bearings, alternator off Pic 2-01: Note that
Evo X Walbro 450 Pump System
 Evo X Walbro 450 Pump System Installation Guide Please contact us at sales@wtftuned.com with any additional questions Tools required: 8 mm socket and wrench, needle-nose pliers, razor, drill w/ 5/64 bit,
2. With the rear door open remove pull-style clip from the passenger side just below the door latch.
 LoD Offroad FJ Cruiser Rear Bumper with Tire Carrier Installation Instructions 1. Begin with removing factory spare from the rear door. 2. With the rear door open remove pull-style clip from the passenger
REPAIR INSTRUCTION - MP4120-SWS/MP4124-SWS
 Disassembly sequence REPAIR INSTRUCTION - MP4120-SWS/MP4124-SWS 1. With a 27mm wrench, remove the three discharge plugs (#48) and three inlet plugs (#42A) from the manifold (#43). 2. Inspect the plug o-rings
READ THIS BEFORE PROCEEDING
 READ THIS BEFORE PROCEEDING Congratulations for purchasing a quality cylinder head from Kiwi Cylinder Heads. Please read the following notes carefully to ensure the installation goes smoothly and the repair
Thermo-Bob Installation Manual: KLR650A ( )
") Thermo-Bob Installation Manual: KLR650A (1987-2007) Thank you for purchasing the Thermo-Bob radiator bypass system for the KLR650. Since the KLR already has a doohickey, it seemed that this thingamabob
Thermo-Bob Installation Manual: KLR650A (1987-2007) Thank you for purchasing the Thermo-Bob radiator bypass system for the KLR650. Since the KLR already has a doohickey, it seemed that this thingamabob
Cylinder head/gasket, replacing
 1(16) Cylinder head/gasket, replacing Special tools: 951 2666, 951 2767, 999 5450, 999 5452, 999 5454, 999 5670, 999 5718, 999 5719, 999 5750, 999 5972 Removing the cylinder head gasket Note! As the illustrations
JRSC + BBK Install on SVTF. Neil A. Shah medicnas on focaljet September 2006
 JRSC + BBK Install on SVTF Neil A. Shah medicnas on focaljet September 2006 ECU up here. When removing make sure the smaller bundles of wires don t get wrapped around the bottom edge and break - this almost
NOTE: Do not disassemble upper intake manifold from lower intake manifold unless replacement of one of the components is necessary.
 Fig. 2: Lower Intake Manifold Bolt Tightening Sequence INTAKE MANIFOLD (UPPER) NOTE: Do not disassemble upper intake manifold from lower intake manifold unless replacement of one of the components is necessary.
INSTALLATION INSTRUCTIONS AIR/OIL SEPARATOR KIT
 INSTALLATION INSTRUCTIONS AIR/OIL SEPARATOR KIT 2015+ SUBARU WRX (LHD ONLY) Document: 19-0136 Support: info@radiumauto.com This document covers the installation of the Radium brake master cylinder brace
Tailgate Light Bar Installation by Flopster Feb 2015
 Tailgate Light Bar Installation by Flopster843 23 Feb 2015 If you ever looked at the rear of a 3rd generation Dodge Ram dually pickup truck, you'll notice that there is a light bar with 3 red marker lights
Changing Gear Lube. BY MIKE ALLEN Photographs by James Westman Published in the July, 2006 issue. 1 of 5 29/08/2006 2:09 PM
 1 of 5 29/08/2006 2:09 PM SAVE THIS EMAIL THIS Close Changing Gear Lube Manual transmissions, transfer cases and axles need to have their lubricants changed occasionally if your vehicle sees hard use.
FRONT FENDERS WITH FACTORY INNER FENDERS JEEP WRANGLER TJ/LJ/YJ/CJ7 INSTALLATION INSTRUCTIONS
 FRONT FENDERS WITH FACTORY INNER FENDERS JEEP WRANGLER TJ/LJ/YJ/CJ7 INSTALLATION INSTRUCTIONS TOOLS NEEDED 13mm socket 5/32 Allen head 5/16 wrench or socket 7/16 wrench or socket 7/32 Allen head 5/8 wrench
DOWNLOAD ENHANCED INSTALL MANUALS
 U 3 October 2016 1041564 6.7L Performance Intake Plate Manual (I-00371) 1 DOWNLOAD ENHANCED INSTALL MANUALS Cummins 6.7L High Flow Intake Plenum Cover 1041564 2008-2016 6.7L RAM 2500-3500 Pickup PLEASE
EURO HEADLIGHT ADJUSTER REMOVAL AND INSTALLATION
 EURO HEADLIGHT ADJUSTER REMOVAL AND INSTALLATION This document is a step by step explanation of how to remove and replace the headlight adjusters in the Euro headlights. Parts needed to repair both headlights:
Oil change: Mark s 2015 Jetta. Changed oil and 10k service on 11 October 2015.
 Oil change: Mark s 2015 Jetta. Changed oil and 10k service on 11 October 2015. Mark had the car on the lift when I got there. The dog was friendly, but not much help. Oil level before the change at 9,997
Engine Front Cover. Special Tool(s) 3-Jaw Puller 303-D121 or equivalent. Installer, Front Cover Oil Seal (T88T-6701-A)
 3-Jaw Puller 303-D121 or equivalent. Installer, Front Cover Oil Seal (T88T-6701-A)") SECTION 303-01B: Engine 4.6L (3V) 2009 Mustang Workshop Manual IN-VEHICLE REPAIR Procedure revision date: 05/23/2008 Engine Front Cover Special Tool(s) 3-Jaw Puller 303-D121 or equivalent Installer, Front
SECTION 303-01B: Engine 4.6L (3V) 2009 Mustang Workshop Manual IN-VEHICLE REPAIR Procedure revision date: 05/23/2008 Engine Front Cover Special Tool(s) 3-Jaw Puller 303-D121 or equivalent Installer, Front
DODGE CUMMINS ARP HEAD STUDS. Installation Instructions
 Installation Manual ARP Head Studs P/N 247-4202 425 s P/N 247-4204 625 s 2003-2014 DODGE CUMMINS ARP HEAD STUDS Installation Instructions Dodge Cummins 5.9L & 6.7L 24V ARP 425 s 247-4202 Dodge Cummins
CHANGING THE ENGINE IN A GMC MOTORHOME. Preface to engine removal
 CHANGING THE ENGINE IN A GMC MOTORHOME 1 Preface to engine removal Taking the engine out by lifting and moving to the center door was, I believe, pioneered by Darrel Winterfeldt sometime in the late '80s
2004 Volvo C70 L5-2.4L Turbo VIN 63 B5244T7 Cylinder Head Assembly Service and Repair, Removal and Replacement: Cylinder Head/Gasket, Replacing
 1 of 25 8/18/2011 6:10 PM 2004 Volvo C70 L5-2.4L Turbo VIN 63 B5244T7 Cylinder Head Assembly Service and Repair, Removal and Replacement: Cylinder Head/Gasket, Replacing Cylinder head/gasket, replacement
 Page 1 of 14 This install requires work on your supplemental restraint system and could cause injury or damage to your car. If you are not comfortable performing the steps detailed here then do not attempt
Turner M50 Manifold Adapter Install. April 26, 2012
 April 26, 2012 Models: 1996-99 E36 328i/M3; 1997-98 E39 528i, 1997-98 Z3 2.8, 1998-2000 MZ3 S52 Product(s): Turner M50 Manifold Adapter Kit Subject: Installation Guidelines and Tips This guide will aid
2017+ L5P Duramax 3 ½ Down Pipe & EGR Fix Kit
 2017+ L5P Duramax 3 ½ Down Pipe & EGR Fix Kit Covers installation of PN s: WCF100630, WCF100829 Note: This Kit is for off road competition use only! Off Road Competition Use Tuning & Exhaust System is
PT 709 firing pin and extractor removal. Disclaimer: My Taurus manual says not to take this apart (just flush it with cleaner).
.") PT 709 firing pin and extractor removal. Disclaimer: My Taurus manual says not to take this apart (just flush it with cleaner). But several list members have done this without ill effect. So here goes:
PT 709 firing pin and extractor removal. Disclaimer: My Taurus manual says not to take this apart (just flush it with cleaner). But several list members have done this without ill effect. So here goes:
3 October 2016 PN# V Dodge Twin Turbo Kit (I-00274) ½ D o d g e 2 4 v I S B
 ½ D o d g e 2 4 v I S B") 3 October 2016 PN#1045320 24V Dodge Twin Turbo Kit (I-00274) 1 DOWNLOAD ENHANCED INSTALL MANUALS AT dieselperformance.com BD Twin Turbo Kit 1998½- 2 0 0 2 D o d g e 2 4 v I S B Part# 1045320 PLEASE READ
3 October 2016 PN#1045320 24V Dodge Twin Turbo Kit (I-00274) 1 DOWNLOAD ENHANCED INSTALL MANUALS AT dieselperformance.com BD Twin Turbo Kit 1998½- 2 0 0 2 D o d g e 2 4 v I S B Part# 1045320 PLEASE READ
INSTALLATION INSTRUCTIONS
 INSTALLATION INSTRUCTIONS COOLANT EXPANSION TANK FORD FOCUS Document: 19-0151 Support: info@radiumauto.com WARNINGS: DO NOT WORK ON THE COOLANT SYSTEM WHEN THE ENGINE IS AT OPERATING TEMPERATURE. WAIT
LML 3 Y-Bridge Kit or High Flow Intake Bundle Package
 2011-2016 LML 3 Y-Bridge Kit or High Flow Intake Bundle Package Covers installation of PN s: WCF100607, WCF100691, WCF100716, & WCF100353 Note: This Kit is for off road competition use only! Overview-
Common Rail Injector Removal and Install Instructions
 2003-2007 Common Rail Injector Removal and Install Instructions Tools Needed:] Vise T15 Torx 13mm Wrench 22mm wrench 15mm wrench 19mm Wrench 10mm socket 8mm socket 11mm socket 15mm socket 24mm socket Torque
OIL PUMP (G306709) DISCOVERY 3, ENGINE - TDV6 2.7L DIESEL SPECIAL TOOL(S) Crankshaft Front Seal Remover PUMP - OIL - RENEW
 DISCOVERY 3, ENGINE - TDV6 2.7L DIESEL SPECIAL TOOL(S) Crankshaft Front Seal Remover PUMP - OIL - RENEW") 2005.0 DISCOVERY 3, 303-01 ENGINE - TDV6 2.7L DIESEL OIL PUMP (G306709) IN-VEHICLE REPAIR 12.60.26 PUMP - OIL - RENEW 2700 CC 4.3 USED WITHINS SPECIAL TOOL(S) 303-1120 Crankshaft Front Seal Remover 303-1122
2005.0 DISCOVERY 3, 303-01 ENGINE - TDV6 2.7L DIESEL OIL PUMP (G306709) IN-VEHICLE REPAIR 12.60.26 PUMP - OIL - RENEW 2700 CC 4.3 USED WITHINS SPECIAL TOOL(S) 303-1120 Crankshaft Front Seal Remover 303-1122
Replace clutch and flywheel * (Volkswagen Sharan 2010-Present)
") Replace clutch and flywheel * (Volkswagen Sharan 2010-Present) *Caution! This instructions are created by random users and must be used as a reference only! Please, take all safety precautions, and if
Replace clutch and flywheel * (Volkswagen Sharan 2010-Present) *Caution! This instructions are created by random users and must be used as a reference only! Please, take all safety precautions, and if
2017 Current Ford Raptor HoneyBadger Rear Bumper Installation Instructions
 2017 Current Ford Raptor HoneyBadger Rear Bumper Installation Instructions PREPARATION 1. Disconnect the negative terminal on the battery. Park the vehicle on level ground and set the emergency brake.
IN-VEHICLE REPAIR. Engine Front Cover
 303-01B-1 IN-VEHICLE REPAIR Engine Front Cover Material Item Specification 303-01B-1 Special Tool(s) Motorcraft SAE 5W-20 WSS-M2C930-A Premium Synthetic Blend 3-Jaw Puller Motor Oil 303-D121 XO-5W20-QSP
JEEP TJ & (XJ 84-01) ATLAS 2 SP.
 ATLAS 2 SP.") KIT CONSISTS OF: No. Qty Part No. Description 4320 Aerotech Center Way, Page 1 of 9 1 1 302051-RLE BASE- TWIN STICK MOUNT 42RLE 2 1 302080 STUD BOLT 1/2"-13 X 7 (XJ) 3 1 303120 SERRATED LOCK NUT 1/2" X
KIT CONSISTS OF: No. Qty Part No. Description 4320 Aerotech Center Way, Page 1 of 9 1 1 302051-RLE BASE- TWIN STICK MOUNT 42RLE 2 1 302080 STUD BOLT 1/2"-13 X 7 (XJ) 3 1 303120 SERRATED LOCK NUT 1/2" X
Assembly Manual. 1/10th Formula 1 Car
 Assembly Manual 1/10th Formula 1 Car Center Pivot Bag 1 3374 - Center Pivot Socket 40194 - Hard Anodized Alum Pivot ball 3254-2-56 *Note - Sometimes it is helpful to slightly over-tighten the top clamp
This is an aluminum-case PowerGlide Transmission out of a 1966 Chevelle.
 Removal Procedures ***Take a picture of the transmission and note the lever positions (Transmission Arm Lever points up and Kickdown Lever point down)*** This is an aluminum-case PowerGlide Transmission
YOUR CAR's COOLANT MUST BE COLD TO DO THIS. DON'T BE STUPID AND SCALD YOURSELF.
 I just read through the service manual, checked out Billman's recommendations, and tackled the coolant change on my 2003 s2000. I'm not a mechanic by trade but have done valve adjustments, head gaskets,
Another CJ picture guide to replacing the key cylinder in a non-tilt steering column
 Another CJ picture guide to replacing the key cylinder in a non-tilt steering column by John Strenk Well I'm sure it's happened to all of us one time or another. You park your jeep and go to turn off your
Rear Wheel Removal (by BassCliff)
") Rear Wheel Removal (by BassCliff) Hello to my GS riding friends! After picking up a nail in my rear tire (while on the freeway at 75mph!) I thought I would take a few pictures to help illustrate the rear
Rear Wheel Removal (by BassCliff) Hello to my GS riding friends! After picking up a nail in my rear tire (while on the freeway at 75mph!) I thought I would take a few pictures to help illustrate the rear
INSTALLATION INSTRUCTIONS FUEL SURGE TANK KIT
 INSTALLATION INSTRUCTIONS FUEL SURGE TANK KIT BMW E46 3-Series, Excl Convertible Document: 19-0056 Support: info@radiumauto.com Relieve fuel pressure in vehicle before beginingthe installation. Disconnect
BMW 528i E39 Trunk Harness Repair
 My problems started when I got a false alarm about the trunk lid being open. It went away the next day, but then I noticed the trunk light was out. I checked the bulb and it was fine. After reading the
SAISBM V36W Installation Instructions
 The Original Secondary Air Injection System Bypass Kit SAISBM V36W Installation Instructions All Applicable Toyota/Lexus Vehicles Introduction: The Secondary Air Injection System (SAIS) bypass module is
Another CJ picture guide to
 Another CJ picture guide to replacing the key cylinder in a non-tilt steering column by John Strenk Well I'm sure it's happened to all of us one time or another. You park your jeep and go to turn off your
ITEM PART NO. DESCRIPTION QTY BODY - SNORKEL (SS1410HP) " AIR RAM ASSEMBLY BRACKET - UPPER MOUNTING 1
 AIR RAM ASSEMBLY BRACKET - UPPER MOUNTING 1") L; SS1410HP SAFARI ARMAX SNORKEL VOLKSWAGEN AMAROK V6 TDI550 3.0L TDI V6 Engine Parts List 10/04/2018 ITEM PART NO. DESCRIPTION QTY 1 910-133-600 BODY - SNORKEL (SS1410HP) 1 2 000-135-960 4" AIR RAM ASSEMBLY
L; SS1410HP SAFARI ARMAX SNORKEL VOLKSWAGEN AMAROK V6 TDI550 3.0L TDI V6 Engine Parts List 10/04/2018 ITEM PART NO. DESCRIPTION QTY 1 910-133-600 BODY - SNORKEL (SS1410HP) 1 2 000-135-960 4" AIR RAM ASSEMBLY
3.4L V6 SUPERCHARGER 7 TH INJECTOR KIT
 Part Number: 00602-17620-260 00602-17620-261 00602-17620-263 00602-17620-264 00602-17620-274 00602-17620-275 00602-17620-276 Section I Installation Preparation Kit Contents Item # Quantity Reqd. Description
Written By: Hybrid Racing
 Hybrid Racing K20Z3/K24 Coolant Port Adapter Review this guide for instructions on how to install the Hybrid Racing upper coolant port for the K20Z3/K24 engine. This guide features the kit being installed
Mustang Steeda Tri-Ax Shifter Installation Guide
 Mustang Steeda Tri-Ax Shifter Installation Guide The below installation instructions work for the following products: Mustang Short-Throw Shifters and Mustang Handles This "all questions answered" guide
Industrial Injections Compound Turbo Installation For 6.7L Scorpion
 Industrial Injections Compound Turbo Installation For 6.7L Scorpion Step 1: Whenever you are doing an installation the first thing you should do is unhook the batteries to avoid arcing. You will need an
Installation Guide for Rough Country 30 in. Chrome Series LED Light Bar w/ Hood Mounting Brackets
 Installation Guide for Rough Country 30 in. Chrome Series LED Light Bar w/ Hood Mounting Brackets Installation Time: 1 Hour Tools Required Trim removal tool (plastic or wood to prevent scratches on the
2008 Toyota Tundra 4WD Brake Job: A Quick Job and Even Quicker Write-Up.
 FRONT BRAKES: 2008 Toyota Tundra 4WD Brake Job: A Quick Job and Even Quicker Write-Up. 1. Remove this bolt holding brake line bracket to the suspension. 2. I had to replace all 4 rotors at 60K miles, so
IAG Competition Series Air / Oil Separator (AOS) For 2017 STI
 For 2017 STI") P IAG Competition Series Air / Oil Separator (AOS) For 2017 STI Part# IAG-ENG-7251 Tools Required: Ratchet, torque wrench, extensions, needle nose pliers, hose cutter, snips/scissors, flat head screw driver,
P IAG Competition Series Air / Oil Separator (AOS) For 2017 STI Part# IAG-ENG-7251 Tools Required: Ratchet, torque wrench, extensions, needle nose pliers, hose cutter, snips/scissors, flat head screw driver,
Speedometer Repair & Lube Pt.1
 Speedometer Repair & Lube Pt.1 1. Begin disassembly on a clean area approximately 2' by 3' so you have plenty of room to layout parts as you disassemble them. I use a piece of white or light colored paper
Ford Racing Performance Improvement Intake Manifold (96-04 GT) Time Necessary: Approximately 4 hours
 Time Necessary: Approximately 4 hours") Ford Racing Performance Improvement Intake Manifold (96-04 GT) Time Necessary: Approximately 4 hours Tools Required: Ratchet and socket set Torque wrench Large adjustable wrench Needle nose pliers A dozen
Ford Racing Performance Improvement Intake Manifold (96-04 GT) Time Necessary: Approximately 4 hours Tools Required: Ratchet and socket set Torque wrench Large adjustable wrench Needle nose pliers A dozen
There was some debate whether or not there was a write up, with Pictures, for replacing the ignition switch.
 Replacing the Ignition Switch - Step by Step with Pictures. http://forums.audiworld.com/showthread.php?p=18927576 (Corey 02ALMSTT) (With updates/corrections by Dave F.) February 1, 2013 (I = Corey, mostly)
 Page 1 of 15 Transmission, Model S5-42 ZF Model S5-42 ZF Disassembly NOTE: For 4x4 and F-Super Duty vehicles, skip to Step 5. 1. Attach the transmission to the Bench Mounted Holding Fixture T57L-500-B