Zoom and Print Options
|
|
|
- Adrian Barrett
- 5 years ago
- Views:
Transcription
1 Vehicle» Engine, Cooling and Exhaust» Engine» Timing Components» Timing Chain» Service and Repair» Procedures» Timing Chain and Sprockets Replacement Timing Chain and Sprockets Replacement Tools Required ^ J44221 Camshaft Holding Tool ^ J45059 Angle Meter Removal Procedure 1. Remove #1 cylinder spark plug. 2. Remove the camshaft cover. 3. Remove the exhaust camshaft position (CMP) sensor. 4. Remove the intake CMP sensor. 5. Remove the engine front cover. 1/13
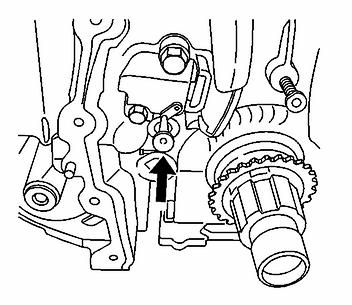
2 6. Rotate the crankshaft in the engine rotational direction clockwise, until the #1 piston is at top dead center (TDC) on the compression stroke. The word Delphi on the exhaust camshaft position actuator will be parallel with the cylinder head to cam cover mating surface. 2/13

3 Caution: Refer to Camshaft Holding Tool Caution in Service Precautions. 7. Install the J44221 to the rear of the camshafts. 3/13

4 8. Release the tension on the timing chain by moving the tensioner shoe in. 9. Place the tee into the tensioner to hold the shoe in place. 4/13

5 10. Remove and discard the exhaust camshaft position actuator bolt. 11. Remove the exhaust camshaft position actuator. 5/13

6 12. Remove and discard the intake camshaft sprocket bolt. 13. Remove the intake camshaft sprocket. 14. Remove the timing chain. 15. Remove the crankshaft sprocket. 16. Clean and inspect the timing chain and sprockets. Refer to Timing Chain and Sprockets Cleaning and Inspection. Installation Procedure 6/13
7 Important: Ensure the #1 piston is at TDC. The pin on the crankshaft for the timing chain sprocket should be straight up. 1. Install the crankshaft sprocket to the crankshaft snout. Important: Every 7th link of the timing chain is darkened to aid in aligning the timing marks. 2. Install the intake camshaft sprocket into the timing chain. Aligning the dark link (1) of the timing chain with the timing mark on the intake camshaft sprocket. 3. Feed the timing chain down through the opening in the cylinder head. 4. Install the timing chain on the crankshaft sprocket. Aligning the dark link (2) of the timing chain with the timing mark on to the crankshaft sprocket. Important: Ensure the alignment pin is properly engaged with the camshaft 5. Install the intake camshaft sprocket onto the intake camshaft. 7/13

8 Notice: Refer to Fastener Notice in Service Precautions. 6. Install a NEW intake camshaft sprocket bolt. Tighten the bolt a first pass to 20 Nm (15 ft. lbs.). Using the J45059 rotate the bolt a final pass an additional 100 degrees. 7. Ensure the camshaft actuator is fully advanced prior to installation. 8/13

9 8. Install the exhaust camshaft actuator into the timing chain. Aligning the dark link (1) of the timing chain with the timing mark (1) on the exhaust camshaft position actuator sprocket. Notice: The camshaft actuator must be fully advanced during installation. Engine damage may occur if the camshaft actuator is not fully advanced. Important: ^ To aid in aligning the actuator to the camshaft, use a 25 mm (1 inch) wrench on the hex of the camshaft to rotate ^ Ensure the alignment pin is properly engaged with the camshaft Install the exhaust camshaft actuator onto the exhaust camshaft. 9/13
10 10. Install a NEW exhaust camshaft actuator bolt. Tighten the bolt a first pass to 25 Nm (18 ft. lbs.). Using the J45059 rotate the bolt a final pass an additional 135 degrees. 10/13
11 11. Remove the tee in the timing chain tensioner in order to regain tension on the timing chain. 11/13
12 12. Remove the J44221 from the camshafts. 12/13
13 13. The dark links (1) on the timing chain should be aligned with the marks on the sprockets as shown. 14. Install the engine front cover. 15. Install the intake CMP sensor. 16. Install the exhaust CMP sensor. 17. Install the camshaft cover. 18. Install #1 cylinder spark plug. 13/13
CAMSHAFT TIMING CHAIN, SPROCKET, AND TENSIONER REPLACEMENT
 Page 1 of 45 CAMSHAFT TIMING CHAIN, SPROCKET, AND TENSIONER REPLACEMENT Special Tools J 45027 Tensioner Tool J 45059 Angle Meter Page 2 of 45 Removal Procedure Page 3 of 45 Page 4 of 45 Page 5 of 45 Fig.
The following tools will be required to perform this new service procedure outlined in this bulletin:
 The following new service information outlined in this bulletin will aid technicians in removal and installation of the cylinder head without the removal of the front engine cover. The new service procedure
Camshaft Timing Chain, Sprocket, And Tensioner Replacement
 2007 Pontiac Solstice - Engine Mechanical > Engine Mechanical - 2.0L > Repair Instructi... Page 1 of 29 2007 Pontiac Solstice : Engine Mechanical > Engine Mechanical - 2.0L > Repair Instructions - On Vehicle
CAMSHAFT TIMING CHAIN, SPROCK... CAMSHAFT TIMING CHAIN, SPROCKET, AND TENSIONER REPLACEMENT (LE5 OR LE9) (ENGINE MECHANICAL - 2.2L OR 2.
 (ENGINE MECHANICAL - 2.2L OR 2.") CAMSHAFT TIMING CHAIN, SPROCK... CAMSHAFT TIMING CHAIN, SPROCKET, AND TENSIONER REPLACEMENT (LE5 OR LE9) (ENGINE MECHANICAL - 2.2L OR 2.4L) Document ID# 2133175 Camshaft Timing Chain, Sprocket, and Tensioner
CAMSHAFT TIMING CHAIN, SPROCK... CAMSHAFT TIMING CHAIN, SPROCKET, AND TENSIONER REPLACEMENT (LE5 OR LE9) (ENGINE MECHANICAL - 2.2L OR 2.4L) Document ID# 2133175 Camshaft Timing Chain, Sprocket, and Tensioner
2004 Chevy Truck Silverado WD V6-4.3L VIN X
 1 of 14 10/17/2013 8:32 PM 2004 Chevy Truck Silverado 1500 2WD V6-4.3L VIN X Vehicle» Powertrain Management» Ignition System» Distributor» Service and Repair» Distributor Replacement DISTRIBUTOR REPLACEMENT
GM 6-Cylinder Cam Tool Set 3.0L and 3.2L Operating Instructions
 GM 6-Cylinder Cam Tool Set 3.0L and 3.2L Operating Instructions Set Includes: Locking Tool... 536594 Locking Tool... 536595 Crankshaft Holding Tool... 536596 Alignment Gauge... 536608 Belt Installation
Removal Procedure. Remove the timing chain tensioner. 1 of 32 12/17/ :42 AM
 1 of 32 12/17/2011 11:42 AM Removal Procedure 1. 2. 3. 4. 5. 6. Remove the camshaft cover. Raise and support the vehicle. Remove the No. 1 cylinder spark plug. Rotate the crankshaft in the engine rotational
Engine Cylinder Head Installation
 Engine Cylinder Head Installation Important: Install the cylinder head without the camshafts. 1. Install the engine cylinder head to the engine block. 2. Install the AIR pump bolt and fir tree fastener
ENGINE MECHANICAL > VALVE CLEARANCE INSPECTION > 2.5L >
 Print 2003 Subaru Forester 2.5L Eng X ENGINE CONTROLS - ON-VEHICLE ADJUSTMENTS ENGINE MECHANICAL > VALVE CLEARANCE INSPECTION > 2.5L > 1. Set the vehicle onto the lift. 2. Lift-up the vehicle. 3. Remove
2005 Chrysler 300 C ENGINE Mechanical - 3.5L - Service Information & Magnum
 1. Install camshaft sprockets onto the camshafts. Install NEW sprocket attaching bolts into place. The 255 mm (10 in.) bolt is to be installed in the left camshaft and the 213 mm (8 3/8 in.) bolt is to
Use Installation Procedure 1 when the crankshaft has NOT been rotated from the original position.
 2001 Blazer 4WD Applies to: 4.3L Report a problem with this article Removal Procedure Notice: There are two procedures available to install the distributor. Use Installation Procedure 1 when the crankshaft
RECOMMENDET INSTALLATION PROCEDURE Timing Belt Tensioner for Aftermarket OPEL 2.0L SOHC, Fam. 2 (Revision date: 04/27/1999)
") 1. Allow the engine and tensioner to stabilize to the same relative ambient temperature before installing a tensioner for proper belt tension adjustment. Do not attempt to install a cool tensioner onto
1. Allow the engine and tensioner to stabilize to the same relative ambient temperature before installing a tensioner for proper belt tension adjustment. Do not attempt to install a cool tensioner onto
Timing Belt: Service and Repair Timing Belt Replacement
 2003 Saturn Truck VUE V6-3.0L VIN B Copyright 2007, ALLDATA 9.50 Page 1 Timing Belt: Service and Repair Timing Belt Replacement Removal Procedure 1. Remove the front timing belt cover. 2. Rotate the crankshaft
IN-VEHICLE REPAIR. Timing Drive Components Camshaft Drive Cassette, LH. Special Tool(s) Holding Tool, Camshaft Sprocket (T97T-6256)
 Holding Tool, Camshaft Sprocket (T97T-6256)") 303-01A-1 IN-VEHICLE REPAIR Timing Drive Components Camshaft Drive Cassette, LH 303-01A-1 Special Tool(s) Holding Tool, Camshaft Sprocket 303-564 (T97T-6256) Adapter for 303-564 303-578 (T97T-6256-A) Holding
303-01A-1 IN-VEHICLE REPAIR Timing Drive Components Camshaft Drive Cassette, LH 303-01A-1 Special Tool(s) Holding Tool, Camshaft Sprocket 303-564 (T97T-6256) Adapter for 303-564 303-578 (T97T-6256-A) Holding
Distributor: Service and Repair Distributor Replacement REMOVAL PROCEDURE
 2001 Chevy Truck S10/T10 Blazer 2WD V6-4.3L VIN W Copyright 2007, ALLDATA 9.50 Page 1 Distributor: Service and Repair Distributor Replacement REMOVAL PROCEDURE NOTE: There are two procedures available
ENGINE REMOVAL Install: Exhaust pipe 1 5. Tighten: Nuts (exhaust pipe) 2. Exhaust pipe nut 20 Nm (2.0 m kgf, 14 ft lbf) 6.
 2. Exhaust pipe nut 20 Nm (2.0 m kgf, 14 ft lbf) 6.") ENGINE REMOVAL 4. Install: Gasket New Exhaust pipe 1 5. Tighten: Nuts (exhaust pipe) 2 Exhaust pipe nut 20 Nm (2.0 m kgf, 14 ft lbf) 6. Install: Clamp Slide the clamp onto the end of the muffler and insert
ENGINE REMOVAL 4. Install: Gasket New Exhaust pipe 1 5. Tighten: Nuts (exhaust pipe) 2 Exhaust pipe nut 20 Nm (2.0 m kgf, 14 ft lbf) 6. Install: Clamp Slide the clamp onto the end of the muffler and insert
3. Using the ST, align the Top mark on crank sprocket to nine o clock position as shown in the figure
 2008 Tribeca (3.6L) MECHANICAL(H6DO) > Timing Chain Assembly Report a problem with this article INSTALLATION Be careful that the foreign matter is not into or onto assembled component during installation.
6.0 Liter Timing Chain, Crankshaft Sprocket, Camshaft Position Actuator, and Solenoid Valve Replacement
 Special Tools EN 46330 Timing Belt Tensioner Retaining Pin J 8433 Two Jaw Puller J 41478 Crankshaft Front Oil Seal Installer J 41558 Crankshaft Sprocket Remover J 41665 Crankshaft Balancer and Sprocket
GM V8 Cam Tools Set Operating Instructions
 GM V8 Cam Tools Set Operating Instructions Part No. Cam Tool 527048 Cam Chain Tension Holder 527050 Crankshaft Rotation Tool 527057 Camshaft Holding Tool (qty. 2) 527058 Secondary Drive Sprocket Fixture
Timing Drive Components Camshaft Timing
 SECTION 303-01B: Engine 4.0L SOHC 1998 Explorer/Mountaineer Workshop Manual IN-VEHICLE REPAIR Procedure revision date: 10/17/2002 Timing Drive Components Camshaft Timing Special Tool(s) Timing Chain Tensioner
2002 Explorer Sport/Sport Trac Workshop Manual
 Page 1 of 17 SECTION 303-01: Engine 4.0L Single Overhead Camshaft (SOHC) IN-VEHICLE REPAIR Procedure revision date: 07/13/2005 Cylinder Head Special Tool(s) Spark Plug Wire Remover 303-106 (T74P-6666-A)
2002 Escape Workshop Manual
 SECTION 303-01B: Engine 3.0L (4V) IN-VEHICLE REPAIR Procedure revision date: 10/09/2003 Timing Drive Components Removal CAUTION: Failure to verify correct timing drive component alignment will result in
2005 Hyundai Tucson LX. On some models, engine is equipped with a timing belt and timing chain. Inspect timing chain when replacing timing belt.
 TIMING BELT NOTE: On some models, engine is equipped with a timing belt and timing chain. Inspect timing chain when replacing timing belt. Removal 1. Remove the engine cover. See Fig. 1. 2. Remove right
1. Remove the timing belt upper front cover. Refer to Timing Belt Upper Front Cover Removal.
 2013 Sonic Applies to: 1.8L (LUW, LWE) Report a problem with this article Special Tools EN-652 Flywheel Holder EN-6333 Locking Pin EN-6340 Locking Tool EN-6628-A Locking Tool EN-45059 Torque Angle Sensor
1991 Nissan 240SX. 2.4L 4-CYL - VINS [F,M,S] 1991 ENGINES Nissan 2.4L 4-Cylinder
![1991 Nissan 240SX. 2.4L 4-CYL - VINS [F,M,S] 1991 ENGINES Nissan 2.4L 4-Cylinder](/thumbs/95/123571962.jpg "1991 Nissan 240SX. 2.4L 4-CYL - VINS [F,M,S] 1991 ENGINES Nissan 2.4L 4-Cylinder") NOTE: Use illustration for component reference. See Fig. 7. 1. Remove spark plug wires. Set No. 1 piston at TDC on its compression stroke. Remove vacuum hoses, electrical harnesses, connectors, and harness
NOTE: Use illustration for component reference. See Fig. 7. 1. Remove spark plug wires. Set No. 1 piston at TDC on its compression stroke. Remove vacuum hoses, electrical harnesses, connectors, and harness
Timing Chain: Service and Repair With 2 Piece Tensioner (TSB A) Precaution. Removal This article has been updated with bulletin No A.
 Precaution. Removal This article has been updated with bulletin No A.") 1997 Chevrolet Cavalier L4-144 2.4L DOHC VIN T SFI Page 1 Timing Chain: Service and Repair With 2 Piece Tensioner (TSB 67-61-22A) Precaution Bulletin No.: 67-61-22A Date: July, 1998 TIMING CHAIN TENSIONER
1997 Chevrolet Cavalier L4-144 2.4L DOHC VIN T SFI Page 1 Timing Chain: Service and Repair With 2 Piece Tensioner (TSB 67-61-22A) Precaution Bulletin No.: 67-61-22A Date: July, 1998 TIMING CHAIN TENSIONER
- 1/7 - Copyright Litens Automotive Group All rights reserved.
 Caution: The procedure to access the timing belt tensioner and all other timing driven components must be done according to the car manufacturer s guidelines. Engine temperature: 1. The tensioner must
2001 Escort Workshop Manual
 Page 1 of 6 SECTION 303-01B: Engine 2.0L Zetec 2001 Escort Workshop Manual IN-VEHICLE REPAIR Procedure revision date: 10/26/2004 Timing Drive Components Timing Belt Special Tool(s) Crankshaft TDC Timing
TIMING BELT TENSIONER FOR AFTERMARKET RENAULT G8T 2.2L DIESEL ENGINE (Revision date: 06/24/1999)
") 1. Allow the engine and tensioner to stabilize to the same relative ambient temperature before installing a tensioner for proper belt tension adjustment. Do not attempt to install a cool tensioner onto
1. Allow the engine and tensioner to stabilize to the same relative ambient temperature before installing a tensioner for proper belt tension adjustment. Do not attempt to install a cool tensioner onto
Distributor Replacement
 Page 1 of 11 2002 Chevrolet Chevy K Silverado - 4WD Sierra, Silverado (VIN C/K) Service Manual Document ID: 690165 Distributor Replacement Removal Procedure Notice: There are two procedures available to
CAUTION: Do not compress the ratchet assembly. This will damage the ratchet assembly.
 Installation Engines with ratcheting timing chain tensioners 1. CAUTION: Timing chain procedure must be followed exactly or damage to valves and pistons will result. CAUTION: Do not compress the ratchet
Recommended Installation Procedure Timing Belt Tensioner (979597) 2.0L DOHC, RENAULT F4R Turbo, F4R L DOHC, RENAULT F4P720 (05/18/2004)
 2.0L DOHC, RENAULT F4R Turbo, F4R L DOHC, RENAULT F4P720 (05/18/2004)") Caution: The procedure to access the timing belt tensioner and all other timing driven components must be done according to the car manufacturer s guidelines. Engine temperature: 1. The tensioner must
Caution: The procedure to access the timing belt tensioner and all other timing driven components must be done according to the car manufacturer s guidelines. Engine temperature: 1. The tensioner must
15.Timing Chain Assembly
 15. A: REMOVAL 1. TIMING CHAIN RH When replacing a single part, perform the work with the engine assembly installed to body. 1) Remove the chain cover. 2) Using
Timing Drive Components ( )
") Page 1 of 14 (12.65.13) Removal 1. Remove the engine front cover. For additional information, refer to For additional information, refer to. 2. Remove the spark plugs. 3. Remove the crankshaft position
Page 1 of 14 (12.65.13) Removal 1. Remove the engine front cover. For additional information, refer to For additional information, refer to. 2. Remove the spark plugs. 3. Remove the crankshaft position
Classification: Reference: Date: VE30DE CAM TIMING
 Classification: Reference: Date: EM93-002 NTB93-126 September 2, 1993 VE30DE CAM TIMING APPLIED VEHICLE(S): All equipped with VE30DE Engine SERVICE INFORMATION When servicing VE30DE engine cylinder heads,
9/24/2017 Camshaft Timing Chain Removal and Installation Engine Mechanical 2002 Audi A6/S6/Quattro/Allroad MotoLogic
 2002 A6/S6/Quattro/Allroad The information in this article comes from a service manual containing information that applies to the following engine code: BAS. Section Info: Report a problem with this article
Valve Timing, Adjust (Z 22 SE)
") Page 1 of 15 Valve Timing, Adjust (Z 22 SE) Remove 1. Open the bonnet. 2. Disconnect the battery. 3. Open the engine cover (1). 4. Detach the engine cover. 6 bolts (2) and (3) 5. Release the fuel pressure.
Page 1 of 15 Valve Timing, Adjust (Z 22 SE) Remove 1. Open the bonnet. 2. Disconnect the battery. 3. Open the engine cover (1). 4. Detach the engine cover. 6 bolts (2) and (3) 5. Release the fuel pressure.
ATech Timing Belt Tensioner (979756) PSA EW10A 2.0L Engine
 PSA EW10A 2.0L Engine") Caution: The procedure to access the timing belt tensioner and all other timing driven components must be done according to the car manufacturer s guidelines. Engine temperature: 1. The tensioner must
Caution: The procedure to access the timing belt tensioner and all other timing driven components must be done according to the car manufacturer s guidelines. Engine temperature: 1. The tensioner must
Service and Repair Note:
 Service and Repair Note: Ford does not provide camshaft gear timing marks, or information to perform timing belt service without the special tools shown in this procedure. Timing Drive Components - Timing
REMOVAL & INSTALLATION
 REMOVAL & INSTALLATION TIMING BELT Removal 1. Disconnect negative battery cable. Rotate engine clockwise and position cylinder No. 1 on TDC of compression stroke. Ensure "O" mark on crankshaft pulley aligns
2003 Cadillac CTS V6-3.2L VIN N
 1 of 16 5/11/2013 11:18 AM 2003 Cadillac CTS V6-3.2L VIN N Vehicle» Engine, Cooling and Exhaust» Engine» Timing Belt» Service and Repair» Timing Belt Replacement Timing Belt Replacement Tools Required
2002 Escape Workshop Manual
 SECTION 303-01A: Engine 2.0L Zetec 2002 Escape Workshop Manual IN-VEHICLE REPAIR Procedure revision date: 10/25/2004 Timing Belt Special Tool(s) Crankshaft TDC Timing Peg 303-574 (T97P-6000-A) Camshaft
Distributor Replacement (HVS)
") 1 of 8 3/3/2018, 3:02 PM 1998 Chevrolet K Pickup - 4WD Chevy Pickup, GMC Pickup, Suburban, Tahoe, Yukon VIN C/K Service Manual Engine Engine Electrical Repair Instructions Document ID: 207477 Distributor
1 of 8 3/3/2018, 3:02 PM 1998 Chevrolet K Pickup - 4WD Chevy Pickup, GMC Pickup, Suburban, Tahoe, Yukon VIN C/K Service Manual Engine Engine Electrical Repair Instructions Document ID: 207477 Distributor
Service and Repair. Material. Timing chain
 ALLDATA Online - 1999 Mercury Cougar V6-153 2.5L DOHC VIN L SFI - Service and... Page 1 of 16 Service and Repair Notes Material Timing chain 1. Remove and discard the camshaft seal. 2. Remove the engine
TIMING BELT AND SPROCKET(S) REMOVAL - TIMING BELT
 REMOVAL - TIMING BELT") TIMING BELT AND SPROCKET(S) REMOVAL - TIMING BELT 1. Disconnect negative battery cable. 2. Raise vehicle on hoist. Remove right front wheel. 3. Remove belt splash shield. 4. Remove accessory drive belts.
TIMING BELT AND SPROCKET(S) REMOVAL - TIMING BELT 1. Disconnect negative battery cable. 2. Raise vehicle on hoist. Remove right front wheel. 3. Remove belt splash shield. 4. Remove accessory drive belts.
Recommended Installation Procedure (11 DEC 09) ATech Timing Belt Tensioner (979847/901) VW 1.6/2.0L L4 EA189 CR Engine
 ATech Timing Belt Tensioner (979847/901) VW 1.6/2.0L L4 EA189 CR Engine") Initial Preparation: Caution: The procedure to access the timing belt tensioner and all other timing driven components must be done according to VW s guidelines. The mounting of the TBT is done on the
Initial Preparation: Caution: The procedure to access the timing belt tensioner and all other timing driven components must be done according to VW s guidelines. The mounting of the TBT is done on the
5. Keep rotating the water pump housing to release the belt tension and remove the belt once it becomes loose.
 Initial Preparation: Caution: The procedure to access the timing belt tensioner and all other timing driven components must be done according to manufacturer s guidelines. Cold Engine Cold tensioner: 1.
1 of 17 2/19/ :10 AM TIMING BELT
 1 of 17 2/19/2012 11:10 AM TIMING BELT 2 of 17 2/19/2012 11:10 AM INSTALLATION SPROCKET 1) Install right-hand belt cover No.2. 3 of 17 2/19/2012 11:10 AM 2) Install left-hand belt cover No.2. 3) Install
12/30/2018 Fuel/Ignition Ignition Distributor Removal and Installation Distributors 1997 Dodge RAM Pickup (5.2L V8) - BR MotoLogic
 - BR MotoLogic") 1997 RAM Pickup (5.2L V8) - BR DISTRIBUTORS REMOVAL Report a problem with this article CAUTION: Base ignition timing is not adjustable on any engine. Distributors do not have built in centrifugal or vacuum
1997 RAM Pickup (5.2L V8) - BR DISTRIBUTORS REMOVAL Report a problem with this article CAUTION: Base ignition timing is not adjustable on any engine. Distributors do not have built in centrifugal or vacuum
Recommended Installation Procedure (25 MAY 07) ATech Timing Belt Tensioner (979778) FIAT FIRE 8-valve 1.2/1.4L Engine
 ATech Timing Belt Tensioner (979778) FIAT FIRE 8-valve 1.2/1.4L Engine") Caution: The procedure to access the timing belt tensioner and all other timing driven components must be done according to the car manufacturer s guidelines. Engine temperature: 1. The tensioner must
Caution: The procedure to access the timing belt tensioner and all other timing driven components must be done according to the car manufacturer s guidelines. Engine temperature: 1. The tensioner must
TECHNICAL SERVICE BULLETIN
 TECHNICAL SERVICE BULLETIN SUBJECT: NO.: 09-15-93 Camshaft Timing Belt Replacement/Adjustment GROUP: Engine Service Procedure DATE: Sep.17, 1993 This Bulletin Is Supplied As Technical Information Only
2007 Ford Freestyle SEL
 Fig. 279: Exploded View Of Engine Heads, Intake & Exhaust Components Item Part Number Description 1 9D475 Exhaust gas recirculation (EGR) system module 2 9D477 EGR module tube 3 9F485 RH exhaust manifold
MANUFACTURER'S SUGGESTED SCHEDULED MAINTENANCE
 HONDA 2.2L & 2.3L 4-Cylinder - DOHC & SOHC - 1990-97 MANUFACTURER'S SUGGESTED SCHEDULED MAINTENANCE For 1990-94 vehicles, the manufacturer recommends camshaft and balance shaft belts be replaced at 90,000
ATech Timing Belt Tensioner (979572) VM MOTORI 2.5L Diesel, Common Rail Engine
 VM MOTORI 2.5L Diesel, Common Rail Engine") Caution: The procedure to access the timing belt tensioner and all other timing driven components must be done according to the car manufacturer s guidelines. Engine temperature: 1. The tensioner must
Caution: The procedure to access the timing belt tensioner and all other timing driven components must be done according to the car manufacturer s guidelines. Engine temperature: 1. The tensioner must
Fig. 195: Positioning Timing Chain On Exhaust Camshaft Courtesy of BMW OF NORTH AMERICA, INC.
 Fig. 195: Positioning Timing Chain On Exhaust Camshaft Install camshafts so that cam tips on inlet and exhaust valves on 1st cylinder face one another. Refer to 11 31 001 REPLACING CAMSHAFT (M52TU / M54
Recommended Installation Procedure ATech Timing Belt Tensioner DaimlerChrysler PL, PT, JR 2.0L 4-Cyl. Engine (10/27/2003)
") Initial Preparation: Caution: The procedure to access the timing belt tensioner and all other timing driven components must be done according to DAIMLERCHRYSLER PL s guidelines. The mounting of the TBT
Initial Preparation: Caution: The procedure to access the timing belt tensioner and all other timing driven components must be done according to DAIMLERCHRYSLER PL s guidelines. The mounting of the TBT
1 of 10 2/10/2017 5:20 PM
 1 of 10 2/10/2017 5:20 PM Crankshaft Pulley Removal NOTICE: Do not loosen or remove the crankshaft pulley bolt without first installing the special tools as instructed in this procedure. The crankshaft
Timing Belt: Service and Repair Timing Belt Replacement
 2000 Cadillac Catera V6-3.0L VIN R Copyright 2006, ALLDATA 8.80 Page 1 Timing Belt: Service and Repair Timing Belt Replacement TIMING BELT REPLACEMENT Removal Procedure ^ Tools Required - J 42069 Timing
2012 Kia Soul L4 2.0L
 2012 Kia Soul L4 2.0L Vehicle» Engine, Cooling and Exhaust» Engine» Timing Chain» Service and Repair» Repair Procedures» Part 1 Removal Engine removal is not required for this procedure. CAUTION: Use fender
REMOVAL & INSTALLATION
 REMOVAL & INSTALLATION TIMING BELT Removal 1. Disconnect negative battery cable. On Millenia, raise and support vehicle. Remove right front wheel. Remove lower engine covers. 2. On all models, remove accessory
TIMING BELT REPLACEMENT. Tools Required. J A (KM-421-A) Timing Belt Adjuster J Angle Meter KM-470-B Angular Torque Gage
 Timing Belt Adjuster J Angle Meter KM-470-B Angular Torque Gage") Page 1 of 20 TIMING BELT REPLACEMENT Tools Required J 42492-A (KM-421-A) Timing Belt Adjuster J 45059 Angle Meter KM-470-B Angular Torque Gage Removal Procedure Fig. 37: View Of Throttle Cable CAUTION:
Page 1 of 20 TIMING BELT REPLACEMENT Tools Required J 42492-A (KM-421-A) Timing Belt Adjuster J 45059 Angle Meter KM-470-B Angular Torque Gage Removal Procedure Fig. 37: View Of Throttle Cable CAUTION:
1998 Volkswagen Golf GL
 Removal (Thermo Tensioner Roller - 1997 & Up) CAUTION: To prevent valves from contacting piston, DO NOT rotate camshaft or crankshaft with timing belt removed. Valve damage may result. 1. Remove air cleaner
1992 Mitsubishi 3000GT VR-4
 TIMING BELT Removal (Diamante SOHC) 1. Remove left front and left side splash shields. Using engine hoist, lift engine just enough to remove weight from engine mounts. Remove drive belts. Remove A/C tensioner
2nd Timing Chain and Chain Tensioner Components S6RW0C
 8) Install cylinder head cover referring to Cylinder Head Cover Removal and Installation. 9) Install oil pan. Refer to Oil Pan and Oil Pump Strainer Removal and Installation in Section 1E for installation.
IN-VEHICLE REPAIR. Cylinder Head. Special Tool(s) Timing Tool, Crankshaft TDC (T97T-6303-A) or. Special Tool(s) equivalent
 Timing Tool, Crankshaft TDC (T97T-6303-A) or. Special Tool(s) equivalent") 303-01A-1 IN-VEHICLE REPAIR Cylinder Head Special Tool(s) Torque Wrench Extension 303-575 (T97T-6256-F) or equivalent Special Tool(s) 303-01A-1 Timing Tool, Crankshaft TDC 303-573 (T97T-6303-A) or equivalent
303-01A-1 IN-VEHICLE REPAIR Cylinder Head Special Tool(s) Torque Wrench Extension 303-575 (T97T-6256-F) or equivalent Special Tool(s) 303-01A-1 Timing Tool, Crankshaft TDC 303-573 (T97T-6303-A) or equivalent
IN-VEHICLE REPAIR. Camshaft RH. Removal. 2. Remove the RH valve cover. For additional information, refer to Valve Cover RH in this section.
 303-01B-1 IN-VEHICLE REPAIR Camshaft RH Special Tool(s) Compressor, Valve Spring 303-1039 Wedge, Timing Chain 303-1175 303-01B-1 2. Remove the RH valve cover. For additional information, refer to Valve
IN-VEHICLE REPAIR. Timing Drive Components. Removal. 3. Disconnect the eight ignition coil electrical connectors.
 303-01A-1 IN-VEHICLE REPAIR Timing Drive Components 303-01A-1 Special Tool(s) Compressor, Valve Spring 303-581 (T97T-6565-A) Holding Tool, Crankshaft 303-448 (T93P-6303-A) 3. Disconnect the eight ignition
MECHANICAL(H4DOTC DIESEL) > Cylinder Block INSTALLATION 1. After setting the cylinder block to ST, install the crankshaft bearing.
 > Cylinder Block INSTALLATION 1. After setting the cylinder block to ST, install the crankshaft bearing.") MECHANICAL(H4DOTC DIESEL) > Cylinder Block INSTALLATION 1. After setting the cylinder block to ST, install the crankshaft bearing. ST 499817100 ENGINE STAND Apply a coat of engine oil to the bearing and
MECHANICAL(H4DOTC DIESEL) > Cylinder Block INSTALLATION 1. After setting the cylinder block to ST, install the crankshaft bearing. ST 499817100 ENGINE STAND Apply a coat of engine oil to the bearing and
VALVE TIMING CHECK-TIMING BELT COVER INSTALLED
 TIMING BELT SERVICE VALVE TIMING CHECK-TIMING BELT COVER INSTALLED 1. Remove number one spark plug. 2. Using a dial indicator; set number one cylinder to TDC on the compression stroke. 3. Remove the access
Distributor Replacement (5.7L)
") Page 1 of 13 1999 Chevrolet Chevy K Pickup - 4WD Escalade, Pickup (Classic), Suburban, Tahoe, Yukon (VIN C/K) Service Manual Engine Engine Mechanical - 5.0L and 5.7L Repair Instructions Document ID: 371340
Page 1 of 13 1999 Chevrolet Chevy K Pickup - 4WD Escalade, Pickup (Classic), Suburban, Tahoe, Yukon (VIN C/K) Service Manual Engine Engine Mechanical - 5.0L and 5.7L Repair Instructions Document ID: 371340
2003 Saturn Vue. SATURN 3.0L V6 DOHC - L-Series After VIN & Vue
 TIMING BELT Removal 1. Disconnect negative battery cable. Remove air cleaner assembly. 2. Raise and support vehicle. Remove right front wheel. Remove lower front splash shield. 3. Lower vehicle. Loosen,
1. Disconnect negative battery cable. 2. Remove upper and lower front timing belt covers..
 BELT AND SPROCKETS-TIMING REMOVAL TIMING BELT Zoom 1. Disconnect negative battery cable. 2. Remove upper and lower front timing belt covers.. CAUTION: When aligning crankshaft and camshaft timing marks
Poor Idle Quality AJ16 Engine Valv. alve Timing Modification. Engine numbers listed below
 TECHNICAL BULLETIN Poor Idle Quality Normally Aspirated AJ16 Engine Valv alve Timing Modification MODEL 4.0L Normally Aspirated 1995 MY Engine numbers listed below DATE 8/95 12-57 ISSUE: To improve idle
Timing Chain Renew ( ) Remove. 2,0 DOHC-8V Engine. Special Tools Angle gauge A Universal flange-holding wrench
 Remove. 2,0 DOHC-8V Engine. Special Tools Angle gauge A Universal flange-holding wrench") Timing Chain Renew ( 34 0) Special Tools 5-030A Universal flange-holding wrench 540-540 Angle gauge 5030A -47 Remover for vibration damper 68-68 Crankshaft immobilising tool 47 Remove. Standard preparatory
Timing Chain Renew ( 34 0) Special Tools 5-030A Universal flange-holding wrench 540-540 Angle gauge 5030A -47 Remover for vibration damper 68-68 Crankshaft immobilising tool 47 Remove. Standard preparatory
& MX Loosen the righthand front wheel lug nuts, then raise and support the vehicle with jack stands.
 Vehicle: 1996 MAZDA 626: DX 2.0L L4 GAS-FI-N Content: Engine Service >> Timing Belt >> Timing Belt, Replace 1993-97 626 & MX-6 This engine is classified as an Interference engine. If the timing belt breaks
REMOVAL & INSTALLATION
 REMOVAL & INSTALLATION CAUTION: This application is an interference engine. Do not rotate camshaft or crankshaft when timing belt is removed, or engine damage may occur. TIMING BELT Removal 1. Disconnect
2001 Dodge Dakota ENGINES 4.7L V8
 FRONT COVER Removal & Installation 1. Disconnect negative battery cable. Remove drive belt. Remove A/C compressor mounting bolts, and position compressor aside. Drain cooling system. Remove radiator hoses.
Service and Repair. Removal. Remove the engine cover. Remove the drive belt. Select Vehicle New TSBs Technician's Reference
 1 of 7 4/5/2008 9:30 AM Home Account Contact ALLDATA Log Out Help Select Vehicle New TSBs Technician's Reference Component Search: METRO TOYOTA OK 2002 Kia Truck Sedona EX V6-3.5L Vehicle Level Engine,
Service and Repair SERVICE POINTS OF REMOVAL. Select Vehicle New TSBs Technician's Reference Mitsubishi 3000GT V6-2972cc 3.
 1 of 12 5/4/2008 10:31 PM Home Account Contact ALLDATA Log Out Help METRO TOYOTA Select Vehicle New TSBs Technician's Reference 1992 Mitsubishi 3000GT V6-2972cc 3.0L DOHC Vehicle Level Engine, Cooling
3/6/2017 Timing Chain Service and Repair, Removal and Replacement: Valve Timing, Installing and Adjusting
 Valve timing, adjusting Special tools and equipment - T10068 Camshaft bar - T10069 Counter support - VAG 1331 Torque wrench (5-50 Nm) - VAG 1332 Torque wrench (40-200 Nm) - AMV 174 004 01 Sealing compound
Timing Belt Removal. CAUTION: Inspect the water pump when replacing the timing belt (page 10-9). 4. Remove the P/S bracket.
. 4. Remove the P/S bracket.") Timing Belt Removal CAUTION: Inspect the water pump when replacing the timing belt (page 10-9). Turn the crankshaft so that No. 1 piston is at top dead center (page 6-64). Before removing the timing belt,
Timing Belt Removal CAUTION: Inspect the water pump when replacing the timing belt (page 10-9). Turn the crankshaft so that No. 1 piston is at top dead center (page 6-64). Before removing the timing belt,
2nd Timing Chain and Chain Tensioner Components S6RW0C
 8) Install cylinder head cover referring to Cylinder Head Cover Removal and Installation. 9) Install oil pan. Refer to Oil Pan and Oil Pump Strainer Removal and Installation in Section 1E for 10) Install
ASSEMBLY. Engine. Special Tool(s) Installer, Crankshaft Vibration Damper (T74P-6316-B) Special Tool(s)
 Installer, Crankshaft Vibration Damper (T74P-6316-B) Special Tool(s)") 303-01A-1 ASSEMBLY Engine Special Tool(s) Tensioner, Timing Chain 303-571 (T97T-6K254-A) Special Tool(s) 303-01A-1 Installer, Crankshaft Vibration Damper 303-102 (T74P-6316-B) Holding Tool, Camshaft Sprocket
303-01A-1 ASSEMBLY Engine Special Tool(s) Tensioner, Timing Chain 303-571 (T97T-6K254-A) Special Tool(s) 303-01A-1 Installer, Crankshaft Vibration Damper 303-102 (T74P-6316-B) Holding Tool, Camshaft Sprocket
REMOVAL & INSTALLATION
 REMOVAL & INSTALLATION CAUTION: This application is an interference engine. Do not rotate camshaft or crankshaft when timing belt is removed, or engine damage may occur. TIMING BELT Removal (Standard Tensioner
2012 Kia Soul L4 2.0L
 2012 Kia Soul L4 2.0L Vehicle» Engine, Cooling and Exhaust» Engine» Timing Chain» Service and Repair» Repair Procedures» Part 2 Installation 1. The TDC marks of the intake and exhaust CVVT sprockets are
2003 Nissan-Datsun Truck Frontier 4WD V6-3.3L (VG33E)
") 1 of 15 8/7/2016 2:34 PM 2003 Nissan-Datsun Truck Frontier 4WD V6-3.3L (VG33E) Vehicle» Engine, Cooling and Exhaust» Engine» Cylinder Head Assembly» Service and Repair» Removal and Installation 2 of 15
1 of 15 8/7/2016 2:34 PM 2003 Nissan-Datsun Truck Frontier 4WD V6-3.3L (VG33E) Vehicle» Engine, Cooling and Exhaust» Engine» Cylinder Head Assembly» Service and Repair» Removal and Installation 2 of 15
CAMSHAFT INSTALLATION INSTRUCTIONS FOR NISSAN KA24DE ENGINES W/DOUBLE ROW CHAIN (SEE LAST PAGE FOR USING JWT CAMS IN KA24DE W/SINGLE ROW CHAIN)
") 9/13 UPDATE CAMSHAFT INSTALLATION INSTRUCTIONS FOR NISSAN KA24DE ENGINES W/DOUBLE ROW CHAIN (SEE LAST PAGE FOR USING JWT CAMS IN KA24DE W/SINGLE ROW CHAIN) 1. It is highly recommended that an oil and filter
9/13 UPDATE CAMSHAFT INSTALLATION INSTRUCTIONS FOR NISSAN KA24DE ENGINES W/DOUBLE ROW CHAIN (SEE LAST PAGE FOR USING JWT CAMS IN KA24DE W/SINGLE ROW CHAIN) 1. It is highly recommended that an oil and filter
BULLETIN TESTING. Article from Honda Service News. DTC P0341: CMP Sensor A and CKP Sensor Incorrect Phase Detected. Troubleshooting Flowchart
 2005 Honda Truck CR-V 4WD L4-2.4L Vehicle > ALL Diagnostic Trouble Codes ( DTC ) > Testing and Inspection > P Code Charts > P0341 BULLETIN TESTING Article from Honda Service News DTC P0341: CMP Sensor
https://quickserve.cummins.com/qs2/pubsys2/xml/en/procedures/40/ tr.html
 Page 1 of 7 NOTE: The timing pin is used to accurately locate TDC for setting the overhead. The timing pin is typically located below the fuel pump. for front gear train engines, in the front gear housing
2010 Transit Connect Workshop Manual. 31. Remove the 3 bolts, thermostat housing and thermostat.
 31. Remove the 3 bolts, thermostat housing and thermostat. 32. Remove the 2 bolts, stud bolt and the A/C compressor. 33. Remove the bolt and the KS. 34. Remove the 8 bolts and the crankcase vent oil separator.
Recommended Installation Procedure ATech Timing Belt Tensioner and AUDI 2.0L 4V FSI & TFSI Engine (19 January 2015)
") The procedure to access the timing belt tensioner and all other timing driven components must be done according to the car manufacturer s guidelines. Engine temperature: 1. The tensioner must be installed
The procedure to access the timing belt tensioner and all other timing driven components must be done according to the car manufacturer s guidelines. Engine temperature: 1. The tensioner must be installed
TIMING BELT REPLACEMENT. Removal Procedure. Tools Required J Timing Belt Alignment Kit J Crank Hub Torx Socket
 1 of 15 3/19/2012 5:34 PM TIMING BELT REPLACEMENT Removal Procedure Tools Required J 42069 Timing Belt Alignment Kit J 42098 Crank Hub Torx Socket Notice: Failure to follow the described timing belt inspection
5-18 ENGINE TOP END. Cylinder Head Cover
 5-18 ENGINE TOP END Cylinder Head Cover Cylinder Head Cover Installation Replace the head cover gasket [A] with a new one. Apply silicone sealant [B] to the cylinder head as shown. Sealant - Kawasaki Bond
Recommended Installation Procedure (31 MARCH 2010) ATech Timing Belt Tensioner (979004) EA T 20 Valve Longitudinal Engine
 ATech Timing Belt Tensioner (979004) EA T 20 Valve Longitudinal Engine") Caution: The procedure to access the timing belt tensioner and all other timing driven components must be done according to the car manufacturer s guidelines. Engine temperature: 1. The tensioner must
Caution: The procedure to access the timing belt tensioner and all other timing driven components must be done according to the car manufacturer s guidelines. Engine temperature: 1. The tensioner must
CAUTION: When aligning timing marks, always rotate engine by turning the crankshaft. Failure to do so will result in valve and/or piston damage.
 REMOVAL Timing Chain 1. Disconnect negative battery cable. 2. Drain cooling system. 3. Remove upper intake manifold. 4. Remove cylinder head covers, crankshaft vibration damper, and timing chain cover.
2004 Nissan/Datsun Truck Quest Mini Van 3.5L SFI DOHC 6cyl Repair Guides Engin...
 Page 1 of 10 SAVE 20% ON ONLINE SHIP-TO-HOME ORDERS OF $100 OR MORE. Use Code: MOM20 See Details Nissan Quest 2001-02 and 2004-06 REMOVAL & INSTALLATION Timing Chain Cover Removal & Installation 3.5L Engine
GM 4-Cylinder Cam Tool Set Operating Instructions
 GM 4-Cylinder Cam Tool Set Operating Instructions Cam Tool Part No. Page Camshaft Gear Holder... 536174...2 Camshaft Gear Holder... 536176...2 Camshaft Holding Tool... 536172... 14 Camshaft Sprocket Holding
REMOVAL & INSTALLATION
 REMOVAL & INSTALLATION TIMING BELT Removal 1. Noting position for installation reference, disconnect secondary wires from spark plugs. Remove spark plugs. 2. Disconnect negative battery cable. Remove air
Zoom and Print Options
 Vehicle» Engine, Cooling and Exhaust» Engine» Cylinder Head Assembly» Rocker Arm Assembly» Service and Repair» Procedures» Cam, Valve Springs & Seals, Cam Roller Follower and Lifter Camshaft, Valve Springs,
VALVE CLEARANCE (K3-VE)
") ENGINE MECHANICAL VALVE CLEARANCE (K3-VE) 25 ENGINE MECHANICAL VALVE CLEARANCE (K3-VE) INSPECTION 1. DISCONNECT NEGATIVE BATTERY TERMINAL (See page RS-164.) 2. ROVE ENGINE UNDER COVER 3. DRAIN ENGINE COOLANT
ENGINE MECHANICAL VALVE CLEARANCE (K3-VE) 25 ENGINE MECHANICAL VALVE CLEARANCE (K3-VE) INSPECTION 1. DISCONNECT NEGATIVE BATTERY TERMINAL (See page RS-164.) 2. ROVE ENGINE UNDER COVER 3. DRAIN ENGINE COOLANT