Flap Encoder Installation manual
|
|
|
- Julia Hines
- 5 years ago
- Views:
Transcription


1 Flap Encoder Installation manual Version 1.3 LXNAV d.o.o. Kidričeva 24, 3000 Celje, Slovenia tel fax Page 1 of 16
2 1 Important Notices Limited Warranty 3 2 Packing Lists 4 3 Installations Installation in a Ventus 2a Installation in a Ventus 2cxm Installation in a Ventus 2cx Installation in a JS Installation in an Arcus Installation at Alexander Schleicher Installation in an ASG 29: Installation in an ASW Installation in a DG Installation in a Ventus Ct Connecting LXNAV FLAP ENCODER Flap encoder configuration Wiring Updating firmware of FLAP ENCODER Updating via RS485 from main unit 15 4 Revision history 16 Page 2 of 16
3 1 Important Notices The LXNAV FLAPENCODER system is designed for VFR use only as an aid to flap management. All information is presented for reference only. It is ultimately the pilot's responsibility to ensure that the aircraft is being flown in accordance with the manufacturer's aircraft flight manual. The flap encoder must be installed in accordance with applicable airworthiness standards according to the country of registration of the aircraft. Information in this document is subject to change without notice. LXNAV reserves the right to change or improve their products and to make changes in the content of this material without obligation to notify any person or organisation of such changes or improvements. A Yellow triangle is shown for parts of the manual which should be read carefully and are important for operating the LXNAV FLAP ENCODER system. Notes with a red triangle describe procedures that are critical and may result in loss of data or any other critical situation. A bulb icon is shown when a useful hint is provided to the reader. 1.1 Limited Warranty This LXNAV FLAP ENCODER product is warranted to be free from defects in materials or workmanship for two years from the date of purchase. Within this period, LXNAV will, at its sole option, repair or replace any components that fail in normal use. Such repairs or replacement will be made at no charge to the customer for parts and labour, the customer shall be responsible for any transportation cost. This warranty does not cover failures due to abuse, misuse, accident, or unauthorised alterations or repairs. THE WARRANTIES AND REMEDIES CONTAINED HEREIN ARE EXCLUSIVE AND IN LIEU OF ALL OTHER WARRANTIES EXPRESSED OR IMPLIED OR STATUTORY, INCLUDING ANY LIABILITY ARISING UNDER ANY WARRANTY OF MERCHANTABILITY OR FITNESS FOR A PARTICULAR PURPOSE, STATUTORY OR OTHERWISE. THIS WARRANTY GIVES YOU SPECIFIC LEGAL RIGHTS, WHICH MAY VARY FROM STATE TO STATE. IN NO EVENT SHALL LXNAV BE LIABLE FOR ANY INCIDENTAL, SPECIAL, INDIRECT OR CONSEQUENTIAL DAMAGES, WHETHER RESULTING FROM THE USE, MISUSE, OR INABILITY TO USE THIS PRODUCT OR FROM DEFECTS IN THE PRODUCT. Some states do not allow the exclusion of incidental or consequential damages, so the above limitations may not apply to you. LXNAV retains the exclusive right to repair or replace the unit or software, or to offer a full refund of the purchase price, at its sole discretion. SUCH REMEDY SHALL BE YOUR SOLE AND EXCLUSIVE REMEDY FOR ANY BREACH OF WARRANTY. To obtain warranty service, contact your local LXNAV dealer or contact LXNAV directly. January LXNAV. All rights reserved. Page 3 of 16
4 2 Packing Lists LXNAV FLAP ENCODER Page 4 of 16

5 3 Installations The flap encoder can be connected to LX90x, Lx80xx via the RS485 bus. It is physically mounted near the flap mechanism. The flap encoder is very sensitive and accurate, and can detect very small movements. 3.1 Installation in a Ventus 2a Page 5 of 16


6 3.2 Installation in a Ventus 2cxm Another installation in a Ventus Page 6 of 16

7 3.3 Installation in a Ventus 2cx Installation in a JS1 3.5 Installation in an Arcus Page 7 of 16


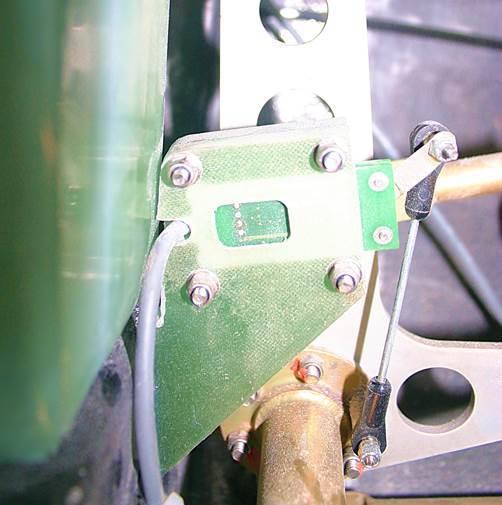
8 3.6 Installation at Alexander Schleicher 3.7 Installation in an ASG 29: Everything else is configured on main unit. Page 8 of 16
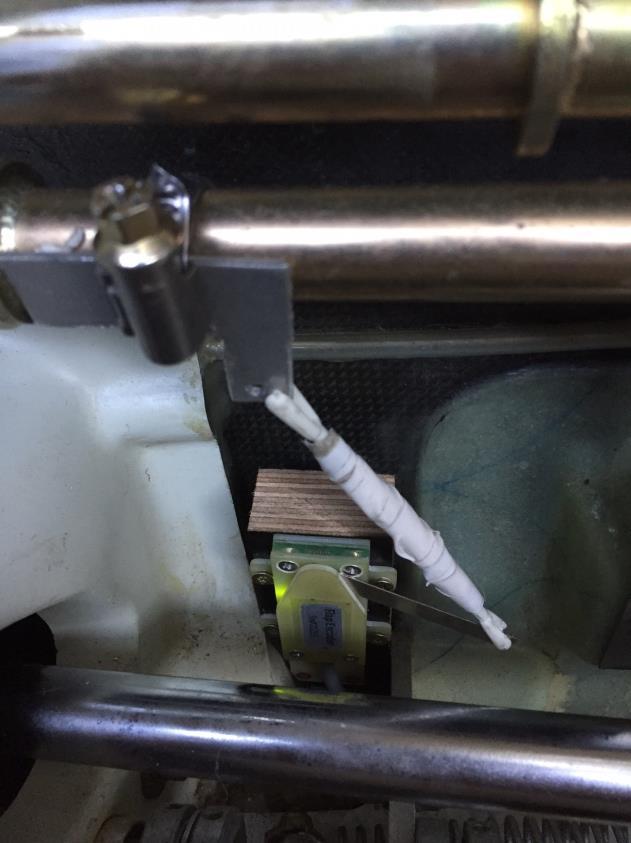
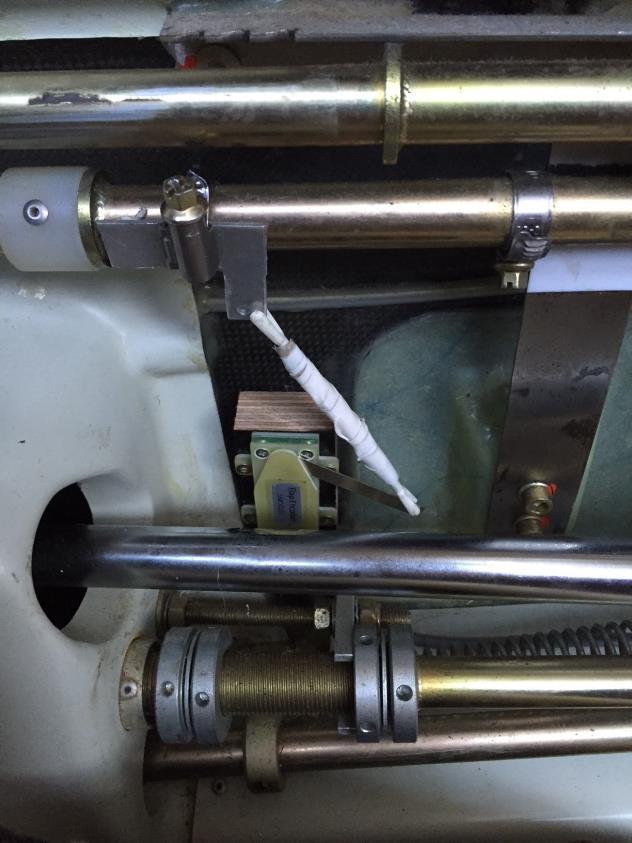
9 3.8 Installation in an ASW20 Page 9 of 16
 8.")


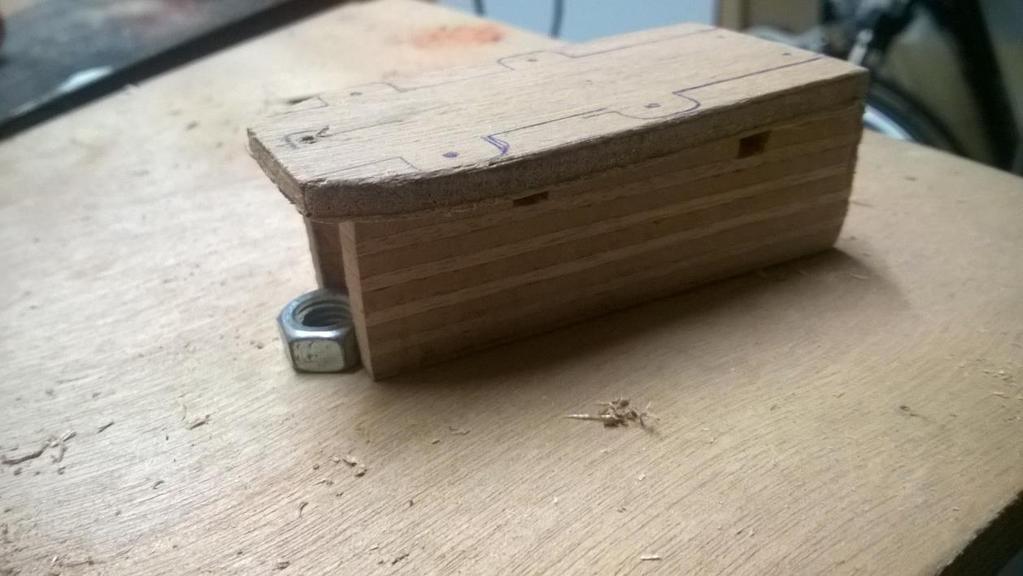
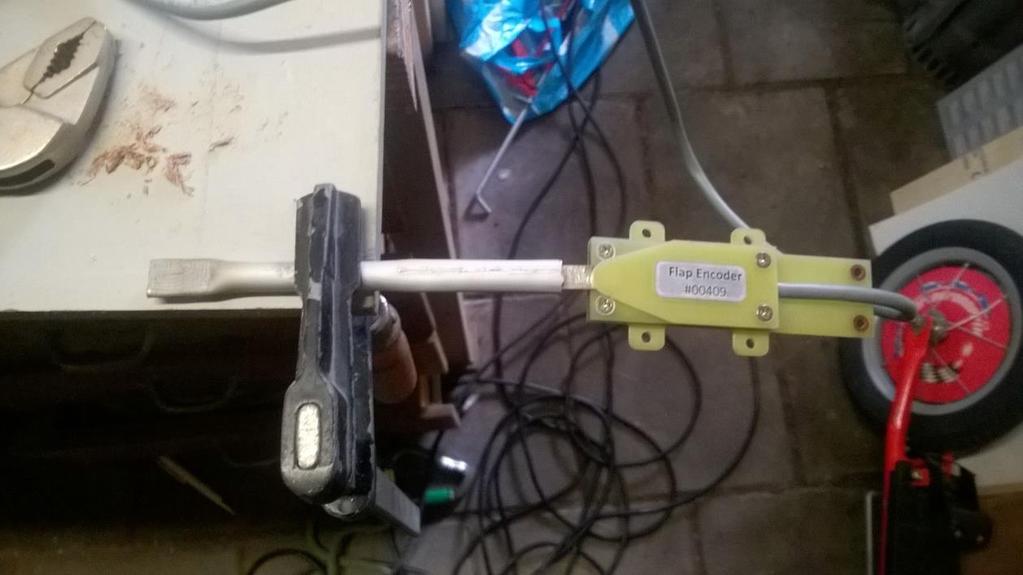
10 Instructions: Replace the bolt that holds the flap springs at the mixer. With: M6 x 80 (better is 100mm) 8.8 Make a bracket for the flap sensor from multiplex as attached. Place this bracket centred to the main mixer bolt We used a 6mm aluminium tube, wall thickness 1mm to lengthen the sensor arm. Formed it in the right shape by heating it slightly. Drill a 6mm hole on the flattened side This was attached to the 80mm bolt with two self-locking nuts, 2 washers and two Teflon washers. Page 10 of 16
11 3.9 Installation in a DG800 Page 11 of 16

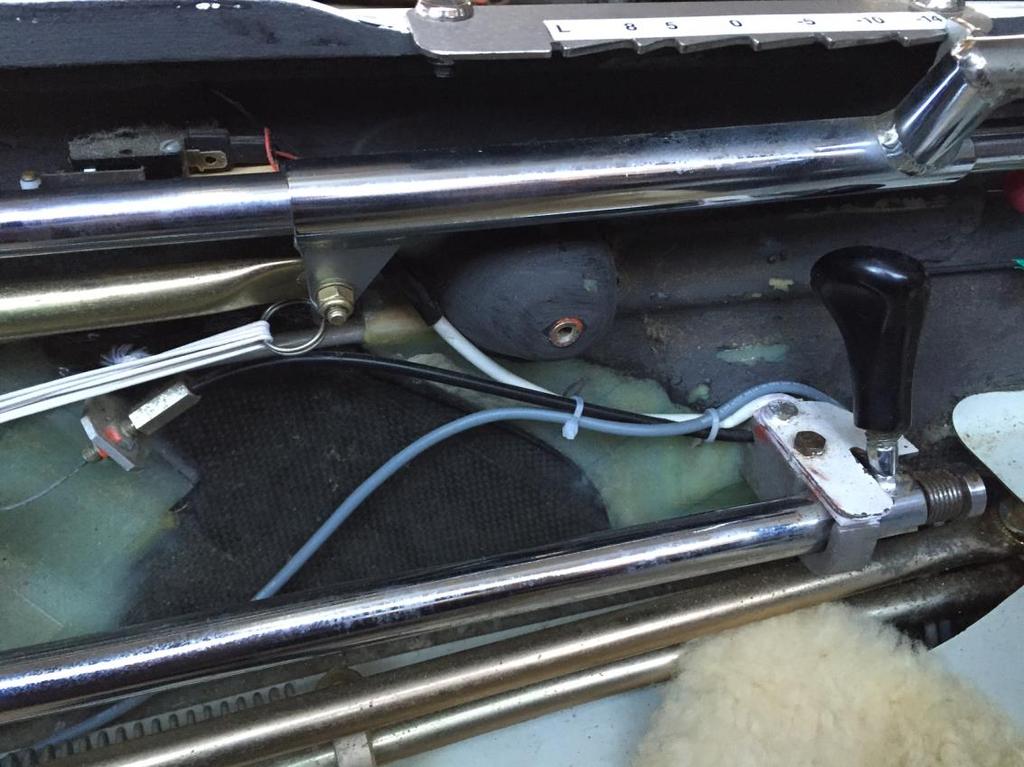
12 3.10 Installation in a Ventus Ct Page 12 of 16


13 3.11 Connecting LXNAV FLAP ENCODER LXNAV FLAP ENCODER is connected to main unit through RS485 bus Flap encoder configuration The first step is to enter all flap positions in the LX90XX/80XX. This can be done under the Setup->Polar and the Glider s menu. The information required to complete this step can be found in the aircraft flight manual. The second step is to program the flap positions under the Setup-Hardware-Flaps menu. Page 13 of 16

14 After configuring the flap encoder in the previous steps, the last step is to use LXstyler to display the flap tape on the main screen. Page 14 of 16

15 SUBD9 / male Flap Encoder Version 1.3 August Wiring 485 CABLE RS A Green 350 cm LABEL:RS B Yellow Brown White Flap encoder 3.14 Updating firmware of FLAP ENCODER Firmware updates can be performed from the LX90XX/80XX Updating via RS485 from main unit Start the LX9000 and go to the Setup->Password menu option. Enter password and press ENTER. The LX90XX/80XX will automatically search for an update file. If more than one update file is found a selection dialogue will appear. Select the appropriate update file, and wait until the update has finished. Page 15 of 16
16 4 Revision history January 2015 December 2016 August 2018 Added installations in DG800, Ventus Ct Added installations in ASW20 English correction done by JR Page 16 of 16
FES 14S Discharging assistant
 FES 14S Discharging assistant Suitable for FES GEN1 (14S) battery pack, and FES GEN2 (14S) battery pack User manual, Version 1.2 LZ design d.o.o., Brod 3D, 1370 Logatec, Slovenia tel +386 59 948 898 info@lzdesign.si
FES MOTOR MANUAL. Version 1.2. Type: FES-DIS-M100
 FES MOTOR MANUAL Version 1.2 Type: FES-DIS-M100 LZ design d.o.o., Brod 3D, 1370 Logatec, Slovenia tel +386 59 948 898 info@lzdesign.si www.front-electric-sustainer.com Table of Content 1. Important notices...3
FES FCU instrument manual
 FES FCU instrument manual Version 1.63 For instrument type: FES-FCU 57 For FCU software version: 2.34 LZ design d.o.o., Brod 3D, 1370 Logatec, Slovenia tel +386 59 948 898 info@lzdesign.si www.front-electric-sustainer.com
External Non-Contact Fluid Level Sensor
 External Non-Contact Fluid Level Sensor NON-CONTACT SENSOR Tek Tanks Limited The Old Stables Tel: +44 (0)1420 520830 West End Farm Fax:+44 (0)1420 520840 Upper Froyle sales@tek-tanks.com Hampshire GU34
INSTALLATION, MAINTENANCE & SERVICE MANUAL
 INSTALLATI, MAINTENANCE & SERVICE MANUAL M151217L Product Specifications 20" (506mm) 3.3 (85mm) 9.8 (250mm) 38" (974mm) 4.2 (106mm) 9.8 (250mm) 48" (1208mm) 4.2 (106mm) 56" (1442mm) 4.2 (106mm) Wiring
PFS Rotameter. Variable Area Flowmeter. Instruction Manual PFS-RM200, RM230, RM250
 PFS Rotameter 09/2018 Rev. 0 Variable Area Flowmeter Instruction Manual PFS-RM200, RM230, RM250 Please note: This instruction manual provides detailed information and instructions that must be read, understood
RV-10 Center Arm Rest Console
 RV-10 Center Arm Rest Console Important Notice: This manual contains important information that may affect the safety of your aircraft. Read the Warranty / Agreement below. There is information in the
RANGE HOODS USER INSTRUCTIONS
 RANGE HOODS USER INSTRUCTIONS Model: Advanta Pro III 30 & 36 IMPORTANT SAFETY INSTRUCTIONS Carefully read the following important information regarding installation safety and maintenance. Keep these instructions
Microscope light manual
 Microscope light manual LS-12 and LS-14 LS-12 LS-14 1/9 Content Overview... 3 Mounting... 4 Light adjustment... 5 Mirror... 6 Filters... 6 Replacing microscope light... 7 Technical data... 8 Troubleshooting...
Internal PVC Rod-Style Fluid Level Sensor
 Internal PVC Rod-Style Fluid Level Sensor New Providence Marine Systems INTERNAL PVC ROD SENSOR Copyright 2006 Topic Table of Contents Page 1:Introduction 2 2:Installation Guide 3 3:Limited Warranty 5
DWS404 DWS524 DWS654 DWS684 DWS694. DWS SERIES INSTALLATION/OWNER'S MANUAL Car Audio Speakers
 DWS404 DWS524 DWS654 DWS684 DWS694 DWS SERIES INSTALLATION/OWNER'S MANUAL Car Audio Speakers PREPARATION Safety Guidelines Thank you for purchasing the DWS Series car speakers. Although Dual has attempted
PART NUMBER: F-706RLSS REVOLUTION LIFT: SLING-SEAT OPTION
 PART NUMBER: F-706RLSS REVOLUTION LIFT: SLING-SEAT OPTION 500 LB. [227 kg] MAXIMUM CAPACITY MANDATORY LEAVE THIS MANUAL WITH LIFT OWNER - WARNING- IMPORTANT SAFETY INSTRUCTIONS 1. READ AND FOLLOW ALL INSTRUCTIONS.
Intelligent Charging System. User Manual PB-80C24
 Intelligent Charging System User Manual PB-80C24 Introduction The Intelligent Charging System uses power sensors and charging logic to deliver the fastest, most efficient possible charge. The system automatically
All products subject to this warranty must be returned for examination, repair or replacement to:
 Limited Warranty The software and sensors are warranted by the manufacturer, Toledo Integrated Systems, to be free from defects in workmanship for one year from the date of manufacturer s shipment. This
Instruction Sheet. SFR Series. Swing Frame rack
 Instruction Sheet SFR Series Swing Frame rack THANK YOU Thank you for purchasing the SFR Series Swing Frame Rack. Please read these instructions thoroughly before installing/assembling this product. PRODUCT
Grid Tied Limiter User Manual
 Grid Tied Limiter User Manual Manual Version: GTL-2016-2 TABLE OF CONTENTS 1. GENERAL DESCRIPTION... 3 2. GRID TIED LIMITER OVERVIEW... 3 3. SYSTEM WITHOUT THE GRID TIED LIMITER... 4 4. SYSTEM WITH THE
Smart-UPS RC External Battery Pack Tower/Rack-Mount 4U
 Smart-UPS RC External Battery Pack Tower/Rack-Mount 4U SRC96XLBP SRC96XLBP2S English 990-3486A 01/2009 Introduction Overview The American Power Conversion (APC ) SRC96XLBP external battery pack (XLBP)
EMISSION CONTROL WARRANTY STATEMENT
 EMISSION CONTROL WARRANTY STATEMENT YOUR WARRANTY RIGHTS AND OBLIGATIONS The California Air Resources Board, U.S. EPA and Zenith Power Products LLC (ZPP) are pleased to explain the emission control system
GM 2500,3500 Nerf Bar Installation Instructions
 GM 2500,3500 Nerf Bar Installation Instructions Part # 100-7023-00 Fitment: 07-17 GM 2500/3500 Crew Cab 1) Remove Battle Armor nerf bar and hardware from box. Hardware supplied is shown below. Contains
LBH / LBFR SERIES. Instruction Sheet. Telescoping Lacer Bar
 Instruction Sheet LBH / LBFR SERIES Telescoping Lacer Bar THANK YOU Thank you for purchasing the LBH / LBFR Series Telescoping Lacer bar. Please read these instructions thoroughly before installing this
series USER MANUAL
 888 534-5994 4000 series USER MANUAL Contents Here s all the information you need for setting and operating your new Lathem time recorder. Service information is also included in this manual, in case any
Installation Instructions
 Installation Instructions Bradley Touch Time Valve for Column Showers Table of Contents Pre-Installation Information...............2 Touch Time Valve Installation............3 Touch Time Valve Wiring Diagram........4
PLEASE ENSURE THE JUMP STARTER IS FULLY CHARGED PRIOR TO FIRST USE.
 PLEASE ENSURE THE JUMP STARTER IS FULLY CHARGED PRIOR TO FIRST USE.. (1) RG1000 EMERGENCY JUMP STARTER PORTABLE POWER SUPPLY (1) 3-IN-1 USB CABLE (1) RG1000 EMERGENCY JUMP STARTER PORTABLE POWER SUPPLY
INSTALL GUIDE Dodge/RAM 5.7L HEMI
 INSTALL GUIDE 2009-2017 Dodge/RAM 5.7L HEMI TABLE OF CONTENTS 3 GETTING STARTED 3 PARTS LIST 4 INSTALLATION INSTRUCTIONS 4 REMOVING THE STOCK INTAKE ASSEMBLY 6 INSTALLING THE AIR FILTER 7 INSTALLING THE
Instructions and Parts List 3M-Matic P/N Infeed/Exit Conveyor Attachment, 1.2 Meter
 Instructions and Parts List TM 3M-Matic P/N 78-8069-3971-2 Infeed/Exit Conveyor Attachment, 1.2 Meter Type 19100 The Infeed/Exit Conveyor, 1.2 Meter, has been designed and tested to be used only with 3M-Matic
Model AS-RC3260 TV Cart. Rolling Cart for Audio Mount System & Flat Panel TVs
 Model AS-RC3260 TV Cart Rolling Cart for Audio Mount System & Flat Panel TVs GETTING STARTED Introduction Congratulations on the purchase of your new Helios AS-RC3260 Rolling Cart. For maximum benefit,
Installation Instructions
 85-3909 rev. 01 09-09 Installation Instructions Thank you for purchasing this anti-sway bar kit. Please read through these instructions before installation. Rear Anti-Sway Bar Kit for Chevrolet G30 part
Read and follow all instructions. Safety can only be ensured if the walker is assembled and operated according to these instructions.
 Aqua Walker 9889 Garrymore Ln Missoula, MT 59808 888-687-3552 +1-406-549-0769 www.aquacreek.com Manual PART #: F-605UW 300 LB. [136 kg] MAXIMUM WEIGHT CAPACITY MANDATORY LEAVE THIS MANUAL WITH WALKER OWNER
Installation Instructions
 85-3195 rev. 12 04-18 Installation Instructions Thank you for purchasing this antisway bar kit. Please read through these instructions before installation. Part #1139-117 Rear Anti-Sway Bar Kit 1½ diameter
Model T2642 Wall Mount. Television Wall Mount with Tilt Option
 Model T2642 Wall Mount Television Wall Mount with Tilt Option Getting Started Introduction Congratulations on the purchase of your new Audio Solutions T2642 Television Wall Mount. For maximum benefit,
Installation and Maintenance Instructions
 Installation and Maintenance Instructions Limited One Year Warranty T&S warrants to the original purchaser (other than for purposes of resale) that such product is free from defects in material and workmanship
Patron Call System. Scope s DataPage II Lite & NexCall Coaster. Operators/Installation Manual
 Scope s DataPage II Lite & NexCall Coaster Operators/Installation Manual PREFACE Important Installation Information It is the purchasers responsibility to determine the suitability of this equipment and
SOLAR DASH CHARGING SYSTEM USER GUIDE
 SOLAR DASH CHARGING SYSTEM Doc 1.01 INST049 INSTALLATION STEP 1 Place 20 watt solar panel in the dash of the vehicle facing up. Note: For ideal results position the vehicle in a manner in which the solar
WiFi Tank Level Monitor Installation Instructions
 WiFi Tank Level Monitor Installation Instructions COMPATIBILITY To install the Tank Utility remote level monitor, you will need the following: A WiFi connection at your tank site An Apple or Android smartphone
HBC-20 - LED HIGH BAY
 To prevent death, injury or damage to property, this product must be installed in accordance to National Electrical Code (NFPA70) in the US or Canadian Electrical Code (CSA.) in Canada. Risk of fire or
Woolich Racing. Bike Harness Installation Instructions Hayabusa Gen 2 (08+)
") Woolich Racing Bike Harness Installation Instructions Hayabusa Gen 2 (08+) 1) Introduction To connect your Woolich Racing product to the ECU ( Engine Control Unit or computer) in your bike you need to
Woolich Racing Bike Harness Installation Instructions Hayabusa Gen 2 (08+) 1) Introduction To connect your Woolich Racing product to the ECU ( Engine Control Unit or computer) in your bike you need to
INSTALLATION INSTRUCTIONS SINGLE HORIZONTAL ACCESS DOOR PANTRY INSERT MANUAL
 INSTALLATION INSTRUCTIONS MODEL #88972 SINGLE HORIZONTAL ACCESS DOOR PANTRY INSERT MANUAL TABLE OF CONTENTS PAGE # INSTALLATION INSTRUCTIONS...................2 CABINET LOCATION GUIDELINES...2 REGULAR
Terms and Conditions
 Terms and Conditions GUARANTEE: All Brighton-Best International, Inc. products are manufactured to rigid quality control standards which meet or exceed industry standards. Records and tests pertaining
OWNERS MANUAL HF4263
 OWNERS MANUAL HF4263 ADJUSTABLE AB / BACK HYPER BENCH Note: Both Serial Number and Model Number are Required when Ordering Parts RECORD SERIAL NUMBER HERE CATALOG NUMBER 0805-000 Customer Service (800)
Model:M5B/M5W/M5N. Installation Guide. Specifications Desktop Weight Capacity Keyboard Tray Weight Capacity Height Adjustable Range
 Model:M5B/M5W/M5N Installation Guide Website: www.flexispot.com Tel: 1-855-421-2808 Specifications Desktop Weight Capacity Keyboard Tray Weight Capacity Height Adjustable Range 33 Ibs (15 KG) 4.4 Ibs (2
AXS609 AXS612 AXS514 AXS SERIES. INSTALLATION/OWNER'S MANUAL Car Audio
 AXS609 AXS612 AXS514 AXS SERIES INSTALLATION/OWNER'S MANUAL Car Audio PREPARATION Safety Guidelines Thank you for purchasing the AXS Series car speakers. Although Axxera has attempted to make sure all
Installation Instructions
 85-3214 rev. 07 03-11 Installation Instructions Thank you for purchasing this anti-sway bar kit. Please read through these instructions before installation. Rear Anti-Sway Bar Kit Freightliner FL Series
Humidity Monitor model 00619
 Instruction Manual Humidity Monitor model 00619 CONTENTS Unpacking Instructions...2 Package Contents...2 Product Registration...2 Features & Benefits...3 Setup...3 Measurement Units...4 Placement Guidelines...4
OWNERS MANUAL HF4550 PREACHER CURL. Customer Service (800) (858) Fax (858) RECORD SERIAL NUMBER HERE
 (858) Fax (858) RECORD SERIAL NUMBER HERE") OWNERS MANUAL HF4550 PREACHER CURL Note: Both Serial Number and Model Number are Required when Ordering Parts RECORD SERIAL NUMBER HERE CATALOG NUMBER 0805-001 Customer Service (800) 548-5438 (858) 578-7676
OWNERS MANUAL HF4550 PREACHER CURL Note: Both Serial Number and Model Number are Required when Ordering Parts RECORD SERIAL NUMBER HERE CATALOG NUMBER 0805-001 Customer Service (800) 548-5438 (858) 578-7676
Model AS-FM64 Wall Mount. Full Motion Television Wall Mount
 Model AS-FM64 Wall Mount Full Motion Television Wall Mount Getting Started Introduction Congratulations on the purchase of your new Audio Solutions AS-FM64 Television Wall Mount. For maximum benefit, please
Adapter. Owner's Manual & Warranty. Item# JSFSA. Compatible with Weego Jump Starter Battery+ Models JS 12 & JS 18
 Adapter Item# JSFSA Owner's Manual & Warranty Compatible with Weego Jump Starter Battery+ Models JS 12 & JS 18 Learn About Your Wee go 12V DC Adapter! There are so many tools and accessories you can power
SYSTEM MANUAL. Automated Motorized Hydraulic Traffic Controller. Revision CS72-HTC
 CS72-HTC SYSTEM MANUAL Automated Motorized Hydraulic Traffic Controller Revision 2002.01 Spike Systems 3623 S. Seventh Street Phoenix, Arizona 85040 Phone: (602) 243-0291 Fax: (602) 243-0294 Hydraulic
OWNERS MANUAL HF PAIR VERTICAL DUMBBELL RACK. Customer Service (800) (858) Fax (858) RECORD SERIAL NUMBER HERE
 (858) Fax (858) RECORD SERIAL NUMBER HERE") OWNERS MANUAL HF4459 5 PAIR VERTICAL DUMBBELL RACK Note: Both Serial Number and Model Number are Required when Ordering Parts RECORD SERIAL NUMBER HERE CATALOG NUMBER 0605-000 Customer Service (800) 548-5438
OWNERS MANUAL HF4459 5 PAIR VERTICAL DUMBBELL RACK Note: Both Serial Number and Model Number are Required when Ordering Parts RECORD SERIAL NUMBER HERE CATALOG NUMBER 0605-000 Customer Service (800) 548-5438
Installation Instructions
 85-3414 rev. 02 11-09 Installation Instructions Thank you for purchasing this anti-sway bar kit. Please read through these instructions before installation. Rear Anti-Sway Bar Kit for the Monaco Diplomat
3M-MaticTM. Tape Edge Fold Kit. Instructions and Parts List. For Use On: AccuGlide TM STD Upper and lower Taping Heads. Purpose of Attachment
 Instructions and Parts List 3M-MaticTM Tape Edge Fold Kit For Use On: AccuGlide TM STD Upper and lower Taping Heads Kit Part Number Fits 78-8095-4854-4 2 Inch Upper Head 78-8095-4855-1 2 Inch Lower Head
DM1016S INSTALLATION/OWNER'S MANUAL 10" Marine DVC Subwoofer
 DM1016S INSTALLATION/OWNER'S MANUAL 10" Marine DVC Subwoofer DM1016S INSTALLATION Preparation/Installation Please read entire manual before installation. Before You Start Disconnect negative battery terminal.
ADJUSTABLE COMFORT ASSEMBLY INSTRUCTIONS
 ASSEMBLY INSTRUCTIONS ASSEMBLY INSTRUCTIONS For customer service call 1-877-707-7533 or email azcustomerservice@classicbrands.org STEP 1: Carefully open the carton and remove all boxes then lay out the
OWNERS MANUAL HF
 OWNERS MANUAL HF4461-48 HORIZONTAL DUMBBELL RACK Note: Both Serial Number and Model Number are Required when Ordering Parts RECORD SERIAL NUMBER HERE CATALOG NUMBER 1005-000 Customer Service (800) 548-5438
Annunciator Panel. (AP-7H and AP-7V) Operating and Installation Instructions OI
 Operating and Installation Instructions OI") Annunciator Panel (AP-7H and AP-7V) Operating and Installation Instructions OI 0908931 9/8/93 You must read this manual before installing or operating the instrument. This manual contains warranty and
Annunciator Panel (AP-7H and AP-7V) Operating and Installation Instructions OI 0908931 9/8/93 You must read this manual before installing or operating the instrument. This manual contains warranty and
Model FM2642 Wall Mount. Full Motion Television Wall Mount
 Model FM2642 Wall Mount Full Motion Television Wall Mount Getting Started Introduction Congratulations on the purchase of your new Audio Solutions FM2642 Television Wall Mount. For maximum benefit, please
EchoPod. Technical Support. Model: DL14-(XX) Quick Start
 Quick Start") Technical Support For complete product documentation, video training, and technical support, go to www.flowline.com. For phone support, call 562-598-3015 from 8am to 5pm PST, Mon - Fri. (Please make sure
Technical Support For complete product documentation, video training, and technical support, go to www.flowline.com. For phone support, call 562-598-3015 from 8am to 5pm PST, Mon - Fri. (Please make sure
Installation and Operation Guide
 Bus-Scan 500 RF Installation and Operation Guide All Content and Information are Copyright 2018-2019 Robotics Technologies, Inc. Features and Information are subject to change without notice. All Rights
Potentiometer Thrust Plate Kit (50421) Installation & Operator s Instruction Manual
 Installation & Operator s Instruction Manual") Potentiometer Thrust Plate Kit (0) Installation & Operator s Instruction Manual Thank You The employees of Chore-Time Equipment would like to thank you for your recent Chore-Time purchase. If a problem
Potentiometer Thrust Plate Kit (0) Installation & Operator s Instruction Manual Thank You The employees of Chore-Time Equipment would like to thank you for your recent Chore-Time purchase. If a problem
Installation and Operation Guide
 Bus-Scan CR2 RF Installation and Operation Guide All Content and Information are Copyright 2018 Robotics Technologies, Inc. Features and Information are subject to change without notice. All Rights Reserved.
2019-ON RAM 1500 INSTALLATION INSTRUCTIONS
 2019-ON RAM 1500 INSTALLATION INSTRUCTIONS Thank you for purchasing ROCKSTARTM Splash Guard Mud Flaps. Agri-Cover, Inc. proudly manufactured these mud flaps using superior quality materials and workmanship.
Instruction Sheet DWRSR-ZL. Zero Clearance Latch
 Instruction Sheet DWRSR-ZL Zero Clearance Latch US Patent 7,188,570 B2 THANK YOU Thank you for purchasing the DWRSR-ZL Zero Clearance Latch. Please read these instructions thoroughly before installing
Installation Instructions
 85-3207 rev. 03 05-06 Installation Instructions Thank you for purchasing this anti-sway bar kit. Please read through these instructions before installation. Rear Anti-Sway Bar Kit for the Freightliner
Woolich Racing. Bike Harness Installation Instructions Suzuki Harness Type 4a GSX1300R (Hayabusa)
") Woolich Racing Bike Harness Installation Instructions Suzuki Harness Type 4a 2013+ GSX1300R (Hayabusa) 1) Introduction To connect your Woolich Racing product to the ECU ( Engine Control Unit or computer)
Woolich Racing Bike Harness Installation Instructions Suzuki Harness Type 4a 2013+ GSX1300R (Hayabusa) 1) Introduction To connect your Woolich Racing product to the ECU ( Engine Control Unit or computer)
INSTALLATION & OPERATING INSTRUCTIONS: REVOLUTION SPINEBOARD ATTACHMENT WARNING
 INSTALLATION & OPERATING INSTRUCTIONS: REVOLUTION SPINEBOARD ATTACHMENT LOAD CAPACITY: 500 LBS [227 kg] MANDATORY: LEAVE THIS MANUAL WITH LIFT OWNER WARNING 1. READ AND FOLLOW ALL INSTRUCTIONS. LIFT SAFETY
INSTALLATION/OWNER'S MANUAL DP " Woofer in Enclosure
 INSTALLATION/OWNER'S MANUAL DP1000 10" Woofer in Enclosure Installation Thank you for purchasing the DP1000 10" Woofer with enclosure. Although Dual has attempted to make sure all of the information contained
RAM 1500, 2019 CLASSIC & 2010-ON 2500/3500 INSTALLATION INSTRUCTIONS
 2009-18 RAM 1500, 2019 CLASSIC & 2010-ON 2500/3500 INSTALLATION INSTRUCTIONS Thank you for purchasing ROCKSTARTM Splash Guard Mud Flaps. Agri-Cover, Inc. proudly manufactured these mud flaps using superior
Installation Instructions
 85-4592 rev. 08 02-18 Installation Instructions Thank you for purchasing our sway bar kit. Please read through these instructions before installation. Auxiliary Rear Anti-Sway Bar Kit for Ford F53 part
Installation Instructions
 85-3209 rev. 07 03-11 Installation Instructions Thank you for purchasing this anti-sway bar kit. Please read through these instructions before installation. Front Anti-Sway Bar Kit for Workhorse W22, Holiday
Customer Support
 Portable auxiliary air tanks owner's Manual aux05 aux05a aux10 WWW.CALIFORNIAAIRTOOLS.COM Customer Support 1-866-409-4581 TAbLe OF CONTeNTS INTROduCTION IntroductIon Important Safety InStructIonS components
Installation and Operation Manual
 Installation and Operation Manual * Read all installation instruction and warranty information prior to beginning installation * XeVision HID landing and taxi lights are for experimental aircraft only
INSTALL GUIDE Ford F L
 INSTALL GUIDE 2011-2014 Ford F-150 5.0L TABLE OF CONTENTS 3 GETTING STARTED 3 PARTS LIST 4 INSTALLATION INSTRUCTIONS 4 REMOVING THE STOCK INTAKE ASSEMBLY 5 INSTALLING THE AIR FILTER 6 INSTALLING THE HOUSING
Tiller Lock Assembly
 2 1 4 1 2 4 1 2 4 1 7 6 7 8 Positioning Pin Assembly 1 Positioning Pin 2 Spring Black Knob 5 4 1 2 2 1 Tiller Lock Assembly 1 2 4 Threaded Rod Rotating Rod Spring Flat Washer 5 6 7 8 C Type Plastic Washer
SOIL RESISTIVITY TESTER
 An ISO 9001:2008 Company FEATURES : Auto-ranging microprocessor controlled. Earth Resistivity ( ) test. Earth testing range 20, 200, 2000. Earth voltage measuring : 0-300V AC. Automatic C check. Automatic
EAGL 1-Touch Laser Level
 EAGL 1-Touch Laser Level Owner s Manual GENERAL INFORMATION Thank you for buying the EAGL 1-Touch laser. Although it is very simple to use, we recommend that you read this manual before operating the laser.
 CUSTOMER SERVICE: 800-973-8374 Frame Assembly Instructions Headboard Installation E 1. Use the remote control to raise the head of the adjustable foundation in order to gain access to the foundation
Cabling for power, control, and video must be run to the installation site before the mount is installed.
 User Installation User Guide Guide & Operation Manual V940D V-20B-A-2 V940D Mounting Kits Mounting Pole Mounting Kits Adapter X532-11-00 Vicon Industries Inc. does not warrant that the functions contained
Installation Instructions
 85-3910 rev. 03 01-18 Installation Instructions Thank you for purchasing the antisway bar kit. Please read through these instructions before installation. Rear Anti-Sway Bar Kit for Ford F-250/F-350 part
Instruction Manual. Backup Sensor Reversing System RVS-RS103
 Instruction Manual Backup Sensor Reversing System RVS-RS103 RVS Systems, Inc. 2017 TABLE OF CONTENTS System Description............................ 03 Safety Information........................... 04 Before
WARRANTY POLICY FOR LD SERIES LABEL DISPENSERS REPAIR POLICY
 TDA025B INTRODUCTION Thank you for buying our automatic tape dispenser. The TDA025 can automatically cut and dispense many types of tape. Before using, please read this instruction manual carefully. WARRANTY
Installation Instructions
 85-3511 rev. 04 11-15 Installation Instructions Polyurethane Bushing Kit for Ford F-53 (Front) (replaces OE bushings and brackets) part #4139-127 1-5/8 diameter INTRODUCTION Thank you for purchasing this
Grape Solar STAR Series Connection Guide Copyright 2012, Grape Solar, Inc. All Rights Reserved
 Grape Solar STAR Series Connection Guide Copyright 2012, Grape Solar, Inc. All Rights Reserved For more information about this kit, visit http://www.grapesolar.com/manuals.html Series vs. Parallel Connections
7.3L POWERSTROKE BANJO BOLT KIT Fits L Powerstroke Diesel. Installation Guide
 7.3L POWERSTROKE BANJO BOLT KIT Fits 94-03 7.3L Powerstroke Diesel Installation Guide INSPECT CONTENTS OF THIS KIT THOROUGHLY BEFORE STARTING THE INSTALLATION PROCESS! IF YOU FIND A PROBLEM WITH YOUR PACKAGE:
Table of Contents. Page 2. midlandusa.com. Model PPG100
 Table of Contents WELCOME TO THE WORLD OF MIDLAND... FEATURES... FCC NOTIFICATION... CONTROLS AND INDICATORS... LCD DISPLAY... CHARGING YOUR PPG100... AC Charging... 12V DC Car Charging... Solar Charging...
END USER TERMS OF USE
 END USER TERMS OF USE The following is the End Users Terms of Use as it currently appears in the Mobileye User Manual and Warranty information. This is here for your review and information; it is subject
Installation Instructions Soft Top Replacement Hardware, Wrangler
 Installation Instructions Soft Top Replacement Hardware, 87-95 Wrangler IMPORTANT NOTICE: Carefully read instructions before attempting to install this product. Rampage is in no way responsible for any
Dodge Ram 1500, Quad/Reg. Cab, w/6.4ft. & 8ft. Bed, 2 & 4 WD. For updates see PRODUCT SUPPORT tab at
 Assembly, Installation, Operation and Maintenance Instructions 2009-2016 Dodge Ram 1500, Quad/Reg. Cab, w/6.4ft. & 8ft. Bed, 2 & 4 WD. Part # 30665 Dealer / Installer: Provide a copy of these Instructions
HPx-JDx3-xx HARNESS INSTALLATION
 HPx-JDx3-xx HARNESS INSTALLATION Conversion Manual 09040106b HEADSIGHT.COM 574.546.5022 About Headsight Headsight Contact Info Headsight, Inc. 4845 3B Road Bremen, IN 46506 Phone: 574-546-5022 Fax: 574-546-5760
Owner s Manual. Features
 Owner s Manual Pumptec is a microcomputer based pump protection device that continuously monitors motor load and power line conditions to provide protection against dry well conditions, waterlogged tanks,
JD-2 TOLL FREE UG August /2011
 Instructions Manual Office Phone: 1-800-503-7534 / 305-868-1603 Fax: 305-866-2704 sales@skyfood.us - www.skyfood.us Warehouse Phone: 1-800-445-6601 / 973-482-5070 Fax: 973-482-0725 Juice Dispenser Model
Scale Feeder Manifold Water Filtration System Instruction Manual
 3M TM Water Filtration Products Scale Feeder Manifold Water Filtration System Instruction Manual For SF1XX High Flow Series Water Filtration Systems Installer: Please leave this manual with owner/operator.
INSTRUCTION MANUAL. Rotary Unidirectional Piezoelectric Motor Evaluation Kit. (Model: UPM-28) Made in USA
 Made in USA") www.dtimotors.com INSTRUCTION MANUAL Rotary Unidirectional Piezoelectric Motor Evaluation Kit (Model: UPM-28) Made in USA Rev. 6/2/2017 Table of Contents 1.0 Introduction... 2 2.0 Properties... 3 3.0 Unpacking
www.dtimotors.com INSTRUCTION MANUAL Rotary Unidirectional Piezoelectric Motor Evaluation Kit (Model: UPM-28) Made in USA Rev. 6/2/2017 Table of Contents 1.0 Introduction... 2 2.0 Properties... 3 3.0 Unpacking
Force Test Stands Series ES MODELS ES10 & ES20. User s Guide
 Force Test Stands Series ES MODELS ES10 & ES20 User s Guide Models ES10 & ES20 Thank you! Thank you for purchasing a Mark-10 Series ES Force Measurement Test Stand. We are confident that you will get many
DISCONTINUED VERSION Parts listed in this catalog may no longer be available. ILLUSTRATED PARTS CATALOG
 BUNN WL WARMER DISCONTINUED VERSION Parts listed in this catalog may no longer be available. FRONT REAR ILLUSTRATED PARTS CATALOG Designs, materials, weights, specifications, and dimensions for equipment
Instruction Sheet BRK/RK SERIES. Black Laminate Rack
 Instruction Sheet BRK/RK SERIES Black Laminate Rack THANK YOU Thank you for purchasing the BRK/RK Series Black Laminate Rack. Please read these instructions thoroughly before assembling this product. PRODUCT
Installation Instructions SRC Over-Size Tire Carrier Jeep Wrangler/Unlimited Part # 2743
 NOTE: Carefully read instructions entirely before assembling/installing this product. Parts Included Qty Parts Included Qty Tire Carrier 1 8 x 70mm Hex Bolt 4 Brake Light Bracket 1 8mm Flat Washer 4 Tire
TABLE OF CONTENTS. Important Safety Information 3. Parts List 4
 1 TABLE OF CONTENTS Important Safety Information 3 Parts List 4 Assembling THERACK 5 7 How To Unfold THERACK 8 How To Fold THERACK 9 THERACK Levels 10 Warranty 11 2 IMPORTANT SAFETY INFORMATION IMPORTANT:
GC-1. Roof and Gutter De-Icing Control Installation and Operating Instructions FOR EXTERIOR INSTALLATION ONLY
 GC-1 Roof and Gutter De-Icing Control Installation and Operating Instructions FOR EXTERIOR INSTALLATION ONLY GENERAL INFORMATION The GC-1 heating cable controller has been designed and manufactured for
INSTALL GUIDE Silverado/Sierra L/6.2L
 INSTALL GUIDE 2014-2017 Silverado/Sierra 1500 5.3L/6.2L TABLE OF CONTENTS 3 GETTING STARTED 3 PARTS LIST 4 INSTALLATION INSTRUCTIONS 4 REMOVING THE STOCK INTAKE ASSEMBLY 7 INSTALLING THE AIR FILTER 8 INSTALLING
Rotax 912iS HIC/Power Wiring Harness. Part No: CAV11. Option C : Wire-ended EMU/EMS Connections
 Rotax 912iS HIC/Power Wiring Harness Part No: CAV11 Option C : Wire-ended EMU/EMS Connections Specification and Installation Manual (Please retain for reference) Version 1.5 July 2018 Product Variant Serial
Instruction Sheet SRSR SERIES. Rotating Sliding Rail System
 Instruction Sheet SRSR SERIES Rotating Sliding Rail System THANK YOU Thank you for purchasing the SRSR Series Rotating Sliding Rail System. Please read these instructions thoroughly before assembling this