British 40mm gun, but to no harmful effect for the attackers.
|
|
|
- Patrick Taylor
- 6 years ago
- Views:
Transcription

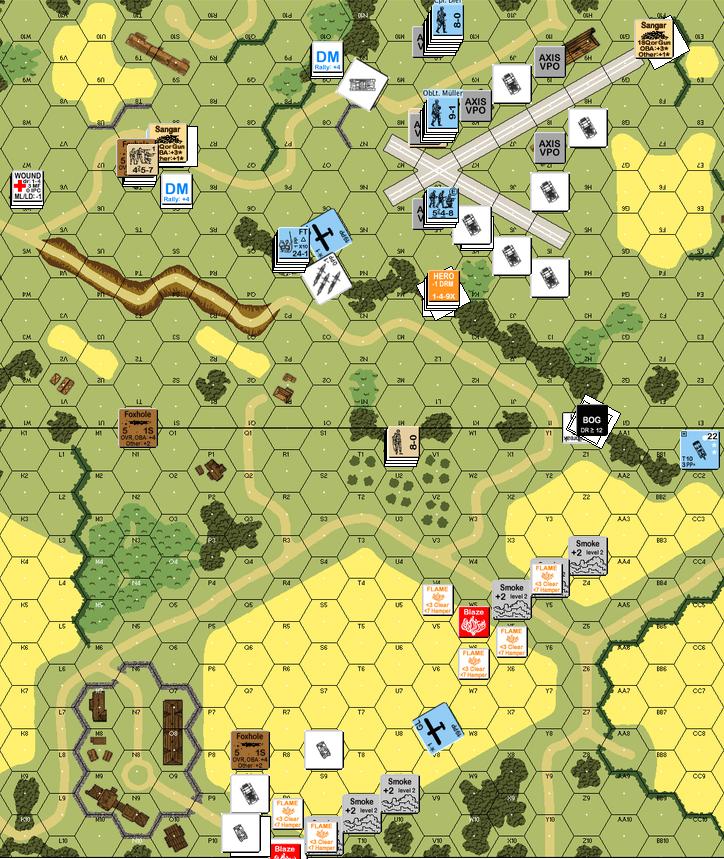
1 13 July 1942 Situation At Start: 1x 10⁻²; 1x 9-1; 1x 8-0; 8x 548; 3x 468; 2x 248; 3x LMG; 3x MMG Temporary assets attached: 3x SdKfz (Kettenkrad); 3x 228; 2x 75* RCL; 1x 10⁵* RCL; 3x Bf 109F; 1x Bf 110D; 6x Go242 gliders. Dawn. Midway through July, and after a lengthy and extensive pounding by the Luftwaffe and the Italian Navy, word has come that Operation Herkules the assault on Malta is on! The target for 3rd Battalion, Kompanie C is a small improved airfield located on the SE corner of Malta. Given the presence of AA guns, a drop directly on the airfield is deemed too dangerous. Kompanie C s landing zone is a large wheat field to the west of the airfield. The LZ may be near a possible British unit s bivouac area, but it is believed any British troops in the area can be quickly overwhelmed before moving on to take the airfield. German Turn 1: As Kompanie C drifted silently toward the ground, safely away from the AA guns at the airfield, extremely accurate long-range fire from a 40mm Bofors cannon riddled and destroyed the lastmost glider with its RCL gun and crew as it approached its LZ. All but one of the gliders overshot their LZs and, as feared, landed nearly on top of a British bivouac area. In contrast, the Fallschirmjagers came down slightly SE of the planned LZ, but intact as a unit. There is at least a reinforced platoon of British infantry very near to where the gliders landed. The guns, Kettenkrads and their crews will be left

2 to fend for themselves. The Fallschirmjagers cannot take the time to save them and have any hope of securing the airfield as well. Situation after the German forces landed: Allied Turn 1: The bivouacked British troops looked to be more interested in finishing off the gliders, their crews and capturing or destroying their cargo. As the Fallschirmjagers gathered themselves for the advance on the airfield, Brits charged Hauptmann Metzler and the troops he was organizing. Outnumbering the charging Brits by more than 2:1, a hail of point blank fire stopped the charge cold. The Brits scurried away under the cover of the wheat. British troops from the bivouac assaulted and destroyed the two gliders that carried the remaining German guns. The Germans would make the assault on the airfield without any heavy weapons. German Turn 2: Oberleutnant Müller took half of Kompanie C toward the airfield, gathering weapons canisters as they moved. Hauptmann Metzler and Sgt. Gibler formed a rearguard in the wheat field, exchanging fire with the British. British troops had captured two of the gliders and the RCL guns. One gun was turned on a glider, setting it ablaze along with its Kettenkrad cargo. The other RCL, was destroyed when the British troops tried to fire it. Of the six loaded gliders sent along as support for Kompanie C, only one Kettenkrad was able to successfully unload and escape the enemy bivouac area. Oblt. Müller s men reached the treeline west of the airfield. Aside from some wrecked fighter planes near the runway, only a few enemy troops could be seen. Allied Turn 2: With the gliders and their cargo destroyed, the British troops began pressuring Hauptmann Metzler, Sgt. Gibler and their troops. The British assault was disjointed and piecemeal. While the Germans fired well enough to blunt the initial probes, it became clear a fighting withdrawal would be in order for the Germans to get clear of the wheat field and rejoin Oblt. Müller s force. While the attack in the wheat field was unfolding, a Bren gun carrier approached Oblt. Müller who froze! Still, the squad carrying an MMG tried to stop the carrier. The MG fire did no damage. The carrier swerved away, moving on toward the fight in the wheat field. German Turn 3: Oblt. Müller gathered his half of Kompanie C and moved them along a road next to a treeline. On the other side of the trees, lay the airfield. A probe by one German squad drew fire from a

3 British 40mm gun, but to no harmful effect for the attackers. Hpt. Metzler s and Sgt. Gibler s rearguard attempted to disengage and join Oblt. Müller s assault on the airfield. While Hpt. Metzler s men were able to blunt the assault on their position, Sgt. Gibler s men were only partially successful. The Brits concentrated their fire on Sgt. Gibler and his men, causing them to retreat in disarray. In a way, their retreat was fortunate as it also worked to move them closer to the main body of Kompanie C. Seeing Gibler s men break and retreat, Hpt. Metzler kept his troops in good order and positioned to slow down any attempt at pursuit by the British. Allied Turn 3: During the retreat, Sgt. Gibler died from wounds he received in the firefight in the wheat field. British NCOs and officers worked to rally their troops who had wavered in the wheat field fight with the Germans. A British Bren gun carrier moved close to Hpt. Metzler s position in an attempt to check the Germans as they disengaged. Hpt. Metzler s men gave far better than they received as they slowly withdrew, Allied casualties continued to mount. At the airfield, the British and Maltese troops took casualties as they exchanged fire with Oblt. Müller s force. German Turn 4: Hpt. Metzler s men continued firing at the pursuing British troops and finally broke them up and drove them away. They could now turn their attention to the British Bren carrier to their immediate right. Oblt. Müller s men continued to inflict casualties on the Allies near the NE-SW runway. They pressed forward, expecting the Allied fire to drive them back toward the treeline, but there was no such fire. The airfield seemed oddly undermanned for such an important military objective.

4 Allied Turn 4: Three Me109s appeared overhead. One 109 went after the AA gun north of the airfield, the other two attacked the AA gun at the end of the NW-SE runway from different directions. The AA gun crews were very good. They caused the first attacks by the 109s to break off. However, the second 109 to attack the SE AA gun dropped its bomb and caused the gun s crew to scramble away for better cover. The British carrier drove right into Hpt. Metzler s position, Bren gun blazing. Neither the carrier crew or the Fallschirmjagers were able to gain an advantage. Oblt. Müller s men kept up their fire on the British positions. The British resistance was weakening. Soon, there would be nothing preventing the Germans from taking control of the entire facility. German Turn 5: Sgt. Gibler s men regained their composure following their retreat to the woods. Cpl. Dief harangued the men. Their bloodlust rose. The desire to avenge Sgt. Gibler and their comrades overwhelmed them. Cpl. Dief and the squad looked around for a target for their anger. They saw a British ATR crew creeping toward Hpt. Metzler s melee with the Bren carrier. Those British were undoubtedly part of the force that had driven them out of the wheat field. Cpl. Dief s men would charge that ATR crew, kill it and rejoin Hpt. Metzler all in one move. At the airfield, fire from Oblt. Müller s men shattered the resistance from the British troops in the control tower. They forced the British from the tower and left the trees to continue moving forward to take the rest of the field. Cpl. Dief s charge drew some poorly aimed fire from some British troops surprised to see such a dash. Once upon the ATR crew, it was dispatched with no difficulty. Likewise, Hpt. Metzler men were able to dispose of the Bren carrier. A well-placed hand grenade set it ablaze. Allied Turn 5: With Cpl. Dief s men rejoining Hpt. Metzler and the destruction of the carrier, the Allied troops gave the Germans a wide berth. Any fire was at long range and ineffective. Any Allied troops that got too close to Metzler s position were driven off, with heavy casualties. A Stuka joined the 109s over the airfield. With one AA gun crew driven away from their gun, the planes concentrated on the other AA gun north of the airfield. The Stuka led the way. The AA fire was well off the mark. The Stuka s bomb was not. The bomb missed the AA gun, but the concussion killed the AA gun crew outright. After the second AA gun crew was put out of commission, the planes flew off to find other targets on Malta. Oblt. Müller s men continued clearing the Allies from positions at the airfield. Once Kompanie C reunited at the airfield, it would be difficult for the Allies to dislodge it. For Hpt. Metzler s force, unfortunately, the fire from the burning carrier, spread to the wheat, and the men had to run for their lives to avoid being burned alive. German Turn 6: After Hpt. Metzler s men finished their dash away from the carrier fire, the Hauptmann began acting very strangely then collapsed and died! The medic said it was a heart attack, as no wounds could be found on his body. With the death of Hpt. Metzler, a full platoon of Fallschirmjagers were left, disorganized, milling about in a small woods, waiting for orders. Oblt. Müller s men adopted


5 a fire and move tactic. The fire portion was wholly ineffective with two MGs malfunctioning. Sensing that the airfield was nearly deserted, Oblt. Müller boldly ordered his men forward to secure the remaining buildings before the rest of Kompanie C rejoined them. While Oblt. Müller taking control of the airfield, Cpl. Dief suddenly panicked. It was now apparent why the airfield has been so deserted. The bulk of the Allied troops, rather than maintaining a defense at the airfield, were on patrol when the airdrop occurred. Now, the Allies would be on their way back to expel Oblt. Müller and his men. Allied Turn 6: As the British troops moved toward the airfield, Oblt. Müller s men finally drove away the last few known Maltese guerrillas from the airfield s ordinance shed. German Turn 7: Atmospheric conditions had been wreaking havoc with the German radios. Cpl. Dief lost contact with Hpt. Metzler and Oblt. Müller. With the carrier fire spreading to the E-SE of his position and the British firing at long range from two different spots, Cpl. Dief panicked again. Hpt. Meztler s men were still disorganized with no leadership, no orders and no direction. Even Oblt. Müller lost effective communication with his men. In spite of his comm problems, enough of Müller s men were able to direct fire on the Maltese guerrillas to drive them completely away from the airfield. One of Müller s squads moved to clear the barracks, was ambushed and ended up in a melee with a half dozen British troops. Allied Turn 7: Two A9 Cruiser tanks arrived to support the British effort to retake the airfield. When the tanks drew near to Cpl. Dief s squad, they fired a captured British ATR at the lead tank and hit it, but the shell caused no damage. The tanks drove on and neared (the late) Hpt. Metzler s men, who were still in disarray. Upon seeing the tanks, the men broke and ran. The lead tank opened up with its MGs, killing several of the fleeing Fallschirmjagers. Some British troops reached the treeline near the airfield and exchanged fire with the German troops in the control tower. In the barracks, the Germans eliminated the British troops, but not without taking an equal number of casualties themselves. Save for the HQ building across the road from the hangars,

6 Kompanie C was in almost complete control of the airfield. German Turn 8: Despite sniper fire, Oblt. Müller s men finished clearing the airfield s buildings and captured the occupied HQ building. A British probe toward the control tower was cut to pieces by deadly small arms and MG fire. A few of Hpt. Metzler s men finally pulled themselves together and moved to join Müller s force. It was at this point that Cpl. Dief began to feel very alone. With British troops in the distance to the NE and SW, British tanks to the SE and the fire in the wheat field spreading to their immediate rear, Dief and his men made a run for it. They dashed through some wheat that had just begun to burn, but as soon as the ran onto the road, the tanks commanders opened up with their outside turret MGs, pinning Dief and his men in the open on the road. Thinking quickly, Cpl. Dief led his men into the smoke drifting to the SE from the burning carrier. Under cover of the smoke, Dief hoped to get away from the British, their armor and rejoin the rest of Kompanie C at the airfield. Allied Turn 8: Some British troops riding bicycles arrived. It appeared the German attack was drawing a hodge-podge of Allied units in response. For some reason, the British tanks turned their attention to Cpl. Dief and his men and their attempt to use the smoke to cover their movement away from the British force. Small groups of Allied troops continued to make probes toward the airfield. These probes were met with a devastating volume of fire from Oblt. Müller s men. Piecemeal attacks by a squad here or there were not going to force the Fallschirmjagers from the airfield. It would take a coordinated assault by a much larger infantry force, the tanks and, perhaps, some artillery for the Allies to prevail. That larger infantry force appeared to be on the way. German Turn 9: The Germans were now scanning the treeline west of the airfield for Allied troops to appear. Their fire was disrupting and causing casualties among the Allies units before they could gather themselves to even attempt an assault on the airfield. Another of Hpt. Metzler s squads reorganized themselves and moved to clear a house south of the airfield where wounded Allied troops had been seen to take shelter. Cpl. Dief s use of the smoke as cover saved him and his men from the immediate threat posed by the British tanks. They reached the relative safety of the treeline to the SW of the airfield. Allied Turn 9: The wind started to gust. Fortunately for Cpl. Dief, his men no longer needed the smoke for cover. British troops continued to approach the airfield in piecemeal fashion and they continued to be shot down as they left the cover of the trees. The British armor continued to fire at and pursue Cpl. Dief and his men. Cannon and MG fire from the British tanks began to take its toll. Cpl. Dief s force
 or would gather into a united force and attack en masse. German Turn 10: Oblt.")
7 began to wither away. The Allied troops continued their march toward the airfield. It was not clear whether the Allies would continue to arrive as separate groups (and be destroyed separately) or would gather into a united force and attack en masse. German Turn 10: Oblt. Müller s men continued to wait for the British to attack. A wounded Luftwaffe pilot came out of hiding. His effort to join Kompanie C (at least temporarily) thwarted by the presence of a British platoon also on its way to the airfield. Allied Turn 10: The British troops continued their rather deliberate advance toward the airfield. The only units attempting to force the issue were the Cruiser tanks one driving very close to the airfield HQ building, the other becoming bogged as it attempted to traverse the treeline to attack Cpl. Dief and the remainder of his force. As Oblt. Müller s men concentrated on the treeline and the expected British attack, a dozen Maltese guerrillas surprised Müller and his men in Hangar #1. Even the surprise of an ambush can be a relative thing when the odds are stacked 5:1 against the attacker. The ambushers attack was short-lived and wholly unsuccessful. German Turn 11: A glider with a squad of assault engineers was the first German aircraft to use the newly captured airfield. The glider overshot the end of the runway. And that was fortunate, as at the exact moment the glider skidded off the runway, a British artillery barrage hit the airfield. Although the barrage landed squarely on the airfield s runways, Oblt. Müller s men were largely unaffected. The only German position hit by the artillery was Oblt. Müller s own position in Hangar #1. Cpl. Dief finally made contact with the Germans at the airfield. Dief assisted in the elimination of the Maltese guerrilla leader that had been hiding out south of the airfield. Allied Turn 11: The British artillery continued. Oblt. Müller did his best to keep up the morale of his troops, but the shelling was beginning to wear on his men. Lacking any true AT weapons, the Germans unsuccessfully tried to kill the Cruiser tank using their MGs. The other Cruiser continued to struggle s it tried to make it through the treeline. It got bogged, then unbogged, then bogged again. The British infantry continued their piecemeal attacks on the airfield. They continued to die and be driven off whenever they got too close to the German positions.
8 German Turn 12: More of the same with little effect MGs vs. Cruiser, more artillery, and more British infantry forced to retreat in the face of extremely heavy German fire. By this time, Cpl. Dief and the other German troops patrolling south of the airfield had returned to the area of the airfield and planned to move forward for a more direct (and closer) attack on the Cruiser near the airfield HQ. Allied Turn 12: Even though the British troops were having poor luck in their assaults on the airfield, a couple of their leaders became particularly stalwart, even heroic. For some reason, the British artillery adjusted 120m to the SW AWAY from the German positions at the airfield. The German MGs intensified their fire on the Cruiser tank. Bullets finally penetrated its armor. The tank s crew fled the tank under the German s fire and took cover under and behind the tank. The few British troops in the area charged the control tower. All but one of the Brits were pinned down. One, very brave, wounded British trooper actually made it into the control tower, but he was quickly cut down. German Turn 13: The Germans continued to drive away the British. Oblt. Klemmer and his engineers, armed to the teeth with flamethrowers and demolition charges, advanced away from their glider and into the treeline. Now, it would be even more difficult for the British to establish themselves to retake the airfield. Allied Turn 13: The situation was looking bleak for the Allies. The artillery fire ended. The British troops were disorganized. Those that weren t had a lot of open ground to cover before they would be anywhere close to any of the buildings at the airfield. Some British seemed resigned that the airfield could not be retaken and began to dig foxholes. Still, a squad of bicycle troops charged into the treeline. This boldness so shocked Oblt. Klemmer and his men that they did not react. British troops in the treeline was nothing new to Oblt. Müller s men. Their fire annihilated the audacious Brits. More British made it to the treeline. This time, the Germans were were unable to drive them all away. But, the Germans were well dug in at the airfield and they outnumbered the Allies in the area. This airfield was secure! Situation at Mission End: 1x 9-1; 1x 8-0; 7x 548; 2x 468; 1x 248; 1x 247; 3x LMG; 3x MMG; 1x (Br.) ATR Temporary assets attached: 1x SdKfz (Kettenkrad) Temporary reinforcements: 1x 9-1; 1x 548 (AE); 2x FT; 3x DC German casualties were 27 KIA (including Hpt. Metzler and Sgt. Gibler) and 11 wounded. The Allies suffered far worse. Enemy casualties were estimated at 97 KIA and 36 wounded, including a Bren carrier and a Cruiser tank. The British AA guns were unmanned, but the Germans had not taken the time to capture the AA gun at the end of the runway. Kompanie C was relatively intact as a fighting unit, but had lost two of its most experienced leaders. (Final battlefield map attached next page)
9
British Motor Company
 British Motor Company The first Motor Battalions formed part of the experimental pre-war Mobile Division, which would go on to become the British Army s first Armoured Division. Unlike its Infantry Battalion
OPERATION HANNIBAL THE SEIZURE OF CORINTH CANAL BRIDGE 27 TH APRIL 1941 (GREECE)
") OPERATION HANNIBAL THE SEIZURE OF CORINTH CANAL BRIDGE 27 TH APRIL 1941 (GREECE) BASED ON THE ORIGINAL SCENARIO BY COLIN RUMFORD UPDATED BY MARK PIPER. GRAPHICS BY COLIN. Background As the British and
OPERATION HANNIBAL THE SEIZURE OF CORINTH CANAL BRIDGE 27 TH APRIL 1941 (GREECE) BASED ON THE ORIGINAL SCENARIO BY COLIN RUMFORD UPDATED BY MARK PIPER. GRAPHICS BY COLIN. Background As the British and
Zeppelin The German Airship For use in Axis & Allies 1914 Board Game Historical Board Gaming v1.0
 1 2 Zeppelin The German Airship For use in Axis & Allies 1914 Board Game Historical Board Gaming v1.0 Overview The German airships were operated by the Army and Navy as two entirely separate organizations.
British Commando (1934/45)
") British Commando (1943/45) While originally formed as a raiding force to maintain a British presence on the Continent, the Commandos were employed as light infantry for the later part of the war. Each
British Commando (1943/45) While originally formed as a raiding force to maintain a British presence on the Continent, the Commandos were employed as light infantry for the later part of the war. Each
RUles summary. The TURN TURN SEQUENCE ORDERS MOVEMENT FUBAR CHART. Appendix II TROOP QUALITY AND MORALE OFFICER MORALE MODIFERS
 RUles summary The TURN TURN SEQUENCE 1. Orders phase 1. Draw an order die from the dice cup and hand it to the appropriate player. 2. The player chooses one of his units and gives it an order. Place the
Desert Pass Blitzkrieg Commander battle report
 Desert Pass Blitzkrieg Commander battle report 26th November 2007: Nik & Dean, Taunton, Somerset Desert Pass: Tunisia, January 1943 Afrika Korps v British & American allies DAK 1500 points v Allies 3000
Part C: World War I Trench Warfare
 Part C: World War I Trench Warfare Trench Warfare is a type of fighting where both sides build deep trenches as a defense against the enemy. These trenches can stretch for many miles and make it nearly
A SUPPLEMENT FOR BOLT ACTION CANADIANS. Second World War
 Second World War 1939 1945 A SUPPLEMENT FOR BOLT ACTION ARMY SPECIAL RULES The following special rule can be seen as an additional National Characteristic for the ones already mentioned in the Armies of
To hit Range Hit # Pen. Unit. Armor HE SA Speed Morale PV
 PzKw 38(t) A 15/45 5/3 4/2 4/2 4 3 15 PzKw 38(t) E 15/45 5/3 4/2 4/3 4 3 15 PzKw II A 12/36 6/3 2/1 2/2 0 3 12 PzKw II F 12/36 6/3 2/1 3/2 0 3 12 PzKw II L 12/36 6/3 2/1 3/2 0 3 15 PzKw II (F1) 12 -/-
Hungarian Setup. Bridge
 Hungarian Setup Bridge Wooded hill (woods with underbrush) with clear hilltop. Units on the hilltop can see over the woods Rough Terrain Ford* - somewhere on the river line. Unfordable River with Bridge
The Capture of Hubert-Folie
 The Capture of Hubert-Folie Now that Bras is taken, the 8 th Motor Battalion heads for Hubert-Folie, while the 3 Mon comes up to take its place in Bras. Unfortunately, German mortar fire pins them down
KAMPFGRUPPE KERSCHER
 By Casey Davies Updated on 2 June 201 1 KAMPFGRUPPE KERSCHER Battlegroup Kerscher Tank Company HEADQUARTERS HEADQUARTERS Kampfgruppe Kerscher HQ 3 You must field one platoon from each box shaded black
The Cauldron / Gazala, 1942 A Flames of War Mega-Game Scenario
 The Cauldron / Gazala, 1942 A Flames of War Mega-Game Scenario After the British success in Operation Crusader at the end of 1941, Rommel had been pushed all the way back to Cyrenaica and the key fortress
1st Armoured Regiment
 1st Armoured Regiment The 1st Armoured Regiment was raised on 7 July 1949, as part of the new Australian Regular Army. The regiment s nucleus consisted of personnel from the 1st Australian Armoured Car
KEY WEAPONS OF WWI. Gas Tanks Machine Guns Rifles and bayonets Grenades Artillery Submarines Flame Throwers Airplanes and zeppelins
 World War I Weapons KEY WEAPONS OF WWI Gas Tanks Machine Guns Rifles and bayonets Grenades Artillery Submarines Flame Throwers Airplanes and zeppelins GAS As World War I went on, poison gas was used more
D-DAY THE CANADIAN PUSH ON CARPIQUET AIRFIELD
 D-DAY + 1 - THE CANADIAN PUSH ON CARPIQUET AIRFIELD HISTORICAL EVENTS At 0745 hours on 7th June 1944 the Canadian 9th Infantry Brigade resumed their push inland from Juno Beach. The Stuart tanks of the
WARGAME RULES 20mm Scale Russo-German War c. 1943
 WARGAME RULES 20mm Scale Russo-German War c. 1943 Mike Adams December 2001 Ver 3 Based on Battle! by Charles Grant Setup The setup is determined by the scenario being played. Troops in cover may begin
Image 1. Wirbelwind based on Pz IV chassis.
 During the later years of World War II, the German air force had lost control of the air. This was particularly true on the western front. British and American planes roamed almost at will seeking ground
Panzer Grenadiers 255 MP (45) Munitions Halftrack 200 MP 15 Fuel. Vampire Halftrack 220 MP. Mortar Halftrack 240 MP 40 Fuel
 Munitions Halftrack 200 MP 15 Fuel. Vampire Halftrack 220 MP. Mortar Halftrack 240 MP 40 Fuel") Headquarters Kettenrad 165 MP Panzer Grenadiers 255 MP (45) 2 Panthers 1000 MP Panther Battle Group 120 MP 20 Fuel Panzer Elite Tech Tree Relic Patch v 2.300 Logistik 220 MP 20 Fuel Scout Car 220 MP Munitions
Headquarters Kettenrad 165 MP Panzer Grenadiers 255 MP (45) 2 Panthers 1000 MP Panther Battle Group 120 MP 20 Fuel Panzer Elite Tech Tree Relic Patch v 2.300 Logistik 220 MP 20 Fuel Scout Car 220 MP Munitions
DEFEAT IN THE CORNFIELDS
 DEFEAT IN THE CORNFIELDS BRAS, NORMANDY, JULY 19, 1944: On the second day of Operation Goodwood, several small towns still had to be taken before the main objective, the ridges beyond could effectively
THE BATTLE OF CELLENO By JC von Winterbach
 THE BATTLE OF CELLENO By JC von Winterbach CELLENO, ITALY, JUNE 10 th, 1944: On June 10 th, 1944, the 6 th South African Armoured Division deployed their entire 11 th South African Armoured Brigade in
(3rd Special Base Force) 1943 FORTIFIED COMPANY (TARAWA)
 1943 FORTIFIED COMPANY (TARAWA)") HEADQUARTERS HEADQUARTERS (2) Regimental HQ COMBAT PLATOONS 1943 FORTIFIED COMPANY (TARAWA) You must field the HQ and two Infantry Platoons. You may choose aditional Tanks, Artillery Support and Reserve.
HEADQUARTERS HEADQUARTERS (2) Regimental HQ COMBAT PLATOONS 1943 FORTIFIED COMPANY (TARAWA) You must field the HQ and two Infantry Platoons. You may choose aditional Tanks, Artillery Support and Reserve.
Convoy 678N Engagement Green Tab AAR
 Convoy 678N Engagement Green Tab AAR Scania LSA Anaconda Background Mission: 1075 th TC CO executes Iraqi Express mission to Theater Distribution Center at LSA Anaconda 20 March 2005. Convoy Organization:
VILLERS BOCAGE CAMPAIGN
 VILLERS BOCAGE CAMPAIGN HISTORY The Battle of Villers Bocage took place during the Second World War on 13 June 1944, one week after the Normandy Landings by the Western Allies to begin the conquest of
1/25/2017. Operation Sea Lion German Invasion of England & The Battle of Britain The Luftwaffe s Attempt to Gain Air Superiority & Beyond!
 Operation Sea Lion German Invasion of England & The Battle of Britain The Luftwaffe s Attempt to Gain Air Superiority & Beyond! 1 Led by Herman Goering WWI fighter ace / Hitler s deputy Condor Legion Experiences
Landships of Mogdonazia by John Bell
 Landships of Mogdonazia by John Bell These rules are made to interact with Larry Brom s The Sword and The Flame rules set. Anything not explained here might be found in TSATF. It should be noted that the
Silence The Gun. A scenario for General Glen s Combat Rules For Toy Soldiers
 A scenario for General Glen s Combat Rules For Toy Soldiers Silence The Gun One of a dozen gliders sent to carry British airborne troops to Caen took off from a remote airfield in Southern England during
Turnbull: A Micro Melee Scenario. Turnbull
 Turnbull Historical Background Amid the chaos that characterized the airborne operations on the morning of 6 June 1944, Lieutenant Turner B. Turnbull and 41 men of 3 rd Rifle Platoon Company D were dispatched
Armies of CHINA. Written by: Paul Beccarelli. Production: Mark Owen. Artwork from Men-At-Arms 424: The Chinese Army Osprey Publishing, Ltd.
 Armies of CHINA Written by: Paul Beccarelli Production: Mark Owen Artwork from Men-At-Arms 424: The Chinese Army 1937-49 Osprey Publishing, Ltd. ospreypublishing.com warlordgames.com This get-you-by Bolt
BATTLE OF THE CARATARRA FRANZIA FROM COLDWARS 2010
 BATTLE OF THE CARATARRA FRANZIA FROM COLDWARS 2010 The battle in question occurred on the 18 th of March 1937 between the C.T.V. (Italian Fascist) Littorio Motor Division under General Annabale Bergonzoli
TRIER, GERMANY. The Capture of Trier (March 1, 1945) Trier, the oldest
 Trier, the oldest") 37 TRIER, GERMANY d a y 1 4 T rier, Germany, was a mere 60 miles or so due east. It was half a day s journey. By the time the tank column was readied with fuel, ammunition, and water, and had been checked
37 TRIER, GERMANY d a y 1 4 T rier, Germany, was a mere 60 miles or so due east. It was half a day s journey. By the time the tank column was readied with fuel, ammunition, and water, and had been checked
The Daimler Fighting Vehicles Project Part Bm On Active Service 1947 to 1957 Suez and Egypt
 Egypt and the Suez Crisis ADD DETAILS AS THEY CAN BE FOUND The post war strain on Anglo-Egyptian relations came to a head on 26th July 1956 when President Nassar announced the nationalization of the Anglo-French
Ticket to Don Gamemaster s notes
 Ticket to Don Map Ticket to Don Gamemaster s notes Date: Jun 28th, 1942 Time: 0800 Location: East of Harkov, Ukraine Background: Summer of 1942 in the East Front began with huge Russian losses. In two
Imperial Guard Recon Forces
 Imperial Guard Recon Forces General Overview: While most people who face the Imperial Guard will see a relatively similar force, the guard is a massive juggernaut of forces made up from millions of planets
After Action Report. Key: 1. * = 1 Enemy A/C KIA # = 5 Enemy A/C KIA. / 2 = Half of an Enemy A/C KIA 1. / 3 = Third of an Enemy A/C KIA
 UNITED STATES DEPARTMENT OF WAR HEADQUARTERS 900th BOMB GROUP (H) BOMBER COMMAND FIFTEENTH AIR FORCE FIFTEENTH AIR FORCE STATION 300 SAN GIOVANNI AIRFIELD, ITALY APO 766 After Action Report Pilot: 1st
Bloody Buron. A Final Combat Scenario
 Bloody Buron A Final Combat Scenario Bloody Buron History For "Charnwood," Montgomery deployed the three divisions of the 1 British Corps, supported by artillery and naval guns offshore. A front of some
IV IL-2
 The Western Front... 3 The Eastern Front... 5 Who Are the Americans?...10 US Special Rules... 14 US Force Diagram...15 M4 Sherman Tank Company...16 M4 Sherman Tank Company HQ... 17 M4 Sherman (late) Tank
World War I Joseph Jackson Downs Douglas, Wesley Wright, and Samantha
 World War I 1917-1918 Joseph Jackson Downs Douglas, Wesley Wright, and Samantha World War I in 1917 Jan 19- Zimmerman Note Feb 1- Germans resume unrestricted submarine war fare. By February 28-8 American
WEAPONS WORLD WAR II: WAR ON LAND. 1. ARMORED WARFARE or BLITZKRIEG A. TANKS: Faster and more powerful they were organized into armored divisions.
 WEAPONS WORLD WAR II: WAR ON LAND World War II unleashed some of the most destructive weapons ever seen. Science and technology made tremendous breakthroughs. World War II exceeded the Great War in brutality.
Desert Duel Blitzkrieg Commander battle report
 Desert Duel Blitzkrieg Commander battle report 5th June 2007: Nik & Dean, Taunton, Somerset Desert Duel: October 1942 Italian & German army v British 8th Army Battle of Attrition: Axis 2000 points v Allies
Fallschirmjäger (1940/43)
") Fallschirmjäger (190/3) Fallschirmjäger in German means parachute rifleman. The Luftwaffe (German Airforce)expanded from its initial regiment of airborne troops at the beginning of the war to a Fallschirmjäger
Fallschirmjäger (190/3) Fallschirmjäger in German means parachute rifleman. The Luftwaffe (German Airforce)expanded from its initial regiment of airborne troops at the beginning of the war to a Fallschirmjäger
CRIMES AGAINST HUMANITY
 CRIMES AGAINST HUMANITY Editorial note: During the war, the PAVN (People's Army of Vietnam or North Vietnamese Army) used underage children, many of them below the age of 15, to wage war against South
THE FALL GELB CAMPAIGN
 THE FALL GELB CAMPAIGN This Chain of Command campaign shall focus on infantry fighting at the very beginning of the Fall of France, May 10-15, 1940. The campaign will last for a maximum of 9 Campaign Turns
Additions,and Updates to Wargame Rules. T. Sheil and A. Sheil All Rights Reserved
 Additions,and Updates to Wargame Rules. T. Sheil and A. Sheil All Rights Reserved Additions, Updates and Improvement s to Hans Und Panzer, Hans und Panzer Afrika Korps, Krunch a Commie and Grant s Battle
Table of Contents. Preface... x. Section 1. Assuming the Duties of Game Master Section 2. Generating Characters... 3
 Table of Contents Preface... x Introduction...x Intended Audience...x Equipment Needed...x Author s Notes and Acknowledgements... xi Section 1. Assuming the Duties of Game Master... 1 The Spreadsheet...1
Operation Sea Lion German Invasion of England & The Battle of Britain The Luftwaffe s Attempt to Gain Air Superiority & Beyond!
 Operation Sea Lion German Invasion of England & The Battle of Britain The Luftwaffe s Attempt to Gain Air Superiority & Beyond! 1 Led by Herman Goering WWI fighter ace / Hitler s deputy Condor Legion Experiences
Churchills in the Italian Campaign
 Churchills in the Italian Campaign Through mud and blood to the green fields beyond. 1 January 1944 31 October 1944 As a result of the relative success of the six Churchill IIIs that saw action during
Marines On Peleliu 1
 1 Marines On Peleliu A Pictorial Record Eric Hammel 232 Photos The American campaign in the western Pacific from the late summer 1944 to mid-1945 was a violent undertaking at every turn. The Japanese had
Service Battery: 1 medium ammo truck with AAMG and trailer
 3rd Armored Division [Experienced/8] Division Troops: Division (MG Maurice Rose) Division Headquarters Company: 1 M5 light tank 1 recon jeep with MG 1 57L52 AT gun and crew (integral bazooka) 1 M3 halftrack
ARRAS May 21, The History
 ARRAS May 21, 1940 The History On May 21, 1940 Lord Gort, commander of the BEF (British Expeditionary Force), orders a counterattack versus the 7th Panzer Division, commanded by General Rommel, supported
British equipment losses at Dunkirk and the post Dunkirk situation
 British equipment losses at Dunkirk and the post Dunkirk situation The Dunkirk evacuation represented massive losses in materials and equipment for the British army. In this article we are going to take
00 c0)0. This Document IS A HOLDING OF THE ARCHIVES SECTION LIBRARY SERVICES FORT LEAVENWORTH, KANSAS DOCUMENT NO. N COPY NO ,55.
0. This Document IS A HOLDING OF THE ARCHIVES SECTION LIBRARY SERVICES FORT LEAVENWORTH, KANSAS DOCUMENT NO. N COPY NO ,55.") 00 c0)0 5 3,55 y COLMIAD AiD STAFF COLLEGE FOiT ZIAVEITCRTH -t- KANSAS School of Combined Arms Regular Course 1946-1947 The Capture of Ubach (30th Inf. Div) (Break Out Area for 2nd. Armored Div.) North
00 c0)0 5 3,55 y COLMIAD AiD STAFF COLLEGE FOiT ZIAVEITCRTH -t- KANSAS School of Combined Arms Regular Course 1946-1947 The Capture of Ubach (30th Inf. Div) (Break Out Area for 2nd. Armored Div.) North
First Gulf War US vs Iraq
 First Gulf War vs Iraq by Jimbo 6000pts attacking strategic town v 3000pts dug in Iraqis I'm on defence and think I ve got the tactics to defeat the invading imperialists!! Here s my army (Iraq) 1 CO (CV8)
THE PIMPLE YOUR ORDERS PREPARING FOR BATTLE
 THE PIMPLE BEDA FOMM, LIBYA, 6 th FEBRUARY 1941: After their crushing defeats at their camps near the Egyptian border and at Bardia and Tobruk the Italian 10 th Army was in full retreat. But, units of
234 Brigade Nov LBBG-01 Infantry Brigade (Experienced) HEADQUARTERS ELEMENT. LBBG-02 Infantry Battalion BATTLE GROUPS
 HEADQUARTERS ELEMENT. LBBG-02 Infantry Battalion BATTLE GROUPS") 234 Brigade Nov 1943 LBBG-01 Infantry Brigade (Experienced) HEADQUARTERS ELEMENT x1 er x1 Morris MWD 15cwt Truck LBBG-02 Infantry Battalion HEADQUARTERS ELEMENT x1 er LBME-01 x4 Infantry Company BATTLE
234 Brigade Nov 1943 LBBG-01 Infantry Brigade (Experienced) HEADQUARTERS ELEMENT x1 er x1 Morris MWD 15cwt Truck LBBG-02 Infantry Battalion HEADQUARTERS ELEMENT x1 er LBME-01 x4 Infantry Company BATTLE
Future infantry squads shall be equipped with lighter, Safer, programmable but more lethal ammunition
 Future infantry squads shall be equipped with lighter, Safer, programmable but more lethal ammunition U.S. Army small-arms experts recently laid out a blueprint of future small-arms goals that would equip
Daily Staff Journal S3, HQ, 3d Sqdn, 4th Cav 29 Jan Jan 68
 Call Signs: Cen = Centaur Warrior =??? Division or 2d Brigade Vindicator = Arty FO S6 = Sqdn Cdr SA = Sabre Alpha (A Trp) SB = Sabre Bravo (B Trp) Killer = Artillery Battery Trojan = 2d Bn, 27th Inf Blaster
The Lexington Minute Men, Inc.
 The Lexington Minute Men, Inc. (Member of the Centennial Legion of Historic Military Commands, Inc.) The 2 nd Battle of Lexington Parker s Revenge Contact: Henry Liu Lexington Minute Men Event Coordinator
RESTRICTED AN 01 -SEC - 2 PILOT'S FLIGHT OPERATING INSTRUCTIONS FOR ARMY MODELS. B-24D and J
 RESTRICTED AN 01 -SEC - 2 FOR OFFICIAL USE ONLY PILOT'S FLIGHT OPERATING INSTRUCTIONS FOR ARMY MODELS B-24D and J This publication shall not be carried in aircraft on combat missions or when there is a
The Central Pacific: Tarawa (Gilbert Isles) and Kwajalein (Marshall Islands)
 and Kwajalein (Marshall Islands)") The Central Pacific: Tarawa (Gilbert Isles) and Kwajalein (Marshall Islands) 1 2 Kwajalein Atoll (Marshall Islands) 3 4 Kwajalein Atoll 5 6 Admiral Nimitz made Kwajalein the prime goal, but he wanted to
The Central Pacific: Tarawa (Gilbert Isles) and Kwajalein (Marshall Islands) 1 2 Kwajalein Atoll (Marshall Islands) 3 4 Kwajalein Atoll 5 6 Admiral Nimitz made Kwajalein the prime goal, but he wanted to
6th Airborne Armoured Recce Regiment
 6th Airborne Armoured Recce Regiment On inspection we had a bit of paint missing and bullet holes in the tool boxes. Once again we had been lucky. Sergeant Sheffield, 6th Airborne Armoured Recce Regiment
Medal of Honor Microsite - SSG Carter Battlescape
 Medal of Honor Microsite - SSG Carter Battlescape 1 - Area of Operations/Initial Attack (TERRAIN VIDEO Same as Romesha) Transitions into slide below Combat Outpost, or COP, Keating, was a company-sized
The Diary of 9 Platoon of 3 Company, 27 (Machine Gun) Battalion at Sidi Rezegh
 Battalion at Sidi Rezegh") The Diary of 9 Platoon of 3 Company, 27 (Machine Gun) Battalion at Sidi Rezegh From 23 November until 1 December 1941, while under the command of New Zealand s 6 Brigade, 9 Platoon was in action on the
The Diary of 9 Platoon of 3 Company, 27 (Machine Gun) Battalion at Sidi Rezegh From 23 November until 1 December 1941, while under the command of New Zealand s 6 Brigade, 9 Platoon was in action on the
Tankette Waltz. Movement:
 Tankette Waltz From the 1920s until the late 1930s, tank design was a novelty. Many theories were attempted. A common clash was between proponents of infantry versus cavalry. Infantry design wanted tanks
Test of. Bell AH-1S Cobra. Produced by Area-51 Simulations
 Test of Bell AH-1S Cobra Produced by Area-51 Simulations The Bell AH-1 Cobra is a two bladed, single engine, two crew attack helicopter produced by Bell Helicopters since the mid 1960s. The Cobra shares
PART II. Designed to play Company to Brigade sized WWII wargames. Simultaneous turns ensuring the players are always involved.
 PART II SUPPORT MATERIAL FOR BLAZE AWAY WWII Designed to play Company to Brigade sized WWII wargames. Game time 1-4 hours. Simultaneous turns ensuring the players are always involved. Basic unit is a stand
TOBRUK AAR of Strategy & Tactics #278 Tobruk 1941
 Tobruk, with the German 15 th and 21 st Panzer Divisions deployed to the east and other Italian formations covering the coastal positions. The Axis can win a sudden death victory if they manage to capture
Desert Hills Blitzkrieg Commander battle report
 Desert Hills Blitzkrieg Commander battle report 9th May 2007: Nik & Dean, Taunton, Somerset Desert Hills: October 1942 Italian & German army v British 8th Army Deliberate Attack: Axis 2005 points v Allies
US 2nd MARINE DIVISION
 HEADQUARTERS HEADQUARTERS (2) Regimental HQ COMBAT PLATOONS You must field the HQ and two Marine Platoons and one Transport Platoon. You may choose additional Tanks, Artillery Support and Reserve. INFANTRY(2)
GOAL To examine the realities of trench warfare.
 GOAL To examine the realities of trench warfare. What is Trench Warfare? Cross-section of a front-line trench Type of fighting during World War I in which both sides dug trenches protected by mines and
IMPERIAL JAPAN. Armies of. Frontispiece artwork: Peter Dennis. Artwork courtesy of Osprey Publishing. Production and Photography: Mark Owen
 Armies of IMPERIAL JAPAN Frontispiece artwork: Peter Dennis Artwork courtesy of Osprey Publishing Production and Photography: Mark Owen Miniatures painted by: Bruce Murray & Andrés Amián Fernández ospreypublishing.com
More than 7,600 Canadian troops died fighting in the Netherlands. The last months of the Second World War, The Canadian military was given the
 Liberation of the Netherlands Notes More than 7,600 Canadian troops died fighting in the Netherlands. The last months of the Second World War, The Canadian military was given the dangerous job of liberating
10 Critical Paint Meter Mistakes That Cost Unsuspecting Car Dealers A Fortune
 10 Critical Paint Meter Mistakes That Cost Unsuspecting Car Dealers A Fortune What You Learn In This Report Can Add $1,000's Of Additional Profit To Your Bottom Line...Every Month And Help You Avoid Disastrous
British Destroyers And Frigates: The Second World War And After By Norman Friedman READ ONLINE
 British Destroyers And Frigates: The Second World War And After By Norman Friedman READ ONLINE 66 Cruisers, mainly post-world War 1 with some older ships converted for AA duties These were based on the
Ginkel Heath DZ Y. 18th September 1944 Scenario written by Andy Parkes
 Ginkel Heath DZ Y 18th September 1944 Scenario written by Andy Parkes Overall Situation:- British View 1st Airborne Divison 13:00h, 17th Sept 1944 Holland. The 1st Airborne Division consisted of two parachute
UMPIRE NOTES Circa 1944 (Version of 22 October 2017)
") UMPIRE NOTES Circa 1944 (Version of 22 October 2017) The US Army Umpire concept during World War II was first documented in a mimeograph dated February 1941. Subsequently the Army produced two Umpire manuals;
UMPIRE NOTES Circa 1944 (Version of 22 October 2017) The US Army Umpire concept during World War II was first documented in a mimeograph dated February 1941. Subsequently the Army produced two Umpire manuals;
Russian Urban Tactics:
 BQ ß 7 D na & IL tu s ß g ra @ s Hü BS 0 WE R 0 TV STRATEGIC FORUM INSTITUTE FOB NATIONAL STRATEGIC STUDIES by Lester W. Grau, Foreign Military Studies Office Note Background Conclusions Russian Urban
Tiger Leader Update Kit August 26, Beta 1.2
 Tiger Leader Update Kit August, 0 - Beta. I have been working with Christopher Dean and Rick Martin to assemble this Tiger Leader Update Kit. We are distributing this kit in PDF format for now to get it
Warfare at Reading 2014:- Juniville June 10 th 1940.
 Warfare at Reading 2014:- Juniville June 10 th 1940. My first outing as Umpire and hosting the annual Big Game. The German offensive is prepared for the 9 th June morning. During this battle, 5 French
Stolberg Campaign German Forces v1.3 (1 hex = 1200 yards map) Command Decision Test of Battle By Jeff Glasco
 Command Decision Test of Battle By Jeff Glasco") LXXXI Corps Transport: (Trained/6) (Langerwehe L4) 8 medium trucks 9th Panzer Division: (Experienced/9) Division (Walheim J18) (Major General Gerhard Mueller) Division Headquarters Company: (Walheim J18)
LXXXI Corps Transport: (Trained/6) (Langerwehe L4) 8 medium trucks 9th Panzer Division: (Experienced/9) Division (Walheim J18) (Major General Gerhard Mueller) Division Headquarters Company: (Walheim J18)
THE PUSAN PERIMETER. ~_-,dj.~~~!~; Reworked M4A3 of A Company, 89th Tank Battalion, with units of the 29th Infantry Regiment, August, 1950.
 Mines were an ever present danger to tanks. This Marine M-26 lost its right tread to a mine while leading an advance against North Korean troops near Myong-ni. Extra gear is being carried over the entire
Examples and Little Stories
 Examples and Little Stories The following pages are short sections of wargames chosen to illustrate a range of rules that appear in Heroes All and Fight Your Own Battles. Most relate to solo games but
Operation Grouser I The Sequel to Hickory II (September1, 1967)
") Operation Grouser I The Sequel to Hickory II (September1, 1967) One Long Day In writing this narrative, it is my hope that others who participated in Grouser I will offer their recollections so that a
Operation Grouser I The Sequel to Hickory II (September1, 1967) One Long Day In writing this narrative, it is my hope that others who participated in Grouser I will offer their recollections so that a
Organization of British Armored Divisions Structure and Divisional Elemental Assignments By Division
 Organization of British Armored Divisions Structure and Divisional Elemental Assignments By Division 1939-1945 Part One: The following section provides the internal structure of the British armored division
G R R A R R M 1 1 E 3 3 R 3 4
 G R R R 3 Platoon: Panzer Grenadier Platoon Unit Name: No. 1 Rifle quad dr Name: Weapon M Pen HtH Rifle 12 2 8 1 0 MG 3(2) 6(2) 12 0 +2 MG-2 (MG) 12(2)2(3)8(2) 1-1 MG-2 (MMG) 1(3)30(3)60(3) 1-1 Hand 1
Table of Contents. Preface... xi. Section 1. Assuming the Duties of Game Master Section 2. Generating Characters... 5
 Table of Contents... xi Introduction... xi Intended Audience... xi Equipment Needed... xi Author s Notes and Acknowledgements... xii Section 1. Assuming the Duties of Game Master... 1 Spreadsheet...2 Section
A Case Study: US-Somali Relations
 A Case Study: US-Somali Relations Independence and Union July 1, 1960 British Somaliland (North) Italian Somaliland (South) President Siad Barre October 21, 1969 January 26, 1991 Somali-Ethiopian War 1977-1978
Artillery Factors in the Dunnigan System
 Artillery Factors in the Dunnigan System By Alan R. Arvold Way back when Panzer- Blitz was first being developed, Dunnigan and crew created a rather complex system of determining the counter values for
US BG-01->BG-03. Command X1 M4 75mm Sherman Tank US-02. MANEUVER ELEMENTS ME-01 X1 Light Tank Company
 Battle Group-01 Combat (2 or 3 per 1944-45 Light Armored Div.) US BG-01->BG-03 X1 er US-19 X1 Jeep US-13 Alternative x1 er US-19 x1 M5 Stuart Tank US-01 BATTLE GROUPS BG-02 x1 Armor Heavy Task Force (Armor
Technology DURING TANKS. Tracer Bullets
 & WARFARE WWI Technology DURING TANKS The Allies began developing these armored landships in 1915, but the first tanks didn t make their way into battle until the Somme offensive the following year. So
Additional Units. Written by: Alessio Cavatore. Frontispiece artwork: Peter Dennis. Production and Photography: Mark Owen
 TM Additional Units A s our range grows, we might be adding to the Bolt Action game system a few units that are not covered by the already vast list of units in our Armies of supplements. To allow you
TANK BATTLE AT JUVELIZE 22 nd September 1944 (Lorraine, France) A Rapid Fire scenario V 1.3 By Brad Smith and Mark Piper
 A Rapid Fire scenario V 1.3 By Brad Smith and Mark Piper") TANK BATTLE AT JUVELIZE 22 nd September 1944 (Lorraine, France) Background A Rapid Fire scenario V 1.3 By Brad Smith and Mark Piper In September 1944, Patton s US Third Army fought a series of armoured
TANK BATTLE AT JUVELIZE 22 nd September 1944 (Lorraine, France) Background A Rapid Fire scenario V 1.3 By Brad Smith and Mark Piper In September 1944, Patton s US Third Army fought a series of armoured
Passenger Dies When Semi-Truck Trailer Hits Cow In Roadway Incident Number: 05KY089
 Passenger Dies When Semi-Truck Trailer Hits Cow In Roadway Incident Number: 05KY089 Tractor-trailer cab involved in fatal crash. Cab was cut away with torches so EMS personnel could reach occupants and
(C-10) (C-13) 6. GUNNERY COMBAT PHASE Players declare firing ships For each fire combat:
 (C-13) 6. GUNNERY COMBAT PHASE Players declare firing ships For each fire combat:") MICRONAUTS: THE GAME - WWII COMBAT TABLE CARDS Use this page to keep track of steps involved in each game phase. Tables are grouped on the following pages according to function. 1. INITIATIVE/COHESION
MICRONAUTS: THE GAME - WWII COMBAT TABLE CARDS Use this page to keep track of steps involved in each game phase. Tables are grouped on the following pages according to function. 1. INITIATIVE/COHESION
DESERT RATS. Command & Control. Sand & Steel in the Western Desert 1941/42
 DESERT RATS Sand & Steel in the Western Desert 1941/42 Introduction These rules are intended to provide a framework for tank battle games set in the Deserts of north Africa in World War 2. The basic groups
Burning Alps (Warhammer 40,000 8th Edition) [111 PL, 1999pts]
![Burning Alps (Warhammer 40,000 8th Edition) [111 PL, 1999pts]](/thumbs/89/99961093.jpg "Burning Alps (Warhammer 40,000 8th Edition) [111 PL, 1999pts]") Burning Alps (Warhammer 40,000 8th Edition) [ PL, 999pts] Patrol Detachment (Imperium - Adeptus Custodes) [50 PL, 995pts] Rules: Aegis of the Emperor, Sworn Guardians, The Emperor's Chosen HQ [0 PL, 250pts]
Burning Alps (Warhammer 40,000 8th Edition) [ PL, 999pts] Patrol Detachment (Imperium - Adeptus Custodes) [50 PL, 995pts] Rules: Aegis of the Emperor, Sworn Guardians, The Emperor's Chosen HQ [0 PL, 250pts]
By Phil Yates and Wayne Turner
 By Phil Yates and Wayne Turner Updated on 19 Dec 2012 Führer PanzerGrenadiierkompanie Leader s Motorised Grenadier Company Infantry Company Motivation and Skill The Panzergrenadier battalions were newly-raised,
The Toron Dominion. The troopers in the foreground are members of the 82nd Nordonian Strikers, equipped with full armor and medium automatic rifles.
 The Toron Dominion PRONGHORN T-48 medium hover tank The Pronghorn is a conventional hover tank designed to combine speed and firepower. Its reliable armament package is mounted in a fully-rotating turret
US Weapons of the. Persian Gulf War
 US Weapons of the Persian Gulf War Objectives: Identify the difference between Desert Shield and Desert Storm. Describe weapons used by the United States in the air war against Iraq. Describe weapons used
The Guys : Same place in 2004:
 Context: Few days after D-day operations, we are located on the West side of Caen. In the area of N13 road and Paris Cherbourg railway line, Canadians and Germans are facing each other On June 08th 1944