BOTTOM PLOW OWNERS MANUAL MOLDBOARD PLOWS
|
|
|
- Loreen Richard
- 6 years ago
- Views:
Transcription


1 1 BOTTOM PLOW OWNERS MANUAL MOLDBOARD PLOWS
2 To The Owner: Read this manual before using your moldboard plow. The information presented will prepare you to do a safer, better job. Study this manual and become acquainted with all adjustments before attempting to operate your new implement. This moldboard plow has been carefully manufactured to provide dependable and satisfactory use. Observe all safety information in this manual. WARNING Be sure that the tractor s front end is weighted to maintain stability. Tractor front end weight should be at least 20% of the total tractor weight with the equipment in the raised position. WARNING To avoid tire damage always check the tire clearance immediately after making top link, and / or wheel spacing adjustments. WARNING The plow is equipped with shearbolt protection. Replace the shearbolt with a grade 2 bolt only. Use of a stronger bolt will void the warranty and may damage the plow. SAFETY SUGGESTIONS: 1. Read and understand the owner s manual for both the tractor and the implement. 2. Do not walk on the implement. 3. Do not adjust implement while it is in motion. 4. Keep all bolts tight, and all nuts in place. 5. Do not work on or under the implement. 6. Do not stand between implement and tractor. 7. Keep implement in good operating condition. 8. Operate all controls from tractor seat. 9. Only the operator should be allowed on the tractor during operation. 10. Use front weights according to your tractor manual to provide front end stability. 11. Always lower the implement to the ground when not in use. 12. Use extreme care when transporting implement particularly over rough ground, ditches, or slopes. 13. Do not transport over 10 miles per hour. 14. Before performing any maintenance or inspecting an implement, lower to the ground, turn off tractor engine and block as required.
, but do not remove the bolt. 2.")
 from the Angles ( P-8 ) that are holding the Cross Shaft Assembly ( P-1 ) in place. 4.")
3 Plow Assembly Instructions Plows are shipped with the 3-point hitch in the down position to save on shipping costs. Before you can use the plow, it must be assembled in the upright position. The instructions for doing so are as follows: Refer to the next 6 pictures for parts descriptions. 1. Remove the 5/8 nut from the back of the Rear strut ( P-4 ), but do not remove the bolt. 2. Remove the 5/8 x 4 bolt, nut, and lock washer from the front end of the Rear Strut ( P-4 ) that holds the Top Link of the hitch together. 3. Remove the U-Bolts ( M-37 ) from the Angles ( P-8 ) that are holding the Cross Shaft Assembly ( P-1 ) in place. 4. Disassemble the Front Struts ( P-3 & P-6 ), Rear Strut ( P-4 ), Strut Bushing ( P-13 ), and the Cross Shaft Assembly ( P-1 ) and lay the parts aside temporarily. 5. Loosen the 5/8 x 2 1/2" bolts and rotate the Angles ( P-8 ) 180 degrees and re-tighten them. 6. Reposition the Cross Shaft Assembly ( P-1 ) on top of the frame over the Angles ( P-8 ). 7. Re-assemble the Front Struts ( P-3 & P-6 ), Rear Strut ( P-4 ) and the Strut Bushing ( P-13 ), and reposition them on the top of the Cross Shaft Assembly ( P-1 ). Then put the U-bolts ( M-37 ) back in place over the Front Struts ( P-3 & P-6 ) and Cross Shaft Assembly ( P-1 ). Re-tighten all fasteners beginning with the Rear Strut ( P-4 ). 8. Remove the Category I Link Pins ( MB-6 ) and turn them around and retighten them. The plow is now ready to use.


4
5
6

7

 and welded Seat Clamp ( P-61 ) as shown in the pictures below. Tighten only until snug.")
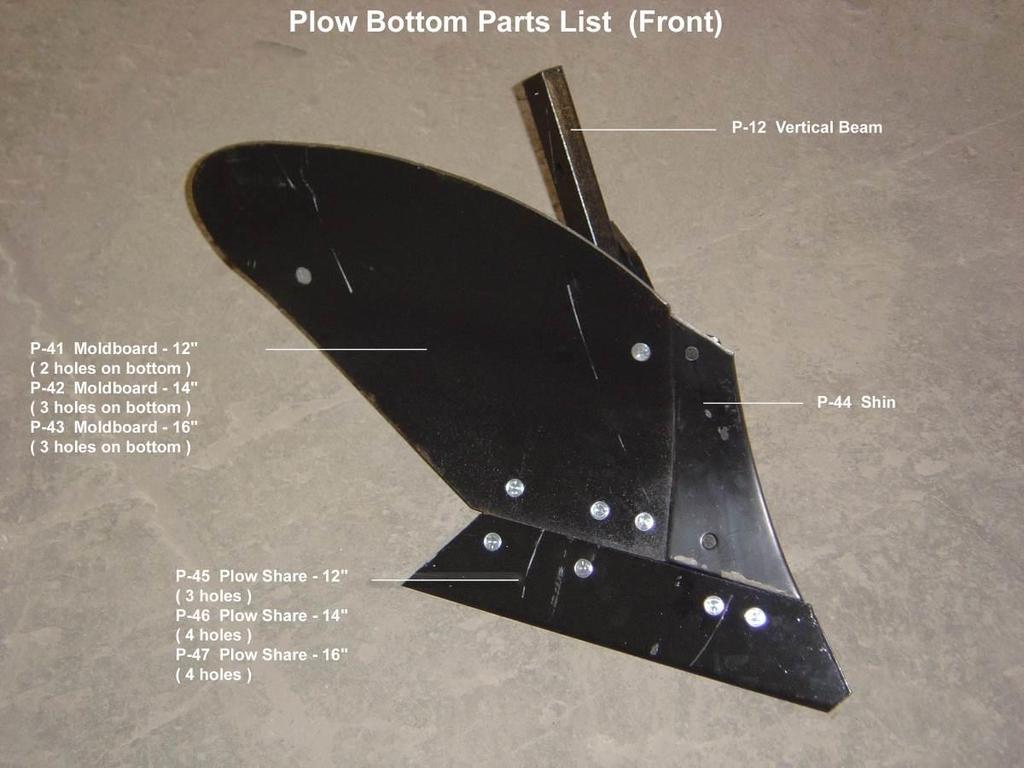
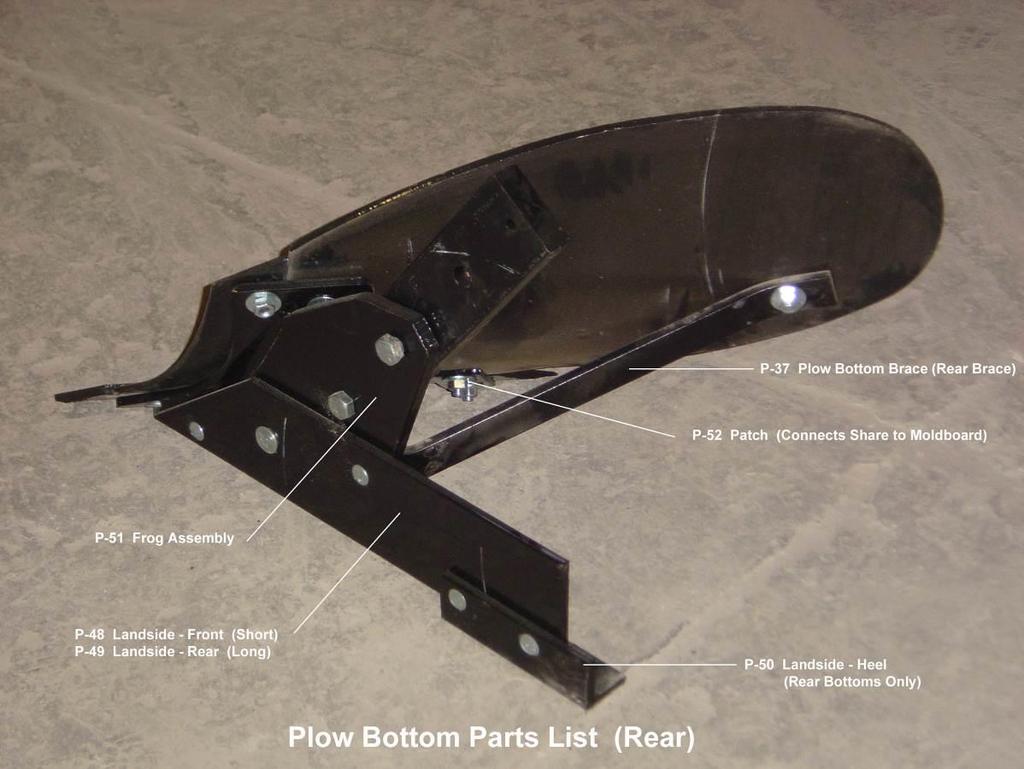
8 Plow Coulter NOTE: Rolling Coulters should be used on plows at all times. With disc coulters correctly set, plowing will be smoother and neater. Plows will pull easier. The rolling coulter disc outlines the cut of the plow bottom. It cuts through sod, surface trash, aids in securing clean, uniform furrows, reduces draft and lessens wear on the cutting edge of the plow bottom. Coulter Mounting Mount the Coulter stem on the plow frame using the U -bolt ( P-62 ) and welded Seat Clamp ( P-61 ) as shown in the pictures below. Tighten only until snug. Coulter Adjustment To adjust the Coulter, twist the stem to get the lateral adjustment, and raise or lower it to get the proper height. The rolling Coulter should only be positioned far enough to the left of the Landside ( P- 49 ) to allow a clean, straight furrow wall. For average conditions set the coulter blade between a 1/2 inch and 5/8 inch to the left of the landside. Loose ground and tough scouring conditions will sometimes require the coulter to be set a little wider. The rolling coulter should be set deep enough to cut trash and leave a clean furrow wall. It should not be run too deep or it will push trash instead of cutting it. Under all conditions, try to maintain a greater distance between the top of the Shin ( P-44 ) and the rear of the coulter blade and a lesser distance between the bottom of the coulter blade and the shin. In hard ground conditions raise the coulter to reduce the tendency toward riding the plow out of the ground. In light and loose soils, especially when there is heavy or rough trash, move the coulter down. Tighten U bolts when adjustments are completed. Note: coulter blades must be kept sharp.
 with lock washers and nuts provided as shown in the picture below.")
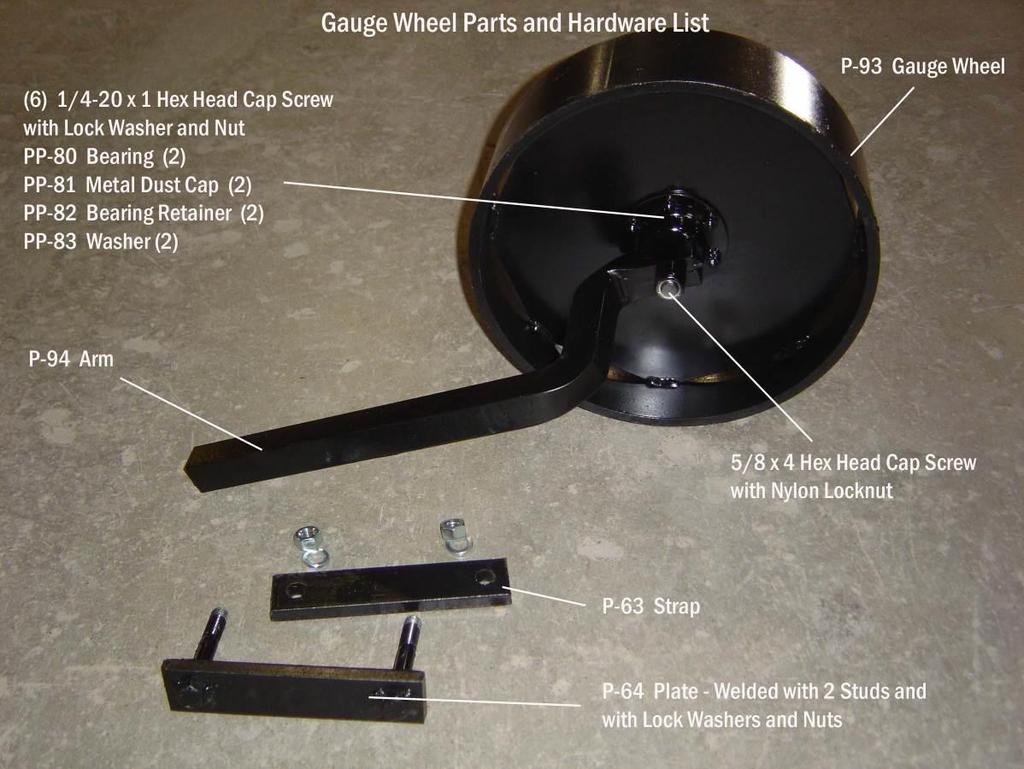
9 Gauge Wheel The Gauge Wheel is shipped assembled and has only to be bolted to the Short Bar ( P-11 ) using the Clamp Assembly ( P-63 & P -64 ) with lock washers and nuts provided as shown in the picture below. Depth adjustment is made by sliding the gauge wheel through its clamp.
10 Cross Shaft & Link Pin Adjustments After connecting the plow to the tractor, it is necessary to adjust the plow so that it is trailing the tractor correctly to obtain optimum performance. In these instructions, when referring to the left or right, please note that left and right is as if you were sitting on the tractor. To obtain optimum performance, you must position the plow so that the outer tip of the Plow Share ( P-45 ) is trailing near the center of the right rear tractor tire. This can be achieved by loosening the U-bolts ( M-37 ) holding the Cross Shaft Assembly ( P-90 ) to the frame and slide it to the left or right. It will also be necessary to adjust the lift arms and turnbuckles on the tractor as well. To adjust the amount of resistance, you can reposition the right Link Pin ( MB-6 ) forward or backwards. Moving the link pin forward decreases the amount of resistance and or cut. Moving the link pin backward increases the resistance and or cut. After you make your first furrow or pass, you may have to re-adjust the plow because the right rear tractor tire will then be traveling in the previous cut furrow.
11 LIMITED WARRANTY A & B Equipment, Inc. warrants its products to be free of defects in material and workmanship for a period of 1 year from the date of purchase, under normal use and service providing the equipment is purchased for individual and not commercial use. Defective parts must be returned to A & B Equipment, Inc. at owner s expense for inspection. The obligation of A & B Equipment, Inc. under this warranty shall be limited to shipment, to the original purchaser at retail, of the parts of equipment intended to replace the part or parts acknowledged by A & B Equipment, Inc. to be defective in material or workmanship and does not include any installation or transportation costs. No warranty is made with respect to items made by others, since such items are warrantied by their respective makers. No liability is assumed for expenses or damages resulting from the malfunction or interruption in operation of equipment. This warranty does not apply to any equipment which has been damaged, in any accident, or by fire, flood, act of God, or which has been subjected to abuse, misuse, negligence, alterations, and / or tampering. Purchaser s exclusive remedy for breach of warranty, other defect, or conduct giving rise to liability shall be the repair or replacement of the product sold, and the manufacturer under no circumstances shall be liable for economic loss or incidental consequential damages. Effective upon the expiration of this limited warranty ( one year from the date of purchase), the manufacturer disclaims all implied warranties, including the warranty of merchantability and fitness. A & B Equipment, Inc. reserves the right to make improvements and changes in specifications without notice or obligation to modify previously sold units.
3-Pt. Subsoiler. Owner s Manual
 3-Pt. Subsoiler Owner s Manual WARNING: Read carefully and understand all ASSEMBLY AND OPERATION INSTRUCTIONS before operating. Failure to follow the safety rules and other basic safety precautions may
EverythingAttachments Compact & Field Plows
 EverythingAttachments Compact & Field Plows OWNER AND OPERATOR S MANUAL CAUTION SAFETY FIRST READ ALL PAGES BEFORE USING Seller or Owner Should Pass On This Manual to User T.C. Corriher Implement Co. Inc.
AGCO. Corn Header Manual d HEADSIGHT.COM
 AGCO Corn Header Manual 09020401d HEADSIGHT.COM 574.546.5022 About Headsight Headsight Contact Info Headsight, Inc. 4845 3B Road Bremen, IN 46506 Phone: 574-546-5022 Fax: 574-546-5760 Email: info@headsight.com
Operator s Manual & Repair Parts Manual. Do Not Use or Operate This Equipment Until You Have Read and Understand This Manual
 Operator s Manual & Repair Parts Manual Do Not Use or Operate This Equipment Until You Have Read and Understand This Manual The purpose of this manual is to explain maintenance requirements and adjustments
TRACTOR QUICK HITCH CATEGORY 2
 TRACTOR QUICK HITCH CATEGORY 2 Assembly & Operation Manual June 2007 Form: QuickhitchCat2 TABLE OF CONTENTS SECTION PAGE 1 Safety Information... 1 1.1 Training... 1 1.2 Before Operation... 1 2 Specifications...
Owner s Manual SB5010 Broadcast Spreader. Caution: Read all Safety Instructions and Operating Instructions Carefully.
 Manufacture s Limited Warranty for Broadcast Spreader Owner s Manual SB00 Broadcast Spreader The limited warranty set forth below is given by Precision Products Incorporated with respect to new merchandise
Installation Instructions
 Installation Instructions CUSTOM QUICK INSTALL MOUNTING KIT 2011 & UP Ford Super Duty F-250/F-350/F-50 2011 & UP Part Number: 50073 WARNING: Under no circumstances do we recommend exceeding the towing
Installation Instructions **THIS RAIL MOUNTING KIT USES 11 BOLTS**
 Installation Instructions CUSTOM QUICK INSTALL MOUNTING KIT FORD SUPER DUTY Part Numbers: 50074 WARNING:Under no circumstances do we recommend exceeding the towing vehicle manufacturers recommended vehicle
RED23305 Owner s Manual
 RED23305 Owner s Manual 5 foot, 3-Point Mounted Snow Blower 270 West Park Avenue Huron, SD 57350 866-526-5682 Serial Number: Date of Purchase: Red Devil Snow Blower See Figure 1. 1. The Red Devil Snow
ATV BLADE HARDWARE. Owner s Manual
 1701 38TH AVE W PO BOX 257 SPENCER, IA 51301 PHONE: 712-262-4191 FAX: 712-262-0248 SERVICE: 800-841-2222 E-MAIL: ccac@cyclecountry.com www.cyclecountry.com ATV BLADE HARDWARE For POLARIS ATVs Owner s Manual
Model 35 PARTS MANUAL
 Model 35 PARTS MANUAL Version 3-2007 Ashland Industries Inc. 1115 Rail Drive P.O. Box 717 Ashland, WI. 54806 Ph: 877-634-4622 Toll Free Ph: 715-682-4622 Fx: 715-682-9717 www.ashlandind.com Model 35 Scraper
Quadratec Aluminum Transfer Case Skid Plate
 Quadratec Aluminum Transfer Case Skid Plate Installation Manual for 07-Current Wrangler (JK) 2 or 4 Door # 12500.0213 Note: This skid plate must be used in conjunction with the Engine & Transmission Skid
Table of Contents. Technical Information Warning Statement
 Table of Contents Technical Information-----------------------------------1 Warning Statement--------------------------------------2 Read Before Riding-------------------------------------3 List of Parts-----------------------------------------------4
Gold Operator Manual
 Gold Operator Manual Call ProMow for ALL Service Needs Toll Free: 1-877-477-6669 Dear Valued Customer. Let me take this opportunity to congratulate you on your purchase of a ProMow Reel Mower System. You
04 & 14 F FRONT 1.0 REAR LEVELING KIT INSTALLATION
 INSTRUCTION PART NO 15312 KIT NO 3836 04 & 14 F-150 2.0 FRONT 1.0 REAR LEVELING KIT INSTALLATION READ INSTRUCTIONS COMPLETELY THROUGH BEFORE STARTING. FAILURE TO ADHERE TO THE INSTRUCTIONS WILL VOID ANY
4745 Drill OWNER'S MANUAL (06-08) #
 #") 4745 Drill OWNER'S MANUAL (06-08) # 605865 Identification Your CrustBuster drill is identified by a Serial Number and Model Number. Record these numbers in the spaces provided in this manual and refer
4745 Drill OWNER'S MANUAL (06-08) # 605865 Identification Your CrustBuster drill is identified by a Serial Number and Model Number. Record these numbers in the spaces provided in this manual and refer
COVER PAGE CUSTOM QUICK INSTALL MOUNTING KIT NOTE!
 COVER PAGE NOTE! Prior to installing product, please visit one of our websites to assure your kit contains the most recent revision to installation instruction and verify vehicle application. www.reeseproduct.com
Installation Instructions
 85-3700 rev. 08 05-18 Installation Instructions Thank you for purchasing this antisway bar kit. Please read through these instructions before installation. Front Anti-Sway Bar Kit for the F53 Chassis part
Warning Statement Read Before Riding
 Table of Contents Technical Information-----------------------------------1 Warning Statement--------------------------------------2 Read Before Riding------------------------------------- List Of Parts-----------------------------------------------4
FORM: S-tine Cultivator.QXD
 "S" TINE CULTIVATOR Operation, Service & Parts Manual For GST Series FORM: S-tine Cultivator.QXD February 2003 TABLE OF CONTENTS Introduction/Assembly.....................1 General Maintenance.....................1
HSIV PLOW OPERATOR S MANUAL
 PLOW RWF INDUSTRIES 873 Devonshire Ave., Woodstock, Ontario N4S 8Z4 Tel: (519) 421-0036 Toll Free: 1-800-263-1060 Fax: (519) 421-0028 Email: parts@rwfbron.com JANUARY 2015 THE INFORMATION CONTAINED IN
Installation Instructions
 85-4592 rev. 08 02-18 Installation Instructions Thank you for purchasing our sway bar kit. Please read through these instructions before installation. Auxiliary Rear Anti-Sway Bar Kit for Ford F53 part
OPERATOR S MANUAL MODEL RS-2
 MODEL RS-2 SC500G2A THIS MANUAL CONTAINS THE OPERATING INSTRUCTIONS AND SAFETY INFORMATION FOR YOUR SCAG ACCESSORY. READING THIS MANUAL CAN PROVIDE YOU WITH AS- SISTANCE IN MAINTENANCE AND ADJUST- MENT
ROTARY TILLER. Operation, Service & Parts Manual For "AS" Series. FORM: ASTillerBook.QXD
 ROTARY TILLER Operation, Service & Parts Manual For "AS" Series FORM: ASTillerBook.QXD April 2002 TABLE OF CONTENTS Preparation......................................1 Assembly Instructions.............................2
KAWASAKI. BAYOU 400 4x4
 1701 38TH AVE W PO BOX 257 SPENCER, IA 51301 PHONE: 712-262-4191 FAX: 712-262-0248 SERVICE: 800-841-2222 E-MAIL: ccac@cyclecountry.com KAWASAKI BAYOU 400 4x4 Instruction Manual ATV BLADE HARDWARE MODEL
Quadratec Dual Steering Stabilizer Kit
 Quadratec Dual Steering Stabilizer Kit Installation Manual: for 97-06 (TJ) Wrangler # 16116.0202 PARTS LIST: Steering Damper - Qty 2 Black Boot & Boot Tie - Qty 2 (each) Decal - Qty 2 Hourglass Bushing
Model:M5B/M5W/M5N. Installation Guide. Specifications Desktop Weight Capacity Keyboard Tray Weight Capacity Height Adjustable Range
 Model:M5B/M5W/M5N Installation Guide Website: www.flexispot.com Tel: 1-855-421-2808 Specifications Desktop Weight Capacity Keyboard Tray Weight Capacity Height Adjustable Range 33 Ibs (15 KG) 4.4 Ibs (2
Installation Manual. 3 suspension system Toyota Tacoma 4WD & 2WD prerunner. Part # Part # Important customer information:
 Installation Manual 3 suspension system 2005-2018 Toyota Tacoma 4WD & 2WD prerunner Part # 53908 SS03012017 Part # 53908 2007-2018 Toyota Tacoma 4WD & 2WD Prerunner 3 Suspension System (no strut disassembly)
Installation Instructions
 85-3910 rev. 03 01-18 Installation Instructions Thank you for purchasing the antisway bar kit. Please read through these instructions before installation. Rear Anti-Sway Bar Kit for Ford F-250/F-350 part
DRAGO. Corn Header Manual f HEADSIGHT.COM
 DRAGO Corn Header Manual 09020801f HEADSIGHT.COM 574.546.5022 About Headsight Headsight Contact Info Headsight, Inc. 4845 3B Road Bremen, IN 46506 Phone: 574-546-5022 Fax: 574-546-5760 Email: info@headsight.com
I-130 XL PARTS MANUAL Introduced 4/01/01
 I-130 XL PARTS MANUAL Introduced 4/01/01 Ashland Industries Inc. Hwy. 13 South P.O. Box 717 Ashland, WI. 54806 877-634-4622 Toll Free - phone 715-682-4622 phone 715-682-9717 fax www.ashlandind.com MODEL
Utility Jack Model Number: HD HD HD
 Utility Jack Model Number: 74407 74407HD 74410 74410HD 74413 74413HD 74412 74415 70429 Rolled Acme Thread and Anti-Friction thrust Bearings High Strength Tubing This Instruction Sheet contains IMPORTANT
ATV BLADE HARDWARE. Owner s Manual
 1701 38TH AVE W PO BOX 257 SPENCER, IA 51301 PHONE: 712-262-4191 FAX: 712-262-0248 SERVICE: 800-841-2222 E-MAIL: ccac@cyclecountry.com www.cyclecountry.com ATV BLADE HARDWARE For HONDA ATVs Owner s Manual
ROUSH Mustang Lowering Spring Kit
 ROUSH Mustang Lowering Spring Kit Part Number R06000043 Applications: 2010 ROUSH V8 Mustang 2010 Mustang GT w/ ROUSH Front Struts and Rear Shocks This spring set will lower your 2010 ROUSH Mustang an additional
48" and 52" Hyflo Fans Installation and Operators Instruction Manual
 48" and 52" Hyflo Fans Installation and Operators Instruction Manual Thank You The employees of Chore-Time Equipment would like to thank your for your recent Chore-Time purchase. If a problem should arise,
IS INDEPENDENT SUSPENSION SYSTEM OWNERS MANUAL
 IS INDEPENDENT SUSPENSION SYSTEM OWNERS MANUAL * Made in U.S.A. Patent number 5899470 IS153-002 REV. 1 Description Congratulations on your purchase of the MOR/ryde IS suspension system*. The MOR/ryde IS
Installation Instructions SRC Over-Size Tire Carrier Jeep Wrangler/Unlimited Part # 2743
 NOTE: Carefully read instructions entirely before assembling/installing this product. Parts Included Qty Parts Included Qty Tire Carrier 1 8 x 70mm Hex Bolt 4 Brake Light Bracket 1 8mm Flat Washer 4 Tire
Installation Instructions
 85-3511 rev. 04 11-15 Installation Instructions Polyurethane Bushing Kit for Ford F-53 (Front) (replaces OE bushings and brackets) part #4139-127 1-5/8 diameter INTRODUCTION Thank you for purchasing this
3-Pt. Quick Hitch. Owner s Manual
 3-Pt. Quick Hitch Owner s Manual WARNING: Read carefully and understand all ASSEMBLY AND OPERATION INSTRUCTIONS before operating. Failure to follow the safety rules and other basic safety precautions may
INSTRUCTIONS. 4-Link Parallel With Adjustable Panhard Bar Rear Suspension System FOR MOPAR MUSCLE CARS: A-BODY (RS-5435)
") MOPAR A-BODY 4-LINK PARALLEL COIL OVER SYSTEM INSTRUCTIONS 4-Link Parallel With Adjustable Panhard Bar Rear Suspension System FOR MOPAR MUSCLE CARS: 1967-1976 A-BODY (RS-5435) Revised: 6-1-2011 Page 2
MOPAR A-BODY 4-LINK PARALLEL COIL OVER SYSTEM INSTRUCTIONS 4-Link Parallel With Adjustable Panhard Bar Rear Suspension System FOR MOPAR MUSCLE CARS: 1967-1976 A-BODY (RS-5435) Revised: 6-1-2011 Page 2
ValveSentry USER S MANUAL REVISED 8/6/16 IMPORTANT! PLEASE READ CAREFULLY AND SAVE
 ValveSentry USER S MANUAL REVISED 8/6/16 IMPORTANT! PLEASE READ CAREFULLY AND SAVE This user s manual contains important information about your ValveSentry device s operation. If you are installing this
Before installing your Roush Performance Product(s), read through the entire installation procedure and check to make sure all items are present.
, read through the entire installation procedure and check to make sure all items are present.") 2005-2006 Ford Mustang GT Legal / Stage 3 / Offroad Exhaust Kits for Roush Rear Valence Installation Instructions Application: 2005- Ford Mustang GT Model Must have Roush Rear Valence Kit #R03030061 Before
2005-2006 Ford Mustang GT Legal / Stage 3 / Offroad Exhaust Kits for Roush Rear Valence Installation Instructions Application: 2005- Ford Mustang GT Model Must have Roush Rear Valence Kit #R03030061 Before
CORN HEADER MANUAL: CNH PRE-2012
 CORN HEADER MANUAL: CNH PRE-2012 09020201c HEADSIGHT.COM 574.546.5022 About Headsight Headsight Contact Info Headsight, Inc. 4845 3B Road Bremen, IN 46506 Phone: 574-546-5022 Fax: 574-546-5760 Email:
Quadratec 2 or 4 Bike Receiver Bike Racks
 Quadratec 2 or 4 Bike Receiver Bike Racks Installation Manual: Designed for Jeep Vehicles with 2 Receiver Style Hitches # 92034.1000 and # 92034.1001 PARTS LIST: Receiver Base & Main Rack System - QTY
V-Twin Forward Control Installation Instructions
 V-Twin Forward Control Installation Instructions Thank you for a choosing a Supreme Legends USA product. Supreme Legends forward controls are designed to add style and performance to your bike. Our extended
Middle Buster, Sub Soiler, Middle Buster SC
 Middle Buster, Sub Soiler, Hardware Kit 8090000 THANK YOU FOR PURCHASING THIS PRODUCT Congratulations on your purchase. Behlen Country has been in the business of providing quality equipment to landowners
Dodge Ram 1500, Quad/Reg. Cab, w/6.4ft. & 8ft. Bed, 2 & 4 WD. For updates see PRODUCT SUPPORT tab at
 Assembly, Installation, Operation and Maintenance Instructions 2009-2016 Dodge Ram 1500, Quad/Reg. Cab, w/6.4ft. & 8ft. Bed, 2 & 4 WD. Part # 30665 Dealer / Installer: Provide a copy of these Instructions
Installation Instructions
 85-4209 rev. 05 11-18 Installation Instructions Thank you for purchasing this anti-sway bar kit. Please read through these instructions before installation. Factory Replacement Anti-Sway Bar Kit part #1129-135
Rear Sway Bar for XC90 ( ) 2.5T and T6 ipd mounting kit SBK42
 2.5T and T6 ipd mounting kit SBK42") Dedicated to improving vehicle fun, safety & performance Installation Instructions Rear Sway Bar for XC90 (2003-0) 2.5T and T6 ipd mounting kit SBK2 PI-298 08/06 Thank you for purchasing this anti-sway
Dedicated to improving vehicle fun, safety & performance Installation Instructions Rear Sway Bar for XC90 (2003-0) 2.5T and T6 ipd mounting kit SBK2 PI-298 08/06 Thank you for purchasing this anti-sway
INSTALLATION/OWNER'S MANUAL DP " Woofer in Enclosure
 INSTALLATION/OWNER'S MANUAL DP1000 10" Woofer in Enclosure Installation Thank you for purchasing the DP1000 10" Woofer with enclosure. Although Dual has attempted to make sure all of the information contained
Model AS-FM64 Wall Mount. Full Motion Television Wall Mount
 Model AS-FM64 Wall Mount Full Motion Television Wall Mount Getting Started Introduction Congratulations on the purchase of your new Audio Solutions AS-FM64 Television Wall Mount. For maximum benefit, please
ValveSentry USER S MANUAL PLEASE READ CAREFULLY AND SAVE
 ValveSentry USER S MANUAL IMPORTANT! PLEASE READ CAREFULLY AND SAVE This user s manual contains important information about your ValveSentry device s operation. If you are installing this ValveSentry device
MODEL I-900 SCRAPER INDEX
 I-900 PARTS MANUAL Ashland Industries Inc. Hwy. 13 South P.O. Box 717 Ashland, WI. 54806 877-634-4622 Toll Free - phone 715-682-4622 phone 715-682-9717 fax www.ashlandind.com MODEL I-900 SCRAPER HOW TO
Cognito Motorsports, Inc. Upper Control Arm Kit for 2011-Present GM 8-Lug #UCAK100051
 Cognito Motorsports, Inc. Upper Control Arm Kit for 2011-Present GM 8-Lug #UCAK100051 Introduction - Installation requires a qualified mechanic. - Read instructions carefully and study the pictures (if
Model T2642 Wall Mount. Television Wall Mount with Tilt Option
 Model T2642 Wall Mount Television Wall Mount with Tilt Option Getting Started Introduction Congratulations on the purchase of your new Audio Solutions T2642 Television Wall Mount. For maximum benefit,
XB IMPLEMENTS PARTS MANUAL
 XB IMPLEMENTS PARTS MANUAL Parts Manual For: MIDDLE BUSTER/SUB SOILER - MB-S-XB CARRY ALL - CA-XB DIRT SCOOP - DS-24-XB YARD RAKE - TYR-60-XB REAR BLADE - TRB-60-XB BOX BLADE - BB-48-XB August 2011 Form:
K -HART. Coulter. Owner s Manual Model 1600, 1620, 1601, 1602, 1603
 K -HART INDUSTRIES LTD. www.khartindustries.com Coulter Owner s Manual Model 600, 620, 60, 602, 603 Box 520 Elrose, Saskatchewan S0L 0Z0 Canada Ph: (306)378-2258 Fax: (306)378-2926 E-mail:sales@khartindustries.com
US Patent 0540, 400 Other Patents Pending. Read this manual completely before assembling and riding our PET PRO-FLEX 500. Always wear a Helmet!
 US Patent 0540, 400 Other Patents Pending Read this manual completely before assembling and riding our 500 Always wear a Helmet! Priority Electric Transportation, LLC. 1007 West College Ave. #293 Santa
FIXED DEPTH INSERTION METER INSTRUCTIONS
 UNPACKING Please open and inspect your package upon receipt. Your package was packed with great care and all the necessary packing materials to arrive to you undamaged. If you do find an item that is broken
GERINGHOFF. Corn Header Manual f HEADSIGHT.COM
 GERINGHOFF Corn Header Manual 09020701f HEADSIGHT.COM 574.546.5022 About Headsight Headsight Contact Info Headsight, Inc. 4845 3B Road Bremen, IN 46506 Phone: 574-546-5022 Fax: 574-546-5760 Email: info@headsight.com
Mustang Billet Rear Lower Control Arm Kit
 Mustang Billet Rear Lower Control Arm Kit Part #R06030037 Application: 2005-2009 Ford Mustang Installation Instructions Before installing your ROUSH Performance Product(s), read through the entire installation
INSTRUCTIONS TUBULAR CONTROL ARMS & COIL-OVER CONVERSION FOR AMC MUSCLE CARS: 1970 AMX JAVELIN SPIRIT, HORNET, GREMLIN, CONCORD
 AMC TUBULAR CONTROL ARMS & COIL OVER KIT INSTRUCTIONS TUBULAR CONTROL ARMS & COIL-OVER CONVERSION FOR AMC MUSCLE CARS: 1970 AMX 1970-74 JAVELIN SPIRIT, HORNET, GREMLIN, CONCORD Revised 6/1/2012 www.freakride.com
Quadratec Aluminum Skid Plate for Fuel Tank
 RIVAL_JK_FUELT_SKID_8_A4.qxp_A4 6/13/17 4:13 PM Page 1 Quadratec Aluminum Skid Plate for Fuel Tank Installation Manual for 07-Current Wrangler (JK) 2 Door # 12500.0215 TO REDUCE RISK OF SERIOUS INJURY
Owner's Manual LAWN AERATOR MODELS: PA-40 BH PA-48 BH. Assembly Installation Operation Repair Parts
 Owner's Manual LAWN AERATOR MODELS: PA-40 BH PA-48 BH Assembly Installation Operation Repair Parts For use with Riders and Lawn/Garden Tractors IMPORTANT This manual contains information for the safety
Model FM2642 Wall Mount. Full Motion Television Wall Mount
 Model FM2642 Wall Mount Full Motion Television Wall Mount Getting Started Introduction Congratulations on the purchase of your new Audio Solutions FM2642 Television Wall Mount. For maximum benefit, please
1401 / 1402 / 1403 ADJUSTABLE TRAILING ARM MOUNT BRACES INSTALLATION OF HOTCHKIS PERFORMANCE ADJUSTABLE TRAILING ARM MOUNT BRACES
 1401 / 1402 / 1403 ADJUSTABLE TRAILING ARM MOUNT BRACES 1401 78-88 GM A/G-BODY / 1402 68-72 GM A-BODY / 1403 64-67 GM A-BODY Thank you for your purchase. Please call us at (562) 907-7757 if you have any
Operator s Manual. Go Galvanized! YOU'RE ALWAYS AHEAD...WITH A MODERN BEHIND.
 SUMMER 2008 C2 tilting grader blade Operator s Manual YOU'RE ALWAYS AHEAD...WITH A MODERN BEHIND. 003-5336 003-5342 003-5531 003-5544 P.O. Box 790 Beaumont, Tx 77704 409.833.2665 1.800.231.8198 Fax: 409.726.8333
Tiller Lock Assembly
 2 1 4 1 2 4 1 2 4 1 7 6 7 8 Positioning Pin Assembly 1 Positioning Pin 2 Spring Black Knob 5 4 1 2 2 1 Tiller Lock Assembly 1 2 4 Threaded Rod Rotating Rod Spring Flat Washer 5 6 7 8 C Type Plastic Washer
Installation manual 3 front / 2 rear suspension system FJ / Runner Part # sj110607rev.03
 Part #: 52000 2007-2014 Toyota FJ / 2003-2009 4Runner 3 front / 2 rear suspension system Parts list: Part # Description Qty. 52907-01 Pre load spacer 2 52907-02 Strut spacer 2 MO3531BK-01 Rear coil spring
Installation manual. 1.5 front leveling kit. Nissan Titan. Part # Part # Important customer information: Nissan Titan
 Installation manual 1.5 front leveling kit 2004-2015 Nissan Titan Part # 52008 sj071408rev.01 Part # 52008 2004-2015 Nissan Titan 1.5 front leveling kit Part # Description Qty. 52008-01 Front strut spacers
LEWIS WINDROWER OWNER / OPERATOR MANUAL
 LEWIS WINDROWER OWNER / OPERATOR MANUAL MODEL # WR-1 WINDROWER Manufactured by: LEWIS BROTHERS MANUFACTURING, INC. Post Office Box 146 Baxley, GA 31513 Tel: (912) 367-4651 Fax: (912) 367-3958 2-21-14 1
OPERATOR S MANUAL MODEL GC-SFZ
 R Made in the USA by MODEL GC-SFZ THIS MANUAL CONTAINS THE OPERATING INSTRUCTIONS AND SAFETY INFORMA- TION FOR YOUR SCAG ACCESSORY. READ- ING THIS MANUAL WILL PROVIDE YOU WITH MAINTENANCE AND ADJUSTMENT
OWNER'S MANUAL L A W N R O L L E R PRT-481S BH. Safety Assembly Operation Repair Parts Maintenance. Visit us on the web!
 OWNER'S MANUAL L A W N R O L L E R ROLLER MODEL: PRC- BH PRT- BH PRT-S BH PRT-S BH Safety Assembly Operation Repair Parts Maintenance Recommended for use with Riding Mowers, Lawn or Garden Tractors, and
SUNDOWN Operation. & Parts Manual. for Box Blade Models BB15-48, 60 BB20-48, 60, 72 BB30-60, 72, 84, & 96
 SUNDOWN Operation & Parts Manual for Box Blade Models BB15-48, 60 BB20-48, 60, 72 BB30-60, 72, 84, & 96 Operations and Parts Manual Table of Contents Section Page Table of Contents 2 Retail Customer Responsibility
Deluxe Hitch 3-Bike Rack Instructions for Part # BC-3581
 General Guidelines Deluxe Hitch 3-Bike Rack Instructions for Part # BC-3581 It is the user s responsibility to read and follow all instructions. Keep these instructions with the product at all times and
Independent Suspension System Owner s Manual
 Independent Suspension System Owner s Manual Independent Suspension System CONTENTS Introduction...2 Parts Listing & Rubber Shear Spring Defelction...3 Maintenance Checks & Trouble Shooting...4 & 5 Warranty...6
84in. Driveway Drag. Owner s Manual
 84in. Driveway Drag Owner s Manual WARNING: Read carefully and understand all ASSEMBLY AND OPERATION INSTRUCTIONS before operating. Failure to follow the safety rules and other basic safety precautions
Instruction Sheet SRSR SERIES. Rotating Sliding Rail System
 Instruction Sheet SRSR SERIES Rotating Sliding Rail System THANK YOU Thank you for purchasing the SRSR Series Rotating Sliding Rail System. Please read these instructions thoroughly before assembling this
Thermaltake Warranty / Support Information
 Thermaltake Warranty / Support Information Technical Support Thermaltake is committed to providing the highest quality, most reliable products for our valued customer. There are several ways you may contact
DWS404 DWS524 DWS654 DWS684 DWS694. DWS SERIES INSTALLATION/OWNER'S MANUAL Car Audio Speakers
 DWS404 DWS524 DWS654 DWS684 DWS694 DWS SERIES INSTALLATION/OWNER'S MANUAL Car Audio Speakers PREPARATION Safety Guidelines Thank you for purchasing the DWS Series car speakers. Although Dual has attempted
Installation Instructions
 Equipment Required: Installation Instructions Fastener Kit: F Wrenches: 15/16, 10 mm Drill Bits: 1/4 Other Tools: Drill, Reciprocating Saw 9464/9474 HIDE-A-GOOSE HITCH All Fasteners Typical, Both Sides
TABLE OF CONTENTS DESCRIPTION. Safety Instructions & Safety Sign Locations Operating Instructions Assembly Instructions...
 TABLE OF CONTENTS DESCRIPTION PAGE Warranty... 1 Safety Instructions & Safety Sign Locations... 2 Operating Instructions... 3 Assembly Instructions... 5 500 & 600 Snowblower Drawings... 8 500 & 600 Snowblower
Model AS-RC3260 TV Cart. Rolling Cart for Audio Mount System & Flat Panel TVs
 Model AS-RC3260 TV Cart Rolling Cart for Audio Mount System & Flat Panel TVs GETTING STARTED Introduction Congratulations on the purchase of your new Helios AS-RC3260 Rolling Cart. For maximum benefit,
Model 7500 OPERATING INSTRUCTIONS MAINTENANCE INSTRUCTIONS. Terrco, Inc.
 Terrco, Inc. Model 7500 OPERATING INSTRUCTIONS MAINTENANCE INSTRUCTIONS Terrco, Inc. 222 1st Avenue NW Watertown, SD 57201 Phone: (605) 882-3888 Fax: (605) 882-0778 Email: info@terrco.com OPERATING AND
OPERATOR S MANUAL with Parts List & Warranty. For Model 100SP Topdresser
 OPERATOR S MANUAL with Parts List & Warranty For Model 100SP Topdresser July 30, 2009 Model 100SP Topdresser LIMITED WARRANTY Earth & Turf Products, LLC warrants to the original Purchaser, all Earth &
Innovation in Mobility. R1208 Six-Way Power Seat Base. Operator Manual. 03/25/02 32DSB01.A RICON CORPORATION All Rights Reserved
 Innovation in Mobility R1208 Six-Way Power Seat Base Operator Manual 03/25/02 32DSB01.A 92-2002 RICON CORPORATION All Rights Reserved Printed in the United States of America This RICON product must be
Installation Instructions
 85-4341 rev. 04 10-15 Installation Instructions Thank you for purchasing this antisway bar kit. Please read through these instructions before installation. Rear Anti-Sway Bar Kit for Chevy 2500/3500/4500
Instruction Sheet DWRSR-ZL. Zero Clearance Latch
 Instruction Sheet DWRSR-ZL Zero Clearance Latch US Patent 7,188,570 B2 THANK YOU Thank you for purchasing the DWRSR-ZL Zero Clearance Latch. Please read these instructions thoroughly before installing
TS69 TS65 TS55 TS45 TS5768 TS SERIES INSTALLATION/OWNER'S MANUAL
 TS69 TS65 TS55 TS45 TS5768 TS SERIES INSTALLATION/OWNER'S MANUAL Car Audio Speakers TS SERIES PREPARATION Getting Started Thank you for purchasing the TS Series car speakers. Although Dual has attempted
ATV BLADE HARDWARE. Owner s Manual
 1701 38TH AVE W PO BOX 257 SPENCER, IA 51301 PHONE: 712-262-4191 FAX: 712-262-0248 SERVICE: 800-841-2222 E-MAIL: ccac@cyclecountry.com www.cyclecountry.com ATV BLADE HARDWARE For HONDA ATVs Owner s Manual
8" - 12" Hydraulic Steel Squeeze Off Tool
 8" - 12" Hydraulic Steel Squeeze Off Tool ECN 19130 C812S Hydraulic Steel Squeeze Off Tool for Steel Pipe Page 1 of 8 This Footage Tools C812S Steel Squeeze Off Tool is sold with one pump configuration
Cognito Motorsports, Inc., GM 2011-present 8-Lug truck Pitman/Idler Arm Support Kit SKU# PISK3008 **UTILITY PATENT US 7,475,891 B2**
 Cognito Motorsports, Inc., GM 2011-present 8-Lug truck Pitman/Idler Arm Support Kit SKU# PISK3008 **UTILITY PATENT US 7,475,891 B2** Introduction - This application is for stock and lifted applications
I-110 PARTS MANUAL Updated 3/21/01
 I-110 PARTS MANUAL Updated 3/21/01 Ashland Industries Inc. Hwy. 13 South P.O. Box 717 Ashland, WI. 54806 877-634-4622 Toll Free - phone 715-682-4622 phone 715-682-9717 fax www.ashlandind.com MODEL I-100,
Pneumatic Cylinder 14 Bore X 21 Stroke Part No. P Replaces Part No. P
 Pneumatic Cylinder 14 Bore X 21 Stroke Part No. P -322908-00000 Replaces Part No. P-191067-00000 Service Information WARNING: INSTALLATION AND MOUNTING The user of these devices must conform to all applicable
INTRODUCTION INSTALLATION
 INTRODUCTION INSTALLATION, OPERATION & MAINTENANCE INSTRUCTIONS This instruction manual includes installation, operation and maintenance information for the figure G73 gear operator. The figure G73 is
TERMS OF USE TERMS AND CONDITIONS. Plumbing and Heating Products (PL-WR)
") TERMS OF USE 1. Watts pricing and product data is subject to change without notice and such changes supersede all previous versions. 2. Watts data is to be used as provided. Watts is not responsible for
TERMS OF USE 1. Watts pricing and product data is subject to change without notice and such changes supersede all previous versions. 2. Watts data is to be used as provided. Watts is not responsible for
Wood Chipper Model C550M Operator's Manual
 Wood Chipper Model C550M Operator's Manual THIS MANUAL MUST BE READ AND UNDERSTOOD BEFORE ANYONE OPERATES THIS MACHINE! Manual# 990023 Revised 01/2010 YOU MUST FILL OUT YOUR WARRANTY REGISTRATION TO ACTIVATE
Installation Instructions
 85-3180 rev. 07 03-14 Installation Instructions Thank you for purchasing this antisway bar kit. Please read through these instructions before installation. Front Anti-Sway Bar Kit for the Ford E350/450
Installation manual. Toyota Tundra 4WD & 2WD. 2.5 Suspension kit. Part # Part # Important customer information:
 Installation manual 2007-2016 Toyota Tundra 4WD & 2WD 2.5 Suspension kit Part # 53070 sj11082011rev.03 Part # 53070 2007-2016 Toyota Tundra 4WD & 2WD 2.5 Suspension kit Part # Description Qty. 53070-01
4" Oval Nerf Bar. Part No. A1003S/B. PARTS LIST: Qty Part Description Qty Part Description
 ` 4" Oval Nerf Bar Part No. A1003S/B Fits: 2007 - Current Chevrolet Silverado 1500/2500/3500 Crew Cab 2007 - Current GMC Sierra 1500/2500/3500 Crew Cab REMOVE CONTENTS FROM BOX. VERIFY ALL PARTS ARE PRESENT.