INSTALLATION INSTRUCTIONS Horizon XP Performance Handlebar
|
|
|
- Alaina Baldwin
- 5 years ago
- Views:
Transcription
1 INSTALLATION INSTRUCTIONS Horizon XP Performance Handlebar HZ10090XP, HZ10090XP-BA (1 Mount) Gen 1 HZ10093XP, HZ10093XP-BA (1 1/4 Mount) Gen 1 HZ10096XP, HZ10096XP-BA ( 1 1/4 Mount) Gen 2 HZ10097XP, HZ10097XP-BA (1 Mount) Gen 2 IMPORTANT: PLEASE GIVE CUSTOMER ENCLOSED INFORMATION!
2 Thank you for your HeliBars purchase. HeliBars are designed to increase your long distance comfort and improve the handling of your motorcycle, and we feel confident you will enjoy them. The Horizon handelbar is the most technologically advanced handlebar system to ever grace a motorcycle. Many saftey features have been included in the design. It is of the utmost importance the bars are installed by a mechanic with good mechanical skills following the installation instructions provided. HeliBars INSTALLATION DANGER: IMPROPER INSTALLATION COULD RESULT IN SERIOUS INJURY OR DEATH. HAVE A QUALIFIED MECHANIC INSTALL YOUR HeliBars. BRAKE FLUID CAN BE CORROSIVE TO PLASTIC & PAINT. PLEASE USE CAUTION WHEN WORKING WITH YOUR HYDRAULIC SYSTEMS. ENSURING ALL WORK AREAS ARE PROTECTED. AFTER INSTALLATION, MOVE BARS LOCK TO LOCK AND CHECK CLEAR- ANCE OF: 1.CABLES 2. HYDRAULIC LINES 3.WIRES 4.FAIRING 5.FUEL TANK. TORQUE ALL HARDWARE TO MANUFACTURER S SPECIFICATIONS. IF YOU HAVE INSTALLATION QUESTIONS, PLEASE CALL Page 2
3 WARRANTY / RETURN POLICY We make every effort to build a quality product so you can fully enjoy your riding experience. Thank you for your order. HeliBars may be returned for defects in materials and workmanship within one year from the date of shipment to the original purchaser, in which event the purchaser may receive a replacement set of Heli- Bars. If within thirty (30) days of the shipping date you are not satisfied for any reason, you can return the HeliBars. Return policy is valid for original purchaser only. If HeliBars are purchased from a vendor other than Heli Modified, Inc., customer must contact vendor where purchased regarding returns. Refund will be extended to original purchaser only. There are no other warranties which extend beyond this. Conditions of this 30 day return policy: 1. Bars must not be used as a tie down point. (See attached Trailering Instructions ). 2. Bars cannot be damaged, dented, or altered in any way. 3. Bars cannot be overtorqued. 4. Refund will be for product purchase price only, and credited to original purchaser only. 5. Product must be returned with all original equipment, documents and in original packaging. There must be no physical damage caused by the customer or by carrier. 6. A Return Authorization Number must be obtained from us before you return the product. We reserve the right to charge a re-stocking fee of up to 25% if the above criteria are not met. THERE ARE NO FURTHER EXPRESS OR IMPLIED WARRANTIES INCLUDING, BUT NOT LIMITED TO, IMPLIED WARRANTIES OF MERCHANTABILITY OR FITNESS FOR A PARTICULAR PURPOSE. By accepting this product, the consumer agrees to arbitrate and litigate any controversy in the State of Maine, and under the laws of the State of Maine. HELI MODIFIED INC. ASSUMES NO LIABILITY FOR ANY INJURY OR LOSS OF PROPERTY WHICH RESULT FROM IMPROPER INSTALLATION OR USE OF ANY HELI BARS. ALL HELI MODIFIED, INC. PRODUCTS SHOULD BE INSTALLED BY A QUALIFIED MECHANIC. IMPROPER INSTALLATION MAY CAUSE DEATH OR INJURY. Ride Safe and Enjoy! Page 3

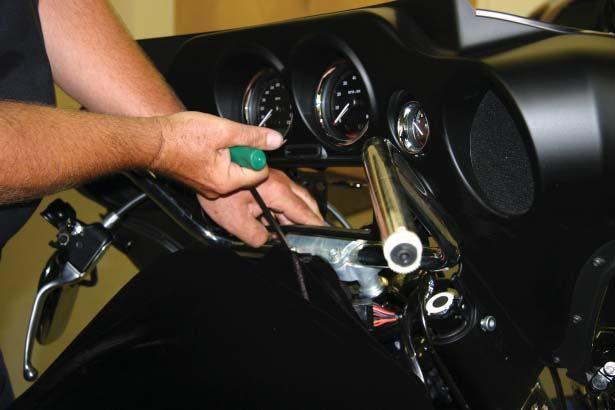
4 HORIZON XP Performance Handlebar HZ10090XP, HZ10090XP-BA (1 Mount) Gen 1 HZ10093XP, HZ10093XP-BA (1 1/4 Mount) Gen 1 HZ10096XP, HZ10096XP-BA ( 1 1/4 Mount) Gen 2 HZ10097XP, HZ10097XP-BA (1 Mount) Gen 2 WARNING: IMPROPER INSTALLATION COULD RESULT IN SERIOUS INJURY OR DEATH. HAVE A QUALIFIED MECHANIC INSTALL YOUR HORIZON BARS. The Horizon-XP handlebars are delivered with all the rotating components installed at the factory. This simplifies installation; however, none of the rotating components are torqued to spec. Once, the bars and all controls are installed and adjusted to the customers preference the rotating components will need to be torqued to spec. Follow the manufacturer s recommendation for handlebar removal/installation using the factory service manual. Stock Harley Davidson motorcycles do not need to change any lines/cables. Motorcycles 2007 and earlier modles will require a flexible SS front hydraulic brake line. We recommend HD part # which fits Road Kings and Road Glides. On Softails and Dynas use HD part # These lines work best and allow full adjustability of the Horizon handlebars. Stock handlebar risers are required to install Horizon handlebars. It is recommended that the fuel tank and front fender be covered with a protective layer Road Glide Installation (all other motorcycles please proceed to general instructions on page #5) On 2015 Road Glides, only the instruments over the handlebars need to be removed to install the Horizon XP handlebars. Harley Davidson has pinned the stock handlebar straps in the stock bars. It will be necessary to remove the pins to re-attach. If you do not wish to use the stock straps and use the smaller Harley strap you can order part number: A 1. Remove the screws on the sides of the fork mounted instrument housing. Pull up the cluster, disconnect the 2 connectors and set instrument housing aside. 2. Loosen the front brake hydraulic line banjo bolt at the front brake master cylinder enough to rotate the line up Page 4
5 to about the 8:00 position (viewed from the left side of the bike) and re-tighten banjo bolt. 3. Remove controls from the stock handlebars. 4. Loosen and remove the 4 handlebar top clamp screws and the cover. Remove stock handlebars. 5. The dowel pin located on the lower handlebar mounting clamp needs to be tapped down for clearance of the HeliBar mounting knurls and to allow forward and back adjustability. The pin should be nearly flush with the bottom of the handlebar mounting area. 6. Locate the fly-by-wire connector and disconnect. With a Molex tool, disassemble the wires from the connector (Photo 2) and remove the throttle assembly from the stock bar. Install the XP lower assembly into the fork mount such that the upper pivot clamp bolts face the rider. Tighten top clamp bolts enough to keep bar from rotating. 7. Install throttle assembly into the right side HeliBar tube from the notched end as per Photo 3. Place the supplied conduit over the fly-by-wires and re-install the connector. 8. It will be necessary to remove the right and left side control housing wire loom connectors from the plastic holders in the instrument housing to gain a bit of slack. 9. Re-install master cylinder handlebar clamps. It will be necessary to remove the pins in order to install. General Instructions: 1.) Install the partially assembled Horizon bar in the top triple clamp bar clamps as per the stock handlebars. The Horizon is delivered with the mounting (knurled) bar and risers torqued to spec. A good starting point is to have the risers pointing at about 45 degrees toward the rider. Tighten the handlebar fork clamps enough to keep the bars from falling. For 2013 and earlier Road Glides 3.) Remove fairing (front cover.) 4.) Remove ignition knob. 5.) Remove rear fork cover (ignition) On 2007 and earlier models, drain the front brake system and remove the stock front brake lines. 4.) Remove all controls and the stock handlebars. See Photo #1. IMPORTANT: On 2008 models and newer the front brake hydraulic line banjo fitting at the master cylinder must be rotated forward slightly. See Photo B: Loosen the banjo bolt just enough so the line can be rotated forward, re-tighten. Some adjustment may be necessary after Horizon Bars are installed. On 2008 and newer models, locate the throttle-by wire Molex connector, remove the connector pins using the Molex tool and withdraw from the stock handlebar. Note the location of the wires by color. See Photo #2 and #3. 7.) Install the throttle and right control housing onto the right bar. The right bar has the small radial groove fac- Page 5
6 ing the rider with the controls wire slot facing down. Remove the inner socket head cap screw from the upper handlebar clamp, carefully insert bar until the screw captures the handle bars groove. See Photo #6. Lightly tighten. Carefully install the front brake master cylinder. Use caution to not damage the front brake micro switch plunger that operates the rear brake light. 9.) On the right side, position the throttles cables and the front brake upper hydraulic line as shown in photo #5. Rotate the banjo fitting at the master cylinder to the rough angle as shown in photo #6. Use small cable ties to hold wire loom to the brake line. The front brake hydraulic line and wire loom should be positioned high enough to keep them from contacting the tank mounted speedometer when the bars are turned to the right steering stop. Tighten right control housing and master cylinder. Leave a small gap between the master cylinder and the upper handlebar clamp. Notice that the wiring harness for the 2008 and newer Throttle-by-wire is installed into the right handlebar and is exiting from the bar lower slot. Cover any bare wires with shrink tube and reconnect Molex connector to the throttle-by-wire harness. Plug back into it s connector. 10.) On left side position clutch cable so that it rests behind the left side handlebar riser. This provides the smoothest path although other placements are possible. When re-attaching the clutch controls onto the Horizon bars if slack is necessary, temporarily remove the p-clip that holds the line to the left fork tube and reposition it to the rear of the fork tube to gain additional slack. Then re-attach. On Screaming Eagle Models with hydraulic actuated clutch, position the master cylinder on the left handlebar so that it matches the clearance between the front brake master cylinder and the pivot 2 housing. 11.) Install the two black plastic caps into the inside ends of the left and right handlebar tubes. On 2013 and older Road Glides reposition the clutch cable so it runs up along the left fork tube and through the small square cut out in the forks black plastic cover (left side.) 11.) Adjust bars. Before headlight housing covers are assembled (if equipped), rotate bars back and forth to find the best position. Tighten fork handlebar clamps to factory specs. Rotate bars up and down to desired angle. Upper pivot shaft pinch bolts (1 on left and 1 on right) are located on the bottom of the risers top mounting clamps. Torque to 14ft. lbs. 12.) Rotate handle bars forward and back to desired angle. Match left and right bar angles by noticing the moving and stationary parts of the upper clamps so each side looks the same. Tighten to 14 ft. lbs. Please refer to Page 11 for details. Clutch and front brake levers can be adjusted up and down. Torque the two pinch bolts (per side) - located on the bottom of upper pivot #2 where the handlebar shaft is attached - to 14 ft.lbs. It is a good idea to leave the fork handlebar cover off the headlight housing (some models) in case more adjusting is necessary. Remember to plug in and remount the headlight before a test ride. Do not road test until all pivoting clamp pinch bolts are double checked for tightness. All pivoting pinch bolts are 14 ft. lbs, the riser pinch bolts (10mm bolts) 30 ft. lbs. (See Photo A) Use a 6mm hex drive for pinch bolt torquing. Page 6
7 After all adjustments are made, torque the following: 1. Handlebar mounting clamps (on the top triple clamp) to 16 ft lbs. See photo #1 2. See photo A Torque 10mm screw to 30 ft. lbs. a 8mm hex drive is required. 3. See photo A Torque 8mm screw to 14 ft lbs. a 6mm hex drive is required. 4. See photo A Torque the two handle bar pinch bolts (M8) to 14 ft lbs. Install 4 chrome covers supplied in these screws. Double check all hardware for proper tightness including all controls. 5. Reinstall all fairing components (if applicable).!! CAUTION!! BARS MUST BE TORQUED TO SPECIFIED VALUES. THEY MUST NOT BE OVERTORQUED. OVERTIGHTENED HARDWARE CAN LOSE INTEGRITY. HELI MODIFIED, INC. ASSUMES NO LIABILITY FOR ANY INJURY OR LOSS OF PROPERTY WHICH MAY RESULT FROM IMPROPER USE OF PRODUCT. All text & photos Heli Modified Inc Page 7
8 Page 8


9 Photo # 1 Photo # 2 Photo # 3 Page 9


10 Photo # 5 Photo # 6 8mm 8mm 10mm (8mm hex head) Photo # 7 Photo # A Page 10

11 Photo # B Page 11
12 Trailering with HeliBars HeliBars clip ons and handlebars must not be used as the primary holding points for tie downs while trailering. As with your stock bars applying extreme force to the ends of the bars can bend the bars or rotate them on their mounts. Use a wheel chock and pull the machine down and forward using soft ties or similar, attached to the lower triple clamp. Bars should only be used as secondary attachment points to steady the motorcycle from lateral sway. Failure to follow these guidelines can cause damage to the bars and the motorcycle, and may also void our warranty. Page 12
INSTALLATION INSTRUCTIONS Horizon CCR HZ13054
 INSTALLATION INSTRUCTIONS Horizon CCR HZ13054 IMPORTANT: PLEASE GIVE CUSTOMER ENCLOSED INFORMATION! Thank you for your purchase of our HeliBars. They are designed to increase your long distance comfort
INSTALLATION INSTRUCTIONS
 INSTALLATION INSTRUCTIONS Ducati 749/999 TracStar TM HeliBars Replacement Handlebars P/N: TS07059 IMPORTANT: PLEASE GIVE CUSTOMER ENCLOSED INFORMATION! Thank you for your purchase of our HeliBars. They
INSTALLATION INSTRUCTIONS
 INSTALLATION INSTRUCTIONS 2004-2008 Ducati ST3/ST4 HeliBars Replacement Handlebar Risers P/N: HB2405 IMPORTANT: PLEASE GIVE CUSTOMER ENCLOSED INFORMATION! Thank you for your purchase of our HeliBars. They
INSTALLATION INSTRUCTIONS
 INSTALLATION INSTRUCTIONS 2005-2008 BMW K1200S TracStar Replacment Handlebars P/N: TS05027 IMPORTANT: PLEASE GIVE CUSTOMER ENCLOSED INFORMATION! Thank you for your purchase of our HeliBars. They are designed
INSTALLATION INSTRUCTIONS
 INSTALLATION INSTRUCTIONS Horizon ST Patented Multi Axis Adjustable Handlebar System for 2012-2015 BMW K1600GTL P/N: HST05078 IMPORTANT: PLEASE GIVE CUSTOMER ENCLOSED INFORMATION! Patent No: US 8,230,758
INSTALLATION INSTRUCTIONS
 INSTALLATION INSTRUCTIONS 1998-2008 R1 & 2008-2013 R6 TracStar Replacment Handlebars P/N: TS09073 IMPORTANT: PLEASE GIVE CUSTOMER ENCLOSED INFORMATION! Thank you for your purchase of our HeliBars. They
INSTALLATION INSTRUCTIONS
 INSTALLATION INSTRUCTIONS HeliBars Tour Performance Adjustable Handlebar Bridge 2006-2013 Yamaha FJR1300 US & European P/N: HR09079 IMPORTANT: PLEASE GIVE CUSTOMER ENCLOSED INFORMATION! Thank you for your
INSTALLATION INSTRUCTIONS
 INSTALLATION INSTRUCTIONS HeliBars Tour Performance Handlebar Riser 2014+ Yamaha Super Tenere P/N: HR09109 IMPORTANT: PLEASE GIVE CUSTOMER ENCLOSED INFORMATION! Thank you for your purchase of our HeliBars.
INSTALLATION INSTRUCTIONS
 INSTALLATION INSTRUCTIONS 2006-2008 BMW K1200R TracStar Handlebars P/N: TS05028 IMPORTANT: PLEASE GIVE CUSTOMER ENCLOSED INFORMATION! Thank you for your purchase of our HeliBars. They are designed to increase
INSTALLATION INSTRUCTIONS
 INSTALLATION INSTRUCTIONS BMW S1000RR 2015+ TracStar Replacement Handlebars P/N: TS05099 IMPORTANT: PLEASE GIVE CUSTOMER ENCLOSED INFORMATION! Thank you for your purchase of our HeliBars. They are designed
INSTALLATION INSTRUCTIONS
 INSTALLATION INSTRUCTIONS 2006-2010 Kawasaki ZX10R TracStar Replacment Handlebars P/N: TS04072-KA 2011-2012 Kawasaki ZX10R TracStar Replacment Handlebars P/N: TS04072-KB IMPORTANT: PLEASE GIVE CUSTOMER
INSTALLATION INSTRUCTIONS
 INSTALLATION INSTRUCTIONS BMW K1600GT/GTL 2011+ HeliBars Handlebar Relocation Adapters Part # HR05108 IMPORTANT: PLEASE GIVE CUSTOMER ENCLOSED INFORMATION! Thank you for your purchase of our HeliBars.
INSTALLATION INSTRUCTIONS
 INSTALLATION INSTRUCTIONS 2013-2014 Honda CBR500R/RA Tour Performance Handlebar Risers P/N: HR01087 IMPORTANT: PLEASE GIVE CUSTOMER ENCLOSED INFORMATION! Thank you for your purchase of our HeliBars. They
INSTALLATION INSTRUCTIONS. KAWASAKI Concours Handlebar Risers for ABS & Non-ABS Part # HR04042 & HR04042-NABS
 INSTALLATION INSTRUCTIONS KAWASAKI Concours14 2008-2015 Handlebar Risers for ABS & Non-ABS Part # HR04042 & HR04042-NABS IMPORTANT: PLEASE GIVE CUSTOMER ENCLOSED INFORMATION! Thank you for your purchase
INSTALLATION INSTRUCTIONS
 INSTALLATION INSTRUCTIONS 2008-2013 Suzuki GSX1300R Hayabusa TracStar Replacment Handlebars P/N: TS03000 IMPORTANT: PLEASE GIVE CUSTOMER ENCLOSED INFORMATION! Thank you for your purchase of our HeliBars.
INSTALLATION INSTRUCTIONS
 INSTALLATION INSTRUCTIONS 2017+ BMW R9T Racer HeliBars Replacement Triple Clamp w/built in Risers Part # HRT05126 IMPORTANT: PLEASE GIVE CUSTOMER ENCLOSED INFORMATION! Thank you for your purchase of our
INSTALLATION INSTRUCTIONS HONDA CBR250R P/N: HB01075
 INSTALLATION INSTRUCTIONS HONDA CBR250R P/N: HB01075 IMPORTANT: PLEASE GIVE CUSTOMER ENCLOSED INFORMATION! Thank you for your purchase of our HeliBars. They are designed to increase your long distance
2010 BMW S1000RR TracStar HeliBars TS mm taller (1.7 ) ~ 20mm Rear Offset (.8 ) ~ Stock Width (25 ¼ )
 ~ 20mm Rear Offset (.8 ) ~ Stock Width (25 ¼ )") WARNING: IMPROPER INSTALLATION COULD RESULT IN SERIOUS INJURY OR DEATH. HAVE A QUALIFIED MECHANIC INSTALL YOUR HELIBARS. Right Side To protect your motorcycle during installation place clean shop rags
WARNING: IMPROPER INSTALLATION COULD RESULT IN SERIOUS INJURY OR DEATH. HAVE A QUALIFIED MECHANIC INSTALL YOUR HELIBARS. Right Side To protect your motorcycle during installation place clean shop rags
Horizon LST Installation Photos Honda GL F6B Bagger P/N: LST01084
 Horizon LST Installation Photos 2001-2015 Honda GL1800 2013-2015 F6B Bagger P/N: LST01084 IMPORTANT: PLEASE GIVE CUSTOMER ENCLOSED INFORMATION! Thank you for your HeliBars purchase. HeliBars are designed
I N S TA L L AT I O N
 I N S TA L L AT I O N 5008 fits: H-D: '80-Up Electra glide, tour glide, road king, road glide or street glide PartS Included 1 Right Fork Mount Assembly 1 Left Fork Mount Assembly 2 H3 Driving Light Assemblies
INSTALLATION FORK MOUNTED DRIVING LIGHTS 5008
 5008 PARTS INCLUDED 1 Right Fork Mount Assembly 1 Left Fork Mount Assembly 2 H3 Driving Light Assemblies 1 12-Pin Wiring Adapter 1 Hardware Kit for Fork Mount Driving Lights, Including: 6 5/16-18 Nylock
w w w. h d o n l i n e s h o p. d e CRUISE CONTROL KIT GENERAL INSTALLATION -J04064 REV Kit Number Models Additional Parts Required
 -J006 REV. 006-08- CRUISE CONTROL KIT GENERAL Kit Number 7796-07 Models For the most up-to-date model fitment information, please see the product label or www.harley-davidson.com. Additional Parts Required.
INSTALLATION INSTRUCTIONS FOR THE MOTOR TRIKE CROSS COUNTRY / CROSS ROADS / HARD BALL RAKE KIT
 INSTALLATION INSTRUCTIONS FOR THE MOTOR TRIKE CROSS COUNTRY / CROSS ROADS / HARD BALL RAKE KIT Thank you for choosing the Motor Trike Cross Country / Cross Roads / Hard Ball rake kit. We ask that you read
w w w. h d o n l i n e s h o p. d e STREET SLAMMER HANDLEBAR KIT GENERAL INSTALLATION -J03363 REV Kit Number Models Kit Contents
 -J06 REV. 006-06- GENERAL Kit Number 69-0 Models STREET SLAMMER HANDLEBAR KIT Ask a Harley-Davidson dealer or refer to the latest Harley- Davidson Genuine Motor Accessories and Genuine Motor Parts catalog
INSTALLATION. DRIVING LIGHTS for FLHT/FLHX/FLHR 5005
 DRIVING LIGHTS for FLHT/FLHX/FLHR 5005 PARTS INCLUDED 1 Right Driving Light Assembly 1 Left Driving Light Assembly 1 Right Driving Light Bracket 1 Left Driving Light Bracket 4 Driving Light Bracket Plugs
w w w. h d o n l i n e s h o p. d e CHROME SWITCH HOUSING KIT GENERAL HANDLEBAR SWITCH REMOVAL/INSTALLATION FXDWGI AND FXDBI MODEL TURN SIGNAL REMOVAL
 -J00 REV. 00-07-9 GENERAL Kit Number 70-9B, 70-9B, 708-9C Models For the most up-to-date model fitment information, please see the product label or www.harley-davidson.com. See Table for items contained
INSTALLATION. Note: Not all parts will be used in the installation of this product. -cont.-
 5005 Fits: 06-up FLHX, 04-up Screamin Eagle Ultra Classic Electra Glide & Screamin Eagle Electra Glide Classic, '97-up FLHT, FLHTC, FLHTCU, FLHR PartS Included 1 Right Driving Light Assembly 1 Left Driving
MULTI-FIT BRAIDED THROTTLE/IDLE CABLE KITS
 -J08 REV. 008-08-5 MULTI-FIT BRAIDED THROTTLE/IDLE CABLE KITS GENERAL Kit Numbers Stainless Steel Kits 560-0 56-00 56-0A 565-0A 5650-0A 5670-0A 567-0A 567-0A 5678-0 569-0 5699-05 5656-0 56579-0A 5670-0
INSTALLATION CLAMP-ON FORK MOUNTED DRIVING LIGHTS 5015
 CLAMP-ON 5015 PARTS INCLUDED 2 Driving Lights 2 Side Mount Clamps-43mm/49mm 1 Hardware Kit Including: 2 49mm Spacers 4 43mm Spacers 2 Pivot Dome Washers 2 3/8-16 Serrated Hex Nut 1 Wiring Kit for Driving
INSTALLATION. DRIVING LIGHTS for FLHT/FLHX/FLHR BLACK. THANK YOU FOR CHOOSING KϋRYAKYN!
 THANK YOU FOR CHOOSING KϋRYAKYN! PROTECT YOURSELF AND OTHERS FROM POSSIBLE INJURY AND PROPERTY DAMAGE OR LOSS. PAY CLOSE ATTENTION TO ALL INSTRUCTIONS, WARNINGS, CAUTIONS, AND NOTICES REGARDING THE, USE,
INSTALLATION CONSTELLATION DRIVING LIGHTS 5009
 INSTALLATION CONSTELLATION DRIVING LIGHTS 5009 PARTS INCLUDED 1 Right Driving Light with Turn Signals 1 Left Driving Light with Turn Signals 1 Installation Component Kit Including: 8 Insulated Male Spades
INSTALLATION CONSTELLATION DRIVING LIGHTS 5009
 INSTALLATION CONSTELLATION DRIVING LIGHTS 5009 PARTS INCLUDED 1 Right Driving Light with Turn Signals 1 Left Driving Light with Turn Signals 1 Installation Component Kit Including: 8 Insulated Male Spades
w w w. h d o n l i n e s h o p. d e ROAD KING FAT HANDLEBAR KIT GENERAL PREPARATION - ALL MODELS -J02375 REV Kit Number Models ABS Models
 -J02375 REV. 2008--9 GENERAL Kit Number 56675-05 Models For model fitment information, see the P&A Retail Catalog or the Parts and Accessories section of www.harley-davidson.com (English only). ABS Models
INSTALLATION BLIND SPOT TURN SIGNAL MIRRORS 1457
 BLIND SPOT TURN SIGNAL MIRRORS 1457 PARTS INCLUDED 2 Blind Spot Turn Signal Mirror Assemblies 1 Wire Harness Kit Including: 2 Wiring Harness (four pin) 1 Adapter Harness (six pin) 2 3-Pin Female Connectors
INSTALLATION. Note: Not all of the included parts will be used during this installation. -cont.-
 Driving Lights for Road Glide 5007 Fits: 98-up Road Glide PartS Included 1 Right Light Assembly 1 Left Light Assembly 1 Right Mounting Bracket 1 Left Mounting Bracket 1 Hardware Kit Including: 2 Narrow
INSTALLATION PROCESS: FK003D945-7 Complete Front, Rear, and Clutch A.B.S. KIT Harley Davidson FLH Touring Models
 INSTALLATION PROCESS: FK003D945-7 Complete Front, Rear, and Clutch A.B.S. KIT 2014-2017 Harley Davidson FLH Touring Models Parts List: 4 Lines 1 Brake Light Switch Adapter 7 Single banjo bolts 2 Caliper
DETACHABLE QUARTER FAIRING AND DOCKING HARDWARE KIT
 INSTRUCTIONS -J09 REV. 0--00 Kit Numbers 7070-98 (primed kit) DETACHABLE QUARTER FAIRING AND DOCKING HARDWARE KIT General This kit is for installation on 988 and later XL, FXR and FXD model motorcycles
INSTALLATION HYPERCHARGER AIR FILTER KIT 9992
 9992 PARTS INCLUDED 1 Chrome Hypercharger Assembly with Chrome Blood Groove Trap Door and Chrome Butterflies 1 Support Bracket 1 Breather Hardware Kit, including: 2 1-1/4 Breather Bolts 2 Breather Hoses
INSTALLATION LIGHTED CURVED LAY DOWN LICENSE PLATE MOUNT 3166
 INSTALLATION LIGHTED CURVED LAY DOWN LICENSE PLATE MOUNT 3166 PARTS INCLUDED 1 Lighted Curved Lay Down License Plate Assembly 1 Hardware Kit Including: 6 Cable Ties 1 Dielectric Grease Pack 1 1 x 8 Tape
Be sure to read and go over all pages before you start your installation
 Yamaha Gen-2 V-MaxV Holeshot Superbike Bars Installation Guide Pre-Installation Note Be sure to read and go over all pages before you start your installation Preparation for Installation A) It is recommended
w w w. h d o n l i n e s h o p. d e BLACK HAND CONTROLS FOR DYNA AND SOFTAIL MODELS GENERAL INSTALLATION -J04155 REV Kit Number Models
 -J0 REV. 00-08- BLACK HAND CONTROLS FOR DYNA AND SOFTAIL MODELS GENERAL Kit Number 709-07 (BLACK) Models This kit is designed for installation on 9 and later Sportster, Dyna, Softail, and Road King models
Avoid damage to the motorcycle. Protect painted surfaces with a soft cloth or blanket.
 HOUSINGS 7808 Thank You For Choosing Küryakyn! Protect yourself and others from potential injury and property damage or loss. Pay close attention to all instructions, warnings, cautions, and notices regarding
INSTALLATION HYPERCHARGER AIR FILTER KIT 9754
 9754 PARTS INCLUDED 1 Chrome Hypercharger Assembly 1 Support Bracket 1 Breather Hardware Kit, including: 2 1-1/4 Breather Bolts 2 Breather Hoses 4 Shim Washers 1 Twin Cam Breather Kit, Including: 1 Breather
w w w. h d o n l i n e s h o p. d e MODULAR DIAMONDBACK BRAKE LINE KITS GENERAL -J04284 REV Kit Number Models Tools and Supplies Required
 -J08 REV. 007-07-6 GENERAL MODULAR DIAMONDBACK BRAKE LINE KITS Table. Upper Brake Line s (Banjo Angle 0 - Straight) 7-07 77-07 79-07 8-07 87-07 9-07 8-07 8 inch 9 inch 0 inch inch inch inch inch 96-07
w w w. h d o n l i n e s h o p. d e HEATED HAND GRIP KITS GENERAL REMOVAL -J02983 REV Kit Number Models Kit numbers Service Parts
 -J098 REV. 007-0-0 GENERAL Kit Number 56047-0B, 5607-0B, 5674-0B, 5696-0B, 565-0B, 5669-0A, 56694-04A, 56750-04A, 5688-0A, 569-05, 5696-05, 56997-07 Models For model fitment information, please see the
A Division of Thiessen Products, Inc.
 The JIMS FORCEFLOW CYLINDER HEAD COOLER is designed for Twin Cam Models 1999 to present. Also fits all JIMS Twin Cam Race Engines. NOTE: These instructions show the installation of this product on a 2012
w w w. h d o n l i n e s h o p. d e TWO-INCH TACHOMETER KIT GENERAL INSTALLATION -J03991 REV Kit Number Models Kit Contents
 -J0399 REV. 006-05- GENERAL Kit Number 67564-05A Models This kit fits: 004 and later FXD, FXDC, FXDX, and FXDWG 004 and later Softail (exept FLSTN) 004 and later FLHR/C 004 and later XL 006 and later FXDB
INSTRUCTIONS. w w w. h d o n l i n e s h o p. d e SPRINGER AUXILIARY LAMP KIT 1WARNING -J03497 REV General.
 INSTRUCTIONS -J097 REV. 0-0-00 Kit Number 6986-0A General Auxiliary/fog lamps are not included in this kit. The lamps must be purchased separately. HDI (International) motorcycles should only use approved
Instruction set # 7068 Cognito Motorsports, Inc. Upper Control Arm Leveling Kit for GM 8-Lug #UCAK (Boxed Style)
") Cognito Motorsports, Inc. Upper Control Arm Leveling Kit for 2001-2010 GM 8-Lug #UCAK100010 (Boxed Style) Introduction - These control arms will not affect the height of the truck, the height is determined
Cognito Motorsports, Inc. Upper Control Arm Leveling Kit for 2001-2010 GM 8-Lug #UCAK100010 (Boxed Style) Introduction - These control arms will not affect the height of the truck, the height is determined
INSTALLATION INSTRUCTIONS
 THANK YOU FOR CHOOSING KURYAKYN! Protect yourself and others from possible injury and property damage or loss. Pay close attention to all instructions, warnings, cautions, and notices regarding the installation,
DYNA OIL COOLER AND THERMOSTAT KIT
 INSTRUCTIONS -J000 REV. 07-5-00 Kit Numbers 6985-0 (Chrome) and 6989-0 (Silver) General DYNA OIL COOLER AND THERMOSTAT KIT These oil cooler kits feature a thermostat built-in to the oil filter mount. These
INSTRUCTIONS. w w w. h d o n l i n e s h o p. d e ENGINE GUARD-MOUNTED FOG LAMP KIT 1WARNING -J02798 REV Installation.
 INSTRUCTIONS -J0798 REV. 9-4-00 Kit Number 689-98B General ENGINE GUARD-MOUNTED FOG LAMP KIT Installation This kit fits all models equipped with Harley-Davidson -/4 in. ( mm) diameter front engine guards,
Hitch Mounted Motorcycle Carrier
 04100-1 Hitch Mounted Motorcycle Carrier Carrier Parts List '!"!#! $!%! & "! ' "!! $ $!(! & )*+,-). /0/ )*+, ). ' 1222122213 4! 2 122213!!! 12$122213 &4! 12$13 &! $2!%" 2221 "%1!(5( 2221 11!!% ( $ 12$12$213
INSTALLATION INSTRUCTIONS
 THANK YOU FOR CHOOSING KURYAKYN! Protect yourself and others from possible injury and property damage or loss. Pay close attention to all instructions, warnings, cautions, and notices regarding the installation,
KIT # MC-2911, MC-2923 FOR ALL YEAR SUZUKI M-109R SERIES
 Congratulations on your purchase of an Arnott Motorcycle Air Suspension system. This system provides you with the ability to maintain your bike at a constant level regardless of load, resulting in enhanced
ROAD TECH ZUMO GLOBAL POSITIONING SYSTEM (GPS) HANDLE- BAR MOUNT KIT
 HANDLE- BAR MOUNT KIT") -J046 REV. 008-08- ROAD TECH ZUMO GLOBAL POSITIONING SYSTEM (GPS) HANDLE- BAR MOUNT KIT GENERAL Kit Number 965-08 Models This kit is required when using a Road Tech Zumo GPS unit on specific model motorcycles.
-J046 REV. 008-08- ROAD TECH ZUMO GLOBAL POSITIONING SYSTEM (GPS) HANDLE- BAR MOUNT KIT GENERAL Kit Number 965-08 Models This kit is required when using a Road Tech Zumo GPS unit on specific model motorcycles.
Quality Work with Quailty People
 Manuafactured by : DRM Industries Corp. Quality Work with Quailty People 231 W. Adams St. PO Box 758 Lake Delton, WI 53959 Call for Customer Sevice at 608-254-8158 7am to 4pm Monday - Friday Email: framelock@drmindustries.com
Assembly Instructions
 www.rockymounts.com TandemMount R4 Installation Manual Guidelines/Restrictions: - This carrier is intended for Thule rectangular and Yakima round bars only. - Bicycles must be equipped with quick release
INSTALLATION GUIDE. Doc ID: A Doc Rev:
 REKLUSE MOTOR SPORTS EXP Kit for Harley-Davidson Big Twin Hydraulic-Actuated OVERVIEW INSTALLATION GUIDE Doc ID: 191-6200A Doc Rev: 061215 This kit replaces the OEM clutch pack (friction disks and drive
INSTALLATION INSTRUCTIONS
 THANK YOU FOR CHOOSING KURYAKYN! Protect yourself and others from possible injury and property damage or loss. Pay close attention to all instructions, warnings, cautions, and notices regarding the installation,
BrakeAway Products Inc. wishes you many years of cramp free cruising, ENJOY and ride SAFELY!!!
 Congratulations on the purchase of your new BrakeAway Motorcycle Cruise Control. At BrakeAway Products, we are committed to your complete satisfaction. With proper installation, use, and periodic maintenance,
IMPORTANT! 09 to Current Straight Up Electric Billet Center Stand. Dealer and/or Customer must complete the following items: Center Stand Checklist
 IMPORTANT! 09 to Current Straight Up Electric Billet Center Stand Dealer and/or Customer must complete the following items: Center Stand Checklist 1. Complete the Measurement Guide 2. Read the Operation
w w w. h d o n l i n e s h o p. d e CHROME 1.25 INCH (31.75 MM) DIAMETER HANDLEBAR KIT GENERAL INSTALLATION -J04405 REV Kit Number Models
 DIAMETER HANDLEBAR KIT GENERAL INSTALLATION -J04405 REV Kit Number Models") -J005 REV. 008-09-0 CHROME.5 INCH (.75 MM) DIAMETER HANDLEBAR KIT GENERAL Kit Number 560-08 Models For model fitment information, see the P&A retail catalog or the Parts and Accessories section of www.harley-davidson.com
-J005 REV. 008-09-0 CHROME.5 INCH (.75 MM) DIAMETER HANDLEBAR KIT GENERAL Kit Number 560-08 Models For model fitment information, see the P&A retail catalog or the Parts and Accessories section of www.harley-davidson.com
INSTALLATION INSTRUCTIONS FOR THE MOTOR TRIKE GL1500 RAKE KIT
 INSTALLATION INSTRUCTIONS FOR THE MOTOR TRIKE GL1500 RAKE KIT Thank you for choosing the Motor Trike GL1500 Rake Kit. We ask that you read the directions before you start and follow them very closely.
KIT # MC-3104 FOR HARLEY DAVIDSON DYNA SERIES
 Congratulations on your purchase of an Arnott Motorcycle Air Suspension system. This system provides you with the ability to maintain your bike at a constant level regardless of load, resulting in enhanced
INSTALLATION ZOMBIE L.E.D. FUEL & BATTERY GAUGE. THANK YOU FOR CHOOSING KϋRYAKYN!
 THANK YOU FOR CHOOSING KϋRYAKYN! PROTECT YOURSELF AND OTHERS FROM POSSIBLE INJURY AND PROPERTY DAMAGE OR LOSS. PAY CLOSE ATTENTION TO ALL INSTRUCTIONS, WARNINGS, CAUTIONS, AND NOTICES REGARDING THE, USE,
INSTALLATION TRUE DUAL HEADPIPES 497
 TRUE DUAL HEADPIPES 497 PARTS INCLUDED 1 Front Head Pipe 1 Rear Head Pipe 1 Front Heat Shield 1 Rear Heat Shield 1 Bracket (stamped 422-P) 1 Bracket (stamped 423-P) 2 1/2 x 1-1/4 Socket Head Cap Screw
RUN/BRAKE/TURN AUXILIARY LIGHTS J
 RUN/BRAKE/TURN AUXILIARY LIGHTS J06236 2018-05-31 GENERAL Kit Numbers 67800589A, 69202276 Models For model fitment information, see the P&A retail catalog or the Parts and Accessories section of www.harleydavidson.com
R O A D S M I T H TRIKE CONVERSIONS BY THE TRIKE SHOP
 R O A D S M I T H TRIKE CONVERSIONS BY THE TRIKE SHOP Please thoroughly review the instructions before and during installation. Keep in mind that this product was designed to be installed by trained dealer
Cobra & Cobra XL. Power Trak Current GL1800 Goldwing. Installation Instructions. California Sidecar Parts & Technical Support
 Cobra & Cobra XL by 2001 - Current GL1800 Goldwing Power Trak 6 Installation Instructions REVISED 1 2015 California Sidecar Parts & Technical Support 434.263.8866 Warnings and considerations: 1. Disclaimer
w w w. h d o n l i n e s h o p. d e ROAD TECH QUEST GLOBAL POSITIONING SYSTEM (GPS) MOUNTING KIT GENERAL INSTALLATION -J03554 REV.
 MOUNTING KIT GENERAL INSTALLATION -J03554 REV.") -J03554 REV. 007-08-0 ROAD TECH QUEST GLOBAL POSITIONING SYSTEM (GPS) MOUNTING KIT GENERAL Kit Number 900-05 Models For model fitment information, please see the P&A Retail Catalog or the Parts and Accessories
-J03554 REV. 007-08-0 ROAD TECH QUEST GLOBAL POSITIONING SYSTEM (GPS) MOUNTING KIT GENERAL Kit Number 900-05 Models For model fitment information, please see the P&A Retail Catalog or the Parts and Accessories
INSTALLATION. led fairing lights for gl
 for gl1800 4627 Fits: 01-up GL1800 Parts Included 4 7-Color Lizard Lights 1 7-Color Controller/Switch 1 Hardware Kit including: 4 Replacement Adhesive Pads 4 18 Extensions 1 Double Male Lizard Light Connector
97-02 JEEP TJ BODY LIFT KIT INSTRUCTIONS
 92RC60500 97-02 JEEP TJ BODY LIFT KIT INSTRUCTIONS Congratulations on your purchase of a new Rough Country 2 /3 Body Lift. We are committed to providing you with the best product available for the best
KING KONG CLUTCH INSTALLATION INSTRUCTIONS
 KING KONG CLUTCH INSTALLATION INSTRUCTIONS over view BAKER KING KONG CLUTCH V.05_091008 FEATURES: 1 Piece steel clutch basket design 66 tooth ring gear configuration, 23% thicker than stock 20 massive
II Bagger/III Bagger Adjustable FLH/FLT Arms Installation Instructions
 II Bagger/III Bagger Adjustable FLH/FLT Arms Installation Instructions Thank you for a choosing a Supreme Legends USA product. Supreme Legends Adjustable Extended Bagger Arms are designed to give your
INSTALLATION INSTRUCTIONS
 MINIMUM REQUIRED TOOLS: F-BOMB SOFTAIL INSTALLATION INSTRUCTIONS FLAT HEAD SCREWDRIVER 1/2, 9/16, 14mm, 7/8 or 22mm WRENCHES INCLUDED HARDWARE: 1. (2) 02 ADAPTER 2. (3) 02 PLUG SOCKET 3. (1) NUT PLATE
INSTALLATION TURN SIGNAL MIRRORS 1432
 1432 PARTS INCLUDED 1 Left Side Turn Signal Mirror Assembly with Convex Glass 1 Right Side Turn Signal Mirror Assembly with Convex Glass 1 Hardware Kit, Including: 2 5/16-18 X 1-1/2 Socket Head Cap Screws
POWER CELL FOR DYNA WITH CLEAN CHROME COVER 562
 POWER CELL FOR DYNA WITH CLEAN CHROME COVER 562 THANK YOU FOR CHOOSING CRUSHER! PROTECT YOURSELF AND OTHERS FROM POTENTIAL INJURY AND PROPERTY DAMAGE OR LOSS. PAY CLOSE ATTENTION TO ALL INSTRUCTIONS, WARNINGS,
INSTALLATION INSTRUCTIONS
 MINIMUM REQUIRED TOOLS: INSTALLATION INSTRUCTIONS LOWDOWN SOFTAIL FLAT HEAD SCREWDRIVER 1/2, 9/16, 14mm, 7/8 or 22mm WRENCHES 5/16, 1/2, 9/16 SOCKETS AND RATCHET SNAP RING PILERS 3/16, 1/4, 5/16 ALLEN
P/N Instr Rev Page 1 of 11
 BRAKE AND CLUTCH KIT P/N 2883864 IMPORTANT Due to the technical nature of this kit, Indian Motorcycle insists this installation be performed by a certified Indian Motorcycle Technician. APPLICATION Verify
HIGH RISE POWER ANGLE KIT
 HIGH RISE POWER ANGLE KIT P/N 33-0100 OWNER S MANUAL Application HIGH RISE PUSH TUBE 33-0000 & 34-0000 ATTENTION DEALER: CUSTOMER MUST RECEIVE A COPY OF THIS MANUAL AT THE TIME OF SALE. Before you begin,
INSTALLATION INSTRUCTIONS FOR FORD 4WD SUPER DUTY 6 SUSPENSION SYSTEM
 INSTALLATION INSTRUCTIONS FOR 1999-2004 FORD 4WD SUPER DUTY 6 SUSPENSION SYSTEM Requires the following parts for a complete installation: Front Leaf Springs P/N 60SD6 Hardware Kit P/N 6000H Vehicle specific
INSTALLATION INSTRUCTIONS
 MINIMUM REQUIRED TOOLS: INSTALLATION INSTRUCTIONS LOWDOWN SPORTSTER FLAT HEAD SCREWDRIVER 1/2, 9/16, 14mm, 7/8 or 22mm WRENCHES 5/16, 1/2, 9/16 SOCKETS AND RATCHET SNAP RING PILERS 3/16, 1/4, 5/16 ALLEN
MASTER CYLINDER INSPECTION
 7-16 CHASSIS A-PDF Split DEMO : Purchase from www.a-pdf.com to remove the watermark Remove the piston assembly. MASTER CYLINDER INSPECTION MASTER CYLINDER Inspect the master cylinder bore for any scratches
VRSC-DX Truck-Lite LED Headlight Installation Instructions
 VRSC-DX Truck-Lite LED Headlight Installation Instructions The following Instructions are for installing a 7 Truck-Lite LED headlight into a Harley Davidson VRSC-DX Night Rod Special fairing. Other 7 headlights
Superbike Kit
 Superbike Kit www.spieglerusa.com sales@spieglerusa.com Mounting Instructions & Safety Instructions for Honda CBR 1000 RR ABS model year 2017 - Attention Important Safety Instructions: Thank you for purchasing
SPECIAL TOOLS REQUIRED:
 INSTALLATION INSTRUCTIONS FOR 2010-15 TOYOTA 4RUNNER WITH XREAS SUSPENSION 3 SUSPENSION LIFT KIT PART NUMBER 432X WARNING!!! READ AND UNDERSTAND ALL INSTRUCTIONS BEFORE PROCEEDING. MAKE SURE THAT YOU HAVE
INSTALLATION INSTRUCTIONS
 Equipped with AEM Dryflow Filter No Oil Required! INSTALLATION INSTRUCTIONS PART NUMBER: 21-8203 2003-2005 DODGE RAM 1500 Pickup V8-5.7L C.A.R.B. E.O. # D-670 2003-2005 DODGE RAM 2500 Pickup V8-5.7L C.A.R.B.
E.C.C. Airtail Compressor Kit for Airtail Suspension System Installation Instructions
 E.C.C. Airtail Compressor Kit for Airtail Suspension System Installation Instructions The following document will cover Installation Instructions for the following applications: 2000-2006 Harley Davidson
INSTALLATION INSTRUCTIONS
 THANK YOU FOR CHOOSING KURYAKYN! Protect yourself and others from possible injury and property damage or loss. Pay close attention to all instructions, warnings, cautions, and notices regarding the installation,
Installation Manual TWM Performance Short Shifter Cobalt SS/SC, SS/TC, HHR SS, Ion Redline and Saab 9-3
 Page 1 Installation Manual TWM Performance Short Shifter Cobalt SS/SC, SS/TC, HHR SS, Ion Redline and Saab 9-3 Please Note: It is preferable to park on a flat surface, as you will have to engage and disengage
JAMP-330RK14-BLU. Installation Instructions. ROKKER XXR 330w BlueTooth Controlled Amplifier Kit for Harley RoadKing
 ROKKER XXR 330w BlueTooth Controlled Amplifier Kit for 1998-2018 Harley RoadKing # JAMP-330RK14-BLU 2017 J&M Corporation. All rights reserved. 9/17 Installation Instructions Product Description This exciting
CHEVY / GMC 1500HD / 2500HD 2WD 8 LUG 7 BASIC KIT
 85101 2000-2010 CHEVY / GMC 1500HD / 2500HD 2WD 8 LUG 7 BASIC KIT C8510-4 MAIN BOX KIT W/ HARDWARE 1) FRONT X MEMBER 1) REAR X MEMBER 2) TORSION BAR DROPS 1) LEFT BUMP STOP 1) RIGHT BUMP STOP 2) SWAY BAR
InstaTrike. Installation Manual. Yamaha Virago 750/1100
 InstaTrike By Installation Manual Yamaha Virago 750/1100 Limited Warranty TOW-PAC, INC. warrants to the first end user purchaser that this product InstaTrike when purchased will be free from defective
Installation. Installation Instructions Monotube Cartridge Fork Kit 97-Later* Harley Davidson FLH/FLT
 Installation Instructions Monotube Cartridge Fork Kit 97-Later* Harley Davidson FLH/FLT ATTENTION Statements in these instructions that are preceded by the following words are of special significance:
FREIGHT TRAIN HEADLAMP NACELLE KITS
 -J09 0-08-8 FREIGHT TRAIN HEADLAMP NACELLE KITS GENERAL Kit Numbers 6000, 600 Models For model fitment information, see the P&A retail catalog or the Parts and Accessories section of wwwharley-davidsoncom
INSTALLATION INSTRUCTIONS FOR FORD 4WD SUPER DUTY F /2 COIL SPRING SUSPENSION SYSTEM
 INSTALLATION INSTRUCTIONS FOR 2005-07 FORD 4WD SUPER DUTY F250-350 4 1/2 COIL SPRING SUSPENSION SYSTEM Requires the following parts (sold separately) for a complete installation: KIT PART NUMBER (6345
Installation Manual TWM Performance Short Shift Kit Stage 1 and Stage 2 MazdaSpeed 6
 Page 1 Installation Manual TWM Performance Short Shift Kit Stage 1 and Stage 2 MazdaSpeed 6 Please Note: It is preferable to park on a flat surface, as you will have to engage and disengage the hand brake
AltRider DualControl Brake System for BMW R1200GSW INSTALLATION INSTRUCTIONS
 made in USA AltRider DualControl Brake System for BMW R00GSW INSTALLATION INSTRUCTIONS The most up to date instructions can be downloaded from the product page at altrider.com, under the instructions tab.
Installation Manual TWM Performance Short Shifter Subaru STi 2008+
 - 1 - Installation Manual TWM Performance Short Shifter Subaru STi 2008+ Please Note: It is preferable to park on a flat surface, as you will have to engage and disengage the hand brake and shift from