INSTRUCTIONS. Triangulated 4-Link Coil Over Rear Suspension System (RS-2450) For FORD Muscle Cars: FAIRLANE
|
|
|
- Elwin Jordan
- 5 years ago
- Views:
Transcription


1 FORD FAIRLANE 4-LINK TRIANGULATED SYSTEM INSTRUCTIONS Triangulated 4-Link Coil Over Rear Suspension System (RS-2450) For FORD Muscle Cars: FAIRLANE Revised:
2 Fairlane 4-Link Triangulated Rear Suspension Part # RS Page 2
3 Page 3
4 Page 4
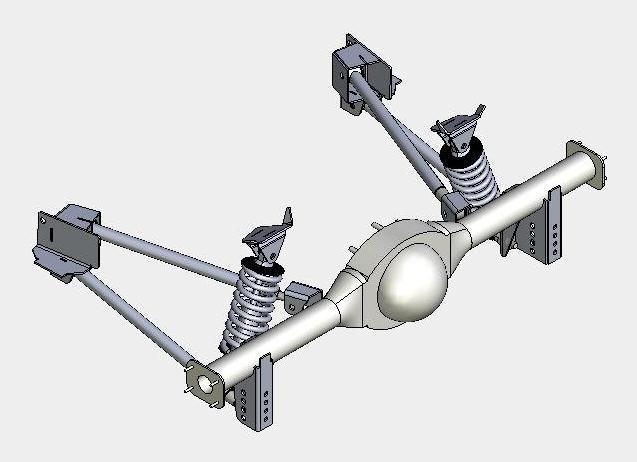
5 Installation Instructions Vehicle: Fairlane 4-Link Triangulated Rear Suspension Part # RS-2450 Sub-Frame System Contents Two (2) Forward Frame Brackets Raw Steel Two (2) Lower Differential Brackets Raw Steel Two (2) Small Upper Trailing Arm Differential Brackets Raw Steel Two (2) Upper Coil Over Mount Brackets Raw Steel Two (2) Upper Trailing Arms with Adjustable End Two (2) Lower Trailing Arms with Adjustable End All Necessary Grade 8 Hardware Thank you for purchasing a world-class Control Freak Suspensions Ford Fairlane 4-Link Triangulated Rear Suspension kit, manufactured in Winter Springs, Florida. We believe this system is the best available at any price. As with any aftermarket performance product, this product is recommended for off road use only. This system is typically subjected to uses that exceed its mechanical limits, so there is no warranty, expressed or implied. Blue Moon Services LLC and its Control Freak Suspensions brand cannot control how this product is installed or used. By purchasing this product you are assuming all risks associated with its installation and use and agree to possess appropriate skills for its installation and use. Blue Moon Services LLC and its Control Freak Suspensions brand, our vendors and suppliers will not be held responsible, liable or accountable for any injury, damage, loss, penalties or fines that occur, directly or indirectly, from the installation and use of this product.. Please note that while installation is relatively easy for those with welding skills and moderate experience, novices should employ a professional for installation. Fit is guaranteed on vehicles that are unmolested that is cars that have not suffered any chassis or significant sub-frame damage. Such damage can bend or alter the unitized body or chassis, making installation more difficult and may require chassis adjustment. Read all of the instructions before starting installation. IMPORTANT NOTES: 1. All brackets in this kit must be welded into place. 2. Use extra caution in jacking and stabilizing the vehicle for this installation. A lift is highly recommended. 3. Be certain to remove carpeting, insulation or other flammables from the area being welded or subjected to welding heat. Page 5


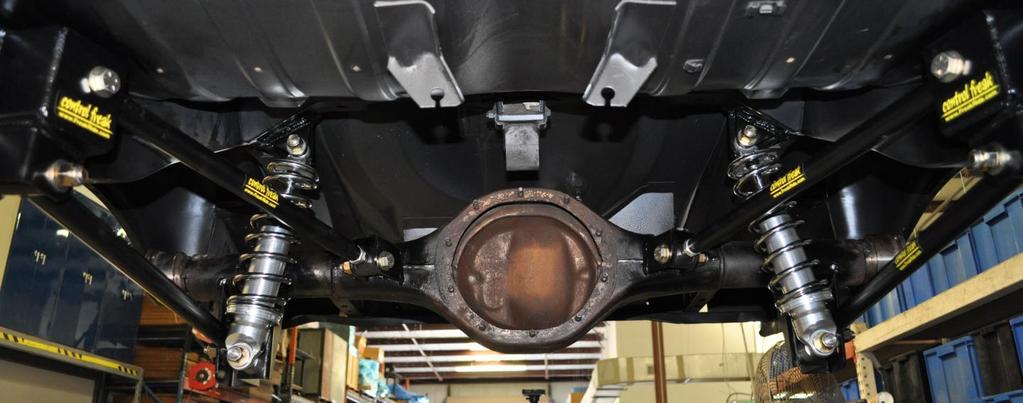
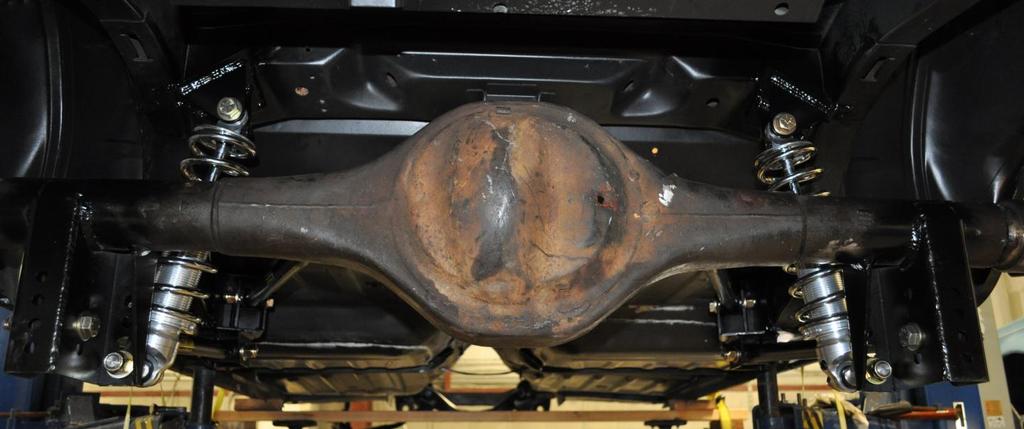
6 What Else Do I Need? Everything you need is included in the purchase price. Installation requires welding. Disconnect your battery BEFORE welding. If you don t, you run the risk of ruining electronic ignition and entertainment components in the car. Installation 1. Clean the metal or debris, rust, undercoating, paint or other elements in the bracket areas so shiny metal shows through. This provides a clean surface to weld to. On the differential, remove the stock spring perches and grind the welds smooth. 2. The most critical step is locating the forward frame brackets. Simply bolt the bracket to the forward leaf spring hole using the original bolt. This locates the forward frame brackets on each side of the vehicle. Just make certain it is vertical to the ground (90 Degrees to the frame). 3. We suggest you also clamp the bracket to the rail to close any gap between the bracket and the rail prior to welding. Tack the forward frame brackets into place as shown in the picture above and to the right and remove the bolt. 4. Attach the upper and lower trailing arms to the forward frame brackets and hand tighten the nuts onto the bolts. Make certain the upper trailing arms are adjusted to the same length, with about three threads showing behind the jam nut. Do the same for the lower trailing arms. 5. You are now ready to put the differential into position. Place the differential at ride height and center it into the vehicle, making certain the housing flanges are the same distance from the frame rails on both sides of the car. 6. Measure the angle of the transmission tail shaft. You will transfer this same angle to the pinion, making certain the angle from the tail shaft is the same on the pinion of the differential unit. Once done, place a degree gauge on the driveshaft and determine the angle. You can now determine what the pinion angle is vs. where it should be. Adjust the differential by rotating it so it is between zero and minus onehalf degree for street use at ride height. For track use you will need to determine the pinion angle based upon power, launch capability and other factors. Once the brackets are installed you will be able to make other adjustments. For now it is important to have a correct pinion angle and to have the housing centered in the vehicle. 7. Place the assembled trailing arms, with brackets attached, onto the differential. This dictates where the brackets should be. Once again, check the centering of the differential unit and the pinion angle. When it is all correct, tack weld all of the brackets into position. 8. Set the upper trailing arm brackets onto the differential, as shown, and tack weld into position. Page 6


7 9. Attach the machined studs to the rear lower trailing arm brackets and mount the coil over shocks to the studs. Place the upper coil over mounting brackets into position, making certain the coil over shocks are correctly angled. They should be straight up and down when viewed from the side, and angled when looking at them from the front or rear. When satisfied, tack weld the brackets into place. The coil over shock should be perfectly vertical when bolted up and viewed from the side. 10. Check once again to make certain that the differential housing is at ride height, is centered in the vehicle and that the pinion angle is still zero degrees. When confirmed, remove the trailing arms and loosen the axles from the differential housing. When welding the differential brackets, do a little at a time, making certain not to melt any seals on the axle tubes. 11. Once cooled, reassemble the system, making certain all bolts are tight. Check and re-check all bolts for correct tightness. 12. You can now adjust the coil over shocks leaving about 1 of threads showing below the height adjustment. Turn the valve all the way counterclockwise and then count ten turns clockwise. This will provide a preliminary setting for the coil over adjustments. 13. Do not worry if the vehicle is sitting higher than you expected. Set the coil overs to sit about ¾ higher than where you want it because the shocks will settle by that amount after miles of driving. 14. Check your pinion angle and make certain it is not more that negative ½ degree. Make necessary adjustments. 15. Congratulations your system is installed. 16. If you purchased the adjustable rear sway bar, now is the time to install it. Refer to the directions included with the sway bar. Page 7


8 Check Out Our Other FORD Suspension & Go-Fast Goodies Coil-Over Conversion Kits Mustang Fairlane Comet Falcon 4-Link Coil-Over Rear Suspension Kits Mustang Falcon, Comet and other Fairlane s Coming Soon Brake Systems From Wilwood, SSBC & Others Page 8


9 Mustang Independent Front Suspension System Road Tested at Bonneville & Talladega Page 9
10 Page 10
11 PAYMENT We accept VISA, MasterCard, Discover, American Express, PayPal, Wire Transfer, Certified Check and Money Order. DELIVERY Orders for small systems and components usually ship within three (3) business days. IFS Systems typically ship within sic (6) business days, depending on options. Air and other expedited options are available upon request and are subject to special handling charges. RETURNS Product returns & exchanges must be called in for authorization prior to return and shipped freight prepaid with a copy of the original invoice. Shipments without proper paperwork will be refused. Returns are subject to a 15% restocking charge or Fifteen Dollar ($15.00) minimum. Freight charges are nonrefundable. All returns/exchanges must be made within thirty (30) days of purchase date from Control Freak Suspensions. Product that has been installed, cut, scratched or painted cannot be returned. CUSTOM PRODUCTS Custom production items require full payment with the order and are non-returnable. ORDERING Orders can be placed by calling our toll free number: , or our toll number: You may also to: sales@freakride.com WARRANTY DISCLAIMER Purchaser understands and recognizes that racing parts equipment and services provided by, manufactured and/or sold by Blue Moon Services LLC d/b/a Control Freak Suspensions are subject to varied conditions due to the manner in which they are installed and used. Purchaser further recognizes and agrees that suitability of any part sold or manufactured by Blue Moon Services LLC d/b/a Control Freak Suspensions for a particular application is the purchasers decision and that the purchaser is not relying on the skill or judgment of Blue Moon Services LLC d/b/a Control Freak Suspensions regarding suitability of any product or service. Blue Moon Services LLC d/b/a Control Freak Suspensions makes no warranties whatsoever, expressed or implied, oral or written to purchasers. There is no warranty of merchantability made to purchasers with regard to off road, racing and racing equipment. Liability is limited to repair or replacement of defective parts to original purchaser. Blue Moon Services LLC, d/b/a Control Freak Suspensions is not liable for any consequential damages, expenses or injury arising from the use, misuse, or improper installation of any product manufactured or sold by Blue Moon Services LLC d/b/a Control Freak Suspensions. Blue Moon Services LLC d/b/a Control Freak Suspensions is not responsible for any labor or shipping costs associated with any warranty claim. Blue Moon Services LLC d/b/a Control Freak Suspensions reserves the right to make changes in design or add to or improve its product without incurring any obligation to install the same on any products previously manufactured. This warranty shall not apply to any product which has been repaired or altered in any way so as in our judgment to affect its performance; nor which has been subject to misuse, abuse, negligence, racing or any other occurrence beyond the control of Blue Moon Services LLC d/b/a Control Freak Suspensions. The information in this catalog is deemed accurate to the best of our knowledge and belief. However, Blue Moon Services LLC d/b/a Control Freak Suspensions cannot assume responsibility for possible error. Page 11
12 FORD FAIRLANE 4-LINK TRIANGULATED SYSTEM Control Freak Suspensions 1101 Oak Lane, Suite 1031 Winter Springs, FL Toll Free Fax Page 12
INSTRUCTIONS. Triangulated 4-Link Coil Over Rear Suspension System. For FORD / MERCURY Muscle Cars: MUSTANG COUGAR
 FORD Tech Line: 888-325-6462 MUSTANG / COUGAR 4-LINK TRIANGULATED SYSTEM INSTRUCTIONS Triangulated 4-Link Coil Over Rear Suspension System For FORD / MERCURY Muscle Cars: 1965-1970 MUSTANG 1967-1969 COUGAR
INSTRUCTIONS FOR AMC MUSCLE CARS: AMX JAVELIN AMX / JAVELIN ADJUSTABLE REAR SWAY BAR. Tech Line:
 AMC Tech Line: 888-325-6462 1968-74 AMX / JAVELIN ADJUSTABLE REAR SWAY BAR INSTRUCTIONS FOR AMC MUSCLE CARS: 1968-1970 AMX 1968-74 JAVELIN Requires Control Freak Rear Suspension Systems RS-1400T, RS-1400P
INSTRUCTIONS. 4-Link Parallel With Adjustable Panhard Bar Rear Suspension System FOR MOPAR MUSCLE CARS: A-BODY (RS-5435)
") MOPAR A-BODY 4-LINK PARALLEL COIL OVER SYSTEM INSTRUCTIONS 4-Link Parallel With Adjustable Panhard Bar Rear Suspension System FOR MOPAR MUSCLE CARS: 1967-1976 A-BODY (RS-5435) Revised: 6-1-2011 Page 2
MOPAR A-BODY 4-LINK PARALLEL COIL OVER SYSTEM INSTRUCTIONS 4-Link Parallel With Adjustable Panhard Bar Rear Suspension System FOR MOPAR MUSCLE CARS: 1967-1976 A-BODY (RS-5435) Revised: 6-1-2011 Page 2
INSTRUCTIONS TUBULAR CONTROL ARMS & COIL-OVER CONVERSION FOR AMC MUSCLE CARS: 1970 AMX JAVELIN SPIRIT, HORNET, GREMLIN, CONCORD
 AMC TUBULAR CONTROL ARMS & COIL OVER KIT INSTRUCTIONS TUBULAR CONTROL ARMS & COIL-OVER CONVERSION FOR AMC MUSCLE CARS: 1970 AMX 1970-74 JAVELIN SPIRIT, HORNET, GREMLIN, CONCORD Revised 6/1/2012 www.freakride.com
INSTRUCTIONS TUBULAR CONTROL ARMS & COIL-OVER CONVERSION FOR FORD MUSCLE CARS: FORD FAIRLANE CO-2330 Small Block CO-2335 Big Block
 FORD 1962-65 FAIRLANE CONTROL ARMS & COIL OVER SYSTEM INSTRUCTIONS TUBULAR CONTROL ARMS & COIL-OVER CONVERSION FOR FORD MUSCLE CARS: 1963-1965 FORD FAIRLANE CO-2330 Small Block CO-2335 Big Block Revised:
INSTRUCTIONS. 4-Link Triangulated Rear Suspension System FOR MOPAR MUSCLE CARS: B-BODY (RS-5530) B-BODY (RS-5540)
 B-BODY (RS-5540)") MOPAR 1966-1972 B-BODY 4-LINK TRIANGULATED SYSTEM INSTRUCTIONS 4-Link Triangulated Rear Suspension System FOR MOPAR MUSCLE CARS: 1966-1970 B-BODY (RS-5530) 1971-1972 B-BODY (RS-5540) Revised: 7-1-2015
MOPAR 1966-1972 B-BODY 4-LINK TRIANGULATED SYSTEM INSTRUCTIONS 4-Link Triangulated Rear Suspension System FOR MOPAR MUSCLE CARS: 1966-1970 B-BODY (RS-5530) 1971-1972 B-BODY (RS-5540) Revised: 7-1-2015
INSTRUCTIONS. 4-Link Parallel With Panhard Bar Rear Suspension Systems FOR MOPAR MUSCLE CARS: B-BODY (RS-5460)
") MOPAR 1962-1965 B-BODY 4-LINK SYSTEM W/PANHARD BAR INSTRUCTIONS 4-Link Parallel With Panhard Bar Rear Suspension Systems FOR MOPAR MUSCLE CARS: 1962-1965 B-BODY (RS-5460) Revised: 4-1-2014 Page 2 Page
MOPAR 1962-1965 B-BODY 4-LINK SYSTEM W/PANHARD BAR INSTRUCTIONS 4-Link Parallel With Panhard Bar Rear Suspension Systems FOR MOPAR MUSCLE CARS: 1962-1965 B-BODY (RS-5460) Revised: 4-1-2014 Page 2 Page
5) The trailing arm should then pivot smoothly on the chassis. 6) Install the rear bolt. 7) Place one drop of blue Loctite
 The trailing arm should then pivot smoothly on the chassis. 6) Install the rear bolt. 7) Place one drop of blue Loctite") INSTALLATION INSTRUCTIONS 1301 / 1302 / 1305 / 1306 THANK YOU FOR CHOOSING HOTCHKIS PERFORMANCE PRODUCTS Removal of Stock Lower Trailing Arms 1) Place car on level surface. 2) Support rear of the car on
INSTALLATION INSTRUCTIONS 1301 / 1302 / 1305 / 1306 THANK YOU FOR CHOOSING HOTCHKIS PERFORMANCE PRODUCTS Removal of Stock Lower Trailing Arms 1) Place car on level surface. 2) Support rear of the car on
Front Axle Assembly: Hairpin Radius Rods
 INSTRUCTIONS 916-395 *916-395* August 2011, Speedway Motors, Inc. Front Axle Assembly: Hairpin Radius Rods This radius rod front end kit is used with OEM or aftermarket tube or I-beam axles that use a
Please read the following key points before installing this kit.
 Please read the following key points before installing this kit. 1 Before performing the subframe connector installation, the vehicle must be completely assembled with all body and component parts installed
1313 LOWER TRAILING ARMS CHEVROLET B-BODY
 1313 LOWER TRAILING ARMS 59-64 CHEVROLET B-BODY Thank you for your purchase from our line of classic Chevrolet B-body suspension parts.. Please call us at (877) 4NO-ROLL if you have any questions regarding
'64-72 Chevelle/ A Body Rear Coilover Conversion Kit
 Nov 3, 2017 '64-72 Chevelle/ A Body Rear Coilover Conversion Kit Includes instructions for Currie Brand Axles The following instructions are intended for professional installers and are guidelines only.
Installation Instructions
 Nov 3, 2017 G-Body Rear Coilover Conversion Kit 1 P a g e Installation Instructions The following instructions are intended for professional installers and are guidelines only. Speedtech Performance assumes
UPPER TRAILING ARM REMOVAL
 #1204 MUSTANG UPPER TRAILING ARMS Thank you for your purchase. Please call us at (562) 907-7757 if you have any questions regarding your Hotchkis Performance products. Visit us online @ www.hotchkis.net
1401 / 1402 / 1403 ADJUSTABLE TRAILING ARM MOUNT BRACES INSTALLATION OF HOTCHKIS PERFORMANCE ADJUSTABLE TRAILING ARM MOUNT BRACES
 1401 / 1402 / 1403 ADJUSTABLE TRAILING ARM MOUNT BRACES 1401 78-88 GM A/G-BODY / 1402 68-72 GM A-BODY / 1403 64-67 GM A-BODY Thank you for your purchase. Please call us at (562) 907-7757 if you have any
DISCLAIMER FOR OFF ROAD USE ONLY
 DISCLAIMER FOR OFF ROAD USE ONLY THE PURCHASER IS RESPONSIBLE FOR DETERMINING THE SUITABILITY OF ANY AND ALL PRODUCTS PURCHASED Purchaser understands and recognizes that off road and racing equipment and
94-96 Impala SS/ B-Body Rear Coilover Conversion Kit
 January 29, 2014 94-96 Impala SS/ B-Body Rear Coilover Conversion Kit The following instructions are intended for professional installers and are guidelines only. Speedtech Performance assumes NO responsibility
78-88 G Body Rear Trailing Arm Kit
 May 14, 2014 78-88 G Body Rear Trailing Arm Kit Parts in this kit may vary slightly from photo. The following instructions are intended for professional installers and are guidelines only. Speedtech Performance
'64-72 Chevelle/ A Body Rear Coilover Conversion Kit
 February 3, 2014 '64-72 Chevelle/ A Body Rear Coilover Conversion Kit Includes instructions for Currie Brand Axles The following instructions are intended for professional installers and are guidelines
INSTALLATION INSTRUCTIONS
 INSTALLATION INSTRUCTIONS 1301 / 1302 / 1305 / 1306 THANK YOU FOR CHOOSING HOTCHKIS PERFORMANCE PRODUCTS Removal of Stock Lower Trailing Arms 1) Place car on level surface. 2) Support rear of the car on
1204AA Ford Mustang Double Adjustable Trailing Arms
 1204AA 79-04 Ford Mustang Double Adjustable Trailing Arms Thank you for your purchase from our new line of Ford parts. Please call us at (877) 4NO-ROLL if you have any questions regarding the service or
4007/4008/ Camaro/Firebird. Please read the following key points before installing this kit.
 Please read the following key points before installing this kit. 1 Before performing the subframe connector installation, the vehicle must be completely assembled with all body and component parts installed
Sport Sway Bar Kit C-10 Truck
 Sport Sway Bar Kit 22390 67-72 C-10 Truck Thank you for your purchase from our new line of Chevy parts. Please call us at 877-4NO - ROLL if you have any questions regarding the service or installation
INSTALLATION INSTRUCTIONS QA1 P/N R , R , R R , R , R F100 Rear Coil-over Conversion System
 INSTALLATION INSTRUCTIONS QA1 P/N R120-170, R120-200, R120-250 R220-170, R220-200, R220-250 65-72 F100 Rear Coil-over Conversion System TOOLS AND SUPPLIES REQUIRED Floor Jack Two (2) Jack Stands Drill
1109 Tubular Lower A-Arms Camaro/Firebird
 1109 Tubular Lower A-Arms 67-69 Camaro/Firebird Tubular Lower A-Arms: Thank you for your purchase from our new line of F-Body parts. Please call us at (877) 4NO - ROLL if you have any questions regarding
Chicane Coilover Kit For '64 to '72 Chevelle/ A Body. Installation Instructions
 Nov 3, 2017 Chicane Coilover Kit For '64 to '72 Chevelle/ A Body Installation Instructions Actual parts may vary from photo depending on application. 1 P a g e The following instructions are intended for
P/N# Performance Lowering Springs Installation Instructions
 P/N# 19391 Performance Lowering Springs Installation Instructions Thank you for your purchase of this Hotchkis Performance product. Your Lowering Spring set was designed with the performance and durability
Installation Manual Clayton Off Road Suspension: XJ 6.5 Coil Conversion Long Arm Lift Kit Jeep Cherokee Last Revision No.: 3/1/11 PN
 Thank you for purchasing a Clayton Off Road suspension. Please check to make sure you have all necessary parts before you start your install. XJ 8.0 Coil 1100107 3 Link Bridge W/mount 1100108 Front Spring
22421 SPORT SWAY BAR SET TOYOTA COROLLA
 22421 SPORT SWAY BAR SET 98-01 TOYOTA COROLLA Thank you for your purchase from our line of Corolla parts. Please call us at (877) 4NO-ROLL if you have any questions regarding the service or installation
Camaro / Firebird. Please read the following key points before installing this kit.
 Please read the following key points before installing this kit. 1 Before performing the subframe connector installation, the vehicle must be completely assembled with all body and component parts installed
2236 Sway Bar Installation Instructions
 2236 Sway Bar Installation Instructions Thank you for your purchase of this Hotchkis Performance product. Your stabilizer bar set was designed with the performance and durability you ve come to expect
4007/4008/ Camaro/Firebird. Please read the following key points before installing this kit.
 Please read the following key points before installing this kit. 1 Before performing the subframe connector installation, the vehicle must be completely assembled with all body and component parts installed
Rear Leaf Spring Kit 24366, Chrysler B-body, Chrysler E-Body
 P Rear Leaf Spring Kit 24366, 24367 66-70 Chrysler B-body, 70-74 Chrysler E-Body Thank you for your purchase from our new line of Mopar parts. Please call us at 877-4NO - ROLL if you have any questions
Index. Page Number Section
 S H O C K S Index Page Number Section 1-4 GM Front Coil Over Installation 5-7 Front Smooth Body Shock Installation 7-8 Rear Smooth Body Shock Installation 8-11 Custom Coil Over Installation 12 Tuning and
Assembly Instructions
 TOOLS REQUIRED: _(2) 3/4 wrenches _7/16 wrench _3/8 wrench _5/16 allen wrench Display/work stand is for assembly procedure only. May be purchased separately. CONTENTS (PARTS & HARDWARE) _(1) Receiver tube
SPORT COIL SPRINGS Scion xa & xb Part #19412 INSTALLATION OF HOTCHKIS FRONT COIL SPRINGS
 SPORT COIL SPRINGS 2004+ Scion xa & xb Part #19412 Thank you for your purchase from our new line of Scion xa / xb parts. Please call us at (877) 4NO-ROLL if you have any questions regarding the service
25405 COMPETITION END LINK KIT 2002-UP ACURA RSX, 2004 Subaru STi INSTALLATION OF HOTCHKIS FRONT ENDLINKS
 25405 COMPETITION END LINK KIT 2002-UP ACURA RSX, 2004 Subaru STi Thank you for your purchase from our line of competition parts. Please call us at (877) 4NO-ROLL if you have any questions regarding the
4007 (Coupe) / 4008 (Convertible) Subframe Connectors Camaro/Firebird
 / 4008 (Convertible) Subframe Connectors Camaro/Firebird") 4007 (Coupe) / 4008 (Convertible) Subframe Connectors 67-69 Camaro/Firebird Thank you for your purchase from our new line of F-Body parts. Please call us at (877) 4NO - ROLL if you have any questions regarding
4007 (Coupe) / 4008 (Convertible) Subframe Connectors 67-69 Camaro/Firebird Thank you for your purchase from our new line of F-Body parts. Please call us at (877) 4NO - ROLL if you have any questions regarding
P/N# Performance Lowering Springs Installation Instructions
 P/N# 19110 Performance Lowering Springs Installation Instructions Thank you for your purchase of this Hotchkis Performance product. Your Lowering Spring set was designed with the performance and durability
Rear Suspension System C-10 Pickup Truck
 Rear Suspension System 18390 67-72 C-10 Pickup Truck Thank you for your purchase from our new line of Chevy parts. Please call us at 877-4NO - ROLL if you have any questions regarding the service or installation
Tubular Lower A-Arms GM A-Body Tubular Lower A-Arms GM F-Body
 1104 - Tubular Lower A-Arms 64-72 GM A-Body 1108 - Tubular Lower A-Arms 70-81 GM F-Body Tubular Lower A-Arms: Thank you for your purchase from our new line of A-Body parts. Please call us at (877) 4NO
Aug 24, 2017 ATS AFX Spindle Installation Instructions
 Aug 24, 2017 ATS AFX Spindle Installation Instructions 1 P a g e The following instructions are intended for professional installers and are guidelines only. Speedtech Performance assumes NO responsibility
Rear Sway Bar Kit 22390R C-10 Truck
 Rear Sway Bar Kit 22390R 67-72 C-10 Truck Thank you for your purchase from our new line of Chevy parts. Please call us at 877-4NO - ROLL if you have any questions regarding the service or installation
Chicane Coilover Kit For '70 to '81 Camaro/Firebird
 Nov 25, 2013 Chicane Coilover Kit For '70 to '81 Camaro/Firebird 1 P a g e Installation Instructions The following instructions are intended for professional installers and are guidelines only. Speedtech
Sport Coil Springs Dodge Magnum, Chrysler 300C Dodge Challenger SRT Dodge Challenger R/T
 Sport Coil Springs 19101 - Dodge Magnum, Chrysler 300C 19107 - Dodge Challenger SRT-8 19108 - Dodge Challenger R/T Thank you for your purchase from our new line of Magnum/300C parts. Please call us at
IMPORTANT NOTICE Stock Height OEM Spindle
 IMPORTANT NOTICE Ball Joint Info: Before you install this product, please verify which front spindles you have. We have designed the upper a arms to utilize the 73 87 style spindles. This type of spindle
Installation Instructions and Warranty Information
 Installation Instructions and Warranty Information 1625S 96-98 Mustang 4.6L 2v 1-1/2 1625S-8 96-98 Mustang 4.6L 2v 1-5/8 1625S-1 99-04 Mustang 4.6L 2v 1-1/2 1625S-9 99-04 Mustang 4.6L 2v 1-5/8 1625S-5JT
22427 SWAY BAR SET 2002-UP SUBARU WRX WAGON
 22427 SWAY BAR SET 2002-UP SUBARU WRX WAGON Thank you for your purchase from our line of Subaru WRX parts. Please call us at (877) 4NO-ROLL if you have any questions regarding the service or installation
Installation Instructions and Warranty Information
 Installation Instructions and Warranty Information 1999 2003 Ford SuperDuty Truck and Excursion Part# 1669S, 1669S-1, 1669S-2 Read all instructions carefully before attempting installation. Rev. 10/05
Sport Sway Bar Kit C-10 Truck
 Sport Sway Bar Kit 22108 67-72 C-10 Truck Thank you for your purchase from our new line of Chevy parts. Please call us at 877-4NO - ROLL if you have any questions regarding the service or installation
PIVOT BUSHING KIT GM F-BODY
 PIVOT BUSHING KIT 21016 67-69 GM F-BODY 67-69 GM F-Body Pivot Bushing Kit Thank you for your purchase. Please call us at 877-4NO - ROLL if you have any questions regarding the service or installation of
Dec 1, 2017 ATS AFX Spindle Installation Instructions
 Dec 1, 2017 ATS AFX Spindle Installation Instructions 1 P a g e The following instructions are intended for professional installers and are guidelines only. Speedtech Performance assumes NO responsibility
14366, Adjustable Strut Rods Chrysler A-Body Chrysler B-Body Chrysler E-Body
 14366, 14385 Adjustable Strut Rods 67-76 Chrysler A-Body 1966-1970 Chrysler B-Body 1970-1974 Chrysler E-Body Thank you for your purchase from our new line of B & E-Body parts. Please call us at (877) 4NO
Sport Sway Bar Kit UP SCION xb
 Sport Sway Bar Kit 22429 08-UP SCION xb Thank you for your purchase from our new line of Scion parts. Please call us at 877-4NO - ROLL if you have any questions regarding the service or installation of
1107 Tubular Upper A-Arms Camaro/Firebird
 1107 Tubular Upper A-Arms 67-69 Camaro/Firebird Thank you for your purchase from our new line of F-Body parts. Please call us at (877) 4NO - ROLL if you have any questions regarding the service or installation
Installation Instructions
 Mar 13, 2018 1955-1957 Chevy Smooth Firewall Part number 81511 Installation Instructions The following instructions are intended for professional installers and are guidelines only. Speedtech Performance
1401 / 1402 / 1403 ADJUSTABLE TRAILING ARM MOUNT BRACES INSTALLATION OF HOTCHKIS PERFORMANCE ADJUSTABLE TRAILING ARM MOUNT BRACES
 1401 / 1402 / 1403 ADJUSTABLE TRAILING ARM MOUNT BRACES 1401 78-88 GM A/G-BODY / 1402 68-72 GM A-BODY / 1403 64-67 GM A-BODY Thank you for your purchase. Please call us at (562) 907-7757 if you have any
Sport Sway Bar Kit (22425) Scion tc
 Scion tc") Sport Sway Bar Kit (22425) Scion tc Thank you for your purchase from our new line of Scion tc parts. Please call us at (877) 4NO - ROLL if you have any questions regarding the service or installation of
Sport Sway Bar Kit (22425) Scion tc Thank you for your purchase from our new line of Scion tc parts. Please call us at (877) 4NO - ROLL if you have any questions regarding the service or installation of
Technical Support Line: (952) Hanover Ave. Lakeville, MN
 Hanover Ave. Lakeville, MN") Technical Support Line: (952) 985-5675 Email: Sales@QA1.net 21730 Hanover Ave. Lakeville, MN 55044 www.qa1.net INSTALLATION INSTRUCTIONS QA1 1967-1979 Mopar A-Body Rear 6 link Conversion System QA1 p/n
Technical Support Line: (952) 985-5675 Email: Sales@QA1.net 21730 Hanover Ave. Lakeville, MN 55044 www.qa1.net INSTALLATION INSTRUCTIONS QA1 1967-1979 Mopar A-Body Rear 6 link Conversion System QA1 p/n
Sport Sway Bar Kit (22431 ) Subaru Forester INSTALLATION OF HOTCHKIS FRONT SWAY BAR
 Subaru Forester INSTALLATION OF HOTCHKIS FRONT SWAY BAR") Sport Sway Bar Kit (22431 ) Subaru Forester Thank you for your purchase from our new line of Forester parts. Please call us at (877) 4NO - ROLL if you have any questions regarding the service or installation
Sport Sway Bar Kit (22431 ) Subaru Forester Thank you for your purchase from our new line of Forester parts. Please call us at (877) 4NO - ROLL if you have any questions regarding the service or installation
2253 FRONT AND REAR SPORT SWAY BAR SET CHEVROLET B-BODY
 2253 FRONT AND REAR SPORT SWAY BAR SET 65-66 CHEVROLET B-BODY Thank you for your purchase from our line of classic Chevrolet B-body suspension parts. Please call us at (877) 4NO-ROLL if you have any questions
Installation Manual ZJ Long Arm Upgrade kit Jeep Grand Cherokee Last Revision No.: 1/30/12 PN
 Thank you for purchasing a Clayton Off Road suspension. Please check to make sure you have all necessary parts before you start your install. 4804010 ZJ 93-95 Long Arm Upgrade Kit 1200010 4 Link Axle Truss
Installation Instructions and Warranty Information
 Installation Instructions and Warranty Information For 2004-05 Nissan Titan 5.6L Part#1400S Read all instructions carefully before attempting installation. Rev. 10/05 Installation instructions for JBA
1202AA GM A-BODY Double Adjustable Trailing Arms
 1202AA 68-72 GM A-BODY Double Adjustable Trailing Arms Thank you for your purchase from our new line of GM parts. Please call us at (877) 4NO-ROLL if you have any questions regarding the service or installation
Sport Sway Bar Kit Chrylser E-Body Cuda, Challenger
 Sport Sway Bar Kit 2254 70-74 Chrylser E-Body Cuda, Challenger Thank you for your purchase from our new line of Mopar parts. Please call us at 877-4NO - ROLL if you have any questions regarding the service
INSTALLATION OF HOTCHKIS FRONT STABILIZER BAR
 22441 FRONT AND REAR SPORT SWAY BAR SET Infiniti G37/S Coupe & G35/S Sedan Thank you for your purchase from our Hotchkis line of suspension parts. Please call us at (877) 4NO-ROLL if you have any questions
2282R GM A Body Extreme Rear Sway Bar
 2282R 1964-1972 GM A Body Extreme Rear Sway Bar Thank you for your purchase from our new line of GM parts. Please call us at (877) 4NO - ROLL if you have any questions regarding the service or installation
Rear Upper Camber Link (12425) Scion tc
 Scion tc") Rear Upper Camber Link (12425) Scion tc Thank you for your purchase from our new line of Scion tc parts. Please call us at (877) 4NO-ROLL if you have any questions regarding the service or installation
Rear Upper Camber Link (12425) Scion tc Thank you for your purchase from our new line of Scion tc parts. Please call us at (877) 4NO-ROLL if you have any questions regarding the service or installation
Sport Sway Bar Kit Chevy Camaro
 Sport Sway Bar Kit 22109 2010 Chevy Camaro Thank you for your purchase from our new line of Chevy parts. Please call us at 877-4NO - ROLL if you have any questions regarding the service or installation
REAR SWAY BAR 2207R GM CAMARO/FIREBIRD
 REAR SWAY BAR 2207R 67-69 GM CAMARO/FIREBIRD Thank you for your purchase of this Hotchkis Performance product. Your stabilizer bar set was designed with the performance and durability you ve come to expect
2406 SPORT LEAF SPRINGS 2WD EXT/QUAD CAB 97-UP DODGE DAKOTA
 2406 SPORT LEAF SPRINGS 2WD EXT/QUAD CAB 97-UP DODGE DAKOTA Thank you for your purchase from our line of Dodge Dakota & Durango suspension parts. Please call us at (877) 4NO-ROLL if you have any questions
PLEASE READ THIS MANUAL CAREFULLY, PRIOR TO USE.
 For questions and concerns please contact: Fastfish Motorsports (352)799-4527 or (813)363-8103 PLEASE READ THIS MANUAL CAREFULLY, PRIOR TO USE. Door Car Set Up: The race car lifting jacks come with tabs
4/6 Coil Spring Kit C-10 Truck
 4/6 Coil Spring Kit 19390 67-72 C-10 Truck Thank you for your purchase from our new line of Chevy parts. Please call us at 877-4NO - ROLL if you have any questions regarding the service or installation
Installation Instructions and Warranty Information For Ford F-250 & F-350 Trucks with 7.5L V8 Auto. Transmission Only
 Installation Instructions and Warranty Information For 1988-1998 Ford F-250 & F-350 Trucks with 7.5L V8 Auto. Transmission Only Part# 1629SJT, 1629-1SJT, Requires part# 1629YJT, 1629Y-1JT, 1629Y-2JT, or
NOTICE- THIS K-MEMBER REQUIRES THE USE OF COIL OVER SUSPENSION. K-MEMBER WILL NOT WORK WITH FACTORY STYLE SPRINGS.
 Technical Support Line: (952) 985-5675 Email: Info@QA1.net 21730 Hanover Ave. Lakeville, MN 55044 www.qa1.net INSTALLATION INSTRUCTIONS MUSTANG K-MEMBER P/N MUK11, MUK12, MUK13 NOTICE- THIS K-MEMBER REQUIRES
MOVE ON TO THE REAR BAR INSTALLATION
 22410 STREET SWAY BAR SET 2001-UP LEXUS IS300 Thank you for your purchase from our line of Lexus parts. Please call us at (877) 4NO-ROLL if you have any questions regarding the service or installation
Technical Support Line: (952) Fax Line: (952) Hanover Ave. Lakeville, MN
 Fax Line: (952) Hanover Ave. Lakeville, MN") Technical Support Line: (952) 985-5675 Fax Line: (952) 985-5679 21730 Hanover Ave. Lakeville, MN 55044 www.qa1.net INSTALLATION INSTRUCTIONS QA1 P/N CC104MU Camber Caster Plates 1994-2004 Mustang 5.0/4.6
Technical Support Line: (952) 985-5675 Fax Line: (952) 985-5679 21730 Hanover Ave. Lakeville, MN 55044 www.qa1.net INSTALLATION INSTRUCTIONS QA1 P/N CC104MU Camber Caster Plates 1994-2004 Mustang 5.0/4.6
HEIDTS RF-110. INSTALLATION INSTRUCTIONS Fairlane Comet Rear 4-Link
 HEIDTS RF-110 INSTALLATION INSTRUCTIONS 66-67 Fairlane 66-67 Comet Rear 4-Link Please read these instructions completely before starting your installation. Remember the basic rule for a successful installation:
Anti-roll bar set (pn 2278) Pontiac GTO
 Pontiac GTO") Anti-roll bar set (pn 2278) Pontiac GTO Thank you for your purchase from our new line of GTO parts. Please call us at (877) 4NO-ROLL if you have any questions regarding the service or installation of your
Anti-roll bar set (pn 2278) Pontiac GTO Thank you for your purchase from our new line of GTO parts. Please call us at (877) 4NO-ROLL if you have any questions regarding the service or installation of your
Installation Instructions and Warranty Information
 Installation Instructions and Warranty Information For JBA Headers 1997-2004 Chevrolet Corvette and z06 LS-1 / LS-6 V-8 Part# Application 1817 97-99 with 1-5/8 tube 1817-1 01-04 with 1-5/8 tube 1817-2
BMW E46 M3 SPORT SWAY BAR SET # 22826
 BMW E46 M3 SPORT SWAY BAR SET # 22826 Thank you for your purchase from our new line of BMW E46 parts. Please call us at (877) 4NO - ROLL if you have any questions regarding the service or installation
RV-10 Center Arm Rest Console
 RV-10 Center Arm Rest Console Important Notice: This manual contains important information that may affect the safety of your aircraft. Read the Warranty / Agreement below. There is information in the
Quadratec 3 Add-A-Leaf Suspension Lift Kit
 Quadratec 3 Add-A-Leaf Suspension Lift Kit Installation Manual: for 1984-2001 Cherokee (XJ) # 16400.005X PARTS LIST: Front Coil Springs - QTY 2 Add-A-Leafs - QTY 2 5/16 x 3 Tie Bolts - QTY 2 5/16 Tie Bolt
INSTALLATION INSTRUCTIONS QA1 P/N x400, x500, x600, x400, x500, x F100 Front Coil-over Suspension System
 INSTALLATION INSTRUCTIONS QA1 P/N 52620-x400, 52620-x500, 52620-x600, 52621-x400, 52621-x500, 52621-x600 65-72 F100 Front Coil-over Suspension System TOOLS AND SUPPLIES REQUIRED Floor Jack Two (2) Jack
Can Am X3 MTS Suspension Kit
 Can Am X3 MTS Suspension Kit (Part #51-10751000 - 51-10751011) DISCLAIMER The purchaser understands, recognizes, and agrees that the suitability of any part sold or manufactured by Lone Star Racing for
INSTALLATION OF HOTCHKIS PERFORMANCE FRONT SWAY BAR
 2268 FRONT AND REAR SPORT SWAY BAR SET 59-64 CHEVROLET B-BODY Thank you for your purchase from our line of classic Chevrolet B-body suspension parts. Please call us at (877) 4NO-ROLL if you have any questions
Air-Boss VP Intake Plenum
 Installation Manual P/N 98502-ABIP 98.5-02 DODGE CUMMINS Air-Boss VP Intake Plenum Installation Instructions P/N 98502-ABIP GDP Air-Boss VP Plenum Installation PLEASE READ ALL INSTRUCTIONS BEFORE BEGINNING
JK HD Skid Plate for Rear Falcon Shocks
 1 JK HD Skid Plate for Rear Falcon Shocks Kit # 36-07-01-300 Important Notes: Prior to beginning this or any installation read these instructions to familiarize yourself with the required steps and evaluate
Sport Sway Bar Kit VW MKV & MKVI Jetta, GTI, GLI Audi A3
 Sport Sway Bar Kit 22833 06-09 VW MKV & MKVI Jetta, GTI, GLI 06-07 Audi A3 Thank you for your purchase from our new line of Audi/VW parts. Please call us at 877-4NO - ROLL if you have any questions regarding
Anti-Roll Bar Set # 2279, Cadillac CTS V6 & CTS-V
 Anti-Roll Bar Set # 2279, 2280 2003+ Cadillac CTS V6 & CTS-V Thank you for your purchase from our new line of CTS parts. Please call us at (877) 4NO-ROLL if you have any questions regarding the service
2015 & 2018 Fender Brace Installation Instructions
 2015 & 2018 Fender Brace Installation Instructions Thank you for your purchase of this Hotchkis Performance product. Your Fender Brace set was designed with the performance and durability you ve come to
2006 SHOCK TOWER BRACE 93-UP F-BODY CAMARO/FIREBIRD
 2006 SHOCK TOWER BRACE 93-UP F-BODY CAMARO/FIREBIRD Thank you for your purchase of this Hotchkis Performance product. Please call us at (800) 4NO-ROLL if you have any questions regarding this product.
Anti-roll bar set Chrysler Magnum, Charger, 300C, SRT Dodge Challenger
 Anti-roll bar set 22101 Chrysler Magnum, Charger, 300C, SRT-8 22107 Dodge Challenger Thank you for your purchase from our new line of Chrysler parts. Please call us at (877) 4NO-ROLL if you have any questions
16385 Steering Tie Rods Chrysler A-Body
 16385 Steering Tie Rods 1967-76 Chrysler A-Body Before You Start: Thank you for your purchase from our new line of B & E-Body parts. Please call us at (877) 4NO - ROLL if you have any questions regarding
PVI 1800/PVI Residential/Commercial Grid-Tied Photovoltaic Inverter WARRANTY MANUAL. Subject to Change REV , Solectria Renewables
 PVI 1800/PVI 2500 WARRANTY MANUAL Residential/Commercial Grid-Tied Photovoltaic Inverter 2009, Solectria Renewables Subject to Change REV 10.09 1 Product Warranty & RMA Policy 1.1 Warranty Policy The Solectria
DODGE CUMMINS Air-Boss CR Intake Plenum
 Installation Manual P/N 0307-ABIP 2003-07 DODGE CUMMINS Air-Boss CR Intake Plenum Installation Instructions P/N 0307-ABIP GDP Air-Boss CR Plenum Installation PLEASE READ ALL INSTRUCTIONS BEFORE BEGINNING
16366 Steering Tie Rods Chrysler B-Body, Charger, Super Bee, Road Runner, GTX Chrysler E-Body, Cuda, Challenger
 P 16366 66-70 B-Body, 70-74 E-Body 16366 Steering Tie Rods 1966-1970 Chrysler B-Body, Charger, Super Bee, Road Runner, GTX 1970-1974 Chrysler E-Body, Cuda, Challenger Thank you for your purchase from our
Installation Instructions
 Nov 25, 2013 Upper Control Arms Installation Instructions The following instructions are intended for professional installers and are guidelines only. Speedtech Performance assumes NO responsibility for
ROUSH Mustang Lowering Spring Kit
 ROUSH Mustang Lowering Spring Kit Part Number R06000043 Applications: 2010 ROUSH V8 Mustang 2010 Mustang GT w/ ROUSH Front Struts and Rear Shocks This spring set will lower your 2010 ROUSH Mustang an additional
51201 INSTALLATION INSTRUCTIONS
 7929 Lincoln Ave. Riverside, CA 92504 Phone: 951.689.ICON Fax: 951.689.1016 PART # 51201 51201 INSTALLATION INSTRUCTIONS DESCRIPTION 07-UP TUNDRA MULTI-RATE RXT LEAF SPRING KIT 1-22-2019 REV.B COMPONENTS