WARNING: PLEASE FOLLOW ALL ASSEMBLY INSTRUCTIONS AND READ AND UNDERSTAND THE OPERATING INSTRUCTIONS BEFORE YOU
|
|
|
- Bernard Garrett
- 6 years ago
- Views:
Transcription
1
2 WARNING: PLEASE FOLLOW ALL ASSEMBLY INSTRUCTIONS AND READ AND UNDERSTAND THE OPERATING INSTRUCTIONS BEFORE YOU OPERATE THE CADDY, EITHER MANUALLY OR BY REMOTE CONTROL. User Manual version 1.0 2
3 PLEASE READ BEFORE RETURNING THIS PRODUCT FOR ANY REASON: If you have a question or experience a problem with your Spitzer Golf Caddy, call to speak with a support representative. Or for fast response, us at support@spitzerproducts.com **DISCLAIMER SAFETY WARNING** OPERATORS ARE SOLELY RESPONSIBLE FOR SAFE OPERATION and MAINTENANCE OF THIS DEVICE. AS A REMOTELY CONTROLLED DEVICE, EXTREME CAUTION AND CARE MUST BE TAKEN TO AVOID INJURIES, DAMAGE OR LOSS. UNDER NO CIRCUMSTANCES DOES SPITZER GOLF ASSUME ANY RESPONSIBILITY FOR OPERATOR SAFETY, INJURIES OR PRODUCT LOSS. 3
4 Table of Contents 1.0 Introduction Features Parts List Assembly Instructions Wireless Control Fob Battery Replacement Operating Instructions Battery Charging & Maintenance Caddy Self Test (IMPORTANT)! Non Moving Test (Initial Test) Moving Test (Prior to each use) Recommendations for Efficient and Safe Operation Additional Functions Free Wheel Mode Wireless Control Fob Frequency Synchronization General Maintenance Electronic Systems Technical Specifications EL Frequently Asked Questions (FAQ) Support Information
5 1.0 Introduction 1.1 Features The SPITZER EL6 Electric Golf Trolley/Caddy is an electrically assisted manually controlled movement of the cart while you walk along with it. This operation is controlled through the wireless control fob on the cart. 5
6 1.2 Parts List The following is a list of parts that the package should normally contain. If your package is missing any parts, please contact support@spitzerproducts.com immediately. Optional Accessories Available at Cup Holder Carrying Bag Rain Cover 6

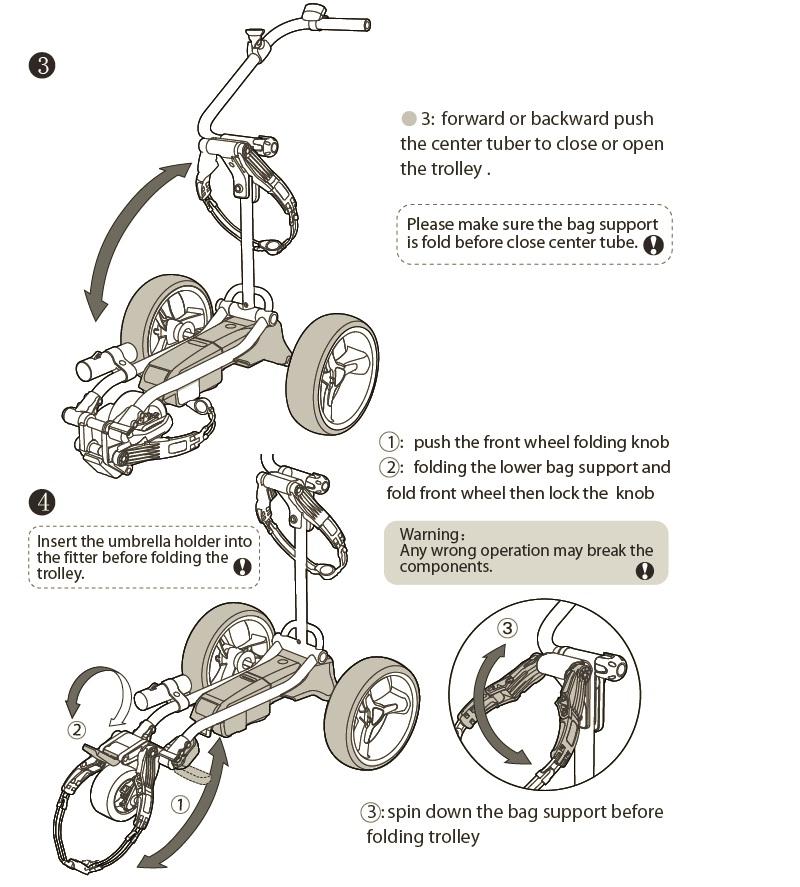
7 2.0 Assembly Instructions 7
8 8
 Speed Control Knob: Turn the speed control knob to adjust the speed. Clockwise to increase speed.")

9 3.0 Wireless Control Fob (a) Power LED: Ensure the Operational LED on/illuminated when you start using controller (b) Auto Distance Selection: The controling distance for 10,20,30 meters. The 30meter button is alsothe frequency synchronization button (c) Speed Control Knob: Turn the speed control knob to adjust the speed. Clockwise to increase speed. Counter Clockwise to decrease speed (d) Start/Stop Button (Integrated into Speed Control Knob): Push the Speed Control Knob to Start or Stop the trolley 3.1 Battery Replacement The Wireless Control Fob requires a Type A123 battery. Insert the battery in the correct position, matching + and with the markings in the battery holder. Other Notes: The remote control uses two 1.5V AAA batteries available in any supermarket, drug store or electronics store It is recommended to keep a set of extra batteries ready as replacement It is strongly recommended to operate the caddy at a range not to exceed 10 yards in order to prevent the loss of control of the unit! 9
 Please do not charge the battery near a heater, or where heat accumulation may occur or in direct sunshine.")
10 4.0 Operating Instructions PLEASE OBEY THESE PRECAUTIONS FOR BATTERY USE & CHARGING a) Please do not charge the battery in a sealed container or in upside down position. It is recommended to charge the battery in a well ventilated area. b) Please do not charge the battery near a heater, or where heat accumulation may occur or in direct sunshine. c) In order to prolong the service life of the battery, please avoid complete discharge and charge the battery after every use. When the trolley is not in use for an extended period of time, it is recommended to charge the battery once a month. d) The battery s poles red color stands for positive, and the black for negative. In case of battery replacement please reconnect the poles of the battery correctly. Otherwise your caddy could suffer severe damage. e) EXPLOSION HAZARD! Please do not disassemble the battery or throw it into a fire. f) SAFETY HAZARD! NEVER TOUCH THE ELECTRIC POLES OF THE BATTERY!! 4.1 Battery Charging & Maintenance The SPITZER EL6 is equipped with an advanced ultra lightweight Lithium type battery. It requires special care to prolong its life and ensure optimal performance. Please follow these important instructions and safety tips when charging the battery. Charging Instructions: 1. Ensure power is turned off and remove the battery from the chassis. 2. Connect the battery pack to the charger and plug into wall. 3. Charger will display green LED when the battery is fully charged. 10
11 Battery Charging Notes: The charge current should not exceed 2A current, if the charge current exceeds the specified value, it will damage the battery charge and discharge performance, mechanical performance and safety performance and possibly cause the battery to overheat heat or leak. Do not charge the battery with a voltage higher than the specified voltage 25.2V to avoid damage of the battery. Only use the supplied charger. Use of an unspecified charger may damage the battery and invalidate the warranty. Prohibit reverse charging of the battery. The battery must be connected correctly. The charger supplied is an auto smart charger. It will cease charging when it detects the battery is full. It is still recommended to disconnect the charger once the battery is fully charged. Battery Maintenance: 1. Fully charge this battery if you plan to store it in a non use state for an extended period of time. 2. Take care in handling the battery. If the battery is dropped or hit against a solid object, it will shorten the battery s life. 3. Please store the battery in a secure location, out of reach from children. 4. For the initial/first charge of the battery ensure that charge the battery no less than 8 hours to maximize its capacity 5. Never place the charger on top of the battery when charging. 6. Keep the battery in a normal environment away from excessive heat and from damp environments. 7. The battery is only designed for this trolley,pls don t use it on any other device or other purpose The battery is a consumable item. Its performance will gradually deteriorate during its normal operation this is a normal phenomenon. When the battery no longer holds enough charge, please contact Spitzer for purchase of a replacement battery. 11
12 5.0 Caddy Self Test (IMPORTANT)! Please review or follow these steps and guidelines to test your caddy prior to use every time. 5.1 Non Moving Test (Initial Test) Before actually using the SPITZER cart for the first time, it is recommended you operate the golf cart elevated at the drive wheels to familiarize yourself with how the cart works. Elevate your cart with a paint can or a similar sized and strength item allowing your cart s drive wheels to freely move without touching the ground. The pictures below illustrate an example of how the cart can be elevated for this test. Follow the steps in Section 7.2 with the cart elevated in this manner. 5.2 Moving Test (Prior to each use) Make sure this test is performed with the caddy in a wide and safe area, free of obstructions or valuables, such as people, parked automobiles, flowing traffic, furniture or water bodies (rivers, swimming pools etc.), steep hills, cliffs or similar hazards. The functions of the caddy are controlled through wireless control fob. The variable speed control knob on the fob controls the speed and the Stop/Start functions of the caddy. 1. Ensure the variable speed control knob is at its 0 position. To verify, the knob should be turned counterclockwise. 2. Turn the main switch to On (I) position. 3. Turning the knob forward (clockwise) will increase the forward movement speed of the caddy. 4. To slow down or stop the caddy, turn the knob backwards (counterclockwise). 5. In order to immediately stop the caddy press down on round speed control knob located on the wireless control fob!! Make sure you are close to the caddy at all times while testing it and familiarizing yourself with the wireless control fob! The wireless control fob is designed to have a range of approximately 50 yards, but it is strongly recommend to operate the caddy in closer ranges of 10 yards to be able to react to any unforeseen events, such as other golfers crossing your path or to avoid hidden obstructions (creeks, bunkers) or an unexpected disconnection in remote operation. 12
13 5.3 Recommendations for Efficient and Safe Operation Be alert and act responsibly at all times while operating your caddy, just as you would when operating a riding cart, motor vehicle or any other type of machinery. We absolutely do not recommend the consumption of alcohol or any other impairing substances while operating our caddies. Do not operate the caddy in narrow or dangerous spaces, places with valuables or any people gathering areas, such as parking lots, close to flowing traffic, bag drop off areas, stores, driving ranges, putting greens and practice areas, pro shops, restaurants, starter areas and other areas where people or items could be harmed through an error or lack of skill in operation. In such situations the caddy should be best operated with its manual controls or without power. Also, please make sure to always switch off the power ( 0 ) and secure the caddy when you park and leave the unit for any reason, either on or off course. With its optimized balance and straight front wheel the caddy has extraordinarily narrow and responsive turning and maneuvering abilities. However, it sometimes tends to react to severe uneven weight distribution of its load or steep slope variations and follows the slope of the golf course. Therefore, please make sure the weight in your bag is distributed evenly (move heavy balls and items to both sides, or shift the bag on the caddy). Also, when operating your caddy by remote control anticipate the slope of the course in order to avoid frequent corrections in directions. In some extreme environments, such as very uneven terrain, steep hills, narrow and/or sloped cart paths, muddy areas, gravel paths, close to bunkers and hazard, around bushes and trees it is recommended to operate the caddy via manual control in order to prevent any collisions, damage or the need for complicated correction adjustment maneuvers. 13
14 6.0 Additional Functions 6.1 Free Wheel Mode The caddy can be operated without power. In order to activate the free wheel mode turn the main power switch into Off position. The caddy now can be pushed manually without resistance from the drive shaft. 6.2 Wireless Control Fob Frequency Synchronization One controller can be synchronized with one trolley. synchronization process as follows: Perform the wireless fob controller 1. Turn off the power by holding the "Power" key on the control box until the power light turns off. 2. Press and hold the "distance control 30" key on the controller, at the same time turn on the power on the control box. If the Power LED indicator on the control fob is flashing with green lights, it means this remote controller synchronized with the trolley. 14
15 7.0 General Maintenance The steps below will ensure that you experience a prolonged and reliable life out of your SPITZER EL6. 1) The Caddy has been designed so that the user can concentrate on playing golf, while the caddy does the work of carrying your bag. In order to keep your SPITZER EL6 looking at its best, we advise that you wipe any mud or grass from the frame, wheels and chassis after every round with a damp cloth or paper towel. 2) Do NOT use hoses or any high pressure jet washers to prevent moisture entering the electronic systems, motors or gear boxes of the caddy. 3) Remove the rear wheels every few weeks and remove any debris that might cause the wheels to drag. Apply a hydrophobic lubricant, such WD 40 to keep moving parts smooth and corrosion free. 4) A four five hour round of golf played once a week for 12 months is equivalent to four years use of a lawnmower, so please inspect your cart at least once a year thoroughly, and if you notice any symptoms of wear, contact your SPITZER Service Center. Alternatively, you can have your caddy inspected and tuned by our Service Center, so it s always in great shape for the new season. 5) Always disconnect the battery when you store the caddy, and always put your caddy together before re connecting the battery. If you are not planning to play for at least a month, store the battery in a warm and dry place (not on concrete floor). All of these recommendations will help keep your SPITZER EL6 in top condition and ensure that it remains your reliable partner, both on and off the course. 15
16 8.0 Electronic Systems Wireless Control Fob Range: We recommend not exceeding 10 yards distance. The greater the distance between you and caddy, the greater the chance of losing contact with it. Microcomputer: The caddy has 2 microcomputer controls: The first is in main controller box. The second is in the remote control transmitter handset. Safety Protection: When the temperature of the controller box reaches its upper limit in case of an overload it will automatically shut down to cool off. Microprocessor Controlled Electronics System: When you connect the battery, the electronics system will automatically run through a start up routine. Then you can press the main OFF/ON switch on the handle. The battery charge indicator lights will show you the charge level of the battery from green (fully charged) to red (discharged). Important: The electronics controller box contains no user serviceable parts. Therefore, it is sealed to reduce the risk of moisture entering and impacting the electronic system. Breaking this seal increases the risk of damaging the electronics and decreasing the reliability of your caddy. DO NOT attempt to open the controller case. Doing so will void the warranty. 16
17 9.0 Technical Specifications EL6 Feature Specification Wireless Control Fob Speed Control Function: Speed Control (Forward Only), Auto-Distance (10/20/30m) Motor Power: 1 x 180 Watt 24 V DC Electric Drive Train Rear Wheel Drive, Steel Gear (17:1 ratio) Power: 24V Battery Average Charge Time: 4 Hours Lifetime: 600 charges Charger Input: 100/240V AC Output: 24V/2A DC Trickle Charger Net Weight Caddy: 18 Lbs (8.2 kg) Weight Net Weight Battery: 4 Lbs (1.6 kg) Total Net Weight: 22 Lbs (10 kg) Speed 5.4 m/h (8.6 km/h) Distance/Range 18 Holes Maximum Load 55 Lbs (25 kg) Climbing Ability 25 degrees Full Folded Dimensions Length 64cm 60cm Width 56cm 56cm Height 26cm 26cm Rear Wheels Airless, rubberized tread Front Wheels Airless, rubberized tread Materials Frame: Aluminum Bag Support: ABS, Nylon Colors Painted: Silver Oxidized: Stainless Steel Additional Accessories Cup Holder Seat Umbrella Holder Carrying Bag Rain Cover Scorecard Holder Warranty 1 Year on Parts Type: Cardboard Box, Styrofoam or Cardboard Cushioning Packaging Dimensions: 30 x 25" x 14 (65 x 53 x 30 cm) Gross Weight: (13 kg) 17
18 10.0 Frequently Asked Questions (FAQ) 1. Question: I lost my remote control handset. Reply:You can purchase a new remote handset from Follow the instructions in Section 6.2 to re synchronize the remote control. 2. Question: When I connect the battery plug to the caddy and turn the main switch on, the battery indicator lights do not come on. Reply: Inspect if if the battery leads are well connected to the battery. 3. Question: The caddy s main switch is on, and all battery indicator lights are on, but the caddy does not run or one motor does not run. Reply: Please check the motor connectors on the controller box and if connector pins are in the correct position. 4. Question: The caddy does not respond well to the remote control handset? Reply: Please check the condition of the handset batteries. Make sure you do not exceed the range distance limit. 5. Question: The trolley stops by itself. Reply: Please check the battery charge. Also the controller box has a shut down function, if the battery is too low or the controller is overheating or the caddy does not receive a signal for a while. 6. Question: The caddy tracks to one side. Reply: Please make sure that the weight distribution of your golf bag is balanced on the caddy. To adjust the tracking loosen the axle screw of the front wheel on the right side, and adjust the wheel position accordingly. Tighten the axle screw after the adjustment to make sure the front wheel stays in the desired position. 7. Question: The caddy does not respond at all to the remote control handset. Reply: Follow the instructions in Section 6.2 to re synchronize the remote control. 18
19 11.0 Support Information SUPPORT INFORMATION FOR ANY FURTHER INFORMATION OR SUPPORT ISSUES, PLEASE CALL SPITZER GOLF AT OR S WILL BE PROMPTLY RESPONDED TO AT SUPPORT@SPITZERPRODUCTS.COM 19
SPITZER EL100 Remote Controlled Electric Golf Caddy User Manual
 SPITZER EL100 Remote Controlled Electric Golf Caddy User Manual WARNING: PLEASE FOLLOW ALL ASSEMBLY INSTRUCTIONS AND READ AND UNDERSTAND THE OPERATING INSTRUCTIONS BEFORE YOU OPERATE THE CADDY, EITHER
SPITZER RL150 Remote Controlled Electric Golf Caddy User Manual
 SPITZER RL150 Remote Controlled Electric Golf Caddy User Manual WARNING: PLEASE FOLLOW ALL ASSEMBLY INSTRUCTIONS AND READ AND UNDERSTAND THE OPERATING INSTRUCTIONS BEFORE YOU OPERATE THE CADDY, EITHER
PLEASE READ BEFORE RETURNING THIS PRODUCT FOR ANY REASON:
 WARNING: PLEASE FOLLOW ALL ASSEMBLY INSTRUCTIONS AND READ AND UNDERSTAND THE OPERATING INSTRUCTIONS BEFORE YOU OPERATE THE CADDY, EITHER MANUALLY OR BY REMOTE CONTROL. User Manual version 1.0 PLEASE READ
SPITZER RL150 Remote Controlled Electric Golf Caddy User Manual
 SPITZER RL150 Remote Controlled Electric Golf Caddy User Manual WARNING: PLEASE FOLLOW ALL ASSEMBLY INSTRUCTIONS AND READ AND UNDERSTAND THE OPERATING INSTRUCTIONS BEFORE YOU OPERATE THE CADDY, EITHER
Bat-Caddy X3R Remote Controlled Electric Golf Caddy User Manual
 Bat-Caddy X3R Remote Controlled Electric Golf Caddy User Manual WARNING: PLEASE FOLLOW ALL ASSEMBLY INSTRUCTIONS AND READ AND UNDERSTAND THE OPERATING INSTRUCTIONS BEFORE YOU OPERATE THE CADDY, EITHER
User Manual GRX- 950 and GRX- 950 Li
 User Manual GRX- 950 and GRX- 950 Li Page 1 of 17 TABLE OF CONTENTS INTRODUCTION 3 BASIC SET- UP 4 TURNING ON YOUR GRX- 950 7 PRECAUTIONS 8 FREE WHEEL MODE 9 GENERAL BATTERY CARE 10 BATTERY INFORMATION
Instruction manual DENVER DBO
 Instruction manual DENVER DBO-6500 www.facebook.dk/denver-electronics Before operating this vehicle, read all the instructions for safe assembly and operations. User s manual can guide you through the
Mobility Scooters. Owners Manual
 Mobility Scooters Owners Manual 1 Electromagnetic Interference ( EMI ) It is very important that you read this manual before using the scooter for the first time including the following information regarding
EXTREME-TERRAIN COMBO Z12 GALAXY HOVERBOARD + JETKART XT
 EXTREME-TERRAIN COMBO Z12 GALAXY HOVERBOARD + JETKART XT TABLE OF CONTENTS What s in the Box 1 Features & Specs 2 Charging the Battery 3 Indicator Lights 4 Riding the Z12 Galaxy 5 How to Recalibrate 6
What s in the Box 1. Features & Specs 2. Charging the Battery 3. Indicator Lights 4. How to Recalibrate 5. Riding the Rogue 6. Care and Maintenance 7
 ROGUE HOVERBOARD TABLE OF CONTENTS What s in the Box 1 Features & Specs 2 Charging the Battery 3 Indicator Lights 4 How to Recalibrate 5 Riding the Rogue 6 Care and Maintenance 7 Safety Warnings 8 1. WHAT
Electric Car User Manual
 Electric Car User Manual The owner s manual contains important safety information as well as assembly, use and maintenance instructions. The Ride-on Car must be assembled by an adult who has read and understands
EW-20 Black. Owner s Manual. (888) Sales (888) Service
 Sales (888) Service") EW-20 Black Owner s Manual www.ewheelsdealers.com (888) 305-0881 Sales 0 (888) 571-2845 Service Table of Contents Page 2 - Feature Guide Page 3 - Product Specifications Page 4 - Operation of Scooter Page
EW-20 Black Owner s Manual www.ewheelsdealers.com (888) 305-0881 Sales 0 (888) 571-2845 Service Table of Contents Page 2 - Feature Guide Page 3 - Product Specifications Page 4 - Operation of Scooter Page
EW-04. Owner s Manual. ewheels Service (888)
") EW-04 Owner s Manual ewheels Service (888) 571-2845 0 Table of Contents Page 2 - Feature Guide Page 3 - Technical Specifications Page 4 - Operation of Scooter Page 8 - Folding Instructions Page 9 - Charging
EW-04 Owner s Manual ewheels Service (888) 571-2845 0 Table of Contents Page 2 - Feature Guide Page 3 - Technical Specifications Page 4 - Operation of Scooter Page 8 - Folding Instructions Page 9 - Charging
EW-09. Owner s Manual. (888) Customer Service. (888) Service
 Customer Service. (888) Service") EW-09 Owner s Manual www.ewheelsdealers.com (888) 305-0881 Customer Service (888) 571-2845 0 Service Table of Contents Page 2 - Feature Guide Page 3 - Product Specifications Page 4 - Operation of Scooter
EW-09 Owner s Manual www.ewheelsdealers.com (888) 305-0881 Customer Service (888) 571-2845 0 Service Table of Contents Page 2 - Feature Guide Page 3 - Product Specifications Page 4 - Operation of Scooter
INSTRUCTION MANUAL. Maserati Alfieri Ride-On SKY SKY4735. Ver. 1
 INSTRUCTION MANUAL Maserati Alfieri Ride-On Ver. 1 SKY4734 + SKY4735 Charge item 8 to 12 hours before initial use. After initial charge, follow the normal recommended charging time. bestchoiceproducts.com
Riding Your Halo Go Before You Begin Safety Alerts
 HALO GOTM Before You Begin---------------------01 Riding Your Halo Go-----------07-10 Main Components-------------------02 Safety Alerts--------------------------11 Charging Your Batteries------------03
Bigfoot Mini Quad Battery Operated Ride On Instruction / Assembling Manual
 Bigfoot Mini Quad Battery Operated Ride On Instruction / Assembling Manual BF CHILDREN S PRODUCTS Adult Assembly Required Please read this manual carefully before assembly and use. This manual contains
GT MAGNETIC POWER BICYCLES (SMART CYCLE)
") GT MAGNETIC POWER BICYCLES (SMART CYCLE) Congratulations on selecting the GT Magnetic Power Bicycle (Smart Cycle in short). In order to use and enjoy your Smart Cycle safely and to get the best performance
GT MAGNETIC POWER BICYCLES (SMART CYCLE) Congratulations on selecting the GT Magnetic Power Bicycle (Smart Cycle in short). In order to use and enjoy your Smart Cycle safely and to get the best performance
MULTI-FUNCTION JUMP STARTER
 MULTI-FUNCTION JUMP STARTER FEATURES 1. Flashlight 2. Jump Start Port 3. LED Power indicator 4. USB Output 5. Power button 6. Charging port 7. Car battery clamp 8. Home charger&car charger 9. Portable
OWNERS INSTRUCTION GUIDE. RoboKaddy
 OWNERS INSTRUCTION GUIDE RoboKaddy RoboKaddy Assembly Thank you for purchasing a PowaKaddy RoboKaddy. Your RoboKaddy is factory programmed and ready for use. However, please take time to read this manual
PCBL 1600/1800 POWER WHEELCHAIR MODERN USER'S MANUAL Edition
 PCBL 1600/1800 POWER WHEELCHAIR MODERN USER'S MANUAL Edition 09.2013 mdh sp. z o.o. 90-349 Łódź, ul. Tymienieckiego 22/24 tel. (+48) 42 212 32 08 fax: (+48) 42 674 04 99 www.mdh.pl viteacare@mdh.pl 1 TABLE
Walker Loader Bucket OPERATOR S AND PARTS MANUAL
 Walker Loader Bucket OPERATOR S AND PARTS MANUAL Please Read and Save These Instructions For Safety, Read all Safety and Operation Instructions Prior To Operating Machine P/N 6690 TABLE OF CONTENTS Introduction
USER GUIDE. electric skateboard. Your ZINGO CRUZE warranty must be registered online within 7 days of purchase.
 electric skateboard USER GUIDE Your ZINGO CRUZE warranty must be registered online within 7 days of purchase. To activate your warranty visit www.tevo.co.za and click the Register your warranty tab at
User Manuel. Titan Hummer XL
 User Manuel Titan Hummer XL Dear User, Tzora Active Systems Ltd. thanks you for choosing the Titan Hummer-XL and wishes you safe and enjoyable journeys. For proper operation and to maintain the scooter
VERT 1 VERTICAL TAKE OFF / LANDING RC PLANE
 VERT 1 VERTICAL TAKE OFF / LANDING RC PLANE THANK YOU. Thank you for your purchase of Protocol s Vert I Vertical Take Off / Landing RC Plane. You are about to experience the best of what remote control
USER AND SAFETY MANUAL
 USER AND SAFETY MANUAL HANDLE- BARS STEM COLLAR ROD SADDLE SAFETY HOOK- STRIP BRAKE SUPPORT BARS AFT TUBE FRONT TUBE SAFETY RULES SECURE THE ROD AND ATTACH SAFETY HOOK-STRIP before every ride. RIDE WHEELA
USER GUIDE. electric skateboard. Your ZINGO BLAZE warranty must be registered online within 7 days of purchase.
 electric skateboard USER GUIDE Your ZINGO BLAZE warranty must be registered online within 7 days of purchase. To activate your warranty visit www.tevo.co.za and click the Register your warranty tab at
INSTRUCTION MANUAL. Rescue Ride-On SKY Ver. 5
 Ver. 5 INSTRUCTION MANUAL Rescue Ride-On SKY2886 + 3995 SAFETY Please retain these instructions for future reference. This vehicle must be assembled by an adult who has read and understood the instructions
Triaxe Sport. By Enhance Mobility
 Triaxe Sport By Enhance Mobility User Manual April 2016 Thank you for choosing the Triaxe Sport Folding Scooter. Please read this manual carefully before operating the the Triaxe Sport. If you have any
User Manual of Bagibike Electric Bicycles
 User Manual of Bagibike Electric Bicycles Model: Bagibike B16. http://www.bagibike.com Page 1 FOREWORD The following operation manual is a guide to assist you. This manual is not a complete document on
INSTRUCTION MANUAL. Kids Ride-On Dirt Bike with Training Wheels SKY SKY3487. Ver. 2
 Ver. 2 INSTRUCTION MANUAL Kids Ride-On Dirt Bike with Training Wheels SKY3486 + SKY3487 Pg. 2 Thank you for choosing us! Since 2002, Best Choice Products has been bringing customers high-quality products
INSTRUCTION MANUAL. Kids Ride-On Motorcycle SKY Ver. 3
 INSTRUCTION MANUAL Kids Ride-On Motorcycle Ver. 3 SKY785 + 89 Pg. 2 Thank you for choosing us! Since 2002, Best Choice Products has been bringing customers high-quality products at the absolute lowest
AVIATOR REMOTE CONTROL HELICOPTER
 AVIATOR REMOTE CONTROL HELICOPTER THANK YOU. Thank you for your purchase of Protocol s Aviator Remote Control Helicopter. You are about to experience the best of what remote control flight has to offer.
INSTRUCTION MANUAL. Ride-On Convertible SKY907 + SKY908 + SKY2308. Ver. 3
 Ver. 3 INSTRUCTION MANUAL Ride-On Convertible SKY907 + SKY908 + SKY2308 SAFETY Please retain these instructions for future reference. This vehicle must be assembled by an adult who has read and understood
USER MANUAL. Your ZINGO DRIFTA 360 warranty must be registered online within 7 days of purchase.
 USER MANUAL Your ZINGO DRIFTA 360 warranty must be registered online within 7 days of purchase. To activate your warranty visit www.tevo.co.za and click the Register your warranty tab at the top of the
F1-S REMOTE OWNER S MANUAL & USER GUIDE
 F1-S REMOTE OWNER S MANUAL & USER GUIDE IMPORTANT INFORMATION EUROPEAN UNION DECLARATION OF CONFORMITY : Herby, Stewart Golf Limited, declares that the Radio transmitter and receiver is in compliance with
PCBL 1610/ 1810 DE LUXE POWER WHEELCHAIR USER'S MANUAL Edition
 PCBL 1610/ 1810 DE LUXE POWER WHEELCHAIR USER'S MANUAL Edition 08.2010 mdh sp. z o.o. 90-349 Łódź, ul tymienieckiego 22/24 tel. (+48) 42 212 32 08 fax: (+48) 42 674 04 99 www.mdh.pl export@mdh.pl 1 TABLE
INSTRUCTION MANUAL. 12V Ride on ATV Quad SKY SKY SKY3754. Ver. 4
 Ver. 4 INSTRUCTION MANUAL 2V Ride on ATV Quad SKY207 + SKY2580 + SKY3754 Charge for 8 hrs before initial use. After initial charge, follow the normal recommended charging time. bestchoiceproducts.com SAFETY
Operation and Maintenance Instructions
 X-Treme TM Electric Moped Operation and Maintenance Instructions Electric Moped XM-3100 Revised 11/6/08 Operation and Maintenance Instructions We strongly recommend that you read this entire manual before
INSTRUCTION MANUAL. Ride-On Convertible Truck SKY SKY SKY2581. Ver. 2
 Ver. 2 INSTRUCTION MANUAL Ride-On Convertible Truck SKY2069 + SKY2338 + SKY2581 SAFETY Please retain these instructions for future reference. This vehicle must be assembled by an adult who has read and
Bigfoot Sport Quad Ba ery Operated Ride On Instruc on / Assembling Manual
 Bigfoot Sport Quad Ba ery Operated Ride On Instruc on / Assembling Manual Item No.: KL-40048 Adult Assembly Required. Please read this manual carefully before giving this toy to your child. This manual
Remote Control Engine Starter System Owner s Manual
 Remote Control Engine Starter System Owner s Manual Introduction 1. Introduction 2 2. Features of the System 3 3. Safety Precaution 4 4. Name of each part 6 5. Display 7 6. Operating the Transmitter 8
Golden Motor e-throne Folding Wheelchairs. Brushless Electric Wheelchairs e-throne. User's Guide
 Golden Motor e-throne Folding Wheelchairs Brushless Electric Wheelchairs e-throne User's Guide PRECAUTIONS Thank you for buying e-throne folding wheelchair from Golden Motor technology co., ltd. We sincerely
A-Type, S-Type, & Cruiser Scooters. Read and understand this entire manual before allowing child to use this product!
 A-Type, S-Type, & Cruiser Scooters OWNER S MANUAL Read and understand this entire manual before allowing child to use this product! NOTE: Manual illustrations are for demonstration purposes only. Illustrations
carrygolf carrygolf.net INSTRUCTIONS: CARRYGOLF LEOPARD LEOPARD
 INSTRUCTIONS: CARRYGOLF LEOPARD LEOPARD 1 CONTENTS 1. In The Box 2. Assembly Instructions 3. Control Panel Functions 4. Driving With Remote Control 5. How To Manage Without Remote Control 6. Battery 7.
Southern Oregon University Van Safety Training for Students and Employees of the University
 Southern Oregon University Van Safety Training for Students and Employees of the University Template courtesy of George Fox University PASSENGER VAN USE POLICY All drivers must be 18, have a valid drivers
Backup Sensors User s Information Manual RIDGELINE
 Backup Sensors User s Information Manual RIDGELINE A Few Words About Safety Your safety, and the safety of others, is very important. Operating your vehicle s backup sensors safely is an important responsibility.
NOT RETURN TO STORE. NOTE:
 A 5 Lux Scooter Owner s Manual Read and understand this entire manual before allowing child to use this product! For assistance contact Razor. DO NOT RETURN TO STORE. NOTE: Manual illustrations are for
Cruiser RC-900. Remote Golf Cart. Distributor: P/N: US. User s Manual
 Cruiser RC-900 Remote Golf Cart Distributor: P/N: 906140 US User s Manual FEDERAL COMMUNICATION COMMISSION INTERFERENCE STATEMENT This equipment has been tested and found to comply with the limits for
DO NOT RETURN TO STORE. NOTE:
 Pro Series Scooters Owner s Manual Read and understand this entire manual before allowing child to use this product! For assistance contact Razor. DO NOT RETURN TO STORE. NOTE: Illustrations are for demonstration
Installation and Operation Guide. Tundra HD 2500 Power Inverter. for the. Webasto BlueCool Truck System
 Installation and Operation Guide Tundra HD 2500 Power Inverter for the Webasto BlueCool Truck System www.tundrainternational.com www.techwebasto.com BCTSP0063A Table of Contents 1. Introduction 4 1.1 Disclaimer.................................................................................
S7 REMOTE Electric Trolley Instruction Manual
 S7 REMOTE Electric Trolley Instruction Manual Before using the S7 REMOTE for the first time, please take a few minutes to read through this manual to ensure that you get the most out of your trolley REGISTERONLINE
Owner s Manual with Assembly Instructions Please read this manual and save it. For Model RC09037
 Product features may vary from the pictures above Owner s Manual with Assembly Instructions Please read this manual and save it. For Model RC09037 Use only with a 12 Volt (7.0 Amp/Hr.) Battery, 12 Volt
Eclipse Solar Suitcase
 Eclipse Solar Suitcase Renogy 100W 200W 2775 E. Philadelphia St., Ontario, CA 91761 1-800-330-8678 Version 1.0 Important Safety Instructions Please save these instructions. This manual contains important
IPS INSTRUCTION MANUAL
 IPS INSTRUCTION MANUAL CAUTIONS 1. PLEASE READ THE INSTRUCTION MANUAL CAREFULLY BEFORE USING THE IPS SELF BALANCING UNICYCLE; 2. PLEASE KEEP THE SPEED IN THE SAFE RANGE WHICH IS UNDER 10km/h; 3. THE PEDALS
THIS VEHICLE MUST BE ASSEMBLED BY AN ADULT. PLEASE READ THE MANUAL CAREFULLY BEFORE OPERATION. WARNING CALIFORNIA PROPOSITION 65 WARNING
 TABLE OF CONTENTS A Electric Car Specifications 2 B List of Parts 4 C Assembly 5 D Battery Charging 7 E How to Use 9 F Safety Precautions 9 G Simple Repairs 10 H Maintaining your Vehicle 11 I About Thermal
WheelieSafe. WheelieSafe. User Manual. Motorized Trolley. Distributor:
 WheelieSafe Motorized Trolley WheelieSafe Distributor: User Manual You must read this manual before using your WheelieSafe trolley P/N: 9023100 Rev. 01/16 Table of contents Contents Pages Safety Symbols,
Bigfoot Motorised Utility Vehicle Ba ery Operated Ride On Instruc on / Assembling Manual
 Bigfoot Motorised Utility Vehicle Ba ery Operated Ride On Instruc on / Assembling Manual Item No. KL-40033BF Adult Assembly Required. Please read this manual carefully before giving this toy to your child.
EW-27 Crossover Pre-Mobility Scooter
 EW-27 Crossover Pre-Mobility Scooter Owner s Manual www.ewheelsdealers.com Before (888) 305-0881 you operate Customer the Service scooter (888) 571-2845 Service 0 Locate the below listed materials in rear
Single Seater Golf Buggy Owners Manual
 Dedication to Excellence Dedication to Excellence Single Seater Golf Buggy Owners Manual www.i-motioncaddys.com sales@i-motioncaddys.com www.i-motioncaddys.com sales@i-motioncaddys.com Introducing i-m
CAUTION-ELECTRICALLY OPERATED PRODUCT:
 CAUTION-ELECTRICALLY OPERATED PRODUCT: NOT RECOMMENDED FOR CHILDREN UNDER 8 YEARS OF AGE, AS WITH ALL ELECTRIC PRODUCTS, PRECAUTIONS SHOULD BE OBSERVED DURING HANDLING AND USE TO PREVENT ELECTRIC SHOCK,INPUT:120V
Original. User Manual & Install Guide. Safe-T-Pull Inc. Page 1 of 15
 Original User Manual & Install Guide Safe-T-Pull Inc. Page 1 of 15 TABLE OF CONTINENTS 1. Before You Begin...3 Disclaimer...3 What Is Included...3 Claims...3 Contact Us...4 Safety Notes...4 2. Introduction...5
X9 REMOTE OWNER S MANUAL & USER GUIDE
 X9 REMOTE OWNER S MANUAL & USER GUIDE IMPORTANT INFORMATION BLUETOOTH SIGNALS : The Bluetooth module DW-BTM-222 used in this product is a Class 1 device, subclass 22; Wide Band Data Transmission Systems
FTX Banzai RTR Brushed 2.4GHz 4WD Drift Car
 FTX Banzai-Manual_Banzai 11/12/2013 16:12 Page 1 FTX Banzai-Manual_Banzai 11/12/2013 16:12 Page 2 FTX Banzai RTR Brushed 2.4GHz 4WD Drift Car Congratulations on your purchase of the FTX Banzai electric
Pro Series Scooters, Black Label Scooters and El Dorado Scooter
 Pro Series Scooters, Black Label Scooters and El Dorado Scooter Owner s Manual Read and understand this entire manual before allowing child to use this product! For assistance contact Razor. DO NOT RETURN
USER MANUAL. To activate your warranty visit
 USER MANUAL Your ZINGO X100 warranty must be registered online within 7 days of purchase. To activate your warranty visit www.tevo.co.za, click the Outdoor tab, then click the ZINGO X100 icon, then click
MODEL HD99 HYDRAULIC ONE MAN TOWABLE EARTHDRILL
 DO NOT THROW AWAY IMPORTANT MANUAL MODEL HD99 HYDRAULIC ONE MAN TOWABLE EARTHDRILL Operators Manual GROUND HOG, INC. P.O.BOX 290 San Bernardino, CA. 92402 Phone (909) 478-5700 Fax (909) 478-5710 E-mail:
Decals. IMPORTANT INFORMATION Xxxx xxx xxxx xx xxxx x xxxx. WARNING! Xxxx xxx xxxx xx xxxx x xxxx.
 symbols and decals Xxxx xxx xxxx xx xxxx x xxxx. IMPORTANT INFORMATION Xxxx xxx xxxx xx xxxx x xxxx. Used in this publication to notify the reader of a risk of personal injury, particularly if the reader
Powerboard TM by Exkate
 Powerboard TM by Exkate OWNERS MANUAL Introduction to The Powerboard TM Dear Customer: Congratulations and thank you for purchasing the Powerboard TM (electric skateboard). For the greatest pleasure and
INTELLIGENT BATTERY CHARGER/MAINTAINER
 INTELLIGENT BATTERY CHARGER/MAINTAINER OWNER S MANUAL Read carefully and understand all ASSEMBLY AND OPERATION INSTRUCTIONS before operating. Failure to follow the safety rules and other basic safety precautions
User Manual. Product: Smart Balance Scooter. Model: K1
 Product: Smart Balance Scooter Model: K1 User Manual Self-balancing scooter, is a new high-tech product with self-balance, It s a good helper for leisure and entertainment. Brief Introduction Self-balancing
THIS VEHICLE MUST BE ASSEMBLED BY AN ADULT. PLEASE READ THE MANUAL CAREFULLY BEFORE OPERATION. WARNING CALIFORNIA PROPOSITION 65 WARNING
 TABLE OF CONTENTS A Electric Car Specifications 2 B List of Parts 4 C Assembly 5 D Battery Charging 7 E How to Use 9 F Safety Precautions 9 G Simple Repairs 10 H Maintaining your Vehicle 10 I About Thermal
Owner s Manual with Assembly Instructions Please read this manual and save it. For Model RC09075
 Product features may vary from the pictures above Owner s Manual with Assembly Instructions Please read this manual and save it. For Model RC09075 Use only with a 12 Volt (7.0 Amp/Hr.) Battery, 12 Volt
Design Features: User Manual. 1. PFC function. 2. LCD remote control. 3. Battery temperature sensor function.
 User Manual Design Features: 1. PFC function. except BC-1215HT / BC-2407HT 2. LCD remote control. BC-1215HT / BC-2407HT 3. Battery temperature sensor function. 4. Tri-LED color indicator for different
Questions - usage (EN) ENGLISH. - How can I avoid getting the headband cords tangled? Stow your lamp as indicated in the drawing below.
 ENGLISH. - How can I avoid getting the headband cords tangled? Stow your lamp as indicated in the drawing below.") NAO support (EN) ENGLISH Questions - usage - Can I tell which mode I m in (REACTIVE LIGHTING or constant) when the lamp is on my head? Yes, just put a finger over the sensor. If the brightness changes,
NAO support (EN) ENGLISH Questions - usage - Can I tell which mode I m in (REACTIVE LIGHTING or constant) when the lamp is on my head? Yes, just put a finger over the sensor. If the brightness changes,
Diagram. Packing list. Joystick Joystick base Power switch. Backrest. Brake handle. Armrest. Cushion. Upper frame. Frame. Storage bag.
 H8 EN USER MANUAL Diagram Backrest Brake handle Joystick Joystick base Power switch Armrest Cushion Upper frame Storage bag Battery Controller Motor Frame Footrest Front wheel Packing list Wheelchair body
definition Retarders definition driving tip chapter 2 heavy vehicle braking Using retarders
 chapter 2 heavy vehicle braking Brake fade occurs when your brakes stop working properly because they're overheated. Your vehicle takes longer to stop, or may not stop at all if you haven't properly controlled
Owner s Manual for the Travelite Electric Wheelchair
 Tel: 083 284 2973 Fax:086 232 5223 Email:ruan@cheapest-wheelchairs.co.za OR rosslyn@adpwheelchairs.co.za Web: www.cheapest-wheelchairs.co.za ORwww.adpwheelchairs.co.za Owner s Manual for the Travelite
STOP. Broadcast Spreader. Operator's Manual. Model No Safety Assembly Operation Maintenance Parts
 Operator's Manual STOP Broadcast Spreader Model No. 486.2400 DO NOT RETURN TO STORE For Missing Parts or Assembly Questions Call 1-866-56-8388 CAUTION: Before using this product, read this manual and follow
1100MM P-51 Mustang ELECTRIC POWERED REMOTE CONTROL AIRPLANE ELEVENHOBBY.COM
 1100MM P-51 Mustang ELECTRIC POWERED REMOTE CONTROL AIRPLANE ELEVENHOBBY.COM WARNING: Read the ENTIRE instruction manual to become familiar with the features of the product before operating. Failure to
PLEASE BE SAFE WHEN RIDING... ALWAYS WEAR A HELMET AND OBEY ALL LAWS!
 Powered Personal Transportation Electric Power Board Product Handbook FOR THE BLADEZ XTR Street ELECTRIC POWER BOARD Model: PB-SM1806 PLEASE BE SAFE WHEN RIDING... ALWAYS WEAR A HELMET AND OBEY ALL LAWS!
24 Volt - 3/8" Cordless Impact Wrench
 24 Volt - 3/8" Cordless Impact Wrench INSTRUCTION MANUAL Item # 3994040 IMPORTANT SAFETY INSTRUCTIONS WARNING: When using electrical equipment such as this, basic safety precautions should always be followed
User Manual. MB-6000-UD Rev. 1.03
 User Manual MB-6000-UD Rev. 1.03 Table of Contents I. The Controls II. III. IV. Unit Operations A. Folding the Unit B. Folding the Handlebars C. Unlocking and Unfolding D. Precautions and Starting E. Power
ITEM # V CORDLESS SNOW SHOVEL MODEL #KSS 1280B-06 Español p. 19. ATTACH YOUR RECEIPT HERE Serial Number. Purchase Date
 ITEM #0533632 80 V CORDLESS SNOW SHOVEL MODEL #KSS 1280B-06 Español p. 19 ATTACH YOUR RECEIPT HERE Serial Number Purchase Date Questions, problems, missing parts? Before returning to your retailer, call
The Grasshopper. Golf Buggy. Owners Manual Classic - Cobra - Junior (Twin Motor)
") The Grasshopper Golf Buggy Owners Manual Classic - Cobra - Junior (Twin Motor) Grasshopper Golf Buggies Ltd 86-88 Mason Street Sutton-in-Ashfield Nottinghamshire NG17 4HP Tel: (+44) 01623 404730 email:
The Grasshopper Golf Buggy Owners Manual Classic - Cobra - Junior (Twin Motor) Grasshopper Golf Buggies Ltd 86-88 Mason Street Sutton-in-Ashfield Nottinghamshire NG17 4HP Tel: (+44) 01623 404730 email:
ATV-320 R OWNER S MANUAL
 ATV-320 R OWNER S MANUAL FOREWORD May we, the manufacturer, take this opportunity to thank you for choosing our ATV to serve you. This Owner s Manual is prepared for you to properly operate in safety.
Operating and Assembly Manual
 Model 1080 Operating and Assembly Manual Midwest Equipment Manufacturing, Inc. 5225 Serum Plant Road Thorntown, IN 46071 08-02-16 SAFETY RULES Remember, any power equipment can cause injury if operated
Section 4.3. Machine Operation - Operating Procedures. Before Starting the Engine: General Pre-Start Inspection
 Section 4.3 Machine Operation - Operating Procedures Before Starting the Engine: General Pre-Start Inspection... 4.3.2 Engine Starting Procedure... 4.3.2 Cold Weather Start-Up... 4.3.3 Engine Shutdown
MODEL C HOVERBOARD USER MANUAL
 MODEL C HOVERBOARD USER MANUAL Thank you for purchasing High Roller Hoverboard Model C. Before you begin, please make sure to read the User Manual and follow all safety precautions. The User Manual can
Illustrated Parts List I HDC 1000 ( ) Repair Parts Manual
 Repair Parts Manual") Illustrated Parts List 2008-01 I0807212 531 03 10-07 HDC 1000 (45-01714-669) Repair Parts Manual owners manual Model No. 45-01714-669 10 CU. FT. CART CAUTION: Read Rules for Safe Operation and Instructions
Illustrated Parts List 2008-01 I0807212 531 03 10-07 HDC 1000 (45-01714-669) Repair Parts Manual owners manual Model No. 45-01714-669 10 CU. FT. CART CAUTION: Read Rules for Safe Operation and Instructions
BEING A DEFENSIVE DRIVER
 BEING A DEFENSIVE DRIVER BEING A DEFENSIVE DRIVER Introduction... 1 Plan and Prepare... 2 A Defensive Attitude... 3 Tailgating...3 Driven to Distractions... 4 Practical Driving Procedures In the City...
ITEM # V SNOW SHOVEL. MODEL #KSS 2540A-06 Español p. 18. ATTACH YOUR RECEIPT HERE Serial Number. Purchase Date
 ITEM #0727249 40 V SNOW SHOVEL MODEL #KSS 2540A-06 Español p. 18 ATTACH YOUR RECEIPT HERE Serial Number Purchase Date Questions, problems, missing parts? Before returning to your retailer, call our customer
PACKAGE LIST CONTENT. User Manual 1 GIMBAL STABILIZER 1 MICRO USB CABLE 1
 CONTENT Package List...1 Disclaimer and Warning...2 Safety Operation Guidelines...4 USB Connection...7 Mounting Camera, Checking Balance...9 Panel Introduction...10 Operating Mode...11 Changing Orientation...12
GENERAL SAFETY RULES... 3 IMPORTANT INFORMATION REGARDING DRILL DESIGN... 4 GENERAL OPERATING INFORMATION... 5
 1 GENERAL SAFETY RULES... 3 IMPORTANT INFORMATION REGARDING DRILL DESIGN... 4 GENERAL OPERATING INFORMATION... 5 BATTERY USE, STORAGE AND CHARGING INSTRUCTIONS... 6 GENERAL MAINTENANCE INSTRUCTIONS...
OWNERS MANUAL FOR THE 4-WEEL HD SCOOTER
 Tel: 083 284 2973 Fax:086 232 5223 Email:rosslyn@adpwheelchairs.co.za OR sales1@adpwheelchairs.co.za Web: www.cheapest-wheelchairs.co.za OR www.adpwheelchairs.co.za OWNERS MANUAL FOR THE 4-WEEL HD SCOOTER
Operating and Assembly Manual
 Model 470-/H/PRO/IC Operating and Assembly Manual Midwest Equipment Manufacturing, Inc. 5225 Serum Plant Road Thorntown, IN 46071 11-11-11 SAFETY RULES Remember, any power equipment can cause injury if
Important! It is essential that you read the instructions in this manual before assembling, operating, and maintaining the product.
 Important! This appliance is not intended for use by persons (including children) with reduced physical, sensory or mental capabilities, or lack of experience and knowledge, unless they have been given
Pro. User Manual. Safe-T-Pull Inc Page 1 of 19
 Pro User Manual Safe-T-Pull Inc. 2015 Page 1 of 19 TABLE OF CONTINENTS 1. Before You Begin...3 Disclaimer...3 What Is Included...3 Unpacking Instructions....4 Claims...4 Contact Us...4 Safety Information...4
Owner s Manual, Operating Instructions Manual, and Replacement Parts Manual. Lift-Rite Hand Pallet Trucks Model PST Plus
 Owner s Manual, Operating Instructions Manual, and Replacement Parts Manual Lift-Rite Hand Pallet Trucks Model PST Plus This publication, 1269849/001B, applies to the Lift-Rite Hand Pallet Truck, Model
WARNING! Decals. IMPORTANT INFORMATION Xxxx xxx xxxx xx xxxx x xxxx. Xxxx xxx xxxx xx xxxx x xxxx.
 symbols and decals Xxxx xxx xxxx xx xxxx x xxxx. Used in this publication to notify the reader of a risk of personal injury, particularly if the reader DOES NOT follow the instructions given in the manual.